

Page 1
Installation Instructions
(Part #76878) 76
-
86 CJ7’s
the edge of vehicle tub.
FIG A
FIG B
XRC Corner Guards
(Part # 76874) 97-06 Wranglers
WWW.SMITTYBILT.COM
(Part # 76876) 87-95 Wranglers
NOTE: Carefully read entire instructions thoroughly before attempting to install this part. Drilling is required for
installation. Use caution at all times. It is recommended to have assistance when installing these parts.
Parts Included Qty
Drivers Side Corner 1
Passenger Side Corner 1
3/8"x3/4” Counter-Sunk Bolt 22
3/8” Flat Washer 24
3/8” Lock Nut 24
3/8” x 3 ½” Bolt 2
6 mm Allen Head Bolt 14
6 mm Flat Washer 14
6 mm Lock Nut 14
8 x 1.25 x 30mm Bolt 4
Note: Hardware varies depending on part number ordered/received.
Step 1: Remove your factory or aftermarket rear parts from the vehicle. (Save hardware, some will be
re-used.) This includes your fender flares, gas cap, gas cap plastic bezel, rear taillights
(You can reach the wire loom plug by reaching up through the underside of each rear corner)
license plate bracket, tire stop (YJ,CJ7 only), plastic tailgate hinge covers (late TJ’s only) etc.
(If your CJ has rear side turn signals, you will not be able to re-use them)
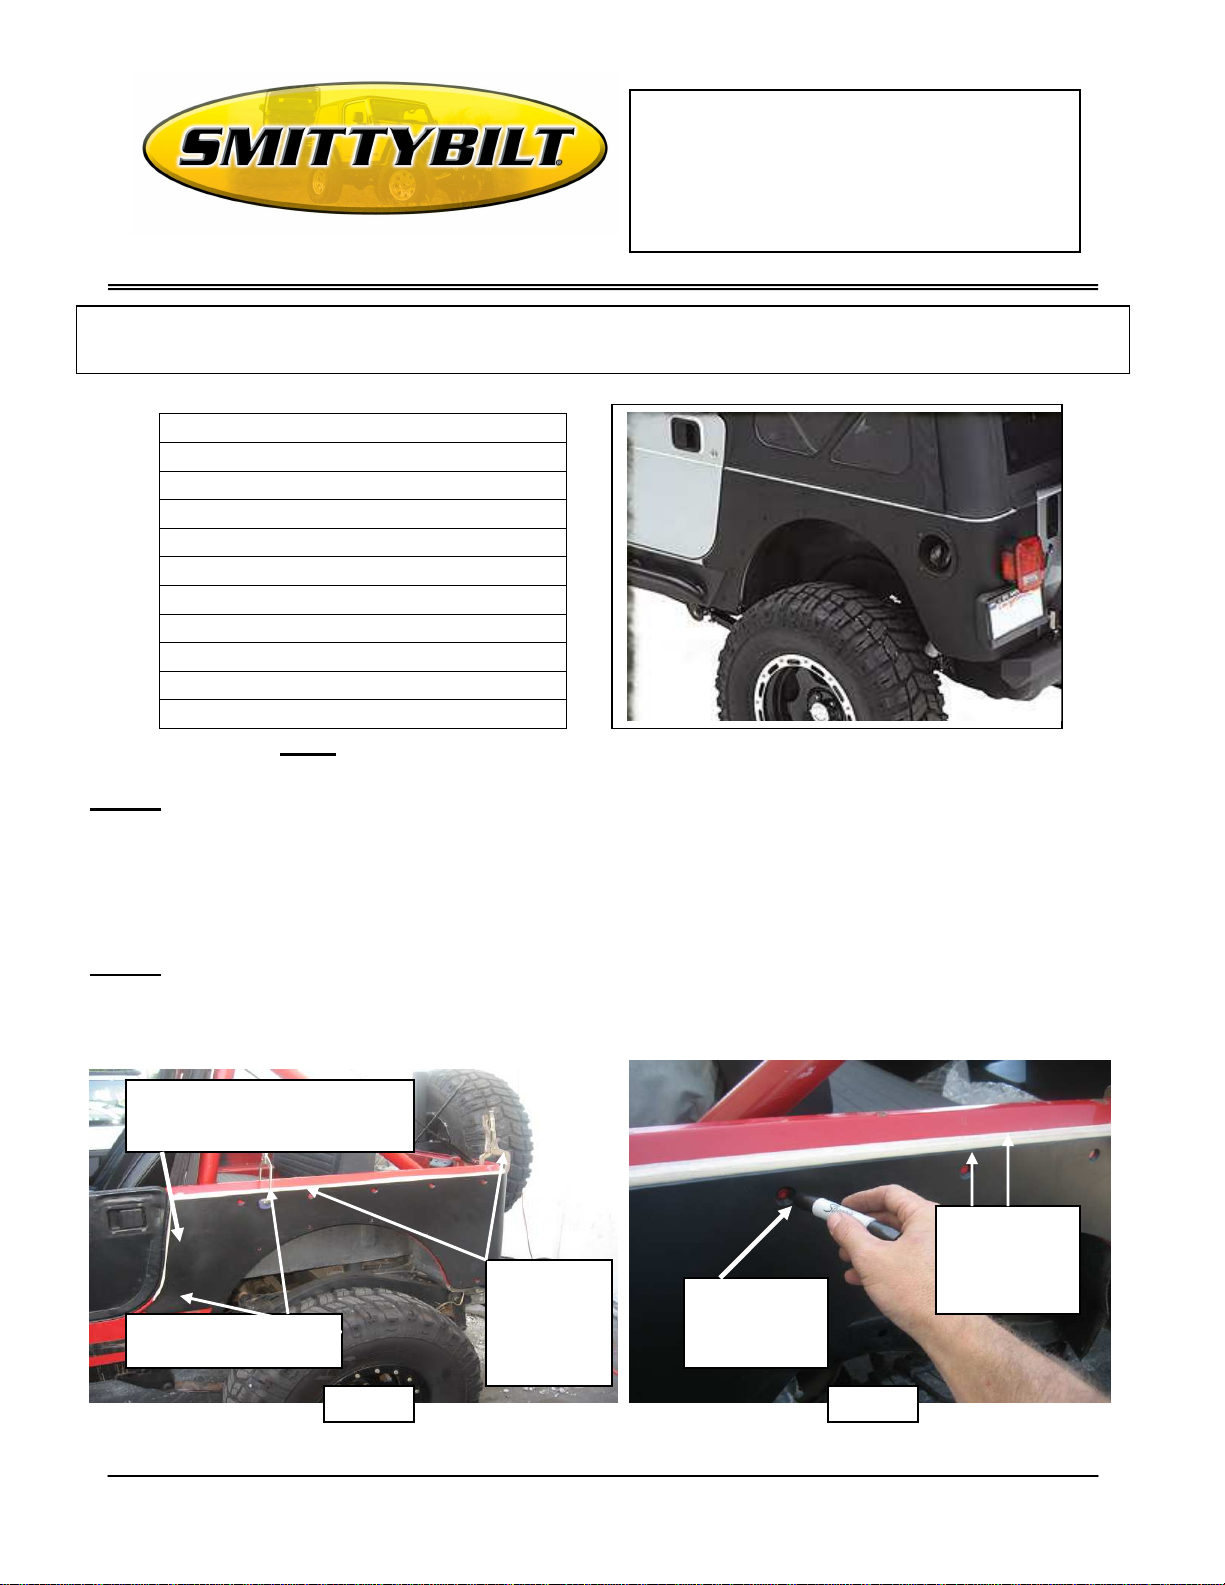
Step 2: Make sure vehicle is clean. Place masking tape along the top edge of the tub and down along the
the back of the door opening. (Fig A) Start by positioning the driver side corner on vehicle by lining
up the pre-drilled holes on the corner with the factory holes on the body. (Taillight, gas door, flare,
ect. holes.) Use some kind of clamp (Vice, or C-clamp) to hold corner on vehicle. (Fig A)
Line up the front so it follows the
same line as the door opening
Place masking tape along
Make sure top
edge of guard
Hold guard
on vehicle
using some
kind of
quick clamp
Use a marker
or scribe to
mark the holes.
runs parallel
with the body
For Technical Support/Warranty Information please call 310-762-9944
Smittybilt, 400 West Artesia Blvd, Compton, CA 90220
Page 2
Installation Instructions
(Part #76878) 76
-
86 CJ7’s
XRC Corner Guards
(Part # 76874) 97-06 Wranglers
WWW.SMITTYBILT.COM
(Part # 76876) 87-95 Wranglers
Step 3: Make sure guard is in correct position and the top edge is parallel with the body tub (Fig B) and the
front door cut out is even on back edge of door. (Fig A)
Step 4: With the guard tight against the body and holes lined up, use a marker or scribe to mark the holes.
(Fig B)
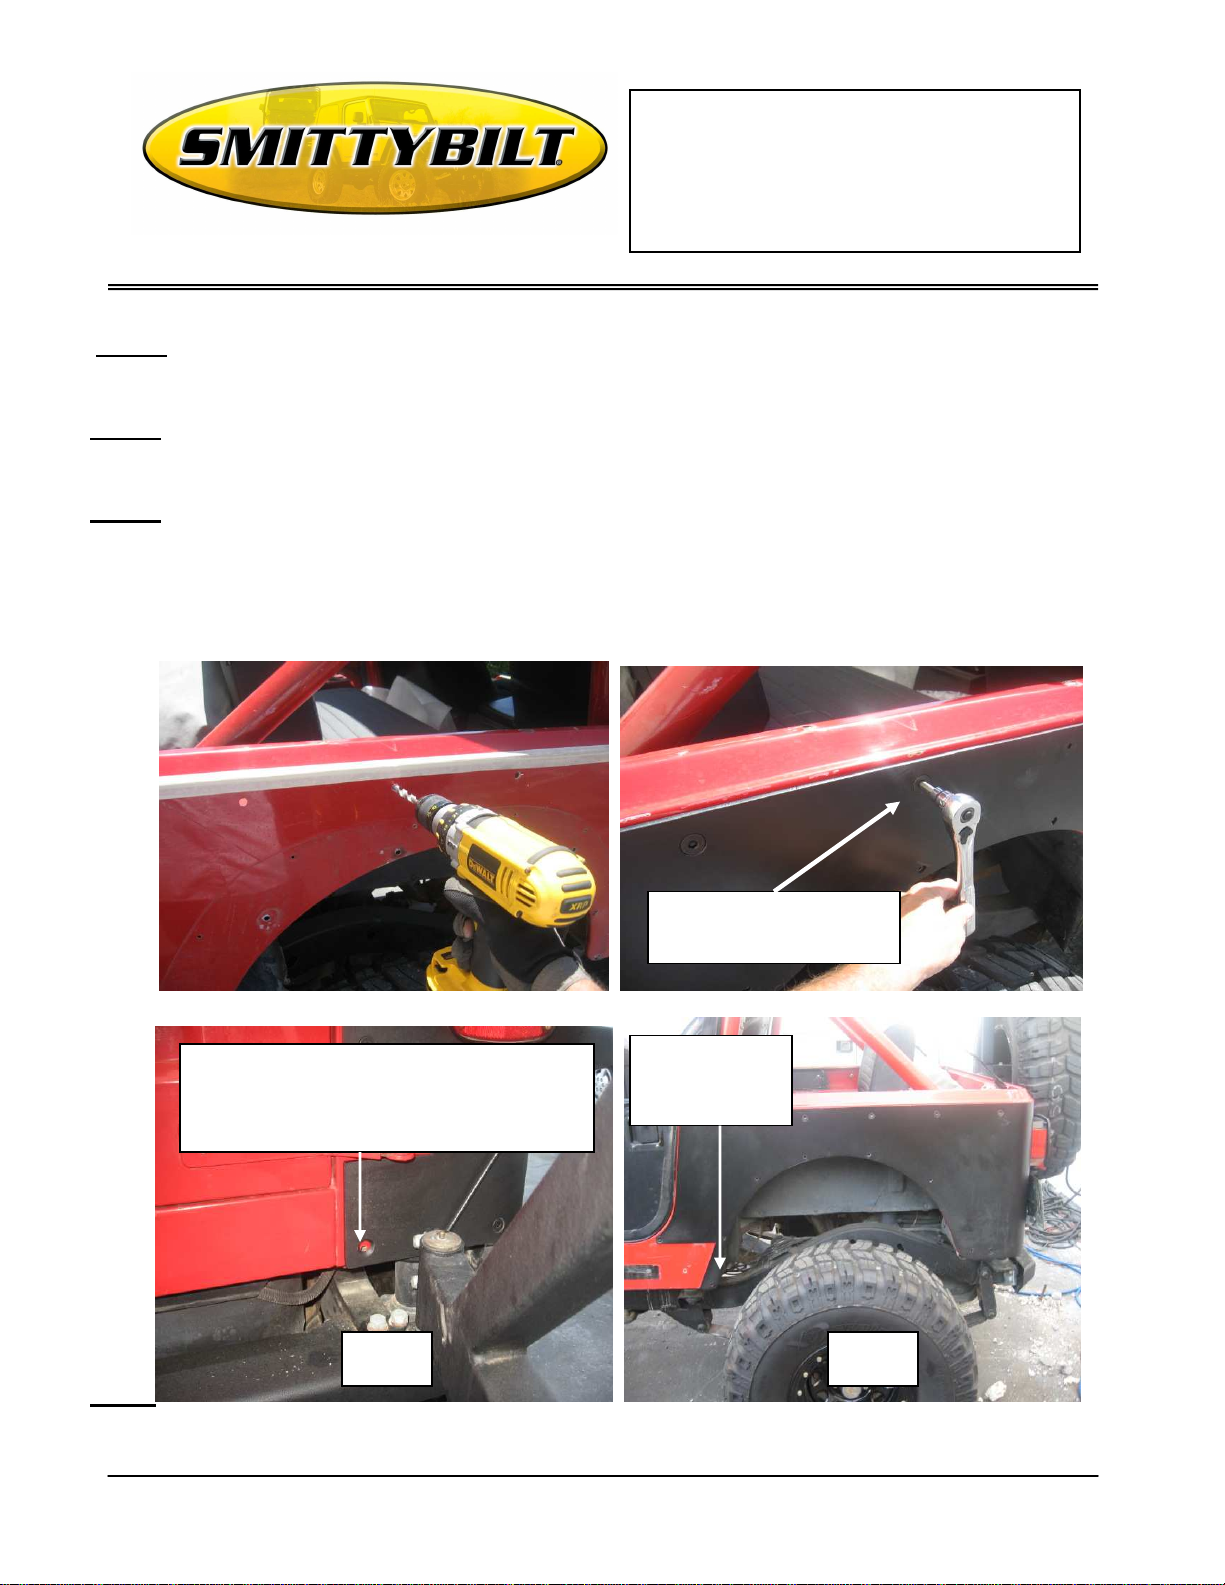
Step 5: Carefully remove guard from vehicle. NOTE: Be sure to check backside of all hole locations
for wires or other obstructions. Center punch all marked holes. Drill all holes using a 7/16”
drill bit. Make sure to clean off any burrs after drilling, we also recommend using touch up paint or
a clear coat to go over any exposed metal. (Fig C) On late model TJ’s an access hole may be needed
to install washer and nut on the front lower hole on the corner guard. (Fig H,I) This can be achieved
using a 1” hole saw/bit or something similar.
Install guard using the 3/8”
counter sunk bolts.
(Fig C) (Fig D)
Use the 3 ½” long bolt for the lower
bottom corner hole. You will need to
drill through the inner pocket wall also.
Use the factory
hardware where the
holes line up with
the OEM nut inserts
Fig E Fig F
For Technical Support/Warranty Information please call 310-762-9944
Smittybilt, 400 West Artesia Blvd, Compton, CA 90220
Page 3

Installation Instructions
(Part #76878) 76
-
86 CJ7’s
XRC Corner Guards
(Part # 76874) 97-06 Wranglers
WWW.SMITTYBILT.COM
(Part # 76876) 87-95 Wranglers
On late model TJ’s and CJ’s an access hole from the inside of the vehicle may
be needed on the backside of hole to gain access in order to install washer and
nut. This can be done by using a 1” hole saw or something similar.
(Fig G) (Fig H) (Fig I)
Step 6: Position guard back on vehicle and attach using the included counter sunk bolts. Fig D (It may be
easier to clamp the guard on again and then insert bolts) Do not fully tighten at this time.
Make sure the pre-drilled holes in the guard for the flares and rear OEM parts line up with the holes
in the body. The two long counter sunk bolts go into the lower corner hole next to the tailgate.
(1per side) Fig E. NOTE: If any of the holes are slightly off simply open them up using a slightly
larger drill bit. Once all bolts are inserted and the remaining holes are lineup, you may tighten
completely.
Step 7: Flare Installation (Fig G, H) For ease of installation you can drill out the factory holes to ¼”
FACTORY FLARE- install over the corner guard using the factory hardware.
XRC FLARE – install over the corner guard using the included 6mm Allen head bolts.
NO FLARE- use the included 6mm hardware to secure the edge around the wheel well.
NOTE: If you have factory nut inserts in the lower holes for the flare openings, use the factory
hardware.
Step 8: Re-install factory pieces over corner guard. (Taillights, gas door, bezel, ect.) Installation is now
complete. Repeat same steps for opposite side. (Fig I, J)
For Technical Support/Warranty Information please call 310-762-9944
Smittybilt, 400 West Artesia Blvd, Compton, CA 90220
Page 4

Installation Instructions
(Part #76878) 76
-
86 CJ7’s
XRC Corner Guards
(Part # 76874) 97-06 Wranglers
WWW.SMITTYBILT.COM
(Part # 76876) 87-95 Wranglers
(Fig I) (YJ SHOWN) (Fig J)
CARE AND MAINTENANCE
To protect your investment it is recommended to regularly wash and wax this part. Do not use any type of cleaners that contain
abrasives that may damage the finish of your part.
LIMITED WARRANTY
Smittybilt (The Company) warrants to the original purchaser of this product that should the product or any part thereof, under normal use and
conditions, be proven defective in material or workmanship within 5 years from the original date of purchase, such defect(s) will be repaired or
replaced (At the Company’s option) without charge for parts or labor.
To obtain repair or replacement within the terms of the warranty, the product is to be delivered with proof of warranty coverage ( e.g. dated bill of
sale, receipt), specification of defect, freight pre-paid with Returns Good Authorization Number from Smittybilt to place of purchase. Items
returned to Smittybilt without a Returns Authorization Number will be refused and returned to sender at the sender’s expense.
This warranty does not apply to any product or part thereof which, in the opinion of the Company, has suffered or been damaged through
altercation, improper installation, mishandling, misuse, neglect accident or acts of nature. THE EXTENT OF THE COMPANY’S LIABILITY
UNDER THIS WARRANTY IS LIMITED TO THE REPAIR OR REPLACEMENT PROVIDED ABOVE AND, IN NO EVENT,
SHALL THE COMPANY’S LIABILITY EXCEED THE PURCHASE PRICE PAID BY THE PURCHASER FOR THIS PRODUCT.
This warranty is in lieu of all expressed warranties and liabilities. ANY IMPLIED WARRANTIES, INCLUDING ANY IMPLIED WARRANTY
OF MERCHANTABILITY SHALL BE LIMITED TO THE DURATION OF THIS WRITTEN WARRANTY. ANY ACTION FOR BREACH
OF ANY WARRANTY HEREUNDER INCLUDING ANY IMPLIED WARRANTY OF MERCHANTABILITY MUST BE BROUGHTH
WITHIN A PERIOD OF 90 DAYS FROM DATE OF ORIGINAL PURCHASE.IN NO CASE SHALL THE COMPANY BE LIABLE FOR
ANY CONSEQUENTIAL OR INCIDENTAL DAMAGES FOR BREACH OF THIS OR ANY OTHER WARRANTY, EXPRESSED OR
IMPLIED,WHATSOEVER. No person or representative is authorized to assume for the company any liability other than expressed herein in
connection with the sale of this product. Some states do not allow limitations on how long an implied warranty lasts or the exclusion or limitation
of incidental or consequential damage, therefore above limitations may not apply to you. This warranty gives the purchaser specific legal rights.
The purchaser may have additional rights, which vary from state to state.
For Technical Support/Warranty Information please call 310-762-9944
Smittybilt, 400 West Artesia Blvd, Compton, CA 90220
 Loading...