

Page 1
Installation Instructions
Top
Parts Included
Qty
Door
Parts Inclu
ded Qty
NOTE: Carefully read entire instructions thoroughly befor
e attempting to assemble and/or
rail
97-06 Jeep Hardtop (1-piece)
Part # 519701 (without doors)
WWW.SMITTYBILT.COM
Part # 519801 (with doors)
install this product.
Hardtop 1
Rear Window 1
Weather Stripping 2
5/16 x 1” Phillips Head Bolt 6
3/8 Flat Washer 6
5/16 Nut Plate 6
This accessory is designed and manufactured primarily to augment the vehicles appearance
and to protect the occupants from normal weather conditions. This product is not designed to
protect occupants from injury or death in the event of an accident. Always wear your seat belt.
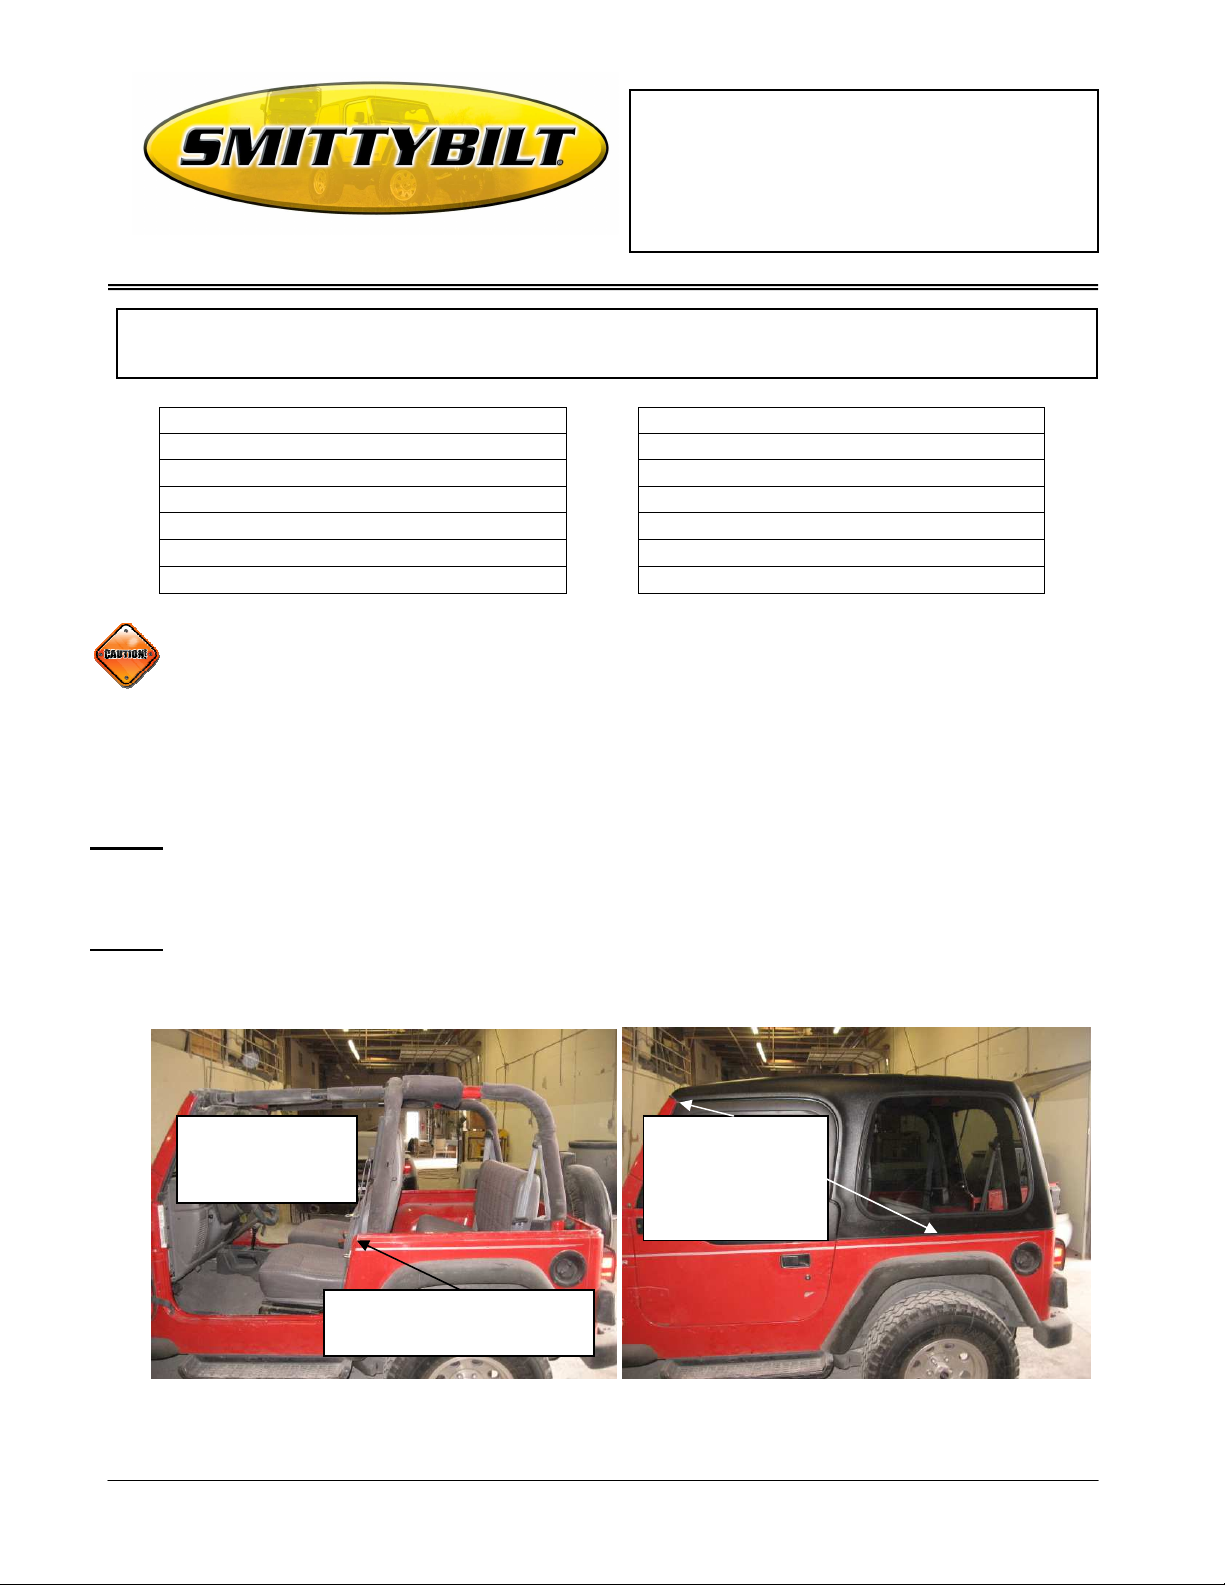
Step 1: If equipped remove softop and all hardware. (Fig A) If your vehicle has the molded rubber seal on
top of the belt rail located right behind each door; remove it as well.
Step 2: With assistance carefully set hardtop on vehicle; setting the back side edge on the vehicles belt rail
and the front on top of the windshield frame. (Fig B) Center top on vehicle.
Passenger Upper Door (if ordered) 1
Driver Upper Door (if ordered) 1
Compression Nut 6
4” Truss Head Bolt 2
5” Truss Head Bolt 4
Armrest 2
If equipped
remove softop and
all hardware.
(Fig A) (Fig B)
If your vehicle has the molded rubber
seal on top of the belt rail located right
behind each door; remove it as well.
Smittybilt, 400 West Artesia Blvd, Compton, CA 90220
With assistance
carefully set hardtop
on vehicle; setting
the back side edge
on the vehicles belt
Page 2
Installation Instructions
97-06 Jeep Hardtop (1-piece)
Part # 519701 (without doors)
WWW.SMITTYBILT.COM
Part # 519801 (with doors)
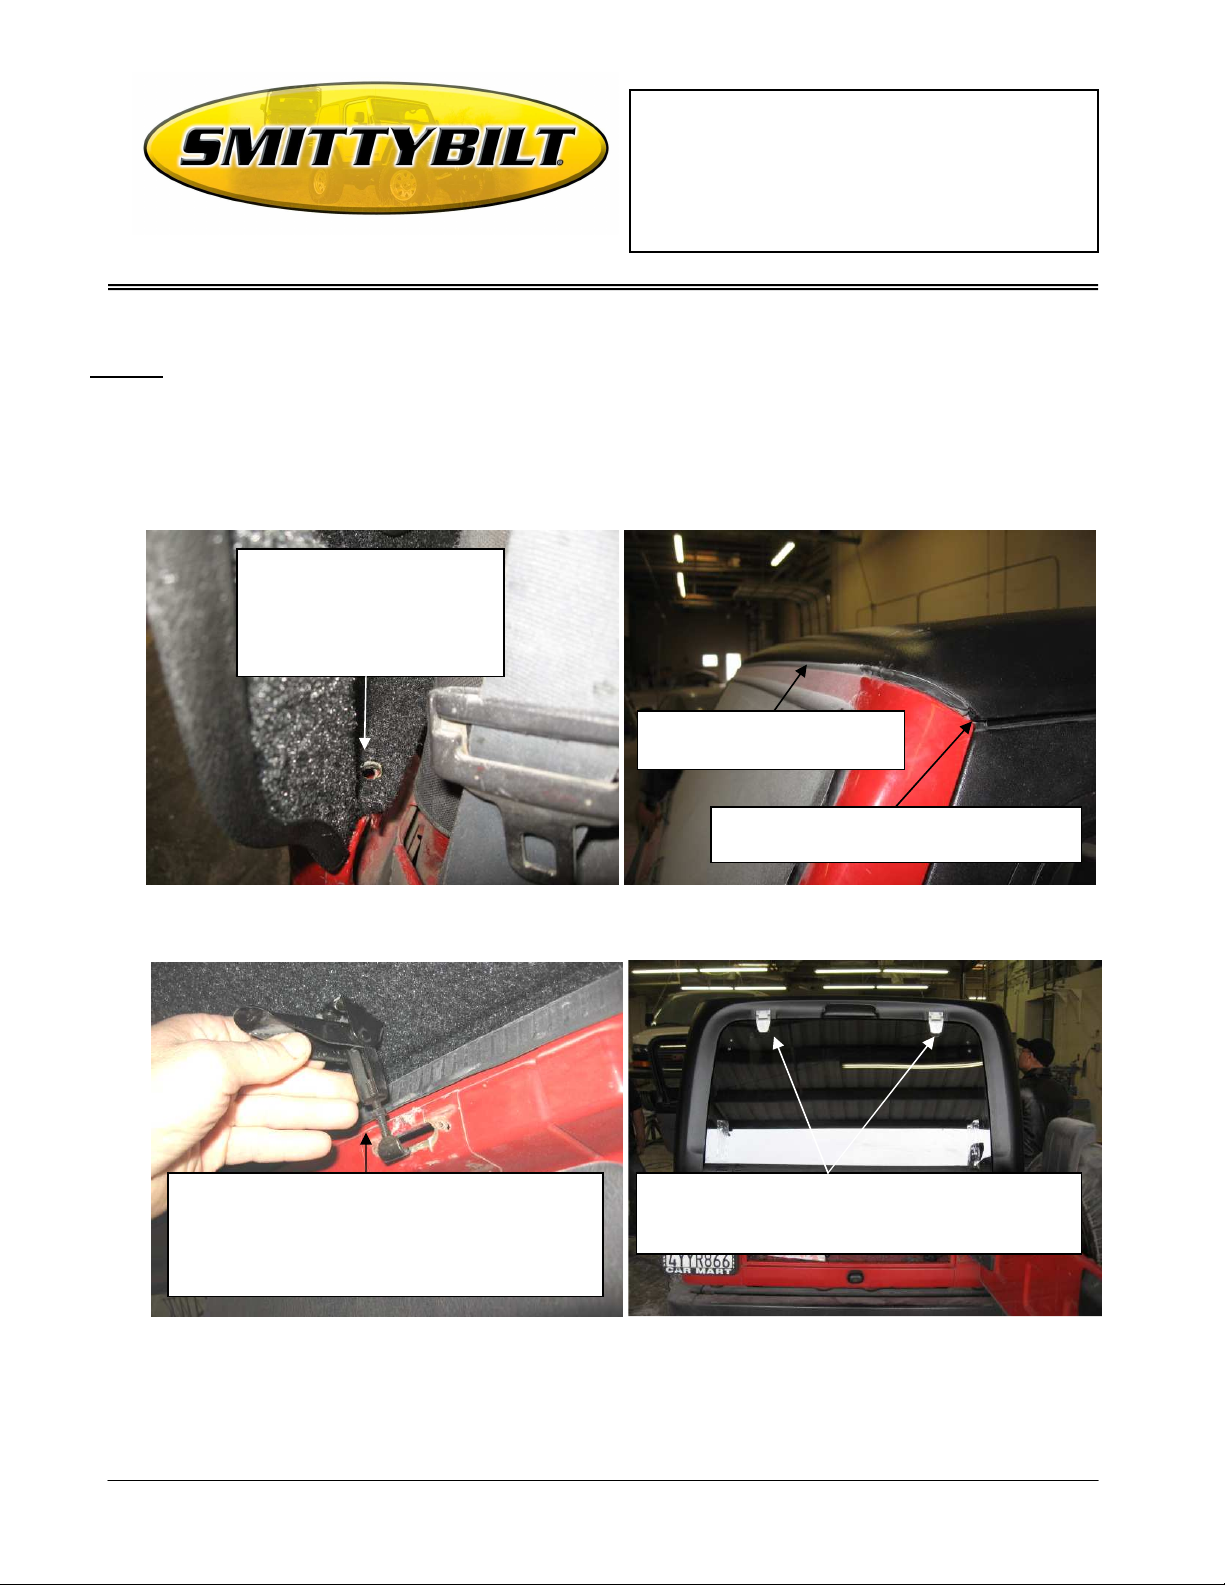
Step 3: Align the holes in the top (3 on each side) with the holes on the vehicle. Mount using 1 ea 5/16x1”
bolt, flat washer and nut plate. (Fig C) Do not tighten completely at this time. It may be helpful to
have assistance by having someone push from the outside in so the holes align easier. Due to
variances in vehicles if a mounting hole is slightly off you can easily open the hole up with a drill bit.
Align the holes in the top (3 on
each side) with the holes on the
vehicle. Mount using 1 ea
5/16x1” bolt, flat washer and nut
plate. Do not tighten completely
at this time.
Make sure top is centered on the
windshield frame and gasket.
On late model TJ’s push up the ends of the
factory windshield gasket into the top.
(Fig C) (Fig D)
Attach the two front windshield latches on the top
into the slots in the windshield frame. You can
rotate the hook in and out to adjust for a tight snug
fit. When the desired location is found tighten the
hex nut up to lock into place.
Hold the rear window on the back of the top. Insert
the threaded rods on the back of the window hinges
through the pre-drilled holes in the top.
(Fig E) (Fig F)
Smittybilt, 400 West Artesia Blvd, Compton, CA 90220
Page 3

Installation Instructions
97-06 Jeep Hardtop (1-piece)
Part # 519701 (without doors)
WWW.SMITTYBILT.COM
Part # 519801 (with doors)
Step 4: Make sure top is centered on the windshield frame and gasket. (Fig D) Note: On late model TJ’s
push up the ends of the factory windshield gasket into the top.
Step 5: Attach the two front windshield latches on the top into the slots in the windshield frame. You can
rotate the hook in and out to adjust for a tight snug fit. When the desired location is found tighten
the hex nut up to lock into place. (Fig E)
Step 6: With assistance have someone hold the rear window on the back of the top. Insert the threaded
rods on the back of the window hinges through the pre-drilled holes in the top secure with hex nuts.
Do not fully tighten at this time (Fig F, G)
Insert the threaded rods on the
back of the window hinges
through the pre-drilled holes in
the top secure with hex nuts.
Install the included weather stripping pieces on the
rear corners of the body tub. Trim if necessary.
Make sure area is clean before applying. Start at
the edge of the seal on the top and attaché
inwards (towards the tailgate opening)
(Fig G) (Fig H)
Step 7: Close the window and check the gap between the window and the top all of the way around. Center
window on top. Now you may tighten the hinge bolts completely. (Fig G) Now raise the window
up and install the 2 gas struts. They pop onto the attached brackets on the top and the window.
Step 8: Install the included weather stripping pieces on the rear corners of the body tub. Trim if necessary.
(Fig H)
Step 9: You may now tighten the rear mounting bolts along the rear of the top that you installed in Step 3.
Installation of the top is now complete.
Smittybilt, 400 West Artesia Blvd, Compton, CA 90220
Page 4

Installation Instructions
The 4” bolts go on the middle and rear locations
black plastic plugs
97-06 Jeep Hardtop (1-piece)
Part # 519701 (without doors)
WWW.SMITTYBILT.COM
Part # 519801 (with doors)
UPPER WINDOW INSTALLATION
Step 1: Using a flat screwdriver or panel puller carefully pry out the factory door inserts in the top
of the door. (3 per door) Insert the included nut inserts into the bottom of each door insert.
The thicker part of the nut insert goes towards the top. (Fig I) Now place the door inserts back
into the doors.
Insert the included nut inserts into the
bottom of each door insert. The thicker
part of the nut insert goes towards the top.
(Fig I) (Fig J)
Step 2: Place the upper door on top of your factory half door lining up the holes in the door with the door
inserts. Install the 4” bolt in the front hole and the 5” bolts in the middle and rear. (Fig J) Use caution
when installing the bolts not to push the nut inserts out of the door inserts. Tighten each bolt to
secure the door. (Do not over-tighten)
Step 3: Once door is secure place the plastic armrest on door secure by pushing the black plastic plugs
through the armrest and into the door. (Fig J) Repeat steps 1 thru 3 for the other side.
Installation is now complete. (Fig K, L)
Once door is secure place the plastic
armrest on door secure by pushing the
The 5” bolt
goes in the
front
location.
Smittybilt, 400 West Artesia Blvd, Compton, CA 90220
Page 5

Installation Instructions
97-06 Jeep Hardtop (1-piece)
Part # 519701 (without doors)
WWW.SMITTYBILT.COM
Part # 519801 (with doors)
(Fig K) (Fig L)
ADJUSTMENTS
Due to the variances in vehicles; adjustments may need to be made.
1. If the back side of the door is hitting the top, unhook the windshield latches, loosen the rear mounting
bolts and then push top backwards. Re-tighten the rear bolts and re adjust front latches.
2. If the top of the door is hitting the top, you can shim the top. Unlatch the front of the top and remove
the rear bolts. You can shim top simply by placing the needed amount of flat washers over the
mounting holes on the vehicle and the replace top over and reattach bolts.
3. You can also make adjustments to the lower doors by slightly loosening the door bolts using a T40
torx bit and reposition the door for an improved fit.
CARE AND MAINTENANCE
Wash and clean using a soft cloth and non abrasive soap and water. DO NOT use automotive past
wax or something similar that use fillers like Armor all. It is recommend to use something like Auto
Glym plastic conditioner. It contains weather resistant resin polymers to help reduce the aging effect
cause by sunlight, water and other elements. It is available at most automotive detail outlets.
Smittybilt, 400 West Artesia Blvd, Compton, CA 90220
Page 6

Installation Instructions
97-06 Jeep Hardtop (1-piece)
Part # 519701 (without doors)
WWW.SMITTYBILT.COM
Part # 519801 (with doors)
LIMITED WARRANTY
Smittybilt’s products are covered under the following limited warranties only. Note that the duration of the limited
warranty differs according to the material and finish of the product purchased. Subject to the duration and conditions of
the limited warranty stated below, Smittybilt warrants to the original retail purchaser that its products are free from
defects in material and workmanship. All other warranties and representations express or implied are hereby
disclaimed, including fitness for merchantability and buyer’s intended use or purpose. All parts are sold “AS IS” except
for the limited warranties granted herein. Buyer assumes all risks as to the selection, suitability and performance of all
goods and products selected. This limited warranty does not cover damage or impairment in any part due to misuse,
improper installation, accident or contact with on-road or off-road hazards, product modification, improper or inadequate
cleaning and/or maintenance. Smittybilt is not responsible for items damaged during shipping. This warranty is not
transferable from the original buyer. For the original Buyer to be eligible for the limited warranty coverage, the Buyer
must provide proof of purchase. Smittybilt strongly recommends returning the warranty registration card.
Customer’s remedy hereunder shall be limited only to repair or replacement (at Smittybilt’s option) of any defective
part(s) returned to Smittybilt at customer’s expense. The determination of whether or not a returned part is defective or
subject to coverage under the limited warranties stated herein shall be made at Smittybilt’s sole discretion.
To assure product quality, Smittybilt reserves the right to change product design, material, specification and finishes
without prior notice to customers. This limited warranty gives you specific legal rights and you may also have other
rights, which may vary from state to state. Some states do not allow limitations on how long an implied warranty lasts,
so the above limitations may not apply as to you. Also, some states do not allow the exclusion or limitation of incidental
or consequential damages, so the above limitations or exclusions may not apply to you. Smittybilt reserves the right to
discontinue product lines and substitute products, or provide other remedies than those listed in this limited warranty for
those discontinued products.
1. Limited One (1) Year Limited Warranty
Smittybilt fiberglass/Hardtop products carry the foregoing limited repair or replacement warranty for a
period of (1) one-year against workmanship and defects in the material from the date of purchase.
Warning
Rollover and other types of vehicle accidents may result in serious injury or death to you, your passengers and
others sharing the road. Smittybilt accessories are decorative and are not intended to reduce or avoid injury or
damage in the event of an accident. The weight and location of Smittybilt accessories may affect your vehicles’
handling, stability and performance, creating an increased risk of accident or rollover. Before installing any
accessory, check state laws and assure that the accessory will not obscure any lights or interfere with proper
operation on your vehicle’s safety equipment. Consult your owner’s manual and the Smittybilt instructions, or
additional safety information. Smittybilt products, nor the warnings contained herein, are not a substitute for
your safe driving. Don’t drink and drive, always use seat belts and don’t drive faster than conditions permit
Smittybilt, 400 West Artesia Blvd, Compton, CA 90220
 Loading...