

Page 1
Installation Instructions
Parts Included Qty
Parts Included Qty
Rear Storage Vault
07-12 Wrangler & Unlimited
WWW.SMITTYBILT.COM
Part # 2763
Read instructions entirely before installing and using this part. Drilling is required to install this part.
Storage Box 1
“L” Bracket 3
5/16” Hex Bolt 3
5/16” Nut 3
Note: If installing in a 2 door JK you will need to remove the rear seat from the vehicle. Due to variations
between models and different manufacture options, mounting is not the same in all vehicles. The Storage
Vault can be securely mounted in various ways, using the “L” brackets or box base mounting holes or a
combination of both. It is recommended to mount using 4 mounting points but the option is yours.
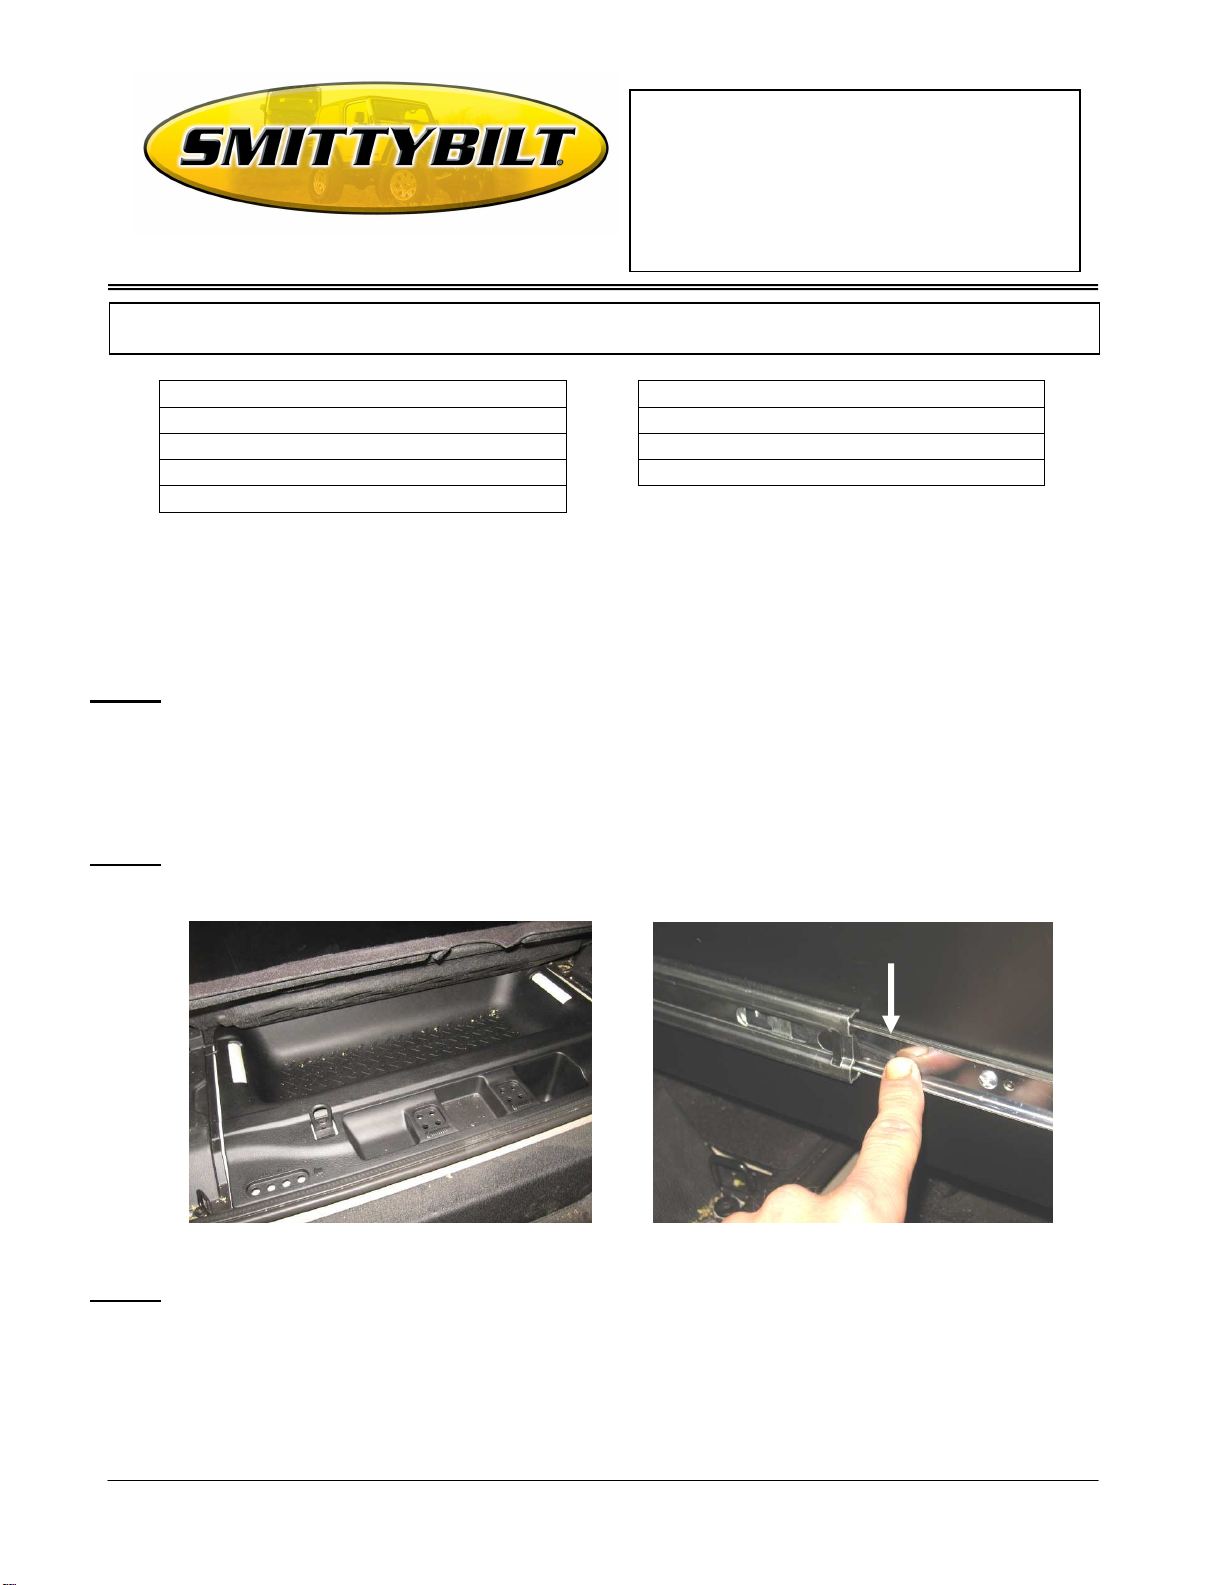
Step 1: The storage vault will cover the rear oem storage area. If you have anything inside it, remove now.
(Fig A) You will also need to remove your floor jack. Your new storage vault is the perfect place to store it!
NOTE: If you do not want to drill and permanently secure your box, simply slide drawer back into box and
you are done.
Step 2: Remove the drawer from the box completely. Pull the drawer out and release side locking clamps.
(Push down on the left side (Fig B) and push up on the right side.) This will enable you to remove it.
5/16” Flat Washer 6
¼” x 1 ¼’ Self Tapping Screw 10
¼” Flat Washer 10
(Fig A) (Fig B)
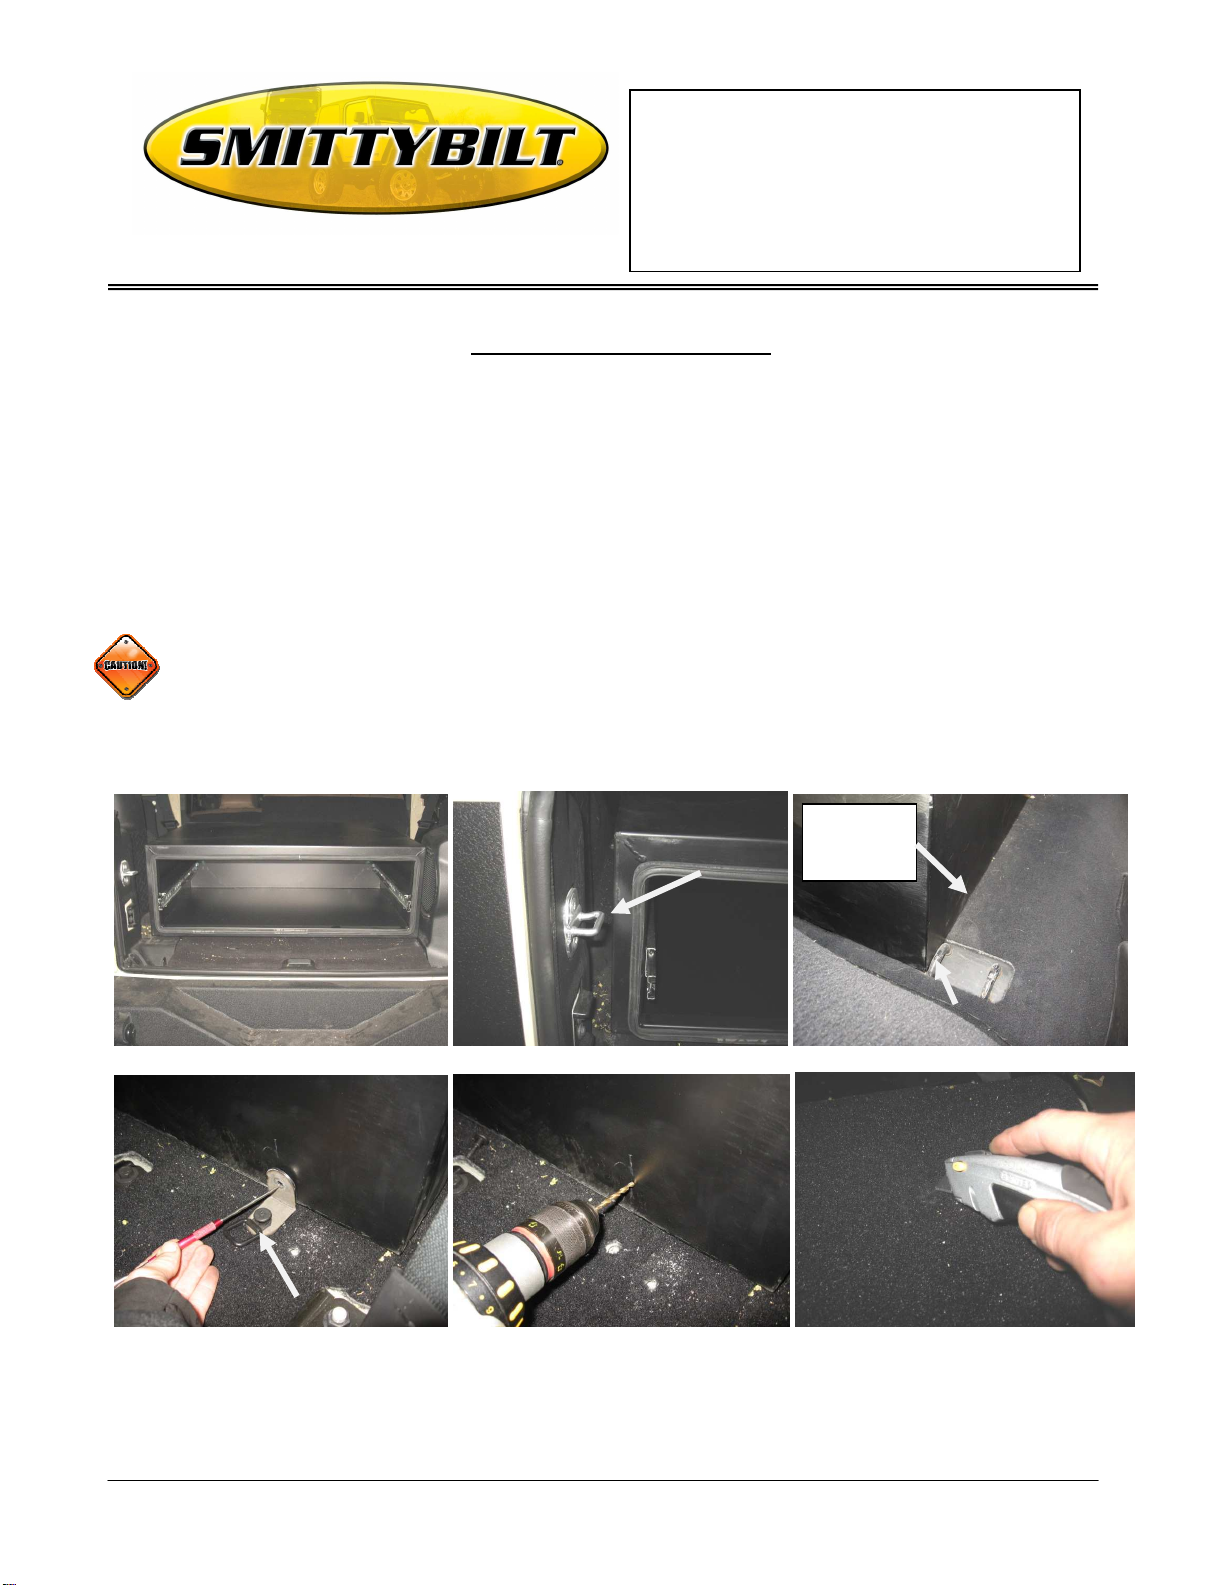
Step 3: Set the box in back of vehicle. (Fig C) Center the box as best as you can. Make sure box drawer will
not interfere with tailgate latch. (Fig D)
On 2-Doors push box back until its next to the rear oem seat bracket (Fig E)
On 4-Doors push box back approx. one inch in front of the oem strap brackets. ( Fig F)
For Technical Support/Warranty Information please call 310-762-9944
Smittybilt, 400 West Artesia Blvd, Compton, CA 90220
Page 2
Installation Instructions
Rear Storage Vault
07-12 Wrangler & Unlimited
WWW.SMITTYBILT.COM
Part # 2763
Rear “L” Mounting Brackets
On most 4-door models you can mount the rear of the box using the included “L” brackets. Fold rear seat
forward. Remove the two strap brackets using a #30 Torx bit. Place the included “L” bracket over the hole
and secure using the bolt you just removed. Use a scribe or other sharp object to mark a hole on the back of
the box then remove bracket and drill a 5/16” hole. (Fig F, G)
On 2-door models you will need to drill both holes for the rear “L” brackets. (floor and box) Place bracket in
desired location and mark holes both on the box and carpet. Its recommended to cut a small hole in the carpet
where marked in order to install the screw easier. (Fig H) Drill a pilot hole and then install bracket onto floor
using the included self tapping screws. (Fig L)
Always use caution when drilling. Make sure there are no obstructions before doing so. (Fig I)
Secure brackets to the floor. Do not attach box to the brackets at this time.
2-Door “L”
bracket
placement
(Fig C) (Fig D) (Fig E)
(Fig F) (Fig G) (Fig H)
For Technical Support/Warranty Information please call 310-762-9944
Smittybilt, 400 West Artesia Blvd, Compton, CA 90220
Page 3

Installation Instructions
Rear Storage Vault
07-12 Wrangler & Unlimited
WWW.SMITTYBILT.COM
Part # 2763
Front / Inside Mounting
On some 4-door models you can mount the front right side of the box using the included “L” bracket.
Remove the strap bracket located in front of the 12v outlet using a #30 Torx bit. (Fig J) Place the included
“L” bracket over hole and secure using the bolt you just removed. Use a scribe or other sharp object to mark
hole on the side of the box then remove bracket and drill a 5/16” hole. (Fig F, G)
On other models you will need to drill both holes in the front, using the pre-drilled holes in the bottom of
the box as a template. If you did not use the “L” brackets on the rear of the box there are 4 holes on the inside
of the box base to use as mounting points. Making sure box is in desired location mark the holes using a white
wax or paint pin in order to show up on the carpet. (Fig K) Be sure too note the location of the box in order
for the holes to lineup when installing the screws. Remove the box and set to the side. Its recommended to cut
a small hole in the carpet where marked in order to install the screws easier. (Fig H) Drill a pilot hole through
the carpet and floor. (Fig L) Set box back into vehicle in the same location it was previously in. (Fig C)
Secure with self tapping screw and fender washer. (Fig M) Do not tighten completely at this time.
(Fig I) (Fig J) (Fig K)
(Fig L) (Fig M) (Fig N)
For Technical Support/Warranty Information please call 310-762-9944
Smittybilt, 400 West Artesia Blvd, Compton, CA 90220
Page 4

Installation Instructions
Rear Storage Vault
07-12 Wrangler & Unlimited
WWW.SMITTYBILT.COM
Part # 2763
If using “L” brackets on the rear and or one side, insert a 5/16” hex bolt through the bracket into the box.
Begin to tighten the hex bolts. It’s best to tighten each one a little bit in a round pattern instead of one
completely at a time. This will help you get your box level as close as possible. Once all screws are secure on
the inside base of the box, proceed to tighten all of the “L” bracket hardware.
After going back to make sure all hardware is tight, re-install the drawer into the box. Installation is now
complete. (Fig O, P, Q)
(Fig O) (Fig P) (Fig Q)
The latch is adjustable in order to get a tighter or lose fitting door by loosening, turning and the tightening
the two nuts located on each side of the latch (Fig R)
Even with Storage Vault installed you still have room to add Smittybilts GEAR tailgate cover for even
more storage. (Fig S, T)
(Fig R) (Fig S) (Fig T)
For Technical Support/Warranty Information please call 310-762-9944
Smittybilt, 400 West Artesia Blvd, Compton, CA 90220
Page 5

Installation Instructions
Rear Storage Vault
07-12 Wrangler & Unlimited
WWW.SMITTYBILT.COM
Part # 2763
Limited Warranties
Smittybilt’s products are covered under the following limited warranties only. Note that the duration of the
limited warranty differs according to the material and finish of the product purchased. Subject to the duration
and conditions of the limited warranty stated below, Smittybilt warrants to the original retail purchaser that its
products are free from defects in material and workmanship. All other warranties and representations
express or implied, are hereby disclaimed, including fitness for merchantability and buyer’s intended use or
purpose. All parts are sold “AS IS” except for the limited warranties granted herein. Buyer assumes all risks
as to the selection, suitability and performance of all goods and products selected. This limited warranty
does not cover damage or impairment in any part due to misuse, improper installation, accident or contact
with on-road or off-road hazards, product modification, improper or inadequate cleaning and/or maintenance.
Smittybilt is not responsible for items damaged during shipping. This warranty is not transferable from the
original buyer. For the original Buyer to be eligible for the limited warranty coverage, the Buyer must provide
proof of purchase. Smittybilt strongly recommends returning the warranty registration card.
Customer’s remedy hereunder shall be limited only to repair or replacement (at Smittybilt’s option) of any
defective part(s) returned to Smittybilt at customer’s expense. The determination of whether or not a
returned part is defective or subject to coverage under the limited warranties stated herein shall be made at
Smittybilt’s sole discretion.
To assure product quality, Smittybilt reserves the right to change product design, material, specification and
finishes without prior notice to customers. This limited warranty gives you specific legal rights and you may
also have other rights, which may vary from state to state. Some states do not allow limitations on how long
an implied warranty lasts, so the above limitations may not apply as to you. Also, some states do not allow
the exclusion or limitation of incidental or consequential damages, so the above limitations or exclusions may
not apply to you. Smittybilt reserves the right to discontinue product lines and substitute products, or provide
other remedies than those listed in this limited warranty for those discontinued products.
Warning
Rollover and other types of vehicle accidents may result in serious injury or death to you, your passengers
and others sharing the road. Smittybilt accessories are decorative and are not intended to reduce or avoid
injury or damage in the event of an accident. The weight and location of Smittybilt accessories may affect
your vehicles’ handling, stability and performance, creating an increased risk of accident or rollover. Before
installing any accessory, check state laws and assure that the accessory will not obscure any lights or
interfere with proper operation on your vehicle’s safety equipment. Consult your owner’s manual and the
Smittybilt instructions, or additional safety information. Smittybilt products, nor the warnings contained
herein, are not a substitute for your safe driving. Don’t drink and drive, always use seat belts and don’t drive
faster than conditions permit.
For Technical Support/Warranty Information please call 310-762-9944
Smittybilt, 400 West Artesia Blvd, Compton, CA 90220
 Loading...