

Smith's Heating First Ceramic Edge Pro, Ceramic Edge Pro 50245, Ceramic Edge Pro C10555 Owner's Manual
Owner’s Manual
Manuel d’utilisation • Manual del propietario
747 MID-AMERICA BOULEVARD • HOT SPRINGS, ARKANSAS 71913-8414 USA
Phone (+1) 501-321-2244 • Fax (+1) 501-321-9232
www.smithsedge.com
Smith’s Model # 50245 • C10555 • Made in China • Patent Pending
Voltage: 120V/60Hz • Watts: 68.2W • Currents 1.22A
Modèle Smith’s n° 50245 • Fabriqué en Chine • Brevet en instance
Tension: 120V/60Hz • Watts: 68,2W • Courants 1,22A
Smith’s Modelo # 50245 • C10555 • Hecho en China • Patente Pendiente
Voltaje: 120V/60Hz • Potencia: 68,2W • Corriente 1,22A
Smith’s®, Ceramic Edge Pro™ & The Edge Experts®
are registrations and trademarks of Smith Abrasives, Inc.
Smith’s®, Ceramic Edge Pro™ et The Edge Experts®
font l’objet de dépôts légaux et de marques de commerce de Smith Abrasives, Inc.
Smith’s®, Ceramic Edge Pro™, y The Edge Experts®
son marcas comerciales y registradas de Smith Abrasives, Inc.
Ceramic Edge Pro™
Electric Knife Sharpener
Affûteur électrique Ceramic Edge Pro
™
Ceramic Edge Pro™ Afilador de cuchillos eléctrico
Electric & Manual Sharpening In One Unit
Affûtage électrique et manuel en une seule unité
Afilado manual y eléctrico en un solo producto
For Best Results, Read Instructions Before Use
Pour de meilleurs résultats, veuillez lire les instructions avant toute utilisation
Para obtener los mejores resultados, lea las instrucciones antes de usar el aparato

READ ALL INSTRUCTIONS
IMPORTANT SAFEGUARDS
This is a listed appliance. It is intended for household use only. When using electrical
appliances, the following basic safety precautions should always be followed:
1. Do not use appliance for other than intended use.
2. This appliance is not intended for use by persons (including children) with
reduced physical, sensory or mental capabilities, or lack of experience and
knowledge, unless they have been given supervision or instruction concerning
use of the appliance by a person responsible for their safety.
3. Children should be supervised to ensure that they do not play with the appliance.
4. Unplug from outlet when not in use or when cleaning.
5. Switch off the appliance before changing accessories or approaching parts
which move in use.
6. The use of attachments not recommended or sold by the manufacturer may
cause fire, electrical shock or injury.
7. Do not use outdoors.
8. This sharpener is designed to sharpen knives. Do not try to sharpen any other
type of blade on this machine.
9. Do not attempt to sharpen knives that do not fit freely into the blade guide slots.
10. Do not use with lubricants, water or honing oil.
11. If the elecrical cord is damaged, it must be replaced by the manufacturer, its
service agent, or similarly qualified persons in order to avoid hazard.
12. To protect against electric shock, do not put knife sharpener in water or any liquid.
13. Avoid contact with moving parts.
14. During sharpening, do not let the electrical cord hang over the edge of the counter or
table or come in contact with a/the knife being sharpened, a hot surface, or stovetop.
15. Caution: This appliance is equipped with a polarized electrical plug (one blade is
wider than the other). It will only fit into an electrical outlet one way. If it doesn’t
fit in the outlet, reverse the plug and try again. If plug still doesn’t fit, contact a
qualified electrician. Do not attempt to modify or defeat this safety feature.
SAVE THESE INSTRUCTIONS
Smith’s® Model 50245 – Ceramic Edge Pro™ Electric Knife Sharpener
Since 1886, Smith’s® has been a trusted name in knife and tool sharpening products.
The company’s long history has focused on a single mission: provide the consumer
with the best value in easy-to-use and effective knife, scissors, and tool sharpeners.
Now with an expanded line of electric sharpeners, Smith’s has the products and
expertise to do the job no matter how simple or complex your edge care needs.
The newest edition to our expanding line of electric sharpeners is the Ceramic Edge
Pro™ Electric Knife Sharpener. The Ceramic Edge Pro™ is unlike other electric
sharpeners currently on the market today because this sharpener produces a true,
factory quality (or better) cutting edge on your knife blade while removing less
metal from the blade. So, how exactly, you ask yourself, is this product capable of
doing this? The answer is by combining new sharpening technology with the right
abrasive material.
Traditional electric knife sharpeners work in a combination of numerous steps and
only sharpen one side of the knife at a time. These products can often scratch and/
or damage the knife blade during sharpening and always require a finishing step to
remove the burr on the cutting edge from sharpening one side at a time. In addition,
they cannot guarantee that both sides of the blade are sharpened equally on both
sides, even though this is one of the keys to obtaining the sharpest cutting edge
(the other is consistency of angle to the sharpening surface). When you combine
this inadequacy with the fact that most electric sharpeners use an abrasive material
that can actually damage the cutting edge instead of enhancing it, the end result is
usually a knife blade that doesn’t cut consistently all the way down the blade or one
that dulls quickly.
Interlocking sharpening wheels deliver fast and precise sharpening of both sides
of your knife blade EQUALLY at the same time. They reduce the amount of time
needed to sharpen your knife because you aren’t sharpening one side at a time, and
they leave no burr on the cutting edge. Now, make those interlocking wheels out
of a material that is very forgiving to the blade and you eliminate the possibility of
marring or damage to your blade. In addition, you will remove very little metal from
the knife blade and extend the life of your knife. The Ceramic Edge Pro™ Electric
Knife Sharpener uses these patented, extra-fine ceramic abrasive sharpening
wheels in its electric sharpening slot to produce a smoother, more consistent cutting
edge and ultimately a sharper knife. The sharpness and quality of the cutting edge
produced by these ceramic wheels is better than any diamond-coated wheel
sharpener on the market today!
WARNING! This electric knife sharpener will produce a very sharp edge. Use
caution when handling your knife after sharpening. Do not test knife sharpness
by running your fingers or any part of your body along the edge of the blade. To
avoid injury, handle sharpened knives with extreme care.
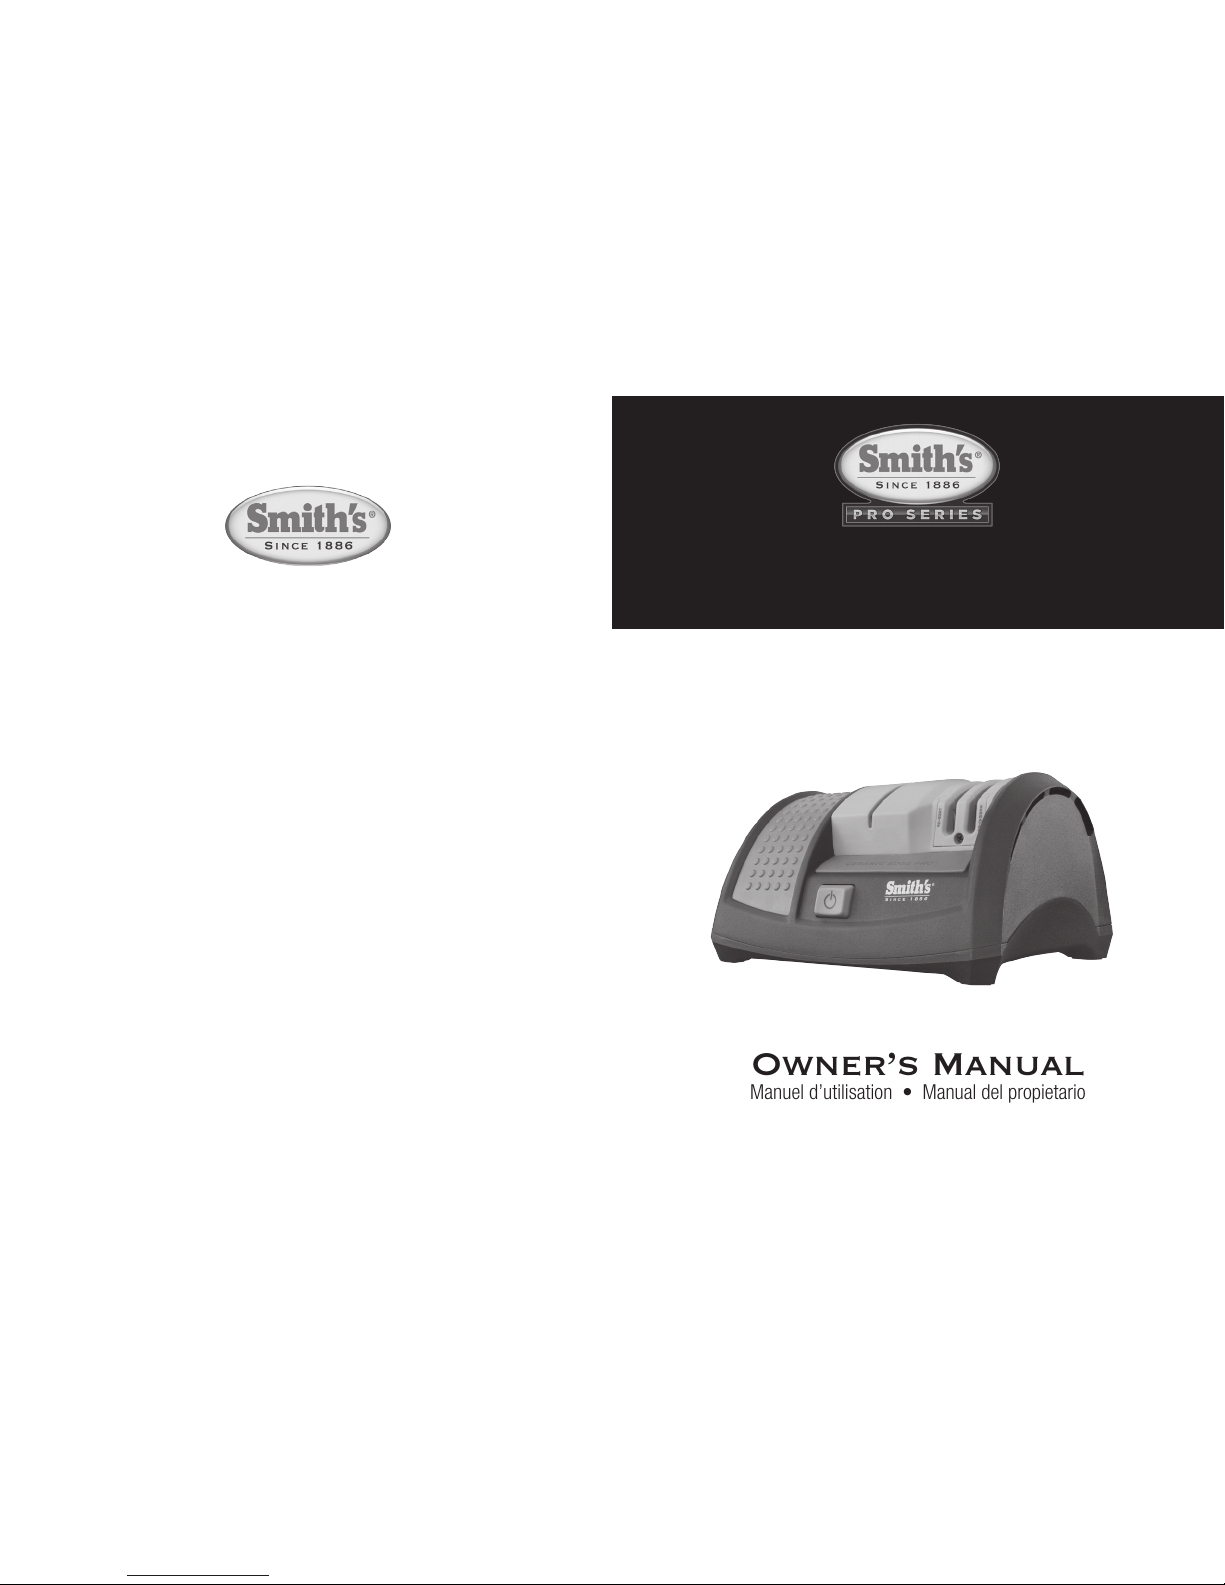
Featuring Interlocking Ceramic Wheels
Rubber Hand Grip
Clean Out Slot Under
Machine
Manual Edge Setting Slot
Non-slip
Rubber Feet for
Stability
Serrated Edge Manual Sharpener
Like in all Smith’s electric sharpeners, we have continued the practice of combining
the quick and precise sharpening provided by electrical powered sharpening wheels
with the versatility of manual sharpening elements. This unique combination
provides a broad capability to suit multiple blade types and edge conditions….
everything from extremely dull blades to already sharp blades in need of a quick
touch up, or from straight edge blades to blades with serrations.
Your Ceramic Edge Pro™ Electric Knife Sharpener will sharpen straight edge knives
of alloy, carbon, or steel in the electric sharpening slot. It is designed to sharpen your
finest custom knives, everyday pocket or sport knives, hunting/fishing knives, and
kitchen knives with a grind on both sides of the blade and that will fit freely into the
sharpening slots. Knives with large or small serrations can be sharpened manually in
the easy to use pull through slot marked “Serrated”. Do not attempt to sharpen any
blade that does not fit freely into the electric sharpening slot, ceramic blades, Asian
style knives (will sharpen but diminishes performance), or knives with a grind on just
one side of the blade. Listed below are the unique features of your new Ceramic
Edge Pro™ Electric Knife Sharpener.
The interlocking wheels in the Ceramic Edge Pro™ were designed to sharpen
at a 45 degree angle (22.5° on each side) and to provide a Precision Machined
Edge configuration. A Precision Machined Edge configuration offers the perfect
combination of edge retention, performance, and sharpness, opposed to other
edge configurations that are generally strong in just one of these characteristics.
The 45-degree combined sharpening angle allows this sharpener to be versatile
enough to sharpen a wide variety of kitchen knives as well as hunting/fishing
knives and everyday pocket knives.
Manual Edge Setting Slot (CARBIDE)
The preset carbide blades are used to set the initial edge on your
knife to match the sharpening angle of the ceramic wheels. The
carbides do not need to be used again unless you have damaged
your edge. Light touch up on the ceramic wheels is all that is
required once you obtain the initial edge on your knife.
Manual Serrated Edge Sharpening Slot (SERRATED)
The characteristic scallops of a serrated blade are usually only
ground on one side of the knife blade. For this reason, it is
not recommended that serrated blades be sharpened using
the Interlocking Ceramic Wheels in the electric sharpening slot.
These wheels are designed to sharpen both sides of any blade
at the same time. For proper sharpening of your serrated blade, Smith’s strongly
recommends manual sharpening in the serrated edge sharpening slot as the
preferred way to lightly hone a serrated edge. This sharpening slot has triangular
shaped ceramic stones that are designed to follow the shape of your serrations
and ensure proper and consistent sharpening for all types of serrations.
The Interlocking wheels
produce a Precision
Machined Edge, which
offers the perfect
combination of excellent
edge retention, edge
performance, and
sharpness.
Precision
Machined
Edge
Flat Edge
Hollow Edge
Good edge
retention -
not as sharp
Good initial sharpness -
poor edge retention
Good edge
retention and
sharpness
Interlocking Ceramic Wheels
The Ceramic Edge Pro™ electric knife sharpener comes with extra-fine interlocking
ceramic wheels which provide superior edge producing capabilities while removing
minimal material from your knife edge. Compared to diamond abrasives, ceramics
produce a smoother, cleaner cutting edge resulting in a sharper knife that had less
metal removed from its blade. Removing less metal extends the life of your knife.
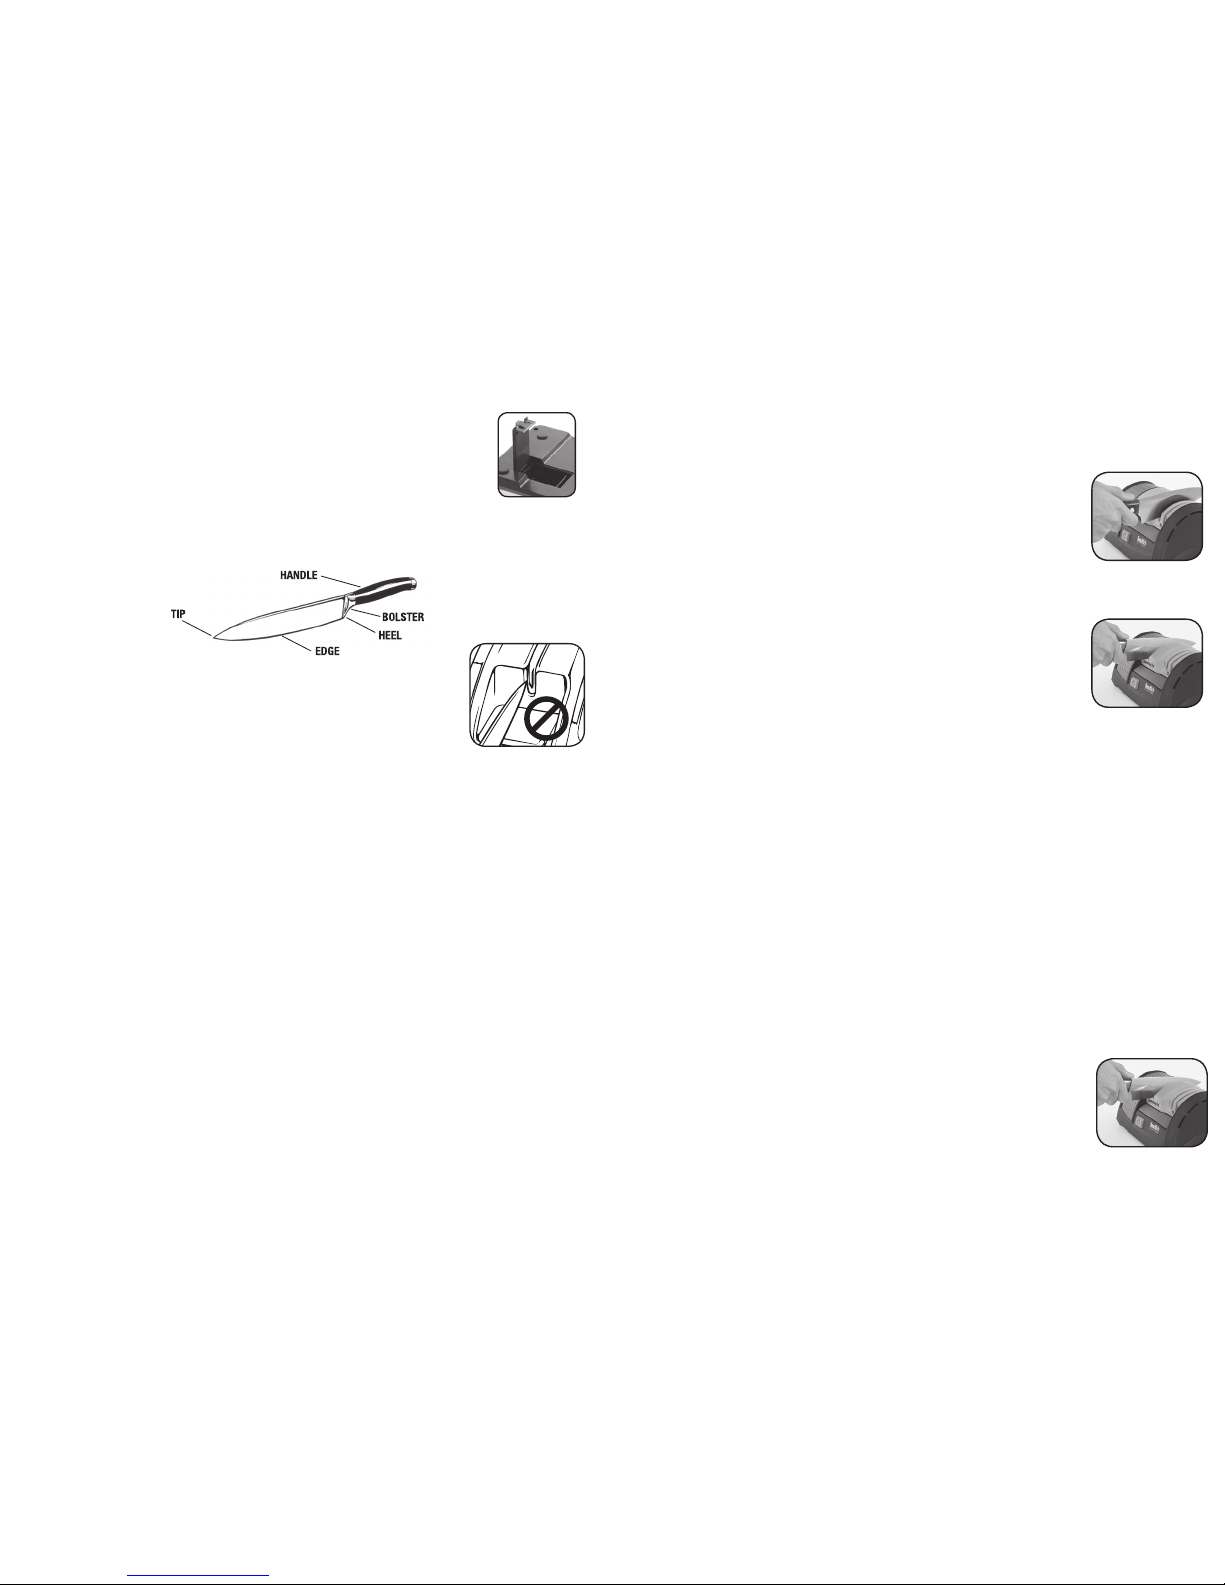
Step 1. Insert the heel portion of your blade into the manual slot marked
CARBIDE and pull through from heel to tip (never back and forth). Moderate
downward pressure is all that is required when pulling the knife through the
slot and lift the knife handle in the curve portion of the blade to sharpen all
the way out to the tip. Use a smooth, consistent stroke when pulling the knife
through the slot at a speed of 1 second per 2 inches. Repeat a minimum of
10 times. After 10 pulls, the knife should begin to pull thru the slot smoothly.
If not, additional pulls are required. NOTE: Knives made of extremely hard
steel may require additional pulls through the slot when setting the initial edge.
Step 2. Once the initial edge is set using the CARBIDE slot, turn on the power
to the interlocking ceramic wheels. Insert the heel portion of the knife blade
into the slot and lower the blade to make contact with the interlocking wheels.
When your blade contacts the wheels and self-aligns itself between the two
wheels, pull through slot from heel to tip (never back and forth) at a speed of
1 second for every 2 inches of the blade. Moderate downward pressure is
all that is required and lift the handle at the end to sharpen all the way out
to the tip of the blade. Use a smooth, consistent stroke when pulling the blade through the slot.
Step 3. Repeat a minimum of 10 times. NOTE: Knives made of extremely hard steel may
require additional pulls through the slot when sharpening the edge.
Step 4. Check the sharpness of your blade by cutting a piece of paper or a fruit or vegetable. If
additional sharpening is needed, repeat process until sharp but make sure to clean your knife
before continuing. In most instances, you will only need to repeat Steps 2-4. In rare cases though,
if your knife is severely damaged and extremely dull, you may need to repeat Steps 1-4 again. If
knife is sharp, be sure to turn off power to the machine.
Re-sharpening or light honing of a European/American Style Kitchen Knife with
a straight edge and ground on both sides
NOTE: This process requires use of the electric sharpening slot ONLY and should be
applied to moderately dull blades or if you are just maintaining an already sharp blade.
Smith’s recommends always performing a light touch up of your knife before each use.
Step 1. Turn on power to the interlocking wheels. Insert the heel portion of your blade into theslot
and lower blade to make contact with the interlocking ceramic wheels. When your blade contacts
the wheels and self-aligns itself between the two wheels, pull through slot
from heel to tip (never back and forth) at a speed of 1 second for every 2
inches of the blade. Moderate downward pressure is all that is required and
lift the handle at the end to sharpen all the way out to the tip of the blade. Use
a smooth, consistent stroke when pulling the blade through the slot.
Step 2. Repeat a minimum of 10 times. NOTE: Knives made of extremely hard
steel may require additional pulls through the slot when sharpening the edge.
OPERATING INSTRUCTIONS
Read all IMPORTANT SAFEGUARDS and OPERATING INSTRUCTIONS thoroughly
before using this product.
CAUTION:
• Always sharpen your knife blade from the heel to the tip of the blade,
never back and forth.
• Never insert the tip of the knife blade into the sharpening slot first, or
push your knife blade through the sharpening slot. This could damage the
knife sharpener and/or your knife.
• In order to get the best results and to reduce excessive wheel wear, it is important that
you keep the proper orientation of the knife blade to the wheels. Always keep the knife blade
perpendicular to the counter top, so that the blade contacts both ceramic wheels equally. It
should be straight up and down in the center of the sharpening slot at all times. Hold your knife
securely but comfortably in your hand and use light downward pressure to contact the wheels.
• Due to some handle designs, you may not be able to sharpen the entire length of the blade
using the ceramic sharpening wheels. In these limited cases, Smith’s® recommends using
the manual sharpening slots to sharpen these small areas of your blade. Use the slot marked
“Carbide” if this portion of your blade is extremely dull or damaged and in need of re-setting
the edge, then move to the finishing/honing stage in the slot marked “Serrated.” If this portion
of your knife is somewhat sharp but in need of light honing, just use the slot marked “Serrated”
to sharpen this portion of your blade.
• Do not use excessive force when sharpening with the interlocking wheels or the wheels will
stall during use.
Clean Out
A magnetic collection strip located in the bottom of the sharpener
collects the metal filings generated during the sharpening process
for safe and easy disposal.
Step 1
Step 2
Initial edge setting and/or sharpening extremely dull or damaged European/
American Style Kitchen knives with a grind on both sides.
”European/American Style Kitchen Knives” is defined as kitchen knives with an angle of 14 – 20
degrees on each side (28 – 40 degrees combined).
NOTE: You must first set the initial cutting edge of your knife to the appropriate angle of
the interlocking ceramic wheels before sharpening your blade in the electric sharpening
slot. This is a one-time process that will not be required for re-sharpening or light honing.
You will also have to use this process if your blade ever gets damaged or extremely dull.
Step 1

Step 3. Check the sharpness of your blade by cutting a piece of paper or a fruit or vegetable. If
additional sharpening is needed, repeat process until sharp but make sure to clean your knife
before continuing. If sharp, turn off power to the machine.
Initial edge setting and/or sharpening extremely dull or damaged Outdoor Sport Style
knives (i.e. Hunting/Fishing/Camping), Tactical knives, or everyday pocket knives with
a grind on both sides
”Outdoor Sport Style Knives” is defined as knives used in sporting activities with an angle of 20 – 30
degrees on each side (40 – 60 degrees combined).
“Tactical Knives” is defined as knives primarily designed for utility/tool use but can also be used in
close combeat by military/law enforcement. Angles for Tactical knives normally range from 25 – 30
degrees on each side (50 – 60 degrees combined).
“Everyday Pocket Knives” is defined as a small size folding knife with one or more blades that fold into
the handle and may be used for anything from opening an envelope to slicing an apple. Most angles
of Pocket Knives range from 20 – 30 degrees on each side (40 – 60 degrees combined).
NOTE: You must first set the initial cutting edge of your knife to the appropriate angle of
the interlocking ceramic wheels before sharpening your blade in the electric sharpening
slot. This is a one-time process that will not be required for re-sharpening or light honing.
You will also have to use this process if your blade ever gets damaged or extremely dull.
Step 1. Insert the heel portion of your blade into the manual slot marked
CARBIDE and pull through from heel to tip (never back and forth). Moderate
downward pressure is all that is required when pulling the knife through
the slot and lift the knife handle in the curve portion of the blade to sharpen
all the way out to the tip. Use a smooth, consistent stroke when pulling
the knife through the slot at a speed of 1 second per 2 inches. Repeat a
minimum of 20 times. After 20 pulls, the knife should begin to pull thru the
slot smoothly. If not, additional pulls are required. NOTE: Knives made of
extremely hard steel may require up to 50 pulls through the slot when setting the initial
edge.
Step 2. Once the initial edge is set using the CARBIDE slot, turn on the power to the interlocking
ceramic wheels. Insert the heel portion of the knife blade into the slot and
lower the blade to make contact with the interlocking wheels. When your
blade contacts the wheels and self-aligns itself between the two wheels,
pull through slot from heel to tip (never back and forth) at a speed of 1
second for every 2 inches of the blade. Moderate downward pressure is
all that is required and lift the handle at the end to sharpen all the way out
to the tip of the blade. Use a smooth, consistent stroke when pulling the
blade through the slot.
Step 3. Repeat a minimum of 20 times. NOTE: Knives made of extremely hard steel may
require up to 50 pulls through the slot when sharpening the edge.
Step 4. Check the sharpness of your blade by cutting a piece of paper or a fruit or vegetable. If
additional sharpening is needed, repeat process until sharp but make sure to clean your knife
before continuing. In most instances, you will only need to repeat Steps 2-4. In rare cases, if your
knife is severely damaged and extremely dull, you may need to repeat Steps 1-4 again. If knife
is sharp, be sure to turn off power to the machine.
Step 2
Step 1
NOTE: This process requires use of the electric sharpening slot ONLY and should be
applied to moderately dull blades or if you are just maintaining an already sharp blade.
Smith’s recommends always performing a light touch up of your knife before each use.
Step 1. Turn on power to the interlocking wheels. Insert the heel portion of your blade into the
slot and lower blade to make contact with the interlocking ceramic wheels.
When your blade contacts the wheels and self-aligns itself between the two
wheels, pull through slot from heel to tip (never back and forth) at a speed of
1 second for every 2 inches of the blade. Moderate downward pressure is
all that is required and lift the handle at the end to sharpen all the way out to
the tip of the blade. Use a smooth, consistent stroke when pulling the blade
through the slot.
Step 2. Repeat a minimum of 10 times. NOTE: Knives made of extremely hard steel may
require additional pulls through the slot when sharpening the edge.
Step 3. Check the sharpness of your blade by cutting a piece of paper or a fruit or vegetable. If
additional sharpening is needed, repeat process until sharp but make sure to clean your knife
before continuing. If sharp, turn off power to the machine.
Sharpening any type of Serrated Edge Knife with a grind on one side or both sides
Step 1. Insert the serrated portion of your blade into the manual slot marked SERRATED and
pull through slot from start of serrations to the end. Moderate downward pressure is all that is
required when pulling the knife through the slot because the blade has to be able to lift and fall
as it follows the shape of the serration. Use a smooth, consistent stroke when pulling the knife
through the slot at a speed of 1 second for every 2 inches of the blade. You will feel the blade
lightly bouncing as you pull it through the sharpening slot. This is normal and to be expected.
Repeat a minimum of 10 times. NOTE: Knives made of extremely hard steel may require
additional pulls through the slot when sharpening the serrated edge.
Step 2. Check the sharpness of your serrations. If additional sharpening is needed, repeat the
process until sharp.
Step 1
Re-sharpening or light honing of Outdoor Sport Style knives (i.e. Hunting/Fishing/
Camping), Tactical knives, or everyday pocket knives with a grind on both sides

TROUBLESHOOTING GUIDE
Symptom: Sharpener stops running while in use.
Cause: Sharpener has a built in motor thermostat as a safety feature. It protects sharpener
from overheating if left on accidentally for a long period or is being used improperly.
Solution: If the thermostat shuts down the motor, unplug the sharpener and wait about
one hour for the motor to cool down, and the sharpener will restart. If motor still will not
re-start, please contact Smith’s
®
Customer Service department at 800-221-4156 or (+1)
501-321-2244 or via the world wide web at www.smithsedge.com for refund or replacement
assistance.
Symptom: Carbide blades and/or ceramic stones in manual sharpening slots stop sharpening.
Cause: The carbide blades and ceramic stones will lose their sharpening ability and
effectiveness over time as metal particles/dust collects on the working corners of the abrasive
material.
Solution: The cover that holds the manual sharpening materials can easily be removed from
the front of the machine to expose the crossed carbide blades and triangular-shaped ceramic
stones. Just remove the small screw holding the cover in place. Once exposed, the carbide
blades can be removed and replaced if needed. The ceramic stones can be removed and
cleaned to refresh their sharpening capabilities or replaced if needed. If cleaning, use a small
nylon brush (like a toothbrush) to scrub the surface of the stones with kitchen cleansing
powder and water. After cleaning, replace the stones in their original configuration and attach
the cover. If cleaning the stones does not increase their sharpening effectiveness, you should
replace the ceramic stones. Replacement carbide blades or ceramic stones can be purchased
via Smith’s® website, www.smithsedge.com/Accessories/ReplParts, or by contacting Smith’s
Customer Service department at (+1) 501-321-2244 (toll free: 1-800-221-4156).
Symptom: Interlocking ceramic wheels stop sharpening.
Cause: With extended use (approximately 3,000 pulls) under normal operating conditions, the
ceramic wheels will lose their sharpening capabilities and effectiveness as dust and metal
filings build up on the surface of the wheels.
Solution: If at anytime you feel like the interlocking ceramic wheels are not sharpening
effectively, the ceramic wheels should be cleaned to restore their sharpening capability.
Smith’s® offers an easy to use felt cleaning brush that can be used to remove the build-up
of metal particles/dust from the ceramic wheels and restore their abrasive surface. Please
contact Smith’s Customer Service department at 800-221-4156 or (+1) 501-321-2244 or visit
our website, www.smithsedge.com/Accessories/Repl Parts to purchase directly from our site.
Instructions for using the brush will be included.
Symptom: The sharpener will not start when initially plugged into electrical socket.
Cause: Sharpener or electrical cord could be damaged or malfunctioning.
Solution: The sharpener should be returned to Smith’s for refund or replacement. Please
contact Smith’s Customer Service department at 800-221-4156 or (+1) 501-321-2244 or via
our website, www.smithsedge.com.
Maintenance
• Periodically, the clean out door on the bottom of the sharpener should be opened and cleaned.
• To clean the exterior housing, unplug the unit from the electrical outlet and simply wipe with
a damp cloth. Do not use a powdered abrasive cleaner to clean sharpener. Do not immerse or
flush the sharpener with water. Do not use any lubricant to clean the abrasive wheels or on any
other components.
WARRANTY SERVICE
In the event service or warranty work is needed on your Ceramic Edge Pro™ Electric Knife
Sharpener, please contact Customer Service at the address or phone number listed below for
a return authorization. All returns must be accompanied by name, current shipping address,
telephone number or e-mail address, and a brief description of the problem or damage.
Send to:
Smith’s
CS Dept. 50245
747 MID-AMERICA BOULEVARD
HOT SPRINGS, ARKANSAS
71913-8414 USA
• Clean and dry knives before sharpening.
• Always hold knife parallel to the tabletop so the knife contacts both wheels equally.
• Always pull the knife blade through the wheels, never push your knife blade into the
sharpening wheels.
• Use light downward pressure to establish contact with the wheels.
• Unplug sharpener when not in use.
DON’Ts
• DO NOT USE TO SHARPEN CERAMIC KNIVES.
• Never use lubricants on the wheels.
• This sharpener is designed to sharpen knives and scissors. Do not sharpen any other types
of blades on this sharpener.
• Never insert the tip of the knife into the wheels or damage to the knife will occur.
• Never use the sharpener if cord is damaged.
• Do not use excessive force when sharpening your knife or scissors.
SHARPENER MAINTENANCE AND CARE GUIDE
Follow these easy tips and instructions to keep your Ceramic Edge sharpener in prime
condition for years to come:
DO’s
• Read the instruction manual thoroughly before using the sharpener.
 Loading...