

Page 1
Type Mode
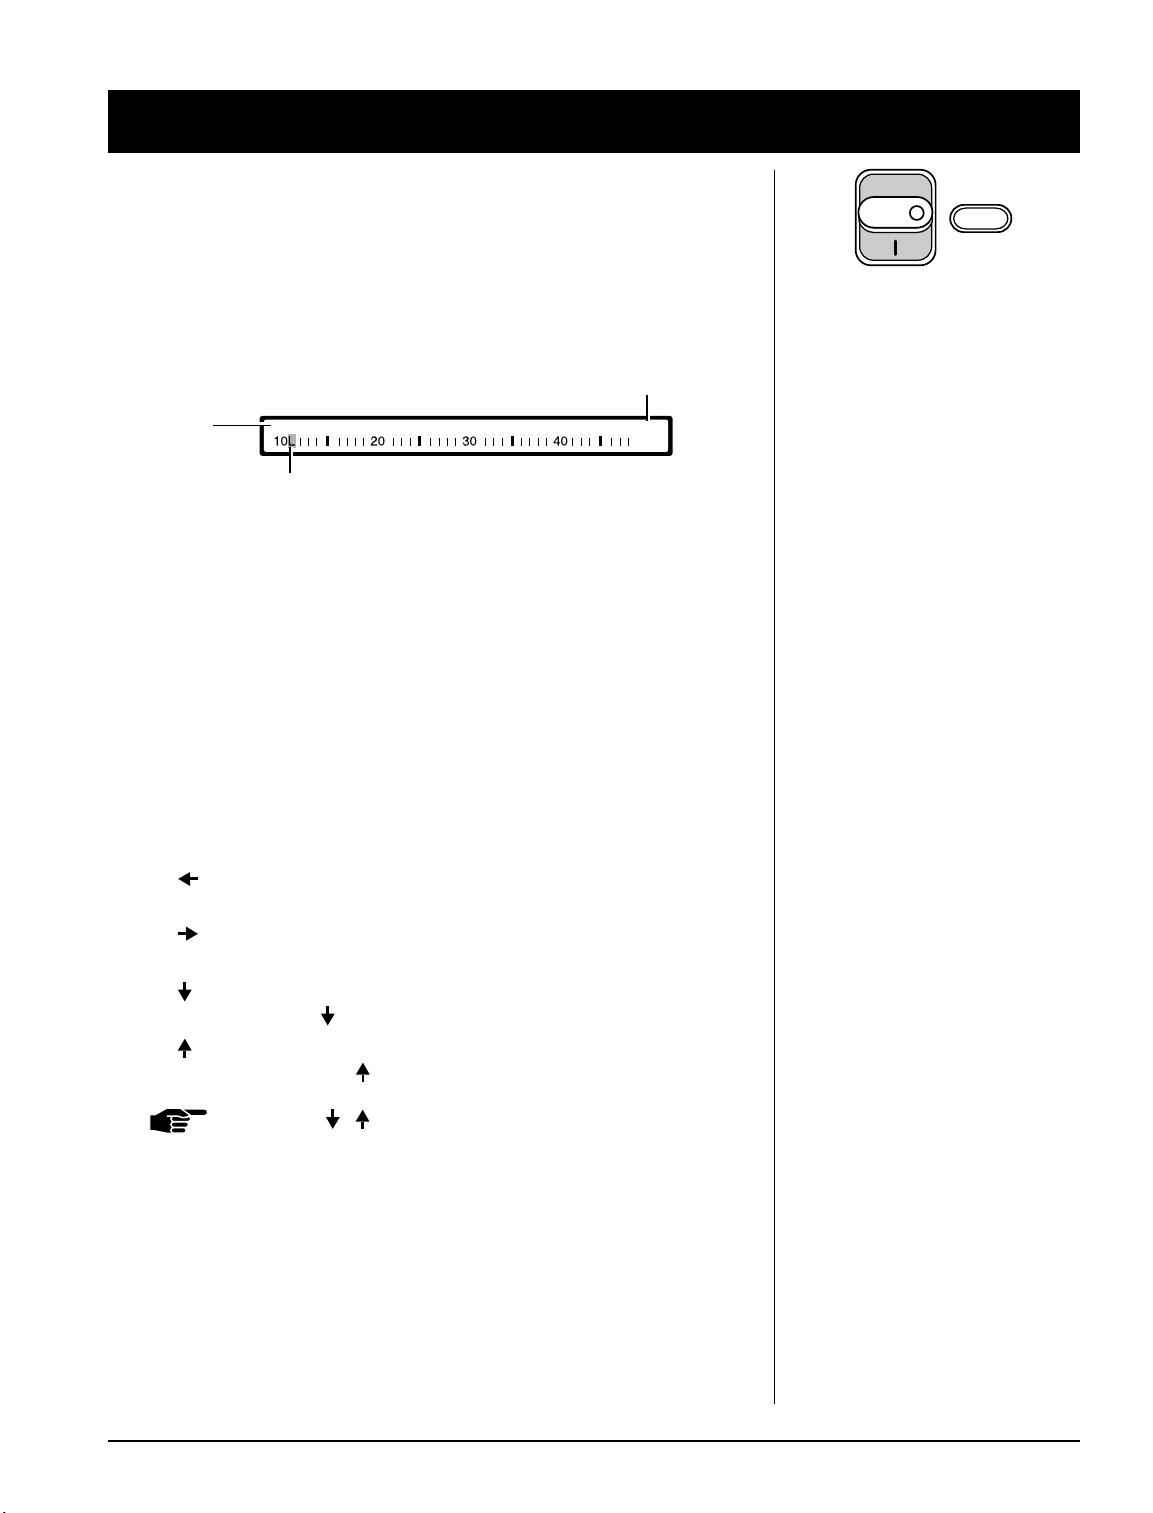
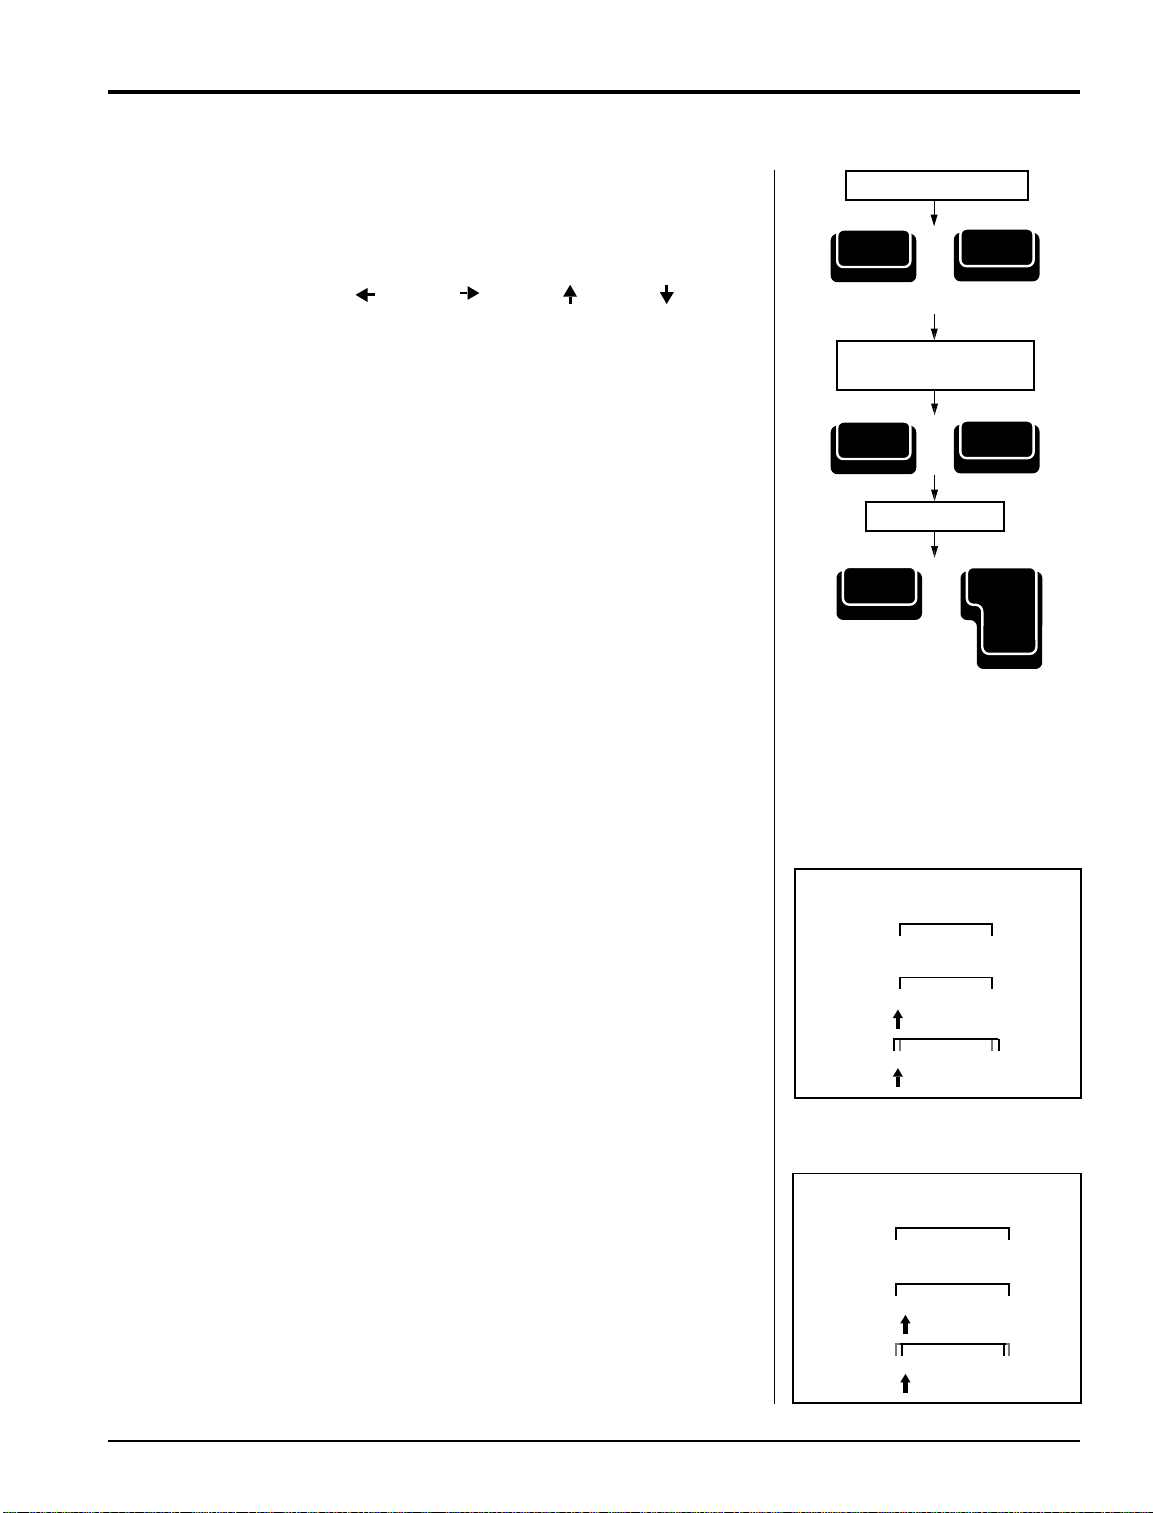
In Type Mode, the typing scale appears on the display and the blinking
cursor moves along it as you type characters on paper.
The Display
Type Mode is activated by sliding the Mode Selector to Type, if
necessary. The typing scale is illustrated below.
Position Indicator
End of Page Pitch Line Impression Keyboard
Status Line
Status Line — Gives current settings, keyboard status, and cursor
position.
Cursor — A rectangle that shows the location of the print hammer.
Position Indicator — Indicates your current print hammer position.
Entering Text
OFF 10 1 M I 12
Cursor
Type
When entering text, it is useful to know how to use the cursors and Auto
Return.
Cursor Moves
Code + or Back Space — Moves typing position to the left one
character at a time.
Code + or Spacebar — Moves typing position to the right one
character at a time.
Code + — Moves typing position down equal to line setting (i.e., if you
are double spacing text, key moves typing position down two lines.)
Code + — Moves typing position up equal to your line setting (i.e., if
you are single spacing text, key moves typing position up one line.)
NOTE: The / are repeating keys. If they are held down, the
paper will continue to move up or down.
Smith Corona Corporation Type Mode — 3-1
Page 2
Code
+
Auto Return
You can program the Memory Typewriter to automatically return at the
!
^
1
end of each line. When a space or hyphen is typed in the “warning
zone,” which begins five spaces before the right margin, the carrier
automatically returns to the next line. For lengthy words falling at the
end of the line, simply type a hyphen as you normally would and the
carrier returns automatically. To activate Auto Return:
1. Press Code + Return (1). Unit beeps, and the Status Line prompts
Auto Return ON.
2. Type text. Do not press Return at the end of line.
Deactivating Auto Return
Press Code + Return (1). The Status Line prompts:
Auto Return OFF.
3-2 — Type Mode Smith Corona Corporation
Page 3
Text Enhancements
Bold Print
1. Press Code + Bold (B). A beep is heard, and the display prompts:
Bold Print ON.
2. Type text.
3. To turn off bold print, press Code + Bold (B). No beep is heard, and
the display prompts:
Bold Print OFF.
NOTE: If correcting bold text within correction memory with
Bold Print OFF, bold text will be corrected, but
replacement text will not be bolded unless Bold Print is
reactivated.
Auto Underscore
As you are typing, you can automatically underscore each word or
words and spaces.
Underscoring Words Only
This feature automatically underscores just the words as you type.
1. Press Code + Word (3) . A beep is heard, and the display prompts:
Underscore WORD.
2. Type your text.
3. Deactivate Auto Underscore Word by pressing Code + Word (3). No
beep is heard, and the display prompts:
Underscore OFF.
Code
Code
Code
Code
+
Type Text
+
+
Type Text
+
B
Bold
B
Bold
Word
#
3
Word
#
3
é
é
Using Auto Underscore All
+
+
All
$
`
4
All
$
`
4
This feature automatically underscores both words and spaces as you type.
1. Press Code + All (4). A beep is heard, and the display prompts:
Code
Underscore ALL.
2. Type your text.
Type Text
3. Press Code + All (4) to deactivate Auto Underscore All. No beep is
heard, and the display prompts:
Code
Underscore OFF.
NOTE: If correcting underscore within correction memory with
Underscore All OFF, underscored text will be corrected,
but replacement text will not be underscored unless
Underscore is reactivated.
Smith Corona Corporation Type Mode — 3-3
Page 4
Position Print Hammer
Shift
Paper In
+
Manual Underscore
You can also manually underscore text already typed.
1. Position the print hammer under the first character of the text to be
underscored.
2. Press Shift + -/_ once to underscore each character.
Code
+
Type Text
Return
Reloc
Auto
Center
ç
@
2
Centering Text
1. Press Code + Auto Center (2). The carrier moves to the center of the
margins. A beep is heard, and the display prompts:
Auto Center @
and indicates the print hammer position.
2. Type the text to be centered. As you type, the text appears on the
display. If a mistake is made, use Correct, WordEraser or type over
errors. Press Code + Auto Center (2) to restart centering.
3. Press Return. Text prints automatically centered between current
margins.
4. Press Return again to deactivate Auto Center.
NOTE: When Auto Center is activated, the Format feature is not
functional.
3-4 — Type Mode Smith Corona Corporation
Page 5
Indented Paragraph
To indent paragraphs, set “temporary left margins,” so text is
automatically indented after carriage returns The example below shows
a paragraph which has been indented five spaces.
National Accounting Seminar
Marvelous Paper Products will participate in the
National Accounting Seminar. We will focus on our
new computerized accounting program.
Those attending will include one Sales
Account Executive from each of our Sales
Districts, two System Consultants and two
Field Service Technicians.
Details will follow.
Setting Paragraph Indent
1. Tab or space to desired indent location.
2. Press Code + Indent (6). A beep is heard. Status Line prompts:
Indent ON.
An “L” appears on the typing scale indicating the indent location.
3. Type the desired text. When Auto Return is active or when the
Return is pressed, the print hammer returns to the indented position.
4. Press Code + Indent (6) to deactivate Paragraph Indent. The paper
advances one line and returns to the original margin. Display
prompts:
Indent OFF.
Code
+
~
¢
6
Smith Corona Corporation Type Mode — 3-5
Page 6
Changing Settings
You can change the end of page setting, line spacing, impression control,
pitch and number of lines displayed in Type Mode. New settings will
replace any existing settings. (See “Page Layout.”)
NOTE: If you change pitch, remember to change the printwheel.
Corrections
The typewriter can automatically correct all characters in a three line
correction memory buffer. You can easily correct characters not in the
buffer by performing an extra step (see “Off-Line Correction”).
Remember to use Code + , Code + , Code + , Code + , Return,
Back Space, and Spacebar when positioning the print hammer to make a
correction. If you use the platen knob, the line count may be inaccurate.
IMPORTANT: If you changed printwheels, be sure to insert the
proper printwheel before making corrections.
Position Print Hammer
Correct
Type Correction
Code
Return
+
Position Print Hammer
®
WordEraser
LineEraser
Type Correction
Code
Return
+
Reloc
Reloc
Erasing Character(s) in Correction Memory
1. Position the print hammer on the incorrect character, if necessary,
and then press Correct. Hold down to continue erasing characters to
the left. Do not use the platen knob to position the print hammer.
2. Type the correction. Be sure to activate Bold or Underscore if you
want the replacement text enhanced.
3. Press Code + Reloc (Return) to quickly return to your previous
typing position, if necessary.
NOTE: You erase the correction memory buffer when you turn off
the typewriter, use the Automatic Paper Insert feature,
switch modes, or change pitch.
WordEraser
This feature allows you to erase word(s) within the correction memory
buffer.
1. Position the print hammer on any character in the incorrect word
or on the space to the right of the word. If you are correcting more
than one word, position the print hammer on the right-most
incorrect word.
2. Press WordEraser once for each incorrect word. The error is erased.
3. Type in the correction. Be sure to activate Bold or Underscore if you
want the replacement text enhanced.
4. Press Code + Reloc (Return) to return to your previous typing
position, if necessary.
®
3-6 — Type Mode Smith Corona Corporation
Page 7
The
LineEraser
®
Using the LineEraser feature, you can easily remove an entire line of text
located in correction memory.
1. Position the print hammer on any character in the line.
2. Press Code + LineEraser (WordEraser). No beep is heard. Correction
begins immediately from the last character typed on the line up to
the first character typed on the line.
Position Print Hammer
Code
Type Correction
+
WordEraser
LineEraser
®
NOTE: You can press Code + Stop (S) to stop LineEraser.
Erasing will stop immediately. The print hammer remains
on the last character corrected.
3. Type in the correction. Be sure to activate Bold or Underscore if you
want to replace enhanced text.
4. Press Code + Reloc (Return) to return to your previous typing
position, if necessary.
NOTE: If Code + LineEraser is pressed while off-line or when
there is no text in the correction buffer, you will receive
an ERROR message.
Character Swap
®
Character Swap allows you to reverse the order of adjacent characters on
a line within the correction memory buffer. For example, if you typed
“Teh,” you could reverse the “h” and the “e,” to produce “The.”
Character Swap will transpose lower-case and upper-case letters without
changing the case. Also, Character Swap will swap bold and underlined
characters, retaining the enhancement of the character.
Characters must be in the correction memory buffer; that is, they must be
in one of the last three lines of typed text. This feature is inactive when
typing text in a special field (e.g., Auto Center) or when you are using
List and AutoSpell.
1. Position the print hammer on the second of the two characters to be
swapped. (The print hammer must be on the character, not the space
following the character.) For example, to swap “eh” as in the
example above, position the cursor on “h.”
2. Press Code + (W). The character currently selected will be
swapped with the preceding one. In the example above, “eh” would
become “he.” The print hammer relocates after the right most
corrected character.
Code
Code
Code
+
Teh
The
+
+
Return
,
W
,
Reloc
Smith Corona Corporation Type Mode — 3-7
Page 8
Position Print Hammer
Half Space
¿
Code
Type Correction
Correct
Return
+
Reloc
%
5
Auto Half Space
Use this feature to insert one additional character into a word or delete
one or more character(s) from a word.
1. Position print hammer to any character in the incorrect word.
2. Press Code + Half Space (5) to activate Auto Half Space. The word is
automatically erased. Print hammer locates on the center of the space.
3. Type the desired word. (Characters appear on the display.) Use
Correct to correct errors on the display.
4. Press Return. The new word prints.
5. Press Code + Reloc (Return) to return to your previous typing
position.
NOTE: You can use the WordFind feature to quickly locate
misspelled words within correction memory.
Code
Return
+
Reloc
Position Print Hammer
Code
Correct
+
Retype the Incorrect Character
to Erase the Error
Type Correction
Code
Return
+
Reloc
Off-Line Correction
To correct an error not in the correction memory buffer:
1. Position the print hammer to the incorrect character using
Code + , Code + , Code + , Code + , Spacebar, Return, and
Back Space. Do not use the platen knob to position the print
hammer.
2. Press Code + Correct. One beep is heard, and the display prompts:
Manual Correct.
3. Release both keys. You can cancel the correction by pressing Return.
4. Retype the incorrect character to erase the error.
5. Type the correct character.
6. Press Code + Reloc (Return) to quickly return to your previous
typing position.
NOTE: For bold characters, repeat the correction process,
if necessary.
3-8 — Type Mode Smith Corona Corporation
Page 9
Forward Correction
To correct several characters or word(s) not in the correction memory
buffer.
1. Position the print hammer to the first character in the series to be
corrected using Code + , Code + , Code + , Code + ,
Spacebar, Return, and Back Space. Do not use the platen knob to
position the print hammer.
2. Press Code + Correct twice. Two beeps are heard, and the display
prompts:
Forward Correct.
At this point you can cancel correction by pressing Return.
3. Retype all the characters or words to be deleted. (As you type, the
typewriter erases each character. You may have to adjust your
typing speed so that the typewriter removes characters correctly.)
4. Press Code + Correct. No beep is heard, and the print hammer
returns to the position where Forward Correct was activated.
5. Type the correct characters or words.
6. Press Code + Reloc (Return) to quickly return to your previous
typing position.
Half Space
The Half Space feature is used when making corrections not in the
correction memory buffer when a character has been omitted or when
one too many characters have been typed. When Half Space is activated,
the typing position moves a half space to the right.
Position Print Hammer
Code
Correct
+
(twice)
Retype All Characters
or Words to be Deleted
Code
Correct
+
Type Corrections
Code
Return
+
Adding Another Character
Reloc
Adding a Character
Find
Look for mispelled words
1. Erase the incorrect word following the first 4 steps of the Forward
Correct method.
Erase
Look for mispelled words
2. Backspace one additional space before the first character of the word
erased.
3. Press Code + Half Space (Spacebar). The print hammer advances a
Correct
Look for mispelled words
misspelled
half space.
4. Type in the correct word.
5. Press Code + Reloc (Return).
Removing Another Character
Removing a Character
1. Erase the incorrect word following the first 4 steps of the Forward
Correct method.
2. Press Code + Half Space (Spacebar). The print hammer advances a
half space.
3. Type in the correct word.
Find
Look for misspellled words
Erase
Look for misspellled words
Correct
Look for misspellled words
misspelled
4. Press Code + Reloc (Return).
Smith Corona Corporation Type Mode — 3-9
Page 10

 Loading...