

smirthwaite STRATO 10041, STRATO 10043, STRATO 10042, STRATO 10044, STRATO 10045 Instructions For Use Manual
Page 1
6/17
STRATO
INSTRUCTIONS FOR USE
Sizes 1 & 2
Codes 10041 & 10042
Sizes 3, 4 & 5
Codes 10043, 10044 & 10045
Page 2

!
Strato
1
SECTION PAGE START
1.0 STRATO SIZES 1&2 2
2.0 STRATO SIZES 3,4 & 5 19
Page 3
!
Strato
2
STRATO
INSTRUCTIONS FOR USE
Sizes 1 & 2
Codes 10041 & 10042
Page 4

!
Strato
3
CONTENTS PAGE
1.0 INTRODUCTION 3
2.0 ILLUSTRATION OF YOUR CHAIR 4
3.0 FOR YOUR SAFETY 5
4.0 TECHNICAL DATA 7
5.0 UNPACKING YOUR CHAIR 8
6.0 SETTING UP AND ADJUSTING YOUR CHAIR 8
7.0 CARE AND MAINTENANCE 14
8.0 WARRANTY & SERVICE 15
9.0 CONTINUOUS IMPROVEMENT 16
10.0 SERVICE INSPECTION 17
1.0 INTRODUCTION
Thank you for choosing the Smirthwaite Strato Nursery Chair.
Strato is an innovative Nursery chair designed for children who are able to get in and
out of their chair independently but require minimal to moderate postural support
when seated. The uniquely contoured seat tilts forward to encourage an extremely
comfortable anterior tilt of the pelvis for improved stability as well as trunk and lower
limb alignment. The Strato aims to enhance the user’s function and cognitive
development.
IMPORTANT!
These instructions should be read by all therapists and carers using
the equipment and should be retained for future reference. The
product should always be used under adult supervision.
Any incorrect use of the product and failure to follow the instructions
may put the user at risk or impede the function. If you have any
queries using this product or wish for further copies, please do not
hesitate to contact Customer Service department on
T: +44 (0) 1626 835552.
This product has been designed and manufactured specifically and
solely for use by clients with special needs.
Page 5

!
Strato
4
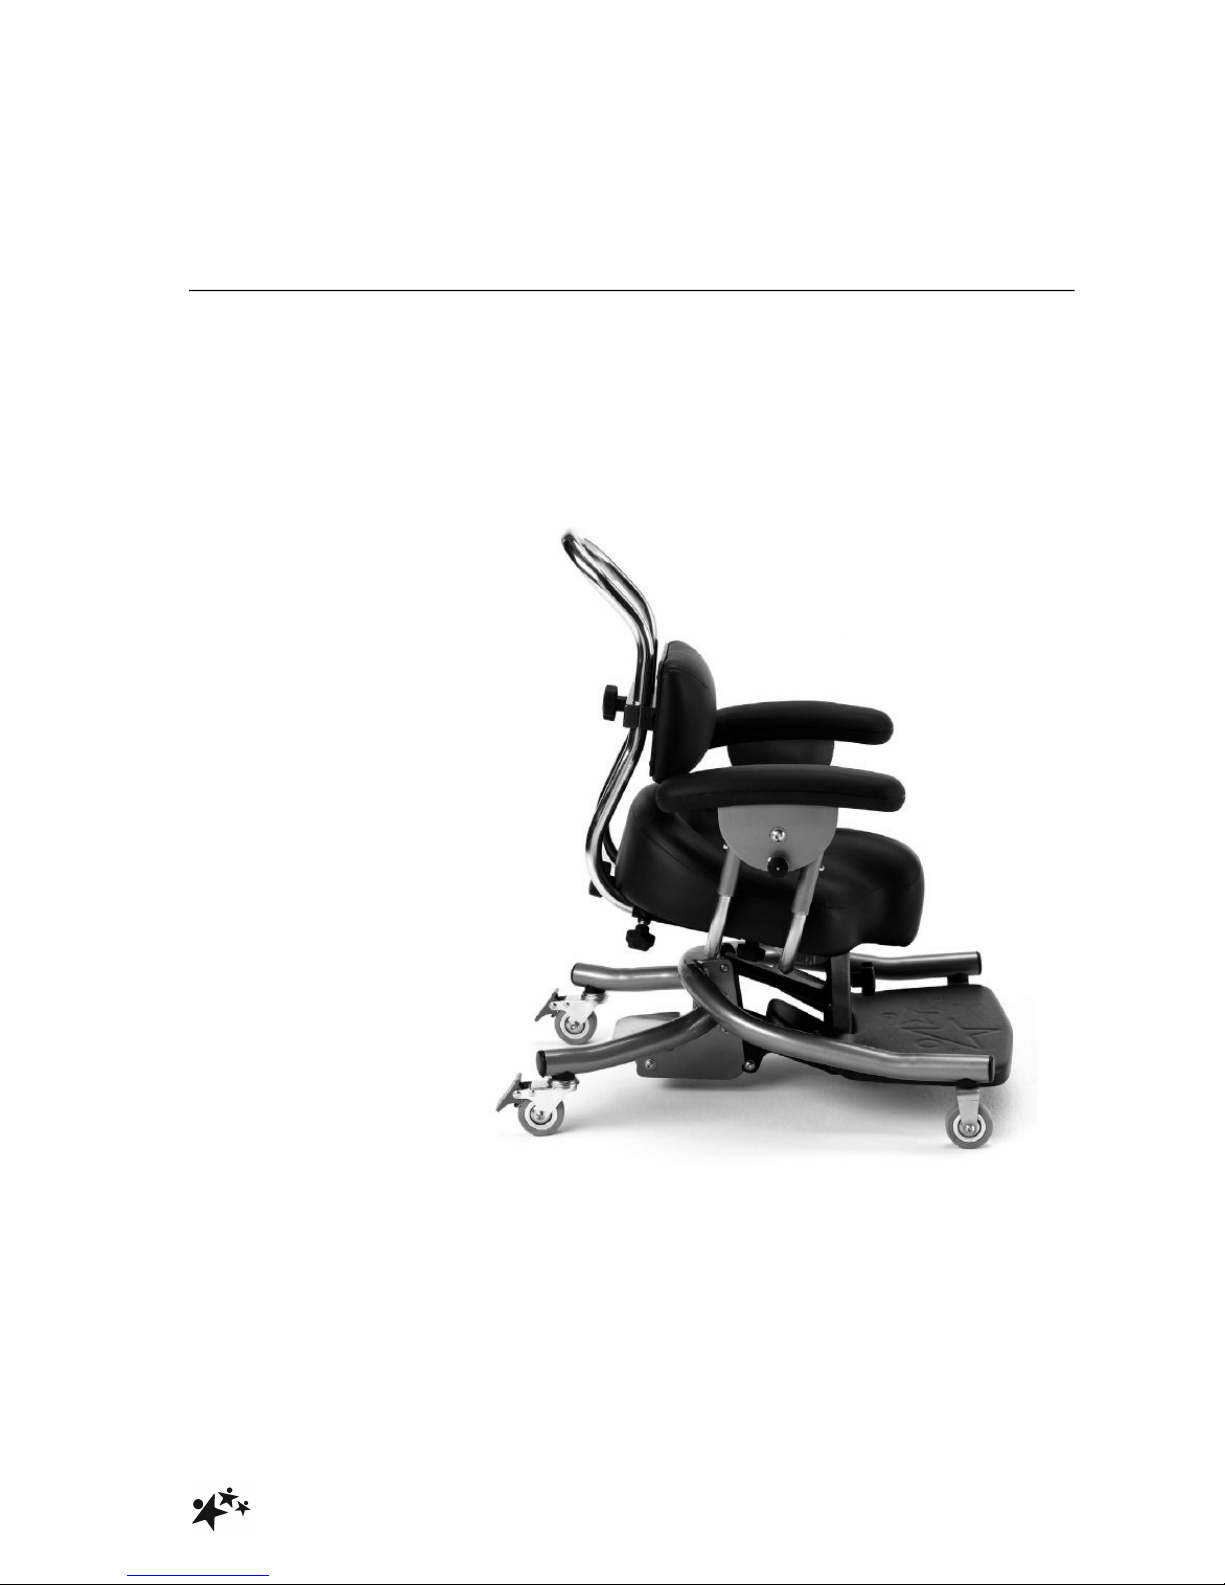
2.0 ILLUSTRATION OF YOUR CHAIR
A. Handle Extension
B. Handle
C. Handy Hook
D. Lumbar Prompt!
E. Pelvic Strap
F. Armrest
G. Personal Pocket
H. Seat
I. Footrest
J. Castor
Page 6

!
Strato
5
3.0 FOR YOUR SAFETY
STOP!
Please read these instructions CAREFULLY and THOROUGHLY.
• The user should NOT be left unattended whilst in the chair. Always ensure a
responsible therapist or carer is in attendance.
• The carer should be familiar with the methods of adjustment and have completed
all adjustments appropriately to meet the needs of the child before transferring
the child onto the chair
• Regular maintenance checks and cleaning are essential for the safe use of this
equipment (see care and maintenance section).
• Always fasten the pelvic strap and any other straps provided with the chair.
• Always lock at least two of the wheels when the chair is static!
• The castors of the Strato are designed for indoor use only, and may be damaged
if used outdoors. The Strato should not be used as a transit chair!
• Regularly check that straps and/or harnesses are not showing signs of tearing or
fraying, and that they fasten correctly.
• If any part is loose, damaged or functioning incorrectly, DO NOT use until
rectified.
• Always keep this product away from naked flames, cigarettes and sources of
heat including open fireplaces, radiators, heaters.
• DO NOT fit parts or accessories of other manufacturers to this product unless
authorised to do so in writing by Smirthwaite Ltd. Failure to follow these
instructions will not only invalidate the guarantee but could make the chair
dangerous to use. Smirthwaite Ltd will not accept liability for any injury or damage
incurred through such malpractices. Any repairs required must be carried out by
Smirthwaite Ltd authorised personnel.
• If you believe the chair or any fitted accessory to be faulty at any time, DO NOT
USE – contact Smirthwaite by telephone on +44 (0)1626 835552
• The Strato is CE marked. This certifies that it meets all relevant European safety
requirements.
Page 7

!
Strato
6
STOP!
LAP STRAPS & HARNESSES SAFETY NOTICE
Lap straps and harnesses must be appropriate and safe for the user and
the users clothing.
Lap straps and harnesses must be checked every time the chair is used to
ensure they are fitted as prescribed by the clinician, take account of the
users clothing and are tightened so that the user cannot sustain injury.
Checking the fit of lap straps and harnesses must be done with the user in
the chair and should be undertaken as soon as the users sits in the chair.
Page 8
!
Strato
7
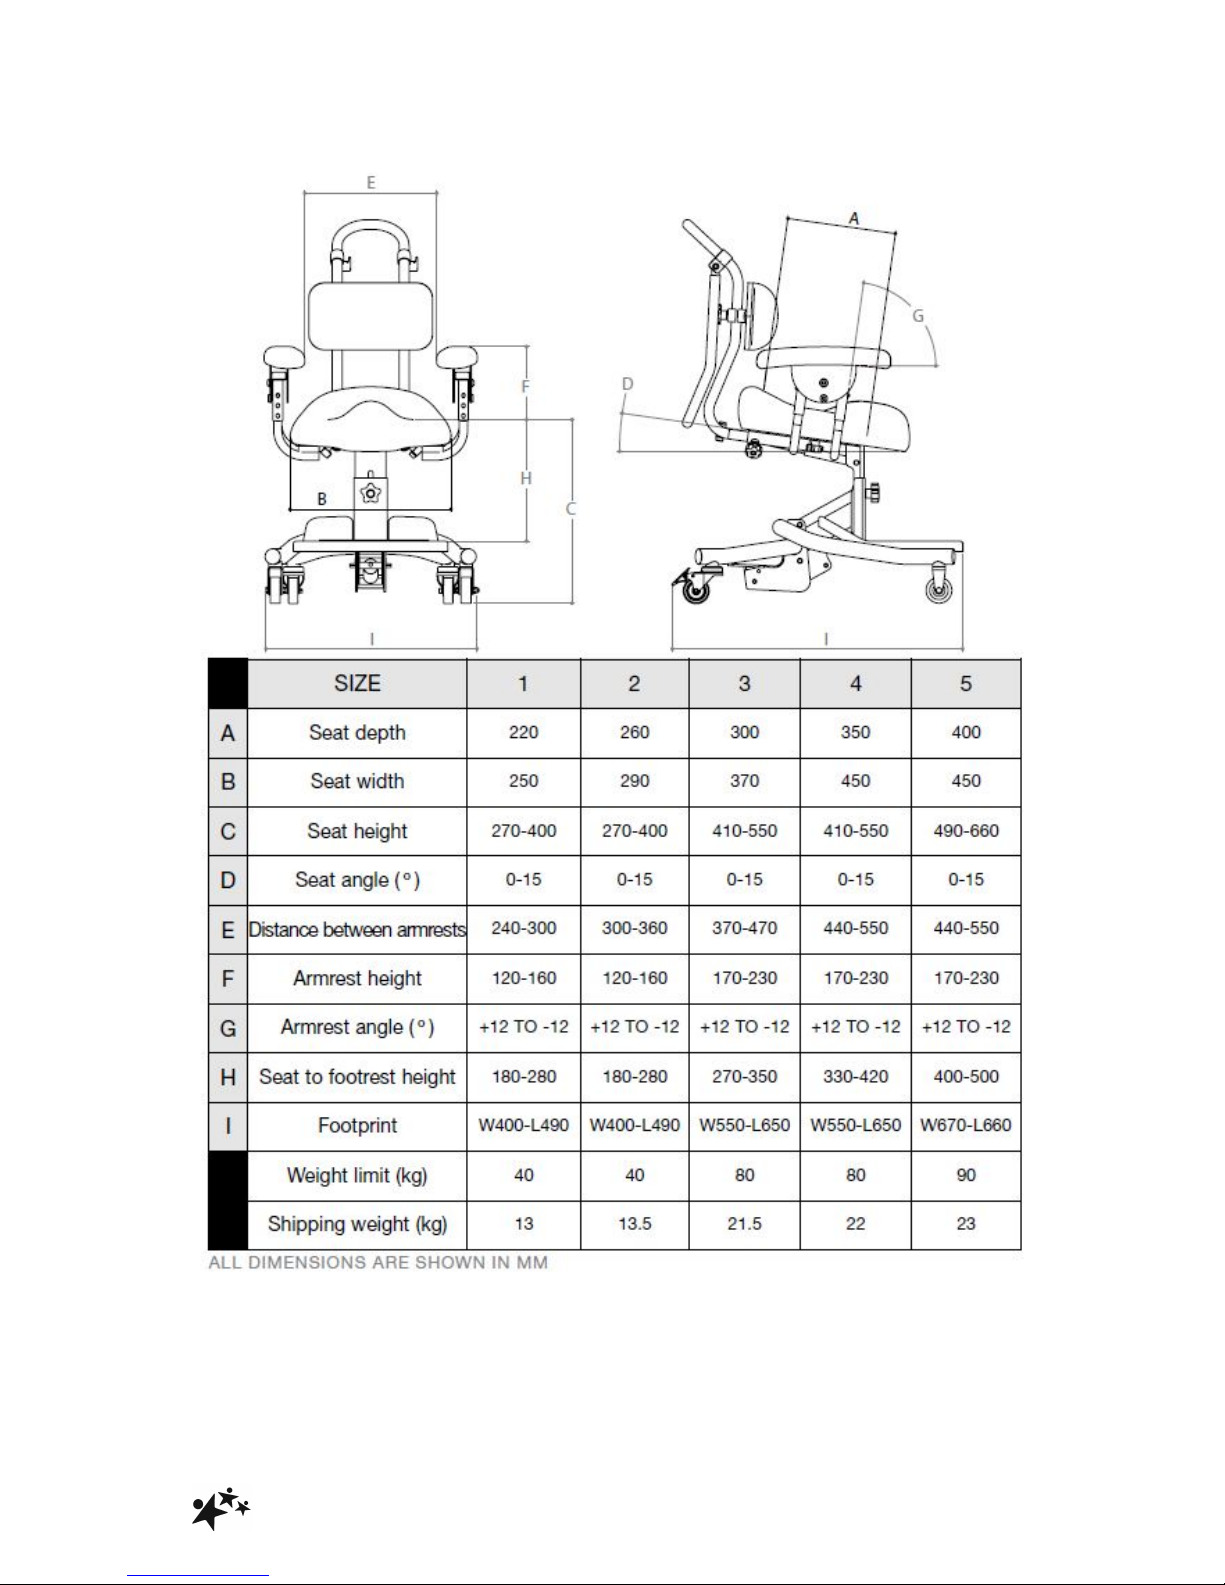
4.0 TECHNICAL DATA
Page 9
!
Strato
8
5.0 UNPACKING YOUR CHAIR
• When delivered, the Strato will be ready assembled as per your order.
• Please take note of any instructions on the packaging box when unpacking your
Strato.
• Once the chair has been carefully unpacked, please check all parts.
• Ensure that all handwheels are securely tightened and that none are missing.
• If any part is loose, damaged or functioning incorrectly, do not use until rectified.
6.0 SETTING UP AND ADJUSTING YOUR CHAIR
STOP!
If in any doubt, ALWAYS seek ADVICE.
Always turn hand wheels, levers and screws clockwise to tighten or
anti-clockwise to loosen. The chair must be fully adjusted by a
therapist or trained representative before use.
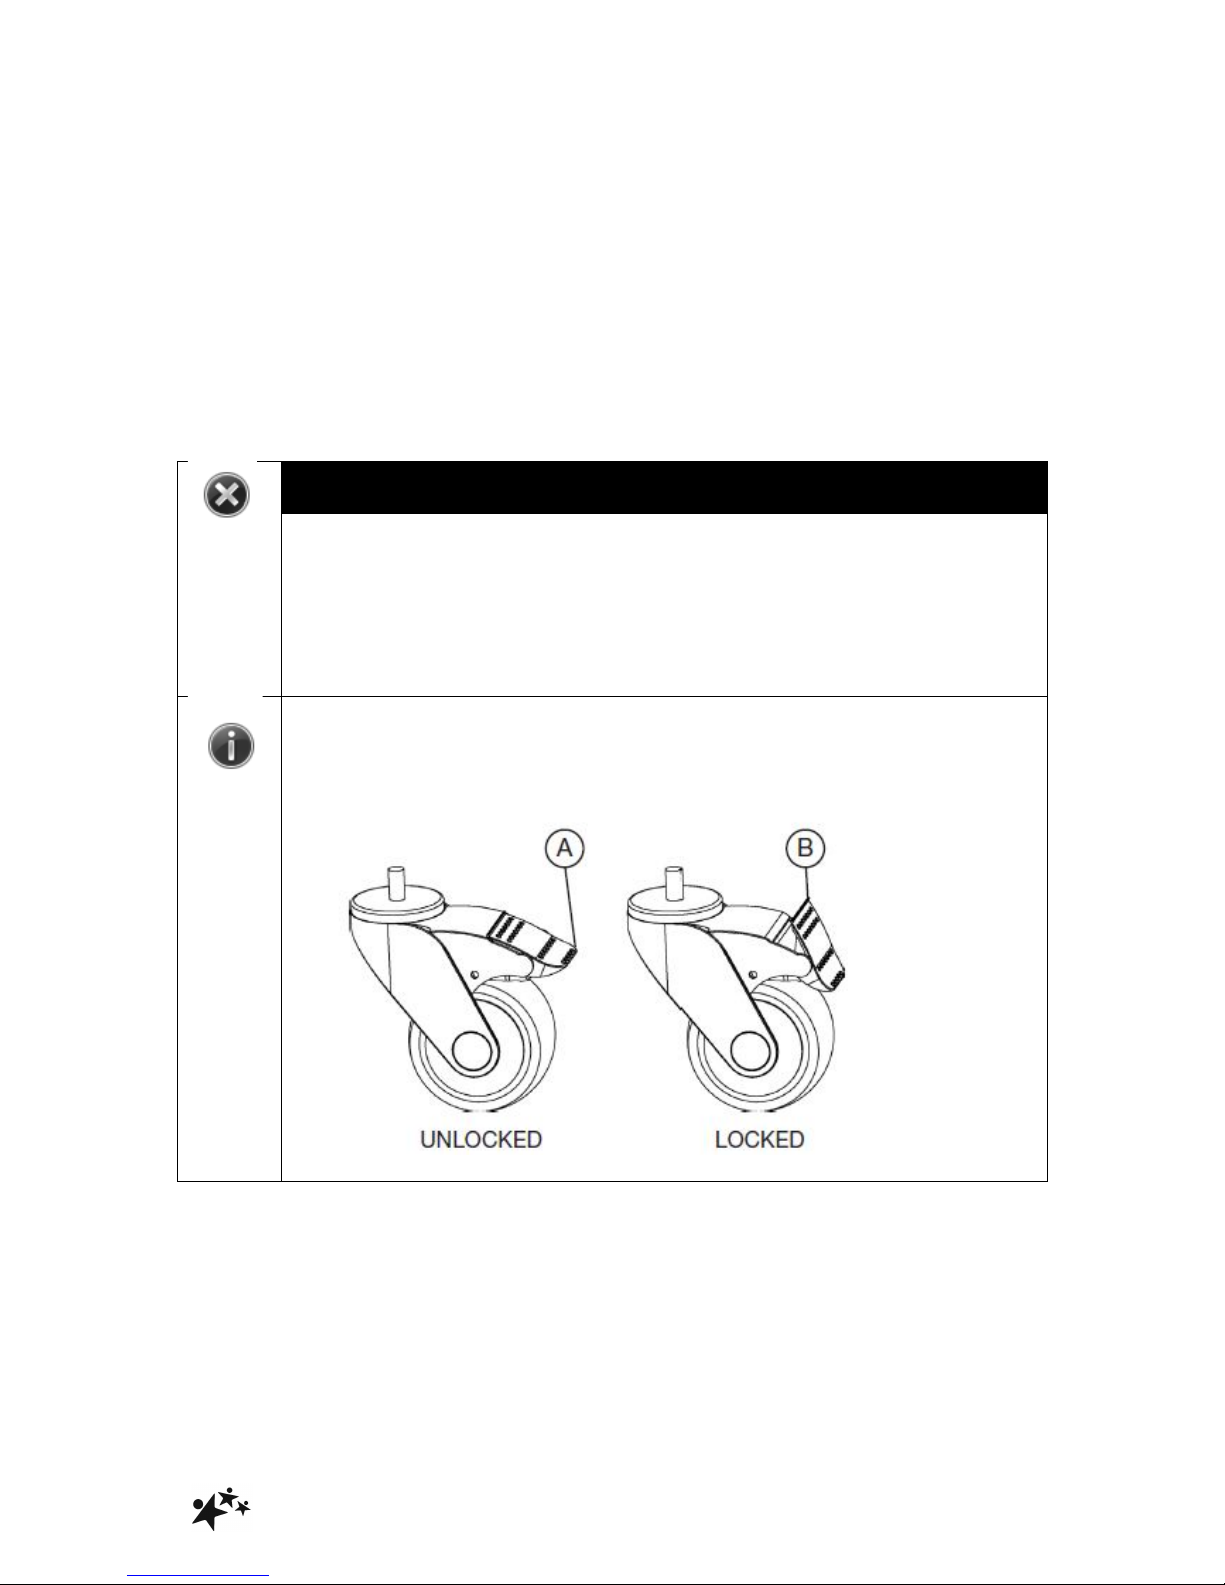
Always lock the castors when attaching items or making
adjustments. To lock, apply foot to point (A), to unlock apply foot to
point (B).
Page 10

!
Strato
9
6.1 SEAT
6.1.1 SEAT ADJUSTMENTS
• Two adjustments can be made to the seat; height and angle
• Adjustments can be made with or without the user seated in the chair!
6.1.2 HEIGHT
• Hold handle (A)
• Depress pedal (B) with foot
• Adjust seat height to required
position
• Take foot of pedal (B)!
6.1.3 ANGLE (FORWARD TILT)
• Turn handwheel (D) clockwise to
tilt the seat backward
• Turn handwheel (D) anitclockwise
to tilt the seat forward
• Use adjustment indicator (E) to
record angle of the seat
Page 11
!
Strato
10
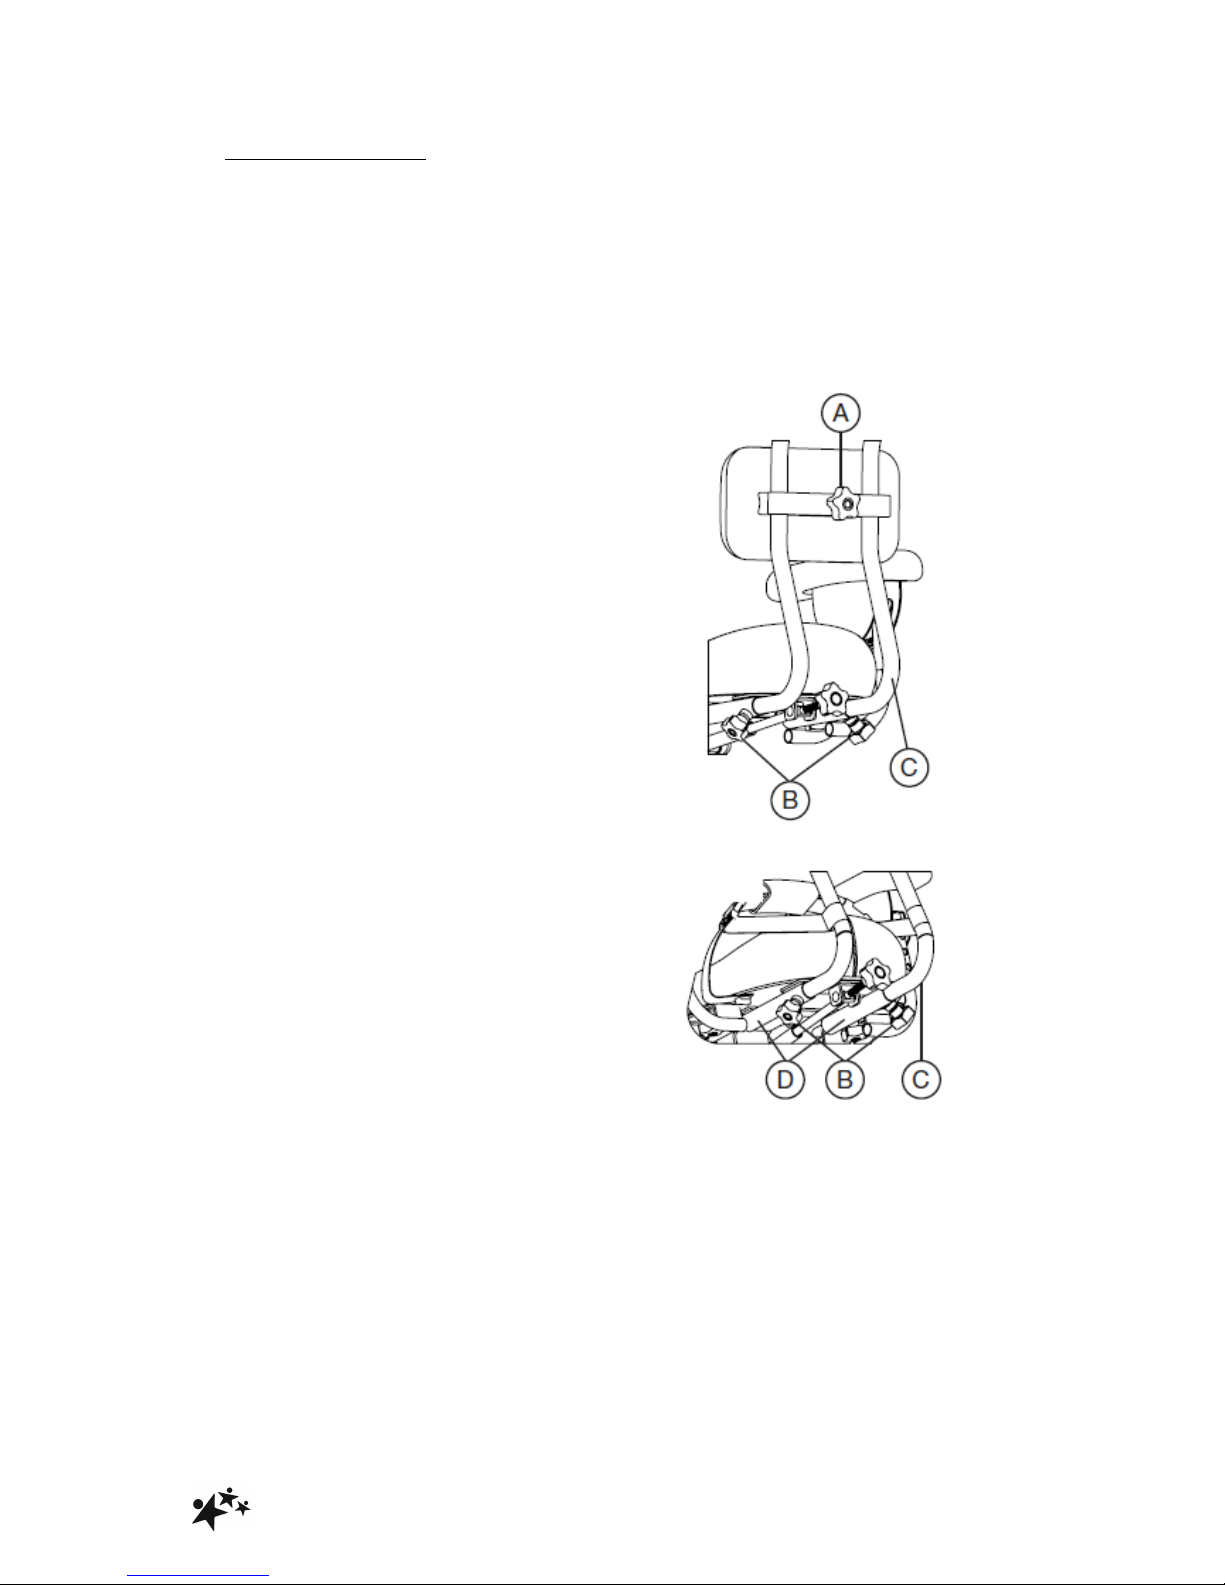
6.2 LUMBAR PROMPT
6.2.1 LUMBAR PROMPT ADJUSTMENT
• It is recommended that the lumbar prompt be correctly positioned at the user’s
lumbar region!
• Two adjustments can be made to the Lumbar Prompt; height and depth.!
6.2.2 HEIGHT
• Loosen handwheel (A)!
• Move lumbar prompt up or down
to achieve the desired position!
• Re-tighten handwheel (A)!
6.2.3 DEPTH
• Loosen handwheels (B)
• Slide lumbar prompt tubes (C) in
or out to the desired position
• Re-tighten handwheels (B)
6.2.4 LUMBAR PROMPT
ATTACHMENT
• Insert ends of lumbar prompt tube
(C) into receivers (D)
• Tighten handwheels (B)
• To detach, simply reverse the
process
Page 12
!
Strato
11
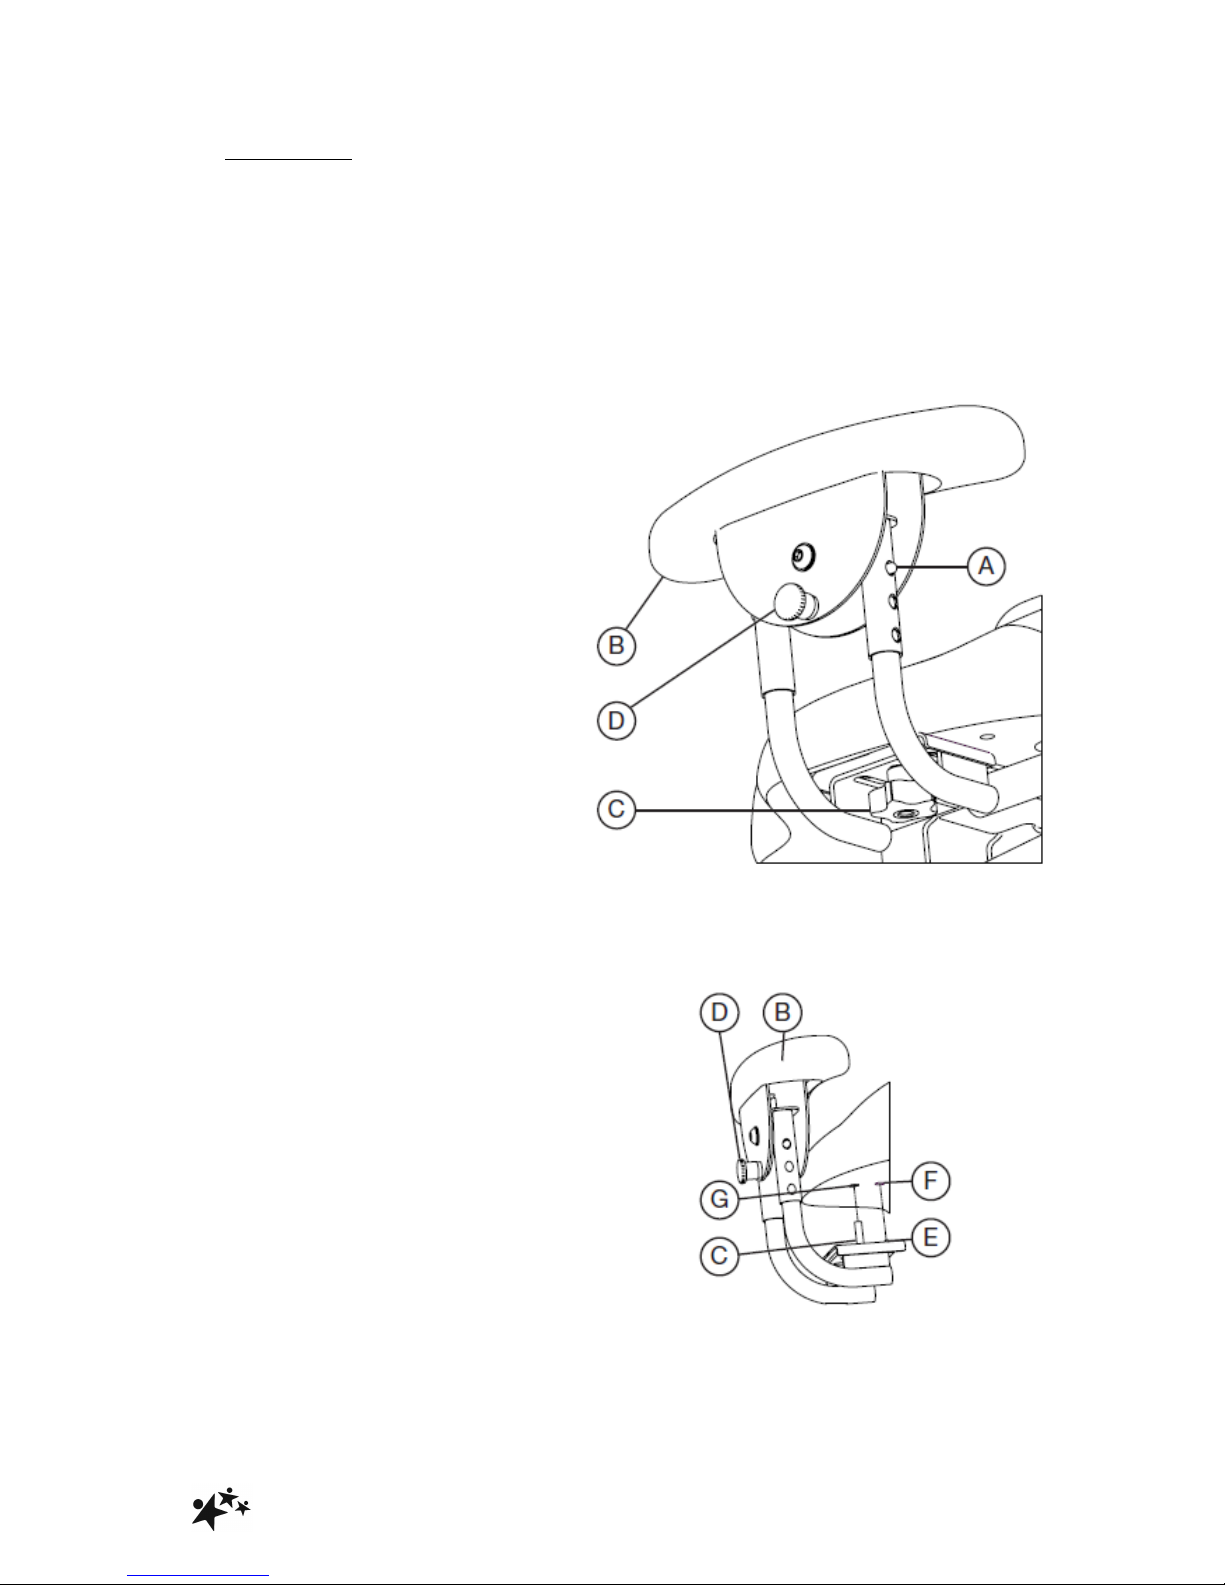
6.3 ARMRESTS
6.3.1 ARMREST ADJUSTMENT
• Three adjustments can be made to the armrests; height, width and angle.!
6.3.2 HEIGHT
• Depress spring pins (A)!
• Slide the armrest (B) up or down
to the desired position!
• Ensure both spring pins are re-
engaged!
• Repeat for the other armrest!
6.3.3 WIDTH
• Loosen handwheel (C)
• Slide armrest (B) in or out to
desired position
• Re-tighten handwheel (C)
• Repeat for the other armest
6.3.4 ANGLE
• Pull spring plunger (D)
• Tilt armrest (B) to desired position
• Release spring plunger (D)
• Ensure spring plunger (D) is re-
engaged
• Repeat process for the second
armrest
6.3.5 ARMREST ATTACHMENT
• For ease of attaching armrest, lay
chair on its side
• Hold armest (B) under seat
• Locate tab (E) in hole (F)
• Screw handwheel (C) into hole
(G)
• Tighten handwheel (C) to secure
• Repeat for second armrest
• To detach, simply reverse the
process!
Page 13

!
Strato
12
6.4 PELVIC STRAP
6.4.1 PELVIC STRAP
ADJUSTMENT
• Release either clip (A)!
• Seat user in the chair!
• Ensure user is seated with lower
back against the lumbar prompt!
• Re-connect clip (A)!
• Pull simultaneously on straps (B)!
• Maintain the position of the user
in the chair!
• Place ends of straps inside sleeve
(C)!
• Do not over tighten.!
6.4.2 PELVIC STRAP ATTACHMENT
• Remove the lumbar prompt (see 6.2)!
• Thread the lower ends of the lumbar prompt tubes (D) through the looped ends (E)
of the pelvic strap (B)!
• Slide up locating rings (I) below looped ends (E)!
• Insert ends of lumbar prompt tubes (D) into receivers (F)!
• Tighten handwheels (H)!
• Anchor the other end of the pelvic strap to the underside of the seat using
handwheels (G)!
!
Page 14

!
Strato
13
6.5 FOOTREST
6.5.1 FOOTREST ADJUSTMENTS
HEIGHT:
• Loosen handwheel (A)!
• Slide footrest (B) up or down to the desired position!
• Re-tighten handwheel (A)!
Page 15

!
Strato
14
7.0 CARE AND MAINTENANCE
IMPORTANT!
Cleaning is recommended on a regular basis
• A damp soft cloth with mild soap to clean the seat cover and base is
recommended.
• Rinse with a clean damp cloth and dry.
• A soft brush maybe used to remove severe or stubborn stains.
• DO NOT soak or immerse the chair in water.
• DO NOT use solvents, abrasives, synthetic detergents, wax polishes,
antibacterial sprays or wipes.
• Household bleaches can be used if diluted to no greater than 5% proof.
• The pelvic strap can be cleaned with a damp cloth. In cases of extreme
soiling it can be machine washed at a low temperature and MUST be drip
dried.
• ALWAYS ensure the product is dry before use.
• ALWAYS keep the product away from naked flames, cigarettes and source of
heat including open fireplaces, radiators and heaters.
• For further information please refer to MHRA or Local Authority cleaning
guidelines.
7.1 DAILY CHECKS
• Check the accessories for damage or loose connection points!
• Check all upholstery for signs of wear and tear!
• Check the castors are running freely and brakes are in working order!
• Keep all parts clean!
• Check that all clamping and positional components are working, secure and
free from damage.!
STOP!
The user should not be seated while the checks are carried out.
7.2 SERVICE INTERVAL
The Strato Chair should be serviced annually. Servicing must only be undertaken by
a Smirthwaite service engineer, or by a Smirthwaite trained representative.
Page 16

!
Strato
15
7.3 NOMINAL SERVICE LIFE
Your product has a nominal service life of 12 years, during which full post-sales
support will be available with regard to spares and servicing.
Product service life has been determined based upon the design complexity of
product, and the anticipated exposure to normal use.
Good practice dictates all Smirthwaite products have been designed and
manufactured to high levels of safety and quality, and will meet requirements of
normal use when maintained in line with our servicing recommendations.
STOP!
If the product has been out of use for an extended period of time (6
months or more) it should always be serviced prior to being
reissued.
If the product has been subjected to ‘heavy’ or ‘constant’ use, the
service should be reduced to half the recommended period.
Constant and/or heavy use is considered to be:
• Daily use above 7 hours duration
• Weekly use above 5 days duration
• Monthly use above 10 months per year
• Use by a client who is at 90% to 100% of the maximum weight limit of
the product. The maximum weight limit must NEVER be exceeded
• Use by a client who is extremely active, either voluntarily or
involuntarily
Page 17

!
Strato
16
7.4 EXTENDING NOMINAL SERVICE LIFE
At Smirthwaite we are proud to produce products that have a reputation for quality
and durability.
We believe our products have the potential to provide benefits to our clients beyond
the nominal service life documented above.
We will continue to provide full support beyond the nominal service life provided the
following conditions are met:
1. A full service schedule has been maintained. (Please refer to Page 14)
2. A full service and inspection is undertaken at the end of the nominal service
life period
3. The product is subsequently serviced annually (or biannually if under
‘heavy/constant’ use conditions)
4. Smirthwaite reserve the right to limit support where parts/components are no
longer available
7.5 DOCUMENTATION/RECORDS
• It is the responsibility of the current equipment owner to ensure the ‘Instructions
for Use’ manual and any further manuals for accessories fitted to the equipment
are handed over to the new owner at the time of exchange/sale
• It is the responsibility of the current equipment owner to ensure the service and
inspection record form is kept up to date
7.6 PRODUCT CONFIGURATION
• Smirthwaite will document and maintain a record of the original product
configuration at the time of first sale
• Smirthwaite will not be held responsible for any subsequent changes to this
configuration unless authorized to do so in writing by Smirthwaite Ltd
• It is the equipment owner’s responsibility to maintain their own records of
changes to the equipment configuration and to be able to provide such records to
subsequent owners to maintain traceability
• We recommend an inspection/service by a Smirthwaite Service Engineer (or
Smirthwaite trained engineer) whenever a significant change is made to product
configuration to ensure the product is safe to use. If in any doubt, ALWAYS
seek ADVICE
Page 18

!
Strato
17
IMPORTANT REMINDER!
DO NOT fit parts or accessories of other manufacturers to this product
unless authorized to do so in writing by Smirthwaite Ltd.
Any servicing or repairs required must be carried out by Smirthwaite Ltd
(or a Smirthwaite trained engineer).
If you believe this product to be faulty – DO NOT USE – Contact
Smirthwaite Ltd on T: +44 (0) 1626 835552
If in any doubt, ALWAYS seek ADVICE.
8.0 WARRANTY & SERVICE
Smirthwaite Ltd warrants the products detailed on your order to be free from defects
in materials and workmanship for a period of 2 years from date of delivery. If a fault
develops during the period, please call Customer Services by email or telephone
01626 835552 who will advise you on the best course of action. Possible action may
be for us to arrange to send out one of our Service Engineers, or have the goods
returned to us. Should a repair not be possible within the guarantee period we will
replace the product for new or nearest equivalent product. In the unlikely event that
we cannot repair or exchange we will refund in full.
This warranty is for the UK only. The warranty excludes faults due to accident,
neglect, misuse, not following the Instructions and normal wear and tear. This
warranty is in addition to your legal rights. Goods will only be collected from the
original delivery address.
A charge may be made where the goods cannot be repaired under the terms of the
warranty. You will be advised before this is made.
T: +44 (0)1626 835552 E: info@smirthwaite.co.uk
9.0 CONTINUOUS IMPROVEMENT
Smirthwaite Ltd are committed to continuous improvement to their product range.
Should you have any suggestions or comments please send them to our product
design department at: info@smirthwaite.co.uk
Smirthwaite Ltd reserve the right to change the specification or material without prior
notice.
For catalogues, help and further information on our products please contact us at:
Smirthwaite Ltd 16 Wentworth Road Heathfield, Devon.TQ12 6TL
T: +44 (0)1626 835552
F: +44 (0)1626 835428
E: info@smirthwaite.co.uk
W: www.smirthwaite.co.uk
Page 19

!
Strato
18
10.0 SERVICE INSPECTION
10.1 Product Information
Model:
Size:
Date of Manufacture
Serial Number
Final Inspection
10.2 Service & inspection record form:
Date
Procedure
Service
Personnel
Page 20

!
Strato
19
STRATO
INSTRUCTIONS FOR USE
Sizes 3, 4 & 5
Codes 10043, 10044 & 10045
Page 21

!
Strato
20
CONTENTS PAGE
1.0 INTRODUCTION 21
2.0 ILLUSTRATION OF YOUR CHAIR 22
3.0 FOR YOUR SAFETY 23
4.0 TECHNICAL DATA 24
5.0 UNPACKING YOUR CHAIR 25
6.0 SETTING UP AND ADJUSTING YOUR CHAIR 25
7.0 CARE AND MAINTENANCE 33
8.0 WARRANTY & SERVICE 36
9.0 CONTINUOUS IMPROVEMENT 36
10.0 SERVICE INSPECTION 37
1.0 INTRODUCTION
Thank you for choosing the Smirthwaite Strato School Chair.
Strato is an innovative school chair designed for children who are able to get in and
out of their chair independently but require minimal to moderate postural support
when seated. The uniquely contoured seat tilts forward to encourage an extremely
comfortable anterior tilt of the pelvis for improved stability as well as trunk and lower
limb alignment. The Strato aims to enhance the user’s function and cognitive
development.
IMPORTANT!
These instructions should be read by all therapists and carers using
the equipment and should be retained for future reference. The
product should always be used under adult supervision.
Any incorrect use of the product and failure to follow the instructions
may put the user at risk or impede the function. If you have any
queries using this product or wish for further copies, please do not
hesitate to contact Customer Service department on
T: +44 (0) 1626 835552.
This product has been designed and manufactured specifically and
solely for use by clients with special needs.
Page 22

!
Strato
21
2.0 ILLUSTRATION OF YOUR CHAIR
A. Handle
B. Handy Hook
C. Lumbar Prompt
D. Pelvic Strap!
E. Armrest
F. Pocket (accessory)
G. Seat
H. Lever
I. Footrest
J. Footplate
K. Castor
Page 23

!
Strato
22
3.0 FOR YOUR SAFETY
STOP!
Please read these instructions CAREFULLY and THOROUGHLY.
• The user should NOT be left unattended whilst in the chair. Always ensure a
responsible therapist or carer is in attendance.
• The carer should be familiar with the methods of adjustment and have completed
all adjustments appropriately to meet the needs of the child before transferring
the child onto the chair
• Regular maintenance checks and cleaning are essential for the safe use of this
equipment (see care and maintenance section).
• Always fasten the pelvic strap and any other straps provided with the chair.
• Always lock at least two of the wheels when the chair is static!
• The castors of the Strato are designed for indoor use only, and may be damaged
if used outdoors. The Strato should not be used as a transit chair!
• Regularly check that straps and/or harnesses are not showing signs of tearing or
fraying, and that they fasten correctly.
• If any part is loose, damaged or functioning incorrectly, DO NOT use until
rectified.
• Always keep this product away from naked flames, cigarettes and sources of
heat including open fireplaces, radiators, heaters.
• DO NOT fit parts or accessories of other manufacturers to this product unless
authorised to do so in writing by Smirthwaite Ltd. Failure to follow these
instructions will not only invalidate the guarantee but could make the chair
dangerous to use. Smirthwaite Ltd will not accept liability for any injury or damage
incurred through such malpractices. Any repairs required must be carried out by
Smirthwaite Ltd authorised personnel.
• If you believe the chair or any fitted accessory to be faulty at any time, DO NOT
USE – contact Smirthwaite by telephone on +44 (0)1626 835552
Page 24

!
Strato
23
• The Strato is CE marked. This certifies that it meets all relevant European safety
requirements.
STOP!
LAP STRAPS & HARNESSES SAFETY NOTICE
Lap straps and harnesses must be appropriate and safe for the user and
the users clothing.
Lap straps and harnesses must be checked every time the chair is used to
ensure they are fitted as prescribed by the clinician, take account of the
users clothing and are tightened so that the user cannot sustain injury.
Checking the fit of lap straps and harnesses must be done with the user in
the chair and should be undertaken as soon as the users sits in the chair.
Page 25

!
Strato
24
4.0 TECHNICAL DATA
Page 26

!
Strato
25
5.0 UNPACKING YOUR CHAIR
• When delivered, the Strato will be ready assembled as per your order.
• Please take note of any instructions on the packaging box when unpacking your
Strato.
• Once the chair has been carefully unpacked, please check all parts.
• Ensure that all handwheels are securely tightened and that none are missing.
• If any part is loose, damaged or functioning incorrectly, do not use until rectified.
6.0 SETTING UP AND ADJUSTING YOUR CHAIR
STOP!
If in any doubt, ALWAYS seek ADVICE.
Always turn hand wheels, levers and screws clockwise to tighten or
anti-clockwise to loosen. The chair must be fully adjusted by a
therapist or trained representative before use.
IMPORTANT!
Always lock the castors when attaching items or making adjustments.
To lock, apply foot to point (A), to unlock apply foot to point (B).
Page 27

!
Strato
26
6.1 SEAT
6.1.1 SEAT ADJUSTMENTS
• Two adjustments can be made to the seat; height and angle!
6.1.2 HEIGHT
To raise the seat:
• Flip up the footrest and ensure users
feet are placed firmly on the floor!
• Ease the user’s weight from the seat!
• Lift lever (A)!
• Allow seat to rise to desired position!
• Release lever (A) to lock!
• Lower user’s weight back to the seat!
To lower the seat:
• Reduce body weight from the seat!
• Lift lever (A)!
• Gently allow body weight to lower seat to
desired position!
• Release lever (A) to lock!
6.1.3 ANGLE (TILT FORWARD)
NOTE: The user should NOT be seated in
chair when adjusting the angle. Please
keep hands clear of area (B). Ensure
memory stop is at maximum setting.
• Hold handle (C)!
• Loosen lever lock (D)!
• Raise or lower seat to desired position!
• Re-tighten lever lock (D)!
Page 28

!
Strato
27
6.1.4 MEMORY STOP
!
• Loosen handwheel (E)!
• Slide the memory stop (F) up to the
clamp (G)!
• Re-tighten handwheel (E)!
6.2 LUMBAR PROMPT
6.2.1 LUMBAR PROMPT ADJUSTMENT
• It is recommended that the lumbar prompt be correctly positioned at the user’s
lumbar region!
• Two adjustments can be made to the Lumbar Prompt; height and depth.!
6.2.2 HEIGHT
• Loosen handwheel (A)!
• Move lumbar prompt up or down
to achieve the desired position!
• Re-tighten handwheel (A)!
6.2.3 DEPTH
• Loosen handwheels (B)
• Slide lumbar prompt tubes (C) in
or out to the desired position
• Re-tighten handwheels (B)
6.2.4 LUMBAR PROMPT
ATTACHMENT
• Insert ends of lumbar prompt tube
(C) into receivers (D)
• Tighten handwheels (B)
• To detach, simply reverse the
process
Page 29

!
Strato
28
6.3 ARMRESTS
6.3.1 ARMREST ADJUSTMENT
• Three adjustments can be made to the armrests; height, width and angle.!
6.3.2 HEIGHT
• Depress spring pins (F)!
• Slide the armrest (G) up or down
to the desired position!
• Ensure both spring pins are re-
engaged!
• Repeat for the other armrest!
6.3.3 WIDTH
• Loosen handwheel (A)
• Slide armrest (G) in or out to
desired position
• Re-tighten handwheel (A)
• Repeat for the other armest
6.3.4 ANGLE
• Pull spring plunger (E)
• Tilt armrest to desired position
• Release spring plunger (E)
• Ensure spring plunger is re-
engaged
• Repeat process for the second
armrest
6.3.5 ARMREST ATTACHMENT
• For ease of attaching armrest, lay
chair on its side
• Hold armest (G) under seat
• Locate pins (C) in hole (B)
• Screw handwheel (A) into hole
(D)
• Tighten handwheel (A) to secure
• Repeat for second armrest
• To detach, simply reverse the
process!
Page 30

!
Strato
29
6.4 PELVIC STRAP
6.4.1 PELVIC STRAP
ADJUSTMENT
• Release either clip (F)!
• Seat user in the chair!
• Ensure user is seated with lower
back against the lumbar prompt!
• Re-connect clip (F)!
• Pull simultaneously on straps (D)!
• Maintain the position of the user
in the chair!
• Place ends of straps inside sleeve
(E)!
• Do not over tighten.!
6.4.2 PELVIC STRAP ATTACHMENT
• Remove the lumbar prompt (see 6.2)!
• Thread the lower ends of the lumbar prompt tubes (D) through the looped ends (B)
of the pelvic strap (A)!
• Slide up locating rings (C) below looped ends (B)!
• Insert ends of lumbar prompt tubes (D) into receivers (E)!
• Tighten handwheels (F)!
• Anchor the other end of the pelvic strap to the underside of the seat using
handwheels (G)!
!
Page 31

!
Strato
30
6.5 FOOTREST ADJUSTMENTS
6.5.1 HEIGHT:
• Loosen handwheels (B)!
• Depress pins (D) if needed!
• Slide footrest up or down to the
desired position!
• Re-tighten handwheel (B)!
The height adjustment is fitted with a
maximum height stop. When the footrest
is extended downwards to its maximum,
two pins locate into holes in the rear of the
tubes.
6.5.2 DEPTH:
• Loosen handwheel (A)!
• Slide footrest backwards or forwards to
the desired position!
• Re-tighten handwheel (A)!
6.5.3 TRANSFER:
• For ease of transfer, the footplates can
be flipped up!
• Simply lift inside of footplate (C) to
upper stop!
6.5.4 FOOTREST ATTACHMENT:
• For ease of attachment, lay chair on
back!
• Hold footrest under seat!
• Locate pins (E) with holes (F)!
• Screw handwheel (A) into hole (G)!
• Tighten handwheel (A) to secure!
• To detach, reverse this process!
Page 32

!
Strato
31
6.6 BRAKING SYSTEM (IF FITTED)
6.6.1 ILLUSTRATION OF YOUR STRATO USER OPERATED BRAKES KIT
A. Lever knob
B. Lever
C. Lever box (can be positioned left or right on armrest to suit client needs)
D. Adjustor!
E. Balance box
6.6.2 USER OPERATION
• To apply the brakes, simply push the
lever (C) downwards.
• The brakes can then be locked on by
parking the lever – simply pull the
lever toward the seat cushion when it
has reached its fully downward
position.
• To release the brakes, push the lever
(C) outward to release from its parked
position.
• The lever is sprung loaded; once
released it will automatically return to
its top position.!
ABC
DEC
Page 33

!
Strato
32
6.6.3 CARER OPERATION
• The product has been designed to permit any of the castors to be independently
applied or released by a carer, using each individual castor foot pedal.
• See diagram above for castor brake information
• If the user is having difficulty operating the brake system, check that none of the
castors have had brakes applied directly.!
6.6.4 DAILY CHECKS
• Check the braking system for damage or wear/tear.!
• Operate the brake system, and check for sufficient hold and release!
• Check each castor independently, operating each individual castor brake!
STOP!
Over a prolonged period of use, it is likely the cable system will settle
and require occasional adjustment.
On the lever box there is an adjustor (D), which can be rotated to
tighten the mechanism.
Please contact the factory, or your local advisor, if you are in any
doubt.
D
Page 34

!
Strato
33
7.0 CARE AND MAINTENANCE
IMPORTANT!
Cleaning is recommended on a regular basis
• A damp soft cloth with mild soap to clean the seat cover and base is
recommended.
• Rinse with a clean damp cloth and dry.
• A soft brush maybe used to remove severe or stubborn stains.
• DO NOT soak or immerse the chair in water.
• DO NOT use solvents, abrasives, synthetic detergents, wax polishes,
antibacterial sprays or wipes.
• Household bleaches can be used if diluted to no greater than 5% proof.
• The pelvic strap can be cleaned with a damp cloth. In cases of extreme
soiling it can be machine washed at a low temperature and MUST be drip
dried.
• ALWAYS ensure the product is dry before use.
• ALWAYS keep the product away from naked flames, cigarettes and source of
heat including open fireplaces, radiators and heaters.
• For further information please refer to MHRA or Local Authority cleaning
guidelines.
7.1 DAILY CHECKS
• Check the accessories for damage or loose connection points!
• Check all upholstery for signs of wear and tear!
• Check the castors are running freely and brakes are in working order!
• Keep all parts clean!
• Check that all clamping and positional components are working, secure and
free from damage.!
STOP!
The user should not be seated while the checks are carried out.
7.2 SERVICE INTERVAL
The Strato Chair should be serviced annually. Servicing must only be undertaken by
a Smirthwaite service engineer, or by a Smirthwaite trained representative.
Page 35

!
Strato
34
7.3 NOMINAL SERVICE LIFE
Your product has a nominal service life of 12 years, during which full post-sales
support will be available with regard to spares and servicing.
Product service life has been determined based upon the design complexity of
product, and the anticipated exposure to normal use.
Good practice dictates all Smirthwaite products have been designed and
manufactured to high levels of safety and quality, and will meet requirements of
normal use when maintained in line with our servicing recommendations.
STOP!
If the product has been out of use for an extended period of time (6
months or more) it should always be serviced prior to being
reissued.
If the product has been subjected to ‘heavy’ or ‘constant’ use, the
service should be reduced to half the recommended period.
Constant and/or heavy use is considered to be:
• Daily use above 7 hours duration
• Weekly use above 5 days duration
• Monthly use above 10 months per year
• Use by a client who is at 90% to 100% of the maximum weight limit of
the product. The maximum weight limit must NEVER be exceeded
• Use by a client who is extremely active, either voluntarily or
involuntarily
Page 36

!
Strato
35
7.4 EXTENDING NOMINAL SERVICE LIFE
At Smirthwaite we are proud to produce products that have a reputation for quality
and durability.
We believe our products have the potential to provide benefits to our clients beyond
the nominal service life documented above.
We will continue to provide full support beyond the nominal service life provided the
following conditions are met:
5. A full service schedule has been maintained.
6. A full service and inspection is undertaken at the end of the nominal service
life period
7. The product is subsequently serviced annually (or biannually if under
‘heavy/constant’ use conditions)
8. Smirthwaite reserve the right to limit support where parts/components are no
longer available
7.5 DOCUMENTATION/RECORDS
• It is the responsibility of the current equipment owner to ensure the ‘Instructions
for Use’ manual and any further manuals for accessories fitted to the equipment
are handed over to the new owner at the time of exchange/sale
• It is the responsibility of the current equipment owner to ensure the service and
inspection record form is kept up to date
7.6 PRODUCT CONFIGURATION
• Smirthwaite will document and maintain a record of the original product
configuration at the time of first sale
• Smirthwaite will not be held responsible for any subsequent changes to this
configuration unless authorized to do so in writing by Smirthwaite Ltd
• It is the equipment owner’s responsibility to maintain their own records of
changes to the equipment configuration and to be able to provide such records to
subsequent owners to maintain traceability
• We recommend an inspection/service by a Smirthwaite Service Engineer (or
Smirthwaite trained engineer) whenever a significant change is made to product
configuration to ensure the product is safe to use. If in any doubt, ALWAYS
seek ADVICE
Page 37

!
Strato
36
IMPORTANT REMINDER!
DO NOT fit parts or accessories of other manufacturers to this product
unless authorized to do so in writing by Smirthwaite Ltd.
Any servicing or repairs required must be carried out by Smirthwaite Ltd
(or a Smirthwaite trained engineer).
If you believe this product to be faulty – DO NOT USE – Contact
Smirthwaite Ltd on T: +44 (0) 1626 835552
If in any doubt, ALWAYS seek ADVICE.
8.0 WARRANTY & SERVICE
Smirthwaite Ltd warrants the products detailed on your order to be free from defects
in materials and workmanship for a period of 2 years from date of delivery. If a fault
develops during the period, please call Customer Services by email or telephone
01626 835552 who will advise you on the best course of action. Possible action may
be for us to arrange to send out one of our Service Engineers, or have the goods
returned to us. Should a repair not be possible within the guarantee period we will
replace the product for new or nearest equivalent product. In the unlikely event that
we cannot repair or exchange we will refund in full.
This warranty is for the UK only. The warranty excludes faults due to accident,
neglect, misuse, not following the Instructions and normal wear and tear. This
warranty is in addition to your legal rights. Goods will only be collected from the
original delivery address.
A charge may be made where the goods cannot be repaired under the terms of the
warranty. You will be advised before this is made.
T: +44 (0)1626 835552 E: info@smirthwaite.co.uk
9.0 CONTINUOUS IMPROVEMENT
Smirthwaite Ltd are committed to continuous improvement to their product range.
Should you have any suggestions or comments please send them to our product
design department at: info@smirthwaite.co.uk
Smirthwaite Ltd reserve the right to change the specification or material without prior
notice.
For catalogues, help and further information on our products please contact us at:
Smirthwaite Ltd 16 Wentworth Road Heathfield, Devon.TQ12 6TL
T: +44 (0)1626 835552
F: +44 (0)1626 835428
E: info@smirthwaite.co.uk
W: www.smirthwaite.co.uk
Page 38

!
Strato
37
10.0 SERVICE INSPECTION
10.1 Product Information
Model:
Size:
Date of Manufacture
Serial Number
Final Inspection
10.2 Service & inspection record form:
Date
Procedure
Service
Personnel
Page 39

!
Strato
38
NOTES
Page 40

!
Strato
39
Smirthwaite Ltd, 16 Wentworth Road, Heathfield, Newton Abbot, Devon.TQ12 6TL
T: +44 (0) 1626 835552 F: +44 (0) 1626 835428 E: info@smirthwaite.co.uk www.smirthwaite.co.uk
 Loading...