

Page 1

INTEGRATED WASHER DRYER
INSTRUCTION MANUAL GB
1
Page 2

2
GB
Contents
1. The new washing sys tem 3
2. Safety warnings 4
3. Installation instruct ions 6
4. Description of controls 12
5. Washing instruct ions 17
6. Drying instructions 22
7. Cleaning and maintenance 26
8. Troubleshooting 28
9. Control panel symbols 30
This appliance is marked according to the European directiv e 2002/96/EC on Wast e Electrical and Electronic Equipment
WEEE).
By ensuring this product is disposed of correctly, you will help prev ent potential negative consequences f or the environ-
ment and human health, which could otherwise be caused by inappropriate waste handling of this product.
The symbol
be treated as household waste. Instead it shall be handed over to the applicable collection point for the recycling of electrical and electronic equipment.
Disposal must be carried out in accordance with local environmental regulations f or wast e disposal.
For more detailed inf ormation about treatment, rec overy and recyc ling of this product, please contact y our local city off ice, y our household waste disposal serv ice or the shop where y ou purchased the product.
on the product, or on the docum ents accompany ing t he product, indicates that this appliance may not
Page 3

1. THE NEW W ASHING SYSTEM
This new washer dryer is the outcome of years of research.
The leading-edge design and the quality of the production processes used to manufacture this product ensure it will give you many years of excellent service.
Its concept satisfies all current and future washing and drying requirements.
Its low water, pow er and detergent consumption help protect the environment
and reduce running costs to a minimum.
Water and pow er consumption has been reduced in all programmes.
These results were achieved by means of a special washing system valid for all
programmes and all fabrics.
The drum is fitted with three external vanes that keep the water constantly circulating,
thereby offering intensive and uniform washing whilst consuming less water.
This ensures your laundry is washed and treated with utmost care.
The new washing system is so effective that normally dirty laundr y can even be
cleaned without a pre-wash cycle.
Washing times have also been reduced.
Pre-washing is only recommended for very dirty laundry.
Please read the operating instructions with care in order to take full advantage of all
the features offered by this washer dryer.
Warning!
Please read all the instructions contained in this manual in order to understand how
to operate this appliance correctly and safely.
This manual is divided into paragraphs which provide a step-by-step description of
all the functions of the appliance. The instructions are easy to understand and are
accompanied by detailed illustrations.
This manual provides a quick and easy reference for answering all your questions
concerning the use of your new washer dryer.
Keep this manual near the machine for future consultation.
When selling or moving the appliance, make sure this manual remains with the
machine.
GB
3
Page 4

2. SAFETY WARNINGS
Attention!
These w ar nings are given for safety r easons.
Please re ad them carefully before installing and using the appliance.
This manual forms an integral part of the appliance and must therefore be kept intact together with the
machine. Before using the appliance, carefully read all the instructions contained in this manual. Instal-
lation must be performed by a qualified technician in compliance with the regulations in force. It has
been designed for domestic use and complies with EEC Directives 72/23, 89/336 (including 92/31 and
93/68) currently in force. The appliance is designed for the following purpose: washing and drying linen
or fabrics declared by their manufacturers to be suitable for machine washing by means of an appro-
priate symbol. Any other use shall be considered improper. The manufacturer declines all respon-
sibility for uses other than those described above.
The name plate featuring the technical data, serial number and markings is visibly positioned on the
inner edge of the door. This name plate must never be removed.
Do not leaving discarded packaging materials unsupervised within the home. Separate the various
packaging materials and take them to the nearest sorted waste collection centre.
The ele ctrical and plumbing w ork require to install the appliance may only be performed by
qualified technicians.
The appliance must be provided with an earth connection in accordance with the electrical safety regulations in force. The manufacturer declines all responsibility for damage to persons or property
resulting from failure to earth the appliance or from a defective earth connection.
If the appliance is not connected to the electrical power supply by means of a plug, it is necessary to
install an isolation switch with a contact opening gap of at least 3 mm.
The plug on the power cord and the corresponding socket must be of the same type and must conform
to the regulations in force. Check that the voltage and frequency of the electrical power supply match
the ratings on the name plate. Avoid using adaptors or shunt connections. Never unplug the appliance
by pulling the power cord.
The machine is only disconnected from the electrical pow er supply if the plug has been removed from the socket or if the general switch has been turned off. After installation, the plug
must remain accessible.
The appliance must always be connected to the water supply with new hoses (supplied with the appliance). Old hoses must never be reused.
Make sure the appliance does not lie on the power cord.
Before use, make sure the tub assembly has been released (see instructions).
If the tub assembly has not been released, it may damage the appliance or adjacent furniture or appli-
ances during the spin cycle.
The washer dryer must never be used in vehicles, on ships or planes, or in special environmental conditions such as explosive or corrosive (powder, vapour and gas) atmospheres or near explosive and/or
corrosive liquids.
Do not install the washer dryer in areas subject to frosting. Frozen pipes may burst under pressure.
Make sure that the drain hose is securely attached to the basin and cannot move.
If it is not securely fitted, the repulsive force of the water may detach it from the basin and cause flood-
ing.
When attaching the hose to the basin, make sure the w ater drains away rapidly and does not fill
the basin up.
Do not overload the appliance.
Never use detergents containing solvents or chemicals.
These may damage the machine and form poisonous fumes.
They may also catch fire and explode.
GB
4
Page 5

Do not wash petrol-soaked garments in the washer dryer. Make sure there are no inflammable items
(e.g.: lighters, matches, etc.) in pockets before washing.
If volatile fluids have been used to clean garments, make sure that the substances have been removed
before loading them in the washing machine.
Before loading garments for washing, make sure the pockets are empty, the buttons securely fixed and
the zips closed.
Do not wash frayed or torn garments.
The glass of the door will heat up considerably when washing at elevated temperatures.
Make sure all the w ater has drained away before you open the door.
If water is present, only open the door after draining it. If in doubt, read the instruction manual.
The water in the machine is not drinkable!
Swallowing washing machine detergents can cause lesions in your mouth and throat.
Before removing laundry from the washer dryer, make sure the drum has stopped moving.
Always switch off the appliance after use to avoid wasting electricity.
Leave the door ajar between one wash and the next in order to keep the gasket in good condition.
Prolonged inactivity.
If the machine is left inactive for a long period: disconnect the machine from the electricity and water
supplies and leave the door ajar to prevent bad smells from forming.
In the event of a fault, nev er attempt to re pa ir the machine yourself. Disconnect the appliance from
the electri c al po wer suppl y an d sh u t of f th e wate r tap . The n call a qu ali fi ed techni ci an. Re pa i rs ma y
only be performed by qualified technicians.
Repairs performed by unqualified people may be hazardous for users.
Obsolete appliances must be rendered unusable: make sure that the door cannot be closed (to
prev ent children from getting trapped inside w hile playing and risking their liv es) and cut off
the powe r cord after unplugging it.
The appliance must then be taken to a sorted waste collection centre.
This appliance is intended for use by adults.
Do not allow children to tamper with the controls or play with the washer dryer.
Do not allow children to approach the appliance while it is working.
Keep children away from the appliance.
Small animals or children may get inside the washer dryer.
Always check the inside of the drum before use and do not allow children to play w ith the appli-
ance.
Packaging materials (plastic bags, polystyrene, metal profiles, etc.) must not be left within reach of
children.
Keep children away from the machine when the door or detergent tray is open; the appliance may contain residues of detergent which can cause irreversible damage to the eyes, mouth and throat, as well
as possible death by suffocation.
Important !
This appliance is easy to use.
In order to obtain the best results, however, read this manual with care and follow all the instructions
before starting.
The manual gives instructions and useful advice on how to install, use and service the appliance correctly.
The manufacture declines all responsibility f or damage to persons or property resulting
from failure to observe the above precautions, from tampering w ith even just a single com-
ponent of the appliance, or f rom the use of unoriginal spare parts.
GB
5
Page 6
3. INSTALLATION INSTRUCTIONS
Important !
The appliance must be installed by a specialised technician according to curren t regulation s.
This washer dryer is very heavy. Take care when lifting it.
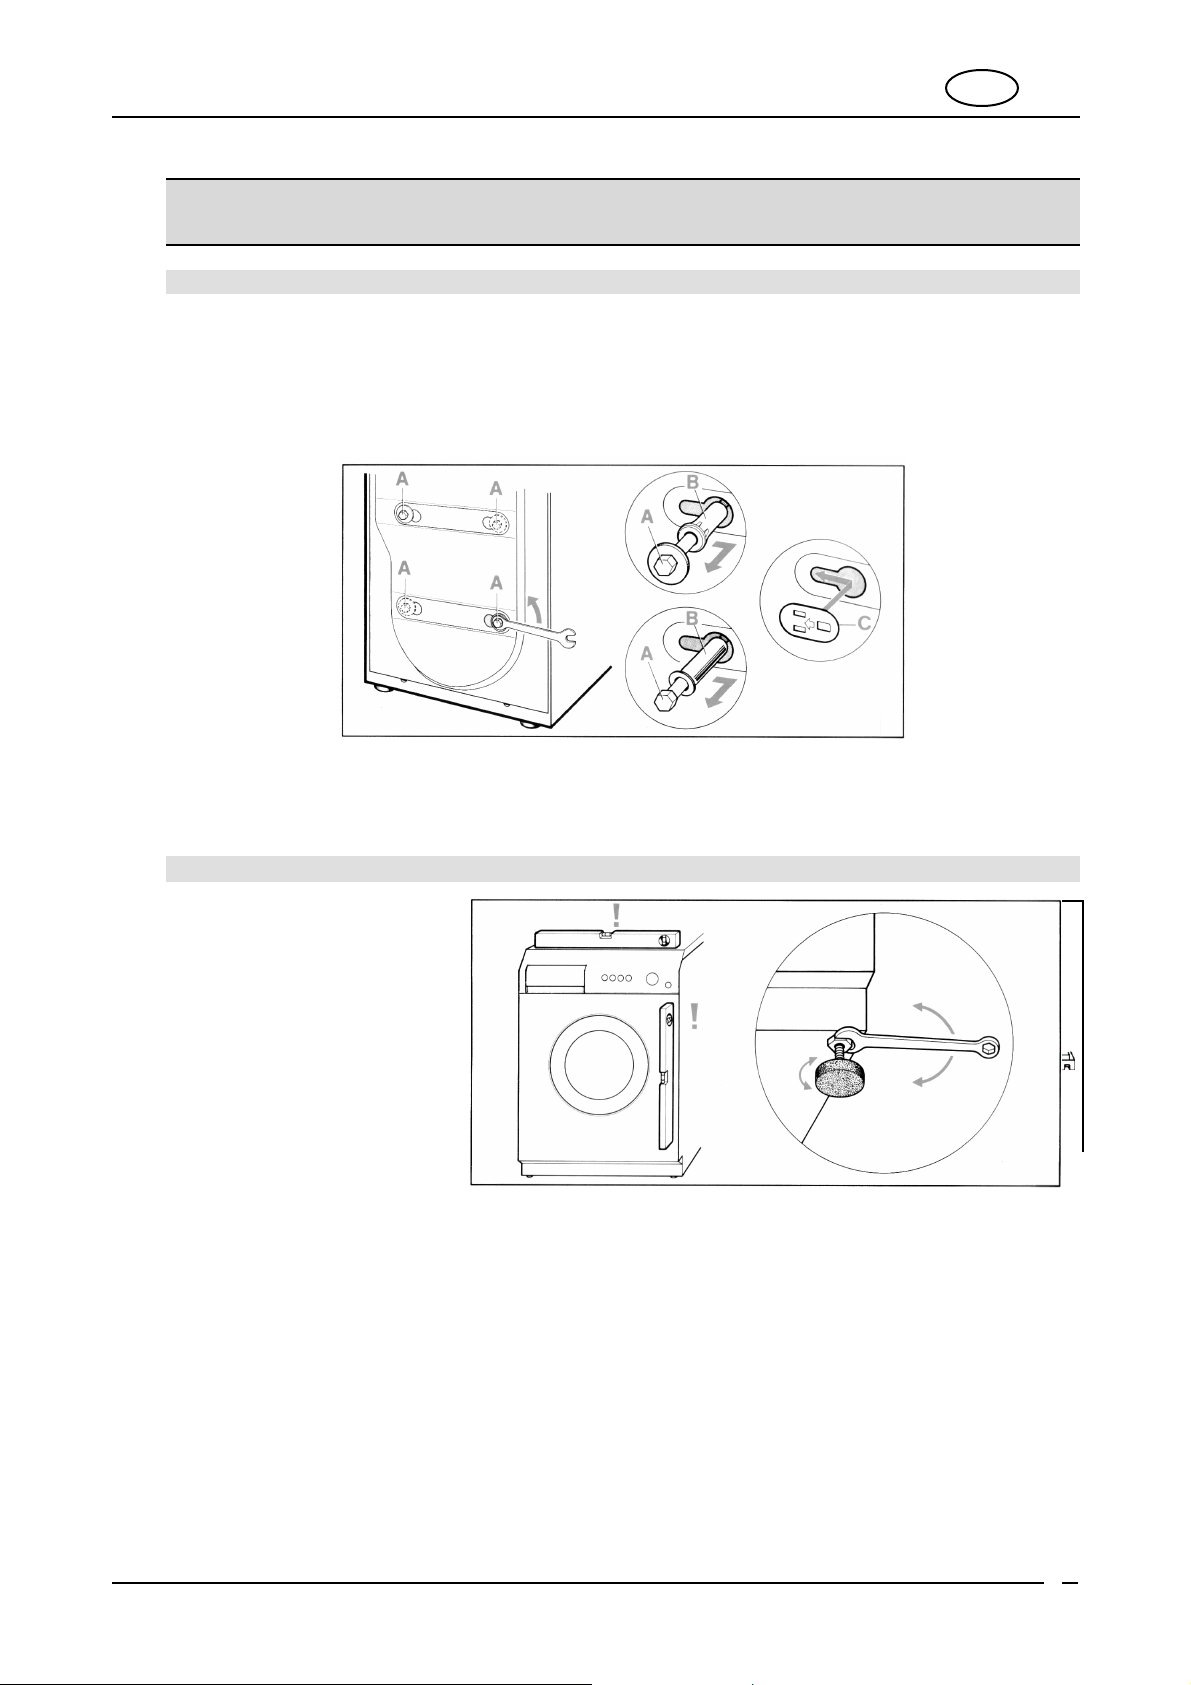
3.1 UNPACKING
The inside of the machine c omprises a moving assembly which is blocked f or transport purposes by t he screws
(A) located at the rear of the washer dryer.
1. Release the assembly by removing these screws with a 13 mm wrench.
2. Remove the screws (A) and relative spacers (B) from the back of the washer dry er.
3. To prevent water from entering the machine, or people f rom touching live c omponents with their f ingers,
close the four holes left open by the screws with the supplied plastic plugs (C).
GB
Attention!
• Do not turn the machine upside down and do not place it on its side.
• Keep all the components used to lock the drum as sembly as they will be needed if you decide to move the
appliance in future.
3.2 POSITIONING AND LEV ELLING
1. Place the appliance in the
chosen position.
2. Carefully lev el the machine in
all directions using a spirit
lev el and adjus ting the f eet if
necessary. After adjusting the
machine, lock the feet with the
relative lock nuts.
The water inlet and drain hoses can be turned to the right or left depending on installation requirements.
Attention!
• Carry out this operation carefully to prevent the washer dryer from vibrating, generating noise or moving during operation.
• If the appliance is installed adjacent to a carpeted floor, ensure that the openings on its underside are
not obstructed.
• Make sure the washer dry er does not touch walls, furniture, etc., while it is working.
6
Page 7
3.3 ADDITIONAL IMPORTANT INSTALLATION INSTRUCTIONS
1. Carefully read the installation instructions in point 3 on page 6 of the washer dryer installation manual.
2. After the initial instructions have been adhered to. I.e. removing transit bolts and fitting the adjustable feet etc.
Using a spirit level, make sure that the washer dryer is completely lev el and the overall height of the legs, in-
cluding the rubber foot and the locking nuts, is no greater than 25mm maximum.
3. When installing the washer dry er y ou must ensure that the leg locking nuts are firmly tightened.
Under no circumstances should the washer dry er be installed with the front legs higher than the rear. If attention is required in lev elling the f urniture door then we would adv ise fitting the “push-push” catch and the rub-
ber f urniture door buffer. It is important to not e that any other installation other than one of a lev el nat ure
could induce v ibration or excessiv e movem ent of the washer dry er, especially on the spin cycle.
4. The machine should be installed directly onto a c lean, sound and level f loor, and as low as poss ible. Please
note this machine should not be inst alled on carpets, foam-backed f looring, laminate and parquet floors. If,
however, f or cosmetic purposes the machine height needs to be raised, it must not be done so by raising the
height of the legs, but via an additional baseboard.
As a manufacture we do not recommend or specify any particular means by which to raise the washer dryer,
but have found that dense board, between 18mm and 40mm in thickness, grip-fixed and screwed to the f loor
and capable of supporting the weight of the washer dryer without distortion, and cut to the dimensions of the
machine base appears to be good installation practice.
Please note that any material that has a shiny or a slippery f inis h should not be used.
5. Floating floors. As more apartments are being built with f loating floors, additional care must be taken when installing the washer dryers. The current flooring specif ications st ate that additional bracing must be installed in
areas directly below electric storage heaters and door thresholds. It is important to note that whilst some elec-
tric storage heaters have a weight of 80kgs, washer dry ers , when loaded, hav e a combined weight in excess
of 90kgs and the oscillating nature of any loaded washer dry er will deliv er v ary ing stresses and loadings on to
the adjacent floor area.
Howev er bec ause floating flooring manuf acturers current specific ations do not state that additional bracing is
required in the f loor area below heavy domestic appliances the f looring area below washer dryers is generally
only supported in one direction and not two as is the case with electric storage heaters. Theref ore in order to
prov ide t he house purchaser with additional peace of mind, and to prevent any unnecessary v ibration and oscillation in the kitchen area we would advise hous e builders to consider f itting additional f loor brac ing at the
time of floor installation to a similar specification to that which is required f or the installation of electric storage
heaters.
6. The ideal base surface f or any heavy domest ic appliance to stand on is one of solid concrete, as any m inor
leak from the domestic water supply will not adv ersely eff ect the area adjacent to the washer dryer, as any
leak onto a floating and/or wood laminate floor could cause extens ive water damage.
Please note that as these machines are water t ested prior to leav ing our f actory a small amount of residual
water will be present in the hoses, theref ore care must be taken to prevent any minor water spillage during in-
stallation. Please also ens ure that t he water f eed hose are c orrectly fitted and tightened, bot h at the m ains
and the machine connectors.
7. Please ensure that installation is carried out in accordance to the above installation instructions. As failure to
do so could invalidate the guarantee.
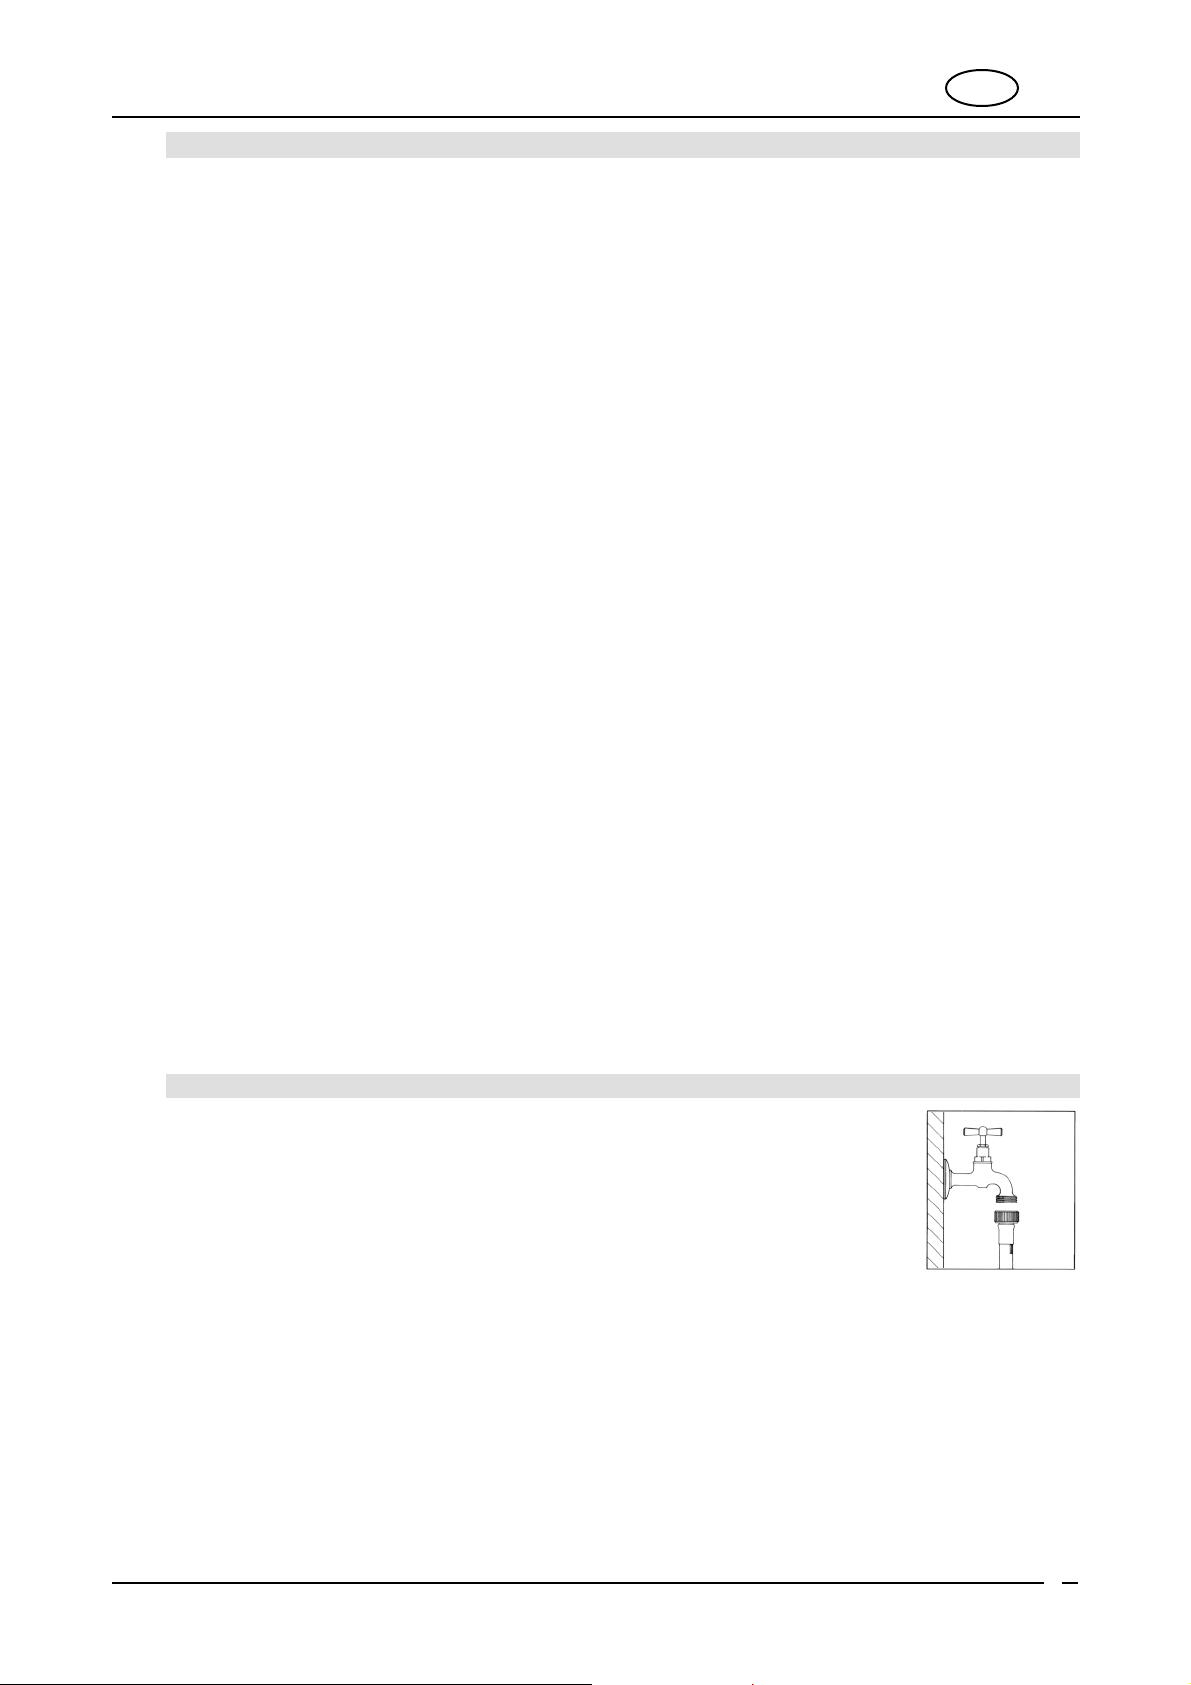
3.4 WAT ER SUPPLY CONNECTION
1. Check that inlet pressure lies between the f ollowing v alues: 50-900kPa. For higher
pressures, install a pressure reducer.
2. Connect the cold water inlet hose (light blue ring nut) to the cold water tap with a ¾
gas thread, taking care to screw it firmly into place in order to prevent leaks. The water
inlet hose must not be bent or crushed and must not be replaced or cut.
3. If the model is designed f or operation with hot water, then the inlet water temperature
must not exceed 60°C and the hose with the red ring nut must be connected to the hot
water tap.
Attention!
• If the water pipe is new or has not been used f or a long time, let a certain amount of water run bef ore attach-
ing the inlet hose. This stops any deposits of sand and ot her impurities from clogging the f ilters used by the
machine to protect the water inlet v alves.
GB
7
Page 8
GB
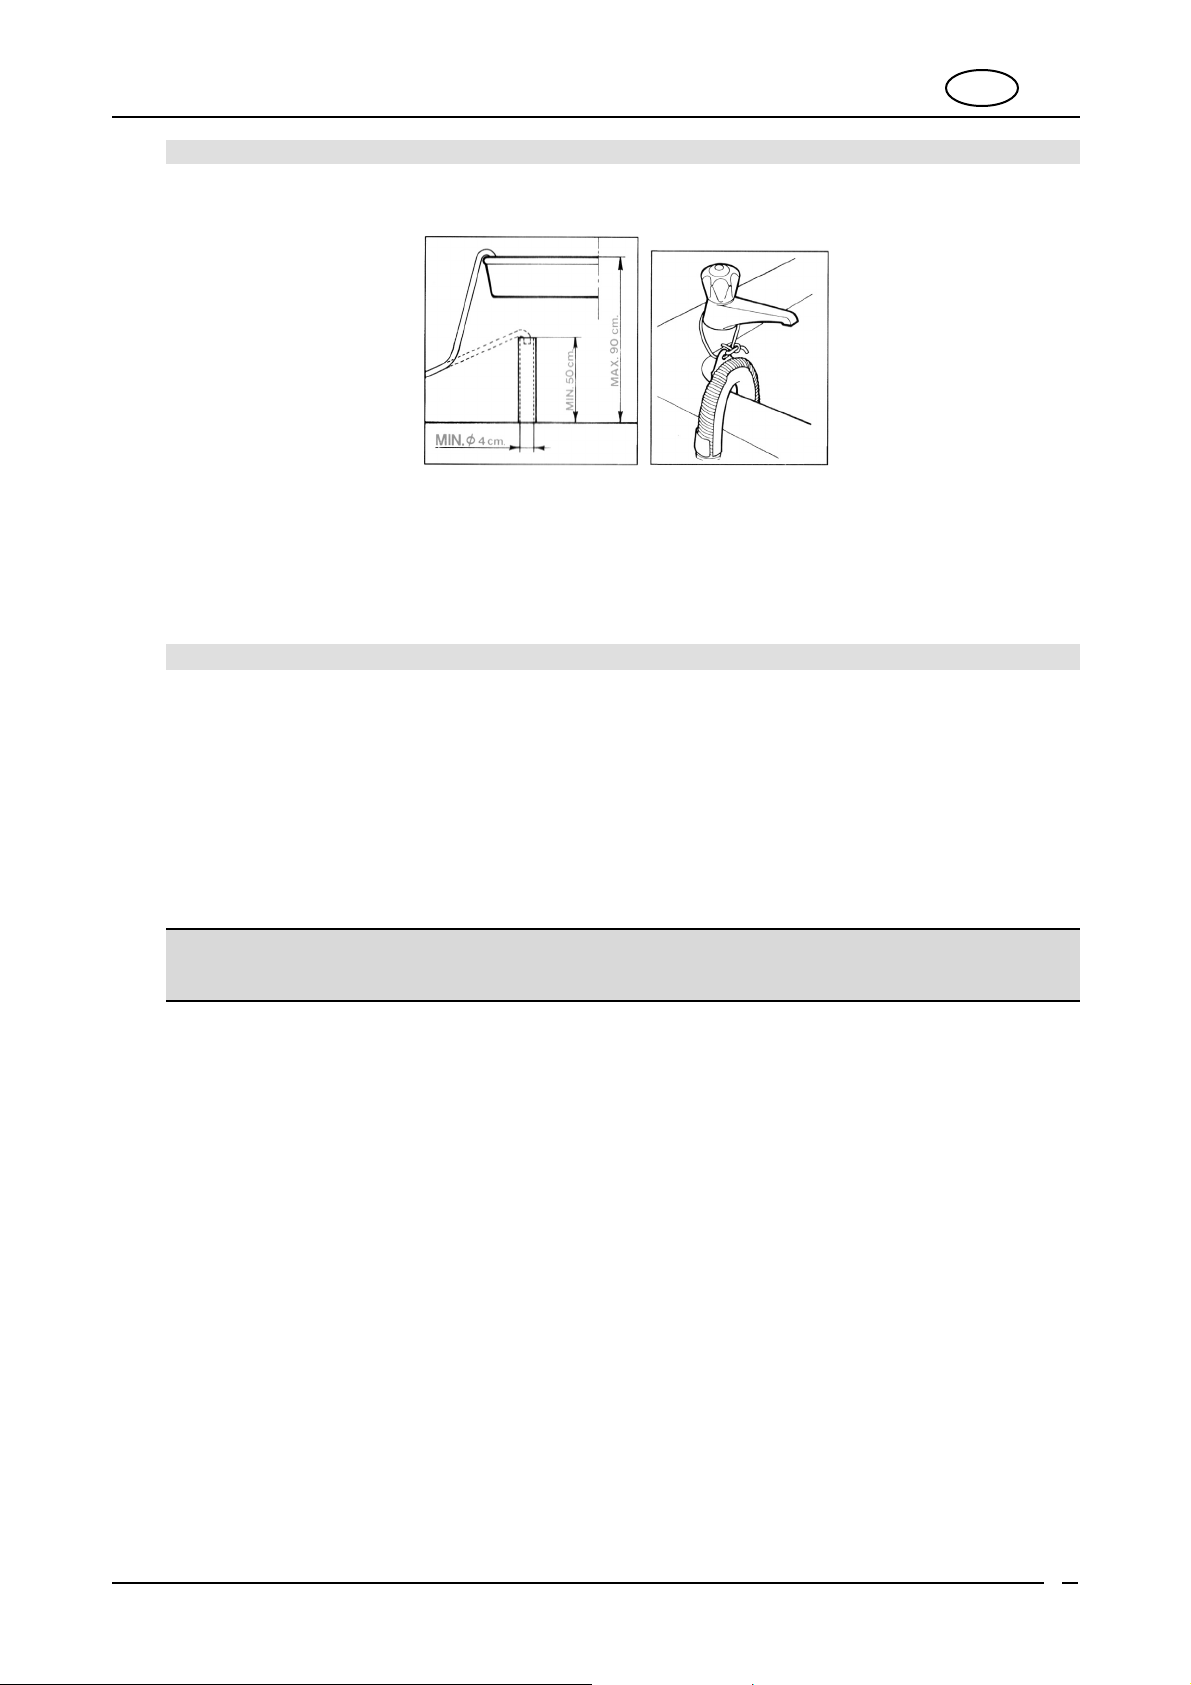
3.5 DRAIN CONNECTION
1. Insert the end of the drain hose into a drain pipe hav ing an internal diameter of at least 4 cm and a height
ranging between 50 and 90 cm, or attac h it (using the relative curv ed plastic prof ile) to a basin or bath tub.
2. Always check that the end of t he drain hose is securely attached in order to prevent the repulsive f orce of the
water f rom moving it out of position.
Attention!
• Do not bend or obstruct the hose as this will reduce the f low of water.
• Any ex tensions to the drain hose must not exceed 1 metre, they m ust have the same internal diameter and
must not be obstructed in any way.
• In no circumstances should the end of t he drain hose be submerged in water.
3.6 ELECTRICAL C ONNECTION
Before fitting the plug into the socket, make sure that:
1. Input voltage matches that indicated on the name plate attached to the inner edge of the door.
2. The circuit-breaker, pressure relief v alves, power line and socket are capable of withstanding the maxi-
mum rated power input indicated on the name plate.
3. The socket is compatible with the plug supplied with the machine without the need to f it multiple sockets,
adaptors or extension leads that could cause ov erheating or burning.
Attention
• The plug must be accessible aft er installation.
• The appliance must be earthed. Plug the mac hine into a socket f itted with an eff icient earth connection.
The manufacturer declines all responsibility for damage to persons or property resulting from
failure to earth the appliance or from a defective earth connection. Correct electrical connec-
tions gua rantee maximum safety.
• This appliance complies with EEC directive 89/336 of 3.5.89 (modified by EEC direct ive 92/31) relative t o the
• If the power cord is damaged, only replace it with an original spare part av ailable f rom our service depart-
• Do not insert/remove the plug from the socket if your hands are wet.
• Remove the plug from the socket by gripping the plug and not the cord.
If the socket does not correspond to the supplied plug, replace the socket with one of a suitable type.
elimination of radio interference.
ment.
8
Page 9
3.7 FIT TI NG T HE F U RNIT URE DO O RS
Once the washer dry er has been c orrectly inst alled and comm issioned, the furniture door can be fitt ed following
the dimensions on the template and the instruction enclosed in the washer dry er packaging.
Please note that only f urniture doors of a thickness between 16mm and 21mm are compatible with this washer
dry er.
Important – The machine complies with the current safety provisions governing electri cal equip ment. It
must be installed by a specialised technician in compliance with the current standards in order to prevent
it from becoming a potential danger for the user.
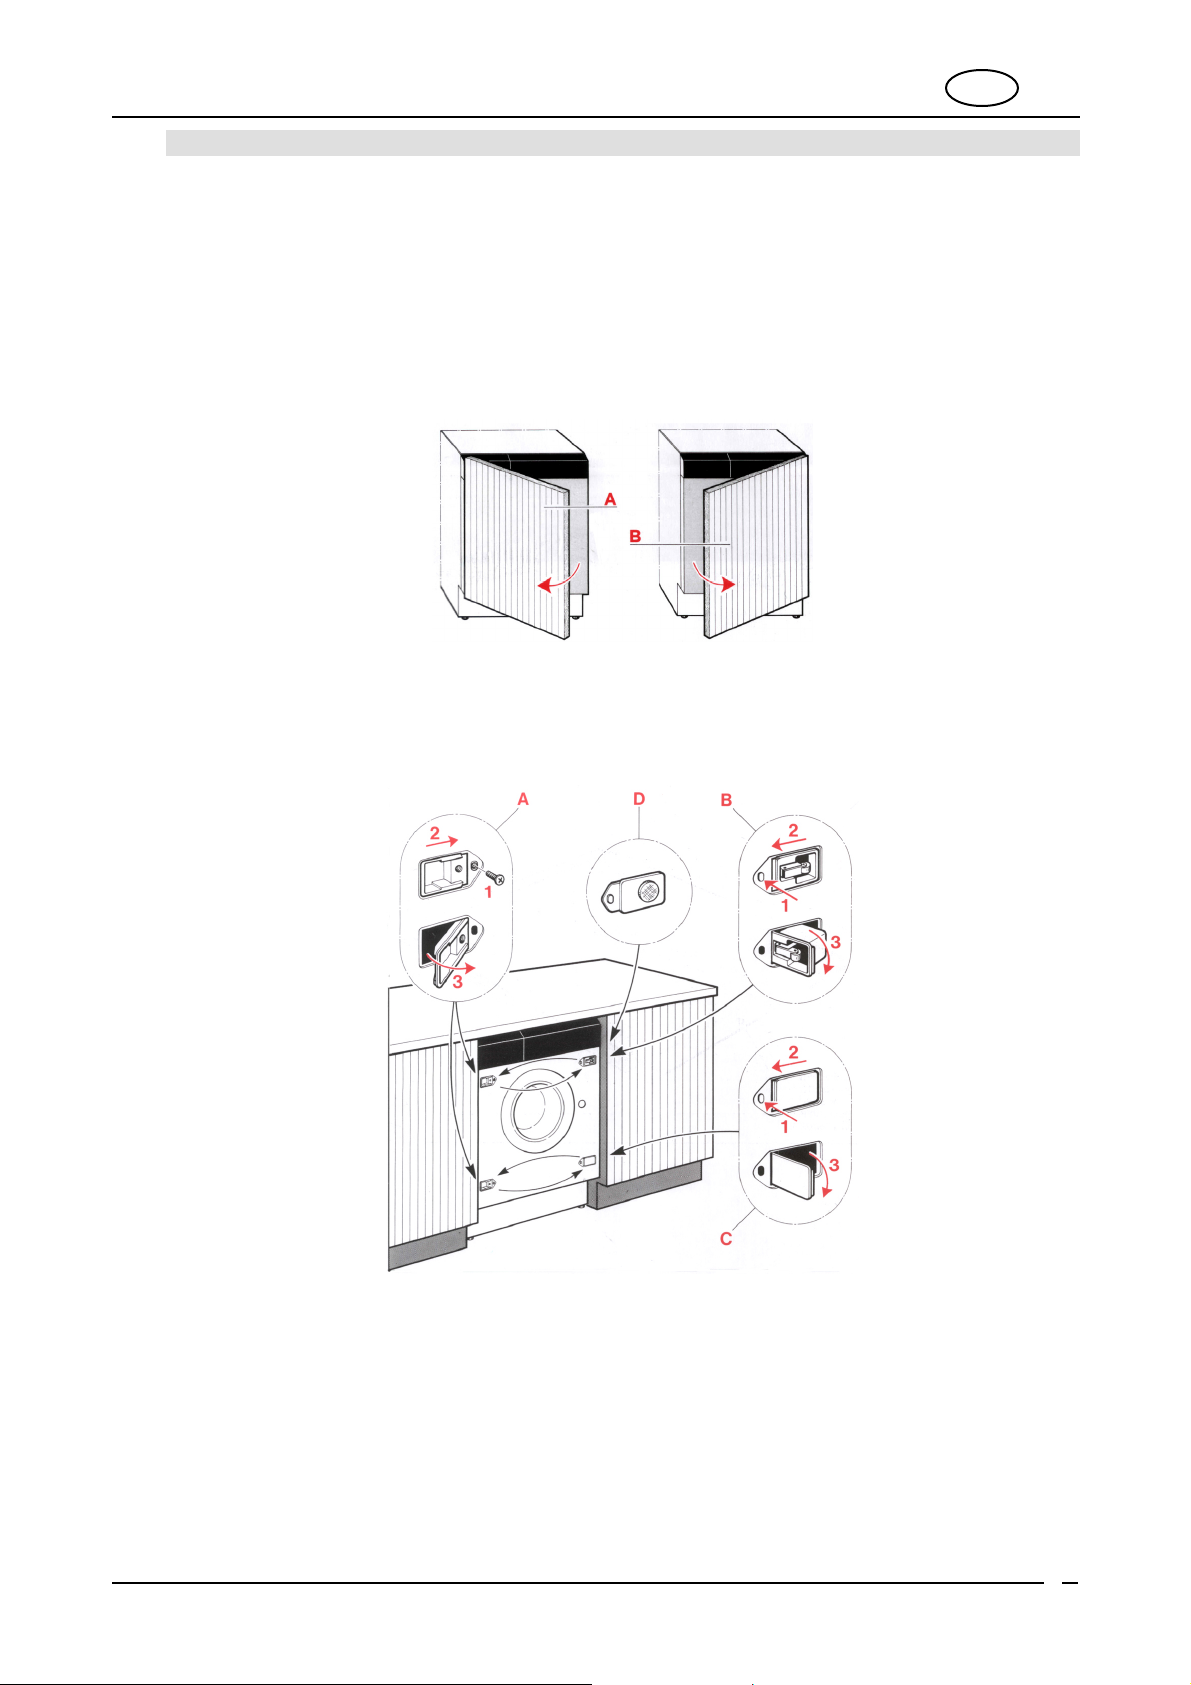
3.7.1 How to fit the furniture door
The furniture door that covers the front can be hinged on either the left side or right side.
GB
For pratical reasons, it is advisable to maintain the sam e opening direction as the glass door (with hinges applied
to the left-hand side).
The appliance has hinge supports on the lef t-hand side, whilst the push-push clos ing system is mounted on t he
upper right-hand part.
If the magnetic closing mechanism is required, remov e t he exist ing component (B) and install the com ponent (D)
as illustrated below.
Important! Ensure that the appliance is disconnected from electri city supply before installing the furniture
door (during which all hinging and closing mechanisms must be removed from the front) on to the washer
dryer).
Warning – To hinge the panel on the right-hand side (opening direction opposite to that of the glass door),
completely remov e the hinge supports (A), the closing hook (B), the lower bearing plug of the rubber plug (C) f rom
the f ront part of the machine and fit them t o the opposite side.
All parts fitted to the front of the washing dryer must be correct ly remounted (no hole must be left open). This will
prev ent users f rom touching liv e parts of the appliance.
Our company declines all responsibility for damage caused by failure or negligence in complying with
these safety provisions.
9
Page 10
3.7.2 Use of the furniture door fixing template
Proceed in the following way when applying the wooden panel to the washing dryer:
GB
1. When fitting the f urnit ure door utilising the door template y ou will need t o make sure that the bottom and
the top of the f urniture door will line up with the adjacent cabinet furniture doors.
2. The final positioning of the furniture door hinges will be dictated to by t he height or the plinth plus any ad-
ditional base-board used in conjunction with raising the height of the washer dryer for cosmetic purposes
3. Calculate the height of the plinth.
4. There are two holes “A” in the upper part of the template. These will hav e been perforat ed and are used
to mark the holes that will subsequently house the upper hinge and the insert for the closing hook. The
small central hole “B” is used to mark the position of the met al plate f ixing hole when f itting the magnetic
catch.
5. Remov e the f our pieces of protective f ilm from self-adhes ive areas “C” of the template
6. Position the template on the inside of the f urniture door taking in to consideration point one above.
7. Ensure that you have placed the template in the correct position making sure that it is vertically and hori-
zontally correct with reference to the guides on the template and mark the positions of the holes with a
pencil.
8. After hav ing set the template in its correct position and af ter hav ing also checked that is centered in a
horizontal direction with reference to the lines marked at the ends, mark the positions of the holes using
the tip of a pencil.
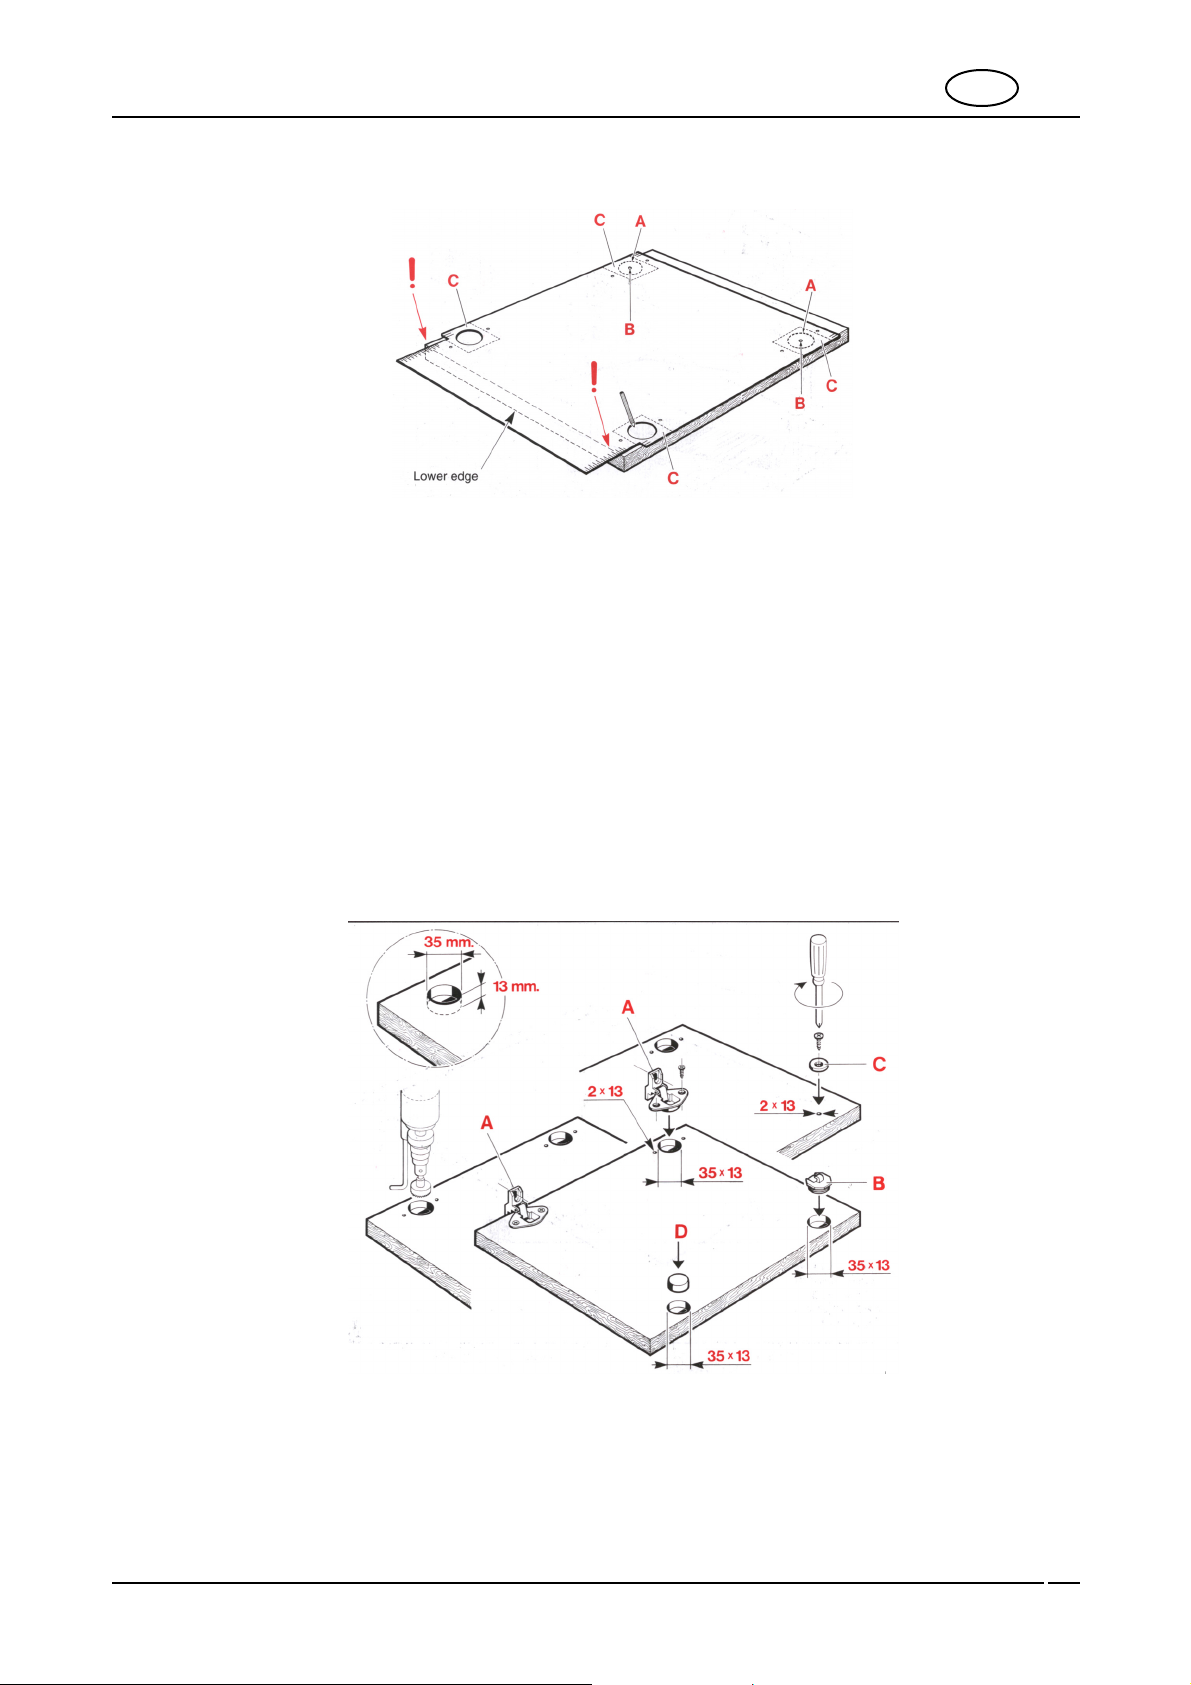
3.7.3 Fitting the hinge components to the furniture door
1. Drill holes in the furniture door f or the hinges, the door buff er and the closing hook, using a pedestal
mounted drill and a suitable 35mm f urniture drill bit, drill 4 number 13mm deep holes into the f urniture
door (Care must be taken not to exceed 13mm or the door f ascia could be damaged). Pleas e note that if
the magnetic door catch is required then a small pilot hole is all that is needed
2. On the hinge side of the f urniture door drill four number 2mm x 13mm deep holes f or t he hinge fixing
screws (Care must be taken not to exceed 13mm or the door fascia could be damaged)
3. Screw the two hinges “A” into the f urniture door, according to whether the furniture door is left or right-
hand hinged.
10
Page 11

4. On the opposite side of the f urniture door either insert closing hook “B” or screw in metal plate “C” into
the upper side opposite the hinges. Then insert the door buff er ”D” into the remaining position opposite
the lower hinge
5. Following this operation the f urniture door will be ready to be f itted onto the washer dryer using the 2
screws “A” supplied.
3.7.4 Ad justing the hinges
GB
If the furniture door needs final adjustment the screws “A” can be slackened and the door lev elled. Once levelled
re-tighten the screws
3.7.5 Recessing the appliance
Push the washing machine into its recess. Turn the f eet to horizontally, level the m achine if necessary and lock
the counter nut with the relative check nut. To prev ent vibrations from the machine from being transm itted to the
surrounding furniture, check that the sides and top of t he appliance are unable to touch the f urniture itself. Ther e
must be a space of at least 2mm all around. The rear part of the machine must also remain some distance
away from the back wall. If the recessing cav ity is higher than 820mm the opening between the f loor and sides of
the machine (when this is installed at the end of a line of furniture), must be completely closed in com pliance with
the relative safety prov isions.
The cov ering must make it impossible for users to touch live parts of the electrical system and must require tools
in order to be remov ed.
Our company declines all responsibility f or damages caus ed by f ailuresto comply with these safety provisions.
3.7.6 Fitting the plinth
The base plinth f or kitchen f urniture must be removable in the area in front of the washer dry er to allow access for
routine maintenance of the drain pump if it becom es clogged with buttons, fasteners, or similar objects, and for our
engineers to be able to remove the washer dry er f or service.
Please note: our engineers will not remove plinths that have been f ixed into position by glues or mastics, or where
removal could cause third-party damage.
If a plinth is fitted directly onto the washer dry er t hen it must be done so with four screws inserted into the four
pre-set holes
Application of the plinth to the fu rnitur e must not involve elimination or modification o f the washing
machine plinth. Owing to safety reasons, this may not be removed. It must absolutely remain intact and
fixed to the washing machine.
11
Page 12

4. DESCRIPTION OF CONTROLS
4.1 CONTROL PANEL
All the commands and controls of the appliance are assem bled together on the f ront panel.
M ode ls w it h out de laye d
start option
M ode ls w it h de laye d
start option
Description of controls
Open door button
A
ON-OFF and programme selection knob
B
Time remaining sho wn on di spla y LED
C
Spin speed shown on display LED
D
Drying time for delicates sh o wn on di spla y LED
E
Drying time for c ottons shown on display LED
F
Display
G
Select spin speed button
H
Select programme and drying time button
I
Select programme and drying time button enabled LED
L
Options buttons
M
Options enabled LED' s
N
Start-Pause button
O
Start-Pause button LED
P
Select delayed start button
Q
Select delayed start button LED
R
De l a yed s tart time shown on display LED
S
GB
12
Page 13

Open door button
A
ON-OFF and washing and
B
drying programme selection knob
Time remaining shown on
C
display LED
Time remaining
Press the button to open the door. Chapter 5 – Washing instructions – explains how the door works and how to use it.
This knob lets you:
• switch the machine on and off by moving it in either
di rection from the OFF position (knob indicator vertical )
• se l e ct washing temperatures within the various fab-
ric sectors by turning it in both directions
• select the drying programme
The knob does not move while the programme is running.
The programme is electronically controlled by the machine.
This LED indicates that the display is showing the total duration of the selected programme before the programme starts,
and the time remaining while the programme is running.
GB
Spin speed shown on dis-
D
play LED
Delicate cycle drying time
E
for delicates show n on dis-
This LED indicates that the display is showing the maximum
spin speed for the selected programme. It stays on while spin
speed is being selected with the relative button.
This LED indicates that the display is showing the drying time
for delicate garments (synthetics, delicates).
play LED
Intensive cycle drying time
F
shown on display LED
This LED indicates that the display is showing the drying time
for cotton and coloured garments.
13
Page 14

Display
G
Sele ct spin speed button or
H
stop w ith tub full
Select programme and dry-
I
ing time button
Select programme and dry-
L
ing time button enabled
The display shows the following information:
1. time remaining for the sele ct ed p ro g ramm e, given
in hours/minutes.
2. delayed start (for models featuring this option).
Given in hours/minutes. When the time remaining
before the programme starts is less than 60 minutes,
this information is given in minutes/seconds.
3. spin speed
4. drying times given in hours/minutes
5. cycle pause - flashing STOP
6. end of cycle - END
7. error codes
To find out which of the first 4 pieces of information are
shown on the display, check which of the LED's, C, D, E, F or
S (the latter for models featuring the delayed start option) is
lit.
Press the button repeatedly to select the required spin
speed. The following spin speeds are available:
• 0000: spin disabled and stop with tub full. The ma-
chine does not perform the final spin and ends the
washing programme with water in the tub. To drain
the water, see the explanations shown in paragraph
5.13
• from 600 rpm to the maximum speed indicated for
the model: for cotton and coloured programmes,
speed increases by 100 rpm starting from 600 rpm
up to the maximum speed indicated for the model
• from 600 to 900 rpm: for synthetics, delicates and
w oollens programmes, speed increases by 100 rpm
starting from 600 rpm up to 900 rpm.
Press the button repeatedly to select drying times up to a
maximum of 2 hours (120 minutes), with increments of 10
minutes, starting from 20 minutes. The type of drying cycle
can be selected with one of the following LED's:
• Delicate drying programme (letter E in this section):
drying temperature 60 °C, for synthetic and delicate
garments.
• Intensive drying programme (letter F in this section):
drying temperature 90 °C, for cotton and coloured
garments.
This LED lights up when drying times are being selected and
during the drying phase.
LED
GB
14
Page 15

Options buttons
M
The options that may be available on the washer dryer are
shown below.
Quick wash Button
Increase water button
Easy-iron button
Economy cycle button
- e
Extra Rinse button
Delicates button
This button reduces the overall durat ion of the washing cyc le. This
option is used to wash small loads or less dirty washing in less time.
The bleach stage is skipped when the Quick Wash button is
pressed (for models with bleach function).
This washer dry er is programmed to use a certain quantity of water
and consume a certain amount of power considered to be sufficient
f or a normal washing cycle.
Only press this button for specific requirements, e.g.: for very
delicate fabrics (curtains or wool).
The water lev el f or washing and rinsing rises and power consump-
tion for heating increases.
This option reduces creasing on garments at the end of t he programme. The machine perf orms a more delicate spin cyc le and
moves the garments at the end of the programme. Spin speed f or
all programmes is 600 rpm.
Press this button for cottons programmes, the machine will per-
form an extended wash at 35°C (biological step) th ereby offering good washing performance combined with power saving.
The machine then continues the cycle at the selected temper ature.
N.B.:
Press the economy cycle butt on to obtain a m aximum washing
temperature of 60° C and the elimination of t he pre wash cycle.
In areas with sof t water or to improv e rinsing, press this button (optional for intensive programmes) to enable the extra rinse f unction
(about 20% more water).
Press this button to reduce mov em ent of the drum and, consequently, of the washing. Suitable f or part icularly delicate garments
(shirts, silk, curtains, etc.)
Half load button
1/2
If the machine is used with a sm aller amount of washing than that
indicated in the “Programme Chart”, press this button to sav e water,
detergent and electricity.
This option should not be used f or synthetics or woollens.
The recommended doses of detergents should be reduced in
proportion to the load.
GB
15
Page 16

Options enabled LED's
N
“Start/Pause” button
O
Start-Pause button LED
P
Q Select delayed start but-
ton*
These LED's light up when the relative option button is
pressed and indicate that the option has been selected. They
remain on until the machine switches off or a different selection is made.
Press this button to start the selected washing programme.
During washing, press the “Start/Pause” button for about 3
seconds to pause the washing cycle. During the pause, the
“Time remaining” Led flashes and STOP appears on the dis-
play. T o resume the washing cycle from where it left off, simply press the “Start/Pause” button again.
This LED lights up when the washing cycle starts (StartPause button pressed) and remains on until the end of the
programme.
Press this button repeatedly to select after how many hours
you want the selected washing/drying programme to start.
The default value is 0 hours 0 minutes and each time the button is pressed it increases by 30’ up to 12h and by 60’ for the
following 12 hours, up to 24 hours.
Select de layed start button
R
LED*
The LED lights up while the delayed start time is being selected and remains on until the programme starts.
Delayed start time show n on
S
display LED*
This LED indicates that the display is showing the selected
delayed start time.
GB
* Only for models featuring the delayed start option
4.2 DETERGENT T RAY
This is located to the left of the control panel. Pull it out to
open.
The tray comprises four compartments which are marked as
follows
“1”: pre-wash detergent
“2”: main wash detergent
“ ” or “3”: fabric softener, starch, etc. (treatment products).
Compartment “4” is used for bleach. If there is a cover marked
, this means that bleach cannot be used with this model of
machine. If bleach can be used with the machine, there is no
cover.
16
Page 17

5. WASHING INSTRUCTIONS
5.1 PREPARING THE WASHING
1. Separate the washing according to the type and colourfastness of the fabrics.
2. Wash whites and coloureds separately. Wash new coloured garments separately f or the f irst time. A label is
normally applied to garments giving inf ormation on how to clean them. A brief desc ription of t hese labels is
shown below.
W ASHING BLEACHING
Machine wash at ma x. 90°C
Machine wash at ma x. 60°C
IRONING
Machine wash at ma x. 40°C
Machine wash at ma x. 30°C
Machi ne w ash, del i ca te c ycl e
at ma x. 60°C
Machi ne w ash, del i ca te c ycl e
at ma x. 40°C
Machi ne w ash, del i ca te c ycl e
at ma x. 30°C
Hand was h
Do not wash
Bleachi ng al lo wed
Hot iron
High tem-
perat ure
An y sol vent
Warm ir on
DRY CLEANING
An y sol vent e-
xcept tr i chloroe-
th ylen e
Less than 60°C
Cool i r on
Petrol e um
sol vent an d
DRYING
Do not ble ach
R113
Attention!
• Do not wash unhemmed or torn garments as they may fray.
• Foreign bodies may damage garments or machine components. Theref ore, empty all pockets and turn them
inside out, remov e rings and hooks f rom curtains or put them in a string bag.
• Put very sm all articles (belts, handkerchiefs, socks, bras with stiffeners, etc.) into a white canv as bag. Clos e
push buttons and zips and sew on loose buttons.
• Modern detergents and correct washing temperatures are generally sufficient to remov e stains f rom fabrics.
Howev er, some s tubborn stains, such as grass, f ruit, egg, blood, rust and ink, should be pre-treated bef ore
washing. Depending on the type of fabric, many stain removers can be found in the shops. Stains
should always be cleaned or diluted immediately as the older they g et, the more diffi cult they are to
remove.
• Garments may be damaged if fabric care symbols are not observed.
Do not i r on
Do not dr y cle an
Do not tumble dr y
GB
Wool – Only pure wool, identif ied by or with the label <<shrink-proof machine washable and dryable>> can
be machine washed with the specif ic programme, other ty pes of wool should be hand-washed or dry -cleaned.
5.2 OPENI NG THE DOOR
The machine is fitted with a saf ety dev ic e that prev ents the door from opening while it is working.
1. Before opening the door, wait 1 or 2 minutes after the programme ends (“End” LED on) to allow the
safety device to disengage.
2. Make sure there is no water in th e tub and that the drum is not moving. Open the door by pressing the
“Open door” button on the f ront panel and pulling it open.
Attention!
• If the washing programme is interrupted, you will have to wait f rom 3 to 15 minutes, depending on the tem-
perature of the water, bef ore the door opens.
Attention!
The water may still be boiling if the washing cycle was performed at high temperatures.
If there is still water inside the drum, do not open the door!
17
Page 18

5.3 PREPARING THE WASHING
Where possible, save electricity by washing full loads divided by type of fabric. Int roduce loose washing and
alternate large items with small ones. For the first f ew times, weigh the wash loads and t hen rely on y our judge-
ment. Av erage weights of comm on garments are shown below:
5.4 LOADING THE WASHI NG
1. Open the door and load the washing tak ing care to distribute it unif ormly, loosely and not packed into the
drum; alternate large items with small ones if poss ible.
2. The washer dry er described in this manual can be loaded with up to 5kg of washing. Heavier loads will
lead to unsatisf ac tory washing results and may cause the machine to work incorrectly.
3. To save energy, wash fu ll loads div ided by type of fabric, according to the quantities indic ated in the
“Programmes chart” supplied with this manual.
4. Close the door by pressing it against the body of the appliance until y ou hear a click. Make sure no gar-
ments hav e got caught between the door and the rubber gasket.
Attention!
• If the door is not closed properly, a safety dev ice prevents the washer dry er f rom working.
• Do not use more than the recommended amount of detergent: too much may deteriorate washing re-
sults.
5.5 ADDING DET ERGENT AND ADDITIV ES
If bleach can be used with the machine (no cov er marked with
The level of the liquids must not exceed the maximum limit, otherwise the trays will be emptied too soon.
Bef ore pouring thick additiv es into the tray, dilute them with a little water to prev ent them f rom obstructing the trap.
Only use f oam-c ontrolled detergent suitable for use in washer dryers.
Determine the quantity of detergent according to the hardness of the water, and the type, quantity and
dirtiness of the washing.
This will allow y ou to obtain the required effect using as little detergent as possible.
Detergent packs indicate the quantities to use according to 4 lev els of hardness and f or normally dirty loads of 4-5
kg.
Ask your local water board to tell you how hard your water is.
Water hardness
Hardness level French degree fH German degree dH
Soft Up to 15° Up to 8°
Moderately hard 15° - 25° 8° - 14°
Hard 25° - 40° 14° - 22°
Ve ry hard Over 40° Over 22°
Follow the instructions shown in the “Programme Chart” provided together with the manual and add detergent and any additives to the
relative compartment before s tarting t he programme.
Pour the pre-wash powder detergent into the c ompartment m arked
“1”.
Pour main wash detergent into compartment “2”. Machine accessories
include a red insert “A” that can be placed inside compartm ent “2” to
allow liquid detergent to be used. The addit iv es are automatically in-
troduced into the tub during f inal rinsing.
Pour liquid additives such as starch and f abric softener into “3”,
marked with
.
) add bleach to compartment “4” if you wish.
GB
18
Page 19

5.6 DOSING POWDER DET ERGENT S
Normally dirty washing
1. Choose a programme without prewash.
2. Pour the total quantity of detergent indicated on the packs into compartment “2” of the detergent tray.
Very dirty washing
1. Choose a programme with prewash.
2. Add ¼ of the recommended quantity of detergent into compartment “1” of the detergent tray and ¾ of the detergent into compartm ent “2”.
Attention!
• If there are no dosage indications for delicate synthetics, add from ½ to 2/3 of t he recommended quantity for
resistant cottons.
• For the wool programme, only use neutral detergents f or woollens.
• Base your doses according to the detergent manuf acturer's recommendations.
5.7 DOSING LIQUID DETERGENTS
1. Pour the recommended dose into the batcher supplied with the liquid detergent and place it inside the drum;
otherwise, pour it into compartment “2” of the det ergent tray after f itt ing the relative red insert “A” (see para-
graph 5.5).
2. The scale on the red insert will help you to use the right quantity of liquid detergent.
Attention!
• Liquid detergents can be used according to the manufacturer's recomm ended dose only for the main washing cycle, that is, in all programmes without prewash.
• When compartment “2” is used for powder detergent, the red insert “A” must be remov ed.
5.8 SCAL E-REMOVERS
Scale-remov ers can be introduced into compartments “1” and “2” according to the manufacturer's indications.
First, add the detergent and then the scale-rem over.
5.9 SWITCHING ON THE MACHINE AND SELECTING THE WASHING PROGRAMME
To switch on the machine and select programmes, proceed as follows:
1. Turn the programme knob in either direction.
2. Select the washing temperature, within the sectors marked on the front panel by the following words:
• Cotton, coloureds
• Wool
The washer dryer has the following basic wash in g pr ogrammes which, by adjusting the temperature and
using the v arious button f unctions, allow a wide range of programmes to be set f or all requirements.
Intens ive washing programme
for resistant
Delicate washing programmes
f or delic ate
They prevent the f ormation of creases that are difficult to remov e during
ironing.
• Synthetics, delicates
U
cottonU, UcolouredU or UhempU f abrics.
U
artificial synthet ic fibresU, UblendsU or UlinenU f abrics.
GB
Wool programme
only for garments marked “
U
pure woolU” washable, treated, shrink proof.
Other types of wool should be hand washed or dry -cleaned.
To select programmes according to th e type of fabric, consult the “Programme chart” supplied together with this manual.
19
Page 20

U
Display information
When the machine is switched on, the display visualises
the duration (hours/minutes) and maximum spin speed
3 seconds 3 seconds
env is aged for the programme. These two parameters are
displayed alternatively for 3 seconds each, toget her with
their relative LED's, until the selected programme starts.
Attention!
• The following partial washing programmes can be set
using the programmes knob:
-Rinse with additive
-Drain and spin
-Fabric softener
These partial programmes are inside the Cotton, Synt hetics and Wool sectors, except f or the drain and spin
programme (Drain
)
.
• If the indicated tem perature shows 0°, this means that the programm e perf orms a cold wash cycle. The same
cold wash is also performed by the Hand wash programme in the Wool sector.
• The fabric treatment labels show which washing temperature must be set.
• If various garments in the same load require different washing temperatures, choose the lowest wash-
ing temperature of all.
• If the laundry is only slightly dirty and does not need the bleaching effect of high temperatures, a lower temperature can be chosen to save power. In spite of t he low temperature and c onsequent sav ing of electric-
ity, an automatic time control keeps t he duration of the main washing unv aried compared with that of a high
temperature programme. It is therefore possible to successfully wash normally dirty laundry at lower wash-
ing temperatures than the maximum temperatures s hown on the fabric care labels.
5.10 M ODI FYI N G STA RTI NG PA RA M ET ERS
5.10.1 SPIN SPEED
Press the select spin speed button ( ), the relativ e LED lights up and the display visualises the maximum speed
env isaged for the selected washing programme.
Press the button repeatedly. Speed decreases by 100 rpm every time until the spin cycle reaches 0 rpm and is
disabled.
GB
5.10.2 OPTIONS
Use the options buttons (indicated in c hapter 4 – Description of controls, letter M) to enable m achine options. A
selected option is highlighted by the option LED located above the button in question.
5.10.3 DELAYED START (ONLY FOR MODELS FEATURING THIS FUNCTION)
Press the delay ed start button (
). The relative LED located above the button lights up.
The display v isualises the t ime remaining (hours/minutes) bef ore the select ed washing
programme starts: the display initially shows 0 hours 0 minutes for all programmes.
Press the button repeatedly. The Start delay increases by 30 minutes each time it is
pressed for the first 12 hours. After that it increases to 60 minutes up to 24 hours.
While selecting the delay ed start time,
y ou c a n r es et t h e t im e r by p r ess i n g t he
button for at least 3 seconds.
20
Page 21

5.11 STARTING THE WASHING PROGRAMME
1. Bef ore start ing the selected programme, carefully close the door, open the water tap and add the detergent and additiv e
2. Press the “Start-Pause” button. The LED located above the Start-Pause button remains lit throughout the
cy cle.
After starting, the display shows the time remaining until the end of t he programme. The LED remains on
throughout the cycle.
Example
GB
If delayed starting has been set (only for models f eaturing t his option), the display visualises the time remaining bef ore the cycle starts. When delayed starting is set, the relativ e LED f lashes on and off.
Example
5.12 INT ERRUPTING OR CHANGING THE WASHING PROGRAMME
The washing programme may be interrupted at any time while it is running:
1. press “Start/Pause” f or approximately 3 seconds: the display alternates between STOP (f or 1 second)
and three horizontal lines (f or 1 second) and the Start/Pause LED f lashes.
The programme can also be stopped by turning t he programme/temperature selection knob while the cycle is running.
2. If you wish to change the washing programme, simply select the new programme by turning the programme knob without pausing the machine f irst. The new washing cycle will be perf ormed starting from
the beginning. If the tub is already full of water, the new programme will omit the filling phase.
3. To resume the cycle, press Start -Pause again.
5.13 END OF PROGRAMME
The washing programmes are automatically c ompleted, the display shows END and t he
“Time remaining” LED lights up.
1. Turn the programmes knob to OFF to switch off the machine.
2. Open the door.
3. Remov e the washing from the drum.
4. Leav e t he door ajar in order to allow the inside of the washer dryer to dry.
5. Turn off the water tap.
If the no-spin option was selected during the initial spin speed set up phase and the machine stops with the tub f ull
(spin speed 0), STOP appears on the display at the end of t he washing programme, alternat ing with 0000 (spin
speed 0) and the spin LED lights up.
21
Page 22

GB
To continue draining and spinning, press the spin select button twice. The machine resumes the cycle by draining
the water and spinning. To select spin speed, press the button until the required speed is display ed. If you wish to
drain the water in the tub without spinning, press the s pin select button until 0000 appears on the display. This indicates that the machine will drain the water without spinning.
5.14 END OF PROGRAMM E BEEP ER
When a washing and/or dry ing cycle f inishes, the message END appears on the dis play and a beepers s ounds
twice. To disable this signal, press t he second and t hird button from the left simultaneously. The mes sage OFF
immediately appears on the display to indicate that the beeper has been disabled.
To enable the end of programme beeper, repeat t he operation. This time, the m essage ON will appear on the display.
The appliance is supplied with the end of programme beeper enabled.
6. DRYING INSTRUCTIONS
6.1 GENERAL
The washing is dried by means of a continuous f low of hot air produced by a fan which passes through the drum
and removes humidity from the washing.
This humidity is then condensed inside the machine when it comes into contact with the cold water.
For this reason, the water tap must be left open and the drain hose must be correctly positioned during
drying cycles.
This machine allows wash-only, dry -only and wash+dry programmes to be set.
In the latter programmes, the cycle shifts automatically from washing to dry ing without having to touch the controls
to continue the cycle after washing.
Warnings
• Only dry linen or garments washed in a water-based solut ion and suitable f or tumble drying.
• Do not dry f abrics that hav e been dry -cleaned or stain-removed with chemical solv ents, woollens or
blended woollens that shrink with heat, very delicate f abrics such as silk and synthetic net curtains, f abrics that can easily fray s uch as loose wool, padding and excessively f rayed carpets, articles containing
f oam rubber or similar elastomers.
• The quantity of washing that can be introduced into the washer dr yer for drying must not exceed
2.5kg. This washer dry er has been built to offer maximum performance with dry loads weighing not more
than 2.5 kg.
• When intensiv e washing programmes are set, drying is automatically perform ed at 90°C, while dry ing
times may vary f rom 20 to 120 minutes.
• For delicate programmes, dry ing is automat ically performed at 60°C, again with dry ing t imes v arying from
20 to 120 minutes.
22
Page 23

• For automatic wash+dry programmes, theref ore, the dry ing temperature depends on which washing pro-
gramme is selected.
• The washing must hav e been prev iously washed and spun bef ore a dry -only programme can be perf orm ed.
• When drying particularly f luf fy items suc h as new terry towels, the "Rinse" program should be carried out
to ensure that any deposits left by the f abric are removed, and are not deposited on the clothes in the
Important – Do not dry fabrics that cannot withstand temperatures of 60°C or in any c ase fabrics that cannot
withstand the selected temperature.
6.1.1 TABLE OF APPROXI MATE DRYING TIMES AND TEMPERATURES
next wash.
Weight of
washing
Resistant f abric
dry ing at 90°C
Delicate f abric
dry ing at 60°C
Drying result
GB
1.5kg
2.5kg
6.1.2 EXTR A DRYING
If the washing is still too wet when the programme finis hes, set a brief timed drying cyc le.
Caution!: do not dry garments too much as they may crease or shrink.
40 minutes 70 minutes Damp for ironing
70 minutes 100 minutes Dry
70 minutes 120 minutes Damp for ironing
90 minutes - Dry
6.2 WASH-ONLY PROGRAMMES
Follow the instructions c ontained in chapter 5 – Washing inst ructions, taking care to set drying time to 0 with the
Select programme and drying time button (see chapter 4 – Description of controls, letter I).
6.3 WASH+DRY PROGRAMM ES
Washing and dry ing programm es can be automatically performed with intensive cycles (cottons, coloureds) and
synthetics/delicat es cycles. For the latter, only delicate dry ing is allowed (dry ing at 60°C, identified by the LED with
the “-” sign), while f or cotton and coloured garments, both the delicate dry ing programme (drying at 60°C, “-”) and
the intensiv e drying programme (drying at 90°C, “
matic dry ing is not possible after washing.
To wash and dry automatically, a load of washing weighing no more than 2.5 kg of cotton or 1.5 kg of synthet-
ics should be used.
Therefore, if the load to wash and dry exceeds the above quantities, an automatic washing programme should not
be set and, at the end, the load will have to be div ided in half and dry ing done in two steps.
To set an automatic wash+dry programme, proceed as f ollows:
1. Select the wa shing pr og r amme as shown in paragraph 5.9;
2. Select the required spin speed as shown in paragraph 5.10.1;
3. Press the select drying programmes and dry ing times button (
does the delicate drying times LED (“-”). The display s hows the time (hours/minutes) set for the s elected
dry ing programme. Initially, the time is equal to 0h 0’ for all programmes.
+
”) are allowed. If a wool washing programme is selected, auto-
). The LED over the button lights up as
4. Press the select button ( ) repeatedly, t he dry ing tim e (hours/minutes) starts f rom 0 hours 20 minutes
and increases by 10 m inutes every t ime the button is pressed, up to a maximum of 2 hours . Press the
button again, the time starts again from 0h 0minutes and t he LED switches f rom delicate drying (-
tensiv e dry ing (+
hours. Switching f rom intensiv e (
down the button for at least 4 sec onds.
)
or v ice-versa. Press the button again to increase by 10 minutes and so on up to 2
+
) to delicate (-) dry ing or v ice-v ers a can also be ac hiev ed by holding
)
to in-
23
Page 24

Example
GB
Drying times depend on the spin s peed: the higher the speed the lower the drying time and, consequently, t he
lower the power consumption.
Choose the highest spin speed compatible with the type of washing.
5. To start the washing programme, automatic ally f ollowed by the dry ing programme, follow the instructions
shown in paragraph 5.11 – Starting the washing programme. During washing and dry ing, the display visualises the time remaining and the LED ov er the select dry ing programme and drying times button lights up. This
indicates that the washing programme will be f ollowed by the drying programme.
Example
Warnings
If the spin speed is set t o 0 (no spin and stopping with the t ub full), the machine does not automat ically perform
the drying cycle.
6.4 DRY-ONLY PROGRAM M E
When the washing cycle has terminated, programme drying as follows:
1. Switch off the machine by turning the select washing/drying programmes knob to OFF.
2. Turn the knob to the dry ing programme marked with
3. Select the spin speed with the select spin speed button (
;
) as described in paragraph 5.10.1 and remember
that the spin option is only possible for the intensive drying programme (“+”) and f or dry ing times ranging from
1h 30’ to 2h 0’;
4. Select the dry ing time and programme (intensiv e or delicate) as described in paragraph 6.3 – Wash+dry programme.
5. Press the “Start-Pause” button to begin the drying programme. During the drying programme, the display
shows the inf ormat ion indicated in paragraph 6.3 – Wash+dry programme.
Warnings
• As the washing programme has not been selected, the drying programme (intensive or delicate) can be cho-
sen as required. Bear in mind that int ensive dry ing (LED marked + and dry ing temperature of 90°C) is rec-
ommended for cottons and coloureds, while delicate drying LED marked - and drying temperat ure of 60°C) is
recommended f or synthetics and delicates.
• To obtain satisfactory dry ing results, the load must not exceed 2.5 kg of cottons or 1.5 kg of sy nthetics.
24
Page 25

6.5 INT ERRUPTING OR CHANGING THE DRYING PROGRAMME
1. To interrupt the dry ing programme, proceed as indicated in point 1 of paragraph 5.12 – Interrupting or changing the washing programme. When the machine is paused, the dry ing time can be changed by pressing the
select button (
2. If you wish to stop the programme and remove the washing, y ou s hould first allow the appliance to cool. Set
dry ing t ime to 20 minutes with the select button. Start the mac hine as indicated in the following point and re-
move the washing at the end of the cycle.
6.6 END OF DRYI NG PROGRAMM E
Same methods as indicated in paragraph 5.13 – End of programm e.
6.7 PROGRAMME FINISHED BUZZER
Same methods as indicated in paragraph 5.14 – End of programm e beeper.
).
GB
25
Page 26

7. CLEANING AND MAINTENANCE
Important – B efore cleaning or servicing the machine, remo ve the plug fro m the socket.
7.1 EXTERNAL CLEANING
• Regular and constant cleaning will keep y our appliance looking like new.
• Clean the outer surfaces with soap and water and then dry thoroughly with a soft cloth.
• Clean parts in plastic with a damp cloth.
• Do not scratch with sharp objects and do not use solv ents or abrasive products as these will damage the
surf ace.
• For reasons of safety, never spray water onto the appliance.
7.2 CLEANING THE DRUM
• Remov e any rust s tains from the drum with a special cleaner for st ainless steel or, f or part icularly s tub-
born stains, with extra f ine abrasive paper.
• To remov e scale f rom the washer dryer, only use branded scale remov ers with anti-corrosion agents f or
washing machines.
• Follow the manuf acturer's instructions and recommended quantities to the letter.
• After removing scale or rust from the drum, perform a few rinse cycles to eliminate acid residues
as these may damage the machine. Never use detergents containing solvents. These may form
7. 3 C L EA NI N G T HE DO O R GA S KET
Periodically check that no clips, buttons, nails or needles have got caught in the folds of t he door gasket.
vapours that may catch fire and explode.
GB
7.4 CLEANING THE DRAIN PUMP
Only clean the drain pump if it is obstructed by buttons, hairpins and the like and the water cannot drain.
In this case, proceed as follows.
1. Remove the plug from the socket to disconnect the machine fro m the electrical power supply.
2. Depending on the model, proceed as f ollows:
MODEL A – Use a coin to turn the plastic buttons
f ix ing the cover to the base plate anti-clockwise.
MODEL B – Insert a small screwdriv er into the
slots in the base plate c over, then gently pris e up
to release the upper part of the cov er.
Pull the cov er slightly forwards and t hen up to remov e it completely.
26
Page 27

3. Pull out the drain hose “A”.
Attention: if the hose is hot it means the water is hot or boiling. Place a
tray on the f loor and remove the plug “B” to drain the water.
Depending on the quantity of water, it m ay be necessary to em pty the
tray several times.
When no more water comes out, push the hose back in and sc rew
back the plug “B”.
4. Unscrew the cover of the pump “D” by turning it anti-clockwise.
Clean the pump body and remov e any f oreign bodies.
Check the inside “E” and mak e sure the impeller turns f reely. If t here are
7.5 CLEANING THE DET ERGENT TRAY
Keep the detergent tray free from scale.
To simplify this operation, com pletely rem ove the detergent tray (pull it out
as far as it will go, lift it slightly and then pull fairly vigorously ).
Remov e the traps «B» (there are two traps if the machine is not fitt ed with a
cover for the bleach compartment) and clean with hot water.
Put back the traps and remove any residues of detergent bef ore putting the
tray back.
7.6 CLEANING THE WATER INLET FILTER
The machine is fitted with a filter f or protecting the water inlet valv es.
The f ilter is fitted t he gas thread of the inlet hose connected to the tap
Clean the f ilter if no water or insufficient quantities of water enter the washing machine.
To do this, proceed as follows:
any foreign bodies, remov e t hem.
5. Screw the pump cover back on.
Fix the drain hose by s napping the plug into place «C».
Depending on the model, put back the cov er as f ollows:
MODEL A – Insert the lower part of t he cov er f irst. Then secure it by turning the plastic buttons a quarter
turn clockwise.
The slots in the buttons must be horizontal.
MODEL B – Insert the lower part of the cov er first and then push it towards the bas e plate until it clicks
into place.
• Remove the plug from the socket to disconnect the machine from the
electrical power supply.
• Turn off the water tap.
• Unscrew the inlet hose from the tap.
• Remov e the f ilter from the inlet hose gas thread.
• Clean the f ilter with water and a brush.
• When screwing the inlet hose back on to the tap, make sure the f ilter is correctly pos itioned.
GB
27
Page 28

8. TROUBLESHOOTING
This product complies with current saf ety regulations gov erning elec trical equipment. For safety reasons, all technical inspections or repairs must be perf ormed by qualified technicians in order to prevent hazardous situations f or
users.
If the machine does not work, bef ore calling the Service Centre and spending money unnecessarily, check that
the operations indicated in this
1 The machine does not start
The tub does not fill with
2
water
No water appears to be in
3
the drum
4 The water does not drain
The water does not drain
5
after final rinsing in delicates and woollens wash-
ing programmes
The machine fills with wa-
6
ter and drains continuously
Strong vibrations during
7
sp inni ng
Too much foam forms and
8
escapes from the tray
9 Water on the floor
Not all the fabric softener
10
enters the machine or too
much water remains in the
compartment
U
troubleshooting tableU hav e been performed.
Check that:
- the plug is correctly fitted into the socket
- the door is securely c losed
- the “Start-Pause” button has been pressed.
Check that:
- the plug is correctly fitted into the socket
- the door is securely closed
- the water tap is open
- the water inlet filters are not c logged. Clean them as indicated in
paragraph 6.5.
- the water inlet tube is not jammed or bent
No f ault.
The water lev el is lower than the glass of the door because the new machines use less water though obtaining the same washing and rinsing re-
sults.
Check that:
- the drain hose is not twist ed
-
the drain pump is not clogged. Clean it as indicated in paragraph 6.3.
This is envisaged by the washing programme (if the no-spin and stop with
tub f ull
option has been selected) to prev ent fabrics from creasing.
To drain the water, proceed as described in the “End of programme” section, paragraph 5.13.
Make sure the end of the drain hose is not too low.
Check that:
- the m achine has been properly levelled as desc ribed in paragraph
3.2
- the machine is not too close to walls or f urniture
- the int ernal moving assembly has been released as desc ribed in
paragraph 3.1
Check that:
- the detergent is suitable for automatic machines and is not for hand
washing
- no more than the quantities indicat ed in the manual are used
Check that:
- the unions of the water inlet hose are not loose
- the end of the drain hose has not moved out of place.
Make sure that the traps in the detergent tray are correctly positioned and
are not clogged. Clean them as indicated in paragraph 6.4.
GB
28
Page 29

The machine does not spin
11
Draining water from the
12
drum
The washing has not been
13
correctly spun
Residues of detergent on
14
the washing
The washing does no t dry
15
Washing results are unsat-
16
isfactory
The unbalanced load sensor has triggered because the washing is not
unif orm ly dist ributed inside the drum. If the washing is wet at the end of
the cycle, distribute it well inside the basket and repeat just the spin cycle.
In the event of a power f ailure or a fault in the appliance, the water inside
the drum can be drained as described in paragraph 6.3
Large items have rolled up and are not unif ormly distributed inside the
drum. Alway s wash large items together with small ones.
Many phosphate-free detergents contain substances that are difficult to
dissolv e in water.
Select the Rinse programme or brush the washing.
Check that:
- the water tap is open
- the washing does not weight too much
- the drying time is suitable.
- suff ic ient dry ing time has been selected
If the machine does not dry all the same, call the Serv ic e Centre to remove fabric frays f rom the fan and drying ducts.
- Too little det ergent or an unsuit able detergent may hav e been
used.
- Stubborn stains were not pre-treated
- The wrong temperature was selected
- The drum was overloaded
ERROR SIGNALS
In the ev ent of faults, the machine will display an error code.
GB
Error code Problem
Door not closed properly. Close it.
Aquastop. Contact the nearest Serv ice Centre after disconnect ing the machine from
For all other error codes, contact the nearest Ass istance Centre after disc onnecting the power supply and closing
the water tap.
the electrical power supply and closing the water tap.
No water for washing. See point 2 on the troubleshoot ing table.
The water does not drain. See point 4 on the troubleshooting table.
29
Page 30

9. CONTROL PANEL SYM BOLS
PROGRAMS
DRYI NG
HAND WASH
PRE-WASH
RINSES
DRAIN AN D SPI N
SECTION
COTT O N AND CO L -
OURED
WOOL
DRYI NG
SI NT HET I CS AND
DEL ICAT ES
OPTIONS OTHER S YM BOLS
- e
WATE R I NCREASE
NO SPIN OR STOP WHIT
FULL TUB
DELAY TIMER
DEL ICAT ES
ECONOMY CYCLE
QUICK W AS H
EXT RA RI NS E
EASY-IRON
HALF LOAD
SPIN
GB
FABRIC CO NDI T I ONE R
OPEN DOOR
ST ART-P AUSE
ST ART
WASH
END
HEAT ING
TIME REMAINING
30
Page 31

PROGRAMME GUIDE - KEY TO BUTTON
S
th
ti
fibres blends
cs
e
yn
and
delicates
load (kg)
(optional)
Temperature
Max. recommended load (kg)
Prewash detergent
Main wash detergent
Additive
Quick wash
Slightly dirty delicate coloureds Cold 4-2
Slightly dirty delicate coloureds 30° 4-2
Normally dirty delicate coloureds 40° 5-2
Normally dirty resistant coloureds 60° 5-2
Very dirty washing 60° 512
Extremely dirty washing 90° 412
Drain and spin 0° 5-- -
Rinses 0° 5--
cotton, col oured or hemp fabrics)
Cotton and colour eds programmes (f or
Wool,
programme
Fabric softener 0° 5-Wool and silk 35° 1-2
Silk
Handwash
Rinses 0° 2,5 - Normally dirty delicate synthetics 40° 2,5 - 2
synthetic
s (artificial
Very dirty resistant synthetics 60° 2,5 1 2
0°
1-2
U
U
U
U
U
U
U
U
U
U
U
U
U
○○
○○
○○
○○
○○
○○
○ -
○○
○○
--
-
○○
○○
○○
-
Extra Rinse
possible after washing
Drying
Max. drying
+
2,5 Cold wash, rinses and final spin at selected speed
-
+
2,5 Wash at 30°C, rinses and final spin at selected speed
-
+
2,5 Wash at 40°C, rinses and final spin at selected speed
-
+
2,5 Economy wash at 60°C, rinses and final spin at selected speed
-
+
2,5 Prewash at 35°C, economy wash at 60°C, rinses and final spin at selected speed
-
+
2,5 Prewash at 35°C, wash at 90°C, rinses and final spin at selected speed
-
+
2,5 Just drain, or drain and final spin at selected speed
-
+
2,5 3 rinses and final spin at selected speed
-
+
2,5 1 rinse with softener, drain and spin at selected speed
-
Wash at 35°C, drain and spin at selected speed (max. 900 rpm)
Cold wash, rinse and spin at selected speed (max. 900 rpm)
1,5 3 rinses and final spin at selected speed (max. 900 rpm)
-
1,5 Wash at 40°C, rinses, drain and spin at selected speed (max. 900 rpm)
-
1,5 Prewash at 35°C, wash at 60°C, rinses, drain and spin at selected speed (max. 900 rpm)
-
Description of washing cycle
START - PAUSE
QUICK WASH
= button can be pressed
DELAYED START
INCREASE WATER
EASY-IRON
DRYING
EXTRA RINSE
NO SPIN AND STOP WITH
TUB FULL
SPIN
ECONOMY
DELICATES
HALF
1/2
LOAD
Codice 19 592 0060 00 GB
 Loading...