

Page 1

Dear Customer,
The manufacturer reserves the right to make any changes deemed useful for the improvement of its products without
prior notice. The illustrations and descriptions contained in this manual are therefore not binding and are merely
indicative.
Thank you for choosing a Smeg product.
By choosing Smeg, you have selected an appliance which combines iconic style with
innovative technical design and attention to detail.
This appliance coordinates perfectly with other Smeg products, or works equally great
as a standalone statement piece in your kitchen.
We hope you enjoy using your new appliance!
For any further information please visit www.smeg.com or www.smegusa.com (website
valid only for the USA, Canada and South America).
SMPR01 SMSC01
Pasta roller accessory Spaghetti accessory
SMFC01 SMTC01
Fettuccine accessory Tagliolini accessory
SMPC01
Pasta roller accessory and Pasta cutting set (Fettuccine and Tagliolini)
Page 2

Contents
EN
1 Instructions 27
1.1 Introduction 27
1.2 This user manual 27
1.3 Intended use 27
1.4 Manufacturer liability 28
1.5 Disposal 28
2 Description 29
2.1 Product description 29
2.2 Standard accessories 30
3 Use 31
3.1 Before first use 31
3.2 Fitting the pasta roller and accessories for cutting the pasta 31
3.3 Using the pasta roller 33
3.4 Using the accessories for long pasta 35
4 Cleaning and Care 36
4.1 Instructions 36
4.2 Maintenance 36
4.3 Cleaning the surfaces 36
4.4 Ordinary daily cleaning 36
4.5 Food stains or residues 36
4.6 Lubricating the mechanism 36
4.7 Extraordinary maintenance 37
5 Recipes 38
Important Safeguards
WARNING: If the instructions contained in this manual are not followed
precisely, fire or explosion may result causing property damage, personal
injury or death.
READ AND SAVE THESE INSTRUCTIONS - Your safety and the safety of
others are very important.
We have provided many important safety messages throughout this manual and
on the appliance.
Read all the instructions before using the appliance and always obey all safety
messages.
23
Page 3
Important Safeguards
RECOGNIZE SAFETY INFORMATION
This is a safety alert symbol. This symbol alerts you to potential hazards that can
result in severe personal injury or death.
UNDERSTAND SIGNAL WORDS
A signal word - DANGER, WARNING or CAUTION - is used with the safety alert
symbol. DANGER denotes the most serious hazards. It means you could be killed
or seriously injured if you do not immediately
means you could be killed or seriously injured if the instructions are not followed.
CAUTION indicates a potentially hazardous situation, which, if not avoided, could
result in minor to moderate injury.
• This appliance is intended for use in the home only.
• Use this appliance only for its intended purpose. The
manufacturer cannot be held liable for damage caused by
WARNING
improper use of this appliance.
• This appliance complies with current safety regulations.
Improper use of this appliance can result in personal injury
and material damage.
• Read all the instructions before installing or using the
appliance for the first time.
• Keep these operating instructions in a safe place and pass
them on to any future user.
follow the instructions. WARNING
The safety messages will inform you of potential hazards, on how to avoid the risk of injury
and what can occur if the instructions are not followed.
IMPORTANT: Observe all codes and ordinances in force.
WARNING: For your safety, the instructions contained in this manual must be
followed to minimize the risk of fire or explosion and to prevent property damage,
personal injury or death.
Do not store or use gasoline or other flammable vapors, liquids or materials near this or any
other appliance.
NOTE: This appliance is NOT designed for installation in manufactured (mobile)
homes or in recreational vehicles (RVs).
DO NOT install this appliance outdoors.
24
Page 4

Important Safeguards
EN
WARNING
To reduce the risk of fire, electrical shock, personal injury, or
damage when using the appliance, follow basic safety
precautions, including the following:
Follow all safety instructions in order to use
the appliance safely.
• Read this user manual and the manual
supplied with the stand mixer carefully
before using the appliance.
• To protect against electric shock, do not
immerse the appliance, the power cord
or the plug in water or any other liquid.
• Do not use the stand mixer when the
power cord or the plug is damaged or
after the appliance malfunctions, or
when the appliance has fallen or is
damaged in any manner. Return
appliance to the nearest authorized
service center for examination, repair or
adjustment.
• Do not use the accessories if the stand
mixer power cord or the plug is
damaged, or if the stand mixer has been
dropped or is damaged in any manner.
• If the power cord is damaged, it must be
replaced by the manufacturer, its service
agent or similarly qualified persons in
order to avoid a hazard.
• The cable is short to prevent accidents.
Do not use an extension cord.
• Do not let cord hang over edge of table
or counter or touch hot surfaces.
• Do not pull on the cord to unplug it from
the power socket.
• Do not place the appliance above or
near lit gas or electric burners, inside an
oven or near other heat sources.
• Switch off the appliance immediately
after use.
• Do not leave the appliance unattended
while it is operating.
• Do not use the accessories if they are
damaged.
• Do not leave the accessories unattended
during use.
• Do not modify the accessories.
• Do not try to repair the accessories
yourself or without the assistance of a
qualified technician.
• Disconnect the appliance from the
power socket as soon as you have
finished using it and before cleaning it.
• In case of fault, repairs should only be
carried out by a qualified technician.
• Never try to put out a fire or flames with
water: turn off the appliance, remove the
plug from the socket and smother the
flames with a fire blanket or any other
appropriate cover.
• Do not modify the appliance.
• Keep the appliance out of children’s
reach.
25
Page 5

Important Safeguards
For the appliance and accessories
• Unplug the appliance from the power
socket as soon as you have finished
using it and before cleaning it.
• Always unplug the appliance from the
wall if it is left unattended and before
assembling, disassembling or cleaning.
• Remove beaters from mixer before
washing.
• Do not insert, remove or replace
attachments with the safety lock
disengaged (motor head lowered).
• Do not touch moving parts while the
appliance is operating. Keep hands,
hair, clothing, spatulas and any other
objects away from the mixer’s
attachments and accessories to avoid
personal injury or damage to the
appliance.
• Do not remove attachments while the
mixer is operating. Switch off the
appliance and unplug it before changing
accessories or approaching moving
parts while they are in use.
• Check that the bowl is correctly
positioned and locked into its base
before using the appliance with its
attachments.
• Do not release or remove the bowl while
the appliance is operating.
• Do not exceed the bowl's maximum
capacity.
• Let the appliance cool down before
cleaning.
• The use of attachments not
recommended or sold by the
manufacturer may cause fire, electric
shock or injury.
• Do not place objects on top of the
appliance.
• Do not use harsh detergents or sharp
objects to wash or remove residues from
the bowl, attachments or accessories.
• Do not use outdoors.
• The stand mixer can be used to mix,
whip, whisk and knead solid and liquid
ingredients to speed up the preparation
time for various recipes. With the
addition of optional accessories it is able
to grind, mince, grate, mill, roll out and
cut pasta into different shapes, etc.
• Close supervision is necessary when any
appliance is used by or near children.
• Do not use more than one attachment at
a time.
• Turn off the stand mixer before attaching
or removing the accessories.
• Do not remove accessories while the
stand mixer is operating. Check that the
speed selector is in the 0 (OFF) position.
• Let the accessories cool down before
cleaning.
• Do not use harsh detergents or sharp
scrapers to clean the accessories.
• Do not place objects on top of the
accessories.
26
SAVE THESE INSTRUCTIONS
Page 6

Important Safeguards
EN
1 Instructions
1.1 Introduction
Key information for the user:
Instructions
General information on this user
manual, on safety and final
disposal.
Description
Description of the accessories.
Use
Information on using the
accessories.
Cleaning and care
Information on proper cleaning and
maintenance of the accessories.
Recipes
List of recipes for preparing various
types of pasta.
Safety instructions
1.2 This user manual
This user manual is an integral part of the
appliance and must therefore be kept in its
entirety and within the user’s reach for the
whole working life of the appliance.
1.3 Intended use
• These accessories are designed
exclusively for home use.
• Use these accessories only in
combination with the same
manufacturer's stand mixer.
• Use the accessories indoors.
• The pasta roller can be used to roll out
the pasta to the required thickness.
• The long pasta accessories can be used
to cut the pasta into different shapes
(tagliatelle, tagliolini, fettuccine and
spaghetti).
• Do not use the accessories for anything
other than their intended use.
• These accessories may not be used by
people (including children) of reduced
physical or mental capacity, or lacking in
experience in the use of electrical
appliances, unless they are supervised or
instructed by adults who are responsible
for their safety.
Information
Advice
The California Safe Drinking
Water and Toxic Enforcement Act
requires the Governor of
California to publish a list of
substances known to the State of
California to cause cancer, birth
defects or other reproductive harm,
and requires businesses to warn
customers of potential exposure to
such substances.
27
Page 7

Important Safeguards
Warning
• This product contains a chemical known
by the State of California to cause
cancer, birth defects or other
reproductive harm.
• This appliance can cause low-level
exposure to some of the substances
listed, including benzene,
formaldehyde, carbon monoxide,
toluene, and soot.
1.4 Manufacturer liability
The manufacturer shall not be held
responsible for personal injuries or property
damage caused by:
• Using the accessories for purposes other
than those intended;
• Not having read the user manual;
• Tampering with any part of the
accessories;
• Using non-original spare parts
• Not following the safety instructions.
1.5 Disposal
Power voltage
Danger of electrocution
• Turn off the appliance.
• Unplug the appliance from the wall
outlet.
• Old appliances do not belong in
household waste! To comply with
current legislation, old appliances,
having reached the end of their useful
lives, should be taken to a disposal
facility where they can be sorted. In this
way, any valuable material contained in
the old appliances can be recycled and
the environment protected. Local
authorities or their waste disposal
operators can provide further
information.
Our accessories are packed in nonpolluting and recyclable materials.
• Dispose of the packing materials at an
appropriate disposal facility.
Plastic packaging
Danger of suffocation
28
• Do not leave the packaging or any part
of it unattended.
• Do not let children play with the plastic
bags.
Page 8

EN
2 Description
2.1 Product description
Description
2
1
3
SMPR01 - Pasta roller accessory SMSC01 - Spaghetti accessory
2
SMFC01 - Fettuccine accessory SMTC01 - Tagliolini accessory
1 2
2
1
1
1 Rollers
2 Attachment
3 Thickness selection knob
29
Page 9

Description
2.2 Standard accessories
Brush
For removing dry pasta residue from the
accessories and rollers.
The accessories intended to come
into contact with food are made of
materials that comply with the
provisions of current legislation.
30
Page 10

Use
EN
1
3 Use
Electrical Shock Hazard
• Plug into a grounded 3-prong outlet.
• Do not remove the ground prong.
• Do not use an adapter.
• Do not use an extension cord.
• Failure to follow these instructions can
result in death, fire, or electrical shock.
Volts: 120 Volts AC only.
Hertz: 60 Hz
Your stand mixer has a 3-prong
grounded plug. To reduce the risk
of electrical shock, this plug will fit
into an outlet only one way. If the
plug does not fit in the outlet,
contact a qualified electrician. Do
not modify the plug in any way.
• Do not use an extension cord. If the
power supply cord is too short, have a
qualified electrician or service technician
install an outlet near the appliance.
• A short power supply cord (or
detachable power supply cord) should
be used to reduce the risk resulting from
becoming entangled in or tripping over a
longer cord.
• Longer detachable power supply cords
or extension cords are available and
may be used if care is taken when using
them.
If a longer detachable power supply cord
or extension cord is used:
• The marked electrical rating of the
power supply cord or extension cord
should be at least as great as the
electrical rating of the appliance.
• The cord should be arranged so that it
will not hang over the countertop or
tabletop where it can be pulled on by
children or tripped over unintentionally.
• If the appliance is of the grounded type,
the extension cord should be a
grounded, 3-prong cord.
3.1 Before first use
1. Remove any protective packaging from
the outside or inside of the accessories.
2. Remove any labels from the accessories.
3. Clean the accessories (see “4 Cleaning
and Care”).
4. Prepare the pasta to be rolled with the
pasta roller or to be cut with the
accessories for long pasta.
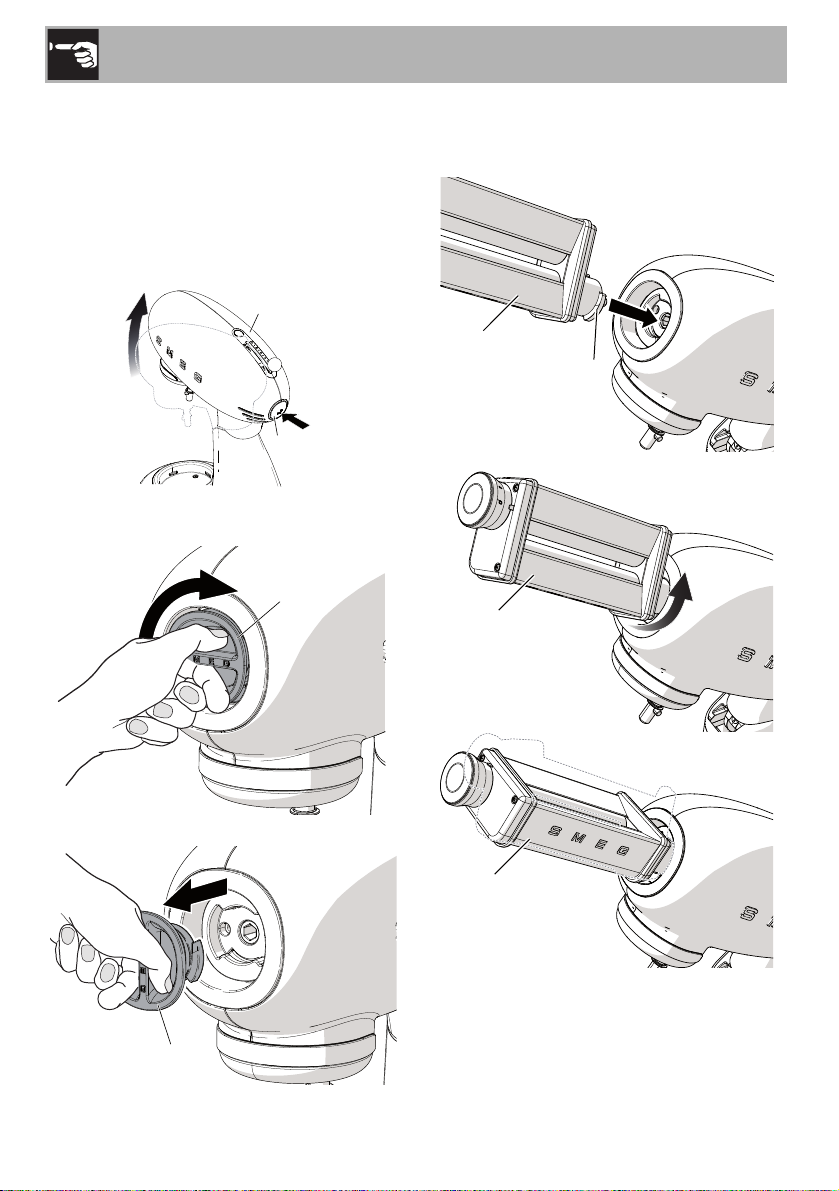
3.2 Attaching the pasta roller and
accessories for cutting the pasta
1. Turn off the stand mixer by moving the
mixer lever (1) to the ‘0’ (OFF) position.
2. Remove the plug from the power socket.
31
Page 11
Use
4
4
5
5
5
6
3. Press the release button (2).
4. Hold down the button and raise the
head (3), accompanying its movement
with your hand.
5. Remove any standard accessories
(dough hook, wire whisk, flat beater)
w h i c h m a y b e i n s e r t e d i n t h e m i x e r .
3
2
6. Grasp the front attachment hub cover (4)
at the center and turn it clockwise.
8. Insert the accessory (5) following the
guide in the attachment hub (6), then turn
it 60°.
7. Pull the cover (4) to remove it.
32
9. Press the release button and lower the
stand mixer head, supporting it with your
hand as you lower it.
Page 12

Use
EN
3.3 Using the pasta roller
Pasta roller settings
Setting Suitable for
2 Kneading, rolling out
3 Thick egg pasta
4Egg pasta
4 or 5 Pasta for lasagne,
fettuccine, spaghetti,
tagliolini
6 or 7 Pasta for tortellini, thin
fettuccine
1. Follow the tips given in the section “Tips
for perfect pasta dough” when
preparing the pasta dough.
2. Cut the pasta dough into pieces
approximately 1 cm (1/2 inch) thick.
3. Pull the knob (7) in the direction shown
by the arrow A to release it, then turn it to
the ‘1’ position.
7
A
4. Let go of the knob (7) and ensure that it
has locked into position.
7 or 8 Very thin pasta
Risk of food poisoning
• Do not leave ingredients subject to
spoiling such as eggs, dairy, etc. outside
the fridge for more than one hour.
7
5. Plug the stand mixer into the power
socket.
33
Page 13

Use
6. Move the stand mixer speed selector
lever (9) to the ‘1’ position to start the
rollers
.
9
Moving parts
Danger of personal injury and
damage to the appliance
• Do not touch the accessories while the
appliance is running.
• Do not use the accessories for anything
other than the uses specified.
7. Sprinkle flour on both sides of a piece of
dough. Then pass it through the rollers to
roll it out.
8. Fold the dough in two and insert it
between the rollers again.
9. Select position ‘2’ with the knob on the
pasta roller. Pass the dough between the
rollers to roll it thinner. Continue to
gradually reduce the space between the
rollers, until you obtain pasta of the
required thickness. (See “Pasta roller
settings” for further details).
10. Move the stand mixer speed selector to
the ‘0’ (OFF) position to stop it.
Improper use
Risk of damage to the accessory
• Do not use the pasta roller to roll out or
cut any kind of dough other than pasta
dough.
11. Once you have finished using the
accessory, unplug the mixer, remove the
accessory from the attachment hub and
replace the cover on the attachment hub.
34
Page 14

Use
EN
3.4 Using the accessories for long
pasta
Use the pasta roller to roll out the dough to
the thickness required for the type of pasta
you wish to cut, as described in section “3.3
Using the pasta roller”.
1. Select the required long pasta
accessory.
2. Follow the same procedure described in
section “3.2 Attaching the pasta roller
and accessories for cutting the pasta” to
attach the accessories for long pasta.
3. Pass the dough through the chosen pasta
cutting accessory (1) in order to shape it
into the required type of pasta.
Tips for perfect pasta dough
• Humidity, type of flour chosen and size
of the eggs used can all influence the
consistency of the pasta dough.
• The pasta dough should be firm and
rough to the touch, but should also be
malleable. It should not stick to your
fingers or crumble.
• Pinch the pasta dough to check its
consistency. If the dough remains
compact and does not stick to your
fingers, it is suitable. If this is not the case,
add a little flour. If the pasta is crumbly,
add a little water.
• Cut the sheets of pasta into two or more
pieces before cutting them into
fettuccine, tagliolini or spaghetti, as they
will be difficult to manage if they are too
long.
• The pasta may be cooked immediately
after cutting.
Tips for preserving pasta
Moving parts
Danger of personal injury and
damage to the appliance
• Do not touch the accessories while the
appliance is running.
• Do not use the accessories for anything
other than the uses specified.
4. Move the stand mixer speed selector to
the ‘0’ (OFF) position to stop it.
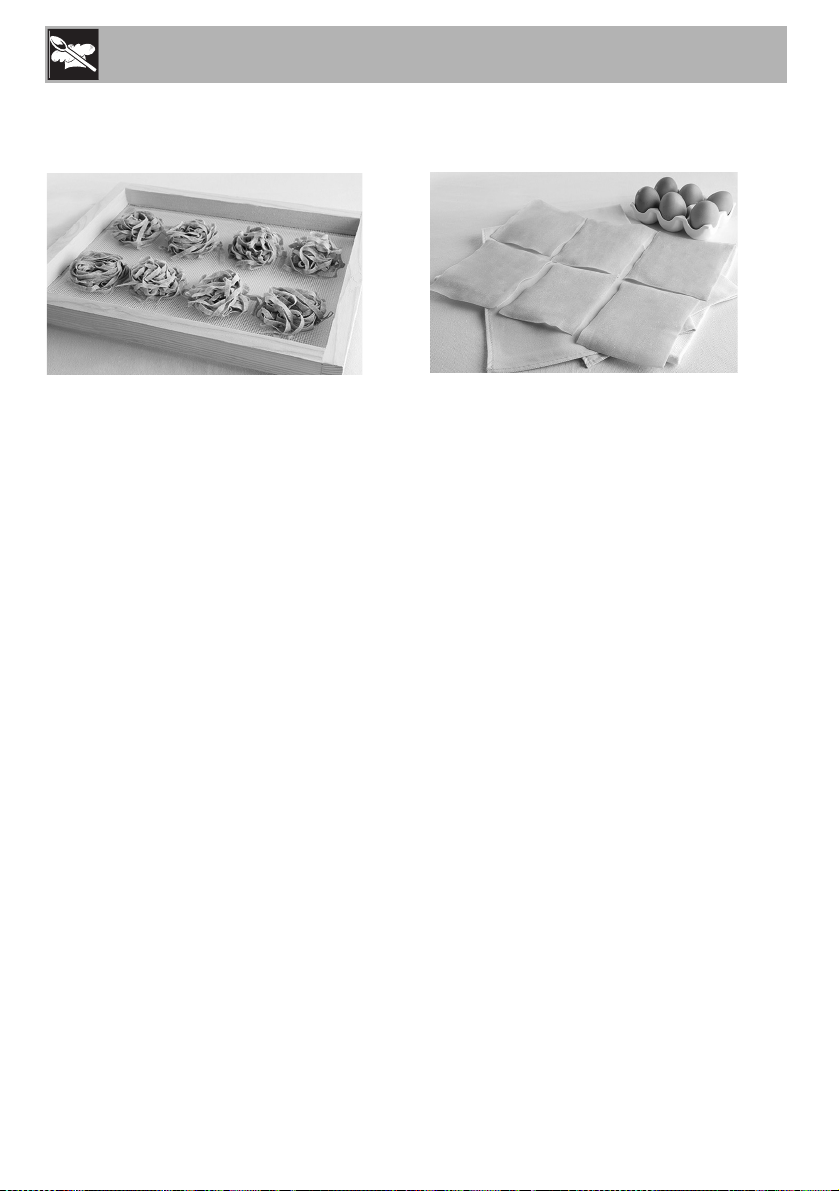
Freshly made pasta may be eaten
immediately, or dried or frozen to be used
at a later date.
• To dry the pasta, spread it out in a single
layer on a tray or dish towel for
approximately one hour and leave it to
air dry. The dried pasta can be kept in an
airtight plastic container.
• To freeze the pasta, let it dry in the air for
approximately one hour, sprinkle it with
flour and roll it up into nests. Then place it
in an airtight plastic container and store it
in the freezer.
35
Page 15
Cleaning and Care
4 Cleaning and Care
4.1 Instructions
Improper use
Danger of electrocution
• Switch off and unplug the mixer before
cleaning it and its attachments and
accessories.
Improper use
Risk of damage to surfaces
• Do not place the accessories in water.
• Never wash in the dishwasher.
• Do not use steam jets to clean the
accessories.
• Do not use cleaning products containing
chlorine, ammonia or bleach.
• Do not use abrasive or corrosive
detergents (e.g. powder products, stain
removers and metallic sponges).
• Do not use rough or abrasive materials
or sharp metal scrapers.
4.4 Ordinary daily cleaning
Use a soft cloth or a dry microfiber cloth to
clean the surfaces.
4.5 Food stains or residues
Let the pasta roller and the long pasta
accessories dry for at least one hour before
removing any pasta residue. Use the
supplied brush to remove any dry pasta
residue.
Never use sharp scrapers or knives, as
these will damage the surface.
Do not insert cloths or dish towels between
the rollers to clean them.
4.6 Lubricating the mechanism
Lubricate the mechanism at least once a
year, or every 50 uses.
Use a light mineral oil.
1. Apply a drop of mineral oil to each of the
four corners of the rollers.
4.2 Maintenance
All service should be performed by an
authorized service representative.
4.3 Cleaning the surfaces
To keep the surfaces in good condition,
they should be cleaned regularly after use.
36
Page 16

Cleaning and Care
EN
1
2
2
1
3
4
4
5
5
6
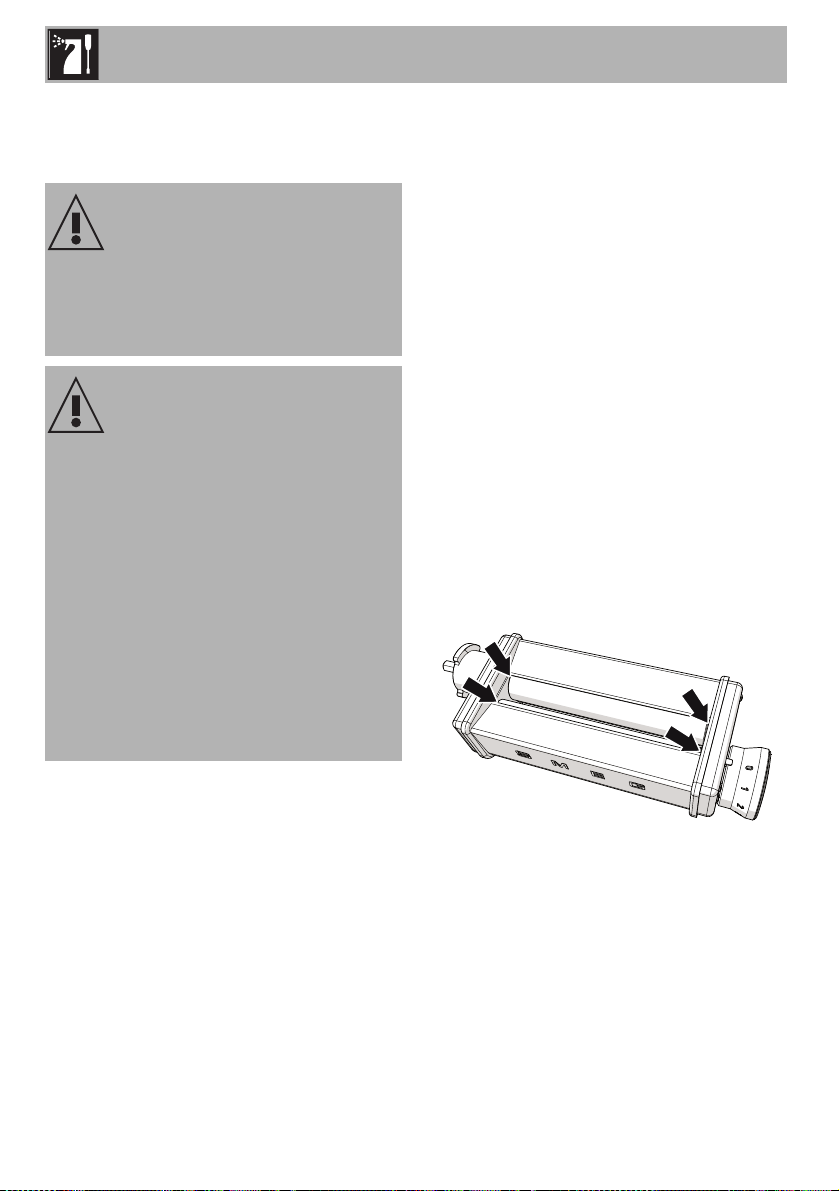
4.7 Special maintenance
For more thorough cleaning and to avoid
the proliferation of germs which could
contaminate the pasta, disassemble the
scrapers and clean the rollers of the long
pasta accessories as follows:
1. Remove the lower scrapers (1) by
pressing down on the milled parts (2)
and moving the scraper sideways.
2. Insert the end (3) of the rod in the hole (4)
of the scraper (5) and pull upwards.
3. Clean the pasta roller and the long pasta
accessories using the supplied brush (6).
4. Put the scrapers back in place, following
the above procedure in reverse.
Important
• Before cleaning, let the pasta cutting
accessories dry for at least one hour,
then remove any dry pasta residue with
the cleaning brush. If this is difficult, tap
the accessory with your hand.
37
Page 17
5 Recipes
Recipes
Whole Wheat Fettuccine
Ingredients:
270g (2 1/4 cups) whole wheat flour
130g (3/4 cup) Durum wheat semolina
4 eggs
2-3 tablespoons water (if required)
A pinch of salt
Flour to roll the dough
Method
1. Using the dough hook attachment, mix
the flour, semolina, salt and eggs on
speed 1 or 2 for 3-5 minutes. Soften the
dough with water if necessary.
2. Remove the dough from the bowl, wrap
with cling film and let rest in the in the
refrigerator for 30 minutes.
3. Roll the dough using the pasta roller
accessory, sprinkling with flour when
necessary so that it does not stick.
Pass it through the roller several times,
reducing the thickness from no. 0 to 5.
4. Allow the sheets of pasta to dry a little,
and then make the fettuccine using the
fettuccine accessory.
5. Sprinkle the fettuccine strips with flour,
form into nests and let dry well.
Lasagna Sheets
Ingredients:
400g (3 1/4 cups) flour
4 eggs
20g (1 1/2 tablespoons) water
A pinch of salt
Flour to roll the dough
Method
1. Using the dough hook attachment, mix
the flour, salt and eggs on speed 1 or 2
for 3-5 minutes. Soften the dough with
water if necessary.
2. Remove the dough from the bowl, wrap
with cling film and let rest in the
refrigerator for 30 minutes.
3. Roll the dough using the pasta roller
accessory, sprinkling with flour when
necessary so that it does not stick.
Pass it through the roller several times,
reducing the thickness from no. 0 to 3.
4. When the dough is at thickness 3,
change to thickness 6 and roll through
once. Cut it into ready-to-use rectangles.
38
Page 18

Recipes
EN
Spinach Tagliolini
Ingredients:
340g (2 3/4 cup) flour
3 eggs
70g (2 1/2 oz) spinach (cooked,
squeezed and blended)
A pinch of salt
Flour to roll the dough
Method
1. Using the dough hook attachment, mix
the flour, salt, eggs and spinach on
speed 1 or 2 for 3-5 minutes.
2. Remove the dough from the bowl, wrap
with cling film and let rest in the
refrigerator for 30 minutes.
3. Roll the dough using the pasta roller
accessory, sprinkling with flour when
necessary so that it does not stick.
Pass it through the roller several times,
reducing the thickness from no. 0 to 5.
4. Leave the dough to rest for a few minutes,
then cut with the tagliolini accessory,
sprinkling the pasta with flour.
5. Sprinkle the tagliolini strips with flour, form
into nests and let dry thoroughly.
Tomato cannelloni sheets
Ingredients:
300g (2 1/2 cups) flour
2 eggs
1 egg yolk
120g (4 1/4 oz) of concentrated tomato
purée
1-2 tablespoons water (if required)
A pinch of salt
Flour to roll the dough
Method
1. Pour the flour and salt in the mixer bowl.
In a separate bowl beat the whole eggs
with the egg yolk and the concentrated
tomato puree and pour into the flour.
Using the dough hook attachment, mix
everything together on speed 1 or 2 for
3-5 minutes. If necessary, soften with
water.
2. Remove the dough from the bowl, wrap
with cling film and let rest in the
refrigerator for 30 minutes.
3. Roll the dough using the pasta roller
accessory, sprinkling with flour when
necessary so that it does not stick.
Pass it through the roller several times,
reducing the thickness from no. 0 to 5.
4. Roll through one last time at thickness 6.
5. Cut the dough into ready-to-use
rectangles of about 10 x12 cm (3.9 x
4.7 inches).
39
Page 19

Recipes
Spaghetti
Ingredients:
400g (2 1/2 cups) Durum wheat semolina
230g (1 cup) hot water
6g (1 teaspoon) salt
Flour to roll the dough
Method
1. Using the dough hook attachment, mix
the semolina, water and salt on speed 1.
2. Work it for 4 or 5 minutes to make a
smooth dough.
3. Remove the dough from the bowl, wrap
with cling film and let rest in the
refrigerator for 30 minutes.
4. Roll the dough using the pasta roller
accessory, sprinkling with flour when
necessary so that it does not stick.
Pass it through the roller several times,
reducing the thickness from no. 0 to 1.
5. Let the pasta rest for 10-15 minutes, then
cut with the spaghetti accessory,
sprinkling the pasta thoroughly with flour.
6. Allow to dry before use.
40
Page 20

 Loading...