

Page 1

Contents
1. Preliminary instructions_____________________________________ 5
ISPOSING OF PACKAGING ___________________________________ 6
1.1 D
1.2 D
ISPOSING OF OLD APPLIANCES _______________________________ 6
2. Description of controls _____________________________________ 7
RONT CONTROL PANEL_____________________________________ 7
2.1 F
2.2 E
LECTRONIC PROGRAMMER __________________________________ 9
2.3 C
LOCK AND PROGRAMMER __________________________________ 12
3. Using the oven ___________________________________________ 13
3.1 W
3.2 O
3.3 C
4. Available accessories _____________________________________ 14
5. Cooking hints ____________________________________________ 16
5.1 T
5.2 H
5.3 G
5.4 H
5.5 D
5.6 D
5.7 S
6. Recommended cooking table _______________________________ 20
7. Maintenance and cleaning __________________________________ 22
7.1 E
7.2 D
7.3 O
7.4 P
ARNINGS AND GENERAL ADVICE _____________________________ 13
VEN LIGHT ____________________________________________ 13
OOLING VENTILATION_____________________________________ 13
RADITIONAL COOKING ____________________________________ 16
OT-AIR COOKING ________________________________________ 16
RILL COOKING__________________________________________ 17
OT-AIR GRILLING ________________________________________ 17
ELICATE COOKING _______________________________________ 18
EFROSTING____________________________________________ 18
PIT ROASTING __________________________________________ 19
NAMELLED PARTS _______________________________________ 22
OOR GLASS ___________________________________________ 22
UTER OVEN STRUCTURE __________________________________ 22
YROLYSIS: AUTOMATIC OVEN CLEANING _______________________ 22
8. Extraordinary maintenance _________________________________ 26
EPLACING THE LIGHT BULB _________________________________ 26
8.1 R
8.2 D
ISMANTLING THE DOOR ___________________________________ 26
3
Page 2

Introduction
Thank you for having preferred our product. From now on we
feel sure you will enjoy creatively using your new oven.
We recommend you carefully read the instructions in this
manual. A lot of room has been given to the best and most
correct way of using the oven. These instructions will also make
it easier for you to become acquainted with each single
component or accessory.
Useful hints are provided on how to use pans and cooking
utensils, on correct guide positions and control settings.
Be sure to follow the cleaning instructions carefully. That way
your oven will give you many long years of reliable service.
The single paragraphs illustrate oven operation, step by step.
The text is easy to understand and completed with pictures and
some of the most commonly used pictograms.
By reading this manual carefully, you will find all the answers to
your oven operation queries.
4
Page 3
Preliminary instructions
1. Preliminary instructions
WE ADVISE YOU READ THIS INSTRUCTION MANUAL CAREFULLY BEFORE
USING THE OVEN.
THIS APPLIANCE HAS BEEN DESIGNED FOR THE FOLLOWING PURPOSES:
- COOKING AND HEATING FOOD -
ANY OTHER USE IS TO BE CONSIDERED IMPROPER.
THE MANUFACTURER DECLINES ALL RESPONSIBILITY FOR IMPROPER USE.
NEVER TRY TO REPAIR THE APPLIANCE BY YOURSELF!
IN CASE OF ONGOING FAULTS, TURN THE MAIN SWITCH OFF, DISCONNECT
THE POWER SUPPLY AND CONTACT YOUR NEAREST DEALER.
ALWAYS INSIST ON ORIGINAL SPARE PARTS.
THE MANUFACTURER CANNOT BE HELD RESPONSIBLE FOR ANY INJURIES
TO PERSONS OR DAMAGE TO THINGS CAUSED BY FAILURE TO FOLLOW THE
ABOVE INSTRUCTIONS OR BY TAMPERING WITH ANY APPLIANCE
COMPONENTS.
THE IDENTIFICATION PLATE, WITH TECHNICAL DETAILS, THE SERIAL NUMBER
AND
DO NOT REMOVE THE PLATE.
MARK ARE LOCATED ON THE OVEN DOOR FRAME.
NEVER LEAVE PACKAGING AROUND THE HOME.
THIS MANUAL IS AN INTEGRAL PART OF THE APPLIANCE AND SHOULD
THEREFORE BE KEPT INTACT IN A SAFE PLACE FOR THE ENTIRE LIFE CYCLE
OF THE OVEN.
INSTALLATION MUST BE DONE BY QUALIFIED PERSONNEL IN ACCORDANCE
WITH CURRENT REGULATIONS.
THIS APPLIANCE CONFORMS TO ALL CURRENT LEGAL PROVISIONS
CONCERNING RADIO DISTURBANCES.
EARTHING THE APPLIANCE IN COMPLIANCE WITH WIRING SYSTEM SAFETY
REGULATIONS IS MANDATORY.
THE PLUG TO BE CONNECTED TO THE POWER CABLE AND RELEVANT
SOCKET MUST BE OF THE SAME TYPE AND CONFORM WITH REGULATIONS IN
FORCE.
NEVER DISCONNECT THE PLUG BY JERKING THE CABLE.
DO NOT OBSTRUCT OPENINGS OR AIR AND HEATING VENTS.
5
Page 4
Preliminary instructions
AFTER USING THE OVEN, ALWAYS MAKE SURE THE CONTROL KNOBS ARE AT
"ZERO" POSITION (OFF).
WHEN THROWING AWAY AN OLD APPLIANCE, ALWAYS MAKE SURE ANY
PARTS WHICH COULD INJURE PERSONS OR DAMAGE THINGS ARE
RENDERED HARMLESS.
NEVER ALLOW THE OVEN TO BE USED BY CHILDREN WITHOUT ADULT
SUPERVISION.
DURING THE AUTOMATIC CLEANING CYCLE (PYROLYSIS) THE OUTER DOOR
WINDOW COULD BECOME HOTTER THAN NORMAL. KEEP CHILDREN AT A
DISTANCE.
NEVER PUT INFLAMMABLE OBJECTS IN THE OVEN. IF THIS WERE
ACCIDENTALLY LIT IT COULD CAUSE A FIRE.
1.1 D
ISPOSING OF PACKAGING
Always dispose of packaging in a proper manner. The best thing is to
get rid of it through a pre-sorted waste collection centre.
1.2 D
ISPOSING OF OLD APPLIANCES
Before throwing away an old appliance, make sure this is rendered
harmless and dispose of it through a pre-sorted waste collection centre.
6
Page 5
Description of controls
2. Description of controls
2.1 F
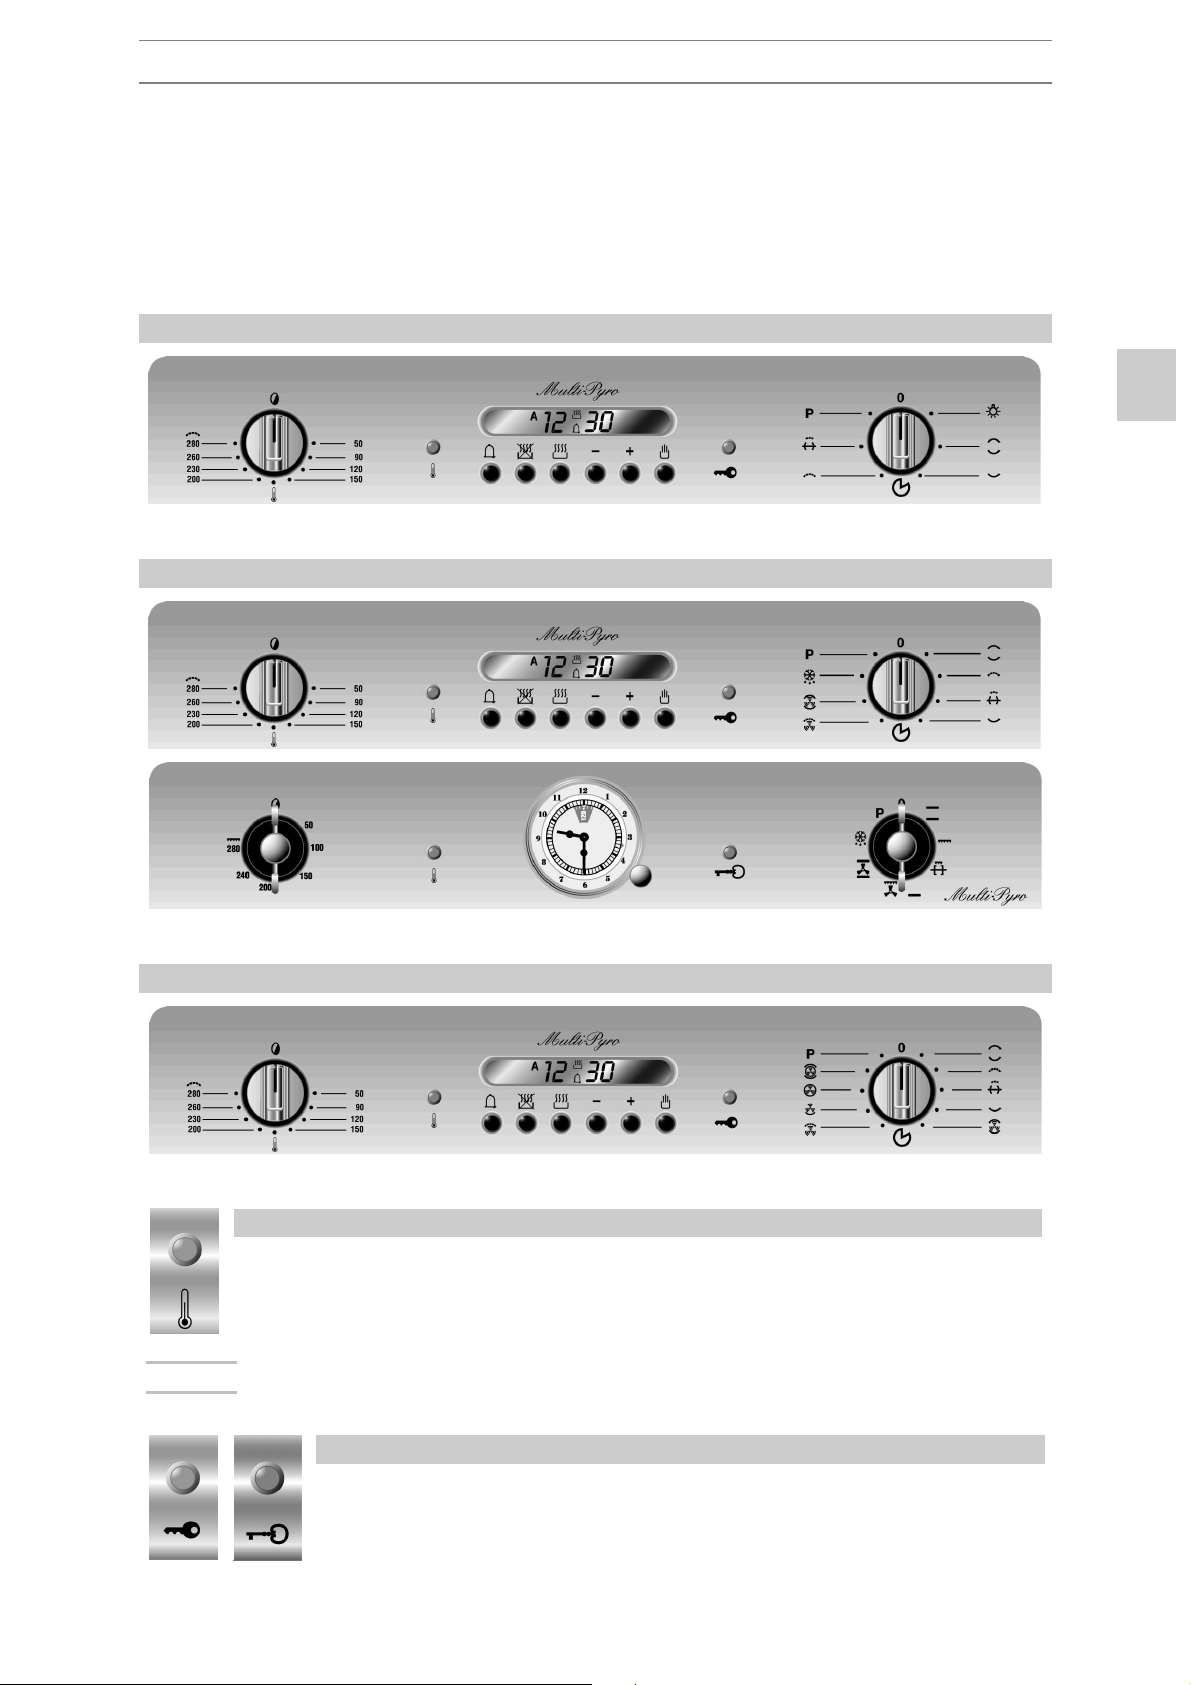
All the oven controls are grouped together on the front panel.
RONT CONTROL PANEL
STATIC MODEL
8-FUNCTIONS MODEL
10-FUNCTIONS MODEL
THERMOSTAT INDICATOR LIGHT
When this light comes on, the oven is heating up. When this light goes out,
the preset heating temperature has been reached. When the light flashes,
the temperature inside the oven is steady at the set temperature.
NOTE :
THIS LIGHT ALSO COMES ON DURING THE AUTOMATIC CLEANING CYCLE
(PYROLYSIS) AND GOES OUT WHEN THE SET TIME HAS PASSED.
DOOR LOCK INDICATOR LIGHT
When this light comes on during automatic cleaning (pyrolysis), the
door lock device is operative.
7
Page 6
Description of controls
NOTE :
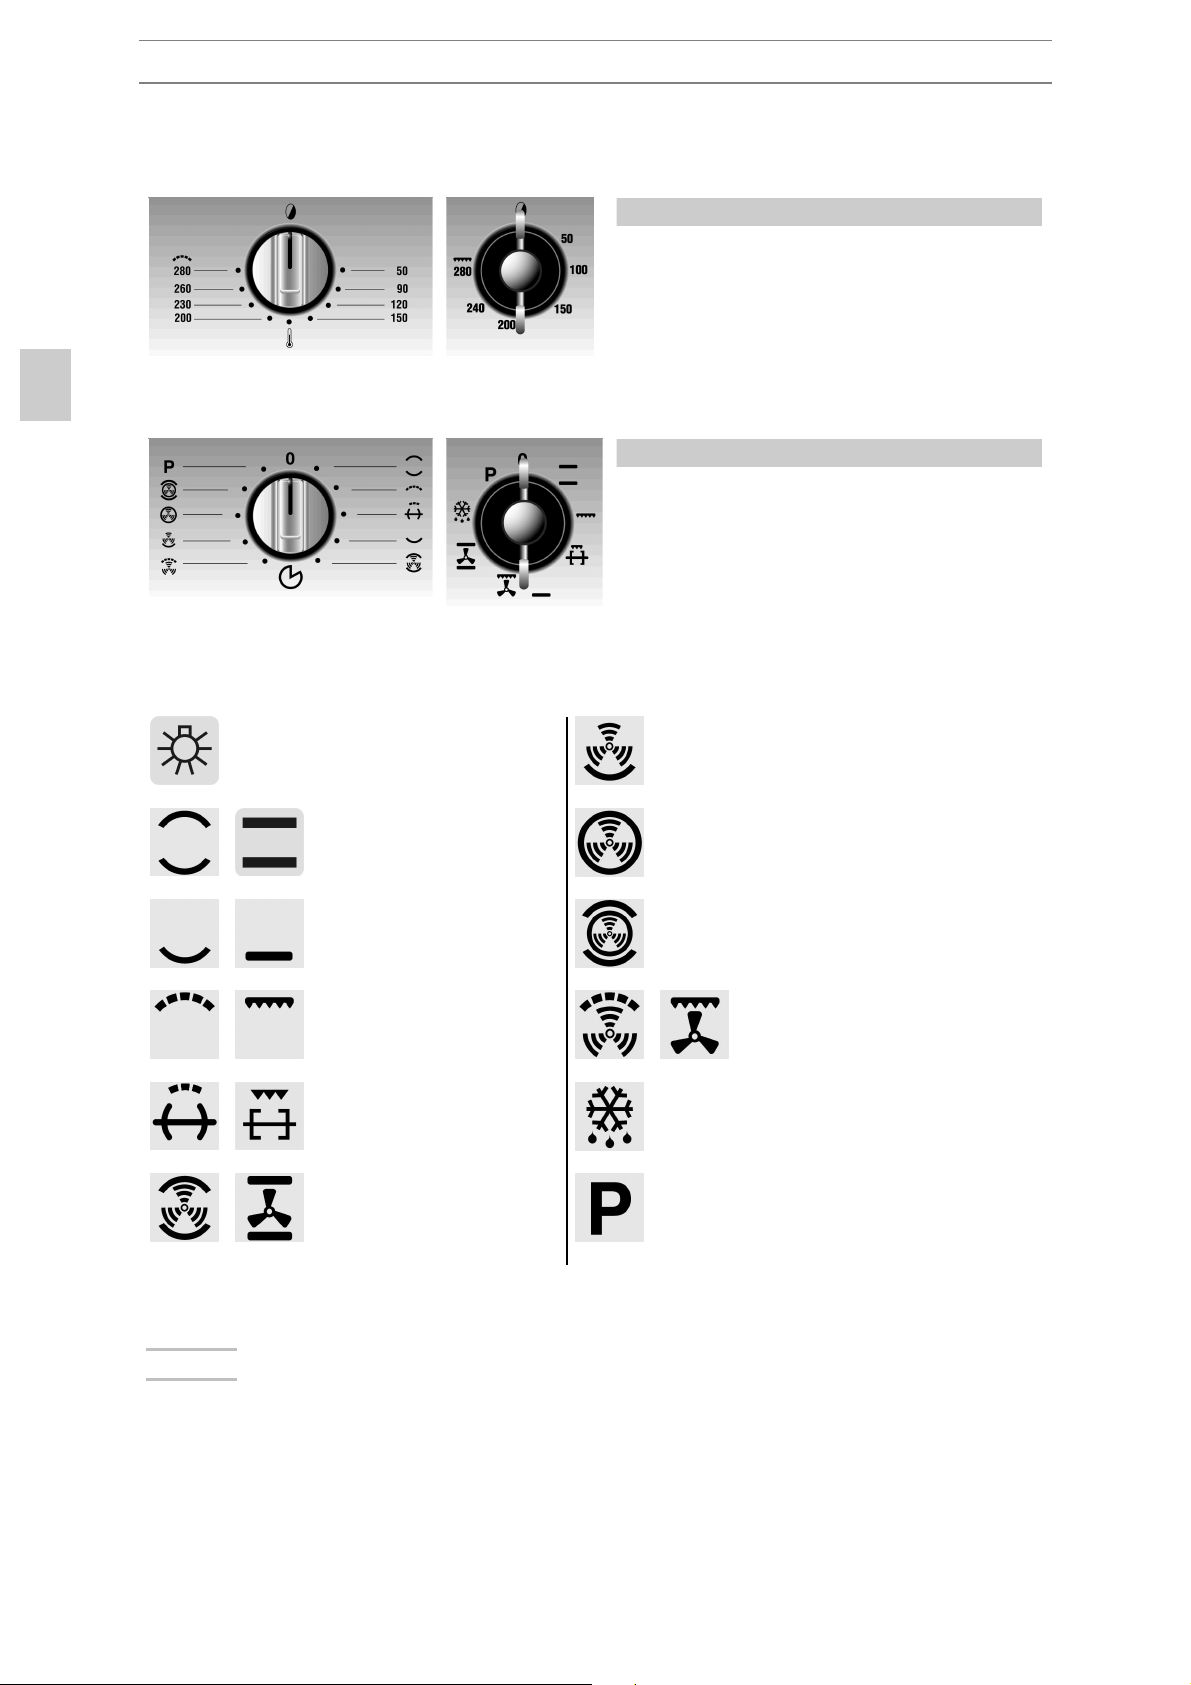
THERMOSTAT KNOB
Cooking temperature is selected by
turning the knob clockwise to the
desired setting, between 50 and
280 °C.
FUNCTION SWITCH
Turn the switch to select one of the
following functions:
OVEN LIGHT
UPPER AND LOWER
HEATING ELEMENT
LOWER HEATING
ELEMENT
GRILL ELEMENT
GRILL + SPIT ELEMENT
UPPER AND LOWER
HEATING ELEMENT +
VENTILATION
NOT ALL FUNCTIONS ARE AVAILABLE ON ALL MODELS.
LOWER HEATING ELEMENT +
VENTILATION
VENTILATED HEATING
ELEMENT + VENTILATION
UPPER AND LOWER HEATING
ELEMENT + VENTILATED
HEATING ELEMENT
GRILL ELEMENT +
VENTILATION
DEFROSTING
AUTOMATIC CLEANING CYCLE
(PYROLYSIS)
8
Page 7

Description of controls
2.2 E
LIST OF FUNCTIONS
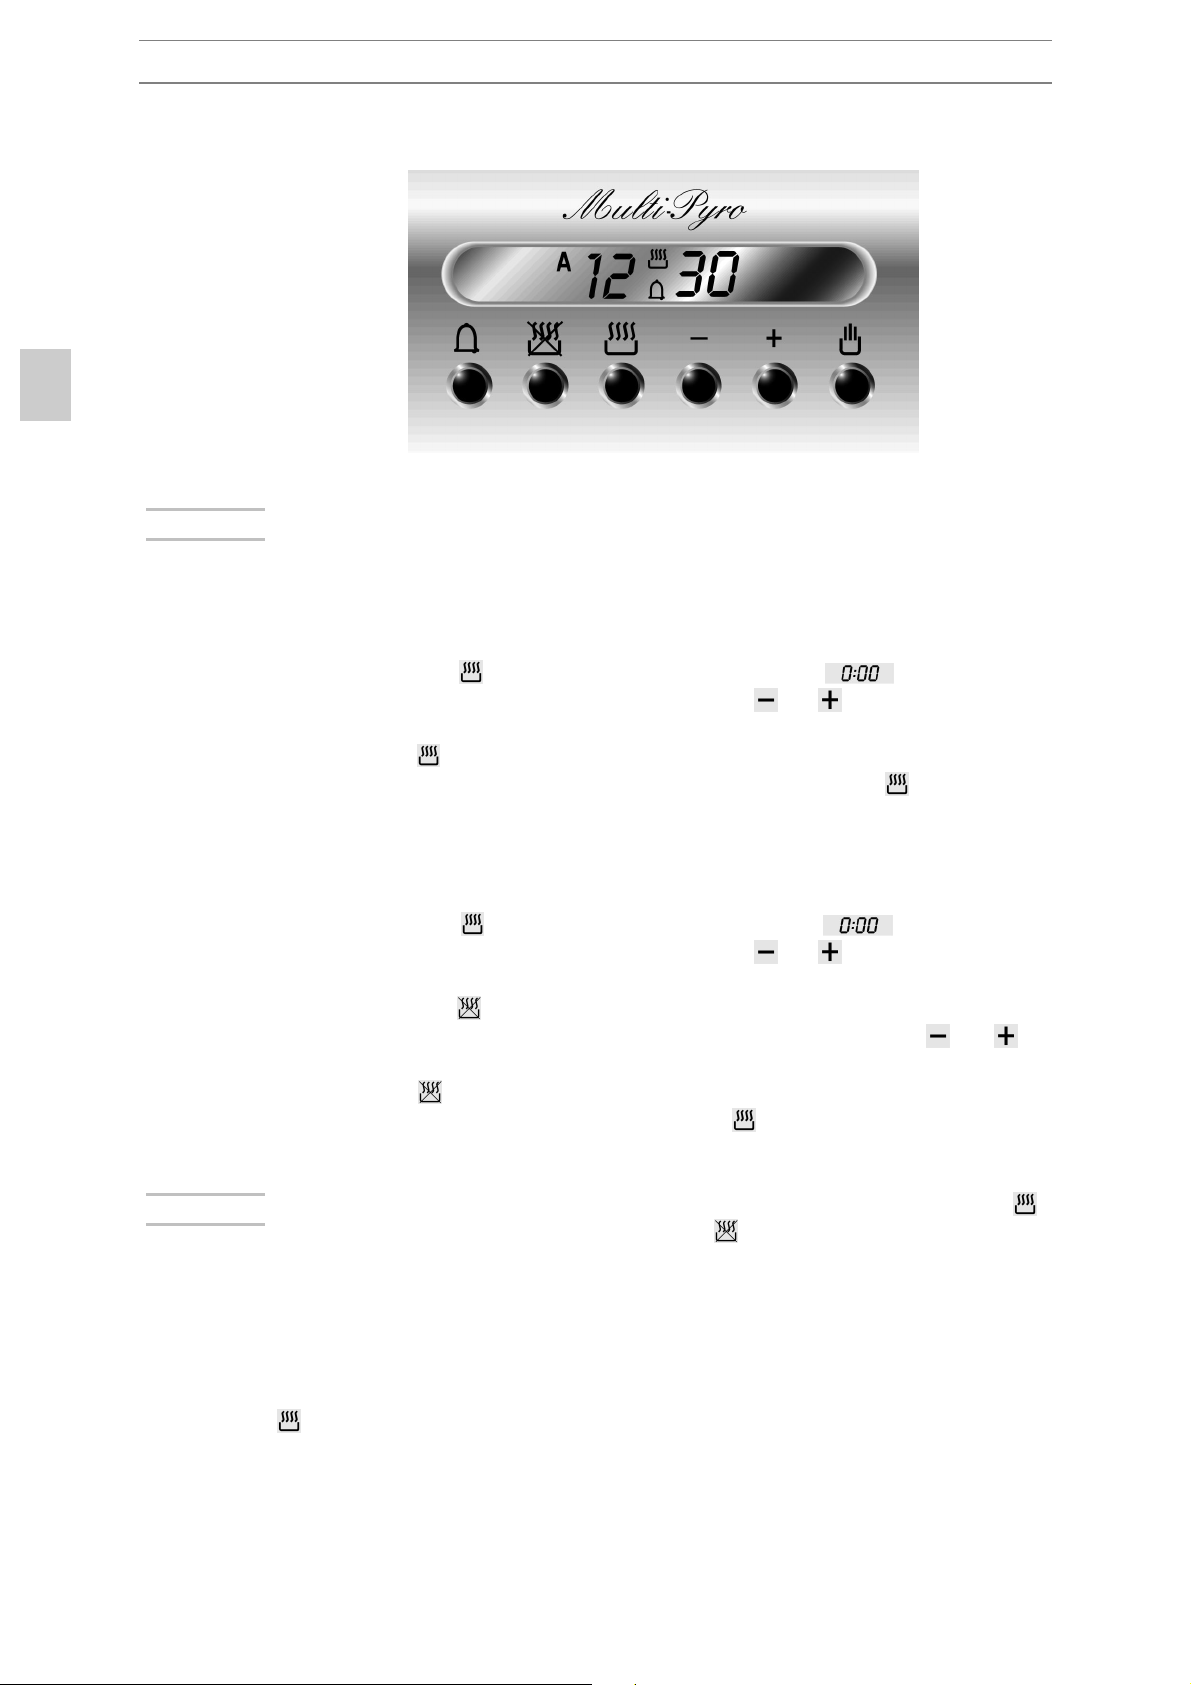
MINUTE-COUNTER KEY
END-OF-COOKING KEY
COOKING TIME KEY
TIME BACK KEY
TIME FORWARD KEY
MANUAL OPERATION KEY
2.2.1 Clock adjustment
When using the oven for the first time, or after a power failure, the
display flashes regularly and indicates
key
changes the time by 1 minute either up or down.
Press one of the two keys until the right time appears.
LECTRONIC PROGRAMMER
. To stop flashing, press
on the display. By pressing keys or each single press
9
Page 8
Description of controls
NOTE :
NOTE :
BEFORE SETTING THE PROGRAMMER ACTIVATE THE DESIRED FUNCTION
AND TEMPERATURE.
2.2.2 Semiautomatic cooking
Use this setting for automatic oven switch-off at the end of cooking time.
By pressing key , the display lights up, showing ; keep the key
pressed and at the same time, press keys
or to set the cooking
time.
Release key
to start the programmed cooking time count. The display
will now show the right time together with symbols A and .
2.2.3 Automatic cooking
Use this setting to automatically start and stop the oven.
By pressing key
pressed and at the same time, press keys
time.
By pressing key
keep the key pressed and at the same time, press keys
, the display lights up showing ; keep the key
or to set the cooking
the sum of the right time + cooking time will appear;
or to
regulate the end of cooking time.
Release key
the right time together with symbols A and
to start the programmed count and the display will show
.
AFTER SETTING, TO SEE HOW MUCH COOKING TIME IS LEFT, PRESS KEY ;
TO SEE END OF COOKING TIME, PRESS KEY
.
2.2.4 End of cooking
When cooking is over, the oven will automatically switch off and, at the
same time, an intermittent alarm will sound. After switching off the alarm,
the display will once again show the right time together with the symbol
, indicating that the oven has returned to manual operation mode.
10
Page 9
Description of controls
IMPORTANT :
NOTE :
IMPORTANT :
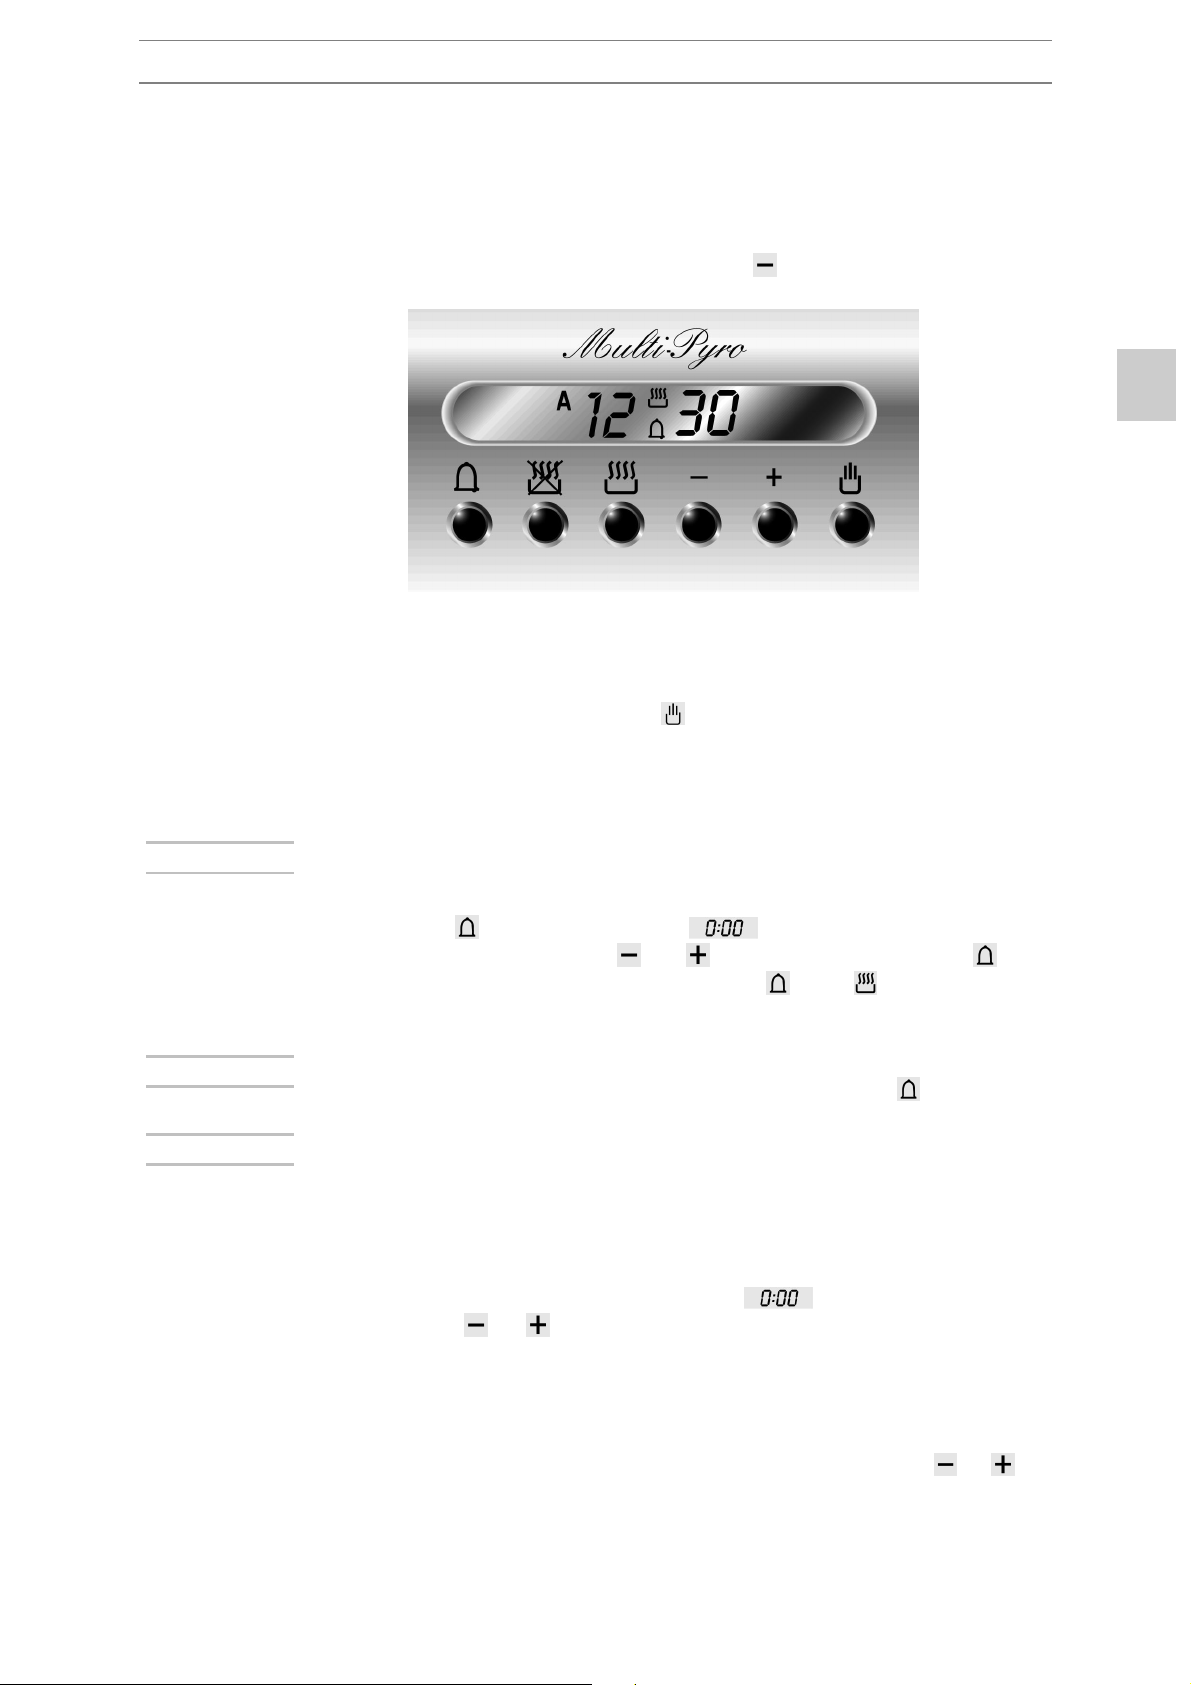
2.2.5 Adjusting alarm volume
The acoustic alarm has three different settings. These can be operated,
while the alarm is sounding, by pressing key
.
2.2.6 Switching off the alarm
The alarm switches off automatically after seven minutes. It can be
manually turned off by pressing key
.
2.2.7 Minute-counter
The programmer can also be used as a simple minute counter.
THE USE OF THE MINUTE-COUNTER WILL NOT INTERRUPT OVEN
OPERATION AT THE END OF THE SET TIME.
By pressing key
at the same time press keys
programmed count starts and the symbols
monitor.
AFTER PROGRAMMING THE MINUTE-COUNTER, THE DISPLAY WILL SHOW
THE RIGHT TIME. TO DISPLAY REMAINING TIME, PRESS KEY
WRONG SETTINGS ARE PREVENTED LOGICALLY (E.G., ANY CONFLICT
BETWEEN END OF COOKING TIME AND A LONGER TIME WILL NOT BE
ACCEPTED BY THE PROGRAMMER).
, the display shows ; keep the key pressed and
or . By releasing the key , the
and appear on the
.
2.2.8 Cancellation of set data
Once the programme has been set, keep the key of the function to be
cancelled pressed, while at the same time
of variation keys
or . Time cancellation will be considered as end-
is reached by means
of-cooking time by the programmer.
2.2.9 Changing the set data
The cooking data entered can be changed at any time by keeping the
function key pressed and at the same time adjusting the keys or .
11
Page 10

Description of controls
2.3 C
IMPORTANT :
2.3.1 Setting the clock
To set the correct time, PRESS and turn knob A anticlockwise.
NOTE :
2.3.2 Semiautomatic cooking
Use this setting for automatic oven switch-off at the end of cooking time.
Turn the knob A anticlockwise to set the cooking time in the window B.
2.3.3 Automatic cooking
Use this setting to automatically start and stop the oven.
Turn the knob A anticlockwise to set the cooking time in the window B.
PULL and turn the knob A anticlockwise so the arrow C coincides with
start of desired cooking time.
2.3.4 End of cooking
When cooking is over, the oven will automatically switch off and, at the
same time, an intermittent alarm will sound.
2.3.5 Switching off the alarm
The alarm can be switched off manually by turning the knob A
anticlockwise until symbol
IMPORTANT :
LOCK AND PROGRAMMER
THE KNOB A MUST ALWAYS BE TURNED ANTICLOCKWISE.
BEFORE SETTING THE PROGRAMMER ACTIVATE THE DESIRED FUNCTION
AND TEMPERATURE.
appears in window B.
TO USE THE OVEN MANUALLY AFTER PROGRAMMING, TURN THE KNOB A
UNTIL THE SYMBOL
APPEARS IN WINDOW B.
12
Page 11
Using the oven
3. Using the oven
3.1 W
Before using the oven for the first time, pre-heat it to maximum
temperature (280°C) long enough to burn any manufacturing oily
residues which could give the food a bad taste.
After a power failure, the display will flash at regular intervals showing
To regulate, refer to para. 2.2 Electronic programmerv”.
During cooking, do not cover the bottom of the oven with aluminium or
tin foil and do not place pans or oven trays on it as this may damage
the enamel coating. If you wish to use greaseproof paper, place it so
that it will not interfere with the hot air circulation inside the oven.
3.2 OVEN LIGHT
The light comes on by turning the function switch to any position or by
opening the door with the oven off.
3.3 C
ARNINGS AND GENERAL ADVICE
.
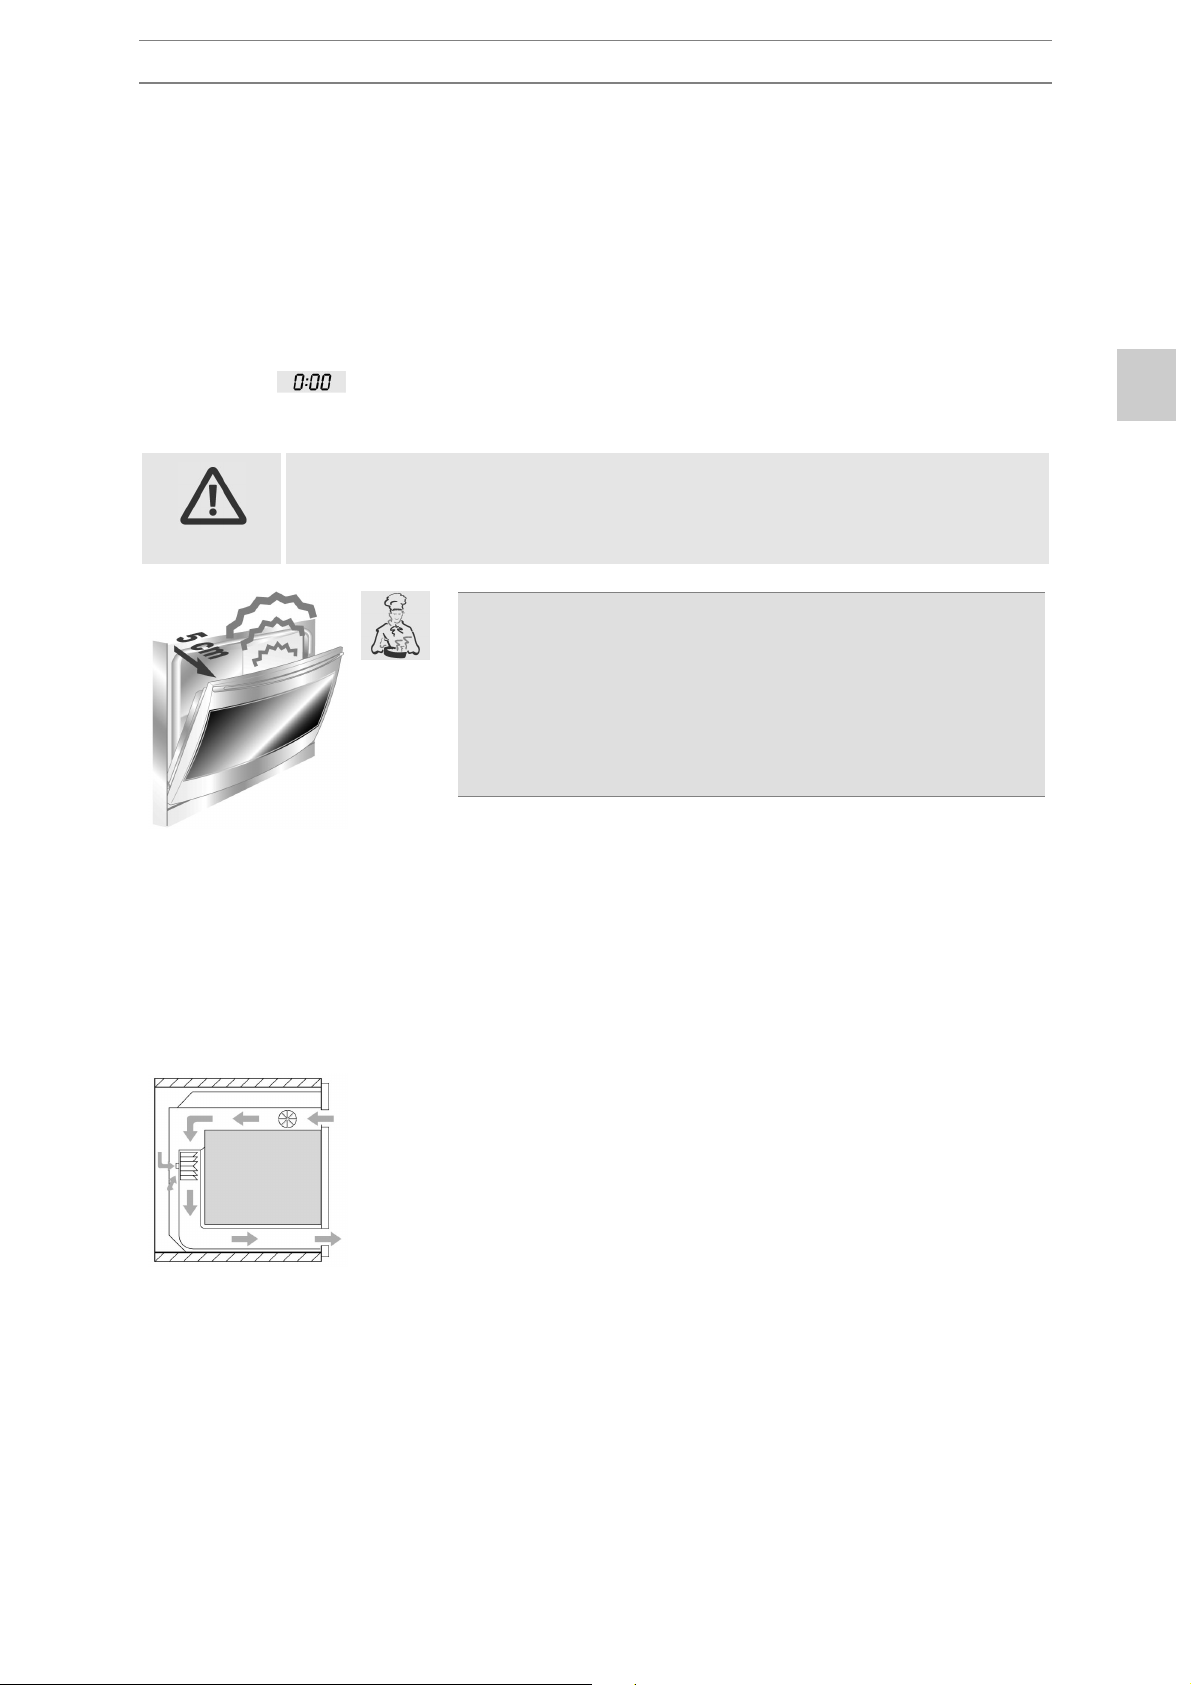
To prevent any steam in the oven creating problems,
open the door in two stages: half open (5 cm approx.)
for 4-5 seconds and then fully open.
To access food, always leave the door open as short a
time as possible to prevent the temperature in the
oven from falling and ruining the food.
OOLING VENTILATION
The oven features cooling fans which switch on together with
the oven.
Fan operation causes a normal flow of air which exits at the
bottom part of the oven front.
PYROLYSIS: once the cleaning cycle has started, the fans only
operate when the oven has achieved a preset temperature.
13
Page 12
Available accessories
g
g
g
4. Available accessories
NOTE :
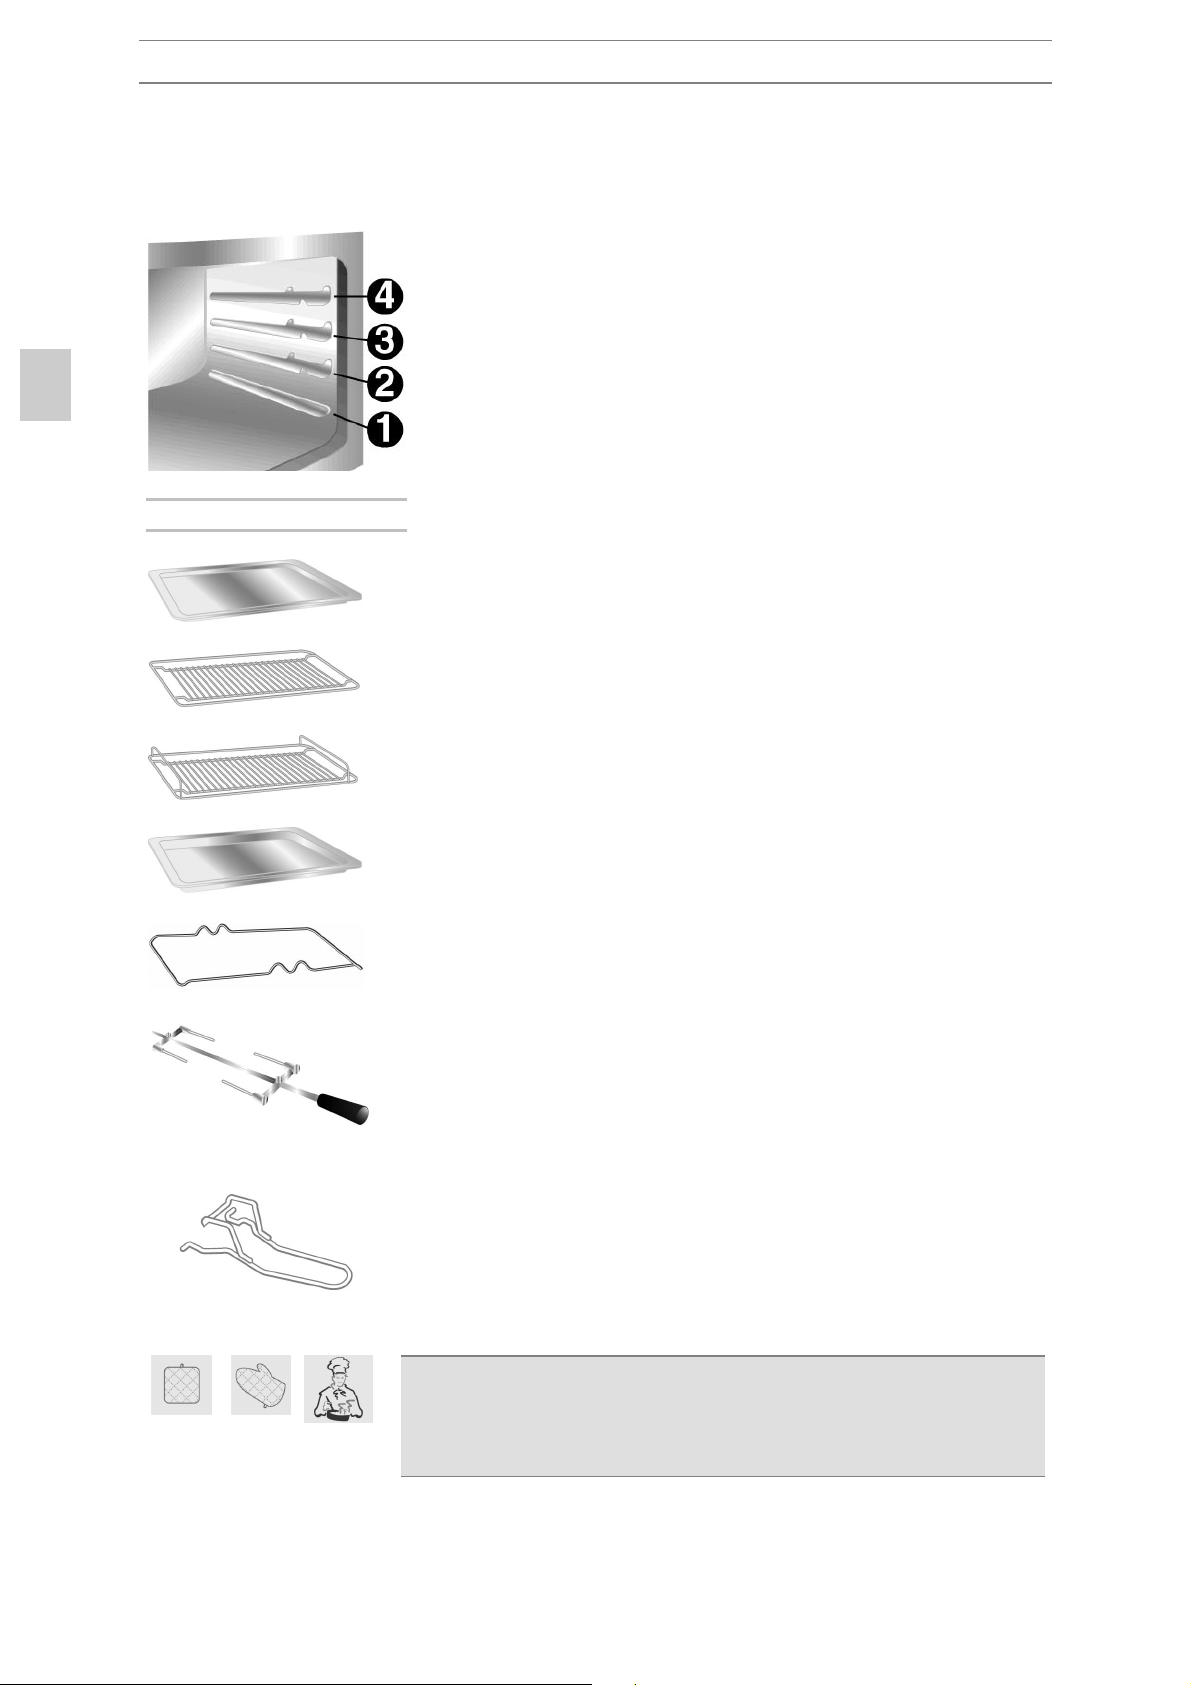
The oven features 4 support positions for plates and racks
of different height.
SOME MODELS DO NOT FEATURE ALL ACCESSORIES.
Baking plate for cakes or biscuits.
Tubular rack: for cooking food on plates, small cakes,
roasts or food requiring light grilling.
Tubular tray-holder rack: for cooking food on plates,
small cakes, roasts or food requiring light grilling.
Oven plate: useful for collecting fats falling from the rack.
Tubular frame for roasts: supports the roastin
instructions at para. 5.7 Spit roasting”).
Spit: useful for cookin
requiring uniform cooking.
spit (see
chickens, sausages and all food
14
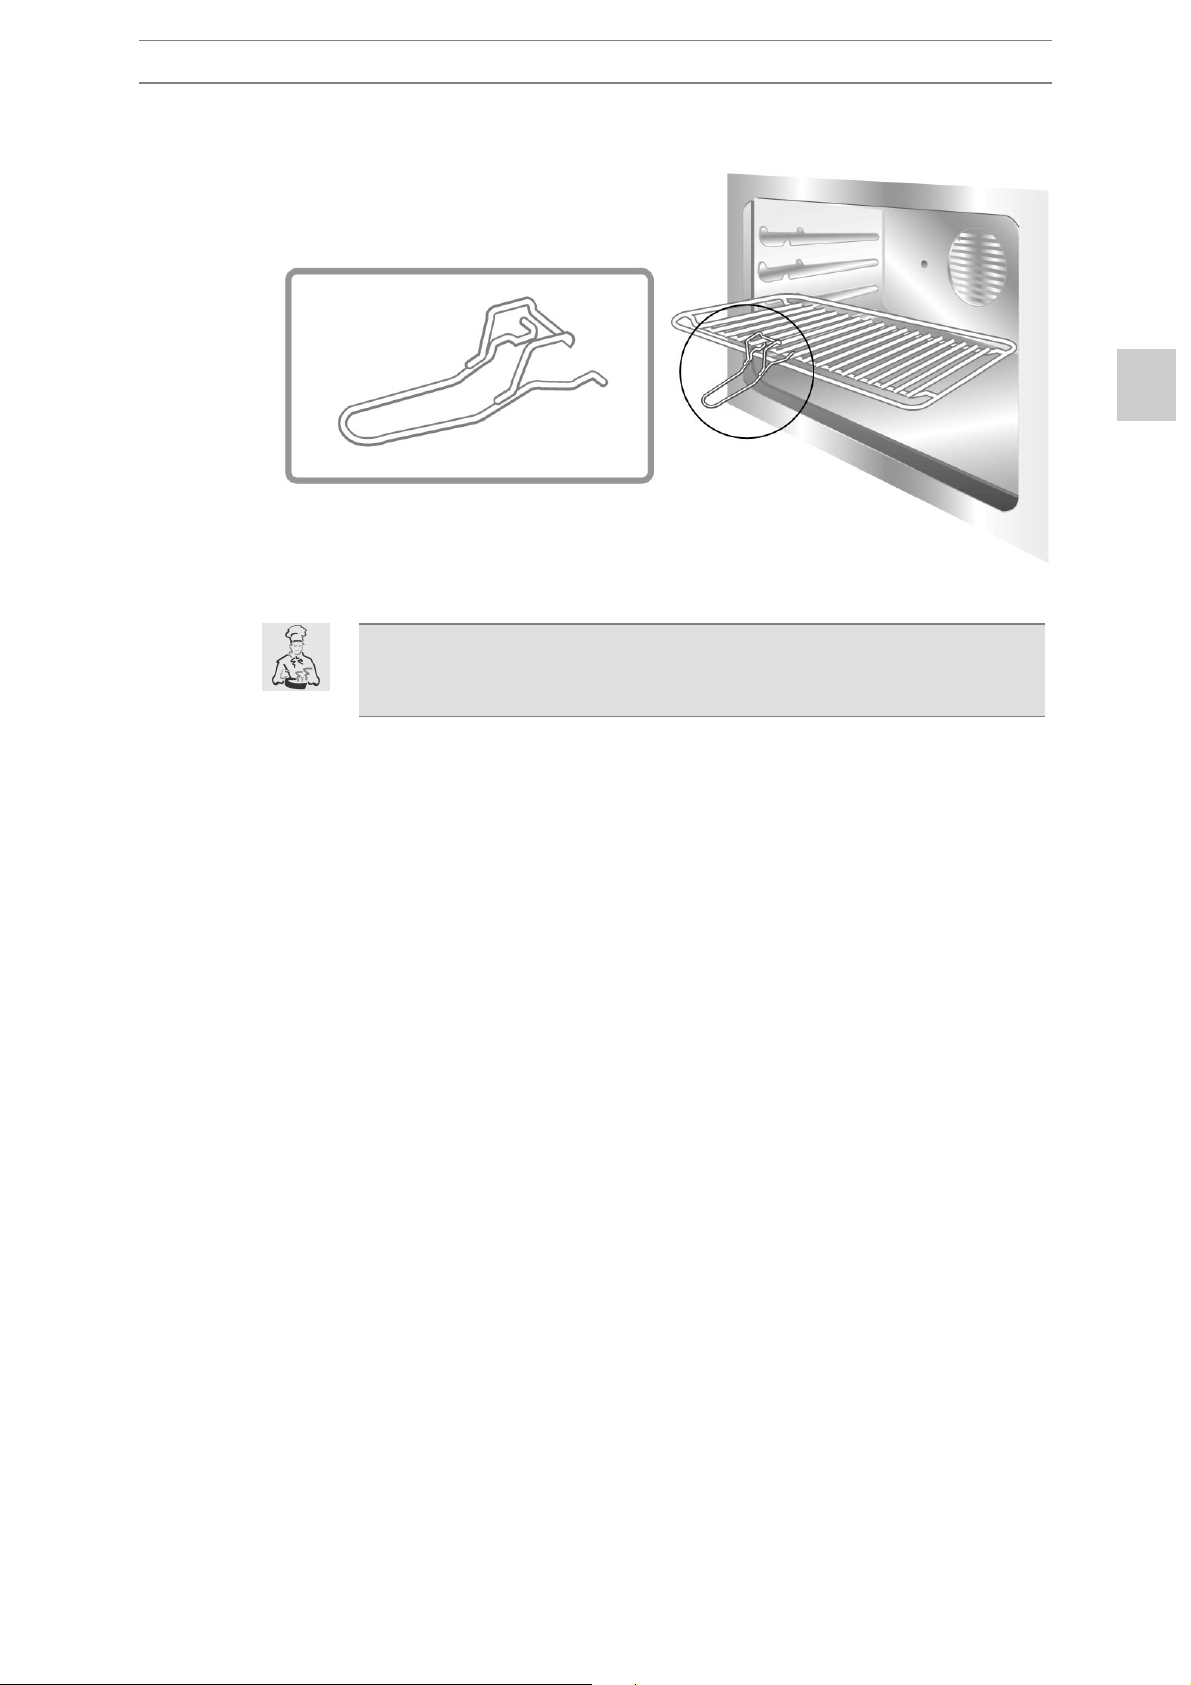
Chromium-plated tubular gripper for removin
and plates from the oven.
The chromium-plated tubular gripper is a very useful
accessory in the kitchen. Besides firmly gripping plates and
racks, it prevents direct contact (avoiding the use of oven
gloves and fabric pot-holders).
hot racks
Page 13
Available accessories
Request original accessories directly from your local dealer,
who will be pleased to recommend the best articles for your
oven.
15
Page 14
Cooking hints
5. Cooking hints
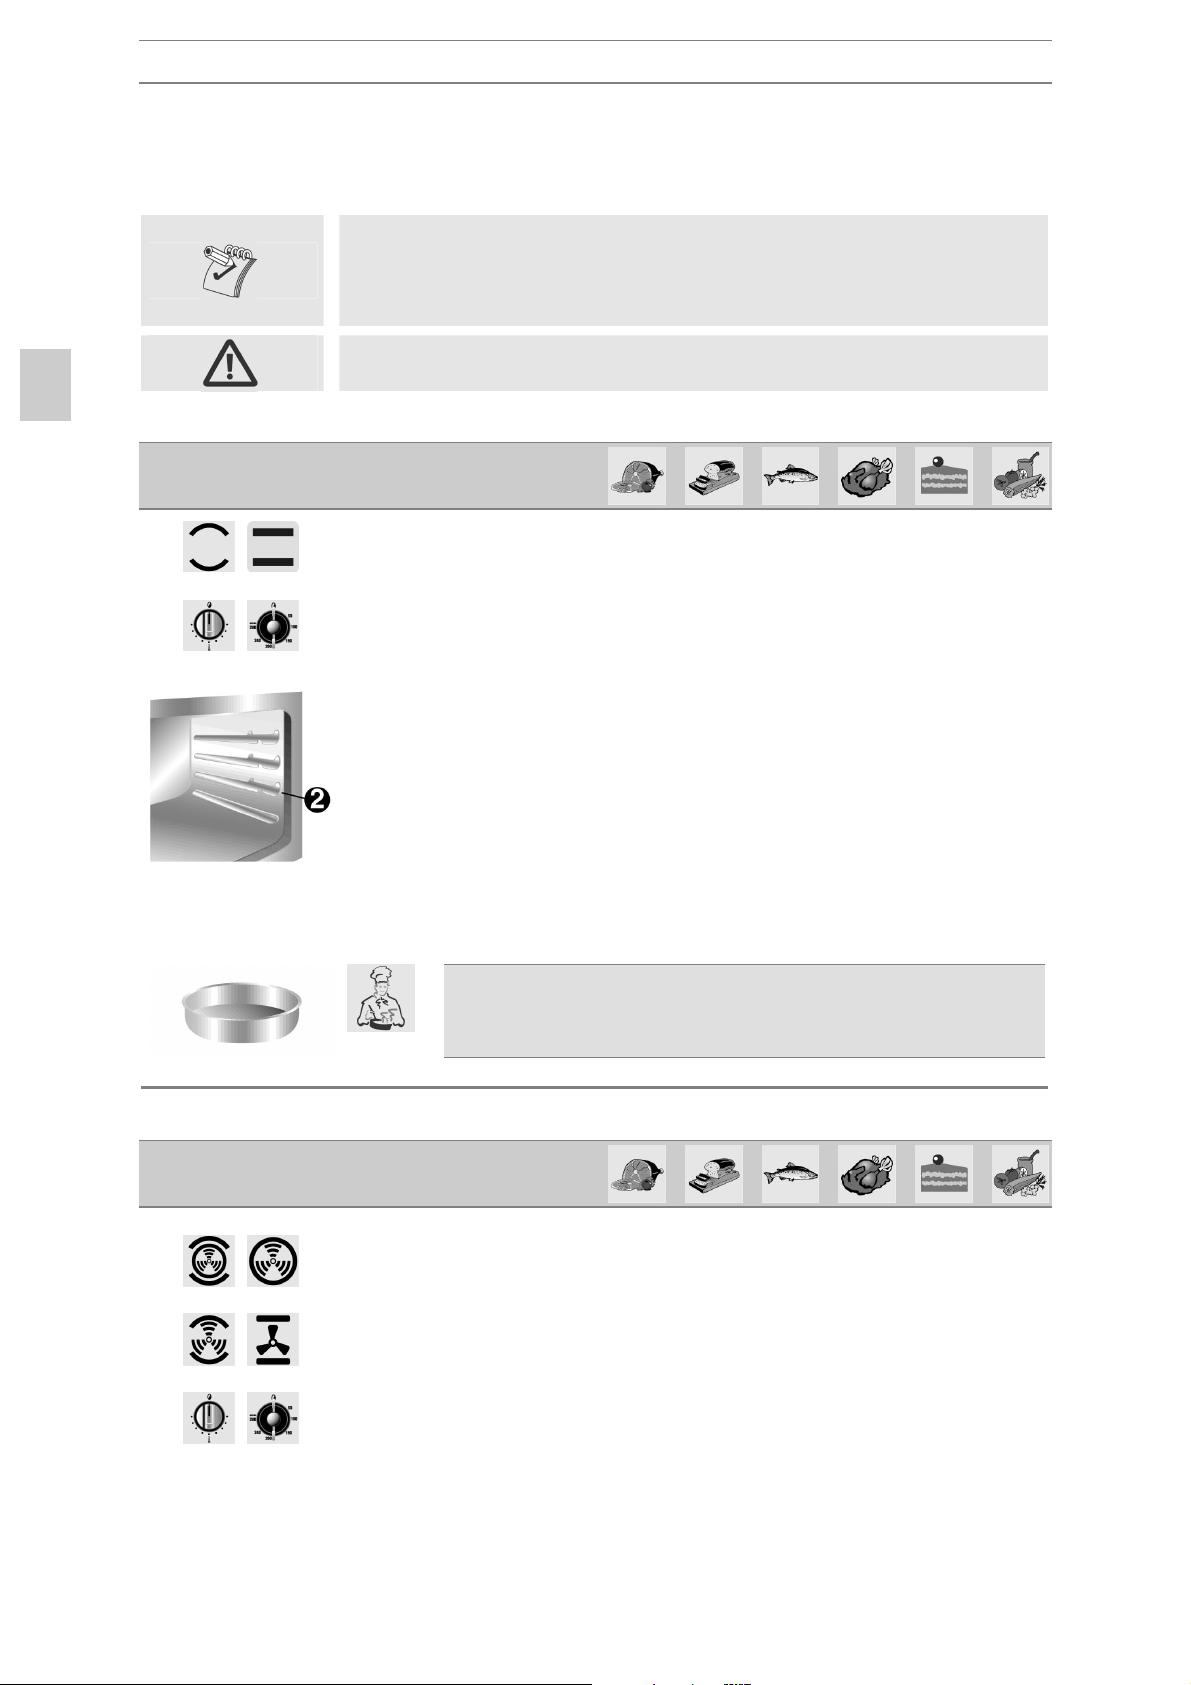
In fan-assisted mode preheating should be carried out at 30/40°C
5.1 TRADITIONAL COOKING
above the cooking temperature. This considerably shortens
cooking times and reduces power consumption, as well as giving
better cooking results.
Keep the oven door closed during cooking.
FUNCTION SWITCH
THERMOSTAT SELECTOR SWITCH - 50-280°C
50 - 280 °C
This traditional cooking system where heat flows from both
above and below is suitable for cooking food on one level only.
The oven must be preheated until the preset temperature has
been reached. Only place the food in the oven after the
thermostat indicator light has gone out. Very fat meats can be
placed in the oven while this is still cold. Place frozen meat
directly in the oven without defrosting. The only precaution to be
taken is to choose approx. 20 °C lower temperatures and approx.
1/4 longer cooking times.
Use high-rim pans to prevent fat splashing and dirtying
the sides of the oven.
5.2 HOT-AIR COOKING
50 - 280 °C
16
FUNCTION SWITCH
THERMOSTAT SELECTOR SWITCH - 50-280°C
Page 15

Cooking hints
5.3 G
This system is ideal for cooking different types of food (fish,
meat, etc.,) on more than one level without spreading of smell or
taste.
The circulation of air in the oven ensures uniform heat.
Multiple cooking is possible as long as the cooking
temperature of the different foods is the same.
RILL COOKING
FUNCTION SWITCH
THERMOSTAT SWITCH AT MAXIMUM
MAX.
Ensures quick browning of food. The plate is best inserted at top
level. For short or small-quantity cooking, the rack should be
inserted at the third level from the bottom. For longer cooking
and wide-surface grilling, fit the rack at bottom level. This will
also depend on size of food.
5.4 HOT-AIR GRILLING
FUNCTION SWITCH
THERMOSTAT SWITCH AT MAXIMUM AND DOOR FULLY
CLOSED
MAX.
Ensures uniform heat distribution with greater heat penetration
into the food. Food will be lightly browned on the outside and
remain soft inside.
17
Page 16

Cooking hints
5.5 D
50 - 280 °C
5.6 D
ELICATE COOKING
FUNCTION SWITCH
THERMOSTAT SELECTOR SWITCH - 50-280°C
Ideal for pastries and cakes with wet covering and little sugar and
damp desserts in moulds. Excellent results can also be achieved
in completing cooking at the bottom and with dishes requiring
heat in the lower area in particular. The plate is best inserted at
bottom level.
EFROSTING
FUNCTION SWITCH
THERMOSTAT SWITCH IN POSITION 0
0
The flow of air produced by the fan ensures quicker defrosting.
The air circulating inside the oven is at room temperature.
The advantage of defrosting at room temperature is that it
does not alter the taste and appearance of the food.
18
Page 17
Cooking hints
5.7 S
MAX.
PIT ROASTING
FUNCTION SWITCH
THERMOSTAT SWITCH AT MAXIMUM
This is an energy saving-cooking system. Place the food at the
centre of the plate or rack and cook as indicated in para. 5.3
“Grill cooking”. Recommended for small pieces only.
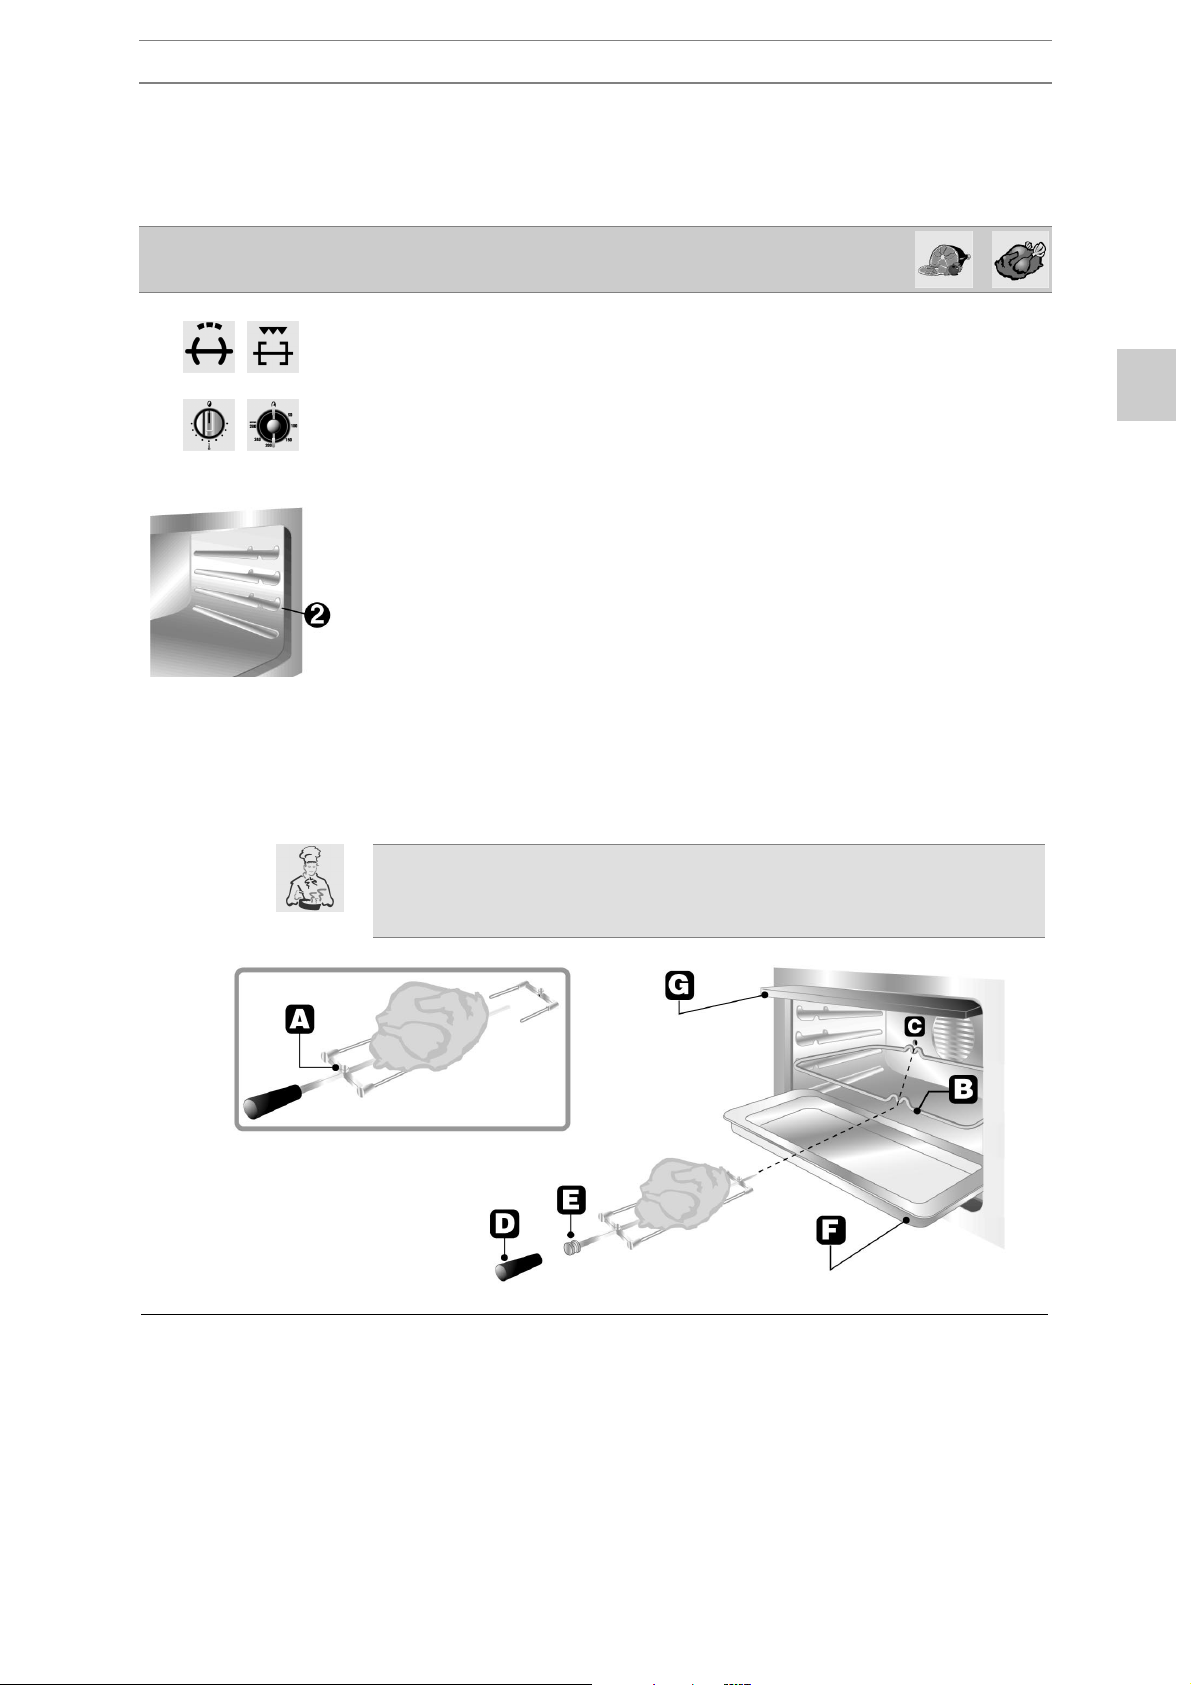
Prepare the food on the spit rod and block fork screws A. Insert
the frame B in the second level from the bottom. Remove handle
D and position the spit rod so the pulley E remains guided on
frame B. Completely fit frame B until the tip of the spit rod fits into
hole C on the back wall of the oven. Place an oven dish F on the
bottom guide and pour in a little water to prevent smoke from
forming.
It is normal for the thermostat light to flash during cooking.
This indicates the temperature inside the oven is regular
(above all when the oven door is closed).
19
Page 18

Recommended cooking table
6. Recommended cooking table
Cooking times, especially meat, vary according to the thickness and
quality of the food and to consumer taste.
TRADITIONAL COOKING
FOOD LEVEL FROM
BELOW
FIRST COURSES
Lasagne
Oven-baked pasta
MEAT
Roast veal
Roast beef
Roast pork
Chicken
Duck
Goose - Turkey
Rabbit
Leg of lamb
ROAST FISH 1 - 2 170 - 200 according to
PIZZA 1 - 2 210 - 240 40 - 45
DESSERTS
Meringue
Short pastry
Ciambella
Savoyards
Brioches
Fruit cake
(*) = with preheated oven
2 - 3
2 - 3
2
2
2
2
2
2
2
1
1 - 2
1 - 2
1 - 2
1 - 2
1 - 2
1 - 2
TEMPERATURE (°C) TIME IN MINUTES (*)
210 - 230
210 - 230
170 - 200
210 - 240
170 - 200
170 - 200
170 - 200
140 - 170
170 - 200
170 - 200
50 - 70
170 - 200
165
150
170 - 200
170 - 200
30
40
30 - 40 / Kg.
30 - 40 / Kg.
30 - 40 / Kg.
45 - 60
45 - 60
45 - 60
50 - 60
15 / Kg.
dimensions
60 - 90
15 - 20
35 - 45
30 - 50
40 - 45
20 - 30
GRILLING
FOOD LEVEL FROM
BELOW
FIRST SURFACE SECOND SURFACE
Pork chops
Fillet of pork
Fillet of beef
Liver
Veal escalopes
Half chicken
Sausages
Meat-balls
Fish fillets
Toast
4
3
3
4
4
3
4
4
4
4
9 - 11
9 - 11
9 - 14
TIME IN MINUTES
7 - 9
2 - 3
7 - 9
7 - 9
7 - 9
5 - 6
2 - 4
5 - 7
5 - 9
9 - 11
2 - 3
5 - 7
9 - 11
5 - 6
5 - 6
3 - 4
2 - 3
20
Page 19

Recommended cooking table
HOT-AIR COOKING
FOOD LEVEL FROM
FIRST COURSES
Lasagne
Oven-baked pasta
Creole rice
MEAT
Roast veal
Roast pork
Roasted beef
Fillet of beef
Roast lamb
Roast beef
Roast chicken
Roast duck
Roast turkey
Roast rabbit
Roast hare
Roast pigeon
FISH 2 - 3 150 - 170 according
PIZZA 2 - 3 210 - 240 30 - 50
DESSERTS (pastries)
Ciambella
Fruit cake
Sponge-cake
Brioches
Strudel
Savoyard pudding
Bread
Toast
TEMPERATURE (°C) TIME IN MINUTES
BELOW
2
2
2
2
2
2
2
2
2
2
2
2
2
2
2
2 - 3
2 - 3
2 - 3
2 - 3
1 - 2
2 - 3
2 - 3
1 - 2
190 - 210
190 - 210
190 - 220
150 - 170
150 - 160
160 - 170
160 - 180
130 - 150
170 - 180
170
160 - 170
150 - 160
150 - 160
160 - 170
140 - 170
150 - 170
170 - 190
190 - 220
160 - 170
150
160 - 170
190 - 210
220 - 240
20 - 25
25 - 30
20 - 25
65 - 90
70 - 100
65 - 90
35 - 45
100 - 130
40 - 45
70 - 90
100 - 160
160 - 240
80 - 100
30 - 50
15 - 25
to dimensions
35 - 45
40 - 50
25 - 35
40 - 60
25 - 35
30 - 40
40
7
21
Page 20
Maintenance and cleaning
7. Maintenance and cleaning
7.1 E
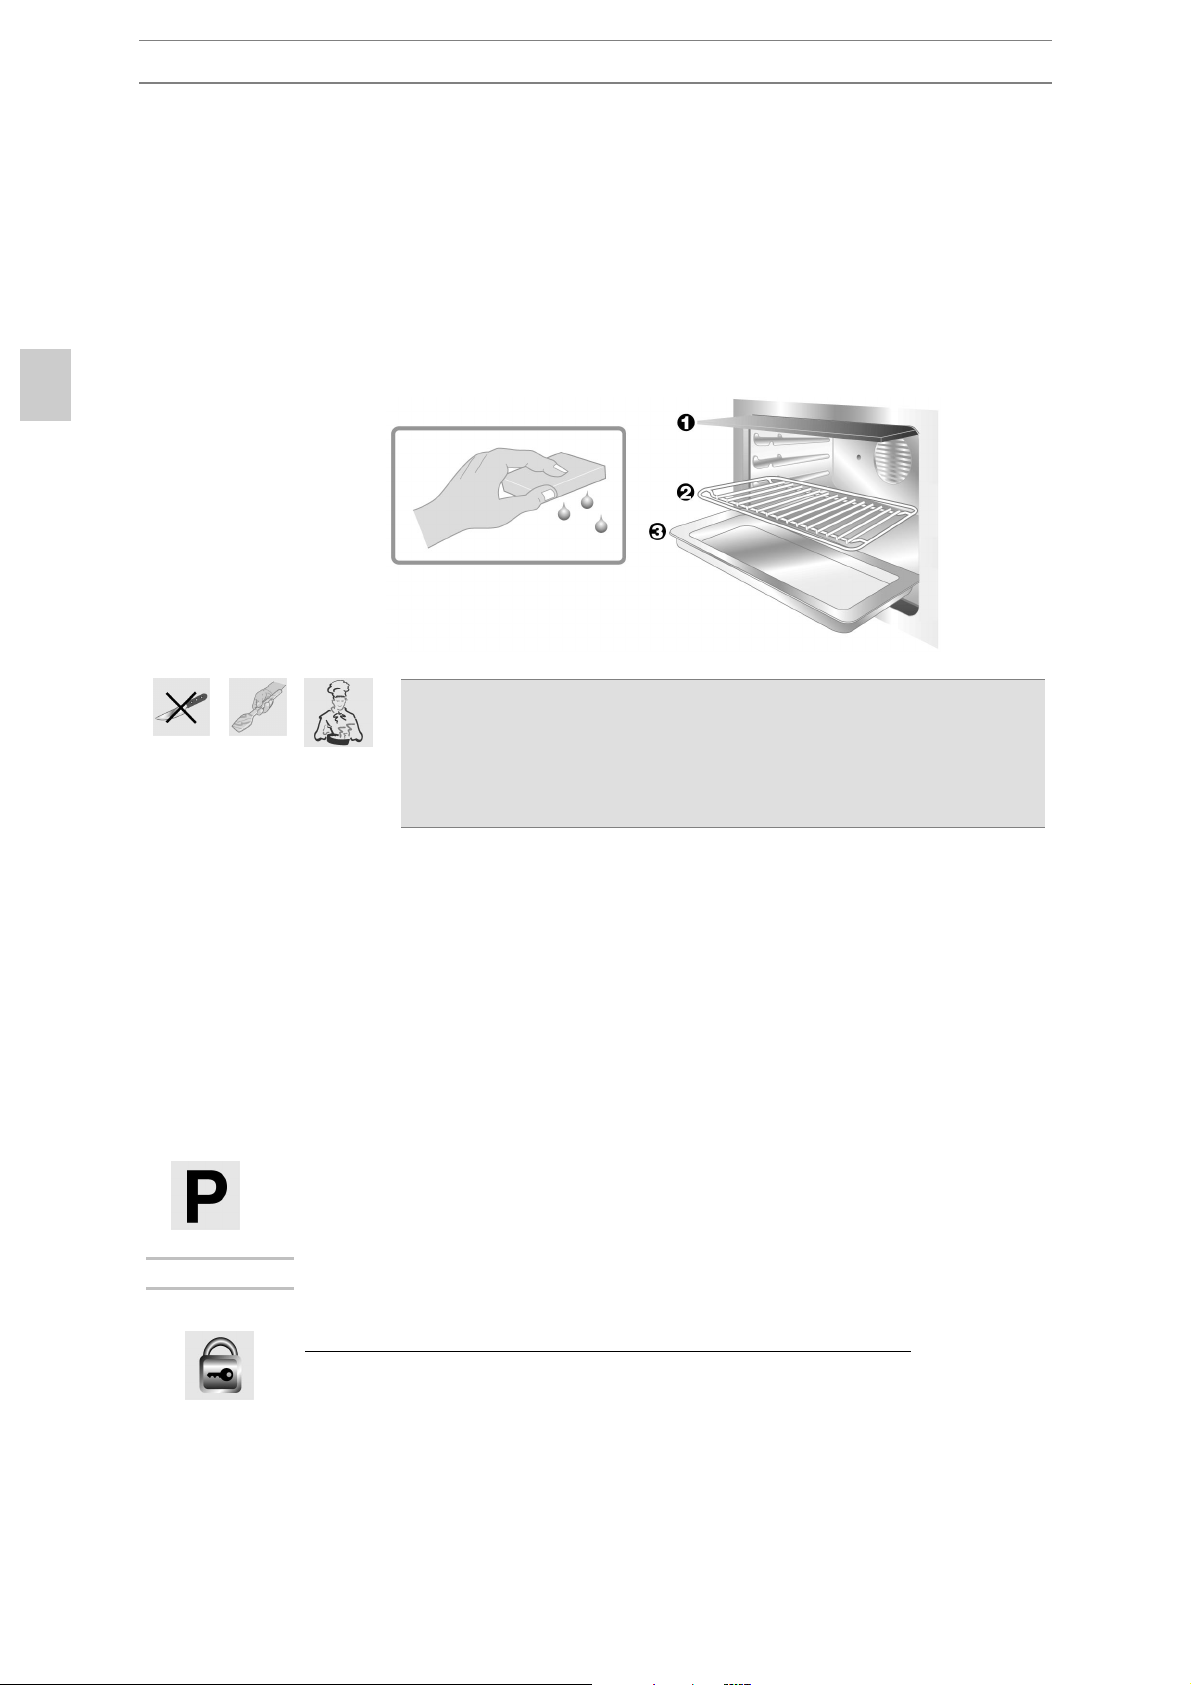
Wait for the oven to cool, take out all the removable parts and proceed
to wash with water and regular detergent.
Dry and replace components.
7.2 DOOR GLASS
Always keep this clean. Use absorbent kitchen paper. In the case of
persistent dirt, wash with damp sponge and regular detergent.
7.3 O
Wash with water and regular detergent.
7.4 P
Pyrolysis is an automatic high-temperature cleaning method which
causes dirt to dissolve.
IMPORTANT :
NAMELLED PARTS
For cleaning enamelled parts, never use abrasive products,
metal wire sponges or sharp objects so as not to damage
the surface.
Remove any dried remains of food on surfaces with a
wooden or plastic utensil.
UTER OVEN STRUCTURE
YROLYSIS: AUTOMATIC OVEN CLEANING
BEFORE STARTING THE AUTOMATIC CLEANING CYCLE, MAKE SURE THE
OVEN IS EMPTY AND DOES NOT CONTAIN FOOD OR ANYTHING ELSE.
A DOOR LOCK DEVICE PREVENTS THE DOOR BEING OPENED.
IN CASE THE OVEN IS INSTALLED UNDER A COOKTOP, MAKE SURE THAT
DURING THE AUTOMATIC CLEANING CYCLE ANY GAS OR ELECTRIC HOBS
ARE TURNED OFF.
22
Page 21
Maintenance and cleaning
7.4.1 Before starting the automatic cleaning cycle
The Pyrolysis process can be performed at any time of the day or night
(to take advantage of lower night-time electricity rates).
Before proceeding, check the following:
• remove all the accessories from the oven (some of them will not
withstand heat and become damaged and/or deformed);
• remove the most obvious traces of dirt (Pyrolysis cleaning would take
too long);
• make sure the oven door is properly closed;
• when setting the cleaning cycle, remember the following:
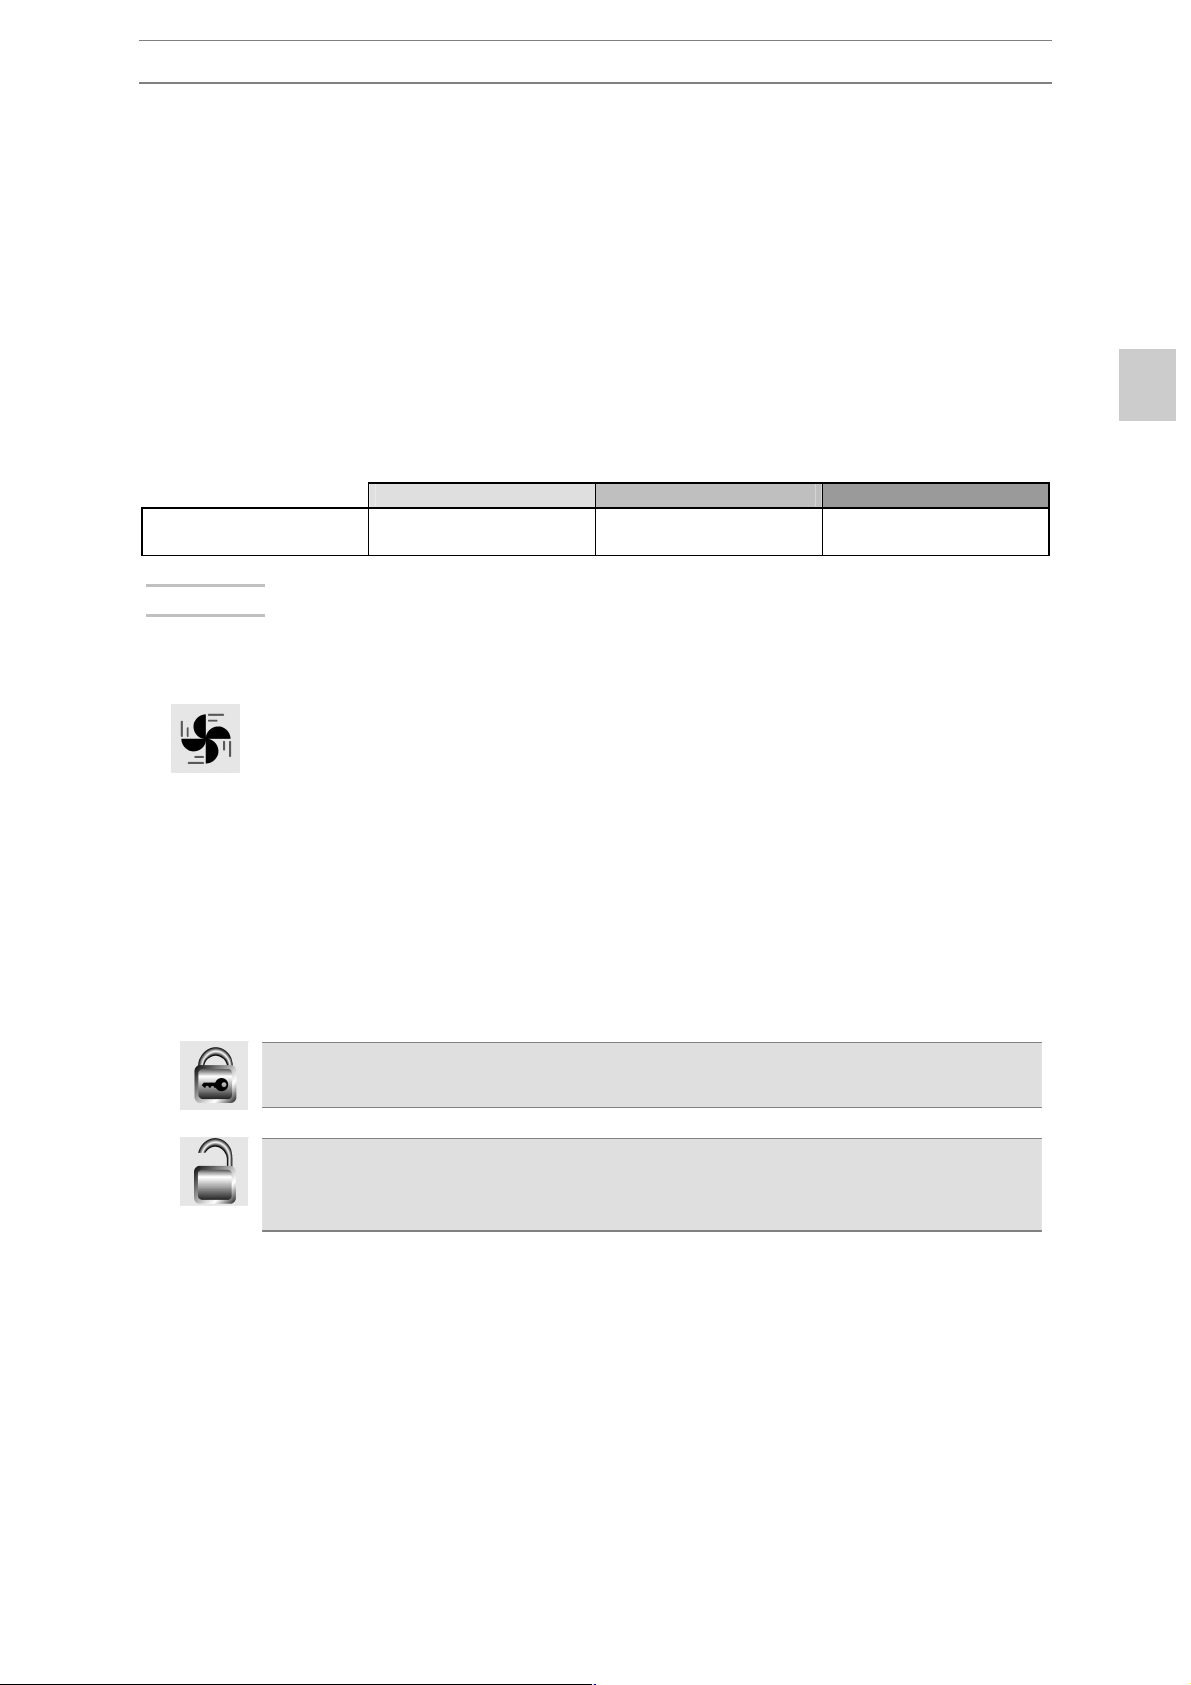
NOT VERY DIRTY DIRTY VERY DIRTY
DURATION OF
CLEANING :
NOTE:
THE FIRST AUTOMATIC CLEANING CYCLE COULD CAUSE BAD SMELLS DUE
TO EVAPORATION OF OILY SUBSTANCES USED DURING MANUFACTURE.
THIS IS A QUITE NORMAL OCCURRENCE WHICH DISAPPEARS AFTER THE
FIRST CLEANING CYCLE.
DURING THE AUTOMATIC CLEANING CYCLE, THE FANS MAKE MORE NOISE
DUE TO GREATER ROTATION SPEED. THIS IS QUITE NORMAL AND IS
INTENDED TO FAVOUR THE ELIMINATION OF HEAT. AFTER PYROLYSIS,
VENTILATION CONTINUES AUTOMATICALLY FOR LONG ENOUGH TO PREVENT
THE CABINET WALLS AND FRONT OF THE OVEN FROM OVERHEATING.
7.4.2 How the automatic cleaning cycle works
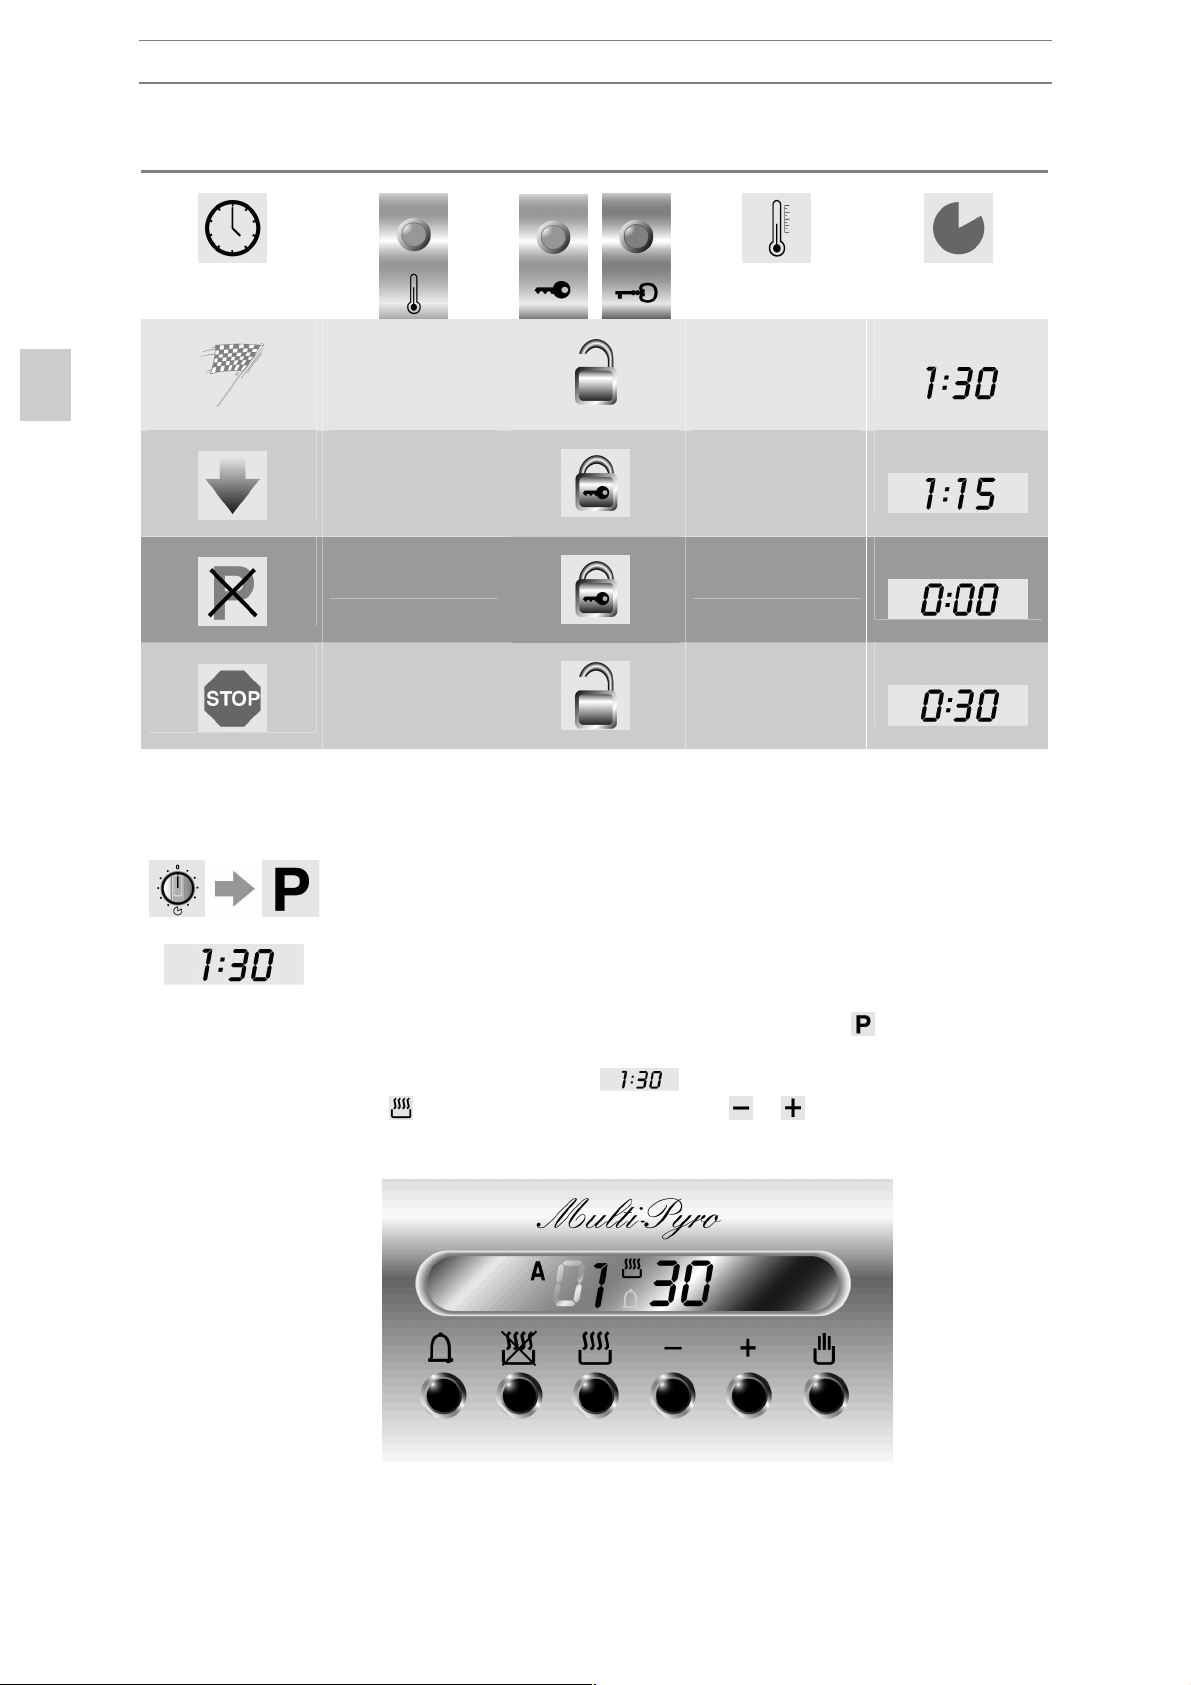
The following table shows an example of automatic cleaning cycle
operation.
When the cleaning cycle is set, the thermostat light comes on, while the
door lock device (and indicator light) is not engaged.
When the temperature reaches 300 °C, a lock device triggers to prevent
door opening.
At the end of the cleaning cycle, the thermostat indicator light goes off.
The door-lock is only released afterwards when the temperature inside
the oven has dropped below 300 °C.
90 MIN. 105 MIN. 120 MIN.
23
Page 22
Maintenance and cleaning
ON
ON
OFF
OFF
-
300 °C
500 °C
300 °C
7.4.3 Setting the automatic cleaning cycle with the electronic
programmer
FUNCTION SWITCH
MINIMUM DURATION OF CLEANING CYCLE: 1 hour 30 min.
Position the function selector switch on the symbol
: the thermostat
indicator light will come on and the programmer will automatically set on
a minimum pyrolysis time of
press key
and increase/decrease keys o . Pyrolysis time can be
. To display or regulate this time,
set to a maximum of 3 hours.
24
Page 23
Maintenance and cleaning
The cleaning cycle can be programmed so it starts at a specific time.
Press key
o .
7.4.4 Setting the cleaning cycle with the programmer clock
FUNCTION SWITCH
DURATION OF CLEANING CYCLE
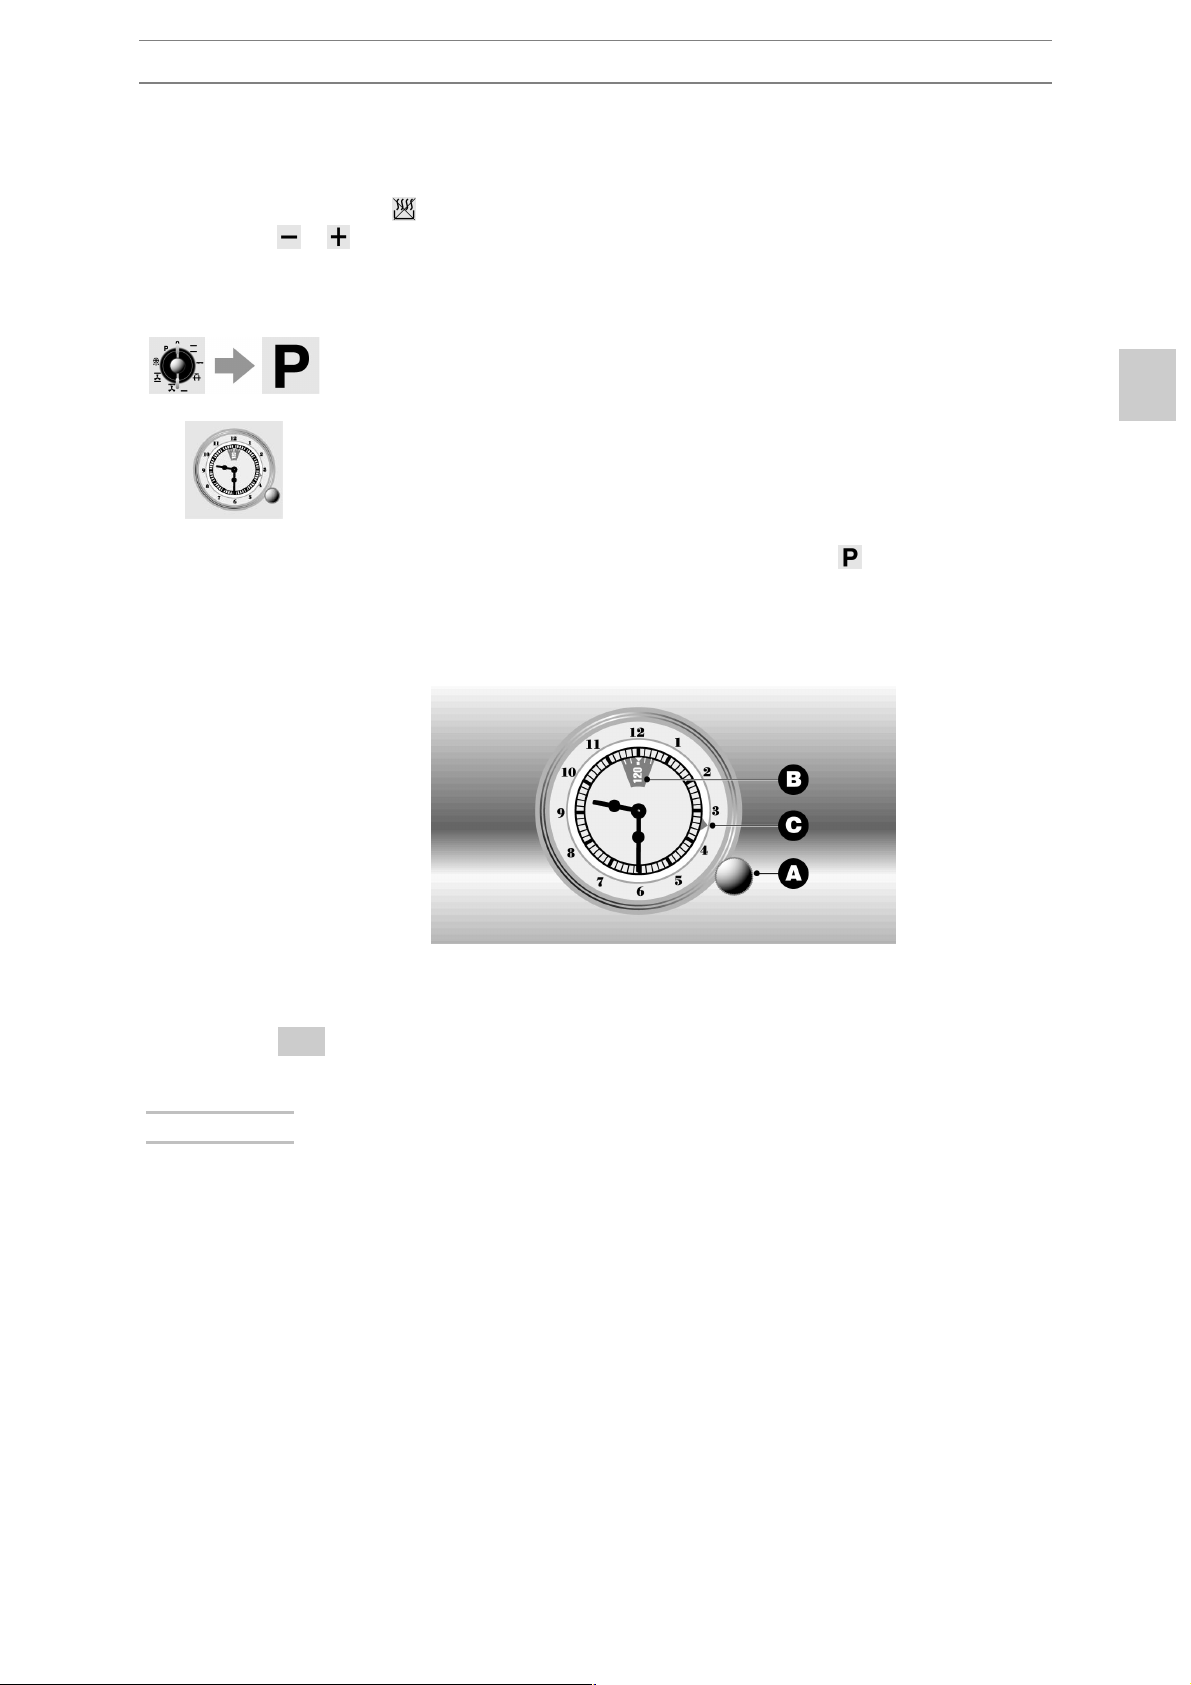
Position the function selector knob on symbol
indicator light will come on. Turn the knob A anticlockwise to set
duration of pyrolysis in window B. This can be set from a minimum of 1
hour 30' to a maximum of 3 hours.
and change the setting by means of setting variation keys
: the thermostat
The cleaning cycle can be programmed so this begins at a preset time.
Turn the knob A anticlockwise to set duration of pyrolysis in window B.
PULL and turn the knob A anticlockwise so the arrow C coincides with
the desired start time.
NOTE:
PRESETTING OF THE CLEANING CYCLE IS INDISPENSABLE.
25
Page 24
Extraordinary maintenance
8. Extraordinary maintenance
Periodically, the oven will require small maintenance operations or the
replacement of parts subject to wear like seals, light bulbs, etc. Below
are some specific instructions for maintenance jobs of this type.
BEFORE PERFORMING ANY OPERATIONS REQUIRING ACCESS TO POWERED
PARTS, SWITCH OFF THE POWER SUPPLY TO THE MACHINE.
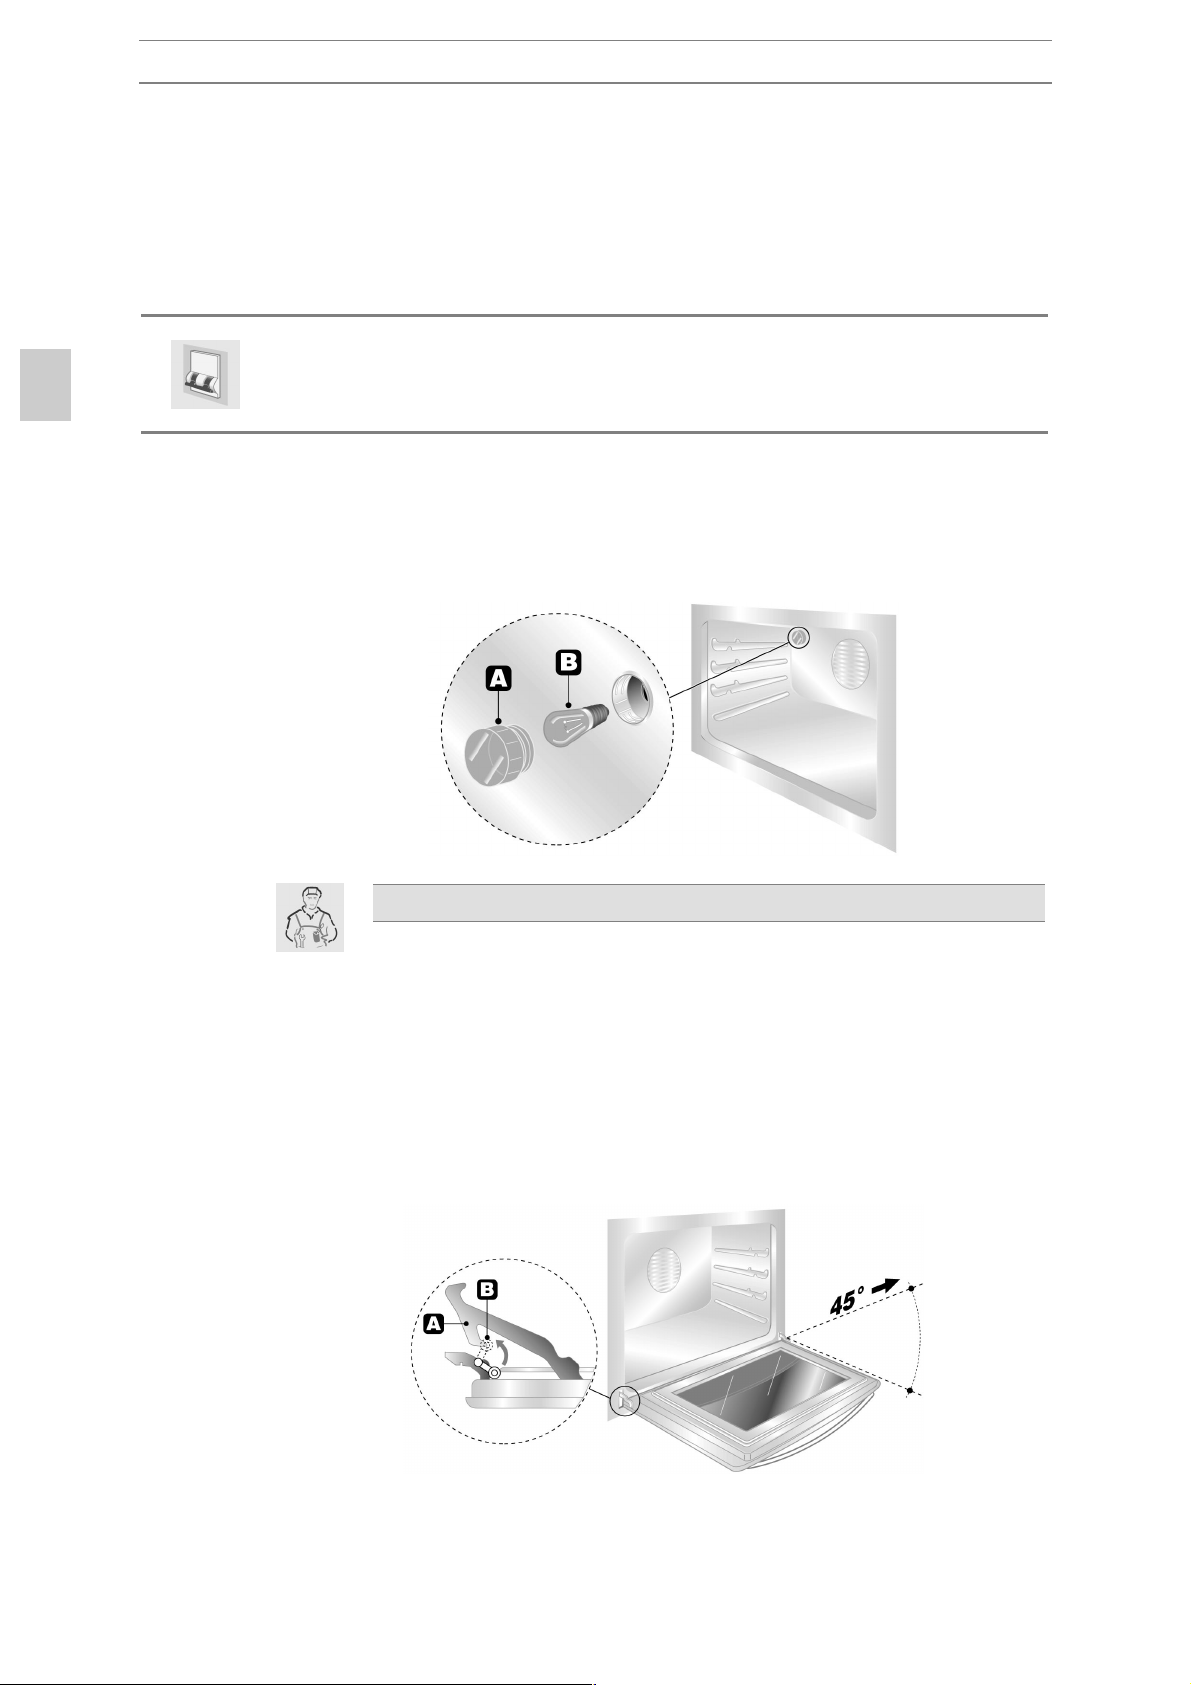
8.1 REPLACING THE LIGHT BULB
Remove cover A by twisting anticlockwise, replace bulb B with another
similar bulb. Refit the cover A.
Only use oven bulbs (T 300 °C).
8.2 D
ISMANTLING THE DOOR
Hold the door on both sides with both hands near hinges A and raise
levers B. Lift up the door forming an angle of about 45° and remove. To
refit, slide the hinges A in the grooves, drop the door and release levers
B.
26
 Loading...