

Page 1

Dear Customer,
Thank you for purchasing one of our products. We are confident that this practical and modern
appliance, made with top quality materials, will satisfy your needs in every way. This new piece of
equipment is simple to use but, before operating it, please read this booklet carefully for best
results.
The manufacturer cannot be held liable for consequential damages to objects or persons
resulting from faulty installation or misuse of this appliance.
INSTRUCTIONS AND SUGGESTIONS FOR
USE, INSTALLATION AND MAINTENANCE
OF THE BUILT-IN ELECTRIC BARBECUE
The manufacturer cannot be held responsible for any inaccuracies due to printing or reproduction errors
contained in the present booklet. The features of the picture diagrams included are purely indicative. We
reserve the right to make any changes to our products that are deemed necessary or useful and in the
interest of the user that are not detrimental to essential operating and safety features.
COD. 01093SM (01093ING) – 10.03.2005
TIPO: PFZ 02
MOD.: SGR30
SMEG S.p.A.
Via Leonardo da Vinci, 4
42016 GUASTALLA- ITALIA
GB
Page 2

TYPE: BD30
14
1 Grill 2400 W
2 Grill rack
3 Grill control knob
4 Grill on/off indicator lamp
Caution: this appliance is designed for personal household use only.
BARBECUE DESCRIPTION
Page 3

1) SWITCHING ON THE BARBECUE
The barbecue is controlled by a power regulator with
12 positions (see fig. 1). Turn the knob clockwise to
the desired position (from 1 to 12) to switch it on.
To use the grill function turn the knob to position 12.
A light click warns that the thermostat has been shut
down and the resistance will quickly become red-hot.
A red indicator lamp indicates it is switched on.
The barbecue allows fast cooking on the grill.
The function of the lava stone contained in the drip
pan is to absorb drippings of oil or fat that are
produced during cooking. It also accumulates heat
during the initial operating phase of the resistance
allowing, before long, uniform grilling very similar to
that obtained using charcoal.
For better results it is recommended you pre-heat the
lava stone for at least 10 minutes on position 1. This
step is strongly recommended when the appliance is
switched on for the first time. It reduces the risk of the
cooked food absorbing the odours produced by the
resistance the first time it is switched on.
15
USE
FIG. 1
Page 4

16
USE
WARNING:
When turning the grill on for the first time or if
the grill has remained inactive for a long time,
care must be taken to dry it out by switching on
the grill for 30 minutes to position 1 on the
regulator in order to eliminate any moisture
absorbed by the insulating material.
To use correctly remember:
- Turn the current on only after placing the pan or
food on the grill.
- Never leave the appliance unattended while
using the grill, and keep children at a safe
distance. In particular, ensure that the handles
are in the correct position inwards and watch
out when cooking food with oil and fat as they
are easily inflammable.
- Even after use, the grill remains hot for a long
time. Do not touch it with your hands or other
objects to avoid burns.
- As soon as a crack is noticed on the surface of
the heating element, immediately disconnect the
appliance from the mains.
Page 5

17
CLEANING
CAUTION: Before cleaning of any kind,
disconnect the appliance from the mains.
2) COOKING SURFACE
To maintain the surface of the barbecue always
clean and to extend the lifespan of the appliance, it
is very important to wash it after every use with
warm, soapy water, rinse, and dry thoroughly.
Let the barbecue and all its parts cool off before
cleaning. Do not use scouring pads, abrasive
cleaners or corrosive sprays.
Never allow vinegar, coffee, milk, salt water, lemon
or tomato juice to remain in contact with the
surfaces for long periods of time.
WARNING:
- To maintain the grill in good condition after
use, it should be treated with the special
products available on the market so that the
surface always remains clean. This
procedure is necessary to prevent the
formation of rust.
- Don’t use steam jets for the equipment
cleaning.
Page 6

18
INSTALLATION
TECHNICAL DATA FOR INSTALLERS
Installation and maintenance listed in this section
must only be carried out by qualified personnel
(law n° 46 and D.P.R. 447).
A faulty installation can cause damage to
persons, animals or objects, towards whom the
manufacturer cannot be held responsible.
The cut-off or automatic control devices of the
appliance can only be modified by the
manufacturer or by a duly authorized supplier.
3) INSTALLING THE BARBECUE
Take the barbecue out of its packaging, unpack
the various loose parts, then make sure it is not
damaged. In case of doubt do not use the
appliance and contact a qualified technician.
Packaging (cardboard, bags, expanded
polystyrene, nails...) must not be left within
children's reach as they are potential sources
of danger.
An opening in the table top of the piece of modular
furniture must be made with the dimensions
indicated in fig. 2, making sure that the dimensions
of the space required to install the appliance are
observed.
This is a Class 3 appliance and is therefore
subject to all the requirements set by the
standards for these appliances.
FIG. 2
FIG. 3
Page 7

4) SECURING THE BARBECUE
To secure the barbecue to the worktop the
fastening clamps accompanying this booklet
must be assembled. The following procedures
must be carried out to do this:
remove all movable parts from the barbecue;
turn the appliance over taking care to place it
on a soft surface to avoid damaging the external
surfaces;
remove the clamps "G" from the package and
install them according to the diagram in fig. 4.
After these steps have been carried out, the
special gasket that prevents liquids from leaking
can be installed. To fit this gasket correctly,
please strictly follow the directions below:
- detach the gasket strips from their support taking
care that the transparent protection remains
attached to the gasket;
- put the gasket "E" (fig. 4) in the correct position
under the edge of the table top, so that the outer
side of the gasket fits perfectly with the external
perimeter of the worktop. The ends of the strips
must fit without overlapping;
- make sure the gasket adheres to the countertop
evenly all around, press it down with your
fingers, then remove the protective strip of the
gasket and position the barbecue in the opening
made in the worktop;
- secure the appliance by tightening the clamp
screws "F" (see fig. 5).
- In order to prevent any accidental contact with
the surface of the heated barbecue during use, a
separation in wood must be inserted and
fastened with screws at a minimum distance of
60 mm from the top (fig. 6).
WARNING: Note that the adhesive which joins the
plastic laminate to the worktop must be resistant
to temperatures of no less than 150°C to prevent
the covering from detaching.
The installer is advised that the rear wall,
adjoining and surrounding surfaces of the
barbecue must be resistant to a temperature of
75K.
FIG. 4 FIG. 5 FIG. 6
INSTALLATION
ABCDE
BARBECUE 285 485 60 60 150 min.
19
USEFUL MEASUREMENTS
(mm)
Page 8
20
5) ELECTRICAL CONNECTIONS
The electrical connection must be made in
conformity with current rules and regulations.
Before making a connection, check that:
- The capacity and outlets of the electrical
installation are suitable for the maximum power
output of the appliance (see the information label
attached on the underside of the housing).
- The outlet or installation is provided with a ground
connection according to standards and provisions
currently in force. All responsibility is declined for
failure to comply with these provisions.
- If a power cord is not supplied with the appliance,
connect a cable with a suitable section to the
terminal board (see the table in paragraph 6)
keeping the ground wire longer than the lead
wires in conformity with the diagram in fig. 7.
When connection to the power circuit is made
through an outlet:
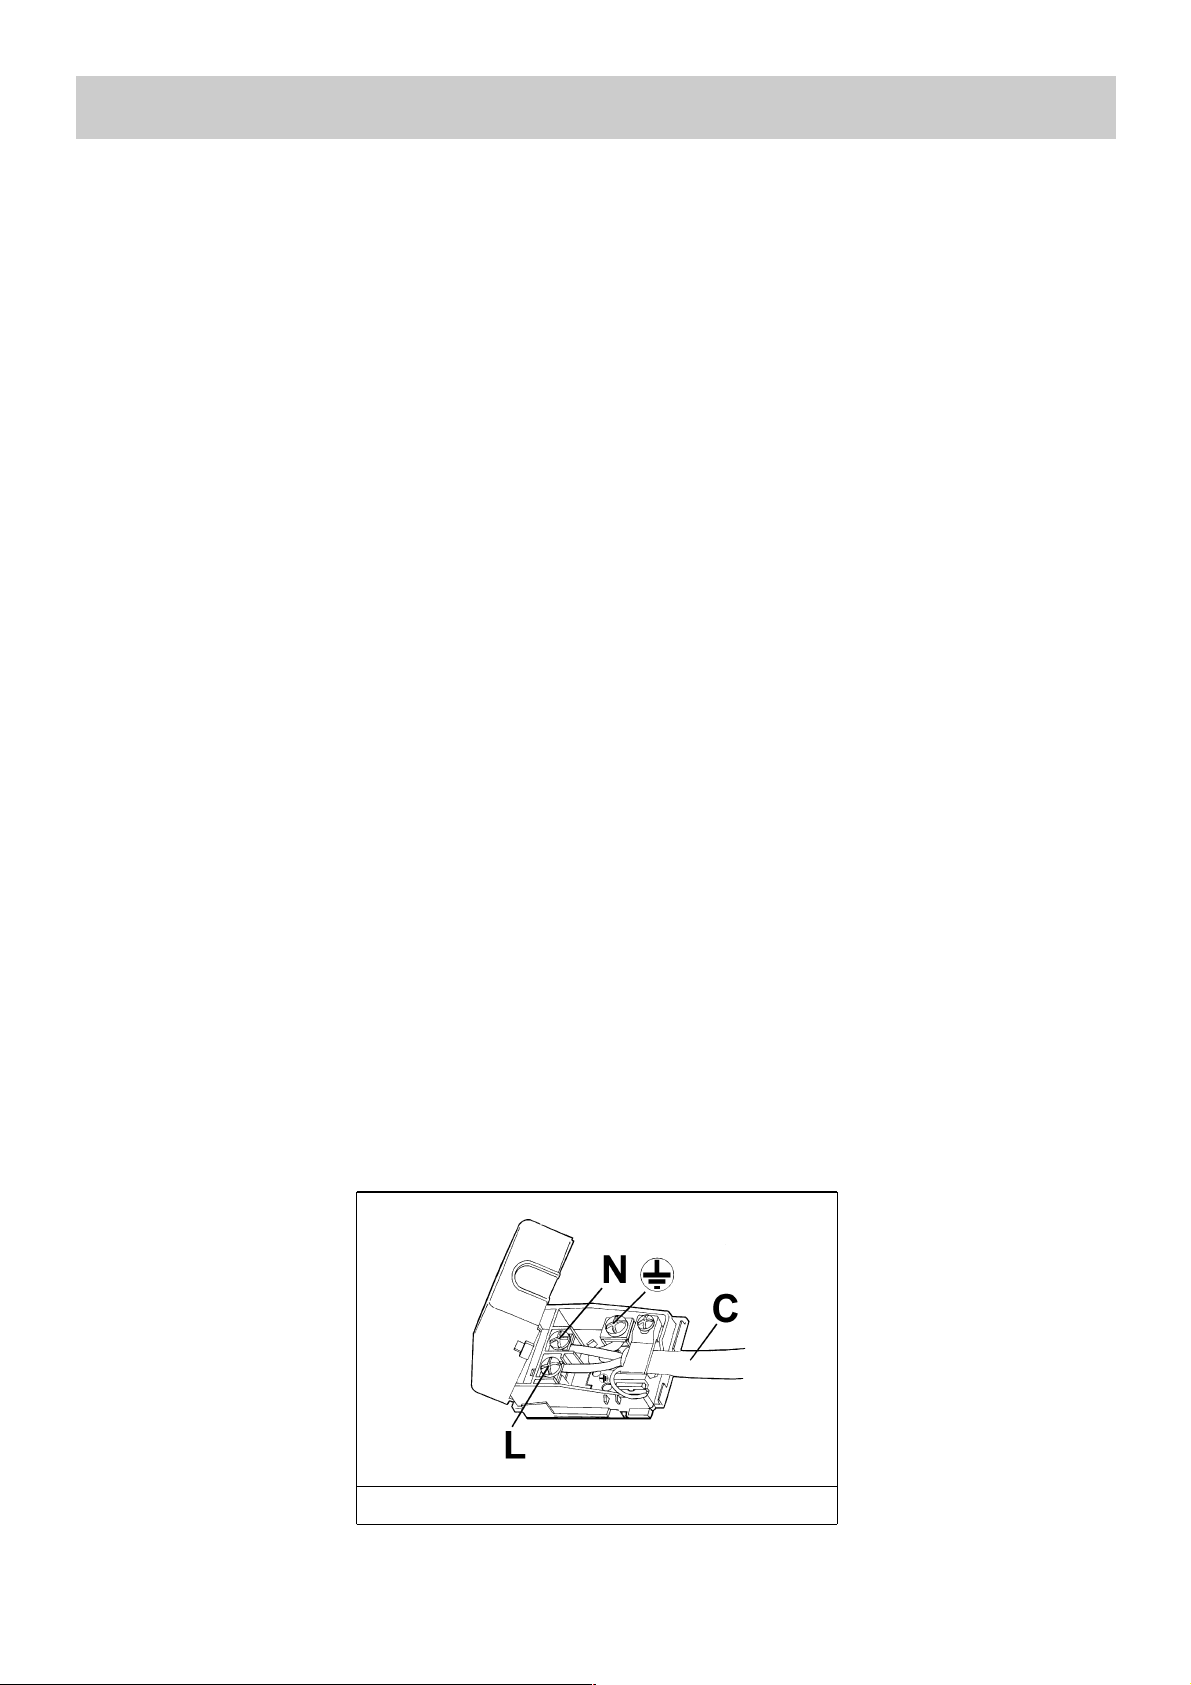
- Apply to power cable "C", if not provided, a
standard plug suitable for the load indicated on
the information label. Connect the wires as in the
diagram in fig. 7 taking care to observe the
responses listed below:
Letter L (phase) = brown cable;
Letter N (neutral) = blue cable;
Symbol
(earth) = yellow-green cable.
- The power cord must be placed in a way that it
does not reach an excess temperature of 75K in
any position.
- To connect, do not use adaptors or switches as
they may cause false contacts resulting in
dangerous overheating.
When connection is made directly to the power
circuit:
- Place a switch between the appliance and the
circuit of an appropriate size for the load of the
appliance and with a minimum aperture between
contacts of 3mm.
- Remember that the earth cable must not be
broken by the switch.
- As an alternative, the electrical connection may
also be protected by a high sensitivity differential
switch.
It is strongly recommended that the yellow-green
earth cable provided be connected to a good earth
installation.
WARNING: All of our appliances are designed
and manufactured according to European
standards EN 60 335-1 and EN 60 335-2-6 and
relative amendments.
This appliance satisfies the requirements of
European directives:
- CEE 89/336 + 92/31 + 93/68 concerning
electromagnetic compatibility.
- CEE 73/23 + 93/68 concerning electrical safety.
INSTALLATION
FIG. 7
Page 9

Name W
21
Grill 2400
TYPE AND SECTION OF POWER CABLES
2400 W 3 X 1.5 mm2(*)
2400 W 3 X 1.5 mm
2
(*)
ELECTRICAL COMPONENTS OUTPUT
MAINTENANCE
Before carrying out maintenance of any kind,
disconnect the appliance from the mains. All
maintenance must be carried out by authorized
personnel only.
6) PART REPLACEMENT
To replace components located inside the barbecue
the resistance should be lifted up and secured in
the vertical position. Take out the drip pan
containing the lava stone and loosen the four
screws that are under it (see fig. 8). The work
surface can now be detached from the worktop
giving access to all internal components.
To reassemble the work surface of the appliance
take care not to damage the power cables and
make certain that they are well positioned in the
guides along the side of the appliance.
Note: In the event the power cord is replaced,
the ground wire must be left longer than the
lead wires (fig. 9) and the instructions in the
paragraph "ELECTRICAL CONNECTIONS" must
be observed.
To reassemble the appliance repeat the steps
above in the reverse order.
7) TECHNICAL SPECIFICATIONS OF
ELECTRICAL COMPONENTS
To facilitate the task of the installer a table with
component specifications is included below.
Type Total output of Single-phase power supply
of cable appliance 230 – 240 V ~
Rubber
H05 RR-F
Neoprene
H05 RN-F
FIG. 8
FIG. 9
Page 10

22
TECHNICAL SPECIFICATIONS
BARBECUE
Voltage 230 – 240 V ~
Frequency 50/60 Hz
Total nominal power 2400 W
Page 11

23
TECHNICAL ASSISTANCE AND SPARE PARTS
Before leaving the factory, this equipment was tested and adjusted by skilled personnel so as to
guarantee the best operating results.
Original spare parts can only be found at our technical service centres and authorized stores. Every
repair or adjustment necessary thereafter must be carried out with the greatest care by qualified
personnel.
For this reason we recommend you always contact the dealer you purchased it from or our nearest
service centre stating the make, model, series and type of problem experienced with the equipment. The
relevant specifications are stamped on the information label attached on the underside of the appliance
and on the label attached to the packing box. This information will allow the technician to procure the
appropriate spare parts and guarantee that the right action is taken promptly. It is recommended that you
note these specifications below so that they are readily available at all times.
MAKE: .......................................................
MODEL: .................................................…
SERIES: ...................................................
Page 12

24
 Loading...