

Page 1

Contents
1 Instructions 4
1.1 General safety instructions 4
1.2 Manufacturer liability 5
1.3 Appliance purpose 5
1.4 Disposal 5
1.5 Identification plate 6
1.6 This user manual 6
1.7 How to read the user manual 6
2 Description 7
2.1 General Description 7
2.2 Control panel 8
2.3 Other parts 9
2.4 Available accessories 9
2.5 Other cooking containers 10
3 Use 11
3.1 Instructions 11
3.2 First use 12
3.3 Using the accessories 12
3.4 Using the oven 13
3.5 Cooking advice 22
3.6 Special functions 23
3.7 Secondary menu 28
4 Cleaning and maintenance 30
4.1 Instructions 30
4.2 Cleaning the surfaces 30
4.3 Ordinary daily cleaning 30
4.4 Food stains or residues 30
4.5 Removing the door 30
4.6 Cleaning the door glazing 31
4.7 Removing the internal glass panes 31
4.8 Cleaning the inside of the oven 33
4.9 Cleaning the tank 35
4.10 Extraordinary maintenance 38
5 Installation 40
5.1 Electrical connection 40
5.2 Cable replacement 40
5.3 Positioning 41
EN
We advise you to read this manual carefully, which contains all the instructions for
maintaining the appliance’s aesthetic and functional qualities.
For further information on the product: www.smeg.com
3
Page 2

Instructions
1 Instructions
1.1 General safety instructions
Risk of personal injury
• During use the appliance and its
accessible parts become very hot.
Children must not come near the
appliance.
• Never touch the heating elements
during use.
• Keep children under eight years of
age at a safe distance if they are not
constantly supervised.
• Children must never play with the
appliance.
• Never rest metallic objects such as
knives, forks, spoons and lids on the
appliance during use.
• Switch off the appliance immediately
after use.
• Never try to put out a fire or flames
with water: Turn off the appliance
and smother the flames with a fire
blanket or other appropriate cover.
• The appliance must never be
cleaned by unsupervised children.
• Do not clean the appliance
immediately after turning it off – wait
for it to cool down first.
• Have authorised persons carry out
installation and assistance
interventions according to the
standards in force.
• Do not modify this appliance.
• Do not insert pointed metal objects
(cutlery or utensils) into the slots in the
appliance.
• Do not try to repair the appliance
yourself or without the intervention of
authorised persons.
• If the power supply cable is
damaged, contact technical support
immediately and they will replace it.
Risk of damaging the appliance
• Do not use abrasive or corrosive
detergents (e.g. scouring powders,
stain removers and metallic sponges)
on glass parts, as this could cause
breakage.
• Use wooden or plastic utensils.
• Do not seat on the appliance.
• Do not use steam jets to clean the
appliance.
• Do not obstruct ventilation openings
and heat dispersal slots.
• Never leave the appliance
unattended during cooking
operations where fats or oils could
be released.
4
Page 3
Instructions
• Never leave objects on the cooking
surface.
• Do not use the appliance to heat
rooms for any reason.
• Do not remove the seal on the face
of the oven.
For this appliance
• Ensure that the appliance is switched off
before replacing the bulb.
• Do not rest any weight or sit on the open
door of the appliance.
• Take care that no objects are stuck in the
doors.
1.2 Manufacturer liability
The manufacturer declines all liability for
damage to persons or property caused by:
• Use of the appliance other than that
specified;
• Non-observance of the user manual
provisions;
• Tampering with any part of the
appliance;
• Use of non-original spare parts.
1.3 Appliance purpose
• This appliance is intended for cooking
food in the home environment. Every
other use is considered improper.
• This appliance may be used by children
aged at least 8 and by persons of
reduced physical, sensory or mental
capacity, or lacking in experience in the
use of electrical appliances, provided
that they are supervised or instructed by
adults who are responsible for their
safety.
• The appliance is not designed to
operate with external timers or with
remote-control systems.
1.4 Disposal
This appliance must be disposed of
separately from other waste
(Directives 2002/95/EC, 2002/
96/EC, 2003/108/EC). The appliance
does not contain substances in quantities
sufficient to be considered hazardous to
health and the environment, in accordance
with current European directives.
To dispose of the appliance:
• Cut the power supply cable and remove
it along with the plug.
EN
Power voltage
Danger of electrocution
• Disconnect the mains supply.
• Unplug the appliance.
5
Page 4
Instructions
• Deliver the appliance to the appropriate
recycling centre for electrical and
electronic equipment waste, or return it to
the retailer when purchasing an
equivalent product, on a one for one
basis.
Our appliances are packed in nonpolluting and recyclable materials.
• Deliver the packing materials to the
appropriate recycling centre.
Plastic packaging
Danger of suffocation
• Do not leave the packaging or any part
of it unattended.
• Do not let children play with the
packaging plastic bags.
1.5 Identification plate
The identification plate bears the technical
data, serial number and brand name of the
appliance. Do not remove the identification
plate for any reason.
1.7 How to read the user manual
This user manual uses the following reading
conventions:
Instructions
General information on this user
manual, on safety and final
disposal.
Description
Description of the appliance and its
accessories.
Use
Information on the use of the
appliance and its accessories,
cooking advice.
Cleaning and maintenance
Information for proper cleaning and
maintenance of the appliance.
Installation
Information for authorised persons:
Installation, operation and
inspection.
1.6 This user manual
This user manual is an integral part of the
appliance and must therefore be kept in its
entirety and within the user’s reach for the
whole working life of the appliance.
Read this user manual carefully before using
the appliance.
6
Safety instructions
Information
Advice
1. Sequence of instructions for use.
• Standalone instruction.
Page 5

2 Description
2.1 General Description
Description
EN
1 Control panel
2 Oven light
3 Seal
4 Door
5 Fan
6 Evaporation tray
7 Water supply tube
8 Rack support frames
Frame shelf
7
Page 6
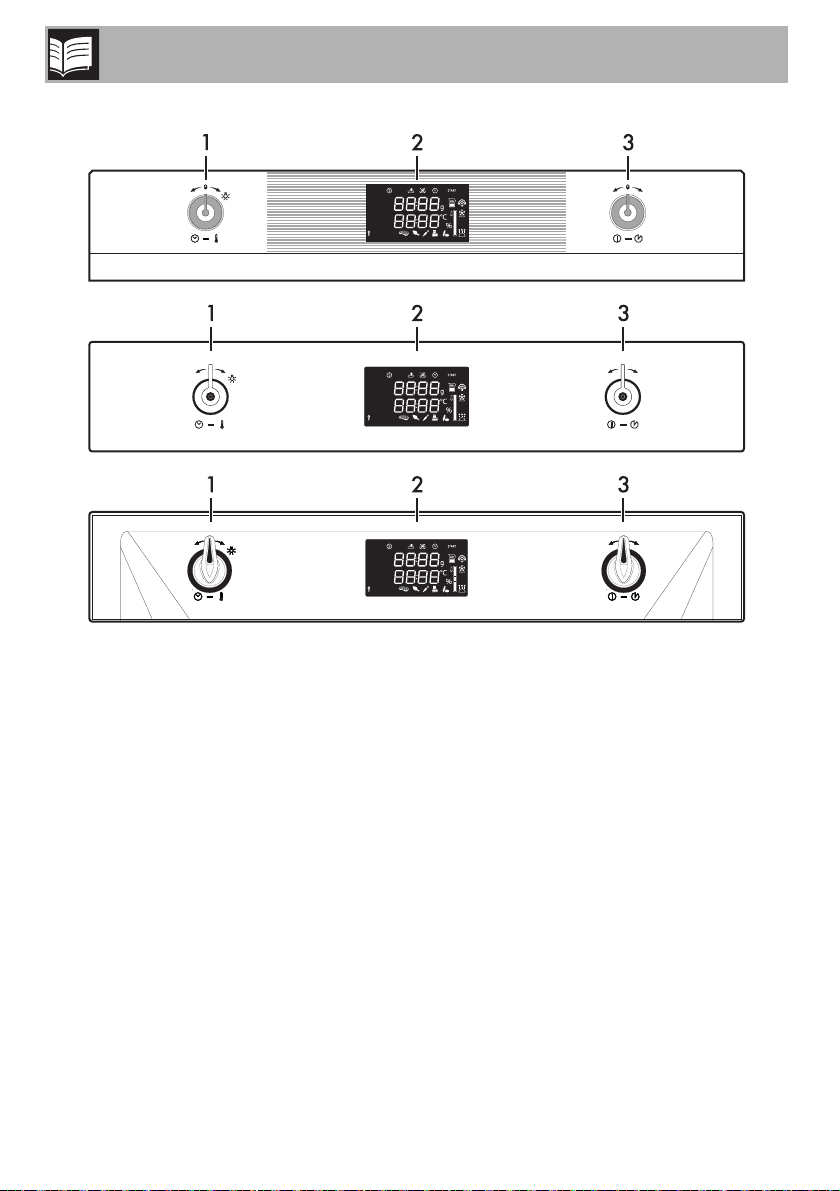
2.2 Control panel
Description
1 Temperature knob
This knob can be used to select:
• The cooking temperature
• The duration of a function
• Programmed cooking procedures
• The current time
• The turning on or off of the light inside the
appliance.
8
2 Display
Displays the current time, the selected
cooking temperature and function and any
time set.
3 Function knob
This knob can be used to:
• Turn the appliance on and off
• Select a function
• Start or stop a function.
Page 7
Description
2.3 Other parts
Shelves
The appliance features shelves to position
trays and racks at different heights. The
insertion heights are indicated from the
bottom upwards (see 2.1 General
Description).
Cooling fan
The fan cools the oven and comes into
operation during cooking.
The fan causes a steady outflow of air from
above the door which may continue for a
brief period of time even after the appliance
has been turned off.
Interior lighting
The appliance interior lighting comes on:
• When the door is opened
• When any function is selected
• When you turn the temperature knob to
the right (turn the temperature knob to the
right again to turn off the interior lighting).
When the door is open, it is not
possible to turn off the interior
lighting.
2.4 Available accessories
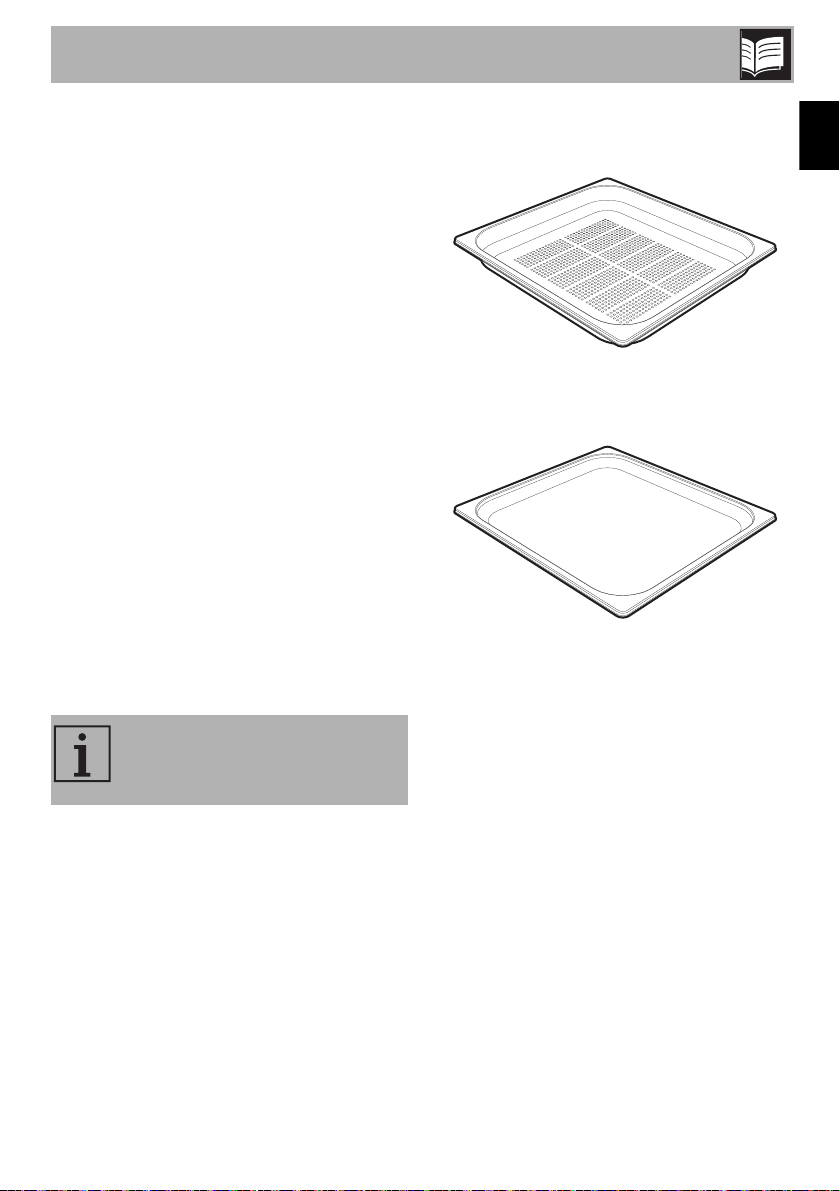
Perforated tray
Useful for steaming fish and vegetables.
Tray
Useful for cooking desserts (with cooking
duration less than 25 minutes, or without
steam), rice, vegetables and cereals, this is
also essential for collecting liquids resulting
from steaming or defrosting foodstuffs
contained in the perforated tray above.
EN
9
Page 8
Description
a
a
a
a
a
a
a
a
a
a
a
a
a
a
a
a
a
a
a
a
a
a
a
a
a
a
a
a
a
a
a
a
a
a
a
a
a
a
a
a
a
a
a
a
a
a
a
a
a
a
a
a
a
a
a
a
a
a
a
a
a
a
a
a
a
a
a
a
a
a
a
a
a
a
a
a
a
a
a
a
a
a
a
a
a
a
a
a
a
a
a
a
a
a
a
a
a
a
a
a
a
a
a
a
a
a
a
a
a
a
a
a
a
a
a
a
a
a
a
a
a
a
a
a
a
a
a
a
a
a
a
a
a
a
a
a
a
a
a
a
a
a
a
a
a
a
a
a
a
a
a
a
a
a
a
a
a
a
a
a
a
a
a
a
a
a
a
a
a
a
a
a
a
a
a
a
a
a
a
a
a
a
a
a
a
a
a
a
a
a
a
a
a
a
a
a
a
a
a
a
a
a
a
a
a
a
a
a
a
a
a
a
a
a
a
a
a
a
a
a
a
a
a
a
a
a
a
a
a
a
a
a
a
a
a
a
a
a
a
a
a
a
a
a
a
a
a
a
a
a
a
a
a
a
a
a
a
a
a
a
a
a
a
a
a
a
a
a
a
a
a
a
a
a
a
a
a
a
a
a
a
a
a
a
a
a
a
a
a
a
a
a
a
a
a
a
a
a
a
a
a
a
a
a
a
a
a
a
a
a
a
a
a
a
a
a
a
a
a
a
a
a
a
a
a
a
a
a
a
a
a
a
a
a
a
a
a
a
a
a
a
a
a
a
a
a
a
a
a
a
a
a
a
a
a
a
a
a
a
a
a
a
a
a
a
a
a
a
a
a
a
a
a
a
a
a
a
a
a
a
a
a
a
a
a
a
a
a
a
a
a
a
a
a
a
a
a
a
a
a
a
a
a
a
a
a
a
a
a
a
a
a
a
a
a
a
a
a
a
a
a
a
a
a
a
a
a
a
a
a
a
a
a
a
a
a
a
a
a
a
a
a
a
a
a
a
a
a
a
a
a
a
a
a
a
a
a
a
a
a
a
a
a
a
a
a
a
a
a
a
a
a
a
a
a
a
a
a
a
a
a
a
a
a
a
a
a
a
a
a
a
a
a a
a
a
a
a
a
a
a
a
a
a
a
a
a
a
a
a
a
a
a
a
a
a
a
a
a
a
a
a
a
a
a
a
a
a
a
a
a
a
a
a
a
a
a
a
a
a
a
a
a
a
a
a
a
a
a
a
a
a
a
a
a
a
a
a
a
a
a
a
a
a
a
a
a
a
a
a
a
a
a
a
a
a
a
a
a
a
a
a
a
a
a
a
a
a
a
a
a
a
a
a
a
a
a
a
a
a
a
a
a
a
a
a
a
a
a
a
a
a
a
a
a
a
a
a
a
a
a
a
a
a
a
a
a
a
a
a
a
a
a
a
a
a
a
a
a
a
a
a
a
a
a
a
a
a
a
a
a
a
a
a
a
a
a
a
a
a
a
a
a
a
a
a
a
a
a
a
a
a
a
a
a
a
a
a
a
a
a
a
a
a
a
a
a
a
a
a
a
a
a
a
a
a
a
a
a
a
a
a
a
a
a
a
a
a
a
a
a
a
a
a
a
a
a
a
a
a
a
a
a
a
a
a
a
a
a
a
a
a
a
a
a
a
a
a
a
a
a
a
a
a
a
a
a
a
a
a
a
a
a
a
a
a
a
a
a
a
a
a
a
a
a
a
a
a
a
a
a
a
a
a
a
a
a
a
a
a
a
a
a
a
a
a
a
a
a
a
a
a
a
a
a
a
a
a
a
a
a
a
a
a
a
a
a
a
a
a
a
a
a
a
a
a
a
a
a
a
a
a
a
a
a
a
a
a
a
a
a
a
a
a
a
a
a
a
a
a
a
a
a
a
a
a
a
a
a
a
a
a
a
a
a
a
a
a
a
a
a
a
a
a
a
a
a
a
a
a
a
a
a
a
a
a
a
a
a
a
a
a
a
a
a
a
a
a
a
a
a
a
a
a
a
a
a
a
a
a
a
a
a
a
a
a
a
a
a
a
a
a
a
a
a
a
a
a
a
a
a
a
a
a
a
a
a
a
a
a
a
a
a
a
a
a
a
a
a
a
a
a
a
a
a
a
a
a
a
a
a
a
a
a
a
a
a
a
a
a
a
a
a
a
a
a
a
a
a
a
a
a
a
a
a
a
a
a
a
a
a
a
a
a
a
a
a
a
a
a
a
a
a
a
a
a
a
a
a
a
a
a
a
a
a
a
a
a
a
a
a
a
a
a
a
a
a
a
a
a
a
a
a
a
a
a
a
a
a
a
a
a
a
a
a
a
a
a
a
a
a
a
a
a
a
a
a
a
a
a
a
a
a
a
a
a
a
a
a
a
a
a
a
a
a
a
a
a
a
a
a
a
a
a
a
a
a
a
a
a
a
a
a
a
a
a
a
a
a
a
a
a
a
a
a
a
a
a
a
a
a
a
a
a
a
a
a
a
a
a
a
a
a
a
a
a
a
a
a
a
a
a
a
a
a
a
a
a
a
a
a
a
a
a
a
a
a
a
a
a
a
a
a
a
a
a
a
a
a
a
a
a
a
a
a
a
a
a
a
a
a
a
a
a
a
a
a
a
a
a
a
a
a
a
a
a
a
a
a
a
a
a
a
a
a
a
a
a
a
a
a
a
a
a
a
a
a
a
a
a
a
a
a
a
a
a
a
a
a
a
a
a
a
a
a
a
a
a
a
a
a
a
a
a
a
a
a
a
a
a
a
a
a
a
a
a
a
a
a
a
a
a
a
a
a
a
a
a
a
a
a
a
a
a
a
a
a
a
a
a
a
a
a
a
a
a
a
a
a
a
a
a
a
a
a
a
a
a
a
a
a
a
a
a
a
a
a
a
a
a
a
a
a
a
a
a
a
a
a
a
a
a
a
a
a
a
a
a
a
a
a
a
a
a
a
a
a
a
a
a
a
a
a
a
a
a
a
a
a
a
a
a
a
a
a
a
a
a
a
a
a
a
a
a
a
a
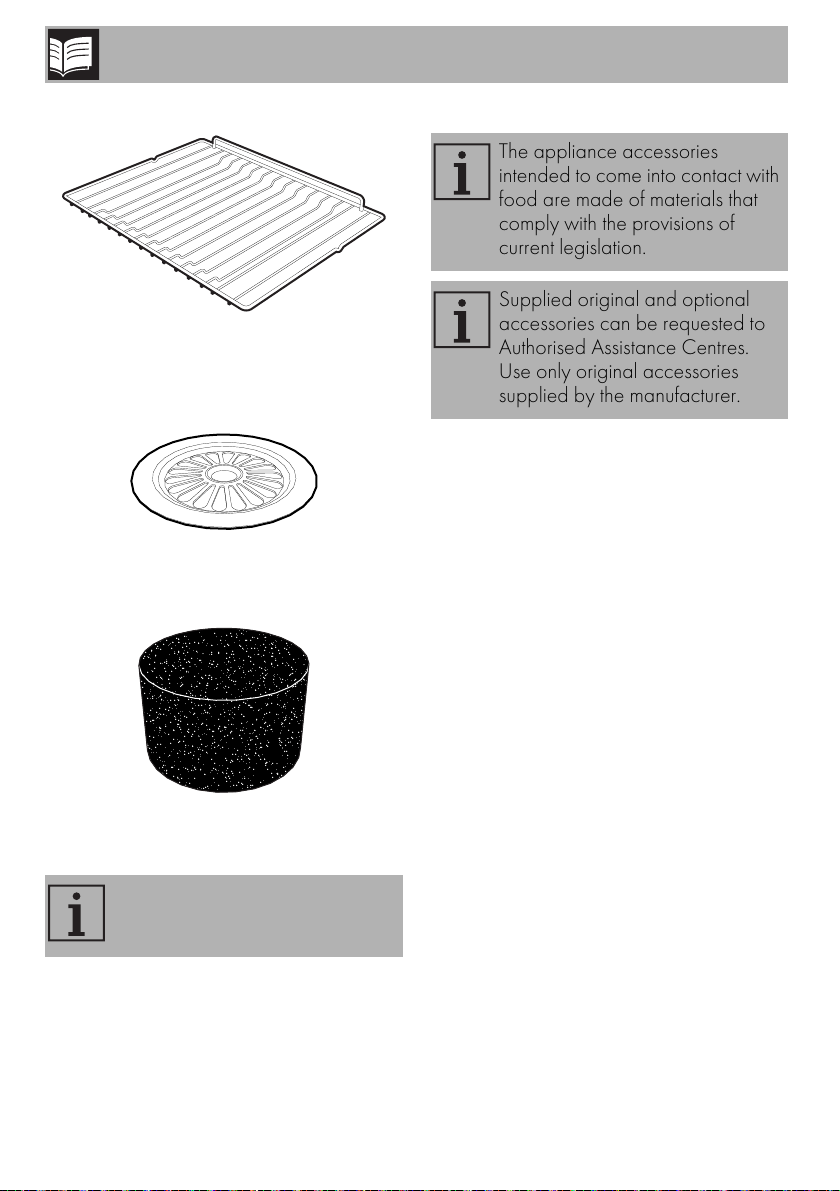
Rack
Useful for supporting containers with food
during cooking.
Evaporation tray cover
Evenly distributes steam inside the oven.
Sponge
Useful for removing condensation from
inside the oven.
The appliance accessories
intended to come into contact with
food are made of materials that
comply with the provisions of
current legislation.
Supplied original and optional
accessories can be requested to
Authorised Assistance Centres.
Use only original accessories
supplied by the manufacturer.
2.5 Other cooking containers
• You may also use your own containers
for cooking, as long as they are resistant
to high temperatures.
• For steam cooking, the use of metal
containers is recommended. Metal
facilitates better distribution of heat to the
foods.
• It is normal for metal containers to
deform somewhat during hightemperature cooking, but they will return
to their original shape when they cool.
• Thick ceramic plates may require more
heat than normal. Longer cooking times
may be necessary.
Some models are not provided
with all accessories.
10
Page 9
Use
3 Use
3.1 Instructions
High temperature inside the oven
during use
Danger of burns
• Keep the oven door closed during
cooking.
• Protect your hands by wearing oven
gloves when moving food inside the
oven.
• Open the appliance door carefully
during or after cooking.
• Take care because steam may not be
visible at certain temperatures.
• Do not cook dishes containing large
quantities of strong alcoholic beverages.
Alcohol vapour inside the oven could
ignite.
• Do not touch the heating elements inside
the oven.
• Do not pour water directly onto very hot
trays.
• Do not allow children to approach the
appliance when it is in operation.
Improper use
Risk of damage to enamelled
surfaces
• When steaming, always place the tray
below the perforated tray in order to
catch any drips.
• Do not cover the bottom of the oven
cavity with aluminium or tin foil sheets.
• The base of the oven and the
evaporation tray must always be left
free.
• Dishes must be heat and steam resistant.
• Do not use silicone moulds when
steaming.
• If you wish to use greaseproof paper,
place it so that it will not interfere with the
hot air circulation inside the oven.
• Do not place pans or trays directly on
the bottom of the oven cavity.
• Do not pour water directly onto very hot
trays.
EN
11
Page 10
Use
High temperature inside the oven
during use
Danger of fire or explosion
• Do not spray any spray products near
the appliance.
• Do not use or leave flammable materials
near the appliance.
• Do not use plastic kitchenware or
containers when cooking food.
• Do not put sealed tins or containers in
the oven.
• Do not leave the appliance unattended
during cooking operations where fats or
oils could be released.
• Remove all trays and racks which are
not required during cooking.
3.2 First use
1. Remove any protective film from the
outside or inside of the appliance,
including accessories.
2. Remove any labels (apart from the
technical data plate) from the
accessories and from the oven cavity.
3. Remove and wash all the appliance
accessories (see 4 Cleaning and
maintenance).
4. Heat the empty oven at the maximum
temperature for at least 20 minutes to
burn off any residues left by the
manufacturing process (see 3.4 Using
the oven).
5. You must set the current time in order to
start using the appliance (see “Setting the
time”).
3.3 Using the accessories
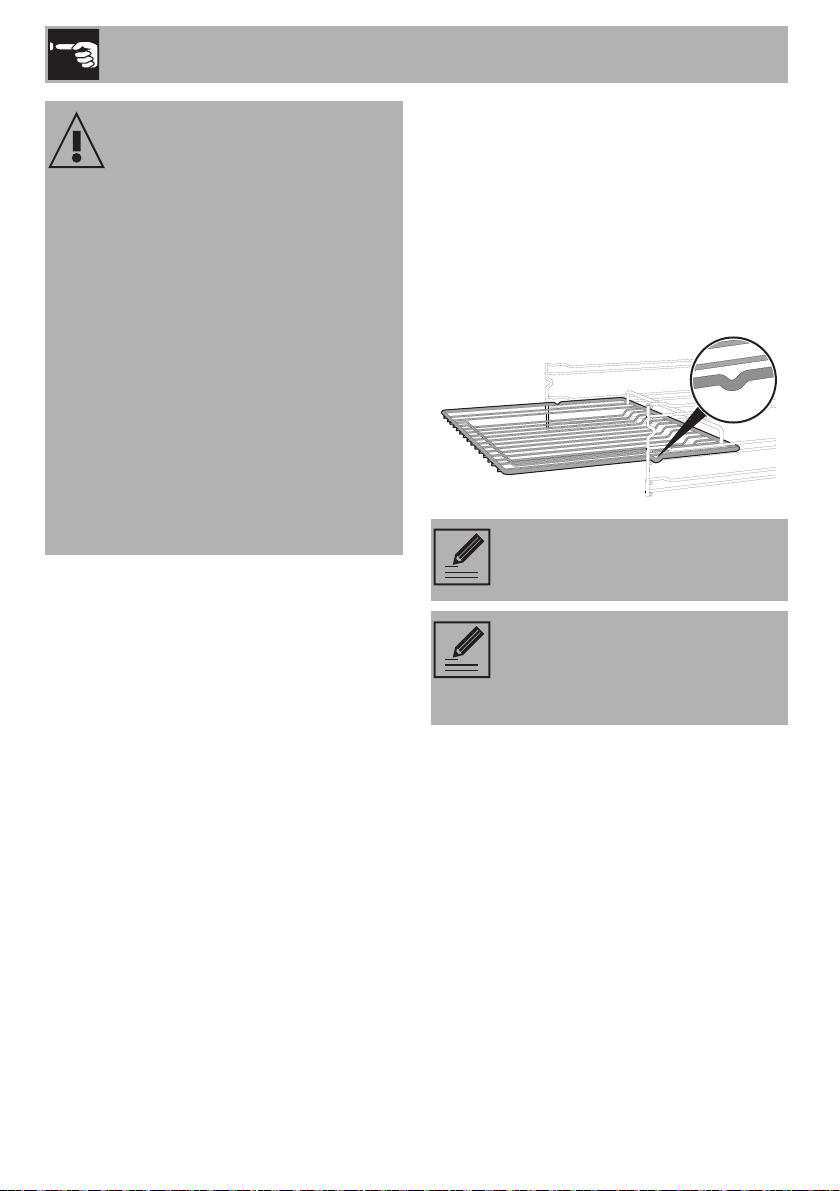
Racks
The racks must be inserted into the side
guides until they come to a complete stop.
• The mechanical safety locks that prevent
the rack from being taken out
accidentally have to face downwards
and towards the oven back.
Gently insert the racks into the
oven until they come to a stop.
Clean the racks and trays before
using them for the first time to
remove any residues left by the
manufacturing process.
12
Page 11
Use
Trays
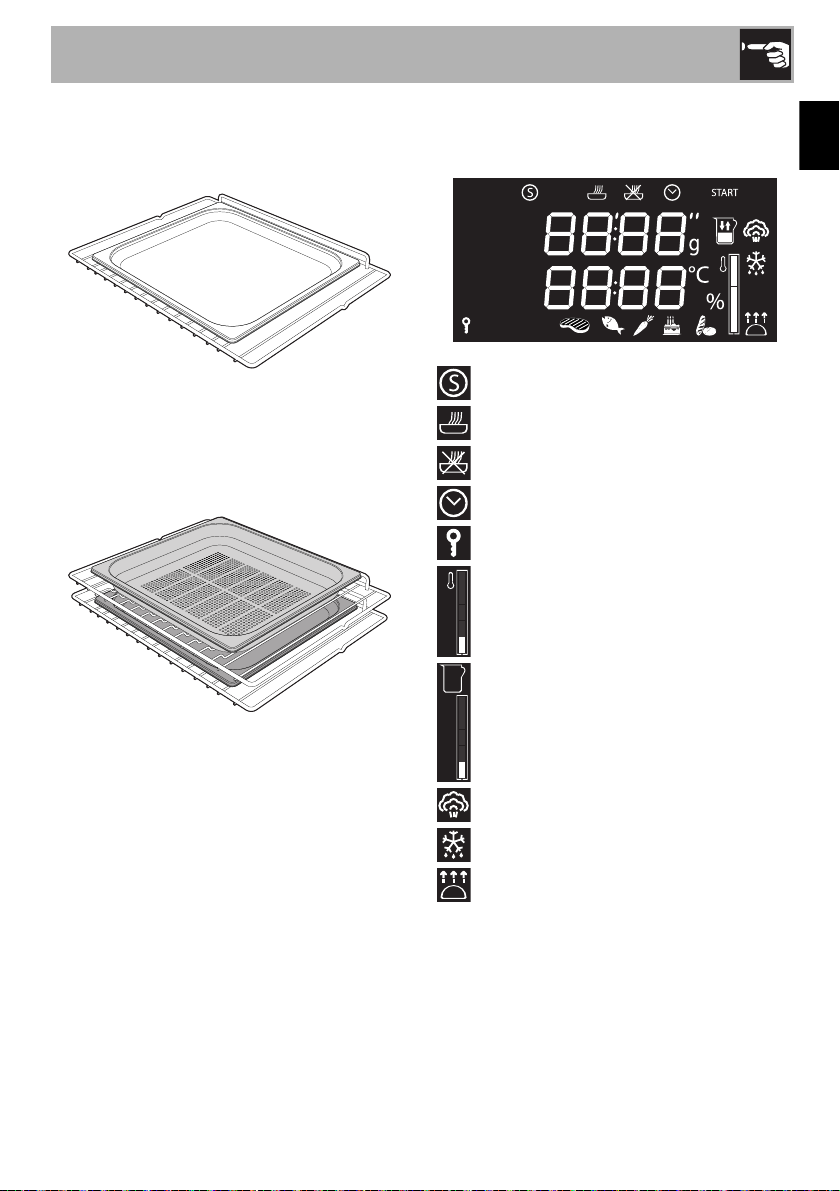
The tray must be inserted in the groove in
the rack.
In particular, the perforated tray must be
inserted in the groove in the rack above it.
This allows liquids to be collected
separately from the food which is being
cooked.
3.4 Using the oven
Display
Showroom indicator light
Timed cooking indicator light
Programmed cooking indicator light
Clock indicator light
Child lock indicator light
Temperature indicator light
EN
Tank level indicator light
Steam indicator light
Defrost indicator light
Proving indicator light
13
Page 12
Use
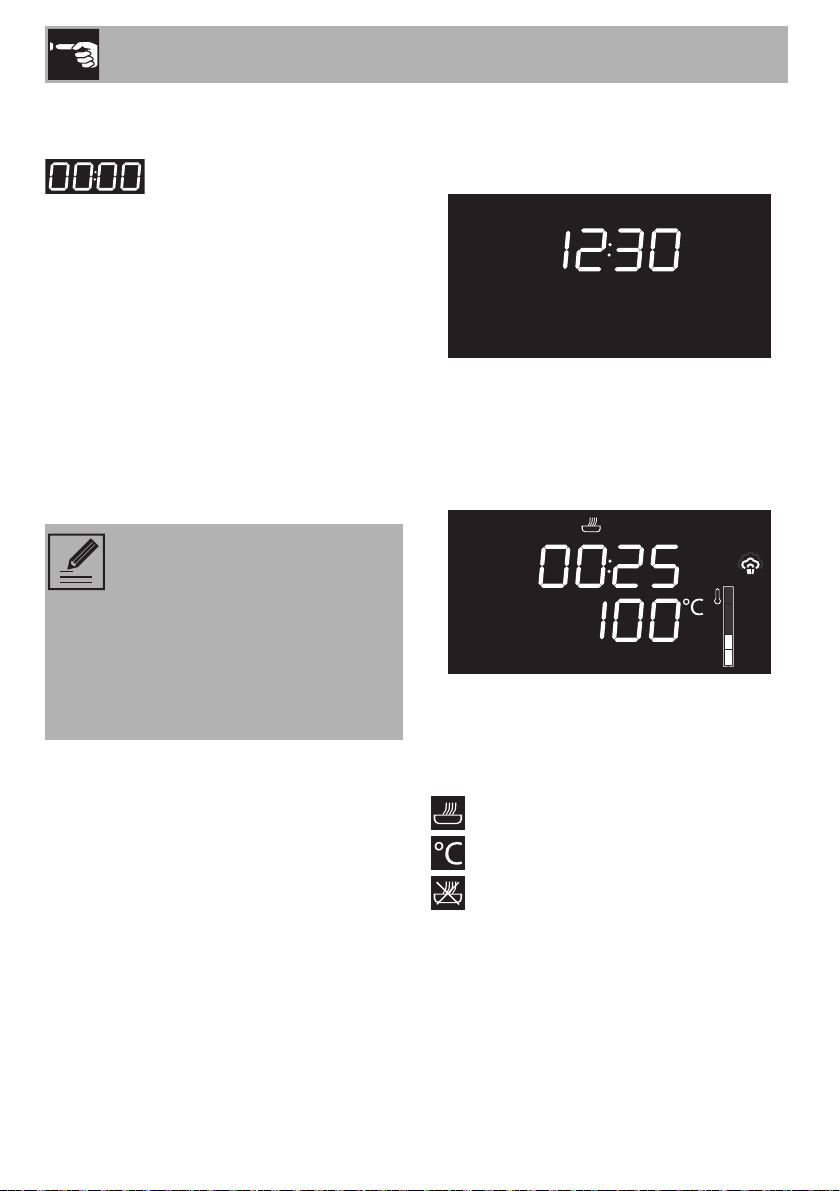
Setting the time
On the first use, or after a power failure,
will be flashing on the
appliance’s display. To be able to start any
cooking function, the current time must be
set.
1. Turn the temperature knob to set the
displayed time (keep the knob turned to
produce a faster increase or decrease).
2. Press the temperature knob.
3. Turn the temperature knob to set the
minutes (keep the knob turned to
produce a faster increase or decrease).
4. Press the temperature knob to finish
adjustment.
It may become necessary to
change the current time, for
example for daylight saving time.
From the stand-by position, keep
the temperature knob turned to the
right or left until the hours flash.
It is not possible to change the time
if a function is active.
Operating modes
Stand-by: When no function is selected, the
display shows the current time
.
ON: When a function is activated, the
display shows the parameters set such as
temperature, duration and temperature
reached.
Each time the temperature knob is pressed
during a function, the parameters will be
cycled through in the following order.
14
Timed cooking duration
Temperature
Programmed cooking time
.
In all modes it is possible to modify the
value by turning the temperature knob to the
left or right. Keep the knob turned to
produce a faster increase or decrease.
Page 13
Use
Steaming settings
Do not place food or any other
object directly on the bottom of the
oven. The base of the oven and
the evaporation tray must always
be left free.
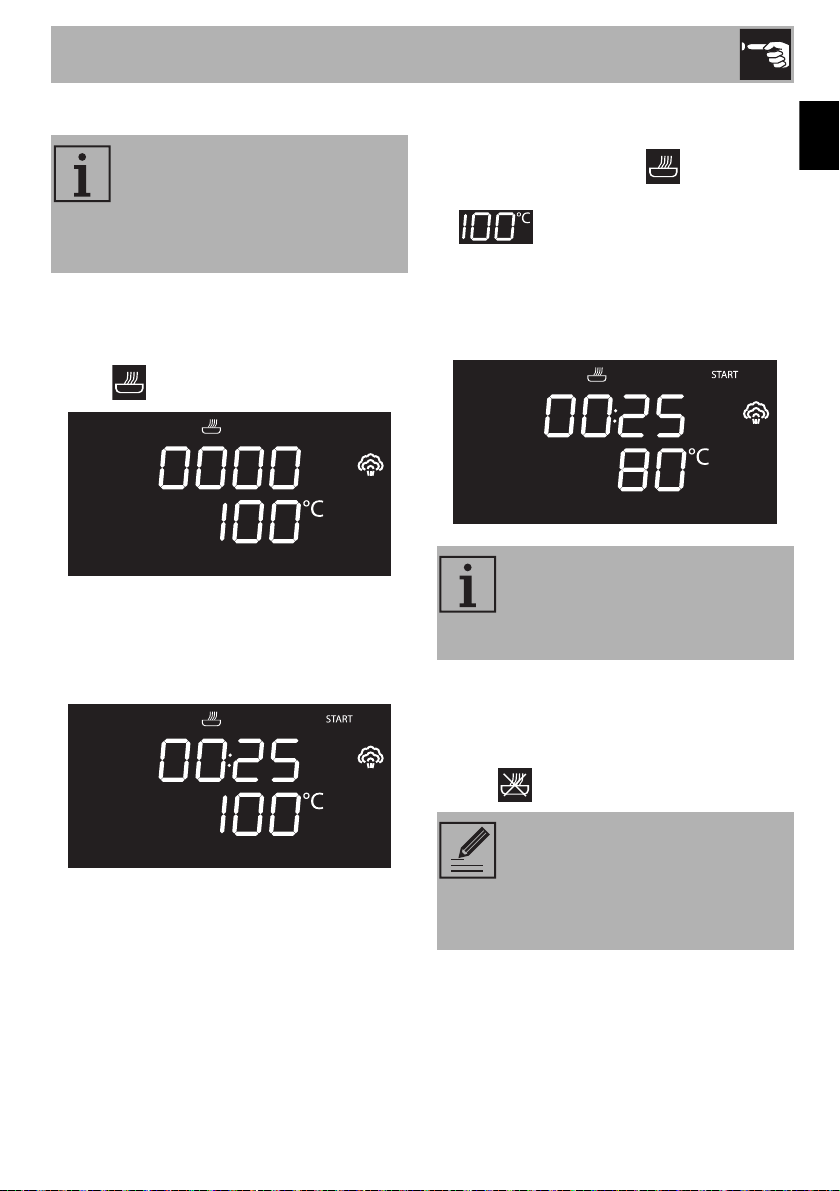
1. Place the food inside the oven.
2. Press the function knob to activate the
appliance. The timed cooking indicator
light will flash.
3. Turn the temperature knob to the right or
left to set the steaming duration from
00:01 to 02:00. Keep the knob turned
for a fast increase or decrease.
4. Press the temperature knob to confirm the
required cooking duration. The timed
cooking indicator light remains on
steadily, while the temperature indication
starts flashing.
5. If you wish to modify the default
temperature (100°C), turn the
temperature knob to the left or right until
you reach the required value.
The minimum temperature which
can be set is 30°C. Each
movement of the temperature knob
changes the value by 5°C.
6. Press the temperature knob to confirm the
cooking temperature set. The
temperature indication remains steady,
while the programmed cooking indicator
light starts flashing.
EN
If cooking has just been performed
with temperatures greater than
100°C, you must wait for the oven
to cool in order to use the steaming
function.
15
Page 14
Use
At this point it is possible to set programmed
cooking.
Programmed cooking is the
function which allows cooking to
be stopped at an established time
depending on the time set by the
user, after which the oven will
switch off automatically.
If you do not wish to set timed cooking, just
wait a few seconds until the indicator light
starts flashing, otherwise
continue from step 10.
If you do wish to set timed cooking,
proceed as follows:
7. While the programmed cooking
indicator light is flashing, turn the
temperature knob to the right or left to set
the cooking end time.
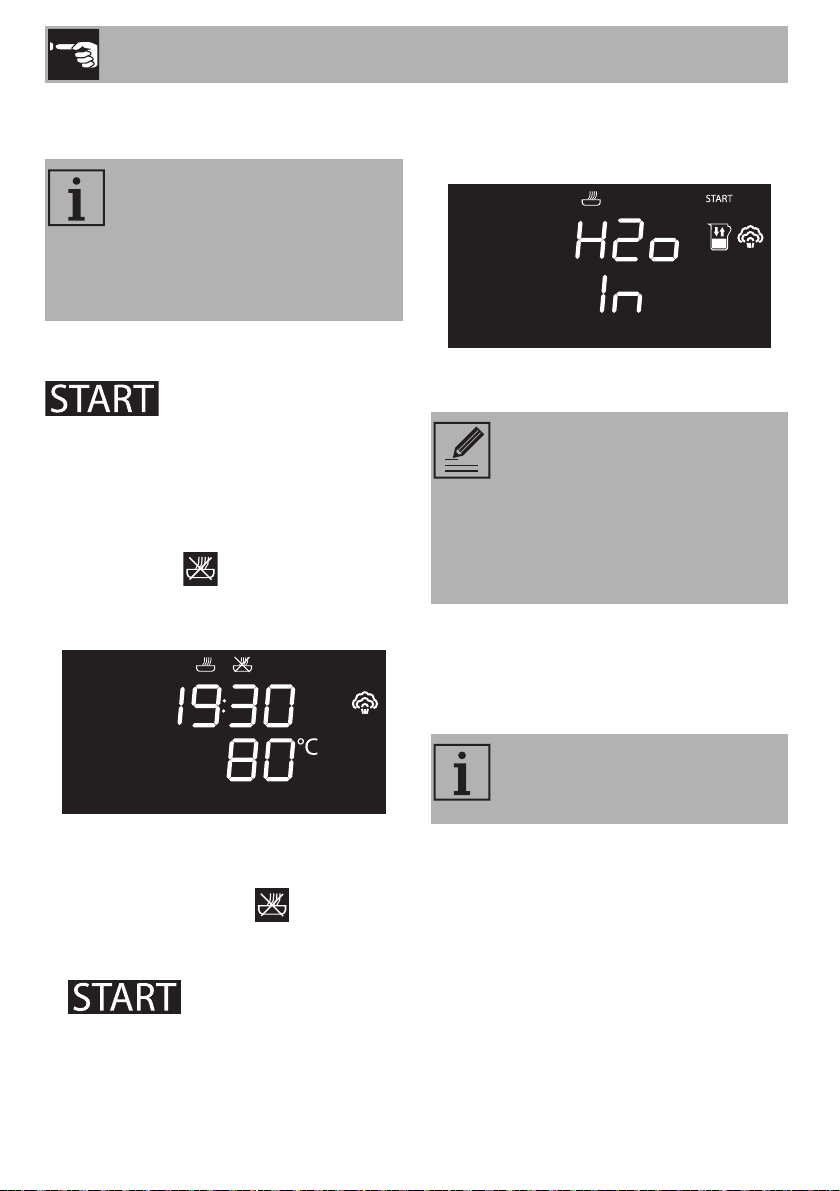
10. Press the function knob. A request to fill
the tank with water is shown on the
display.
Filling the tank
• Use cold tap water which is not
too hard, softened water or still
mineral water.
• Do not use distilled water, tap
water with a high chloride
content (> 40 mg/l), or other
liquids.
11. Fill a container (e.g. a jug) with sufficient
water for the cooking duration.
12. Open the oven door.
13. Rest the container on the open door.
8. Press the temperature knob to confirm the
cooking end time. The programmed
cooking indicator light remains on
steadily.
9. After a few seconds, the indicator light
flashes on the display.
16
Note: the container with the water
must have a gross weight lower
than 5 kg.
Page 15

Use
14. Extract the tube from its seat and
immerse its end in the container until it
reaches all the way to the bottom.
15. Press the function knob to start drawing
water into the appliance’s tank.
The appliance will automatically
draw the quantity of water
necessary for cooking on the basis
of the set duration.
16. When the appliance has finished taking
in water, shake the tube to remove any
residual water.
17. Return the tube to its original position,
remove the container of water and close
the door.
When the door is closed, an
automatic system will automatically
draw in any residual water in the
tube to avoid drips. A bubbling
noise may be heard; this is
completely normal.
EN
In the event that the water runs out,
the appliance will automatically
stop the cooking process, a
buzzer will sound and the display
will show a request to fill the tank
with water.
17
Page 16
18. Press the function knob to start steaming.
Cooking can be interrupted at any
time by pressing and holding the
function knob for a few seconds.
Each time the door is opened, the
function in progress will stop and
then automatically restart when the
door is closed again.
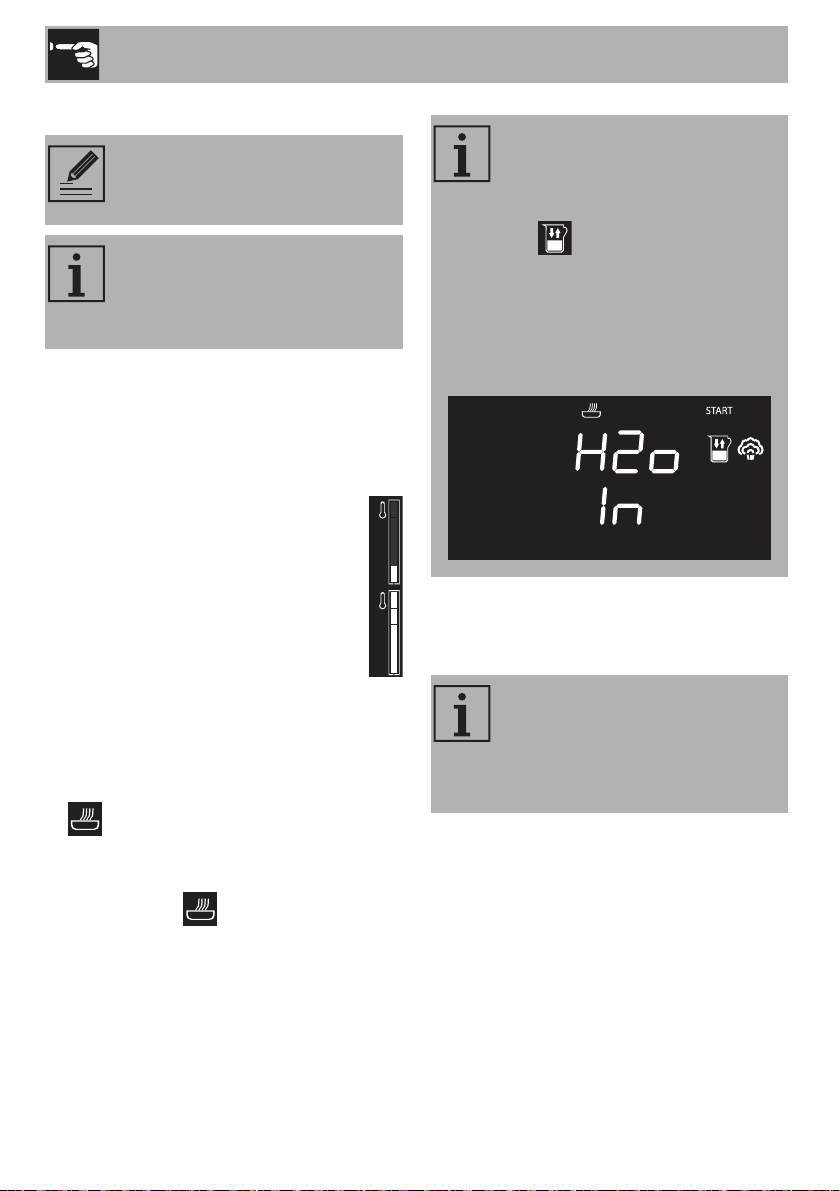
Preheating stage
Steaming is always preceded by a
preheating stage, which allows the
appliance to heat up to cooking
temperature.
The temperature reached flashes to
indicate that this stage is in progress.
When preheating finishes, the
temperature reached remains lit
steadily, a buzzer sounds and the
cooking proceeds automatically.
Modifying the set data
During operation, it is possible to modify the
cooking duration:
19. When the timed cooking indicator light
is lit steadily and cooking is in
progress inside the appliance, press the
temperature knob. The timed cooking
indicator light will start flashing.
Use
If you set a longer cooking time
than that previously set - meaning
that the water added to the tank
will be insufficient - the indicator
light will flash on the display
for a few seconds. Cooking will
proceed regardless, but when the
tank is empty a request to add
water will be shown on the
display.
20. Turn the temperature knob right or left to
alter the pre-set cooking time.
Towards the end, the appliance
automatically switches off its
heating elements in order to finish
cooking using the residual heat
inside the oven cavity.
18
Page 17
Use
Modifying programmed cooking
If programmed cooking is set, after
modifying the cooking time, the
end of cooking time must be re-set.
21. When the timed cooking and
programmed cooking indicator
lights are lit steadily and the appliance is
waiting for cooking to start, press the
temperature knob. The timed cooking
indicator light will start flashing.
22. Turn the temperature knob right or left to
alter the pre-set cooking time.
23. Press the temperature knob again. The
timed cooking indicator light
switches off and the programmed
cooking indicator light starts
flashing. The display shows the cooking
end time.
24. Turn the temperature knob right or left to
delay the cooking end time.
25. After a few seconds the timed cooking
and programmed cooking
indicator lights stop flashing and
programmed cooking restarts with the
new settings.
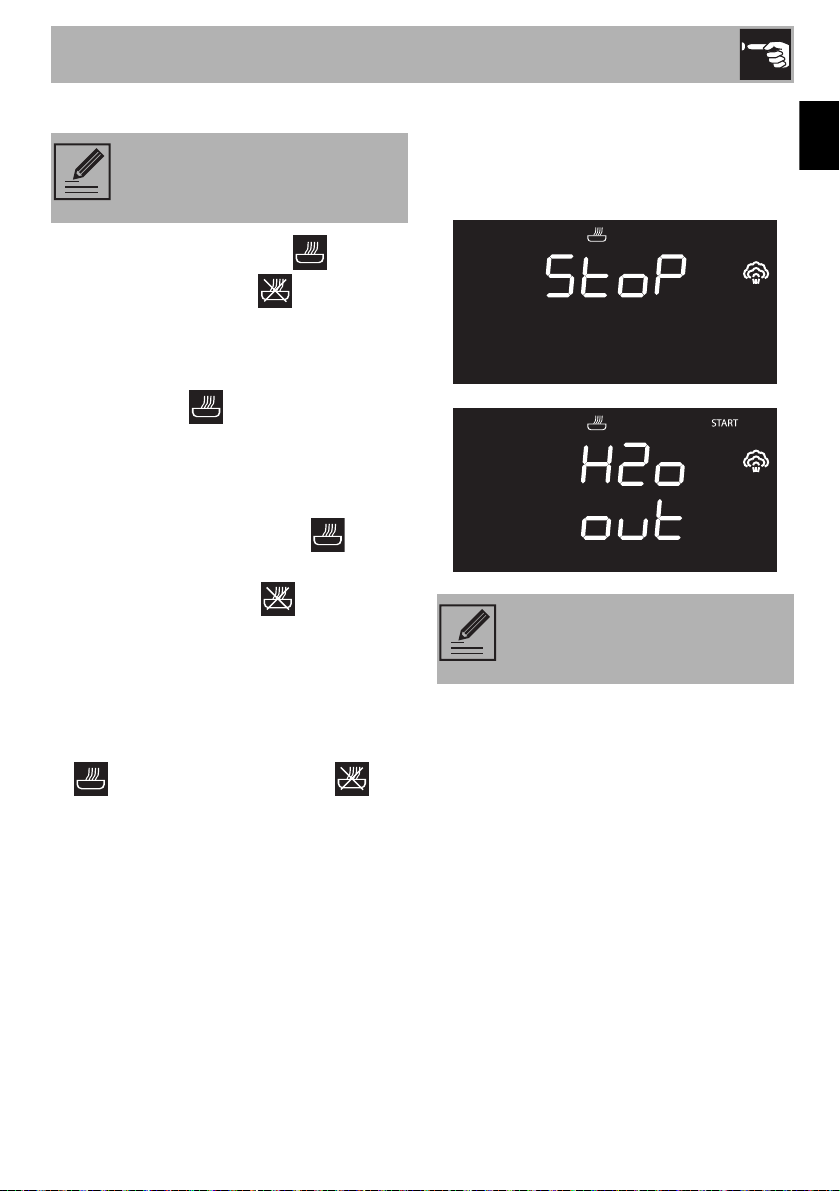
End of steaming
When steaming finishes, a buzzer will
sound and the following screens will
alternate on the display.
To select further cooking, turn the
temperature knob right or left
again.
26. Press the function knob to stop the
buzzer.
27. Stand to the side of the appliance and
open the door ajar for a few seconds to
allow excess steam to escape.
28. Fully open the door when safe to do so
and cautiously remove the food from the
oven.
EN
19
Page 18

Use
Removing the residual water
We recommend emptying the
tank each time you finish using
the appliance to avoid scale
build-up.
29. Remove the cover from the evaporation
tray and dry it with the sponge supplied.
Note: The evaporation tray cover
may be very hot: use appropriate
protection.
If the remaining quantity of water is over
500 ml, the water will be discharged into
the evaporation tray in two different steps to
facilitate drying. The display will show
“STEP 1” when the first stage has finished,
and draining will stop. You must press the
function knob again to complete the
draining with “STEP 2”. When this has
completed, “END” will be displayed.
If you do not wish to proceed with
draining the tank, hold down the
function knob for a few seconds.
32. Squeeze out the excess water into a
separate container.
Take care: the water may be very
hot.
33. Also remove condensation from the
base and walls of the oven, the door
glass and drip tray and the front of the
appliance.
30. We recommend positioning the
supplied sponge inside the evaporation
tray.
31. Press the function knob to begin
draining residual water from the tank.
The residual water is discharged into the
evaporation tray: as well as facilitating
removal, this contributes to cooling down
the oven more quickly.
20
Page 19

Use
Advice for steam cooking
• Pasta and rice: upon reaching 100°C,
the cooking time will be the same as with
cooking on a hob. Place the pasta or
rice in a metal tray and cover with
around a centimetre of water. For best
results when cooking rice, place a lid on
the container or cover with aluminium foil.
This procedure allows the rice to absorb
all the water, and it can then be served
directly to the table.
• Eggs: these may be boiled, scrambled
or poached by using the steam function
at 100°C. To obtain perfect boiled
eggs, place them on a perforated tray
and cook for 4-6 minutes for soft boiled
eggs and 8-10 minutes for hard-boiled
eggs. For scrambled eggs, place the
beaten eggs in a metal tray together with
milk, butter and seasoning. Cover the
tray with aluminium foil. Mix every
couple of minutes using a fork. For
poached eggs, pour boiling water into
the metal tray with a drop of vinegar and
steam cook for around 4-5 minutes.
• Vegetables: steam cooking vegetables
gives excellent results. They maintain their
colour, flavour and nutritional properties.
For dense vegetables such as potatoes,
turnips and parsnips, cook at 100°C for
the same length of time you would boil
them on a hob. For broccoli and carrots,
cook for 6 minutes if you want them to
remain firm, or 10 minutes if you want
them to be softer.
• Fish: due to the delicate nature of fish,
steaming gives excellent results. For oily
fish such as salmon or trout, cook at
100°C for around 5 minutes. For white
fish such as cod or haddock, cook at
80°C for around 5 minutes. If you are
cooking different foods, all fish must be
cooked in the perforated tray which must
be placed on the bottom shelf of the
oven to avoid liquid from the fish
dripping onto other food products.
• Meat: casseroles and curries are ideal
for steam cooking. Prepare the casserole
as for normal oven cooking. Place it in a
metal tray, cover with a lid or aluminium
foil, and cook for between 45 minutes
and 3 hours depending on the cut of
meat used.
• Thin soups: steam cooking allows
flavours to develop perfectly with
minimum effort, as the liquids will not boil
over. For vegetable soup with the correct
consistency, first steam the vegetables,
then add broth and steam cook at
100°C. The steam function is also ideal
for preparing large quantities for later
use.
• Soups: Thicker soups are also easy and
quick to prepare. Place the soup in a
metal tray, cover with a lid or aluminium
foil and steam cook at 100° C for the
same time you would cook it in a
microwave oven. Mix midway through
cooking for a creamier consistency.
EN
21
Page 20

Use
• Reheating: using the steam cooking
function will not dry foods out and gives
a moister result. A previously prepared
home-cooked meal, covered with
aluminium foil, will take around 10-12
minutes to reheat. Ready meals will
require approximately double the time
indicated on the package.
• Defrosting: it is possible to use the steam
cooking function to defrost foods. Times
vary, but defrosting with the steam
cooking function takes around half the
time necessary for covered foods left to
defrost at room temperature.
• Peeling peppers and tomatoes: this
otherwise time-consuming operation is
very simple when you use the steam
cooking function. Use a knife to cut a
small cross in the skin of the tomato, and
steam cook for 1 minute. Peppers have
tougher skin, and may require up to 4
minutes to soften them sufficiently for
peeling.
• Chocolate: this can be melted using the
steam cooking function. Place the
chocolate in a metal tray, cover with
aluminium foil and steam cook for 1
minute. Unlike other methods, chocolate
is unlikely to burn in the steam oven.
• Hot towels: ideal for facial treatments, a
close shave or for use after a meal, these
are easy to prepare using the steam
cooking function. Moisten a towel with
water, roll it up and steam it for 1 minute.
3.5 Cooking advice
General advice
• It is not possible to shorten cooking times
by increasing the temperature (the food
could be overcooked on the outside and
undercooked on the inside).
• Cooking times vary according to the
thickness and quality of the food and to
consumer taste.
• The first few times you use the appliance,
until acquiring sufficient confidence and
knowledge of the required cooking
times, we suggest setting slightly longer
cooking times and testing the food
quickly a little before cooking ends. In
this manner, if the food is not yet ready
you will be able to continue cooking
without the need to add more water to
the tank thanks to the remaining time. If,
however, the food is already cooked, it
will be possible to immediately stop
cooking and drain the residual water
from the tank.
Advice for cooking desserts/pastries and
biscuits
• Use dark metal moulds: They help to
absorb the heat better.
22
Page 21
Use
Advice for defrosting and proving
• Place frozen foods without their
packaging in a lidless container on the
first shelf of the oven.
• Avoid overlapping the food.
• To defrost meat, use the rack placed on
the second level and a tray on the first
level. In this way, the liquid from the
defrosting food drains away from the
food.
To save energy
• Reduce any opening of the door to a
minimum to avoid heat dispersal.
• Keep the inside of the appliance clean
at all times.
3.6 Special functions
Defrost by time
It is not possible to modify the
temperature of the defrost by time
function.
1. Place the food to be defrosted inside the
oven.
2. Press and turn the function knob to select
the defrost by time function marked by
the indicator lights and .
3. Press the function knob to confirm your
choice of function.
4. Turn the temperature knob to set the
defrost duration (from 5 seconds to 99
minutes).
5. Press the function knob to start defrosting.
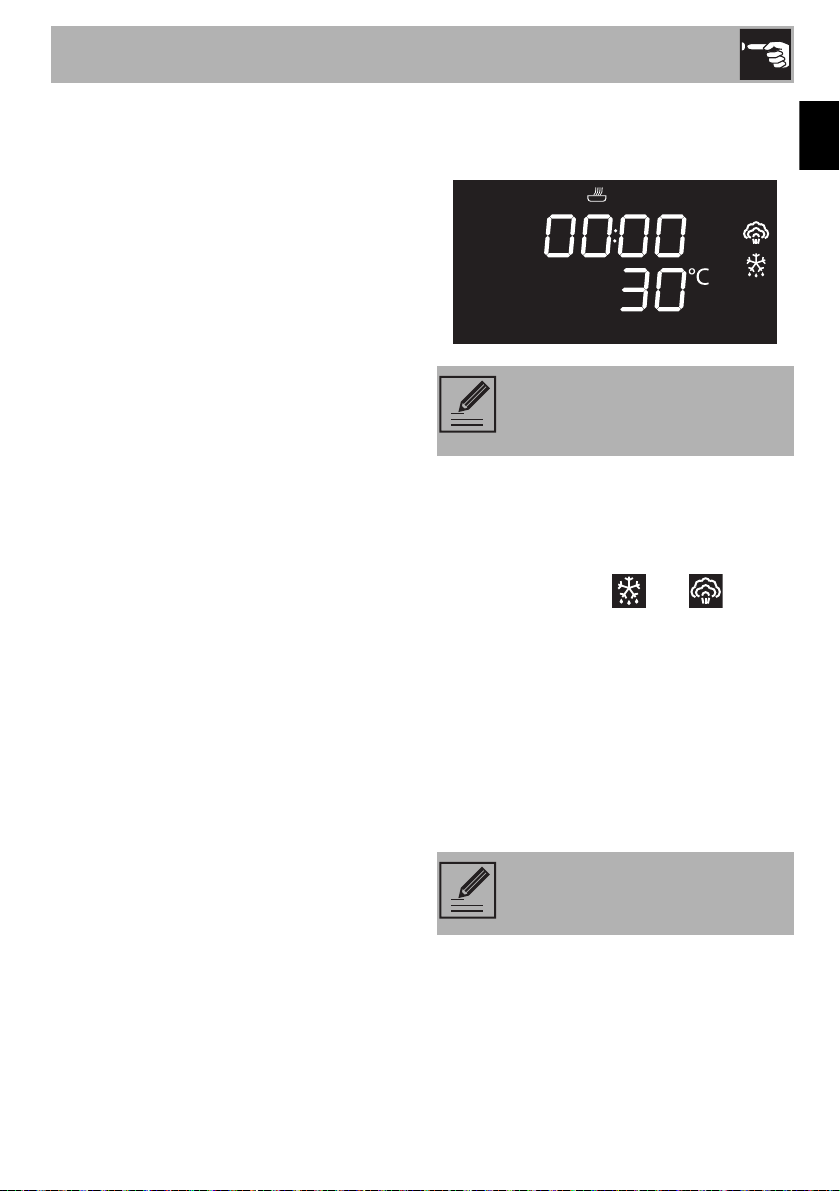
6. At the end, the word STOP will be
displayed.
EN
IMPORTANT: always fully defrost
foods before cooking
23
Page 22

Use
• Place frozen foods without their
packaging in a lidless container
on the first shelf of the oven.
• Avoid overlapping the food.
• To defrost meat, use the rack
placed on the second level and
a tray on the first level. In this
way, the liquid from the
defrosting food drains away from
the food.
Proving
It is not possible to modify the
temperature of the proving
function.
1. Place the dough to be proved inside the
oven.
2. Press and turn the function knob to select
the proving function marked by the
indicator lights and .
3. Press the function knob to confirm your
choice of function.
4. Turn the temperature knob to set the
proving duration (from 5 seconds to 99
minutes).
5. Press the function knob to start the
proving function.
6. At the end, the word STOP will be
displayed.
Heating
This function allows you to heat
previously cooked food which has
been kept in the refrigerator.
1. Place the food to be heated inside the
oven.
1. Press and turn the function knob to select
the heating function.
2. Turn the temperature knob to modify the
heating duration.
3. Press the function knob to confirm the
parameters and start heating.
24
Page 23

Use
Defrost by weight
This function defrosts foods on the
basis of the type and weight of the
frozen product.
It is not possible to modify the
temperature of the defrost by
weight function.
1. Place the food to be defrosted inside the
oven.
2. Press the function knob to select defrost
by weight, marked by and
the illuminated food symbols
.
6. Press the function knob to confirm the
parameters and start defrosting.
7. At the end, the word STOP will be
displayed.
Preset parameters:
dE Type
01 Meat 500 105
02 Fish 400 43
03 Vegetables 300 45
04 Bread 300 20
Weight
(g)
* Time
(minutes)
*Defrosting times may vary on the basis of
the shape and size of the food to be
defrosted.
EN
3. Press the function knob to confirm your
choice of function.
4. Turn the function knob to select the type
of food to defrost.
5. Turn the temperature knob to select the
weight (in grams) of the food to defrost.
25
Page 24
Use
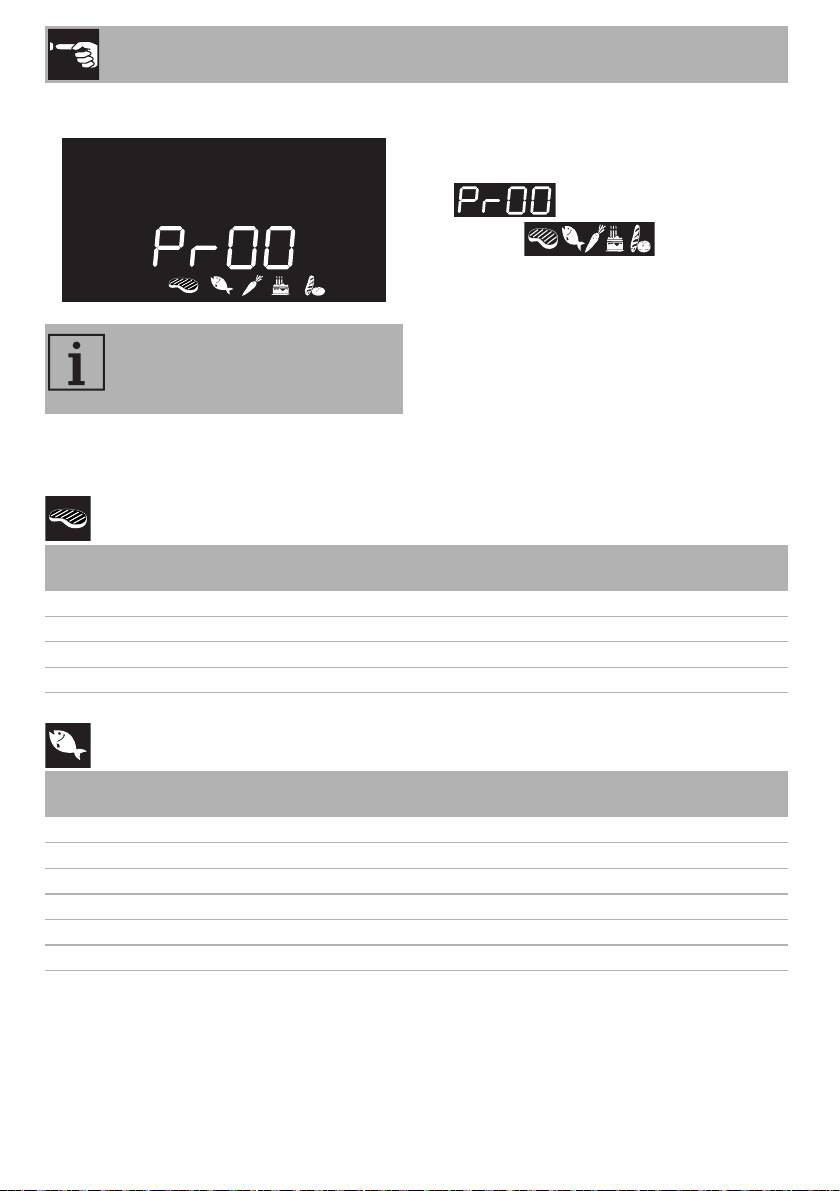
Automatic programs
The automatic cooking programs
are divided by the type of food to
be cooked.
Automatic programs table
MEAT (01 - 04)
Subcategory Size
01 Chicken breast (fresh)
02 Frankfurter (precooked)
03 Smoked pork loin (precooked)
04 Meat loaf (precooked)
1. Place the food inside the oven.
2. Press the function knob to select the
automatic program, marked by
and the illuminated food
symbols .
3. Turn the function knob to select the
required program (see Automatic
programs table).
4. Press the function knob to start cooking.
Weight
Piece of approx. 150 g 500 2+1 100 12
Whole 500 2+1 90 5
Slices approx. 1 cm thick 500 2+1 100 9
Slices approx. 2 cm thick 200 2+1 100 22
(g)
Level
Temp.
(°C)
Time
(minutes)
FISH (05 - 10)
Subcategory Size
05 Fillet of bream (fresh)
06 Fillet of cod (fresh)
07 Fillet of salmon (fresh)
08 Seafood (fresh)
09 Fillet of bream (fresh)
10 Prawns (fresh)
26
Weight
Piece of approx. 150 g 200 2+1 85 7
Piece of approx. 150 g 200 2+1 100 23
Piece of approx. 150 g 200 2+1 100 6
- 500 2+1 100 25
Piece of approx. 150 g 200 2+1 90 25
- 500 2+1 90 5
(g)
Level
Temp.
(°C)
Time
(minutes)
Page 25
Use
VEGETABLES (11 - 17)
Subcategory Size
11 Carrots (fresh)
12 Potatoes (fresh)
13 Cauliflower (fresh)
14 Fennel (fresh)
15 Asparagus (fresh)
16 Courgettes (fresh)
17 Stuffed peppers (precooked)
DESSERTS/PASTRIES (18 - 19)
Subcategory Size
18 Pudding (fresh)
19 Apple sauce (fresh)
PASTA/RICE (20)
Subcategory Size
20 Basmati rice (fresh)
Weight
Rounds approx. 3 cm thick 500 2+1 100 6
Diameter 4-5 cm, cut into
4-6 pieces
In small pieces 500 2+1 100 10
In pieces 500 2+1 100 7
Whole 500 2+1 100 4
Rounds approx. 1 cm thick 500 2+1 100 5
- 500 2+1 100 18
Weight
Up to 300-400 g in moulds
Over 400 g in a pudding
basin
In moulds or in a tray 500 2 100 8
Weight
- 200 2 100 12
Level
(g)
500 2+1 100 25
Level
(g)
200 1 100 50
Level
(g)
Temp.
(°C)
Temp.
(°C)
Temp.
(°C)
Time
(minutes)
Time
(minutes)
Time
(minutes)
EN
27
Page 26

Use
3.7 Secondary menu
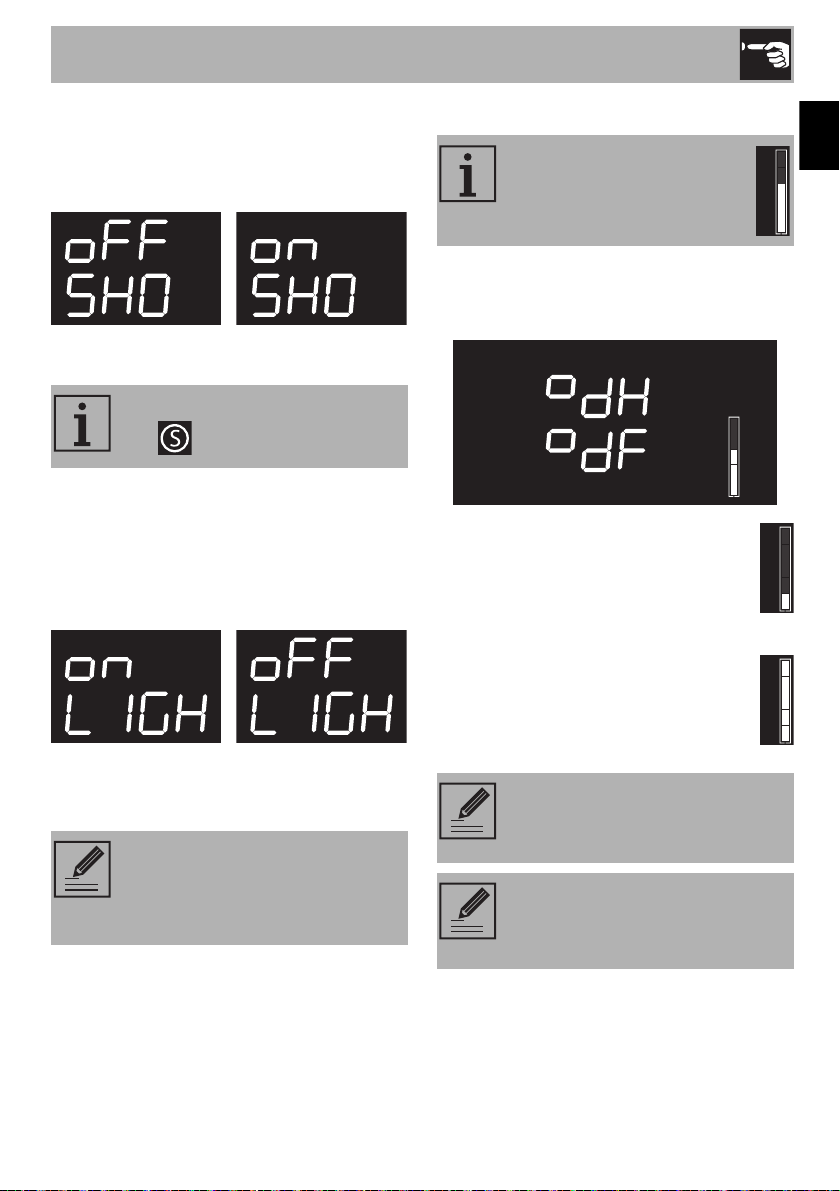
The appliance also has a drop-down
secondary menu allowing the user to:
• Activate or deactivate the Child lock.
• Activate or deactivate Showroom mode
(which disables all the heating elements
so that only the control panel works).
• Activate or deactivate Eco-light mode.
• Set the water hardness value.
With the appliance in Stand-by status
1. Activate the internal light by turning the
temperature knob quickly.
2. Press and hold the temperature knob
down for at least 5 seconds.
3. Turn the temperature knob to the left or
right to change the status of the setting
(ON/OFF) or to the right to increase the
value to set or to the left to decrease it.
4. Press the temperature knob to move to
the next mode.
Child lock mode
This mode allows the appliance to lock the
controls automatically after one minute of
normal operation without any intervention
from the user.
During normal operation it is indicated by
the indicator light coming on.
To release the lock temporarily during
cooking, hold the temperature knob down
for 5 seconds. One minute after the last
setting the lock will become active again.
Touching or varying the position of
the temperature and function
knobs, the display will show “bloc”
for two seconds.
It is still possible to turn the
appliance off instantaneously by
pressing and holding the function
knob down for 3 seconds when in
child lock mode.
28
Page 27
Use
Showroom mode (for exhibitors only)
This mode allows the appliance to
deactivate all heating elements, while
keeping the control panel active.
To use the appliance normally, set this
mode to OFF.
If the mode is active, the indicator
light lights up on the display.
Eco-light mode
For greater energy savings, the light is
automatically deactivated one minute from
the start of cooking.
Water hardness setting mode
The appliance is factory set for
water of medium hardness.
This mode allows you to set the water
hardness value in order to optimise the
descaling process.
It is possible to modify the water
hardness setting from the minimum
value (one bar)...
... Up to the maximum value (five bars).
EN
To stop the appliance from automatically
deactivating the light after one minute, set
this mode to OFF.
The manual off/on control is
always available with both settings
by turning the temperature knob to
the right.
Request information on the
hardness of your water from your
local water board.
If your mains water supply is too
hard, we recommend
using a water softener.
29
Page 28
Cleaning and maintenance
4 Cleaning and maintenance
4.1 Instructions
Improper use
Risk of damage to surfaces
• Do not use steam jets to clean the
appliance.
• Do not use cleaning products containing
chlorine, ammonia or bleach on steel
parts or parts with metallic finishes on the
surface (e.g. anodizing, nickel- or
chromium-plating).
• Do not use abrasive or corrosive
detergents (e.g. scouring powders, stain
removers and metallic sponges) on
glass parts.
• Do not use rough or abrasive materials
or sharp metal scrapers.
Improper use
Risk of damage to the appliance
Pour the product onto a damp cloth and
wipe the surface, rinse thoroughly and dry
with a soft cloth or a microfibre cloth.
4.4 Food stains or residues
Do not use metallic sponges or sharp
scrapers as they will damage the surfaces.
Use ordinary non-abrasive products with
the aid of wooden or plastic utensils if
necessary. Rinse thoroughly and dry with a
soft cloth or a microfibre cloth.
Do not allow residues of sugary foods (such
as jam) to set inside the oven. If left to set for
too long, they might damage the enamel
lining of the oven.
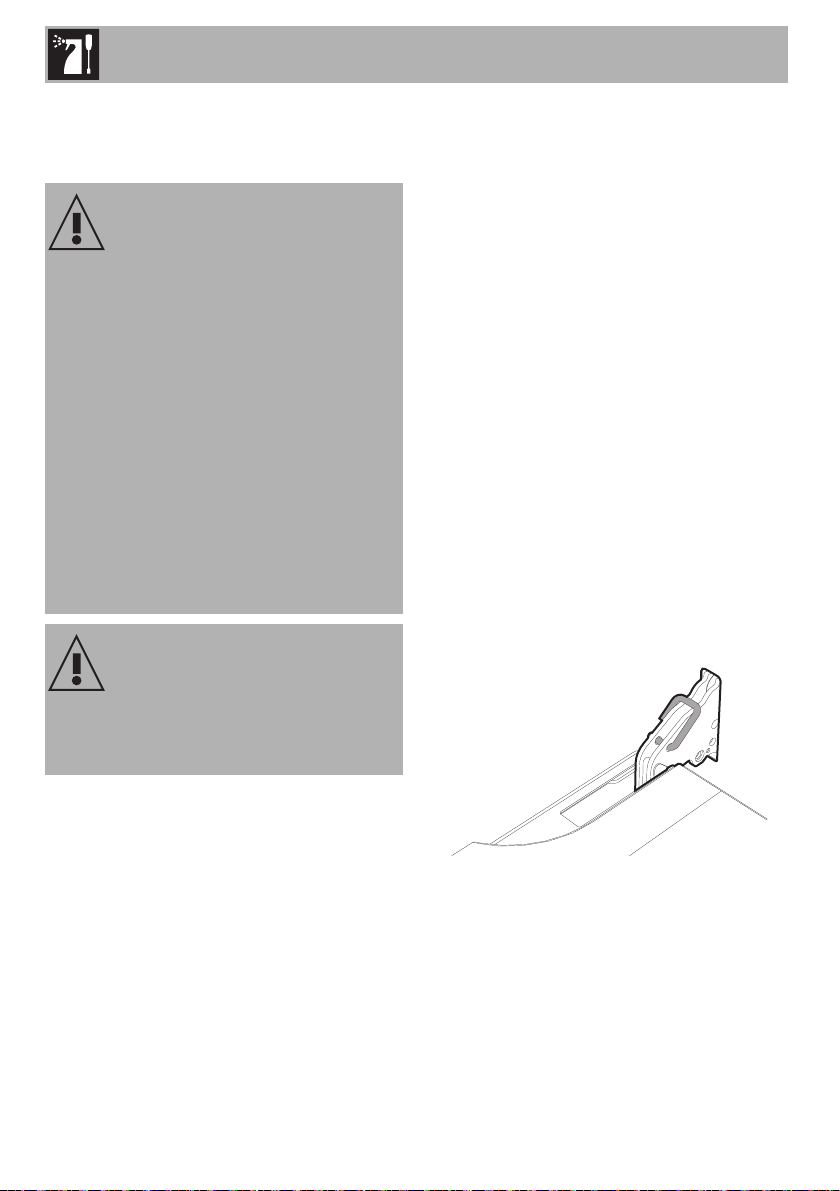
4.5 Removing the door
For easier cleaning, the door can be
removed and placed on a canvas.
To remove the door proceed as follows:
1. Open the door completely and insert two
pins into the holes on the hinges
indicated in the figure.
• Do not remove the seal on the face of
the oven.
4.2 Cleaning the surfaces
To keep the surfaces in good condition,
they should be cleaned regularly after use.
Let them cool first.
4.3 Ordinary daily cleaning
Always use only specific products that do
not contain abrasives or chlorine-based
acids.
30
Page 29

Cleaning and maintenance
2. Grasp the door on both sides with both
hands, lift it forming an angle of around
30° and remove it.
3. To reassemble the door, put the hinges in
the relevant slots in the oven, making sure
that grooved sections A are resting
completely in the slots. Lower the door
and once it is in place remove the pins
from the holes in the hinges.
4.6 Cleaning the door glazing
The glass in the door should always be kept
thoroughly clean. Use absorbent kitchen
roll. In case of stubborn dirt, wash with a
damp sponge and an ordinary detergent.
We recommend the use of
cleaning products distributed by
the manufacturer.
4.7 Removing the internal glass
panes
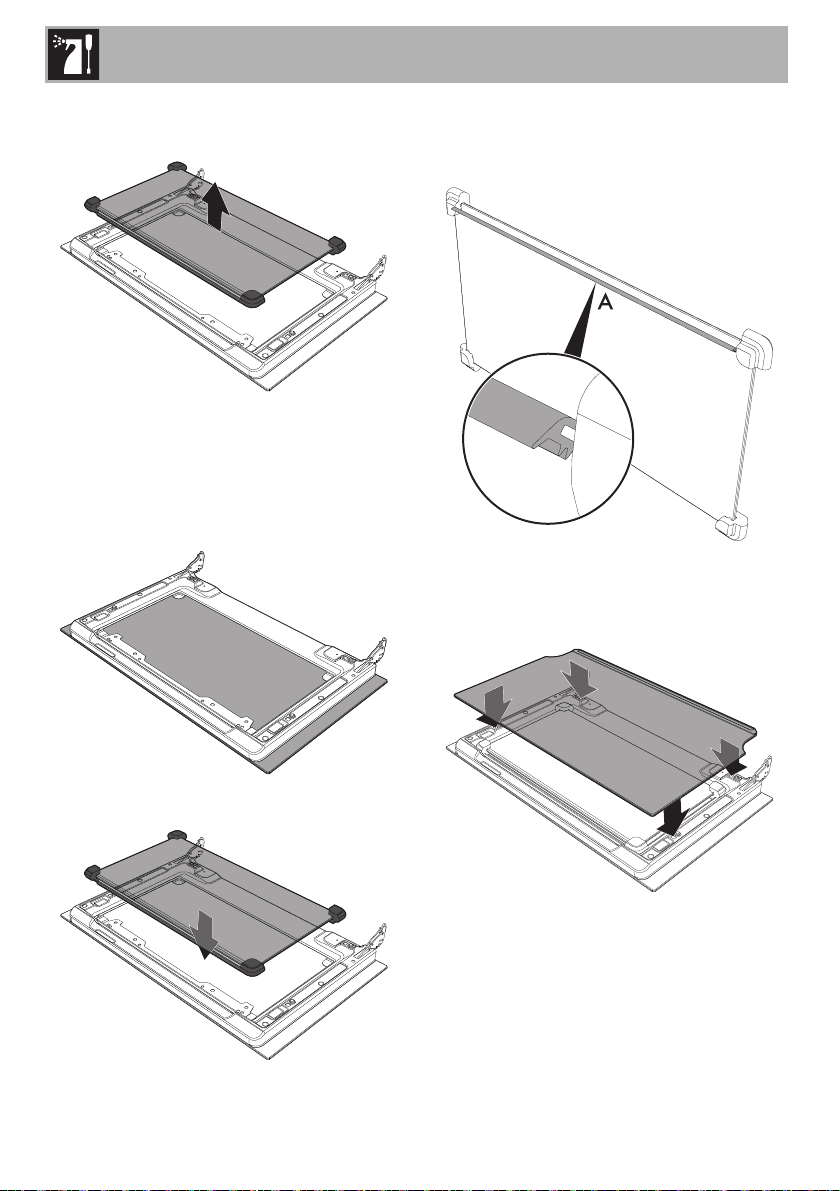
For easier cleaning the door internal glass
panes can be disassembled.
1. Open the door.
2. Remove the internal glass pane by
pulling the rear part gently upwards,
following the movement indicated by the
arrows (1).
3. Then, pull the front part upwards (2). This
way, the 4 pins attached to the glass
detach from their housings in the oven
door.
EN
31
Page 30
Cleaning and maintenance
4. Raise the intermediate glass unit
upwards.
5. Clean the external glass pane and the
panes removed previously. Use
absorbent kitchen roll. In case of
stubborn dirt, wash with a damp sponge
and neutral detergent.
7. The rubber strip A of the intermediate
glass unit can be placed inside the
exterior glass.
8. Centre and insert the 4 pins into their
housings in the oven door by applying
slight pressure.
6. Reposition the intermediate glass unit.
32
Page 31
Cleaning and maintenance
4.8 Cleaning the inside of the oven
For the best oven upkeep, clean it regularly
after having allowed it to cool.
Take out all removable parts.
Clean the oven racks with warm water and
non-abrasive detergent. Carefully rinse and
dry damp parts.
The oven should be operated at
the maximum temperature for
about 15-20 minutes after the use
of specific products, to burn off the
residues left inside the oven.
For easier cleaning, remove the
door.
Descaling
The presence of scale due to lack
of descaling can compromise
correct operation of the appliance
in the long term.
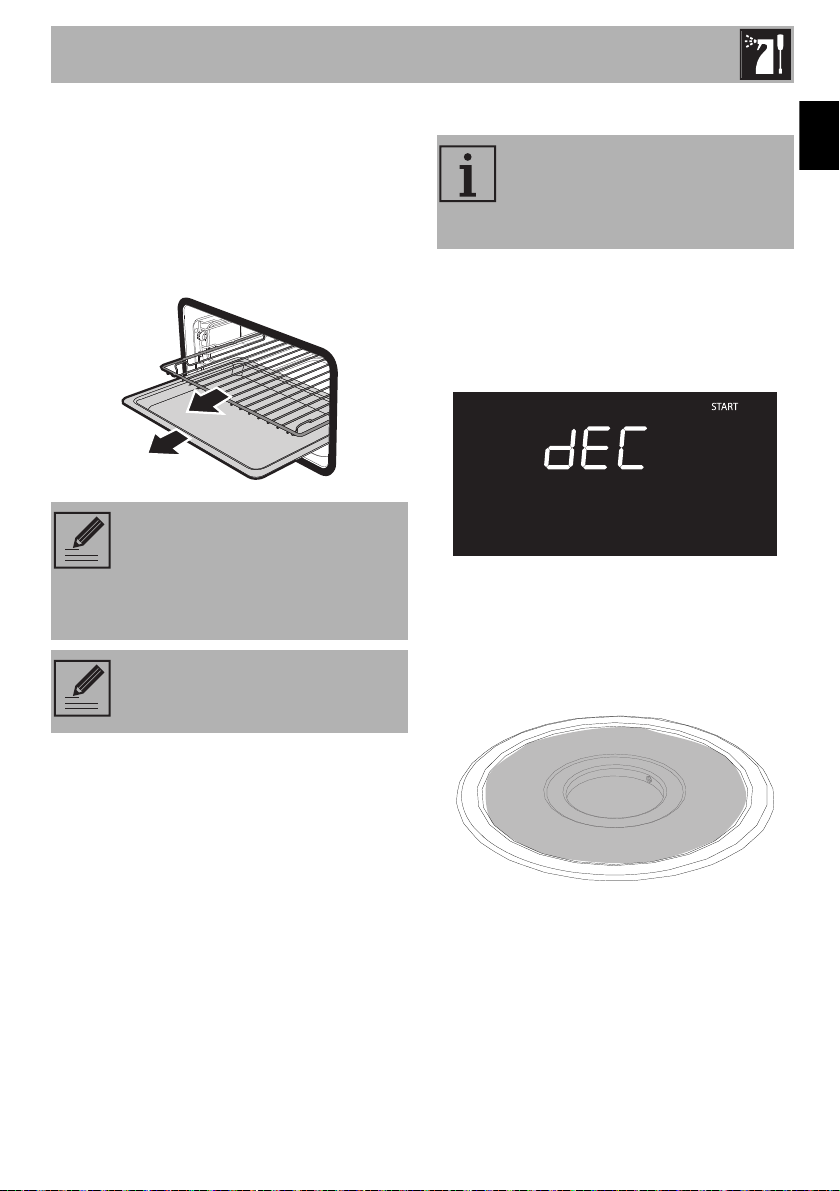
The following indication will periodically
appear on the appliance's display,
notifying you that it is necessary to perform
descaling of the evaporation tray on the
base of the oven:
1. Open the door completely.
2. Pour approximately 250 ml of white
vinegar into the evaporation tray, thus
also covering part of the base of the
oven.
EN
33
Page 32
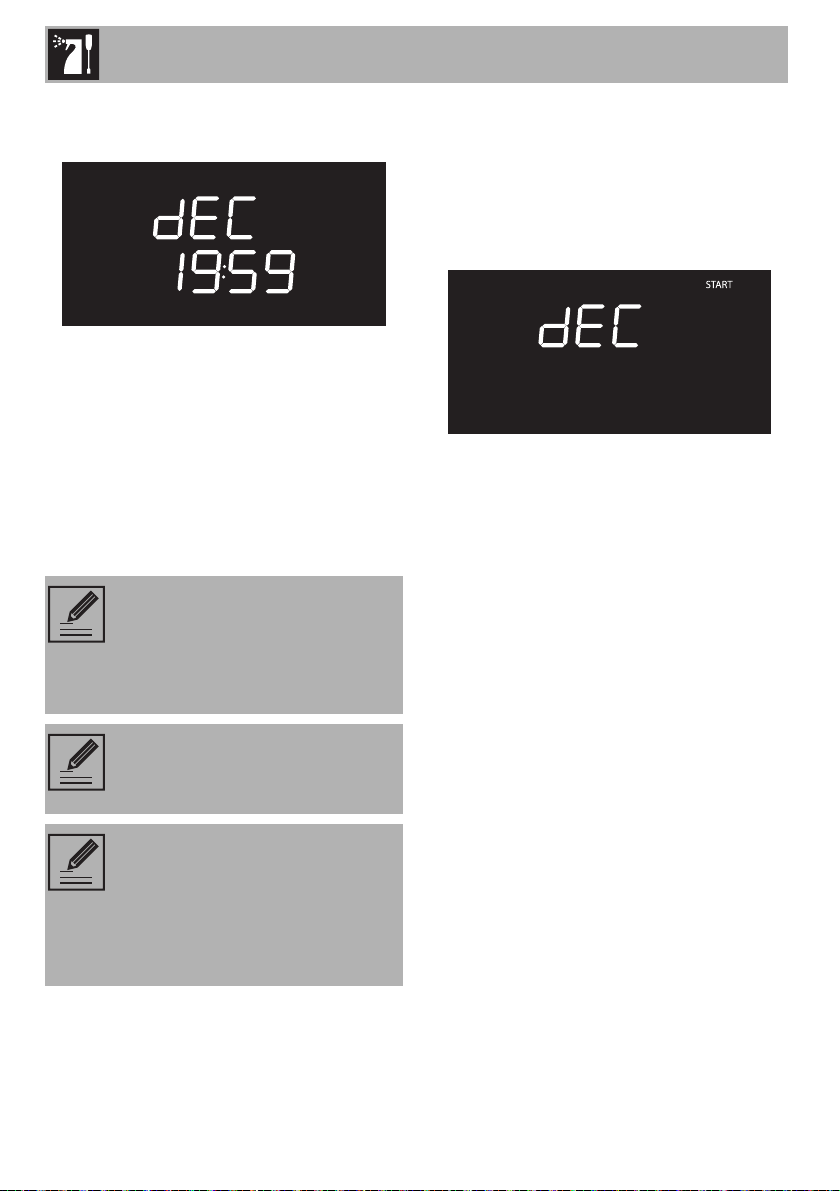
Cleaning and maintenance
3. Press the function knob to start the
descaling function.
4. At the end of the descaling process,
remove the vinegar from the base of the
oven with the supplied sponge.
5. Use a dish sponge on softened
encrustations in order to remove the
largest possible quantity of scale.
6. When you have finished cleaning, close
the door again.
We recommend performing
descaling every time this is
indicated on the display in order to
keep the boiler in perfect
operating condition.
Manual descaling
When you wish to perform descaling in
advance, you can run the function
manually:
1. Press and turn the function knob to select
the descaling function.
2. Proceed with the procedure described in
the “Descaling” chapter, beginning at
point 1.
34
If you wish to skip the descaling
process, hold down the function
knob for a few seconds.
Note: The descaling process can
be skipped three consecutive
times. After this, the appliance will
not allow you to run any other
function until the descaling process
is performed.
Page 33
Cleaning and maintenance
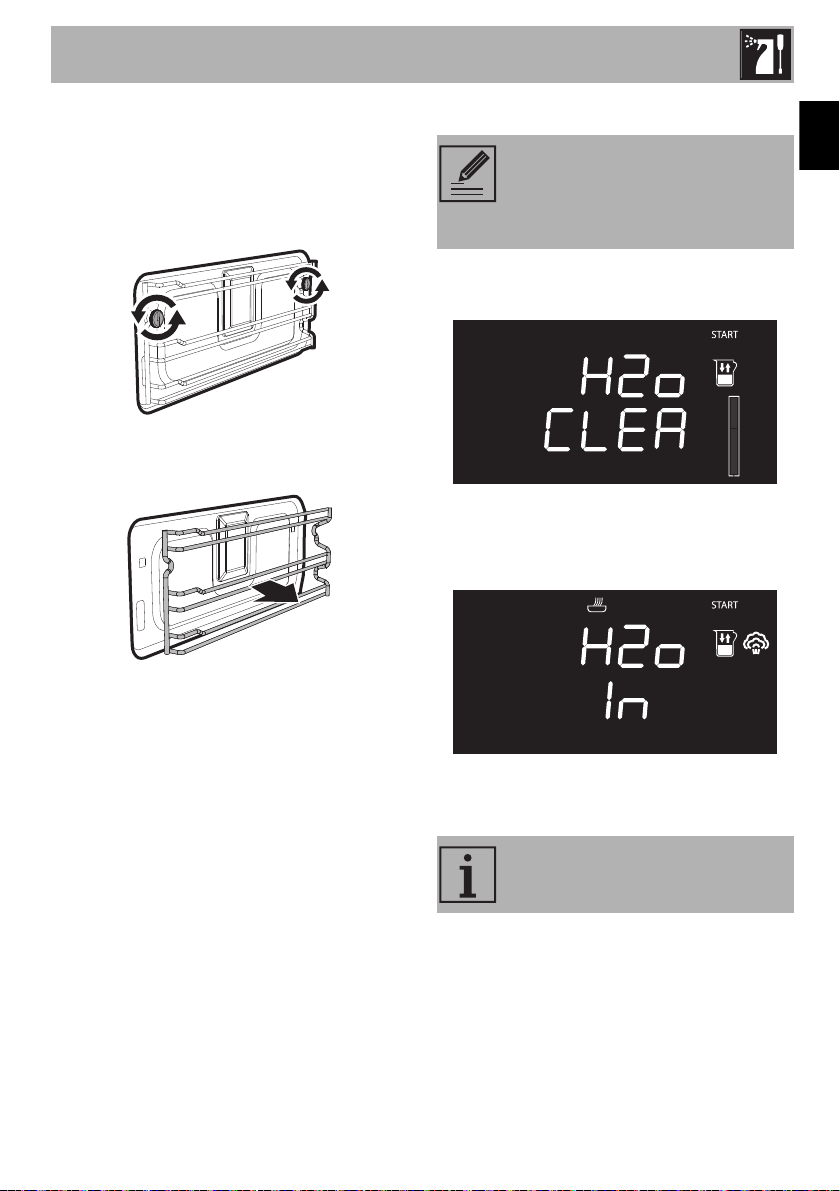
Removing the rack/tray support frames
Removing the guide frames enables the
sides to be cleaned more easily.
To remove the guide frames:
1. Unscrew the frame fastening pins.
2. Pull the frame towards the inside of the
oven to free it from the fastening pins.
4.9 Cleaning the tank
To guarantee optimum
performance of your appliance,
we recommend cleaning the tank
every 2-3 months.
1. Press and turn the function knob to select
the CLEAN function.
2. Press the function knob to confirm your
choice of function. The display will show
a request to fill the tank.
EN
3. When cleaning is complete, repeat the
above procedures to put the guide
frames back in.
3. Fill a container (e.g. a jug) with a mixture
of water and citric acid.
We recommend mixing 30 g of
citric acid with 1.5 litres of water.
35
Page 34

Cleaning and maintenance
4. Open the oven door.
5. Rest the container on the open door.
Note: the container with the
mixture must have a gross weigh
lower than 5 kg.
6. Extract the tube from its seat and immerse
its end in the container until it reaches all
the way to the bottom.
8. When the appliance has finished taking
in water, shake the tube to remove any
residual water.
9. Return the tube to its original position,
remove the container of solution and
close the door.
When the door is closed, an
automatic system will automatically
draw in any residual solution in the
tube to avoid drips.
7. Press the function knob to start drawing
the solution into the appliance's tank.
The appliance will automatically
draw sufficient solution to fill the
tank.
36
10. Press the function knob to start the tank
cleaning process. The display will show
the time left until the end of the cleaning
cycle.
Page 35
Cleaning and maintenance
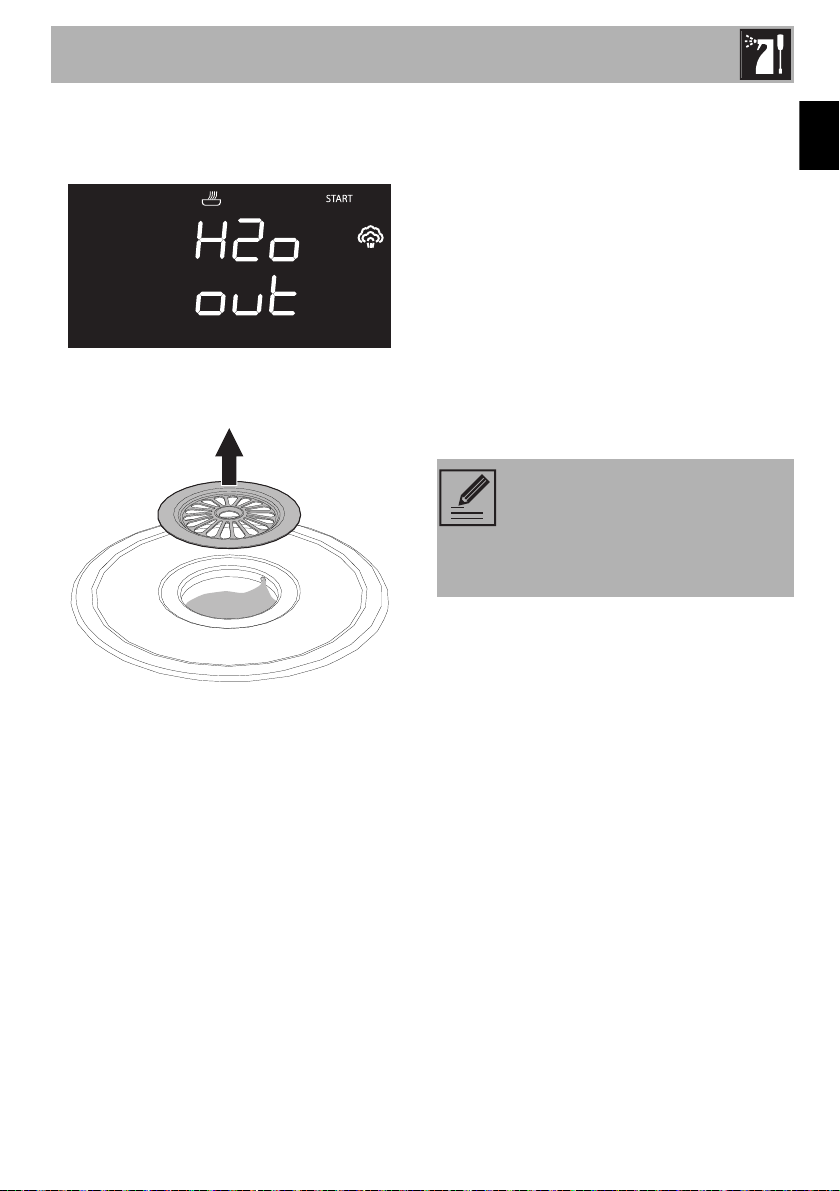
When the cleaning process is complete, a
buzzer will sound and the display will show
the solution draining screen.
11. Remove the cover from the evaporation
tray and dry it with the sponge supplied.
The residual mixture is discharged into the
evaporation tray.
Given that the remaining quantity of solution
is over 500 ml, the liquid will be discharged
into the evaporation tray in two different
steps to facilitate drying. The display will
show “STEP 1” when the first stage has
finished, and draining will stop. You must
press the function knob again to complete
the draining with “STEP 2”. When this has
completed, “END” will be displayed.
14. Use the supplied sponge to remove the
residual mixture from the evaporation
tray.
After cleaning the tank with the
water and citric acid solution,
perform at least one more CLEAN
cycle with clean water in order to
rinse any impurities from the tank.
EN
12. We recommend positioning the
supplied sponge inside the evaporation
tray.
13. Press the function knob to begin
draining the residual solution from the
tank.
37
Page 36

Cleaning and maintenance
4.10 Extraordinary maintenance
Live parts
Danger of electrocution
• Unplug the appliance.
Replacing the internal light bulb
1. Completely remove all accessories from
inside the oven.
2. Remove the rack/tray support frames.
3. Remove the bulb cover using a tool (e.g.
a screwdriver).
Pay attention not to scratch the
oven cavity enamel.
4. Slide out and remove the light bulb.
Do not touch the halogen light
bulb directly with your fingers, but
wrap it in insulating material.
5. Replace the light bulb with one of the
same type (40W).
6. Refit the cover. Ensure the moulded part
of the glass (A) is facing the door.
38
7. Press the cover completely down so that
it attaches perfectly to the bulb support.
Page 37
What to do if...
Cleaning and maintenance
The display is completely off:
• Check the mains power supply.
• Check whether an omnipolar switch
upstream of the appliance supply line is
in the “ON” position.
The appliance does not heat up:
• Check whether it has been set in
“showroom” mode (for further details see
“Secondary menu”).
The controls do not respond:
• Check whether it has been set in “child
lock” mode (for further details see
“Secondary menu”).
If the problem has not been
resolved or in the case of other
types of fault, contact your local
technical support centre.
If other ERRx error messages are
indicated:
note down the error message,
function and temperature set and
contact your local technical
support centre.
EN
39
Page 38

Installation
5 Installation
5.1 Electrical connection
Power voltage
Danger of electrocution
• Have the electrical connection
performed by authorised persons.
• The appliance must be connected to
earth in compliance with electrical
system safety standards.
• Disconnect the mains supply.
General information
Check the grid characteristics against the
data indicated on the plate.
The identification plate bearing the
technical data, serial number and brand
name is visibly positioned on the appliance.
Do not remove this plate for any reason.
The appliance works at 220-240 V~.
Use a three-pole cable (3 x 1.5 mm
referring to the cross section of the internal
conductor).
Perform the ground connection using a wire
that is 20 mm longer than the other wires.
2
,
Fixed connection
Fit the power line with an omnipolar circuit
breaker in compliance with installation
regulations.
The omnipolar circuit breaker should be
located near the appliance and in an easily
reachable position, according to
applicable electrical codes.
Connection with plug and socket
Make sure that the plug and socket are of
the same type.
Avoid using adapters and shunts as these
could cause overheating and a risk of
burns.
5.2 Cable replacement
Power voltage
Danger of electrocution
• Disconnect the mains supply.
1. Unscrew the rear casing screws and
remove the casing to access the terminal
board.
2. Replace the cable.
3. Make sure that the cables (for the oven
or any hob) follow the best route in order
to avoid any contact with the appliance.
40
Page 39
Installation
5.3 Positioning
Heavy appliance
Crushing hazard
• Position the appliance into the cabinet
cutout with the help of a second person.
Pressure on the open door
Risk of damage to the appliance
• Never use the oven door to lever the
appliance into place when fitting.
• Avoid exerting too much pressure on the
oven door when open.
Heat production during appliance
operation
Risk of fire
• Check that the piece of furniture material
is heat resistant.
• Check that the piece of furniture has the
required slots.
• Do not install the appliance in a recess
which can be closed with a door, or in a
cupboard.
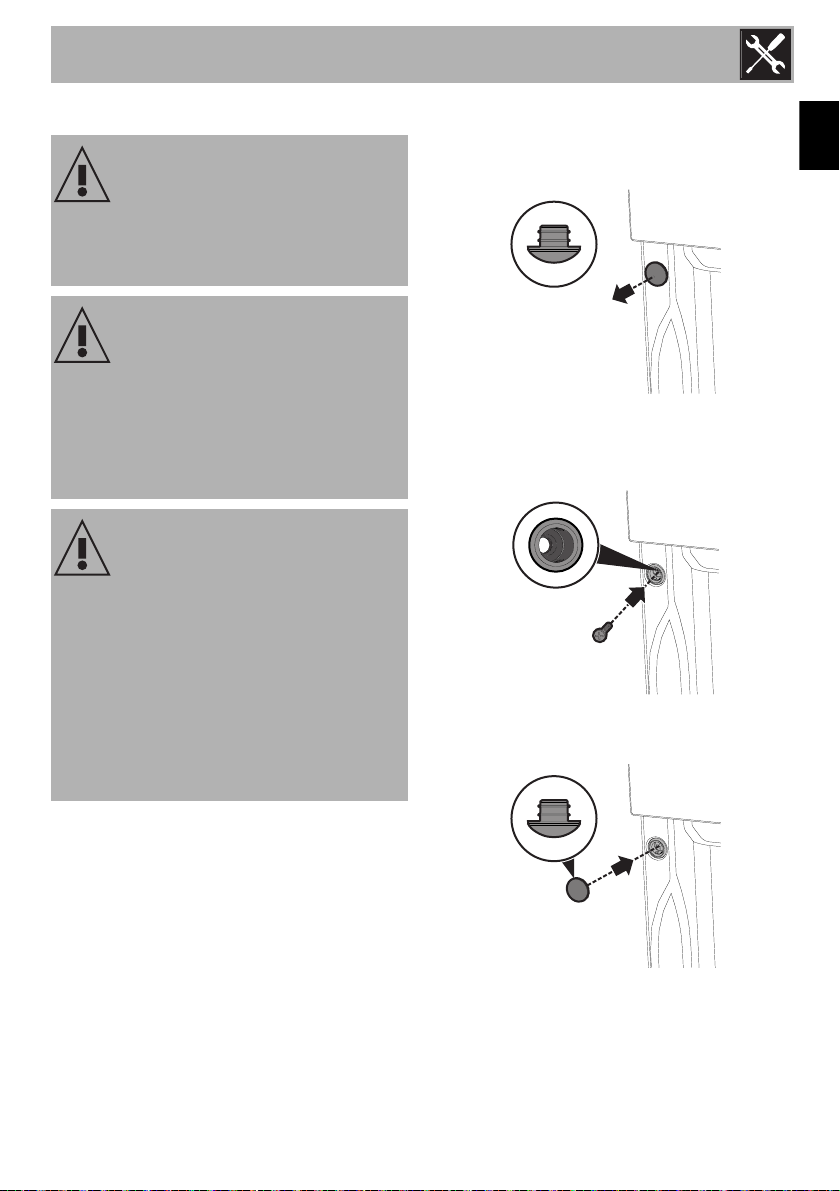
Fastening bushings
Remove the bushing covers inserted on the
oven front.
Mount the appliance into the recess.
Secure the appliance to the piece of
furniture using screws.
Cover the bushings with the covers
removed previously.
EN
41
Page 40

Installation
Position of the power cable
(rear view)
Front panel seal
Glue the supplied front panel seal to the
lower part of the front panel to avoid water
or other liquids from leaking in.
Appliance overall dimensions (mm)
(front view)
42
(top view)
Page 41

(side view)
Installation
EN
43
Page 42
Installation
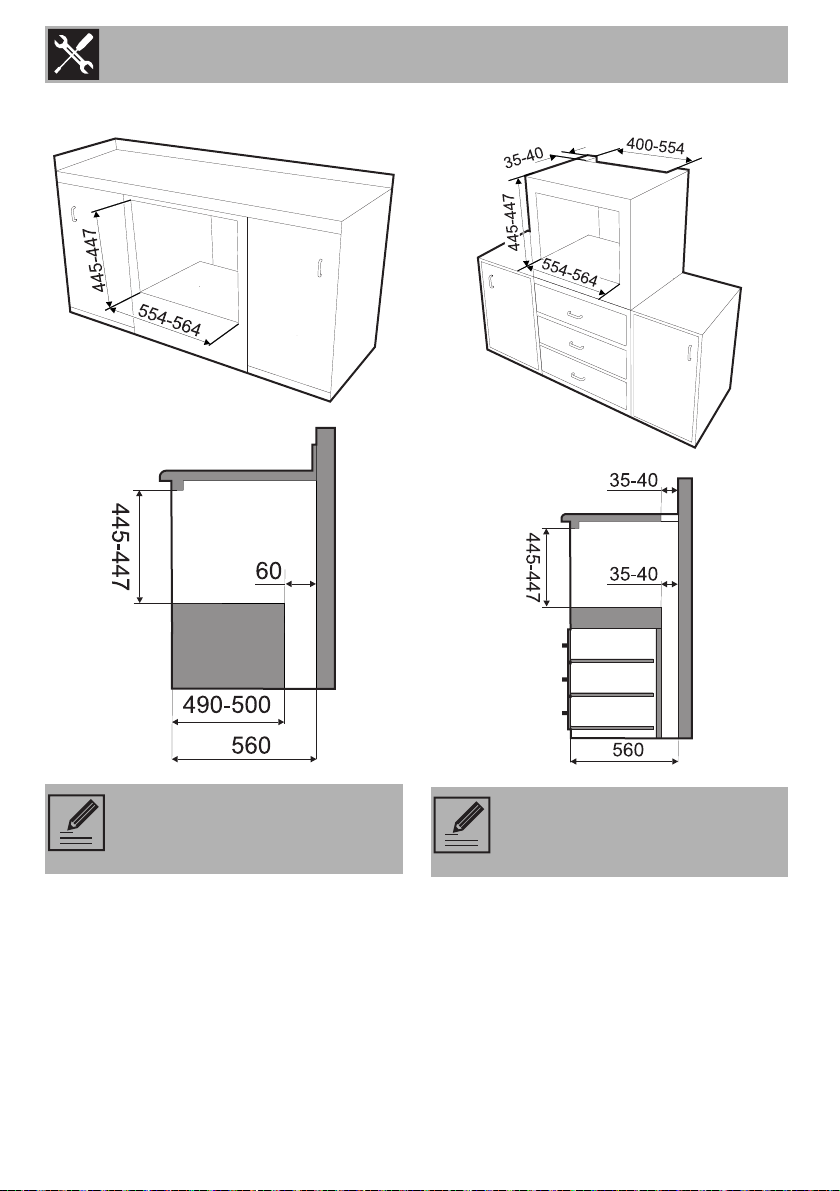
Mounting under worktops (mm) Mounting into a column (mm)
44
Make sure that the piece of
furniture rear/bottom part has an
opening of approx. 60 mm.
Make sure that the piece of
furniture top/rear part has an
opening approx. 35-40 mm deep.
Page 43

Page 44

 Loading...