


223176 1
ISTRUZIONI PER L’USO
ED IL MONTAGGIO
INSTRUCTIONS FOR FITTING AND USE
INSTRUCTIONS DE MONTAGE ET D’UTILISATION
GEBRUIKS- EN MONTAGE-INSTRUCTIES
GEBRAUCHS- UND MONTAGEANWEISUNG
INSTRUCCIONES PARA EL USO Y MONTAJE
INSTRUKCJA OBSŁUGI I MONTAŹU
HASZNÁLATI ÉS BESZERELÉSI UTASÍTÁS
РУКОВОДСТВО К ПОЛЬЗОВАНИЮ И УСТАНОВКЕ
Piano di cottura ad induzione da incasso in vetroceramica con comandi
Touch Control
Built-in glass ceramic induction hob with Touch-Control switches
Plaque de cuisson vitrocéramique à induction avec commande Touch-Control
Vitrokeramische inbouw-inductiekookplaat met Touch-Control-bediening
Einbau-Glaskeramik-Induktionskochfeld mit Touch-Control-Bedienung
Encimera vitrocerámica por inducción incorporada con mando Touch Control
Indukcyjna kuchenka szkło-ceramiczna z systemem obsługi Touch-Control
Beépíthető kerámia-üveg indukciós főzőlap touch-control-kezeléssel
Встроенная индукционная кухонная плита с сенсорным управлением

10 223176
You now own a glass ceramic hob with Touch-Control switches.
Chapters 2 and 3 of these Oper ating Instructions contain information on how you can make sur e that your hob
provides many years of service.
These Operating Instructions are for use with several types of hobs. The nameplate on the front of these
Instructions will show you which type you have bought.
Contents
1. Operations
1.1 Your new hob
1.2 Touch-Control swit ches
1.3 Touch-Control operations
2. Things to watch out for
2.1 Important tips for induction
2.1.1 Induction cooking zones and mess tin
2.1.2 Protection against overheating
2.1.3 General
2.2 Important
3. Cleaning and Care
4. Fitting
4.1 Electrical connection
4.2 Maintenance and repair work
4.3 Working surface cut-out
4.4 Installation
223176 11
1. Operations
1.1 Your new hob with Touch-Control operation
SE2664ID SE2774ID
Cooking zone Ind. 18 cm Ind. 18 cm
Cooking zone Ind. 14.5 cm Ind. 14.5 cm
Cooking zone Ind. 21 cm Ind. 21 cm
Cooking zone Ind. 14.5 cm Ind. 14.5 cm
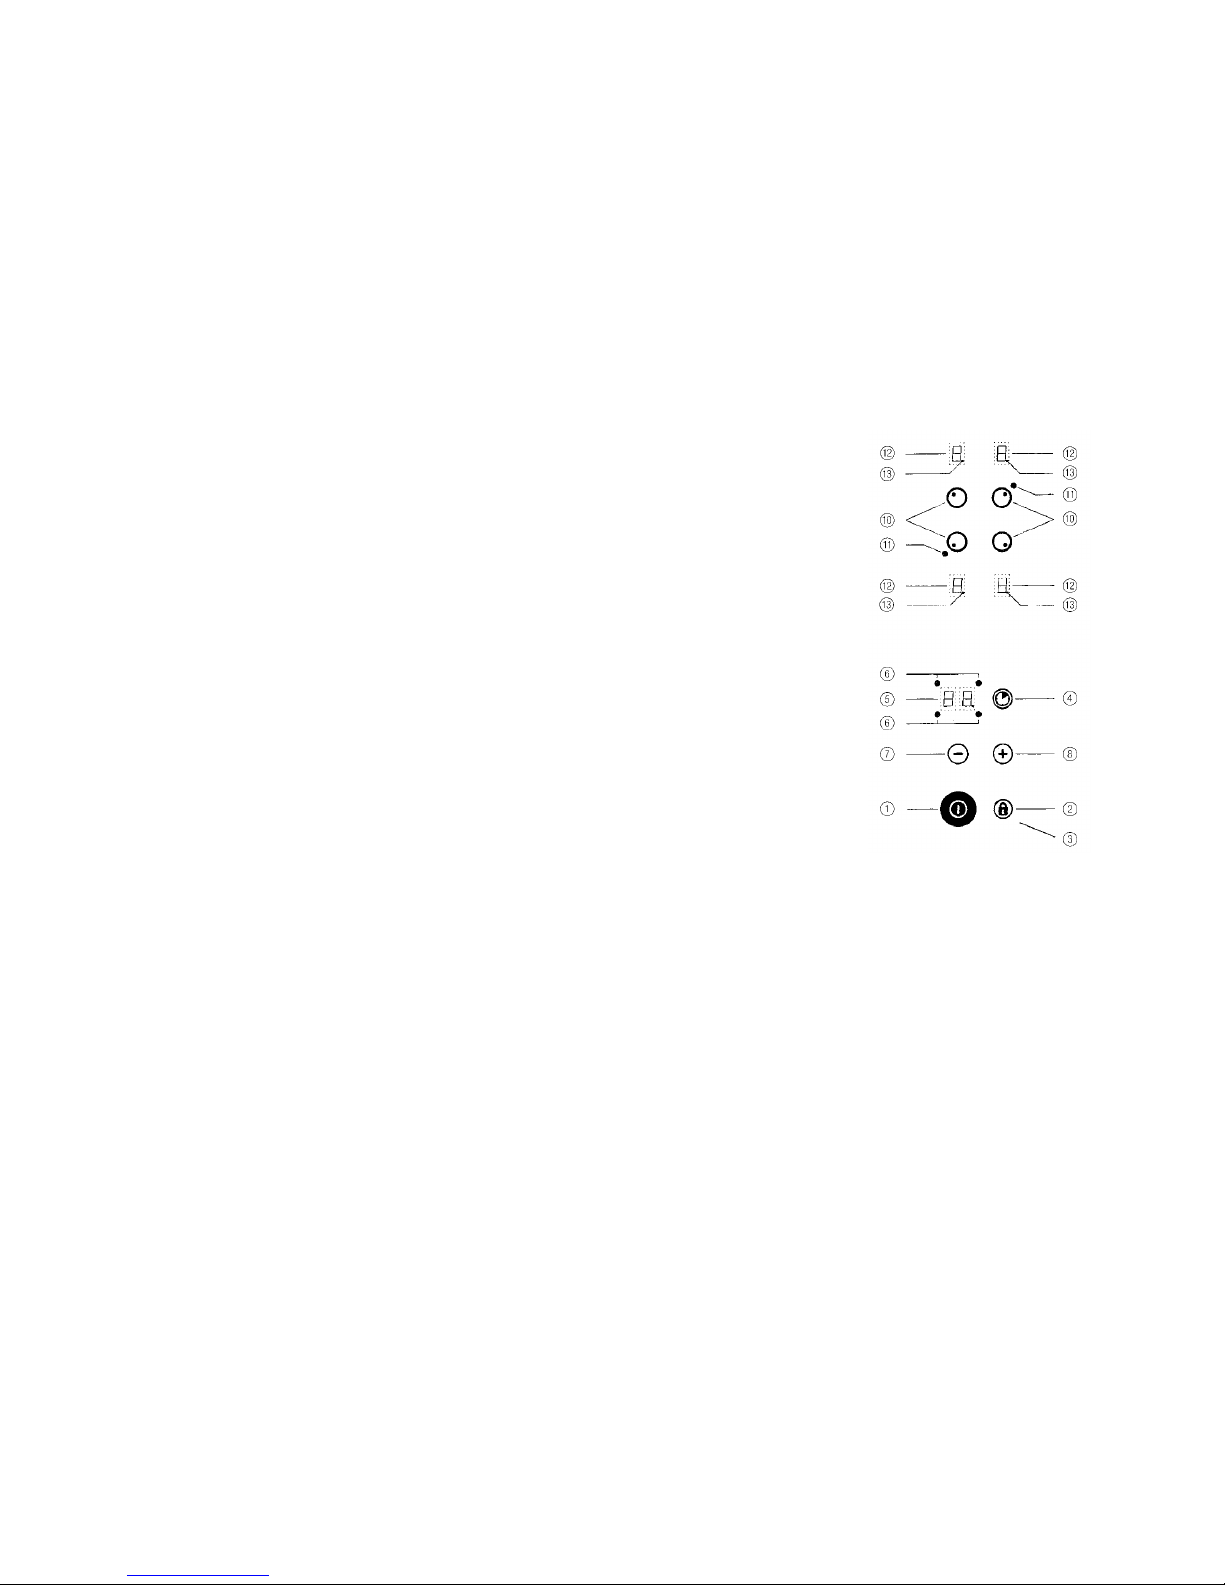
1.2 Touch-Control operating panel
After the supply voltage has been connected (mains connection), a self-test is carried out which is concluded when
a short acoustic signal is to be heard.
1
On/off switch (control)
2
Locking key
3
Control lamp lock (control)
4
Timer key
5
Time display
6
Timer control lam p
7
Minus key
8
Plus key
0
Cooking zone key
!
Control lamp for switching on the twin circuit
"
Cooking level display
§
Readiness point for cooking zone
(lit: cooking zone can be used)
1.3 Touch-Control operations
Each key operation is always confirmed by an acoustic signal.
Pressing the on/off switch key
1 switches on the control system: Put your finger on the button until a "0" lights up
at all of the cooking level display s and the cooking z one stan dby dot
§ flashes. The next action m ust be ca rried
out within ten seconds, otherwise the control system will automatically switch off again.
To switch on a cooking zon e, press the corresponding cooking zone key
0 of the required cooking zone. T he
appropriate stand-by dot cooking zone
§ of the activated cooking zone lights up.
Select a cooking level from 1 to 9 by means of the minus or plus keys
7/8. When switched on, each cook ing zone
can be switched off again at any time. To do this, the required cooking zone must be activated, the stand-by dot
§
lights up.
The minus key
7 can be used to turn the cooling level down to "0"; if the minus and plus keys 7+8 are pressed
at the same time, the cooling level can be switched off directly.
In all cases the comp le te c ont ro l sy ste m c an be swi tched off at any time by p r essi ng t he o n/o ff k ey
1: To switch
off the entire cooking range place your finger briefly on the on/off switch until the control lights go out.
Pressing lockin g key
2 prevents all the keys - with the exception of th e on/off key - from being operated by
mistake. Successful locking is indicated by the control lamp
3. Pressing the locking key 2 cancels this command
again.
Residual heat display
The residual heat display is an illuminated "H" on the appropriate cooking level display ".
 Loading...