

Instructions for use Gebrauchsanweisung Istruzioni per l'uso Návod k obsluze
Washing machine Waschvollautomat Lavatrice Automatická pračka
| Instructions for use | 3 -16 |
|---|---|
| Gebrauchsanweisung1 | 7 - 29 |
| Istruzioni per l'uso3 | 0 - 42 |
| Návod k obsluze4 | 3-51 |
INSTRUCTIONS FOR USE
WASHING MACHINE
Your washing machine is a result of many years of research work and it satisfies every demand of modern washing. It offers a great number of up-to-date wash programmes, it is economic, it uses less water and it saves energy and washing
- When washing delicate laundry and woolens, the laundry remains in the last rinsing water. This prevents delicate laundry from creasing in case you can't take it rinsing water. This prevents delicate launory from creasin out of the machine immediately after completed washing.
- One of the useful features of your new washing machine is that you can select
- Your washing machine is friendly to the environment thanks to the EKO system we have incorporated. The system enables better use of washing powder and less pollution,
Further instructions contain all necessary data that will help you get to know your machine. Read it carefully so that you will know how to handle with the machine.
IMPORTANT
- After removing the packaging check the condition of your washing machine (possible scratches, etc.).
- In case your machine is damaged, immediately inform your dealer (in three days at latest), otherwise we do not take any responsibility.
- Remove the transit brackets before installing the machine.
- Don't forget to consider all the safety precautions when connecting the machine to the water supply and to the mains. It will help you prevent accidents or injuries.
- In case the control panel is covered with protective foil, you may remove it before use. Don't use sharp objects, as you may scratch the control panel.
- We do not take any responsibility for damages or injuries occurring as a result of not taking into account this Instructions for use.
- Name-plate containing all data on type and model of your washing machine is on the rear wall of the appliance.
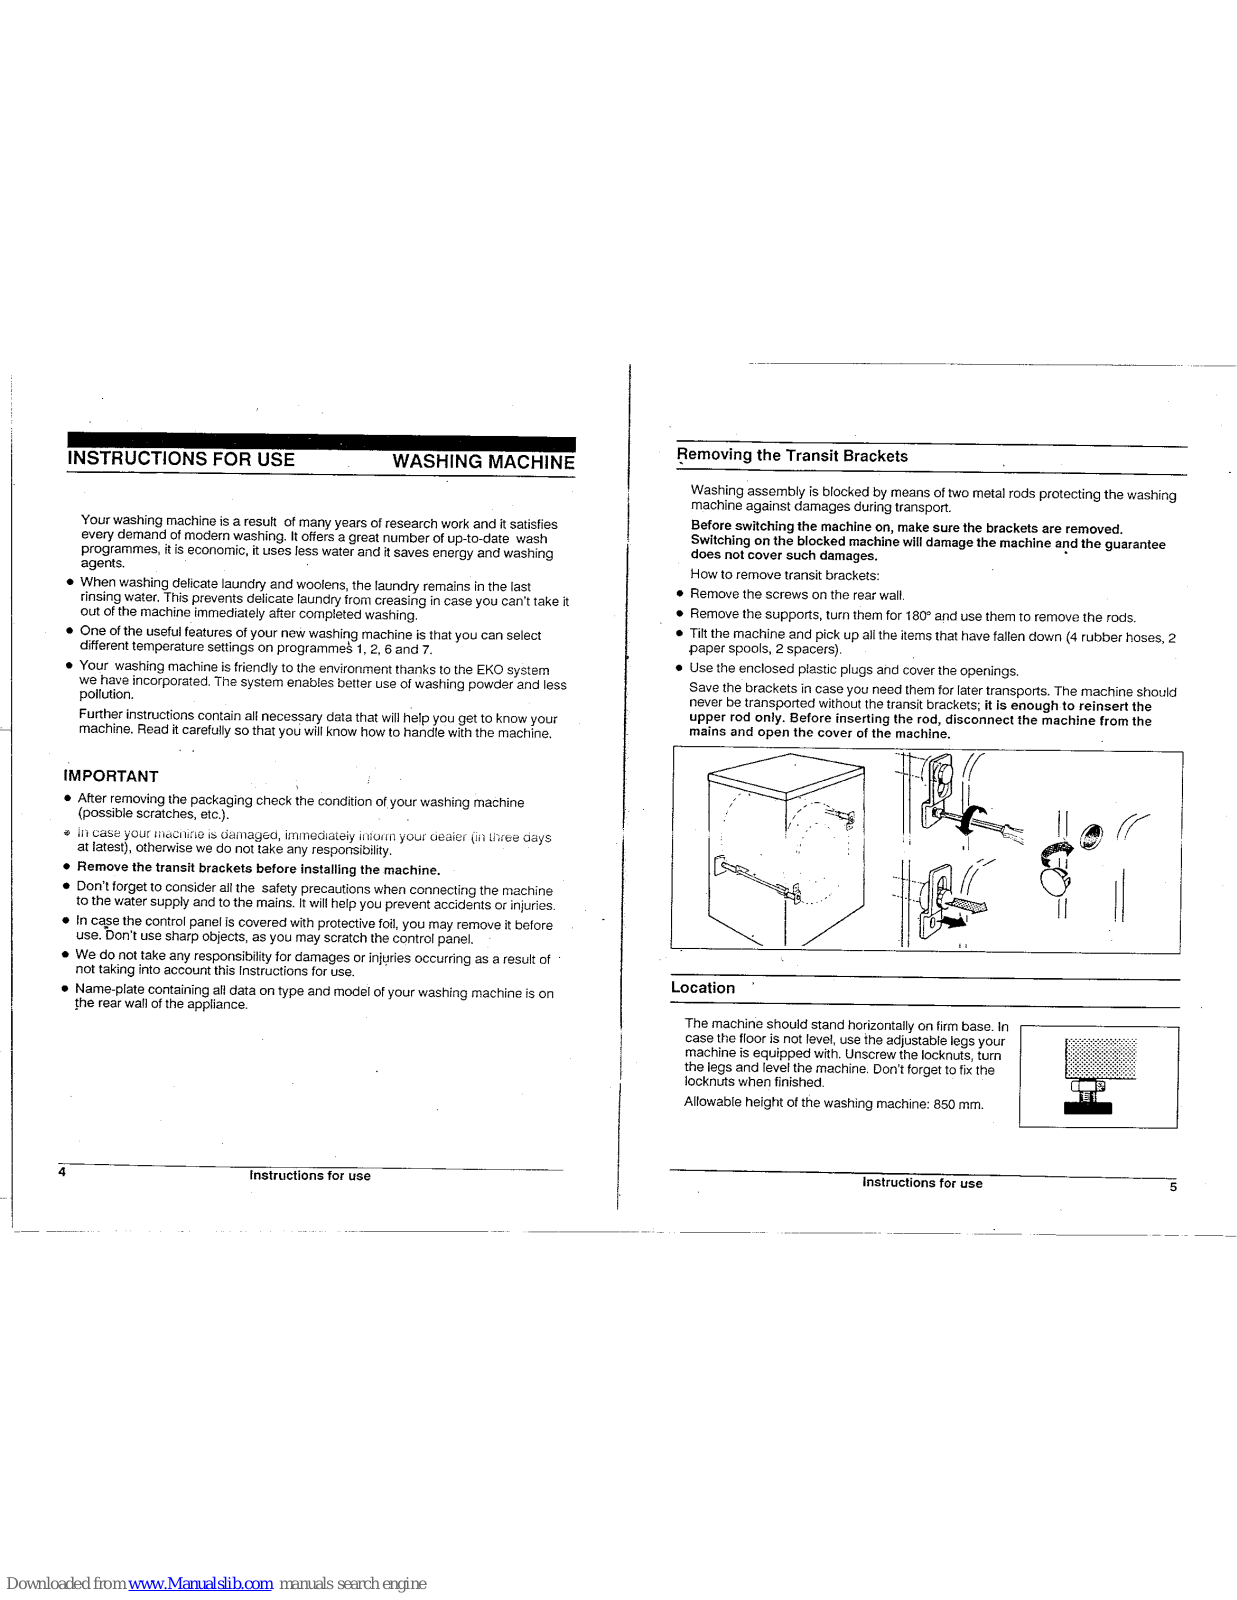
Removing the Transit Brackets
Washing assembly is blocked by means of two metal rods protecting the washing machine against damages during transport.
Before switching the machine on, make sure the brackets are removed. Before switching the machine on, make sure the prackets are removed. Switching on the blocked machine will damage the machine and the guarantee does not cover such damages. How to remove transit brackets:
- Remove the screws on the rear wall.
- Remove the supports, turn them for 180° and use them to remove the rods.
- Tilt the machine and pick up all the items that have fallen down (4 rubber hoses, 2 paper spools, 2 spacers).
- Use the enclosed plastic plugs and cover the openings.
Save the brackets in case you need them for later transports. The machine should never be transported without the transit brackets; it is enough to reinsert the upper rod only. Before inserting the rod, disconnect the machine from the mains and open the cover of the machine

Location
The machine should stand horizontally on firm base. In case the floor is not level, use the adjustable legs your machine is equipped with. Unscrew the locknuts, turn the legs and level the machine. Don't forget to fix the

Allowable height of the washing machine: 850 mm.
Instructions for use
Instructions for use
Water Supply
Supply hose is stored in the drum.
Insert the rubber washer into the locknut on the elbow connection and connect the hose to the washing machine.
Insert the rubber washing machine. Insert the rubber washer with wire-net filter in the nut on the other end of the supply hose, which will prevent solid particles (e.g. sand) to flow through and connect the hose to the cold water supply.

To allow correct operation, make sure that the water pressure is never bellow 0.5 bars. The highest allowable pressure is 8 bars. In case the pressure exceeds the highest allowable limit, fit in the pressure regulator.
Water Outlet
Hook the outlet hose securely over the edge of the sink or bath tub.
Pull a string through the hole on the plastic knee and secure the outlet hose to prevent it from falling on the floor.
The outlet hose can also be connected to the plumbed water outlet, the diameter of which should not be less than 4 cm.
The outlet hose should never be kept in the outlet water, as the washing machine may pump the waste water.
- The outlet hose should not be raised from the floor for more than 100 cm. In case the hose is positioned higher than recommended, the machine will not pump out the water.
- The lowest allowable height is 60 cm from the floor.
6
Instructions for use
Connection to the Power Supply
Before connecting the washing machine to the power supply, check the following:Power supply voltage should correspond to 220 V, 50 Hz.
Power supply voltage should correspond to 220 v, 50 Hz. Your power supply (electricity meter, fuse, socket) should correspond to the values stated on the rate plate, concerning max, overload.
Insert the plug of the washing machine directly into the wall socket, which should be protected by 16 A fuse and a grounding contact (safety socket).
In case of fixed connection, replace the plugged cable cord with an adequate one. The machine should be connected to the power supply by a qualified electrician.
Your washing machine should be connected to the power supply by a quanted teaching supply according to local electricity board regulations and standards.
Closing and Opening the Door
Door can easily be closed by pushing it towards the machine. If it is not properly closed, the machine will not operate.
The door of the washing machine is protected and cannot be opened during the operation of the machine. It can be opened only 2 minutes after the machine was switched off (the lamp is switched off).
The door is opened by pulling the door handle.
n case the door handle has a switch, push the switch and at the same time pull the handle.


The door glass can get very hot during the washing so take care of children not to get close during the operation of the machine.
Instructions for use
7
Preparing the Laundry
Sort the laundry before washing according to the type, quality, colour and soil degree of the laundry.
Type of Fabrics
Most clothes nowadays have labels describing the type of fabric they are made of, the kind of recommended wash and temperature recommended for washing. Only clothes having the following designations can be machine washed:
White linen 195/
Coloured linen 60/ 40/ 30/
Fine and delicate fabrics 60/40/30
If you consider the above mentioned labels, you can choose the correct wash programme, thus avoiding damages to your laundry. We recommend to put specially delicate fabrics (stockings, fine underwear) into a sack or into a pillow, when washing together with other laundry.
Colour Fastness
Separate white fabrics from coloured ones, to avoid colouring the white fabrics. When washing new coloured fabrics, wash them separately, to check the colour fastness.
Choose correct temperature according to colour fastness.
Degree of Soil
Stained and heavily soiled laundry should be washed in smaller quantities (up to 3,5 kg) or with larger amount of washing powder with the prewash programme. You can omit the prewash cycle with less soiled laundry. Heavy stained or soiled areas on the garments can be treated before washing, using special agents.
Loading
Cotton and not so delicate laundry may be loaded in the drum in the quantity of up to 5,0 kg; very soiled items should be loaded in the amount of not more than 4,0 kg.
Delicate and woolen fabrics can be loaded in the quantity of not more than 1,5 kg. The best washing effect is obtained by mixing larger and smaller items of laundry in one load.
Before loading the laundry, check the pockets, zip the zippers and remove metal pins that may cause damage to the fabrics.
When closing the door, be careful not to trap linen between the door gasket and the door.
Instructions for use
Washing Agents and How Much to Use
Use only washing nowder for machine washing!
As to the quantity of the washing powder, refer to the manufacturer's recommendation and pay attention to the water hardness, soil degree and amount of wash. Using the EKO system, you can use 20 % less washing powder with unchanged efficiency of washing, because of the efficient use of the washing powder.
Fabric softener gives your laundry soft feeling and pleasant smell and it neutralizes the static of artificial fabrics. When using softener having higher density, we recommend mixing it with smaller amount of water before pouring it into the dispenser thus avoiding the possibility of clogging the outlet of the dispenser.
Starching agent gives smooth and shinny appearance to your fabrics which become more soil resistant.
Bleaching and Colouring Agents
Use only those bleaching and colouring agents that can safely be used in washing machines (guaranteed by the manufacturer). We do not take any responsibility for possible damages and colouring of gaskets and plastic parts as a result of careless use of the mentioned agents.
Dispenser
Washing powder and other agents are loaded into the dispenser before starting the washing procedure. The dispenser should be clean and dry before loading it so that water can efficiently rinse the washing agents. Use the softener and starching agent as recommended by the manufacturer (the quantity is limited and marked in the dispenser) otherwise it may leak out.
The dispenser is divided into three sections:
Section I for prewash.
Section W for main wash.
Section B for liquid softeners and starching agents. Never use force when pushing the dispenser back in the machine, because it can cause incorrect loading of the liquid softener.

nstructions for use

Control lamp
After the machine is switched on, the control lamp is on.
ON/OFF and Programme Selection Knob
This knob can be turned only clockwise, when the machine is switched off. The machine is switched on by pulling the knob out and switched off by pusping it in

machine is switched OFF This knob is also used to select various programmes.
ON/OFE Control Knob
After selecting one of the programmes with the programme selection knob, switch on the machine with the ON/OFE control knob

machine is switched OFF
Programme Selection Knob
By turning the knob counterclockwise (when the machine is switched off), you can
Programmes 1-5 - resistant cotton and linen fabrics
You can select either the programme with prewash (programme 1) or the programme without prewash (programme 2), and temperatures from cold to 95°C.
Programmes 6-11 - fine and delicate fabrics
You can also select either the programme with prewash (programme 6), the programme without the prewash (programme 7), or programme wool (8) and combine them with all possible temperature settings. After final rinsing the laundry remains in the water. You can finish washing with one of the following programmes (use the ON/OFF and programme selection knob):
- programme 10, (draining), or
- programme 11, (draining and 1 minute spinning).
Programme (8) - wool
All woolen fabrics having labels marked with 8, at the temperature of 40°C, the wool button being switched on.
Instructions for use
Temperature Selection Knob
Washing temperature can be set from cold to 95°C. Temperature is set by turning the knob clockwise, until the selected temperature is reached. Temperature setting is lowered by turning the knob counter-clockwise towards the position 0.
E Pushbutton - Economic Programme
Normally and less soiled fabrics doesn't always have to be washed at the temperature of 95°C (programmes 1 and 2). Economic programme offers you the possibility to wash your laundry at lower temperatures, with 40% energy saving (the duration of the washing cycle is exactly the same as the duration of the washing cycle at 95°C).
Washing powder containing TAED (activator of the bleaching agent) will improve the result of washing.
To set the economic programme, switch on the E pushbutton with programmes 1 and 2 and set the temperature selection control knob to the position 95
1/2 Pushbutton - Half-load
If you want to wash smaller quantities of laundry (up to 2,5 kg), switch on the 1/2 push button with programmes 1 and 2. It will help you save energy and washing agents.
Never use half-load programme for woolens or delicate laundry!
Pushbutton - woolens
In case you wash woolens on programme 8, you have to switch on this push
Spinning ON/OFF Button
When washing delicate linen on programmes 1-4, you can switch off the spinning cycle in which case the machine will only pump out the water.
Spinning OFF
12
Instructions for use
WASH PROGRAMS
| Programme |
Programme
setting |
Temperature
setting (°C) |
Dispenser | Load | |||
|---|---|---|---|---|---|---|---|
| ⊮ | Ū | U | (kg) | ||||
| NORMAL PROGRAMMES | |||||||
| White laundry - prewash | 1 | 60 - 95 | ٠ | • | 5,0 | ||
| White laundry | 2 · | 6Ó - 95 | • | ٠ | 5,0 | ||
| Coloured laundry - prewash | 1 | 30 - 60 | ٠ | ٠ | • | 5,0 | |
| Coloured laundry | 2 | 30 - 60 | • | 5,0 | |||
| Rinsing | 3 | ٠ | 5,0 | ||||
| Softening, starching | 4 | ٠ | 5,0 | ||||
| Spinning | 5 | - | 5,0 | ||||
| DELICATE PROGRAMMES | • . | ` | |||||
| White laundry - prewash | 6 | 60 - 95 | ٠ | • | ٠ | 1,5 | |
| White laundry | 7 | 60 - 95 | • ' | ٠ | 1,5 | ||
| Coloured laundry - prewash | 6 | 30 - 60 | ٠ | ٠ | ٠ | 1,5 | |
| Coloured laundry | 7 | 30 - 60 | ٠ | • · | - | 1,5 | |
| Wool | 8 | 30 - 40 | • | • | 1,0 | ||
| Rinsing, softening | 9 | • | 1,5 | ||||
| Draining | 10 | • | 1,5 | ||||
| Short spinning | 11 | Ì | 1,5 | ||||
Instructions for use
13
Emptying the Washing Machine
Approximately 2 minutes after switching off the machine you may open the door After washing:
Switch off the machine, by pushing the ON/OFF and programme selection button. The control lamp switches off. Remove the laundry from the drum. Check the door gasket and remove solid particles if any (buttons pins etc). Leave the door open and allow the interior to dry
Switch off the (E, 1/2, S, S pushbuttons if you used them
- Turn off the water supply
- Check the dispenser, clean it if necessary and wipe it.
Cleaning and Maintainance
Lint Filter
The lint filter, which is under the cover in (pins, buttons) to enter the pump. The machine. Especially after washing hairy and old fabrics, the filter should be checked and a checked and cleaned

Remove the cover (hold it on the upper part and pull it out)
- Open the tube at the filter and let the water pour in the cover (approximately 1,5) of water because of the EKO system).
- When finished, close the tube with a stopper, because the water may spill during the washing.
- Press the button at filter with your left hand and turn the filter counter clockwise with your right hand (not entirely) and pull out the filter. If you turn the filter too much, you can only remove the locknut; reinsert the locknut, make one or two turns and then pull out the filter.
- Clean the filter, insert it into the cleaned housing and turn it several times until "click" is heard
- Empty the cover and reinsert it.
Instructions for use
After cleaning the filter the EKO system should be refilled with water before washing otherwise it has no effect during the first washing. You can do it by using either of the procedures:
1. Pour approximately 1.5 liter of water through the dispenser.
2 Turn the programme selection knob to the position 9 so that the machine will Ium the programme selection known numb in the water and later drain it out. Your washing machine is now ready for next washing
Wire-net Filter in the Inlet Hose
- Clean the wire-net filter every six months or whenever necessary:
- Turn off the water supply.
- Remove the locknut on the inlet hose
- Clean the filter with running water and reinsert it.
The Housing
Clean the housing of your washing machine with soft cloth and mild detergent. Do
As a result of inadequate washing, greasy clots may appear on the drum, door gasket or fabrics. Remove them as follows:
Prepare a solution of 3/4 - 1 I washing soda (calcified soda) and 1 I of water. Pour the cold riepere a solution of 3/4 - 11 washing soda (calcified soda) and 11 of water. Pour the co solution through the disperser, set the control knob to programme 2 and temperature setting on 95° C. When the programme is faither that n the dispenser, set the control knob to programme 2 and temperature 2. When the programme is finished your washing machine is ready for use.
Dispenser
Clean the dispenser after each washing. Pull it out of the machine and clean it with a brush in warm water.
Door Gasket
Wipe the gasket after each washing; the gasket will last longer.
Protect the Machine Against Freezing
In case your washing machine is installed in a place where temperature can fall bellow 0° C, you should empty the machine after each washing as to avoid damages caused by freezing. The procedure is as follows:
- Turn off the tap.
- Remove the inlet hose from the tap and pour out the remaining water.
- Empty the washing machine through the tube (see Lint Filter Cleaning).
- Empty the outlet hose.
nstructions for use
Before Calling Your Service Center
All electric appliances should be repaired by qualified electricians. However, minor errors that might sometimes occur could be dealt with before calling your service.
|
||||
| Is the machine switched on? Is the water tap opened? Is the wire-net filter on the inlet hose clean? Is the door well closed? Are the transit brackets removed? Is the machine properly leveled? (if not, use the adjustable legs) Check the logat (perhaps you wash only one large piece). | ||||
|
||||
|
||||
|
||||
|
||||
|
||||
If the machine still doesn't work properly, call your nearest service.
...
Instructions for use
GEBRAUCHSANWEISUNG
WASCHVOLLAUTOMAT
Ihr neuer Waschautomat enststand in mehrjähriger Entwicklungsarbeit. Seine Konzeption erfüllt alle Anforderungen moderner Wäschepflege. Sie ermöglicht Ihnen eine vielfältige Wahl moderner Wäschepflegeprogramme. Ihr Waschautomat ist sparsam im Umgang mit Wasser. Energie und Waschmittel
- Wird Feinwäsche gewaschen, so bleibt sie im letzten Spülwasser liegen. Die Wäsche knittert nicht, obwohl Sie keine Zeit haben, sie sofort aus dem Waschautomaten zu nehmen.
- Besonders vorteilhaft ist die beliebige Temperatureinstellung (gilt für die Proramme 1.2.6 und 7)
- Programme 1, 2, 6 und 7) Ihr Waschautomat ist mit dem eingebauten ÖKO-System auch umweltbewußter geworden. Das System sorgt dafür, daß die Waschmittelverluste geringer sind. Dadurch wird der Waschmittelverbrauch und somit auch die Umweltverschmutzung herabgesetzt.
- Eine nähere Beschreibung des Waschautomaten finden Sie in der Gebrauchsanweisung, die Sie mit dem Waschautomaten selbst und mit seiner Handhabung vertraut machen wird. Bitte, lesen Sie die Anweisung aufmerksam durch.
Wichtig
- Nach Entfernen der Verpackung überzeugen Sie sich, daß das Gerät unbeschädigt ist.
- Über evtl. Transportschäden muß Ihr Fachhändler binnen 3 Tagen informiert werden. Spätere Reklamationen werden nicht berücksichtigt.
- Vor dem Anschluß des Waschautomaten muß die Transportsicherung unbedingt entfernt werden.
- Berücksichtigen Sie bitte alle Hinweise für die Aufstellung des Gerätes und für den Anschluß an die Wasserleitung und an das Elektronetz. Dadurch können Sie Unfälle und Geräteschäden vermeiden.
- Eventuell vorhandene durchsichtige Schutzfolie an der Bedienungsblende kann nach Wunsch beseitigt werden.
- Für Schäden, verursacht durch Nichtbeachtung der Anweisung, haften wir nicht.
- Das Typenschild mit den Grunddaten des Waschautomaten befindet sich an seiner Rückwand.
Gebrauchsanweisung
17


 Loading...