


- The range hood must be located 65cm above the cooking appliance
unless specified otherwise. May be reduced to 60cm to align with
the AGA code.
- "IMPORTANT" : "INSTALLATION HEIGHTS IN AUSTRALIA"
1) Where an Electric Cooktop is installed under this Rangehood THE
MINIMUM DISTANCE between the Top of the Cooktop and the underside
of the Rangehood - MUST BE 60cm and the maximum 70 cm.
2) When this Rangehood is installed over a Gas fuelled Cooktop THE
MINIMUM DISTANCE between the Top of the Pot rests and the
underside of the Hood - MUST BE 65cm and the maximum 75 cm.
- FOR INSTALLATION OVER A GAS RANGE OR GAS COOKING
HOB A DIFFERENT SPECIFIC MINIMUM HEIGHT REQUIREMENT
MAY BE REQUIRED BY THE RELEVANT GAS AUTHORITIES.
- IF THE SUPPLY CORD IS DAMAGED, IT MUST BE REPLACED BY
THE MANUFACTURER OR ITS SERVICE AGENT OR A SIMILARY
QUALIFIED PERSON IN ORDER TO AVOID A HAZARD.
- THE APPLIANCE IS NOT INTENDED FOR USE BY YOUNG
CHILDREN OR INFIRM PERSONS WITHOUT SUPERVISION.
- YOUNG CHILDREN SHOULD BE SUPERVISED TO ENSURE THAT
THEY DO NOT PLAY WITH THE APPLIANCE.
- DO NOT USE THE RANGEHOOD LIGHTS AS A NIGHT LIGHT.
- MOST SMEG RANGE HOODS ARE FITTED WITH A METAL
WASHABLE GREASE FILTER. CLEANING CAN BE ATTENDED
BY HAND, OR PER DISHWASHER.
SHOULD YOUR MODEL BE FITTED WITH A FIBRE GREASE
FILTER, THIS CAN BE WASHED AND REUSED UNTIL AT WHICH
TIME IT SHOULD BE REPLACED.

SAFETY WARNINGS
RANGE HOODS
• THERE SHALL BE ADEQUATE VENTILATION OF THE ROOM WHEN THE RANGE
HOOD IS USED AT THE SAME TIME AS APPLIANCES BURNING GAS OR OTHER FUELS.
(NOT APPLICABLE TO APPLIANCES THAT ONLY DISCHARGE THE AIR BACK INTO
THE ROOM)
• THERE IS A RISK OF FIRE IF CLEANING IS NOT CARRIED OUT IN ACCORDANCE
WITH THE INSTRUCTIONS.
• DO NOT FLAMBÉ UNDER THE RANGE HOOD.
• CAUTION: ACCESSIBLE PARTS MAY BECOME HOT WHEN USED WITH A COOKING
APPLIANCE.
• THE APPLIANCE IS NOT INTENDED FOR USE BY PERSONS (INCLUDING CHILDREN)
WITH REDUCED PHYSICAL, SENSORY OR MENTAL CAPABILITIES, OR LACK OF
EXPERIENCE AND KNOWLEDGE, UNLESS THEY HAVE BEEN GIVEN SUPERVISED
OR INSTRUCTION CONCERNING USE OF THE APPLIANCE BY A RESPONSIBLE
PERSON FOR THEIR SAFELY.
• YOUNG CHILDREN SHOULD BE SUPERVISED TO ENSURE THAT THEY DO NOT
PLAY WITH THE APPLIANCE.
• IF THE SUPPLY CORD IS DAMAGED, IT MUST BE REPLACED BY THE
MANUFACTURER OR ITS SERVICE AGENT OR A SIMILARLY QUALIFIED PERSON IN
ORDER TO AVOID A HAZARD.
FOR INSTALLATION INSTRUCTIONS:
• THE EXHAUST AIR MUST NOT BE DISCHARGED INTO A FLUE WHICH IS USED FOR
EXHAUSTING FUMES FROM OTHER APPLIANCES BURNING GAS OR OTHER FUELS.
(NOT APPLICABLE FOR APPLIANCES WHICH ONLY DISCHARGE AIR BACK INTO THE
ROOM)
• THE MINIMUM DISTANCE BETWEEN THE SUPPORTING SURFACE FOR THE COOKING
VESSELS ON THE HOB AND THE LOWEST PART OF THE RANGE HOOD:
WHEN THE RANGE HOOD IS LOCATED ABOVE A GAS APPLIANCE, THIS DISTANCE
SHALL BE 65CM. IF THE INSTRUCTIONS FOR INSTALLATION FOR THE GAS HOB
SPECIFY A GREATER DISTANCE, THIS MUST BE TAKEN INTO ACCOUNT. (THE
DISTANCE OF 65CM CAN BE REDUCED FOR NON COMBUSTIBLE PARTS OF RANGE
HOODS AND PARTS OPERATING AT SAFETY EXTRA LOW VOLTAGE PROVIDED
THESE PARTS DO NOT GIVE ACCESS TO LIVE PARTS. THE VALUE OF 65CM. MAY BE
REDUCED TO 60CM. SO AS TO ALIGN WITH AS 560 1 GAS INSTALLATION.
• REGULATIONS CONCERNING THE DISCHARGE OF AIR HAVE TO BE FULFILLED
04308297/2

Italiano, 10
English, 12
Deutsch, 14
Français, 16
Español, 18
Português, 20
Nederlands, 22
Русский, 24
Dansk, 26
Suomi, 28
Svenska, 30
ЕллзнйкЬ, 32
Română, 34
Čeština, 36
Slovensky, 38
Istruzioni per l’uso
Instructions for use
Betriebsanleitung
Mode d’emploi
Instrucciones de uso
Instruções de uso
Gebruiksaanwijzingen
Руководство по эксплуатации
Brugsanvisning
Käyttöohjeet
Bruksanvisning
ПдзгЯет чсЮузт
Instrucţiuni de utilizare
Návod k použití
Návod na používanie

2
2x
1x
ø 15cm
1x
1x
ø 12.5cm
1x
1x
1x
1x
1x
8x 8x
4.8x38mm
4x
3.9x6mm
1x
2x
1x
2x
3.9 x 6mm

3
L
= 65 cm
min.
!
!
1A
1B
Ø150mm
Ø150mm
Ø125
Ø150
Ø125

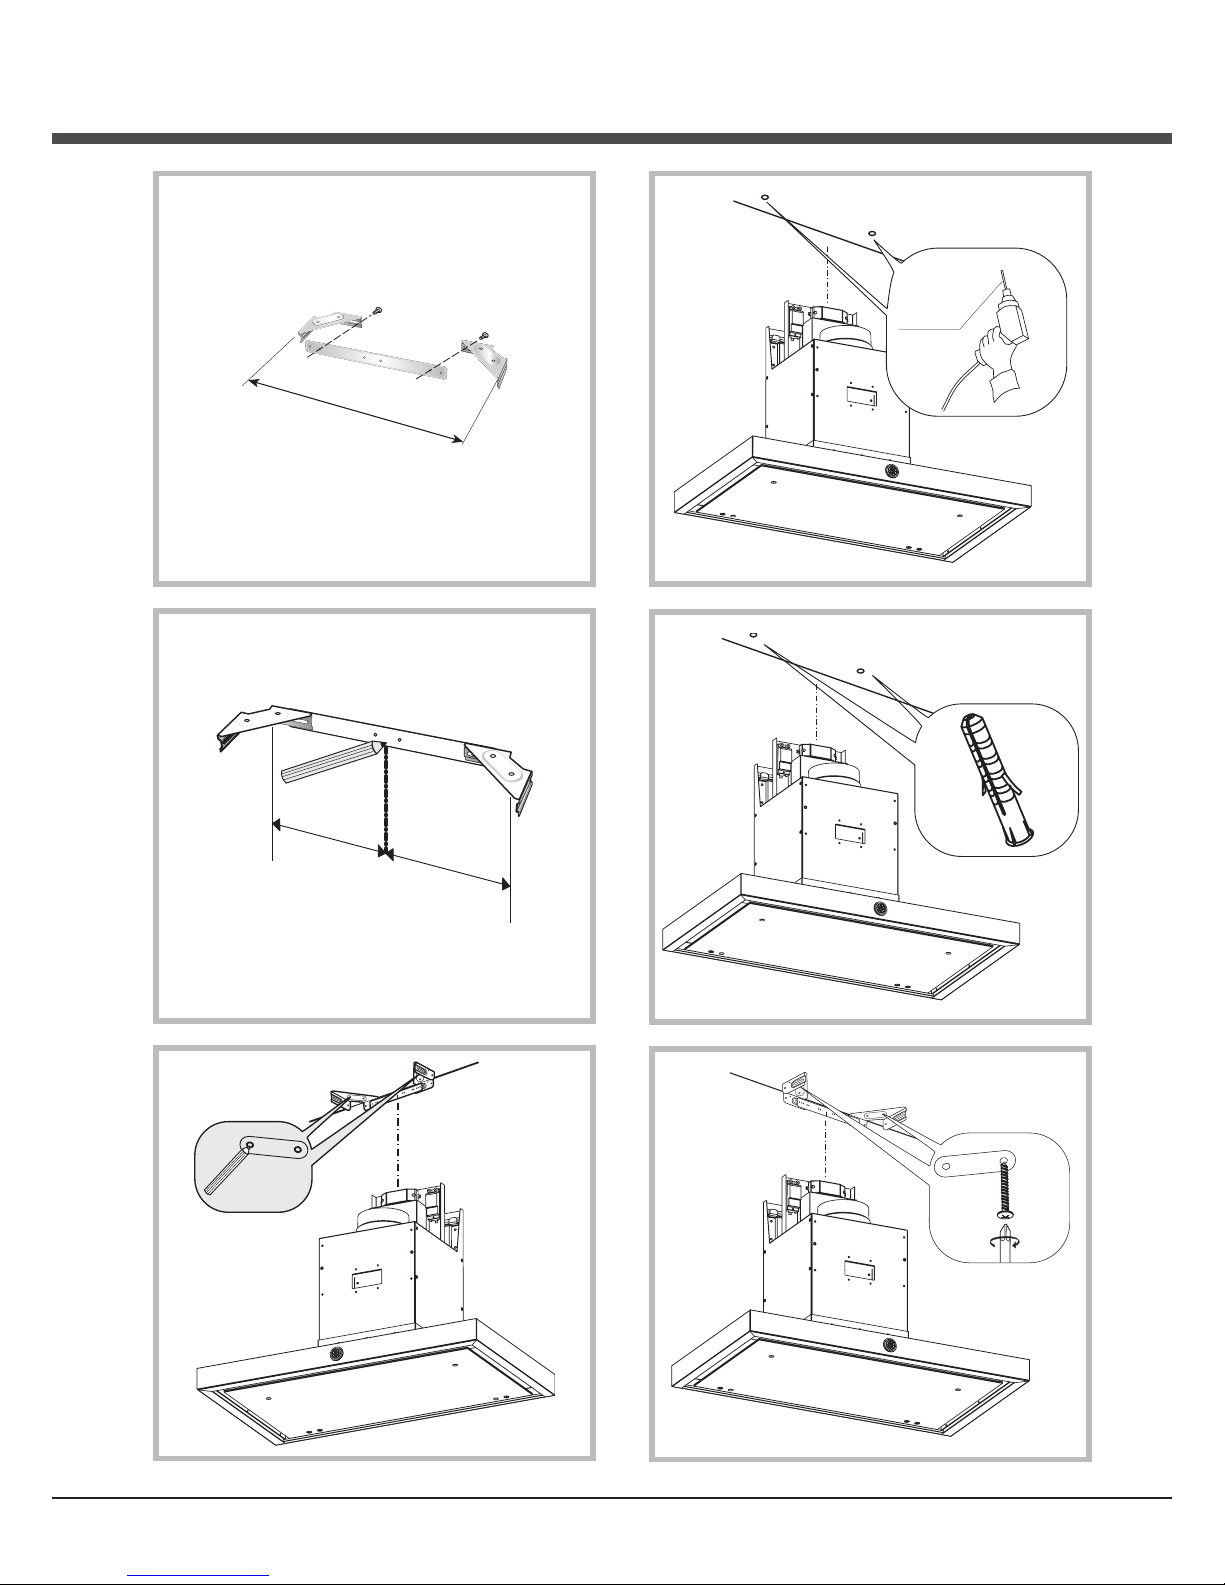
4
2
3
4
5
6
55 mm
7
4.8 x 38 mm
MIN. 1215mm.

5
8
10
11
12
13
Ø 8 mm
9
4.8 x 38 mm
6
15
16
18
14
=
=
Ø 8 mm
4.8 x 38 mm
19
325 mm
3.9 x 6 mm
17
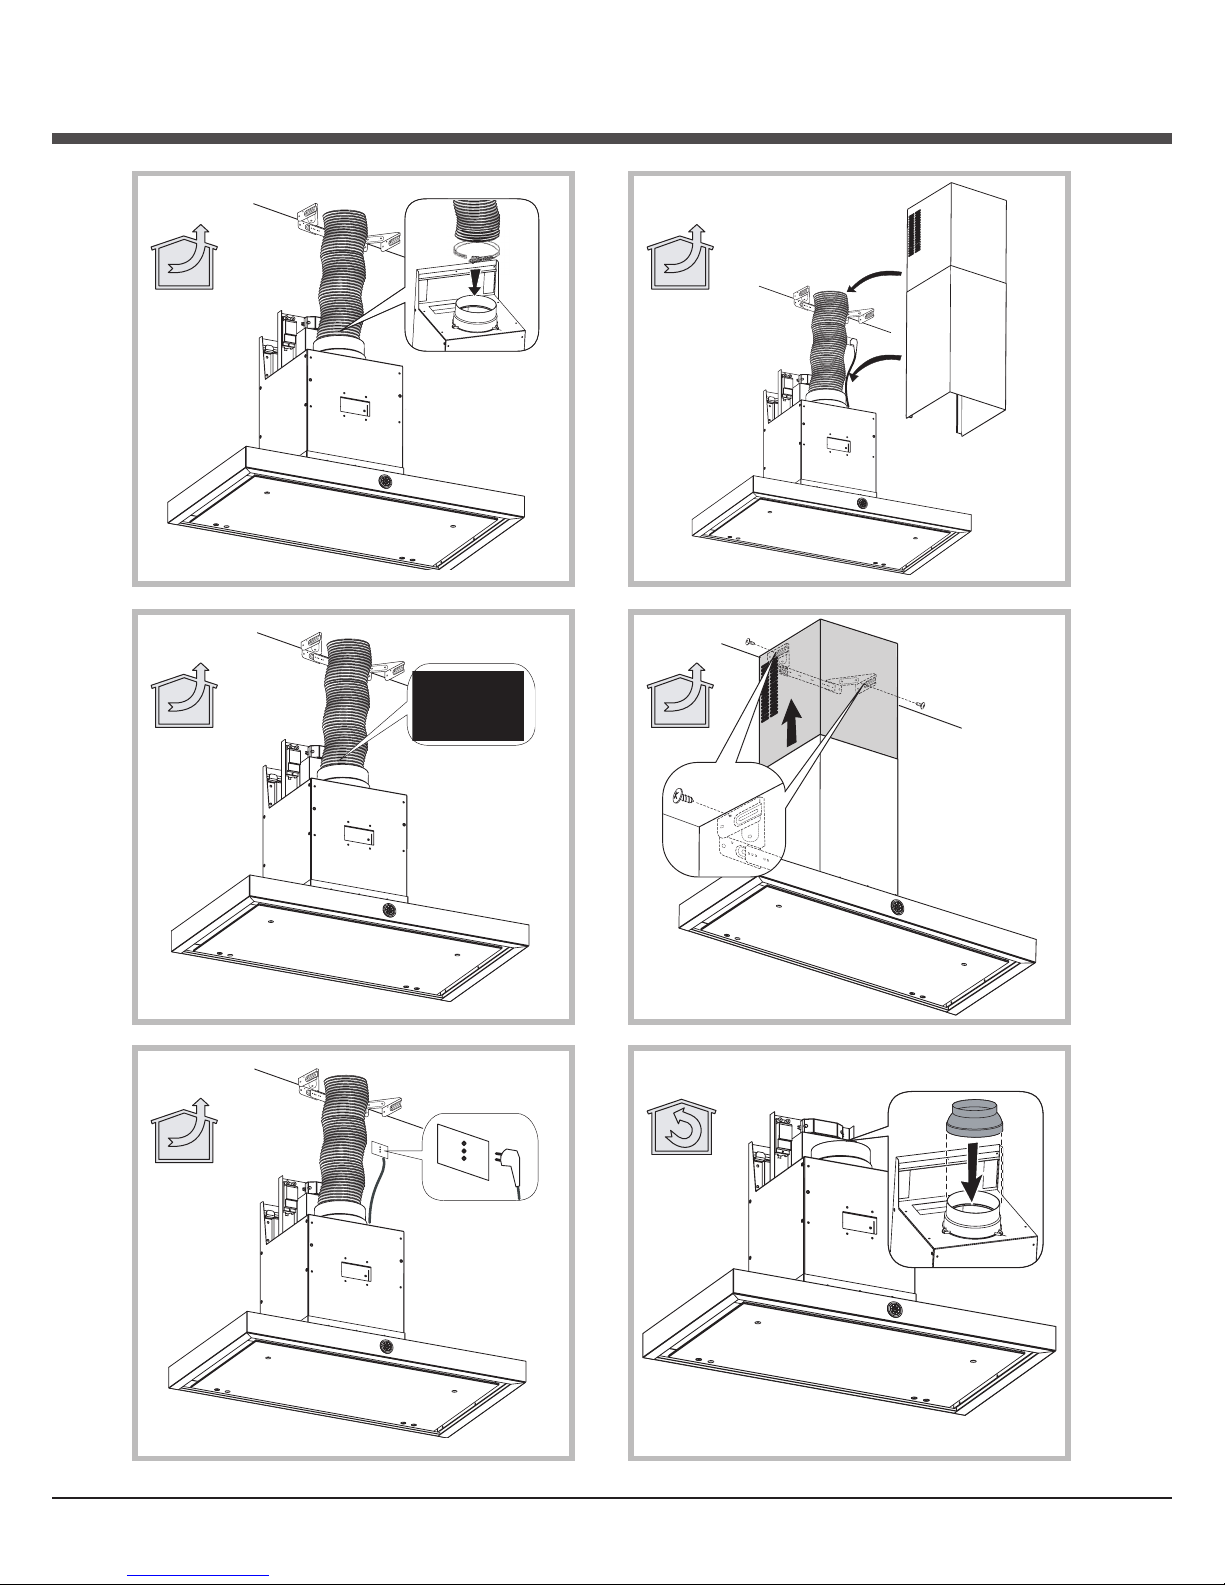
7
20A
22A
21A 24A
23A
3.9 x 6 mm
20B

8
25B
23B
3.9 x 6 mm
22B
21B 24B
26B

9
28B
27B
30B
29B
31B
32B

12
EN
English
! The appliance must be installed by a qualied person
in compliance with the instructions provided.
!
Wear gloves when carrying out installation and
maintenance operations.
AIR VENT
(for ducting versions)
! Prepare the hole and the air vent duct (150 mm dia-
meter).
! Use a duct of the minimum indispensible length.
! Use a duct with as few elbows as possible (maximum
elbow angle: 90°).
! Avoid drastic changes in the duct cross-section.
! Use a duct with an as smooth as possible inside.
! The duct must be made of certied material.
! Do not connect the hood to smoke exhaust ducts
for the products of combustion (boilers, replaces,
stoves, etc).
! For the air vents comply with the provisions laid down
by the competent authorities.
In addition, the air must not be evacuated through a
hole in the wall unless specically intended for this
purpose.
! Fit air intakes in the room to prevent the hood from
creating a negative pressure in the room (which must
not exceed 0.04 mbar); if the hood is used at the
same time as non-electrical equipment (gas-, oil- and
charcoal-red stoves, etc.) the exhaust gas may be
sucked in by the heat source.
FILTERING OR DUCTING VERSION ?
The hood may be in ltering or in ducting version. Decide from the outset which type is to be installed.
For better efciency, we recommend installing the hood
in the ducting version (if possible).
Ducting version
The hood puries the air and evacuates it to the outside
through an exhaust duct (diameter 150 mm).
Filtering version
The hood puries the air and recycles the clean air
back into the room.
CONTROLS
P1
P2
P3 P4
L1
P5
P1: 5’ TIMER
P2: Filter alarm reset
P3: Motor off / speed decrease – .
- holding down the button, the motor turns off storing the current speed
P4: Motor on / speed increase
P5: Lights on/off
L1 Signalling crown:
- Hood in standby: lights up amber-orange. 30” after
the last key has been pressed the crown turns off
- Motor on: L1 lights up turquoise ashing. The
ashing frequency is proportional to the speed
- 5’ TIMER function : L1 lights up turquoise xed
- Filter alarm active: L1 lights up red xed (30h); L2
lights up red ashing (120h)
MAINTENANCE
! Before cleaning or maintenance cut the power.
Cleaning the hood
WHEN TO CLEAN IT: clean it at least every 2 months
to prevent the risk of re.
EXTERNAL CLEANING: use a cloth moistened in lukewarm water and neutral detergent (for painted hoods);
use specic products for steel, copper or brass hoods.
INTERNAL CLEANING: use a cloth (or brush) soaked
in denatured ethyl alcohol.
WHAT NOT TO DO: do not use abrasive or corrosi-
ve products (e.g. metal sponges, brushes, too hard
brushes, very aggressive detergents, etc.)

13
EN
Cleaning the grease lters
WHEN TO CLEAN IT: clean it at least every 2 months to
prevent the risk of re.
HOW TO REMOVE THE FILTERS: push the catch near
the handle towards the rear of the hood and pull the
lter downwards
HOW TO CLEAN THE FILTERS: hand wash or in the
dishwasher using a neutral detergent. If washing in the
dishwasher, possible discoloration of the lters does not
in any way compromise their functioning.
Replacing the charcoal lter (P)
(for ltering version only)
WHEN TO REPLACE IT: replace it at least every 6
months.
HOW TO REMOVE IT: if using the hood in the ltering
version, the charcoal lter has to be replaced. To remo-
ve it, push the catch inwards and remove the charcoal
lter from its seat.
Replacing the lamps
- To change the halogen lamps open the cover levering
from the proper slots.
- Replace it with a lamp of the same type.
WARNING: Do not touch the new lamp with bare
hands.
MALFUNCTIONS
If something appears not to be working properly, do the
following simple checks before calling Technical Service:
• If the hood is not working:
Check that:
- The power has not been disconnected.
- A speed has been selected.
• If the hood performs inefciently:
Check that:
- The motor speed selected is sufcient for the amount
of smoke and vapours released.
- The kitchen is sufciently ventilated to allow air intake.
- The charcoal lter is not worn (hood in ltering version).
• If the hood has turned off during normal functioning:
Check that:
- The power has not been disconnected.
- the omnipolar disconnection device has not tripped.
Components not provided with the product
P
 Loading...