

Smeg PLA6051X, PLA6051N, PLA6051B Instruction Manual
INSTRUCTION MANUAL
GGUUIIDDEEFFOORRUUSSIINNGGTTHHEEDDIISSHHWWAASSHHEERRAANNDDTTHHEEWWAASSHHIINNGGPPRROOGGRRAAMMS
S

Contents
1. Description of the controls________________________________12
Thank you for choosing one of our products.
You are advised to read this manual carefully; it contains all the
information you need about the right conditions for the proper, safe use
of your dishwasher.
The individual sections are laid out to provide you with a step-by-step
guide to all your appliance's functions; the texts are easy to understand
and are complete with detailed illustrations.
This user-friendly manual will provide answers to all your questions
about use of the dishwasher.
For any other information about use and maintenance of the dishwasher,
read the enclosed manual carefully.
USER INSTRUCTIONS: useful information is provided for the use of the
washing programs and all the dishwasher's functions.
User instructions
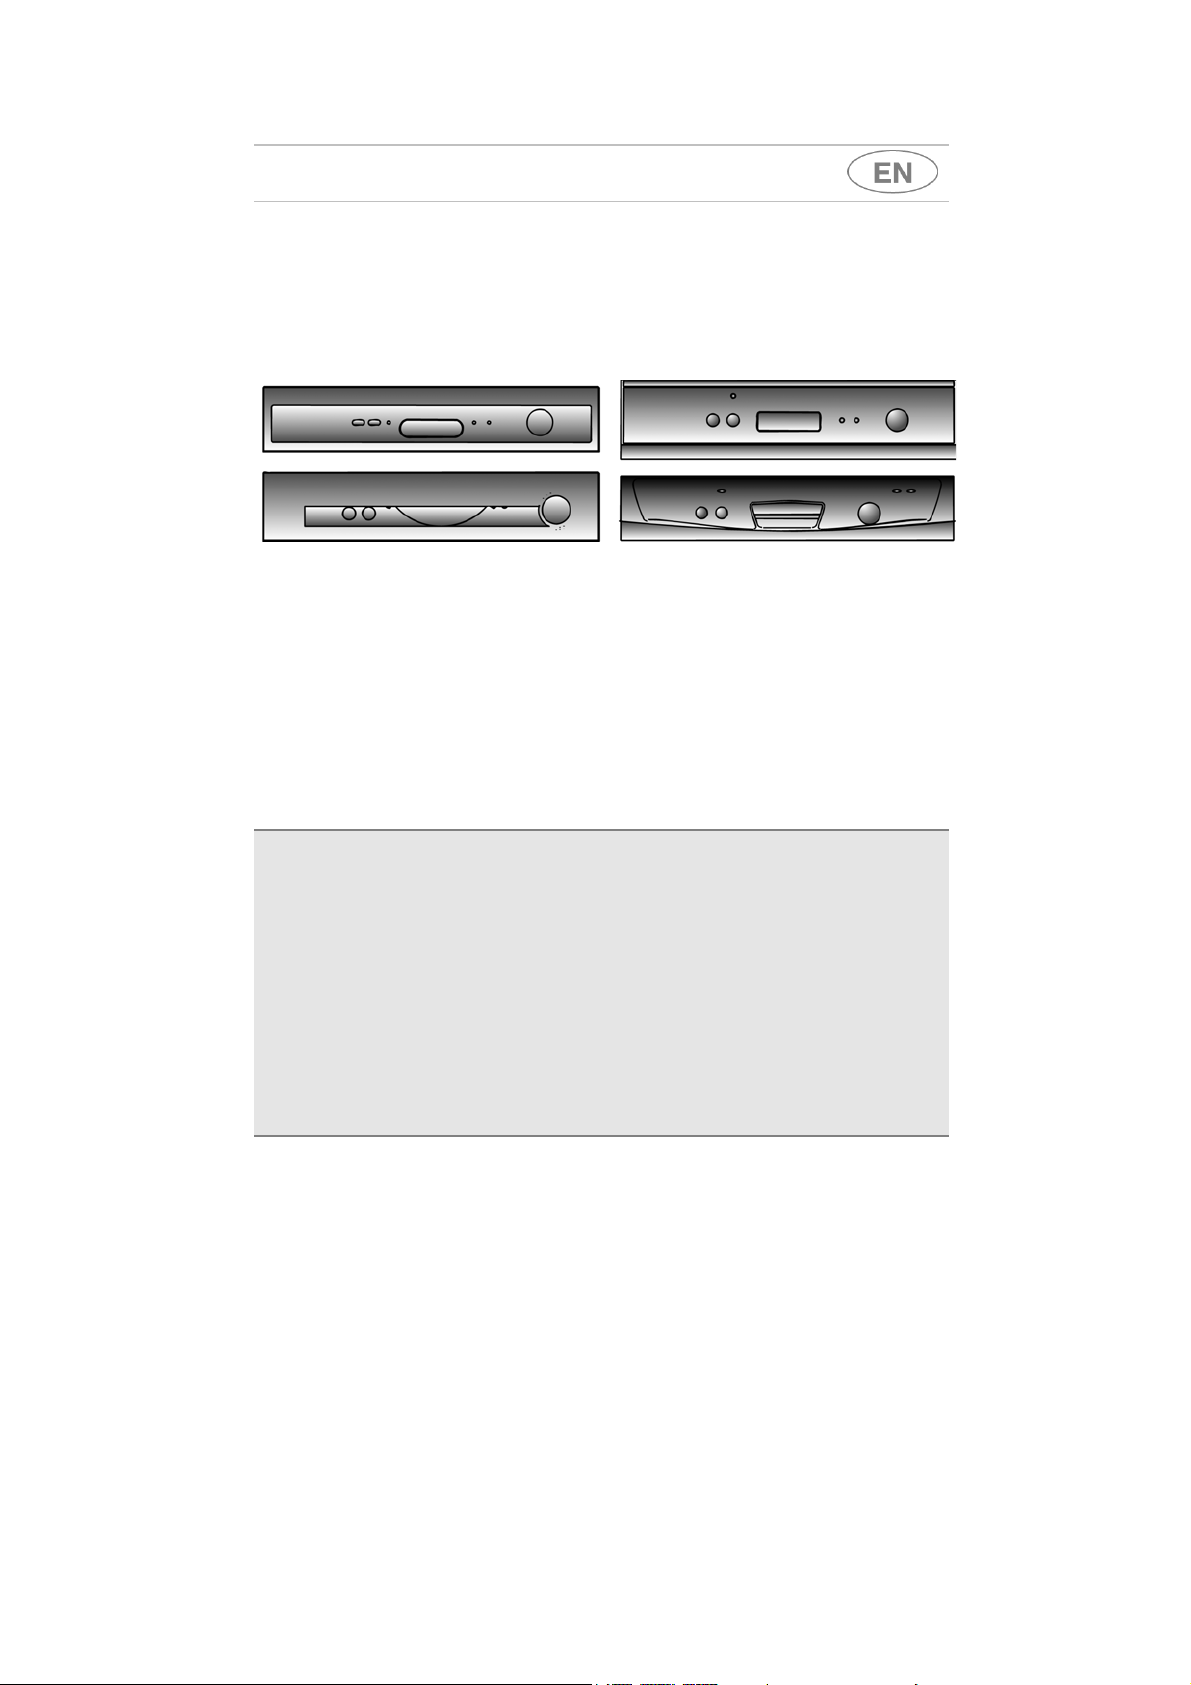
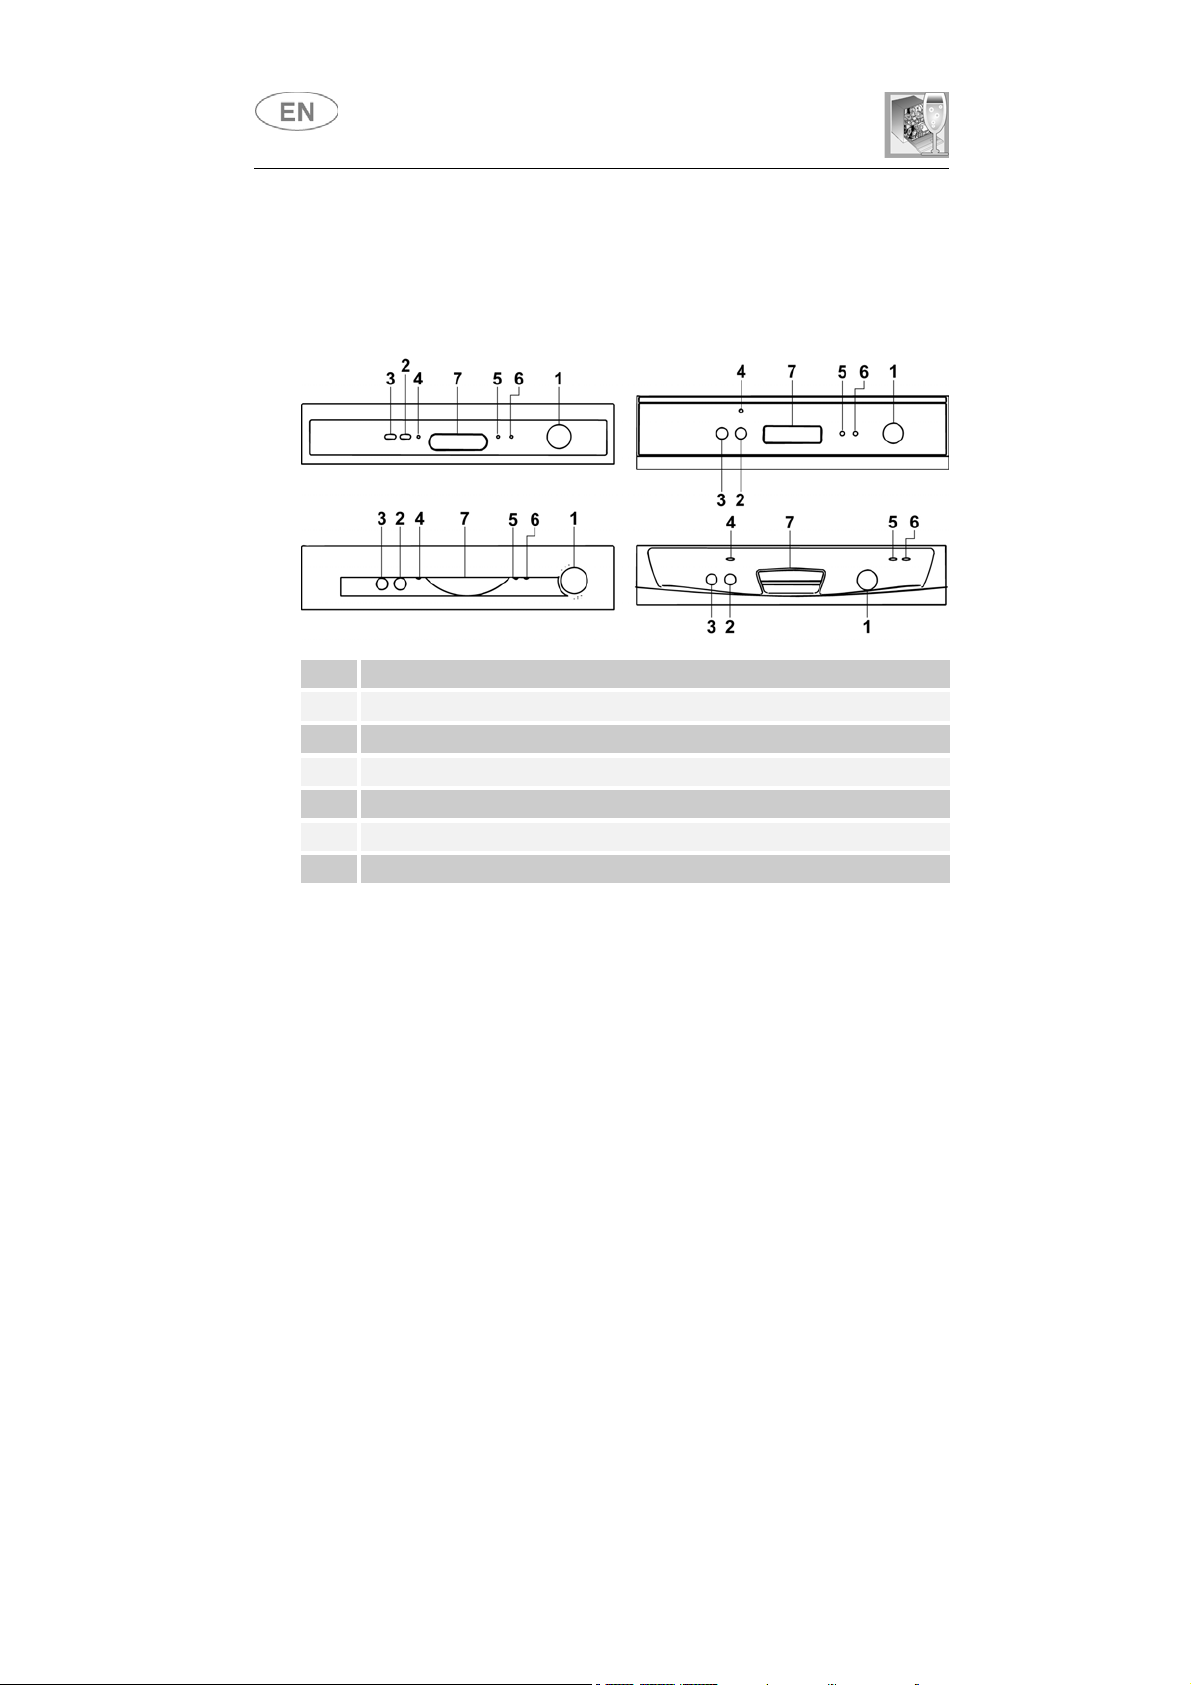
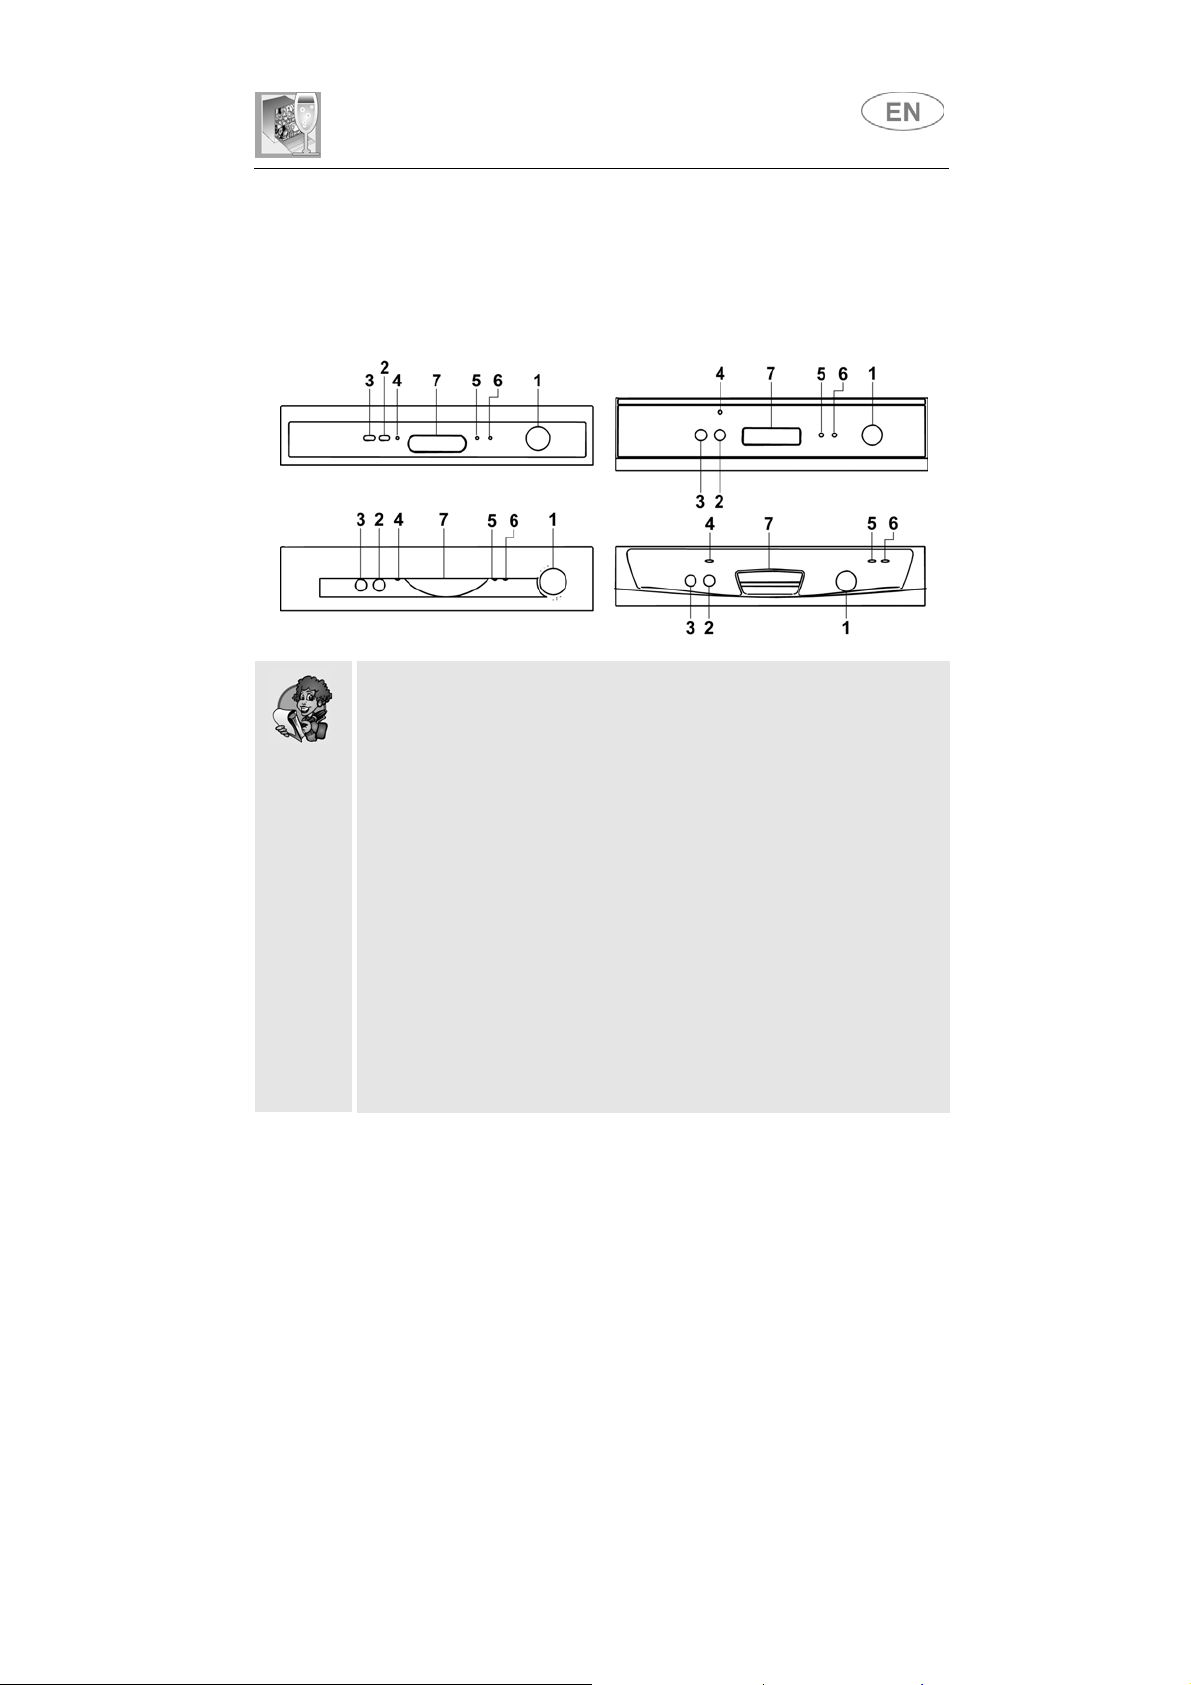
1. Description of the controls
1.1 Front panel
All the dishwasher controls are grouped on the front panel, which is of
different shape depending on the model.
1 WASHING PROGRAM
2 ON/OFF
3 ECO 55°C PROGRAM
4 POWER ON
5 SALT
6 RINSE AID
7
RECESSED DOOR HANDLE
SETTING THE WASHING PROGRAM
To select the most suitable washing program, refer to the table below
which indicates the recommended washing according to dish type and
the degree of soiling.
BUTTON
LIGHT
WARNING LIGHT (certain models only)
WARNING LIGHT (certain models only)
SELECTOR
BUTTON (depending on models)
User instructions
SWITCH,
CYCLE AND
BUTTON
1
2
3
ECO 55°C
(*) EN 50242
3
ECONOMY
4
5
After using the table to identify the most appropriate washing program,
turn the
PROGRAM SELECTION
knob
(1)
to set the program of choice
by aligning the pointer with the program number. If the appliance is fitted
with the selected program indicator disc, this will show the number of the
program set.
AMOUNT OF
DETERGENT
GRAMS MINUTES
_
DURATION
(2)
6' 5 0,03
30 105' 20 1,45
30 100' 16 1,40
30 95' 15 1,24
30 70' 15 1,20
_
55' 11 0,90
SOAK
_
NORMAL
65°C
_
DAILY
60°C
_
ECO
55°C
ECO
RINSE
_
TYPE AND
DEGREE
OF DIRT
ON DISHES
Pans and dishes
pending
completion
of the load
Very dirty pans
and dishes, even
with dried-on dirt
Pans and dishes
with normal dirt
Dishes
with normal dirt
Dishes
with light dirt
Dishes for rinsing
and drying
PROGRAM
SEQUENCE
Cold prewash
Cold prewash
Wash at 65°C
Cold rinse
Rinse at 65°C
Dry
Wash at 60°C
Cold rinse
Rinse at 65°C
Dry
Wash at 55°C
Cold rinse
Rinse at 65°C
Dry
Wash at 55°C
Cold rinse
Rinse at 65°C
Dry
Cold rinse
Rinse at 65°C
Dry
CONSUMPTION
WATER
LITRES (1)
POWER
KWh (2)
Only run the soak program with half loads.
(*) Reference program as per EN 50242 standard.
(–) Not present.
(1) Average power consumption with the softener set on level 2.
(2) The cycle duration and power consumption may vary according to the water and room
temperatures, and the type and amount of dishes.
The washing cycle will not take place if the dishwasher door is left open
or not properly closed.
User instructions
TABLE FOR CERTIFICATION BODIES
Reference standard EN 50242
Reference program
Load 12 place-settings
Type of detergent B
Amount of detergent 30 g
Rinse aid setting Depending on the model 3/4 or 4/6
EN 50242
(*) Selector on 3+
ECO 55°C
1.2 Washing programs
Before starting a washing program make sure that:
• The water supply tap is
• The
• The baskets have been
• The spray arms are able to
• The dishwasher door is
CANCELLING THE CURRENT PROGRAM
To cancel the program in progress the dishwasher must be switched off
by pressing the
Turn the program selector to
On completion of the program, switch off the dishwasher by pressing the
ON/OFF
correct amount of detergent
key
.
ON/OFF
(2)
.
dispenser
obstruction.
open.
correctly loaded.
rotate freely
securely closed
(2)
key
.
SOAK
and wait for the dishwasher to start.
has been added to the
and without
.
User instructions
CHANGING THE PROGRAM
To change the program in progress the dishwasher must be switched off
by pressing the
Turn the program selector to the program required and then switch the
dishwasher on again by pressing
carry out the new program automatically.
TO SAVE ON ENERGY! … AND PROTECT THE ENVIRONMENT
• Always try to run the dishwasher
• Do not wash the dishes in running water.
• Use the washing program that is
load.
• Do not carry out any preliminary rinsing.
• If available, connect the dishwasher to a hot water supply up to 60°C.
• When possible,
the end of the washing cycle: the residual air and heat will dry the
dishes perfectly.
ON/OFF
disable the drying cycle
key
(2)
.
ON/OFF
(2)
key
fully loaded
most appropriate
.
and leave the door open at
. The dishwasher will
for each type of
TO CUT DOWN ON DETERGENT CONSUMPTION! … AND PROTECT
THE ENVIRONMENT
The phosphates contained in dishwasher detergents are harmful to the
environment. To avoid using excessive amounts of detergent and to save
on electricity, observe the following:
•
separate
to aggressive detergents and high temperatures;
•
do not pour
the more delicate items from dishes that are more resistant
the detergent directly on the dishes.
User instructions
If it is necessary to open dishwasher door during the washing cycle,
there will be a
After correctly closing the door, the washing program will start again from
where it was interrupted. This operation may negatively affective the
progress of the washing cycle.
END OF CYCLE
At the end of the washing program the selector will be on one of the
STOP
markers, depending on the program carried out. Switch off the
dishwasher by pressing the
1-minute delay
before the program can be resumed.
ON/OFF
key
(2)
.
REMOVING THE DISHES
At the end of the washing program, wait at least
removing the dishes, to allow them to cool down. To prevent any water
droplets on the upper basket from falling on the dishes in the lower
basket, it is
upper basket.
advisable
to unload the lower basket first, and then the
20 minutes
before
User instructions
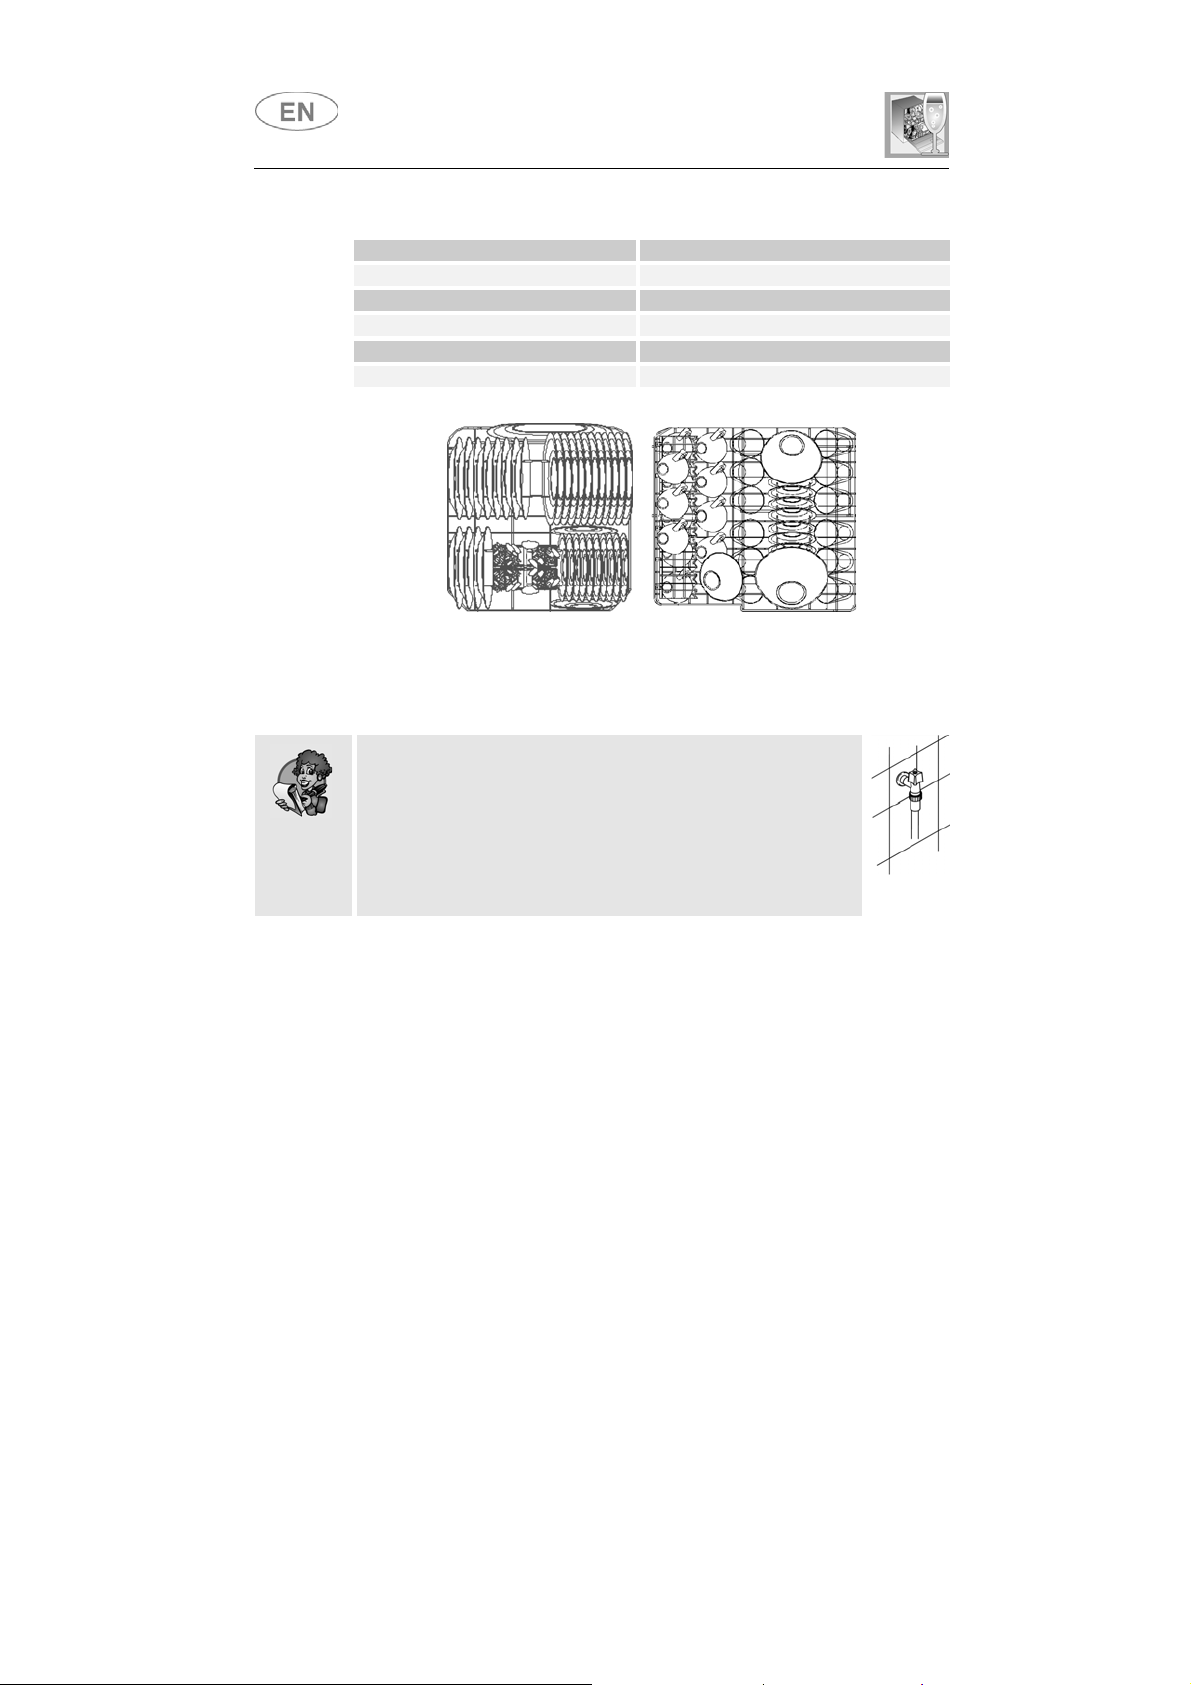
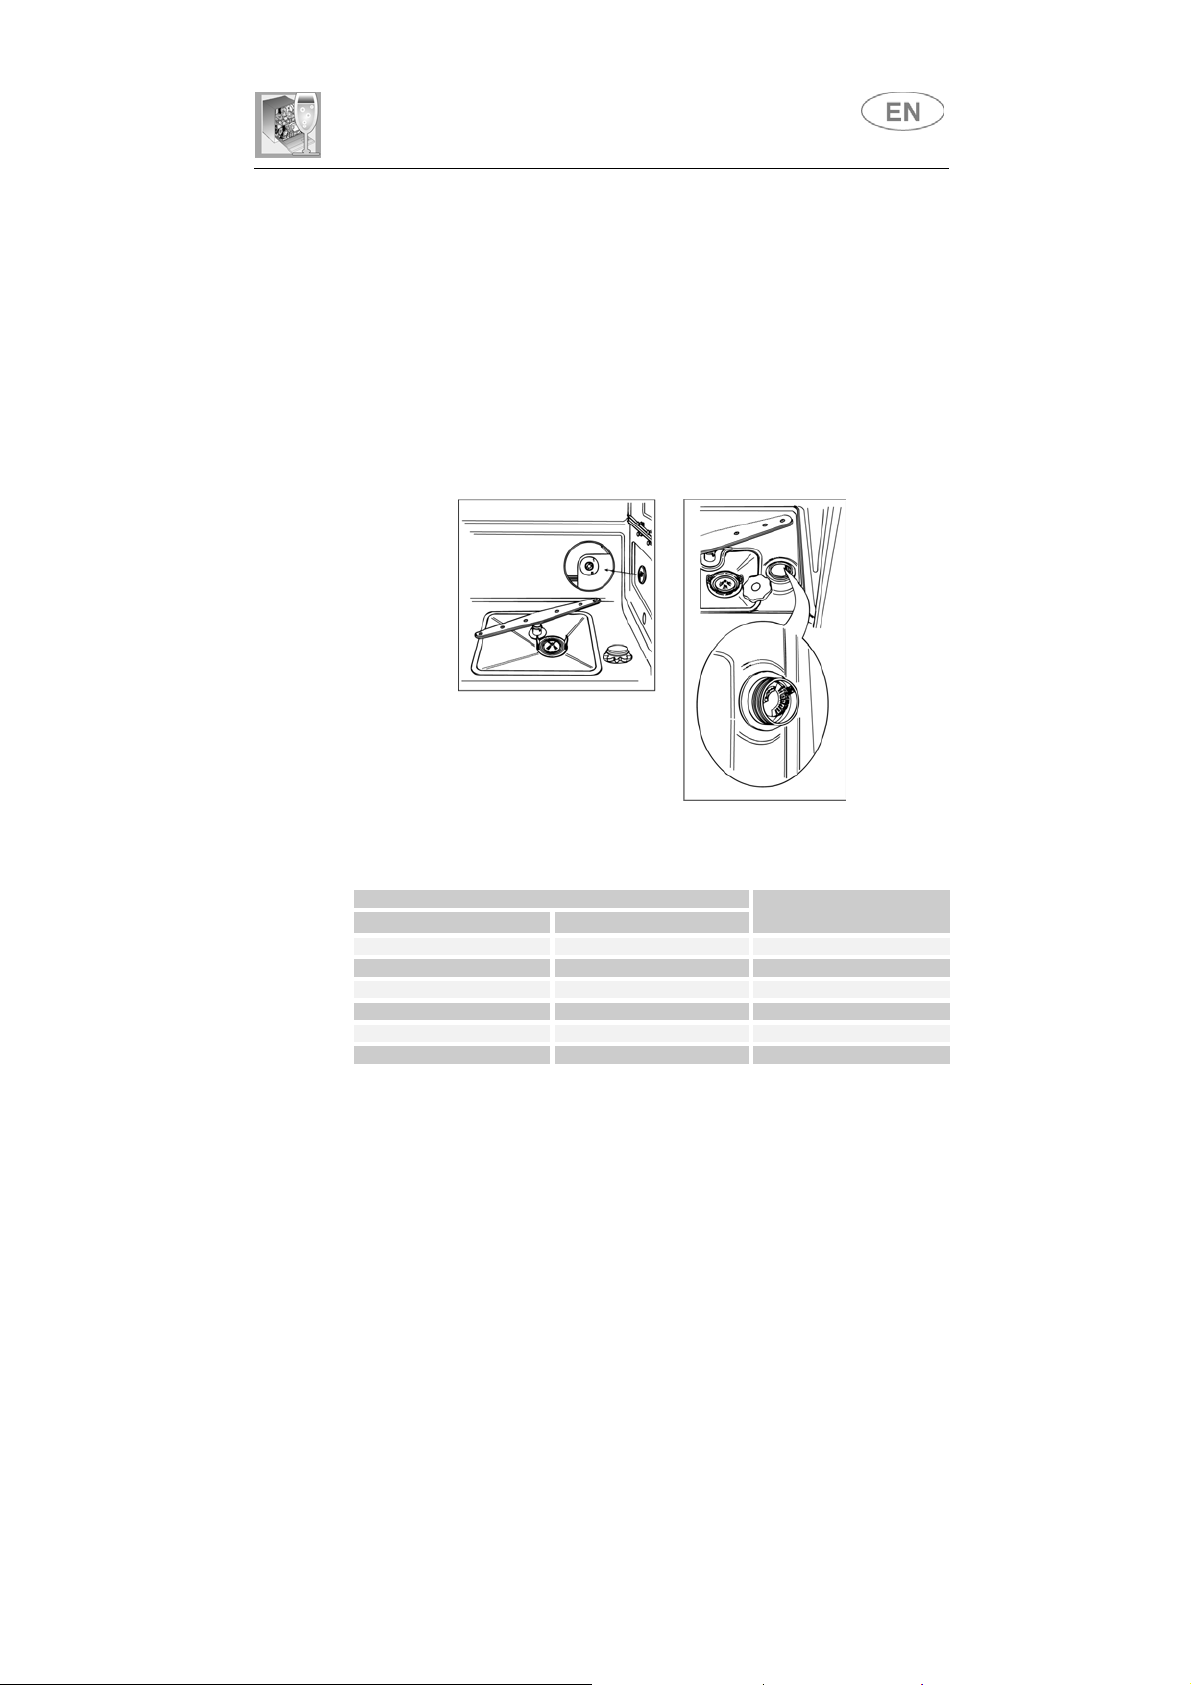
ADJUSTING THE WATER SOFTENING SYSTEM
The dishwasher is equipped with an device for the user to adjust the
water softening system according to the hardness of the water supply.
According to the machine model, the selector which acts on the
adjustment may be located:
• inside the plastic locking ring located on the
the dishwasher;
• inside the water softener, just below the cap.
Both allow for adjustment to 5 settings:
right-hand
side, inside
WATER HARDNESS TABLE
WATER HARDNESS
German Degrees (°dH) French Degrees (°dF)
0 - 4 0 - 7 Setting N. 1 NO SALT
5 - 15 8 - 25 Setting N. 1
16 - 23 26 - 40 Setting N. 2
24 - 31 41 - 60 Setting N. 3
32 - 47 61 - 80 Setting N. 4
48 - 58 81 - 100 Setting N. 5
SETTING
Contact your local water board for information on the hardness of your
water supply.

INSTRUCTION MANUAL
WWAARRNNIINNGGSSAANNDDRREECCOOMMMMEENNDDAATTIIOONNSS,,GGUUIIDDEEFFOORRTTHHEEUUSSEEOOFFBBAASSKKEETTS
AANNDDFFOORRCCLLEEAANNIINNGGDDIISSHHWWAASSHHEERRS
S
S

Contents
1. Safety and operating instructions __________________________ 28
2. Installation and hook-up _________________________________31
3. Operating instructions___________________________________33
4. Cleaning and maintenance _______________________________46
Thank you for choosing one of our products.
You are advised to read this manual carefully; it contains all the
information you need about the right conditions for the proper, safe use
of your dishwasher.
The individual sections are laid out to provide you with a step-by-step
guide to all your appliance's functions; the texts are easy to understand
and are complete with detailed illustrations.
Following the cleaning instructions provided here will keep your
dishwasher's performance at peak levels in the long term.
This user-friendly manual will provide answers to all your questions
about use of the dishwasher.
INSTALLATION INSTRUCTIONS: these are intended for the qualified
technician who must carry out the installation, hook-up and testing of
the appliance.
USER INSTRUCTIONS: useful advice is provided for the use of baskets,
spray arms, containers and filters.
Safety instructions
1. Safety and operating instructions
THIS MANUAL FORMS AN INTEGRAL PART OF THE APPLIANCE: IT MUST
ALWAYS BE KEPT INTACT TOGETHER WITH THE DISHWASHER. BEFORE
USING THE APPLIANCE, CAREFULLY READ ALL THE INSTRUCTIONS
CONTAINED IN THIS MANUAL.
INSTALLATION MUST BE PERFORMED BY A QUALIFIED TECHNICIAN, IN
COMPLIANCE WITH THE REGULATIONS IN FORCE. THIS APPLIANCE IS
INTENDED FOR DOMESTIC USE, AND COMPLIES WITH THE
DIRECTIVES 72/23, 89/336 (INCLUDING 92/31)
INCLUDING THE PREVENTION AND ELIMINATION OF RADIO FREQUENCY
INTERFERENCE.
THE APPLIANCE IS DESIGNED FOR THE FOLLOWING PURPOSE:
AND DRYING OF DISHES
IMPROPER.
USES OTHER THAN THOSE DESCRIBED ABOVE.
THE NAME PLATE FEATURING THE TECHNICAL DATA, SERIAL NUMBER
AND MARKINGS IS VISIBLY POSITIONED ON THE INNER EDGE OF THE
DOOR.
NEVER BE REMOVED.
DO NOT LEAVE THE DISCARDED PACKAGING MATERIALS UNSUPERVISED
WITHIN THE HOME. SEPARATE THE VARIOUS MATERIALS WHICH MAKE
UP THE PACKAGING AND TAKE THEM TO THE NEAREST SORTED WASTE
COLLECTION CENTRE.
THE MANUFACTURER DECLINES ALL RESPONSIBILITY FOR
THE NAME PLATE ON THE INNER EDGE OF THE DOOR MUST
; ANY OTHER USE SHALL BE CONSIDERED
CURRENTLY IN FORCE,
EEC
WASHING
THE APPLIANCE MUST BE PROVIDED WITH AN EARTH CONNECTION IN
ACCORDANCE WITH THE ELECTRICAL SAFETY REGULATIONS IN FORCE.
THE MANUFACTURER DECLINES ALL RESPONSIBILITY FOR DAMAGE TO
PERSONS OR PROPERTY RESULTING FROM THE FAILURE TO EARTH THE
APPLIANCE OR FROM A DEFECTIVE EARTH CONNECTION.
THE POWER SUPPLY LEAD PLUG AND THE RELATIVE SOCKET MUST BE
OF THE SAME TYPE AND COMPLY WITH THE RELEVANT REGULATIONS.
CHECK THAT THE MAINS VOLTAGE AND FREQUENCY ARE THE SAME AS
THE VALUES MARKED ON THE NAMEPLATE. DO NOT USE ADAPTERS OR
SHUNTS.
SUPPLY LEAD.
NEVER DISCONNECT THE PLUG BY PULLING ON THE POWER
• AFTER INSTALLATION, THE PLUG MUST REMAIN ACCESSIBLE.
• IN THE EVENT OF DAMAGE TO THE POWER CORD, HAVE IT
REPLACED BY A QUALIFIED TECHNICIAN.
 Loading...