


INSTRUCTION MANUAL
GUIDE FOR USING THE DISHWASHER AND THE WASHING PROGRAMS


Contents
1. Safety and operating instructions ___________________________2
2. Installation and hook-up___________________________________5
3. Description of the controls_________________________________9
4. Operating instructions ___________________________________20
5. Cleaning and maintenance _______________________________ 36
6. Troubleshooting________________________________________40
Thank you for choosing one of our products.
You are advised to read this manual carefully; it contains all the
information you need about the right conditions for the proper, safe use
of your dishwasher.
The individual sections are laid out to provide you with a step-by-step
guide to all your appliance's functions; the t exts are easy to understand
and are complete with detailed illustrations.
Recommendations are given for the correct use of the baskets, spray
arms, containers, filters, washing programs, and for operating the
controls.
Following the cleaning instructions provided here will keep your
dishwasher's performance at peak levels in the long term.
This user-friendly manual will provide answers to all your questions
about use of the dishwasher.
INSTALLATION INSTRUCTIONS: these are intended for the qualified
technician who must carry out the installation, hook-up and testing of
the appliance.
USER INSTRUCTIONS: these consist of recommendations for using the
appliance, a description of its controls and of the correct cleaning and
maintenance procedures.
1

Safety instructions
ALWAYS SWITCH OFF THE DISHWASHER AFTER EACH USE TO AVOID
1. Safety and operating instructions
THIS MANUAL FORMS AN INTEGRAL PART OF THE APPLIANCE: IT MUST
ALWAYS BE KEPT INTACT TOGETHER WITH THE DISHWASHER. BEFORE
USING THE APPLIANCE, CAREFULLY READ ALL THE INSTRUCTIONS
CONTAINED IN THIS MANUAL.
INSTALLATION MUST BE PERFORMED BY A QUALIFIED TECHNICIAN, IN
COMPLIANCE WITH THE REGULATIONS IN FORCE. THIS APPLIANCE IS
INTENDED FOR DOMESTIC USE, AND COMPLIES WITH THE EEC
DIRECTIVES 73/23, 89/336 (INCLUDING 92/31 AND 93/68) CURRENTLY IN
FORCE, INCLUDING THE PREVENTION AND ELIMINATION OF RADIO
FREQUENCY INTERFERENCE.
THE APPLIANCE IS DESIGNED FOR THE FOLLOWING PURPOSE: WASHING
AND DRYING OF DISHES; ANY OTHER USE SHALL BE CONSIDERED
IMPROPER. THE MANUFACTURER DECLINES ALL RESPONSIBILITY FOR
USES OTHER THAN THOSE DESCRIBED ABOVE.
THE NAME PLATE FEATURING THE TECHNICAL DATA, SERIAL NUMBER
AND MARKINGS IS VISIBLY POSITIONED ON THE INNER EDGE OF THE
DOOR. THE NAME PLATE ON THE INNER EDGE OF THE DOOR MUST
NEVER BE REMOVED.
DO NOT LEAVE THE DISCARDED PACKAGING MATERIALS UNSUPERVISED
WITHIN THE HOME. SEPARATE THE VARIOUS MATERIALS WHICH MAKE
UP THE PACKAGING AND TAKE THEM TO THE NEAREST SORTED WASTE
COLLECTION CENTRE.
THE APPLIANCE MUST BE PROVIDED WITH AN EARTH CONNECTION IN
ACCORDANCE WITH THE ELECTRICAL SAFETY REGULATIONS IN FORCE.
THE MANUFACTURER DECLINES ALL RESPONSIBILITY FOR DAMAGE TO
PERSONS OR PROPERTY RESULTING FROM THE FAILURE TO EARTH THE
APPLIANCE OR FROM A DEFECTIVE EARTH CONNECTION.
IF THE APPLIANCE IS INSTALLED ON A CARPETED OR COVERED FLOOR,
ENSURE THAT THE OPENINGS ON ITS UNDERSIDE ARE NOT
OBSTRUCTED.
WASTING ELECTRICITY.
2
Safety instructions
IN THE EVENT OF A FAULT, DISCONNECT THE DISHWASHER FROM THE
OBSOLETE APPLIANCES MUST BE RENDERED UNUSABLE. CUT OFF THE
MAINS POWER CORD AFTER UNPLUGGING IT FROM THE WALL OUTLET,
AND MAKE SAFE ANY COMPONENTS WHICH MIGHT BE DANGEROUS FOR
CHILDREN (LOCKS, DOORS, ETC.).
THIS APPLIANCE IS MARKED ACCORDING TO THE EUROPEAN DIRECTIVE
2002/96/EC ON WASTE ELECTRICAL AND ELECTRONIC EQUIPMENT
(WEEE).
BY ENSURING THIS PRODUCT IS DISPOSED OF CORRECTLY, YOU WILL
HELP PREVENT POTENTIAL NEGATIVE CONSEQUENCES FOR THE
ENVIRONMENT AND HUMAN HEALTH, WHICH COULD OTHERWISE BE
CAUSED BY INAPPROPRIATE WASTE HANDLING OF THIS PRODUCT.
THE SYMBOL ON THE PRODUCT, OR ON THE DOCUMENTS
ACCOMPANYING THE PRODUCT, INDICATES THAT THIS APPLIANCE MAY
NOT BE TREATED AS HOUSEHOLD WASTE. INSTEAD IT SHALL BE
HANDED OVER TO THE APPLICABLE COLLECTION POINT FOR THE
RECYCLING OF ELECTRICAL AND ELECTRONIC EQUIPMENT.
DISPOSAL MUST BE CARRIED OUT IN ACCORDANCE WITH LOCAL
ENVIRONMENTAL REGULATIONS FOR WASTE DISPOSAL. FOR MORE
DETAILED INFORMATION ABOUT TREATMENT, RECOVERY AND
RECYCLING OF THIS PRODUCT, PLEASE CONTACT YOUR LOCAL CITY
OFFICE, YOUR HOUSEHOLD WASTE DISPOSAL SERVICE OR THE SHOP
WHERE YOU PURCHASED THE PRODUCT.
ELECTRICAL POWER SUPPLY AND SHUT OFF THE WATER TAP.
DO NOT USE APPLIANCES WHICH HAVE BEEN DAMAGED DURING
TRANSIT! IF IN DOUBT, CONSULT YOUR DEALER.
THE APPLIANCE MUST BE INSTALLED AND CONNECTED IN ACCORDANCE
WITH THE INSTRUCTIONS PROVIDED BY THE MANUFACTURER OR BY A
QUALIFIED TECHNICIAN.
THIS DISHWASHER MUST BE USED BY ADULTS.
USE BY PERSONS WITH REDUCED MENTAL AND/OR PHYSICAL
CAPABILITIES IS ONLY PERMITTED UNDER THE SUPERVISION OF A
PERSON RESPONSIBLE FOR THEIR SAFETY.
KEEP CHILDREN AWAY FROM DETERGENTS AND PACKAGING MATERIALS
(PLASTIC BAGS, POLYSTYRENE, ETC.), AND NEVER ALLOW THEM TO
APPROACH OR PLAY WITH THE DISHWASHER, SINCE IT MIGHT CONTAIN
DETERGENT RESIDUES CAPABLE OF CAUSING PERMANENT DAMAGE TO
THE EYES, MOUTH AND THROAT, AND EVEN LEADING TO SUFFOCATION.
DO NOT INTRODUCE SOLVENTS SUCH AS ALCOHOL OR TURPENTINE
WHICH MAY CAUSE AN EXPLOSION.
DO NOT LOAD DISHES THAT ARE SOILED WITH ASH, WAX OR PAINTS.
3
Safety instructions
The manufacturer declines all responsibility for damage to persons or property
resulting from failure to observe the above precautions, from tamp ering with
even a single component of the appliance, or from the use of non original
spare parts.
LEANING OR SITTING ON THE DISHWASHER DOOR WHEN OPEN MAY
CAUSE THE APPLIANCE TO OVERTURN, PUTING PEOPLE AT RISK.
NEVER LEAVE THE DISHWASHER DOOR OPEN; PEOPLE MIGHT TRIP
OVER IT.
DO NOT DRINK THE WATER RESIDUES WHICH MAY BE PRESENT INSIDE
THE DISHES OR DISHWASHER AT THE END OF THE WASHING PROGRAM
AND BEFORE THE DRYING CYCLE.
KNIVES OR OTHER SHARP-ENDED COOKING UTENSILS MUST BE PLACED
IN THE CUTLERY BASKET BLADE-DOWN, OR LAID HORIZONTAL IN THE
TOP BASKET. TAKE CARE NOT TO CUT YOURSELF AND ENSURE THAT
THEY DO NOT PROJECT FROM THE BASKET.
AQUASTOP MODELS
THE AQUASTOP DEVICE PREVENTS FLOODING IN THE EVENT OF A
WATER LEAK. WHEN THE AQUASTOP DEVICE IS TRIPPED, CALL IN A
QUALIFIED TECHNICIAN TO IDENTIFY AND REPAIR THE FAULT.
IN MODELS EQUIPPED WITH THE AQUSTOP DEVICE, THERE IS A
SOLENOID VALVE INSIDE THE WATER INTAKE HOSE. DO NOT CUT THE
HOSE AND DO NOT ALLOW THE SOLENOID VALVE TO DROP INTO
WATER. IN THE EVENT OF DAMAGE TO THE WATER INTAKE HOSE,
DISCONNECT THE APPLIANCE FROM THE ELECTRICAL POWER SUPPLY
AND FROM THE WATER SUPPLY.
IMMEDIATELY AFTER INSTALLING THE DISHWASHER, PERFORM A QUICK
TEST OF THE APPLIANCE FOLLOWING THE INSTRUCTIONS BELOW. IF
THE DISHWASHER FAILS TO OPERATE CORRECTLY, DISCONNECT IT
FROM THE ELECTRICAL POWER SUPPLY AND CALL THE NEAREST
TECHNICAL SERVICE CENTRE. DO NOT ATTEMPT TO REPAIR THE
APPLIANCE.
THE DISHWASHER MEETS ALL THE REQUIREMENTS SET OUT BY THE
REGULATIONS IN FORCE CONCERNING SAFETY AND ELECTRICAL
EQUIPMENT. ANY TECHNICAL CHECKS SHOULD BE CONDUCTED
EXCLUSIVELY BY A TRAINED AND AUTHORISED TECHNICIAN: REPAIRS
CARRIED OUT BY UNAUTHORISED PERSONS WILL INVALIDATE THE
WARRANTY, AS WELL AS POSING A POTENTIAL HAZARD TO THE USER.
4
Installation instructions
2. Installation and hook-up
Remove the polystyrene basket retainers.
Position the appliance in the desired place of installation. The back or
sides of the dishwasher may be placed up against walls or other
furniture units. If the dishwasher is installed near a heat source, fit the
special insulating panel to prevent overheating and malfunction of the
appliance. To ensure stability, install integrated or built-under
dishwashers only under continuous worktops, and screw them to the
adjacent units. To facilitate the installation procedure, the intake and
drain hoses can be positioned in any directio n; make sure t hat the h oses
are not kinked, crushed or pulled too tightly. Make sure to tighten the
locking ring-nut once the pipes have been placed in the direction
requi red. A hole at least 8 cm in diameter is required to allow the power
supply cable and pipes to pass.
Level the appliance on the floor using its adjustable feet. T his operation
is essential for ensuring correct operation of the dishwasher.
Building-in a dishwasher underneath a ceramic hob is absolutely
forbidden.
A dishwasher can be built-in underneath a conventional hob provided
there is no break in the kitchen worktop, and the dishwasher and hob are
installed and secured correctly, so that no hazards are generated.
When installing the dishwasher in a compartment next to one or more
other appliances, it is essential to comply with all the recommendations
provided by the appliance’s manufacturer (minimum distances, installation
procedures, etc.).
For free-standing models only:
- Installing a hob on top of a free-standing dishwasher is absolutely
forbidden.
- If the appliance is not built-in and is therefore accessible on on side, the
door hinge area must be covered for safety reasons (inj ury haz ard). The
covering fixtures are available as an accessory from specialist dealers
or the After-Sales Service.
- To build in the dishwasher, the special kit must be purchased from
authorised dealers or the After-Sales Service.
Some models are equipped with only one adjustable foot at the rear,
which can be adjusted by turning the screw on the lower front part of the
appliance.
5
Installation instructions
2.1 Water supply connection
Preventing the risk of clogging or damage: if the water pipe is new or
has not been used for a long time, before connecting to the water supply
check that the water is clear and free of impurities, to prevent damage to
the appliance.
The dishwasher must always be connected to the water system
with new hoses; old or used hoses must never be reused.
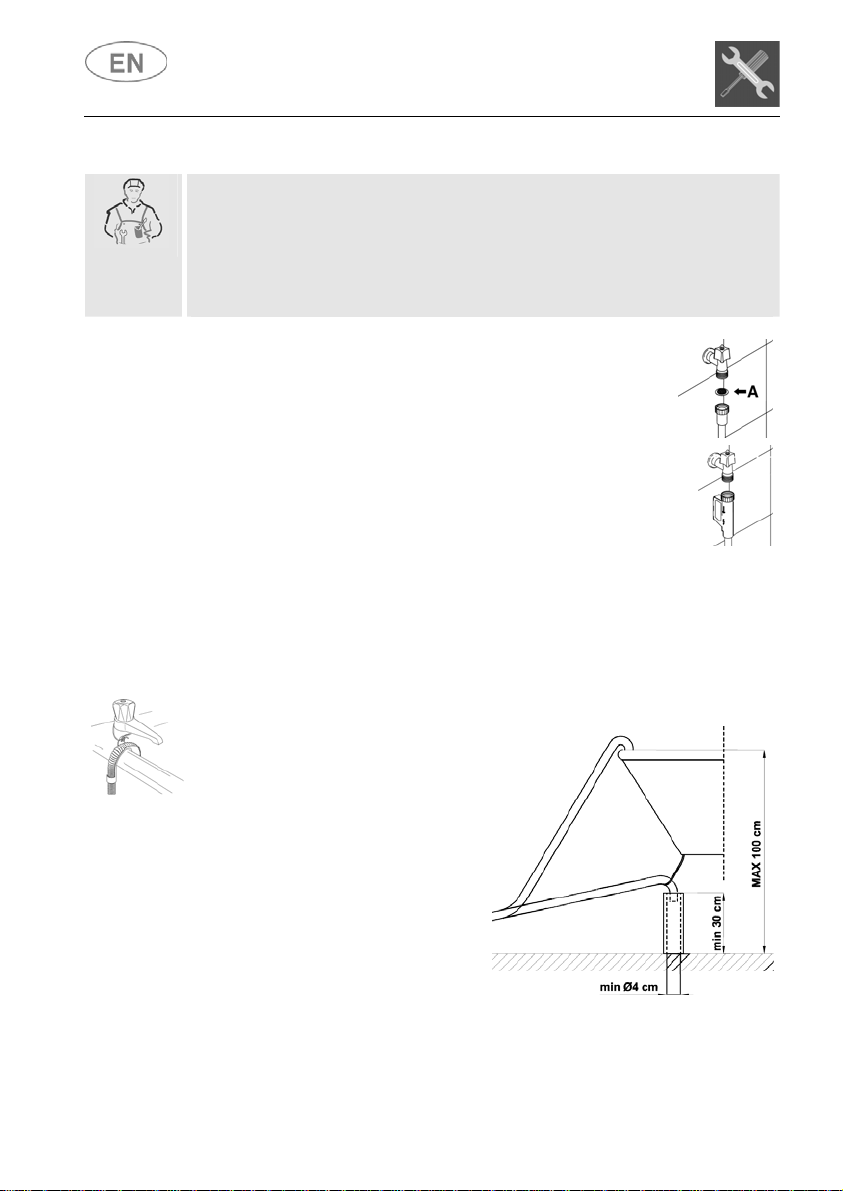
CONNECTING TO THE WATER SUPPLY
Connect the intake hose to a cold water supply with ¾”
gas thread, inserting the filter A supplied with the
dishwasher. Take care to screw the hose firmly into
place with your hands and then complete by
tightening about ¼ of a turn with pliers.
In dishwashers equipped with the ACQUASTOP
device, the filters is already fitted inside the threaded
ring.
The dishwasher can also be connected to a hot water supply not
exceeding 60°C. Supplying the appliance with hot water cuts down the
washing time by approximately 20 minutes, but slightly reduces its
effectiveness. Make the connection to the domestic hot water supply using
the same procedure described for connecting to the cold water supply .
DRAIN CONNECTION
Insert the dishwasher’s drain hose
into a drain pipe having a diameter
of at least 4 cm, or alternatively,
place it inside the kitchen sink
using the plastic support provided,
taking care not to crush or
excessively bend the hose. It is
important to prevent the hose from
coming loose and falling. For this
purpose, the plastic support is
equipped with a hole for tying it to
the wall or water tap.
The free end should be positioned at a height of bet ween 30 and 100
cm, and should never be submerged in water. If a horizontal drain
extension hose is used (for a maximum of 3 m) the drain hose can be
placed at a maximum height of 85 cm from the ground.
6
Installation instructions
2.2 Electrical connection and precautions
CHECK THAT THE VOLTAGE AND THE FREQUENCY OF THE MAINS MATCH
THE RATINGS ON THE NAME PLATE OF THE APPLIANCE POSITIONED ON
THE INNER EDGE OF THE DOOR.
THE PLUG ON THE SUPPLY CORD AND THE CORRESPONDING SOCKET
OUTLET MUST BE OF THE SAME TYPE AND MEET THE REGULATIONS IN
FORCE.
THE PLUG MUST BE ACCESSIBLE AFTER INSTALLATION.
NEVER DISCONNECT THE PLUG BY PULLING ON THE POWER SUPPLY
LEAD.
IN THE EVENT OF DAMAGE TO THE SUPPLY CORD, HAVE IT REPLACED
BY THE MANUFACTURER OR AN AUTHORIZED TECHNICAL SERVICE
CENTRE.
DO NOT USE ADAPTORS OR SHUNT CONNECTIONS IN ORDER TO AVOID
THE POSSIBILITY OF OVERHEATING OR BURNING.
IF THE APPLIANCE IS PROVIDED WITH A PLUGLESS SUPPLY CORD:
IT IS NECESSARY TO INSTALL IN THE FIXED WIRING AN ALL-POLE
DISCONNECTION DEVICE HAVING A GAP BETWEEN CONTACTS OF AT
LEAST 3.5MM. AFTER INSTALLATION THE DISCONNECTION DEVICE HAS
TO BE EASY TO REACH.
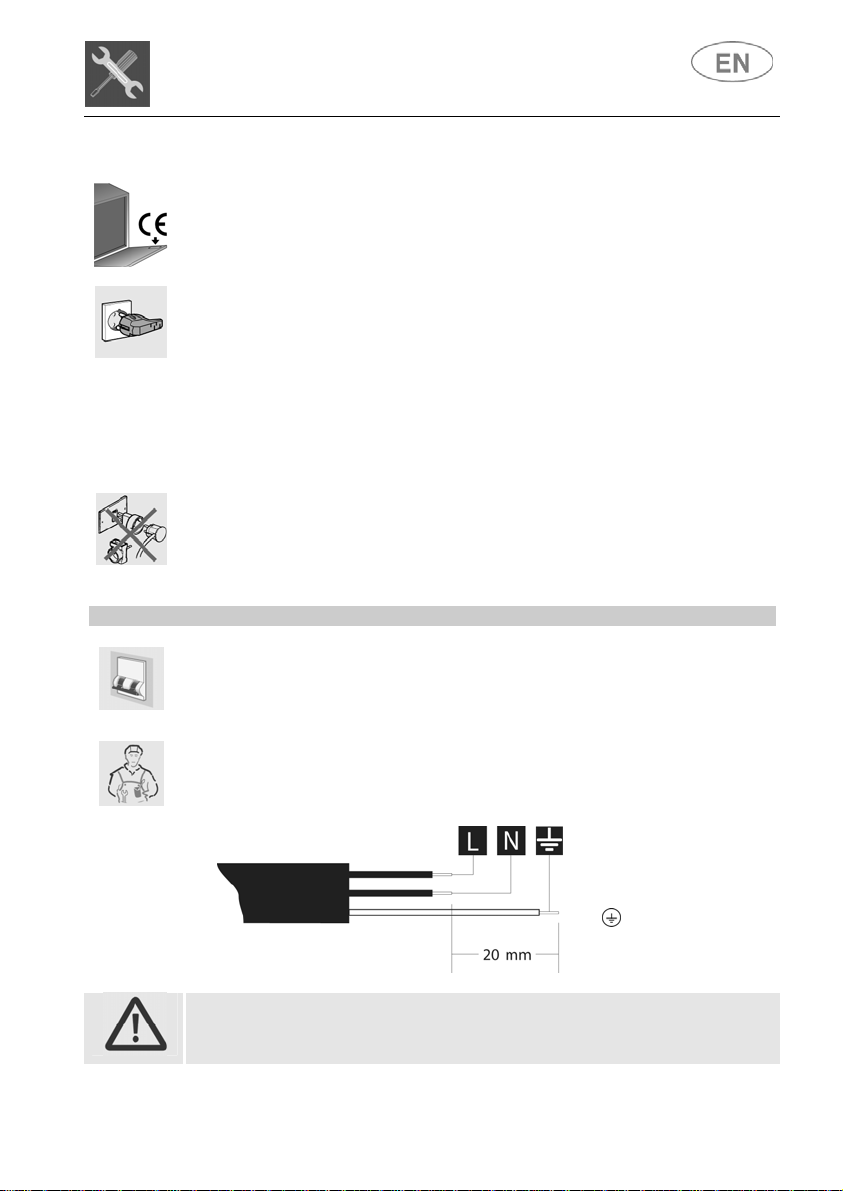
THE CONNECTION TO THE MAINS MUST BE CARRIED OUT BY A
QUALIFIED TECHNICIAN IN ACCORDANCE TO THE SCHEME SHOWN
BELOW AND THE REGULATIONS IN FORCE.
L = brown
N = blue
= yellow-green
In the event of damage to the supply cord, have it replaced by the
manufacturer or an Authorized Technical Service Centre in order to
avoid any risk.
7
Installation instructions
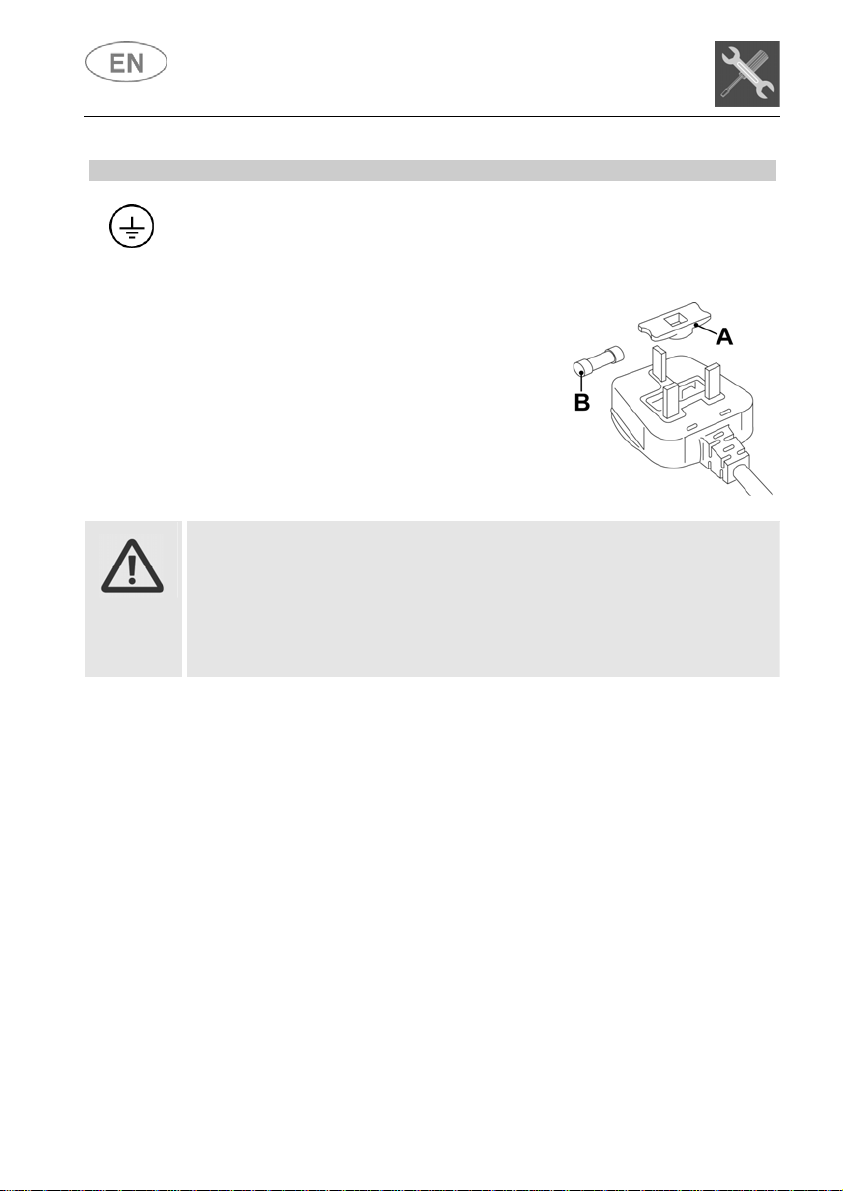
FOR GREAT BRITAIN ONLY:
THIS APPLIANCE MUST BE EARTHED.
Fuse replacement
If the mains lead of this appliance is fitted
with a BS 1363A 13amp fused plug, to
change a fuse in this type of plug use an
A.S.T.A. approved fuse to BS 1362 type
and proceed as follows:
1. Remove the fuse cover A and fuse B.
2. Fit replacement 13A fuse into fuse
cover.
3. Refit both into plug.
The fuse cover must be refitted when changing a fuse and if the fuse
cover is lost the plug must not be used until a correct replacement is
fitted.
Correct replacement are identified by the colour insert o r the colo ur
embossed in words on the base of the plug.
Replacement fuse covers are available from your local electrical store.
8
User instructions
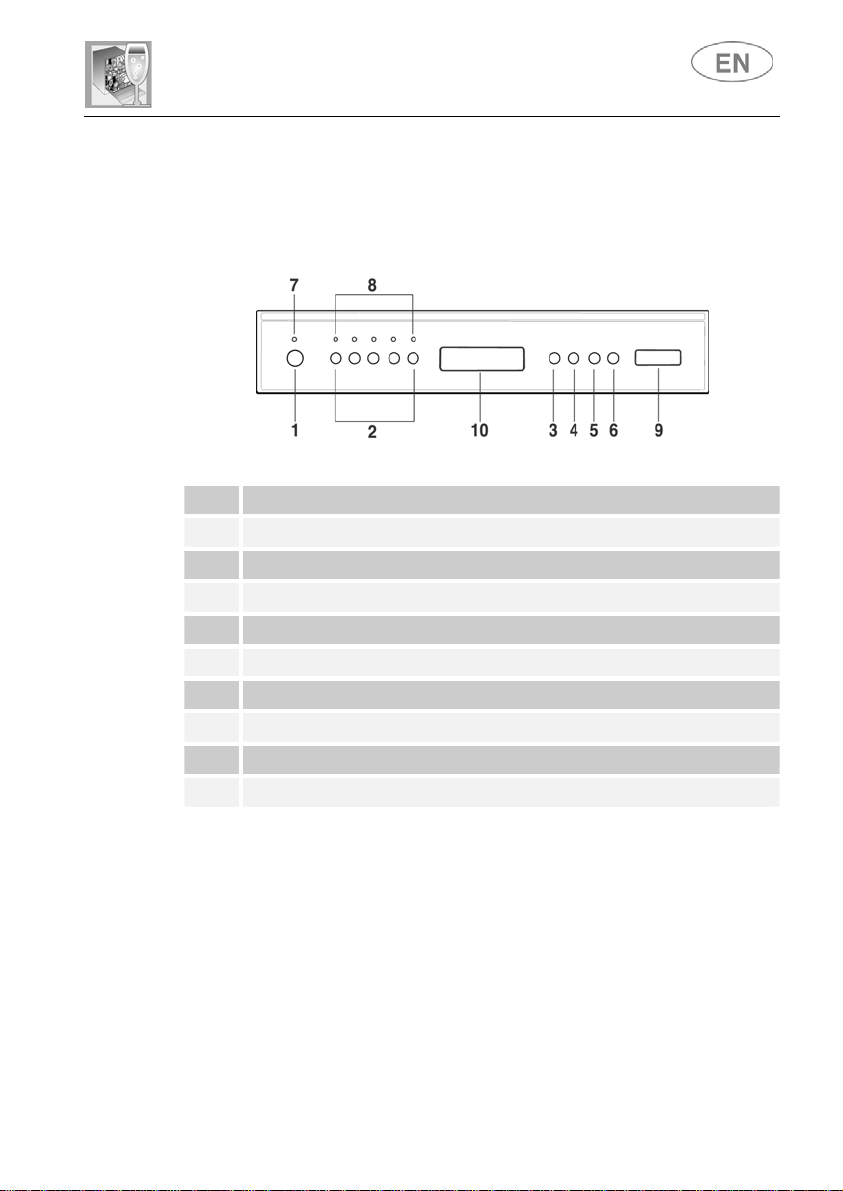
3. Description of the controls
3.1 Front panel
All the dishwasher controls are grouped on the front panel.
1 ON/OFF BUTTON
2 SELECTION PROGRAM BUTTONS (P1…P5)
3 OPTION SELECTION BUTTON
4 CONFIRM OPTIONS BUTTON
5 DELAY PROGRAM BUTTON
6 START/STOP BUTTON
7 POWER ON LIGHT
8 PROGRAMS INDICATOR LIGHTS
9 INFORMATION DISPLAY
10 RECESSED DOOR HANDLE
N.B.: symbols and styling are guideline and may vary depending o n
the model or version of the dishwasher purchased.
9
User instructions
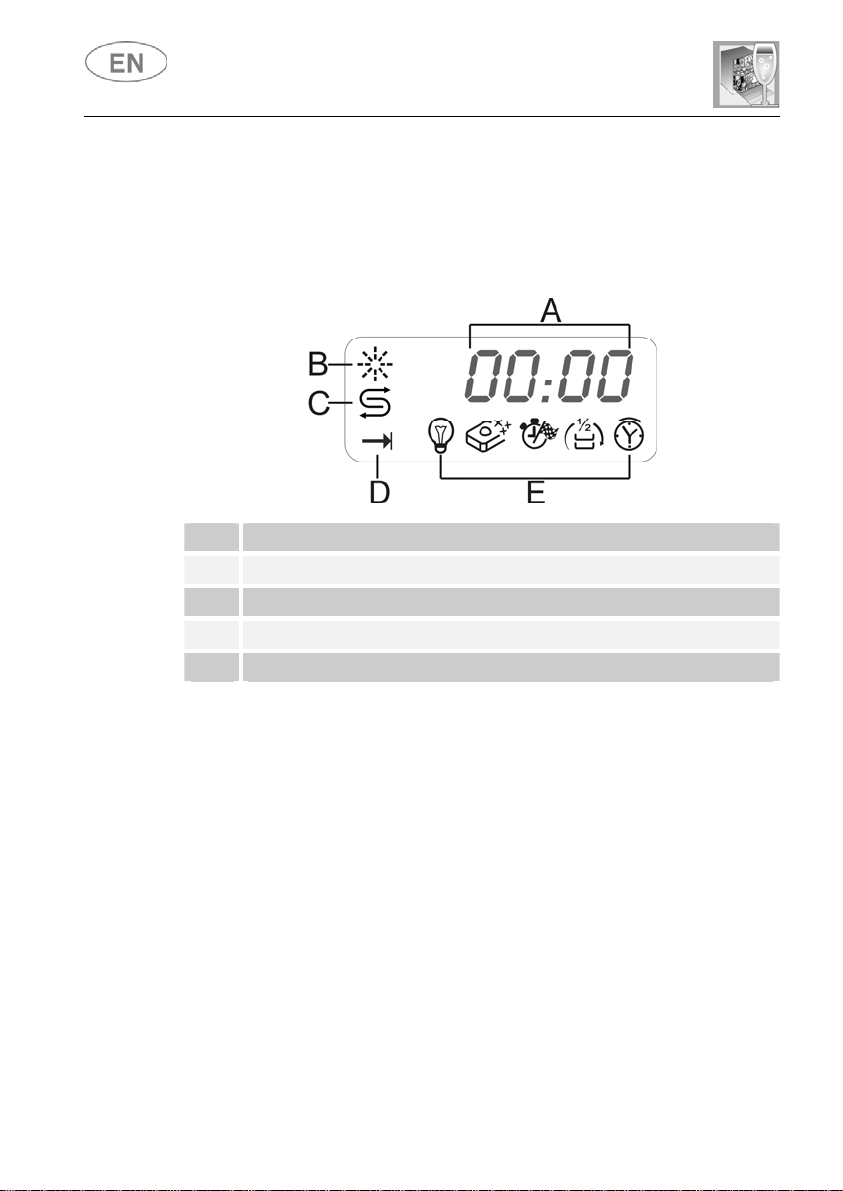
3.2 Information display
The dishwasher is equipped with a practical DISPLAY which provides
information on the programmed dishwasher functions.
A 4-FIGURE DISPLAY
B SALT WARNING LIGHT
C RINSE AID WARNING LIGHT
D START/PAUSE BUTTON
E OPTIONS LIGHT
PROGRAMS TABLE
The manual contains the programs table for several models. T o find the
table for your dishwasher, compar e the program symbols at the top of the
table with those on your control panel.
10
User instructions
PROGRAMS TABLE
PROGRAMME
NUMBER
& SYMBOL
1 SOAK
2 GLASS
3 ECO (*)
EN 50242
4 AUTO 60-70
IEC/DIN
5 SUPER
***
LOAD CROCKERY AND
CUTLERY
Pans and dishes awaiting
completion of the load
Glass, china and mixed
dishes with light dirt.
Dishes with normal dirt,
even with dried-on
Pans and dishes with
normal dirt, even with
dried-on residues.
Very dirty pans and
dishes, even with dried-on
residues
residues.
PROGRAM
PROGRESS
Cold prewash
Wash at 45°C
Cold rinse
Rinse at 70°C
Dry
Cold prewash
Wash at 55°C
Cold rinse
Rinse at 70°C
Dry
When the "AUTO" program is selected, the dishwasher
recognises the type of dirt and automatically adjusts the
washing parameters as appropriate.
Hot prewash
Wash at 70°C
Cold rinse (3)
Rinse at 70°C
Dry
DURATION
MINUTES
(1)
CONSUMPTION
WATER
LITRES
(2)
15' 3,5 0,02
65'
9,5 1,10
160’
160'
15,5 1,70
POWER
KWh (1)
** **
Only run the soak program with partial loads.
Reference program as per EN 50242 standard, with ENERSAVE option selected.
*
(**) See energy label.
Reference program for laboratories: Detergent: 20g in the dispenser + 10g in the
***
door or tablet. Configuration: see photo in “Using the baskets”.
(1) The cycle duration and power consumption may vary according to the water and
room temperatures, and the type and amount of dishes.
Average power consumption with the softener set on level 2.
(2)
(3) 1 or 2 cold rinses depending on the model.
If the dishwasher door is open or not properly closed, the w ashing cycle
will not start.
11
User instructions
QUICK TIME PROGRAMS
(see relevant section for explanation of functioning modes)
LOAD CROCKERY AND
PROGRAMME
NUMBER E
SYMBOL
6 RAPID 27’
Dishes with light dirt,
washed immediately after
+
7 ECO
QUICK
Dishes with normal dirt,
washed immediately after
+
8 NORMAL
QUICK
Dishes with normal dirt,
washed immediately after
+
9 STRONG
and FAST
+
Mixed dishes with normal
(ENERSAVE option non available)
CUTLERY
PROGRESS
Wash at 38°C
use
Rinse at 50°C
Cold prewash
Wash at 55°C
use.
Cold rinse
Rinse at 70°C
Cold prewash
Wash at 70°C
use.
Cold rinse
Rinse at 70°C
Wash at 65°C
dirt without dried-on
residues.
Cold rinse
Rinse at 70°C
PROGRAM
DURATION
MINUTI
(2)
27'
80’
85’
55'
CONSUMPTION
WATER
LITRES (1)
6,5 0,70
12,5 1,25
13 1,40
9,5 1,35
POWER
KWh (2)
(1) The cycle duration and power consumption may vary according to the water
and room temperatures, and the type and amount of dishes.
Average power consumption with the softener set on level 2.
(2)
If the dishwasher door is open or not properly closed, the w ashing cycle
will not start.
12

User instructions
3.3 Washing programs
The dishwasher is equipped with a control panel and an INFORMATION
DISPLAY (9) from which it is possible to carry out all the po wer switch-
on, switch-off and programming operations.
Before starting a washing program make sure that:
• The water supply tap is open.
• The correct amount of detergent has been added to the
dispenser.
• The baskets have been correctly loaded.
• The spray arms are able to rotate freely and without
obstruction.
• The dishwasher door is securely closed.
By pressing the relative button of desired program (see tab le) it will lid up
LIGHTING
Pressing the ON/OFF button (1) will start the dishwasher and will lit up
the dishwasher pilot light (7). After approximately 3 second from this
operation the DISPLAY (9) will be turned on with a visualization that will
depend upon the state of the dishwasher.
PROGRAMMING
All the programming operations are possible only with closed door. With
open door, on the DISPLAY (9) will appear - - : - -.
SELECTION PROGRAM
The program selection is possible
through the relative buttons (2).
the relative pilot light to confirm that the operation did occurred on the
DISPLAY (9) will appear a program duration forecasting (“h.mm”).
13

User instructions
START PROGRAM
At this point, in order to start the machine, it is only enough to press the
START/PAUSE (6) for some seconds until the symbol START/PAUSE
(D) start to flash and confirmation “beep” is heard. From this moment the
cycle duration on the DISPLAY (9) starts to decrease.
This phase, that updates itself during the cycle, is “indicative” since it is
influenced by the washing conditions such as dishwasher type and
quantity, entry temperature etc. For this reason it is normal to s ee the
updating during a program (increment and decrease of minutes)
specially in the passage from one phase to the other (for example, from
washing to rinse).
14
END PROGRAM
The end of the program is indicated by a short signal acoustic and from
the “End” visual notification on DISPLAY (9). By pressing one of the
buttons, the “End” visual signal will vanish from the display and the
dishwasher is ready to continue a new cycle.
INTERRUPTING
In order to interrupt a running program it is necessary:
A PROGRAM
• to press the START/PAUSE (6) for some seconds until when the
symbol START/PAUSE (D) remains lit on the display (confirmation
beep). At this point,it is possible to start the cycle again, otherwise:
TO CHANGE A PROGRAM
To change the running program it is necessary:
• to interrupt the running program (see “INTERRUPTING A PROGRAM”);
• select the new program;
• to press again the START/PAUSE button (6) to make start the new
program.

User instructions
STOPPING A PROGRAM
To cancel a program which is running:
• Interrupt the program (see "
INTERRUPTING A PROGRAM")
• Press the START/PAUSE button (6) and hold it down; the
display will show "P0" and the dishwasher will immediately
switch to the end of the cycle and drain the tank (during this
process, the "START/PAUSE symbol (D) will flash). When the
drain procedure ends, the end of cycle "End" message
appears on the display.
In case that the door is opened during the oper ation, to the next door
closing it is going to be necessary to start the program as shown in
paragraph “STARTING THE PROGRAM”. The program will resume from the
point in which it was interrupted.
In case that the tub temperature is higher than 50°C the program
will start about 60 seconds later.
15

User instructions
PROGRAM DELAY
The PROGRAM DELAY button can be pressed to delay the start of the
washing program by from 1 to 12/24 hours depending on the model. This
option allows the dishwasher to be operated at the time of day of the user's
choice. The first time the PROGRAM DELAY button is pressed the option
light comes on and 1:h appears on the DISPLAY (9). The button can then
be pressed again, to set the delay required (
2:h, 3:h, … etc.). If no button is
pressed for a few seconds, the DISPLAY (9) shows the time left (time
remaining) to the end of the selected program (e.g.
5:40, duration of the
washing cycle + program delay). When the user confirms the program start
(read the relative section) a prewash will be carried out, after which the
PROGRAM DELAY set will begin, and the time remaining on the DISPLAY
will gradually be counted down. At the end of the delay set, the option light
goes out and the washing cycle starts.
N.B.: It is not possible to select the PROGRAM DELAY option once the
cycle has begun.
Chosen the delay, proceed with the program start, press the button
START/PAUSE (6) for same seconds until the START/PAUSE (D)
symbol start to flash.
The machine will perform a dish pre-washing, and when finis h, the “delay
program” will enter in function as it was first set.
In case you want to put to zero the “delay program” within the running
program it is necessary:
• to press the START/PAUSE (6) button for some seconds until the
START/PAUSE (D) symbol remain lid up on the display;
• to press the DELAY PROGRAM (5) more times until the reset of the
delay program (START/PAUSE (D) symbol shut off);
• to press the START/STOP (7) button to make start the program.
N.B.: It is not possible to select the “delay program” when the program
have already began.
16

User instructions
OPTIONS (available in all programs except the soak program)
The options are controlled by the OPTION
SELECTION button (3).
Press the button to access the procedure,
confirmed by flashing of one of the OPTIONS
lights (E).
N.B.: The PROGRAM DELAY light only comes on when the specific
PROGRAM DELAY button (5) is pressed.
Press the SELECT OPTIONS button (5) again to display the next option . To
confirm an option, press the CONFIRM OPT ION b utton (6) (the light stops
flashing and remains on). This operation can be carried out for one or all of
the options available. To deactivate an option which has already been
confirmed, press the OPTION SELECTION button (3) un til the OPTION
LIGHT required flashes, and press the CONFIRM OPTION button (6). The
light stops flashing and goes out.
All options except "3in1" are disabled at the end of the w ash cy cle.
QUICK TIME PROGRAMS
Select this option together with any washing program (except the soak
program) to SHORTEN the cycle. To activate this option, press button
(light comes on) after selecting the program required.
The option is automatically deactivated at the end of the program.
17

User instructions
ENERSAVE
At the end of the drying cycle, a special dev ice automatically releases
the door, which opens slowly and smoothly by a few centimetres. This
ensures perfect drying and greater control of rinsing temperatures.
Once the door has opened, the dishwasher emits a short. The option is
activated by pressing key and the relative light illuminates to indicate
its activation.
When the function is activated, opening of the door must not be
impeded in any way; do not leave anything in the space in front of the
door necessary to allow it to open.
Do not re-close the door during automatic opening as this would
damage the mechanism. Wait for the pushers to retract before re-closing
the door.
18
"3/1"
The option is optimised for use of detergents which are complete with
salt and rinse aid, known on the market as "3 in 1", "triple action", etc.
With this option activated, any salt and rinse aid If you wish to use
detergents which already contain salt and rinse aid already in the
dishwasher will not be used.
- N.B.: even with the "3/1" option selected, the regenerating
salt/rinse aid lights will still stay on if their containers are empty.
IMPORTANT: when no longer required, the option must be disabled
(the light goes out).
If the water hardness has been set on a value above H3, and the “3/1”
option is activated, the relative light flashes, warning of a setting error.
3in1 products are not suitable for use with very "hard" water; this does
not prevent the use of the option, but the washing results might not be
of the best.
SPREAD HALF LOAD
Suitable when there are not many dishes to be washed, it saves energy
and reduces the program duration. Place dishes in both baskets then
load the detergent dispenser than less than the normal amount for a full
load.

User instructions
TO SAVE ON ENERGY! … AND PROTECT THE ENVIRONMENT
• Always try to run the dishwasher fully loaded.
• Do not wash the dishes in running water.
• Use the washing program that is most appropriate for each type of
load.
• Do not carry out any preliminary rinsing.
• If available, connect the dishwasher to a hot water supply up to
60°C.
TO CUT DOWN ON DETERGENT CONSUMPTION! … AND PROTECT
THE ENVIRONMENT
The phosphates contained in dishwasher det ergents are harmful to the
environment. To avoid using excessive amounts of detergent and to
save on electricity, observe the following:
• separate the more delicate items from dishes that are more
resistant to aggressive detergents and high temperatures;
• do not pour the detergent directly on the dishes.
REMOVING THE DISHES
At the end of the washing program, wait at least 20 minutes before
removing the dishes, to allow them to cool down. To prevent any water
droplets on the upper basket from falling on the dishes in the lower
basket, it is advisable to unload the lower basket first, and then the
upper basket.
19

4. Operating instructions
User instructions
Once the dishwasher has been correctly installed, prepare for use as
follows:
• Adjust the water softening system;
• Add the regenerating salt;
• Add the rinse aid and detergent.
4.1 Using the water softening system
The amount of scale contained in the
water (water hardness index) can cause
whitish staining on the dry dishes, which
tend to become dull over time. The
dishwasher is equipped with an automatic
softening system which uses a special
regenerating salt to reduce the hardness
SALT
of the water.
The dishwasher is factory set for water
hardness level 3 (average hardness
41-60°dF – 24-31°dH).
When using water of medium hardness, th e regenerating salt container
should be refilled after approximately 20 washing cycles. The salt
container can hold approximately 1.7 Kg of salt in grains. T he container
is situated at the bottom of the dishwasher. After removing the lower
basket, unscrew the salt container cap by turning it anticlockwise and
pour in the salt using the funnel supplied with the dishwasher. Before
replacing the cap, remove any salt residues from around the opening.
• When using the dishw asher for the first time, in addition to the salt it
is also necessary to add one litre of water to the container.
• Each time the salt container is refilled, make sure that the cap is
securely closed. The mixture of water and detergent must never
penetrate the salt container, as this would compromise the operation
of the regeneration system. In the event of this occurring, the
warranty will be invalidated.
• Only use regenerating salt specially formulated for domestic
dishwashers. If using salt tablets, do not fill the container
completely.
20

User instructions
• Do not use table salt as it contains insoluble substances which,
over time, may damage the water softening system.
• When necessary, refill the regenerating salt container before
starting the washing program. In this way, the excess saline
solution will be immediately removed by the water; the prolonged
presence of salt water inside the tank may lead to corrosion.
Be careful not to confuse the salt and detergent packages; adding
detergent to the salt container will damage the water softening system.
ADDITIONAL FUNCTIONS
(available in all programs except the soak program)
(Customizing the consumer parameters)
The electronic control system allows personalizing the machine use
directly through a programming procedure not directly accessible that
allows: regulate water hardness level.
To access the programming environment, the appliance must be turned
on with the door open. Then proceed as follows:
• press the PROGRAM DELAY button (5 ) until the H symbol appears
on the display, followed by the numb er cu rrently se t (e .g. H3)
• press the PROGRAM DELAY (5) button the number of times
needed to select the right setting level for the hardness of the water
(H0, H1, H2, H3, H4, H5);
N.B.: after few seconds the appliance exits the parameter setting menu
automatically.
21

User instructions
WATER HARDNESS TABLE
German degrees (°dH) French Degrees (°dF)
0 - 4 0 - 7
5 - 15 8 - 25
WATER HARDNESS
SETTING
H 1
NO SALT
H 1
16 - 23 26 - 40
24 - 31 41 - 60
32 - 47 61 - 80
48 - 58 81 - 100
Contact your local water board for information on the hardness of your
water supply.
After adjustment or display of the current setting, simply do not touch the
button for a few seconds; the dishwasher will automatically return to
standard mode, quitting the adjustment mode.
4.2 Using the rinse aid and detergent dispensers
The detergent and rinse aid
dispensers are situated on the inner
part of the door: the detergent
dispenser is on the left, and the
rinse aid dispenser is on the right.
With the exception of the SOAK program, before every washing cycle it
is necessary to add the required amount of deter gent to the detergent
dispenser. The rinse aid, on the other hand, should on ly be added as
required.
H 2
H 3
H 4
H 5
22

User instructions
ADDING THE RINSE AID
The rinse aid helps the dishes dry faster and
prevents the formation of scale deposits and
staining; it is automatically added to the water
during the final rinse cycle, from the container
situated on the inner side of the door.
To add rinse aid:
• Open the door.
• Rotate the container cap anticlockwise by ¼ of a turn and remove it.
• Add the rinse aid until the container is full (approximately 140 cc).
The optical level indicator on the side of the cap should be
completely obscured. Refill the rinse aid when the optical level
indicator becomes clear again, or when the rinse aid warning li ght
illuminates.
• Replace the cover and turn it i n a clockwise direction.
• Use a cloth to remove any spillage of rinse aid which migh t lead to
the formation of excess foam.
ADJUSTING THE RINSE AID DISPENSER SETTING
The dishwasher is factory set for medium water hardness. However it
possible to change the setting by turning the dispenser’s selector to the
desired position: the amount of rinse aid dispensed is proportion al to the
selector position.
• To adjust the rinse aid setting, rotate the dispenser cap th rough a
quarter turn in an anticlockwise direction and remove it.
• Then use a scre wdriver to rotate the ri nse aid sel ector to the des ire d
position.
• Replace the cap, turning it cloc kwise.
• The amount of rinse aid must be increased if the w ashed dishes
appear dull or feature circular stains.
• If, on the other hand, the dishes are sticky or have white streaks, it
is necessary to reduce the rinse aid setting.
23

User instructions
ADDING THE DETERGENT
To open the detergent dispenser cap, lightly press
the button P. Add the detergent and close the cap
carefully.
During the washing cycle, the dispenser will be
opened automatically.
24
• When a program with hot prewash is selected (see program table),
extra detergent must be placed in the cavity G/H (depending on
models).
• Use only detergents specially formulated for dishwashers. For
optimal washing results it is important to use a good qualit y deterg ent.
• The detergent packs must be sealed and stored in a dry place to
prevent the formation of lumps which may n egatively affect washing
results. Once opened the detergent packs should not be kept for too
long, otherwise the detergent loses its effectiveness.
• Do not use detergents formulated for washing dishes by hand,
because they produce a great deal of foam and may negatively affect
the operation of the dishwasher.
• Add the correct amount of detergent. An insufficient amount of
detergent will result in a partial removal of dirt from the dishes,
whereas an excessive amount is wasteful and does not improve the
washing results.
• The market offers liquid and powder detergents with diffe ri ng chemical
compositions, which may con tain phosphates, or be phosphate-free
but contain natural enzymes.
- Detergents containing phosphates are more effective against
grease and starch at temperatures above 60°C.
- Enzyme detergents, on the other hand, are also effective at lower
temperatures (from 40 to 55°C) and are more easily
biodegradable. With enzyme detergents it is possible to obtain at
low temperatures co mparable results to those which can o nly be
achieved at 65°C using traditional detergents.
For the safeguarding of th e environment we recommend the use of
phosphate- and chlorine free detergents.

User instructions
"3/1" Products
If you wish to use detergents which already contain salt and rinse aid,
check whether your dishwasher is fitted with the "3/1 option button" on
the "Controls description" page and then refer to the section which
explains how to use this function.
If the button is not provided, we recommend the use of conventional
products (separate detergent, salt and rinse aid), because with
conventional washing cycles "3/1" products might create probl ems such
as a white deposit, poor drying results and residues left on dishes.
The introduction of detergent into the rinse aid dispenser, ev en in
liquid form, will damage the dishwasher.
4.3 General warnings and recommendations
Before using the dishwasher for the first time, it is advisable to read t he
following recommendations concerning dish types to be washed and
their loading.
There are generally no constraints on the washing of domestic d ishes,
but in certain cases it is necessary to take their characteristics into
account.
Before loading the dishes into the baskets it is necessary to:
• remove coarse food remains: e.g. bones, fish-bones, etc. which
may clog the filter or damage the wash pump.
• soak any pots or pans with burnt-on foo d remains on the bottom to
facilitate removal, then load them into the LOWER BASKET.
There is no need to pre-wash the dishes under running water before
loading them into the baskets since this only wastes water.
Correct loading of the dishes helps ensure optimal washing
results.
25

WARNING!
User instructions
• Make sure that the dishes are securely in pl ace so that they cannot
tip over or obstruct the rotation of the spray arms during the
washing cycle.
• Do not place v ery small objects in the baskets as these could fall
and obstruct the spray arms or the wash pump.
• Containers such as cups, bow ls, glasses and pots should always
be loaded with the opening facing downwards and with any cavities
at an angle, to allow the water to drain out.
• Do not stack dishes or place them in such a w ay that they cover
one other.
• Do not place glasses to o close together because they may knock
against each other and break, or there might be staining at the
point where they touch.
MAKE SURE that the items being washed are dishwasher-safe.
Items which are not dishwasher-safe:
• Wooden dishes, pots or pans: these may be damaged by the
high washing temperatures.
• Handcrafted items: these are rarely suitable for washing in a
dishwasher. The relatively high water temperatures and the
detergents used may damage them.
• Plastic dishes: heat resistant plastic dishes must be washed in the
upper basket.
• Dishes and objects in copper, tin, zinc or brass: these tend to
stain.
• Aluminium dishes: items made from anodised aluminium may
lose their colour.
• Silverware: silver items may stain.
• Glass and crystal: in general, glass and crystal objects can be
washed in the dishwasher. However, certain types of glass and
crystal may become dull and lose their clearness after many
washings. Therefore, for these items we recommend using the
least aggressive program available.
• Decorated items: the decorated objects available on the market
are generally able to withstand washing in the dishwasher,
although the colours may fade after a great many washes. If in
doubt as to the fastness of the colours, it is advisable to wash just a
few items at a time for approximately one month.
26

User instructions
4.4 Using the baskets
The dishwasher has a capacity of 14 place-settings, including serving
dishes.
LOWER BASKET
The lower basket receives the full force of the lower spray arm, and
should therefore be used for the “toughest” items with a heavier degree
of soiling.
All types and combinations of loads are permitted, provided that the
dishes, pots and pans are arranged with all the soiled surfaces exposed
to the water jets coming from the bottom.
Depending on the models, the basket may be equipped with some or all
of the following accessories:
Plate racks, which can be laid flat when not in use (e.g. to accommodate
pans, bowls, etc.). To stow the racks flat, pull them upward and turn
them towards the inside of the basket.
Anti-drip inserts which improve the
drying of dishes. They may be
supplied fitted on the basket or in
the accessories bag; in this case,
to use them, simply fit them into
place as shown.
27

User instructions
Supports for cups and long objects
(ladles, spoons, etc.), in the rear;
can be tipped to the vertical
position when not in use.
Glass holder. Support for longstem glasses. When lifted out of
the stowed position (0) it snaps into
three different positions (1-2-3).
2-position fold-down supports (1-2). In position 1 (vertical) they can be
used to take plates, while in position 2 (slanted) they provide support for
long-stem glasses which will be held in place by the glass holder.
Adjustment: raise point P as shown until the support turns into position 2.
28

User instructions
To lie completely flat, lift the end and turn it towards you so that the
retainer F rotates into place above point S.
LOADING THE LOWER BASKET
Carefully load flat plates, soup plates, dessert and serving dishes,
positioning them vertically. Pots, pans and their covers must be loaded
upside down. When loading soup plates and dess ert bowls, be sure to
leave a gap between them.
Loading examples:
29

User instructions
TOP CUTLERY BASKET
The basket is designed to take cutlery, placed in the spaces provided,
and long utensils, positioned lengthwise.
The “drawer” extraction system makes the basket easier to load, but it
can also be taken completely off its runners by removing the retainers
(as shown here).
Take great care to replace the retainers to ensure that the basket does
not come off the runners accidentally.
30

User instructions
CUTLERY BASKET
The basket has removable top grids into which items of cutlery should
be inserted to keep them properly spaced and allow water to pass
between them effectively. The top grids and central lid are in the bag of
accessories. The central lid functions as a lid only.
The top grids can be detached and used separately.
The cutlery should be arranged in an orderly manner inside the basket,
with the handles pointing downwards. Take care during loading to av oid
injury from the knife blades. The basket is suitable for all types of cutlery,
except those long enough to interfere with the upper spray arm. Ladles,
wooden spoons and cooking knives can b e placed in the upper basket,
making sure that the knife blades do not protrude from the basket.
The cutlery basket slides across the dish washer and can be placed in
any position to allow optimal use of the space in the bottom basket.
31

User instructions
UPPER BASKET
It is recommended to load the upper basket with small- or medium-sized
items such as glasses, small plates, tea or coffee cups, shall ow bowls
and light objects made from heat resistant plastic. If the upper basket is
used in the lowermost position, it can also be loaded with ser ving dishes,
provided they are only slightly soiled.
LOADING THE UPPER BASKET
Load plates facing forward; cups, bowls etc. must always be facing
downwards. The left side of the basket can be loaded with cups and
glasses on two levels. In the centre section, plates and saucers can be
loaded vertically into the supports provided.
Loading examples:
32

User instructions
Examples of loading for intensive dirt:
33

User instructions
Depending on the models, the basket may be equipped with some or all
of the following accessories:
- Supports for cups or long objects (ladles, spoons…), on the left;
can be tipped to the vertical position when not in use.
- Long-stemmed glass holder, on the left; to use, simply lift and
fix onto the hooks provided.
- Cutlery racks, on the right, designed for knives and teaspoons;
for teaspoons, pull out the sliding support. The racks can be
tipped to the vertical position when not in use.
- Fixed or movable racks in the middle. The movable supports
can be fixed vertical, resting on the bottom of the basket when
not in use, or set in the intermediate position, as required.
34

User instructions
ADJUSTING THE UPPER BASKET
The height of the top basket can be adjusted to allow large dishes or
pans to be placed in the bottom basket.
The adjustment procedure may be type A or B, depending on the
dishwasher model purchased.
Version A: pull-out with adjustment in two positions.
• Pull out both the basket guides.
• Remove the stops, first releasing them as shown in the diagram.
• Pull out the basket.
• Fit the upper or lower pair of wheels int o the guide, depending on
the setting required;
• Return the stops to their original position.
The left hand and right hand sides of the basket must alw ays be set at
the same height.
Version B: with adjustment in three positions on both sides.
The sides of the basket must always be set at the same height.
• Raise the basket by pulling on the top edge (1), to the first or
second catch depending on the height required.
• To lower the basket, first release it by pulling the release lever (2).
Adjustment is also possible with the basket loaded, but in this case when
lowering the basket it should be held steady with one hand to avoid
knocking the dishes.
35

5. Cleaning and maintenance
User instructions
Before carrying out any work, always unplug the appliance from the
electrical supply or switch off the all-pole disconnection device.
5.1 General warnings and recommendations
Avoid the use of acidic or abrasive detergents.
Clean the outer surfaces and door-lining of the dishwasher regularly
using a soft cloth moistened with water or with a normal detergent
suitable for painted surfaces. Clean the door gaskets with a damp
sponge. Periodically (once or twice a year) it is a dvisable to clean the
tank and gaskets, using a soft cloth and water to remove any deposits.
CLEANING THE WATER INTAKE FILTER
The water intake filter A located at the outlet of the water supply tap
needs to be cleaned periodically.
After having closed the water supply tap, unscrew the end of the water
intake hose, remove the filter A and clean it delicately under running
water. Reassemble filter A in its seat and carefully screw the water
intake hose back into position.
CLEANING THE SPRAY ARMS
The spray arms can be easily removed for periodic cleaning of the
nozzles, to prevent possible clogging. Wash them under running water
and carefully replace them in their seats, checking that their rotary
movement is in no way impeded.
• To remove the upper spray arm, unscrew locking ring R.
• To remove the lower spray arm, simply lift it up, pulling by the
central part.
• To remove the orbital spray arm assembly, take h old of the longer
arm and pull the orbital unit upward. Wash the arms under a jet of
running water and return them carefully to their seat. After
reassembly, check that the spray arms turn freely. Otherwise,
check that they have been installed correctly.
ORBITAL
36

User instructions
CLEANING THE FILTER UNIT
• It is advisable to periodically inspect the centre filter C and, if
necessary, to clean it. To remove the filter, grip the tabs, turn them
anticlockwise and lift upwards;
• push the centre filter D from the underside to remove it from the
micro-filter:
• separate the two parts which make up the plastic filter by pressing
the body of the filter in the zone shown by the arrows;
• remove the centre filter by lifting it upwards.
GENERAL WARNINGS AND RECOMMENDATIONS FOR CORRECT
MAINTENANCE:
• The filters should be cleaned under running water using a stiff
brush.
• When removin g the filter, take care that there are no food residues
on it. If any residues fall into the washing pit they might block
hydraulic components, or foul the spray arm nozzles.
• It is essential to thoroughly clean the filters according to the
above instructions: the dishwasher cannot function if the filters are
clogged.
• Carefully replace the filters in their seats, to avoid damaging the
wash pump.
PROLONGED DISUSE:
• Run the soak program twice in succession.
• Unplug the power cord from the socket.
• Leave the door slightly open, in order to prevent the formation of
unpleasant odours inside the washing tank.
• Fill the rinse aid disp enser.
• Shut off the water supply tap.
37

User instructions
BEFORE STARTING THE DISHWASHER AFTER PROLONGED
DISUSE:
• Check that there are no deposits of sludge or rust inside the water
pipe: if there are, allow the water to run from the water supply tap for
a few minutes.
• Plug the power cord back into the socket.
• Reconnect the water in take hose and open the tap again.
TROUBLESHOOTING MINOR PROBLEMS
In some cases it is possible to remedy minor problems by referring to th e
following instructions:
If the program fails to start, check that:
• the dishwasher is connected to the electrical power supply;
• there is no power failure;
• the water tap is open;
• the dishwasher door is properly closed.
If water remains inside the dishwasher, check that:
• the drain hose is not kinke d;
• the drain siphon is not obstruc ted;
• the dishwasher filters are not clogged.
If the dishes are not being cleaned properly, check that:
• the correct amount of detergent has been added;
• there is regenerating salt insid e the special container;
• the dishes are being loaded correctly;
• the selected program is suitable for the dish types and their degree
of soiling;
• all the filters are clean an d positioned correctly;
• the spray arm nozzles are not obstructed;
• there is no object obstructing the rotation of the spray arms.
38

User instructions
If the dishes fail to dry or remain dull, check that:
• there is rinse aid insi de the special container;
• the rinse aid dispenser setting is correct;
• the detergent used is of good quality and has not lost its
effectiveness (for example, through incorrect storage, with the box
left open).
If the dishes show signs of streaking, staining, etc., check that:
• the rinse aid dispenser setting is not too high.
If there are visible traces of rust inside the tank:
• the tank is ma de of steel, and therefore any rust marks are due to
external elements (fragments of rust from the water pipes, pots,
cutlery, etc.). Special products are commercially available to remov e
such marks;
• check that the amount of detergent being used is correct. Certain
detergents can be more corrosive than others.
• check that the cap of the salt container is securely closed, and that
the water softening setting is correct.
If after following the above troubleshooting instructions the problem
persists, call the nearest After-Sales Centre.
WARNING: any operations performed on the appliance by
unauthorised persons are not covered by the warranty and shall be
paid for by the user.
39

User instructions
6. Troubleshooting
The dishwasher is equipped with a self-diagnostics system that is
capable of detecting and signalling a number of possible faults.
TABLE OF FAULTS DETECTED BY THE SELF-DIAGNOSTICS SYSTEM
FAULT DESCRIPTION
Er 01
The anti-flooding system (where present) has been tripped service.
40
Er 02
Er 03
Er 04
Er 05
Er 06
Er 07
Er 08
Er 09
The water level limitation system has tripped.
The appliance cannot heat the water.
The temperature sensor is disconnected.
The appliance cannot take in the water.
The appliance cannot drain the water from the tank.
The dishwasher cannot measure the precise water quantity that has
been loaded.
Problem on the water distribution system to the baskes.
Water intake system malfunction.
If an alarm occurs the appliance interrupts the program in progress and
signals a fault.
• Alarms E1, E2, E3, E4, E8 and E9 interrupt the current program
immediately.
• The E5, E6 alarms interrupts the running program once the cause is
resolved, it will bring bach the execution of the program.
• The alarm E7 is visualized at the end of the cycle that comes, however,
brought to the end since the operation of the dishwasher is not harmed.
To “reset” an alarm is necessary:
• Open and close the door, or turn off and on the machine. At this point is
possible to program the dishwasher again.
If the malfunction persists, contact your authorised Service Centre.

User instructions
TECHNICAL DATA
Width
Depth measured flush with the
outer edge of the control panel
Height (depending on models)
Capacity
Water supply pressure
Electrical characteristics
597 ÷ 599 mm
Free standing: 600 mm
Semi-integrated: 570 mm
Free standing: from 850 mm to 890 mm
from 890 mm to 930 mm
Semi-integrated: from 820 mm to 890 mm
from 860 mm to 930 mm
14 Standard place settings
min. 0,05 - max. 0,9 MPa (min. 0.5 – max. 9 bar)
See rating plate
41

115
125
Misurare l’altezza del pannello comandi; fare coincidere l’indice relativo a tale valore con il profilo superiore della porta in legno; tracciare il posizionamento degli agganci porta.
Measure the height of the control panel; bring the mark relating to this value into line with the top edge of the wooden door; mark the positions of the door connections.
Measurer la hauteur du panneau de commandes; faire coïncider l’index relatif à cette valeur avec le profil supérieur de la porte en bois; tracer le positionnement des crochets de la porte.
Die Höhe des Bedienfelds messen; Die diesem Wert entsprechende Markierung mit dem oberen Profil der Holztür zur Deckung bringen; Die Position der Türaufhängungen anzeichen.
Meet de hoogte van het bedieningspaneel; laat de markering die bij die waarde hoort overeenstemmen met het bovenste profiel van de houten deur; teken de positie van de deurhengsels af.
Medir la altura del panel de mandos; hacer coincidir el índice correspondiente a dicho valor con el perfil superior de la puerta de madera; trazar el posicionamiento de las bisagras de la puerta.
Meça a altura do painel de comandos; faça com que o indicador relativo a este valor coincida com o perfil superior da porta de madeira; marque a posição dos ganchos para porta.
115
125
135
145
155
ATTENZIONE:
Montare la porta e regolare la tensione delle
molle laterali prima dell’installazione.
IMPORTANT:
Door template, do not destroy. Fit door and
adjust hinge tension before installation.
ATTENTION:
Apres montàge de la porte, regler la tension
des ressorts lateraux avant l’installation.
1 2 3 4 5
Solo su alcuni modelli
Certain models only
Seulement sur certains modèles
nur bei einige Modellen
Sólo en algunos modelos
alleen indien van toepassing
4
SUPERFICIE INTERNA
SURFACE INTERNE
INNER SURFACE
INNENFLACHE
6
567
165
-
75 - 16575
598
3x16
522
1
567
H
min. 567min.
600
60
130
3
H
1
2
90
H
7 8 9 10
7
9
8
6
m
0,5
min. 0,5 mmin.
m
0,4
min. 0,4 mmin.
m
1,10
max. 1,10 mmax.
0,3-10 bar0,3-10 bar
1,14 m1,14 m 1,25 m1,25 m
1,23 m1,23 m 1,50 m1,50 m
1,78 m1,78 m 1,66 m1,66 m
10
1/2”
S N SF
3/4”
0,3-10 bar0,3-10 bar
5
m
0,00
min. 0,00 mmin.
LATO SUPERIORE
BORD SUPERIEURE
UPPER EDGE
OBERKANTE
m
0,4
min. 0,4 mmin.
WICHTIG:
Tür montieren, Türfedern vor Einbau
einstellen.
ATENÇÃO:
Antes da instalação, monte a porta e
regule a tensão das molas laterais.
IMPORTANTE:
Montar la puerta y regular los
muellas laterales antes de la instalación.
135
145
155
19 570 0055 02
ATTENZIONE:
Quota : secondo i modelli 820÷870 oppure 860÷910.
"H"
H
CAUTION:
Depending on the model, distance may be 820÷870 or 860÷910.
"H"
11
12 13 14 15
13
ATTENTION:
Cote : selon les modèles 820÷870 ou 860÷910.
“H”
ACHTUNG:
Maß : gemäß den Modellen 820÷870 oder 860÷910.
"H"
LET OP: “H"
Hoogte : voor de modellen 820÷870 of 860÷910.
14
12
ATENCIÓN:
Cota : según los modelos 820 ÷ 870 o bien 860 ÷ 910.
"H"
ATENÇÃO:
Cota : dependendo dos modelos 820-870 ou 860-910.
"H"
UPOZORNĚNÍ:
.
Rozměr „H“ podle modelů 820-870 nebo 8 0- 0
NOTA: N.B.: REMARQUE:
ANMERKUNG:
NOTA:
Solamente alcuni modelli sono dotati di uno dei dispositivi sotto illustrati. Only some models are equipped with one of the two devices illustrated below. seul quelques modèles sont munis de l’un de deux dispositifs illustrés ci-dessus.
Nur einige Modelle verfügen über eine der beiden unten dargestellten Einrichtungen.NOTA BENE: NOTA:
Só alguns modelos estão equipados com ou dos dois dispositivos ilustrados abaixo
691
11
MAX 720 mm
Regolazione vite tensione molle (13)
Copertura foto con tappo in dotazione (14)
Door spring Adjustement device (13)
Covering of hole using cap provided (14)
Réglage des ressorts de la porte (13)
Couverture du trou avec le bouchon fourni (14)
Vorrichtung für die Einstellung der Spannung der Türfedem (13) Abdecken des Lochs mit dem mitgelieferten Stopfen (14)
uitsluitend bepaalde modellen zijn uitgerust met één van de twee onderstaand afgebeelde inrichtingen Sólo algunos modelos están equipados con uno de los dos dispositivos que se ilustran a continuación.
Solo su alcuni modelli
Certain models only
Seulement sur certains modèles
nur bei einige Modellen
Sólo en algunos modelos
alleen indien van toepassing
17
16
16
15
15
BEMÆRK:
Afhængigt af modellen er målet ”H” 820÷870 eller 860÷910.
691
691
10
HUOMIO
OPGELET
: Mitta ”H” on mallista riippuen 820-870 tai 8 0- 0.
:
Geef "H" aan volgens de modellen 820÷870 of 8 0÷ 0.
ADVARSEL:
1
11
Avhengig av modell kan avstanden "H" være 820-870 eller 8 0- 0.
UWAGA
:
691
W zależności od modelu, wartość „H” może wynosić
-6-91
820 870 lub 8 0 0.
8
13
POZOR:
Kvóta “H” podla modelov 820-870 alebo 8 0- 0.
691
OBSERVERA!
Beroende på modell kan måttet ”H” vara 820-870 eller 8 0- 0.
691
9
Sicurezza contro gli allagamenti
Sicurezza contro gli allagamenti
Questo
Questo sistema di sicurezza protegge il vostro appartamento
da
da danni dell’acqua. In caso di guasto al tubo di entrata o
permeabilità
permeabilità del sistema della macchina, l’entrata dell’acqua
viene
viene interrotta.
La scatola della sicurezza anti-allagamento montata sul tubo,
La
contiene parti elettriche. E’ pertanto proibito collocare la
contiene
scatola
scatola stessa nell’acqua. Nel caso in cui per una ragione
qualsiasi
qualsiasi la scatola subisca danni, togliere immediatamente
la
la presa di collegamento dalla rete elettrica.
Aquastop-Verlägerung
Aquastop-Verlägerung
Im Handel können längere Aquastopschläuche gekauft werden,
Im
die
die von einem Fachmann mit dem bestehenden Aquastopschlauch
ausgetauscht
ausgetauscht werden müssen. Bei einer elgenmächtigen
Verlängerung
Verlängerung des Wasserzufuhrschlauches trägt der Hersteller
keine
keine weitere Verantwortlichkelt.
“Aquastop” por septuplicado”
“Aquastop” por septuplicado”
El
El sistema “AQUASTOP” por septuplicado protegesu vivienda de forma
fiable
fiable e de danos por escapes de agua. Se corta inmediatamente el
suministro
suministro de agua en caso de cualquier fuga en tubos o en
componentes
componentes del aparato.
contiene componentes eléctricos. Por este motivo no debe
contiene
sumergirse en agua. En caso de que el cajòn de vàlvulas estuviera
sumergirse
danado,
danado, debe desconectarse de la red eléctrica, desenchufando la
clavija.
clavija.
HR AQUASTOP - Zašita pred poplavom
HR AQUASTOP - Zašita pred poplavom
Ovaj sigurnosni sistem štiti vaš stan od štete koju možeuzrokovati voda.
Ovaj
U
U slučaju kvara na dovodnoj cijevi ili u slučaju propuštanja na sistemu
stroja
stroja za pranje posuđa, prekida se dovod vode.
Ku ište
Ku ište ventila, odnosno sigumosne naprave, namještene na cijevi,
sadrži
sadrži elektri ne djelove.
Zato
Zato je ne smijete potopiti u vodu. U slu aju da se kutija iz bilo kojeg
razloga
razloga ošteti, odmah isklju ite aparat iz elektri ne mreže.
sistema di sicurezza protegge il vostro appartamento
danni dell’acqua. In caso di guasto al tubo di entrata o
del sistema della macchina, l’entrata dell’acqua
interrotta.
scatola della sicurezza anti-allagamento montata sul tubo,
parti elettriche. E’ pertanto proibito collocare la
stessa nell’acqua. Nel caso in cui per una ragione
la scatola subisca danni, togliere immediatamente
presa di collegamento dalla rete elettrica.
Handel können längere Aquastopschläuche gekauft werden,
von einem Fachmann mit dem bestehenden Aquastopschlauch
werden müssen. Bei einer elgenmächtigen
des Wasserzufuhrschlauches trägt der Hersteller
weitere Verantwortlichkelt.
sistema “AQUASTOP” por septuplicado protegesu vivienda de forma
e de danos por escapes de agua. Se corta inmediatamente el
de agua en caso de cualquier fuga en tubos o en
El cajòn de valvulas del tubo acquastop
El
del aparato.
componentes eléctricos. Por este motivo no debe
en agua. En caso de que el cajòn de vàlvulas estuviera
debe desconectarse de la red eléctrica, desenchufando la
sigurnosni sistem štiti vaš stan od štete koju možeuzrokovati voda.
slučaju kvara na dovodnoj cijevi ili u slučaju propuštanja na sistemu
za pranje posuđa, prekida se dovod vode.
č
ventila, odnosno sigumosne naprave, namještene na cijevi,
č
č
elektri ne djelove.
č
je ne smijete potopiti u vodu. U slu aju da se kutija iz bilo kojeg
ošteti, odmah isklju ite aparat iz elektri ne mreže.
cajòn de valvulas del tubo acquastop
č
č
čč
čč
Aquastop safety device
Aquastop safety device
The AQUASTOP is
The AQUASTOP is safety device. The aquastop assures
the fresh water hose need only take the stress of water
that
that the fresh water hose need only take the stress of water
pressure
pressure during the actual timer water is flowing. If the hose
should
should begin to leak during this time, the magnetic valve in
the
the water spout cuts off the flow, and the hose is relieved of
pressure.
pressure.
The valve casing on the water-stop hose contains
The
electrically controlled components. It is should not,
electrically
therefore,
therefore, be submersed in water. If the housing
becomes
becomes damaged the plug must be removed from the
soket.
soket.
SLO AQUASTOP - Zaščita pred poplavo
SLO AQUASTOP - Zaščita pred poplavo
Ta varnostni sistem varuje vaše stanovanje pred škodo, ki bi
Ta
jo
jo povzro ila voda. V primeru okvare na dovodni cevi ali v
primeru
primeru puš anja na sistemu pomivalnega stroja, se prekine
dovod
dovod vode. Ohišje ventila oz.
nameščena
nameščena na cevi, vsebuje električ
Zato
Zato je ne smete potopiti v vodo. V primeru, da se ta škatla iz
kakršnegakoli
kakršnegakoli razloga poškoduje, nemudoma izklopite aparat
iz
iz elektri nega omrežja.
during the actual timer water is flowing. If the hose
begin to leak during this time, the magnetic valve in
water spout cuts off the flow, and the hose is relieved of
Operating pressure DIN 44995.
Operating
valve casing on the water-stop hose contains
controlled components. It is should not,
be submersed in water. If the housing
damaged the plug must be removed from the
varnostni sistem varuje vaše stanovanje pred škodo, ki bi
povzro ila voda. V primeru okvare na dovodni cevi ali v
č
č
puš anja na sistemu pomivalnega stroja, se prekine
č
č
vode. Ohišje ventila oz.
na cevi, vsebuje električ
je ne smete potopiti v vodo. V primeru, da se ta škatla iz
elektri nega omrežja.
č
č
safety device. The aquastop assures
pressure DIN 44995.
Varnostne
Varnostne naprave, ki je
razloga poškoduje, nemudoma izklopite aparat
naprave, ki je
dele.
ne
ne dele.
YU AQUASTOP - Заштитa пpeд пoплaвoм
YU AQUASTOP - Заштитa пpeд пoплaвoм
безбедносни систем вaш стaн од штете ко¼у може
Oвaj безбедносни систем вaш стaн од штете ко¼у може
Oâaj
óçpêîóje âoäa. Y cëy÷ajy êâapa ía âoäoâoäíoj öåâè
äa
äa óçpêîóje âoäa. Y cëy÷ajy êâapa ía âoäoâoäíoj öåâè
y cлyчajy прекидa ce oвoдa вoдe.
èëè
или y cлyчajy прекидa ce oвoдa вoдe.
Êyžèøòå
Кyžиште вeнтиa oднocнo безбедноснe нaпрaвe,
ìoíòèðaíe
ìoíòèðaíe ía öåâè, caäæè eëeêòpè÷íe äeëoâe. Çàòo
íecìeòå
íecìeòå äa je ïoòaïœaòe y âoäy. Yc ëy÷ajy äa ce êóòèja
билo кor paзлora oштети, oдмax иcкœyчите aпapaт
èç
из билo кor paзлora oштети, oдмax иcкœyчите aпapaт
eëeêòpè÷íe ìðeæå.
èç
èç eëeêòpè÷íe ìðeæå.
MK AQUASTOP - aЗаштитa oд пoплaв
MK AQUASTOP - aЗаштитa oд пoплaв
Oboj зaштитен систем ro штити вaшиoт cтaн oд пoплaвa.
Oboj
Bo cëy÷ajy ía oøòeòyâaœe ía äoâoäíaòa öåâêa èëè ïaê aêo
cëy÷ajy ía oøòeòyâaœe ía äoâoäíaòa öåâêa èëè ïaê aêo
Bo
пpoпyштa систем вo мaшинaтa зa миeœe caдoви, ce пpeкинyвa
ïpoïyøòa
äoâoäoò ía âoäa. Êyêèøòeòo ía âeíòëoò oäíocío ía
äoâoäoò
cèrypíocíaòa íaïpaâa êoja e íaìecòeía ía öåâêaòa, coäpæè
cèrypíocíaòa
eëeêòpè÷íè äeëoâè è çaòoa íe cìeeòe äa ja òoïèòå âo âoäa.
eëeêòpè÷íè
Aкo ce cлyчи од билo кaкви пpичини кyкиштeтo дa ce oштeти,
Aêo
aïapaòoò âeäaíaø ècêëy÷eòå ro oä eëeêòpè÷íaòa ìpeæa.
aïapaòoò
SW 32
вeнтиa oднocнo безбедноснe нaпрaвe,
ía öåâè, caäæè eëeêòpè÷íe äeëoâe. Çàòo
äa je ïoòaïœaòe y âoäy. Yc ëy÷ajy äa ce êóòèja
зaштитен систем ro штити вaшиoт cтaн oд пoплaвa.
систем вo мaшинaтa зa миeœe caдoви, ce пpeкинyвa
нa вoдa. Кyкиштeтo нa вeнтлoт oднocнo нa
íaïpaâa êoja e íaìecòeía ía öåâêaòa, coäpæè
äeëoâè è çaòoa íe cìeeòe äa ja òoïèòå âo âoäa.
ce cлyчи од билo кaкви пpичини кyкиштeтo дa ce oштeти,
âeäaíaø ècêëy÷eòå ro oä eëeêòpè÷íaòa ìpeæa.
1/2”
min.10mm
3/4”
3/4”
Aquastop
Aquastop
Dieses Wasserschutz-System schutz ihre Wohnung zuverlassing
Dieses
vor Wasserschaden. Bei undichtem Wasserzulaufschlauch oder
vor
undichtem Maschinensystem wird jeglicherweiterer Wasserzulauf
undichtem
unterbunden.
unterbunden.
beinhaltet elektrisch gesteuerte Bauteile. Er darf deshalb nicht
beinhaltet
in Wasser getaucht werden. Sollte das Ventilkastengehause
in
beschadigt sein, ist unbedingt der Netzstecker aus zu ziehen.
beschadigt
Paliers de sécurités pour empecher les fuites
Paliers de sécurités pour empecher les fuites
Le système est doté de sept paliers de sécuritè pour éviter les fuites
Le
d’eau et protége ainsi votre logement contre d’eventuels dègats
d’eau
matériels. Si le tuyau d’arrivée d’eau n’est pas étanche ou si la
matériels.
machine fuit, ce dispositif arrete l’ecoulement d’eau.
machine
sécuirité qui controle l’arrivée d’eau est situé sur le tuyau et
sécuirité
contient des parties électriques. Il ne faut donc pas le tremper
contient
dans l’eau. S’il est endommagé pour une raison quelconque,
dans
débranchez immédiatement l’appareil en retirant la prise.
débranchez
Wasserschutz-System schutz ihre Wohnung zuverlassing
Wasserschaden. Bei undichtem Wasserzulaufschlauch oder
Maschinensystem wird jeglicherweiterer Wasserzulauf
Der Ventilkasten am Wasserstop Schlauch
Der
Ventilkasten am Wasserstop Schlauch
elektrisch gesteuerte Bauteile. Er darf deshalb nicht
Wasser getaucht werden. Sollte das Ventilkastengehause
sein, ist unbedingt der Netzstecker aus zu ziehen.
système est doté de sept paliers de sécuritè pour éviter les fuites
et protége ainsi votre logement contre d’eventuels dègats
Si le tuyau d’arrivée d’eau n’est pas étanche ou si la
Le boitier de
Le
fuit, ce dispositif arrete l’ecoulement d’eau.
qui controle l’arrivée d’eau est situé sur le tuyau et
des parties électriques. Il ne faut donc pas le tremper
l’eau. S’il est endommagé pour une raison quelconque,
immédiatement l’appareil en retirant la prise.
Cu ø10
MIN
40cm
boitier de
Dispositivo di bloccaggio dell’acqua
Dispositivo di bloccaggio dell’acqua
Il tubo di carico dell’acqua è provvisto di un dispositivo di
tubo di carico dell’acqua è provvisto di un dispositivo di
Il
sicurezza che blocca l’afflusso dell’acqua qualora il tubo di
sicurezza
carico si deteriori. Questo fatto viene segnalato dall’apparizione
carico
una tacca rossa nella finestrella “ ”. In questo caso, il tubo di
di
di una tacca rossa nella finestrella “ ”. In questo caso, il tubo di
carico
carico acqua dovrà essere necessariamente sostituito.
Water-stop system
Water-stop
The
The water-stop device protects against water damages caused
by
by leaks on the hose which could develkop due to natural ageing
the hose. In the water-stop system the leaking water fills the
of
of the hose. In the water-stop system the leaking water fills the
corrugated
corrugated hose and activates a stop valve which cuts off the
water
water supply to the machine.
This
This fault is shown by a red sector on the window “ ”.
Should
Should this occur, please refer to your Service Agent.
Dispositif de blocage de l’eau
Dispositif
Le
Le tuyau d’alimentation est équipé d’un dispositif de blocage
d’eau.
d’eau. Dans le cas où le tuyau intérieur devrait se détériorer
à
cause d’une usure naturelle, ce dispositif bloquera l’entrée
à cause d’une usure naturelle, ce dispositif bloquera l’entrée
d’eau
d’eau à l’appareil. Cet inconvenient est signalé par l’apparition
d’un
d’un secteur rouge dans la petite fenêtre “ ”.
Dans
Dans ce cas fermez le robinet d’eau et remplacé le tuyau.
Wasserstop-System
Wasserstop-System
Der
Der Wasserzulaufschlauch ist mit einem Wasserstop-System
ausgestattet.
ausgestattet. Sollte der Innenschlauch durch naturliche Alterung
beschädigt
beschädigt werden, so blockiert das System die Wasserzufuhr
zum
zum Gerät. Die Störung wird durch die Erscheinung einer roten
Markierung
Markierung in Fensterchen “ ” angezeigt.In diesem Fall muß
der
der Wasserhahn geschlossen und der Schlauch ersetzt werden.
che blocca l’afflusso dell’acqua qualora il tubo di
si deteriori. Questo fatto viene segnalato dall’apparizione
A
A
acqua dovrà essere necessariamente sostituito.
system
water-stop device protects against water damages caused
leaks on the hose which could develkop due to natural ageing
hose and activates a stop valve which cuts off the
supply to the machine.
A
fault is shown by a red sector on the window “ ”.
this occur, please refer to your Service Agent.
de blocage de l’eau
tuyau d’alimentation est équipé d’un dispositif de blocage
Dans le cas où le tuyau intérieur devrait se détériorer
à l’appareil. Cet inconvenient est signalé par l’apparition
secteur rouge dans la petite fenêtre “ ”.
ce cas fermez le robinet d’eau et remplacé le tuyau.
Wasserzulaufschlauch ist mit einem Wasserstop-System
Sollte der Innenschlauch durch naturliche Alterung
werden, so blockiert das System die Wasserzufuhr
Gerät. Die Störung wird durch die Erscheinung einer roten
A
in Fensterchen “ ” angezeigt.In diesem Fall muß
Wasserhahn geschlossen und der Schlauch ersetzt werden.
A
A
A
A
A
Waterstop-system
Waterstop-system
De watertoevoerslang is meet een “waterstop-systeem”
watertoevoerslang is meet een “waterstop-systeem”
De
uitgerust.
uitgerust.
door natuurlijke veroudering, de binnenslang lek
Zou, door natuurlijke veroudering, de binnenslang lek
Zou,
dan blokkeert het systeem de watergevoer.
raken,
raken, dan blokkeert het systeem de watergevoer.
optreden van deze storing kunt u zien aan rode sektor
Het
Het optreden van deze storing kunt u zien aan rode sektor
A
het venstertje “ ”. Sluit de waterkraan en vevang de
in
in het venstertje “ ”. Sluit de waterkraan en vevang de
in z’n geheel tegen een nieuwe.
stang
stang in z’n geheel tegen een nieuwe.
Dispositivo de bloqueo del agua
Dispositivo
El
tubo de carga del agua se encuentra provisto de un
El tubo de carga del agua se encuentra provisto de un
dispositivo
dispositivo de seguridad que bloquea el flujo del agua
cuando
cuando el tubo de carga se deteriora. En este caso, se
observara
observara un señal una mancha roja en la ventanilla “ ” y
será
será necesario sostituir el tubo de carga del agua.
el tubo de carga se deteriora. En este caso, se
necesario sostituir el tubo de carga del agua.
A
de bloqueo del agua
de seguridad que bloquea el flujo del agua
un señal una mancha roja en la ventanilla “ ” y
A
A
A
 Loading...