

Page 1
smeg
Operation Manual
For
Multi-function
Built-in Ovens
Page 2
^ft^smeg
^P^P^P technologj style*^
MULTI-FUNCTION OVENS
CONTENTS
Getting started guide
Setting and using the electronic clock
The cooking functions explained
The oven features explained
Using the cooking functions
The cooking charts
Looking after the oven
Problem solving
Model SA708 special features
Warranty and After sales service
1
2
3
4
5
7
8
9
10
PRINTED 1997
Page 3
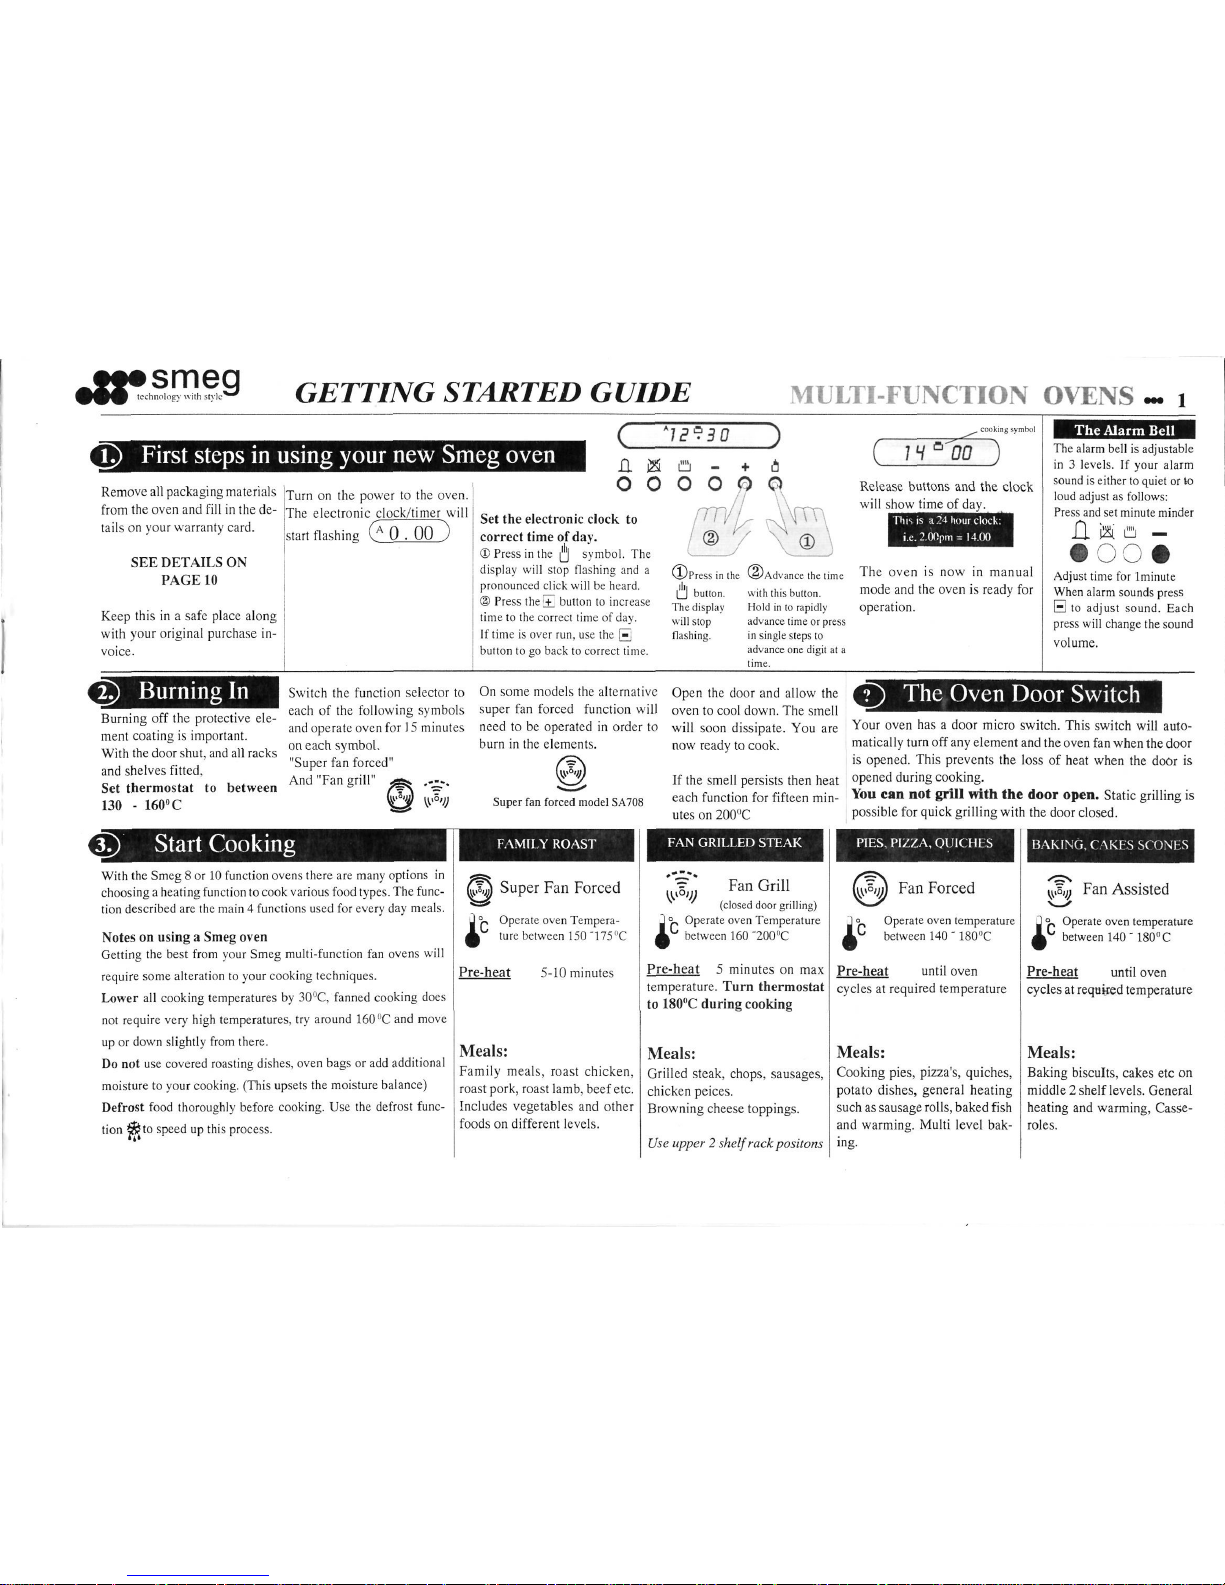
#8*,£nB9 GETTING STARTED GUIDE
MULTI-FUNCTION OVENS
L) First steps in using your new Smeg oven
(
k
]S?30 )
, cooking symbol
Remove all packaging materials
from the oven and fill in the details on your warranty card.
SEE DETAILS ON
PAGE 10
Keep this in a safe place along
with your original purchase invoice.
Turn on the power to the oven.
The electronic clock/timer will
start flashing CA 0 . 00
n as
o o
Set the electronic clock to
correct time of day.
® Press in the r_j symbol. The
display will stop flashing and a
pronounced click will be heard.
© Press the'_+_ button to increase
time to the correct time of day.
If time is over run, use the [—j
button to go back to correct time.
CI) Press in the
lj button.
The
display
will stop
Hashing.
'Advance the time
with this button.
Hold in to rapidly
advance time or press
in single steps to
advance
one
digit at
a
time.
( 1HaHQ
Release buttons and the clock
will show time of day.
I his is a 24 hour clock:
i.e. 2.00pm = 14.00
The oven is now in manual
mode and the oven is ready for
operation.
The Alarm Bell
The alarm bell is adjustable
in 3 levels. If your alarm
sound is either to quiet or to
loud adjust as follows:
Press and set minute minder
n is a
—
toot
Adjust time for lminute
When alarm sounds press
H to adjust sound. Each
press will change the sound
volume.
D Burning In
Burning off the protective element coating is important.
With the door shut, and all racks
and shelves fitted,
Set thermostat to between
130 - 160°C
Switch the function selector to
each of the following symbols
and operate oven for 15 minutes
on each symbol.
"Super fan forced"
And "Fan grill" «s^ ,*^»,
3?) Start Cooking
With the Smeg 8 or 10 function ovens there are many options in
choosing a heating function to cook various food types. The function described are the main 4 functions used for every day meals.
Notes on using a Smeg oven
Getting the best from your Smeg multi-function fan ovens will
require some alteration to your cooking techniques.
Lower all cooking temperatures by 30°C, fanned cooking does
not require very high temperatures, try around 160"C and move
up or down slightly from there.
Do not use covered roasting dishes, oven bags or add additional
moisture to your cooking. (This upsets the moisture balance)
Defrost food thoroughly before cooking. Use the defrost function $£ to speed up this process.
On some models the alternative
super fan forced function will
need to be operated in order to
burn in the elements.
Super fan forced model SA708
FAMILY ROAST
(Ti^) Super Fan Forced
j
°n
Operate oven Tempera-
A ture between 150 "175°C
Pre-heat 5-10 minutes
Meals:
Family meals, roast chicken,
roast pork, roast lamb, beef etc.
Includes vegetables and other
foods on different levels.
Open the door and allow the
oven to cool down. The smell
will soon dissipate. You are
now ready to cook.
If the smell persists then heat
each function for fifteen minutes on 200"C
FAN GRILLED STEAK
Fan Grill
(closed door grilling)
Operate oven Temperature
between 160 "200°C
Pre-heat 5 minutes on max
temperature. Turn thermostat
to 180°C during cooking
Meals:
Grilled steak, chops, sausages,
chicken peices.
Browning cheese toppings.
Use upper 2 shelf rack positons
The Oven Door Switch
Your oven has a door micro switch. This switch will automatically turn off any element and the oven fan when the door
is opened. This prevents the loss of heat when the door is
opened during cooking.
You can not grill with the door open. Static grilling is
possible for quick grilling with the door closed.
PIES,
PIZZA, QUICHES ! II BAKING, CAKES SCONES
*
l
Fan Forced
Operate oven temperature
between 140' 180°C
Pre-heat until oven
cycles at required temperature
Meals:
Cooking pies, pizza's, quiches,
potato dishes, general heating
such as sausage rolls, baked fish
and warming. Multi level baking.
i
\^%JJ
Fan Assisted
^ Operate oven temperature
between 140"
180° C
Pre-heat until oven
cycles at required temperature
Meals:
Baking biscuits, cakes etc on
middle 2 shelf levels. General
heating and warming, Casseroles.
Page 4
##0
,cd
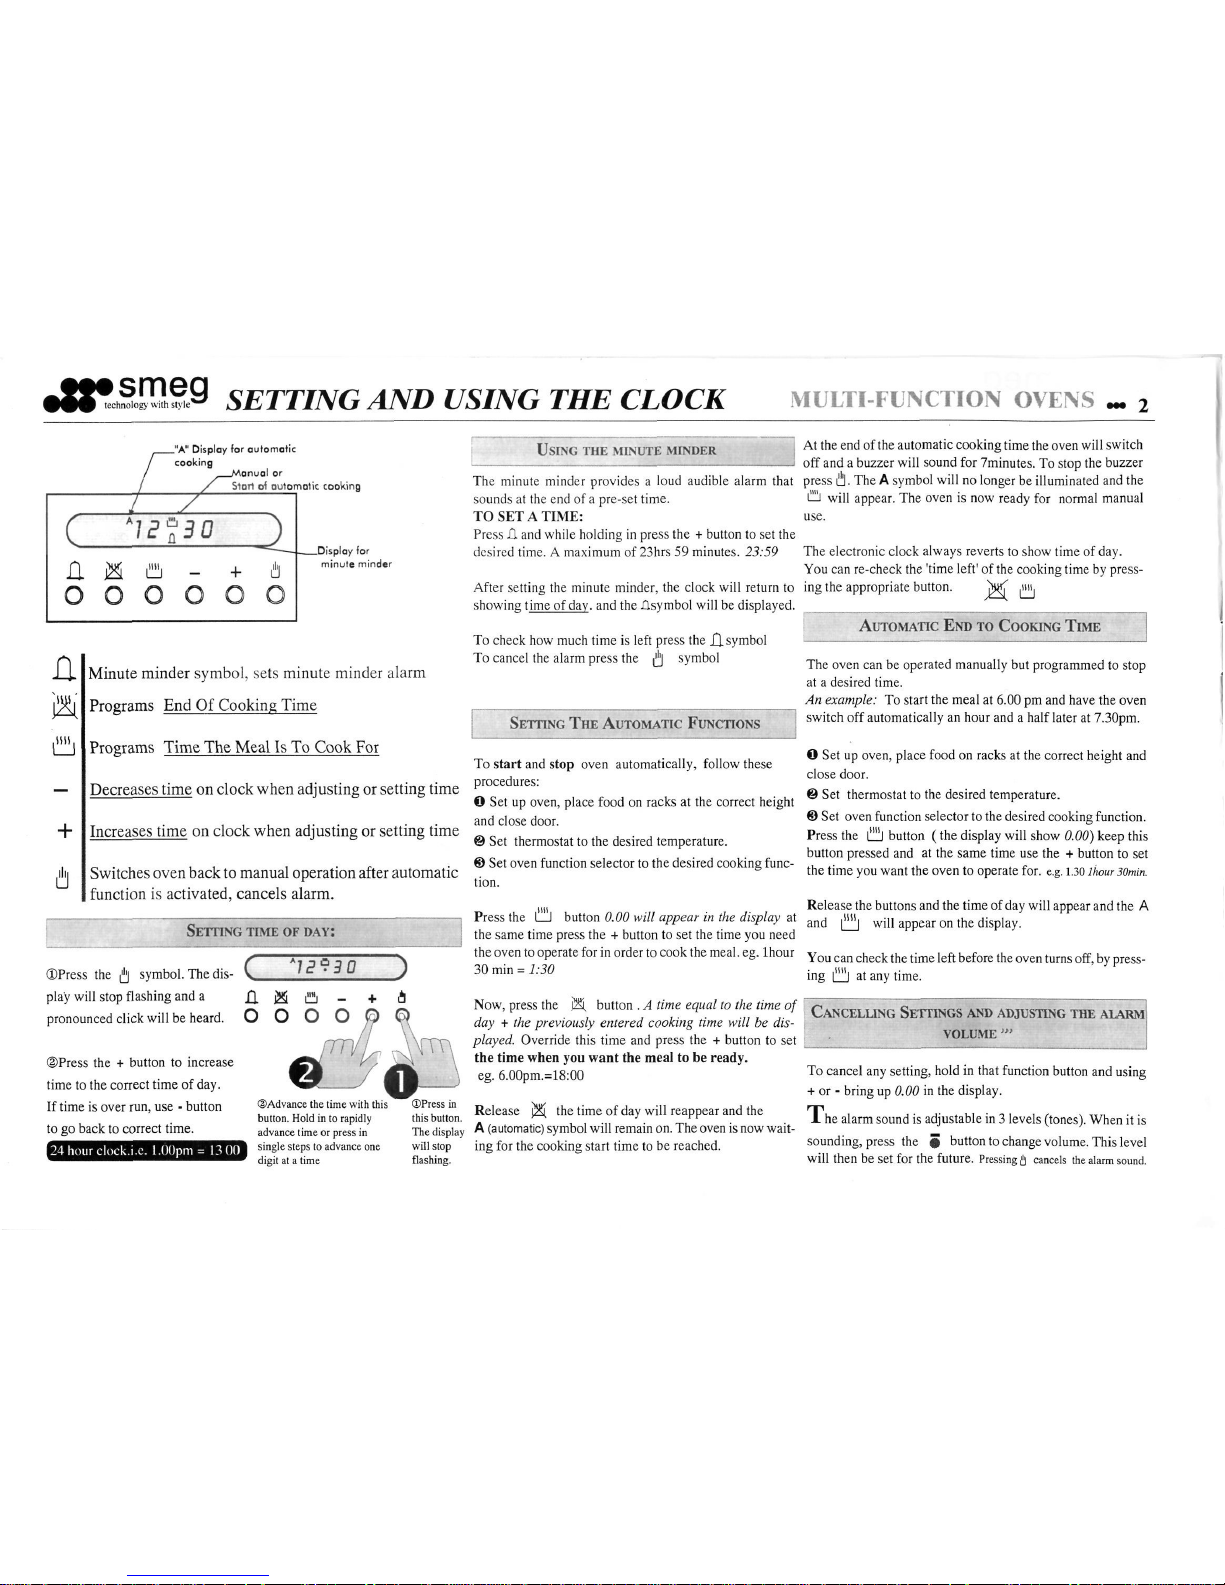
MULTI-FUNCTION OVENS —
2
"A" Display for automatic
cooking
anualor
Start of automatic cooking
USING THE MINUTE MINDER
Display for
minute minder
a
.MW.
+
a
Minute minder symbol, sets minute minder alarm
Programs End Of Cooking Time
Programs Time The Meal Is To Cook For
Decreases time on clock when adjusting or setting time
Increases time on clock when adjusting or setting time
Switches oven back to manual operation after automatic
function is activated, cancels alarm.
SETTING TIME OF DAY:
©Press the ft symbol.Thedis- l IE - 30 J
play will stop flashing and a £L j^ ffl - + A
pronounced click will be heard. O O O O $) Q
©Press the + button to increase
time to the correct time of day.
If time is over run, use - button
to go back to correct time.
24 hourclock.i.c.
1.00pm = 13
00
The minute minder provides a loud audible alarm that
sounds at the end of a pre-set time.
TO SET A TIME:
Press Jl and while holding in press the + button to set the
desired time. A maximum of 23hrs 59 minutes. 23:59
After setting the minute minder, the clock will return to
showing time of
day,
and the .^.symbol will be displayed.
To check how much time is left press the fj. symbol
To cancel the alarm press the Q symbol
At the end of the automatic cooking time the oven will switch
off and a buzzer will sound for 7minutes. To stop the buzzer
press
E| . The A symbol will no longer be illuminated and the
I—I will appear. The oven is now ready for normal manual
use.
The electronic clock always reverts to show time of day.
You can re-check the 'time left' of
the
cooking time by press-
ing the appropriate button. ">wf
,1111,
SETTING THE AUTOMATIC FUNCTIONS
© A
©Advance the time with this ©Press in
button. Hold in to rapidly this button,
advance time or press in The display
single steps to advance one will stop
digit at a time flashing.
AUTOMATIC END TO COOKING TIME
To start and stop oven automatically, follow these
procedures:
O Set up oven, place food on racks at the correct height
and close door.
© Set thermostat to the desired temperature.
© Set oven function selector to the desired cooking function.
Press the I I button 0.00 will appear in the display at
the same time press the + button to set the time you need
the oven to operate for in order to cook the meal. eg. lhour
30 min = 1:30
Now, press the J2S, button . A time equal to the time of
day + the previously entered cooking time will be dis-
played.
Override this time and press the + button to set
the time when you want the meal to be ready.
eg.
6.00pm.=18:00
Release |25( the time of day will reappear and the
A (automatic) symbol will remain
on.
The oven
is
now wait-
ing for the cooking start time to be reached.
The oven can be operated manually but programmed to stop
at a desired time.
An example: To start the meal at 6.00 pm and have the oven
switch off automatically an hour and a half later at 7.30pm.
O Set up oven, place food on racks at the correct height and
close door.
© Set thermostat to the desired temperature.
© Set oven function selector to the desired cooking function.
Press the lUHj button (the display will show 0.00) keep this
button pressed and at the same time use the + button to set
the time you want the oven to operate for. e.g. 1.30
lhour
30min.
Release the buttons and the time of
day
will appear and the A
and | | will appear on the display.
You can check
the
time left before the oven turns off, by press-
ing [^J at any time.
CANCELLING SETTINGS AND ADJUSTING THE ALARM
VOLUME
n>
To cancel any setting, hold in that function button and using
+ or - bring up 0.00 in the display.
A he alarm sound is adjustable in 3 levels (tones). When it is
sounding, press the # button to change
volume.
This level
will then be set for the future. Pressing fl cancels the alarm sound.
Page 5

###
,cc
QD
Cooking function
symbol
CONVENTIONAL COOKING
Top + lower element
2100 warts
SPECIALITY COOKING
MULTI-FUNCTIONOVEN
COOKING FUNCTIONS
CONVENTIONAL GRILLING
1800 watts
Only works with door closed!
FAST BROWNING
BASE
HEAT SYSTEM
Provide gentle base heat
from lower element. 1300
watts
PIES ETC FROM FROZEN
SUPER FAN FORCED
3 elements linked to give
total oven heating at 3000
watts
COMPLETE FAMIL Y MEALS
DEFROST
Fan assisted defrosting without
heating
FAST THAWING
FAN ASSISTED HEATING
Top and bottom elements + fan
distribution 2100 watts
CAKE AND BISCUIT BAKING
FAN GRILLING
Full grill element 2600 watts
Fan distribution
CLOSED DOOR GRILING
FAN
FORCED Element
surrounds fan for even heat
distribution
2200 watts
ROASTING & BAKING, MULTILEVELS
ADDITIONAL FUNCTIONS FOR MODELS SA650 & SA210
FAN GRILLING (ECONOMY)
Centre grill element 1800
watts + fan heat distribution
ECONOMY FAN GRILLING (door closed)
FAN LOWER HEATING
Lower bake element with fan heat
distribution (1300 watts)
LONG SLOW BAKING, FRUITCAKES
ALTERNATIVE FUNCTIONS FOR MODELS SA708 (70cm )
SUPER FAN FORCED
2 elements linked to give _^ ^ >^
total oven heating at 2900
watts
COMPLETE FAMILY MEALS
SMEG OVEN FEATURES
THERMO-SEAL OVEN
The oven compartment is thermo-sealed, which means
only small amounts of cooking vapours escape during
the cooking process. More heat and moisture are retained
in the oven during cooking. This results in faster cooking at lower temperatures and with less drying out of
food.
RECOMMENDATIONS
Because your Smeg oven has many cooking options you
may wish to experiment with different functions to cook
various meals and food types.
The oven is primarily as a fan oven, the use of static
( non fan functions) is an option.
(See cooking chart Pg 6).
Always cook meats elevated on the wire rack or grill
tray. The moving hot air from the fan ensures the food is
cooked completely without turning.
Do not open the oven door often to test food or baste.
Watch your cooking temperatures and times. This oven
heats very quickly on super fan forced and fan grill.
As a guide, lower normal cooking temperatures a mini-
mum of 20-30"C for recipes used in conventional ovens.
Temperatures above 200"C are not normally required.
For fan cooking 160 -175°C is very effective.
The use of 250 or maximum thermostat setting should
be done with caution. Refer "static grilling" Pg4.
PREHEATING
Warming the oven prior to cooking is always worth doing. Normally 5 minutes at the desired cooking temperatures is all that is needed. During winter condensation in
the oven increases. During this time we recommended
pre-heating on [Q] conventional heating for at least 10
minutes before cooking food on a fan function.
Page 6

#JS^-oH2fc9 USING THE COOKING FUNCTIONS MULTIFUNCTION OVENS
FAN COOKING
SUPER FAN FORCED
The oven function combines fanned hot
air produced from the very hot fan
element, and conventional top and
bottom element cooking to allow food to be
cooked very quickly. This allows cooking on
multiple levels at a time.
•5j£ Temperatures should not be higher than
180"C
•>•> Ideal for large items which require thorough
cooking for example large roasts, turkey and
ham.
•>£ This function can also be used to start the
cooking of a large item which can then be
completed on a slow bake (thermo-fan) or
fan forced cooking.
FAN FORCED
Cooking with just the fan and fan element is
ideal for all multi-level heating and baking. It
gives even heating and allows food
to
be placed
on any shelf position. Keep temperature under
180 C and pre-heat the oven.
FAN ASSISTED COOKING
FAN GRILLING
This oven function combines fan and uAu
conventional heating
to
allow food
to
be
cooked very evenly and quickly. Cooking on
multiple levels at the same time. It differs from
fan forced cooking in that heat is reflected from
the top and bottom elements.
It is ideal for roasts, poultry, biscuits, cakes and
general baking.
•>?£ Do not use the very top rack or lower
element cover positions.
-'£ A maximum of 2 levels of baking is
recommended.
-#•
Temperatures should be 20-30 ° C lower than
required in conventional ovens.
\pc')J
This is the the main method of grilling
in your Smeg
oven.
The fan grill system
offers fast healthy grilling at lower
temperatures with the door closed. This method
of grilling uses the themostat to control oven
heat, grilling without the need to turn the food.
See grill fan chart Pg6.
The oven combines fan and conventional grilling
to allow even grilling, with the fan reducing the
risk of burning.
-#-
Temperatures should not be higher than
200"C.
See grill chart Pg6.
•>:'"
Grill on one level only. Upper shelf position
3 or
4.
Other food can be in the oven at the same
time.
•>?c Ideal for all forms of grilling, snacks and
crisping of pasta toppings
plus
grilling of chicken
pieces, steak, sausages, bacon, chops.
CLEANING UP AFTER GRILLING
Allow oven to COOl. (To aid this, turn function controller to conventional heat and leave the thermostat off. This
will run the oven cooling fan.)
-#-
Remove roof liner "A" and wash clean.
•&-
Flip the grill rack over in the grill tray and
soak in water with a little detergent.
-#•
Wash up tray and grill rack in the
dishwasher or in the sink.
STATIC GRILLING
Can only be done with the door
closed!
•Sfs Use this function with caution!
Only for short periods of
time
for browning and
crisping. Maximum operating time is ten
minutes.
•>£"
Do not leave this function on while the oven
is unattended. Watch food carefully to prevent
burning.
/fc Be careful when opening the oven door, do
so by first cracking the door open just a few
millimeters. Then after 10-15 seconds open
fully.
•>:<•
The door is closed during grilling. Cook
only on one level. Use high rack position [4]
-#-
Set the temperature from 175"C to 225"C
to control the grill heat, otherwise use the high
temperatures for intense fast browning only.
-<:'-
Ideal for fast snacks that require crisping or
browning for
example:
Cheese on Toast, Grilled
Tomatoes, Bacon.
CONVENTIONAL HEATING
The oven operates with both top
element and bottom clement only. The
lower element is situated under the
removable lower element cover.
With heat provided from top and bottom this
function uniformly cooks food of-all kinds. Do
not use this function in preference to fan forced.
Heating and cooking from these elements is
slower than fan cooking functions.
•>:'-
Cook on one level at a
time.
Use centre rack
position or 2nd from top.
-Jfc Temperatures should not be higher than
200"
C.
Preheat the oven for 10 to 15min
•#-
Ideal for slow cooking of casseroles and
delicate baking such as souffles or pavlova.
SUPPLEMENTARY FUNCTIONS
DEFROSTING WITH FAN
The oven operates with fan only, no
heating, to quickly thaw out any type
of food.
Food can be placed on multiple levels.
For faster thawing use the Fan & Bottom
Element function at a low temperature of 50"C
FAN + LOWER ELEMENT
The oven combines fan and
conventional upper heating element to
allow even browning and heating of
<M)
foods without drying out the bottom of
the
food.
-#-
Maximum temperature 150°C
•#•
Cooking on one level only. Centre to
high shelf position.
•>!$•
Ideal for cooking of vegetable dishes,
pastas and au-gratin dishes
BASE HEAT SYSTEM
The base heating system operates with
the lower element on. It is a slow and
gentle bottom heat, ideal for browning the bottom of dishes when the base has not cooked
though.
Food should be placed on the lower element
cover or rack position 1.
As this function produces only a low heat, the
thermostat setting should not be higher than
120"C.
Page 7

#JJ*h§oE£9 THE OVEN FEATURES EXPLAINED MULTI-FUNCTION OVENS
THERMO-ZONE TEMPERATURE CONTROL
50 75
100
120 140 160
180
200 225
2*55
WARMING LOW HEAT WARM MODERATE HOT VERY HOT OVEN
MODEL SA650 has this selectable zone thermostat system. These temperature settings have
been arranged to provide maximum flexibility along with ease of
use.
Temperatures of 140,160,
180°C will cover almost all normal baking, roasting and fan grilling of family meals.
OVEN RACKS AND POSITIONS
MODEL DATA PLATE
Side racks
•Wire rack
Shallow dish
Grill rack and grill
tray
SLower element
cover
ABOUT THE OVEN
OVEN LIGHT CONTROL
The oven light has no separate control switch.
The oven light comes on when any cooking
function is selected.
The oven light will also come on automatically
when the door is opened.
CAVITY COOLING SYSTEM
The Smeg oven has an additional cooling fan.
This cooling fan helps keep the oven cool and
provides air ventilation
around the oven cavity.
When any function is se-
lected the this fan starts
automatically.
When operating the oven you will feel warm
air flowing out from under the bottom of the
oven door.
Open the oven door, by firstly just cracking
open the door just a little, the fan will capture
some of the steam from the oven. This is an
important user
tip
to reduce condensation when
opening the oven door.
PULL-OUT ROOF LINER
Your oven is equipped with a removable roof
liner "A". It protects the roof of the oven from
grease spatters. The roof liner pulls out easily
so it can be washed and cleaned after grilling or
roasting.
LOWER ELEMENT COVER
The lower element cover "
B"
is the
bottom shelf
of your
oven.
With any fan function, oven proof
dishes can be placed directly on this base.
This is removable for cleaning once the side
racks have been removed. This will only need
to be done if a spill over has occurred, other
wise as part of a 6 monthly oven maintenance.
THE THERMOSTAT CONTROL
On most models the oven temperature control
is variable.
Turn thermostat knob clockwise to the desired
temperature. Turn backwards anticlockwise to
return to the off position.
Throughout this manual we refer to lower temperatures than most people would expect to operate their oven. These temperature recommendations are important to reduce soiling and in
the successful operation of your Smeg oven.
THERMOSTAT INDICATOR
LAMP
The small orange lamp on the front of the control panel illuminates to show the oven is heating.
It switches off
once
the temperature selected
has been reached.
This lamp should switch on and off during the
cooking process, even when grilling.
Because the loss of heat from this oven is low it
takes some time for the temperature to drop inside the oven and the thermostat to cycle.
OVEN DOOR CONTROL
Your Smeg oven has a door micro switch. This
switch will automatically turn off any element
and the oven fan when the door is opened. This
prevents the loss of heat when the door
is
opened
during cooking.
You cannot grill with the door open. Static
grilling is possible for quick grilling with the
door closed.
Page 8

COOKING CHARTS
MULTI-FUNCTION OVENS
«.
6
yC Selection
by
food type
^k Recomended function
BEST FUNCTION TO USE
FOOD TYPE
MEATS
Roast Lamb & beef
Roast pork
Steak
Chops & sausages
Hamburger patties
CHICKEN
Whole chicken
Chicken breasts & fillets
Chicken legs & pieces
Grilled Chicken
FISH
Whole ( baked)
Fillets
CASSEROLES
Meatballs
in
spaghetti
BAKING
Bread
Cakes
Scones
EGG RECIPES
Custards
Quiche
Pavlova & souffle
TOPPINGS
Toast
and
Cheese
on
toast
Au gratin dishes
COMPLETE FAMILY MEAL
Roast meat, veges, roast
potatoes, fruit
pie
desert
N^j)
•
•
•
•
•
•
•
•
•
\^y
•
•
•
•
•
•
••
•
•
••
•
•
•
\p°0)
•
*
•
•
••
•
•
ftgift
•
•
•
•
•
•
•
•
#
•
•
•
•
•
•
•
*«•—•*
*
•
•
•
•
•
•
-^s
•
•
•
•
•
•
•
$
\^y
*
•
•
*
•
•
•
•
FAN GRILLING CHART
<v°>)j
Times given
are
based
on a
pre-heated oven.
FOOD
STEAK
LAMB
OR
PORK
CHOPS
CHICKEN WINGS
OR
PIECES
CHICKEN FILLETS
KEBABS
SAUSAGES
FISH FILLETS
FISH FINGERS
HASH BROWNS
CHEESE TOPPINGS
CHEESE
ON
TOAST
SHELF
4
3
3
3
3
3
3
3
4
3
4
TEMP'C
180
- 190
160
- 175
160
- 175
160
- 175
160
- 175
160
- 175
150
- 160
160
- 175
180
- 190
160
- 175
180
- 190
TIME
MINUTES
8-10
8-12
10-15
10-15
10-15
10-15
15-20
10-15
8-10
8-10
6-8
FAN FORCED
COOKING CHART
Times given
are
based
on a
pre-heated oven.
FOOD
BAKED WHOLE FISH
ROAST PORK FILLET
ROAST CHICKEN
MEAT LOAF
QUICHE
LAMB CURRY
MEAT
PIE
LASAGNE
APPLE
OR
FRUIT
PIE
APPLE CRUMBLE
SPONGE CAKE
SHELF
2
2
2
2
2
2
1
2
3
2
3
TEMP
°C
160
160
160
160
160
140
- 160
150
- 160
160-175
160
160
160
TIME
MINUTES
20
40
100
-120
60
20-25
120
60
30
min
40
40-50
25
Page 9

#XJ*S[Qfte9 LOOKING AFTER THE OVEN
MULTI-FUNCTION OVENS
REMOVING AND CLEANING
THE SIDE RACKS
Side racks "A" are removed by unscrewing the
large nut
"B"
on each side and pulling the racks
slightly to the centre of the
oven.
The side racks
fit in most dishwashers for cleaning, otherwise
use Scotch-brite or steel soap pads to keep clean.
Replace the side racks fitting " C"
into the back
liner. Screw the nuts
"B"
in firmly
When installing the
racks put a little
cooking oil on the
thread of the stud
"B",
this will stop the
nut seizing on at later
date.
GENERAL
CARE
AND
MAINTENANCE
Before cleaning the oven always switch off
power and allow a hot oven to cool down.
Regular cleaning will keep your oven looking
good for a long time. If fat and food splashes
are left they will bake on and be difficult
to
clean
off
later.
The oven should be wiped out with a
damp cloth on a regular basis.
CLEANING PROCEDURES
External Surfaces, buttons and selector
knobs.
Wipe the outside of
the
oven regularly with a
soft damp cloth using a cream cleaner or spray
on-wipe off all purpose cleaners that are safe
for painted surfaces. Do not use chemical or
abrasive cleaners or materials.
CHANGING THE OVEN LAMP
Replacement light bulbs are available from
Smeg dealers or Smeg approved service centres.
Part
No.S9563
Use only a Smeg light bulbs, they
are special high temperature lamps.
1.
Switch off power to oven.
2.
Unscrew glass cover "A" by turning anti-
clockwise.
3.
Screw out light bulb and replace.
4.
Refit glass cover, do not over tighten.
REPLACING THE DOOR SEAL
Regularly check the oven door seal as it must
be intact at all times. If it becomes broken or
worn REPLACE immediately.
^ To remove seal "A" lift from tab "B"
% Sponge seal with hot soapy water.
$£ Re-mount seal "A" keeping the longer side
horizontal and inserting tabs "B" into the
holes "C" starting with the upper holes.
REMOVING THE OVEN DOOR
Removing the oven door
1.
Open oven door .fully.
Lift catch "B" and hook into arm "C" on
both sides.
2.
With hands clasping either side of the
door lift as if
closing the door
until its about
30%
opened . Lift
slightly and pull
the door forward
removing it from
the oven. If you
need to force the
door then its not
in the correct
position.
Refitting the Oven
Door
1.
The parts A, B, & C must be latched
together.
2.
Place the door in front of
the
oven at a
position about 70% open.
3.
Fit the long arms "C" into the top slots on
the oven sides, keeping the door square
so both arms go in together.
4.
Lift the door up and backwards towards
you slightly until you feel the long arms
catch in their slots.
5.
Lower the door as if
opening,
inserting
the lower arm "A" into the bottom slot on
oven side, guide in with forefinger.
6. Make sure that the notch in arm "A"
engages in on the lip of
the
oven hinge
section.
7.
Try to wiggle the door gently from side
to side, it should be firm and clearly
latched into the oven. If force is required
to fit the door then the door position is
incorrect.
8. Open door fully, release catch "B".
9. Close the door slowly and check that it
closes correctly, the door is square to the
oven and not catching on any part.
If you have
difficulty in removing or refitting the
door,
we
recommend you
visit
any Smeg
appliance
retailer.
They will willingly demonstrate
this
procedure.
LOOKING AFTER THE
CONTINUOUS CLEAN LINERS
Your Smeg oven is fitted with special continuous clean liners. These are brown coloured panels fitted to the side and -^^
rear of
the
oven interior.
They are coated in a special enamel that absorbs
cooking fats into the coating. These fats are then dispersed
thinly over the surface of the liner so the heat
from
the
oven will oxidize
the
fats and burn them
out during ongoing cooking.
Using the oven at the lower temperatures will
help these liners work best.
DOS AND DON'TS WITH CC LINERS
% Never spray oven cleaner or any chemicals
onto the liner surface.
% Never scratch the surface coating.
% Remove and wash every 6-12 months in
very hot water with a little detergent.
% Splotchy marks and stains on the liners are
normal.
% Replace liners if they become damaged.
Page 10

LOOKING AFTER THE OVEN
MULTI-FUNCTION OVENS ...
8
CLEANING THE OVEN
COMMERCIAL OVEN CLEANERS
There are several brands of commercial oven cleaners that are
available from most supermarkets. These products are a spray on
foam and are generally caustic based. These products are fine to
use on the inside of the oven only once the continuous clean liners are removed.
You can clean the side racks, oven interior, roof
liner,
oven racks
and trays. Always follow the direction on the product.
Never spray these cleaners onto any stainless steel or white
painted parts of the oven. Be very careful.
CLEANING THE INTERIOR OF THE OVEN
Although the oven is fitted with continuous clean liners, the oven
will still get dirty and needs periodic maintenance.
The interior of
the
oven strips down for ease of cleaning:
W: Remove all internal racks and trays.
%£ Remove pull-out roof liner
% Remove the side racks
% Remove continuous clean liner panels, side and back
% Lift up lower element cover and remove, (this is hooked over
the back of the lower element, sometimes it is a little difficult to
get out.)
Once the interior
is
stripped of hardware the cavity and elements
can be sprayed with oven cleaners and wiped clean with paper
towels.
The fan blade on the oven fan gets quite dirty, It is
held on by a knurled nut with a left hand thread. This
blade can be either removed and washed or sprayed
with oven cleaner and sponged off.
Once the oven racks and side racks have been removed they can
be cleaned with scouring pads, like Scotch-brite, steel wool and
abrasive cleaners.
NB.
The side racks will easily fit into the dishwasher.
The enamel trays can be cleaned with hot water and detergent
and abrasive cleaners.
CARING FOR THE STAINLESS STEEL FINISH
The stainless steel exterior of your oven is easily scratched and
once marked they are difficult to remove.
Take care of the stainless steel exterior by wiping with a clean
damp cloth and an abrasive free cleaner. Methylated sprits works
well to remove finger
marks.
There are commercial stainless steel
cleaners available. Be careful they do not polish the surface as
this will leave a mark on the brushed finish of the oven.
PROBLEM SOLVER
CONDENSATION AND STEAM
Often there is a concern from new users to Smeg ovens with the
amount of steam and condensation inside the oven. A greater
level of moisture than is normally expected inside the oven is
normal and helps to keep the food moist during cooking. The
amount of moisture is dependent on the food type, i.e. if it is
fresh, defrosted or still frozen when cooking.
Excessive moisture can sometimes be found and comes from:
% Frozen food or food that is not fully defrosted.
% Not pre-heating the oven.
^ Using static ( non fan) functions to cook meat.
% Excessive oven temperatures. Greater than 160-175 "C.
$z Adding extra liquid to increase oven humidity.
W Using a covered roasting dish or oven bag.
Climatic conditions also play a part in oven condensation. During winter it pays to pre-heat the oven longer to reduce condensation.
WATER
LEAKS OUT THE
DOOR WHEN COOKING
This is sometimes noticeable when the door is opened during
roasting meats. To eliminate this:
Ensure the oven is well pre-heated. Keep the door closed, do not
inspect the food until you are expecting it to be ready. You do not
need to baste nor turn food. The more you open the door to inspect or test the food the more condensation will result.
WHAT TO DO IF
THE OVEN WILL NOT HEAT
%£ Check power is on (is the clock flashing 0:00)
^ Check the cook is set correctly, not on automatic yA 0.00 )
% Check the OJ symbol is showing on the clock display.
% Check you have both temperature and function selected.
THE OVEN LIGHT WILL NOT GO
The oven light is controlled off the door micro switch. It will
work when:
% Any cooking function is selected.
The oven door is opened.
Always check the oven lamp. Replacing the oven lamp is not
covered under warranty. (See Pg7.)
NO ALARM SOUND FROM CLOCK
The clock has 3 tone adjustments. Refer
to
Pgl. or
Pg2.
for notes
on adjusting the tone levels.
THE OVEN SHUTS DOWN
This oven is protected by a safety thermostat. If your oven stops
and the clock
goes
out giving the impression of a power cut, your
oven may have overheated. The oven will reset automatically
once the temperature in the cabinet has lowered. You will need
to set the oven clock again as it will be flashing (0.00).
If this happens check:
What temperature and cooking function were you using when
this problem occurred? ( using static non fan functions and high
oven temperatures over 200°C for long periods can cause this
problem).
The cavity cooling fan is running. (turn on any cooking function
and feel for air coming out from just under the oven door.
Use the oven again, only if the problem persists should you need
to consider after sales service.
Page 11

SA708 SPECIAL FUNCTIONS
MULTI-FUNCTION OVENS
SPECIAL FEATURES FOR
MODEL SA708
The Smeg 70 cm wide oven model SA708 has
some special features:
ROTISSERIE GRILL OPTION:
The rotisserie grill operates on any cooking
function as long as the turn spit is fitted into
the drive motor. "B"
The rotisserie can be used with :
FAN GRILL
STATIC GRILL
FAN FORCED
\V°'J)
Use thermostat set
at 150-175°C
Use normal cooking
temperatures,
as
described
in this manual.
ASSEMBLE TURN SPIT AS SHOWN
Insert rotisserie into drive motor "B" with
function controller set to 0 OFF position.
REMOVING THE DOOR SEAL
Clean in hot soapy water and replace.
INNER DOOR GLASS
It is possible to clean the inner door glass.
% The door should be removed from the oven.
/& loosen the screws "A" by two turns.
% firmly secure the door glass by holding it
on the lower and upper sides.
% Pull the panel
"B"
towards you evenly until
it is removed.
^ Clean in hot soapy water and replace.
NOTE: The glass must be repositioned with
the writing
"D"
legible, this means the reflec-
tive surface is facing the right direction.
REMOVING THE DOOR
The door on the SA708 oven removes slightly
differently to that described on Pg 7.
1.
Open door fully
2.
Remove the bottom of the oven door seal,
(fig 1)
3.
Flip
up the tab
"B"
on each hinge upwards until
they catch, letting the door rest on the tabs "B"
the door will remain adjar. (fig 2)
4.
Hold the door firmly on both sides, close
slightly and lift up and towards you in order to
remove it from the oven.
REFITTING THE DOOR
To reposition the door, reverse the procedure.
1.
Place the door onto the oven at about 30%
open, (fig 3)
2.
Slip the left and right hinge arms into the
oven with the door square and level, so both
arms go in evenly.
3.
Once inserted, open the door fully. Remove
and fold away the tabs "B".
4.
Refit the door seal.
5.
Close the door slowly to ensure there are no
problems.
Page 12

WARRANTY AND SERVICE
MULTIFUNCTION OVENS ^
10
IDENTIFYING YOUR OVEN MODEL
The appliance DATA PLATE is attached on
the inside of the left hand frame panel.
The model No. eg. SA398
BEFORE CALLING FOR WARRANTY
ASSISTANCE
OVEN IS NOT OPERATING
/fc Check power is on.
•#-
Check clock is correctly set and on
manual.
•>£ The oven door is shut.
The oven light bulbs are not covered by warranty. If the oven light does not go, check the
lamp first.
OPERATING PROBLEMS
If you are have problems getting
the
results you
expect from your oven, read through this
manual again and check you are following the
procedures.
Your
Smeg
oven operates differently from most
other ovens and will require some adjustment
in cooking technique.
•••smeg
^B^B^B with stylc^^
Smeg Appliances are distributed by:
AUSTRALIAN DISTRIBUTOR
OMEGA APPLIANCES PTY LTD
2-8 BAKER ST
EAST BOTANY NSW
P.O.
BOX 55, BOTANY NSW 2019
PHONE: FREE CALL 1800-815-581
NEW ZEALAND DISTRIBUTOR
APPLICO GROUP LTD
120 CAPTAIN SPRINGS ROAD
ONEHUNGA, AUCKLAND
PRIVATE BAG 92900, ONEHUNGA
AUCKLAND.
PH (09) 574-1050 FAX (09) 574-1051
SERVICE AND WARRANTY
Smeg appliances are covered by a 2 year (24month) exclusive warranty. It is important to
record your Date of Purchase and retain your original purchase invoice.
If you have moved into a home with the product already installed and you do not know the date
of purchase, you must record the date you took occupancy and the name of the builder or estate
agent.
Proof of purchase is required in order to obtain warranty service.
Smeg products are only warranted to the original (first) user.
We recommend that you record these details here as well as filing the invoice and any other
details in a safe place.
Dealer from whom the product was purchased:
Date of Purchase: Model No:
Each country has consumer legislation that applies. Any warranty offered by the distributor is in
addition to the rights available to you under that legislation.
HOW TO OBTAIN SERVICE
After sales service is available through a national service network.
AUSTRALIA
Sydney
Queensland
Newcastle
Canberra
Wagga Wagga
Victoria
Tasmania
South Australia
Western Australia
Telephone No.
(02)9384 5678 sale/adim
(02)9384 5633 service
(07)3268 4911
(049)614 811
(06) 280 7099
(0269) 213 888
(03)9795 1177
(008)63315184
(08) 8346 1888
(09) 356 5555
(02) 9666 5529
(02)9316 7528
(07)3268
3112
(049) 622
738
(06) 280
7137
(0269)
214 526
(03)9795
1017
(03) 6331-7765
(08) 3840 1034
(09) 356 5556
NEW ZEALAND
For service assistance, contact the retailer where the appliance was purchased, they will arrange
service for you.
Or contact Applico Group Ltd. directly on (09) 574-1050 or Toll free on 0800-65-55-25
Service Direct Fax. (09) 574-1071
Page 13

•••smeg
^PQMPr technology
Smeg Appliances are distributed by:
AUSTRALIAN DISTRIBUTOR
OMEGA APPLIANCES PTY LTD
2-8 BAKER ST
EAST BOTANY NSW
P.O.
BOX
55,
BOTANY NSW 2019
PHONE: FREE CALL 1800-815-581
NEW ZEALAND DISTRIBUTOR
APPLICO GROUP LTD
120 CAPTAIN SPRINGS ROAD
ONEHUNGA, AUCKLAND
PRIVATE BAG 92900, ONEHUNGA
AUCKLAND.
PH (09) 574-1050 FAX (09) 574-1051
 Loading...