

Page 1
Contents
1. SAFETY AND USE NOTICES ........................................... 16
2. INSTALLING THE PARTS................................................. 17
3. POSITIONING ................................................................... 20
4. WATER DRAIN.................................................................. 22
5. USE OF THE SINK ............................................................ 23
6. DESCRIPTION OF THE CONTROLS ............................... 24
7. CLEANING AND MAINTENANCE..................................... 25
INSTRUCTIONS FOR THE USER: these contain user advice, description
of the commands and the correct procedures for cleaning and maintenance
of the appliance
INSTRUCTIONS FOR THE INSTALLER: these instructions are intended
for the qualified technician who must perform the installation, put it into
operation and test the appliance
15
Page 2
Instructions for safety and use
1. SAFETY AND USE NOTICES
THIS MANUAL IS AN INTEGRAL PART OF THE PRODUCT. IT MUST BE
KEPT INTACT AND WITHIN EASY REACH THROUGHOUT THE LIFECYCLE
OF THE SINK. WE ADVISE YOU TO READ THIS MANUAL AND ALL THE
INSTRUCTIONS IT CONTAINS CAREFULLY BEFORE USING THE SINK. IT
MUST BE INSTALLED BY QUALIFIED PERSONNEL AND IN ACCORDANCE
WITH APPLICABLE REGULATIONS. THIS SINK HAS BEEN DESIGNED FOR
OUTDOOR DOMESTIC USE, AND IT CONFORMS WITH THE CURRENTLY
APPLICABLE EEC DIRECTIVES.
THE MANUFACTURER CANNOT BE HELD LIABLE FOR ANY USE OTHER
THAN AS INDICATED IN THIS MANUAL.
DO NOT LEAVE WASTE PACKAGING UNATTENDED IN THE DOMESTIC
ENVIRONMENT. SEPARATE THE VARIOUS WASTE MATERIALS FROM THE
PACKAGING AND DEPOSIT THEM AT THE NEAREST DIFFERENTIATED
COLLECTION CENTRE.
IMMEDIATELY AFTER INSTALLATION IS COMPLETE, CARRY OUT A
SHORT TEST ON THE SINK IN ACCORDANCE WITH THE INSTRUCTIONS
GIVEN IN THE MANUAL.
The manufacturer cannot be held liable for damage to persons or
property as a result of failure to observe the above instructions,
interference with any part of the product or the use of non-original spare
parts.
16
INFORMATION FOR USERS
In accordance with Directives 2002/95/EC, 2002/96/EC and 2003/108/EC, regarding
reducing the use of dangerous substances in electrical and electronic equipment and
the disposal of waste, the crossed-out waste bin symbol on the equipment indicates
that, at the end of its useful life, the product must be collected separately from other
waste. At the end of the product's useful life, the user must therefore deposit the
equipment at a suitable differentiated collection centre for waste electrical and
electronic equipment or return it to the seller when purchasing an equivalent piece of
equipment, on a one-for-one basis. Suitable differentiated collection so that the waste
appliance is recycled, processed and disposed of in an ecologically compatible way
contributes to the avoidance of any negative effects on the environment and health,
and facilitates the recycling of the constituent materials of the appliance. Illegal
disposal of the product by the user will lead to the application of administrative
penalties.
Page 3
Instructions for the installer
2
4
1
6
5
7
8
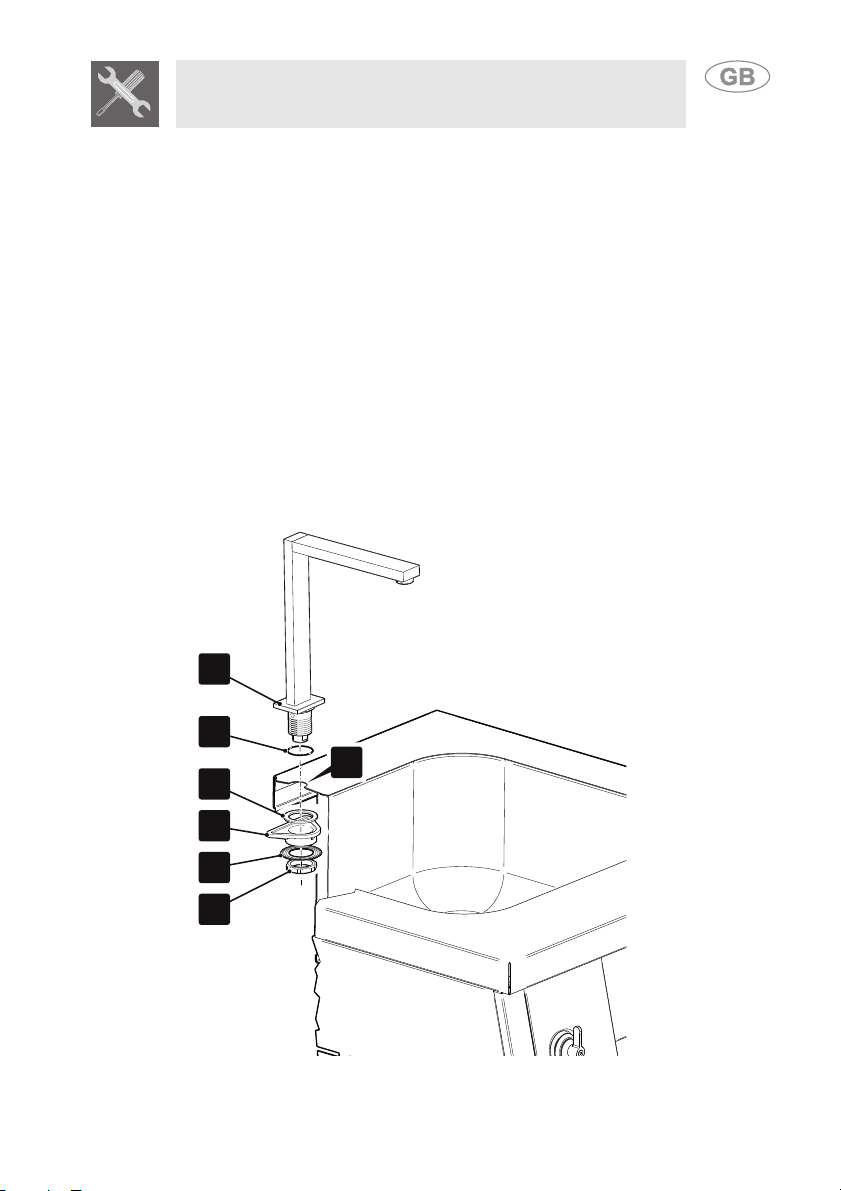
2. INSTALLING THE PARTS
2.1 Installing the tap
Prepare the area where the tap is to be installed then proceed as
follows:
• Insert the tap (2) into the housing hole (1), making sure that the oring seal (4) is in place between the tap and the sink contact
surface.
• Underneath the sink, insert the plastic below-sink reinforcement (5),
together with the rubber seal (6).
• Fix the tap in place by inserting the mounting flange (7) and the
hold-down nut (8); check that the tap is in the correct position in
relation to the sink and tighten the nut using a suitable spanner or
similar tool.
17
Page 4
Instructions for the installer
RECTANGULAR OVERFLOW
2.2 Installation diagram for sink parts
18
Page 5

Instructions for the installer
1
2
3
4
5
5
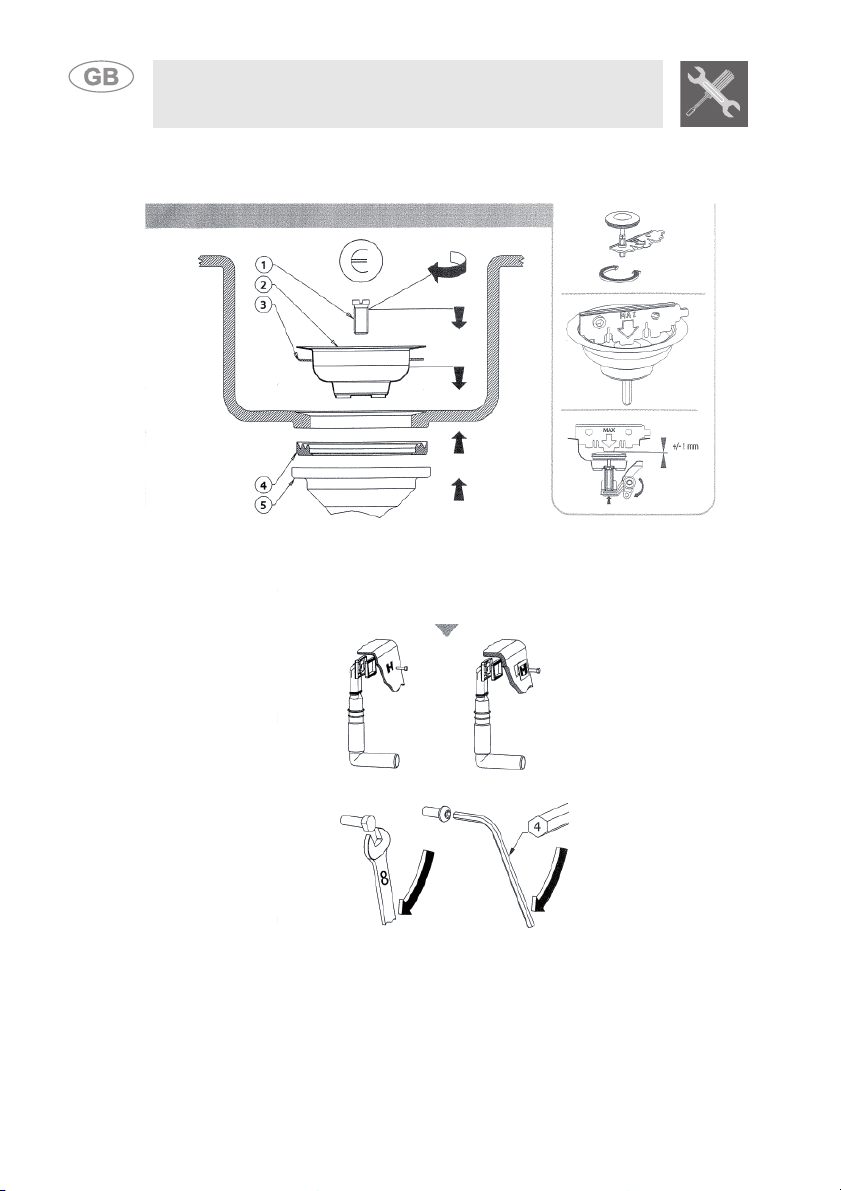
2.3 Overflow drain
• The installation provides the option of connecting the flexible tube to
the overflow drain control.
• Insert the end of the tube (1) into the pin (2) on the drain control (3).
• Attach the plate (4) using the screws (5) as shown in the diagram.
• Check that it is functioning correctly by filling the sink with water and
turning the handle at the front.
19
Page 6

Instructions for the installer
FRONT
VIEW
SIDE
VIEW
POSSIBLE HOLE FOR REAR WATER
CONNECTION
POSSIBLE HOLE FOR
LOWER WATER
CONNECTION
WATER DRAIN GAP
WATER DRAIN GAP
3. POSITIONING
3.1 Built-in installation
WATER
CONNECTION
TUBE 1/2” f
POSSIBLE HOLE
FOR WATER
CONNECTION IF
THERE IS A BACK
WALL
20
Page 7

Instructions for the installer
3.2 Installation on a trolley
See the instructions provided with the trolley to install the sink like a
normal barbecue.
3.3 Connection to the water distribution network
Connect the water intake connector on
the back (A) to a water connector with a
1/2” female threaded end, taking care to
screw them onto the tube tightly.
If the water tube is new or has been
unused for a long period, feed water
through it before connecting it up to
make sure that the water is clear and
free of impurities. If this precaution is not
taken, there is a risk that the water
intake will get blocked and damage the
appliance.
21
Page 8

Instructions for the installer
4. WATER DRAIN
The water drainage can be connected up in three different ways
depending on requirements and the location of the sink.
The drain can be connected:
• to a tank-type container
• for dispersion into the environment
• to the network.
4.1 To a tank
In this case, a quick coupler joint is required for the drain.
A tube with a suitable diameter should then be connected up and
inserted into the coupler, locking it with a clamp or similar part.
Check the water level inside the tank and empty it if it is full.
PLEASE NOTE!
To ensure that the tube does not detach accidentally and spill
water into the surrounding area, make sure that it is securely
attached to the drain connector.
Similarly, check that the tube is inserted properly into the tank.
4.2 For dispersion away from the sink
The connection is the same time as the one used for the tank.
It is important to establish in advance where you wish to direct the
drainage water.
Connect a tube long enough to convey the water to the intended
discharge point.
You are advised to discharge the water to a drain well which is
connected to the sewage system.
22
4.3 To the network
For connection to the water distribution network see SECTION 4 CONNECTION TO THE WATER DISTRIBUTION NETWORK
Page 9

Instructions for the user
1 2
5. USE OF THE SINK
5.1 General instructions and advice
Before using the sink, make sure that the water distribution network
connections and the sink installation have been performed correctly.
Using control (1), the water flow can be adjusted by turning it to the right
to increase the supply or to the left to reduce the supply. To drain the
water, turn control (2) to the right or left.
23
Page 10

Instructions for the user
6. DESCRIPTION OF THE CONTROLS
TURNING RUNNING WATER ON/OFF
Enables running water to be turned on and off and the flow to be adjusted.
OPENING/CLOSING THE DRAIN
24
Enables the drain in the sink to be opened and closed.
DRAIN
Drains and discharges the water from the sink.
TAP
Supplies the water.
BASIN
Dimensions: 450 mm x 400 mm h=180 mm
SHELF SPACE
Useful for storing sponges or detergents.
Page 11

Instructions for the user
7. CLEANING AND MAINTENANCE
7.1 Cleaning stainless steel
Stainless steel needs to be cleaned regularly in order to keep it in good
condition.
To clean and preserve stainless steel surfaces, always use only
special products which do not contain abrasive or chlorine-based acidic
substances.
How to use: pour some of the product onto a damp cloth and wipe over
the surface, rinse carefully and dry with a soft cloth or a chamois
leather.
Never use metal scourers or sharp scrapers to avoid
damage to the surfaces.
Use standard non-abrasive products for steel, and wooden
or plastic implements where necessary.
Rinse the sink carefully and dry with a soft cloth or a
chamois leather.
25
Page 12

Instructions for the user
1
2
3
4
7.2 Inspection and cleaning of the drain
26
If the outflow of water in the sink is not continuous, the drain needs to
be cleaned (1).
Place a container underneath the drain to catch the water once the
drain tube has been detached (2).
Remove the ring nut (3) then detach the drain tube (2); check for waste
inside and remove it so that water can pass through freely.
Reassemble the drain as it was originally and turn on the tap to check
that water is draining correctly.
 Loading...