

Page 1

English | 1
01-10-2012
ENGLISH (Translation of the original instructions)
CONTENTS: page
INSTRUCTIONS FOR THE INSTALLER
I. WARNING 2
II. PRELIMINARY OPERATIONS 2
III. INSTALLATION AREA 2
IV. PREPARING FOR INSTALLATION 3
V. ELECTRICAL CONNECTION 3
VI. SPECIFICATIONS 6
INSTRUCTIONS FOR THE USER
I. WARNING 7
II. FIRST USE 8
III. ORDINARY MAINTENANCE 8
IV. EXTRAORDINARY MAINTENANCE 9
V. MAINTENANCE IN CASE OF BREAKAGE 9
VI. CONTROL PANEL 10
VII. ADVICE DURING COOKING 10
Page 2
English | 2
INTRODUCTION
Dear client, thank you and congratulations for buying this appliance; we are confident that this is the
beginning of a positive and long-lasting collaboration.
This manual has all the necessary information for the correct use, maintenance and installation of
this appliance. The objective of this manual is to enable the technician and user to take all measures
and precautions necessary for the safe, efficient, long-term use of the appliance.
Keep this booklet in a safe place, over the entire life cycle of the product for subsequent reference by
the operators designated to use and specialised technicians.
Where documents are lost or damaged the replacement documentation must be requested directly
from the manufacturer or retailer.
The manufacturer is not held liable for any damage caused by people or things or for inappropriate
use of the appliance, modifications or repairs carried out by unauthorized personnel or used with
spare parts not recommended by the manufacturer and not intended for use with this model.
This appliance complies with the EEC directives in force.
INSTRUCTIONS FOR THE INSTALLER
I. WARNING
Read this instructions booklet carefully before starting the installation and start-up operations.
All installation, assembly, assistance and extraordinary maintenance shall be carried out by qualified
personnel and supplied with necessary professional (authorisations by the manufacturer or retailer),
in accordance with local laws in effect where installation takes place regarding product and
workplace safety.
Incorrect installation, assistance, maintenance, cleaning, tampering or modifications can cause malfunction,
damage and breakage.
The appliance must only be used for cooking or heating of foods in industrial kitchens. Any other use is
inappropriate and dangerous.
II. PRELIMINARY OPERATIONS
On receipt of the product, make sure it has not been damaged during transport and that the packaging has
not been tampered with. In the case of damage or missing parts inform the carrier and retailer/manufacturer
immediately, indicating the code (Art.) and serial number (Ser N°) and attach a photo.
Check that the installation area is kept clear so that doors, corridors and passageways are accessible.
WARNING: the appliance may fall over during transport leading to breakage and damage to things and
people. Use suitable transport capable of taking the weight of the appliance. Do not drag or lean the device
for any reason. Lift it up straight from the ground and place horizontally.
III. INSTALLATION AREA
The appliance shall be installed in enclosed and well ventilated areas (not outdoors).
Before positioning the appliance, check the overall dimensions and the exact position of the electrical, water
connections.
Make sure that it is placed so that the door may be fully opened.
The appliance is not meant to be fitted and a 5 cm space must be left all round it.
It is not advised to place it near heat, fryers or other hot liquids. If this is not possible at least respect the
following distances from machinery: 50 cm from the sides and above the appliance and 70 cm from behind.
Do not place the device near materials or containers of inflammable liquids (such as walls, furniture, screens,
gas canisters) as it can be a fire hazard. If this is not possible, cover the inflammable parts with fire and
heatproof material and by checking fire hazard regulations.
Page 3
English | 3
IV. PREPARING FOR INSTALLATION
Remove the outer packaging (wooden caging and/or carton box) and dispose it in compliance with the laws
in force in the country of installation.
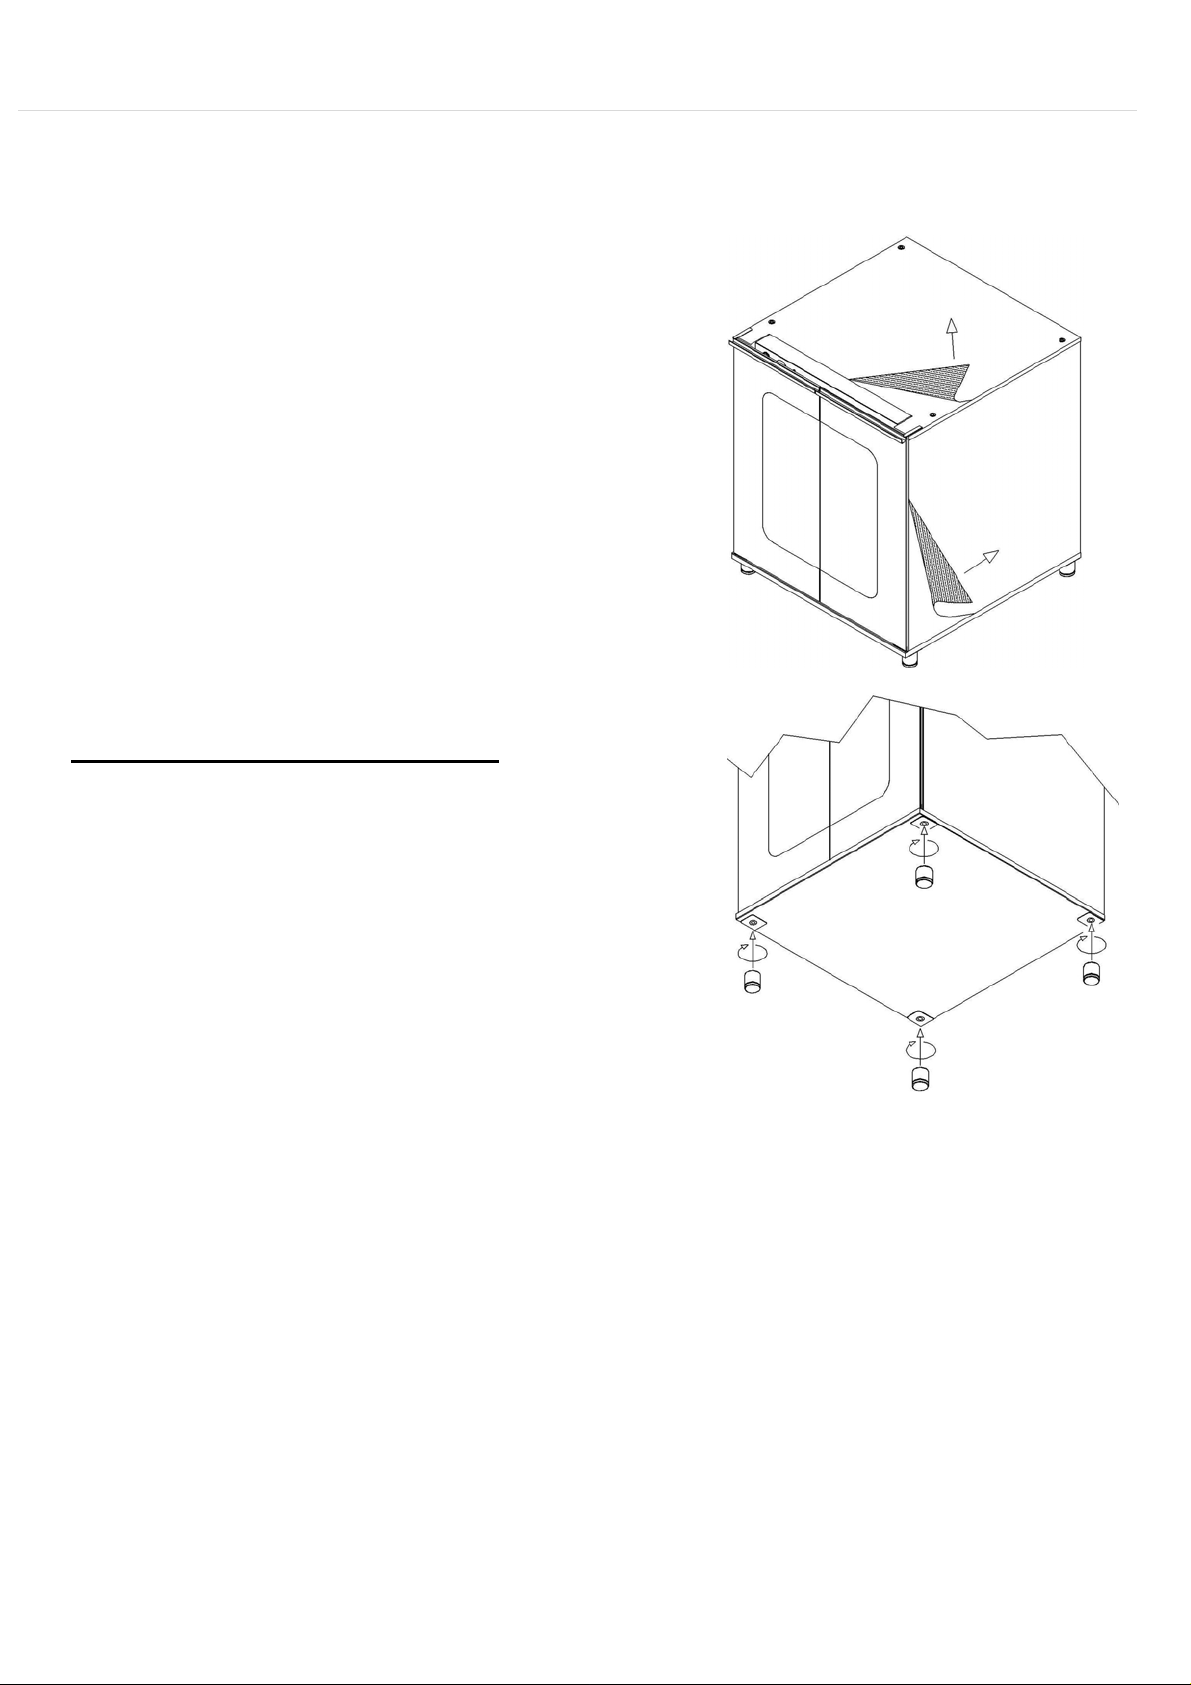
REMOVING PROTECTIVE FILM ETC.
Remove the protection film from the external and
internal walls. (See image)
Remove all information covering from the inside,
and take off all plastic packaging.
STANDS ADJUSTMENT
Do not use the appliance without stands.
Take the stands from inside, raise the device on one
side and screw them in the positions shown. They
have threaded inserts ( see image).
If they are not used, this prevents airflow from cooling
the electric parts and outsides of the device which
causes over-heating and damage to components.
By placing the appliance flat it will ensure correct
functioning. This can be achieved by fitting the stands
correctly and using a spirit level.
V. ELECTRICAL CONNECTION
WARNING: Mains connection must be carried out by a qualified and authorised technician according
to national, international and local laws in the country where it is installed.
Before mains connection, ensure that the frequency (…..V) and voltage (….Hz) meet the requirements
indicated in the in the information tag on the back of the appliance.
WARNING: if the device does not come with a trolley to facilitate transport, it is advisable to connect it first
then place it in position in the work area ensuring the cable is not damaged during placement. This enables
easy and safe connection. Ensure that the cable is uniformly exposed to a room temperature no higher than
50°.
PROOFERS WITH CABLE AND SINGLE PHASE PLUGS
For appliance with cable and plug (single phase 220-240V) the plug merely needs to go into the appropriate
socket (the socket must be adapted for the supplied plug and must withstand the voltage required by the
Page 4

English | 4
appliance indicated on the information plate). The product must be positioned so that the plug is always
accessible.
The appliance comes with certified cable and plug therefore they must not be tampered with or modified.
Only the cable can be substituted: this must be carried out by a qualified authorised technician. The
earth wire must always be yellow green.
APPLIANCE NOT SUPPLIED WITH CABLE WITH THREE PHASE TERMINALS
Articles supplied by us come with terminals such as
in the image. To connect to the mains see the label
in the manual and stuck to the lower part of the back
of the appliance near the Information plate.
The device must be connected to the electricity with
a rubber cable such as H07RN-F.
WARNING: the yellow/green voltage wires in the
earth cable must be 3cm longer than the others.
The device must be connected directly to the mains and must have an easily accessible switch from the start,
installed for the device according to the national, international and local laws in the country where it is
installed. This switch must separate polarization guaranteeing complete disconnection in accordance with the
overvoltage III category.
Correct earthing is obligatory and the earth wire must not be operated by the protection switch.
CABLE CONNECTION
Proceed as follows to connect the power supply wire to the
terminal board:
• ( A1 ) Loosen the tops of the cable gland and open
the bottom part of the back of the appliance by
loosening the screws.
• ( A2 ) Feed the new cable through the cable gland.
Connect the cable voltage to the terminal strips
following the connection diagram on the label on the
back of the appliance. Only connect what is indicated
inserting the copper bridge and the electricity cable
together under the screws, in the tightening direction,
so the cable and the bridge are tightly fixed by
tightening the screw. The type of cable to be used
(HO7RN-F) is indicated on the label for each
connection and the voltage sections in mm².
• ( A4 ) Close the bottom part of the back of the
appliance by tightening the screws and fit the cable
by tightening the cable gland top.
Page 5

English | 5
Erroneous connection could lead to overheating of the terminal board which could lead to blowout and
electric shock.
Check that all the connections are tight before connecting the device to the mains.
PE = Yellow/Green: “EARTH” protection conductor.
N = Blue: neutral conductor.
L = Brown, Grey, Black: live conductors
Check there is no static discharge between live and earth. Check the limit switch continuity between the
external casing and the earth wire of the mains. It is advised to use a multi tester to carry out these
operations.
CABLE SUBSTITUTION
This must be carried out by a qualified authorised technician. The earth wire must always be yellow green.
WARNING: the yellow/green voltage wires in the earth cable must be 3cm longer than the others.
Proceed as follows to connect the power supply wire to the terminal board:
• ( A1 ) Loosen the tops of the cable gland and open the bottom part of the back of the appliance by
loosening the screws.
• ( A3 ) Loosen the terminal screws and feed the cable conductors through. Take out the old cable from
the cable gland.
• ( A2 ) Feed the new cable through the cable gland. Connect the new cable’s conductors to the terminal
following the connection diagram on the label at the lower part of the back of the appliance. Only
Page 6

English | 6
connect what is indicated inserting the copper bridge and the electricity cable together under the
screws, in the tightening direction, so the cable and the bridge are tightly fixed by tightening the screw.
The type of cable to be used (HO7RN-F) is indicated on the label for each connection and the voltage
sections in mm².
• ( A4 ) Close the bottom part of the back of the appliance by tightening the screws and fit the cable by
tightening the cable gland top.
Check that all the connections are tight before connecting the device to the mains.
WARNING: Erroneous connection could lead to overheating of the terminal board which could lead to
blowout and electric shock.
Check there is no static discharge between live and earth. Check the limit switch continuity between the
external casing and the earth wire of the mains. It is advised to use a multitester to carry out these operations
The appliance must be connected to the mains using a H07RN-F cable.
EQUIPOTENTIAL CONNECTION
This connection shall be carried between the different appliances with the
terminal marked by the symbol: (see image).
This terminal enables the connection of Yellow/Green cable with a section
between 2.5 and 10mm² .
The appliance shall be included in an equipotential system whose efficiency
shall be duly verified according to the provisions of the laws in force.
VI. SPECIFICATIONS
Manufacturer:
Address:
Product: Food proofer
L900
Design and number of trays
L=Proofer
PRODUCT CODE (Ref):
L960
L956
L912
L900
L800
L700
L600
Page 7

English | 7
INFORMATION PLATE
INFORMATION
POWER
CONSUMPTI
WEIGHT SUPPLY
FREQUENCY
SUPPLY
model according to customer classification
Art.:
TYPE: product model according to its technical properties
Ref. model according to internal manufacturer’s classification
Ser. N° identification number, different for each product
Information: IPX4 protection level against water sprays / kPa….inflow water pressure / production year.
Power consumption: appliance nominal power kW
Mains supply: TERMINAL CONNECTION TYPE: device tension in V, number of phases and neutrals
(3N = 3 phases more neutral).
Supply frequency: appliance frequency in Hz.
Weight: appliance weight
INSTRUCTIONS FOR THE USER
I. WARNING
Read this instructions booklet carefully in that it provides indications regarding safety and use of the
appliance.
Keep carefully for reference at all times.
Incorrect installation, assistence, maintenance, cleaning, tampering or modifications can cause
malfunction, damage and breakage.
The leavening cabinet must only be used for leavening of foods in industrial and professional kitchens. Any
other use is inappropriate. The manufacturer is not liable where it is used inappropriately.
Page 8

English | 8
The appliance is intended for professional use and it shall be used by qualified personnel.
The appliance is not suitable for use by people with low physical or mental abilities or lacking
experience, unless instructed regarding the operation of the device by the personnel in charge of safety
their safety.
Do not leave the appliance unattended in presence of children and ensure that the latter do not have
access to the appliance.
It is thus strongly recommended not to position sources of heat near the apparatus.
Do not under any circumstance, leave flammable material near a appliance: it can be a fire hazard.
Food container temperatures, accessories or other objects can be very hot; beware of burns when
moving them. Only touch them with relevant thermal protection. Scald danger!
Use fingers to regulate the digital panel options; any other object may damage the device hence nullify
the validity of the warranty.
Damage or breakage of door glass components must be substituted immediately (contact the
Assistence Centre).
If it is not in use for long periods of time (many days) it is advisable to turn it off at the mains.
The producer shall not be deemed liable for any damage incurred by persons or properties, caused
by non compliance with the aforementioned instructions of deriving from tampering with even a
single part of the appliance and use of non-genuine spare parts.
This appliance complies with the EU directives in force.
II. USING FOR THE FIRST TIME
Make sure all checks required to ascertain strict adherence with the soundness of the systems and the
installation of the appliance with the law regulations as well as technical and safety instructions provided for
by this manual are as well are carried out before operating the appliance.
There should not be plastic bags inside it, instruction manuals, plastic film or anything else.
All packaging should have been entirely removed, including the protective film applied on the walls of the
product purchased.
TESTING
Thoroughly verify the conditions listed below:
On reaching the set temperature, the cooking temperature thermostat turns off the heating elements.
The motors of the fans automatically invert the direction of rotation; the inversion occurs every 2 minutes.
FIRST CLEANING OF THE COOKING CHAMBER
Disconnect electrical power from the appliance and wait until the device is cooled completely before
cleaning.
WARNING: the appliance should never be cleaned with high pressure water sprays.
There should never be any residue of solvents or detergents. They should be removed by rinsing thoroughly
using a damp cloth. Appropriate eye, mouth and hand protection should be used. Possible danger of
corrosion.
Heat the device empty up to 200° C (392° F) for about 30 minutes so as to eliminate thermal insulation
odors.
Clean the walls of the cooking chamber using hot water and soap, then rinse; never use aggressive or acid
products.
III. ORDINARY MAINTENANCE
The user is solely responsible for ordinary maintenance. The Assistence Centre must be contacted for
extraordinary maintenance which requires a specialised authorised technician.
Page 9

English | 9
CLEANING: GENERAL RULES
Disconnect electrical power from the appliance and wait until the device is cooled completely before
cleaning.
WARNING: the appliance should never be cleaned with high pressure water sprays.
ORDINARY CLEANING OF COOKING CHAMBER
It is advisable to clean the coking chamber daily so as to maintain correct levels of hygiene and avoid the
deterioration of steel.
Do not use high pressure water steam lances or steamers for cleaning. Acidic, abrasive, corrosive sandbased or caustic soda based detergents are prohibited.
For manual cleaning follow the procedure below:
• Turn on the appliance and set the temperature to 60°C.
• Leave it on for 10 minutes on steam
• Turn off the appliance and let it cool down
• Clean with hot water and soap then rinse.
Only use products recommended by the manufacturer of the appliance.
EXTERNAL CLEANING
Only use a damp cloth with warm water or products suitable for cleaning stainless steel. Do not use acidic
products or ammonia.
WARNING: the appliance should never be cleaned with high pressure water sprays.
IV. EXTRAORDINARY MAINTENANCE
It is advisable to have the appliance subjected to periodical checks (at least once per year) by a specialised
authorised technician.
Any maintenance, installation or repair work must be carried out by qualified authorised personnel by
contacting the Assistance Centre. Before carrying out any operation the appliance must be plugged out at the
mains, turn off the water mains taps and wait for it to cool down.
Before moving the appliance from position, check that the electricity and water connections (electric cables
water pipe and drainage) are correctly plugged out.
If the appliance is on wheels check that electric cables, pipes or anything else are not damaged while moving
it. Ensure the break is on. Avoid placing the device near heat (such as fryers etc.).
After carrying out the task and replacing the appliance in its initial position, check that the electric and water
are connected correctly.
V. MAINTENANCE IN CASE OF BREAKAGE
If the appliance breaks, disconnect it from the mains and turn off water.
Before ringing Customer Service, check the chart below).
PROBLEM CAUSE SOLUTION
Supply voltage failure Restore power supply voltage
The leavening cabinet isn’t
heating
Incorrect connection to the power
supply network
Broken resistance
Broken thermostat temperature
Check connection to the power supply network
Contact specialised technician for repair
(Assistance Service ).
Contact specialised technician for repair
(Assistance Service ).
Page 10

English | 10
If the problem persists we advise you to consult a retailer of manufacturer asking for Assistance Service
specifying the problem and supplying your code (Art.) and serial number (Ser N°) This information is
provided on the INFORMATION PLATE on the back of the machine.
SPARE PARTS
Use only authorized parts for product repair. All interventions shall be carried out by authorized and
specialized technical personnel. Contact the Assistance Centre to request spare parts.
VI. CONTROL PANEL
ON/0FF button
ON/OFF BUTTON
This button turn the the leavening cabinet on and off.
• THERMOSTAT KNOB
This knob allows selecting the desired coking temperature.
THERMOSTAT LIGHT
When the heating elements are lit they are on because the internal leavening cabinet temperature is less
than the set by the thermostat value dial. When the light goes off it means that the inside of the leavening
cabinet has reached the set temperature.
Thermostat knob
Thermostat light
VII. ADVICE FOR USE
Press ON/OFF and turn the temperature dial to the desired value.
HUMIDIFIER
For leavening or to conserve any food, fill the container at the bottom of the leavening cabinet with water and
turn on the appliance, setting the desired temperature. The water will become steam thanks to the heating of
components on the underside of the container.
Only fill to the container up to the line indicated “---------“.
 Loading...