

Page 1

Instructions for Use
Washing machine
Page 2

Thank you for your confi dence in purchasing our washing machine, and congratulations on the
excellent choice.
Your new washing machine meets the requirements of modern treatment of laundry. It is rational
in the consumption of energy, water and washing agents. Our appliances are friendly to the
environment. Some of the materials may be recycled, others deposited or decomposed. To avoid
pollution of environment, once your appliance is no longer useful, take it to your local authorized
waste appliance dealer.
The appliance is intended exclusively for use in households. If the appliance is used for
professional purposes, for profi t, or for purposes beyond regular use in a household, or if appliance
is used by a person who is not a consumer, the warranty period equals the shortest warranty period
possible as stipulated by the relevant legislation.
242221
Description of washing machine ..................................3
Cautions .......................................................................... 4
Installation and connection ........................................... 5
Operation .........................................................................8
Tips for washing and energy saving ..........................19
Cleaning and maintenance .......................................... 20
Failures .......................................................................... 22
Tables ............................................................................ 25
2
Page 3

Description of washing machine
1. Front panel
2. Detergent dispenser
3. Door (depending on the model)
4. Filter lid
Technical information
(depending on the model)
• Max. load: 6 kg / 7 kg
Dimensions (w x d x h):
600 mm x 600 mm x 850 mm
Depth with door open: 106 cm
Weight (net): 90 kg
Nominal voltage: 230 V, 50 Hz
Power: 2300 W
Power socket: (230 V, 50 Hz, 10 A)
Water pressure: min. 0,05 MPa, max. 0,8 MPa
Fuse: 10 A
5. Adjustable legs
6. Water outlet hose
7. Water inlet hose
8. Mains power cable
• Max. load: 4,5 kg
Dimensions slim aparat (w x d x h):
600 mm x 440 mm x 850 mm
Depth with door open: 88 cm
Weight (net): 76 kg
Nominal voltage: 2000 W
242221
3
Page 4

Cautions
• Be sure to remove transport brackets prior fi rst use of the appliance. Attempted operation of the
blocked machine may result in irreparable damage which is not covered by the manufacturer’s
warranty!
• When connecting your washing machine to water supply, be sure to use brand new water inlet
hose and appropriate sealing gaskets (attached).
• Do not locate the machine in a room with temperature below 0°C. Parts of the machine may be
damaged if frozen.
• Install the washing machine in a perfectly horizontal position, on solid fl at concrete fl oor.
• Follow the instructions for correct installation and water and mains connections.
• Never immerse the end of the drain hose into the draining water.
• Prior starting the washing cycle lock the door by pressing them at the designed spot.
• Door may not be open during the washing cycle.
• Use only detergents and softeners for machine wash. Manufacturer may not assume
responsibility for any damage and eventual discoloring of gaskets and plastic components as a
consequence of incorrect use of bleach and/or coloring agents.
• For removal of lime residues use such agents with added anti-corrosion agents. Follow the
manufacturer’s instructions. Finish the lime removal by multiple rinsing to remove completely
eventual acid residues.
• Never use detergents containing solvents, since there is a danger of creating toxic gasses which
may damage the machine and result in ignition or explosion.
• Upon completion of washing operation close the water faucet.
• Before any transport block the machine by inserting at least one transport blocking rod. Prior this
operation disconnect the appliance from the mains power!
• Rating plate with basic information is located above the opening of the machine.
• The warranty shall not apply to consumables (bulbs), minor discoloration or deviations of color,
increased noise level as a consequence of appliance age, which does not affect appliance
functionality, and aesthetical defi ciencies which do not affect appliance functionality or safety.
Before connecting the appliance read these instructions carefully. Repairing the failure
arising from inappropriate connections or use of the appliance is not covered by the
guarantee.
The belt can be replaced by a servising engineer only, who incorporates an original
spare part with the marking MIG OPTIBELT 6EPJ 1260, code 111622 or 6EPJ 1278 code
587612.
The symbol on the product or on its packaging indicates that this product may not
be treated as household waste. Instead it shall be handed over to the applicable
collection point for the recycling of electrical and electronic equipment. By
ensuring this product is disposed of correctly, you will help prevent potential
negative consequences for the environment and human health, which could
otherwise be caused by inappropriate waste handling of thisproduct. For more
detailed information about recycling of this product, please contact your local city
offi ce, your household waste disposal service or the shop where you purchased the
product.
242221
4
Page 5

Installation and connection
Package removalPackage removal
Removal of transport
Removal of transport
brackets
brackets
In removing the wrapping be careful not to damage the
appliance with a sharp object.
Before connecting the appliance, let it warm up to room
temperature (wait for two hours).
• Our appliances are packed in environmentally friendly
materials which may be recycled, deposited or decomposed
without any threat to the environment.
• To this end all wrappings are marked accordingly.
• Move the pipes.
• Loosen screws A at the rear of the machine (Fig. 1).
• Remove the brackets B (Fig. 1) and slide them into the groove
on the blocking rod (Fig. 2) - the right one should be turned
around.
• Use the brackets to rotate blocking rods for 90° and pull them
out.
• Close the openings with attached plastic pegs.
Save transport brackets for eventual later use.Save the transport
brackets for eventual later use.
Be sure to remove the transport brackets prior fi rst
use, otherwise the appliance may be permanently
damaged. In such cases the warranty conditions are
void.
Leveling the applianceLeveling the appliance
Fig. 1 Fig. 2
• Put the appliance in horizontal position by turning the
adjustable legs.
The legs are adjustable up to +/- 1 cm.
After the adjustment tighten the nuts fi rmly (A) - towards
the bottom of the machine!
Vibrations, moving of the appliance and loud operation
due to incorrect setting of the adjustable feet shall not
be covered by this warranty.
The appliance should be placed on a surface with
concrete base; the surface should be dry and clean in
order to prevent slipping. The adjustable feet should
also be cleaned before installation.
242221
5
Page 6

• If you have a tumble dryer of the same dimensions, you can
place it on top of the washing machine.
Water inlet connectionWater inlet connection
To ensure correct operation of the appliance, water
pressure inlet must be between 0,05 and 0,8 MPa.
Minimum water pressure can be established by
measuring the quantity of poured out water. 3 litres of
water must be poured out from completely opened tap
in 15 seconds.
• Insert the gasket with screen into the water inlet hose thread
Screw the hose thread to the water faucet
• In case of hot and cold water connection, connect one hose to
cold and other to hot water faucet as marked at the rear of the
appliance (letters C and H) (C - cold; H - hot)
Partial Aqua-stop (water stop system)
In case of damage on the interior pipe, leaking is prevented by
automatic closing system which stops water inlet to the machine.
In such cases display A turns red.
Inlet pipe must be replaced.
Complete Aqua-stop
In case of damage on the interior pipe, leaking is prevented by
automatic closing system which stops water inlet to the machine.
Security system also detects whether there is any water leakage
within the interior of the machine. In such cases washing is
suspended, machine switches on the pump and signals error.
242221
Do not immerse the Aqua-stop system inlet pipe into
the water, because it contains the electric valve!
6
Page 7

Water outlet connectionWater outlet connection
Connect the appliance to
Connect the appliance to
the mains supply
the mains supply
• Fix the outlet hose to run into the sink or the bathtub, or
connect it directly to the wall drain outlet (diameter min. 4 cm).
• Wall drain must be installed properly and must enable
occasional cleaning.
• Fasten the outlet hose support with a piece of rope led through
the hose elbow, to prevent the hose from slipping to the fl oor.
The end of outlet hose should be placed between minimum 60
cm and maximum 100 cm above the fl oor level.
• Plug the mains power cable to the wall mains socket.
• Required voltage and other information are written on the
rating plate above the door opening of the machine.
The wall socket must be accessible at all times and
must be equipped with an earth lead (in accordance
with the local safety regulations).
The permanent connection must be fi tted by an
authorized personnel only.
Damaged mains power cable may be replaced only by
the producer or his authorized personnel.
Never plug the appliance into the electric shaver socket
or hair dryer socket.
If the socket, the machine is connected to, is protected by the
overload protection switch (FID), the nominal differential current
of the switch must be 30 mA (switch mark Idn or I∆n). In case of a
smaller nominal current in the switch, the machine may be switched
off during its normal operation.
7
242221
Page 8

Operation
A - program selector
B - MENU knob
C - SELECTION knob
D - quick program knob
Program selector Basic programs Partial programs
Cotton
Heavy duty
Synthetics Softening
Delicate Pumping water
Wool Spinning
Manual wash
Jogging
Mix
E - easy ironing knob
F - START/PAUSE knob
G - door knob (depending on the model)
H - display
Rinse
Quick program
Functional knobs
Knob B (MENU) - Use this knob to scroll around main menu.
Knob C (SELECTION) - Use this knob to scroll around main menu.
Knob F (START/PAUSE) - Use it to start or fi nish the program.
242221
8
Page 9

Before fi rst useBefore fi rst use
- Selecting language
To change the language in which the information appear on
the display, press simultaneously the key MENU (B) and
SELECTION(C), and turn the program selector (A) from
position “0” to the fi rst program in clockwise direction (Cotton
95°C). The name of actually selected language appears on the
display. Scroll down the selection of languages by pressing the
SELECTION knob (C), until you fi nd the desired language. Then
turn the program selector back to position “0”. Last selected
language will be saved automatically.
Washing procedureWashing procedure
• Open the door of the machine.
• Load the laundry into the drum.
• Close the door.
• Open the water inlet faucet.
• Push the ON/OFF button and select the program
• Add washing and treatment agents (detergent and softener).
• Start the operation by pushing the START knob (F).
- Open the door of the machine.
Door is opened by pulling the handle (lever) on the right hand
side of the door towards you (in certain models the door is
opened by pressing the knob DOOR (G).
- Sort the laundry by the type of fabrics.
Do the buttons and zippers, tie the strings and pull out
the pockets.
Very delicate laundry should be put in a special
protective sack.
It is suggested to load the drum with items of different
sizes.
Pay attention to the labels on the clothes, indicating
the recommending washing mode (see table of
textile treatment symbols on the last page of these
instructions).
- Load the laundry into the drum.
Check that the drum is empty.
- Close the door of the appliance.
- Open the water inlet faucet.
- Switch the machine on.
242221
9
Page 10

Washing machine
Washing machine
operation
operation
1. Name of the program, 2. Duration or time of day, 3. Symbols
for activation of additional functions, 4. Water quantity in liters,
5. Spin RPM
Program is selected by turning the program selector from the “0”
position to the desired washing program. The display indicates
particular washing program, selected by the program selector.
The program selector may be turned in both directions, and the
appropriate program selected according to the type of laundry
washed and the required washing temperature (see Program
Chart for help).
You may select basic or partial programs.
With each basic program you may also select additional
functions.
Selected program may be changed at random prior pushing the
START button (F).
242221
10
- Selection of basic programs (
Basic programs are selected by turning the program selector
(A) to the desired program. The display indicates the selected
program, along with basic settings.
With each basic program you may also select additional
functions.
Cotton: whites/colored
Normally stained cotton and fl ax bed linen and underwear, table
cloth, bathroom towels, top garments, etc.
For heavily stained permanent press use the heavy duty
program, or program with the pre-wash, or select soaking in case
of stains.
For smaller loads (non-delicate cotton, linen, synthetic, and
mixed fabric) and smaller quantities of soiled laundry (laundry
refreshment, laundry wet with perspiration, etc.), we recommend
the use of the
energy and time.
quick program. This way, you will save both
, , , , , , )
Page 11
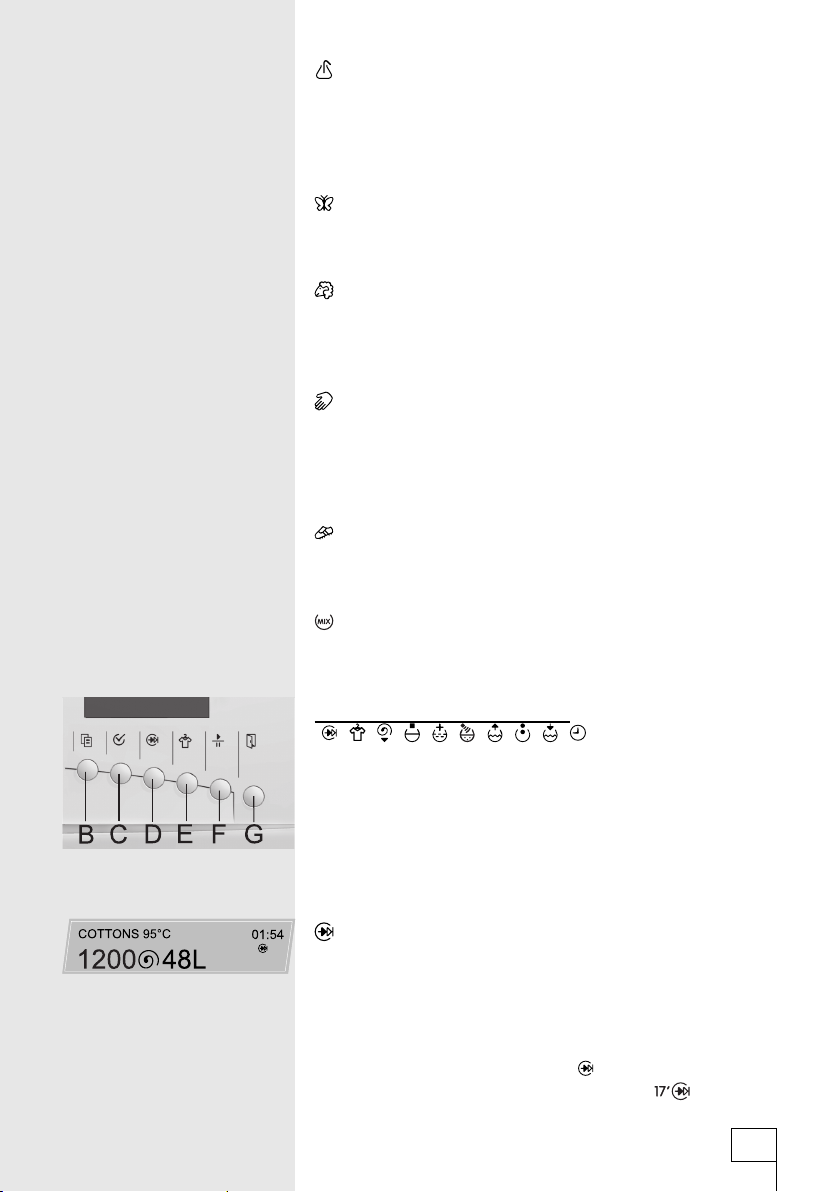
Synthetics
Normally stained shirts, blouses and other polyester and
polyamide garments, or a mixture of these fabrics with cotton.
For heavily stained resistant color laundry, use program with
pre-wash.
Delicate
This is a program for delicate fabrics (dresses, skirts, blouses)
and curtains.
Wool
Especially gentle program for washing wool and garments made
from mixture of other fabrics with wool, appropriately marked for
machine washing.
Manual wash
Very gentle program concluded with short gentle spin (max. 400
RPM).
It is suitable for washing fabrics from fl ax, silk, wool or viscose,
marked accordingly for manual wash.
Jogging
Quick program for washing less stained athletic attires made of
cotton or synthetic fabrics.
Mix
Special program for washing normally stained colored laundry
made from various resistant fabrics at 30°C.
- Selection of additional function
( , , , , , , , , , )
The display always indicates only the menus with functions which
are available for a particular program. Certain functions may not
be selected at the same time (see Program /Additional Functions
Chart). Our suggestion is to select fi rst the additional functions
with ‘Short program (D) and Easy ironing knobs (E). In this case,
only the available additional functions, compatible with the two
selected will be displayed in menus.
Quick program (selection by separate knob)
• Program saves energy.
• Convenient for washing less stained laundry, or smaller
quantities of laundry.
• Washing and rinsing time is reduced.
• Reduced water consumption (with certain models).
• By pressing the key quick program on the program Cotton
.
30°C, activate the program Cotton 30°C-quick
11
242221
Page 12
Easy ironing (selection by separate knob)
Gentle tumbling and fi nal spin prevent excessive creasing of
laundry. Follow the determined maximum load for particular
programs. Suggested reduced load (cotton 3 kg, synthetics 2 kg).
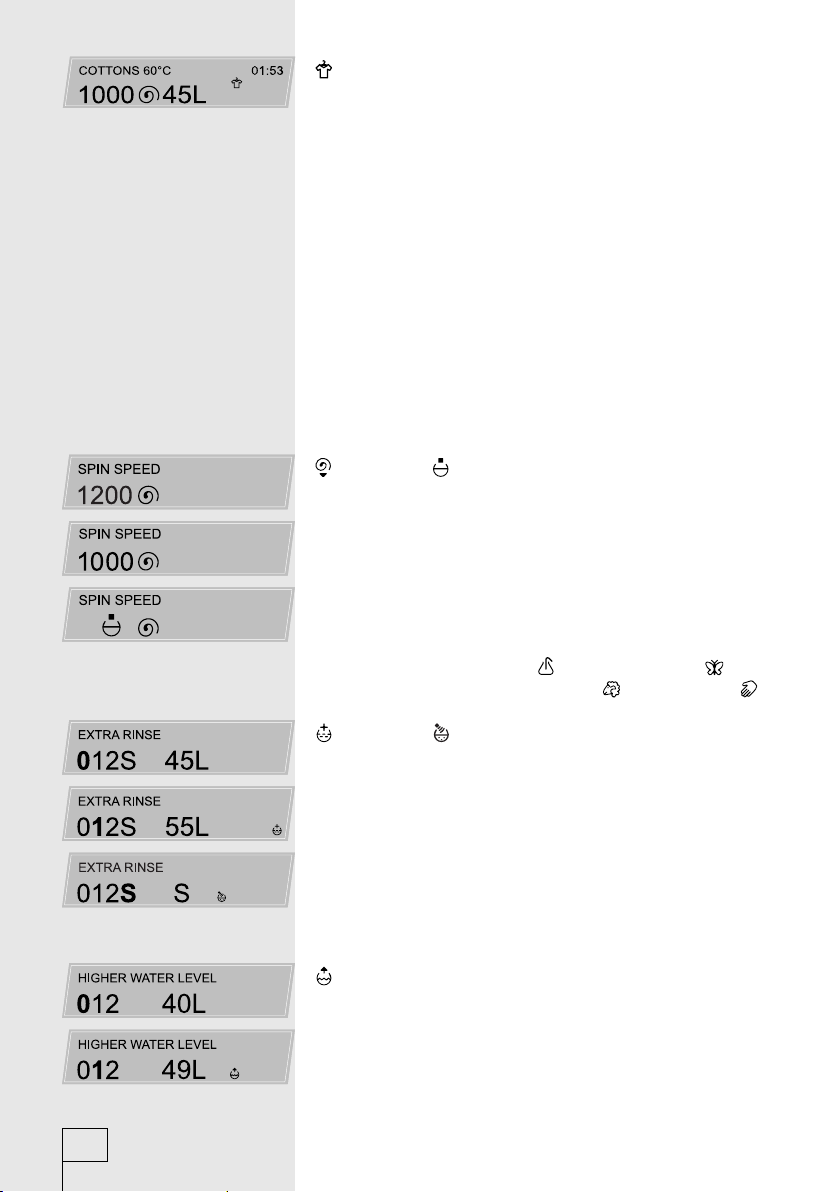
- Selection of additional functions using the MENU knob (B)
By pressing the MENU knob (B) additional functions available
for changing or adding to the pre-selected washing program
are displayed in sequence. If you do not wish to activate or
change certain displayed function, press knob B (MENU) to
move to the next available function.Functions with the choice
of multiple available settings, display the default one in bold
(spin RPM, extra rinse, more water, sound signal). Using the
SELECTION knob (C) you may change settings. Activation of a
particular function is confi rmed by the relevant symbol appearing
on the display. Function is deactivated by another pressing the
SELECTION knob (C).
Spin speed / Rinse hold
Best recommended spin RPM for the selected program appear on
the display. Using the button (C) in some models you can increase
the selected RPM (1300-1800) or reduce in steps till “0”, when all
spins are off. Last selection is “pump stop” meaning that laundry
will remain soaked in the last rinse water.
RINSE HOLD function is selected if you want the laundry not to be
excessively creased in case you are unable to remove it from the
drum immediately after the end of washing cycle. This is specially
handy for washing of synthetics
However, it is not recommended for wool
and delicate laundry .
or manual wash .
242221
Extra rinse/ Clean water sensor
This function is for persons, especially sensitive to detergents.
Using the SELECTION knob (C) you may select one or two extra
rinses, or activate the Clean water sensor (S) - certain models
only. By activating extra rinse the display indicates adequately
increased quantity of water. If the clean water sensor is activated,
the display indicates the symbol “S” instead of water quantity. In
such cases the machine will select appropriate number of rinses
in relation to how clean is rinsing water, detected (measured) by
the sensor.
Higher water level (Water plus)
For washing heavily stained laundry.
Using the SELECTION knob (C) you may increase quantity of
water for rinsing one or two times more; for certain programs
this function is available also for washing. Appropriately larger
quantity of water is indicated by the display.
12
Page 13
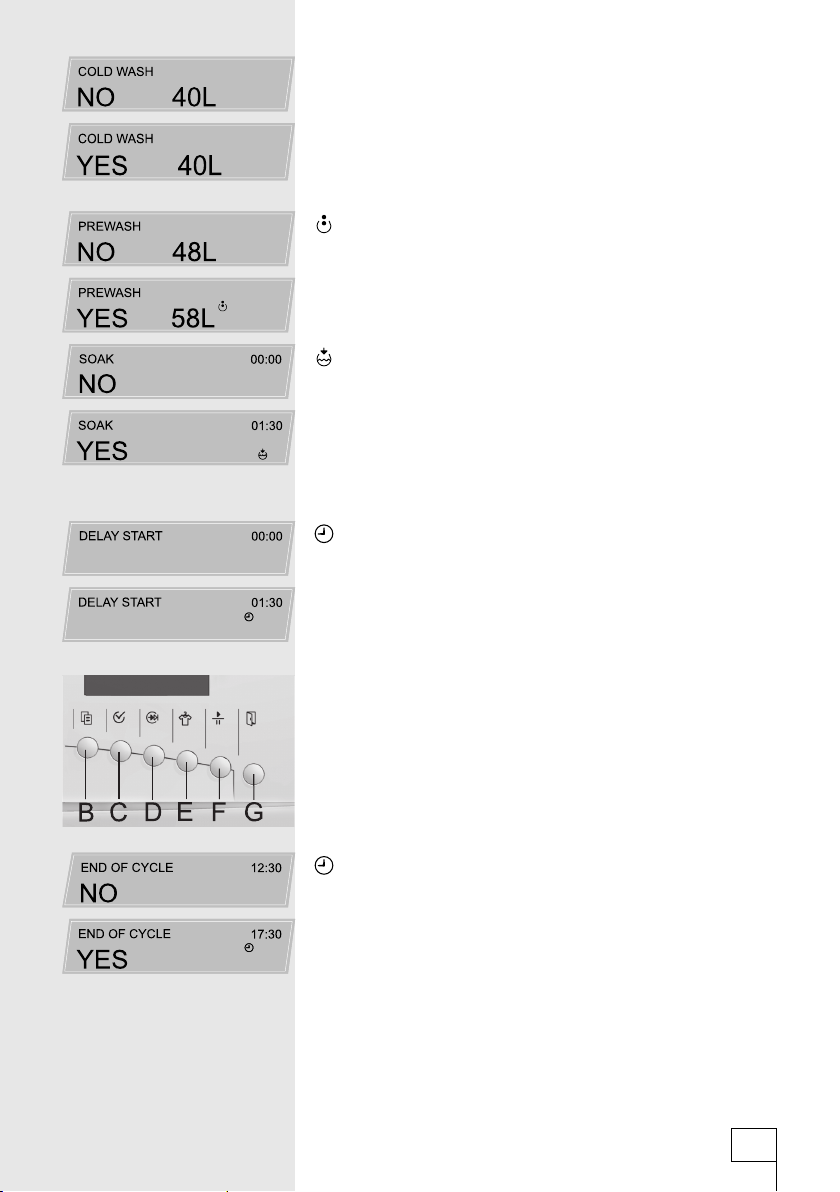
Cold wash
For washing less soiled or colour-sensitive clothes.
Upon switching this function ON, the heating function of this
cycle is switched OFF, therefore the whole program is adequately
shortened.
Pre-wash
Used for washing heavily stained laundry, especially with
superfi cial stains. In default setting the pre-wash function is off. It
is activated by pressing the SELECTION knob (C) on programs
for cotton, synthetics, delicate and mixed laundry.
Soaking
This program is intended for removal of stubborn stains. In
default setting the soaking function is off. It is engaged by
pressing the SELECTION knob (C). Soaking time may be set
from 1 h to maximum 6 hours, in 30 minute steps. At the end of
the preset time the machine automatically starts the selected
washing program.
Delayed start
The function enables delay of starting the washing procedure for
up to 20 hours, in 30 minute intervals for the fi rst two hour delay,
and in hourly intervals for the rest.
Delay is set by pressing or keeping pressed the SELECTION
knob (C) for the required time of delay.
In case you wish to change or suspend the delayed start after
starting the machine with the START knob (F), you may do so by
pressing the MENU knob (B). The delayed start appears; using
the SELECTION button (C) reset the delay period.
Setting the end of program
(certain models only)
Caution: prior this setting check whether the current time of day
is set correctly (see section Special functions). Set the time you
want the program to end the washing procedure.
The machine will automatically calculate the starting time,
depending on the selected program. End of washing may be
delayed for maximum 20 hours, in 30 minute intervals for the fi rst
two hour delay, and in hourly intervals for the rest.
Function is set by pressing or keeping pressed the SELECTION
knob (C) until the required time to end the washing appears on
display.
13
242221
Page 14
Caution: If Clean water sensor is engaged, the program may
last longer for extra rinsing time.
In case you wish to change or suspend the end of washing time
after starting the machine with the START knob (F), you may
do so by pressing the MENU knob. The end of washing time
appears; using the
SELECTION button (C) reset the selected time.
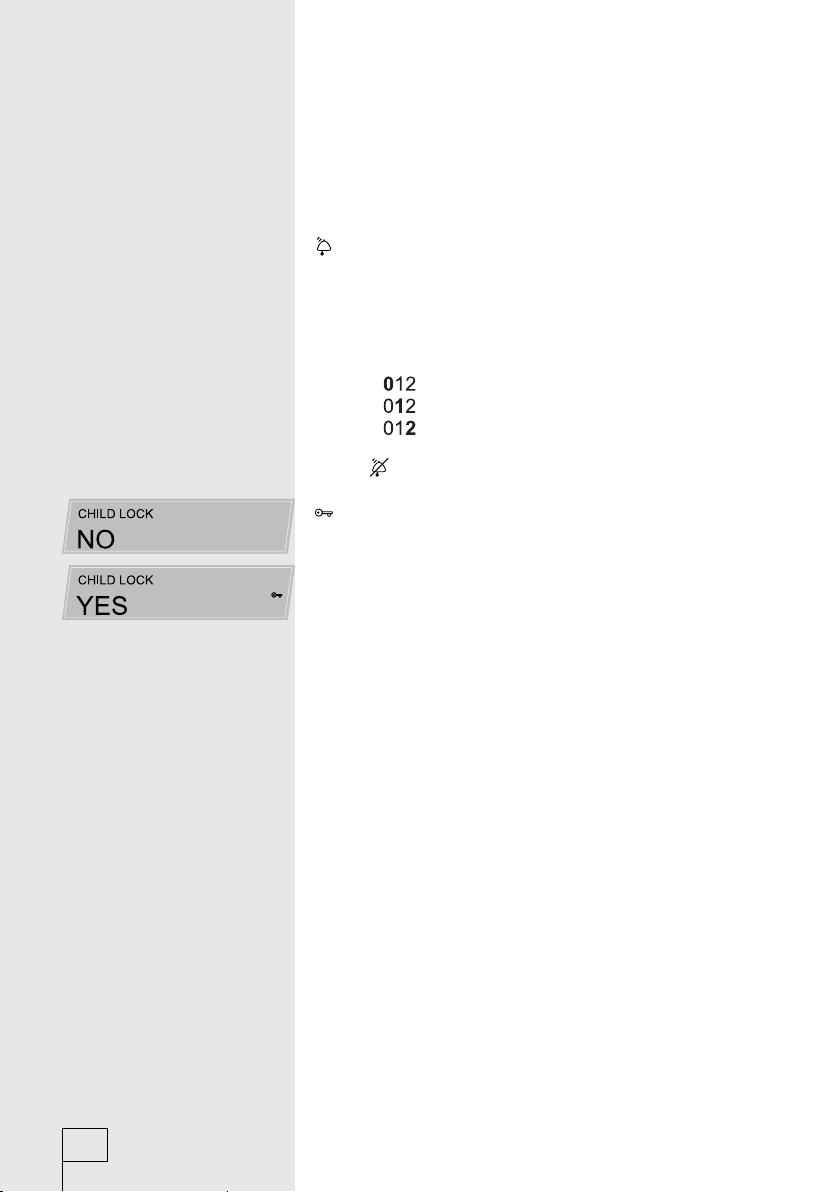
Sound signal
Sound signal beeps when a knob is pressed (function selection),
and it also signals the end of washing program and reporting
failures.
In default setting the sound signal is on. You may select to switch
the sound signal off, or increase volume.
Legend:
sound signal off
normal sound signal setting
increased volume setting
If you switch the sound signal off the display indicates relevant
symbol
.
Child protection
Operation of the washer may be protected against accidental
changes of programs or functions. The function is activated by
pressing the START/PAUSE button (F).
Temporary disengagement of the function (during the operation):
- Keep the MENU knob (B) pressed for 4 seconds, relevant
symbol fl ashes on the display.
- Stop the program by pressing the START/PAUSE knob (F).
- Change settings.
- Press the START/PAUSE button (F) and reactivate the child
lock.
In case you fail press any knob within 15 seconds, the protection
is automatically reactivated.
242221
Permanent disengagement of the function:
a.) During the operation:
- Keep the MENU knob (B) pressed for 4 seconds.
- Stop the program by pressing the START/PAUSE knob (F).
- Using the MENU knob (B) move to child lock option.
- Press the SELECTION knob (C) to disengage the function.
b.) After the program is completed:
- Keep the MENU knob (B) pressed for 4 seconds.
If you switch the machine off after the end of program and fail
to disengage the child lock, it remains active during subsequent
start of the machine. To select new program, you must fi rst
temporarily or permanently disengage the child lock function. The
function remains active even during power failure.
14
Page 15
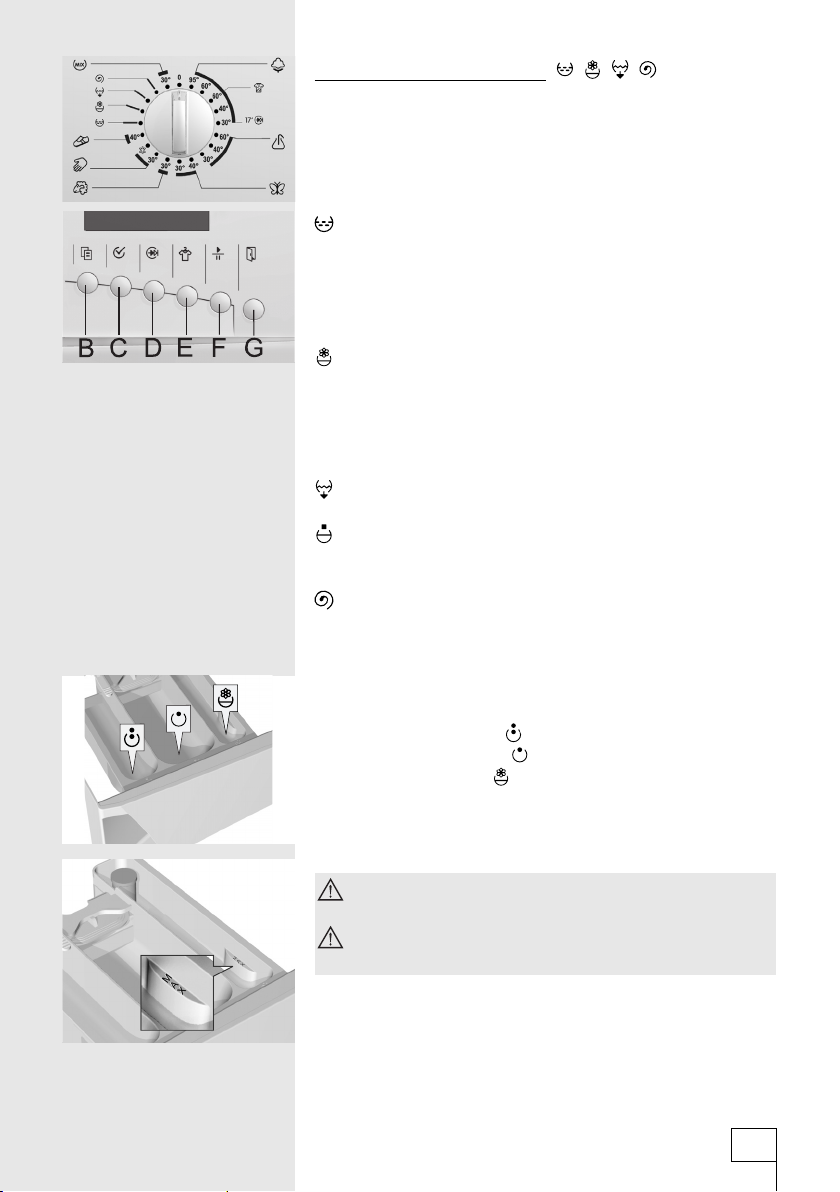
- Selection of partial programs ( , , , )
These are independent programs and may be used when you do
not need the entire washing program. In case you would like to
use more additional programs in a sequence, you must turn off
the appliance prior any new program selection (turn the program
selector to “0” for at least one second).
Rinse
Independent program for rinsing delicate laundry, without
intermediate spinning and with short fi nal spin. You may use it
for rinsing manually washed delicate laundry.
You may engage the reduced spin RPM function.
Softening
This program is intended for softening, bleaching or impregnating
of washed laundry. It is completed with aggressive spinning at
high RPM.
You may engage the reduced spin RPM function.
Pumping the water out
Use it when the washing program was interrupted or if pump stop
function was engaged, and you only wish to pump the water
out of the drum, without spinning.
Spinning
Intensive spin for non-delicate laundry at maximum speed.
Spin revolutions can be altered.
- Adding washing and softening agents
(see tips for washing and energy saving)
• pre-wash compartment
• main wash compartment
• softener compartment
If you do not apply the program which includes the pre-wash
feature, you may add washing detergent directly into the drum,
using the measuring vessel.
When adding softener, be careful to fi ll the dispenser
only up to the marked level.
Be sure to close the detergent dispenser when
opening/closing the appliance door.
15
242221
Page 16
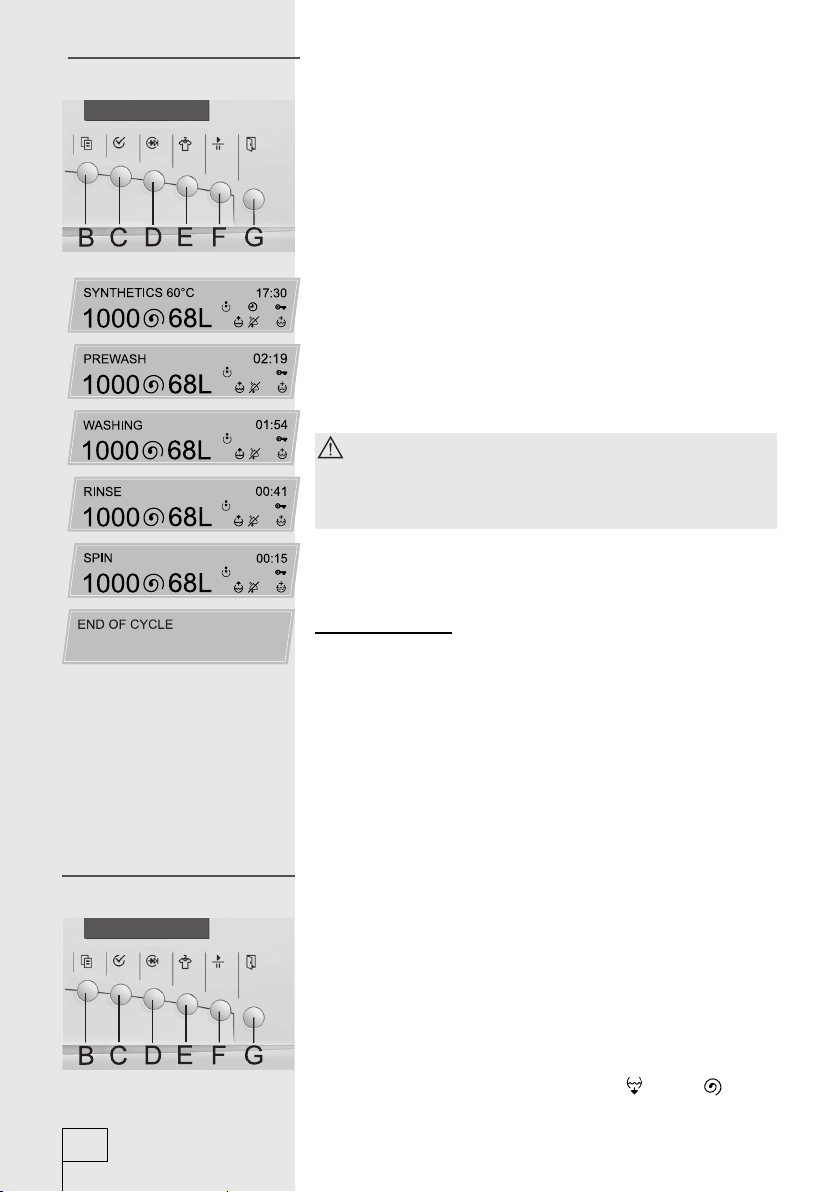
Start the operationStart the operation
Program is activated by pushing the START/PAUSE button (F).
Sound signal confi rms the start, the display indicates fi rst
washing stage and time left to the end of washing. Washing
stages are consecutively displayed in accordance with the
selected program.
If the machine is set with the delayed start, it will start operating
after the delay time expires.
If the pump stop function was set, the program will stop at the
fi nal rinse and the display indicates fl ashing sign pump stop
(RINSE).
You may conclude the program by pressing the START knob (F)
and the machine will fi nish the program with the spin, determined
by that particular program.
In case you would like to alter the washing program, turn the
program selector to the position “0”, followed by the selection of
rinse or merely pumping the water out.
Low water temperature, low network voltage, and
smaller loads of laundry may extend the washing time;
the time indicated on the display is constantly adjusted
to account for such conditions.
- End of operation
• Sound signal indicates that you may now open the door of the
machine.
• Extract the laundry from the drum and remove any alien
objects from the door gasket.
• Leave the door ajar to allow the interior to dry.
• Close the water inlet faucet.
• Switch the machine off by turning the program selector (A) to
position “0”.
• Pull the power lead from the socket and cut the power supply
from the mains.
InterruptionsInterruptions
242221
16
• By the user
Temporary interruption
By pressing the START/PAUSE knob (F) the program may be
suspended at any time.
If the Child lock is engaged you have to deactivate it fi rst. Display
reads PAUSE.
After certain time you may open the door if the water level in the
drum is low enough, otherwise you must fi st empty the water
(use additional program Pumping water out
By pressing the START knob (F) the program is continued where
or Spin .
Page 17
it had been interrupted.
Permanent suspension - change of program
By turning the program selector to the position “0” the program
is permanently suspended. Consequently you may select a new
program (see Program selection).
• Failures
Program is suspended in case a failure occurs. This is
signalled by the relevant reading on the display and a sound
signal (see cf. Troubleshooting).
• Power failure
At electric cutout the program is interrupted, however, after the
power supply has been re-established, the program operation
automatically proceeds.
If a power failure occurs when the drum is still full of
water, be careful not to open the door before you pump
the water out.
After certain time you may open the door if the water level in the
drum is low enough, otherwise you must fi st empty the water
(use additional program Pumping water out
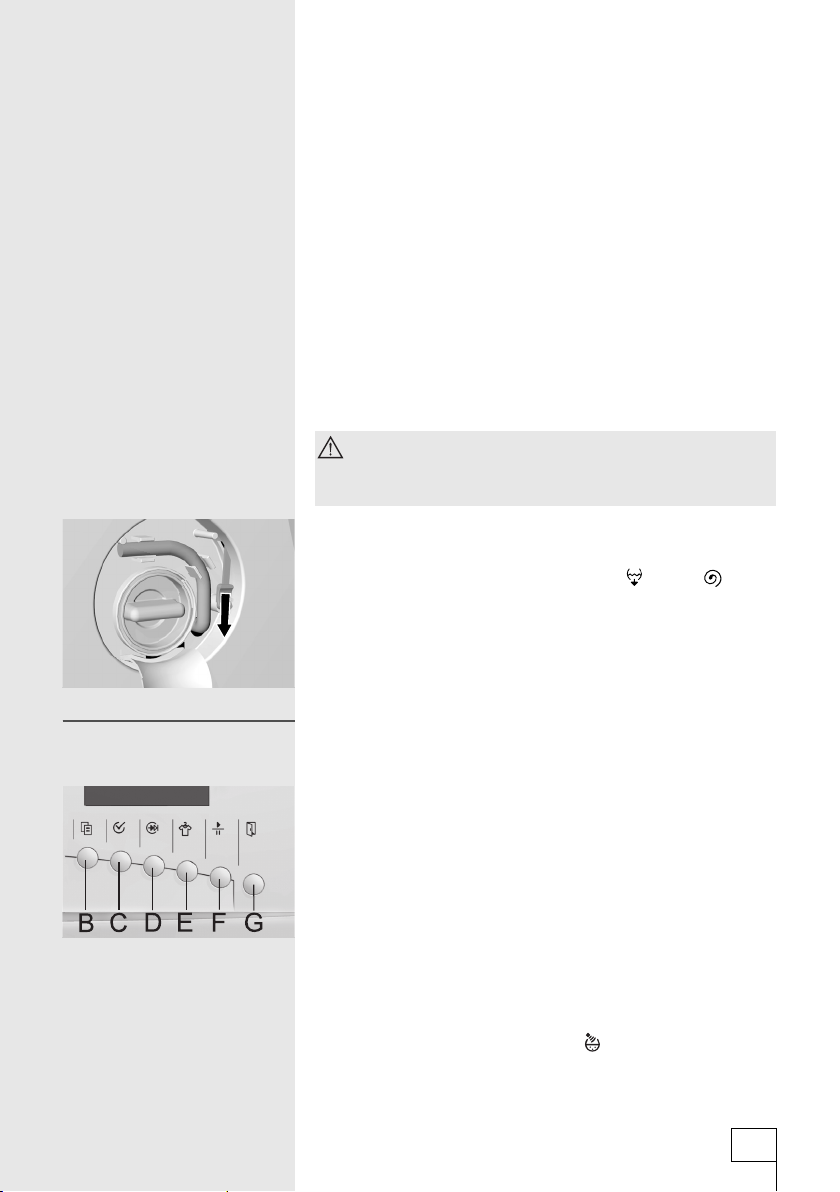
MA (models with the door opening by pressing the G knob
feature the function which enables you to open the door of
the appliance during power failure using special lever, located
adjacent to the fi lter.
or Spin .
Special functions
Special functions
(certain models only)
(certain models only)
• Setting the time of day
- Press MENU (B) and QUICK knobs (D), and turn the program
selector (A) to the fi rst clockwise program. Display reads
CLOCK and =00:00 (hh:mm) in the right corner.
- Hours start fl ashing; push the SELECTION knob (C) to set the
time of day.
- Confi rm setting by pushing the MENU knob (B).
- Now minutes start fl ashing; they are set the same way as
hours.
- Confi rm setting by pushing the MENU knob (B).
- Return the program selector back to “0” position. Set time is
automatically saved.
• Setting the Clean water sensor
In order for the Clean water sensor
properly, it must be fi rst calibrated with water that the washing
machine is connected to. This is performed in the following
manner:
to start working
17
242221
Page 18

- Press MENU (B) and Easy ironing knobs (E), and turn the
program selector to the fi rst clockwise program. Display
reads SENSOR CALIBRATION.
- Start calibration by pushing the START knob (F). The
machine performs calibration procedure automatically.
During the process the reading SENSOR CALIBRATION
is fl ashing. When the procedure is completed, the display
reads END.
- Return the program selector (A) back to “0” position.
If you change the inlet water source during the use of your
washing machine, or in case you think that water quality has
changed, you may repeat the calibration procedure at any time.
The machine will save the value of the last calibration.
242221
18
Page 19
Tips for washing and energy saving
• Before washing sort out the laundry according to the type, degree of dirtiness and color
resistance.
• Prior selecting the washing program consult the sewn tab with information on a particular piece
of laundry (see Maintenance chart on the last page).
• Wash separately the new colored textile products for the fi rst time.
• Wash heavily soiled laundry in small quantities and add more detergent.
• Treat stubborn stains with special stain remover, it will save energy.
• For lightly stained laundry select washing program without pre-wash, use short program and
select lower washing temperature. This way you may save up to 50% of energy.
• Avoid washing too little quantities of laundry because of energy saving and for better
performances of the appliance.
• The largest allowed quantity of dry laundry is indicated in the Program chart on the last page.
• Before washing empty the pockets, close zip fasteners, and remove any metal fasteners or
badges that might clog the drain or damage the laundry or drum interior.
• Loosen the stacked laundry prior inserting it into the drum.
• Use only detergents for machine wash.
• Add powder or liquid detergents according to the manufacturer’s instructions.
• If water hardness level exceeds 14°dH degrees, the use of water conditioner is required. Any
damage to the heater due to failure to use a water conditioning agent shall not be covered by
this warranty.
• Chlorine-based whitening agents are not recommended, as it can damage the heater.
Hardness scale Degree of hardness
°dH(°N) m mol/l °fH(°F) p.p.m.
1 - Soft < 8,4 < 1,5 < 15 < 150
2 - Medium 8,4 - 14 1,5 - 2,5 15 - 25 150 - 250
3 - Hard > 14 > 2,5 > 25 > 250
In case of hard water add detergent according to the Chart for
degree 1 and add appropriate quantity of water softener (see
manufacturer’s instructions).
• If you do not apply the program which includes the pre-wash
feature, you may add washing detergent directly into the drum.
• If you use thick liquid softener it is recommended to dilute
it with water, to prevent clogging of dispenser compartment
ducts.
• Washing machine is equipped with the dispenser partition
gate, so you may pour liquid detergent also into the central
compartment (depending on model). If you use powder
detergent the gate is lifted up, and in case of liquid detergent it
is slid down.
• Liquid detergents are intended for main wash only, without
pre-wash.
19
242221
Page 20
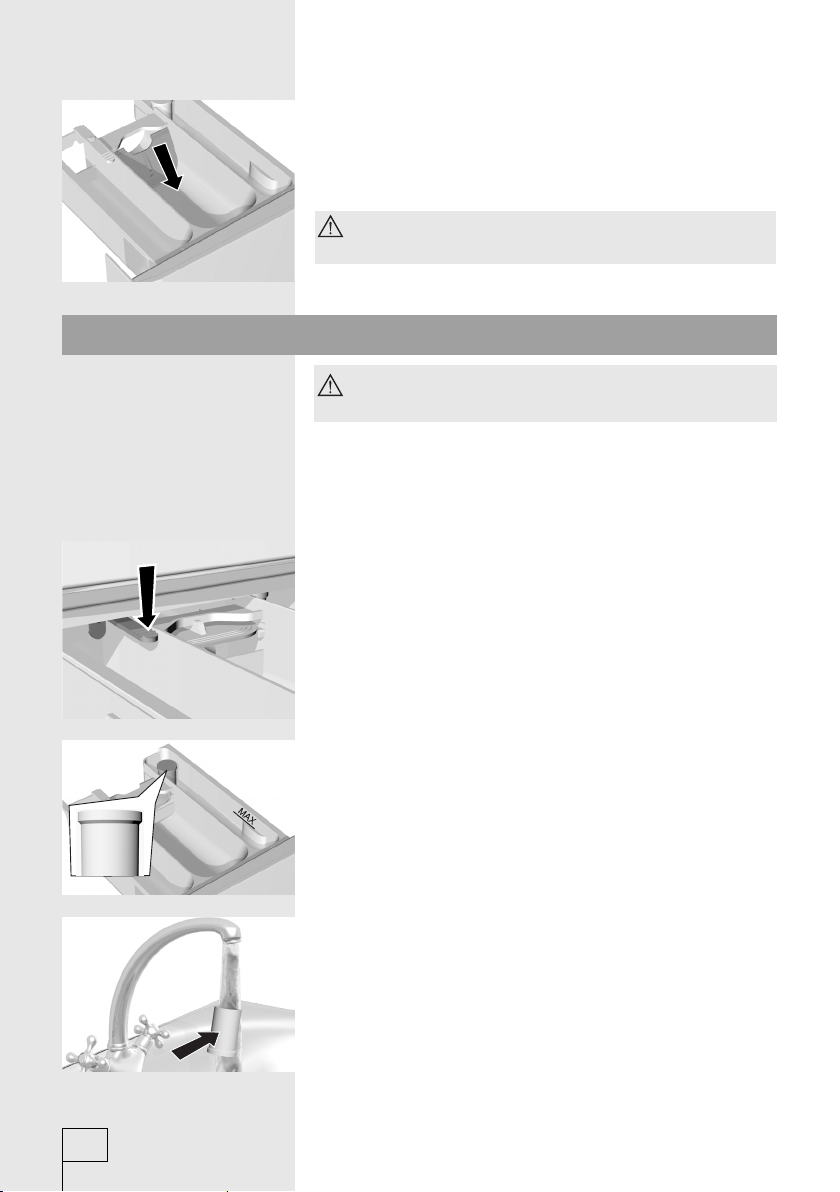
• In models with the delayed start feature, add liquid detergent
directly into the drum, in the attached vessel.
• Insert particularly delicate linen (stockings, delicate female
underwear, etc.) into the special bag.
• High spin RPM leave less moisture in laundry which dries out
much quicker in the tumble dryer, thereby saving energy.
Do not put clods of detergent into the soap dispenser
as the tube in the washing machine may clog.
Cleaning and maintenance
Disconnect the washing machine from the mains
before cleaning!
• The casing should be cleaned with soft cloth and mild
detergent.
• The interior of the drum and the door gasket is cleaned by
washing at 60°C without laundry and adding half quantity of
detergent.
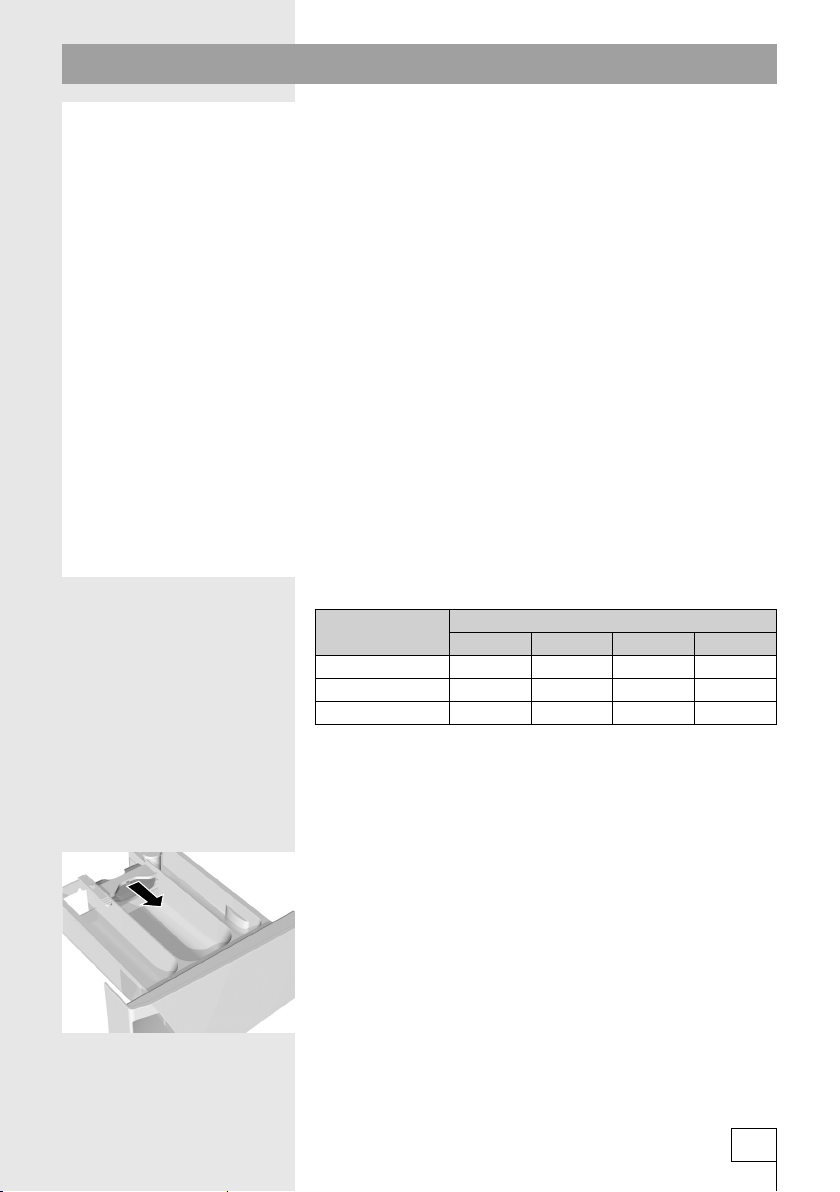
• If necessary, clean the detergent dispenser. Pull it out from its
casing completely by pressing the fl ap (see Fig.).
242221
• If necessary, clean the cover of the bung under the running
water.
20
Page 21
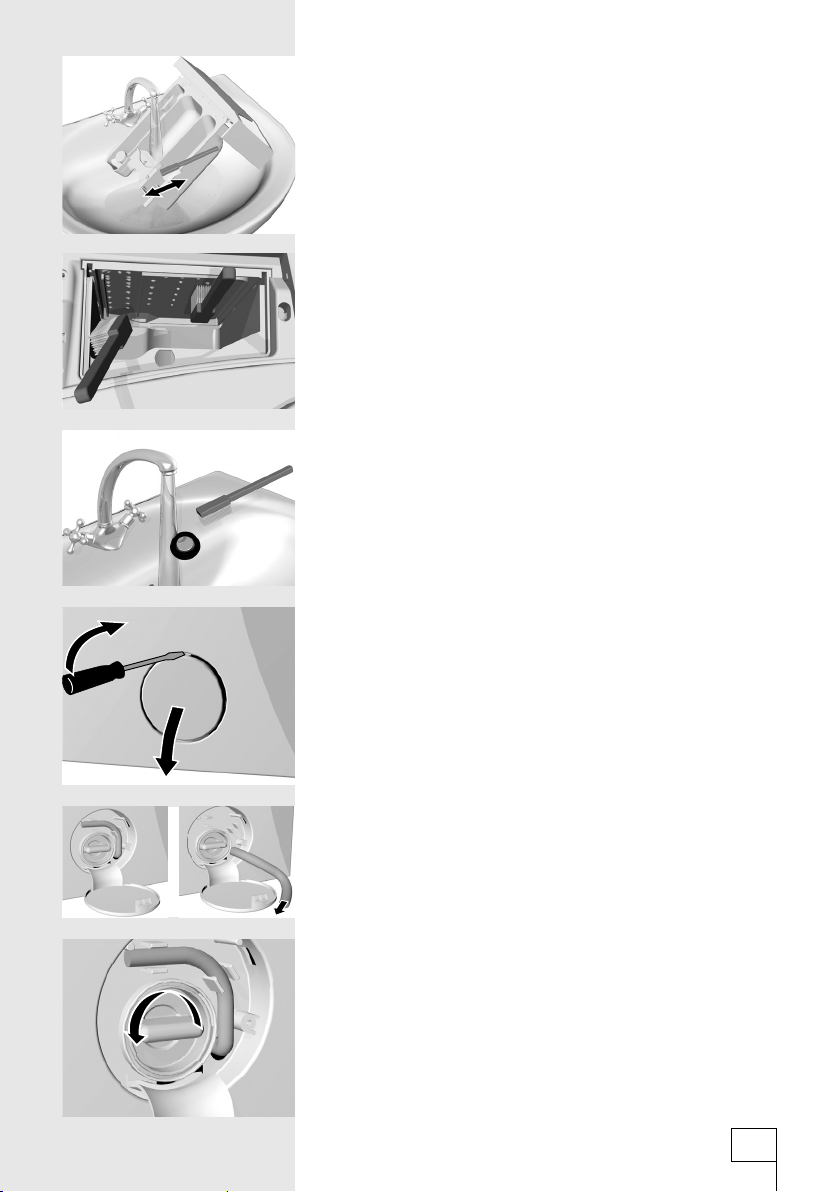
• Wash it under running water using a brush, and dry it. Remove
any leftover dried detergent from the bottom of the casing.
• Clean the entire rinsing area of the washing machine with a
brush, especially the nozzles on the upper side of the rinsing
chamber.
• Clean frequently the water inlet hose screen under running
water.
• After each wash wipe the door rubber gasket. This will prolong
its useful life.
• Open the fi lter lid using fl at screwdriver or similar tool.
• Filter needs occasional cleaning, especially following heavily
shaggy or old laundry. Before cleaning, drain any water from
the machine via drain pipe.
• Turn it anti-clockwise, pull it out and clean under running
water.
21
242221
Page 22
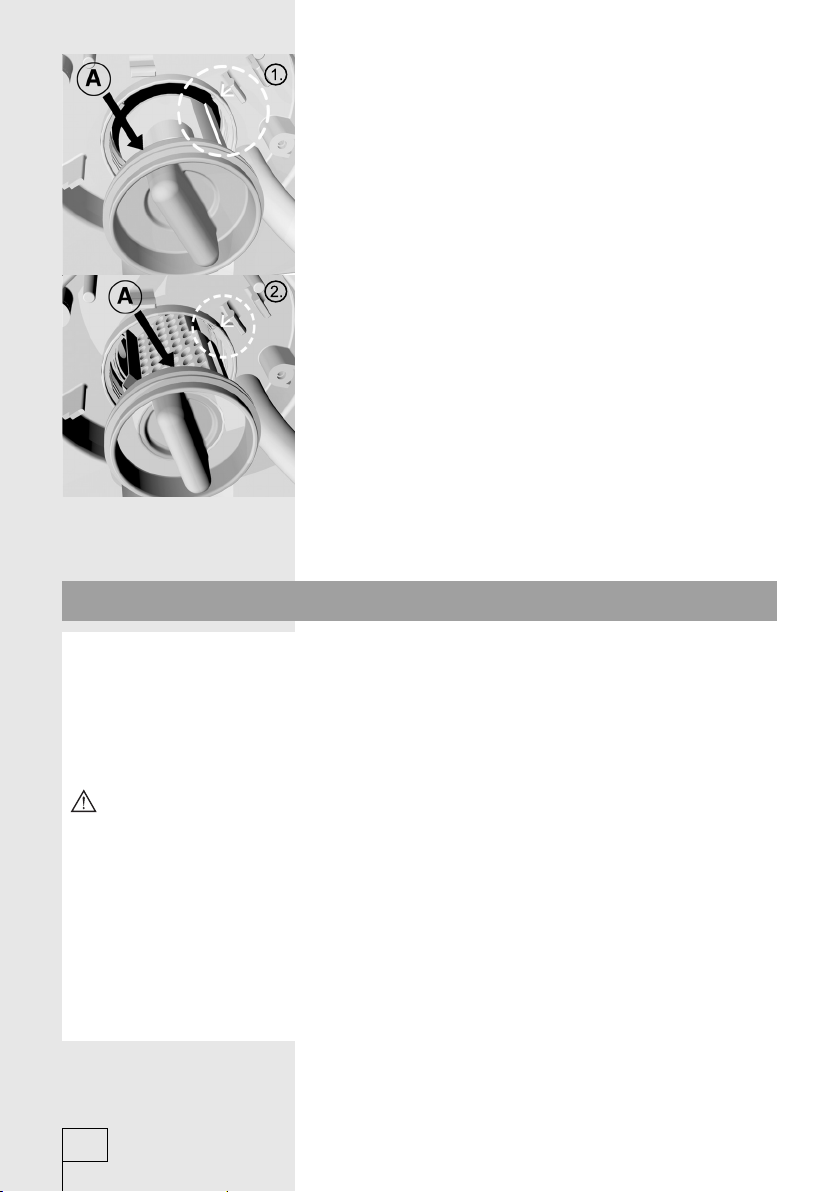
• Insert the fi lter back as shown on the picture (arrow and
pointer), and tighten by turning it in clockwise direction. To
ensure good sealing the gasket surface (A) must be dirt free.
(depending on the model)
(depending on the model)
Failures
If the washing machine identifi es failures in the operation, it reports it immediately. Sound alarm is
heard and the display reads ERROR. Number identifi es the type of failure.
In some cases you may attempt removing certain failures yourself (see the chart below), and the
machine will continue to perform the operation after pressing the START knob (F). The machine
signals failures immediately after detecting them and stops the program, except for heater failure,
where the machine completes the washing program without heating water (FAILURE 1).
In case the machine signals faults you have to wait for at least 2 minutes before you
can open the door of the washing machine.
Interferences from the ambient (for example electrical wiring) could induce signalization of different
faults. In such cases:
- switch the appliance off, and wait for a few seconds;
- switch the appliance back on and repeat the washing program.
If the fault repeats, call authorized service shop.
Warranty shall not apply in case of failures due to interferences from the environment (lightning
stroke, power supply circuit faults, natural disasters).
242221
22
Page 23
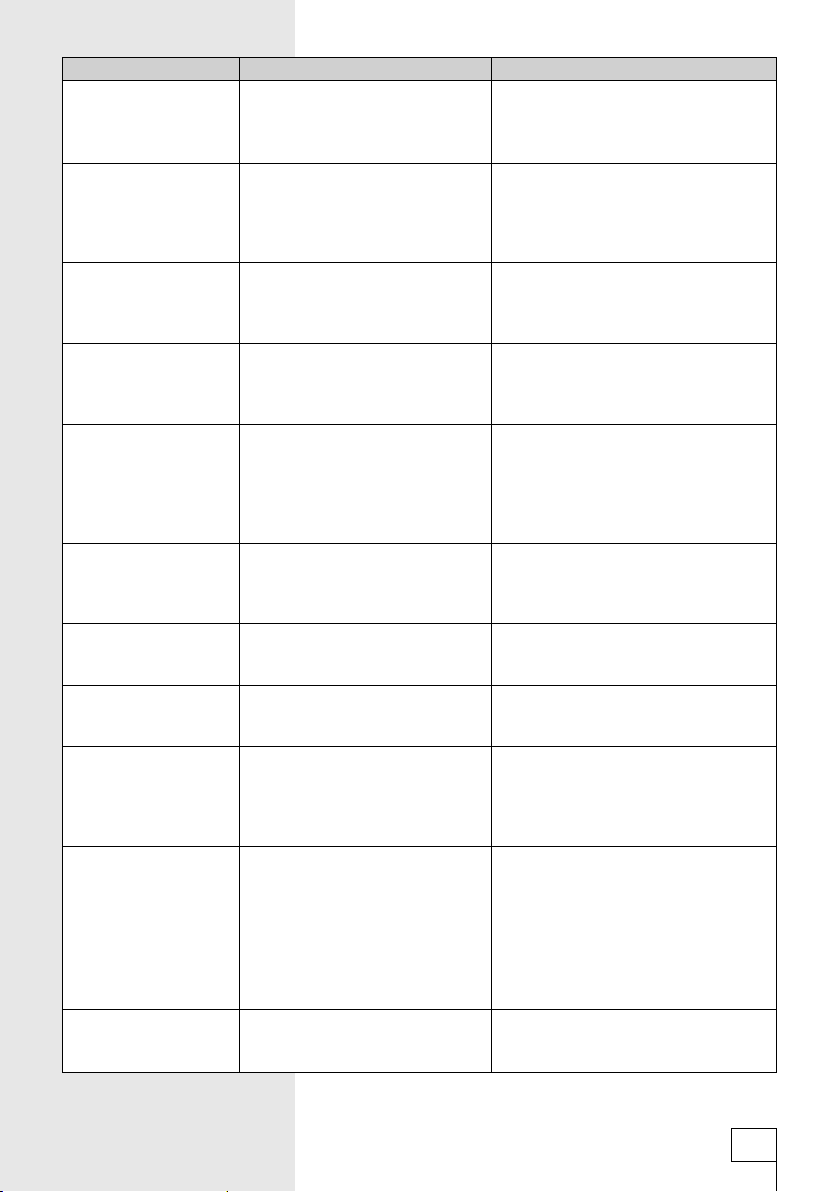
Failure Possible cause Remedy
The machine does not
work
(display is not
illuminated).
Water does not enter
the machine.
Machine is not powered. Check if:
• plug is in the socket,
• there is power in the socket,
• the fuse is OK.
Filter is not tightly screwed in.
Inlet pipe is not tightly screwed
to the machine or to the water
Tighten the fi lter properly.
Tighten the inlet pipe.
Affi x the outlet pipe to the drain.
faucet.
Outlet pipe fell to the fl oor.
The machine moves
during operation.
The machine is not properly
leveled.
Transport brackets are not
Level the machine with the adjustable
legs.
Remove transport brackets.
removed.
The machine vibrates
during the spin.
Excessive foaming
during washing.
Unevenly distributed laundry,
especially with very small
quantities (for ex. only the
bathrobe).
This is normal, the machine will
reduce the RPM if vibrations are
too strong. Wash larger quantity of
laundry.
Excessive measure of detergent. Use washing powder according to
the instructions by the producer and
according to the water hardness and
soiled laundry.
Use only detergents for machine
washing.
Laundry is not properly
spun.
No failure is reported.
The machine switched on the
UKS* function. Because of bad
laundry balance, the machine has
The machine operates normally. Wash
large and small pieces of laundry
together.
automatically reduced spin RPM.
Greasy wads appear
on the laundry.
Too little detergent (laundry was
very greasy).
Wash the laundry again.
Add more detergent for such soiled
laundry, or use liquid detergent.
Unpleasant smell in
the washing machine
Remains of fabrics, washing
agent and softener in the fi lter.
Check whether the fi lter is clean.
drum.
Laundry is stained
after washing.
You used liquid detergent or
detergent for colored laundry
which does not contain whitener.
Use the detergent containing whitener.
Select the heavily soiled laundry
program, or activate soaking function.
You selected inappropriate
program.
White powdery
residues on the
laundry.
Detergent residues in
the dispenser.
It is not the consequence of bad
rinsing, but because of neophosphate detergents containing
non soluble components
(zeolites) for water softening.
Such substances may be
deposited upon the laundry.
Inappropriately selected program.
Low water fl ow pressure.
Some detergents may stick to the
dispenser rather hard if it is wet.
• Immediately rinse the laundry once
again.
• Use liquid detergents which do not
contain zeolites.
• Try removing the residues with the
brush.
• Use program for heavily soiled
laundry, or activate soaking function.
• Clean the inlet pipe screen.
• Wipe the dispenser prior loading
detergent.
23
242221
Page 24
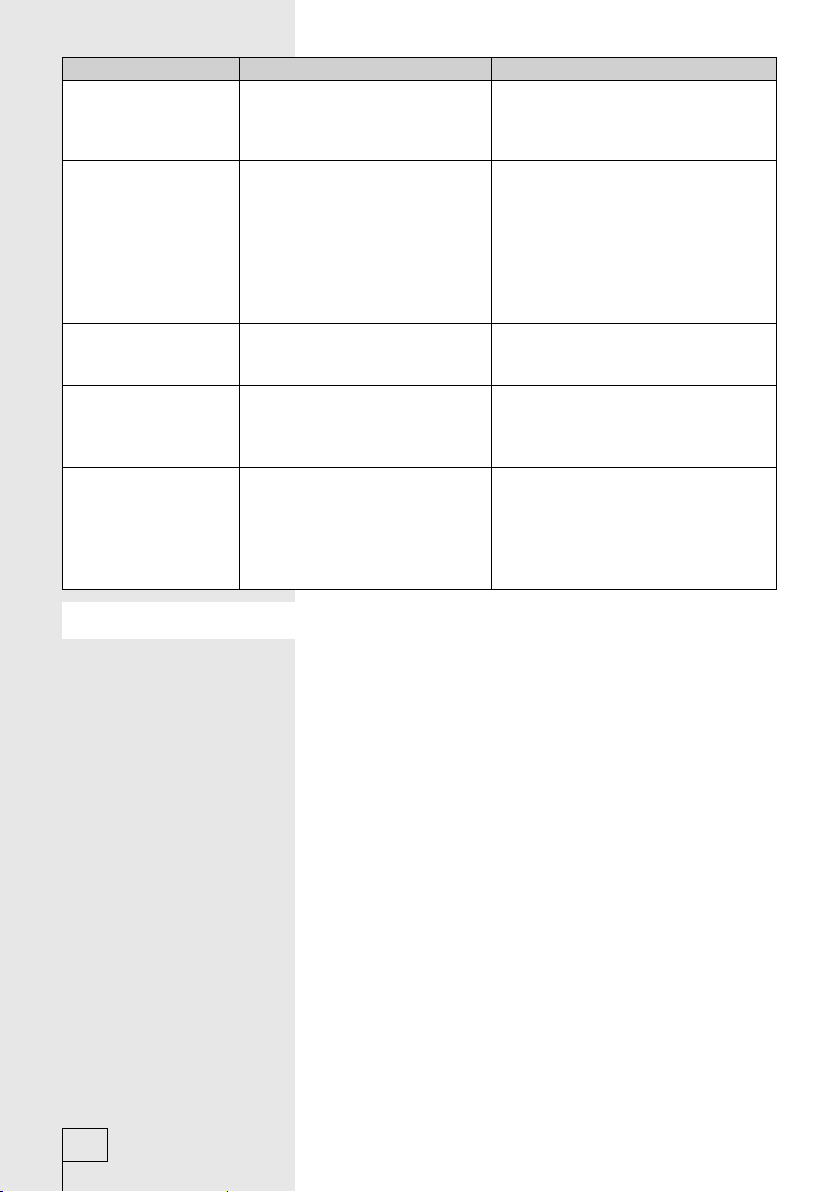
Failure Possible cause Remedy
Softener is not
completely rinsed,
Sucking cover is not correctly
positioned or is clogged.
Clean the dispenser and fi rmly fi x the
cover to its place.
or water is left in the
dispenser dish.
Washing time is longer
than usual.
Time indicated on the
display is corrected
during the washing
cycle.
Washing program does
• Low temperature of inlet water.
• Due to unevenly distributed
load, the machine has activated
• Washing program time may be up to
60% longer; however, this does not
imply a fault in the machine.
the UKS*.
• Low mains voltage.
• There has been a failure in the
power supply.
• Clean water sensor is engaged.
• Washing time is extended by the
power supply down-time.
• Time is prolonged for extra rinses.
Door is not properly closed. Push it towards the machine.
not start.
FAILURE 2
Water does not enter
the machine.
FAILURE 3
Disturbed water inlet. Check if:
• the water faucet is open,
• inlet pipe net fi lter is clean.
(Push the START button again).
Water is poorly
pumped out or not at
all (machine signals
FAILURE 7).
Water outlet is clogged. Check if:
• the fi lter is clean,
• outlet pipe is not jammed,
• outlet pipe is positioned higher than
1 m.
(Push START knob again).
* UKS: universal stability control - this function prevents excessive vibrations during spinning.
242221
In case you were not successful in repairing the malfunctions in
spite of the above suggestion chart, call the nearest authorized
service shop.
Repairing the failure arising from inappropriate connections or
use of the appliance is not covered by the guarantee, and the
repair expenses are paid by the customer.
24
Page 25
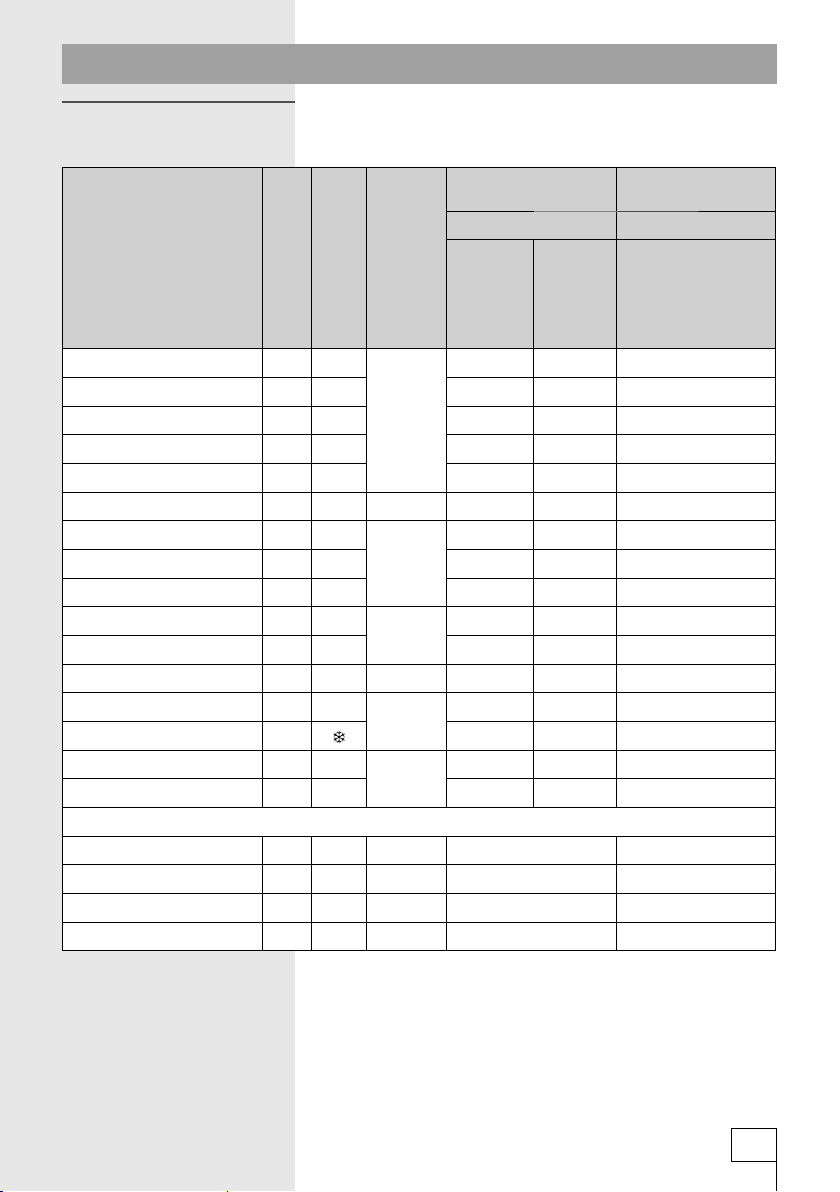
Tables
Program chart - 7 kg
Basic programs
Type of laundry
Cotton
Cotton
Cotton heavy *
Cotton
Cotton 7 30 56 49 0,35
Cotton - quick 17’ 2 30 1000 40 40 0,17
Synthetics
Synthetics
Synthetics
Delicate
Delicate
Wool
Manual wash
Manual wash
Jogging
Mix
Partial programs
Rinse
Softening
Pumping water
Spin
WA 73xxx,...
(depending on the model)
Water cons.
L
RPM RPM
Max. load (kg)
Temp. (°C)
795
7 60 56 49 1,31/1,17**
7 60 56 49 1,33/1,19**
7 40 56 49 0,67
3,5 60
3,5 40 43 43 0,56
3,5 30 43 43 0,36
340
3 30 58 58 0,39
2 30 800 42 42 0,20
1,5 30
1,5 50 50 0,10
340
3,5 30 43 43 0,35
3,5 700 40 0,02
7 1000 18 0,02
7-
7 1700 0,03
Spin max. (RPM)
1700
1000
700
400
1000
800 - 900
62 55 2,31/2,19**
46 46 0,97
58 58 0,48
50 50 0,25
32 32 0,42
1000 - 1700
Energy cons.
kWh
800 - 1700
* Testing program by EN 60456 with the selection of max. spin
RPM.
** depending on model.
25
242221
Page 26
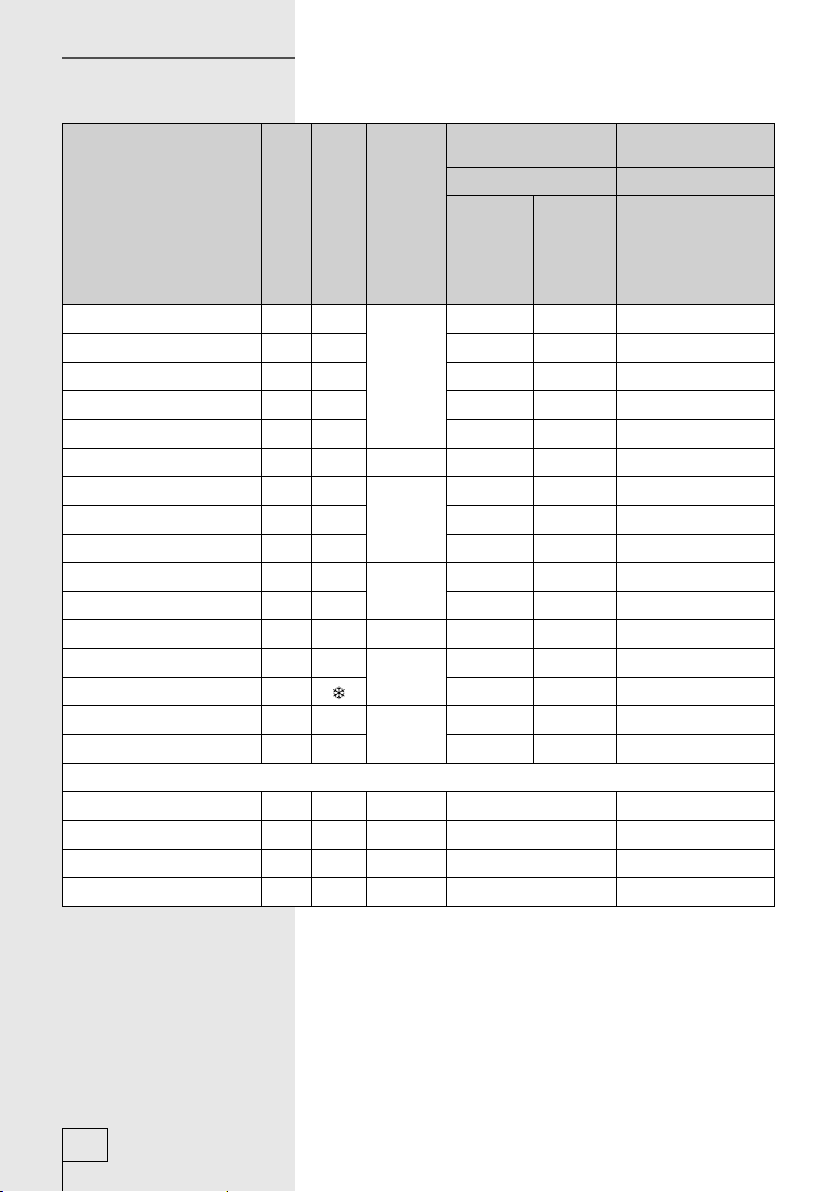
Program chart - 6 kg
WA 63xxx,...
(depending on the model)
Water cons.
Basic programs
Type of laundry
Cotton
Cotton
Cotton heavy *
Cotton
Cotton 6 30 52 45 0,27
Cotton - quick 17’ 2 30 1000 40 40 0,17
Synthetics
Synthetics
Synthetics
Delicate
Delicate
Wool
Manual wash
Manual wash
Jogging
Mix
Partial programs
Rinse
Softening
Pumping water
Spin
Max. load (kg)
Temp. (°C)
695
6 60 52 45 1,12/1,00**
6 60 52 45 1,14/1,02**
6 40 52 45 0,66/0,64**
360
3 40 40 40 0,52/0,50**
3 30 40 40 0,33/0,31**
2,5 40
2,5 30 55 55 0,36/0,34**
2 30 800 42 42 0,20/0,18**
1,5 30
1,5 50 50 0,10
340
3 30 40 40 0,32
3 700 40 0,02
6 1000 16 0,02
6-
6 1700 0,03
Spin max. (RPM)
1700
1000
700
400
1000
L
RPM RPM
800 - 900
58 51 2,10/2,05**
43 43 0,93/0,91**
55 55 0,45/0,43**
50 50 0,25/0,23**
32 32 0,42
1000 - 1700
Energy cons.
kWh
800 - 1700
242221
* Testing program by EN 60456 with the selection of max. spin
RPM.
** depending on model.
26
Page 27
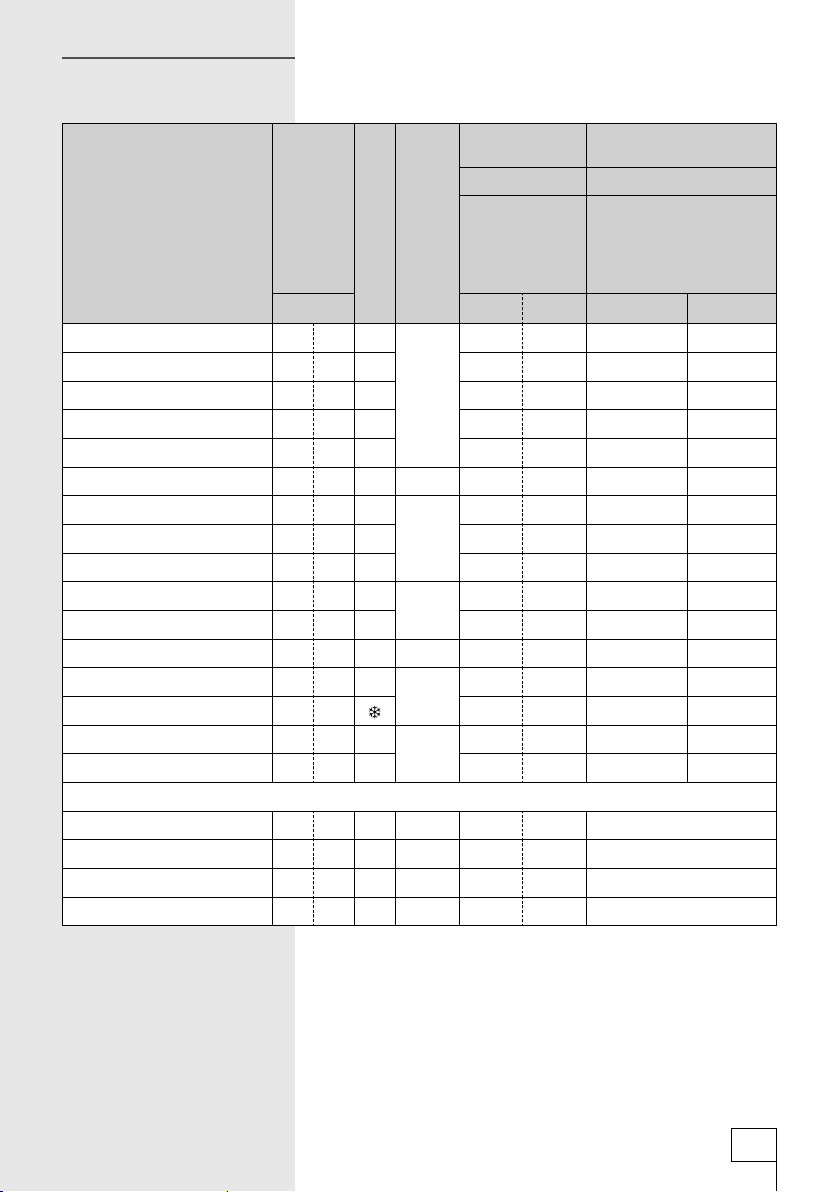
Program chart - 6/7 kg
WA 64xxx, WA 74xxx,...
(depending on the model)
Water cons.
Basic programs
Max. load
Type of laundry
Cotton
Cotton
Cotton heavy *
Cotton
Cotton 6 7 30 45 49 0,27 0,35
Cotton - quick 17’ 2 2 30 1000 40 40 0,17 0,17
Synthetics
Synthetics
Synthetics
Delicate
Delicate
Wool
Manual wash
Manual wash
Jogging
Mix
Partial programs
Rinse
Softening
Pumping water
Spin
kg 6kg 7kg 6kg 7kg
6795
6 7 60 45 49 1,12/1,00/** 1,17
6 7 60 39 45 1,14/1,02** 1,19
6 7 40 45 49 0,64 0,67
3 3,5 60
3 3,5 40 40 43 0,50 0,56
3 3,5 30 40 43 0,31 0,36
2,5 3 40
2,5 3 30 55 58 0,34 0,39
2 2 30 800 42 42 0,18 0,18
1,5 1,5 30
1,5 1,5 50 50 0,10 0,10
3340
3 3,5 30 40 43 0,30 0,35
3 3,5 700 40 40 0,02
6 7 1000 16 18 0,02
67 -
6 7 1800 0,03
Temp. (°C)
Spin max. (RPM)
1800
1000
700
400
1000
L
RPM RPM
1200 - 1800
48 53 2,10/2,05** 2,19
40 43 0,91 0,97
55 58 0,43 0,48
50 50 0,23 0,25
32 32 0,40 0,42
Energy cons.
kWh
1200 - 1800
* Testing program by EN 60456 with the selection of max. spin
RPM.
** depending on model.
27
242221
Page 28
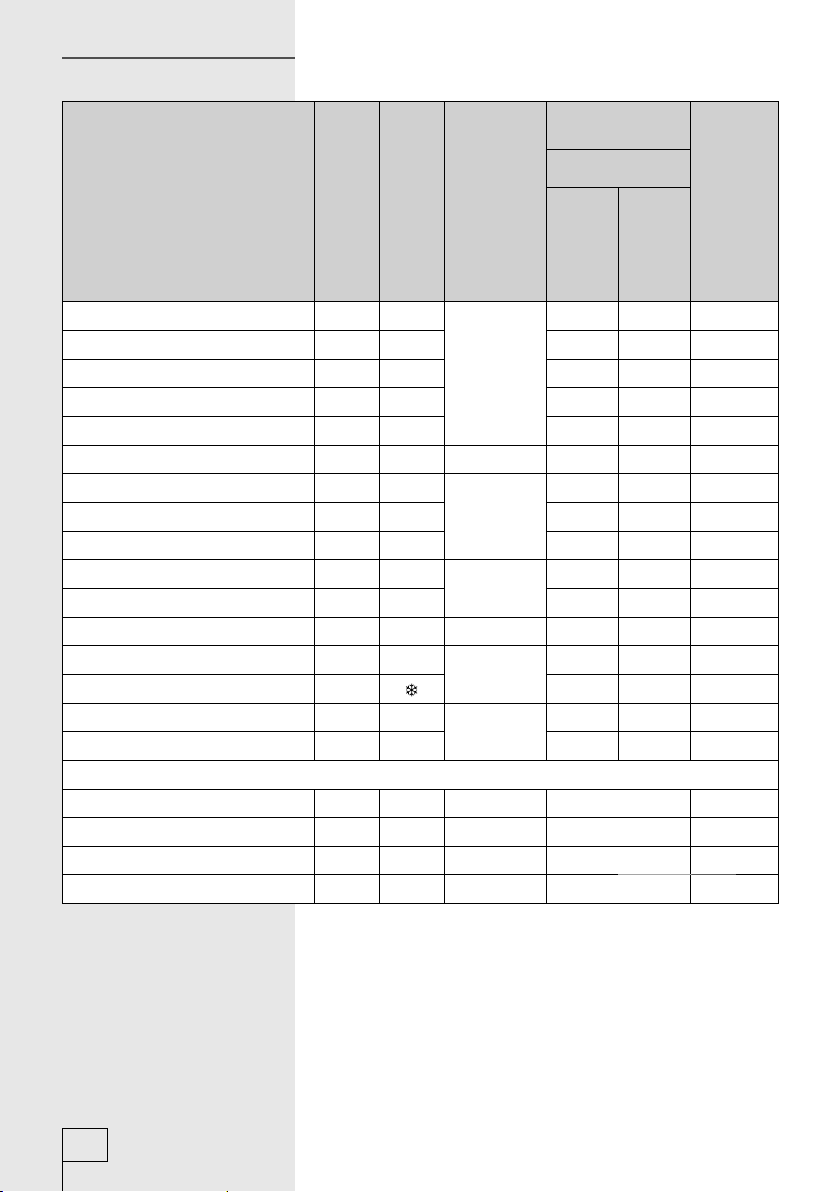
Program chart - 4,5 kg
Basic programs
Type of laundry
Cotton
Cotton
Cotton heavy *
Cotton
Cotton 4,5 30 44 37 0,15
Cotton - quick 17’ 2 30 1000 30 30 0,13
Synthetics
Synthetics
Synthetics
Delicate
Delicate
Wool
Manual wash
Manual wash
Jogging
Mix
Partial programs
Rinse
Softening
Pumping water
Spin
Max. load (kg)
4,5 95
4,5 60 44 37 0,82
4,5 60 44 37 0,85
4,5 40 44 37 0,51
260
2 40 29 29 0,34
2 30 29 29 0,18
1,5 40
1,5 30 38 38 0,15
1 30 800 32 32 0,15
130
1 45 45 0,10
240
2 30 35 35 0,25
1,5 700 30 0,02
4,5 1000 10 0,02
4,5 - -
4,5 1400 - 0,03
Temp. (°C)
Spin max. (RPM)
1400
1000
700
400
1000
Water cons.
L
RPM
800 - 900
47 40 1,80
29 29 0,61
38 38 0,20
45 45 0,20
20 20 0,31
1000 - 1400
Energy cons. kWh
242221
* Testing program by EN 60456 with the selection of max. spin
RPM.
28
Page 29
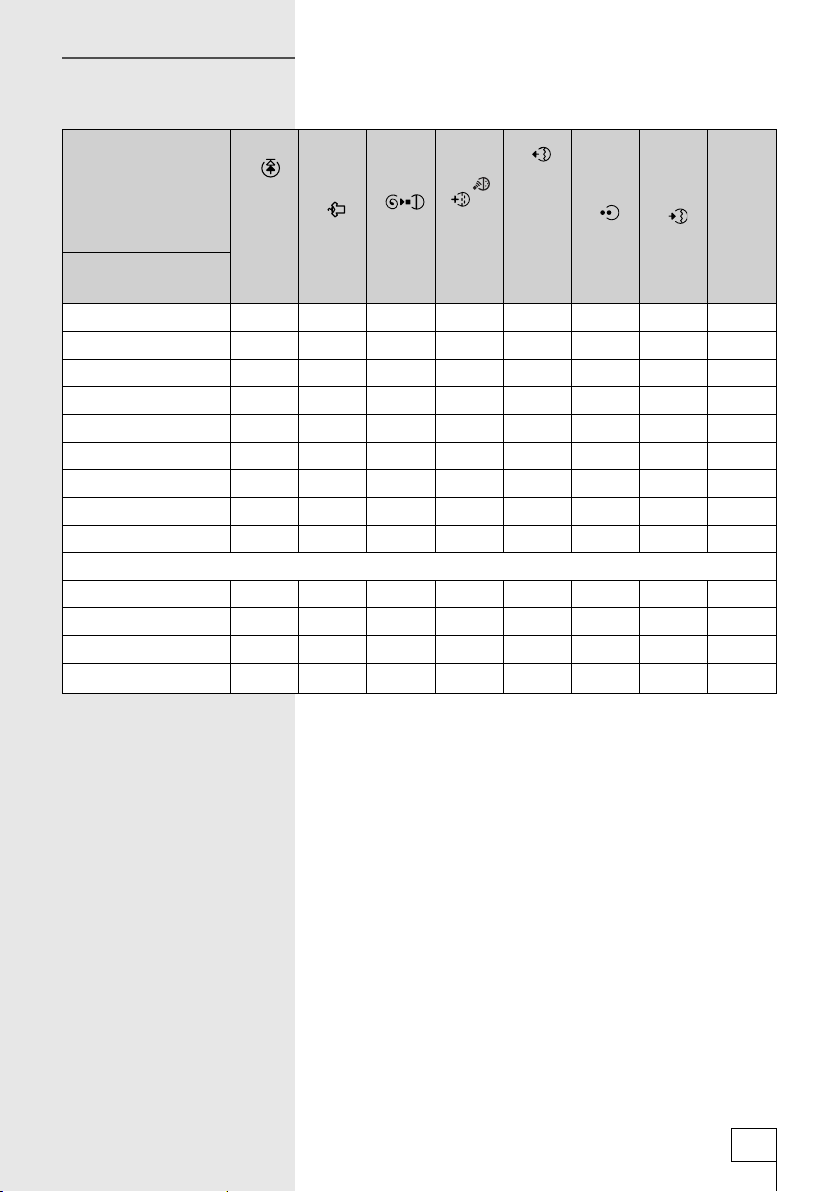
Program chart/Additional
functions
Program
/
Basic programs
Cotton
Cotton heavy
Cotton - quick 17’
Synthetics
Delicate
Wool
Manual wash
Jogging
Mix
Partial programs
Rinse
Softening
Pumping water
Spin
z possibility
Quick program
zzz/zz/zz z z z
zzz/zz/zz z z z
zz/z -/zz z z z
zz/zz z
zz/zz
zzz/zz/zz z z
Easy iron
Spin speed
z/zz/zz z z
zz/zz/zz z
zz/z -/z
z/-
z/-
z/-
Extra rinse / clean
Rinse hold
water sensor
Higher water level
Pre-wash
Soaking
Cold wash
29
242221
Page 30
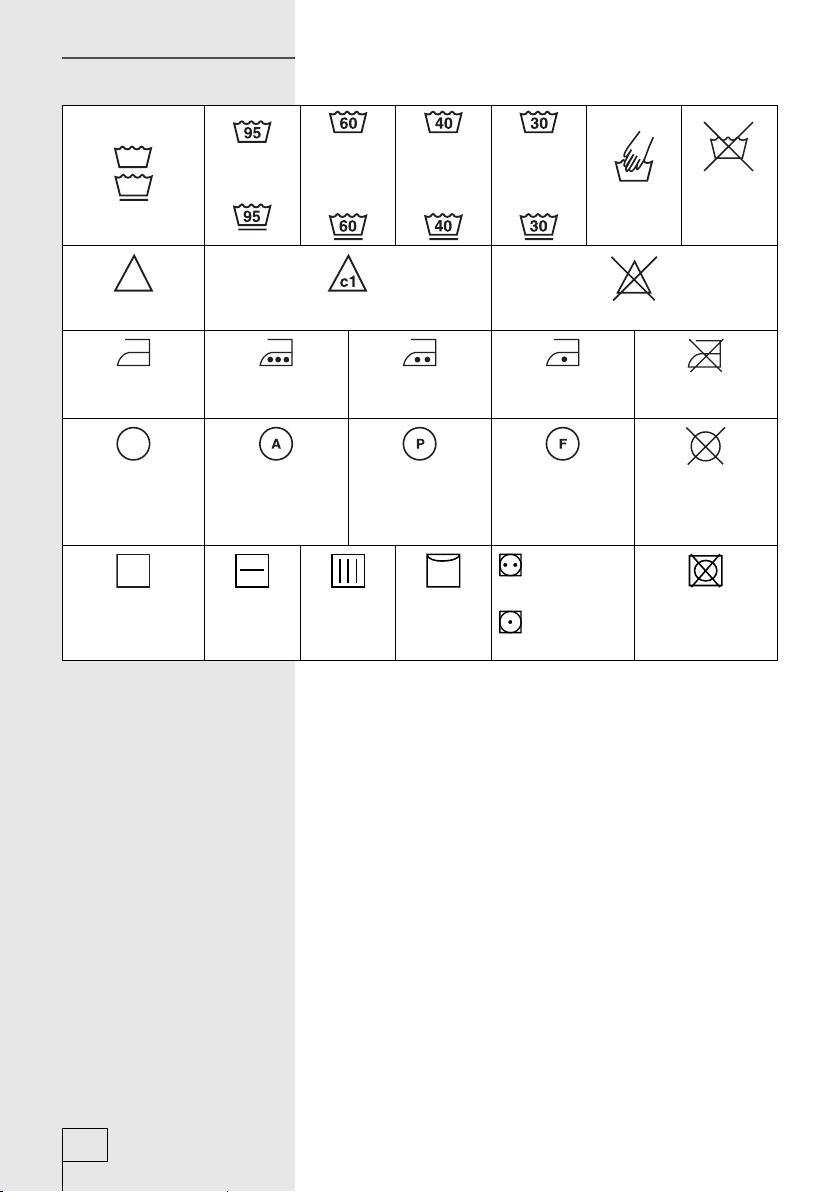
Maintenance chart
Normal wash
Max.
washing
temp. 95°C
Delicate wash
Max.
washing
temp.
60°C
Whitening Whitening in cold water
Ironing Hot iron max.
Hot iron max.
200°C
Dry cleaning Dry cleaning in all
Perchlorin-
solvents
R11, R113,
Kerosene
Drying Place on
Hang wet Hang
fl at surface
Max.
washing
temp.
40°C
150°C
etyhlene
Max.
washing
temp.
30°C
Manual
washing
Whitening not allowed
Hot iron max.
110°C
Dry cleaning in
kerosene, in pure
alcohol and in
R 113
High
temperature
Low
temperature
Washing
not
allowed
Ironing not
allowed
Dry cleaning not
allowed
Tumble drying
not allowed
242221
We reserve the rights to make any changes or mistakes in these operation
instructions.
30
Page 31

Page 32

PS PG3,4 OEM 242221/en (08-08)
 Loading...