

Page 1
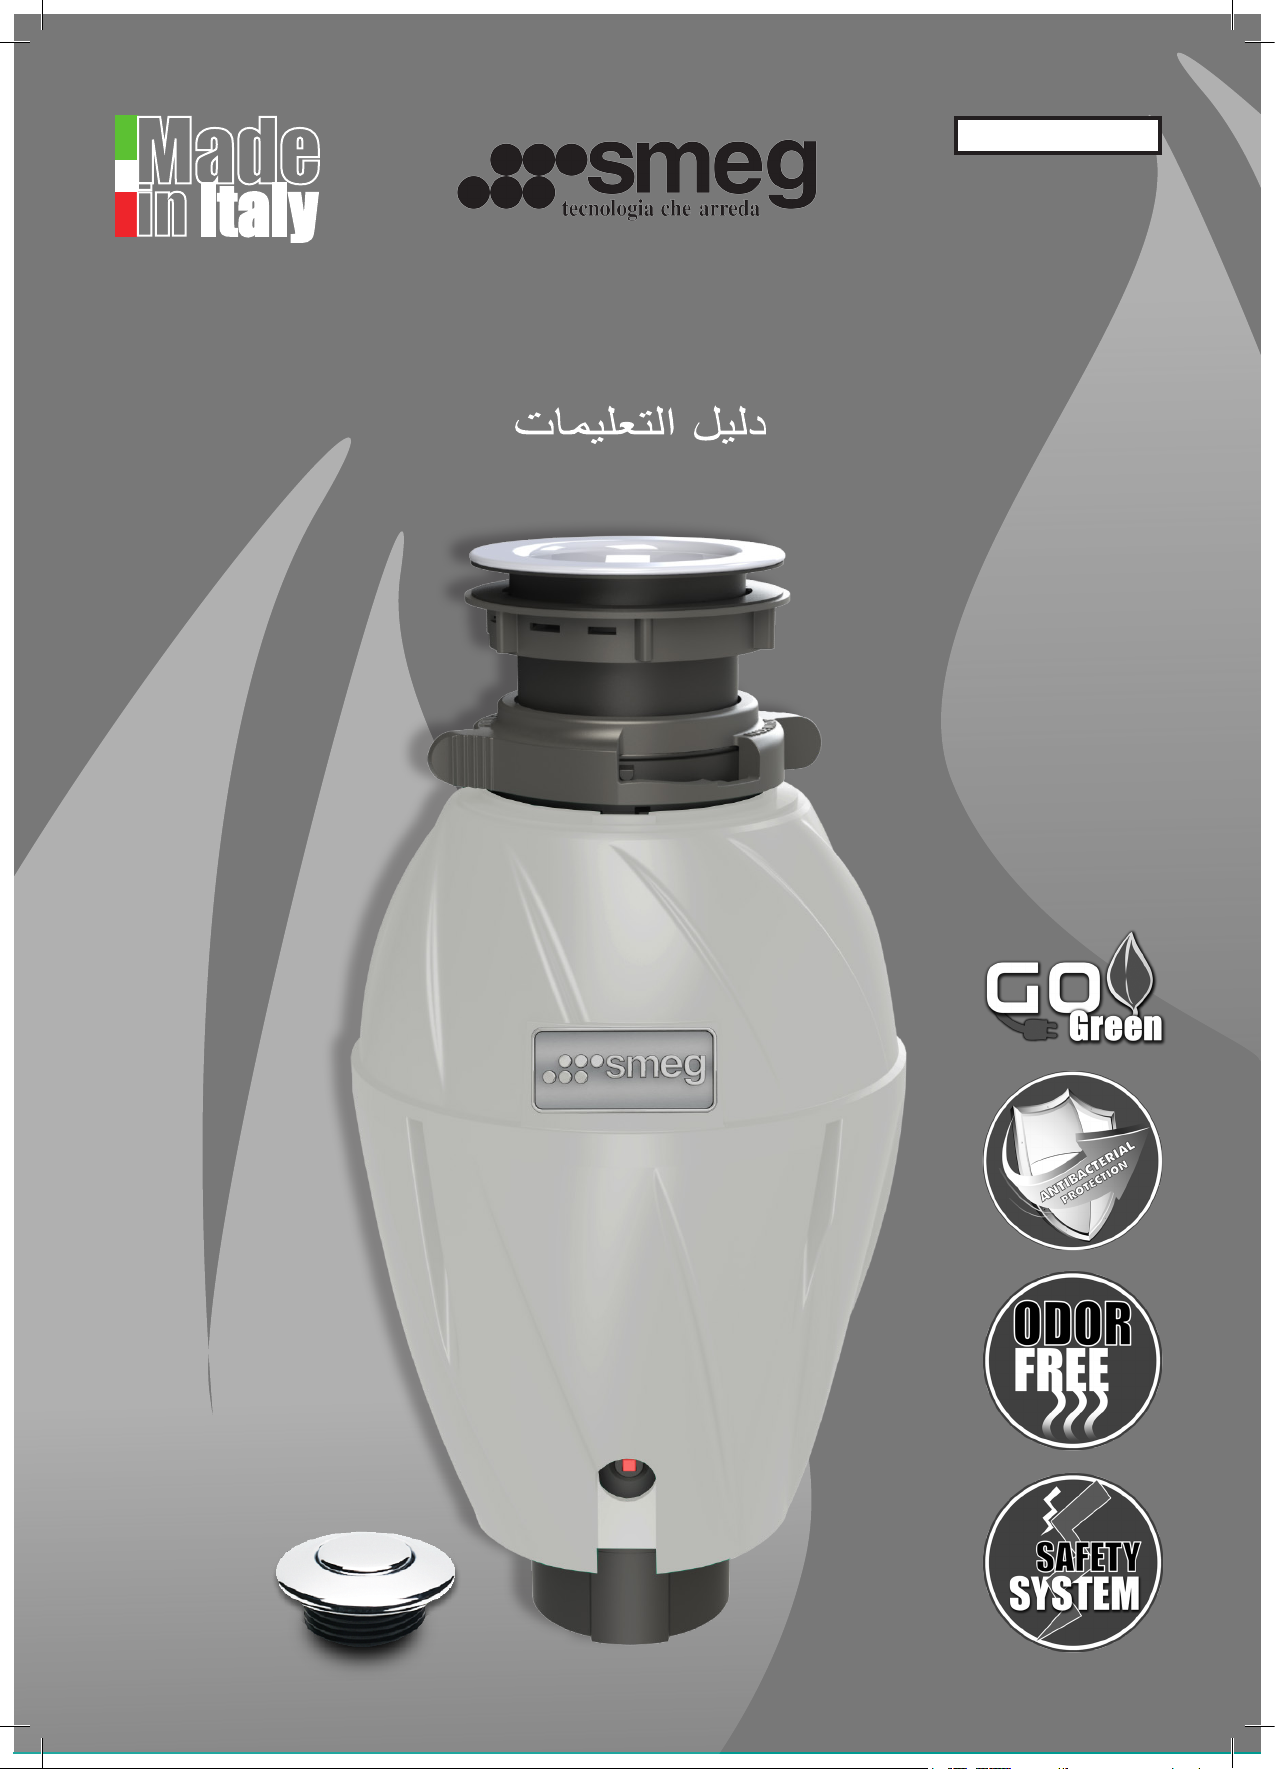
code: MANIA02
MANUALE D’ISTRUZIONI - INSTRUCTION MANUAL
BEDIENUNGS UND WARTUNGSANLEITUNG - MANUEL D’UTILISATION
MODELS:
KITFD050
KITFD050UK
KITFD075
KITFD075UK
KITFD100
KITFD100UK
Page 2

IT
Egregio Cliente
Lei ha acquistato un prodotto SMEG e sentitamente la ringraziamo per la preferenza accordataci. La
tradizione e la serietà della nostra Azienda garantiscono la qualità tecnico-estetica della scelta da Lei
fatta; infatti tutti i nostri prodotti sono realizzati con materiali di prima qualità e con criteri costruttivi
tali da soddisfare anche la clientela più esigente. Per usare nel modo migliore questo Suo nuovo prodotto La preghiamo di leggere attentamente il presente manuale delle istruzioni per l’uso all’interno
del quale troverà tutte le indicazioni ed i consigli necessari per un facile uso. Il manuale delle istruzioni
per l’uso è una guida sicura per l’installazione, l’uso, la manutenzione e garantisce con l’osservanza
delle sue indicazioni, un ottimo funzionamento ed un perfetto rendimento dell’apparecchiatura. Rinnovando il ringraziamento per la scelta da Lei fatta, cordialmente la salutiamo.
SMEG Spa
INDICE
1. SEGNALETICA.......................................................................................................................................................02
2. GENERALITA’........................................................................................................................................................02
3. DATI DEL PRODUTTORE.......................................................................................................................................03
4. TARGHE IDENTIFICATIVE.....................................................................................................................................03
5. SICUREZZA...........................................................................................................................................................03
6. FUNZIONE DELL’APPARECCHIATURA.................................................................................................................05
7.REQUISITI TECNICI................................................................................................................................................06
8. INSTALLAZIONE....................................................................................................................................................07
9. ALLACCIAMENTO ELETTRICO..............................................................................................................................08
10. INSTALLAZIONE PULSANTE PNEUMATICO........................................................................................................09
11. ALLACCIAMENTO IDRICO E SCARICHI.............................................................................................................09
12. ALLACCIAMENTO TROPPOPIENO.......................................................................................................................09
13. ALLACCIAMENTO LAVASTOVIGLIE.....................................................................................................................10
14. ALLACIAMENTO SCARICHI FOGNARI ................................................................................................................10
15. MESSA IN FUNZIONE........................................................................................................................................11
16. ISTRUZIONI PER L’USO...................................................................................................................................................... 11
17. PULIZIA DEL TRITARIFIUTI.............................................................................................................................12
18. SBLOCCAGGIO DEL DISSIPATORE.....................................................................................................................12
19. RISCHI RESIDUI..................................................................................................................................................13
20. MANUTENZIONE................................................................................................................................................13
21. TRASPORTO E MOVIMENTAZIONE.....................................................................................................................14
22. GARANZIA..........................................................................................................................................................14
23. SMALTIMENTO E DEMOLIZIONE.......................................................................................................................14
1
Page 3

1.
SEGNALETICA
Nella stesura del presente manuale sono utilizzati pittogrammi e segnaletiche allo scopo di evidenziare
all’utente argomenti di interesse per la sicurezza o raccomandazioni per il corretto utilizzo del dissipatore per alimenti.
SEGNALETICA DESCRIZIONE
Il simbolo “ AVVISO” indica una situazione potenzialmente pericolosa che, se non
AVVISO
ATTENZIONE
evitata, potrebbe provocare gravi lesioni alle persone o addirittura la morte.
il simbolo “ATTENZIONE” accompagnato ad un simbolo di pericolo, indica una
situazione potenzialmente pericolosa che, se non evitata, può provocare lesioni
personali, danni all’abitazione o all’apparecchio.
IT
ATTENZIONE
ATTENZIONE
La documentazione deve essere conservata e tenuta a disposizione per tutta la durata di vita dell’apparecchio e lo deve
accompagnare in caso di trasferimenti ad altri utenti.
È OBBLIGATORIO LEGGERE E COMPRENDERE LE ISTRUZIONI CONTENUTE NEL PRESENTE MANUALE PRIMA DI ESEGUIRE QUALSIASI TIPO DI ATTIVITÀ SULL’APPARECCHIO
2.
Il presente Manuale delle istruzioni per l’uso si riferisce all’apparecchio elettrico denominato dissipatore per rifiuti alimentari (più
comunemente noto come tritarifiuti ) della serie: KITFD050 - KITFD075 - KITFD100.
Il dissipatore per rifiuti alimentari è un apparecchio elettrico, progettato e realizzato esclusivamente per uso domestico , non può
essere utilizzato in ambienti in cui sono presenti condizioni particolari come atmosfere corrosive o esplosive (polveri,vapori o gas).
L’ apparecchio è sottoposto a controlli costruttivi, collaudi di funzionalità e sicurezza in accordo con quanto richiesto dalle e Direttive Comunitarie e dalle Norme Tecniche vigenti di seguito elencate :
Il simbolo “ ATTENZIONE” non accompagnato da altre simbologie di pericolo,indica all’utente di seguire attentamente le istruzioni.
il simbolo riportato a lato raccomanda che gli interventi tecnici siano svolti da
personale tecnico specializzato : elettricista - idraulico.
simbolo di PERICOLO GENERICO
simbolo di pericolo di ELETTROCUZIONE O SCOSSA ELETTRICA
GENERALITA’
• 2006/95/CE, Direttiva Comunitaria Bassa Tensione (LVD).
• 2004/108/CE Direttiva Comunitaria Compatibilità Elettromagnetica (EMC).
• CEI EN 60335-1 Sicurezza degli apparecchi elettrici d’uso domestico e similare Parte 1 – Norme generali.
• CEI EN 60335-2-16 Sicurezza degli apparecchi elettrici d’uso domestico e similare Parte 2 - Norme particolari per i tritarifiuti
• 61770 Apparecchi elettrici connessi alla rete idrica - Disposizioni per evitare il ritorno d’acqua per effetto sifone e il guasto
dei complessi di raccordo.
• CEI EN 61770/A1/A2 Apparecchi elettrici connessi alla rete idrica - Disposizioni per evitare il ritorno d’acqua per effetto sifone
e il guasto dei complessi di raccordo.
• CEI EN 60529 Gradi di protezione degli involucri.
Per quanto possibile , le suddette Norme riguardano i normali rischi presentati dagli apparecchi ai quali le persone sono esposte
in casa.
ACCERTARSI CHE L’ISTALLAZIONE DEL DISSIPATORE PER RIFIUTI ALIMENTARI
ATTENZIONE
SIA CONSENTITO DALLE NORME LOCALI.
IL DISSIPATORE PER RIFIUTI ALIMENTARI NON È PROTETTO CONTRO I GETTI DI
ACQUA DIRETTI (GRADO DI PROTEZIONE IP20).
2
Page 4

IT
3.
La ditta costruttrice si riserva i diritti della documentazione tecnica allegata alla apparecchiatura ed inoltre ne vieta la riproduzione
o la traduzione sia parziale, che totale, senza previa autorizzazione scritta.
DATI DEL PRODUTTORE
PRODUCER:
Elleci S.p.A., Strada Longitudinale A 1258, Z.I. Mazzocchio
04014 Pontinia (LT) - Italy
Tel. +39.0773.840036
Fax. +39.0773.840038
elleci@elleci.it
4.
5.
ELLECI Spa
Via Migliara 53 z.i. Mazzocchio
04014 PONTINIA - LT - ITALY
Tel . +39(0) 773 - 840036
Fax . +39(0) 773 - 840038
TARGHE IDENTIFICATIVE
I dati riguardanti il modello e le sue caratteristiche possono essere rilevati
consultando la targhetta posta sull’apparecchio.
SICUREZZA
ATTENZIONE
Le operazioni di installazione , regolazione, manutenzione devono essere eseguite da personale qualificato dotato di tutte le attrezzature necessarie al corretto svolgimento delle operazioni in accordo con quanto contenuto nel presente
manuale d’uso , secondo le normative vigenti e le regole di buona tecnica. La
SMEG Spa declina ogni responsabilità derivante da una cattiva installazione ,
regolazione e manutenzione dell’apparecchio.
Prima di eseguire qualsiasi intervento di manutenzione togliere la corrente elettrica e chiudere l’erogazione dell’acqua a monte dell’apparecchio. Nel caso di
sostituzione di componenti e/o accessori , utilizzare esclusivamente ricambi
originali SMEG Spa.
Fate ispezionare periodicamente, da personale qualificato, il buono stato dei
tubi di collegamento alla rete idrica di alimentazione e degli scarichi. Sostituire
tubazioni ed accessori ad ogni minimo cenno di alterazione e/o perdite.
Non aprire gli involucri dei dispositivi elettrici
PERICOLO DI FOLGORAZIONE
CONDOTTE E SCARICHI D’ACQUA
3
Page 5

ATTENZIONE
Nell’utilizzo degli apparecchi elettrici (dissipatore per rifiuti alimentari - tritarifiuti) occorre sempre
tenere presente le modalità consentite di utilizzo ed osservare alcune norme di sicurezza in particolare:
a. Questo apparecchio non è destinato ad essere utilizzato da persone (inclusi i bambini) le cui caratteri-
stiche fisiche, sensoriali o mentali o mancanza di esperienza e conoscenza impediscono loro di utilizzare
l’apparecchio in sicurezza senza supervisione o istruzioni.
b. Sorvegliare affinchè i bambini non utilizzino questo apparecchio o lo scambino per un giocattolo. Prestare
particolare attenzione quando l’apparecchio viene utilizzato in presenza di bambini.
c. Questo apparecchio è stato progettato esclusivamente per lo smaltimento di normali rifiuti alimentari,
l’inserimento di materiale di altro tipo può causare lesioni personali o danni all’abitazione.
Per ridurre il rischio di lesioni personali, non utilizzare il lavello dotato del dissipatore per rifiuti alimentari per
scopi diversi dalle normali attività culinarie ( esempio: per fare il bagno ad un neonato o per lavarsi i capelli).
d. Quando si cerca di sbloccare il dissipatore per rifiuti alimentari inceppato, occorre prima spegnerlo o
togliere la spina di alimentazione elettrica e chiudere il rubinetto dell’acqua.
Utilizzare le procedure descritte nell’apposita sezione “Sbloccaggio del Dissipatore” per sbloccare l’apparecchiatura.
e. Per rimuovere eventuali oggetti dal dissipatore per rifiuti alimentari , utilizzare una pinzetta a becchi lunghi.
IT
f. Non introdurre mani o dita nel dissipatore per rifiuti alimentari .
g. Per ridurre il rischio di lesioni personali causati da materiali espulsi dal dissipatore per rifiuti alimentari non utilizzare l’apparecchio senza che la guarnizione superiore di protezione sia nella sua sede.
USO VIETATO
h. Non introdurre nel dissipatore per rifiuti alimentari: conchiglie o gusci di ostrica, vetro, porcellana, pla-
stica, ossi interi di grandi dimensioni, oggetti in metallo ( tappi, utensili, posate, lattine e simili) grassi caldi,
liquidi bollenti, prodotti chimici per sturare i lavandini a base di soda caustica, prodotti chimici di qualsiasi
genere (vernici, solventi, prodotti per la pulizia della casa, fluidi per l’auto), pellicole in plastica ed altri similari.
USO CORRETTO
i. Quando il dissipatore per rifiuti alimentari non è utilizzato, posizionare il tappo nel foro del lavello per pre-
venire l’introduzione accidentale di materiali nell’apparecchio.
j. Sostituire prontamente la guarnizione superiore di protezione e/o altri dispositivi posti sul dissipatore per
rifiuti alimentari se usurati.
k. Per evitare PERICOLI DI INCENDIO, non conservare ne utilizzare nei pressi del dissipatore per rifiuti alimentari sostanze o oggetti infiammabili quali stracci, carta, bombolette spray, contenitori di gas o benzina
o altre sostanze infiammabili
4
Page 6

IT
6.
DESTINAZIONE ED AMBIENTE DI LAVORO
Il dissipatore per rifiuti alimentari è un’apparecchiatura costruita per essere inserita ed utilizzata in ambiente
domestico, precisamente in cucina, collegato allo scarico del lavello.
E’ previsto l’uso solo con acque pulite.
DESCRIZIONE DELLA APPARECCHIATURA
Il dissipatore per rifiuti alimentari si compone di un involucro in materiale plastico isolante termoformato
all’interno del quale sono alloggiati :
• La girante metallica tritarifiuti.
• Le guarnizioni e i dispositivi di sicurezza del vano di accesso.
• Il motore elettrico.
• I necessari dispositivi di comando elettrico.
• Le raccordature per l’allacciamento del troppo pieno del lavello.
• Le raccordature per l’allacciamento alla lavastoviglie.
• Le raccordature per l’allacciamento agli scarichi in fogna.
FUNZIONE DELL’APPARECCHIATURA
5
Page 7
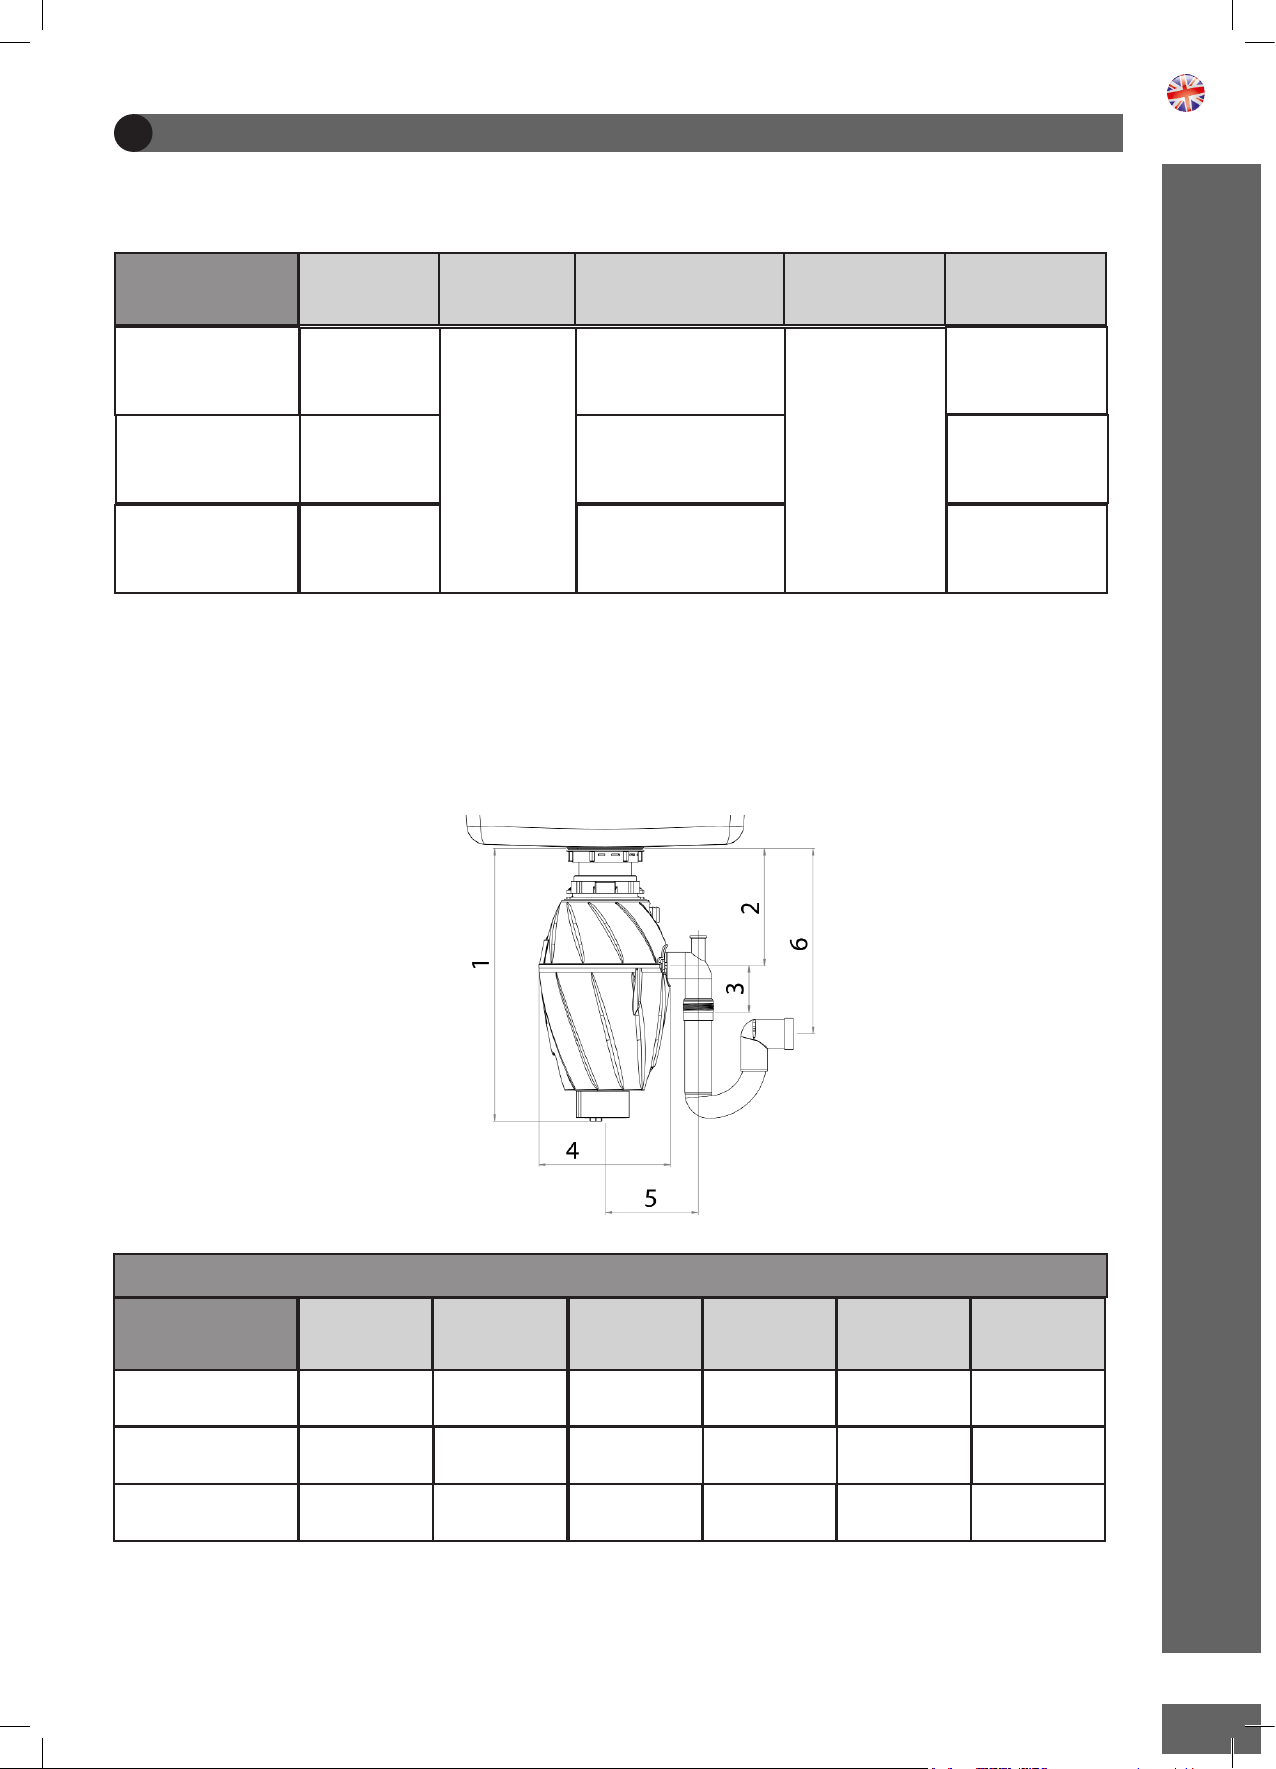
7.
CARATTERISTICHE TECNICHE
REQUISITI TECNICI
IT
MODELLO
KITFD050
KITFD075
KITFD100
DIMENSIONI PER L’INSTALLAZIONE
POTENZA
WATT
375
550
750
TENSIONE
Vac
220 - 240
ASSORBIMENTO
(Ampere)
1.7
2.5
3.4
giri/min
2800
Peso
(Kg)
4,5
4,7
4,8
MODELLO
KITFD050
KITFD075
KITFD100
MISURE IN MILLIMETRI
1 2
370
420
420 185
180
185
3 4
70
70
70 205
205
205
5 6
140
140
140 255
250
255
6
Page 8

IT
8.
Ai fini della sicurezza è importante che i piazzamenti vengano realizzati da personale qualificato.
Accertarsi che il foro su cui sarà installato il dissipatore di rifiuti alimentari,posto sul fondo del lavello, sia
delle opportune dimensioni :
PILETTA TONDA (STANDARD) PILETTA QUADRATA (OPZIONALE)
Per il montaggio del dissipatore rispettare la sequenza di inserimento dei particolari presenti nel kit di installazione come riportato in figura
INSTALLAZIONE
1. Tappo + spingitore a tappo
2. Guarnizione superiore di protezione
3. Piletta
4. Guarnizione in gomma
5. Piano di attacco (fondo lavello)
6. Guarnizione in fibra
7. Ghiera di fissaggio
8. Ghiera di aggancio corpo dissipatore
9. Guarnizione inferiore piletta
7
Page 9

Dopo aver montato correttamente i particolari superiori (1,2,3,4 ,6,7,8,9) posizionare il corpo del dissipatore e serrare la ghiera di aggancio facendola ruotare completamente fino a raggiungere il finecorsa meccanico della posizione LOCK indicata in figura :
IT
Posizionare il corpo del dissipatore per rifiuti alimentari in modo che il dispositivo di riarmo elettrico sia
rivolto verso l’esterno e sempre facilmente raggiungibile.
9.
Ogni intervento sulle parti elettriche deve essere effettuato da personale qualificato che osservi le relative
norme sulla prevenzione degli infortuni.
L’utilizzatore deve predisporre :
- linea elettrica di alimentazione opportunamente dimensionata, dotata di un dispositivo di sezionamento
completo di protezioni contro le sovracorrenti (Id = 0.03 A) ed i contatti indiretti.
- linea per il collegamento al dispersore di terra.
Caratteristiche della fonte di energia elettrica:
- tensione: 220 – 240 V ± 10% L+N+T
- frequenza: 50 – 60 Hz
- potenza max: 1.5 Kw
ALLACCIAMENTO ELETTRICO
ATTENZIONE
E’ VIETATO UTILIZZARE IL DISSIPATORE DI RIFIUTI ALIMENTARI
Nei casi in cui il cavo elettrico di collegamento, la spina o la presa di corrente a parete presentano segni di guasti, imperfezioni o anomalie. La sostituzione dei cavi di alimentazione
danneggiati deve essere effettuata da parte del fabbricante o da personale qualificato per
evitare pericoli.
8
Page 10

IT
10
Per l’installazione del pulsante pneumatico di START - STOP del dissipatore di rifiuti alimentari attenersi allo
schema di collegamento indicato in figura :
INSTALLAZIONE PULSANTE PNEUMATICO
1. Pulsante pneumatico
2. Guarnizione
3. Piano di attacco (bordo/piano lavello)
4. Ghiera di fissaggio
5. Tubo
6. Attacco tubo
11.
ALLACCIAMENTO IDRICO E SCARICHI
Ogni intervento deve essere effettuato da personale qualificato che osservi le relative norme sulla prevenzione degli infortuni.
L’utilizzatore deve predisporre una linea di approvvigionamento idrico, opportunamente dimensionata.
Caratteristiche della fonte di approvvigionamento idrico:
- pressione: 1 -1,5 Bar (100 -150 kpa) - portata : 8 -20 Litri/min
12.
Prima di collegare le tubazioni per lo scarico del troppo pieno del lavello, utilizzando un cacciavite ed un
martello, eliminare il diaframma presente nel gomito di scarico.
ALLACCIAMENTO IDRICO E SCARICHI
ALLACCIAMENTO TROPPO PIENO
9
Eliminazione diaframma
Esempio collegamento scarico troppo pieno lavello
Page 11
13.
Prima di collegare le tubazioni per lo scarico della lavastoviglie, utilizzando un cacciavite ed un martello,
rimuovere il diaframma presente nel corpo del dissipatore, come indicato in figura, e rimuovere eventuali
residui di parti plastiche dall’interno della camera di triturazione.
ALLACCIAMENTO LAVASTOVIGLIE
Eliminazione diaframma
IT
14.
Collegare la tubazione indicata in figura all’impianto di evacuazione fognaria del locale.
Per l’allacciamento del dissipatore per rifiuti alimentari allo scarico fognario, eseguire il montaggio come
indicato in figura rispettando le misure riportate nella scheda delle caratteristiche tecniche e relativa tabella.
ALLACCIAMENTO AGLI SCARICHI FOGNARI
1. Scarico (gomito di fissaggio)
2. Viti di fissaggio
3. Flangia
4. Guarnizione
Collegamento scarico una via Collegamento scarico due vie
10
Page 12

IT
15.
ATTENZIONE
Prima di mettere in funzione il dissipatore per rifiuti alimentari è necessario :
assicurarsi che tutte le masse elettriche siano collegate al conduttore di protezione PE.
accertarsi che tutte le fasi di piazzamento, installazione ed allacciamenti siano
stati eseguiti a regola d’arte seguendo le indicazioni riportate nel presente manuale.
ATTENZIONE
Non utilizzate il dissipatore per rifiuti alimentari prima che l’installazione sia stata verificata e controllata da personale qualificato
MESSA IN FUNZIONE
16.
1. Rimuovere il tappo dal foro di scarico del lavello e far scorrere acqua fredda.
2. Azionare l’interruttore per avviare il dissipatore per rifiuti alimentari.
3. Inserire lentamente i rifiuti alimentari nel dissipatore in modo da ridurre al minimo la eventuale
espulsione di materiale durante la triturazione .
4. Quando tutti I rifiuti alimentari sono stati triturati, spegnere il dissipatore di rifiuti alimentari e lasciare scorrere l’acqua per circa 20-30 secondi per consentire la pulizia della camera di triturazione e
degli scarichi.
5. Durante l’utilizzo accertarsi che il flusso d’acqua abbia una portata di almeno 6-8 litri al minuto.
6. Mantenere l’area al di sotto del dissipatore per rifiuti alimentari sgombera da qualsiasi oggetto in
modo da facilitare l’accesso al tasto di ripristino.
7. Non utilizzare acqua bollente durante la triturazione.
8. Non interrompere il flusso d’acqua e non spegnere il dissipatore di rifiuti alimentari prima che il
ciclo di triturazione sia completato.
ISTRUZIONI PER L’USO
11
9. Non inserire grandi quantità di gusci d’uovo, materiali fibrosi quali cartocci di pannocchie di granoturco,carciofi, ecc. In quanto si rischierebbe di intasare le tubazioni di scarico.
10. Non inserire rifiuti non alimentari di alcun tipo.
11. Non utilizzare l’apparecchio per smaltire materiali duri quali vetro e metalli.
12. Non versare grassi o olii in quanto potrebbero intasare le tubazioni di scarico.
13. Non inserire di colpo grandi quantità di bucce di frutta o verdure , aprire prima il rubinetto dell’ac-
qua e immettere gradualmente i prodotti da triturare.
Page 13

17.
Utilizzando il dissipatore per rifiuti alimentari è possibile che si accumulino delle particelle di grasso o cibo
nella camera di triturazione o nel guarnizione superiore di protezione provocando cattivi odori. E’ possibile
asportare tali residui e pulire l’apparecchio procedendo come segue :
a. SPEGNERE IL DISSIPATORE DI RIFIUTI ALIMENTARI E TOGLIERE L’ALIMENTAZIONE ELETTRICA
b. Rimuovere il tappo e la guarnizione superiore di protezione, pulire l’interno della guarnizione con una
spugnetta umida.
c. Attraverso il foro di scarico del lavello pulire il labbro superiore della camera di triturazione utilizzando
una spugnetta umida.
PULIZIA DEL DISSIPATORE
Tappo
Guarnizione superiore di protezione
IT
Posizione corretta guarnizione di protezione
d. Riposizionare la guarnizione superiore di protezione fino in fondo alla propria sede, mettere il tappo nel
foro di scarico del lavello e riempire il lavello a metà con acqua tiepida.
e. Ricollegare il dissipatore di rifiuti alimentari alle rete elettrica.
f. Azionare il dissipatore e togliere il tappo del lavello consentendo all’ acqua di defluire ed asportare i residui
maleodoranti, far scorrere acqua fredda per alcuni secondi per sciacquare il tutto.
18.
Se il motore del dissipatore di rifiuti alimentari si ferma durante l’utilizzo, è possibile che il dissipatore sia
inceppato, per sbloccarlo agire come segue :
a. SPEGNERE IL DISSIPATORE DI RIFIUTI ALIMENTARI E TOGLIERE L’ALIMENTAZIONE ELETTRICA
b. Chiudere il rubinetto dell’acqua.
c. Rimuovere la guarnizione superire di protezione e con l’utilizzo di una pinzetta a becchi lunghi, attraverso
il foro di scarico del lavello, rimuovere l’oggetto che crea l’ostruzione.
d. Lasciare raffreddare il motore elettrico per 5-8 minuti.
e. Riposizionare correttamente nella propria sede la guarnizione superiore di protezione.
SBLOCCAGGIO DEL DISSIPATORE
Posizione corretta guarnizione di protezione
f. Premere il pulsante di ripristino (switch) posto nella parte inferiore del dissipatore.
g. Ricollegare il dissipatore di rifiuti alimentari alle rete elettrica e riavviare. Se il motore non riparte control-
lare sul quadro elettrico dell’abitazione eventuale intervento di sgancio di interruttori o fusibili. Se dopo aver
provveduto a ripristinare la corretta alimentazione elettrica il dissipatore non funziona, contattare il centro
di assistenza.
12
Page 14
IT
19.
I rischi residui rilevati, associati alla attrezzatura sono minimizzati dalla caratteristiche costruttive, tuttavia
possono verificarsi le seguenti situazioni derivate dall’uso scorretto del prodotto :
RISCHI RESIDUI
N°
1
2
3
L’ulteriore abbattimento dei rischi residui individuati è garantito dalla conoscenza delle istruzioni e dal rispetto delle prescrizioni contenute nel presente manuale.
20.
Di seguito, una lista dei difetti che possono apparire, le loro cause e le contromisure proposte per risolverli:
Versamenti di liquidi a pavimento che possono rendere la superficie di calpestio
sdrucciolevole.
Possibilità di elettrocuzione per errato collegamento del cavo elettrico di linea
collegato alla presa di tensione di 230 Vac.
Possibilità di proiezione di oggetti a causa dell’inserimento di corpi solidi all’interno del dissipatore.
MANUTENZIONE
RISCHIO RESIDUO
Difetto
Il dissipatore
non funziona
Causa
Manca energia elettrica
Intervento del dispositivo
termico di sicurezza
L’interruttore di avvio in
posizione spento
Manca acqua
Cavi di alimentazione
danneggiati
Rimedio
Verificare la presenza di rete
elettrica sul quadro elettrico dell’abitazione
Controllare che la spina di alimentazione sia
correttamente inserita nella presa a parete
Ripristinare il disgiuntore termico posiziona-
to nella parte inferiore del dispositivo
Azionare il pulsante pneumatico
di start-stop
Verificare la posizione del rubinetto di
collegamento alla rete idrica
La sostituzione dei cavi di alimentazione deve
essere effettuata da parte del fabbricante o da
personale qualificato per evitare pericoli
13
ATTENZIONE
Nel caso che il rimedio consigliato non risolva la situazione di guasto/difetto, contattare il centro di assistenza tecnica autorizzato – NON TENTARE MANOVRE O INTERVENTI IMPROVVISATI
Page 15
21.
Il dissipatore per rifiuti alimentari è imballato singolarmente in involucri di cartone posti su pallet standard
in legno/plastica per il trasporto o l’immagazinamento .
Per la movimentazione del singolo prodotto non è previsto l’utilizzo di mezzo o dispositivo di sollevamento.
Per la movimentazione del prodotto su palett è necessario munirsi di mezzo a forche per la movimentazione
dei carichi di caratteristiche idonee alla movimentazione dei pesi indicati nell’etichetta di confezionamento
del pallett. L’imballo realizzato per il dissipatore per rifiuti alimentari è adatto ad ambienti chiusi quali magazzini e depositi protetti dagli agenti atmosferici. Il prodotto non deve essere immagazzinato in spazi aperti
sprovvisti di adeguate coperture in quanto contiene apparecchiature elettriche sensibili all’umidità.
TRASPORTO E MOVIMENTAZIONE
IT
22.
Il dissipatore per alimenti è coperto da garanzia del Costruttore per il seguente periodo dalla data di acquisto.
• KITFD050: 2 ANNI
• KITFD075: 2 ANNI
• KITFD100: 2 ANNI
All’interno di tale periodo saranno sostituiti i pezzi ed i dispositivi risultati guasti o difettosi all’analisi di verifica eseguita nella sede del Costruttore. Il Costruttore si riserva di non eseguire l’intervento in garanzia qualora
siano accertate le seguenti situazioni che determinano la decadenza delle clausole di garanzia:
- Installazione impropria, eseguita da personale non autorizzato e/o specializzato.
- Guasto o anomalia del dispositivo per uso improprio.
- Manomissione.
- Modifica dell’originale.
- Errore di installazione.
- Danni in genere dovuti all’impropria movimentazione ed immagazzinamento.
- Danni derivanti da l’utilizzo di prodotti e sostanze non consentite.
- Inserimento di corpi estranei nel dispositivo.
GARANZIA
Al verificarsi di un guasto o anomalia funzionale contattare il centro di assistenza tecnica autorizzato o il
rivenditore. La garanzia decade qualora si tenti di ripararlo o qualora il dissipatore per alimenti sia utilizzato
per scopi commerciali.
23.
NON DISPERDERE NELL’AMBIENTE DOPO L’USO
NON GETTARE TRA I RIFIUTI GENERICI
L’imballo del dissipatore per rifiuti alimentari è composto da materiali riciclabili (carta, cartone, legno) lo
smaltimento deve essere effettuato osservando le disposizioni locali in materia di tutela ambientale vigenti
nel Paese dell’utilizzatore.
Il corpo del dissipatore per rifiuti alimentari ed i suoi accessori sono classificati come rifiuto speciale RAEE
(rifiuti di apparecchiature elettriche ed elettroniche) lo smaltimento di tali prodotti deve essere effettuato
attraverso il conferimento ad apposite strutture di raccolta, smaltimento o riciclaggio nel rispetto delle leggi
di tutela dell’ambiente vigenti nel Paese dell’utilizzatore.
SMALTIMENTO E DEMOLIZIONE
14
Page 16
EN
Dear Client,
You have purchased an SMEG product and we would sincerely like to thank you for your choice.
The tradition and reliability of our Company guarantees the technical and aesthetic quality of the choice
that you have made; all our products are made from the finest quality materials and assembly standards
to satisfy even the most demanding customer.
In order to use your new product in the best possible way, please carefully read this instruction manual
in which you will find all the necessary indications and advice for successful use.
The instruction manual is a sure guide for installation, use, and maintenance. By following these indications, it guarantees perfect functioning and performance of the machine.
We thank you again for your choice, best wishes.
SMEG Spa
INDEX
1. SYMBOLS.............................................................................................................................................................16
2. GENERAL INFORMATION ...................................................................................................................................16
3. MANUFACTURER’S INFORMATION....................................................................................................................17
4. INFORMATIONAL PLAQUES................................................................................................................................17
5. SAFETY.................................................................................................................................................................17
6. FUNCTIONS..........................................................................................................................................................19
7. TECHNICAL REQUIREMENTS AND PERFORMANCE........................................................................................20
8. INSTALLATION......................................................................................................................................................21
9. ELECTRIC CONNECTION......................................................................................................................................22
10. BUTTON SWITCH INSTALLATION.......................................................................................................................23
11. WATER AND DRAINAGE CONNECTION............................................................................................................23
12. OVERFLOW CONNECTION..................................................................................................................................23
13. DISHWASHER CONNECTION.............................................................................................................................24
14. DRAINAGE CONNECTION .................................................................................................................................24
15. START-UP...........................................................................................................................................................25
16. OPERATION AND INSTRUCTIONS FOR USE..................................................................................................................25
17. CLEANING OPERATIONS.................................................................................................................................26
15
18. UNLOCKING OPERATION....................................................................................................................................26
19. RESIDUAL RISKS................................................................................................................................................27
20. MAINTENANCE...................................................................................................................................................27
21. TRANSPORT........................................................................................................................................................28
22. WARRANTY........................................................................................................................................................28
23. DISPOSAL AND DEMOLITION........................................................................................................................28
Page 17

1.
IN THIS MANUAL, PICTOGRAMS AND SYMBOLS HAVE BEEN USED TO VISUALLY SIGNAL IMPORTANT SAFETY ISSUES
OR RECOMMENDATIONS FOR CORRECT USE OF THE FOOD WASTE DISPOSER.
SYMBOLS
SYMBOL DESCRIPTION
The “WARNING” symbol indicates a potentially hazardous situation which, unless
CAUTION
ATTENTION
avoided, could cause serious personal injury or even death.
The “ATTENTION” symbol accompanied by a danger symbol indicates a potentially
hazardous situation which, unless avoided, may cause personal injury, damage to
the home or the equipment.
EN
ATTENTION
ATTENTION
This documentation should be conserved and kept for the entire lifetime of the machine and should accompany the machine should it be transferred to another user.
IT IS MANDATORY TO READ THE INSTRUCTIONS CONTAINED IN THIS DOCUMENT BEFORE
OPERATING THE FOOD WASTE DISPOSER PRODUCT.
2.
This user instruction manual refers to the electrical equipment called food waste disposer (more commonly known as a waste
disposal) in the range: KITFD050 - KITFD075 - KITFD100.
The food waste disposer is an electrical device, designed and built exclusively for domestic use. It cannot be used in environments
with particular conditions such as a corrosive or explosive atmosphere (powders, vapours or gas).
The device is subject to construction controls, operational and safety testing in accordance with the requirements of the European
Directive and the prevailing Technical Standards listed below:
The “ATTENTION” symbol unaccompanied by other danger symbols indicates that
the user should carefully follow the instructions.
The adjacent symbol recommends that the technical operations are carried out by
specialised technical personnel: electrician - plumber.
General Danger
Danger of electrocution or electric shock
GENERAL INFORMATION
•2006/95/EC,EuropeanDirectiveonLowVoltage(LVD).
•2004/108/EC,EuropeanDirectiveonElectromagneticCompatibility(EMC).
•CEIEN60335-1Householdandsimilarelectricalappliances–Safety–Part1:Generalrequirements
•CEIEN60335-2-16Householdandsimilarelectricalappliances–Safety–Part2:Particularrequirementsforfoodwastedispo-
sers
•61770Electricappliancesconnectedtothewatermains-Avoidanceofbacksiphonageandfailureofhose-sets
•CEIEN61770/A1/A2Electricappliancesconnectedtothewatermains-Avoidanceofbacksiphonageandfailureofhose-sets
•CEIEN60529Degreesofprotectionprovidedbyenclosures
As much as possible, the above Standards are concerned with the normal risks presented by household appliances.
ENSURE THAT INSTALLATION OF THE FOOD WASTE DISPOSER IS PERMITTED
ATTENTION
BY LOCAL STANDARDS.
THE FOOD WASTE DISPOSER IS NOT PROTECTED AGAINST DIRECT WATER
JETS (IP20 DEGREE OF PROTECTION).
16
Page 18
EN
3.
The manufacturing company holds the proprietary rights to the technical documentation attached to the machine and furthermore
prohibits its reproduction or translation, whether partial or in its entirety, without prior written authorization.
MANUFACTURER’S INFORMATION
PRODUCER:
Elleci S.p.A., Strada Longitudinale A 1258, Z.I. Mazzocchio
04014 Pontinia (LT) - Italy
Tel. +39.0773.840036
Fax. +39.0773.840038
elleci@elleci.it
4.
5.
ELLECI Spa
Via Migliara 53 z.i. Mazzocchio
04014 PONTINIA - LT - ITALY
Tel . +39(0) 773 - 840036
Fax . +39(0) 773 - 840038
INFORMATIONAL PLAQUES
The information concerning the model and its characteristics can be found by
consulting the tag located on the appliance.
SAFETY
ATTENTION
All installation, calibration, and maintenance procedures must be carried out by
qualified professionals in accordance with this Instruction Manual and according to existing laws.
SMEG Spa will be not held responsible for improper installation, calibration and
maintenance of the device.
Before carrying out any maintenance operation, turn off the power and close the
water supply to the device.
In the case of substitution of parts and/or accessories, only original SMEG Spa
spare parts should be used.
Do not open the casings and external coverings of electrical devices.
Periodically have the condition of the plumbing connection and drains inspected
by qualified personnel. Replace piping and accessories at the least sign of alteration and/or leaks.
DANGER OF ELECTROCUTION
WATER PIPES AND DRAINS
17
Page 19
ATTENTION
In using electrical appliances (food waste disposers - waste disposals) you must always
bear in mind the permitted modes of use and you must observe some safety standards in particular:
a. This appliance is not intended for use by persons (including children) with reduced physical, sensory or
mental capabilities, or lack of experience and knowledge, unless they have been given supervision or instruction concerning use of the appliance by a person responsible for their safety.
b. Supervise so that children do not use this appliance or mistake it for a toy. Pay particular attention when
the appliance is used in the presence of children.
c. This appliance was designed exclusively for the disposal of normal food waste. The insertion of other
types of material may cause personal injury or damage to the home.
To reduce the risk of personal injury do not use the sink fitted with the food waste disposer for purposes
other than normal kitchen activities (i.e.: bathing an infant or washing hair).
d. When trying to unclog the food waste disposer, you must first switch it off or remove the electrical mains
plug and close the water tap. Use the procedures described in the specific “Unclogging the Disposer” section
to unclog the appliance.
e. To remove any objects from the food waste disposer use long nose pliers.
EN
f. Never introduce hands or fingers into the food waste disposer.
g. To reduce the risk of personal injury from materials ejected from the food waste disposer for never use
the appliance without the top protective gasket in place.
WRONG USE
h. Never introduce into the food waste disposer: shells or oyster shells, glass, porcelain, plastic, large whole
bones, metal objects (caps, utensils, flatware, tins and similar) hot grease, boiling liquinds, caustic soda
based chemical products for unclogging sinks, chemical products of any kind (paints, solvents, home
cleaning products, car fluids), plastic film and other similar items.
i. Do not use this appliance to dispose of hard materials such as glass and metal.
CORRECT USE
j. When the food waste disposer is not used place the plug in the sink hole in order to prevent accidental
introduction of materials into the appliance.
k. Quickly replace the top protective gasket and/or other devices located on the waste disposer if worn.
l. In order to avoid FIRE HAZARDS never store or use flammable substances or objects near the food waste
disposer such as rags, paper, aerosol bottles, gas or petrol containers or other flammable substances.
m. Switch off or unplug the appliance before attempting to free a jammed rotor with an implement.
n. If the supply cord is damaged, it must be replaced by the manufacturer, its service agent or similarly
qualified persons in order to avoid a hazard.
o. The appliance must be installed so that reset buttons and reversing switches are readily accessible.
18
Page 20

EN
6.
INTENDED USE AND OPERATING ENVIRONMENT
The food waste disposer is an appliance built to be inserted and used in the household, specifically in the
kitchen, connected to the sink drain. Only use with clean water is foreseen.
DESCRIPTION OF THE APPLIANCE
The food waste disposer is made up of a plastic heat-shaped plastic housing inside of which the following
are housed:
• The metallic waste disposal impeller
• The gaskets and access compartment safety devices
• The electric motor
• The necessary electrical control devices
• The couplings for hooking up to the sink overflow drain
• The couplings for hooking up to the dishwasher
• The couplings for hooking up to the sewer drains
FUNCTIONS
19
Page 21
7.
TECHNICAL REQUIREMENTS
TECHNICAL REQUIREMENTS AND PERFORMANCE
EN
MODEL
KITFD050
KITFD075
KITFD100
DIMENSIONS FOR INSTALLATION
POWER
WATT
375
550
750
VOLTAGE
Vac
220 - 240
ABSORBTION
(Ampere)
1.7
2.5
3.4
r/min
2800
Weight
(Kg)
4,5
4,7
4,8
MODEL
KITFD050
KITFD075
KITFD100
MEASURES IN MILLIMETER
1 2
370
420
420 185
180
185
3 4
70
70
70 205
205
205
5 6
140
140
140 255
250
255
20
Page 22

EN
8.
For safety purposes it is important that the hook ups are done by qualified personnel
Ensure that the hole in which the food waste disposer, located at the bottom of the sink, is appropriately
sized:
ROUND WASTE (STANDARD) SQUARE WASTE (OPTIONAL)
For installation of the disposer follow the insertion order of the parts in the installation kit as shown in the
figure:
INSTALLATION
1. Plug + Waste pusher
2. Top protective gasket
3. Drain
4. Rubber gasket
5. Connection surface (sink bottom)
6. Fibre gasket
7. Fixing ring nut
8. Disposer body connection ring nut
9. Drain bottom gasket
21
Page 23

After correctly installing the top parts (1, 2, 3, 4, 6, 7, 8, 9) position the body of the disposer and tighten the
connection ring nut, rotating it all the way until reaching the mechanical travel limit of the LOCK position
indicated in the figure:
EN
Position the body of the food waste disposer so that the electrical rearm device is facing outward and
always easily reachable.
9.
Every intervention on the electric parts must be carried out by a qualified professional in accordance with
applicable rules and regulations on injury prevention.
The user must prepare:
- A correctly proportioned electric supply line, equipped with an isolating device complete with power surge
protection (ld = 0.03 A) and indirect contacts.
-A line for the grounding connection
Characteristics of the electric energy source:
- voltage: 220 – 240 V ± 10% L+N+T
- frequency: 50 – 60 Hz
- maximum powet: 1.5 Kw
ELECTRIC CONNECTION
ATTENTION
IT IS FORBIDDEN TO USE THE FOODWASTE DISPOSER
In case the electrical cable is connected, the wall socket or the socket is damaged, not correctly
mounted or if they present some anomalies, the replacement of damaged electrical cables has
to be performed by the manufacturer or skilled / qualified team in order to avoid dangers.
22
Page 24

EN
10
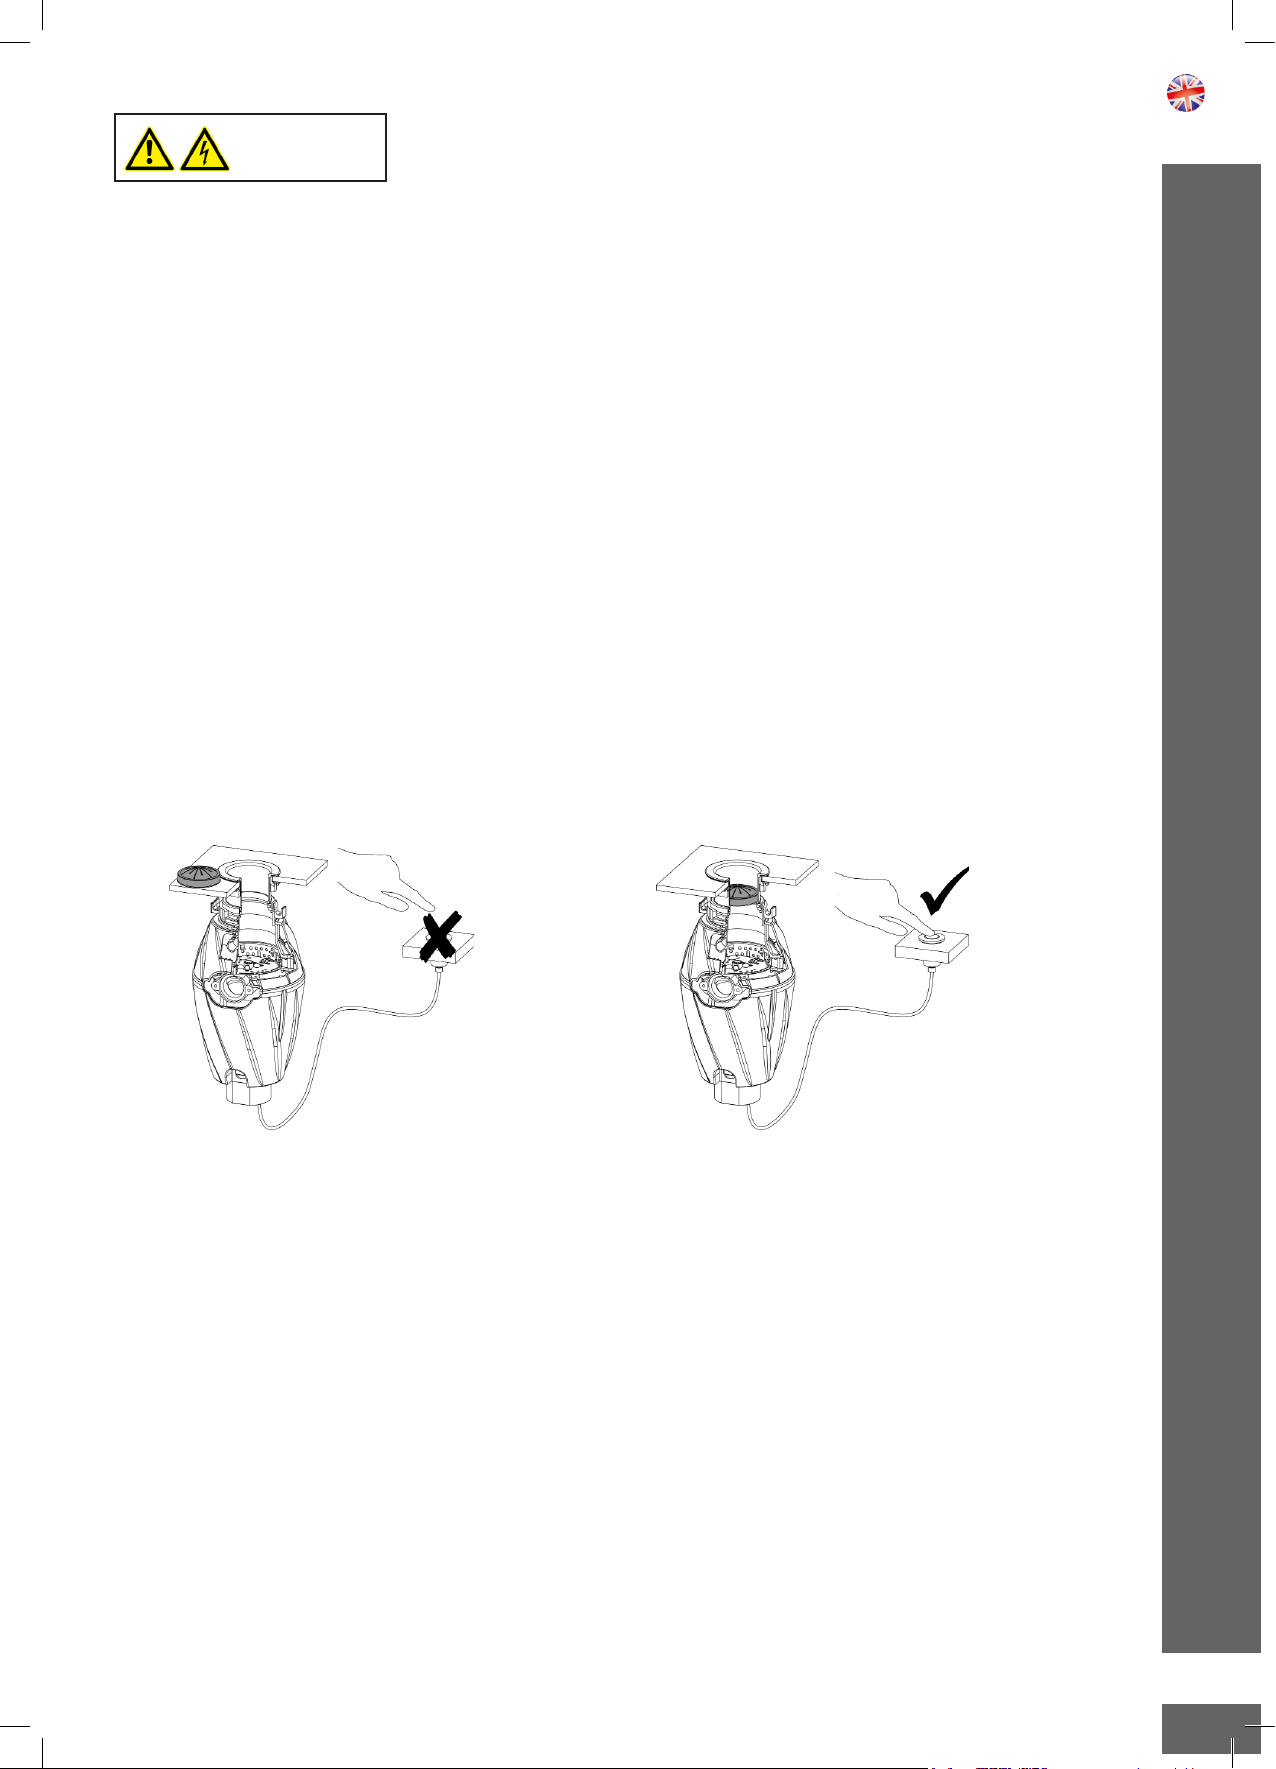
For installation of the food waste disposer START - STOP pneumatic push button follow the connection
diagram shown in the figure:
BUTTON SWITCH INSTALLATION
1. Pneumatic push button
2. Gasket
3. Connection surface (sink edge/surface)
4. Fixing ring nut
5. Pipe
6. Pipe fitting
11.
Every intervention must be carried out by a qualified professional in accordance with the applicable rules and
regulations on injury prevention.
The user must prepare a proportioned water supply line
Characteristics of the water supply source:
- pressure: 1 - 1,5 Bar (100 -150 kpa) - capacity : 8 - 20 L/min
12.
Before connecting the sink overflow drain piping, using a screwdriver and a hammer, remove the diaphragm
on the drain elbow.
WATER AND DRAINAGE CONNECTION
OVERFLOW CONNECTION
23
Removal of the diaphragm
Example of sink overflow drain connection
Page 25

13.
Before connecting the dishwasher drain piping, using a screwdriver and a hammer, remove the diaphragm
on the disposer body as illustrated in the figure and remove any residual plastic parts from inside the
grinding chamber.
DISHWASHER CONNECTION
Removal of the diaphragm
EN
14.
Connect the piping indicated in the figure to the facility’s local sewer drain.
To hook up the food waste disposer to the sewer drain, carry out installation as indicated in the figure,
observing the measures shown on the technical specifications card and the relative table.
DRAINAGE CONNECTION
1. Drain (elbow fixing)
2. Fixing screws
3. Flange
4. Gasket
One-way drain connection Two-way drain connection
24
Page 26

EN
15.
ATTENTION
Before starting up the machine, it is necessary to ensure that:
all the electric groundings are connected to the protective conductor PE.
placement, installation and connections have been carried out in accordance with best working practices, following the instructions indicated in this
manual.
ATTENTION
Do not use the Food waste disposer before the installation has been checked and verified by a
qualified professional
START-UP
16.
1. Remove the plug from the sink drain hole and let cold water flow.
2. Operate the switch to start the food waste disposer.
3. Slowly insert the food waste disposer in such a way as to minimise any ejection of material during
disposal.
4. When all the food waste has been ground, switch off the food waste disposer and let water flow for
about 20-30 seconds in order to clean the grinding chamber and the drains.
5. During use ensure that the water flow is at least 6-8 litre per minute.
6. Keep the area below the food waste disposer free of any object in order to facilitate access to the
reset push button.
7. Never use boiling water during disposal.
8. Do not interrupt the water flow and do not switch off the food waste disposer before the disposal
cycle completes.
OPERATION AND INSTRUCTIONS FOR USE
25
9. Do not insert large quantities of eggshells, fibrous materials such as corncobs, artichokes, etc. as
this would risk clogging the drain piping.
10. Do not insert any type of non food waste.
11. Do not use the appliance to dispose of hard materials such as glass and metals.
12. Do not introduce grease or oil as this could clog the drain piping.
13. Do not suddenly introduce large quantities of fruit or vegetable peels. First open the water tap and
then gradually introduce the items to be disposed of.
Page 27

17.
When using the disposer for food waste it is possible that grease or food particles may accumulate
in the grinding chamber or in the top protective gasket, causing foul odours. This residue
can be removed and the appliance cleaned proceeding as follows:
a. SWITCH OFF THE FOOD WASTE DISPOSER AND REMOVE ELECTRICAL POWER
b. Remove the top protective gasket and clean the inside of the gasket with a damp sponge.
c. Clean the upper lip of the grinding chamber through the sink drain hole using a damp sponge.
CLEANING OPERATION
Plug
Top protective gasket
EN
Correct position of the protective gasket
d. Reposition the top protective gasket all the way into its seat. Place the plug in the sink drain hole and fill
the sink halfway with warm water.
e. Reconnect the food waste disposer to the electrical mains.
f. Operate the disposer and remove the sink plug, allowing the water to flow and remove the foul smelling
residues. Let cold water flow for a few seconds in order to rinse everything.
18.
If the food waste disposer stops during use it is possible that the disposer is clogged. To unclog it proceed
as follows:
a. Switch off the food waste disposer and remove electrical power
b. Close the water tap
c. Remove the top protective gasket and, using long nose pliers, through
the sink drain hole, remove the object clogging the disposer.
d. Let the electric motor cool for 5-8 minutes.
e. Correctly reposition the top protective gasket in its seat.
UNLOCKING OPERATION
Correct position of the protective gasket
f. Press the reset push button (switch) located on the bottom part of the disposer.
g. Reconnect the food waste disposer to the electrical mains and restart. If the motor does not restart check
the household electrical panel for any tripped breakers or blown fuses. If, after restoring correct electrical
power, the disposer does not work, contact the service centre.
26
Page 28

EN
19.
The residual risks associated with the machine are minimized by the manufacturing standards.
Nevertheless, the following situations can occur due to incorrect use of the product:
RESIDUAL RISKS
N°
1
2
3
Residual risks are reduced if the instructions and the guidelines contained in this manual are followed strictly.
20.
The following is a list of the possible defects that can appear, their causes and the proposed countermeasures for resolving them:
Spilling of liquids on the floor that can render the treading surface slippery
Risk of electrocution due to erroneous connection of the power cord connected
to the 230 Vac voltage socket
There is a possibility of the ejection of objects due to the introduction of solid
bodies into the disposer.
MAINTENANCE
RESIDUAL RISKS
Problem
The disposer
does not work
Cause
No electrical power
The thermal safety device has
been tripped
The start switch is in the off
position
There is no water
Damaged electrical cables
Solution
Check for the presence of power
on the household electric panel
Check that the mains plug has been
correctly inserted into the wall socket
Reset the circuit breaker located on the bot-
tom part of the device
Press the start-stop pneumatic
push button
Check the position of the water tap
connected to the water supply system
The replacement of damaged electrical cables
has to be performed by the manufacturer or skil-
led / qualified team in order to avoid dangers
27
ATTENTION
If the suggested remedy does not solve the fault/defect, contact an authorised technical service centre –
DO NOT ATTEMPT MAKESHIFT MANOEUVRES OR OPERATIONS
Page 29

21.
The food waste disposer is packaged individually in cardboard boxes placed on standard pallets in wood/
plastic for transportation or storage. To handle the individual product the use of a vehicle or hoisting device
is not required. To handle the product on a pallet you must use a forked vehicle for moving loads with suitable characteristics to handle the weights indicated on the package label for the pallet. The packaging made
for the food waste disposer is suitable for closed environments such as warehouses and depots protected
from atmospheric agents. The product must not be stored in open spaces without adequate coverage as it
contains electrical equipment sensitive to humidity.
TRANSPORT
EN
22.
The Food waste disposer is covered by the Manufacturer’s warranty for the following period from the date
of sale.
• KITFD050: 2 YEARS
• KITFD075: 2 YEARS
• KITFD100: 2 YEARS
If, during this period, upon inspection by the Manufacturer, any parts or devices are damaged or defective,
the Manufacturer will replace or repair such defective part(s). The Manufacturer reserves the right not to
carry out repairs under warranty if the following situations are ascertained to have brought about the cancellation of the warranty’s provisions:
- Improper installation, carried out by unauthorized and/or incompetent individuals
- Damage or defect of a device for improper use
- Tampering
- Modifying of the original
- Installation error
- Damages caused by improper moving and storing
- Damages caused by the use of prohibited products and substances
- Introduction of foreign bodies into the devices
WARRANTY
In the event of a fault or operational abnormality contact an authorised technical service centre or the reseller. The guarantee will be void in the event of any attempts to repair it or if the food waste disposer is used
for commercial purposes.
23.
DO NOT DISPOSE OF INTO THE ENVIRONMENT AFTER USE
DO NOT DISPOSE OF WITH GENERIC WASTE
The packaging of the food waste disposer is made of recyclable materials (paper, cardboard, wood) and its
disposal must be carried out observing the prevailing local regulations on environmental protection
in the user’s country.
The body of the food waste disposer and its accessories are classified as WEEE special waste
(waste from electric and electronic equipment). Disposal of these products must be carried out
through transfer to specific collection, disposal or recycling structures in observance of the
prevailing laws on environmental protection in the user’s country.
DISPOSAL AND DEMOLITION
28
Page 30

DE
Sehr geehrter Kunde,
Sie haben ein Produkt der SMEG erworben und wir möchten uns für das entgegengebrachte Vertrauen
bedanken. Die Tradition und Zuverlässigkeit unseres Unternehmens gewährleisten die technisch-optische Qualität der von Ihnen getroffenen Wahl. Schließlich werden all unsere Produkte mit erstklassigen
Materialien und nach baulichen Kriterien gefertigt, die selbst höchsten Kundenanforderungen gerecht
werden. Für einen optimalen Gebrauch Ihres Produkts möchten wir Sie bitten, das vorliegende Handbuch aufmerksam zu lesen, denn es enthält alle für einen einfachen Gebrauch erforderliche Hinweise
und Ratschläge. Das Benutzerhandbuch ist eine hilfreiche und sichere Anleitung für Installation, Gebrauch und Wartung. Bei Beachtung der Hinweise und Angaben werden ein optimaler und leistungsstarker Betrieb des Geräts gewährleistet. Wir bedanken uns erneut für Ihre Wahl, mit freundlichen Grüßen.
SMEG Spa
INHALTSVERZEICHNIS
1. HINWEISSYMBOLE...............................................................................................................................................30
2. ALLGEMEINES.......................................................................................................................................................30
3. HERSTELLERDATEN .............................................................................................................................................31
4. IDENTIFIKATIONSSCHILDER ................................................................................................................................31
5. SICHERHEIT ..........................................................................................................................................................31
6. FUNKTION DES GERÄTS ......................................................................................................................................33
7.TECHNISCHE ANFORDERUNGEN ..........................................................................................................................34
8. INSTALLATION .....................................................................................................................................................35
9. ELEKTRISCHER ANSCHLUSS ...............................................................................................................................36
10. INSTALLATION DER DRUCKLUFTTASTE ............................................................................................................37
11. WASSERANSCHLUSS UND ABFLUSS ................................................................................................................37
12. ANSCHLUSS DES ÜBERLAUFS ..........................................................................................................................37
13. ANSCHLUSS DER SPÜLMASCHINE ...................................................................................................................38
14. ANSCHLUSS AN DAS KANALISATIONSSYSTEM ..............................................................................................38
15. INBETRIEBNAHME .............................................................................................................................................39
16. GEBRAUCHSANWEISUNGEN...........................................................................................................................39
17. REINIGUNG DES ABFALLZERKLEINERERS ........................................................................................................40
29
18. LÖSEN DES ZERKLEINERERS ............................................................................................................................40
19. RESTRISIKEN.......................................................................................................................................................41
20. WARTUNG ..........................................................................................................................................................41
21. TRANSPORT UND HANDLING ............................................................................................................................42
22. GARANTIE...........................................................................................................................................................42
23. ENTSORGUNG UND VERSCHROTTUNG .............................................................................................................42
Page 31

1.
BEIM VERFASSEN DES VORLIEGENDEN HANDBUCHS WURDEN EINIGE SYMBOLE UND ZEICHEN VERWENDET, DIE DEN NUTZER AUF BESONDERS WICHTIGE PASSAGEN ZUR SICHERHEIT ODER HINWEISE FÜR
EINEN KORREKTEN GEBRAUCH DEN ZERKLEINERER ELEKTROSPÜLE HINWEISEN SOLLEN.
HINWEISSYMBOLE
SYMBOLE BESCHREIBUNG
Das Symbol “WARNUNG” zeigt eine potentiell gefährliche Situation an, die, falls nicht ver-
VORSICHT
ACHTUNG!
mieden, schwere Personenschäden oder sogar den Tod verursachen könnte.
Das Symbol “ACHTUNG”, begleitet von einem Gefahrensymbol, zeigt eine potentiell gefährliche Situation an, die, falls nicht vermieden, Personenschäden, Schäden an der Wohnung oder am Gerät verursachen könnte.
DE
ACHTUNG!
ACHTUNG!
DAS HANDBUCH MUSS WÄHREND DER GESAMTEN LEBENSDAUER DER MASCHINE GRIFFBEREIT AUFBEWAHRT WERDEN UND BEI
ETWAIGER ÜBERGABE DES GERÄTS AN DRITTE MIT AUSGEHÄNDIGT WERDEN.
2.
Die vorliegende Gebrauchsanweisung bezieht sich auf das Elektrogerät, das als Zerkleinerer von Speiseabfällen bezeichnet wird
(geläufiger als KAZ - Küchenabfallzerkleinerer bekannt), der Baureihe: KITFD050 - KITFD075 - KITFD100. Der Küchenabfallzerkleinerer ist ein Elektrogerät, das ausschließlich für die Verwendung im Haushalt entworfen und gebaut wurde. Er darf nicht in
Räumen verwendet werden, in denen besondere Bedingungen herrschen, wie ätzende oder explosive Atmosphäre (Stäube, Dämpfe oder Gase). Das Gerät wird Konstruktionskontrollen, Betriebs- und Sicherheitsabnahmen im Einklang mit den nachstehend
aufgezählten Vorschriften der Europäischen Richtlinien und den geltenden technischen Normen unterzogen:
DIE IN DIESEM HANDBUCH AUFGEFÜHRTEN ANLEITUNGEN MÜSSEN GELESEN UND BEGRIFFEN WERDEN,
BEVOR DEN ZERKLEINERER AUF IRGENDEINE ART UND WEISE GEBRAUCHT BZW. VERWENDET WIRD.
Das Symbol “ACHTUNG”, von keinen anderen Gefahrensymbolen begleitet, zeigt
dem Benutzer an, die Anweisungen sorgfältig zu befolgen.
Das nebenstehende Symbol ermahnt dazu, die technischen Eingriffe von technischem Fachpersonal ausführen zu lassen: Elektriker - Klempner.
Allgemeine Gefahr
Gefahr von Stromschlägen
ALLGEMEINES
•2006/95/CE,Niederspannungsrichtlinie(LVD).
•2004/108/CE,RichtliniederelektromagnetischenVerträglichkeit(EMC).
•CEIEN60335-1SicherheitderelektrischenHaushaltsgeräteTeil1–AllgemeineVorschriften.
•CEIEN60335-16SicherheitderelektrischenHaushaltsgeräteTeil2–BesondereVorschriftenfürAbfallzerkleinerer.
•61770AndasWassernetzangeschlosseneElektrogeräte-VerfügungenzurVerhinderungdesWasserrückflussesaufgrunddes
Siphoneffekts und der Defekt der Rohranschlüsse.
•CEIEN61770/A1/A2AndasWassernetzangeschlosseneElektrogeräte-VerfügungenzurVerhinderungdesWasserrückflusses
aufgrund des Siphoneffekts und der Defekt der Rohranschlüsse.
•CEIEN60529SchutzgradederGehäuse.
Soweit wie möglich, betreffen die oben erwähnten Normen die gewöhnlichen von den Geräten aufgezeigten Risiken, denen Personen im Haushalt ausgesetzt sind.
VERGEWISSERN SIE SICH, DASS DER EINBAU DES KÜCHENABFALLZERKLEIN-
ACHTUNG!
ERERS VON DEN ÖRTLICHEN VORSCHRIFTEN ZUGELASSEN IST. DER KÜCHENABFALLZERKLEINERER IST NICHT GEGEN DIREKTE WASSERSPRITZER GESCHÜTZT (SCHUTZGRAD IP20).
30
Page 32

DEDE
3.
HERSTELLERDATEN
Die Herstellerfirma behält sich das Recht an der gesamten, im Lieferumfang enthaltenen technischen Dokumentation vor und untersagt jede Art der Vervielfältigung, auch in Auszügen, sowie die Übersetzung ohne
vorherige schriftliche Genehmigung.
PRODUCER:
Elleci S.p.A., Strada Longitudinale A 1258, Z.I. Mazzocchio
04014 Pontinia (LT) - Italy
Tel. +39.0773.840036
Fax. +39.0773.840038
elleci@elleci.it
4.
5.
ELLECI Spa
Via Migliara 53 z.i. Mazzocchio
04014 PONTINIA - LT - ITALY
Tel . +39(0) 773 - 840036
Fax . +39(0) 773 - 840038
IDENTIFIKATIONSSCHILDER
Die das Modell betreffenden Angaben und dessen Merkmale können dem am
Gerät angebrachten Schild entnommen werden.
. SICHERHEIT
ACHTUNG!
Installations-, Einstellungs- und Wartungsmaßnahmen dürfen im Sinne
dieses Bedienungsanleitung und der geltenden Gesetzesvorschriften ausschließlich von qualifiziertem Fachpersonal vorgenommen werden.
Bei unsachgemäßer Installation, Einstellung und Wartung des Geräts übernimmt die Firma SMEG Spa keinerlei Haftung.
Vor dem Ausführen etwaiger Wartungsmaßnahmen stets die Strom- und
die Wasserversorgung des Geräts trennen.Zum Auswechseln von Bauteilen und/oder Zubehör stets ausschließlich originale Ersatzteile der SMEG
Spa verwenden.
Hüllen und Gehäuse der elektrischen Vorrichtungen nicht öffnen.
STROMSCHLAGGEFAHR.
Regelmäßig von Fachpersonal den guten Zustand der Rohre der Wasserzuleitung und der Abflüsse kontrollieren lassen. Rohre und Zubehör beim kleinsten
Anzeichen von Veränderungen bzw. Leckagen austauschen.
WASSERZULEITUNGEN UND -ABFLÜSSE
31
Page 33

ACHTUNG!
Beim Gebrauch der Elektrogeräte (Küchenabfallzerkleinerer) sind stets die zulässigen Verwendungsweisen zu berücksichtigen und einige Sicherheitsvorschriften zu beachten, insbesondere:
a. Dieses Gerät ist nicht dazu gedacht von Personen (Kinder eingeschlossen) benutzt zu werden, deren
physische, sensorische oder geistige Merkmale oder Erfahrungs- bzw. Kenntnismangel sie daran hindern,
das Gerät in Sicherheit ohne Beaufsichtigung oder Anleitung zu gebrauchen.
b. Achten Sie darauf, dass Kinder dieses Gerät nicht benutzen und es mit einem Spielzeug verwechseln.
Besondere Vorsicht walten lassen, wenn das Gerät in Anwesenheit von Kindern benutzt wird.
c. Dieses Gerät wurde ausschließlich für das Zerkleinern von gewöhnlichen Küchenabfällen entworfen;
das Einführen von Material anderer Art kann zu Personenschäden oder Schäden an der Wohnung führen.
Um das Risiko von Personenschäden zu verringern, die mit dem Küchenabfallzerkleinerer versehene Spüle
nicht für andere Zwecke als die gewöhnlichen Küchenarbeiten benutzen (Beispiel: um ein Baby zu baden
oder sich die Haare zu waschen).
d. Wenn man versucht, den verstopften Abfallzerkleinerer zu lösen, ist dieser zuerst abzuschalten oder der
Netzstecker zu ziehen und der Wasserhahn zu schließen.
e.Die im Abschnitt “Lösen des Abfallzerkleinerers” beschriebenen Verfahren verwenden, um die Verstopfung
des Geräts zu lösen. Um etwaige Gegenstände aus dem Abfallzerkleinerer zu entfernen, eine Pinzette mit
langen Schnäbeln verwenden.
DEDE
f. Niemals die Hände oder Finger in den Abfallzerkleinerer einführen.
g. Um das Risiko von durch vom Abfallzerkleinerer ausgestoßenen Material verursachten Personenschäden
zu verringern, das Gerät nicht verwenden, ohne dass sich die die obere Schutzdichtung an ihrem Platz befindet.
Unkorrekte Verwendung
h. Nicht in den Küchenabfallzerkleinerer einführen: Muschel- oder Austernschalen, Glas, Porzellan, Kunststoff, ganze Knochen von großen Abmessungen, Metallgegenstände (Kronkorken, Werkzeuge, Besteck,
Dosen und ähnliches), warmes Fett, kochende Flüssigkeiten, chemische Rohrreinigungsmittel auf Natronlaugengrundlage, chemische Erzeugnisse jeglicher Art (Lacke, Lösemittel, Haushaltsreiniger, Kfz-Flüssigkeiten), Kunststofffolien und anderes der Art.
Richtige Verwendung
i. Wenn der Küchenabfallzerkleinerer nicht benutzt wird, den Stöpsel in den Ausguss der Spüle stecken, um
die zufällige Einführung von Material in das Gerät zu vermeiden.
j. Umgehend die obere Schutzdichtung bzw. andere am Zerkleinerer befindlicher Vorrichtungen ersetzen,
sobald sie abgenutzt sind.
k. Um BRANDGEFAHREN zu vermeiden, in der Nähe des Küchenabfallzerkleinerers keine entzündbaren Stoffe
oder Gegenstände aufbewahren oder benutzen, wie Lappen, Papier, Sprühdosen, Gas- oder Benzinbehälter
oder andere brennbare Stoffe.
32
Page 34

DE
6.
BESTIMMUNG UND EINSATZUMGEBUNG
Der Küchenabfallzerkleinerer ist ein Gerät, das für den Einbau und die Verwendung im häuslichen Bereich,
speziell in der Küche, an den Abfluss der Spüle angeschlossen, gebaut wurde. Es ist die Benutzung nur mit
sauberem Wasser vorgesehen.
BESCHREIBUNG DES GERÄTS
Der Küchenabfallzerkleinerer besteht aus einem warmgeformten isolierenden Kunststoffgehäuse, in dessen
Inneren untergebracht sind:
• Das Abfallzerkleinerungslaufrad
• Die Dichtungen und die Sicherheitseinrichtungen des Zugangsfachs
• Der Elektromotor
• Die erforderlichen elektrischen Steuerungen
• Der Anschluss des Überlaufs der Spüle
• Der Anschluss an den Abfluss der Spülmaschine
• Der Anschluss an die Kanalisation
FUNKTION DES GERÄTS
33
Page 35

7.
TECHNISCHE MERKMALE
TECHNISCHE ANFORDERUNGEN
DE
MODELL
KITFD050
KITFD075
KITFD100
EINBAUAUSMASSE
LEISTUNG
WATT
375
550
750
SPANNUNG
VGS
220 - 240
STROMAUFNAH-
ME (Ampere)
1.7
2.5
3.4
U/min
2800
Gewicht
(kg)
4,5
4,7
4,8
MODELL
KITFD050
KITFD075
KITFD100
MASSE IN MILLIMETERN
1 2
370
420
420 185
180
185
3 4
70
70
70 205
205
205
5 6
140
140
140 255
250
255
34
Page 36

DE
8.
Zu Sicherheitszwecken ist wichtig, dass die Anschlüsse von Fachpersonal ausgeführt werden. Sicherstellen,
dass die Öffnung auf dem Boden der Spüle, an der der Küchenabfallzerkleinerer montiert wird, die richtigen
Abmessungen aufweist :
Siebkörbchen Rund (Standard) Siebkörbchen Quadratisch (Optional)
Für die Montage des Küchenabfallzerkleinerers die Einbauabfolge der im Installations-Bausatz enthaltenen
Einzelteile, wie in der Abbildung aufgeführt, befolgen
INSTALLATION
1. Stöpsel + Drücker Lebensmittel
2. Obere Schutzdichtung
3. Auslauf
4. Gummidichtung
5. Befestigungsebene (Spülenboden)
6. Faserdichtung
7. Befestigungsgewindering
8. Ring zum Einhängen des Gerätekorpus
9. Untere Ausflussdichtung
35
Page 37

Nach ordnungsgemäßer Montage der oberen Einzelteile (1,2,3,4,5,6,7,8,9) den Gerätekorpus platzieren
und den Einhängering soweit anziehen, bis der in der Abbildung gezeigte mechanische Endanschlag LOCK
erreicht wird:
DE
Den Korpus des Küchenabfallzerkleinerers derart platzieren, dass die elektrische Rücksetzvorrichtung nach
außen zeigt und stets leicht zu erreichen ist.
9.
Maßnahmen an den elektrischen Bauteilen dürfen in Übereinstimmung mit den geltenden Vorschriften zur
Verhütung von Arbeitsunfällen ausschließlich von qualifiziertem Fachpersonal vorgenommen werden.
Dabei müssen kundenseitig folgenden Voraussetzungen gegeben sein:
•geeigneteNetzversorgungmitvollkommenerTrennvorrichtung
Überlastschutzvorrichtungen (Id = 0.03 A) und Isolierung gegen direkten Kontakt
•AnschlussandieErdung.
Merkmale der Stromversorgungsquelle:
-Spannung: 220 – 240 V ± 10% L+N+T
- Frequenz: 50 – 60 Hz
- Höchstleistung: 1.5 Kw
ELEKTRISCHER ANSCHLUSS
ACHTUNG!
ES IST NICHT GESTATTET DEN ESSENSRESTEBEHÄLTER ZU VERWENDEN
Im Falle, dass elektrische Kabel eingesteckt sind, Anschlussdosen oder Steckdosen defekt
sind, nicht korrekt montiert wurden oder irgendwelche Anomalien aufzeigen, so müssen
diese beschädigten Kabel fachmännisch, durch ein qualifiziertes Team, ersetzt werden, um
eventuellen Gefahren vorzubeugen.
36
Page 38

DE
10
Für die Installation der START bzw. STOPP-Druckluft-Taste des Küchenabfallzerkleinerers das in der Abbildung gezeigte Anschlussschema befolgen:
INSTALLATION DER DRUCKLUFTTASTE
1. Drucklufttaste
2. Dichtung
3. Befestigungsebene (Spülenrand bzw. Arbeitsplatte)
4. Befestigungsgewindering
5. Schlauch
6. Schlauchanschluss
11.
Maßnahmen an den elektrischen Bauteilen dürfen in Übereinstimmung mit den geltenden Vorschriften zur
Verhütung von Arbeitsunfällen ausschließlich von qualifiziertem Fachpersonal vorgenommen werden.
Der Verbraucher muss eine entsprechende dimensionierte Wasserleitung vorbeiraten mit folgenden Eigenschaften:
- Druck: 1 -1,5 Bar (100 -150 kpa) - Durchfluss : 8 -20 Litri/min
12.
Vor dem Anschluss des Ablaufrohrs des Überlaufs der Spüle mithilfe eines Schraubenziehers und einem
Hammer die Scherblende in der Kurve des Ablaufs beseitigen.
WASSERANSCHLUSS UND ABFLUSS
ANSCHLUSS DES ÜBERLAUFS
37
Beseitigung der Scherblende
Beispiel des Anschlusses des Spülenüberlaufs
Page 39

13.
Vor dem Anschluss des Ablaufrohrs der Spülmaschine mithilfe eines Schraubenziehers und einem Hammer die Scherblende in der Kurve des Ablaufs laut Abbildung beseitigen und etwaige Reste von Kunststoffteilen aus der Zerkleinerungskammer entfernen.
ANSCHLUSS DER SPÜLMASCHINE
Beseitigung der Scherblende
DE
14.
Das in der Abbildung gezeigte Rohr an die Kanalisation des Raums anschließen.
Für den Anschluss des Küchenabfallzerkleinerers an die Kanalisation, die Montage wie in der Abbildung
angegeben ausführen, wobei die im Merkblatt der technischen Merkmale und der entsprechenden Tabelle
aufgeführten Masse zu befolgen sind.
ANSCHLUSS AN DAS KANALISATIONSSYSTEM
1. Ablauf
2. Befestigungsschrauben
3. Flansch
4. Dichtung
Anschluss eines Einweg-Abflusses Anschluss eines Zweiweg-Abflusses
38
Page 40

DE
15.
INBETRIEBNAHME
ACHTUNG!
Vor der Inbetriebnahme des Geräts muss sichergestellt werden dass:
Alle Masseanschlüsse korrekt an den PE-Schutzleiter (Erdung) angeschlossen sind.
Aufstellung, Installation und Anschlüsse korrekt und fachgerecht ausgeführt und
dabei die Anleitungen des Handbuchs beachtet wurden.
ACHTUNG!
Benutzen Sie bitte nicht das Gerät bevor es von einem Techniker geprüft worden ist.
16.
1. Den Stöpsel aus dem Abfluss der Spüle ziehen und kaltes Wasser laufen lassen.
2. Den Schalter betätigen, um den Küchenabfallzerkleinerer zu starten.
3. Die Küchenabfälle langsam in den Zerkleinerer einführen, sodass der etwaige Ausstoß von Material
während des Zerkleinerns auf ein Minimum beschränkt wird.
4. Wenn alle Küchenabfälle zerkleinert worden sind, den Zerkleinerer ausschalten und etwa 20-30
Sekunden lang das Wasser laufen lassen, um die Reinigung der Zerkleinerungskammer und der
Abflüsse zu ermöglichen.
5. Während des Gebrauchs sicherstellen, dass das Wasser einen Durchsatz von mindestens 6-8- Liter
pro Minute besitzt.
6. Den Raum unter dem Küchenabfallzerkleinerer von jedem Gegenstand freihalten, um den Zugang
zur Rücksetztaste zu erleichtern.
7. Während der Zerkleinerung kein kochendes Wasser verwenden.
8. Den Wasserfluss nicht unterbrechen und den Zerkleinerer nicht ausschalten, bevor der Zerkleinerungsvorgang abgeschlossen ist.
GEBRAUCHSANWEISUNGEN
39
9. Keine großen Mengen an Eierschalen, faserigen Stoffen wie Maiskolben, Artischocken , usw. einführen, da man riskiert, die Abflussrohre zu verstopfen.
10. Keine Nicht-Küchenabfälle jeglicher Art einführen.
11. Das Gerät nicht gebrauchen, um harte Werkstoffe wie Glas und Metall zu entsorgen.
12. Keine fette oder Öle eingießen, da diese die Abflussrohre verstopfen könnten.
13. Nicht auf ein Mal große Mengen von Obst- oder Gemüseschalen eingeben, zuerst den Wasserhahn
öffnen und dann nach und nach die zu zerkleinernden Erzeugnisse einführen.
Page 41

17.
Beim Gebrauch des Küchenabfallzerkleinerers ist es möglich, dass sich Essens- oder Fettreste in der Zerkleinerungskammer oder in der oberen Schutzdichtung ansammeln und schlechte Gerüche verursachen. Es ist möglich, diese
Rückstände zu entfernen und das Gerät folgendermaßen zu reinigen:
a. DEN KÜCHENABFALLZERKLEINERER ABSTELLEN UND VOM NETZ TRENNEN
b. Den Stöpsel und die obere Schutzdichtung herausnehmen, das Innere der Dichtung mit einem feuchten Schwamm
reinigen.
c. Durch die Abflussöffnung der Spüle die obere Lippe der Zerkleinerungskammer mit feuchten Schwamm reinigen.
REINIGUNG DES ABFALLZERKLEINERERS
Stöpsel
Obere Schutzdichtung
DE
Richtige Lage der Schutzdichtung
d. Die obere Schutzdichtung wieder bis an ihren Anschlag einsetzen, den Stöpsel in die Abflussöffnung der Spüle
stecken und die Spüle zur Hälfte mit lauwarmem Wasser füllen.
e. Den Küchenabfallzerkleinerer wieder an das Netz anschließen.
f. Den Zerkleinerer betätigen und den Stöpsel der Spüle herausziehen, um dem Wasser zu ermöglichen, abzufließen
und die übelriechenden Rückstände zu entfernen, einige Sekunden lang kaltes Wasser laufen lassen, um das Ganze
zu spülen.
18.
Sollte der Motor des Küchenabfallzerkleinerers während des Gebrauchs stehen bleiben, ist es möglich, dass
der Zerkleinerer blockiert ist; um ihn zu lösen wie folgt vorgehen:
a. Den Küchenabfallzerkleinerer abstellen und vom Netz trennen.
b. Den Wasserhahn schließen.
c. Die obere Schutzdichtung entfernen und mit Hilfe einer langschnabeligen Pinzette durch die
Abflussöffnung der Spüle den Gegenstand, der das Hindernis bildet, entfernen.
d. Den Elektromotor 5-8 Minuten abkühlen lassen.
e. Die oberer Schutzdichtung wieder ordnungsgemäß anbringen.
LÖSEN DES ZERKLEINERERS
Der Zerkleinerer funktioniert nicht
f. Die Rücksetztaste (switch) im unteren Teil des Zerkleinerers drücken.
g. Den Küchenabfallzerkleinerer wieder an das Netz anschließen und einschalten. Startet der Motor nicht,
auf der Schalttafel der Wohnung die etwaige Auslösung eines Lastschutzschalters oder durchgebrannte
Sicherungen überprüfen. Sollte nach der Wiederherstellung der ordnungsgemäßen Stromversorgung der
Zerkleinerer nicht funktionieren, den Kundendienst benachrichtigen.
40
Page 42

DE
19.
RESTRISIKEN
Die in Verbindung mit dem Gerät erkannten Restrisiken wurden durch die baulichen Merkmale minimiert,
dennoch kann es infolge eines unsachgemäßen Gebrauchs zu folgenden Gefahrensituationen kommen:
N°
1
2
3
Vergossene Flüssigkeit am Boden kann die Oberfläche glatt und rutschig machen. Dazu kann es bei unsachgemäßem Befüllen der Becken oder unsachgemäßen Maßnahmen an den Vorrichtungen kommen.
Stromschlaggefahr wegen fehlerhaftem Anschluss des Stromkabels an der 230
Vac Netzsteckdose.
Möglichkeit des Herausschleuderns von Gegenständen aufgrund des Einführens
von Festkörpern in das Innere des Zerkleinerers.
RESTRISIKEN
Eine weitere Vorbeugung der Restrisiken stellt die eingehende Kenntnis und Beachtung der Vorschriften und
Hinweise dieses Handbuchs dar.
20.
WARTUNG
Nachstehend eine Liste der möglichen Störungen, ihrer Ursachen und entsprechenden Behebungsvorschläge:
Störung
Problem
Auflösung
Der Zerkleinerer
funktioniert nicht
Es fehlt Strom
Einschreiten der Thermoschutzvorrichtung
Der Startschalter befindet
sich in AUS-Stellung
Es fehlt Wasser
Beschädigten Kabeln
Das Vorliegen von Strom
auf der Schalttafel der Wohnung überprüfen
Prüfen, ob der Netzstecker
ordnungsgemäß in der Steckdose steckt
Den im unteren Teil des Zerkleinerers befindlichen Rücksetzknopf betätigen
Die Start- bzw. Stopp-Drucklufttaste betätigen
Die Stellung des Hahns des Anschlusses an
das Wassernetz überprüfen
Im Falle, dass elektrische Kabel eingesteckt sind, Anschlussdosen oder Steckdosen defekt sind, nicht korrekt montiert wurden oder irgendwelche Anomalien aufzeigen, so müssen diese beschädigten Kabel fachmännisch, durch ein qualifiziertes
Team, ersetzt werden, um eventuellen Gefahren vorzubeugen.
41
ACHTUNG!
Für den Fall, dass die empfohlene Abhilfe die Störung nicht behebt, den zugelassenen technischen Kundendienst benachrichtigen - KEINE BEHELFSMÄSSIGEN MASSNAHMEN ODER EINGRIFFE VORNEHMEN
Page 43

21.
Der Küchenabfallzerkleinerer ist einzeln in Kartons auf Standard-Paletten aus Holz bzw. Kunststoff für den
Transport oder die Lagerung verpackt.
Für das Handling des einzelnen Produkts ist kein Hebemittel oder Hebevorrichtung vorgesehen.
Für das Handling des Produkts auf Palette ist ein Gabelstapler oder eine Transpalette für den Lasttransport
mit für das auf dem Packungszettel der Palette angegebene Gewicht geeigneten Merkmalen erforderlich.
Die für den Küchenabfallzerkleinerer geschaffene Verpackung ist für geschlossene Räume wie vor Wettereinflüssen geschützte Lagerräume oder -Hallen geeignet. Das Erzeugnis darf nicht im Freien ohne entsprechende Abdeckungen gelagert werden, da es feuchtigkeitsempfindliche Elektrogeräte enthält.
TRANSPORT UND HANDLING
DE
22.
Der Küchenabfallzerkleiner wird vom Ersteller für den folgenden Zeitraum (ab Kaufsdatum).
• KITFD050: 2 JAHRE
• KITFD075: 2 JAHRE
• KITFD100: 2 JAHRE
Während der Garantielaufzeit werden defekte bzw. fehlerhafte Teile und Vorrichtungen nach werksseitiger
Überprüfung ersetzt. Der Hersteller behält sich vor, in folgenden Fällen, die zur Nichtigkeit der Garantiebe-
stimmungen führen, den von der Garantie abgedeckten Eingriff nicht vorzunehmen:
•UnsachgemäßeInstallation,ausgenommenvonnichtbefugtembzw.nichtqualifiziertemPersonal
•DefektoderStörungderVorrichtunginfolgeunsachgemäßenGebrauchs
•UnbefugterZugriff
•VeränderungdesOriginalzustands
•Installationsfehler
•AllgemeineSchädendurchunsachgemäßesHandlingoderLagern
•SchädendurchunzulässigeProdukteoderMittel
•EinführenvonFremdkörpernindieVorrichtungen
Bei Auftreten eines Defekts oder einer Betriebsstörung den zugelassenen Kundendienst oder den Händler
benachrichtigen. Sollte man versuchen, den Zerkleinerer selbst zu reparieren oder diesen gewerblich zu
nutzen, verfällt die Garantie.
GARANTIE
23.
NACH GEBRAUCH NICHT IN DIE UMWELT ENTSORGEN
NICHT IN DEN HAUSMÜLL WERFEN
Die Verpackung des Küchenabfallzerkleinerers besteht recyclefähigem Material (Papier, Karton, Holz).
Die Entsorgung muss unter Einhaltung der im Land des Benutzers geltenden örtlichen Umweltschutzbestimmungen erfolgen.
Der Korpus des Küchenabfallzerkleinerers und dessen Zubehör wird als Sondermüll (EEAG - Elektro- und
Elektronik-Altgeräte) eingestuft.
Die Entsorgung dieser Erzeugnisse hat durch die Abgabe in besonderen Sammel-, Entsorgungs- oder
Recyclingstellen unter Beachtung der im Land des Benutzers geltenden Umweltschutzbestimmungen zu
erfolgen.
ENTSORGUNG UND VERSCHROTTUNG
42
Page 44

FR
Cher Client,
Vous avez fait l’acquisition d’un produit SMEG et nous vous remercions pour la préférence que vous
nous avez accordée. La tradition et le sérieux de notre Entreprise garantissent la qualité technique et
esthétique du choix que vous avez fait ; En effet tous nos produits sont réalisés avec des matériaux
de première qualité et selon des critères de construction en mesure de satisfaire la clientèle la plus
exigeante. Pour un emploi correct du produit nous vous prions de lire attentivement le présent manuel
qui renferme toutes les indications et les conseils nécessaires pour une utilisation pratique et facile.
Le manuel d’utilisation est un guide fiable et sûr pour l’installation, l’usage, l’entretien. Le respect des
observations qui y sont reportées permet de garantir un fonctionnement et un rendement optimal de
l’appareil. Nous vous remercions à nouveau d’avoir choisi notre produit et nous vous prions d’agréer
nos salutations les plus distinguées.
SMEG Spa
SOMMAIRE
1. SIGNALISATION....................................................................................................................................................44
2. GÉNÉRALITÉS ......................................................................................................................................................44
3. DONNÉES DU PRODUCTEUR...............................................................................................................................45
4. PLAQUES D’IDENTIFICATION...............................................................................................................................45
5. SÉCURITÉ..............................................................................................................................................................45
6. FONCTION DE L’APPAREIL.....................................................................................................................................47
7. CRITÈRES TECHNIQUES.......................................................................................................................................48
8. INSTALLATION......................................................................................................................................................49
9. RACCORDEMENT ÉLECTRIQUE ..............................................................................................................................50
10. INSTALLATION BOUTON PNEUMATIQUE............................................................................................................51
11. RACCORDEMENT EAU ET ÉVACUATIONS...........................................................................................................51
12. RACCORDEMENT TROP-PLEIN...........................................................................................................................51
13. RACCORDEMENT LAVE-VAISSELLE ..................................................................................................................52
14. RACCORDEMENT ÉVACUATION DES EAUX USÉES ...............................................................................................52
15. MISE EN SERVICE..............................................................................................................................................53
16. MODE D’EMPLOI.....................................................................................................................................................53
17. NETTOYAGE DU BROYEUR DE DÉCHETS...........................................................................................................54
43
18. DÉBLOCAGE DU BROYEUR.................................................................................................................................54
19. RISQUES RÉSIDUELS..........................................................................................................................................55
20. ENTRETIEN..........................................................................................................................................................55
21. TRANSPORT, DÉPLACEMENT ............................................................................................................................56
22. GARANTIE...........................................................................................................................................................56
23. ÉLIMINATION ET DÉMOLITION..............................................................................................................................56
Page 45

1.
POUR LA RÉDACTION DE CE MANUEL NOUS AVONS EMPLOYÉ CERTAINS PICTOGRAMMES ET SYMBOLES DANS LE
BUT DE SIGNALER VISUELLEMENT À L’UTILISATEUR LES THÈMES IMPORTANTS EN MATIÈRE DE SÉCURITÉ AINSI
QUE LES RECOMMANDATIONS POUR UNE UTILISATION CORRECTE DE LE BROYEUR DE DÉCHETS ALIMENTAIRES
Symboles Description
Le symbole « MISE EN GARDE » indique une situation potentiellement dangereuse
AVIS
ATTENTION
qui, si elle n’est pas évitée, peut provoquer de graves blessures voire la mort.
Le symbole « ATTENTION » accompagné d’un symbole de danger indique une
situation potentiellement dangereuse qui, si elle n’est pas évitée, peut provoquer
des blessures ou endommager l’habitation ou l’appareil.
SIGNALISATION
FR
ATTENTION
ATTENTION
La documentation doit être conservée et gardée à disposition pendant toute la durée de vie de l’appareil et doit accompagner la
machine dans le cas de cessions éventuelles à d’autres utilisateurs.
IL EST OBLIGATOIRE DE LIRE ET DE BIEN COMPRENDRE LES INSTRUCTIONS CONTENUES DANS
LE PRESENT DOCUMENT AVANT DE PROCEDER A LA MOINDRE OPERATION.
2.
Le présent mode d’emploi se réfère à l’appareil électrique dénommé broyeur de déchets alimentaires (plus communément appelé
broyeur) de la série : KITFD050 - KITFD075 - KITFD100. Le broyeur de déchets alimentaires est un appareil électrique conçu et
réalisé exclusivement pour un usage domestique ; il ne peut pas être utilisé dans des environnements présentant des conditions
particulières comme des atmosphères corrosives ou explosives (poussières, vapeurs ou gaz). L’appareil est soumis à des contrôles de construction ainsi qu’à des tests de fonctionnalité et de sécurité conformément aux directives communautaires et aux
réglementations techniques en vigueur, listées ci-dessous:
Le symbole « ATTENTION » sans autre symbole de danger invite l’utilisateur à
suivre attentivement les instructions.
Le symbole ci-contre indique qu’il est conseillé de confier les interventions techniques à du personnel technique spécialisé : électricien - plombier.
Danger général
Danger d’électrocution ou de décharge électrique
GÉNÉRALITÉS
•2006/95/CE,directivecommunautairebassetension(DBT).
•2004/108/CEdirectivecommunautairecompatibilitéélectromagnétique(CEM).
•CEIEN60335-1SécuritédesappareilsélectriquespourusagesdomestiquesetanaloguesPartie1–Prescriptionsgénérales.
•CEIEN60335-2-16SécuritédesappareilsélectriquespourusagesdomestiquesetanaloguesPartie2-Prescriptionsparticu-
lières pour les broyeurs de déchets
•61770Appareilsélectriquesraccordésauréseaud’alimentationeneau-Exigencespouréviterleretourd’eauparsiphonnageet
la défaillance des ensembles de raccordement.
•CEIEN61770/A1/A2Appareilsélectriquesraccordésauréseaud’alimentationeneau-Exigencespouréviterleretourd’eaupar
siphonnage et la défaillance des ensembles de raccordement.
•CEIEN60529Degrésdeprotectionprocurésparlesenveloppes.
Les normes susmentionnées examinent dans la mesure du possible les risques normaux présentés par les appareils auxquels les
personnes sont exposées chez elles.
S’ASSURER QUE L’INSTALLATION DU BROYEUR DE DÉCHETS ALIMENTAIRES
ATTENTION
EST AUTORISÉE PAR LES RÉGLEMENTATIONS LOCALES. LE BROYEUR DE
DÉCHETS ALIMENTAIRES N’EST PAS PROTÉGÉ CONTRE LES JETS D’EAU DIRECTS (DEGRÉ DE PROTECTION IP20).
44
Page 46

DEFR
3.
DONNÉES DU PRODUCTEUR
Le fabricant possède tous les droits en matière de documentation technique fournie avec la machine et en
interdit la reproduction ainsi que la traduction totale ou partielle, sans son autorisation préalable écrite.
PRODUCER:
Elleci S.p.A., Strada Longitudinale A 1258, Z.I. Mazzocchio
04014 Pontinia (LT) - Italy
Tel. +39.0773.840036
Fax. +39.0773.840038
elleci@elleci.it
4.
5.
ELLECI Spa
Via Migliara 53 z.i. Mazzocchio
04014 PONTINIA - LT - ITALY
Tel . +39(0) 773 - 840036
Fax . +39(0) 773 - 840038
PLAQUES D’IDENTIFICATION
Les données concernant le modèle et ses caractéristiques peuvent être recueillies en consultant la plaque d’identification positionnée sur l’appareil.
SÉCURITÉ
ATTENTION
Toutes les opérations d’installation, de réglage et d’entretien doivent être
effectuées par un personnel qualifié en accord avec le présent manuel
d’utilisation et conformément aux réglementations en vigueur.
SMEG Spa décline toute responsabilité dérivant d’une installation, d’un
réglage et d’un entretien de l’appareil erronés.
Avant d’effectuer la moindre intervention d’entretien couper l’alimentation en
courant et fermer l’alimentation en eau en amont de l’appareil. Dans le cas de
remplacement de composants et/ou accessoires, utiliser exclusivement des
pièces de rechange originales SMEG Spa.
Ne pas ouvrir les protections ou les boîtiers des dispositifs électriques
DANGER D’ÉLECTROCUTION
CONDUITES ET ÉVACUATIONS D’EAU Veiller à l’inspection périodique, par du
personnel qualifié, du bon état des tuyaux de raccordement au réseau d’alimentation en eau et des évacuations. Remplacer les conduites et les accessoires au
moindre signe d’altération et/ou de fuite.
45
Page 47

ATTENTION
Lors de l’utilisation des appareils électriques (broyeur de déchets alimentaires) il est nécessaire de
toujours garder à l’esprit les modalités d’utilisation autorisées et de respecter certaines normes de
sécurité, notamment les suivantes :
a. Cet appareil n’est pas conçu pour être utilisé par des personnes (y compris des enfants) dont les caractéristiques physiques, sensorielles ou mentales ou le manque d’expérience et de connaissance les empêchent d’utiliser l’appareil en toute sécurité sans surveillance ou instructions.
b. Veiller à ce que les enfants n’utilisent pas cet appareil et ne le considèrent pas comme un jouet. Être particulièrement vigilant lorsque l’appareil est utilisé en présence d’enfants.
c. Cet appareil a été conçu exclusivement pour l’élimination de déchets alimentaires normaux, l’introduction
de matériel d’un autre type peut entraîner des blessures ou endommager l’habitation. Pour réduire le risque
de blessures, ne pas utiliser l’évier équipé du broyeur de déchets alimentaires à des fins autres que les
activités culinaires normales (exemple : pour donner le bain à un nourrisson ou pour se laver les cheveux).
d. En cas de blocage du broyeur de déchets alimentaires, avant d’intervenir il est nécessaire de l’éteindre ou
de débrancher la fiche d’alimentation électrique et de fermer le robinet d’eau.Suivre les procédures décrites
dans la section « Déblocage du broyeur » prévue à cet effet pour débloquer l’appareil.
e. Pour retirer d’éventuels objets présents dans le broyeur de déchets alimentaires, utiliser une pince à becs
longs.
FR
DE
f. Ne jamais introduire ses mains ou ses doigts dans le broyeur de déchets alimentaires.
g. Pour réduire le risque de blessures causées par du matériel expulsé par le broyeur de déchets alimentaires, ne pas utiliser l’appareil sans que le dispositif supérieur de protection ne soit dans son emplacement.
UTILISATION INTERDITE
h. Ne pas introduire dans le broyeur de déchets alimentaires : coquillages ou coquilles d’huitre, verre, porcelaine, plastique, os entiers de grandes dimensions, objets en métal (bouchons, ustensiles, couverts, boîtes
de conserve et autres), graisse chaude, liquides bouillants, produits chimiques pour déboucher les éviers à
base de soude caustique, produits chimiques de tout genre (peintures, solvants, produits d’entretien de la
maison, fluides pour la voiture), films en plastique et autres.
UTILISATION CORRECTE
i. Lorsque le broyeur de déchets alimentaires n’est pas utilisé, positionner le bouchon dans le trou de l’évier
afin d’éviter l’introduction accidentelle de matériaux dans l’appareil.
j. Remplacer dès que possible le dispositif supérieur de protection et/ou les autres dispositifs présents sur
le broyeur de déchets alimentaires si ceux-ci sont usés.
k. Pour éviter tout DANGER D’INCENDIE, ne pas conserver ni utiliser près du broyeur de déchets alimentaires des substances ou des objets inflammables comme des chiffons, du papier, des bombes spray, des
bouteilles de gaz ou d’essence ou toute autre substance inflammable.
46
Page 48

FR
6.
DESTINATION ET ENVIRONNEMENT D’EXPLOITATION
Le broyeur de déchets alimentaires est un appareil construit pour être inséré et utilisé dans un environnement domestique, précisément en cuisine, raccordé à l’évacuation de l’évier. Seul l’usage avec des eaux
propres est prévu.
DESCRIPTION DE L’APPAREIL
Le broyeur de déchets alimentaires est composé d’une enveloppe en matière plastique isolante thermoformée à l’intérieur de laquelle se trouvent :
• Le disque métallique de broyage
• Les joints et les dispositifs de sécurité de l’orifice d’accès
• Le moteur électrique
• Les dispositifs nécessaires de commande électrique
• Les raccordements pour le branchement du trop-plein de l’évier
• Les raccordements pour le branchement au lave-vaisselle
• Les raccordements pour le branchement aux évacuations des eaux usées
FONCTION DE L’APPAREIL
47
Page 49

7.
CARACTÉRISTIQUES TECHNIQUES
CRITÈRES TECHNIQUES
FR
MODÈLE
KITFD050
KITFD075
KITFD100
DIMENSIONS POUR L’INSTALLATION
PUISSAN-
CE WATT
375
550
750
TENSION
Vac
220 - 240
ABSORPTION
(Ampère)
1.7
2.5
3.4
tours/min
2800
Poids (kg)
4,5
4,7
4,8
MODÈLE
KITFD050
KITFD075
KITFD100
MESURES EN MILLIMÈTRES
1 2
370
420
420 185
180
185
3 4
70
70
70 205
205
205
5 6
140
140
140 255
250
255
48
Page 50

FR
8.
Pour des raisons de sécurité, il est important que les positionnements soient réalisés par du personnel
qualifié. Veiller à ce que le trou à partir duquel sera installé le broyeur de déchets alimentaires, situé
au fond de l’évier, présente des dimensions adéquates :
Bonde ronde (STANDARD) Bonde carrée (OPZIONALE)
Pour le montage du broyeur, respecter la séquence d’insertion des composants présents dans le kit
d’installation comme indiqué dans la figure
INSTALLATION
1. Bouchon + Aliments pousseur
2. Dispositif supérieur de protection
3. Bonde
4. Joint en caoutchouc
5. Plan de fixation (fond évier)
6. Joint en fibre
7. Anneau de serrage
8. Collier de fixation corps broyeur
9. Joint inférieur bonde
49
Page 51

Après avoir correctement monté les composants supérieurs (1,2,3,4,6,7,8,9), positionner le corps du
broyeur et serrer le collier de fixation en le faisant tourner complètement jusqu’à atteindre la butée mécanique de la position LOCK indiquée dans la figure :
FR
Positionner le corps du broyeur de déchets alimentaires de façon à ce que le dispositif de réarmement
électrique soit dirigé vers l’extérieur et soit toujours facilement accessible.
9.
La moindre intervention sur les parties électriques doit être effectuée par un personnel qualifié qui respecte
notamment les normes de prévention des accidents.
L’utilisateur doit s’occuper de préparer:
•laligneélectriqued’alimentationopportunémentdimensionnée,dotéed’undispositifdesectionnementet
de protections contre les surcourants (Id = 0.03 A) et des contacts indirects
•lignederaccordementàlaterre.
Caractéristiques de la source d’énergie électrique:
- tension: 220 – 240 V ± 10% L+N+T
- fréquence:: 50 – 60 Hz
- puissance max:1.5 Kw
RACCORDEMENT ÉLECTRIQUE
ATTENTION
UTILISATION DU BROYEUR D’ÉVIER EST INTERDIT
Dans les cas où le câble de liaison électrique, la prise d’alimentation a signes de défauts, des
imperfections ou des anomalies, un remplacement des câbles d’alimentation
endommagé, doit être effectué par le fabricant ou par du personnel qualifié pour
éviter des dangers.
50
Page 52

FR
10
Pour l’installation du bouton pneumatique START - STOP du broyeur de déchets alimentaires, respecter le
schéma de raccordement indiqué dans la figure :
INSTALLATION BOUTON PNEUMATIQUE
1. Bouton pneumatique
2. Joint
3. Plan de fixation (bord/plan évier)
4. Anneau de serrage
5. Tuyau
6. Raccord tuyau
11.
La moindre intervention sur les parties électriques doit être effectuée par un personnel qualifié qui respecte
notamment les normes de prévention des accidents.
L’utilisateur doit fournir une conduit d’alimentation d’eau, de dimensions appropriées.
Caractéristiques de la source de l’approvisionnement de l’eau:
- pression: 1 -1,5 Bar (100 -150 kpa) - capacité : 8 -20 Litri/min
12.
Avant de raccorder la tuyauterie pour l’évacuation du trop-plein de l’évier, à l’aide d’un tournevis et d’un
marteau, éliminer le diaphragme présent dans le coude d’évacuation.
RACCORDEMENT EAU ET ÉVACUATIONS
RACCORDEMENT TROP-PLEIN
51
Élimination diaphragme
Exemple de raccordement évacuation trop-plein évier
Page 53

13.
Avant de raccorder la tuyauterie pour l’évacuation du lave-vaisselle, à l’aide d’un tournevis et d’un marteau,
éliminer le diaphragme présent dans le corps du broyeur, comme indiqué dans la figure, et retirer tout
résidu éventuel de pièces plastiques présentes à l’intérieur de la chambre de broyage.
RACCORDEMENT LAVE-VAISSELLE
Élimination diaphragme
FR
14.
Raccorder la tuyauterie indiquée dans la figure au système d’évacuation des eaux usées de la pièce.
Pour le raccordement du broyeur de déchets alimentaires à l’évacuation des eaux usées, effectuer le montage comme indiqué dans la figure en respectant les mesures fournies dans la fiche des caractéristiques
techniques et dans le tableau correspondant.
RACCORDEMENT ÉVACUATION DES EAUX USÉES
1. Évacuation
2. Vis de fixation
3. Bride
4. Joint
Raccordement évacuation une voie Raccordement évacuation deux voies
52
Page 54

FR
15.
ATTENTION
Avant de mettre en service la machine il est nécessaire:
de s’assurer que toutes les masses électriques soient raccordées au conducteur
de protection PE.
Avant de mettre en service la machine s’assurer que toutes les phases de positionnement d’installation et de branchements aient été effectuées correctement
en suivant les indications reportées dans le présent manuel.
ATTENTION
Ne pas utiliser le broyeur de déchets alimentaires avant que l’installation a étée vérifiée et surveillée
par un personnel qualifié.
MISE EN SERVICE
16.
1. Retirer le bouchon du trou d’évacuation de l’évier et faire couler de l’eau froide
2. Actionner l’interrupteur pour mettre en route le broyeur de déchets alimentaires
3. Introduire lentement les déchets alimentaires dans le broyeur de façon à réduire au minimum l’éventuelle expulsion de matériel pendant le broyage.
4. Lorsque tous les déchets alimentaires ont été broyés, éteindre le broyeur de déchets alimentaires
et laisser couler l’eau pendant environ 20-30 secondes afin de permettre le nettoyage de la chambre
de broyage et des évacuations
5. Pendant l’utilisation, s’assurer que le flux d’eau présente un débit d’au moins 6-8 litres à la minute
6. Maintenir la zone située sous le broyeur de déchets alimentaires libre de tout objet afin de faciliter
l’accès à la touche de réinitialisation
7. Ne pas utiliser d’eau bouillante pendant le broyage
8. Ne pas interrompre le flux d’eau et ne pas éteindre le broyeur de déchets alimentaires avant que le
cycle de broyage ne soit terminé
MODE D’EMPLOI.
53
9. Ne pas introduire de grandes quantités de coquilles d’œuf, de matériaux fibreux comme les spathes
des épis de maïs, les artichauts, etc. : cela peut boucher les conduites d’évacuation
10. N’introduire aucun déchet non alimentaire de quelque type que ce soit
11. Ne pas utiliser l’appareil pour éliminer des matériaux durs comme le verre et les métaux
12. Ne pas verser de graisses ou d’huiles, celles-ci pouvant boucher les conduites d’évacuation
13. Ne pas introduire en une seule fois de grandes quantités d’épluchures de fruits ou de légumes,
ouvrir d’abord le robinet d’eau et introduire progressivement les produits à broyer
Page 55

17.
L’utilisation d’un broyeur de déchets alimentaires peut entraîner l’accumulation de particules de graisse ou
de nourriture dans la chambre de broyage ou dans le dispositif supérieur de protection, générant de mauvaises odeurs. Il est possible d’éliminer ces résidus et de nettoyer l’appareil en procédant comme suit :
a. ÉTEINDRE LE BROYEUR DE DÉCHETS ALIMENTAIRES ET COUPER L’ALIMENTATION ÉLECTRIQUE
b. Retirer le bouchon et le dispositif supérieur de protection, nettoyer l’intérieur du dispositif à l’aide d’une
petite éponge humide.
c. À travers le trou d’évacuation de l’évier, nettoyer la lèvre supérieure de la chambre de broyage en utilisant
une petite éponge humide.
NETTOYAGE DU BROYEUR DE DÉCHETS
Bouchon
Dispositif supérieur de protection
FR
Position correcte du dispositif de protection
d. Repositionner le dispositif supérieur de protection jusqu’au fond de son emplacement, mettre le bouchon
dans le trou d’évacuation de l’évier et remplir l’évier à moitié avec de l’eau tiède.
e. Rebrancher le broyeur de déchets alimentaires au réseau électrique.
f. Actionner le broyeur et retirer le bouchon de l’évier en permettant à l’eau de s’écouler et d’emporter les
résidus malodorants, faire couler de l’eau froide pendant quelques secondes puis rincer le tout.
18.
Si le moteur du broyeur de déchets alimentaires s’arrête pendant son utilisation, il est possible que le
broyeur soit bloqué. Pour le débloquer, agir comme suit :
a. Éteindre le broyeur de déchets alimentaires et couper l’alimentation électrique.
b. Fermer le robinet d’eau.
c. Retirer le dispositif supérieur de protection et à l’aide d’une pince à becs longs, à travers
le trou d’évacuation de l’évier, retirer l’objet qui fait obstruction.
d. Laisser refroidir le moteur électrique pendant 5-8 minutes.
e. Repositionner correctement dans son emplacement le dispositif supérieur de protection.
DÉBLOCAGE DU BROYEUR
Position correcte du dispositif de protection
f. Presser le bouton de réinitialisation (switch) situé dans la partie inférieure du broyeur.
g. Rebrancher le broyeur de déchets alimentaires au réseau électrique et redémarrer. Si le moteur ne démarre pas, contrôler sur le tableau électrique de l’habitation que des interrupteurs ou des fusibles n’ont pas
sauté. Si après avoir procédé à la restauration correcte de l’alimentation électrique le broyeur ne fonctionne
pas, contacter le centre d’assistance.
54
Page 56

FR
19.
RISQUES RÉSIDUELS
Les risques résiduels relevés et associés à la machine sont réduits au maximum du fait des caractéristiques
de construction de la machine. Toutefois les situations suivantes dérivant d’une utilisation incorrecte du
produit peuvent se présenter:
N°
1
2
3
L’abattement ultérieur des risques résiduels détectés est garanti par la connaissance des instructions et par
le respect des prescriptions contenues dans le présent manuel.
20.
ENTRETIEN
Ci-dessous nous reportons une liste de défauts qui peuvent apparaître, leur cause et les solutions proposées
pour y remédier:
Ecoulements de liquides au sol qui peuvent rendre les surfaces de passage glissantes
Possibilité d’électrocution à cause d’un branchement erroné du câble électrique
de la ligne d’alimentation reliée à la prise de tension de 230 Vac.
Possibilité de projection d’objets due à l’introduction de corps solides à l’intérieur du broyeur.
RISQUES RÉSIDUELS
Défaut
Le broyeur ne
fonctionne pas
Causes
Absence d’énergie électrique
Intervention du dispositif ther-
mique de sécurité
L’interrupteur de mise en ser-
vice est en position arrêt
Absence d’eau
Endommagés câbles de
liaison électrique
Solution
Vérifier la présence de réseau électrique
sur le tableau électrique de l’habitation
Contrôler que la fiche d’alimentation est
correctement insérée dans la prise au mur
Réinitialiser le coupe-circuit thermique posi-
tionné dans la partie inférieure du dispositif
Actionner le bouton pneumatique de start-
stop
Vérifier la position du robinet de raccorde-
ment au réseau d’alimentation en eau
Un remplacement des câbles d’alimentation
endommagé, doit être effectué par le fabricant ou
par du personnel qualifié pour éviter des dangers.
55
ATTENTION
Si jamais le remède conseillé ne permet pas de résoudre la situation de panne/défaut, contacter le centre
d’assistance technique autorisé – NE TENTER AUCUNE MANŒUVRE OU INTERVENTION IMPROVISÉE
Page 57

21.
TRANSPORT, DÉPLACEMENT
Le broyeur de déchets alimentaires est emballé individuellement dans des emballages de carton positionnés
sur des palettes standard en bois/plastique pour le transport ou le stockage. Pour la manutention du produit
seul, aucun appareil ou dispositif de levage n’est prévu. Pour la manutention du produit sur palette, il est
nécessaire de se munir d’un appareil à fourches aux caractéristiques adéquates à la manutention des poids
indiqués sur l’étiquette de conditionnement de la palette. L’emballage réalisé pour le broyeur de déchets
alimentaires est adapté à des environnements fermés, comme les entrepôts et les dépôts, à l’abri des agents
atmosphériques. Le produit ne doit pas être stocké dans des lieux ouverts dépourvus de toitures adéquates
étant donné qu’il contient des appareils électriques sensibles à l’humidité.
22.
GARANTIE
Le broyeur de déchets alimentaires est couvert par la garantie du fabricant pour la période suivante à compter de la date d’achat.
• KITFD050: 2 ANS
• KITFD075: 2 ANS
• KITFD100: 2 ANS
Au cours de cette période les pièces et dispositifs endommagés ou défectueux pourront être remplacés
après analyse et contrôle des composants au siège du fabricant. Le fabricant se réserve le droit de ne pas
effectuer l’intervention en garantie si les situations suivantes, déterminant l’annulation des clauses de garantie, sont avérées :
FR
•Installationimpropre,effectuéeparunpersonnelnonautoriséet/ounonspécialisé
•Panneouanomaliedudispositifpourusageimpropre
•Modification/falsification
•Modificationdel’original
•Erreurd’installation
•Dommagesentoutgenredusàundéplacementetàunstockageimpropres
•Dommagesdérivantsdel’utilisationdeproduitsetsubstancesnonpermises
•Insertiondecorpsétrangersdanslesdispositifs
Lors d’une panne ou d’une anomalie fonctionnelle, contacter le centre d’assistance technique autorisé ou le
revendeur. La garantie est exclue dès lors que le broyeur fait l’objet d’une tentative de réparation ou qu’il est
utilisé à des fins commerciales.
23.
NE PAS JETER DANS L’ENVIRONNEMENT APRÈS UTILISATION
NE PAS JETER AVEC LES DÉCHETS MÉNAGERS
ÉLIMINATION ET DÉMOLITION
L’emballage du broyeur de déchets alimentaires est composé de matériaux recyclables (papier, carton,
bois), l’élimination doit être effectuée en respectant les dispositions locales en matière de protection de
l’environnement en vigueur dans le pays de l’utilisateur.Le corps du broyeur de déchets alimentaires et ses
accessoires sont classés parmi les déchets spéciaux DEEE (déchets d’équipements électriques et électroniques), l’élimination de ces produits doit être effectuée auprès de structures de ramassage, d’élimination ou
de recyclage prévues à cet effet, dans le respect des lois de protection de l’environnement en vigueur dans
le pays de l’utilisateur.
56
Page 58

AR
SMEG
SMEG
57
Page 59

1.
.
!
"
!
"
.
"
"!
.
:
.
!
.
!
AR
" "
.
!
2.
KITFD050 - KITFD075 - KITFD100
58
Page 60

AR
.
!
3.
PRODUCER:
Elleci S.p.A.,
Strada Longitudinale A 1258,
Z.I. Mazzocchio
04014 Pontinia (LT) - Italy
Tel. +39.0773.840036
Fax. +39.0773.840038
elleci@elleci.it
4.
5.
ELLECI Spa
Via Migliara 53 z.i. Mazzocchio
04014 PONTINIA - LT - ITALY
Tel . +39(0) 773 - 840036
Fax . +39(0) 773 - 840038
59
.
SMEG
SMEG
.\.
Page 61

AR
!
60
Page 62

AR
6.
61
Page 63

7.
AR
KITFD050
KITFD075
KITFD100
375
550
750
220 - 240
( )
1.7
2.5
3.4
\
2800
(
)
4,5
4,7
4,8
KITFD050
KITFD075
KITFD100
1 2
370
420
180
185
420 185
3 4
70
70
70 205
205
205
5 6
140
140
250
255
140 255
62
Page 64

AR
( )
) (
8.
.
.
1. +
2.
3.
4 .
5.( )
6.
7.
63
8 .
9.
Page 65

!
8
(
9
7
:
6
3
4
)1 2
LOCK
AR
9.
.
.
.
:
(Id = 0.03 A)
:
220
1.5
.
50 60
في حالة ظهور علامات أي عطل، خلل أو شذوذ في الكبل الكهربائي، القابس أو مقبس التيار الكهربائي. يجب أن يتم إجراء عملية
استبدال الكابلات الكهربائية التالفة من طرف الجهة المصنعة أو أشخاص مؤهلين لتجنب المخاطر.
ممنوع استخدام المشتت الحراري للنفايات الغذائية
64
Page 66

AR
.
10
1.
2 .
3.)\(
4.
5.
6.
11.
12.
\
: 820
.
.
:
) 100
150
(
1.5
-
1
65
Page 67

13.
.
.
AR
14.
.
1.
2.
3.
4.
66
Page 68

AR
!
!
15.
:
PE.
.
16.
.
67
Page 69

17.
.
AR
.
.
.
18.
.
.
.
68
Page 70

AR
:
.
.
!
\
19.
20.
1 ..
2 .
.
230
3.
.
.
:
كابلات التغذية بالتيار تالفة
لتجنب المخاطر.
.
start-stop
في حالة ظهور علامات أي عطل، خلل أو شذوذ في الكبل
الكهربائي، القابس أو مقبس التيار الكهربائي. يجب
أن يتم إجراء عملية استبدال الكابلات الكهربائية
التالفة من طرف الجهة المصنعة أو أشخاص مؤهلين
69
Page 71

21.
AR
22.
.
.
.
( )
\.
.
KITFD050
KITFD075
KITFD100
()
23.
70
Page 72

DICHIARAZIONE DI CONFORMITÀ - DECLARATION OF CONFORMITY - Konformitätserklärung - Déclaration de conformité - إعلان المطابقة
Il sottoscritto in qualità di Legale Rappresentante della Società / The undersigned, in capacity of the Company’s legal representative
SMEG AFTER - SMEG dept. - Via Leoinardo da Vinci 4 - 42016 Guastalla (RE) Italy 0522.170.70.70
DICHIARA - DECLARES
che il prodotto - that the product
KITFD050 - KITFD075 - KITFD100.
é conforme alle Direttive Comunitarie: 2006/95/CE Bassa Tensione (LVD) - 2004/108/CE Compatibilità Elettromagnetica (EMC) ed alle norme tecniche applicabili: CEI EN
60335-1 - CEI EN 61770 - CEI EN 60529
is in conformity with the EU directives: 2006/95/EC Low Voltage (LVD) - 2004/108/EC Electromagnetic Compatibility (EMC) as well as with the applicable technical laws:
CEI EN 60335-1 - CEI EN 61770 - CEI EN 60529
data - date- datum - تاريخ Timbro e Firma - Stamp and signature Stempel und Unterschrift - Cachet et Signature ختم وتوقيع
 Loading...