

(1)
KIT1-TR
Istruzioni di montaggio
Prima di installare lo schienale, rimuovere
l’eventuale alzatina installata
sull’apparecchio (vedi manuale
dell’apparecchio).
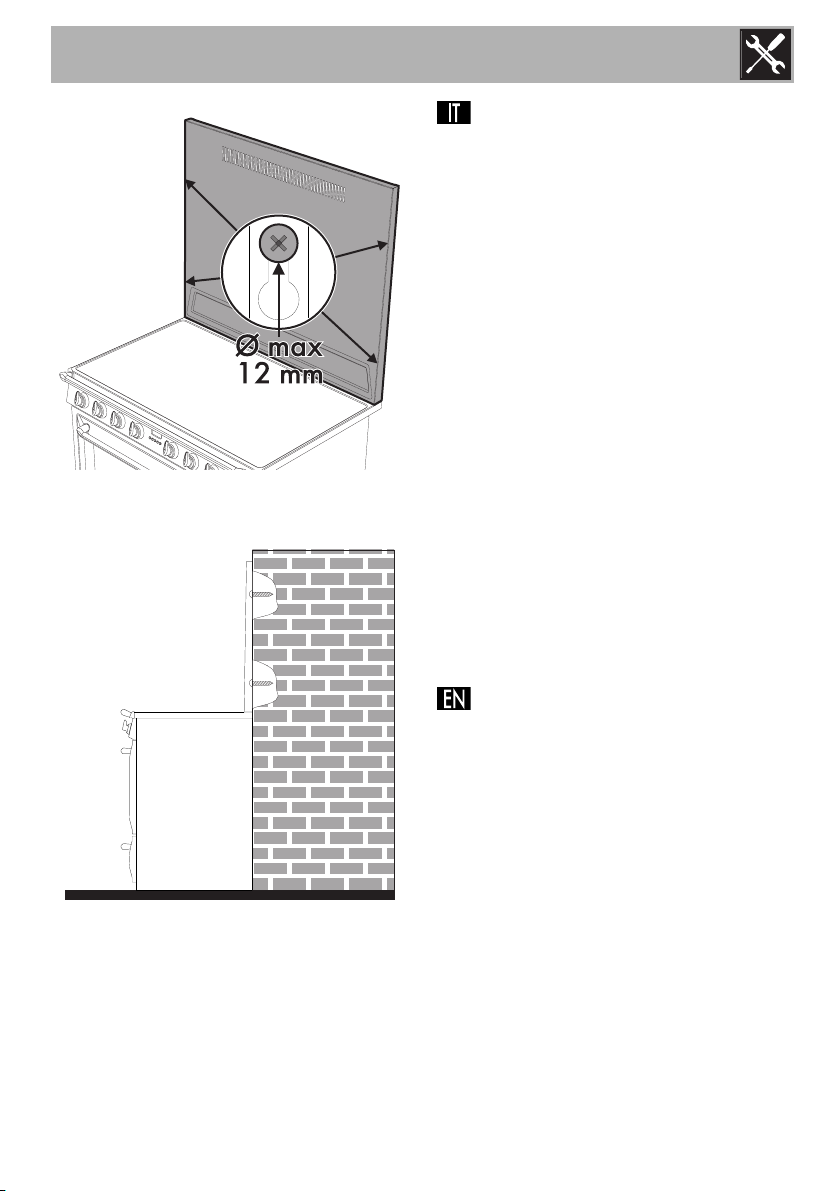
1. Posizionare lo schienale sul lato
posteriore della cucina. (fig. 1)
2. Fissare lo schienale al muro con 4 tasselli
(ø max testa vite 12 mm.) (fig. 2)
Pulizia
Non utilizzare getti di vapore, materiali
ruvidi o abrasivi, raschietti metallici, prodotti
per la pulizia contenenti cloro, ammoniaca
o candeggina.
1. Versare il prodotto su un panno umido e
passare sulla superficie, eventualmente
utilizzare con molta cautela utensili in
legno o materiale plastico.
2. Risciacquare accuratamente e asciugare
con uno straccio morbido o con un
panno in microfibra.
(2)
Assembly instructions
Before installing the back panel, remove the
rear upstand from the appliance, if fitted
(see appliance manual).
1. Position the back panel at the back of the
range. (fig. 1)
2. Fix the back panel to the wall using 4
rawlplugs (max. screw head ø 12 mm)
(fig. 2)
1
KIT1-TR
Cleaning
Do not use steam jets, rough or abrasive
materials, sharp metal scrapers or cleaning
products containing chlorine, ammonia or
bleach.
1. Pour the product onto a damp cloth and
wipe the surface, using, if needed,
wooden or plastic utensils with the utmost
care.
2. Rinse thoroughly and dry with a soft cloth
or a microfibre cloth.
Instructions de montage
Avant d'installer le panneau arrière,
démontez l'éventuel dosseret présent (voir
le manuel de l'appareil).
1. Positionnez le panneau arrière sur le côté
postérieur de la cuisinière. (fig. 1)
2. Fixez le panneau arrière au mur avec les
4 chevilles (ø max. tête de la vis 12 mm.)
(fig. 2)
Nettoyage
N'utilisez pas de jets de vapeur, de
matériaux rêches ou abrasifs, des racloirs
métalliques, des produits de nettoyage
contenant du chlore, de l'ammoniaque ou
de l'eau de javel.
1. Versez le produit sur un chiffon humide et
passez sur la surface ; utilisez
éventuellement avec la plus grande
précaution des ustensiles en bois ou en
plastique.
2. Rincez soigneusement et essuyez avec
un chiffon doux ou en microfibre.
Einbauanleitung
Entfernen Sie vor Einbau der Rückwand die
am Gerät eventuell vorhandene
Schutzleiste (siehe Handbuch des
Gerätes).
1. Platzieren Sie die Rückwand auf der
Rückseite des Herdes. (Abb. 1)
2. Befestigen Sie die Rückwand mit 4
Dübeln an der Wand (ø max. 12 mm.
am Schraubenkopf) (Abb. 2)
Reinigung
Keine Dampfstrahlen, raue oder
schleifende Materialien, Schaber aus
Metall und chlor-, ammoniak- oder
bleichmittelhaltige Reinigungsprodukte
verwenden.
1. Das Produkt auf ein feuchtes Tuch geben
und die Oberfläche abwischen;
eventuell Werkzeuge aus Holz oder
Plastik mit größter Sorgfalt verwenden.
2. Sorgfältig abspülen und mit einem
weichen Lappen oder einem
Mikrofasertuch trocknen.
Aanwijzingen voor de montage
Verwijder de eventuele plint van het toestel
voor u de achterwand installeert (zie de
handleiding van het toestel).
1. Breng de achterwand aan de achterkant
van het fornuis aan. (afb. 1)
2. Bevestig de achterwand aan de muur
met 4 pluggen (max. ø kop schroef 12
mm.) (afb. 2)
2

KIT1-TR
Reiniging
Maak geen gebruik van stoom, ruwe of
schurende materialen, metalen schrapers of
schoonmaakmiddelen met chloor,
ammoniak of bleekmiddel.
1. Giet het product op een zachte doek en
haal hem over de oppervlakken.
Gebruik eventueel heel voorzichtig
houten of plastic gerei.
2. Spoel zorgvuldig, en droog met een
zachte doek of met een microvezeldoek.
Instrucciones de montaje
Antes de instalar el respaldo, quitar el
posible soporte instalado en el aparato
(véase manual del aparato).
1. Colocar el respaldo en el lado trasero
de la cocina. (fig. 1)
2. Fijar el respaldo a la pared con 4 tacos
(ø máx. cabeza tornillo 12 mm.) (fig. 2)
Limpieza
No utilizar chorros de vapor, materiales
ásperos o abrasivos, rascadores metálicos,
productos para la limpieza que contengan
cloro, amoniaco o lejía.
1. Verter el producto sobre un paño
húmedo y pasarlo por la superficie,
eventualmente utilizar con mucho
cuidado utensilios de madera o de
material plástico.
2. Enjuagar cuidadosamente y secar con
un trapo suave o con un paño de
microfibra.
Instruções de montagem
Antes de instalar o encosto, retire o
eventual friso instalado no aparelho (ver
manual do aparelho).
1. Colo o encosto ao lado posterior do
fogão. (fig. 1)
2. Fixe o encosto à parede com 4 buchas
(ø máx da cabeça do parafuso 12 mm.)
(fig. 2)
Limpeza
Não utilize jatos de vapor, materiais
ásperos ou abrasivos, raspadores
metálicos, produtos para a limpeza que
contêm cloro, amoníaco ou lixívia.
1. Deite o produto num pano húmido e
passe sobre a superfície, utilize com
muita cautela utensílios de madeira ou
de material em plástico.
2. Enxagúe muito bem e seque com um
pano macio ou com um pano em
microfibra.
Monteringsanvisningar
Innan man installerar det bakre skyddet ska
man avlägsna listen om en sådan finns
installerad på apparaten (se apparatens
manual).
1. Placera det bakre skyddet vid spisens
baksida. (fig. 1)
2. Fixera det bakre skyddet vid väggen
med hjälp av 4 pluggar (ø max huvud
skruv 12 mm). (fig. 2)
3

KIT1-TR
Rengöring
Rengör inte med ångstrålar och använd inte
redskap som är skrovliga eller slipande,
skrapor i metall eller rengöringsmedel som
innehåller klor, ammoniak eller blekmedel.
1. Häll ut medlet på en fuktig trasa och
torka av ytan. Vid behov kan man med
stor försiktighet använda redskap i trä
eller plast.
2. Skölj omsorgsfullt och eftertorka med en
mjuk trasa eller en mikrofibertrasa.
Инструкции по монтажу
Перед установкой задней панели снять
(при наличии) монтированную на
приборе планку (см. руководство к
прибору).
1. Расположить заднюю панель на
задней стороне плиты. (рисунок 1)
2. Закрепить заднюю панель к стене 4
шурупами с дюбелями (максимальный
диаметр головки шурупов 12 мм).
(рисунок 2)
Чистка
2. Тщательно прополоскать и протереть
насухо мягкой тканью или салфеткой
из микрофибры.
Monteringsvejledning
Før bagstykket monteres, skal man fjerne
eventuelle kantlister monteret på apparatet
(se apparatets manual).
1. Placér bagstykket på bagsiden af
komfuret. (fig. 1)
2. Fastgør bagstykket til muren med 4
rawlplugs (maks. ø for skruehoved er 12
mm) (fig. 2)
Rengøring
Brug ikke dampstråler, ru eller slibende
materialer, metalskrabere, rengøringsmidler
der indeholder klor, ammoniak eller
blegemiddel.
1. Hæld produktet på en fugtig klud og tør
overfladerne af; anvend eventuelt træeller plasticredskaber meget forsigtigt.
2. Skyl grundigt, og tør efter med en blød
klud eller med en mikrofiberklud.
Не использовать для чистки потоки пара,
грубые или абразивные материалы,
металлические скребки, чистящие
средства, содержащие хлор,
нашатырный спирт или отбеливающие
средства.
1. Смочить чистящим средством
влажную тряпку и протереть
поверхность панели, при
необходимости с большой
осторожностью использовать
деревянные или пластмассовые
инструменты.
4
 Loading...