Smeg HMF01RDEU User Manual [ru]

MANUALE D’USO

<![if ! IE]>

<![endif]>IT

SBATTITORE ELETTRICO


USER MANUAL


<![if ! IE]>

<![endif]>EN

HAND MIXER


MANUEL DE L’UTILISATEUR


<![if ! IE]>

<![endif]>FR

BATTEUR


GEBRAUCHSANLEITUNG


<![if ! IE]>

<![endif]>DE

HANDRÜHRGERÄT


GEBRUIKSAANWIJZING


<![if ! IE]>

<![endif]>NL

MIXER


MANUAL DE USO


<![if ! IE]>

<![endif]>ES

BATIDORA


MANUAL DE USO


<![if ! IE]>

<![endif]>PT

BATEDEIRA


BRUKSANVISNING


<![if ! IE]>

<![endif]>SV

MIXER


РУКОВОДСТВО ПО ЭКСПЛУАТАЦИИ

<![if ! IE]>

<![endif]>RU

МИКСЕР


BRUGSANVISNING


<![if ! IE]>

<![endif]>DA

HÅNDMIKSER


INSTRUKCJA OBSŁUGI


<![if ! IE]>

<![endif]>PL

MIKSER


KÄYTTÖOHJE


<![if ! IE]>

<![endif]>FI

SÄHKÖVATKAIN


BRUKSANVISNING


<![if ! IE]>

<![endif]>NO

VISP


مادختسلاا بيتك


<![if ! IE]>

<![endif]>AR

برضم


Consigliamo di leggere attentamente questo manuale, che riporta tutte le indicazioni per mantenere inalterate le qualità estetiche e funzionali dell’apparecchio acquistato.

Per ulteriori informazioni sul prodotto: www.smeg.com

We advise you to read this manual carefully, as it contains all the instructions for managing the appliance’s aesthetic and functional qualities.

For further information on the product: www.smeg.com

Nous conseillons de lire attentivement ce manuel, qui comprend toutes les indications pour maintenir inaltérées les qualités esthétiques et fonctionnelles de l’appareil acheté.

Pour obtenir des informations supplémentaires sur le produit : www.smeg.com

Wir empfehlen, diese Bedienungsanleitung, die sämtliche Anweisungen enthält, um das Aussehen und die Funktionsfähigkeit des Geräts zu erhalten, sorgfältig zu lesen.

Für weitere Informationen über das Produkt wird auf www.smeg.com verwiesen

We adviseren om deze handleiding aandachtig door te lezen. Ze bevat aanwijzingen die nodig zijn om de esthetische en functionele eigenschappen van het gekochte apparaat intact te houden.

Bezoek voor meer informatie over het product: www.smeg.com

Aconsejamos leer atentamente este manual que contienen todas las indicaciones para mantener inalterada la calidad estética y funcional del aparato adquirido.

Más información sobre el producto en: www.smeg.com

Aconselhamos que leia atentamente este manual, que refere todas as indicações para manter inalteradas as qualidades estéticas e funcionais do aparelho comprado.

Para mais informações sobre o produto: www.smeg.com

Vi rekommenderar att ni noga läser denna handbok som anger alla de nödvändiga anvisningarna för att bibehålla den inköpta apparatens utseende och funktioner.

För mer information om produkten: www.smeg.com

Мырекомендуемвамвнимательнопрочитатьданноеруководство,вкоторомприводятсявсеуказания,необходимые для поддержания неизменными эстетических и функциональных свойств приобретенного прибора. Дополнительную информацию об изделии можно получить на сайте: www.smeg.com

Vi anbefaler, at du nøje læser denne vejledning, som indeholder alle anvisninger til at holde det købte apparat i perfekt funktionsmæssig og æstetisk stand.

For yderligere informationer om produktet: www.smeg.com

Zalecamy uważne przeczytanie niniejszej instrukcji, która zawiera wszystkie wskazania dla utrzymania jakości estetyki i funkcjonalności zakupionego urządzenia.

Dalsze informacje dotyczące produktu znajdują się na stronie: www.smeg.com

Lue tämä käyttöopas huolellisesti. Ohjeita noudattamalla taataan laitteen oikeaoppinen ylläpito ja sen ominaisuuksien säilyvyys. Tuotteeseen liittyvät lisätiedot löytyvät osoitteesta www.smeg.com

Vi anbefaler at du leser denne brukerveiledningen grundig, da den inneholder alle indikasjoner for å bevare de estetiske og funksjonenelle kvalitetene til produktet du har kjent.

For ytterligere informasjon om produktet: www.smeg.com

ش ت

.هئا ب تمق يذلا جتنملل ةيفيظولاو ةيلامجلا صئاصخلا لىع ظافحلا نمضت لا تاميلعتلا عيمج مضي ثيح ةيانعب بيتكلا اذه ةءارقب حصنن

ي

www.smeg.com ةرايز ءاجرب جتنَملاُ نع تامولعملا نم ديزملل

Smeg HMF01RDEU User Manual

“A”


2

4


4a

4b

3

5

6


6


1


12

13


10

9

220-240V~ 50/60Hz


8


7

250 W


“B”

A


“C”


11


3


B


B A

11

Informazioni importanti per l’utente / Important information for the user Informations importantes pour l’utilisateur / Wichtige Informationen für den Benutzer Belangrijke informatie voor de gebruiker / Información importante para el usuario Informações importantes para o utilizador / Viktig information för användaren

Важная информация для пользователя / Vigtig information til brugeren

Ważne informacje dla użytkownika / Tärkeitä tietoja käyttäjälle Viktig informasjon for brukere / مدختسملل ةماه تامولعم

Avvertenze / Instructions / Avertissements / Hinweise / Waarschuwingen / Advertencias / Advertências / Varningar / Меры предосторожности / Advarsler / Ostrzeżenia / Varoitukset / Advarsler / تاريذحت

Informazioni generali su questo manuale d’uso, di sicurezza e per lo smaltimento finale / General information on this user manual, on safety and final disposal / Informations générales sur ce manuel d’utilisation, sur la sécurité et sur l’élimination définitive de l’appareil / Allgemeine Informationen zu dieser Gebrauchsanleitung, zur Sicherheit und die endgültige Entsorgung / Algemene informatie over deze handleiding, veiligheidsinstructies en uiteindelijke verwerking / Información general del manual relativa al uso, la seguridad y la eliminación final / Informações gerais sobre este manual do utilizador, segurança e para a eliminação final / Allmän information om denna bruksanvising, om säkerhet och för slutligt bortskaffande / Общая информация о данном руководстве по эксплуатации, безопасности и окончательной утилизации / Generelle oplysninger om denne betjeningsog sikkerhedsvejledning samt endelig bortskaffelse / Ogólne informacje dotyczące użytkowania, bezpieczeństwa i utylizacji / Käyttöohjetta, turvallisuutta ja käytöstä

poistoa koskevat yleistiedot / Generell informasjon om denne brukerveiledningen, sikkerhet og endelig kassering av produktet / تامولعم

ئ

ياهن لكشب زاهجلا نع صلختلا ةيفيكو همادختسا ةملاسو زاهجلا اذه مادختسا ليلد نع ةماع

Descrizione / Description / Description / Beschreibung / Beschrijving / Descripción / Descrição / Beskrivning /

Описание / Beskrivelse / Opis / Kuvaus / Beksrivelse / فصولا

Descrizione dell’apparecchio / Appliance description / Description de l’appareil / Beschreibung des Geräts / Omschrijving van het apparaat / Descripción del aparato / Descrição do aparelho / Beskrivning av apparaten / Описание прибора / Beskrivelse af apparatet / Opis urządzenia / Laitteen kuvaus / Beskrivelse av apparatet / زاهجلا فصو

Uso / Use / Utilisation / Gebrauch / Gebruik / Uso / Utilização / Användning / Использование / Anvendelse /

Użytkowanie / Käyttö / Bruk / لامعتسلاإ

Informazioni sull’uso dell’apparecchio / Information on using your appliance / Informations sur l’utilisation de l’appareil / Informationen zum Gebrauch des Geräts / Informatie over het gebruik van het apparaat / Información sobre el uso del aparato / Informações sobre a utilização do aparelho / Information om användning av apparaten / Информация об использовании прибора / Oplysninger om brug af apparatet / Informacje dotyczące użytkowania urządzenia / Laitteistoa koskevat käyttöohjeet / Informasjon om bruken av apparatet / زاهجلا مداختسا نع تامولعم

Pulizia e manutenzione / Cleaning and care / Nettoyage et entretien / Reinigung und Wartung / Reiniging en onderhoud / Limpieza y mantenimiento / Limpeza e manutenção / Rengöring och underhåll /

Чистка и техническое обслуживание / Rengøring og vedligeholdelse / Czyszczenie i konserwacja / Puhdistus ja hoito / Rengjøring og vedlikehold / ةنايصلا و فيظنتلا

Informazioni per la corretta pulizia e manutenzione dell’apparecchio / Information for proper cleaning and maintenance of the appliance/ Informations pour un nettoyage et un entretien corrects de l’appareil / Informationen zur ordnungsgemäßen Reinigung und Wartung des Geräts / Informatie voor de juiste wijze van reiniging en onderhoud van het apparaat / Información sobre la limpieza y el mantenimiento correctos del aparato / Informações para a limpeza e manutenção corretas do aparelho / Information för korrekt rengöring och underhåll av apparaten / Информация по корректной очистке и техобслуживанию прибора / Oplysninger om korrekt rengøring og vedligeholdelse af apparatet / Informacje dotyczące prawidłowego czyszczenia i konserwacji urządzenia / Laitteiston oikeaa puhdistusta ja huoltoa koskevat tiedot / Informasjon for korrekt rengjøring og vedlikehold av apparatet / فيظنتل تامولعم

حيحص لكشب زاهجلا ةنايصو

Avvertenza di sicurezza / Safety instructions / Consignes de sécurité / Sicherheitshinweise / Veiligheidswaarschuwingen / Advertencia de seguridad / Advertências de segurança / Säkerhetsvarning /

Предупреждение о безопасности / Sikkerhedsanvisninger / Ostrzeżenie dotyczące bezpieczeństwa / Turvallisuuteen liittyvät varoitukset / Sikkerhetsadvarsler / ةملاسلل ريذحت

Informazione / Information / Information / Information / Informatie / Información / Informação / Information / Информация / Information / Informacja / Tietoa / Informasjon / تامولعم

Il costruttore si riserva di apportare senza preavviso tutte le modifiche che riterrà utili al miglioramento dei propri prodotti. Le illustrazioni e le descrizioni contenute in questo manuale non sono quindi impegnative ed hanno solo valore indicativo.

The manufacturrerr reservess the right to make anychangesdeemed ususefulforimprovementthe of itsofproductsits productswithoutwithoutprior priornotice.The. illustrationsThe ansdanddescriptionscontainedthisin thismanualarel aretherereforenotnotbindingandandarearemerelyindicative..

Le fabricant se réserve la faculté d’apporter, sans préavis, toutes les modifications qu’il jugera utiles pour l’amélioration de ses produits. Les illustrations et les descriptions figurant dans ce manuel ne sont pas contraignantes et n’ont qu’une valeur indicative.

Der Hersteller behält sich vor, ohne vorherige Benachrichtigung alle Änderungen vorzunehmen, die er zur Verbesserung seiner Produkte für nützlich erachtet. Die in diesem Handbuch enthaltenen Illustrationen und Beschreibungen sind daher unverbindlich und dienen nur zur Veranschaulichung.

De fabrikant behoudt zich het recht voor zonder waarschuwing alle wijzigingen aan te brengen die hij nodig acht om zijn producten te verbeteren. De afbeeldingen en de beschrijvingen die aanwezig zijn in deze handleiding zijn niet bindend, en hebben enkel een aanduidende waarde.

El fabricante se reserva el derecho a aportar sin aviso previo todas las modificaciones que considere útiles para la mejora de sus propios productos. Las ilustraciones y las descripciones contenidas en este manual no comprometen, por tanto, al fabricante y tienen un valor meramente indicativo.

O fabricante reserva-se o direito de efetuar, sem aviso prévio, qualquer modificação que vise o melhoramento dos respetivos produtos. As ilustrações e descrições contidas neste manual, não são, por isso, vinculativas e possuem apenas valor indicativo.

Tillverkaren förbehåller sig rätten att genomföra alla de ändringar som anses nödvändiga för att förbättra de egna produkterna utan att meddela detta i förväg. De illustrationer och beskrivningar som finns i denna bruksanvisning är vägledande och därmed inte bindande.

Производитель оставляет за собой право вносить без предупреждения все изменения, которые посчитает полезными для улучшения собственной продукции. Рисунки и описания, содержащиеся в данном Руководстве по эксплуатации, не имеют обязательств и имеют ознакомительный характер.

Producenten forbeholder sig retten til at foretage eventuelle ændringer, der anses for at være en forbedring af det oprindelige produkt, uden forudgående varsel. Illustrationer og beskrivelser i denne betjeningsvejledning er derfor ikke bindende og kun vejledende.

Producent zastrzega sobie prawo do nanoszenia, bez uprzedniego powiadomienia, wszelkich zmian, które uzna za przydatne w celu ulepszania swoich produktów. Rysunki i opisy zawarte w niniejszej instrukcji nie są zobowiązujące i mają charakter poglądowy.

Valmistaja pidättää itsellään oikeuden tehdä ohjeisiin mielestään tarpeellisia muutoksia ilman ennakkoilmoitusta. Tässä oppaassa olevat kuvat ja piirrokset eivät näin ollen ole sitovia, vaan ne annetaan vain viitteellisessä mielessä.

Produsenten forbeholder seg rett til endringer på sine produkter grunnet tekniske fremskritt, uten forutgående varsel. Illustrasjonene og beskrivelsene i denne bruksanvisningen er derfor ikke bindende og skal kun betraktes som retningsgivende.

فاصولأاوةيحيضوتلاموسرلاربتعتلا،كلذلو.قبسمراذنإنوداهتاجتنمنيسحتلةبسانماهارتيتلاتلايدعتلاعيمجبمايقلايفقحلاباهسفنلعينصتلاةهجظفتحت“ ”طقفةيداشرإةميقتاذامنإوةمزلمُليلدلااذهيفةدراولا

Suggerimento / Advice / Conseil / Empfehlungen / Aanbeveling / Sugerencia / Sugestões / Råd /

Рекомендация / Forslag / Porada / Neuvo / Forslag / ت

تاحا قا

<![if ! IE]>

<![endif]>IT

Gentile Cliente,

La ringraziamo vivamente per aver acquistato lo Sbattitore elettrico della Linea Smeg.

Scegliendo un nostro prodotto, Lei ha optato per soluzioni in cui la ricerca estetica e una progettazione tecnica innovativa offrono oggetti unici che diventano elementi d’arredo.

Un elettrodomestico Smeg, infatti, si coordina sempre perfettamente con altri prodotti in gamma e, nel contempo, può costituire un oggetto di design per la cucina.

AugurandoLe di apprezzare appieno le funzionalità del Suo elettrodomestico, Le porgiamo i nostri più cordiali saluti.

SMEG S.p.A.

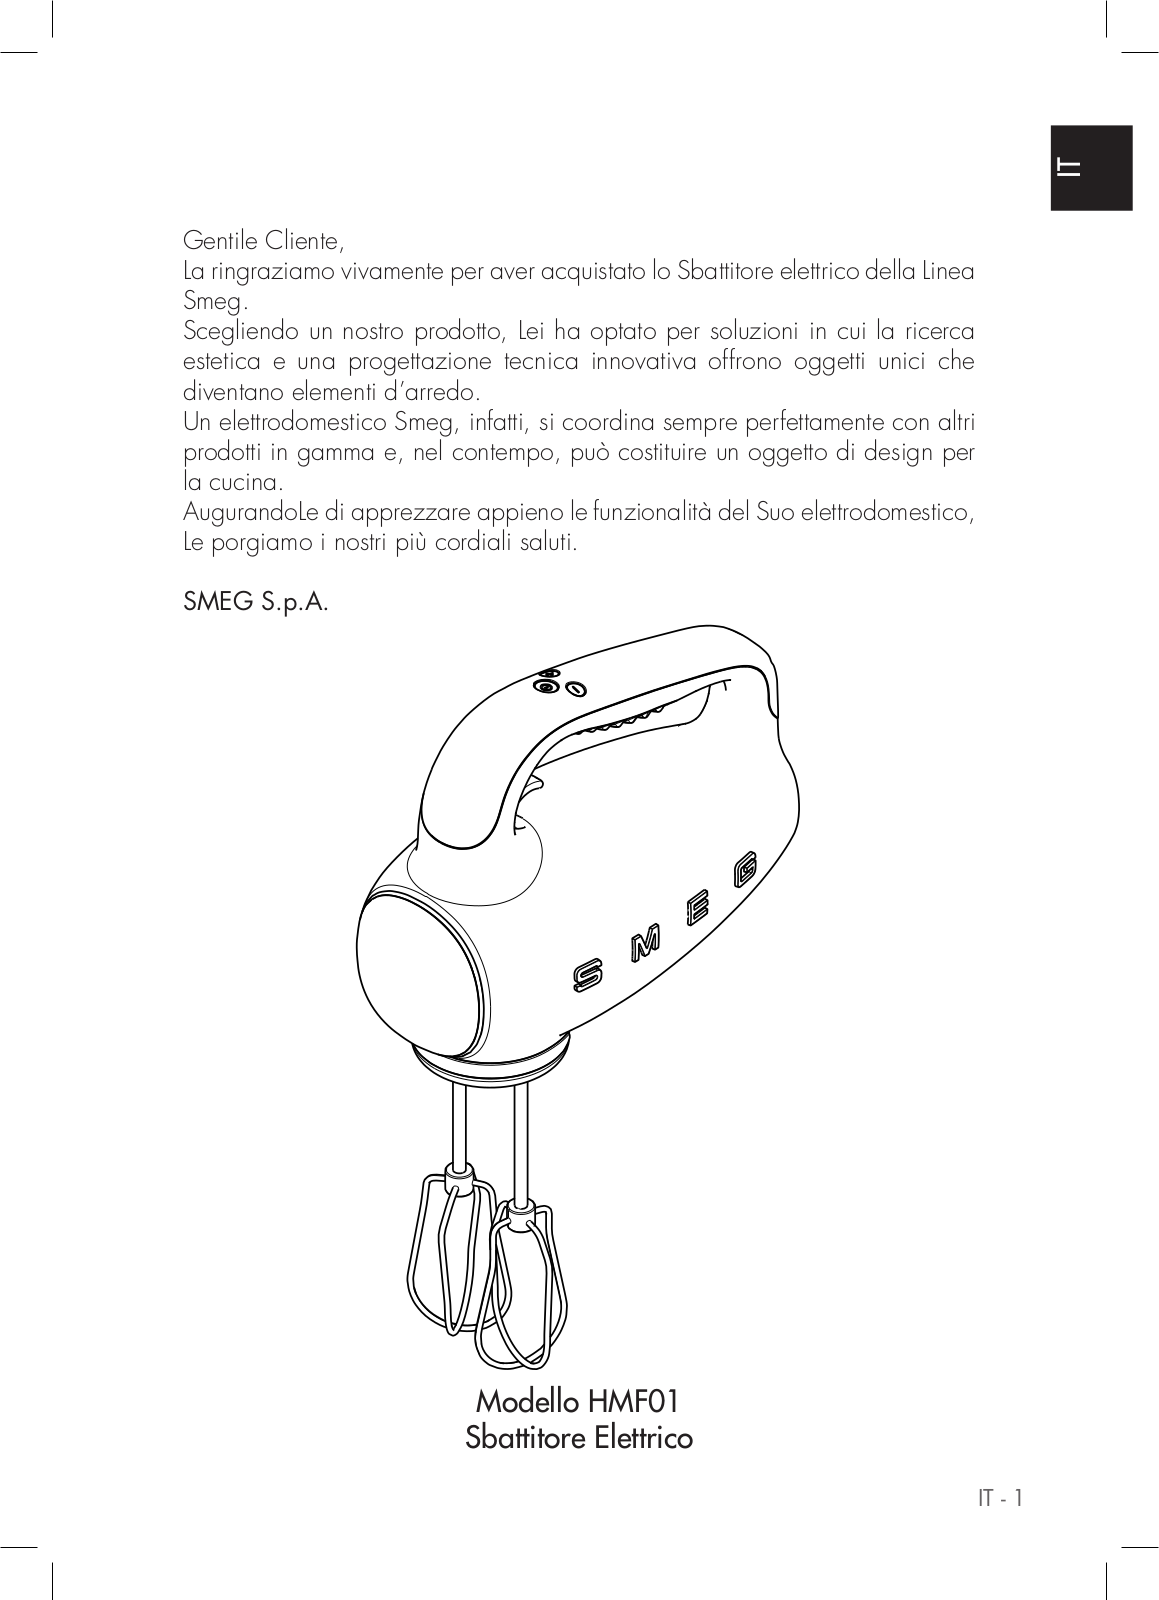
Modello HMF01

Sbattitore Elettrico

IT - 1

Avvertenze

SICUREZZA

Avvertenze fondamentali per la sicurezza.

Seguire tutte le istruzioni di sicurezza per poter utilizzare l’apparecchio in sicurezza:

Non toccare la spina con le mani bagnate.

Assicurarsi che la presa di corrente utilizzata sia sempre accessibile, per poter staccare la spina all’occorrenza.

Non tirare mai il cavo perché potrebbe danneggiarsi.

In caso di guasti all’apparecchio, non tentare di ripararlo.

Spegnere l’apparecchio, staccare la spina dalla presa e rivolgersi all’Assistenza Tecnica.

In caso di danni alla spina o al cavo di alimentazione, farli sostituire esclusivamente dall’Assistenza Tecnica, in modo da prevenire ogni rischio.

Non immergere l’apparecchio nell’acqua.

Attenzione: prima della pulizia scollegare la spina.

Non fare penzolare il cavo di alimentazione dall’orlo del tavolo o altro piano, né farlo toccare con superfici calde.

Conservare il materiale dell’imballaggio (sacchetti di plastica) fuori dalla portata dei bambini.

Gli apparecchi possono essere utilizzati da persone con ridotte capacità fisiche, sensoriali o mentali o mancanza di esperienza e conoscenza se sono sottoposti a supervisione o istruzione sull’uso dell’apparecchio in modo sicuro e se comprendono i pericoli riguardanti l’uso dell’apparecchio.

I bambini devono essere sorvegliati per assicurarsi che non giochino con l’apparecchio.

IT - 2

Non sistemare l’apparecchio sopra o in prossimità di fornelli elettrici o a gas, o in un forno riscaldato.

Verificare che all’interno dell’apparecchio non ci siano oggetti estranei.

Con miscele dense, per evitare surriscaldamenti, non utilizzare continuamente la miscelazione con i ganci impastatori per più di 4 minuti. Lasciare raffreddare l’apparecchio per 10 minuti prima di iniziare un’ulteriore lavorazione.

Spegnere l’apparecchio e scollegarlo dall’a- limentazione prima di toccare le parti che si muovono durante l’uso.

Non ostruire le fessure di ventilazione o di smaltimento calore.

Immergere le fruste nel recipiente con gli alimenti prima di avviare l’apparecchio.

Collegamento dell’apparecchio

Assicurarsi che la tensione e la frequenza della rete elettrica corrispondano a quelle indicate nella targa dati sul fondo dell’apparecchio.

In caso di incompatibilità tra la presa e la spina dell’apparecchio, contattare il servizio di assistenza tecnica per la loro sostituzione.

Questo apparecchio non deve essere utilizzato da bambini. Tenere l’apparecchio e il suo cavo fuori dalla portata dei bambini.

I bambini non devono giocare con l’apparecchio.

Scollegare sempre l’apparecchiatura dalla rete elettrica se lasciata incustodita e prima del montaggio, smontaggio o pulizia.

Spegnere l’apparecchio e scollegarlo dall’alimentazione prima di cambiare gli accessori o avvicinarsi alle parti in movimento durante l’uso.

Avvertenze

Uso conforme alla destinazione

Non utilizzare l’apparecchio per altri scopi che non siano quelli per il quale è stato concepito. Lo sbattitore è destinato esclusivamente per miscelare, impastare, montare a neve uova o panna.

L’apparecchio è destinato a essere utilizzato in applicazioni domestiche e similari, quali:

-nella zona cucina per il personale in negozi, negli uffici e in altri ambienti lavorativi;

-nei bed and breakfast e agriturismi;

-da clienti in alberghi, motel e ambienti residenziali.

Altri utilizzi, come in ristoranti, bar e caffetterie, sono impropri.

Responsabilità del costruttore

Il costruttore declina ogni responsabilità per danni subiti da persone e cose causati da:

uso dell’apparecchio diverso da quello previsto;

mancanza di lettura del manuale d’uso;

manomissione anche di una singola parte dell’apparecchio;

utilizzo di ricambi non originali;

inosservanza delle avvertenze di sicurezza.

Conservare accuratamente queste istruzioni. Qualora l’apparecchio venga ceduto ad altre persone, consegnare loro anche queste istruzioni per l’uso.

Queste istruzioni possono essere scaricate dal sito Web Smeg “www.smeg.com”.

SMALTIMENTO

Gli apparecchi elettrici non devono essere smaltiti assieme ai rifiuti domestici.

Gli apparecchi che recano questo simbolo

sono soggetti alla Direttiva europea 2012/19/ UE. Tutti gli apparecchi elettrici ed elettronici dismessi devono essere smaltiti separatamente dai rifiuti domestici, conferendoli agli appositi centri previsti dallo Stato. Smaltendo correttamente l’apparecchio dismesso, si eviteranno danni all’ambiente e rischi per la salute delle persone. Per ulteriori informazioni sullo smaltimento dell’apparecchio dismesso rivolgersi all’Amministrazione comunale, all’Ufficio smaltimento o al negozio dove è stato acquistato l’apparecchio.

<![if ! IE]>

<![endif]>IT

IT - 3

Descrizione / Montaggio / Comandi

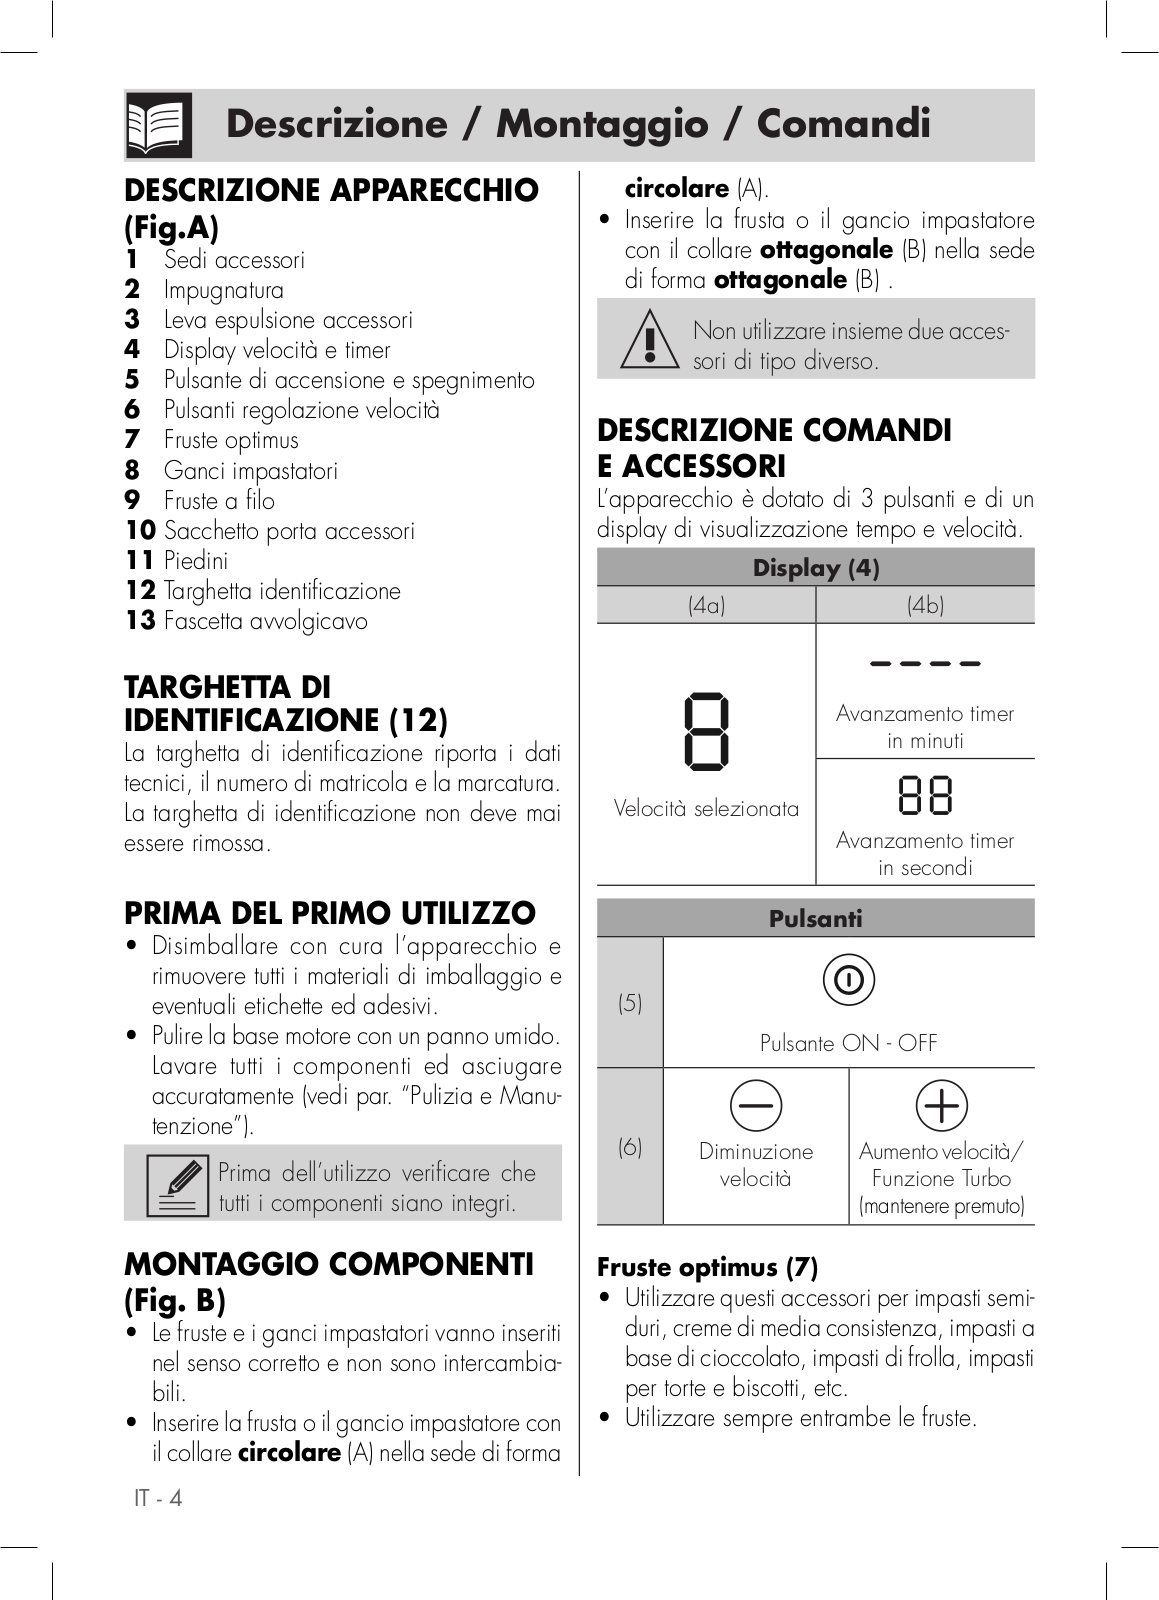
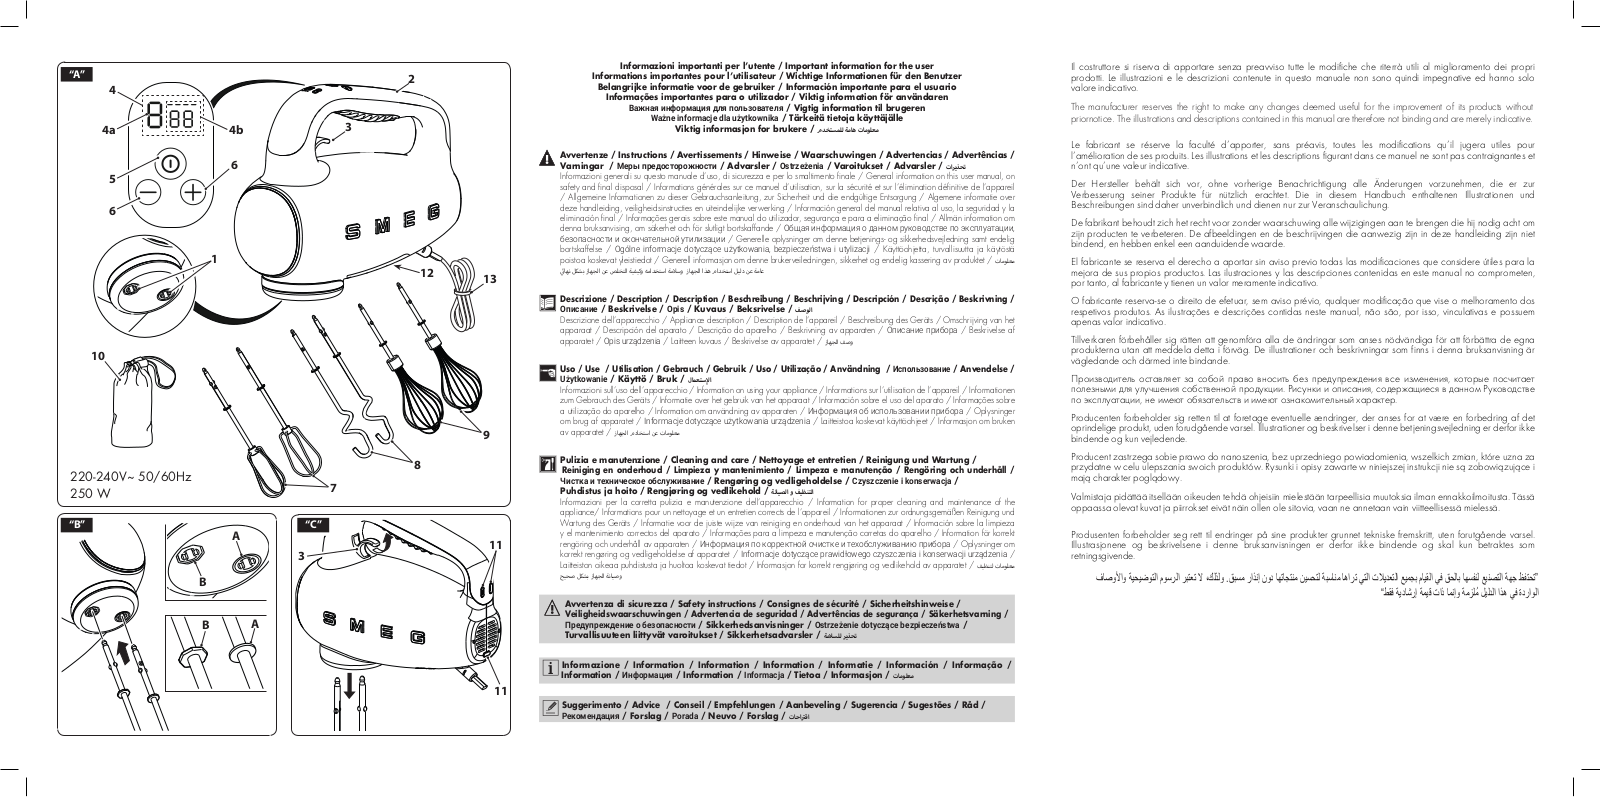
DESCRIZIONE APPARECCHIO (Fig.A)

1Sedi accessori

2Impugnatura

3Leva espulsione accessori

4Display velocità e timer

5Pulsante di accensione e spegnimento

6Pulsanti regolazione velocità

7Fruste optimus

8Ganci impastatori

9Fruste a filo

10Sacchetto porta accessori

11Piedini

12Targhetta identificazione

13Fascetta avvolgicavo

TARGHETTA DI IDENTIFICAZIONE (12)

La targhetta di identificazione riporta i dati tecnici, il numero di matricola e la marcatura. La targhetta di identificazione non deve mai essere rimossa.

PRIMA DEL PRIMO UTILIZZO

Disimballare con cura l’apparecchio e rimuovere tutti i materiali di imballaggio e eventuali etichette ed adesivi.

Pulire la base motore con un panno umido. Lavare tutti i componenti ed asciugare accuratamente (vedi par. “Pulizia e Manutenzione”).

Prima dell’utilizzo verificare che tutti i componenti siano integri.

MONTAGGIO COMPONENTI

(Fig. B)

Le fruste e i ganci impastatori vanno inseriti nel senso corretto e non sono intercambiabili.

Inserire la frusta o il gancio impastatore con il collare circolare (A) nella sede di forma

IT - 4

circolare (A).

Inserire la frusta o il gancio impastatore con il collare ottagonale (B) nella sede di forma ottagonale (B) .

Non utilizzare insieme due accessori di tipo diverso.

DESCRIZIONE COMANDI E ACCESSORI

L’apparecchio è dotato di 3 pulsanti e di un display di visualizzazione tempo e velocità.


Display (4)

(4a)

(4b)

Avanzamento timer in minuti

Velocità selezionata

Avanzamento timer in secondi

Pulsanti

(5) Pulsante ON - OFF

(6)


Diminuzione


Aumento velocità/


velocità

Funzione Turbo


(mantenere premuto)

Fruste optimus (7)

Utilizzare questi accessori per impasti semiduri, creme di media consistenza, impasti a base di cioccolato, impasti di frolla, impasti per torte e biscotti, etc.

Utilizzare sempre entrambe le fruste.

Uso

Ganci impastatori (8)

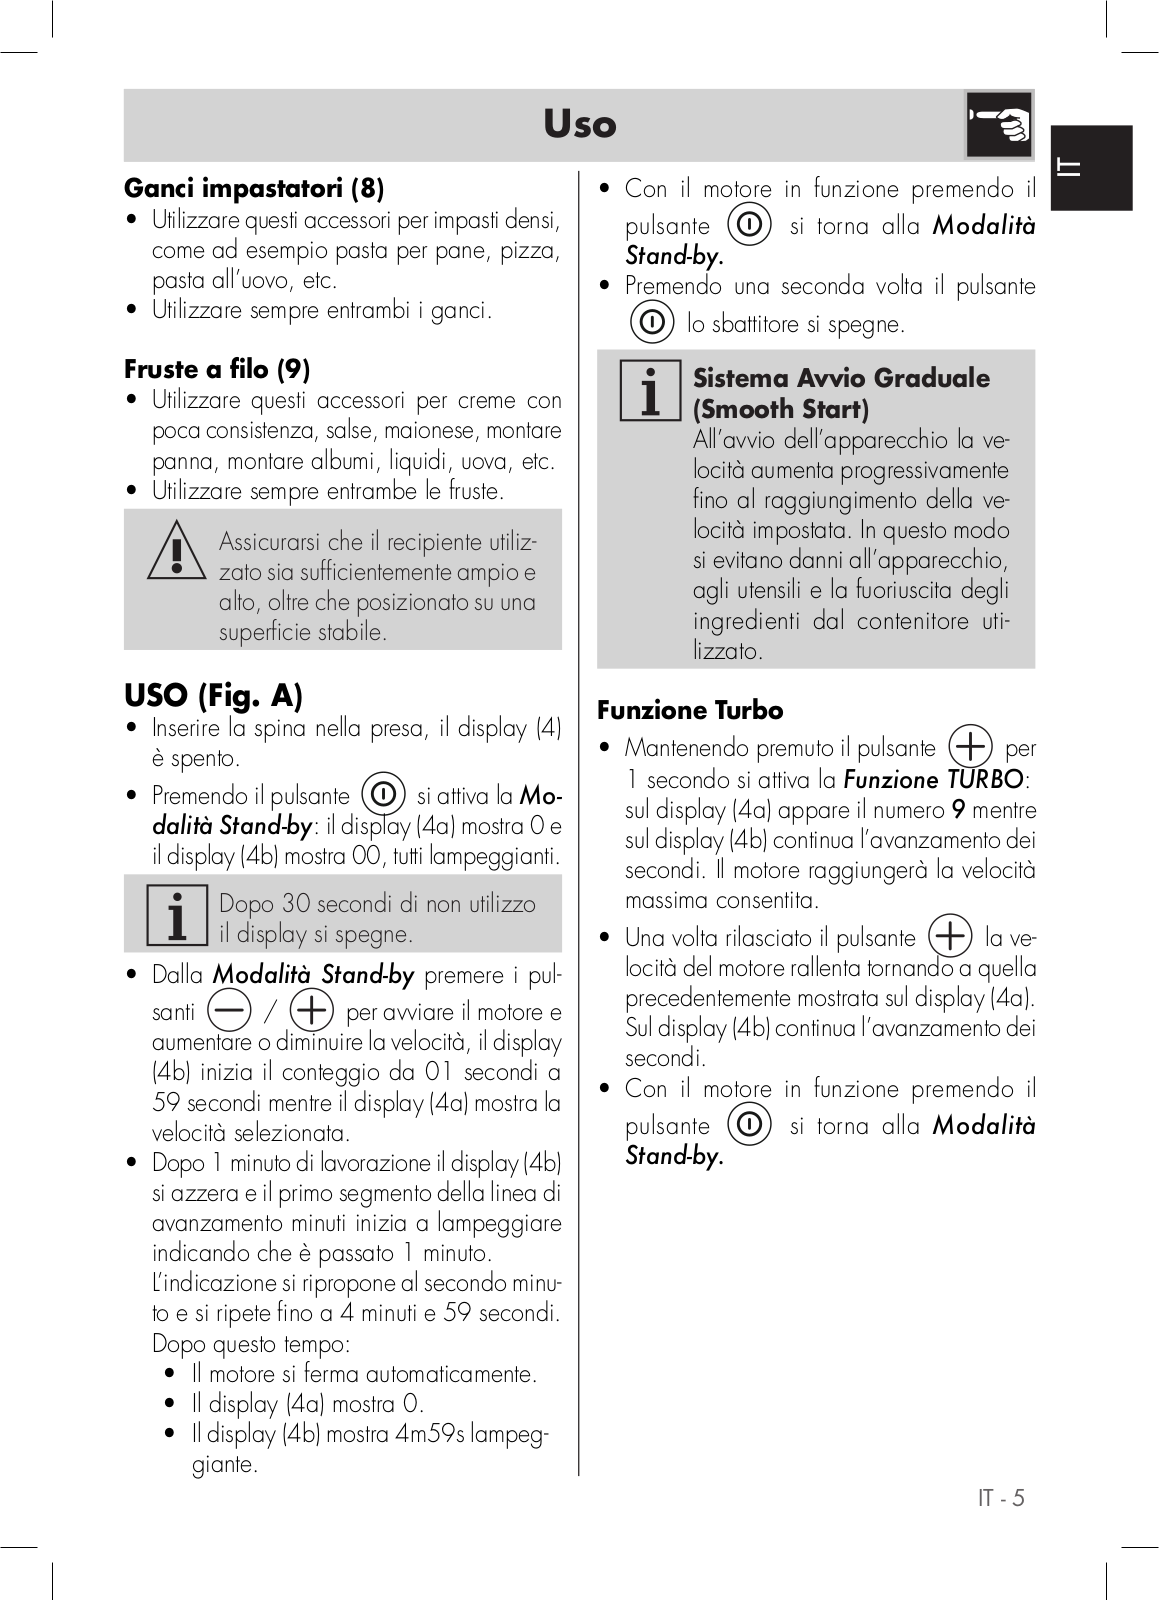
Utilizzare questi accessori per impasti densi, come ad esempio pasta per pane, pizza, pasta all’uovo, etc.

Utilizzare sempre entrambi i ganci.

Fruste a filo (9)

Utilizzare questi accessori per creme con poca consistenza, salse, maionese, montare panna, montare albumi, liquidi, uova, etc.

Utilizzare sempre entrambe le fruste.

Assicurarsi che il recipiente utilizzato sia sufficientemente ampio e alto, oltre che posizionato su una superficie stabile.

USO (Fig. A)

Inserire la spina nella presa, il display (4) è spento.

Premendo il pulsante


si attiva la Mo-


dalità Stand-by: il display (4a) mostra 0 e


il display (4b) mostra 00, tutti lampeggianti.


Dopo 30 secondi di non utilizzo


il display si spegne.


Dalla Modalità Stand-by premere i pul-


santi


/


per avviare il motore e


aumentare o diminuire la velocità, il display


(4b) inizia il conteggio da 01 secondi a


59 secondi mentre il display (4a) mostra la


velocità selezionata.


Dopo 1 minuto di lavorazione il display (4b) si azzera e il primo segmento della linea di avanzamento minuti inizia a lampeggiare indicando che è passato 1 minuto.

L’indicazione si ripropone al secondo minuto e si ripete fino a 4 minuti e 59 secondi. Dopo questo tempo:

Il motore si ferma automaticamente.

Il display (4a) mostra 0.

Il display (4b) mostra 4m59s lampeggiante.

• Con il motore in funzione premendo il

pulsante

si torna alla Modalità

Stand-by.


Premendo una seconda volta il pulsante

lo sbattitore si spegne.

Sistema Avvio Graduale (Smooth Start)

All’avvio dell’apparecchio la velocità aumenta progressivamente fino al raggiungimento della velocità impostata. In questo modo si evitano danni all’apparecchio, agli utensili e la fuoriuscita degli ingredienti dal contenitore utilizzato.

Funzione Turbo


• Mantenendo premuto il pulsante

per

1 secondo si attiva la Funzione TURBO: sul display (4a) appare il numero 9 mentre sul display (4b) continua l’avanzamento dei secondi. Il motore raggiungerà la velocità massima consentita.

Una volta rilasciato il pulsante la velocità del motore rallenta tornando a quella precedentemente mostrata sul display (4a). Sul display (4b) continua l’avanzamento dei secondi.

Con il motore in funzione premendo il

pulsante

si torna alla Modalità

Stand-by.


IT - 5

<![if ! IE]>

<![endif]>IT

Suggerimenti e consigli

CONSIGLI

Attivare l’apparecchio ad una velocità bassa finché gli ingredienti non risultano mischiati per poi aumentare la velocità a seconda dell’operazione da effettuare.

Le condizioni climatiche, le differenze di temperatura stagionali, la temperatura ambiente e la consistenza degli ingredienti possono influire sul tempo di preparazione necessario e sui risultati.

Per migliori risultati con gli impasti densi, lavorarli accompagnandoli con movimenti rotatori e verificare che gli ingredienti liquidi siano almeno 50% rispetto all’impasto totale.

Posizionare il recipiente da utilizzare su di una superficie piana e ben stabile.

Durante le lavorazioni o quando non in uso, è possibile posizionare l’apparecchio sugli appositi piedini (11) (Fig.C).

Con miscele dense, come ad esempio l’impasto, non usare lo sbattitore per più di 4 minuti. Attendere 10 minuti di raffreddamento prima di eseguire una seconda lavorazione. Spegnere l’apparecchio non appena si ottiene la giusta consistenza.

L’apparecchio è dotato di un dispositivo di protezione che ne interrompe il funzionamento in caso di sovraccarico. In caso di attivazione sul display apparirà il simbolo lampeggiante; spegnere l’apparecchio, disinserire la spina dalla presa elettrica, attendere almeno 10 minuti e poi ricollegare l’alimentazione alla presa.

IT - 6

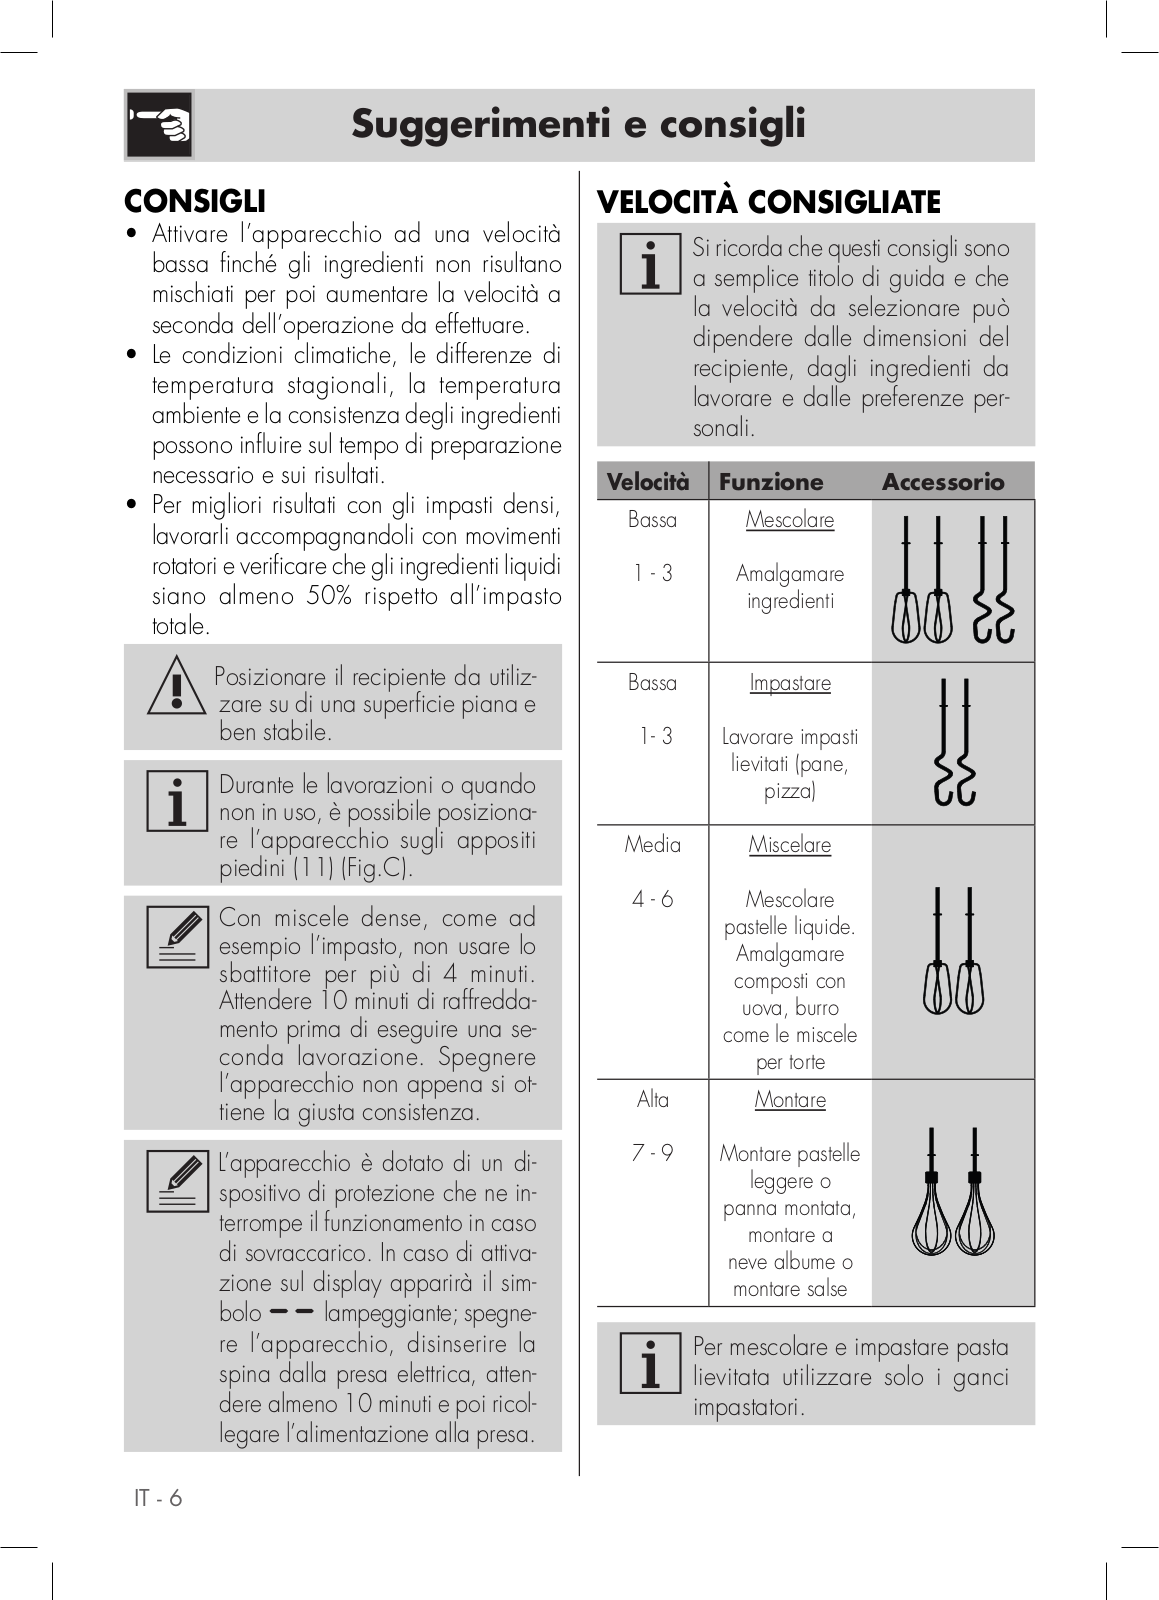
VELOCITÀ CONSIGLIATE

Si ricorda che questi consigli sono a semplice titolo di guida e che la velocità da selezionare può dipendere dalle dimensioni del recipiente, dagli ingredienti da lavorare e dalle preferenze personali.

Velocità

Funzione

Accessorio

Bassa

Mescolare


1 - 3

Amalgamare


ingredienti


Bassa

Impastare


1- 3

Lavorare impasti


lievitati (pane,


pizza)


Media

Miscelare


4 - 6

Mescolare


pastelle liquide.


Amalgamare


composti con


uova, burro


come le miscele


per torte


Alta

Montare


7 - 9

Montare pastelle


leggere o


panna montata,


montare a


neve albume o


montare salse


Per mescolare e impastare pasta lievitata utilizzare solo i ganci impastatori.

Pulizia e manutenzione

PULIZIA E MANUTENZIONE

(Fig. C)

Prima di effettuare l’operazione di pulizia, disinserire SEMPRE la spina dalla presa di corrente e lasciare raffreddare l’apparecchio. Non immergere mai la base motore (1) in acqua o altri liquidi.

Il manuale di istruzioni contiene appropriate istruzioni per la pulizia, manutenzione e operazioni raccomandate dal produttore al cliente. Qualsiasi altro intervento deve essere eseguito da un rappresentante di un servizio autorizzato.

Tirare verso l’alto la leva di espulsione accessori (3) e rimuovere gli accessori.

Le fruste e i ganci impastatori sono lavabili in lavastoviglie.

Asciugare ogni parte dell’apparecchio dopo averlo pulito.

La base motore può essere pulita utilizzando prima un panno umido e successivamente uno asciutto. Evitare l’impiego di detersivi o materiali abrasivi.

<![if ! IE]>

<![endif]>IT

IT - 7

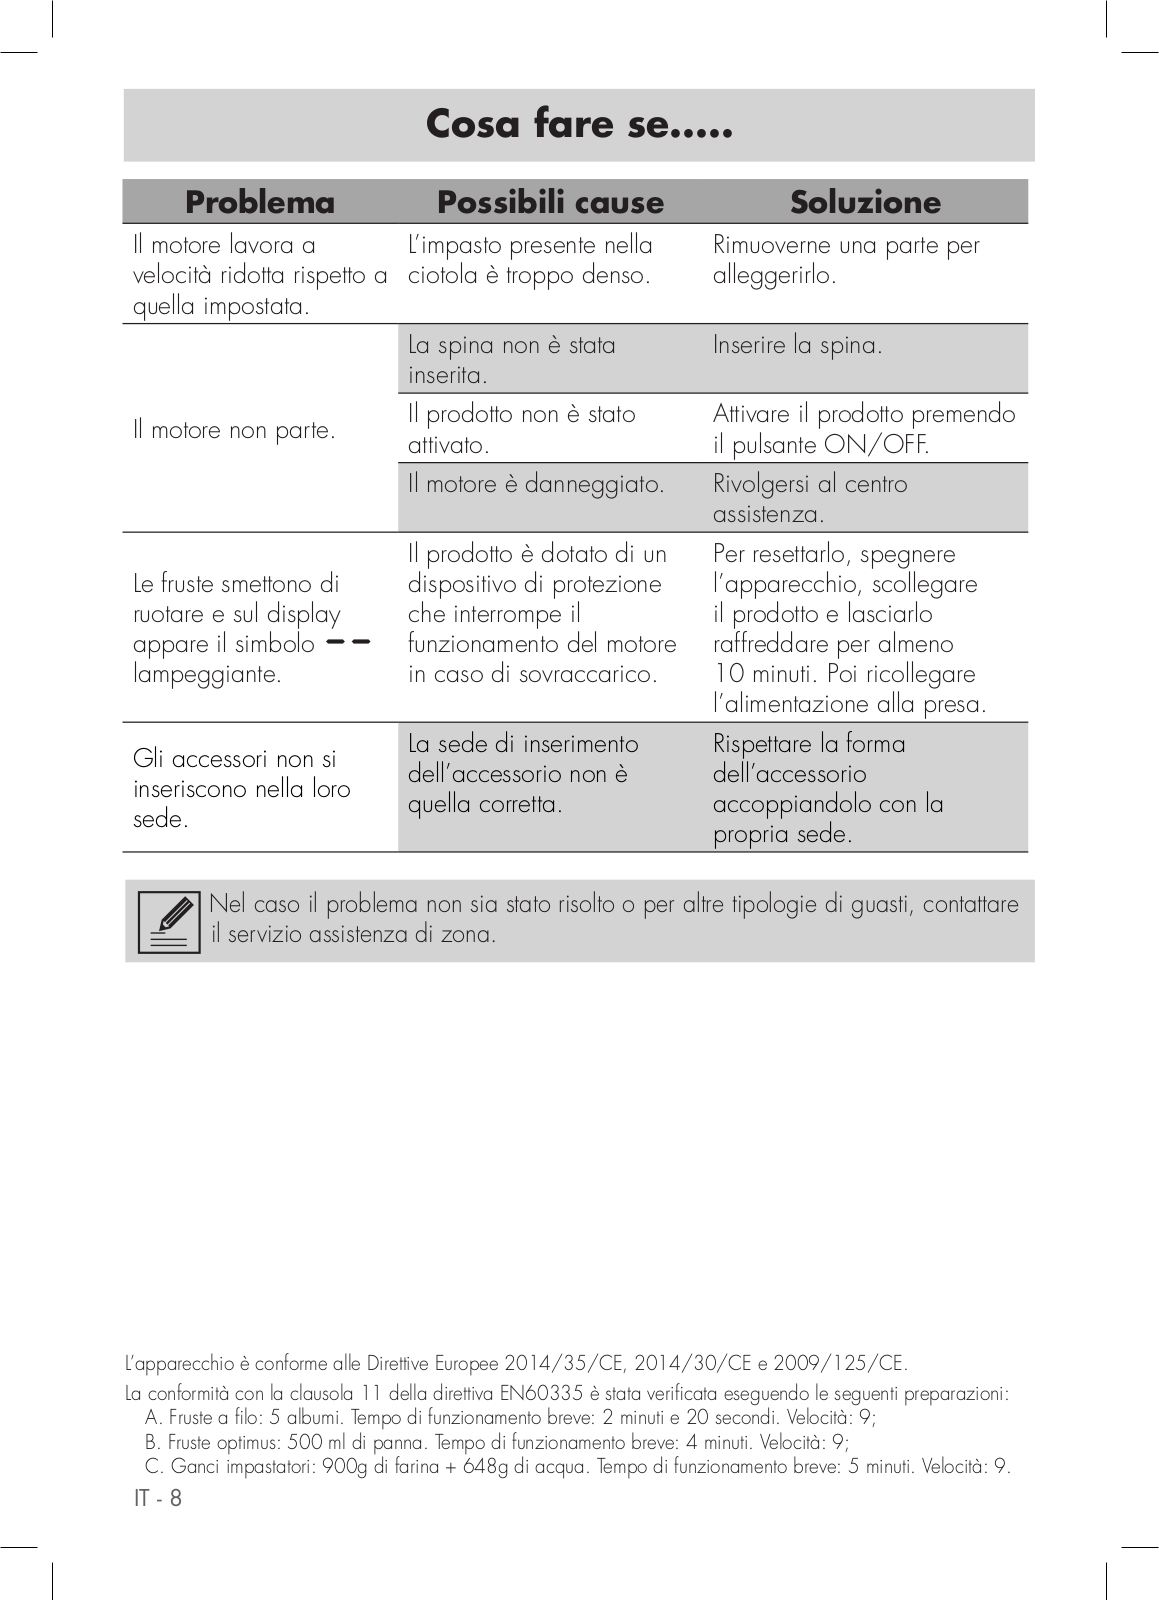
Cosa fare se.....

Problema

Possibili

cause

Soluzione

Il motore lavora a

L’impasto presente

nella

Rimuoverne una parte per

velocità ridotta rispetto a

ciotola è troppo

denso.

alleggerirlo.

quella impostata.


La spina non è

stata

Inserire la spina.


inserita.


Il motore non parte.

Il prodotto non è

stato

Attivare il prodotto premendo

attivato.


il pulsante ON/OFF.


Il motore è danneggiato.

Rivolgersi al centro


assistenza.


Il prodotto è dotato di un

Per resettarlo, spegnere

Le fruste smettono di

dispositivo di protezione

l’apparecchio, scollegare

ruotare e sul display

che interrompe il

il prodotto e lasciarlo

appare il simbolo

funzionamento del motore

raffreddare per almeno

lampeggiante.

in caso di sovraccarico.

10 minuti. Poi ricollegare


l’alimentazione alla presa.

Gli accessori non si

La sede di inserimento

Rispettare la forma

dell’accessorio non è

dell’accessorio

inseriscono nella loro

quella corretta.

accoppiandolo con la

sede.


propria sede.


Nel caso il problema non sia stato risolto o per altre tipologie di guasti, contattare il servizio assistenza di zona.

L’apparecchio è conforme alle Direttive Europee 2014/35/CE, 2014/30/CE e 2009/125/CE.

La conformità con la clausola 11 della direttiva EN60335 è stata verificata eseguendo le seguenti preparazioni:

A.Fruste a filo: 5 albumi. Tempo di funzionamento breve: 2 minuti e 20 secondi. Velocità: 9;

B.Fruste optimus: 500 ml di panna. Tempo di funzionamento breve: 4 minuti. Velocità: 9;

C.Ganci impastatori: 900g di farina + 648g di acqua. Tempo di funzionamento breve: 5 minuti. Velocità: 9.

IT - 8

Dear Customer,

Thank you very much for purchasing the Smeg Line Hand Mixer.

By choosing our product, you have opted for a solution in which aesthetics and innovative technical design offer unique objects, which become part of the furnishings.

In fact, a Smeg household appliance always co-ordinates perfectly with other products in the range and, at the same time, can become a design object for the kitchen.

We hope you fully appreciate the functionalities of your appliance. Best regards.

SMEG S.p.A.

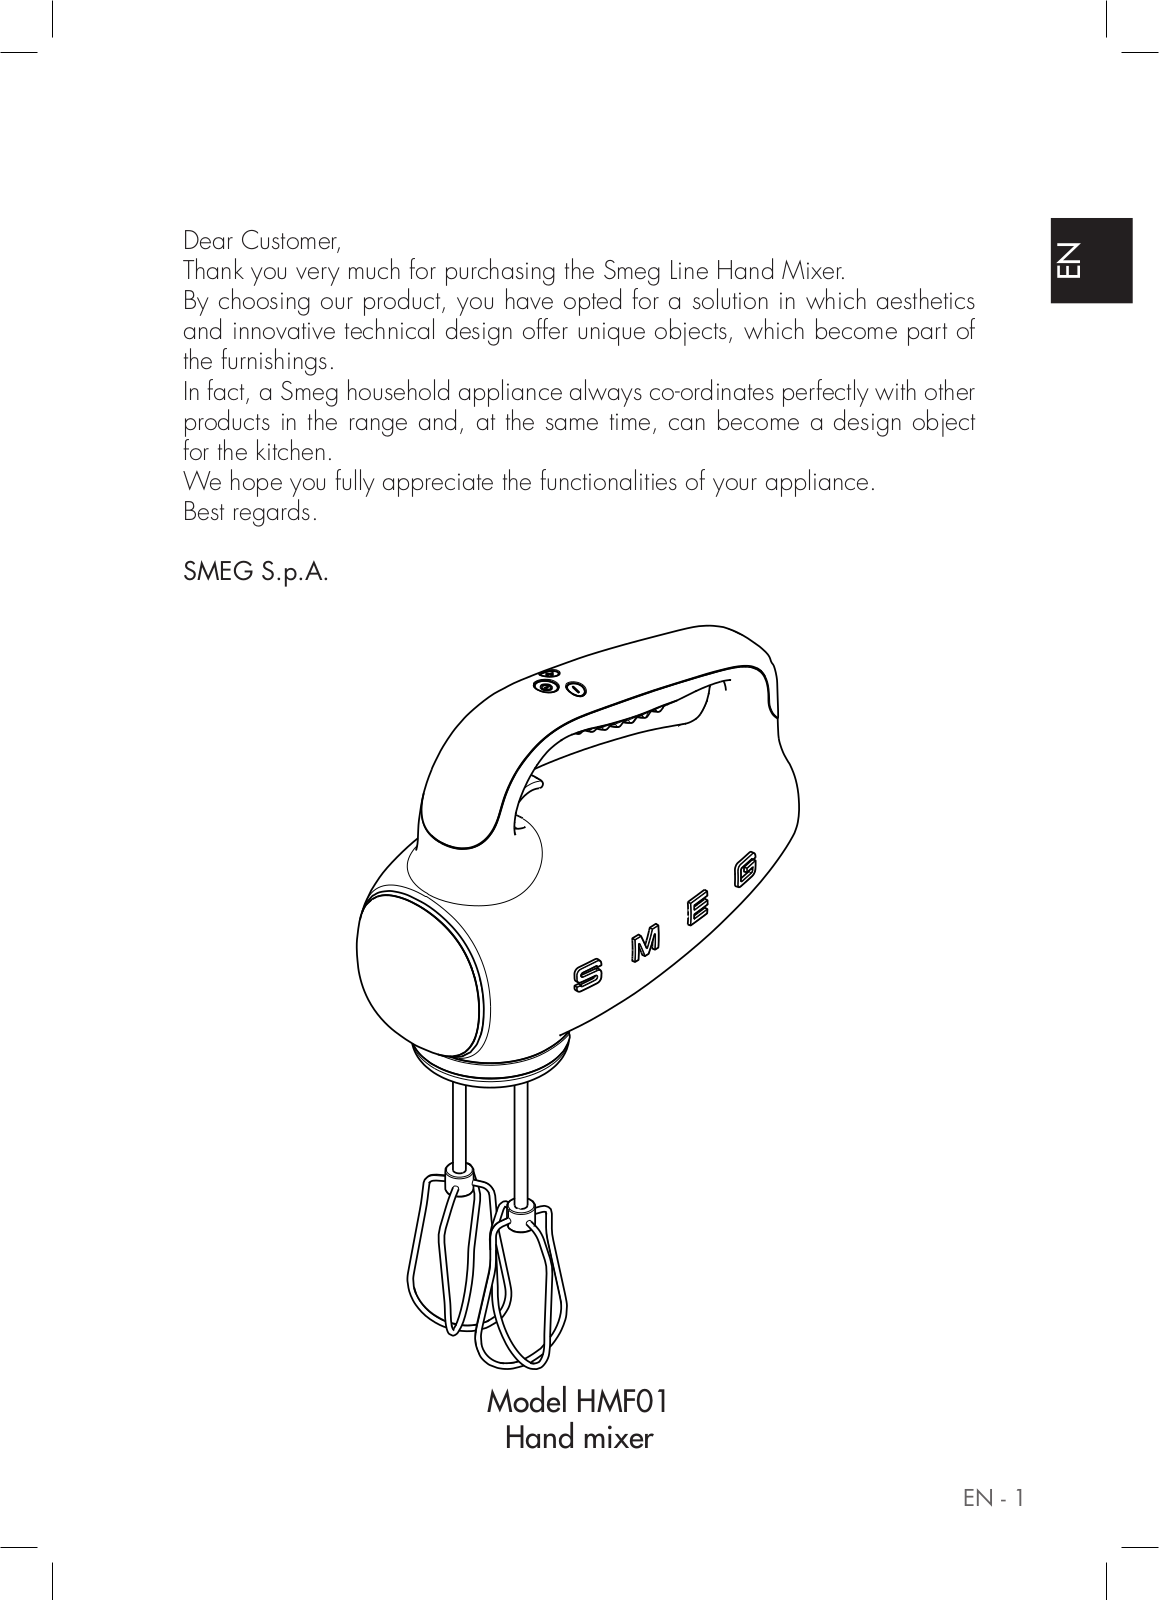
Model HMF01

Hand mixer

<![if ! IE]>

<![endif]>EN

EN - 1

Recommendations

SAFETY

Essential safety recommendations.

Follow all safety instructions in order to be able to use the appliance safely:

Do not touch the plug with wet hands.

Make sure that the power outlet used is always freely accessible, so that it can be unplugged when necessary.

Never pull the cable, it could be damaged.

If the appliance should break down, do not attempt to repair it.

Switch the appliance off, remove the plug from the power outlet and contact the Technical After-sales centre.

If the plug or power supply cable are damaged, have them replaced exclusively by the Technical After-sales centre, so as to prevent all risks.

Do not immerse the appliance in water.

Attention: disconnect the plug before cleaning.

Do not allow the power supply cable to dangle over the edge of the table or other surface or to touch hot surfaces.

Keep the packaging material (plastic bags) out of the reach of children.

Appliances can be used by persons with reduced physical, sensory or mental capabilities or lack of experience and knowledge if they are closely supervised or instructed concerning use of the appliance in a safe way and if they understand the hazards involved.

Children should be supervised to ensure that they do not play with the appliance.

Do not place the appliance on or in proximity of electric or gas cookers, or in a heated oven.

Verify that there are no foreign objects inside the appliance.

EN - 2

With dense mixtures, to prevent overheating, do not use mixing with dough hooks continuously for more than 4 minutes. Leave to cool for 10 minutes before starting a new operation.

Switch off the appliance and disconnect from supply before approaching parts that move when in use.

Do not block the ventilation or heat dissipation slots.

Immerse the whips in the bowl with the food before starting the appliance.

Connect the appliance

Make sure that the mains voltage and the frequency correspond with those indicated on the data plate on the bottom of the appliance.

In the event of incompatibility between the outlet and the plug on the appliance, contact the Technical After-sales service for replacement.

This appliance shall not be used by children. Keep the appliance and its cord out of the reach of children.

Children must not play with the appliance.

Always disconnect the appliance from the supply if it is left unattended and before assembling, disassembling or cleaning.

Switch off the appliance and disconnect from supply before changing accessories or approaching parts that move when in use.

Recommendations

Use compliant with destination

Do not use the appliance for anything other than its intended use. The Hand Mixer is designed for mixing, kneading, whisking eggs or cream.

The appliance is intended for household and similar use, such as:

-in the kitchen area for the staff of shops, offices and other work environments;

-in bed and breakfast and agritourism accommodation;

-by guests at hotels and motels, and in residential environments.

Other uses, in restaurants, bars and cafes for example, are improper.

Manufacturer’s liability

The manufacturer declines all liability for damage undergone by persons and objects due to:

use of the appliance different from that envisioned;

user manual has not been read;

tampering of individual parts of the appliance;

use of non-original spare parts;

failure to comply with safety recommendations.

Keep these instructions carefully. Whenever the appliance is transferred to other persons, they must also be given these user instructions.

These instructions can also be downloaded from Smeg website “www.smeg.com”.

DISPOSAL

Electrical appliances must not be disposed of with household waste.

The appliances that have this symbol are subject to the European Directive 2012/19/EU. All discarded electric and electronic appliances must be disposed of separately from household waste, by taking them to relevant centres envisioned by the Country. By disposing of the discarded appliance correctly, damage to the environment and risks to health will be avoided. For further information regarding disposal of the discarded appliance, contact the Municipal Administration, the Disposal dept. or the shop where the appliance was purchased.

<![if ! IE]>

<![endif]>EN

EN - 3

Description / Assembly / Commands

DESCRIPTION OF THE

APPLIANCE (Fig.A)

1Accessory slots

2Handle

3Accessory release trigger

4Speed and timer display

5Start/Stop button

6Speed adjustment buttons

7Optimus beaters

8Dough hooks

9Wire beaters

10Accessory bag

11Feet

12Identification plate

13Cable winding clamp

IDENTIFICATION PLATE (12)

The identification plate states the technical data, the serial number and marking. The identification plate must never be removed.

BEFORE COMMISSIONING

Unpack the appliance carefully and remove all packaging materials and any labels and stickers.

Clean the motor base using a damp cloth. Wash all components and dry thoroughly (see paragraph “Cleaning and Maintenance”).

Before use, check that all components are integral.

ASSEMBLY OF COMPONENTS

(Fig. B)

Beaters and dough hooks must be inserted into the correct side, and are not interchangeable.

Insert beater/dough hook with a round ring (A) into the round slot (A).

Insert beater/dough hook with octagonal ring (B) into the octagonal slot (B).

EN - 4

Do not use two accessories of different type together.

DESCRIPTION OF CONTROLS AND ACCESSORIES

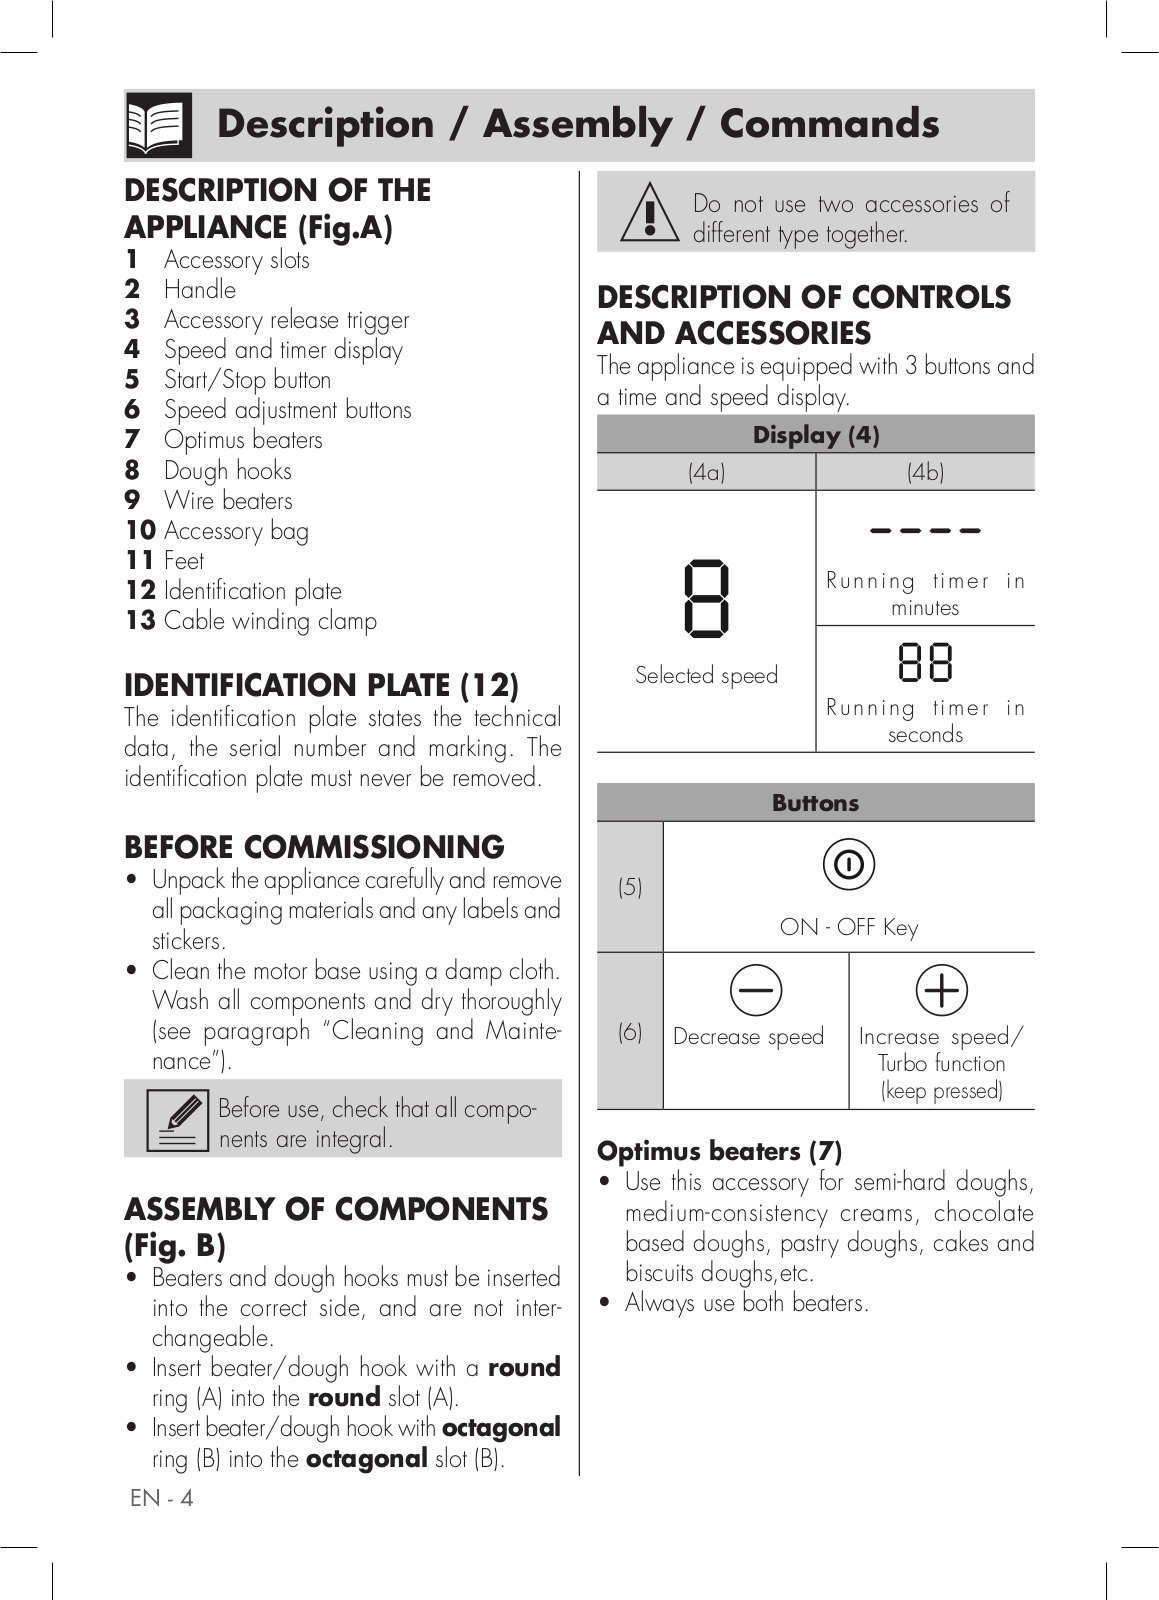
The appliance is equipped with 3 buttons and a time and speed display.

Display (4)


(4a)


(4b)


Running timer

in


minutes


Selected speed


Running timer

in


seconds


Buttons


(5)


ON - OFF Key


(6)


Decrease speed


Increase speed/


Turbo function


(keep pressed)


Optimus beaters (7)

Use this accessory for semi-hard doughs, medium-consistency creams, chocolate based doughs, pastry doughs, cakes and biscuits doughs,etc.

Always use both beaters.

Use

Dough hooks (8)


Use

this

accessory

for

thick doughs,


such

as

bread’s

and

pizza’s dough,


egg pasta, etc.


Always use both dough hooks.

Wire beaters (9)

Use this accessory for creams with little consistency, sauces, mayonnaise, to beat cream, eggs, liquids, egg whites, etc.

Always use both beaters.

Make sure that the bowl used is sufficiently large and high, as well as positioned on a stable surface.

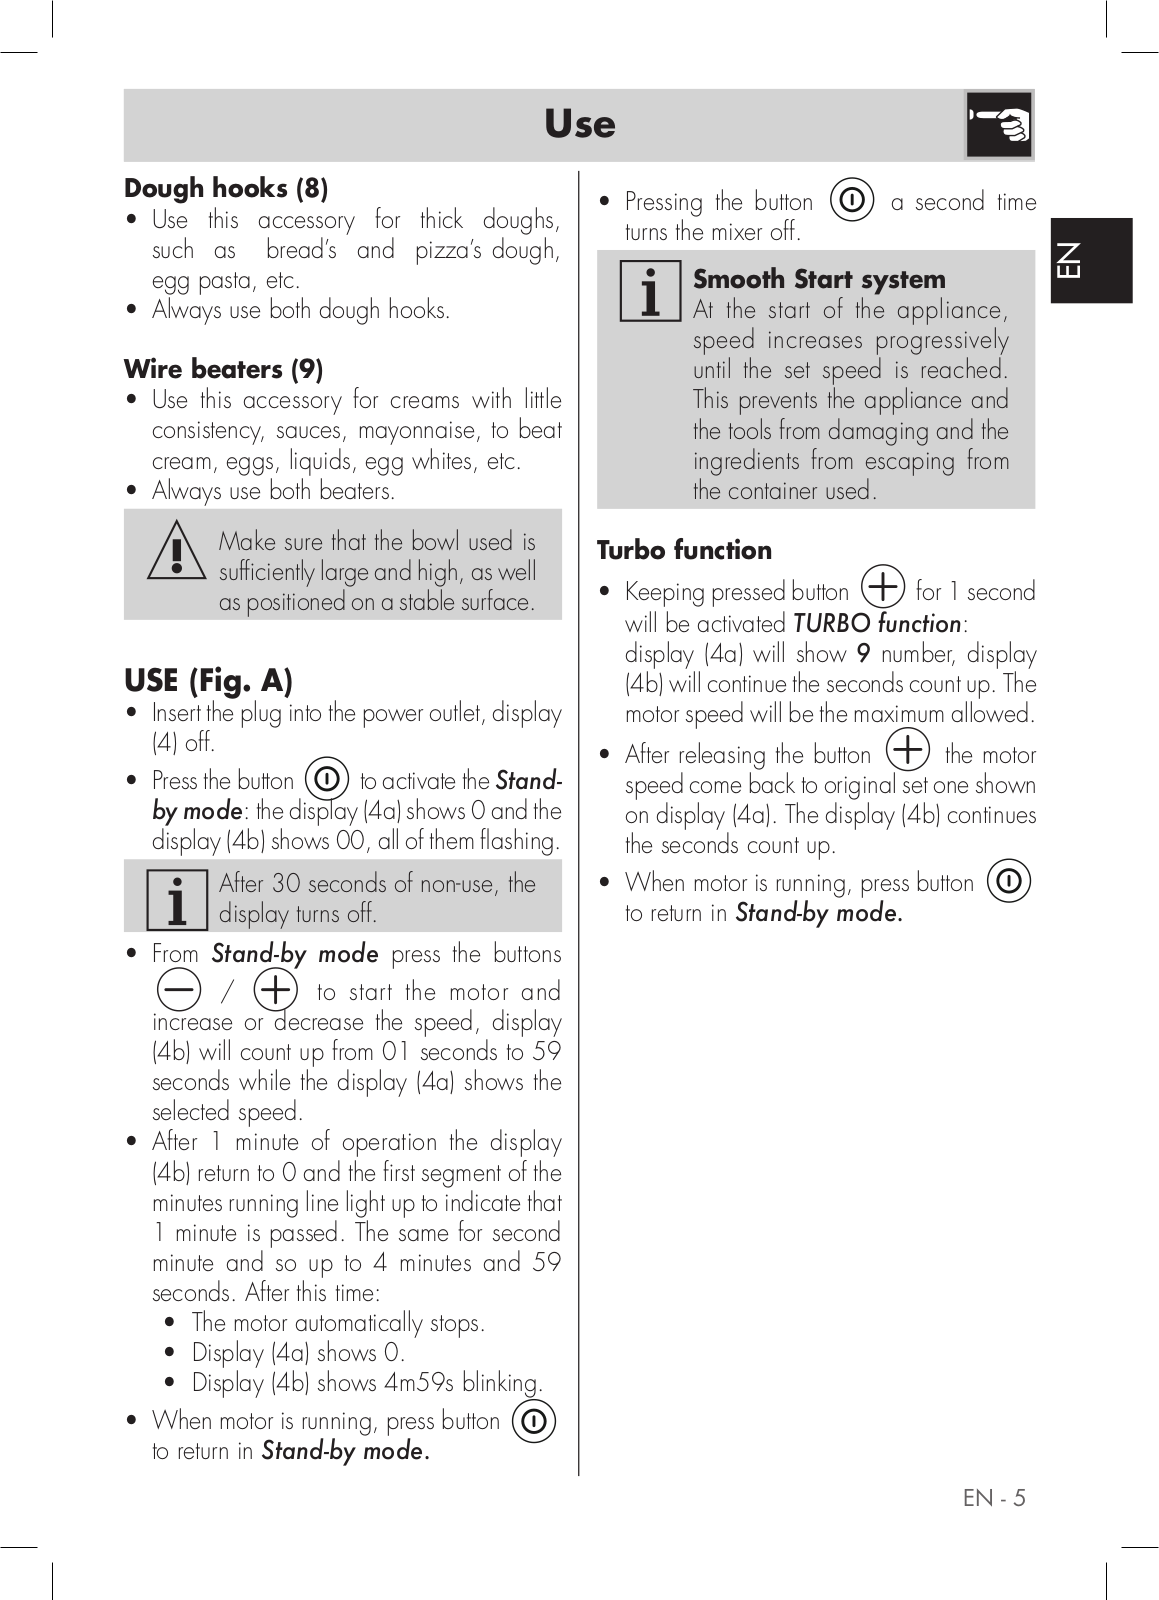
USE (Fig. A)

Insert the plug into the power outlet, display

(4)off.

• Press the button to activate the Standby mode: the display (4a) shows 0 and the display (4b) shows 00, all of them flashing.

After 30 seconds of non-use, the display turns off.

From Stand-by mode press the buttons

/ to start the motor and increase or decrease the speed, display (4b) will count up from 01 seconds to 59 seconds while the display (4a) shows the selected speed.

After 1 minute of operation the display (4b) return to 0 and the first segment of the minutes running line light up to indicate that 1 minute is passed. The same for second minute and so up to 4 minutes and 59 seconds. After this time:

The motor automatically stops.

Display (4a) shows 0.

Display (4b) shows 4m59s blinking.

When motor is running, press button to return in Stand-by mode.

Pressing the button a second time turns the mixer off.


<![if ! IE]>

<![endif]>EN

Smooth Start system


At the start of the appliance,


speed increases progressively


until the set speed is reached.


This prevents the appliance and


the tools from damaging and the


ingredients from escaping from


the container used.


Turbo function

• Keeping pressed button for 1 second will be activated TURBO function: display (4a) will show 9 number, display (4b) will continue the seconds count up. The motor speed will be the maximum allowed.

• After releasing the button the motor speed come back to original set one shown on display (4a). The display (4b) continues the seconds count up.

When motor is running, press button to return in Stand-by mode.

EN - 5

Hints and tips

ADVICES

Activate the appliance at a low speed until the ingredients are mixed and then increase the speed according to the operation to be performed.

Climatic conditions, seasonal temperature differences, temperature and consistency of the ingredients could affect the preparation time necessary as well as the results.

For the best results with thick dough, work it with rotational movements and check that the liquid ingredients are at least 50% of the total dough.

Place the container to be used for the processing on a stable and flat surface.

During processing or when not in use, it is possible to position the appliance on the specific feet (11) (Fig.C).

With dense mixtures, such as the dough, do not use the mixer for more than 4 minutes. Wait 10 minutes for cooling before performing a second process. Switch it off as soon as you’ve got the right consistency.

To protect your handmixer it is fitted with a protection device which will stop the handmixer operating if overloaded. If activated, the flashing symbol will appear on the display; switch off, unplug, wait 10 minutes and then plug back into the power supply.

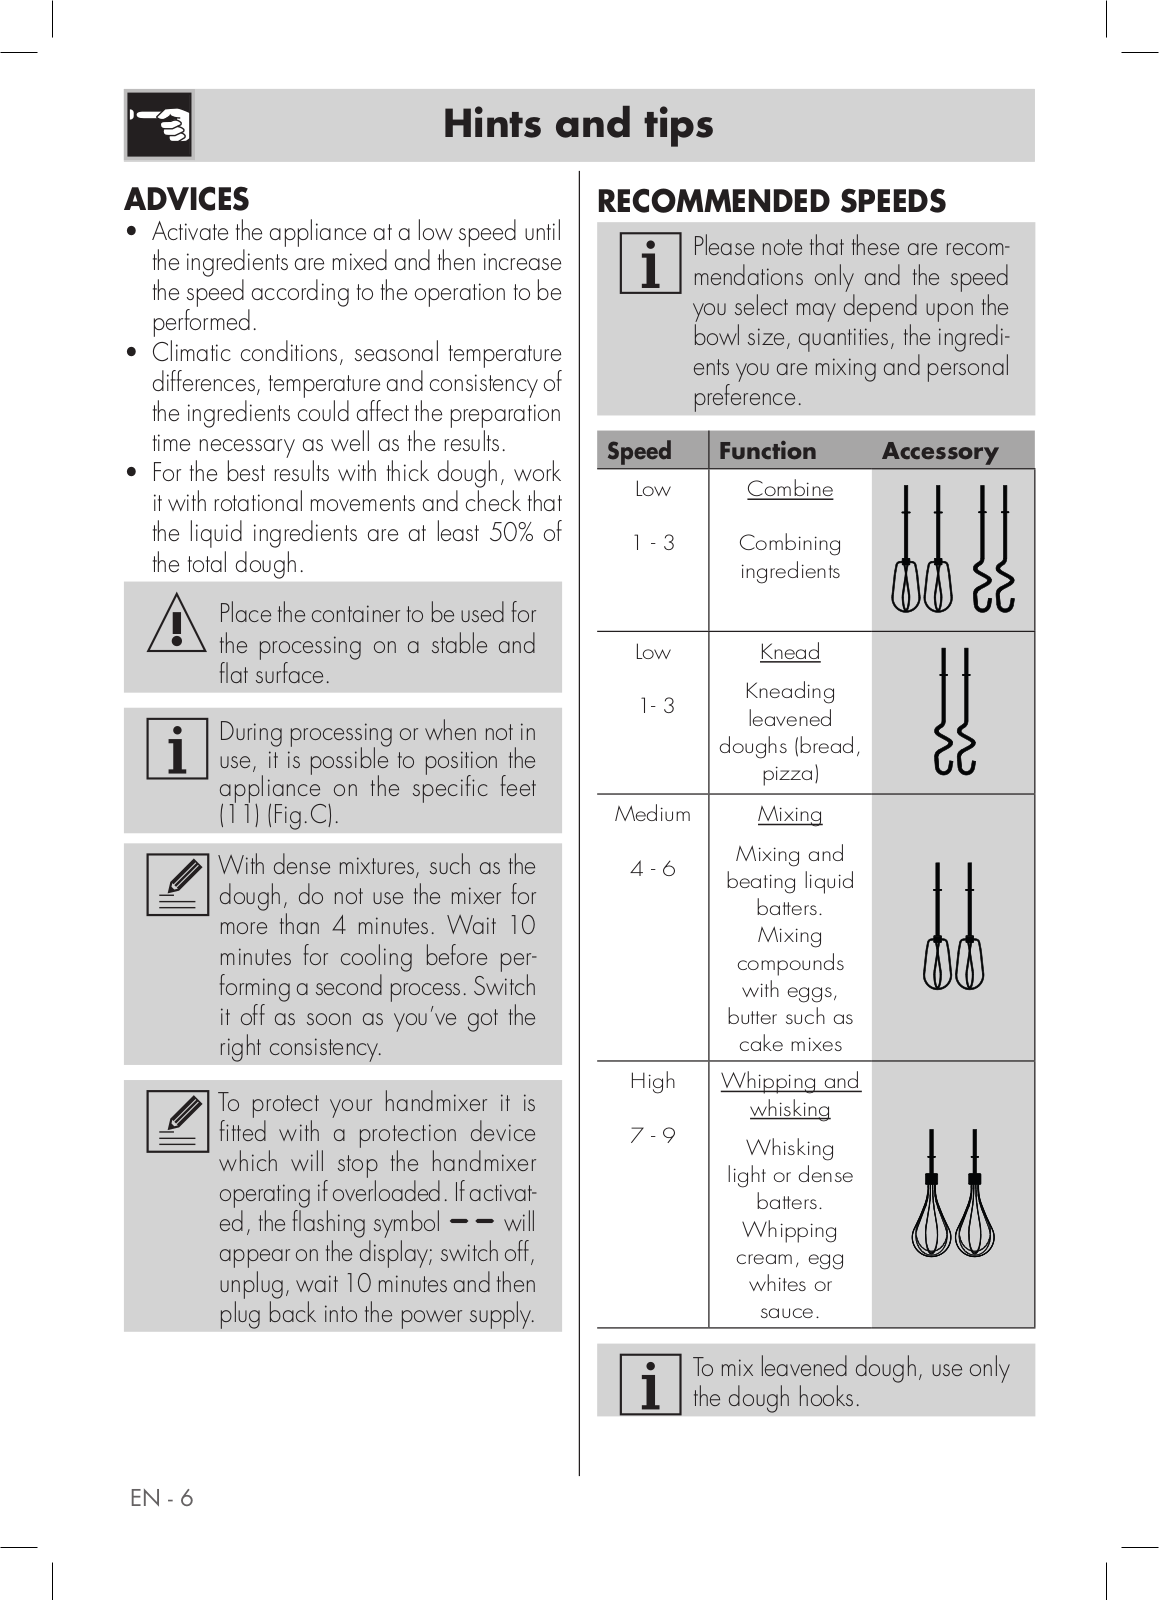
RECOMMENDED SPEEDS

Please note that these are recommendations only and the speed you select may depend upon the bowl size, quantities, the ingredients you are mixing and personal preference.

Speed

Function

Accessory

Low

Combine


1 - 3

Combining


ingredients


Low

Knead


1- 3

Kneading


leavened


doughs (bread,


pizza)


Medium

Mixing


4 - 6

Mixing and


beating liquid


batters.


Mixing


compounds


with eggs,


butter such as


cake mixes


High

Whipping and


whisking


7 - 9

Whisking


light or dense


batters.


Whipping


cream, egg


whites or


sauce.


To mix leavened dough, use only the dough hooks.

EN - 6

Cleaning and maintenance

CLEANING AND

MAINTENANCE (Fig. C)

Before carrying out any cleaning operation, ALWAYS disconnect the plug from the power outlet and allow the appliance to cool down. Never immerse the motor base (1) in water or other liquids.

The instruction manual contains appropriate instructions for cleaning and maintenance operations and operations recommended to the customer by the producer. Any other intervention must be performed by a representative of an authorised service centre.

Pull the accessory release trigger (3) upwards and remove the accessories.

Beaters, dough hooks, wire beaters accessories are dishwasher safe.

Dry all parts of the appliance after cleaning.

The motor base can be cleaned by first using a damp cloth and then a dry one. Do not use detergents or abrasive materials.

<![if ! IE]>

<![endif]>EN

EN - 7

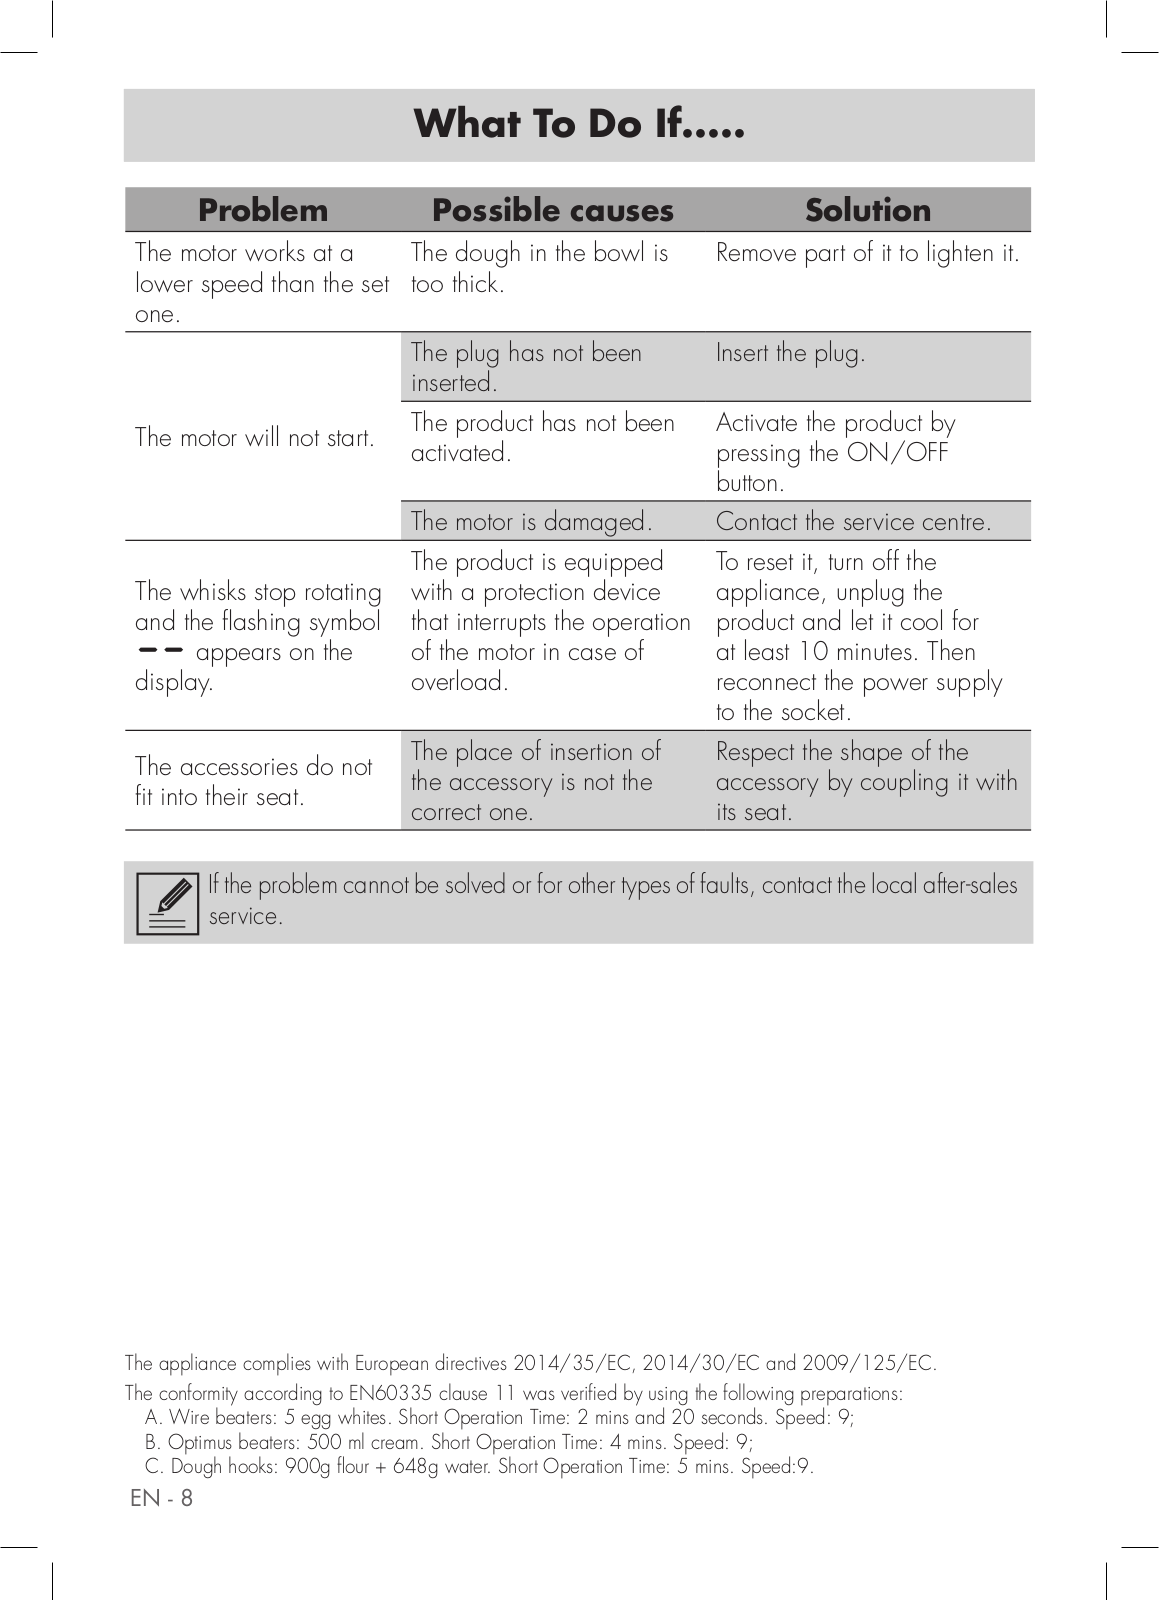
What To Do If.....

Problem

Possible

causes

Solution

The motor works at a

The dough in the

bowl is

Remove part of it to lighten it.

lower speed than the set

too thick.


one.


The plug has not

been

Insert the plug.


inserted.


The motor will not start.

The product has

not been

Activate the product by

activated.


pressing the ON/OFF


button.


The motor is damaged.

Contact the service centre.


The product is equipped

To reset it, turn off the

The whisks stop rotating

with a protection device

appliance, unplug the

and the flashing symbol

that interrupts the operation

product and let it cool for

appears on the

of the motor in case of

at least 10 minutes. Then

display.

overload.

reconnect the power supply


to the socket.

The accessories do not

The place of insertion of

Respect the shape of the

the accessory is not the

accessory by coupling it with

fit into their seat.

correct one.

its seat.


If the problem cannot be solved or for other types of faults, contact the local after-sales service.

The appliance complies with European directives 2014/35/EC, 2014/30/EC and 2009/125/EC. The conformity according to EN60335 clause 11 was verified by using the following preparations:

A.Wire beaters: 5 egg whites. Short Operation Time: 2 mins and 20 seconds. Speed: 9;

B.Optimus beaters: 500 ml cream. Short Operation Time: 4 mins. Speed: 9;

C.Dough hooks: 900g flour + 648g water. Short Operation Time: 5 mins. Speed:9.

EN - 8

Cher Client,

Nous vous remercions vivement pour l’achat du Batteur de la Ligne Smeg. En choisissant un de nos produits, vous avez opté pour une solution dont la recherche esthétique et l’innovante conception technique permettent d’obtenir des objets uniques, capables de devenir des éléments d'ameublement.

En effet, un appareil électroménager Smeg se coordonne toujours parfaitement avec les autres produits de la gamme et peut, dans le même temps, constituer un objet de design pour la cuisine.

Nous vous souhaitons d’apprécier pleinement les fonctions offertes par votre appareil.

Bien cordialement.

SMEG S.p.A.

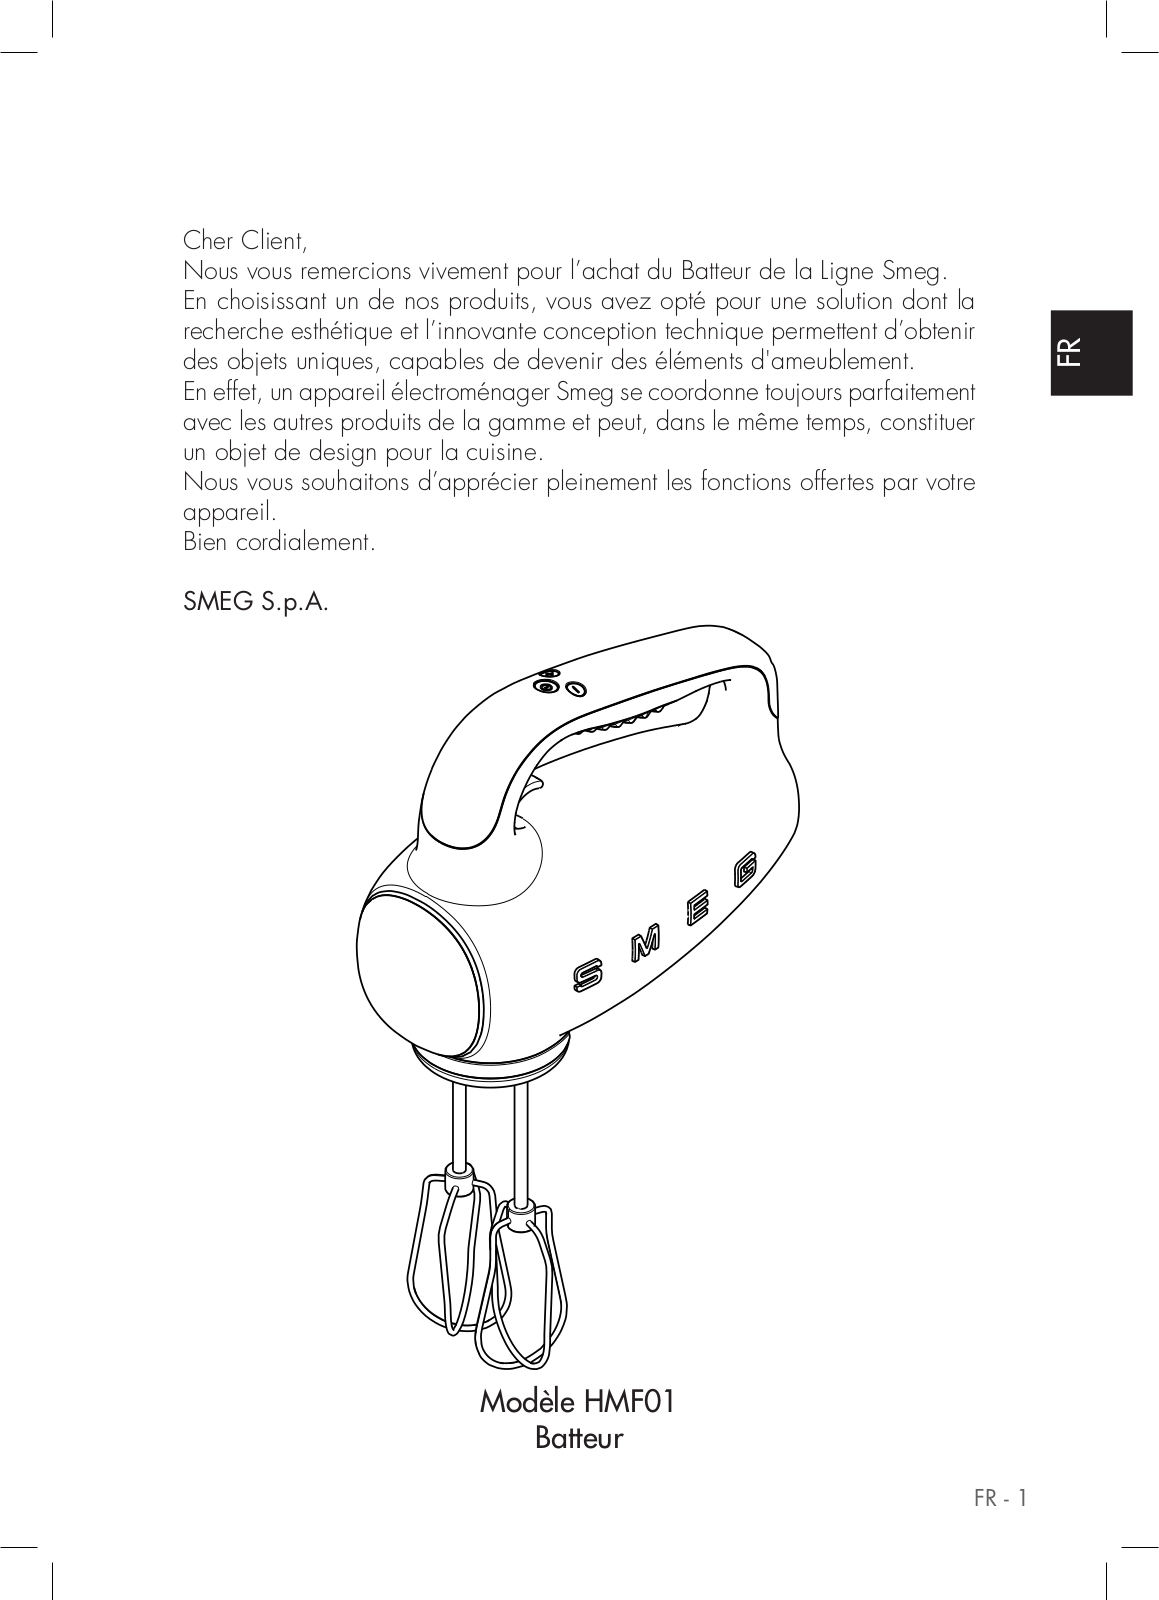
Modèle HMF01

Batteur

<![if ! IE]>

<![endif]>FR

FR - 1

Mises en garde

SÉCURITÉ

Mises en garde fondamentales pour la sécurité.

Suivre les consignes de sécurité pour pouvoir utiliser l’appareil en toute sécurité :

Ne pas toucher la fiche avec les mains mouillées.

S’assurer que la prise de courant utilisée soit toujours accessible, pour pouvoir débrancher la fiche si nécessaire.

Ne jamais tirer le câble puisqu’il pourrait s’endommager.

En cas de panne de l’appareil, ne pas essayer de le réparer.

Éteindre l’appareil, débrancher la fiche de la prise et s’adresser à l’assistance technique.

En cas de dommages à la fiche ou au câble d’alimentation, les faire remplacer uniquement par l’assistance technique afin de prévenir tout risque.

Ne pas plonger l’appareil dans l’eau.

Attention : avant de procéder au nettoyage, débrancher la fiche.

Ne pas faire pendre le câble d’alimentation depuis le bord de la table ou d’un autre plan ni le faire entrer en contact avec des surfaces chaudes.

Conserver le matériau d’emballage (sachets en plastique) hors de la portée des enfants.

Cet appareil peut être utilisé par des personnes aux capacités physiques, sensorielles ou mentales réduites ou en l’absence d’expérience et de connaissance si elles ont été soumises à une supervision ou à des consignes relatives à l’utilisation de l’appareil de manière sécurisée et pour comprendre les risques impliqués.

Les enfants doivent être surveillés afin de s’as-

FR - 2

surer qu’ils ne jouent pas avec l’appareil.

Ne pas ranger l’appareil au-dessus ou à proximité d’une cuisinière ou du gaz, ou d’un four chauffé.

Vérifier qu’aucun objet étranger ne se trouve à l’intérieur de l’appareil.

Avec les mélanges denses, pour éviter des surchauffes, ne pas utiliser continuellement le mélange avec les crochets pétrisseurs pendant plus de 4 minutes. Laisser refroidir l’appareil pendant 10 minutes avant de l’utiliser à nouveau.

Éteindre l’appareil et le débrancher avant de toucher les pièces qui bougent durant l’utilisation.

Ne pas obstruer les fissures de ventilation ou d’évacuation de la chaleur.

Plonger les fouets dans le récipient avec les aliments avant de mettre en marche l’appareil.

Branchement de l’appareil

S’assurer que la tension et la fréquence du réseau électrique correspondent à celles indiquées sur la plaque de données au fond de l’appareil.

En cas d’incompatibilité entre la prise et la fiche de l’appareil, contacter le service d’assistance technique pour procéder à leur remplacement.

Cet appareil ne doit pas être utilisé par les enfants. Tenir l’appareil et son câble hors de la portée des enfants.

Les enfants ne doivent pas jouer avec cet appareil.

Débrancher toujours l’appareil du réseau électrique s’il est laissé sans surveillance et avant le montage, le démontage ou le nettoyage.

Éteindre l’appareil et le débrancher avant de changer les accessoires ou de s’approcher des pièces en mouvement durant l’utilisation.

Mises en garde

Utilisation conforme

Ne pas utiliser l’appareil pour des buts autres que ceux pour lesquels il a été conçu. Le batteur est destiné exclusivement pour malaxer, pétrir, monter en neige des œufs ou de la crème.

L’appareil est destiné à être utilisé dans des applications domestiques et similaires, comme :

-par les employés dans l’espace cuisine des magasins, dans les bureaux et autres environnements de travail ;

-dans les chambres d’hôtes et les gîtes ruraux ;

-par les clients dans les hôtels, les motels et les locaux résidentiels.

D’autres utilisations, comme dans les restaurants, les bars et cafétérias, sont inappropriées.

Responsabilité du constructeur

Le constructeur décline toute responsabilité pour les dommages subis par des personnes et des choses causés par :

l’utilisation de l’appareil différente de celle prévue ;

la non-lecture du manuel d’utilisation ;

la modification même d’une seule pièce de l’appareil ;

l’utilisation des pièces détachées non originales ;

le non-respect des mises en garde de sécurité.

Conserver soigneusement ces ins- tructions. Si l’appareil devait être cédé à d’autres personnes, leur remettre également ces instructions d’utilisation.

Ces consignes peuvent être téléchargées du site Web Smeg « www.smeg.com ».

MISE AU REBUT

Les appareils électriques ne doivent pas être éliminés avec les déchets domestiques.

Les appareils qui comprennent ce symbole


<![if ! IE]>

<![endif]>FR


sont sujets à la Directive européenne 2012/19/


UE. Tous les appareils électriques et électroniques


usés doivent être éliminés séparément des déchets


domestiques, en les remettant dans les centres


appropriés prévus par l’État. En éliminant correc-


tement l’appareil hors d’usage, les dommages à


l’environnement et les risques pour la santé des


personnes sont évités. Pour obtenir plus d’informa-


tions sur l’élimination de l’appareil hors d’usage,


s’adresser à l’administration municipale, au


bureau d’élimination et au magasin où l’appareil


a été acheté.


FR - 3

Description / Montage / Commandes

DESCRIPTION DE L’APPAREIL (Fig.A)

1Logements des accessoires

2Manche

3Levier d’expulsion des accessoires

4Afficheur de vitesse et minuterie

5Bouton d’allumage et d’extinction

6Boutons de régulation de la vitesse

7Fouets optimus

8Crochets pétrisseurs

9Fouets à fil

10Sachet porte-accessoires

11Pieds

12Plaque d’identification

13Collier enrouleur de câble

PLAQUE D’IDENTIFICATION (12)

La plaque d’identification indique les caractéristiques techniques, le numéro de série et le marquage. La plaque d’identification ne doit jamais être retirée.

AVANT LA PREMIÈRE UTILISATION

Déballer soigneusement l’appareil et retirer tous les matériaux d’emballage, ainsi que les étiquettes et les autocollants.

Nettoyer la base moteur avec un chiffon humide.

Laver tous les composants et les sécher soigneusement (cf § « Nettoyage et Entretien »).

Avant utilisation, vérifier que tous les composants sont intacts.

ASSEMBLAGE DES COMPOSANTS (Fig. B)

Les fouets et les crochets pétrisseurs doivent être introduits dans le bon sens et ne sont pas interchangeables.

Introduire le fouet ou le crochet pétrisseur avec le collier circulaire (A) dans le logement circulaire (A).

Introduire le fouet ou le crochet pétrisseur avec le collier octogonal (B) dans le logement octogonal (B).

Ne pas utiliser ensemble deux accessoires de type différent.

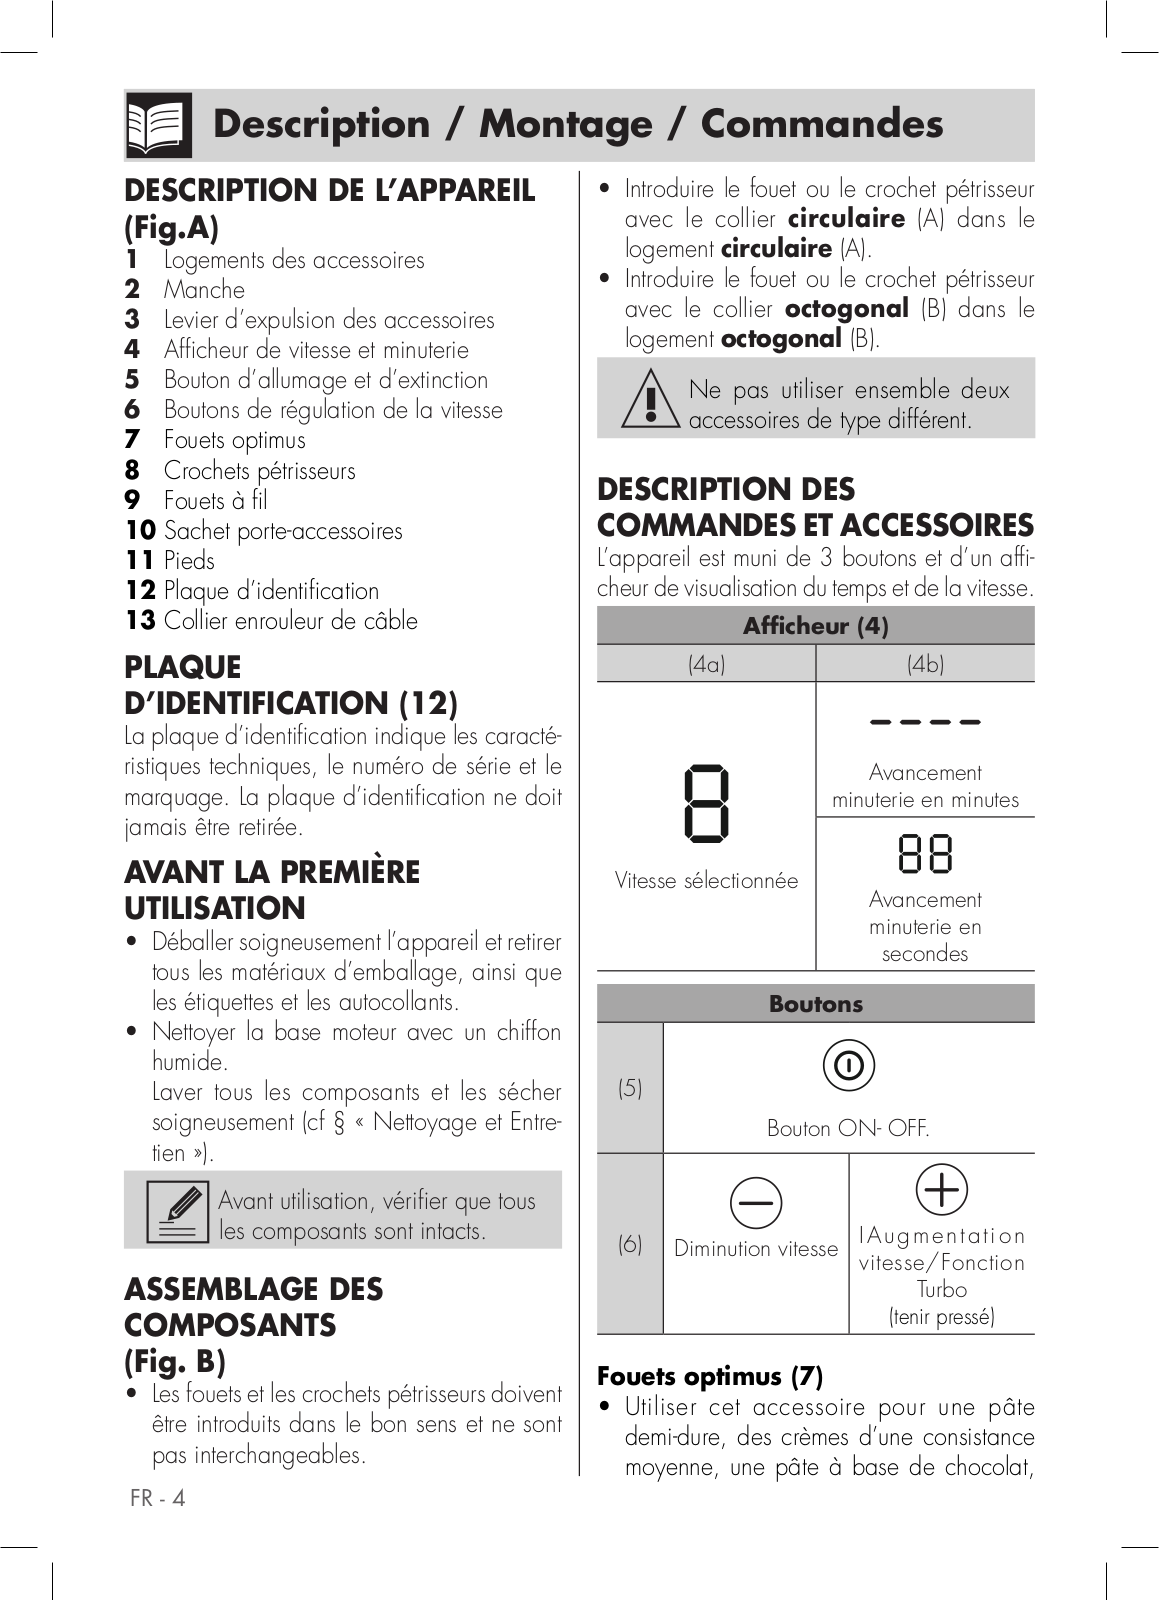
DESCRIPTION DES COMMANDES ET ACCESSOIRES

L’appareil est muni de 3 boutons et d’un afficheur de visualisation du temps et de la vitesse.

Afficheur (4)

(4a)

(4b)

Avancement minuterie en minutes

Vitesse sélectionnée

Avancement minuterie en secondes

Boutons

(5) Bouton ONOFF.

(6)Diminution vitesse IAugmentationvitesse/Fonction

Turbo (tenir pressé)

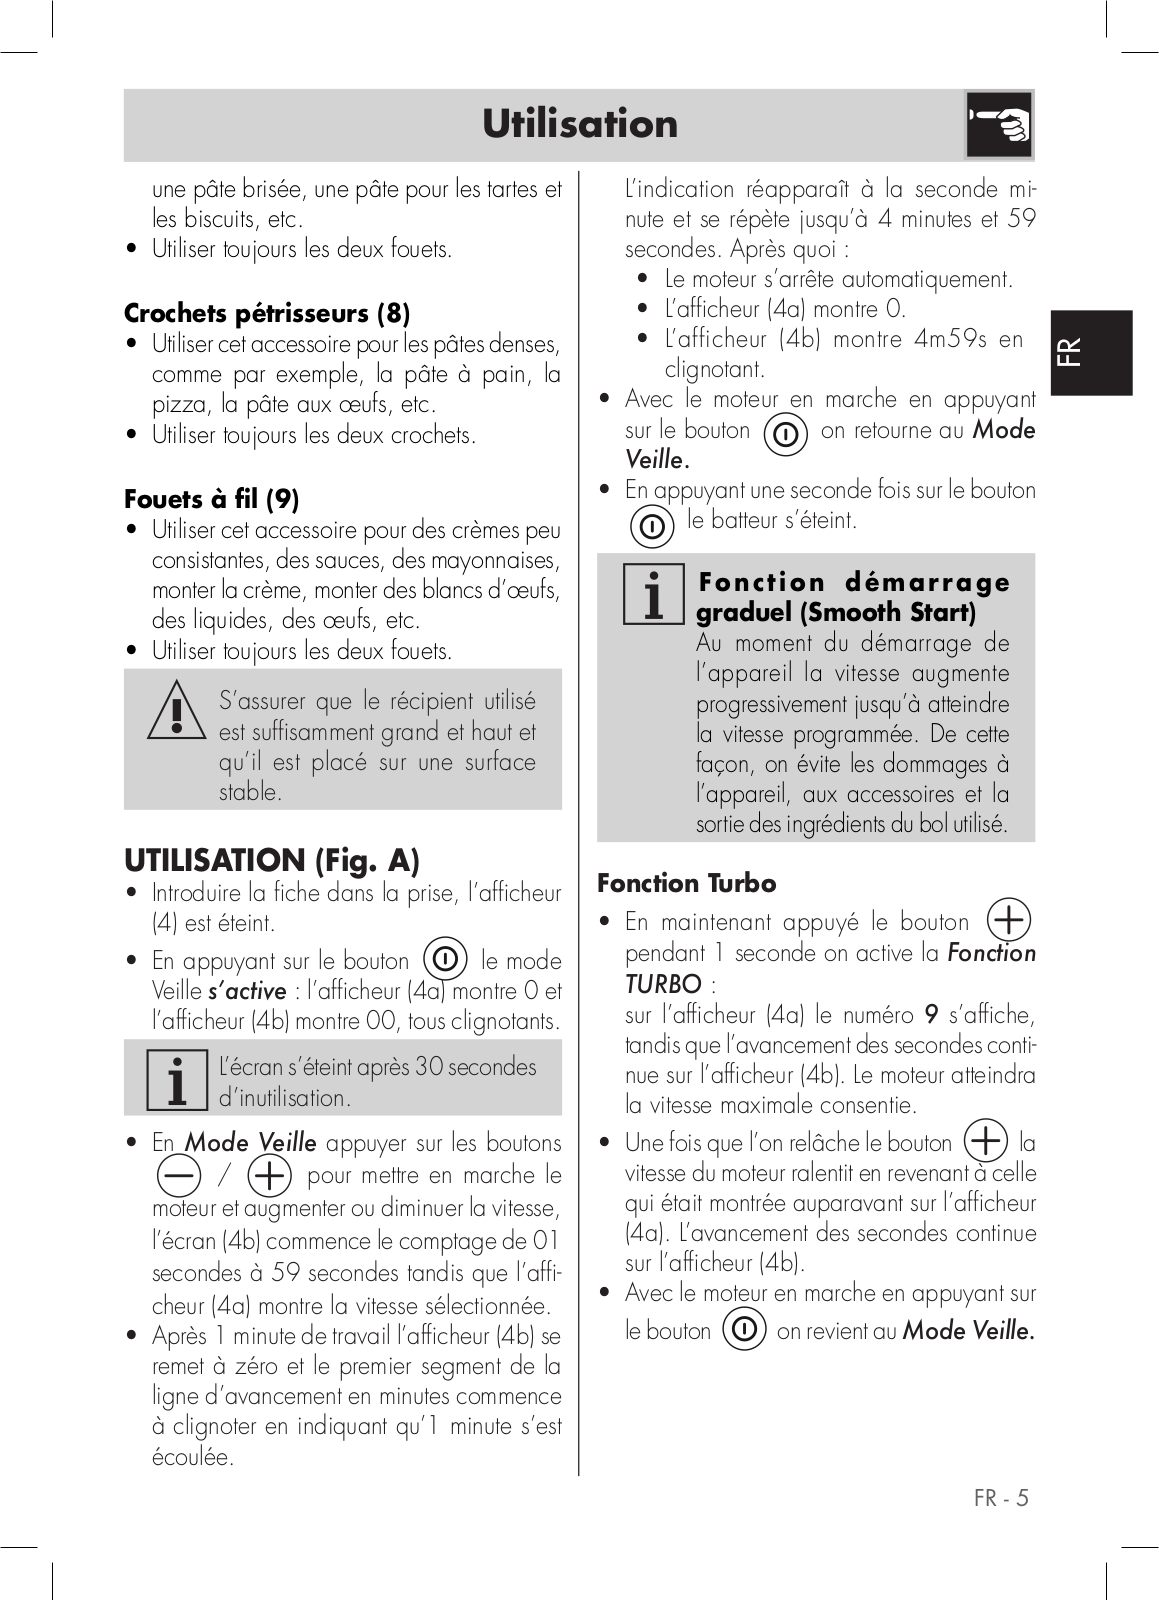
Fouets optimus (7)

Utiliser cet accessoire pour une pâte demi-dure, des crèmes d’une consistance moyenne, une pâte à base de chocolat,

FR - 4

Utilisation

une pâte brisée, une pâte pour les tartes et les biscuits, etc.

• Utiliser toujours les deux fouets.

Crochets pétrisseurs (8)

Utiliser cet accessoire pour les pâtes denses, comme par exemple, la pâte à pain, la pizza, la pâte aux œufs, etc.

Utiliser toujours les deux crochets.

Fouets à fil (9)

Utiliser cet accessoire pour des crèmes peu consistantes, des sauces, des mayonnaises, monter la crème, monter des blancs d’œufs, des liquides, des œufs, etc.

Utiliser toujours les deux fouets.

S’assurer que le récipient utilisé est suffisamment grand et haut et qu’il est placé sur une surface stable.

UTILISATION (Fig. A)

Introduire la fiche dans la prise, l’afficheur

(4)est éteint.

• En appuyant sur le bouton le mode Veille s’active : l’afficheur (4a) montre 0 et l’afficheur (4b) montre 00, tous clignotants.

L’écran s’éteint après 30 secondes d’inutilisation.

En Mode Veille appuyer sur les boutons

/ pour mettre en marche le moteur et augmenter ou diminuer la vitesse, l’écran (4b) commence le comptage de 01 secondes à 59 secondes tandis que l’afficheur (4a) montre la vitesse sélectionnée.

Après 1 minute de travail l’afficheur (4b) se remet à zéro et le premier segment de la ligne d’avancement en minutes commence

àclignoter en indiquant qu’1 minute s’est écoulée.

L’indication réapparaît à la seconde mi-


nute et se répète jusqu’à 4 minutes et 59


secondes. Après quoi :


• Le moteur s’arrête automatiquement.


• L’afficheur (4a) montre 0.


• L’afficheur (4b) montre 4m59s en

<![if ! IE]>

<![endif]>FR

clignotant.


• Avec le moteur en marche en appuyant


sur le bouton


on retourne au Mode


Veille.


• En appuyant une seconde fois sur le bouton le batteur s’éteint.

Fonction démarrage graduel (Smooth Start)

Au moment du démarrage de l’appareil la vitesse augmente progressivement jusqu’à atteindre la vitesse programmée. De cette façon, on évite les dommages à l’appareil, aux accessoires et la sortie des ingrédients du bol utilisé.

Fonction Turbo

En maintenant appuyé le bouton pendant 1 seconde on active la Fonction

TURBO :

sur l’afficheur (4a) le numéro 9 s’affiche, tandis que l’avancement des secondes continue sur l’afficheur (4b). Le moteur atteindra la vitesse maximale consentie.

• Une fois que l’on relâche le bouton la vitesse du moteur ralentit en revenant à celle qui était montrée auparavant sur l’afficheur (4a). L’avancement des secondes continue sur l’afficheur (4b).

• Avec le moteur en marche en appuyant sur le bouton on revient au Mode Veille.

FR - 5

Préconisations et conseils

CONSEILS

Activer l’appareil à basse vitesse tant que les ingrédients ne seront pas mélangés et augmenter ensuite la vitesse selon l’opération que l’on devra accomplir.

Les conditions climatiques, les variations saisonnières de température, la température ambiante et la consistance des ingrédients peuvent affecter le temps de préparation nécessaire et les résultats.

Pour de meilleurs résultats avec des pâtes denses, les travailler en les accompagnant par des mouvements rotatoires et vérifier que la quantité des ingrédients liquides est d’au moins de 50% par rapport à toute la pâte.

Placer le récipient à utiliser sur une surface plate et bien stable.

Durant les préparations ou quand il n’est pas utilisé, on peut placer l’appareil sur les pieds prévus à cet effet (11) (Fig.C).

Avec les mélanges denses, comme par exemple, la pâte, ne pas utiliser le batteur pendant plus de 4 minutes. Laisser refroidir pendant 10 minutes avant d’effectuer une seconde préparation. Éteindre l’appareil dès que l’on obtient la bonne consistance.

L’électroménager est équipé d’un système de sécurité qui empêche le fonctionnement en cas de surcharge. En cas d’activation le symbole clignotant apparaîtra sur l’afficheur ; éteindre l’appareil, débrancher l’alimentation, attendre 10 minutes et rebrancher ensuite l’alimentation à la prise.

FR - 6

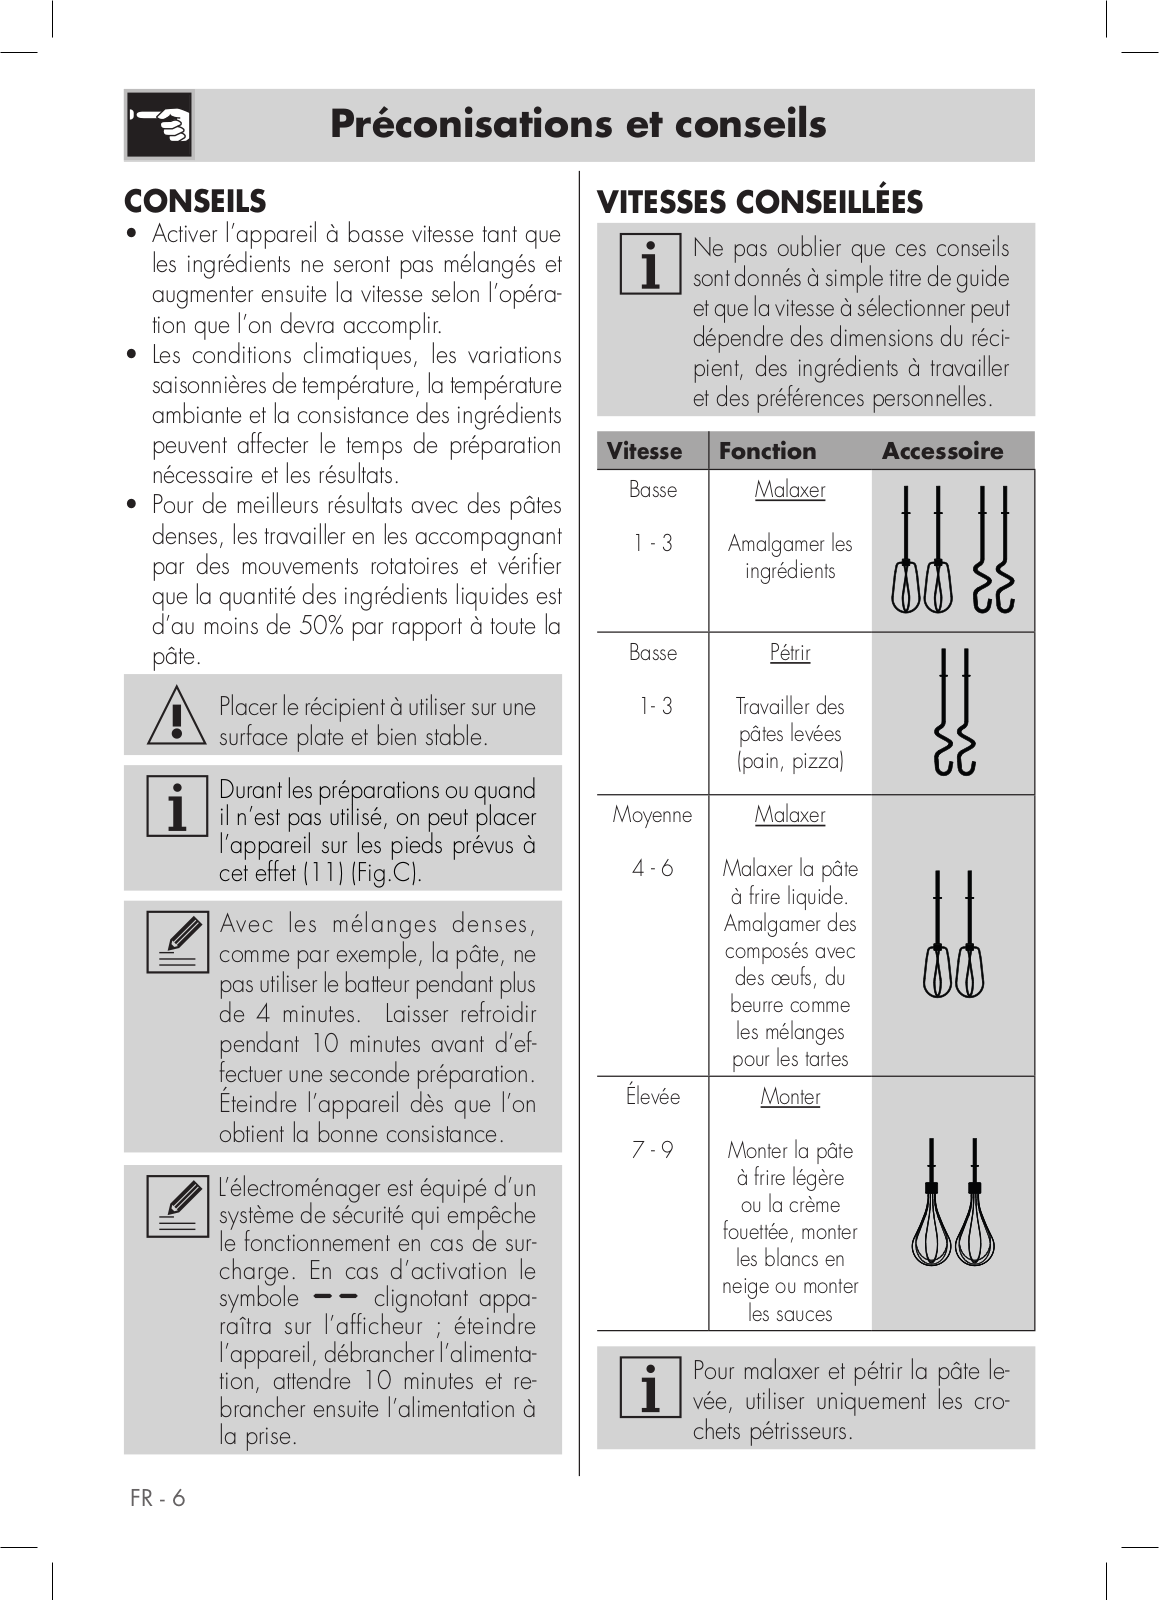
VITESSES CONSEILLÉES

Ne pas oublier que ces conseils sont donnés à simple titre de guide et que la vitesse à sélectionner peut dépendre des dimensions du récipient, des ingrédients à travailler et des préférences personnelles.

Vitesse

Fonction

Accessoire

Basse

Malaxer


1 - 3

Amalgamer les


ingrédients


Basse

Pétrir


1- 3

Travailler des


pâtes levées


(pain, pizza)


Moyenne

Malaxer


4 - 6

Malaxer la pâte


à frire liquide.


Amalgamer des


composés avec


des œufs, du


beurre comme


les mélanges


pour les tartes


Élevée

Monter


7 - 9

Monter la pâte


à frire légère


ou la crème


fouettée, monter


les blancs en


neige ou monter


les sauces


Pour malaxer et pétrir la pâte levée, utiliser uniquement les crochets pétrisseurs.

Nettoyage et entretien

NETTOYAGE ET ENTRETIEN

(Fig. C)

Avant d’effectuer toute opération de nettoyage, TOUJOURS débrancher la fiche de la prise secteur et laisser refroidir l’appareil. Ne jamais immerger la base moteur (1) dans de l’eau ou d’autres liquides.

Le manuel d’instructions contient les instructions appropriées relatives au nettoyage, à l’entretien et aux opérations recommandées par le fabricant au client. Toute autre intervention doit être effectuée par un service d’assistance agréé.

Tirer vers le haut le levier d’expulsion des accessoires (3) et retirer ces derniers.

Les fouets et les crochets pétrisseurs sont lavables dans le lave-vaisselle.

Sécher chaque partie de l’appareil après l’avoir nettoyé.

Le bloc moteur peut être nettoyé en utilisant tout d’abord un chiffon humide, puis un chiffon sec. Éviter d’utiliser des détergents ou des matériaux abrasifs.

<![if ! IE]>

<![endif]>FR

FR - 7

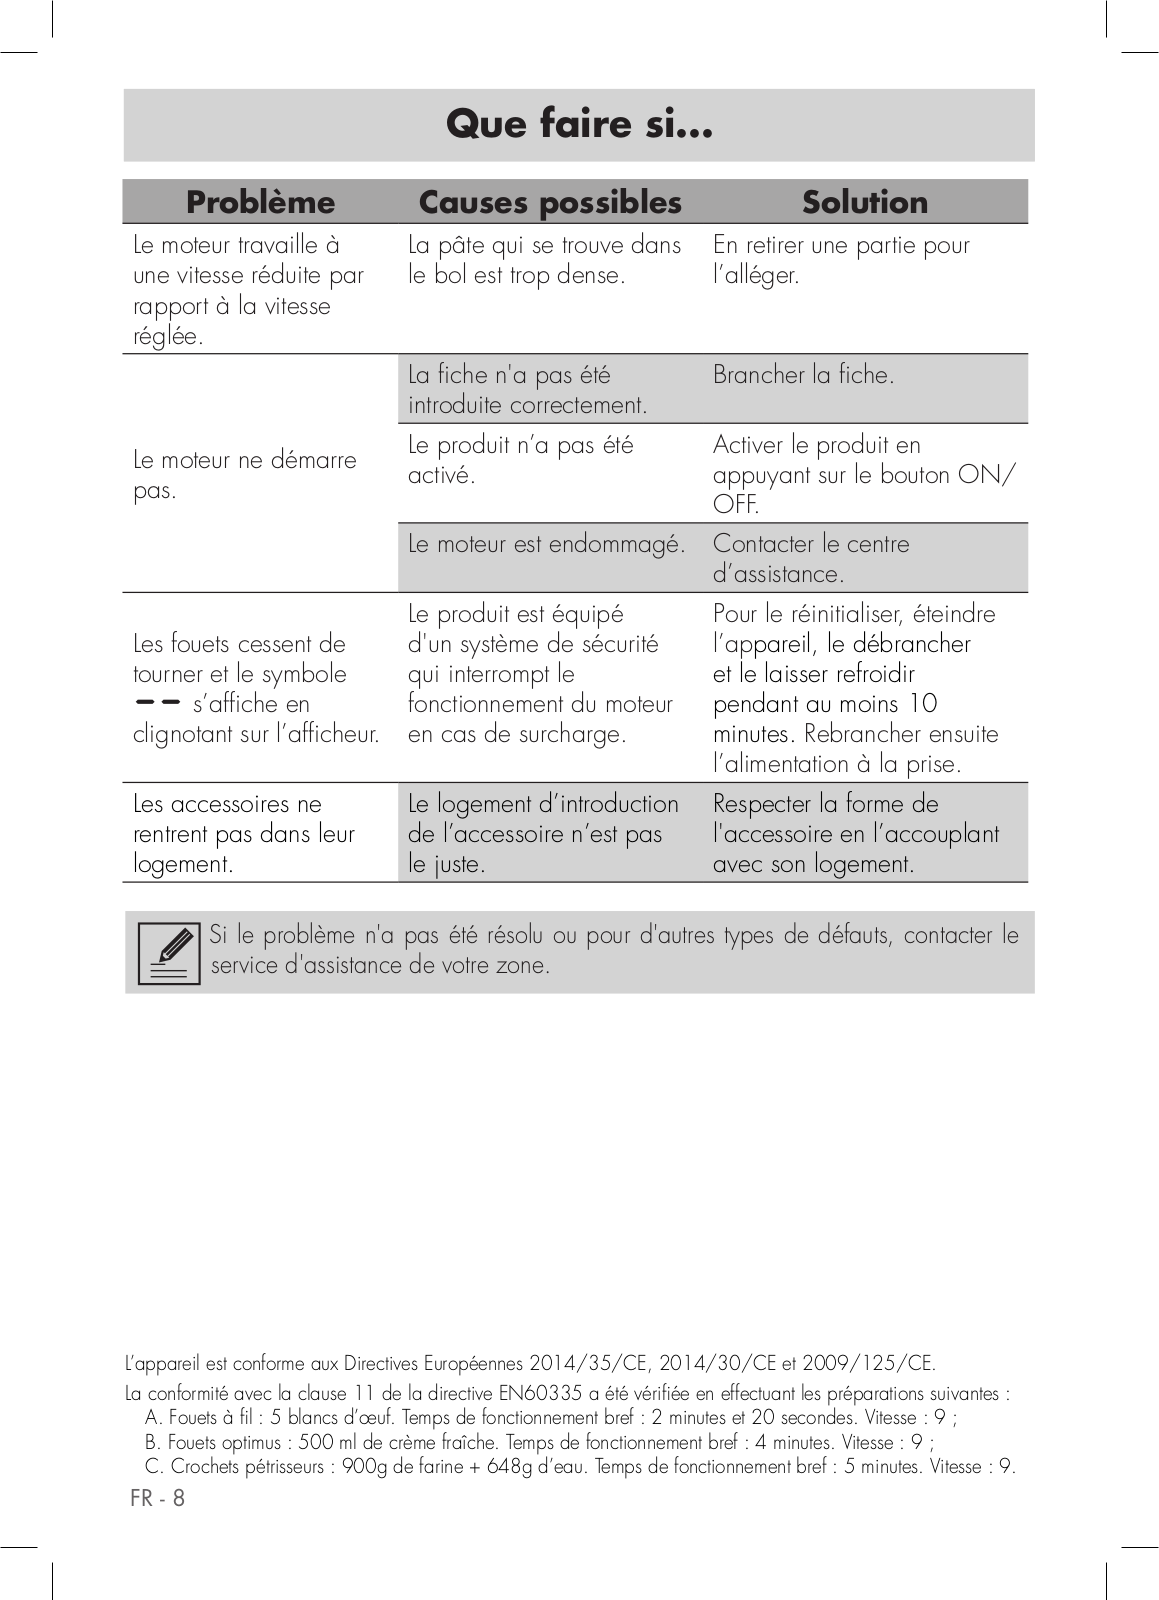
Que faire si...

Problème

Causes possibles

Solution

Le moteur travaille à

La pâte qui se trouve dans

En retirer une partie pour

une vitesse réduite par

le bol est trop dense.

l’alléger.

rapport à la vitesse


réglée.


La fiche n'a pas été

Brancher la fiche.


introduite correctement.


Le moteur ne démarre

Le produit n’a pas été

Activer le produit en

activé.

appuyant sur le bouton ON/

pas.


OFF.


Le moteur est endommagé.

Contacter le centre


d’assistance.


Le produit est équipé

Pour le réinitialiser, éteindre

Les fouets cessent de

d'un système de sécurité

l’appareil, le débrancher

tourner et le symbole

qui interrompt le

et le laisser refroidir

s’affiche en

fonctionnement du moteur

pendant au moins 10

clignotant sur l’afficheur.

en cas de surcharge.

minutes. Rebrancher ensuite


l’alimentation à la prise.

Les accessoires ne

Le logement d’introduction

Respecter la forme de

rentrent pas dans leur

de l’accessoire n’est pas

l'accessoire en l’accouplant

logement.

le juste.

avec son logement.

Si le problème n'a pas été résolu ou pour d'autres types de défauts, contacter le service d'assistance de votre zone.

L’appareil est conforme aux Directives Européennes 2014/35/CE, 2014/30/CE et 2009/125/CE.

La conformité avec la clause 11 de la directive EN60335 a été vérifiée en effectuant les préparations suivantes :

A.Fouets à fil : 5 blancs d’œuf. Temps de fonctionnement bref : 2 minutes et 20 secondes. Vitesse : 9 ;

B.Fouets optimus : 500 ml de crème fraîche. Temps de fonctionnement bref : 4 minutes. Vitesse : 9 ;

C.Crochets pétrisseurs : 900g de farine + 648g d’eau. Temps de fonctionnement bref : 5 minutes. Vitesse : 9.

FR - 8

Sehr geehrter Kunde,

Wir bedanken uns für Ihren Kauf des Handrührgeräts der Baureihe Smeg. Durch die Wahl unseres Produkts haben Sie sich für Lösungen entschieden, die für eine ansprechende optische Gestaltung, vereint mit innovativer Technik, stehen und somit zu einmaligen Einrichtungselementen werden.

So lassen sich Smeg Haushaltsgeräte stets ideal mit anderen Produkten der Serie kombinieren und stellen darüber hinaus Designer-Objekte für die Küche dar. Wir wünschen Ihnen viel Freude mit Ihrem Haushaltsgerät und verbleiben mit freundlichen Grüßen

SMEG S.p.A.

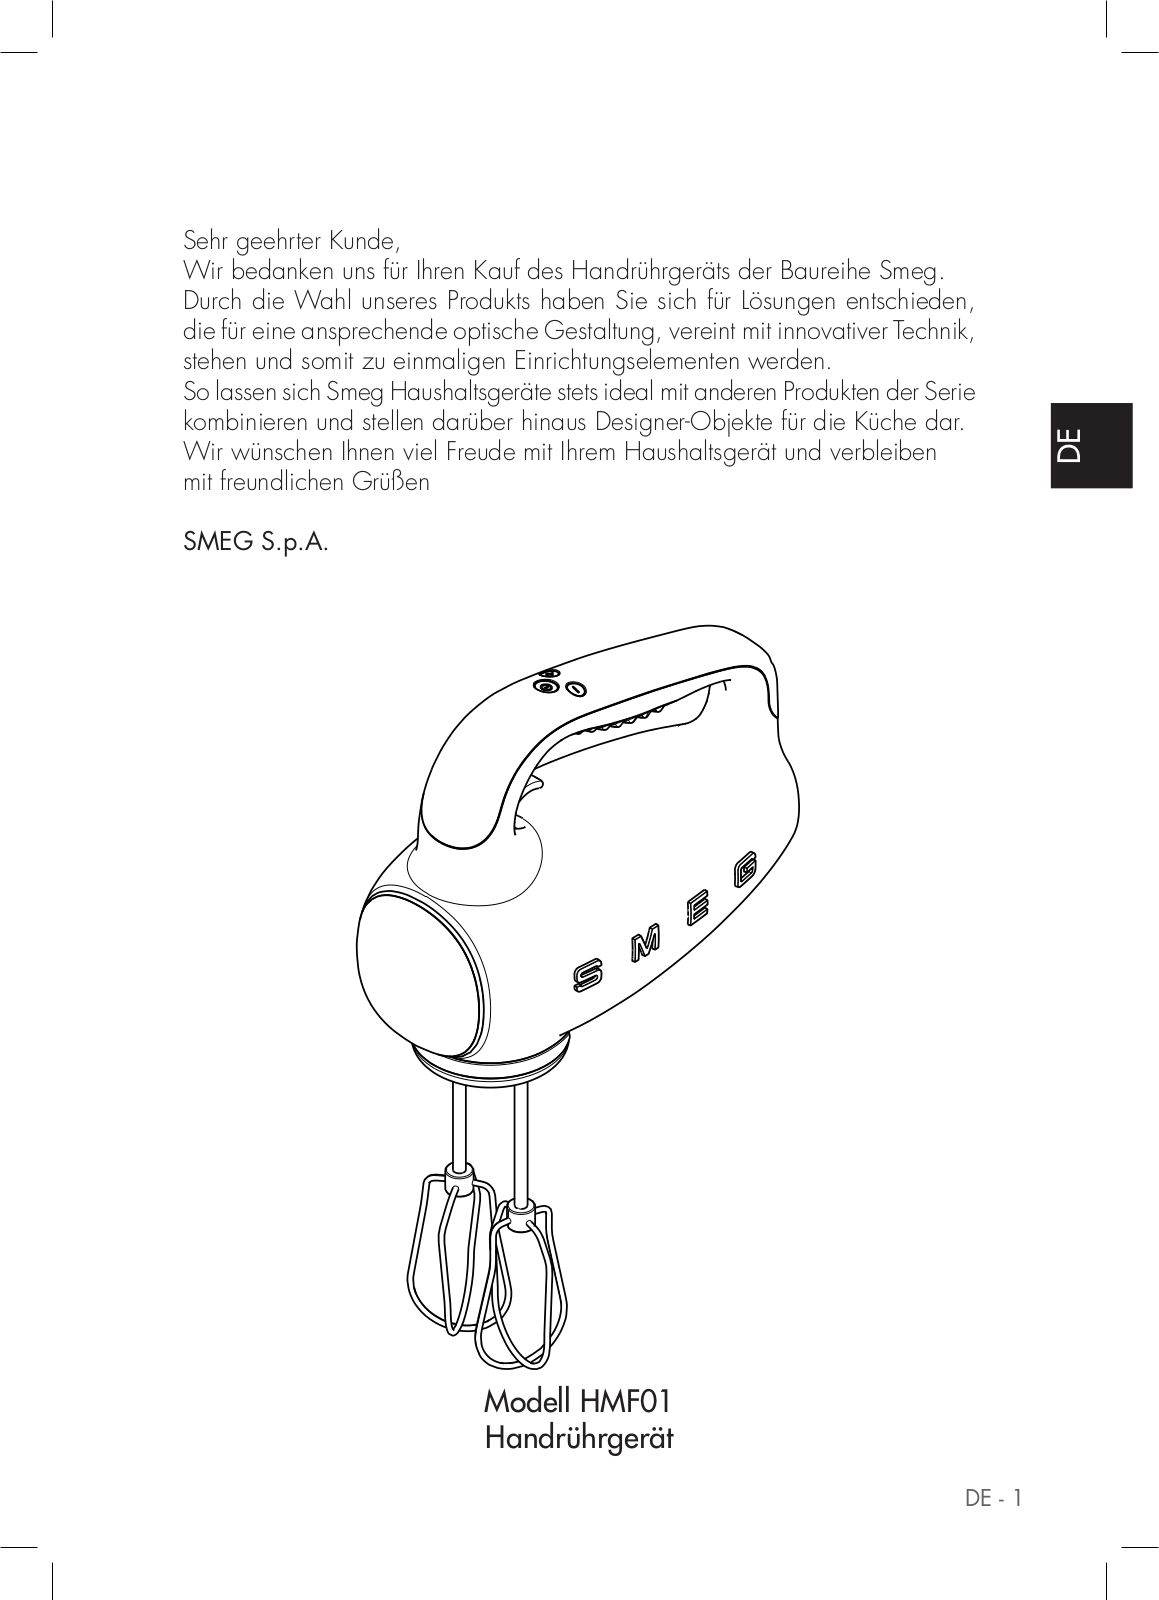
Modell HMF01

Handrührgerät

<![if ! IE]>

<![endif]>DE

DE - 1

Hinweise

SICHERHEIT

Wesentliche Sicherheitshinweise.

Für einen sicheren Betrieb des Geräts, sämtliche Sicherheitsanweisungen befolgen:

Den Stecker nicht mit nassen Händen berühren.

Sicherstellen, dass die Steckdose jederzeit zugänglich ist, um bei Bedarf den Stecker ziehen zu können.

Nicht am Kabel ziehen, es drohen Beschädigungen.

Nicht versuchen, etwaige Defekte zu reparieren.

Das Gerät ausschalten, den Netzstecker aus der Steckdose ziehen und an den technischen Kundendienst wenden.

B e s c h ä d i g t e N e t z s t e c k e r o d e r Versorgungskabel ausschließlich vom technischen Kundendienst ersetzen lassen, um etwaigen Risiken vorzubeugen.

Das Gerät nicht in Wasser tauchen.

Achtung: vor der Reinigung den Netzstecker ziehen.

Das Versorgungskabel nicht über den Tischrand oder andere Flächen hängen lassen und nicht mit heißen Oberflächen in Berührung bringen.

Das Verpackungsmaterial (Plastikbeutel) außerhalb der Reichweite von Kindern aufbewahren.

Dieses Gerät kann von Personen mit eingeschränkten körperlichen, sinnlichen oder geistigen Fähigkeiten oder mit mangelnder Erfahrung und Kenntnis benutzt werden, wenn diese beaufsichtigt werden oder im sicheren Gebrauch des Geräts unterrichtet und die mit dem Gebrauch des Geräts verbundene Gefahr verstanden haben.

Kinder müssen beaufsichtigt werden, um sicherzugehen, dass sie nicht mit dem Gerät

DE - 2

spielen.

Das Gerät nicht auf oder in die Nähe von Elektrooder Gas-Kochplatten oder in einen aufgeheizten Backofen stellen.

Sicherstellen, dass sich in dem Gerät keine Fremdkörper befinden.

Im Fall von zähflüssigen Mischungen, das ununterbrochene Verrühren mit den Knethaken nicht länger als 4 Minuten vornehmen, um Überhitzungen zu vermeiden. Das Gerät 10 Minuten abkühlen lassen, bevor eine weitere Bearbeitung begonnen wird.

Das Gerät ausschalten und vom Netz trennen, bevor die sich beim Betrieb bewegenden Teile berührt werden.

Die Lüftungsschlitze nicht verdecken.

Die Rührbesen in den Behälter mit den Lebensmitteln eintauchen, bevor das Gerät eingeschaltet wird.

Geräteanschluss

Sicherstellen, dass die Netzspannung und Frequenz mit den Angaben auf dem Typenschild am Boden des Geräts übereinstimmen.

Falls der Netzstecker und die Steckdose nicht kompatibel sind, vom technischen Kundendienst auswechseln lassen.

Dieses Gerät darf nicht von Kindern benutzt werden. Das Gerät und das Netzkabel außer Reichweite von Kindern halten.

Kinder dürfen nicht mit dem Gerät spielen.

Wenn das Gerät unbeaufsichtigt ist und vor der Montage, dem Ausbau oder der Reinigung vom Netz trennen.

Das Gerät abschalten oder vom Netz trennen, bevor man Zubehör austauscht oder sich den Teilen in Bewegung beim Betrieb nähert.

Hinweise

Sachund zweckgemäßer Gebrauch

Das Gerät nicht für andere Zwecke als denen, für die es entworfen wurde, verwenden. Das Handrührgerät ist ausschließlich für das Verrühren, Verkneten und das Schlagen von Eiweiß oder Sahne bestimmt.

Das Gerät ist für die Nutzung im Haushalt vergleichbaren Umgebungen bestimmt, wie:

-Im Küchenbereich für Beschäftigte in Geschäften, Büros und sonstigem Arbeitsumgebungen;

-In Bed-and-Breakfast-Einrichtungen und Urlaubs-Bauernhöfen;

-Von Kunden in Hotels, Motels und Wohnanlagen.

Andere Nutzungen, wie in Restaurants, Bars und Cafés, sind missbräuchlich.

Herstellerhaftung

Der Hersteller übernimmt keine Haftung für Personenund Sachschäden, die verursacht wurden durch:

Eine vom vorgesehenen Gebrauch abweichende Gerätenutzung;

Nicht-Lesen der Gebrauchsanleitung;

Manipulationen des Geräts, auch einzelner Teile;

Verwendung nicht originaler Ersatzteile;

Missachtung der Sicherheitshinweise.

Diese Gebrauchsanweisung sorgfäl- tig aufbewahren. Bei Weitergabe an andere Personen muss diese Gebrauchsanweisung mit ausgehändigt werden.

Diese Gebrauchsanweisung können von der Webseite „www.smeg.com“ herunter geladen werden.

ENTSORGUNG

Elektrogeräte dürfen nicht mit dem gewöhnlichen Hausmüll entsorgt werden.

Mit diesem Symbol


gekennzeichnete


Geräte unterliegen der europäischen Richtlinie


2012/19/EU. Alle Elektround Elektronik-


<![if ! IE]>

<![endif]>DE

Altgeräte müssen getrennt vom Hausmüll

entsorgt werden und den entsprechenden,


vom Staat vorgeschriebenen Entsorgungs-


Fachzentren zugeführt werden. Durch die


korrekte Entsorgung des Altgeräts werden


Umweltschäden und

Gesundheitsrisiken für


Menschen vermieden. Weitere Informationen über die Entsorgung des Altgeräts erhalten Sie bei der Gemeindeverwaltung, dem Abfallwirtschaftsamt oder bei Ihrem Gerätehändler.

DE - 3

Beschreibung / Montage / Bedienungen

BESCHREIBUNG DES GERÄTS

(Abb. A)

1Aufnahme des Zubehörs

2Griff

3Auswurfhebel der Rührwerkzeuge

4Geschwindigkeitsanzeige und Timer

5Einund Ausschalttaste

6Tasten Geschwindigkeitsregelung

7Optimus-Quirle

8Knethaken

9Rührbesen

10Zubehörbeutel

11Standfüße

12Typenschild

13Schelle Kabelaufwicklung

TYPENSCHILD (12)

Auf dem Typenschild sind technische Daten, Seriennummer und Kennzeichnung vermerkt. Das Typenschild darf niemals entfernt werden.

VOR DEM ERSTEN GEBRAUCH

Packen Sie das Gerät vorsichtig aus und entfernen Sie alles Verpackungsmaterial sowie etwaige Etiketten und Aufkleber.

Das Motorteil mit einem feuchten Tuch reinigen.

Alle Zubehörteile spülen und sorgfältig trocknen (siehe Abs. „Reinigung und Wartung“).

Vor dem Gebrauch sicherstellen, dass alle Teile unversehrt sind.

MONTAGE DER BESTANDTEILE

(Abb. B)

Die Besen und die Knethaken müssen ordnungsgemäß eingesetzt werden und sind nicht austauschbar.

Den Besen oder den Knethaken mit dem kreisförmigen Wellenbund (A) in die kreisförmige Aufnahme (A) stecken.

Den Besen oder den Knethaken mit dem achteckigen Wellenbund (B) in die achteckige Aufnahme (B) stecken.

Keine Zubehörteile unterschiedlichen Typs gleichzeitig verwenden.

BESCHREIBUNG DER BEDIENELEMENTE UND DER

ZUBEHÖRTEILE

Das Gerät ist mit 3 Tasten und einem Display für die Anzeige der Zeit und der Geschwindigkeit

versehen.


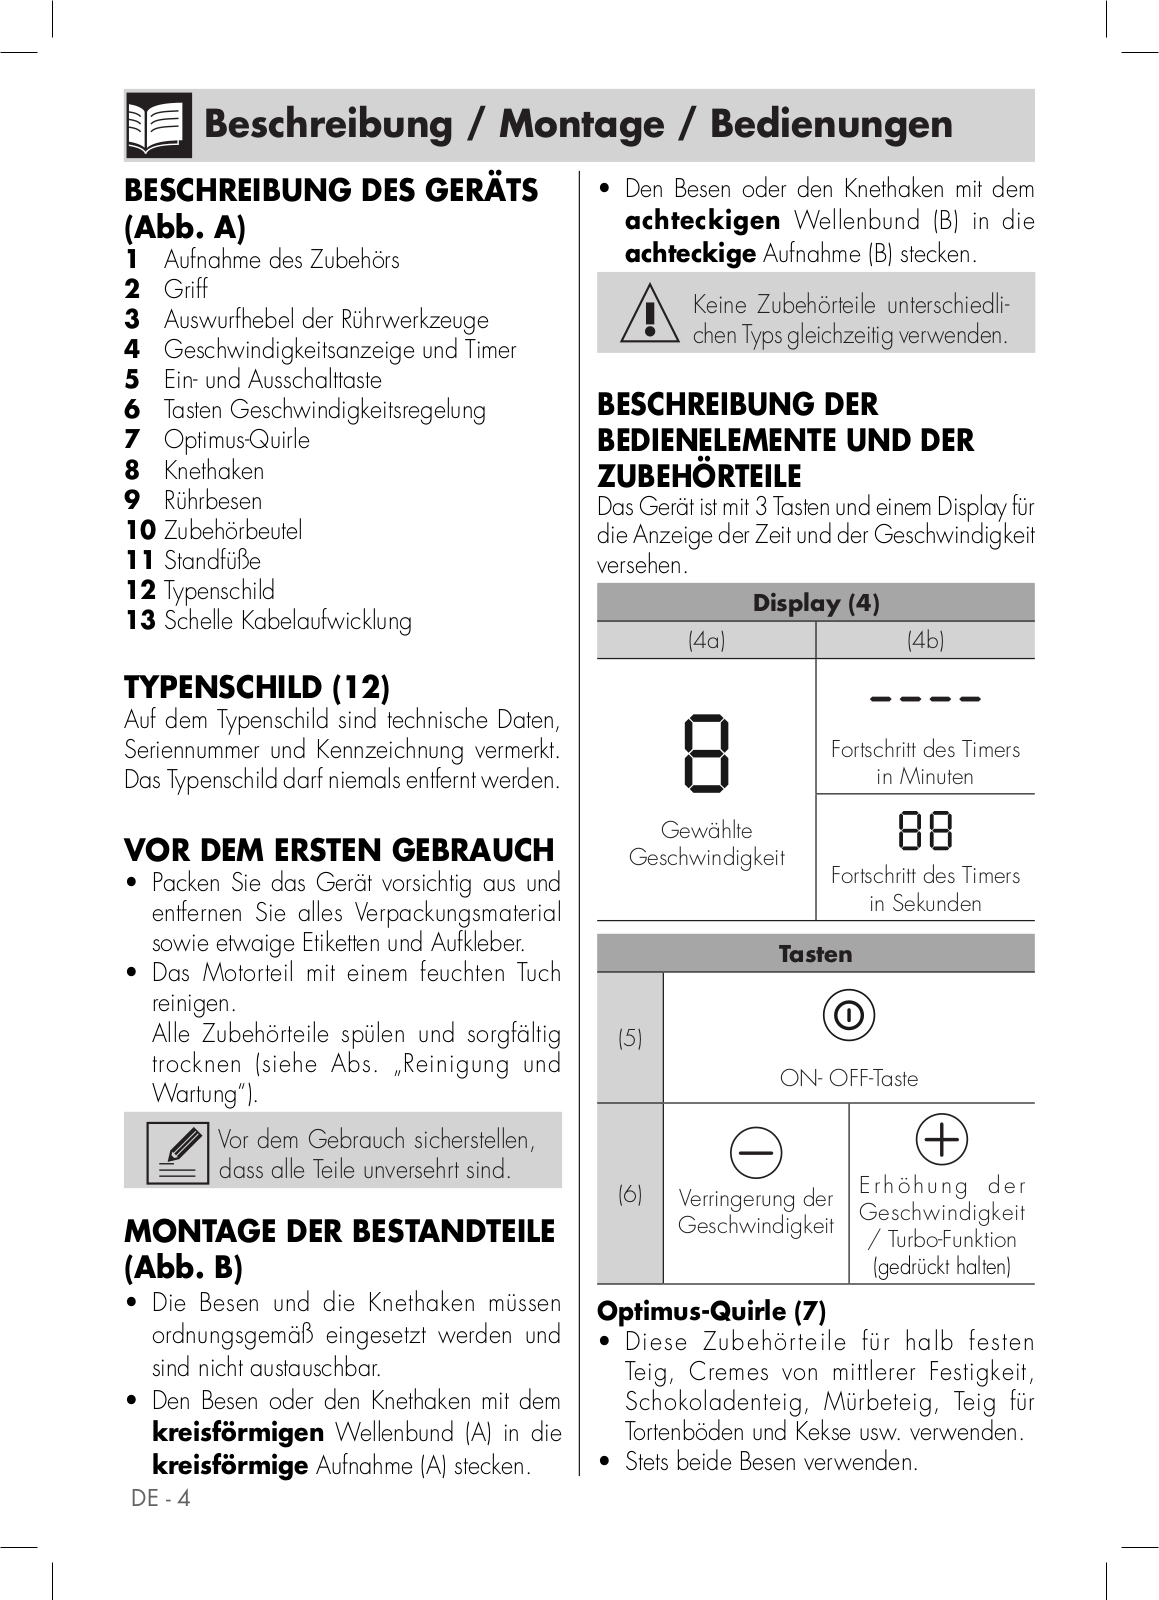
Display (4)


(4a)


(4b)


Fortschritt des Timers


in Minuten


Gewählte


Geschwindigkeit

Fortschritt des Timers


in Sekunden


Tasten


(5)


ON- OFF-Taste


(6)


Verringerung der


E r h ö h u n g d e r


Geschwindigkeit


Geschwindigkeit


/ Turbo-Funktion


(gedrückt halten)


Optimus-Quirle (7)

Diese Zubehörteile für halb festen Teig, Cremes von mittlerer Festigkeit, Schokoladenteig, Mürbeteig, Teig für Tortenböden und Kekse usw. verwenden.

Stets beide Besen verwenden.

DE - 4

Loading...
+ 84 hidden pages