

Page 1

Table of Contents
1. THE ENVIRONMENT - DISPOSAL INSTRUCTIONS ............................................................. 4
2. USER RECOMMENDATIONS ................................................................................................ 5
3. SAFETY PRECAUTIONS ........................................................................................................ 6
4. SUGGESTIONS ...................................................................................................................... 7
5. INSTALLATION AND CONNECTION ..................................................................................... 8
5.1 Overall dimensions .......................................................................................................................................... 8
5.2 Positioning and levelling the appliance ........................................................................................................... 9
5.3 Preparing the Home Garden ......................................................................................................................... 10
5.4 Electrical connection ..................................................................................................................................... 10
5.5 Initial Filling ................................................................................................................................................... 11
6. FIRST USE ............................................................................................................................ 12
7. GETTING TO KNOW YOUR APPLIANCE ............................................................................ 13
8. CONTROL PANEL ................................................................................................................ 14
8.1 External light sensor ...................................................................................................................................... 14
8.2 Internal clock setting/display symbol ............................................................................................................. 14
8.3 Humidity supply/empty tank symbol .............................................................................................................. 14
8.4 Internal temperature/time display .................................................................................................................. 15
8.5 Standby symbol ............................................................................................................................................. 15
8.6 Internal air humidity percentage/minutes display .......................................................................................... 15
8.7 Key lock/unlock symbol ................................................................................................................................. 15
8.8 Internal light ON symbol ................................................................................................................................ 15
8.9 Cuttings function on symbol .......................................................................................................................... 15
8.10 Remote control sensor ................................................................................................................................ 15
9. THE REMOTE CONTROL ..................................................................................................... 16
9.1 Red led .......................................................................................................................................................... 16
9.2 Standby key .................................................................................................................................................. 16
9.3 Cuttings function on key ................................................................................................................................ 17
9.4 Humidifier key ............................................................................................................................................... 17
9.5 Internal light key ............................................................................................................................................ 17
9.6 Clock display/setting key ............................................................................................................................... 18
9.7 Value increase/decrease key ........................................................................................................................ 18
9.8 Replacing the remote control batteries ......................................................................................................... 18
10. USING THE HOME GARDEN ............................................................................................. 19
10.1 Removing and placing the pots in the Home Garden ................................................................................. 19
10.2 Automatic regulation of the internal micro-climate ...................................................................................... 19
10.3 Selecting the programme ............................................................................................................................ 20
10.4 Manual Program .......................................................................................................................................... 20
11. MAINTENANCE AND CLEANING ....................................................................................... 21
11.1 Filling the tank ............................................................................................................................................. 21
11.2 Cleaning the vapour delivery tube ............................................................................................................... 22
11.3 Cleaning the ultrasound vaporiser .............................................................................................................. 22
11.4 Cleaning the base ....................................................................................................................................... 22
11.5 Cleaning the pots ........................................................................................................................................ 22
11.6 Cleaning the glass panels ........................................................................................................................... 22
11.7 Replacing the lamps .................................................................................................................................... 22
12. PROBLEM SOLVING .......................................................................................................... 23
3
Page 2

The environment - Disposal instructions
1. THE ENVIRONMENT - DISPOSAL INSTRUCTIONS
OUR HOME GARDENS ARE PACKAGED ONLY WITH NON-POLLUTANT, ENVIRONMENTFRIENDLY, RECYCLABLE MATERIALS. WE URGE YOU TO COOPERATE BY DISPOSING OF THE
PACKAGING PROPERLY. CONTACT YOUR LOCAL DEALER OR THE COMPETENT LOCAL
ORGANISATIONS FOR THE ADDRESSES OF COLLECTION, RECYCLING AND DISPOSAL
FACILITIES.
NEVER LEAVE ALL OR PART OF THE PACKAGING LYING AROUND: PACKAGING PARTS, AND
ESPECIALLY PLASTIC BAGS, MAY REPRESENT A SUFFOCATION HAZARD FOR CHILDREN.
IMPORTANT: YOUR OLD APPLIANCE MUST ALSO BE DISPOSED OF PROPERLY.
DELIVER THE APPLIANCE TO YOUR LOCAL ORGANISATION AUTHORISED TO COLLECT
SCRAPPED APPLIANCES. PROPER DISPOSAL ALLOWS THE INTELLIGENT RECOVERY OF
VALUABLE MATERIALS.
BY LAW, APPLIANCES MUST ONLY BE DISPOSED OF AT SUITABLY EQUIPPED FACILITIES.
4
Page 3
User Recommendations
2. USER RECOMMENDATIONS
ELECTRICAL CONNECTION: SEE INSTALLATION INSTRUCTIONS FOR SAFETY REGULATIONS
FOR ELECTRICAL APPLIANCES.
IN YOUR INTEREST AND TO ENSURE YOUR SAFETY, BY LAW ALL ELECTRIC APPLIANCES MUST
ONLY BE INSTALLED AND SERVICED BY QUALIFIED STAFF, IN ACCORDANCE WITH THE
RELEVANT REGULATIONS.
GAS OR ELECTRIC APPLIANCES MUST ALWAYS BE DISCONNECTED BY SUITABLY SKILLED
PEOPLE.
THIS MANUAL CONSTITUTES AN INTEGRAL PART OF THE APPLIANCE: TAKE GOOD CARE OF IT
AND KEEP IT TO HAND THROUGHOUT THE APPLIANCE'S LIFE CYCLE. WE URGE YOU TO READ
THIS MANUAL AND ALL THE INFORMATION IT CONTAINS CAREFULLY BEFORE USING THE
APPLIANCE. INSTALLATION MUST BE CARRIED OUT IN COMPLIANCE WITH THE RELEVANT
REGULATIONS. THIS APPLIANCE IS INTENDED FOR HOUSEHOLD USE AND COMPLIES WITH
THE EEC DIRECTIVES CURRENTLY IN FORCE. THE APPLIANCE IS BUILT TO PROVIDE THE
FOLLOWING FUNCTION: GROWING AND CARING FOR PLANTS IN A CONTROLLED
ENVIRONMENT; ANY OTHER USE OF THE APPLIANCE IS IMPROPER USE.
THE MANUFACTURER DECLINES ALL LIABILITY FOR USES OTHER THAN THOSE STATED
ABOVE.
THIS APPLIANCE IS MARKED ACCORDING TO THE EUROPEAN DIRECTIVE 2002/96/EC ON
WASTE ELECTRICAL AND ELECTRONIC EQUIPMENT (WEEE).
THIS GUIDELINE IS THE FRAME OF A EUROPEAN-WIDE VALIDITY OF RETURN AND RECYCLING
ON WASTE ELECTRICAL AND ELECTRONIC EQUIPMENT.
NEVER LEAVE PACKAGING RESIDUES UNATTENDED IN THE HOME. SEPARATE WASTE
PACKAGING MATERIALS BY TYPE AND CONSIGN THEM TO THE NEAREST SEPARATE
DISPOSAL CENTRE.
NEVER OBSTRUCT THE OPENINGS AND SLITS PROVIDED FOR VENTILATION AND HEAT
DISPERSAL.
THIS DOMESTIC HOME GARDEN IS DESIGNED FOR USE IN A CLOSED SPACE, SHELTERED
FROM DIRECT SUNLIGHT.
DO NOT INSTALL IT NEAR TO HEAT SOURCES.
THE REGISTRATION PLATE, WITH ITS TECHNICAL DATA, SERIAL NUMBER AND MARK IS
POSITIONED PROMINENTLY ON THE BASE OF THE HOME GARDEN, AT THE END OF THIS
MANUAL AND ON THE QUALITY CERTIFICATE.
THE REGISTRATION PLATE MUST NEVER BE REMOVED.
WE RECOMMEND OPENING THE HOME GARDEN FOR A FEW MINUTES EVERY DAY: A CHANGE
OF AIR WILL PROMOTE GROWTH AND CARE OF THE PLANTS.
DO NOT OPEN THE APPLIANCE FREQUENTLY OR FOR LENGTHY PERIODS, AS THIS MAY
CAUSE ALTERATIONS TO THE HOME GARDENS INTERNAL MICRO-CLIMATE, WHICH WILL REESTABLISH ITSELF ONLY AFTER A CERTAIN TIME.
The manufacturer declines all responsibility for injury or damage caused by failure to comply with the
above regulations or deriving from tampering with even just one part of the appliance and the use of
non-original spare parts.
5
Page 4
Safety Precautions
3. SAFETY PRECAUTIONS
DO NOT ATTEMPT TO MOVE THE DEVICE BY PULLING ON THE HANDLES OF ITS SLIDING
DOORS OR THE SLIDING TRAY SUPPORTS.
ON INSTALLATION, IF ANY MANUFACTURING DEFECTS OR DAMAGE CAUSED IN TRANSIT ARE
NOTED, CALL YOUR NEAREST SERVICE CENTRE.
FOR INSTALLATION AND CONNECTION, FOLLOW THE INSTRUCTIONS PROVIDED IN THIS
MANUAL ONLY.
IN CASE OF MALFUNCTION, DISCONNECT THE APPLIANCE FROM THE POWER SUPPLY BY
REMOVING THE PLUG, WITHOUT PULLING ON THE POWER SUPPLY LEAD.
ALL REPAIRS OR OTHER WORK NOT COVERED BY THIS MANUAL MUST BE CARRIED OUT BY A
QUALIFIED ENGINEER, WHO CAN BE CONTACTED AT AN AUTHORISED SERVICE CENTRE.
NEVER ATTEMPT TO REPAIR THE APPLIANCE YOURSELF.
NEVER STORE SPRAY CANS CONTAINING FLAMMABLE GASES INSIDE THE APPLIANCE. ANY
LEAKS MAY CONSTITUTE A SERIOUS THREAT TO USERS' SAFETY.
TO RAISE AND LOWER ITS SIDE WALLS, ALWAYS USE ONLY THE PROVIDED HANDLES AND
TAKE CARE NOT TO PLACE YOUR FINGERS ON THE APPLIANCE’S STEEL FRAME.
THE APPLIANCE PRIMARILY IS INTENDED FOR USE BY ADULTS.
CHILDREN OR INFIRM PERSONS SHOULD USE ONLY UNDER ADULT SUPERVISION.
WARNING:
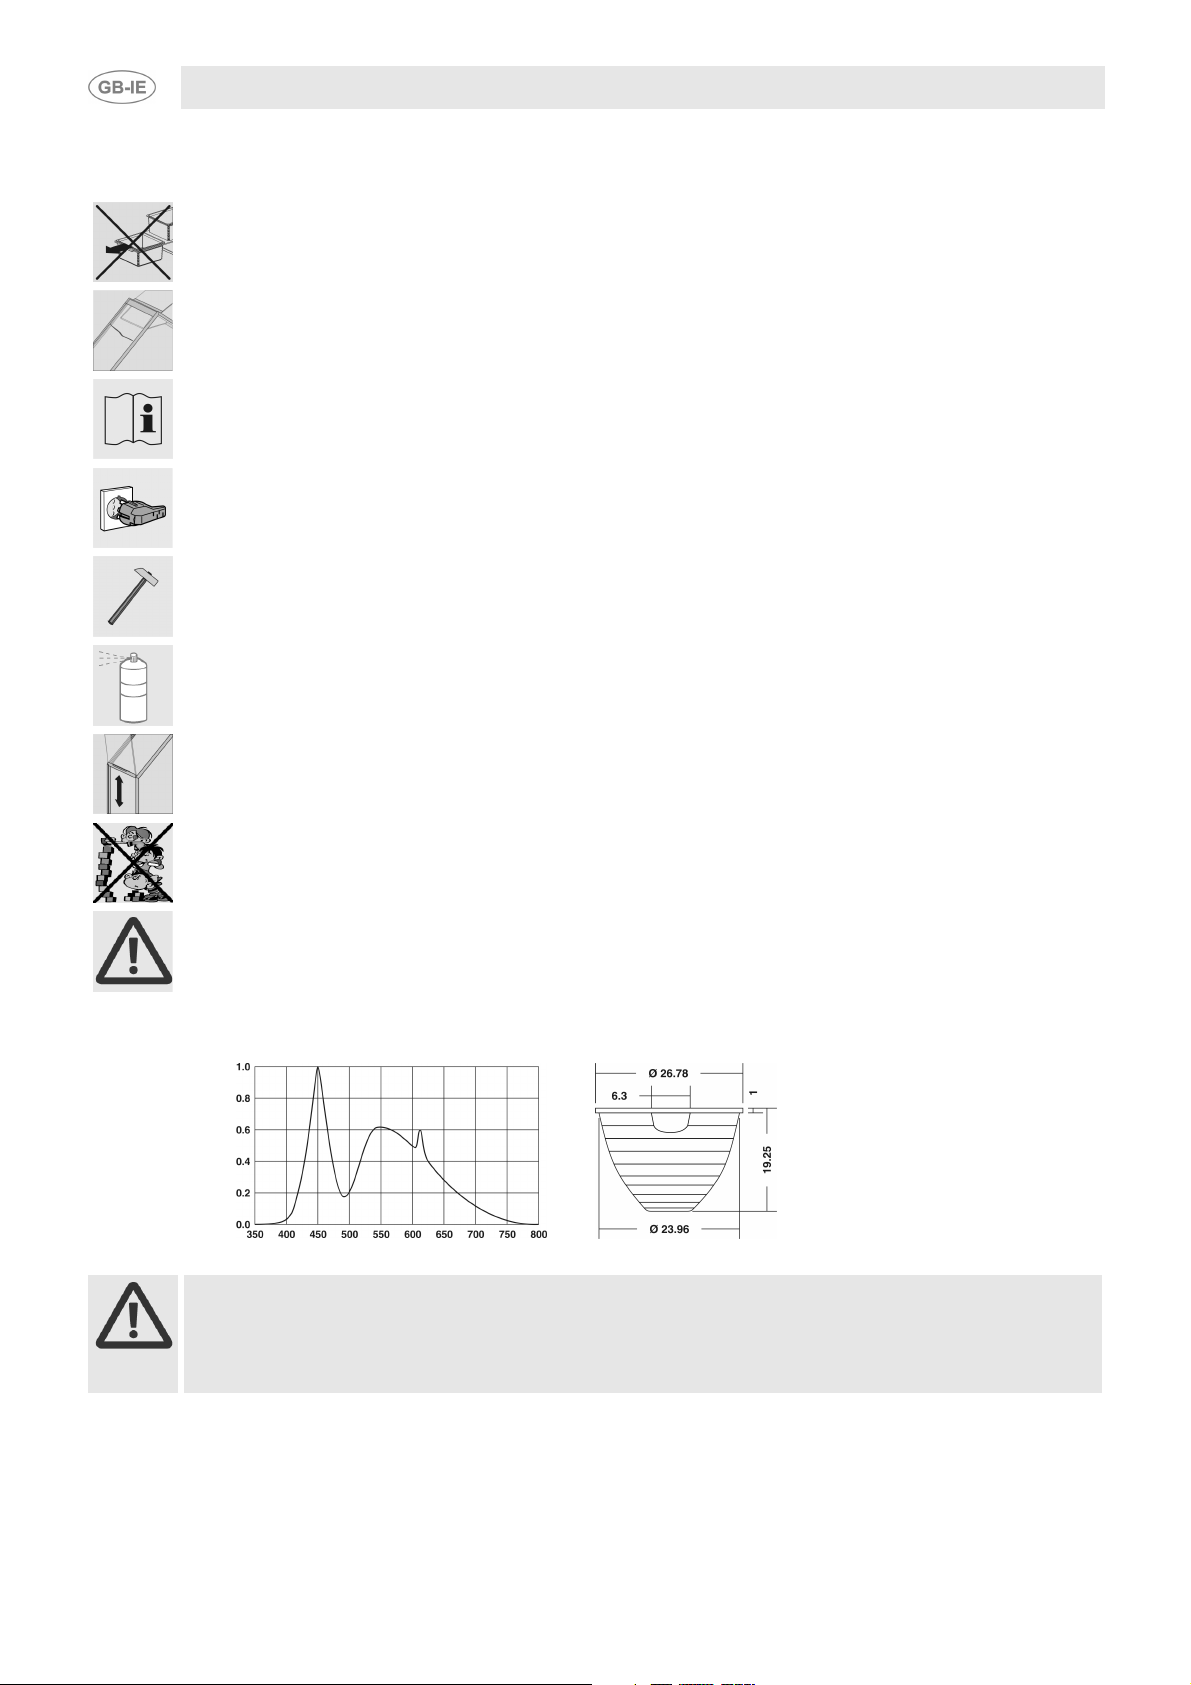
CLASS 1M LED LAMP (EN 60825-1:2003 - IEC 60825-1:1991 + A1:1997 + A2:2001 CONSOLIDATED
EDITION 1.2) - DO NOT VIEW THE BEAM OF LIGHT EMITTED DIRECTLY THROUGH LENSES,
GLASSES, ETC., OR AT DISTANCES OF LESS THAN 10 CM, SINCE THIS MAY BE DANGEROUS
FOR THE EYES.
Wave lenght of peaks LED drawing
Relative spectral
power distribution
GIVEN THE SIZE OF THE GLASS SURFACES OF WHICH IT IS CONSTRUCTED, THE HOME
GARDEN SHOULD BE INSTALLED AWAY FROM DOORS AND WINDOWS TO AVOID ACCIDENTAL
COLLISIONS.
IT SHOULD BE PLACED ON A SUITABLE AND STABLE SURFACE, TO AVOID IT FALLING
ACCIDENTALLY.
Wave lenght (nm)
6
Page 5

Suggestions
4. SUGGESTIONS
REMEMBER THAT PLANTS ARE LIVING ORGANISMS; THEY NEED CARE AND ATTENTION AND
MAY SUCCUMB TO DISEASE AND DIE IF NEGLECTED.
OUR HOME GARDEN, IF USED CORRECTLY, WILL ALLOW YOUR PLANTS TO LIVE IN
CONDITIONS SIMILAR TO THEIR NATURAL ENVIRONMENT.
SUFFICIENT TO ENSURE THAT YOUR PLANTS GROW WITHOUT DISEASE.
YOU MUST ENSURE, FIRST OF ALL, THAT YOU CHOOSE GOOD QUALITY PLANTS, IN GOOD
HEALTH AT THE TIME OF PURCHASE.
YOU MUST THEN CHOOSE THE SOIL WITH CARE, FOLLOWING THE RECOMMENDATIONS OF
YOUR GARDEN CENTRE, AND REGULARLY IRRIGATE, MANURE, TRIM THEM, AND CLEAN
THEIR LEAVES, AND TAKE ALL THE FURTHER MEASURES NECESSARY FOR THEIR CARE.
THESE MEASURES ARE NOT RENDERED UNNECESSARY BY THE USE OF OUR PRODUCT, BUT
ARE INDISPENSABLE FOR HEALTHY GROWTH OF YOUR PLANTS IN THE DOMESTIC
ENVIRONMENT.
THE HOME GARDEN’S MICRO-CLIMATE MUST BE CONSIDERED DYNAMIC, DUE TO ITS SMALL
SIZE. THE ENVIRONMENTAL PARAMETERS OF TEMPERATURE, HUMIDITY AND LIGHTING MUST
BE KEPT WITHIN OPTIMAL SETTINGS AND SMALL DISTURBANCES MAY BE CAUSED BOTH BY
THE USER AND BY THE EXTERNAL ENVIRONMENT, TO WHICH THE HOME GARDEN IS ALWAYS
AND NEVERTHELESS CONNECTED.
THUS, EVEN VARIATIONS IN THE ABOVE PARAMETERS, WHICH CAN BE CAUSED BY PLACING
THE HOME GARDEN IN DIFFERENT LOCATIONS, ARE TO BE CONSIDERED NORMAL.
BUT THIS IS NOT IN ITSELF
7
Page 6
Installation and connection
5. INSTALLATION AND CONNECTION
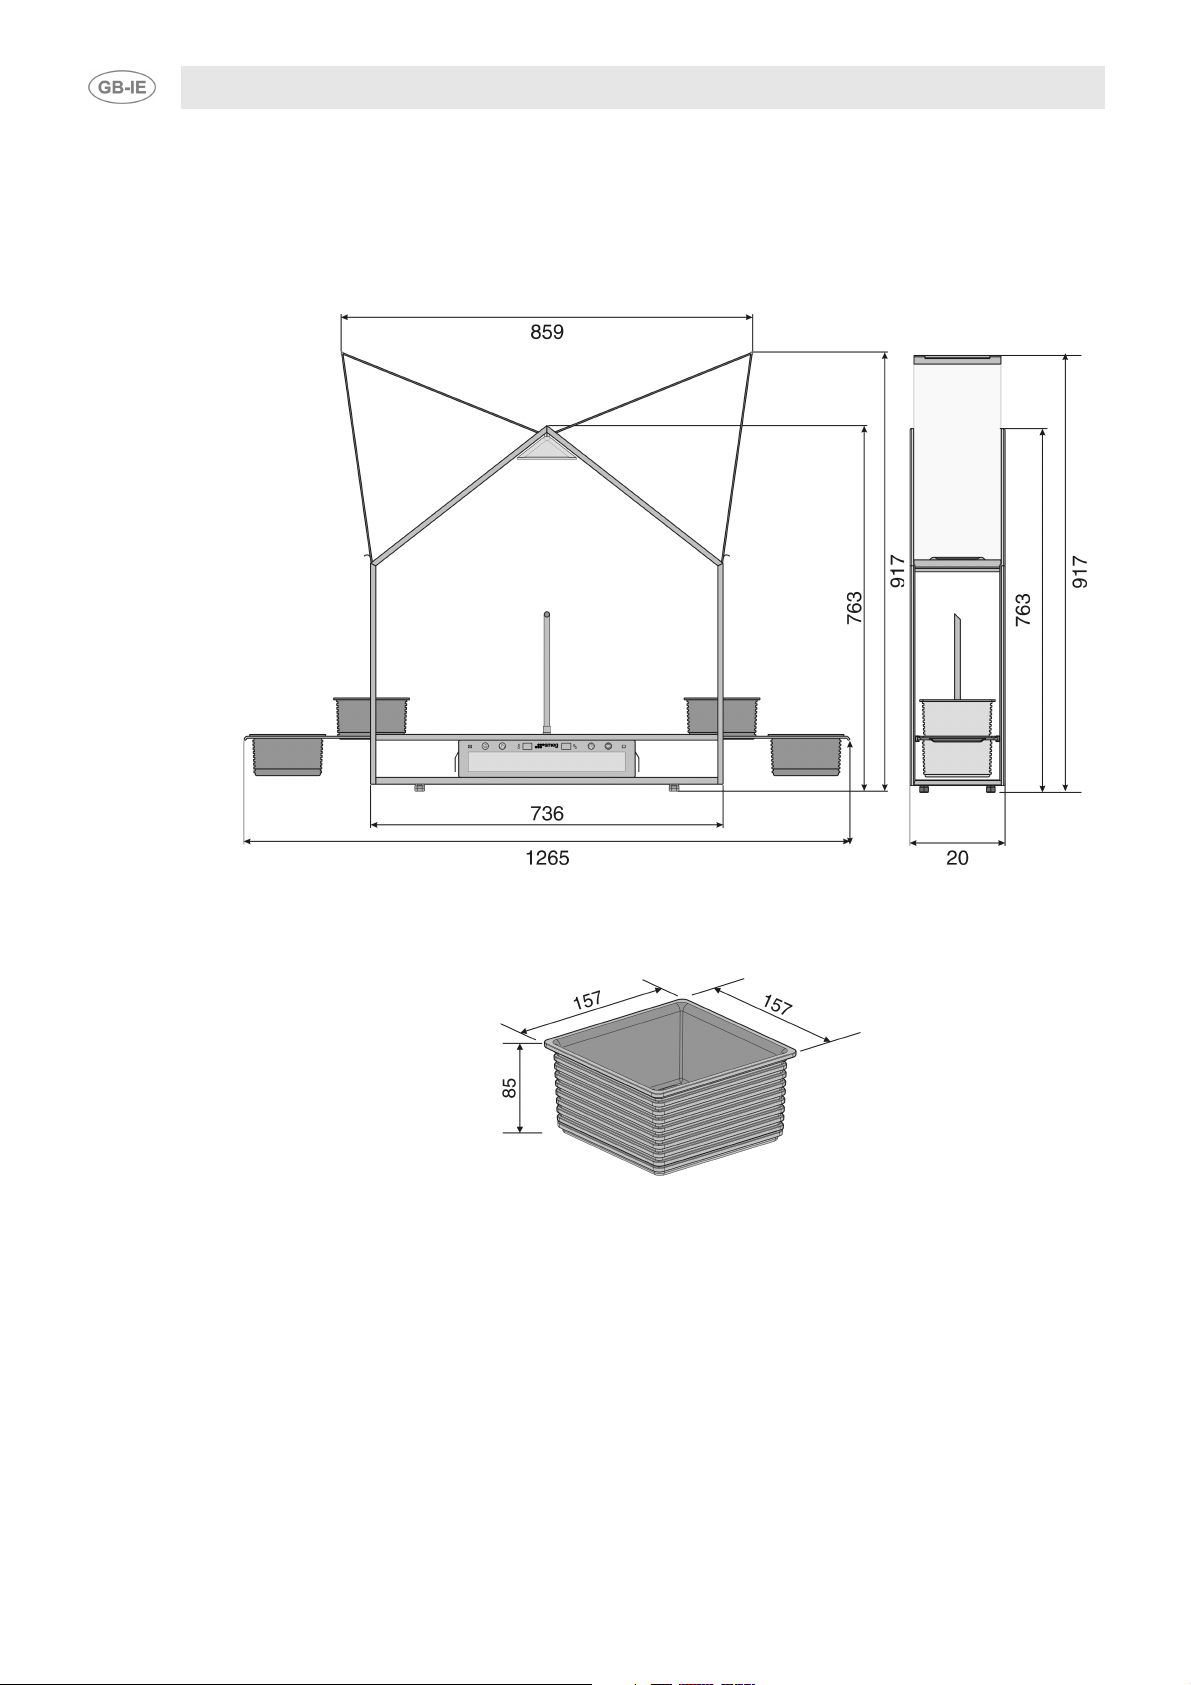
5.1 Overall dimensions
5.1.1 Home Garden’s overall dimensions
The drawing below shows the Home Garden’s maximum overall dimensions with the glass panels and trays open.
(Fig.1)
5.1.2 Pot overall dimensions
The drawing below shows the maximum overall dimensions of the pots.
(Fig. 2)
8
Page 7
Installation and connection
5.2 Positioning and levelling the appliance
Place the Home Garden on a stable, robust surface.
The Home Garden is equipped with 4 adjustable feet for levelling it.
To adjust the feet, simply rotate them as shown in figure 3.
(Fig. 3)
WARNING: DO NOT BLOCK THE GAP BETWEEN THE HOME GARDEN AND ITS SUPPORTING
SURFACE, AS THIS MAY BLOCK THE AIR INTAKES BENEATH IT.
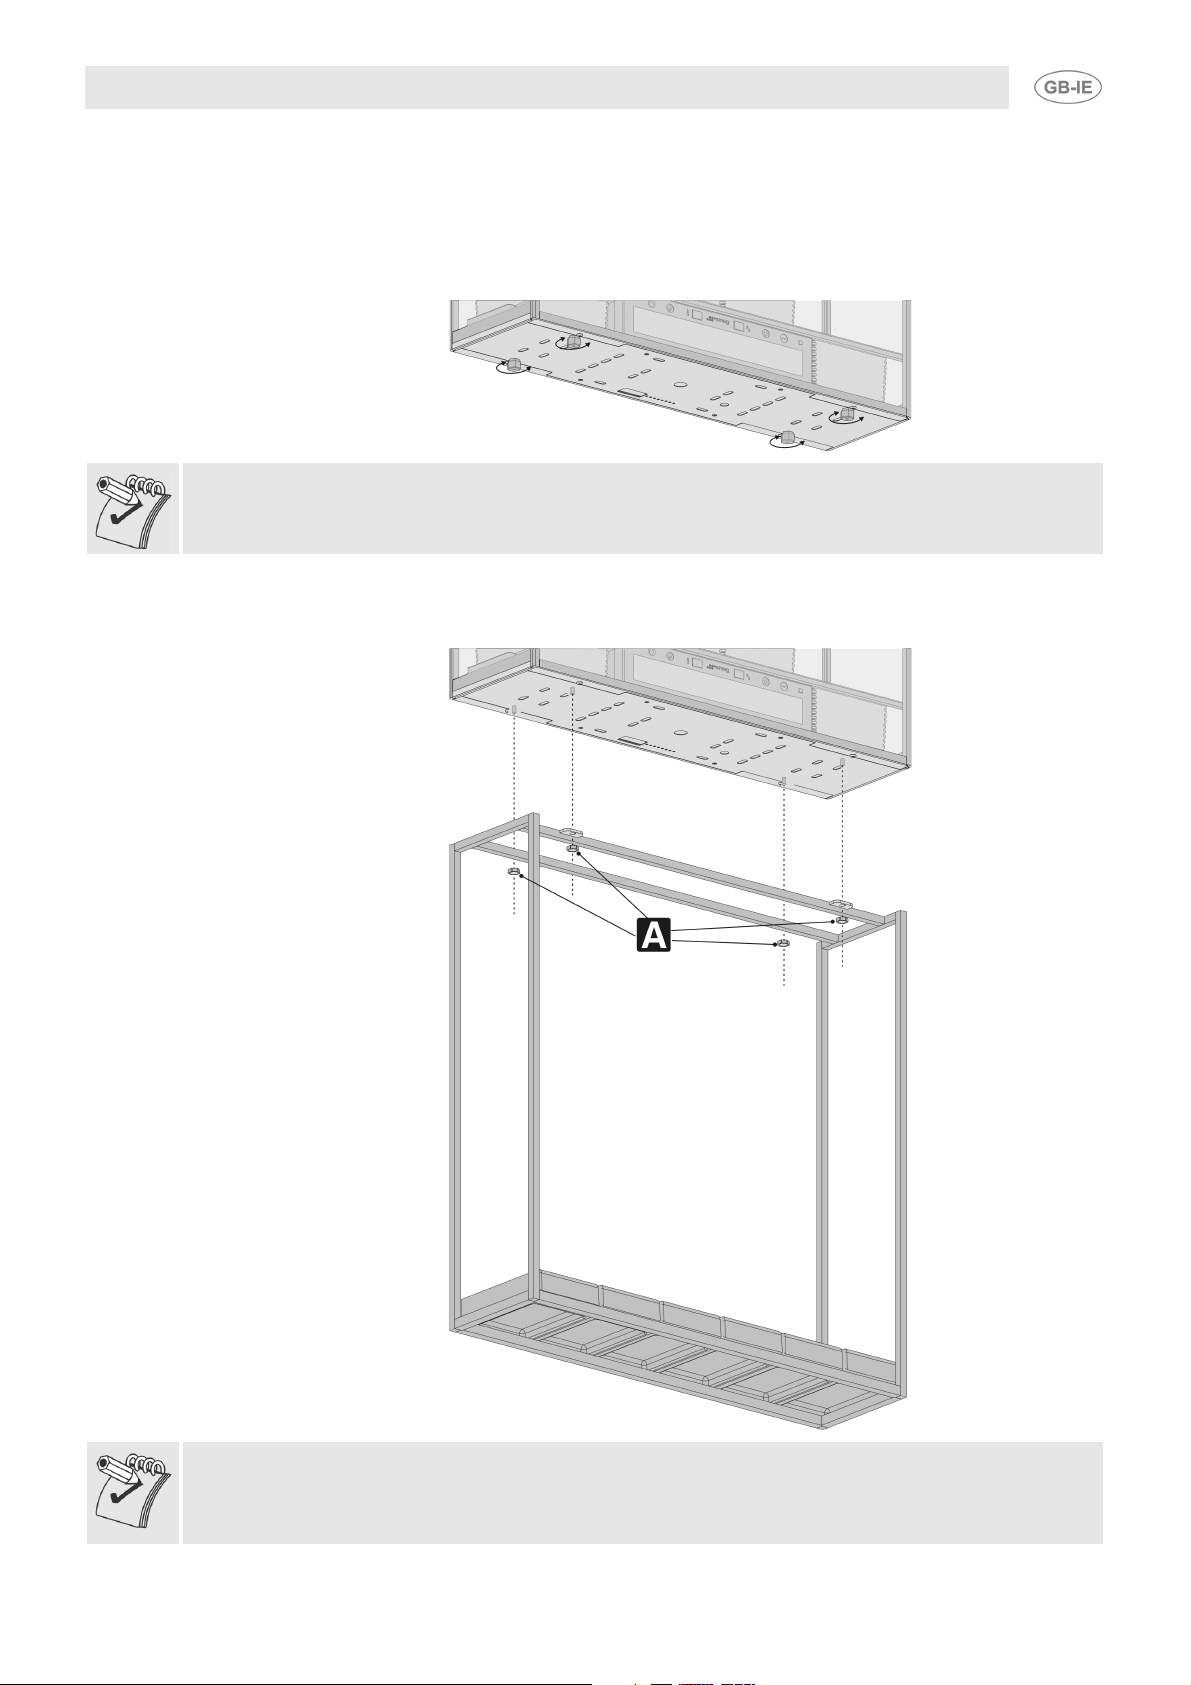
The Home Garden may be placed on a pedestal (optional, available from your service centre).
Completely unscrew the feet and fit the studs into the holes on the pedestal. Now secure the pedestal to
the Home Garden using the 4 provided nuts“A”. (Fig. 4)
(Fig. 4)
ALWAYS PLACE THE HOME GARDEN IN A DRY, WELL VENTILATED LOCATION.
NEVER EXPOSE IT TO DIRECT SUNLIGHT OR INSTALL IT OUTDOORS.
DO NOT INSTALL IT CLOSE TO SOURCES OF HEAT OR DIRECTLY IN THE AIR FLOW FROM A/C
EQUIPMENT.
9
Page 8
Installation and connection
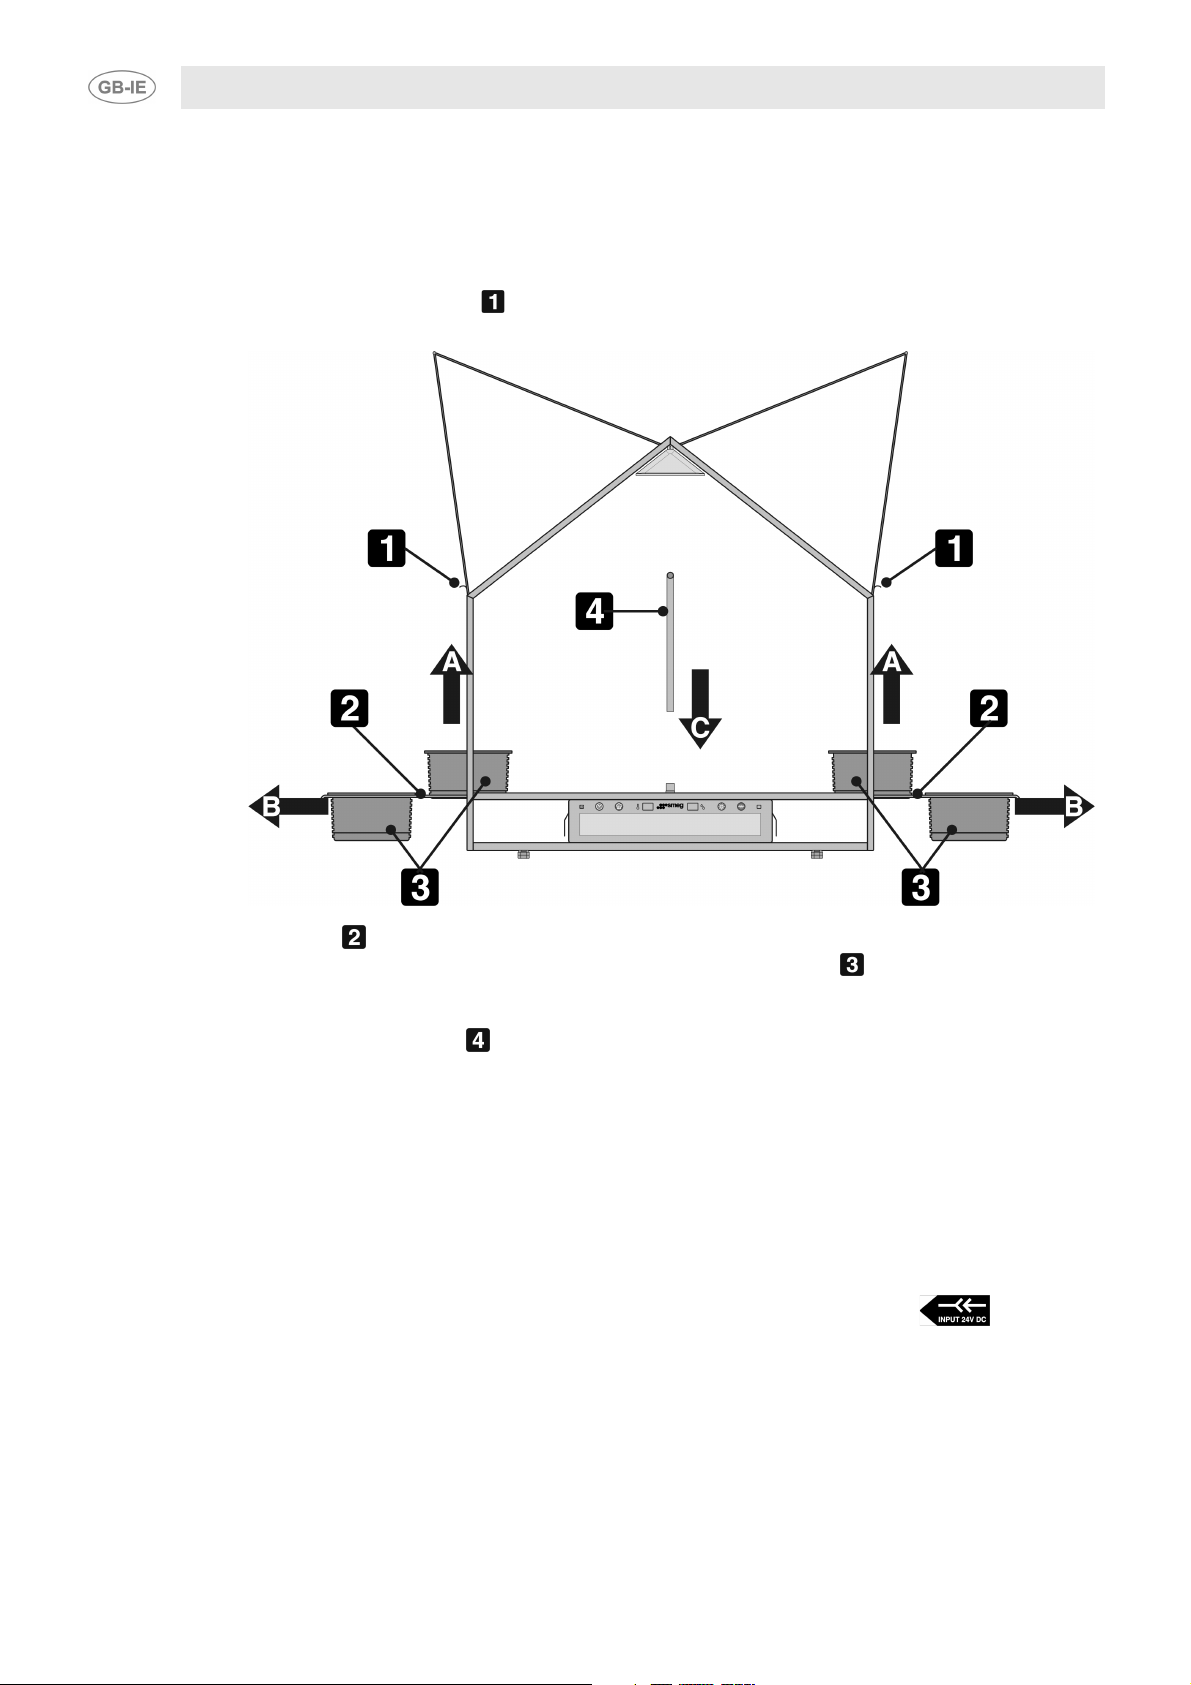
5.3 Preparing the Home Garden
After you have installed your Home Garden according to the instructions in Section "5.2 Positioning and
levelling the appliance", it has to be opened in order to position some parts inside.
Access to the inside of the Home Garden is possible from both side panels.
To open them, grasp the handles (shown in Figure 4) on the lower side glass panels and gently push them upwards until you hear a click (movement A in Figure 5).
(Fig.5)
Two sliding trays ( ) on supports can be removed, as shown by movement “B” in Figure 5.
Included with the Home Garden, you will find a set of 4 special pots ( ) to grow your plants. For
information on placing the pots in their seats, see Section "10.1 Removing and placing the pots in the
Home Garden".
Insert the vapour delivery tube ( ) in its central seat, as shown by movement “C” in Figure 5.
5.4 Electrical connection
Connect the appliance's power supply lead to a mains socket, installed in accordance with electrical
safety regulations. The rated voltage and frequency are stated on the registration plate on the base of
the Home Garden. Always ensure that the indicated values correspond to the mains voltage.
The appliance must be connected to the electrical mains and earthed in compliance with the relevant
regulations and requirements. If the power supply lead has to be replaced, this operation must only be
carried out by an authorised Smeg technical service engineer.
The Home Garden is a low voltage device (24 V) and is supplied with a transformer which goes close
to the mains socket.
To connect the unit to the mains, plug the transformer jack into the socket marked on the base of the Home Garden (Point 1 of figure 6); plug the power cord into the transformer (Point 2 of figure 6) and plug its other end into the mains socket.
10
Page 9

Installation and connection
(fig. 6)
5.5 Initial Filling
The Home Garden’s tank is empty when purchased. It must be filled for the appliance to operate.
For filling instructions, see “"11.1 Filling the tank"” on page 21.
IT IS ADVISABLE TO FILL THE TANK ONLY AFTER THE HOME GARDEN HAS BEEN POSITIONED.
11
Page 10

First use
6. FIRST USE
The inside of the appliance should be cleaned to remove all manufacturing residues. For further information, see "11. Maintenance and cleaning".
The following are the only procedures required to start up the Home Garden when using it for the first
time:
1 switch on the Home Garden by pressing the button on the remote control (see Section "9.2
Standby key");
2 select the program depending on the type of plants you wish to grow (see paragraph "10.3 Selecting
the programme");
3 set the time (see paragraph "9.6 Clock display/setting key");
4 fill the tank (see paragraph "11.1 Filling the tank");
12
Page 11

Getting to know your appliance
7. GETTING TO KNOW YOUR APPLIANCE
HUMIDIFIER WATER
TA NK
CONTROL PANEL
SLIDING TRAYS
PLANT POTS
VAPOUR DELIVERY
TUBE
LED LAMP
HUMIDITY AND
INTERNAL
TEMPERATURE
SENSOR
TAN K F I L LE R CAP
(FIG. 7)
H E AT I N G P LATES
13
Page 12

(Fig. 8)
Control panel
8. CONTROL PANEL
EXTERNAL LIGHT SENSOR
INTERNAL CLOCK SETTING/DISPLAY SYMBOL
HUMIDITY SUPPLY/EMPTY TANK SYMBOL
INTERNAL TEMPERATURE/TIME DISPLAY
STANDBY SYMBOL
INTERNAL AIR HUMIDITY PERCENTAGE/MINUTES DISPLAY
REMOTE CONTROL LOCK SYMBOL
LED LAMP MAXIMUM LIGHT SYMBOL
CUTTINGS FUNCTION SYMBOL
REMOTE CONTROL INFRARED SENSOR
8.1 External light sensor
This sensor detects the environmental light level also controlling the lamp on or off during lighting period set with the program.
8.2 Internal clock setting/display symbol
14
This symbol indicates that the key on the remote control has been pressed to show the current time on the displays. For instructions for setting the time, see "9.6 Clock display/setting key"
8.3 Humidity supply/empty tank symbol
This symbol lights up whenever the key on the remote control is pressed. It flashes when the water
tank level goes into reserve and the humidifier is no longer able to deliver the required vapour. For filling
the water tank, read paragraph "11.1 Filling the tank".
In normal operating conditions, the tank will ensure correct humidification for 25-30 days. This value is
approximate and will depend on the climatic conditions and program selected.
Page 13

Control panel
8.4 Internal temperature/time display
During normal operation, this displays the Home Garden’s internal temperature.
When first switched on, after a power shutdown or when the key is pressed, the display shows the
time for setting. For instructions for setting the time, see "9.6 Clock display/setting key"
The Home Garden does not have a cooling function. It follows that the internal temperature will never be
lower than the external temperature.
8.5 Standby symbol
When this is the only symbol lit up on the control panel, the appliance is in standby.
8.6 Internal air humidity percentage/minutes display
During normal operation, this displays the Home Garden’s internal relative humidity (in %).
When first switched on, after a power shutdown or when the key is pressed, the display shows the
time for setting. For instructions for setting the time, see "9.6 Clock display/setting key".
The Home Garden does not have a dehumidifying function. It follows that the internal humidity will never
be lower than the external humidity.
8.7 Key lock/unlock symbol
When the remote control has not been used for ten minutes consecutively, the Home Garden locks its
current setting and commands are not accepted from the remote control. This is a precaution against
misuse, accidental or in play, by children, who may attempt to change the settings and thus affect the
growth of the plants.
For instructions for deactivating the lock, see "9.2 Standby key".
8.8 Internal light ON symbol
This symbol lights up whenever the key of the remote control is pressed, and stays on for around a
minute during day time, and an hour at night. It can be switched off manually at any time by pressing the
key when it is on. For instructions for the internal lighting function, see "9.5 Internal light key".
8.9 Cuttings function on symbol
This symbol indicates that the “Cuttings” function is activated.
If it is flashing, this means that the climatic conditions do not allow for activating the function.
For instructions for the “Cuttings” function, see "9.3 Cuttings function on key".
8.10 Remote control sensor
This sensor receives the signals emitted by the remote control whenever its keys are pressed and sends
them to the control circuitry, which activates the corresponding components. Ensure that it is never
blocked by any obstacles: they will block the signals from the remote control.
15
Page 14

Remote control
9. THE REMOTE CONTROL
RED LED
STANDBY KEY
“CUTTINGS” KEY
HUMIDIFIER KEY
INTERNAL LIGHT KEY
CLOCK DISPLAY/SETTING KEY
VALUE DECREASE KEY
VALUE INCREASE KEY
(Fig. 9)
9.1 Red led
This led switches on whenever any key is pressed to confirm that the signal has been sent to the control panel.
9.2 Standby key
This key activates the appliance’s circuitry when it is in standby. When it is reconnected to the power
supply, or after a lengthy power shutdown, the Home Garden will start up with the settings it had when it
was switched off. In particular, when first switched on, the Home Garden will be in standby, as shown by
the display described in point , page 15. To activate automatic operation, simply point the remote
control at the appliance and press the key.
Once automatic operation has been activated, the appliance’s circuitry will run a check of the displays
and all control panel leds will light up.
Once this check has terminated, the system will ask you to select one of the 3 pre-set programs or the
manual setting program . For selection of the right program and how to activate it, refer to "10.3
Selecting the programme".
Once the program has been selected, the appliance will prompt you to set the time. For instructions for
setting the time, see "9.6 Clock display/setting key".
The key is also used for unlocking the Home Garden’s settings: Ten minutes after any button has
been pressed for the last time, the Home Garden enters the "lock" mode and a dot lights up on the
humidity display (see point page 14). This is a precaution against misuse, accidental or in play, by
children, who may attempt to change the settings and thus affect the growth of the plants.
To unlock the settings, point the remote control at the Home Garden and hold this key down for a few
seconds until the point on the display disappears. It is now possible to use the other keys on the remote
control again.
16
Page 15

Remote control
WARNING: WHEN IN STANDBY, THE HOME GARDEN NO LONGER AUTOMATICALLY CONTROLS
ITS INTERNAL CLIMATE.
IN CASE OF A POWER BLACKOUT, THE ELECTRONIC CIRCUIT BOARD WILL RETAIN THE LAST
PROGRAM SET BY THE USER IN THE MEMORY, AND WILL REPEAT IT AUTOMATICALLY WHEN
THE POWER SUPPLY IS RESTORED..
9.3 Cuttings function on key
This key activates the “Cuttings” function, which automatically operates the Home Garden’s heating
elements.
This is intended for growing cuttings or immediately after planting seeds. The pots intended for this
function are those around the edge of the lowest level.
When this function is activated, the symbol stays on.
This function can be switched off automatically when the internal temperature exceeds the maximum
permitted value, or manually by pressing the key again at any time.
In certain conditions, the function may not even activate. If for example the external temperature is
greater than that set for the cuttings function, it will not activate and the symbol on the Home
Garden’s control panel will flash three times.
WARNING: BY ACTIVATING THIS FUNCTION, THE STEEL SURFACES ON THE TANK SIDES HEAT
UP. IN THAT POSITION THE HEATING ELEMENTS ACTIVATED BY THIS FUNCTION ARE ON. DO
NOT TOUCH THESE PANELS WITH YOUR BARE HANDS BEFORE ALLOWING THEM SUFFICIENT
TIME TO COOL DOWN.
9.4 Humidifier key
This key manually delivers a few jets of water vapour into the Home Garden. Once the series of jets is finished, or by pressing the key again before the end of the sequence, the appliance will return to normal operation.
WARNING: THE APPLIANCE’S INTERNAL CIRCUITRY CONTROLS THE AMOUNT OF VAPOUR
DELIVERED INTO IT. ONCE THE MAXIMUM NUMBER OF JETS HAS BEEN REACHED, THE
SYSTEM WILL NOT DELIVER ANY MORE UNTIL A CERTAIN PERIOD OF TIME HAS PASSED.
THE FIRST 20-30 JETS OF VAPOUR DELIVERED BY THE HUMIDIFIER WILL BE LESS INTENSE
THAN SUCCESSIVE ONES.
9.5 Internal light key
This key switches the internal light lamps on and off.
If the lamps are on (at any strength) and you press the
maximum power for about one minute and then return to their automatically determined strength.
If the lamps are completely off, pressing this key turns them on at full strength and they will stay on for
about one hour.
In both cases, the lamps can be returned to their automatic setting by pressing the key again.
WARNING: DEPENDING ON THE EXTERNAL LIGHTING INTENSITY, THE INTERNAL LAMPS WILL
EMIT A STRONGER OR WEAKER LIGHT. LOW LIGHT OUTPUT DOES NOT INDICATE A
MALFUNCTION; THEY STAY ON DURING THE DAY OR IN STRONG EXTERNAL LIGHTING AT A
LOW SETTING.
key on the remote control, they will turn on at
17
Page 16

Remote control
9.6 Clock display/setting key
This key is used for displaying and setting the time.
When the key is held down for a few seconds, the symbol lights up on the control panel and the
orange time display flashes. Use the and keys to set the hour. Now press the key to set the
minutes on the blue display, with the and keys.
Once the time is set, press the key again: the display will stop flashing and after a few seconds will
show the external temperature (right) and humidity (left) and the Home Garden will start automatic
internal climate regulation as set in the selected program.
During normal operation and when the Home Garden is not locked, press the key once to display the
time.
For the preset programs, see "10.2 Automatic regulation of the internal micro-climate" and "10.3
Selecting the programme".
9.7 Value increase/decrease key
These keys are used for setting the time as described in paragraph "9.6 Clock display/setting key" and
selecting the Home Garden’s preset operating programs.
For the preset programme, see "10.2 Automatic regulation of the internal micro-climate" and "10.3
Selecting the programme".
9.8 Replacing the remote control batteries
Once they are exhausted, the provided batteries can be replaced with a pair of normal AAA batteries.
Exhausted batteries should be disposed of in a specific waste disposal container.
18
Page 17

Using the Home Garden
10.USING THE HOME GARDEN
At first switch-on, the circuit board automatically presets for the use of program . The symbol flashes to indicate that the time must be set on the control circuit board. For instructions on this procedure, see point "9.6 Clock display/setting key".
WARNING: THE HOME GARDEN CAN ONLY BE OPERATED WITH THE REMOTE CONTROL.
THE CONTROL PANEL ON THE FRONT OF THE APPLIANCE IS PURELY AESTHETIC AND DOES
NOT OPERATE THE HOME GARDEN.
10.1 Removing and placing the pots in the Home Garden
To remove the pots from the appliance, proceed as follows:
Lift the appliance’s two side panels by their handles. The panels are mounted on sliding supports and
should be lifted gently to their maximum extension by simply pulling upwards. At this point, with both side
panels raised, the two sliding trays on which the pots are located can be pulled out. Take care not to exert
excessive force: the end stop which prevents them from falling may be damaged by this. Once the two
sliding trays are fully extended, the pots are available for use.
To refit them inside the Home Garden, simply repeat the same operations in reverse order.
WARNING: DIFFERENT POTS FROM THOSE SUPPLIED WITH THE HOME GARDEN MAY NOT BE
SUITABLE FOR GROWING YOUR PLANTS IN THE APPLIANCE
WARNING: THE HOME GARDEN IS CONSTRUCTED LARGELY OF GLASS. PROCEED GENTLY
AND WITH CARE WHEN HANDLING.
10.2 Automatic regulation of the internal micro-climate
The Home Garden is equipped with three sensors (humidity, light and temperature) which allow its
circuitry to control its environmental variables in accordance with the selected program.
There are three programs for the various types of plant you may wish to grow in the appliance.
The following table explains the types of plants which each program is intended to work with.
PROGRAM PLANTS OPERATING PARAMETERS
1 Green plants (decorative,
indoors), indoors bonsai,
cuttings and orchids.
2 Succulents. (eg. Cacti) - Low humidity.
3 Flowering plants
and seedlings.
CHECK THAT THE SELECTED PROGRAM IS SUITABLE FOR THE PLANTS YOU INTEND TO
GROW, WHICH MUST OBVIOUSLY ALL BE OF THE SAME TYPE.
IF, FOR EXAMPLE, YOU DECIDE TO REPLACE YOUR SUCCULENTS WITH GREEN PLANTS, YOU
MUST CHANGE FROM PROGRAM 2 TO PROGRAM 1 AS DESCRIBED ABOVE.
- High humidity.
- Automatic heating when the external temp-perature is lower than 18°C.
- In case of insufficient external light, the appliance’s lights stay on from 7:00 to 20:00.
- Low ventilation frequency.
- Automatic heating when the external
temperature is lower than 20°C.
- In case of insufficient external light, the appliance’s lights stay on from 7:00 to 21:00.
- High ventilation frequency.
- Moderate humidity.
- Automatic heating when the external temp-perature is lower than 18°C.
- In case of insufficient external light, the appliance’s lights stay on from 7:00 to 20:00.
- Average ventilation frequency.
19
Page 18

Using the Home Garden
10.3 Selecting the programme
When first switched on or when the
dot in the left hand temperature display (see point
the remote control at the appliance and press the key.
Once automatic operation has been activated, the appliance’s circuitry will run a check of the displays and all
control panel leds will light up.
Once this check has terminated, the system will ask you to select one of the 4 programs available
The symbol (followed by a number from 1 to 4) will flash on the left-hand display (the orange one). Use the
and keys to scroll through the 4 programmes ( ; ; ; ). To choose the type of
programme, see Section "10.2 Automatic regulation of the internal micro-climate".
If a programme symbol appears on the display for more than 5 seconds, the respective programme will
activate.
This procedure shows how to select a programme starting from standby.
Once the program has been selected, the appliance’s circuitry will ask you to set the time as described in
paragraph "9.6 Clock display/setting key".
TO CHANGE THE PROGRAMME DURING NORMAL OPERATION, PROCEED AS FOLLOWS.
PRESS THE KEY ONCE: THE CURRENT PROGRAMME WILL DISPLAY ON THE ORANGE
DISPLAY FOR A FEW SECONDS. NOW HOLD DOWN THE SAME KEY FOR THREE SECONDS;
THIS RETURNS TO THE PROGRAMME SELECTION PROCEDURE AND A NEW PROGRAM CAN
BE SELECTED IN THE WAY DESCRIBED IN THE FIRST PART OF THIS PARAGRAPH.
THE HOME GARDEN AUTOMATICALLY REGULATES THE TEMPERATURE, HUMIDITY AND
LIGHTING, BUT IT SHOULD BE RECALLED THAT EVEN IN THESE OPTIMAL CONDITIONS, THE
PLANTS NEED FRESH AIR.
key is pressed, the Home Garden is in standby, as indicated by the
, page 36
). To activate automatic operation, simply point
.
10.4 Manual Program
The Home Garden has a “manual” program in which the operating parameters (temperature and
humidity) can be modified.
To do this, select program (as described in point "10.3 Selecting the programme"). To modify the
preset programs keep the key depressed for a few seconds if you wish to modify the humidity value,
or the key if you wish to modify the temperature value. In this modification mode, the display of the
value being changed will flash.
The parameters can be modified using the and keys.
5 seconds after the last key is pressed, the displays stop flashing and the values set are saved.
Pressing the and keys quickly once activates the "vaporiser" and "cuttings" functions as already described.
The manual control program allows the user to set a number of parameters which control the
microclimate inside the Home Garden.
However, it must be remembered that whether these parameters are actually reached and maintained
over time depends on the external environment surrounding the Home Garden. The heating elements
inside the Home Garden are located underneath the pots on the bottom level (as shown in Fig. 7 on
page 35) and heat both the soil and the air.
Because of this dual action, to prevent damage to the plants inside the Home Garden it is important
always to set an internal temperature not much higher than the surrounding room temperature. To
reduce overheating risks, the Home Garden never heats to a temperature more than 4-5°C higher than
the room temperature.
The maximum temperature that can be set with the manual program is 25 °C.
The maximum humidity that can be set with the manual program is 90%. To prevent overheating of
the ultrasound nebuliser, the Home Garden operates it in on/off mode. Therefore, whether or not the
preset humidity level is reached depends on the humidity of the Home Garden's external environment
and the nebuliser cycle selected.
20
Page 19

Maintenance and cleaning
11.MAINTENANCE AND CLEANING
DISCONNECT THE ELECTRICAL POWER SUPPLY BEFORE ANY PROCEDURE THAT REQUIRES
ACCESS TO LIVE PARTS.
The Home Garden requires very simple periodic maintenance and cleaning; if done regularly, it will be keep in excellent operating and aesthetic condition.
11.1 Filling the tank
The Home Garden’s tank is empty when purchased. It must be filled in order for the appliance to
operate.
It is best to fill the tank only after having positioned the Home Garden.
The tank water level can be seen through the front window, under the control panel.
When the level falls below a certain value, the symbol on the control panel will start flashing. When this symbol is flashing, the humidifier is not able to generate vapour and the tank must be filled as follows.
WHEN THE SYMBOL STARTS FLASHING, SOME AMOUNT OF WATER IS STILL LEFT IN THE
TANK, BUT IT CANNOT BE USED.
Extract the sliding trays and pots as described in paragraph "10.1 Removing and placing the pots in the
Home Garden". With the trays and pots extracted, remove cap “A” by lifting it off as shown in the figure.
Use a garden watering can to slowly fill the tank through hole “B”. A float inside the tank slowly rises as
the water level increases and indicates when the tank is full .
Always check that the water level does not exceed the “max” mark on the front of the tank.
Once the tank is full, close the cap, refit the pots, slide the trays back in and lower the side panels.
AFTER FILLING THE TANK, PRESS THE KEY ON THE REMOTE CONTROL TO SWITCH OFF
THE FLASHING SYMBOL ON THE CONTROL PANEL AND RETURN TO NORMAL OPERATION.
(Fig. 10)
21
Page 20

Maintenance and cleaning
WE RECOMMEND USING LOW HARDNESS WATER WITH A LOW IRON CONTENT IN THE WATER
TANK, INASMUCH AS CALCIUM AND IRON DEPOSITS CAN COMPROMISE THE LOOK AND
OPERATION OF THE HOME GARDEN.
WHEN THE TANK IS FULL, THE VAPOUR JETS WILL BE SLIGHTLY WEAKER. THE STRENGTH OF
THE JETS WILL INCREASE AS THE TANK WATER LEVEL DROPS.
DO NOT USE DEMINERALISED OR DISTILLED WATER AS THEY CAN AFFECT THE OPERATION
OF THE ULTRASOUND VAPORISER.
WARNING: EXCEEDING THE MAXIMUM TANK WATER LEVEL CAN AFFECT THE OPERATION OF
THE ULTRASOUND VAPORISER.
NEVER EXCEED IT.
IF THE WATER LEVEL EXCEEDS THE MAX MARK, THE TANK CAN BE DRAINED WITH A SYRINGE
OR SIMILAR DEVICE.
WARNING: TAKE CARE WHEN MOVING THE APPLIANCE AS ITS CIRCUITRY CAN BE DAMAGED
BY CONTACT WITH THE WATER IN THE TANK.
11.2 Cleaning the vapour delivery tube
Periodically check the delivery tube for blockages.
If it is blocked, extract it (simply pull it upwards) and clean it under running water or with a steel wire.
11.3 Cleaning the ultrasound vaporiser
If it is necessary to clean the internal vaporiser (for example, because vapour is not delivered even after you have thoroughly cleaned the hose), contact your nearest Authorised Service Centre.
11.4 Cleaning the base
The base of the Home Garden, once the pots have been removed, can be cleaned with normal nonabrasive steel detergent, using a clean, dry cloth.
11.5 Cleaning the pots
The pots provided with the appliance have a special double base which can be removed (see figure) for
thorough cleaning without soiling the interior of the Home Garden.
We recommend disinfecting the pots whenever changing the plants contained in them.
22
(Fig. 11)
11.6 Cleaning the glass panels
The Home Garden’s glass panels, like all glass products, are fragile; exercise caution when cleaning them. Use normal glass cleaning products.
11.7 Replacing the lamps
The lamps in the Home Garden are of a special type and when they require replacement, this must be done by an authorised service centre.
Page 21

12.PROBLEM SOLVING
PROBLEM PROBABLE CAUSE POSSIBLE SOLUTION
The Home Garden’s lamps are fully on during day time
The Home Garden’s lamps are off in the evening
The symbol is flashing
Problem Solving
- The external lighting level is
low and the sensor has set
the lamps to maximum
power-
- The lighting period set in the
pro-gram has ended
- No water in the tank
- The vaporiser is dirty
- No malfunction
- No malfunction If you wish to turn on the lamps
anyway, refer to paragraph "9.5 Internal light
key".
- Fill the tank as described in Section- "11.1 Filling
the tank"
- Clean the vaporiser, see paragraph "11.3 Cleaning the ultrasound vaporiser".
The symbol flashes even if there is still a little water left in the tank
When I press the key, no vapour is delivered
The tank has been filled
correctly, but the symbol is
still flashing
The symbol is flashing
When I fit the plug in the mains socket a red point appears on the left display
A blue point appears on the right display
The steel side panels are hot
- There is always a minimum
amount of water left, which
cannot- be utilised-by the
vaporiser.
- The maximum number of
vapour jets allowed by the
circuitry has been exceeded
- The tank has been filled
beyond the maximum level.
- You have not pressed the
key on the remote con-trol
- The external temperature is
higher than the preset maximum: the “Cuttings” function
is not required for growing
cuttings.
- The Home Garden is in
standby
- The remote control keys are
locked
- The cuttings function is activated
- The external temperature is
lower than the set temperature-: the Home Garden is
heating its internal micro-climate
- Fill the tank as described in Section- "11.1 Filling
the tank";
- No malfunction
- Wait a few minutes and try again
- Empty the tank with a syringe or similar device
as described in paragraph "11.1 Filling the tank"
- Press the button on the remote control
- You can continue growing cuttings in any case
- Switch on the Home Garden as described in paragraph "9.2 Standby key"
- To unlock the remote control hold down the
key for a few seconds as described in paragraph
"9.2 Standby key"
- Do not touch the surface underneath the pots
with your bare hands.
- No malfunction
23
Page 22

Page 23

Page 24

 Loading...