

Page 1

INDICE IT
Istruzioni di sicurezza ...........................................................5
Trasporto ............................................................................6
Informazioni sulla salvaguardia dell’ambiente .........................7
Informazioni generali ............................................................7
Preparare l’apparecchio al funzionamento .............................8
Collegamento elettrico ..........................................................9
Sostituzione della lampadina interna ......................................9
Cambio della direzione di apertura degli sportelli ....................9
Regolazione della temperatura ............................................10
Conservare i cibi nel reparto frigorifero ................................10
Sbrinamento del reparto frigorifero ......................................10
Congelare i cibi nel reparto freezer ......................................10
Sbrinamento del reparto freezer .......................................... 11
Pulizia e manutenzione .......................................................11
Consigli pratici e osservazioni .............................................. 12
Problemi di funzionamento e loro risoluzione ........................ 12
Servizio di garanzia ............................................................13
INDEX GB
Safety instructions ..................................................................
Transport ..............................................................................
Environmental protection information ......................................
General information ................................................................
Preparing the appliance for operation .....................................
Connection to the mains .........................................................
Changing the interior light bulb ...............................................
Changing the opening direction of the doors ............................
Temperature regulation ..........................................................
Storage of foodstuffs in the refrigerator compartment ...............
Defrosting of the refrigerator compartment ..............................
Freezing of food stuffs in the freezer compartment ...................
Defrosting the freezer compartment ........................................
Cleaning and care ..................................................................
Practical tips and observations ................................................
Operation problems and their solutions (troubleshooting) ..........
Warranty service ....................................................................
1
Page 2
234
Page 3
Page 4
Page 5

GB
SAFETY INSTRUCTIONS
! Carefully read the Instruction manual. If instructions are not followed, there is a
risk of injury, damage to the appliance, and loss of the right to free warranty service.
We recommend to keep the Instruction manual the whole time you have the appliance. When
you sell the appliance, pass the Instruction manual to the new owner of the appliance.
WARNING! Do not cover the ventilation holes at the top and on the sides of the
appliance.
WARNING! Do not use any mechanical means or electrical devices to hasten the
thawing process when cleaning the freezer compartment.
WARNING! If the supply cord is damaged it must be replaced by the manufacturer,
manufacturer service agent or a similarly qualified person, in order to avoid a
hazard.
WARNING! Disposal of the appliance should be according to national rules.
WARNING! Do not damage the appliance refrigeration system. It contains the
refrigerant gas R600a. If the refrigeration system is damaged:
Do not use any open flame.
Avoid sparks ― do not turn on any electrical appliances or lighting fixtures.
Immediately ventilate the room.
WARNING! Do not allow children to play with the appliance or to plug it in or
unplug from the electricity supply socket. Do not allow children to play with the
packaging material from the appliance.
WARNING! The appliance should not be used by children or mentally challenged
individuals, unless they have previously been shown how to operate the appliance
by someone responsible for their safety.
• The appliance should be transported only in the vertical position! Read more about this in
the section TRANSPORT.
• If the appliance is brought in from the cold (temperature is not higher than +12 °C), you
should wait for two hours before connecting it to the mains.
• The appliance should not be connected to the mains until all packing and transport
materials aren’t removed.
• Once the appliance is unpacked, make sure that it is complete, that the body and the
electrical cord aren’t damaged.
• It is forbidden to use a technically damaged appliance.
• The earthed electrical socket by which the appliance is connected to the mains should be
in an accessible place. Read more about this in the section CONNECTING THE ELECTRICITY
SUPPLY.
• Do not squeeze the plug of the electrical cord with the back wall of the appliance.
• If the appliance is unplugged (for cleaning, moving to another place, etc.), it may be
repeatedly switched on after 15 min.
• Do not store heavy objects such as cooling devices, furniture or other domestic devices
next the appliance in such a way that they could squeeze and damage the electrical cord.
• The appliance should be used only for freezing and storing foodstuffs.
• Before cleaning, switch off the appliance and unplug the electricity supply cord plug from
the electrical socket. Read more about this in the section CLEANING AND CARE.
• The appliance can’t be disposed of by burning. Read more about this in the section
ENVIRONMENTAL PROTECTION INFORMATION.
14
Page 6

GB
• Do not freeze liquid food products in glass containers or bottles in the freezer
compartment.
• Protect the appliance inner surfaces and plastic parts from fats, acids and sauces.
• Do not place any switched on electrical devices (such as microwave ovens, hair dryers,
irons, electric kettles or other electrical devices) on top of the appliance because this may
cause ignition of plastic parts.
• Do not place any dishes with liquids on top of the appliance and do not keep flowers in
vases or other liquid-filled vessels on the appliance.
• Do not climb on or sit on the appliance, do not lean on or hang on the appliance doors,
and do not allow children to do this.
• Do not leave the appliance doors open.
• The appliance must not rest against any pipes for heating, gas or water supply, or against
any other electrical appliances. Read more about this in the section entitled POSITIONING.
• ! IF THE APPLIANCE IS PRODUCED WITH THE SPECIAL SUPPLY CORD IT CAN BE EXCHANGED
ONLY BY THE SAME SPECIAL SUPPLY CORD PROVIDED BY THE MANUFACTURER.
• ! IF THE APPLIANCE IS OUT OF ORDER AND IT IS NOT POSSIBLE TO REPAIR IT BY
MEANS OF GIVEN RECOMMENDATIONS, UNPLUG IT, OPEN THE DOORS AND CALL THE
SERVICE EXPERT. ONLY A SERVICE REPRESENTATIVE CAN REMEDY ALL TECHNICAL OR
CONSTRUCTION FAULTS.
TRANSPORT
! THE MANUFACTURER WILL NOT BE RESPONSIBLE FOR ANY DAMAGE TO THE
APPLIANCE THAT RESULTS FROM NON-COMPLIANCE WITH THE INSTRUCTIONS FOR
TRANSPORTATION.
• The appliance should be transported only in the vertical position.
• When being transported, the appliance should be protected from atmospheric conditions
(rain, snow, dampness).
• The appliance should be firmly secured in place while being transported, to avoid slippage
or any shocks in the transport vehicle.
• If the appliance was transported not vertically, it may be connected to the mains after 4
hours at least. If this is not done, the appliance compressor may fail.
15
Page 7

GB
ENVIRONMENTAL PROTECTION INFORMATION
This symbol indicates that once the appliance is no longer needed, it cannot be
disposed together with other miscellaneous municipal waste. It should be collected
and eliminated separately, i.e. in containers specially marked with this symbol in
large-dimension rubbish collection areas.
Full information on where to submit the old appliance safety can be obtained from
local government authorities, the shop where you bought the appliance, or the
manufacturer’s representatives.
If you decided to scrap the appliance, make it impossible to use in order to prevent possible
misadventure. Pull out the electric plug from the electricity supply socket and then cut off the
cord. Tear off the gasket. Break the door lock if any.
WARNING! Do not dismantle the appliance yourself. Pass it on to recycling
companies.
GENERAL INFORMATION
The appliance is a two–compartment refrigerator-freezer combination. The refrigerator
compartment is intended for storage of fresh foodstuffs; the freezer compartment is intended
for freezing and long-term storage of foodstuffs.
! THE APPLIANCE IS ECOLOGICALLY CLEAN, CONTAINING NO MATERIALS HARMFUL TO
THE OZONE LAYER: the refrigerant used is R600a, the foaming agent used for the appliance
insulation is cyclopentane C5H10.
! THE MANUFACTURER GUARANTEES RELIABLE OPERATION OF THE REFRIGERATOR
WHEN THE AMBIENT TEMPERATURE IS +16 TO +32 DEGREES CELSIUS AND THE RELATIVE
AIR HUMIDITY NOT GREATER THAN 70 PER CENT.
The appliance climate class is N.
Model FD24AP
Total gross volume, L
Freezer gross volume, L
Refrigerator net volume, L
Freezer net volume, L
220
46
166
46
Temperature in the refrigerator compartment, °C from 0 to +10
Temperature in the freezer compartment, °C -18 and lower
Dimensions (HxWxD), cm
Energy efficiency class according to the directive 94/2 E
Energy consumption, kWh/24 h
Freezing capacity, kg/24 h
Freezer temperature rising time from storage temperature
to -9 ºC after power-cut, h
Rated input, W
Voltage used, V/Hz
NOTE. The manufacturer reserves the right to make future changes to technical parameters
and specifications.
16
144x56x60
A
0,75
2
17
105
220-240V/50Hz
Page 8

GB
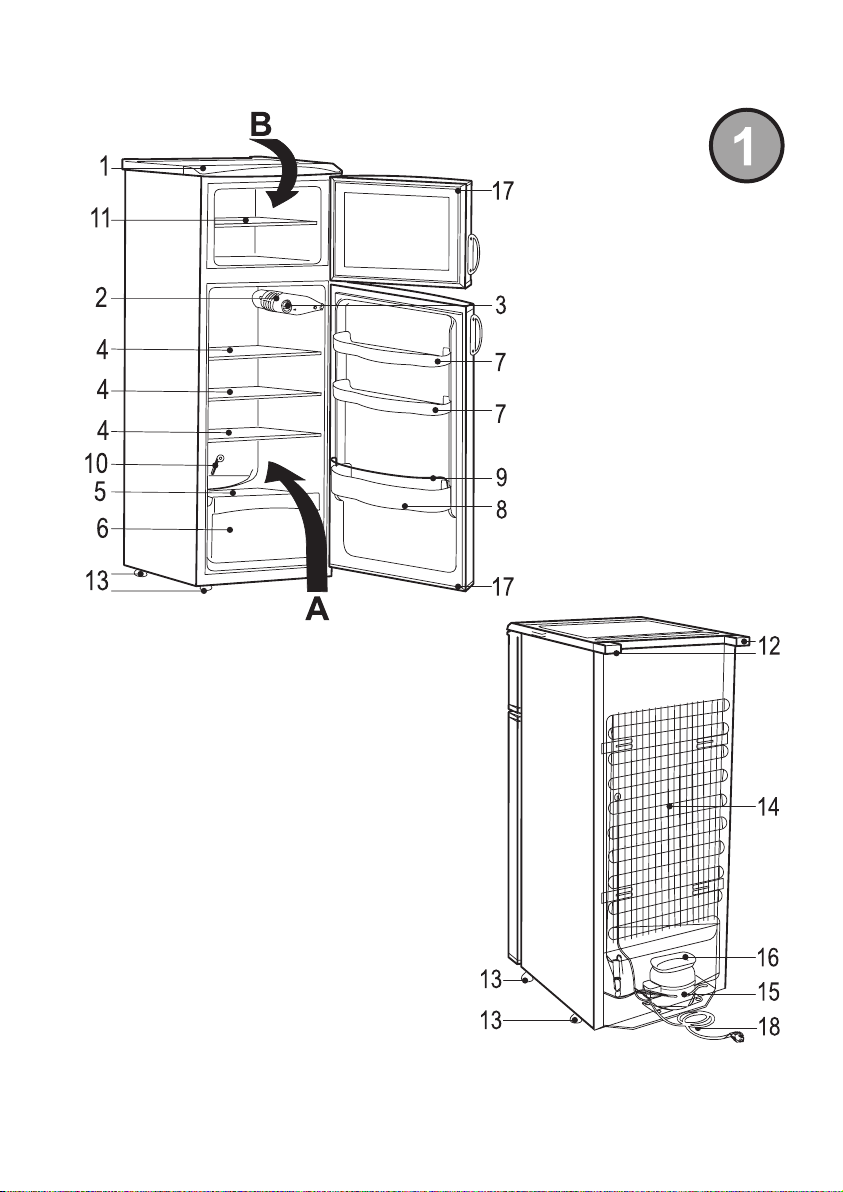
DESCRIPTION OF THE APPLIANCE,
BASIC PARTS
! THE APPLIANCE ACCESSORIES
LISTED BELOW MAY DIFFER FROM THE
ACCESSORIES OF THE APPLIANCE YOU
HAVE BOUGHT IN QUANTITY AND IN
DESIGN. THIS DESCRIPTION IS ADAPTED
FOR ENTIRE GROUP OF REFRIGERATORFREEZER COMBINATIONS.
Fig. 1
A – refrigerator compartment
B – freezer compartment
1. Pull-out shelf
2. Interior light block
3. Thermostat knob
4. Adjustable height shelves
5. Glass shelf
6. Drawer for vegetables and fruits
7. Door trays
8. Bottle tray
9. Bottle holder
10. Thaw water channel cleaner (red colour)
11. Wire shelf
12. Supports
13. Levelling foot
14. Condenser
15. Compressor
16. Thaw water drip tray
17. Rubber sealing gasket
18. Electricity supply cord
PREPARING THE APPLIANCE FOR
OPERATION
! It is recommended to prepare the
appliance for operation with a helper.
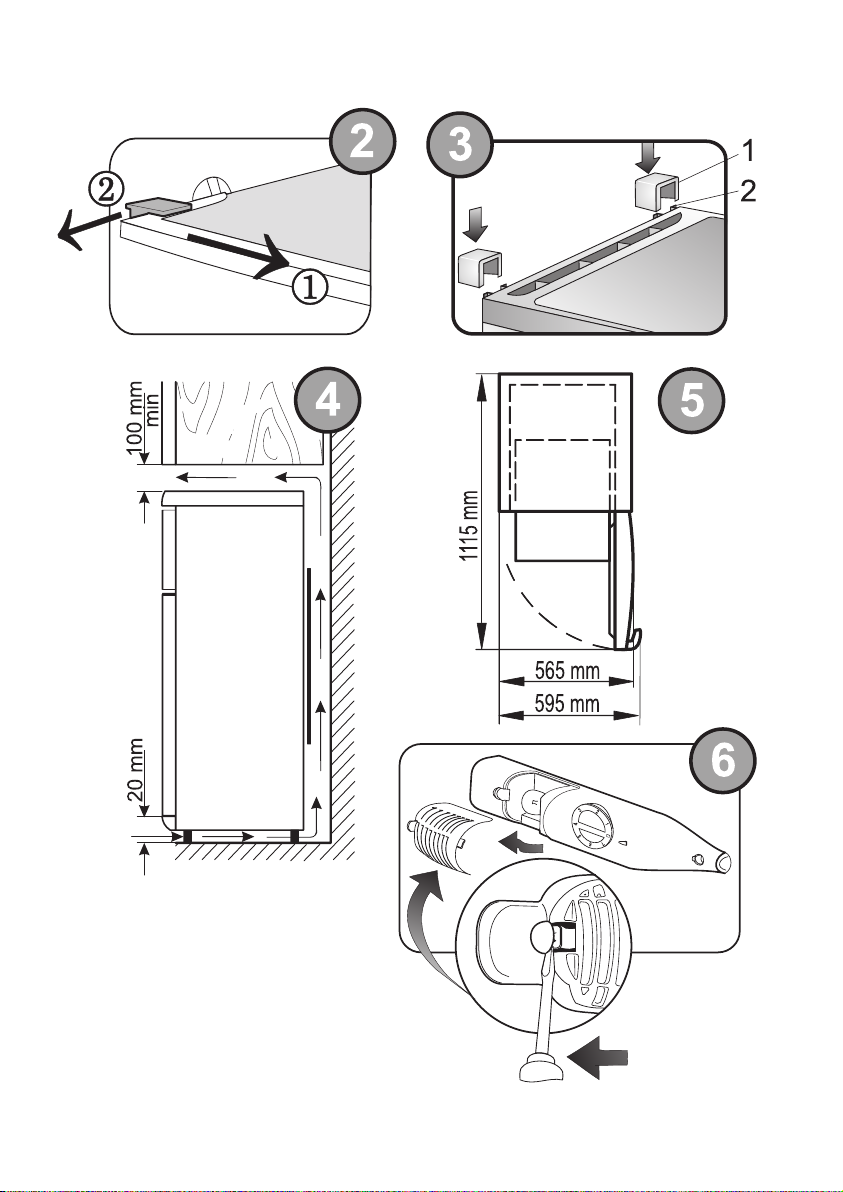
• Remove package.
• Lift the appliance away from foamed
polystyrene base.
• Tear off adhesive tapes.
• Remove all red-coloured parts from the
shelves (fig. 2). Tear away the red-coloured
adhesive tapes from the door trays – they
are intended only for the transport of the
appliance.
! If you have purchased a refrigerator with
vertical boor handles:
• Take the handles out of the bag and
screw them onto the refrigerator door.
• Cover the heads of the screws with the
little caps that you will find in the bag
POSITIONING
• Place the appliance in a dry, well ventilated
room.
• The appliance should not be operated
in an unheated room or porch. Place the
appliance away from heat sources such
as kitchen stove/oven, radiators, or direct
sunlight.
• The appliance must not touch any pipes
for heating, gas or water supply, or any other
electrical devices.
• Do not cover the ventilation holes at the
top of the appliances– it must be a good air
circulation around the appliance. There should
be a gap of at least 10 cm between the top
of the appliance body and any furniture that
may be above it (fig. 5). If this requirement
is not followed, the appliance consumes more
electrical energy and its compressor may
overheat.
• If the appliance is placed in a corner, a
gap of at least 1 cm must be left between the
appliance body and the wall so that the door
can be opened enough to pull out the drawer
for vegetables and fruits (fig. 5).
• The appliance must stand on a level
surface and must not touch the wall. If
necessary, regulate the height of the
appliance by adjusting the levelling feet 13
(fig. 1): by turning them clockwise – the
front of the appliance rises, by turning them
counter clockwise – it comes down. If the
appliance is tilted slightly backward – the
doors will close by themselves.
17
Page 9

GB
CONNECTION TO THE MAINS
WARNING! The appliance must be plugged
in to an earthed electricity supply socket.
• The frequency and power of the electricity
supply in your house must conform to the
general data parameters of the appliance as
it is shown in the table (see page 16).
• When positioning the appliance, be
careful that the electrical cord isn’t squeezed
in order to avoid its damage. This can cause
a short circuit and a fire.
• Make sure that the plug of the electrical
cord is not squeezed by the back wall of the
appliance or otherwise damaged. A damaged
plug can be the cause of a fire!
• When unplugging the appliance, do not
touch the plug pins of the electrical cord.
CHANGING THE INTERIOR LIGHT
BULB
When changing the interior light bulb (fig. 6),
do the actions below in the order they are
listed:
1. Unplug the appliance from the mains by
pulling the plug out of the electricity supply
socket.
2. Push the interior light bulb lid retainer
with a flat screwdriver and with your other
hand pull it toward yourself.
3. First check whether the bulb has really
burnt out: unscrew it and screw it back in.
Plug the appliance into the electricity supply.
If the bulb lights up, it is not necessary to
change it.
4. If the bulb does not light up, replace it
with another 15 W bulb of the same type with
an E14 lamp holder.
5. When you have changed the light bulb,
replace the lid and push — the lid will snap
into position. Plug the appliance into the
electricity supply socket.
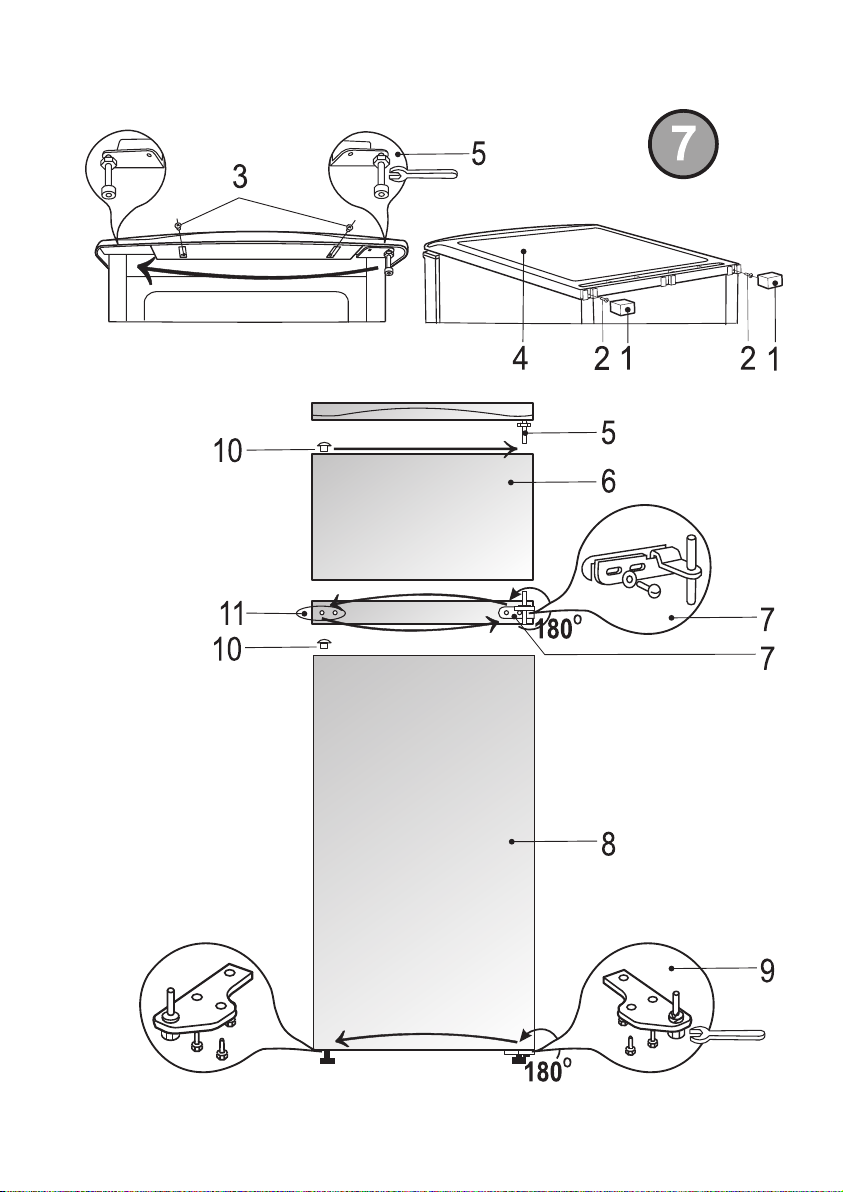
CHANGING THE OPENING
DIRECTION OF THE DOORS
It is recommended that changing the opening
direction of the doors should be done with a
helper. You will need two spanners No. 8 and
No. 10 and a Philips head screwdriver.
! When changing the opening direction of
the doors, YOU CAN NOT lay the refrigerator
horizontally. Do the actions below in the order
they are listed (fig. 7):
WARNING! Turn off the appliance and
pull the plug out of the electricity supply
socket.
1. Remove the two supports 1 at the top
back part of the refrigerator and undo the
screws 2.
2. Undo the two screws 3 that hold the pullout shelf.
3. Take out pull-out shelf 4.
4. Take off bracket 5 with the spacers that
are on the shaft.
5. Remove freezer compartment door 6.
6. Remove middle bracket 7 together with
the washers that are on the shaft.
7. Remove freezer compartment door 8.
8. Remove middle bracket 9 together with
the washers that are on the shaft. Unscrew
the shaft by turning it counter-clockwise.
Turn bracket 9 around a full 180° and screw
the shaft back in.
9. Attach bracket 9 on the opposite side.
10. Remove caps 10 from refrigerator and
freezer compartment doors and press them
in on the opposite side.
11. Remove decorative caps 11, unscrew bolts
from the partition separating the refrigerator
and freezer compartment, and screw them in
on the opposite side. Replace the decorative
caps on the bolts.
12. Mount refrigerator compartment door on
the shaft of bracket 8.
13. Turn bracket 7, together with the bolts
on the shaft and the plastic washer, around a
full 180°, replacing the bolts on the shaft and
tightening them on the opposite side.
14. Mount the freezer door on the shaft of
bracket 7.
18
Page 10
GB
15. Unscrew the shaft from bracket 5
together with its bolts and screw it into the
second aperture of bracket 5. Fix the bracket
in place on the opposite side.
16. Put the pull-out shelf back in place and
replace screws 2 and 3. Place the supports
in the grooves at the top back part of the
refrigerator.
TEMPERATURE REGULATION
The temperature in the refrigerator
compartment is controlled using the
thermostat knob (fig. 1) by turning it to one
side or the other. The temperature indication
in digits is shown beside the thermostat
knob.
The temperature is regulated on a scale of
five/seven digits.
0 = Compressor is switched off.
WARNING! Electric current is not
switched off.
1 = highest temperature (lowest cooling)
5/7= lowest temperature (highest cooling)
If food products in the refrigerator
compartment are too cold, set the thermostat
knob to 1, 2 or 3. If food products in the
refrigerator compartment are not being
chilled sufficiently, set the thermostat knob
to 4, 5 or 6.
! Please set the desired temperature
in the appliance according to your own
requirements.
! THE TEMPERATURE IN THE
REFRIGERATOR COMPARTMENT MAY VARY
DEPENDING ON AMBIENT TEMPERATURE,
THE AMOUNT OF FOODSTUFFS, THE
TEMPERATURE OF THE FOODSTUFFS,
AND HOW OFTEN THE APPLIANCE DOOR
IS OPENED AND CLOSED. Therefore we
recommend:
• locate the appliance away from heat
sources,
• food placed in the appliance should not
be warmer than the room temperature,
• appliance door must not to be left open,
• the appliance door should not be open
longer than it is necessary to take out or put
in foodstuffs.
! IF THE ROOM IS COOL, THE APPLIANCE
COOLS LESS. THE TEMPERATURE IN
THE APPLIANCE MAY THEREFORE RISE.
Use the thermostat wheel to set a lower
temperature.
STORAGE OF FOODSTUFFS IN THE
REFRIGERATOR COMPARTMENT
The refrigerator compartment is intended for
the short-term storage of fresh foodstuffs.
• Do not put hot foodstuffs in the refrigerator
compartment – they must be cooled down to
room temperature.
• Strictly observe the foodstuff validity time
indicated by the manufacturer on the product
packaging.
DEFROSTING OF THE
REFRIGERATOR COMPARTMENT
The refrigerator compartment defrosts
automatically. Drops of ice that form on the
back wall of the refrigeration compartment
thaw during the time the compressor is not
working and the thaw water runs down the
thaw water runoff channel to the tray on
top of the compressor 16 (Fig. 1), where it
evaporates.
FREEZING OF FOOD STUFFS IN
THE FREEZER COMPARTMENT
Fresh food products prepared for freezing and
cooled to room temperature should be placed
in one layer at the bottom of the freezer. The
thermostat knob should be set to 5/7. After
24 hours, move the frozen food products onto
the wire shelf (see illustration 1). When the
products are frozen, the thermostat wheel
should be set at its earlier position.
• DO NOT EXCEED THE INDICATED
MAXIMUM AMOUNT OF FOOD FOR
FREEZING:
FOR MODELS FD24AP IT IS 2 KG PER 24
HOURS.
19
Page 11

GB
• Leave a gap of not less than 3 cm between
the foodstuffs being frozen and the upper
partition.
• Do not place unwrapped foodstuffs in the
freezer sections.
• Do not freeze carbonated beverages.
• Fresh food for freezing should not touch
already frozen foodstuffs.
• Do not freeze foodstuffs that are warmer
than the room temperature.
• Do not freeze liquid foodstuffs in glass
vessels or bottles.
• Strictly observe the frozen food product
validity dates indicated by the manufacturer
on the product packaging.
• We recommend that frozen fish and
sausage should be stored in the freezer
compartment not longer than 6 months;
cheese, poultry, pork, lamb – not more than
8 months; beef, fruit and vegetables – not
longer than 12 months.
DEFROSTING THE FREEZER
COMPARTMENT
The freezer compartment should be thawed
not less than twice a year or when a layer
of ice thicker than 7 mm forms in it. Do the
actions below in the order they are listed:
WARNING! Turn the appliance off
and pull the plug out of the electrical
socket.
• Remove foodstuffs from freezer
compartment. The frozen foodstuffs will not
warm up too much while you are thawing the
freezer compartment if you cover them with
a thick cloth and keep them in a cool place.
• Leave door of appliance open.
• When the ice melts, clean and wipe dry
the surfaces and fixtures of the refrigerators
and freezer compartments.
• Close the appliance door.
• Plug in and turn on the appliance.
CLEANING AND CARE
! REGULARLY CLEAN THE APPLIANCE.
! Remember that before defrosting
the freezer compartment and cleaning
the back part of the appliance body you
must disconnect the appliance from
the electrical energy supply socket by
pulling the plug out of the electricity
outlet.
• Protect the appliance inner surfaces and
plastic parts from fats, acids and sauces. In
case of accidental spills – immediately clean
with warm soapy water or dishwashing
detergent. Wipe dry.
• Clean the appliance inner surfaces with
warm soapy water. Dishwashing detergent
may also be used.
• Wipe dry inner and outer surfaces.
• Regularly clean the hermetic gaskets of
the doors. Wipe dry.
• Regularly wash the trays and other
accessories.
• Regularly clean the thaw water channel
space with a special cleaner 10 for that
purpose (Fig. 1).
• At least once a year clean dust away from
the back part of the appliance body and the
compressor. A soft brush, electrostatic cloth
or vacuum cleaner may be used for cleaning.
• DO NOT use dishwashing detergent
for cleaning trays, butter dishes, meat
compartments, or shelves.
• DO NOT use detergents containing
abrasive particles, acid, alcohol or benzene
for cleaning the appliance inner and outer
surfaces.
• DO NOT use for cleaning cloths or
sponges that have coarse surfaces intended
for scrubbing.
20
Page 12

GB
PRACTICAL TIPS AND
OBSERVATIONS
• Do not keep bananas in the refrigerator
– these fruits are sensitive to cold.
• Do not keep prepared food and readyto-cook (“heat and eat”) food in the same
container.
• Store in an airtight container in the
appliance any foodstuffs that have a strong
odour (e.g. fresh fish, pâté de foie gras goose
liver pâté, and cheese).
• Frozen foodstuffs should be thawed in
the refrigerator compartment. Food that
thaws slowly retains better flavour properties
and spread cold will help to maintain
the set temperature in the refrigeration
compartment.
• Do not consume ice made in the freezer
chamber straight away.
• Products will freeze more quickly if they
are divided up and packed in small portions.
• If the appliance is to be left switched off
for an extended period, leave its doors open.
Remarks on the appliance operating
noise
As the appliance operates and goes through
the freezing cycle, various noises will be
emitted. This is normal and is not a sign of
any malfunction.
• As the refrigerant circulates around the
refrigeration system, it causes sounds like
murmuring, bubbling, or rustling.
• Louder sounds like popping or clicking may
be heard for a short time as the refrigerator’s
compressor switches on.
OPERATION PROBLEMS
AND THEIR SOLUTIONS
(TROUBLESHOOTING)
What if …
• The appliance is plugged in to the
mains but it does not work and the
electricity supply voltage indicator is
not illuminated.
Check that your house electricity supply
installations are in order. Check that the plug
is correctly inserted into the electricity supply
socket.
• The noise has become louder.
Check that the appliance is standing stable,
on a level place To make it level, regulate
the front feet. Check if the appliance is not
touching any furniture, and that no part of the
refrigeration system at the back part of the
appliance body is touching the wall. Pull the
appliance away from any furniture or walls.
Check that the cause of increased noise isn’t
due to bottles, cans or dishes in the appliance
that might be touching each other.
• Water has appeared at the bottom of
the refrigerator compartment.
Check whether a thaw water channel space
isn’t blocked. Clean the thaw water channel
space with a cleaner intended for that
purpose.
• Water has appeared on the tempered
glass shelves.
Food items or dishes in the refrigeration
compartment are touching the back wall of
the compartment. Do not let food items or
dishes touch the back wall.
• Water has appeared under the
appliance.
The thaw water collection tray has slipped off
the compressor. Place the tray on top of the
compressor.
• When the appliance door is opened,
the rubber sealing gasket pulls out.
The gasket is smeared with sticky foodstuffs
(fat, syrup). Clean the sealing gasket and
the groove for it with warm water containing
soap or dishwashing detergent and wipe dry.
Put the rubber sealing gasket back into the
place.
• High temperature in appliance, the
compressor operation pauses are short.
Ascertain whether the appliance door is
shutting tightly, whether the door wasn’t
kept open longer than necessary when taking
out or putting in foodstuffs, or whether a
large amount of warm food was placed in the
appliance.
21
Page 13

GB
• The top of the appliance has
condensation on it.
The ambient relative air humidity is above 70
%. Ventilate the room where the appliance
stands, and if possible remove the cause of
the humidity.
WARRANTY SERVICE
! IF YOUR APPLIANCE IS NOT WORKING
PROPERLY, ASCERTAIN WHETHER YOU
CAN REMEDY THE CAUSE OF THE FAULTY
FUNCTIONING OF THE APPLIANCE
YOURSELF. If you cannot solve the problem
yourself, contact the nearest refrigerator
service representative by telephone or in
writing. When making contact, necessarily
indicate the refrigerator model 1 and number
2. You will find this data on the product label
(Fig. 8), which is glued to the left wall of the
refrigerator compartment, near the fruit and
vegetable drawer.
22
 Loading...