


• Manual de instrucciones.
• Manual de instruções.
• Mode d’emploi.
• Operating instructions
• Bedienungsanleitung.
• Manuale di istruzioni.


CONTENS
Page
Installation ............................................................ 2
General Description.............................................. 3
Starting up ............................................................ 4
Using the refrigerator............................................ 5
Using the freezer................................................... 7
Cleaning and Maintenance .................................. 11
Changing the direction of the doors .................... 12
Problems ..............................................................15
Electrical diagram ............................................... 16
Specifications....................................................... 16
WARNING
If your old refrigerator has a manual or automatic door locking
device DO NOT FORGET TO DESTROY OR INCAPACITATE
THE LOCKING SYSTEM before throwing it away, in order to
prevent children from locking themselves inside whilst
playing.
DO NOT DAMAGE THE PIPES to avoid an uncontrolled leakage
of coolant into the atmosphere.
1
ENGLISH

INSTALLATION
RECOMMENDATIONS
Allow air to circulate behind the refrigerator.
Do not cover the front grill or top of the
refrigerator with any object. If the refrigerator is
placed underneath a cupboard, leave a space for
air to circulate.
Your refrigerator’s climate classification is stated on the specifications plate, and defines the
room temperature range for which the cooling unit
is designed, at which the apparatus is guaranteed
to operate correctly. Where two classes are indicated,
the unit will operate correctly in both.
As far as possible avoid locating near to
heat sources.
If the refrigerator needs to be laid down for
unpacking or to change the direction of the
doors, ONLY LAY IT DOWN ON THE REAR
SECTION.
NOTE: The door hinges are on the right. If this is inconvenient the
hinges can be changed to the other side. Instructions are
contained in the section on changing the direction of door
opening.
Type Temperature range
N 16º - 32º
ST 18º - 38º
T 18º - 43º
IMPORTANT. Ensure that the refrigerator is
well seated on the ground (without
movement) and is properly levelled (without
tilting) by adjusting the levelling feet.
This refrigerator operates at 220/230 v. If the voltage
in your home is different, a transformer should be
used with an outpout of not less than 700 W.
Use an EARTHED plug.
NOTE: The manufacturer will not accept any liability
in the event that these recommendations are not
followed.
BEFORE CONNECTING TO THE POWER
1.- Clean the inside of the refrigerator.
2.- Wait for 2 hours before connecting, to ensure proper functioning.
3.- Connect to the power.
2
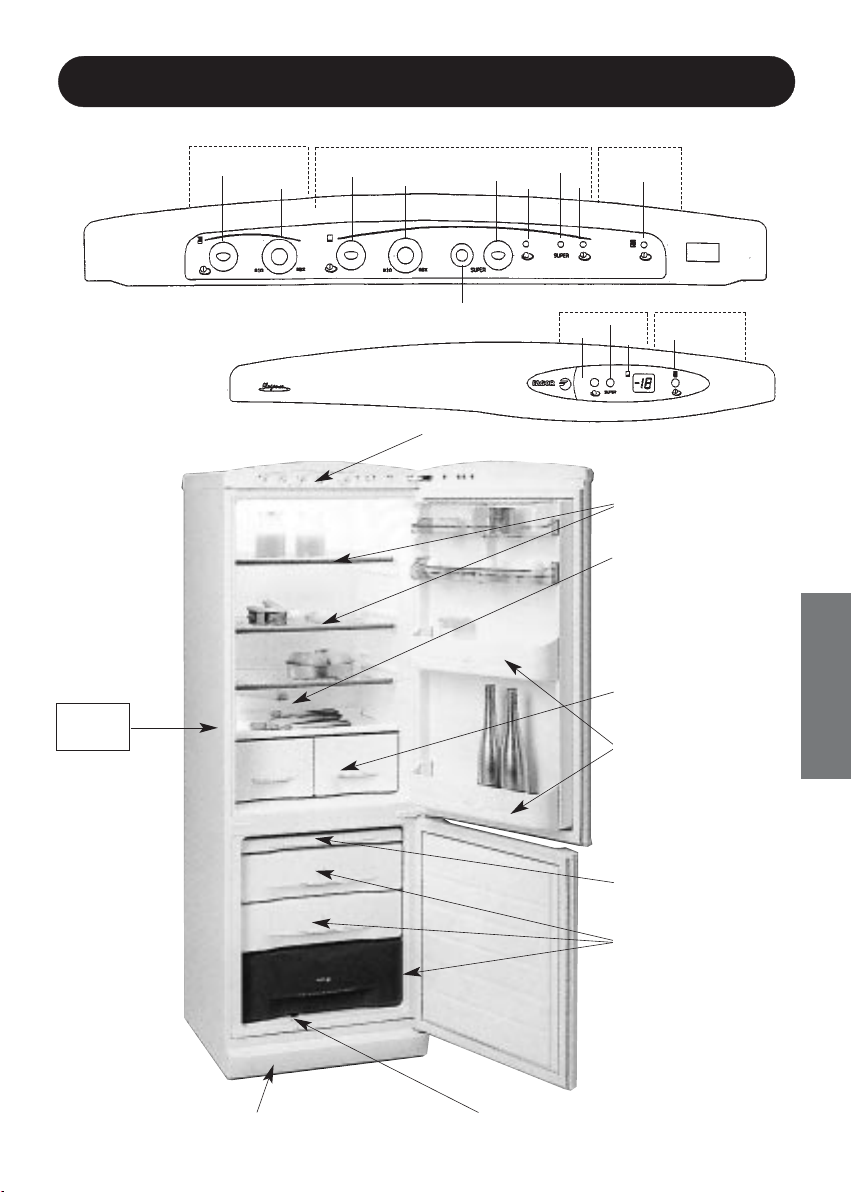
GENERAL DESCRIPTION
REFRIGERATOR
Specifications
Plate
REFRIGERATOR
On/Off
buttom
Thermostat
On/Off
buttom
FREEZER
Thermostat
Ligth bouton
Control panel.
Super freezing
buttom
Alarm
Pilot light
super
Pilot
light
Pilot light super
Alarm
REFRIGERATOR
Pilot
light
FREEZER
Pilot
light
Trays
Water
collection
compartments.
Fruit and
vegetable
compartments.
Bottle shelf
REFRIGERATOR
Pilot light
ENGLISH
FREEZER
NOTE: It is possible
that the internal
distribution of your
appliance does not
correspond to the
figure.
Ventilation grill.
Freezer tray.
Freezer
compartments.
Drain.
3
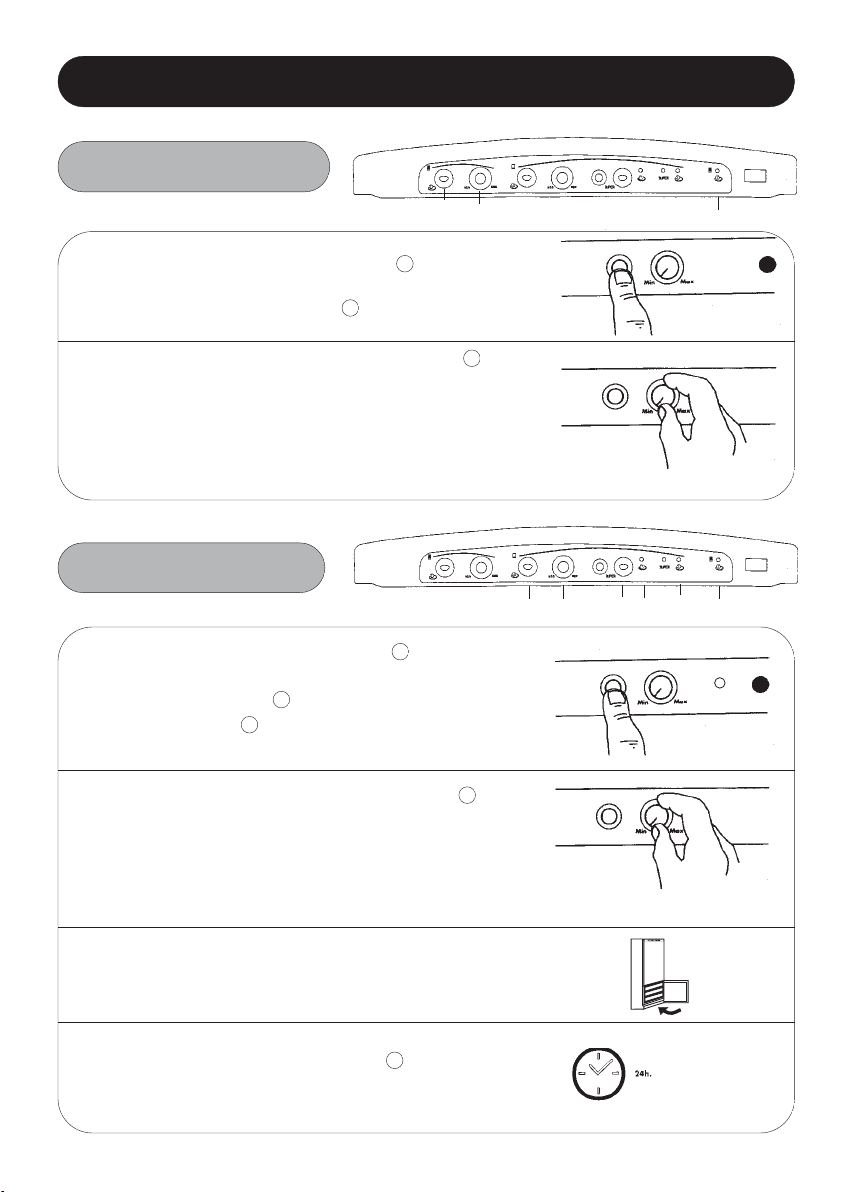
REFRIGERATOR
STARTING UP
1
2
FREEZER
1
2
3
Press the on/off buttom .
The refrigerator will begin operating
and the pilot light will light up.
Pull out the thermostat control, , to
select a colder (MAX) or less cold (MIN)
temperature inside the refrigerator.
An intermediate position is initially
recommended.
Press the on/off button . The
freezer will begin operating and the
pilot light, , will light up. The
alarm, , will also come on as the
freezer will not yet be cold.
Access the thermostat control, , by
pushing it. Select a colder (MAX) or
less cold (MIN) temperature in the
freezer by turning the control. An
intermediate position is initially
recommended.
Close the freezer door but do not
place any food in it yet.
7
6
1
8
2
3
4
Predilect
FAGOR
Min MinMax
DUO ELECTRONIC
4
Food can be placed in the freezer 24
hours later. The alarm, , will have
gone off.
6
4

USING THE REFRIGERATOR
LEAST COLD AREA
INTERMEDIATE AREA
COLDEST AREA
ATTENTION
FOOD
• The temperature inside the refrigerator can be selected by turning the
thermostat control.
• Remenber that the temperature is not totally uniform within the
interior as a whole and different sections are more suitable for different
types of food (as shown in the diagram).
• The temperature inside the refrigerator can be affected by the
ambient temperature, the location of the refrigerator and the frequency
with which the door is opened.
• Do not place uncovered liquids or hot food in the refrigerator.
• NEVER place volatile, inflammable or explosive liquids in the
refrigerator, such as solvents, alcohols, acetone or petrol as there will
be a risk of explosion.
• Meat and fish should be wrapped to avoid smells developing.
5
ENGLISH

USING THE REFRIGERATOR
DEFROSTING
The refrigerator has an automatic defrosting system and it is
not therefore necessary to take any action.
The back wall of the refrigerator
is normally covered with drops
of water or ice. This is
completely NORMAL and is part
of the automatic defrosting
process.
Periodically, or if the water
collection channel is
obstructed by dirt or foreign
material, remove the cleaning
cover, clean and replace it. This
will prevent water from spilling
outside the water collection
channel.
Ensure that foods does not
touch the back wall. The trays
have a limit point for this
purpose which should not be
exceeded.
6

USING THE FREEZER
FAGOR
Min MinMax
Predilect
DUO ELECTRONIC
FREEZING FRESH FOOD
Place food to be frozen inside the
1
freezer.
Press the superfreezing button,
2
(SUPER). The pilot light, , will
9
5
light up.
24 hours later press the button
3
5
, again to disconnect the
superfreezing system. The pilot
light, , will go off. Your food
9
will be properly frozen.
NOTE
• All baskets in the freezer section of this refrigerator are in the 4 star
category and up to 10 kg (20 kg mod. 1FFC-49) of fresh food can be frozen in
24 hours.
ADVICE
• Wrap products to be frozen in aluminium foil or place them in sealed
containers.
ENCGLISH
• Prepare foods in single consumption portions.
• Never refreeze food which has been defrosted.
• Label food with details of the contens and date frozen.
• Do not place food to be frozen in direct contact with food already frozen.
• Do not place fizzy drinks in the freezer section.
• Ice-cream, etc. should not be consumed at too low a temperature.
7

DIRECTIONS FOR USE YOUR FREEZER
FROZEN FOOD PRESERVATION
A FEW HINTS
• When you buy frozen food in your shop, try to introduce the products
into the freezer as soon as possible.
• Observe the preservation time that appear on the product packing,
taking into account this a freezer.
• When freezing food by yourself, consult the list of preservation times.
CONSERVATION TIMES
SORT OF FOOD
FISH AND SHELLFISH
Lobsters 3
Shrimps 3
Cold 2
Sardines and similar 3/4
Trout 2/3
Salmon 2/3
Sole 3
Turbot 2/3
MEAT
Beef 10/12
Mutton 6/8
Veal 9
Pork 6
Fillets/Chops 4
Liver/Kidneys 10
Brain/Tongue 2
Mincemeat, sausages 2
Rabbit 5/7
POUTRY AND GAME
Chickens 10
Turkey (in portions) 7
Duck, goose 5
Hare 6
Partidrige-Quail 8
Pheasants 7/8
Big game 10
READY TO SERVE FOOD
Tomato sauce 3
Stock 3
Beef, veal pork or chicken stews 2/3
Assorted vegetables 3
Stewed meat 3
Hamburguers 2
Stuffed peppers 2
Espinach 2
Brench beans 2
Tarts, confectionery, etc 5/6
Fruit salad 3
Sandwiches 6
Number
of months
SORT OF FOOD
VEGETABLES
Salt-wort 12
Artichoke 12
Carrots 12
Cauliflower 6/8
Brussels sprouts 6
Asparragus 12
Cabbage 6/8
Beans 12
Mushrooms 6
Parsley 12
Peppers 12
Spinach 12
Broad beans 12
FRUITS
Apricots 8
Cherises, plums, raspberries,
gooseberries, blackberries
Peaches 10/12
Strawberries 12
Stewed fruit (apples, pears) 10
Grapes 10/12
Fruit juices 10
Pineaple 10/12
BREAD CONFECTIONERY
Biscuits-tarts 6
Flaky pastry tart 1
Pastry (unbaked) 3
Bread and rolls 2
EGGS AND DAIRY PRODUCE
Eggs (shelled) 6
UHT Milk 3
Burter 6
Cheese (samall portions) 6/8
Fresh cream 3
Predilect
FAGOR
Min MinMax
DUO ELECTRONIC
6
meses
Number
of months
10
8

USING THE FREEZER
DEFROSTING FOOD
The same method should not be
used for defrosting all types of food.
If you purchase frozen food from
stores, follow the instructions on
the packaging.
Green vegetables should be
cooked without defrosting.
Pre-cooked and ready prepared
food can generally be cooked
without defrosting.
Meat and fish should be slowly
defrosted in the refrigerator over
several hours. If you have a
microwave oven, defrosting can to
a large extent be accelerated.
1
2
3
ENGLISH
MAKING ICE CUBES
Fill the trays inside the freezer
three quarters full of water.
Place the trays in the freezer,
preferably in the top section.
Once frozen, the ice cubes can be
removed by gently twisting the
trays.
9

USING THE FREEZER
DEFROSTING AND CLEANING
Press the on/off button. The pilot light will
1
go out and the freezer will be turned off.
Remove frozen food, wrap it in newspaper
and place it in the refrigerator as an
excessive rise in temperature could reduce
2
the food conservation period.
A layer of ice or frost will in
time form on the walls of the
freezer.
This will lead to an increased
power consumption.
In order to avoid this, the
layer of ice should be
removed at least twice each
year.
Leave the door open and unfold the flexible
tab in the base of the freezer. Place one of
the drawers, except for the bottom one,
underneath it to collect the water.
3
When finished, return the tab to its original
position.
You may help remove the ice with a spatula
(non-metallic) or by placing a container
4
with hot water inside.
Dry the inside thoroughly.
5
Press the on/off button. The pilot light will
appear and the freezer will be turned on.
6
Two hours later the frozen food can be
7
replaced in the freezer.
10

CLEANING AND MAINTENANCE
CLEANING
ADVICE
The refrigerator should be
disconnected before cleaning the
inside.
Avoid cleaning
the top with cloth
which is
excessively wet
or spilling water
onto the top part.
This could
damage the
refrigerator.
Do not use abrasive products,
solvents, metal cleaning products or
undiluted detergents.
The grill on the rear
part of the refrigerator
should be cleaned
once a year with a
vacuum cleaner. Dirt
will prevent proper
functioning and
increase electricity
consumption.
TEMPORARILY TURNING OFF THE REFRIGERATOR
If you wish to disconnect the refrigerator for a prolonged period, when going
on holiday or for any other reason, remenber that the refrigerator and freezer
operate completely independently and either of them can be disconnected
with the other left operating or both can be disconnected.
• Remove food and clean and try the inside.
• Leave the door open to avoid the formation of offensive odours.
Follow the same procedure in the event of a prolonged power cut or
refrigerator breakdown.
ENGLISH
CHANGING THE BULB
1- Disconnect the refrigerator.
2- Remove the old bulb and replace
with a similar type.
11

CHANGING THE DIRECTION OF DOOR OPENING
Remove the control panel casing by
inserting the point of a screwdriver
1
into the retaining grooves and
exerting leverage until the rim is
freed.
Remove the upper hinge after first
removing the retaining screw.
2
Grasp the upper door with both
hands and remove it from the
refrigerator.
Remove the middle hinge by
removing the protective plate
which hides the screws, and after
3
removing them, grasp the lower
door with both hands and remove
it from the refrigerator.
Remove the lower skirting as shown
in the diagram. Then remove the
left part of the skirting as shown to
4
locate the lower hinge as shown in
the diagram.
Remove the lower hinge by
removing the 3 retaining screws
(A). Remove the spindle (B) from
the right-hand side position and
insert it on the left hinge.
5
Insert the lower hinge on the left
after first removing the two
screws (C).
12

CHANGING THE DIRECTION OF DOOR OPENING
Replace the lower skirting. Locate
6
the lower door spindle and placing it
on the lower hinge spindle.
Remove the cover of the left-hand
7
side lower door spindle and place it
on the right-hand side (panellable
models do not have this cover).
Insert the middle hinge on the left-
8
hand side spindle of the lower door
and screw it to the fridge, after first
removing the protection covering the
holes. Locate the upper part by
placing it on the spindle of the
middle hinge. Then, replace the
protection plate that conceals the
fixing screws.
Remove the cabinet control panel
housing by inserting the tip of the
9
screwdriver into the securing
grooves and levering it until the lugs
are released.
Unscrew the top hinge, and screw it
in place on the left.
10
ENGLISH
13

Fit the cabinet control panel housing over
11
the attachment lugs and press it into place.
Release the opening regulator on the right
door and place it on the left door by
12
screwing carefully into the holes drilled into
the door.
Hold the top with both hands and fit it on to the middle hinge shaft, then
13
fit the top hinge shaft into its housing.
Insert the door control panel housing by pressing on the door support
14
until the attachment lugs fit into place.
14

PROBLEMS
PROBLEM POSSIBLE REASON SOLUTION
The refrigerator is not working
The refrigerator does not get
properly cold
Drops of water on the rear wall
of the refrigerator
Water shows up of the bottom
of the refrigerator
A large amount of ice forms on the
walls and shelves of the freezer
The refrigerator light does not
come on
Noisy operation
A bubbling noise
Food dries out
Unpleasant shell inside the
refrigerator
The plug is not properly connected to the
power supply.
Electricity is not reaching the plug
because a fuse has blown or an automatic
circuit breaker has opened.
The thermostat is set too low.
The door has not been closed properly or
is opened too often.
The space between the base and the floor is
blocked or the opening to the rear of the rear
part of the refrigerator has been obstructed.
The refrigerator is in direct sunlight or
exposed to a heat source.
Automatic defrosting cycle.
Food or a container has been placed in
contact with the rear wall of the
refrigrator.
The refrigerator drain is obstructed.
The freezer door is obstructed and does
not close properly.
The plug is not properly connected to the
power supply.
Electricity is not reaching the plug
because a fuse has blown or an automatic
circuit breaker has opened.
The bulb is loose.
The bulb has blown.
The refrigerator has not been properly
levelled.
Operating cycle.
Food is not wrapped or placed in a
container.
Food is not properly wrapped or in a
container.
The inside of the refrigerator needs
cleaning.
Connect the plug.
Change the fuse or reset the automatic
circuit breaker.
Turn the thermostat to a colder position.
Ensure that the door does not remain open
for too long.
Keep these areas free as indicate in the
Installation section of this manual.
Change the location of the refrigerator or
protect it from heat sources.
Do not worry -this is completely normal
(see section on Using the Refrigerator in
this manual).
Do not place food or containers in contact
with the rear wall to avoid spillage of water
formed when defrosting.
Unblock the drain with the cleaning cover
as shown in the sectin on Using the
Refrigerator in this manual.
Make sure that doors close properly by
keeping them free from dirt and
obstructions.
Connect the plug.
Change the fuse or reset the automatic
circuit breaker.
Insert properly.
Change the bulb as indicated in this
manual.
Level the refrigerator as indicated in the
Installation section of this manual.
Do not worry -this is completely normal.
Wrap or place food in sealed containers.
Wrap food or place it in a sealed
container.
Clean the refrigerator as shown in this
manual.
ENGLISH
TECHNICAL SERVICE
If you have carried out the above checks and the problem persists DO NOT CARRY OUT ANY REPAIRS
YOURSELF.
Contact your nearest Technical Service.
15

ELECTRIC DIAGRAM
1.- REFRIGERATOR BUTTON SWITCH.
2.- REFRIGERATOR PILOT LIGHT.
3.- REFRIGERATOR THERMOSTAT.
4.- REFRIGERATOR LIGHT SWITCH.
5.- REFRIGERATOR LIGHT.
6.- THERMAL PROTECTOR (LOCATED
INTERNALLY IN DANFOSS COMPRESSOR).
7.- REFRIGERATOR COMPRESSOR.
8.- PTC STARTER.
9.- FREEZER BUTTON SWITCH.
10.- FREEZER PILOT LIGHT.
11.- FREEZER THERMOSTAT.
12.- FREEZING SWITCH.
13.- FREEZING PILOT LIGHT.
14.- ELECTRONIC THERMOMETER.
15.- THERMOMETER SENSOR (NTC).
16.- THERMAL PROTECTOR (LOCATED
INTERNALLY IN DANFOSS COMPRESSOR).
17.- FREEZER COMPRESSOR.
18.- FAN (mod. 1FFC-48).
SPECIFICATIONS
598
ect
il
d
e
r
P
IO
SPAC
IE
T
MUL
FAGOR
597
A
• Dimensions (in mm.)
Refrigerator
. Capacity
(in litres)
Freezer
Total
Tipe of apparatus
Energetic efficiency
Energy consumption over 24 hours
Freezer category
Freezer independence in the event of a power cut
Freezer capacity over 24 hours
Climate
Correct operating temperatures
Noise level
Nominal power
Number of motors
Voltage/Frequency
Weight (kg)
1.150
Gross
Net
Gross
Net
Gross
Net
1FFC-41
A
1725 1875 2025 2025
1FFC-47
1FFC-48
1FFC-49
210 246 281 246
205 240 275 240
96 96 96 126
73 73 73 100
306 342 377 372
278 313 348 340
777 7
CCC B
1.40 kWh. 1.47 kWh. 1.50 kWh. 1.34 kWh.
20 h. 20 h. 20 h. 20 h.
10 kg. 10 kg. 10 kg. 20 kg.
N-ST N-ST N-ST N-T
(16ºC and 38ºC) (16ºC and 38ºC) (16ºC and 38ºC) (16ºC and 43ºC)
43 dBA 41 dBA 44 dBA 44 dBA
196 W 205 W 270 W 240 W
222 2
220 -230/50 Hz 220 -230/50 Hz 220 -230/50 Hz 220 -230/50 Hz
71 73 77 80
• The power consumption figure in the table results from the standard 24-hour test. Actual power consumption will
depend on the location and operating conditions of your apparatus.
• For maximum storage space and to make ice cubes, take out the top freezer tray.
THESE APPLIANCES MEET
EEC DIRECTIVES: 73/23, 93/68, 89/336, 96/57
16
 Loading...