

Page 1
DE Gebrauchsanweisung 2-14. . . . . . . . . . . . . . . . .
GB Instruction manual 15-27. . . . . . . . . . . . . . . . . .
FR Mode d'emploi 28-42. . . . . . . . . . . . . . . . . . . . .
IT Istruzioni per l'uso 43-55. . . . . . . . . . . . . . . . . .
NL Gebruiksaanwijzing 56-68. . . . . . . . . . . . . . . . .
GR ПдзгЯет чсЮуещт 69-83. . . . . . . . . . . . . . . . . .
ES Instrucciones para el uso 84-99. . . . . . . . . . . .
S060480
Gebrauchsanweisung
Instruction manual
Mode d'emploi
Istruzioni per l'uso
Gebruiksaanwijzing
ПдзгЯет чсЮуещт
Instrucciones para el uso
ET 52250
DE, GB, FR, IT, NL, GR, ES,
801 143 05
Page 2

Table of contents
Protection of the Environment 16. . . . . . . . . . . . . . .
Notes on disposal 16. . . . . . . . . . . . . . . . . . . . . . . . . . . .
How to save energy 16. . . . . . . . . . . . . . . . . . . . . . . . . .
Before connecting your new appliance 17. . . . . . . .
Important information 18. . . . . . . . . . . . . . . . . . . . . . .
Safety information 18. . . . . . . . . . . . . . . . . . . . . . . . . . . .
How to prevent damage to your appliance 19. . . . . . .
The hob 21. . . . . . . . . . . . . . . . . . . . . . . . . . . . . . . . . . .
Hotplate control 21. . . . . . . . . . . . . . . . . . . . . . . . . . . . .
Residual heat indicator 21. . . . . . . . . . . . . . . . . . . . . . . .
Setting procedure 22. . . . . . . . . . . . . . . . . . . . . . . . . .
Cooking zone controls 22. . . . . . . . . . . . . . . . . . . . . . . .
Table 23. . . . . . . . . . . . . . . . . . . . . . . . . . . . . . . . . . . . . .
Care and cleaning 24. . . . . . . . . . . . . . . . . . . . . . . . . .
Hob 24. . . . . . . . . . . . . . . . . . . . . . . . . . . . . . . . . . . . . . .
Hob surround 25. . . . . . . . . . . . . . . . . . . . . . . . . . . . . . .
Note 26. . . . . . . . . . . . . . . . . . . . . . . . . . . . . . . . . . . . . . .
AfterĆsales service 27. . . . . . . . . . . . . . . . . . . . . . . . . .
15
Page 3

Protection of the Environment
Your new appliance was protected by suitable
Notes on disposal
How to save energy
packaging while it was on its way to you. All materials
used for this purpose are environmentĆfriendly and
suitable for recycling. Please make a contribution to
protecting the environment by disposing of the
packaging appropriately.
Old appliances are not worthless rubbish! EnvironĆ
mentĆconscious recycling can reclaim valuable raw
materials.
Before disposing of your old appliance, please make
sure that it is unusable, or label it with a sticker stating
Caution: This appliance is defective!"
UpĆtoĆdate information concerning options for
disposing of your old appliance and the packaging
from the new one can be obtained from your retailer
or local municipal office.
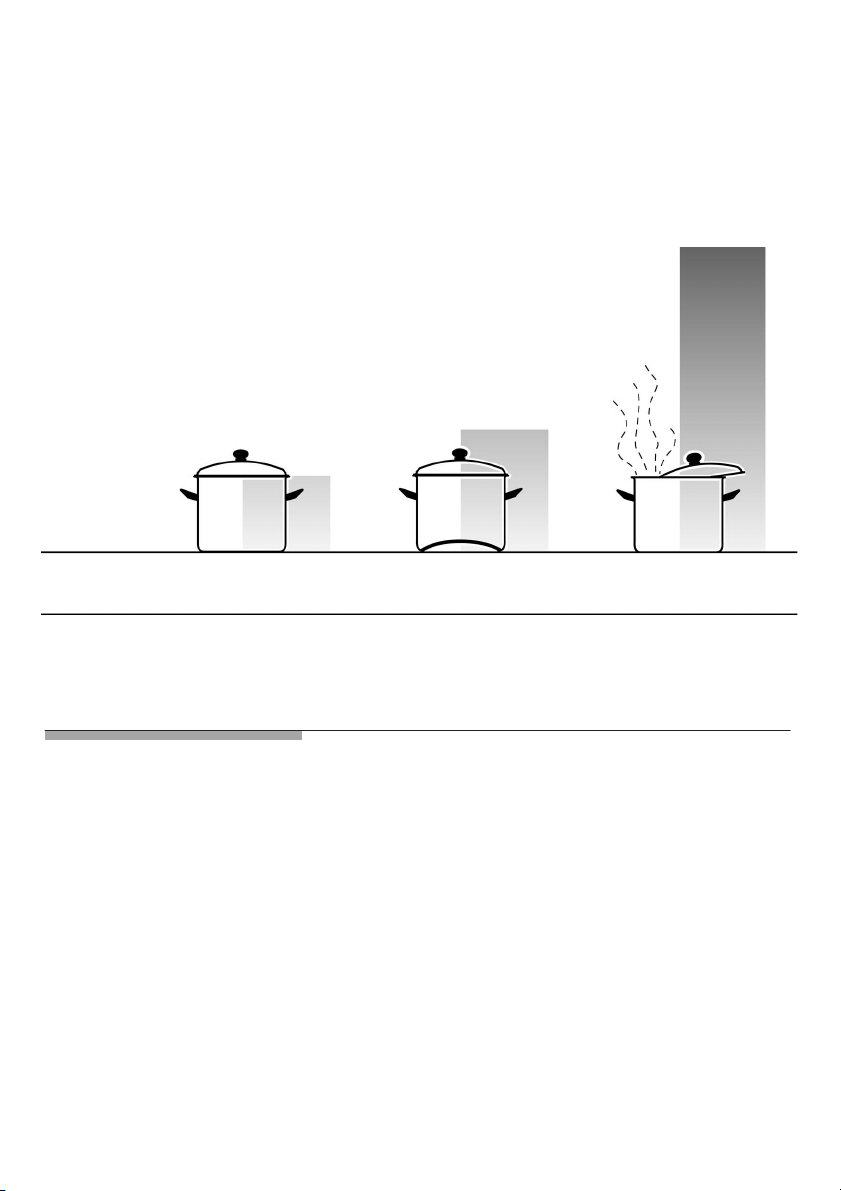
q We recommend that you use saucepans and
frying pans with thick flat bases. Uneven bases
increase cooking times.
16
q Always select a saucepan that is the right size for
the food to be cooked. A large saucepan that is
only halfĆfilled will consume more energy.
q Saucepans and frying pans should always be
covered by a matching lid.
q Using a saucepan base that is the same size as
the hotplate ensures the optimum transfer of heat.
When purchasing saucepans, check that the
manufacturer frequently specifies the top diameter
of the pan rim. Generally, this value is greater than
the diameter of the pan base.
q Switch back to a lower heat setting at the
appropriate time.
Page 4
q Make use of the residual heat. For longer cooking
times, it is possible to switch off the hotplate 5 to
10 minutes before the end of the cooking time.
q Even though the hotplate has been switched off,
you can use it for as long as the residual heat
indicator is illuminated to warm dishes or melt
ingredients.
Energy
consumption
Normal 1ā½Ćfold 4Ćfold
Pan with flat
bottom and lid
Bottom of pan
is not flat
Pan without lid
Before connecting your new
appliance
Please read this instruction manual carefully before
using your new hob for the first time. The instructions
contain important information with regard to user
safety and appliance use and care.
q The electrical connection of your appliance must
be carried out by an approved technician only.
Incorrect connection invalidates any warranty
claims in the event of appliance damage.
17
Page 5

q Please retain these operating and installation
instructions. The envelope for the operating
instructions contains details of the afterĆsales
service which you may need to call if repairs are
required. Please submit the operating and
installation instructions to any subsequent user
of the appliance.
q Do not operate the hob if transport damage is
apparent.
Important information
q This appliance complies with all regulations
Safety information
relevant to electrical appliances. Repairs should
only be carried out by service engineers trained
by the manufacturer. Repairs that have not been
carried out properly represent a considerable
hazard to the user.
q This appliance must be used for the preparation
of food only.
18
q The hob and pans or utensils can become very
hot while it is in use. Make sure that children are
always kept away from the hob.
q Do not leave the hob unattended if you are
cooking with fat or oil. Oil can catch fire if it
overheats. Never pour water onto burning oil or fat.
Burns hazard! Cover the pan in order to smother
the flames and switch off the cooking zone. Leave
the pan to stand on the hob until it has cooled
down.
q The connecting cords of electrical appliances
must not come into contact with the hot cooking
surfaces, as this could result in damage to the hob
and the connecting cord's insulating jacket.
Page 6

How to prevent
damage to your
appliance
Utensils
q In the event that a drawer is located beneath the
hob, you must not store any combustible items
or spray cans in the drawer. Do not place any
combustible items on top of the hob.
q If any cracks, fissures or other breaks appear
on the hob, it must be rendered inoperable
immediately. The hob should be switched off either
via the cooker fuse or circuitĆbreaker in the main
fuse box, or unplugged from its source of power,
whichever is applicable.
q Caution! The saucepan base and the hotplate
must be dry whilst cooking. Any liquid between the
cookware base and the hotplate will vaporize. The
ensuing steam pressure can cause the saucepan
to jump violently. Risk of injury!
q Observe the residual heat indicator. This provides
an indication of which hotplates are still hot.
q Switch off the hotplate if the indicator does not
work when the hotplate is heating.
Call the afterĆsales service.
Please heed the following information in order to preĆ
vent damage to your hob and to keep it in good conĆ
dition:
q Pots and pans should not have a rough base
otherwise they will scratch the cooking zone.
q Do not prepare food in aluminium foil or plastic
containers as the material will melt and stick to
the hob.
q Do not let enamel pans boil dry as this could
damage the base of the pan and the glassĆ
ceramic.
q If you are using special utensils, observe the
manufacturer's instructions.
19
Page 7

Cooking zone
q Do not use the hob as a storage space or work
surface. Salt, sugar or sand (can occur when
vegetables are cleaned) can cause scratches on
the hob.
q Ensure that no hard or sharp object is dropped
onto the hob, otherwise it could become damaged
as a result.
q Only clean the hob when it has cooled, i.e., when
the residual heat display no longer illuminates.
If used when the hotplate is hot, agents used for
cleaning and care of the hotplate will cause stains.
q Do not use a protective foil on the hob.
q Do not put any hot pans on the display panels, the
adjustment range or the hob surround.
Hob discoloration
Examples of possible
damage
Iridescent discoloration (metallic shimmer) is caused
by particles rubbing off the bases of some pans or by
using unsuitable cleaners. This can be removed with
Sainsbury's CERAMIC Hob CLEANER or Hob Clean
but it is a timeĆconsuming job. Our customer service
will remove such stains at a charge. Aggressive or
abrasive cleaning agents will rub off the decor,
causing dark patches.
Any food remains that were not removed and have
become baked on will also cause hob discoloration.
They do not influence the function or stability of the
glass ceramic.
Pitting caused by melted
sugar or food with a high
sugar content.
Scratches caused by
salt, sugar, sand or rough
pan bases.
20
Page 8

The hob
ET 52250
Cooking zone 18 cm
Cooking zone 14,5 cm
Metallic shimmering
discoloration due to
wear from pan bases or
use of an unsuitable
cleaning agent.
Decor rubbed off
due to use of an
unsuitable cleaning agent
Operation display and
Residual heat indicator
Residual heat
indicator
Hotplate control
The hob has a separate residual heat indicator for
each of the hotplates. This indicates which hotplates
are still hot.
21
Page 9

Setting procedure
The hotplate controls are used to set the heat setting
Cooking zone
controls
of the hotplates.
You can turn the controls either to the right or to the
left.
1āāā= lowest setting
6 āā= highest heat setting
22
Page 10

Table
The following tables provide you with a few examples.
Please remember that the cooking times depend on
the type, weight and quality of the food, which means
that deviations are possible.
Set the cooking zone control to setting 6 for bringing
to the boil or initial frying. Then switch the control back
to the appropriate simmer setting.
Melting
Chocolate, butter, honey
Gelatine
Heating and keeping warm
Stew (e. g. lentil dish)
Milk
Heating
Tinned vegetables
Thickened soup
Milk
Defrosting and heating
Frozen spinach
Frozen goulash
Boiling
Rice (with twice the amount
of water)
Fresh vegetables with
1 Ć 3 cups of water
Potatoes boiled in skins with
1 Ć 3 cups of water
Boiled potatoes with
1 Ć 3 cups of water
Pasta (1 Ć 2 l water)
Amount Boil start
setting 6
100 g
1 packet
400 g Ć 800 g
500 ml Ć 1 l
400 g Ć 800 g
500 ml Ć 1 l
200 ml Ć 400 ml
300 g Ć 600 g
500 g Ć 1 kg
125 g Ć 250 g
500 g Ć 1 kg
750 g Ć 1.5 kg
750 g Ć 1.5 kg
200 g Ć 400 g
-
-
1 Ć 3 min.
1 Ć 3 min.
2 Ć 4 min.
4 Ć 6 min.
1 Ć 3 min.
2 Ć 4 min.
2 Ć 4 min.
2 Ć 4 min.
3 Ć 5 min.
4 Ć 6 min.
4 Ć 6 min.
7 Ć 12 min.
Ongoing
cooking
1
1
1 Ć 2
1 Ć 2
1 Ć 2
1 Ć 2
1 Ć 2
2 Ć 3
2 Ć 3
1
1 Ć 2
1 Ć 2
1 Ć 2
1 Ć 2
Total cooking
time
-
-
-
-
5 Ć 10 min.
5 Ć 10 min.
4 Ć 7 min.
10 Ć 20 min.
20 Ć 30 min.
20 Ć 30 min.
10 Ć 20 min.
30 Ć 40 min.
20 Ć 30 min.
10 Ć 15 min.
Roasting
Pot roast
Beef rolls
Poaching
Dumplings (2 Ć 3 l water)
Fish
1 kg
4 pcs.
4 Ć 8 pcs.
300 g Ć 600 g
5 Ć 8 min.
6 Ć 11 min.
7 Ć 12 min.
5 Ć 8 min.
2 Ć 3
2 Ć 3
2 Ć 3
1 Ć 2
80 Ć 100 min.
50 Ć 60 min.
30 Ć 40 min.
15 Ć 25 min.
23
Page 11

Amount
Frying
Fish fingers
Pancakes
Cutlet (in breadcrumbs)
Steaks
DeepĆfat frying
(in 1 Ć 2 l of oil)
Frozen products
Others
* Minerals and vitamins are water soluble, therefore: Use less water - vitamins and minerals are
retained. Use shorter cooking times - for crunchy vegetables.
2 Ć 3 pcs.
200 g / load
400 g / load
Boil start
setting 6
2 Ć 3 min.
2 Ć 3 min.
2 Ć 3 min.
2 Ć 3 min.
10 Ć 15 min.
10 Ć 15 min.
Ongoing
cooking
3 Ć 4
3 Ć 4
3 Ć 4
4 Ć 5
4 Ć 5
2 Ć 3
Total cooking
time
8 Ć 11 min.
ongoing
frying
7 Ć 10 min.
5 Ć 10 min.
Ongoing
deepĆfat frying
Ongoing
deepĆfat frying
Care and cleaning
Hob
24
Do not under any circumstances use a highpressure
or steam cleaner.
A protective cleaning agent will coat the
glassĆceramic hob with a gleaming, dirtĆrepellent film.
This will help to preserve the attractive appearance of
your hob over a long period of time and make it easier
to clean as well. We recommend you use cerafix"
which can be purchased from chemists, hardware
stores or supermarkets.
Clean the hob every time that you use it, so that food
remains are prevented from being baked on to the
surface.
Page 12

Water spots can also be removed using lemon juice or
vinegar. If you accidentally spill acidic liquids onto the
hob frame, please wipe off immediately using a damp
cloth. Otherwise dull areas may appear on the hob
surface.
Note:
If the hob is very dirty, it is best to use a common
household glass scraper.
Suitable cleaners for ceramic hobs:
Cleaning agent
Glass scraper DIY stores/hobby
Replacement blades DIY stores/hobby
COLLO luneta, HOB BRITE
Hob Clean, Hob & Sink Clean,
Sainsbury's CERAMIC Hob
CLEANER, SWISS CLEANER,
WK TOP
Unsuitable cleaning agents:
Do not under any circumstances use an abrasive
sponge or a scouring agent. Nor should any
chemically aggressive cleaners such as oven
sprays or stain removers be used.
Supply source
markets, electric
appliance stores,
specialist kitchen stores,
afterĆsales service
markets, drugstores,
painting accessory
stores, afterĆsales
service
Chemists, hardware
stores, electrical
retailers, supermarkets,
grocers, department
stores
Iridescent discoloration (metallic shimmering) is
caused by the bases of some pans or by using
unsuitable cleaners. This can be removed with
Sainsbury's CERMAIC Hob CLEANER or
Hob Clean but it is a timeĆconsuming job.
Our afterĆsales service will also remove such
discolourations for a small fee.
25
Page 13

Hob surround
Note
The hob surround is best cleaned with lukewarm
soapy water. Do not use a sharp or abrasive cleaning
agent.
q The temperature of the hotplate is controlled via
the switching on and off of the heater; This means
that the hotplate does not always glow red. If you
select a lower heat setting, the heater will switch
off more often than with a higher heat setting. The
heater still switches on and off even on the highest
setting.
q A quiet buzzing sound may be heard when the
hotplates are heating up.
The heater of the individual hotplates may glow
to varying degrees of brightness. It may appear
to extend outside the borders defining the cooking
zone, depending on the angle from which it is
observed.
This represents a technical characteristic and has
no influence on quality or function.
q Irregularities on the surface are a natural
characteristic of glassĆceramic products.
The hob's mirror finish can mean that even
the smallest bubble, less than 1 mm in diameter,
is more or less visible. They neither impair the
performance nor the durability of the
glassĆceramic hob.
26
Page 14

AfterĆsales service
When calling upon our afterĆsales service, please
specify the E number and FD number of your apĆ
pliance.
The nameplate containing these numbers can be
found on the back page of these operating instrucĆ
tions.
27
 Loading...