

Page 1

INSTRUCTION MANUAL
ENITEN
FRFR
FRFRES
ESPRESSO MACHINE
MANUEL D’UTILISATION
MACHINE À CAFÉ
MANUAL DE USO
MÁQUINA DE CAFÉ
Page 2
Dear Customer,
Thank you for buying the Smeg 50’s Retro-Style Espresso Machine.
By choosing one of our products, you have opted for a solution in which aesthetic
research and innovative engineering offer unique items that become decorative
elements.
A Smeg appliance always goes perfectly with the other products of the line and at the
same time can be an object of design in the kitchen.
We hope you fully enjoy all the features of your appliance.
For more information on the product, visit: www.smegusa.com.
Model ECF01
Espresso Machine
Page 3

Contents
ENITEN
1 Instructions 7
1.1 Introduction 7
1.2 This user’s manual 7
1.3 Intended use 7
1.4 Manufacturer's liability 8
1.5 Identification plate 8
1.6 Disposal 8
2 Description 9
2.1 Product Description 9
3 Use 10
3.1 Before first use 10
3.2 First use 11
3.3 How to make espresso 12
3.4 How to make cappuccino 14
3.5 How to heat water 15
3.6 Accessing the programming menus and changing the settings 15
3.7 How to cool down the boiler 18
4 Cleaning and maintenance 19
4.1 Warnings 19
4.2 Cleaning the body of the espresso machine 19
4.3 Cleaning the parts of the espresso machine 19
4.4 Descaling 21
4.5 What to do if... 22
Important Safeguards
WARNING: If the instructions contained in this manual are not followed
precisely, fire or explosion may result causing property damage, personal
injury or death.
READ AND SAVE THESE INSTRUCTIONS - Your safety and the safety of
others are very important.
We have provided many important safety messages throughout this manual and
on the appliance.
Read all the instructions before using the appliance and always obey all safety
messages.
3
Page 4
Important Safeguards
RECOGNIZE SAFETY INFORMATION
This is a safety alert symbol. This symbol alerts you to potential hazards that can
result in severe personal injury or death.
UNDERSTAND SIGNAL WORDS
A signal word - DANGER, WARNING or CAUTION - is used with the safety alert
symbol. DANGER denotes the most serious hazards. It means you could be killed
or seriously injured if you do not immediately
WARNING means you could be killed or seriously injured if the instructions are not
followed. CAUTION indicates a potentially hazardous situation, which, if not
avoided, could result in minor to moderate injury.
• This appliance is intended for use in the home only.
• Use this appliance only for its intended purpose. The
manufacturer cannot be held liable for damage caused by
WARNING
improper use of this appliance.
• This appliance complies with current safety regulations.
Improper use of this appliance can result in personal injury
and material damage.
• Read all the instructions before installing or using the
appliance for the first time.
• Keep these operating instructions in a safe place and pass
them on to any future user.
follow the instructions.
The safety messages will inform you of potential hazards, on how to avoid the risk of injury
and what can occur if the instructions are not followed.
IMPORTANT: Observe all codes and ordinances in force.
WARNING: For your safety, the instructions contained in this manual must be
followed to minimize the risk of fire or explosion and to prevent property damage,
personal injury or death.
Do not store or use gasoline or other flammable vapors, liquids or materials near this or any
other appliance.
NOTE: This appliance is NOT designed for installation in manufactured (mobile)
homes or in recreational vehicles (RVs).
DO NOT install this appliance outdoors.
4
Page 5

Important Safeguards
ENITEN
WARNING
To reduce the risk of fire, electrical shock, personal injury, or
damage when using the appliance, follow basic safety
precautions, including the following:
Follow all safety precautions to ensure safe
use of the appliance.
• Before using the appliance, read this
user manual carefully.
• Do not use the appliance outdoors.
• This appliance is for household use only.
• Do not use the appliance for other than
its intended use.
• Do not allow children to use the
appliance.
• Children should not play with the
appliance. Keep the appliance out of the
reach of children.
• Turn off the appliance immediately after
use.
• Do not leave the appliance unattended
while it is running.
• Disconnect the appliance from the wall
outlet before assembly, disassembly,
cleaning and after each use.
• Let the appliance cool down before
fitting or removing parts and before
cleaning.
• To protect against fire, electrical shock
and personal injury, do not immerse the
appliance, the power cord or plug in
water or any other liquid.
• Do not touch the appliance or the plug
with wet hands.
• Never try to extinguish a flame/fire with
water: turn off the appliance, unplug it
from the outlet and cover the flame with a
lid or a fire blanket.
• Do not use the appliance if the power
cord or plug is damaged or if the
appliance has been dropped or
damaged in any way.
• Do not let the cord hang over the edge
of a table or counter.
• If the power cord is damaged, contact
the technical support service to get a
replacement and to avoid possible
hazards.
• Make sure the power cord does not
come in contact with sharp edges.
• Do not pull on the cord to remove the
plug from the socket.
• Do not place the appliance on or near
switched-on gas or electric burners,
inside an oven, or near heat sources.
• Do not touch hot surfaces. Use handles
and knobs.
• Do not place the appliance near faucets
or sinks.
• Never attempt to repair the appliance
yourself or without the help of a qualified
technician. Failing to do this will void the
warranty.
• In case of malfunction, have the
appliance repaired by a qualified
technician.
• Do not make any changes to the
appliance.
5
Page 6

Important Safeguards
For this appliance
• Always unplug the espresso machine if
left unattended, before assembly and
disassembly of components and before
cleaning.
• Unplug the espresso machine from the
outlet when it is not in operation, before
cleaning and in case of malfunction.
• Allow the espresso machine to cool
before cleaning.
• Do not use the espresso machine without
water in the tank or without the tank.
• Leave at least 1 inch of space between
the espresso machine and any side or
rear surface, and at least 6 inches of
space above the espresso machine.
• Risk of scalding! The espresso machine
generates heat and produces hot water
and steam during operation.
• Risk of scalding! Do not touch the cup
warmer tray during operation.
• Do not use the espresso machine in
combination with parts or accessories
from other manufacturers.
• Use only original spare parts from the
manufacturer. The use of spare parts not
recommended by the manufacturer may
cause fire, electric shock or injury to
persons.
• Place the espresso machine on a flat, dry
surface.
• Avoid wetting or spraying liquid on the
espresso machine. In case of contact
with liquid, immediately unplug the cord
from the electrical outlet and dry
thoroughly: Risk of electric shock!
• Do not use abrasive cleaners or sharp
objects to clean the espresso machine.
• A short power cord is provided to
reduce risks resulting from becoming
entangled in or tripping over a longer
cord.
• Longer, detachable power supply cords
or extension cords are available and
may be used if care is exercised in their
use.
• If an extension cord is used, the marked
electrical rating should be at least as
great as the electrical rating of the
appliance. If the appliance is provided
with 3-wire, grounding type cord, the
extension should be a GROUNDING
TYPE 3 - WIRE CORD. The longer cord
should be arranged so that it will not
drape over the counter-top or table top
where it can be pulled on by children or
tripped over.
• Your product is equipped with a
polarized alternating current line plug (a
plug having one blade wider than the
other). This plug will fit into the power
outlet only one way. This is a safety
feature. If you are unable to insert the
plug fully into the outlet, try reversing the
plug. If the plug should still fail to fit,
contact your electrician to replace your
obsolete outlet. Do not defeat the safety
purpose of the polarized plug.
SAVE THESE INSTRUCTIONS
6
Page 7
Important Safeguards
ENITEN
1 Instructions
1.1 Introduction
Key information for the user:
Warni ngs
General information about the user
manual, safety and final disposal.
Description
Description of the appliance.
Use
Information on using the appliance.
Cleaning and maintenance
Information for proper cleaning and
maintenance.
Safety warning
1.2 This user’s manual
This user's manual is an integral part of the
appliance and must be kept intact and
available to the user throughout its life cycle.
1.3 Intended use
• The appliance is for indoor use only.
• The appliance is intended solely for
household-type use.
• The appliance can be used to prepare
espresso and cappuccino using ground
coffee or pods. Any other use is
inappropriate. Do not use the appliance
for purposes other than its intended use.
The California Safe Drinking
Water and Toxic Enforcement Act
requires the Governor of
California to publish a list of
substances known to the State of
California to cause cancer, birth
defects or other reproductive harm,
and requires businesses to warn
customers of potential exposure to
such substances.
Information
Suggestion
Warning
• This product contains a chemical known
by the State of California to cause
cancer, birth defects or other
reproductive harm.
• This appliance can cause low-level
exposure to some of the substances
listed, including benzene,
formaldehyde, carbon monoxide,
toluene, and soot.
7
Page 8

Important Safeguards
1.4 Manufacturer's liability
The manufacturer accepts no liability for
damage to persons and property caused
by:
• using the appliance in ways other than
those provided;
• not reading the user's manual;
• tampering with any part of the
appliance;
• using non-original parts;
• ignoring safety warnings.
1.5 Identification plate
The identification plate lists the technical
data, serial number and brand name. The
identification plate must never be removed.
1.6 Disposal
Power voltage
Risk of electric shock
• Unplug the appliance.
• Unplug the cord from the wall outlet.
• Old electrical equipment must not be
disposed of with household waste! In
accordance with the law in force,
electrical appliances at the end of their
life should be taken to separate
collection facilities for electrical and
electronic waste. This is so that valuable
materials from old appliances can be
recycled and the environment can be
protected. For more information, please
contact your local authorities or recycling
center employees.
Note that non-polluting and recyclable
materials are used for packaging the
appliance.
• Dispose of the packaging materials at
appropriate differentiated waste
collection centers.
Plastic packaging
Risk of suffocation
• Do not leave the packaging or any part
of it unattended.
• Do not allow children to play with the
plastic packaging bags.
8
Page 9
ENITEN
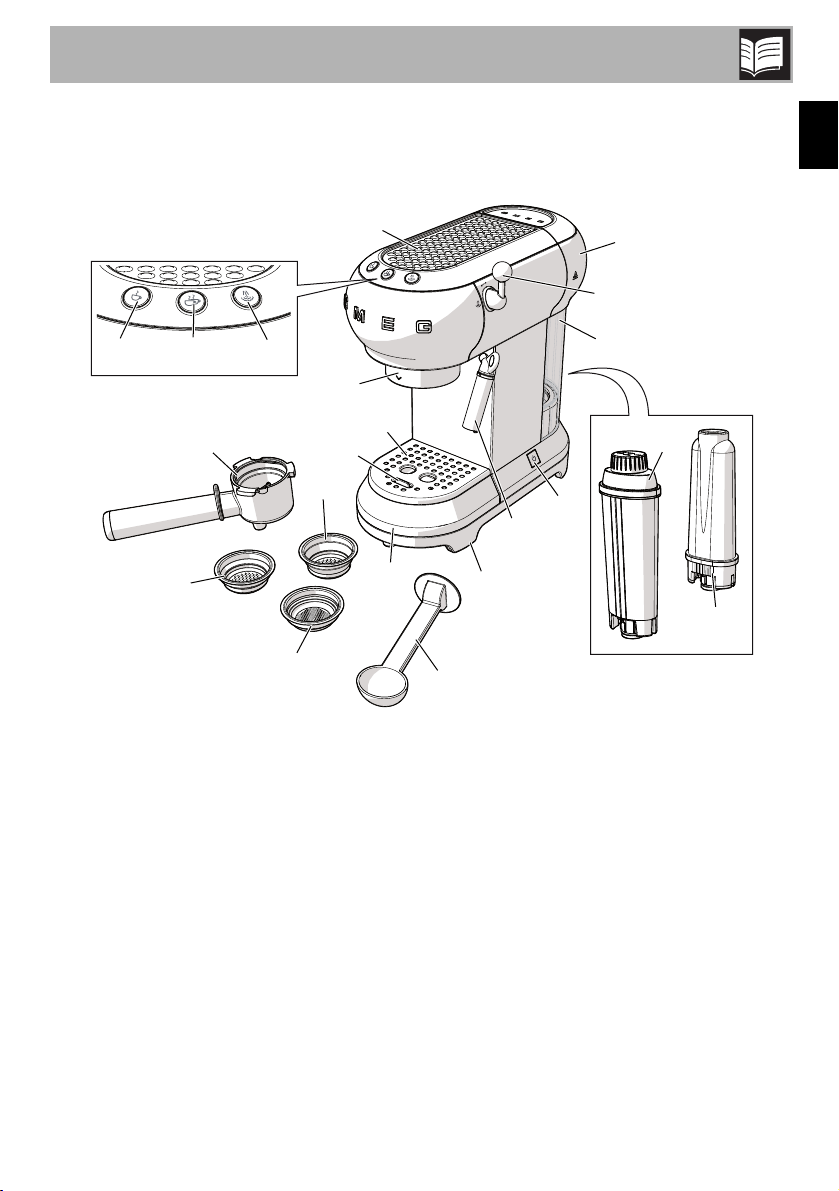
2 Description
2.1 Product Description
Description
1
17 18 19
2
4
3
14
1 Cup warmer tray
2 Grouphead
3 Filter holder
4 Steel cup tray
5 Floater
6 Stainless steel drip tray
7 Hot water and steam wand/Cappuccino
frother
8 Steam valve
9 ON/OFF switch
10 Water tank cover
5
15
6
13
Model ECF01 - Espresso Machine
10
8
11
16
9
7
20
16
12
11 Water tank (1 liter)
12 Measuring scoop/tamper
13 Pod filter basket
14 1-cup ground coffee filter basket
15 2-cup ground coffee filter basket
16 Water softener filter (optional)
17 1-cup coffee button (white light)
18 2-cup coffee button (white light)
19 Steam button (white light)/Descaler
button (orange light)
20 Non-slip feet
9
Page 10
Use
3 Use
3.1 Before first use
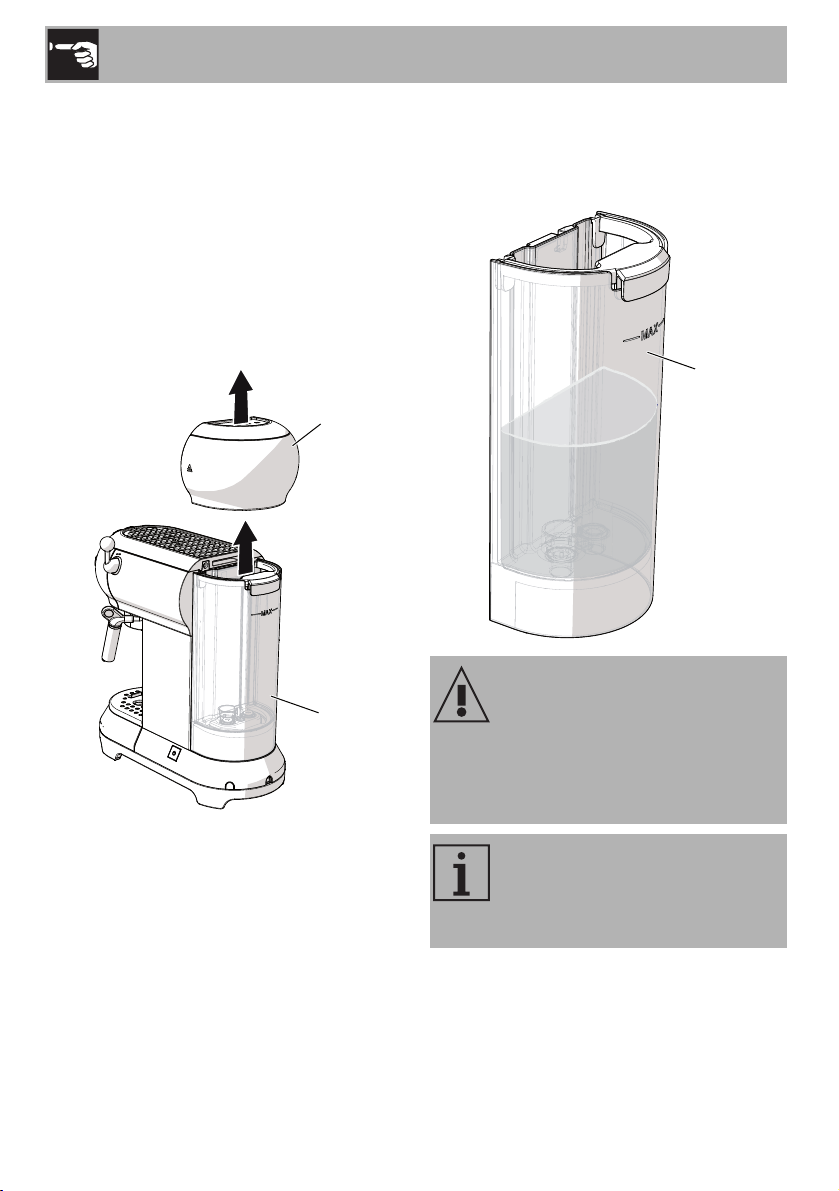
1. Remove any labels and stickers from the
espresso machine.
2. Thoroughly wash and dry the espresso
machine’s parts (see “4 Cleaning and
maintenance”).
3. Remove the cover (1) by pulling it
upwards and then pull out the tank (2).
1
4. Fill the tank (2) with fresh, clean water
directly from the faucet or by using a
pitcher, being careful not to exceed the
maximum level indicated on the tank.
2
10
Risk of accident
2
• Do not operate the espresso machine
without water in the tank or without the
tank in place.
The parts that may come into
contact with food are made of
materials that comply with all legal
provisions in force.
Page 11

Use
ENITEN
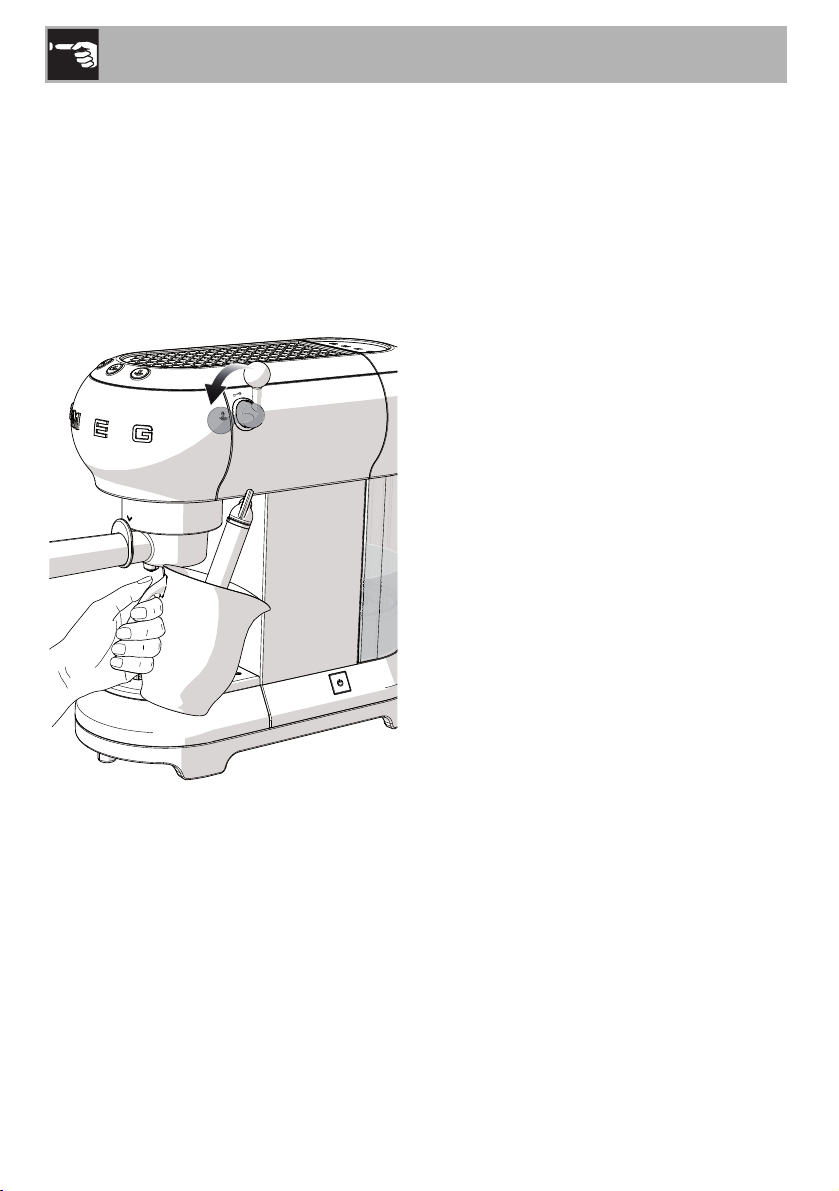
3.2 First use
1. Turn on the espresso machine using the
ON/OFF switch (1): the lights of the
three buttons (2), (3) and (4) will flash in
sequence.
2 3 4
3. Place a container under the hot water/
steam wand (4).
4. Turn the steam valve (5) to the
position and dispense 1/2 cup of water.
5. Turn the steam valve (5) back to the
position.
5
4
2. Lights (2) and (3) will flash to indicate
that the machine is reaching the pre-set
temperature. The espresso machine is
ready for use as soon as the lights stop
flashing.
1
6. Attach the filter holder by aligning the
7. To rinse the machine’s internal circuits,
8. Repeat this procedure 5 times.
Make 4-5 espressos or 4-5
cappuccinos to obtain a
satisfactory result.
handle with and turning it to the
right to the position.
place a container under the coffe spout
and press the button.
11
Page 12

Use
1
2
3
3
Then proceed with rinsing the “steam”
circuit:
9. Place a container under the hot water
spout and turn the steam valve to the
position. Hot water is delivered.
10. When the appliance automatically
stops the hot water delivery, turn the
steam valve back to the position.
11. Repeat this procedure 1 more time (if
necessary, refill the tank).
Filters
The coffee machine comes with three filters:
a one-cup filter, a two-cup filter, and a pod
filter. Below each filter you will find the
corresponding symbol.
3.3 How to make espresso
Ground coffee:
1. Place the ground coffee filter basket (1)
in the filter holder (2), choosing the one-
cup
2. Tamp the ground coffee down using the
tamper (3).
or the two-cup basket.
12
Page 13

Use
ENITEN
3. Wipe off any excess ground coffee
from the edge of the filter holder.
Attach the filter holder by aligning the
handle with and turning it to the
right to the position.
• For one cup, fill the filter basket
with one level scoop of coffee
(about 1 tablespoon.)
• For two cups, fill the filter basket
with two scoops of coffee.
• For a stronger coffee, tamp the
ground coffee hard with the
tamper.
• For a weaker coffee, use the
tamper to tamp the ground
coffee lightly.
4. Place the cup or cups under the filter
holder spouts and press the coffee
button or
Risk of scalding
• To avoid any splashing, do not detach
the filter holder while coffee is being
dispensed. Wait a few seconds for the
process to finish.
.
13
Page 14

Use
Coffee pods:
1. Insert the coffee pod filter basket
the filter holder.
2. Insert the pod in the filter holder trying to
center it as much as possible.
3. Proceed in the same way as with ground
coffee.
Risk of scalding
• To avoid any splashing, do not detach
the filter holder while coffee is being
dispensed. Wait a few seconds for the
process to finish.
• The process can be interrupted
at any time by pressing the coffee
button.
• To increase the amount of coffee
in the cup, hold down the coffee
button.
in
4. When the light stops flashing, place
an empty container under the
cappuccino frother (1) and turn the
steam valve (2) to the position to
drain any water present and then close
the valve.
5. Place the container with the milk under
the cappuccino frother (1), immersing the
cappuccino frother a few millimeters
below the surface. Turn the steam valve (2)
to the position and slowly move the
container up and down to obtain a
creamier foam.
2
1
3.4 How to make cappuccino
1. Make an espresso in a large cup.
2. Press the
3. Fill a container with 1/2 cup cold,
partially skimmed milk for each
cappuccino you want to make.
14
button: the light will flash.
Page 15

Use
ENITEN
6. Once the volume of the milk has
doubled, dip the cappuccino frother
deep into the milk and heat to 140°F
(60°C). Stop the frothing process by
turning the steam valve clockwise.
7. Pour the milk into the cups with the
espresso.
• To make more than one
cappuccino, first prepare all the
espresso and then froth the milk
for all the cappuccinos.
• For hygiene reasons, it is
recommended to clean the
cappuccino frother after use.
• Clean out the milk residue by
opening the steam valve to let out
the steam.
• Release the steam for only a
maximum of 60 seconds.
3.5 How to heat water
1. Turn the machine on using the ON/OFF
switch.
2. Place a container under the cappuccino
frother.
3. Turn the steam valve to the position
to let the hot water out.
• Release the steam for only a
maximum of 60 seconds.
3.6 Accessing the programming
menus and changing the settings
1. Make sure that the machine is ready to
use and hold the button for 10
seconds until the three buttons start
flashing: the machine will enter
programming mode.
2. Program the machine settings to your
own needs.
3. To exit the menu, simply do not press any
button for 15 seconds.
15
Page 16

Use
Setting the coffee temperature
1. Access the programming menu.
2. Press the button to select the
temperature of the coffee. The lights of
the current setting will turn on:
Lights Temperature setting
Low
Medium
High
3. The lights will start flashing in sequence.
4. Press the button corresponding to the
desired temperature: low ,
medium or high .
5. The button will flash to indicate the
selection has been saved.
4. Release the button as soon as you reach
the desired amount of coffee.
5. The light will flash to indicate that the
selected quantity has been saved.
Setting the water hardness
1. Access the programming menu.
2. Press the button to select the water
hardness. The lights of the current setting
will turn on:
Lights Water setting
Soft
Medium
Hard
3. The lights will start flashing in sequence.
4. Press the button corresponding to the
water hardness:
Setting the amount of coffee
To change the quantity of coffee dispensed
by the machine:
1. Place one or two cups under the filter
holder spouts.
2. Press the button for one cup or two
cups and hold it down.
3. The machine will start dispensing coffee.
16
soft medium hard
<10°dH 10°dH - 20°dH > 20°dH
<18°fH 18°fH - 36°fH > 36°fH
< 180 mg/l
CaCo3
180-300 mg/l
CaCo3
360 mg/l
CaCo3
5. The button will flash to indicate the
selection has been saved.
Page 17

Use
ENITEN
Setting the auto shut-off time
For energy saving reasons, the espresso
machine is equipped with an auto shut-off
feature that activates when the machine has
been left on for a long time.
To set the auto shut-off time:
1. Access the programming menu.
2. Press the button to select the auto
shut-off time. The lights of the current
setting will turn on:
Lights Time setting
9 minutes
30 minutes
3 hours
Restoring the factory settings
To restore factory settings:
1. Access the programming menu.
2. Turn the steam valve to the position.
3. Press the button: the three lights will
blink to indicate that the original settings
have been restored.
4. Turn the steam valve back to the
position.
3. The lights will start flashing in sequence.
4. Press the button corresponding to the
time you want to set, choosing from 9
minutes , 30 minutes or 3
hours .
5. The button will flash to indicate the
selection has been saved.
17
Page 18
3.7 How to cool down the boiler
The boiler must be cooled down if you want
to make coffee immediately after frothing
milk for cappuccino.
If the boiler is not cooled down, the coffee
will be burned.
1. Place a container under the cappuccino
frother and open the steam valve to
dispense hot water.
Use
2. The hot water will stop coming out as
soon as the machine has cooled down.
3. Close the steam valve and proceed with
making the coffee.
18
Page 19
Cleaning and maintenance
ENITEN
2
3
4 Cleaning and maintenance
4.1 Warnings
Misuse
Risk of electric shock
• Unplug the espresso machine before
cleaning.
• Do not immerse the espresso machine in
water or other liquids.
• Allow the espresso machine to cool
before cleaning.
Misuse
Risk of damage to surfaces
• Do not use steam jets to clean the
espresso maker.
• Do not use cleaning products containing
chlorine, ammonia or bleach on parts
with metallic surface finishes (e.g.
anodizing, nickel or chrome plating).
• Do not use abrasive or corrosive
detergents (e.g. powders, stain
removers and metal scouring pads).
• Do not use rough or abrasive materials
or sharp metal scrapers.
4.3 Cleaning the parts of the
espresso machine
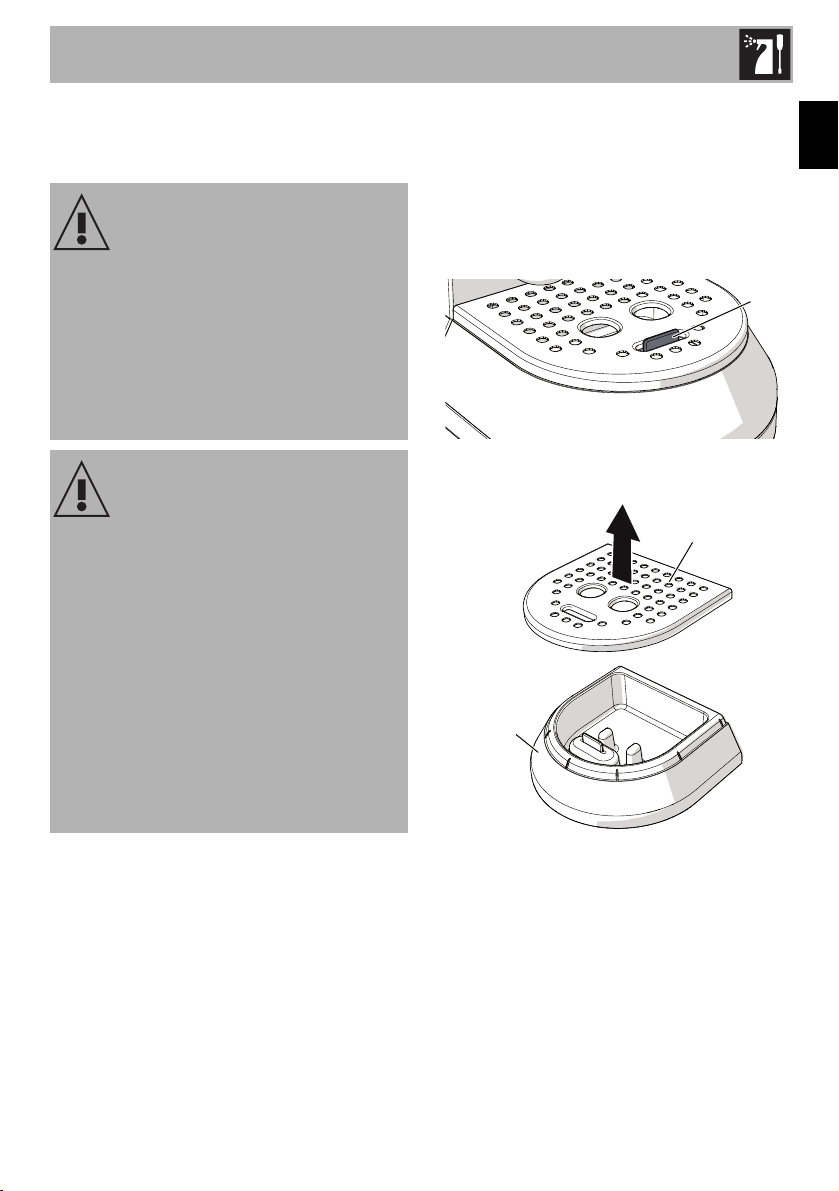
Cleaning the drip tray
The drip tray is fitted with a red floater (1)
that protrudes from the cup tray as soon as
the maximum level of liquid is exceeded.
1
1. Remove the cup tray (2) and then the
drip tray (3) to empty it.
4.2 Cleaning the body of the
espresso machine
To maintain the outer surfaces, you must
clean them regularly after each use after
letting them cool down. Clean with a soft,
damp cloth.
2. Clean the tray with a cloth and put it
back in place with the cup tray.
Cleaning the filter baskets
Clean the filter baskets regularly under
running water. If the holes are clogged,
clean them with a pin or a brush.
19
Page 20
Cleaning and maintenance
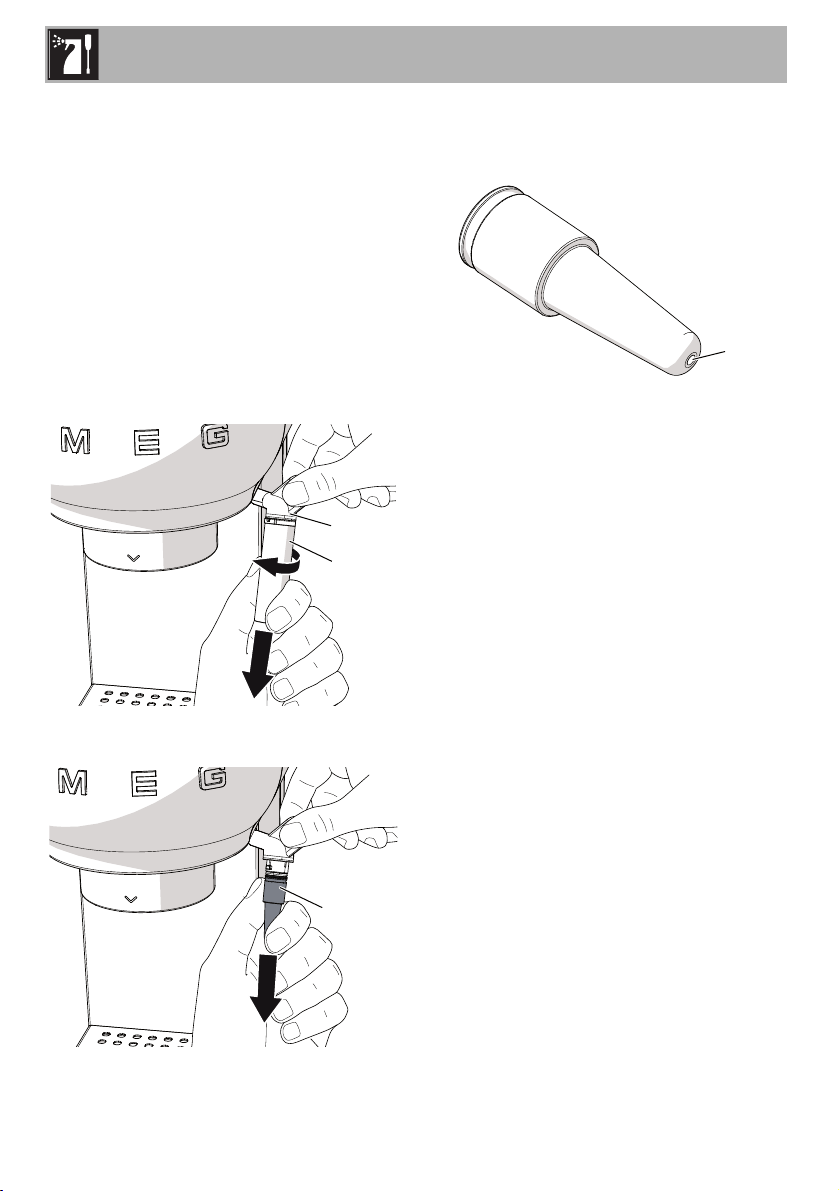
Cleaning the cappuccino frother
Clean the cappuccino frother immediately
after use.
1. Turn the steam valve to release a little
steam and to clean out the milk
remaining inside it.
2. Switch off the espresso machine using the
ON/OFF switch.
3. Hold the tube of the cappuccino frother (1)
with one hand and with the other turn the
cappuccino frother (2) clockwise and
slide it down.
1
2
4. Remove the rubber nozzle (3) from the
frother tube by pulling down on it.
5. Wash the cappuccino frother and the
nozzle with warm water.
6. Check that the hole (4) is not obstructed.
4
7. Insert the nozzle (3) in the cappuccino
frother tube (1) and reposition the
cappuccino frother (2) by sliding it
upwards and turning it counterclockwise.
8. Put the cappuccino frother back together
by following the cleaning instructions in
reverse order.
Cleaning the grouphead
The grouphead should be rinsed out after
every 200 coffees by flushing about 2 cups
of water through it. To do this, press the
coffee button without loading ground
coffee or a pod.
Cleaning the water tank
Clean the water tank about once a month
with a damp cloth and mild detergent.
20
3
Page 21
Cleaning and maintenance
ENITEN
4.4 Descaling
The espresso machine should be descaled
when the button lights up orange.
1. Fill the water tank with a solution of water
and descaling solution in the amounts
recommended by the manufacturer.
2. Press the ON/OFF switch.
3. Remove the filter holder and place a
container under the cappuccino frother.
4. Wait until the or lights stop
flashing.
5. Hold down the button for 10
seconds until the three buttons begin to
blink in sequence.
6. Turn the steam valve to the position.
7. Press to start the descaling process.
8. The descaling cycle will automatically
perform a series of rinses to remove
limescale from the espresso machine.
9. When the orange indicator light
flashes, it means the descaling cycle has
been interrupted.
10. Remove the water tank, empty it and
rinse it.
11. Fill the tank up to the maximum level
and put it back in place.
12. Place an empty container under the
cappuccino frother and check that the
steam valve is in the position. Then,
press the button to start the rinse
cycle.
13. When the water tank is empty, it is
necessary to perform a new rinse cycle,
following steps 10,11 and 12.
14. When the water tank is empty, the
orange indicator light turns off to
indicate that descaling has finished.
15. Make sure that the steam valve is in the
c l o s e d p o s i t i o n .
Risk of injury
• Descaler contains acids which may
irritate the skin and eyes.
• Carefully follow the manufacturer's
instructions and safety warnings on the
packaging in the event of contact with
the skin or eyes.
• Use a descaling solution recommended
by Smeg to avoid damage to the
espresso machine.
Descaling and rinsing the grouphead
During the descaling cycle, close the steam
valve from time to time to make the
descaling solution flow out of the
grouphead.
During the rinse cycle, close the steam valve
from time to time to rinse the grouphead.
21
Page 22

4.5 What to do if...
Problem Possible cause Solution
Cleaning and maintenance
No water in the tank. Fill the tank.
The coffee does not come
out
The coffee drips from the
filter holder and not from
the spouts
The filter holes are blocked.
The tank is not inserted correctly. Insert the tank correctly.
Presence of limescale. Run the descaling cycle.
The filter holder is not attached
properly or is dirty.
The grouphead gasket is worn.
The spout holes are clogged. Clean the spout holes.
Clean the filter basket by
using a brush or a pin.
Attach the filter holder and
turn it until it stops.
Clean the filter holder.
Have it replaced at an
authorized service center.
22
Page 23

Cleaning and maintenance
ENITEN
Problem Possible cause Solution
The filter holder does not
latch into the espresso
machine
The espresso machine
does not work and all the
lights are blinking
The espresso’s crema is
clear and comes out too
quickly from the spout
Use the measuring scoop
The filter basket is too full.
Possible fault.
The ground coffee has not been
tamped enough.
There is too little ground coffee. Increase the amount.
The coffee grind is too coarse.
The quality of the ground coffee is
not correct.
provided and use the
correct filter basket.
Unplug the espresso
machine and contact an
authorized service center.
Tamp the coffee more.
Only use ground coffee for
espresso machines.
Change the type of ground
coffee.
23
Page 24

Cleaning and maintenance
Problem Possible cause Solution
The espresso’s crema is
dark and comes out too
slowly from the spout
The ground coffee has been
tamped too hard.
There is too much ground coffee. Decrease the amount.
The grouphead or the filter basket
is clogged.
The coffee grind is too fine.
Presence of limescale. Run the descaling cycle.
Steam valve open. Close the steam valve.
Tamp the coffee less.
Clean the outlet and the
filter basket.
Only use ground coffee for
espresso machines.
The and lights
flash for a few seconds
24
Boiler temperature is too high. Cool down the boiler.
Presence of limescale. Run the descaling cycle.
Page 25

Cleaning and maintenance
ENITEN
Problem Possible cause Solution
No water in the tank. Fill the tank.
The grouphead or the filter basket
is clogged.
The tank is not inserted correctly. Insert the tank correctly.
If the problem has not been
resolved or there are other types of
faults, contact your local
authorized service center.
Clean the grouphead and
the filter.
25
Page 26

The manufacturer reserves the right to make any changes deemed useful for improvement of its products without prior
notice. The illustrations and descriptions contained in this manual are therefore not binding and are merely indicative.
Le fabricant se réserve la faculté d’apporter, sans préavis, toutes les modifications qu’il jugera utiles pour
l’amélioration de ses produits. Les illustrations et les descriptions figurant dans ce manuel ne sont pas contraignantes et
n’ont qu’une valeur indicative.
El fabricante se reserva el derecho a aportar sin aviso previo todas las modificaciones que considere útiles para la
mejora de sus propios productos. Las ilustraciones y las descripciones contenidas en este manual no comprometen,
por tanto, al fabricante y tienen un valor meramente indicativo.
Page 27

914777367/C
 Loading...