


Table of Contents
1. PRECAUTIONS FOR USE .................................................................................................................................. 26
2. DISPOSAL INSTRUCTIONS - OUR ENVIRONMENT POLICY.......................................................................... 27
3. SAFETY PRECAUTIONS .................................................................................................................................... 28
4. INTENDED USE OF THE APPLIANCE .............................................................................................................. 30
4.1 Examples of outdoor use...................................................................................................................................................30
5. GETTING TO KNOW YOUR APPLIANCE.......................................................................................................... 31
6. BEFORE INSTALLATION ................................................................................................................................... 32
7. INSTALLATION ................................................................................................................................................... 32
7.1 Free-standing installation...................................................................................................................................................32
7.2 Built-in installation..............................................................................................................................................................33
7.3 Connecting the gas cylinder to the appliance ....................................................................................................................34
7.4 Burner, Nozzle and Gas Consumption Data Tables ..........................................................................................................35
7.5 Check for any gas leaks ....................................................................................................................................................35
7.6 Fixing the gas cylinder to the trolley (optional) ..................................................................................................................36
7.7 Hose clip ............................................................................................................................................................................36
8. THE CONTROL PANEL ...................................................................................................................................... 37
9. USING THE BARBECUE .................................................................................................................................... 39
9.1 Fitting and changing the battery ........................................................................................................................................39
9.2 Grid and plate positions .....................................................................................................................................................39
9.3 Switching on ......................................................................................................................................................................40
10. STANDARD ACCESSORIES ............................................................................................................................ 41
11. COOKING ADVICE ........................................................................................................................................... 42
11.1 Meat.................................................................................................................................................................................42
11.2 Vegetables .......................................................................................................................................................................42
11.4 Cooking recommendations ..............................................................................................................................................43
11.3 Cooking table...................................................................................................................................................................43
12. CLEANING AND MAINTENANCE .................................................................................................................... 45
12.1 Cleaning the exterior (stainless steel)..............................................................................................................................45
12.2 Cleaning the internal barbecue components ...................................................................................................................45
12.3 Cleaning the dripping pan................................................................................................................................................46
INSTRUCTIONS FOR THE USER: these provide recommendations for use, a description of the controls
and the correct procedures for cleaning and maintaining the appliance
INSTRUCTIONS FOR THE INSTALLER: these are intended for the qualified engineer who is to install,
commission and test the appliance
25
Precautions for Use
1. PRECAUTIONS FOR USE
THIS MANUAL CONSTITUTES AN INTEGRAL PART OF THE APPLIANCE: TAKE GOOD CARE OF IT
AND KEEP IT TO HAND THROUGHOUT ITS LIFE CYCLE
WE URGE YOU TO READ THIS MANUAL AND ALL THE INFORMATION IT CONTAINS CAREFULLY
BEFORE USING THE PRODUCT. INSTALLATION MUST BE CARRIED OUT BY QUALIFIED STAFF
IN COMPLIANCE WITH THE RELEVANT REGULATIONS. THIS APPLIANCE IS INTENDED FOR
HOUSEHOLD USE OUTDOORS, AND COMPLIES WITH THE EEC DIRECTIVES CURRENTLY IN
FORCE. THE APPLIANCE IS BUILT TO PROVIDE THE FOLLOWING FUNCTION: COOKING AND
HEATING FOODS; ALL OTHER USES ARE TO BE CONSIDERED IMPROPER.
THE MANUFACTURER DECLINES ALL LIABILITY FOR USES OTHER THAN THOSE STATED
ABOVE.
NEVER USE THIS APPLIANCE FOR HEATING ROOMS.
NEVER LEAVE PACKAGING RESIDUES UNATTENDED IN THE HOME. SEPARATE THE VARIOUS
PACKAGING MATERIALS BY TYPE AND CONSIGN THEM TO THE NEAREST SEPARATE
DISPOSAL CENTRE.
NEVER OBSTRUCT THE OPENINGS AND SLITS PROVIDED FOR VENTILATION AND HEAT
DISPERSAL ON THE SIDES AND REAR OF THE APPLIANCE.
THE NAMEPLATE WITH THE TECHNICAL DATA, SERIAL NUMBER AND MARK IS IN A VISIBLE
POSITION ON THE REAR OF THE APPLIANCE.
THE NAMEPLATE MUST NEVER BE REMOVED.
NEVER LEAVE THE APPLIANCE UNATTENDED DURING USE.
NEVER USE METAL SCOURING PADS OR SHARP SCRAPERS ON THE OUTSIDE
SURFACES; THEY WILL DAMAGE THEM.
USE ORDINARY NON-ABRASIVE PRODUCTS WITH THE AID OF WOODEN OR
PLASTIC UTENSILS IF NECESSARY. RINSE THOROUGHLY AND DRY WITH A SOFT
CLOTH OR CHAMOIS LEATHER.
NEVER USE HIGH-PRESSURE JET CLEANERS TO CLEAN THE APPLIANCE; THE POWER OF THE
WATER JET MIGHT DAMAGE THE APPLIANCE, REDUCING ITS SAFETY LEVEL AND CAUSING
UNSIGHTLY FLAWS.
The manufacturer declines all responsibility for injury or damage caused by failure to comply
with the above regulations or deriving from tampering with even just one part of the appliance
and the use of non-original spare parts.
26

Disposal instructions
2. DISPOSAL INSTRUCTIONS - OUR ENVIRONMENT POLICY
Our products are only packaged using non-pollutant, environment-friendly, recyclable materials. We urge
you to cooperate by disposing of the packaging properly. Contact your local dealer or the competent
local organisations for the addresses of collection, recycling and disposal facilities.
Never leave all or part of the packaging lying around. Packaging parts, and especially plastic bags, may
represent a suffocation hazard for children.
Your old appliance must also be disposed of properly.
Important: deliver the appliance to your local organisation authorised to collect scrapped appliances.
Proper disposal allows the intelligent recovery of valuable materials.
27
Safety precautions
3. SAFETY PRECAUTIONS
REFER TO THE INSTALLATION INSTRUCTIONS FOR THE SAFETY REGULATIONS FOR ELECTRIC
OR GAS APPLIANCES AND VENTILATION FUNCTIONS.
IN YOUR INTEREST AND TO ENSURE YOUR SAFETY, BY LAW ALL ELECTRIC APPLIANCES MUST
ONLY BE INSTALLED AND SERVICED BY QUALIFIED STAFF, IN ACCORDANCE WITH THE
RELEVANT REGULATIONS.
OUR APPROVED INSTALLATION ENGINEERS GUARANTEE YOU A JOB WELL DONE.
GAS OR ELECTRIC APPLIANCES MUST ALWAYS BE DISCONNECTED BY SUITABLY SKILLED
PEOPLE.
BEFORE THE APPLIANCE IS PUT INTO OPERATION, THE PROTECTIVE FILMS APPLIED INSIDE
OR OUTSIDE MUST BE REMOVED.
IMMEDIATELY AFTER INSTALLATION, CARRY OUT A QUICK TEST ON THE APPLIANCE
FOLLOWING THE INSTRUCTIONS PROVIDED LATER IN THIS MANUAL. IF THE APPLIANCE FAILS
TO OPERATE, CONTACT YOUR NEAREST SERVICE CENTRE. NEVER ATTEMPT TO REPAIR THE
APPLIANCE.
THIS PRODUCT IS SET IN THE FACTORY TO USE LPG GAS SOLD IN SUITABLE CYLINDERS BY
AUTHORISED DEALERS. IF USE OF ANOTHER TYPE OF GAS SHOULD BECOME NECESSARY,
CONTACT YOUR NEAREST AUTHORISED SERVICE CENTRE.
EVEN IF APPARENTLY EMPTY, GAS CYLINDERS MUST ALWAYS BE HANDLED WITH CARE IN
ACCORDANCE WITH THE SAFETY REGULATIONS SUPPLIED WITH THE INSTRUCTIONS.
NEVER USE ANY GAS CYLINDER IF DENTED OR RUSTY.
NEVER USE A NAKED LIGHT TO CHECK THAT GAS IS FLOWING FROM THE BURNERS
PROPERLY, OR TO LOOK FOR GAS LEAKS IN THE APPLIANCE.
NEVER STORE A SPARE GAS CYLINDER CLOSE TO THE APPLIANCE.
NEVER DISCONNECT THE GAS CYLINDER FROM THE APPLIANCE WHILE IT IS IN OPERATION
AND ALWAYS PERFORM ANY PROCEDURE ON THE GAS CYLINDER WELL AWAY FROM THE
APPLIANCE.
NEVER PLACE PANS WITH BOTTOMS WHICH ARE NOT PERFECTLY FLAT AND SMOOTH ON THE
BARBECUE GRIDS.
DURING USE, THE APPLIANCE BECOMES VERY HOT; PROTECTIVE GLOVES SHOULD BE
WORN TO PREVENT THE RISK OF BURNS.
NEVER USE PANS OR GRIDDLE PLATES WHICH PROJECT BEYOND THE OUTSIDE EDGE OF
THE BARBECUE.
NEVER PLACE FLAMMABLE OBJECTS OR MATERIALS ON THE APPLIANCE: IF IT SHOULD
ACCIDENTALLY BE SWITCHED ON, THIS MIGHT CAUSE A FIRE.
THE APPLIANCE BECOMES VERY HOT DURING USE. TAKE CARE NEVER TO TOUCH THE
HEATING ELEMENTS INSIDE THE APPLIANCE.
28
THE APPLIANCE IS INTENDED FOR USE BY ADULTS. KEEP CHILDREN AT A SAFE DISTANCE
AND NEVER ALLOW THEM TO PLAY WITH IT.
WHEN THE APPLIANCE IS IN OPERATION, ACCESSIBLE PARTS MAY BECOME VERY HOT: KEEP
CHILDREN AT A SAFE DISTANCE.
AFTER EACH USE, ALWAYS CHECK THAT THE CONTROL KNOBS ARE TURNED TO THE (OFF)
POSITION.
Safety precautions
NEVER USE THIS APPLIANCE INDOORS OR INSIDE CARS, TRAILERS, CAMPING VANS OR
CARAVANS.
WHEN HOOKING UP THE APPLIANCE TO THE CYLINDER, USE ONLY THE FITTINGS AND
REGULATORS SUPPLIED WITH THE APPLIANCE. THESE PRODUCTS ARE ALSO AVAILABLE
FROM OUR AUTHORISED SERVICE CENTRES. USING ANY OTHER PRODUCTS CAN
SERIOUSLY COMPROMISE THE SAFETY OF THE APPLIANCE.
IF THE BARBECUE HAS BEEN OUT OF USE FOR SOME TIME, BEFORE REUSING IT CHECK THAT
THE GAS OUTLET HOLES ARE NOT CLOGGED WITH DUST OR SPIDER'S WEBS.
FOR THE CORRECT PROCEDURE, SEE POINT “12.2.3 THE BURNERS”
THIS APPLIANCE MAY ONLY BE USED OUTDOORS WITH NATURAL VENTILATION, OUTSIDE
ENCLOSED AREAS, WHERE ANY GAS LEAKS AND COMBUSTION PRODUCTS CAN BE RAPIDLY
DISPERSED BY THE WIND AND NATURAL AIR CONVECTION.
NEVER USE THE APPLIANCE OUTDOORS IN CASE OF BAD WEATHER. ANY CONTACT WITH
WATER MIGHT SERIOUSLY DAMAGE THE APPLIANCE AND PUT ITS SAFETY AT RISK.
DURING COOKING, TAKE CARE NOT TO OBSTRUCT THE FAT DRAINAGE HOLE IN THE FRONT
OF THE APPLIANCE. IF NECESSARY, CLEAN IT THOROUGHLY WITH THE AID OF A WOODEN
OR PLASTIC UTENSIL.
THESE INSTRUCTIONS ONLY APPLY TO THE COUNTRIES OF DESTINATION WHOSE
IDENTIFICATION SYMBOLS ARE LISTED ON THE COVER OF THIS MANUAL.
The manufacturer declines all responsibility for injury or damage caused by failure to comply with the
above regulations or deriving from tampering with even just one part of the appliance and the use of
non-original spare parts.
29
Instructions for the User
4. INTENDED USE OF THE APPLIANCE
The appliance is specifically constructed for domestic use outdoors and is therefore suitable for
cooking and heating foods. The appliance has not been designed or manufactured for professional use.
Smeg declines all responsibility for damage deriving from improper use of the appliance.
THIS APPLIANCE MAY ONLY BE USED OUTDOORS WITH NATURAL VENTILATION, OUTSIDE
ENCLOSED AREAS, WHERE ANY GAS LEAKS AND COMBUSTION PRODUCTS CAN BE
RAPIDLY DISPERSED BY THE WIND AND NATURAL AIR CONVECTION.
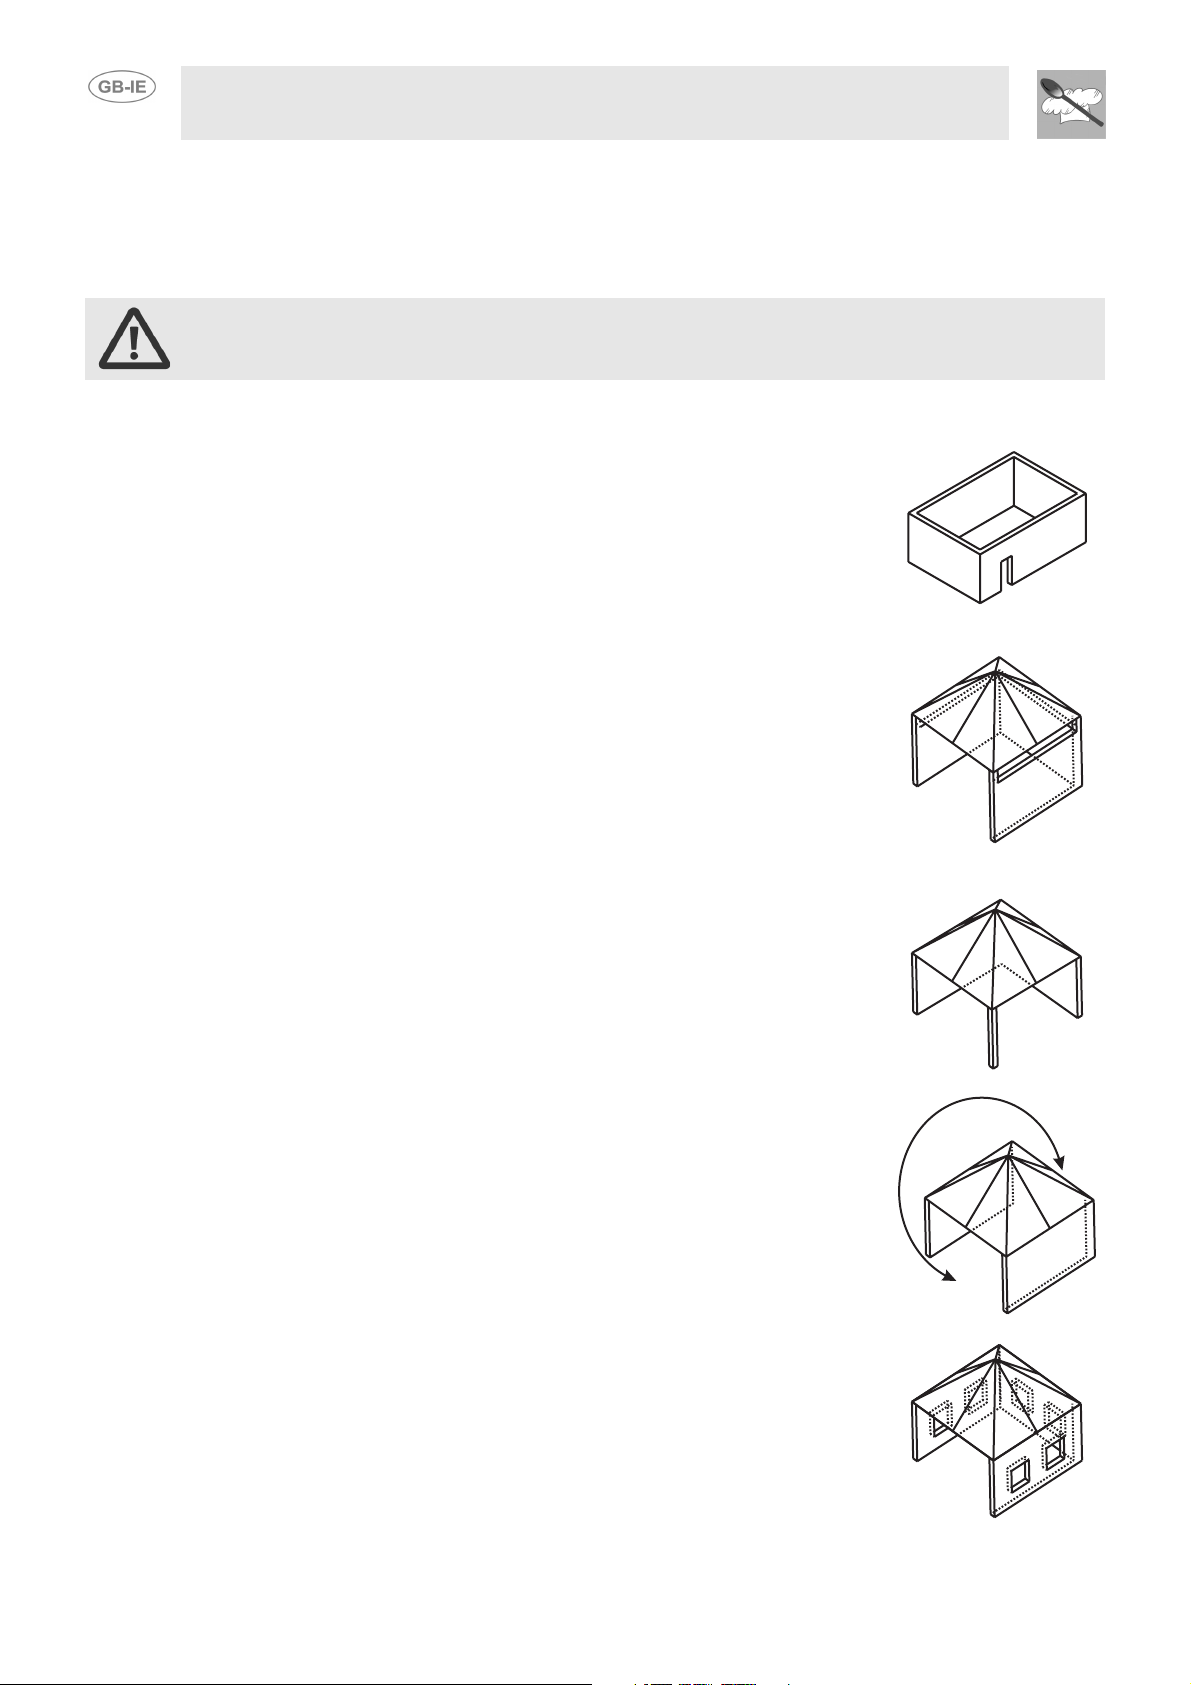
4.1 Examples of outdoor use
Any enclosed areas in which the appliance is placed must be structured as
follows:
• An area with walls on all sides, but at least one permanent opening at ground
level and no roof.
• Inside an enclosed area with a roof but no more than two walls.
• Inside a partially enclosed area with a roof but no more than two walls
provided the following conditions are met:
At least 25% of the total wall area must be completely open.
At least 30% of the remaining area must be open and unrestricted.
• In the case of patios, at least 20% of the total wall area, front and back, must
be open.
30

BQ60S
3
4
7
1
5
2
6
1
2
5
6
3
7
8
9
4
1
2
5
4
6
7
3
BQ6030S
Instructions for the User
5. GETTING TO KNOW YOUR APPLIANCE
CONTROL PANEL
IGNITION BUTTON
DRIPPING AND GRAVY
PA N
HEAT DISPERSAL
VENTS
HOLES FOR LIGHTING
THE RIGHT AND LEFT
BURNERS BY HAND
GRIDS
CERAMIC PLATES
(UNDERNEATH THE
GRIDS)
ULTRARAPID BURNER
BURNER GRID
BQ90S
31

Instructions for the Installer
6. BEFORE INSTALLATION
Never leave packaging residues unattended in the home. Separate waste packaging materials by type
and consign them to the nearest separate disposal centre.
The inside of the appliance should be cleaned to remove all manufacturing residues. For further
information about cleaning, see point 12. CLEANING AND MAINTENANCE.
The product's place of installation should be chosen with care:
1 it must not be too dusty: over time, dust might clog the burners, making the appliance dangerous to
use;
2 it must offer some protection against wind: too much wind during use might prevent the appliance
from functioning correctly;
3 when the appliance is installed on its trolley, it must be placed on a flat, level surface to ensure it is
level and stable.
7. INSTALLATION
This product may be installed in free-standing mode, on a small table or shelf, or built into a masonry or
wooden structure. Otherwise, it may be installed on a special trolley available for separate purchase.
In all cases, the instructions provided below must be complied with.
7.1 Free-standing installation
The barbecue comes complete with 4 feet to be screwed into its four corners.
After fitting these feet and making sure the appliance is level, simply place it on any flat surface and it is
ready for use.
32
Never use the appliance if the feet supplied are not screwed properly into place.
This would cause an overheating hazard which might put the user's safety at risk and damage the
appliance's appearance.
The only circumstances in which the feet provided must not be fitted is when the appliance is installed on
its trolley.

Instructions for the Installer
A
B
C
A
A
A
B
C
A
A
C
B
7.2 Built-in installation
After screwing the 4 feet supplied into place, the barbecue can be installed in compliance with the
dimensions supplied and the instructions below.
INSTALLATION GUIDELINES INSTALLATION OPTIONS
BUILT-IN CLOSE TO INFLAMMABLE
SURFACES
"Inflammable surfaces" refers to wood,
plants, etc. For this installation, a gap of 50
mm must be left from the adjacent walls
(DISTANCE A) and 250 mm from the back
wall, if any (DISTANCE B).
The walls next to the barbecue must not
be taller than its work surface. (see
diagram).
BQ60 S
Any top above the appliance must be at
least 1000 mm above the height of the
grids (DISTANCE C).
BUILT-IN CLOSE TO NON
INFLAMMABLE SURFACES
:
BQ6030 SBQ90 S
"Non inflammable surfaces" refers to
masonry or similar materials. A gap of at
least 25 mm must be left from any adjacent
walls on both sides (DISTANCE A) and
250 mm from a rear wall (DISTANCE B).
The walls next to the barbecue must not
be taller than its work surface. (see
diagram).
Any top above the appliance must be at
least 1000 mm above the height of the
grids (DISTANCE C).
Apart from ventilation requirements, the
gap between the appliance and any rear
wall is needed for the gas connection and
to allow the battery to be changed.
Smaller gaps may put the
structure and the user at risk.
The gas cylinder may be
accessed through a hole made
in the structure (taking care to
protect the edge of the hole to
avoid damaging the gas
connection hose) or by passing
the hose around the appliance.
In this case, take great care to
ensure that the hose does not
touch the product at any point
and is not suspended from the
grids.
33

Instructions for the Installer
7.3 Connecting the gas cylinder to the appliance
All the adjustments necessary to allow the appliance to function correctly are made in the factory. The
only procedure required for correct operation is connection of the hose supplied with the appliance, as
described below.
This product is designed to use only LPG gas sold in suitable cylinders obtainable from specialist
outlets. The appliance comes complete with a rubber hose with pressure regulator and unions. The
pressure regulator is preset in the factory to ensure the appliance functions to the highest standards.
The product leaves the factory set to operate on LPG. If it should become necessary to change the type
of gas and thus the nozzle diameter, contact your nearest authorised service centre.
The appliance can be set to operate on
If the appliance does not function to your satisfaction, DO NOT ATTEMPT TO REPAIR IT YOURSELF;
contact your nearest authorised service centre.
The hose must be fitted or replaced (check its expiration date periodically) in compliance with the
relevant regulations.
NATURAL GAS
. Contact your nearest authorised service centre.
34

Instructions for the Installer
7.4 Burner, Nozzle and Gas Consumption Data Tables
Rated heat
Burner
Left 4.5 100 85 2200 327 321
Central (BQ90S) 4.5 100 85 2200 327 321
Right 4.5 100 85 2200 327 321
Ultra-rapid (BQ6030S) 3.5 94 65 1500 254 250
7.5 Check for any gas leaks
These procedures must be carried out the first time the barbecue is connected and whenever the
gas supply is disconnected and reconnected.
Once the barbecue hose has been connected to the gas supply (LPG), proceed as follows:
1 Open the gas valve on the LPG cylinder, BUT DO NOT ATTEMPT TO LIGHT THE BURNERS.
2 While there is gas pressure in the hose, check all the connections for leaks using a soap and water
solution. Never look for leaks with a naked light.
3 If there are any leaks, bubbles will appear on the poor connection from which gas is escaping. 4 Turn off the cylinder gas tap, tighten the connection which was leaking and repeat the test. 5 If the gas leaks persist, contact your nearest supplier.
capacity
(kW)
Nozzle
diameter
1/100 mm
Bottled gas – G30/G31 30/37 mbar
By-pass
1/100 mm
Reduced heat
capacity
(W)
Capacity
g/h G30
Capacity
g/h G31
NEVER CHECK FOR LEAKS WITH A NAKED LIGHT.
35

Instructions for the Installer
7.6 Fixing the gas cylinder to the trolley (optional)
To secure the gas cylinder to the trolley, use the chain provided, passing it through the points shown in
the diagram.
Fit one link of the chain over the pin A, then pass it over points B and C on the top of the cylinder,
through the hole D and underneath the frame. Then bring the chain out of the frame in point E, fix it to
the pin A again and tighten the ring-nut.
If the pin which secures the chain has to be replaced, refer to the illustrations below which show how to
fit and fix the pin.
1) 2)
7.7 Hose clip
There is a hose clip on the trolley. It must be used to prevent the hose from touching other surfaces in the
section between the appliance's gas connection and the cylinder connection.
The bottom of the carriage is able to take gas cylinders up to 50 cm tall (with pressure regulator fitted).
T he pressure regulator outlet should be horizontal.
36

Instructions for the User
8. THE CONTROL PANEL
All the appliance's control and monitoring devices are placed together on the front panel. The table
below provides the key to the symbols used.
BQ60S
BQ6030S
BQ90S
STANDARD RANGE
ELECTRONIC IGNITION BUTTON CENTRAL BURNER IGNITION KNOB
LEFT BURNER IGNITION KNOB ULTRARAPID BURNER IGNITION KNOB
RIGHT BURNER IGNITION KNOB
37

Instructions for the User
BURNER CONTROL KNOB
These knobs can be used to light the burners inside the barbecue.
To light the flame, proceed as described in point “9.3.1 Electronic burner
ignition”. Burners can also be lit by hand; see point “9.3.2 Manual burner ignition
(for internal burners only)” for further details.
UR3 BURNER CONTROL KNOB (model BQ6030S only)
This knob can be used to light the UR3 side burner (model BQ6030S only).
Useful for conventional cooking or for keeping barbecued food hot.
To light the flame, proceed as described in point “9.3.1 Electronic burner
ignition”.
This appliance is not fitted with a safety valve. It therefore must never be left unattended when in
operation. If you notice that the flames have gone out, turn the knobs to the OFF position AT ONCE and
wait a few minutes before attempting to ignite the burners again.
When the appliance is used for the first time, operate all the burners for 10 minutes with nothing on them
to burn off any oils and manufacturing residues.
WARNING: TO PREVENT COMBUSTION OF RESIDUE FROM PREVIOUS USE OF THE
BARBECUE, CLEAN THE DRIPPING PAN, BURNER COMPARTMENT, CERAMIC PLATES AND
THE BURNERS THEMSELVES BEFORE EACH USE.
WARNING: FOR BQ6030S MODELS, DO NOT EXPOSE THE APPLIANCE TO BAD WEATHER;
STORE IT INDOORS. IF ANY WATER REACHES THE BURNER CAVITY, IT MAY SERIOUSLY
DAMAGE THE APPLIANCE.
38

Instructions for the User
9. USING THE BARBECUE
9.1 Fitting and changing the battery
Some models in this product range have a compartment on the rear to take
one 1.5 V AA pencil battery to supply the burner ignition plugs.
To fit or change the battery, follow the instructions provided below, referring
to the diagram.
• Unscrew the cap A and remove the seal B;
• replace the battery C with another of the same type;
• take care that the battery poles correspond (see diagram on the right);
• replace the seal B and screw the cap A back on.
Caution: flat batteries must not be dumped at random or disposed of with other waste. They must be
collected separately and consigned to your local waste disposal company, or disposed of in the special
containers provided for old batteries.
9.2 Grid and plate positions
Before starting to cook, always check that the grids, refractory plates and stainless steel / cast iron plate
are correctly positioned. The diagram illustrates the correct positions for the plates A and grids B.
4
3
1
5
C
A
2
The self-cleaning refractory plates (A) must be fitted on the rests 1 and 2 shown below.
The grids (B) or the stainless steel / cast iron plate (C) have two rests of different heights at the rear (3
and 4) on which they can be placed. This means they can be moved closer to or further from the
refractory plates (A) depending on the heat level required, and also to use the fat for cooking by tilting
them if so desired.
Only in the configuration shown in the figure, with all the plates and grids correctly installed, can the
barbecues be used for cooking: any other configuration is a source of hazard to the user and can
compromise the operation of the appliance as well as damaging its exterior.
The refractory plates (A) must only be fitted underneath the grids (B) and not underneath the
stainless steel/cast iron plate (C).
39

Instructions for the User
9.3 Switching on
To check that the burners inside the barbecue have ignited, hold one of your hands about 10 cm above
the grids: you should feel a gradually increasing amount of heat.
When lighting the ultra-rapid burner, keep the knob pressed down for about 5 seconds to allow the
thermocouple to heat up. The burner may go out when the knob is released: this means that the
thermocouple has not warmed up enough. Repeat the operation, keeping the knob pressed down for
longer.
If the burners have not ignited after several attempts, wait 5 minutes before attempting to light the
appliance again. This pause is necessary to allow any gas which has built up inside the appliance to
disperse. If no flame is obtained even after numerous attempts, contact your nearest authorised service
centre.
9.3.1 Electronic burner ignition
The burner it controls is shown next to each knob (see point "Control Panel" on page 15). To light the
flame, simply press the knob and turn it anti-clockwise to the minimum flame symbol and press the
ignition button. To adjust the flame, turn the knob to the zone between the maximum ( ) and the
minimum ( ) settings. To turn off the burner, turn the knob back to the OFF position.
9.3.2 Manual burner ignition (for internal burners only)
The burner it controls is shown next to each knob ( see “The control panel”
on page 37).
Each model has holes in the sides (see right) to allow the burners to be lit
by hand.
To ignite the two side burners by hand, turn the knob to the highest setting
and place a lit match close to the ignition hole. The central burner can be lit
in manual mode from another burner: light the right or left-hand burner and
turn the central burner knob to the maximum setting. If the burner does not
light within 10/15 seconds, wait a few minutes and repeat the procedure.
If no spark appears when any burner control knob is pressed, the battery on the rear may need
changing.
For instructions for this procedure, see point “9.1 Fitting and changing the battery “
If the battery is new and still no spark is produced, do not attempt to use the appliance and contact your
nearest authorised service centre.
40

Instructions for the User
10.STANDARD ACCESSORIES
Cast iron plate: for use during specific cooking processes
to eliminate the grilling effect (for more details of cooking
procedures, see “11. COOKING ADVICE” on page 42).
Additional optional accessories are also available from our authorised service centres.
41

Instructions for the User
11.COOKING ADVICE
Some hints and recommendations for getting the best results from your barbecue are provided below.
However, remember that cooking times and heat levels have to be modified to suit the user's taste.
Direct cooking: when the meat or vegetables are cooked directly on the grid underneath which the
burner is lit.
Indirect cooking: when the meat or vegetables are cooked on the grid next to the lit burner.
Water should be poured into the dripping pan for more succulent cooking results and to simplify cleaning
of the barbecue after use.
11.1 Meat
Before any meat cooking procedures, the grids must be preheated with the burners lit at the maximum
setting for at least 5-10 minutes, depending on the thickness of the meat. Quick preheating (about 5
minutes) is recommended for thin pieces of meat (chops, slices of bacon, spare ribs, etc.). Lengthier
preheating (about 10 minutes) is recommended for thicker pieces of meat (large, fatty steaks, whole
chickens, etc.).
11.1.1 Direct cooking
In general, when cooking meat over direct heat the burners must be set at the maximum setting, while
for fish and vegetables they must be set on medium / minimum power.
The cooking time varies depending on the thickness of the food and personal taste.
For best results when grilling, brown the outside at maximum heat then use the knobs to turn the burners
down to a medium / minimum setting to allow the meat to cook right through without burning on the
outside.
The appearance of flames, when cooking pork (i.e. fatty foods) in particular, is normal and is caused by
fat dripping onto the stones. Do not worry, but move the food being cooked to another part of the grid.
To allow this, it is best not to fill the whole grid with food for cooking.
11.1.2 Indirect cooking
After preheating the grids with the burners at the maximum setting, place the meat on a grid next to the
lit burner. On the 90 cm barbecue, for example, the meat can be placed on the central grid after the side
burners have been ignited.
The advantage of indirect cooking is that the heat is less fierce. Start cooking with the burners on the
minimum setting then gradually increase over time.
Naturally, it takes considerably longer than direct cooking, but excellent results will be assured.
Indirect cooking is suited for large cuts of meat or fish, such as: roasts, whole chickens, lamb or
especially thick and/or fatty foods which could result in high flaming if cooked directly due to the fat
dripping onto the refractory plates.
11.2 Vegetables
As for meat, when cooking vegetables it is best to preheat the burners at the maximum setting with the
lid closed. However, in this case the grids must always be preheated for 5/10 minutes.
42
11.2.1 Direct cooking
After preheating, turn the burners down to the minimum setting and arrange the vegetables on the grid.
Given the type of food, the knobs should be kept turned to the minimum setting.

11.3 Cooking table
Instructions for the User
HEAT TEMPERATURE
High 230 - 250 °C
Medium-High 200 °C
Medium 160-180 °C
Medium-Low 150 °C
Low 110-120 °C
11.4 Cooking recommendations
• Always preheat at the maximum setting.
• When cooking with the plate, preheating lasting 15’ is recommended.
• For processes requiring fiercer grilling, preheat the burners for 15’.
• Preheating for indirect cooking is performed by igniting the burner where the food is to be placed for
5' at the minimum setting and the other burners at maximum setting for 10’.
• During direct cooking (meat or fish), if the fierce heat burns the food, turn the burners down using the
knob or move the food.
BURNER
SETTING
Maximum setting
()
Medium-
maximum setting
Intermediate
setting
Mediumminimum setting
Minimum setting
()
BARBECUE
PREPARATION
230-250°C on barbecue
thermometer (if fitted).
200°C on barbecue
thermometer (if fitted).
160-180°C on barbecue
thermometer (if fitted).
150°C on barbecue
thermometer (if fitted).
110-120°C on barbecue
thermometer (if fitted).
USE
For preheating before cooking starts.
For direct cooking of thin cuts of
meat, fish and vegetables.
For direct cooking of medium-sized
cuts of meat such as half chickens or
chicken joints. Also suitable for
indirect cooking
For indirect cooking and smoking, or
for keeping food already grilled warm.
For smoking and indirect cooking of
large pieces of fatty or delicate foods,
or for keeping food already grilled
warm.
43

Instructions for the User
Medium / high flame
Flame at maximum setting
Miscellaneous / advice
3 ‘ / 5 ‘
4' per side
Cooking time
10 ‘
15 ‘
Preheating
0.5 Kg
Weight (hg) / N°
2.0 Kg = 4 pcs
Medium / high flame
Burners on minimum setting
45 ‘
40 ‘ / 50 ‘
10 ‘
10 ‘
1.5 Kg
2.0 Kg
Medium / minimum flame
Burners on medium / minimum setting
150 ‘
15 ‘ / 18 ‘
10 ‘
10 ‘
3.0 Kg
1.0 Kg
Tilt the grids to drain the liquid
Start cooking at min then gradually increase
4 h
5 ‘ / 7 ‘
10 ‘
10 ‘
0.5 Kg
2.5 Kg
Start cooking at min then gradually increase
Start cooking at min then gradually increase
70 ‘
150 ‘
10 ‘
10 ‘
2.5 Kg
1.0 Kg
Burners on medium / minimum setting
Rotate pieces, and medium / minimum flame
30’ / 40 ‘
13 ‘ / 15 ‘
10 ‘
8 ‘ / 10 ‘
2.0 Kg
1.0 Kg
Cooking procedure requiring preheated
Cooking procedure requiring cast iron plate
10 ‘ / 15 ‘
150 ‘ / 180 ‘
10 ‘
15 ‘
600 g
2.5 Kg
Medium flow flame
Flame at maximum setting
8 ‘ / 13’
90’ / 110 ‘
10 ‘
10 ‘
500 g
1.0 Kg
Medium flow flame
Medium / minimum flame
80 ‘ / 90’
15 ‘ / 18 ‘
10 ‘
10 ‘
1.0 Kg
0.5 Kg
medium flow flame
Medium / minimum flame
13 ‘ / 15 ‘
10 ‘ / 12 ‘
10 ‘
10 ‘
3 pcs
750 g
Minimum flame
Cooking procedure with cast iron plate and flame at maximum setting
18 ‘
4' per side
10 ‘
15 ‘
1.0 Kg
0.3 Kg
Minimum flame
Medium / minimum flame
40 ‘
15 ‘
10 ‘
10 ‘
3.0 Kg
0.5 Kg
Minimum flame
Minimum flame
8 ‘
40 ‘
10 ‘
10 ‘
1.0 Kg
0.8 Kg
Only burner underneath the cast iron plate lit
The 2 burners underneath the pizza plate lit at maximum setting
7 ‘
4 ‘ / 6’
15 ‘
15 ‘
0.4 Kg
0.4 Kg
The 2 burners underneath the pizza plate lit at maximum setting
The 2 burners underneath the pizza plate lit at minimum setting
20 ‘ / 25 ‘
5 ‘
15 ‘
0.4 Kg
200 g rolls
Medium / minimum flame
Burners at maximum setting
4 ‘ / 5’ per side
6 ‘ / 8’ per side
5 ‘
10 ‘
1.0 Kg
BARBECUE COOKING
Direct
Direct
Direct
Cooking mode
TYPES OF FOOD
Direct
T-bone steaks
Fillet steak
Chicken joints
Beef steaks
BEEF
Direct
Indirect
Chops
Grilled whole chicken
CHICKEN
Direct
Indirect
Belly pork
Whole neck of pork
MEAT
Indirect
Indirect
Pork shank
Stuffed roast pork
PORK
Direct
Direct
Sausages
Spare ribs
Direct
Indirect
Leg
Sliced onion
LAMB
Direct
Indirect
Whole potatoes
Sliced aubergine
Direct
Indirect
Courgettes
Potatoes in pieces
VEGETABLES
Direct
Direct
Prawns
Peppers
Direct
Direct
Indirect
Tr o ut
Gilthead
Herring fillets (small fish)
FISH
Direct
Direct
Sea-bass
Salmon slices
Direct
Direct
Pineapple
Ready-made dough
PIZZA
FRUIT
Direct
Direct
Ready-made canned products
Home-made flour and yeast dough
PIZZA
PIZZA
Direct
Direct
Home-made flour and yeast dough
READY-COOKED POLENTA SLICES
BREAD
Direct
SLICED BREAD FOR TOASTING
44

Instructions for the User
12.CLEANING AND MAINTENANCE
For the best, most thorough cleaning, we recommend the use of fairly mild products; use cream-type
stainless steel cleaners. SMEG brand products, which guarantee optimal cleaning of your appliance, are
available from authorised service centres.
Protective gloves should be worn when cleaning internal steel parts of the appliance.
12.1 Cleaning the exterior (stainless steel)
To keep the appliance in good condition, the outside and inside parts and accessories should be
cleaned regularly after each use, after allowing them to cool.
For optimal, in-depth cleaning of your barbecue, wear protective gloves and use specific degreasing
cleaners for stainless steel.
SMEG brand products, which guarantee optimal cleaning of your appliance, are available from
authorised service centres. (Puliforno and Crema inox)
12.1.1 Routine cleaning
When cleaning and caring for external stainless steel surfaces, always use only specific
products which do not contain abrasives or chlorine-based acids.
Never use metal scouring pads or sharp scrapers; they will damage the stainless steel. Use
ordinary non-abrasive products, with the aid of wooden or plastic utensils if necessary.
Instructions for use: Spray the product straight onto the dirty surfaces several times.
Wipe with a non-abrasive sponge, rinse thoroughly and dry with a soft cloth. For the best results,
allow the degreasing detergent to act for some time. To eliminate yellowing, pour Crema inox
onto a paper cloth and rub in the direction of the satin-finish.
12.2 Cleaning the internal barbecue components
12.2.1 The ceramic plates
The ceramic plates are made from refractory material and are therefore fragile; handle with care to avoid
breakage.
After each use, the burners should be operated with no food present at the maximum power for 10/15
minutes, to allow the plates to eliminate the food and grease residues accumulated during cooking.
Following this procedure after each use will keep the plates in peak condition over time.
Important: After prolonged and/or fatty cooking processes, it is best to remove excess fat from the
plates with a brush. Finish by cleaning the appliance as indicated above.
To keep the plates always clean and in optimal working order, they should be turned periodically so that
a different side faces towards the burners. The heat of the flames burns off the food and grease residues
that build up during cooking.
The refractory plates must only be fitted underneath the grids and not underneath the stainless
steel/cast iron plate.
45

Instructions for the User
12.2.2 The grids
For the best results, clean the grids when still warm. Wearing heat-resistant gloves, dip them in water
and then scrub them with a brass-bristle brush to remove any food residues. Complete cleaning by
washing the grids with a degreasing detergent and rinse thoroughly.
The continuous contact between the grids and the flame may cause the steel to lose its shine in the
areas exposed to heat over time. This is an absolutely natural phenomenon which does not impair this
component's operation at all. To reduce the yellowing of the grids, we recommend cleaning with Crema
inox and a non-abrasive sponge.
The grids are dishwasher-friendly.
After thorough cleaning, operate the appliance to burn off detergent residues.
12.2.3 The burners
Check regularly that the burners are igniting completely and no gas outlet holes are clogged.
If you notice that a burner is not igniting completely, blowing it with compressed air may be sufficient to
clear dust or spiders' webs from the clogged holes. If this is not sufficient, the burners can be dismantled
for more thorough cleaning, for example by poking a pin through the clogged holes and blowing
compressed air straight into the burner.
To dismantle the burners, the two fixing screws A must first be removed. The burners can then be
removed from their bases in the front of the appliance (detail B) for more thorough cleaning. To
reassemble the burners, fit the front into the hole (detail B) and retighten the screws A.
12.3 Cleaning the dripping pan
After cooking, and after leaving the appliance to cool for at least two hours, extract the dripping pan,
into which a thin layer of water may have been poured before cooking started, and pour the fats into a
container from which they can then be disposed of appropriately. The oil or fat produced by cooking
meat and fish must never be poured down drains or sinks, for example. It must be disposed of correctly
in special containers or delivered to the regulation collection points. Clean the dripping pan with suitable
non-abrasive products and put it back in place.
46
 Loading...