

Page 1
ENGLISH
Installation, use and maintenance instructions
GB
Page 2
2
STANDARDS-WARNINGS AND RECOMMENDATIONS
GB
Thank you for purchasing one of our appliances.
Please read these notes thoroughly as they have been
written to help you obtain the maximum performance
from the appliance.
The quality of the appliance is guaranteed as each
one of our products is fully tested as it comes off the
production line.
Use the appliance and you will see just how much
satisfaction you will get.
This product complies with current European safety
standards governing electrical appliances.
It has been subjected to thorough and meticulous testing to assess its safety and reliability.
Before using the appliance, read this manual carefully
as it will tell you what to do and what not to do.
Improper use of the appliance can be dangerous, above
all for children.
Before connecting the appliance, make sure that the
data on the rating plate complies with that of the
domestic supply.
Do not dispose of the recyclable packing materials in
an unauthorised manner.
Take them to an appropriate plant for recycling.
The electrical safety of this appliance is only guaranteed
when it has been connected to a mains supply with an
effi cient earthing system as provided for by law.
This is an important safety requirement and must be
complied with.
In case of doubt, have the mains supply checked by a
qualifi ed electrician.
907
Page 3
GB
STANDARDS-WARNINGS AND RECOMMENDATIONS
3
As with any other electrical appliance, a few fundamental rules must be observed during use:
• do not touch the appliance with wet or damp hands
or feet.
• do not pull the power cable to remove the plug from
its socket.
• do not expose the appliance to atmospheric
agents.
• do not allow the appliance to be used by unsupervised
children.
• do not plug-in or unplug the appliance using wet
hands. - before carrying out any cleaning or maintenance operation, disconnect the appliance from the
mains supply by either unplugging it or switching
the mains power supply off at the main switch:
• in the case of a fault or malfunction, switch off the
appliance and do not attempt any repairs.
This appliance is marked as complying with European
Directive 2002/96/EC, Waste Electrical and Electronic
Equipment (WEEE).
Make sure that the product is disposed of in a correct
manner. The user is obliged to contribute towards
preventing any negative consequences for health and
the environment.
The symbol affi xed to the product or accompanying documents signifi es that the product must not be
treated as normal domestic refuse, but must be delivered to an authorised collection centre to enable the
electric and electronic equipment to be recycled.
When disposing of the appliance, comply with local
waste disposal regulations. For further information on
the treatment, recovery and recycling of this product,
refer to the appropriate offi ces, local domestic waste
collection service or the retailer from where the appliance was purchased.
907
Page 4
4
STANDARDS-WARNINGS AND RECOMMENDATIONS
GB
WARNING! At the end of the useful life of an appli-
ance that makes use of R 600a refrigeration gas
(isobutane) and fl ammable gas in the insulation
foam, it must be made safe prior to being transported to the place of disposal. To do this, refer
to the retailer or the appropriate local authority.
WARNING! When installing the appliance, con-
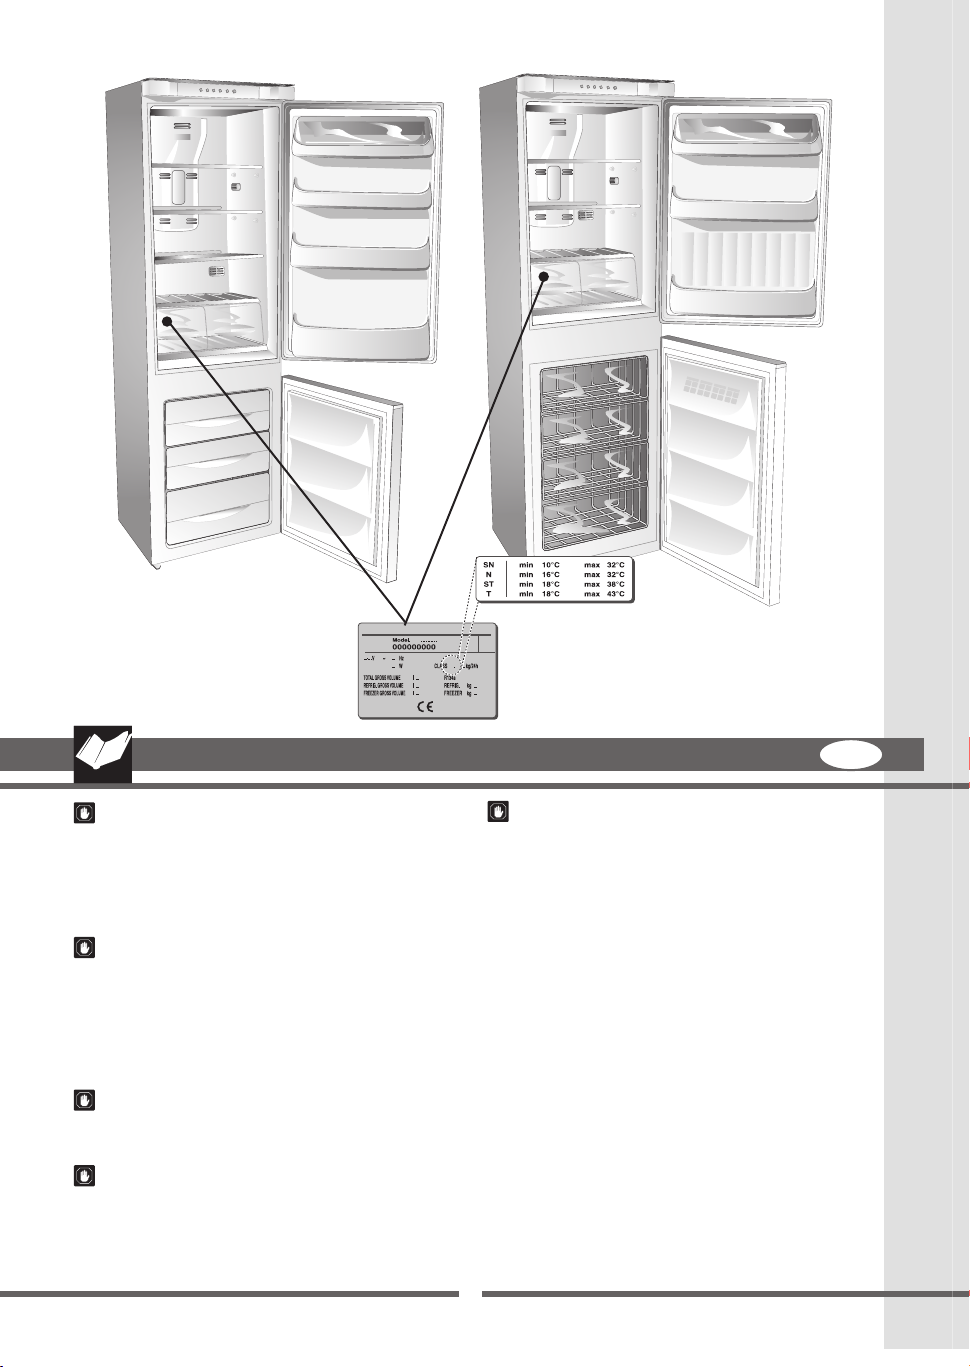
sideration must be given to the climatic category
of the product itself. The climatic category of the
appliance is written on the rating plate. The appliance will function correctly within the ambient
temperature range in the table for the particular
climatic category.
WARNING! Make sure that the ventilation open-
ings in the appliance body or built-in units are
not obstructed.
WARNING! if the appliance is to be left unused
for a long period of time, e.g. holidays, it must
be unplugged, emptied, cleaned and dried. The
door must be left open to prevent the formation
of bad smells.
WARNING: Do not damage the cooling circuit.
907
Page 5
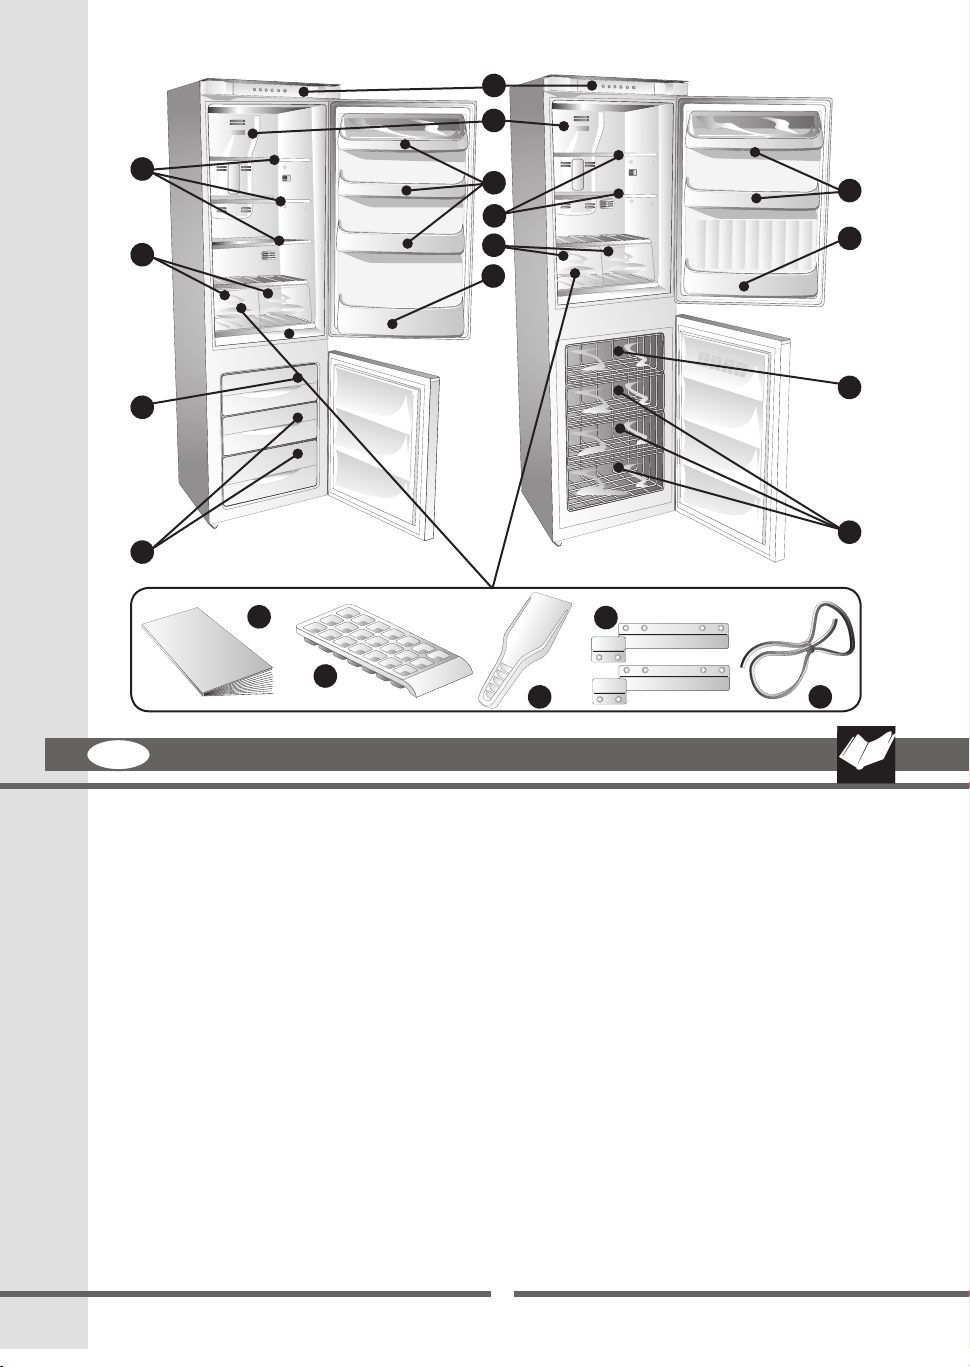
1
8
2
6
6
2
3
3
7
7
4
4
5
5
9
12
10
11 13
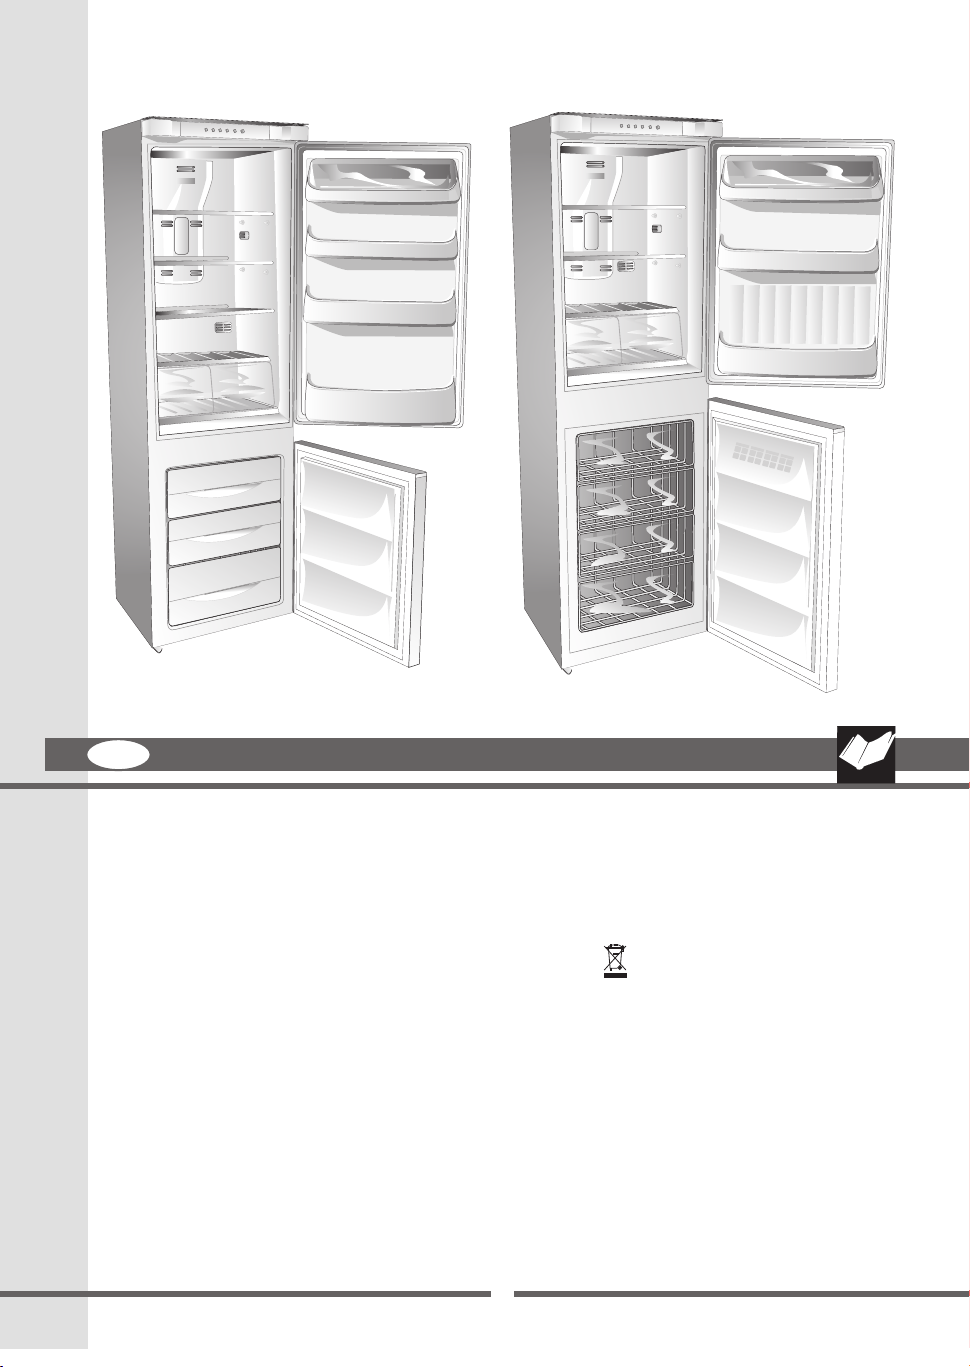
GB
Upright units are large capacity domestic appliances for
freezing, storing and refrigerating any types of food.
The load-bearing STRUCTURE has been fabricated in
steel panels which have been treated and electrostatically painted to resist mistreatment and to ensure that
its “new” look remains unaltered over time.
The INSULATION MATERIALS have been specially
selected to ensure that the INTERNAL temperature
remains constant and to provide maximum storage
space.
The internal STORAGE SPACE has been designed to
store any type of food thanks to the easily removable
shelves.
1 THERMOSTAT
2 ADJUSTABLE SHELVES
3 FRUIT AND VEG BOX WITH REMOVABLE SHELF
4 DRAWER FOR FREEZING FOOD
5 FREEZER DRAWERS
6 CONTAINER SHELF
7 BOTTLE SHELF
DESCRIPTION OF THE APPLIANCE
5
8 INTERNAL LIGHT
9 INSTRUCTION BOOK
10 ICE TRAY
11 ICE SPATULA
12 DOOR OPENING MECHANISM
13 GASKET
907
Page 6
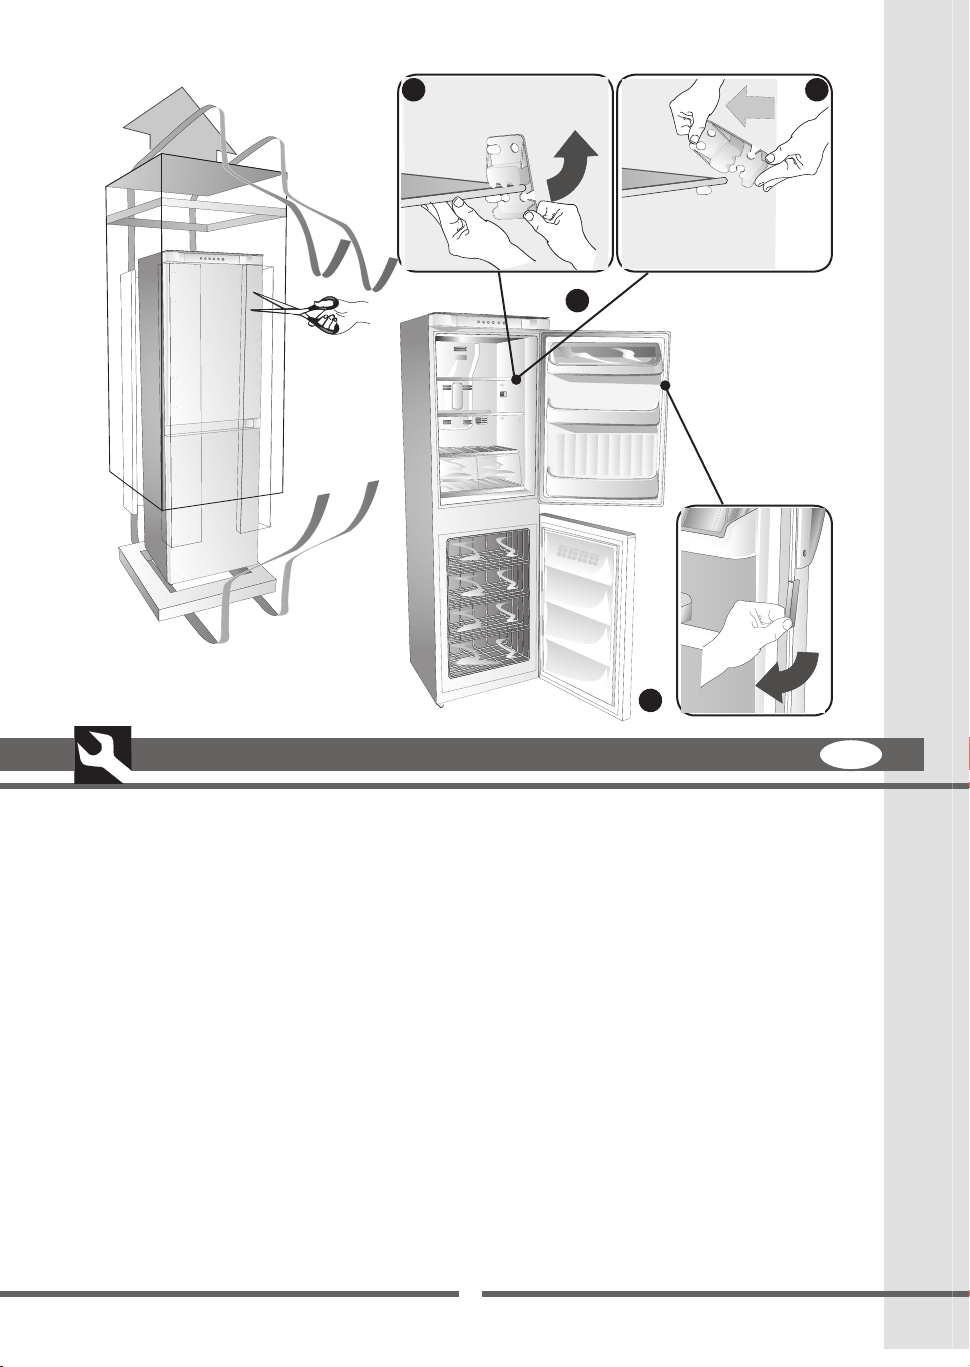
A B
2
6
REMOVING THE TRANSPORT PROTECTION DEVICES
Check that the appliance is undamaged.
The retailer must be informed of any damage to the
appliance within 24 hours of delivery.
1 Remove the protection from the door gasket.
The protection is used to protect the gasket during
transport.
The protection must be removed in order to ensure
that the door seal functions correctly.
To remove the protection, lightly pull one end while
rotating it outwards.
2 Remove the glass shelf locking devices.
These plastic elements prevent the shelves from
moving during transport.
To remove the shelf locking devices, proceed as
follows:
a) Grasp the plastic locking device and rotate it until
it comes away from the shelf.
b) Remove the locking device by pulling it out-
wards.
1
GB
907
Page 7
2a
D
P
2b
2
B
H
2c
GB
1 Once the appliance has been unpacked, check that
2 If the door opening direction is as required, go to
Otherwise, reverse the position of the hinges.
To do this, carefully place the appliance on its
Use spacers to prevent crushing the condenser
POSITIONING AND INSTALLING THE APPLIANCE
the mains voltage is the same as that indicated on
the rating plate.
Point 3.
back.
pipes and damaging the compressor unit.
2d
2f
7
2d Remove the upper hinge pin K and fi t it to the op-
posite side.
2e Remove the central support L.
2f Refi t the upper door.
2a Remove the lower hinge pin P and the distance
spacer D.
2b Remove the lower door.
2c Slide off hinge cover H; remove the middle hinge C, then
free the upper door.
907
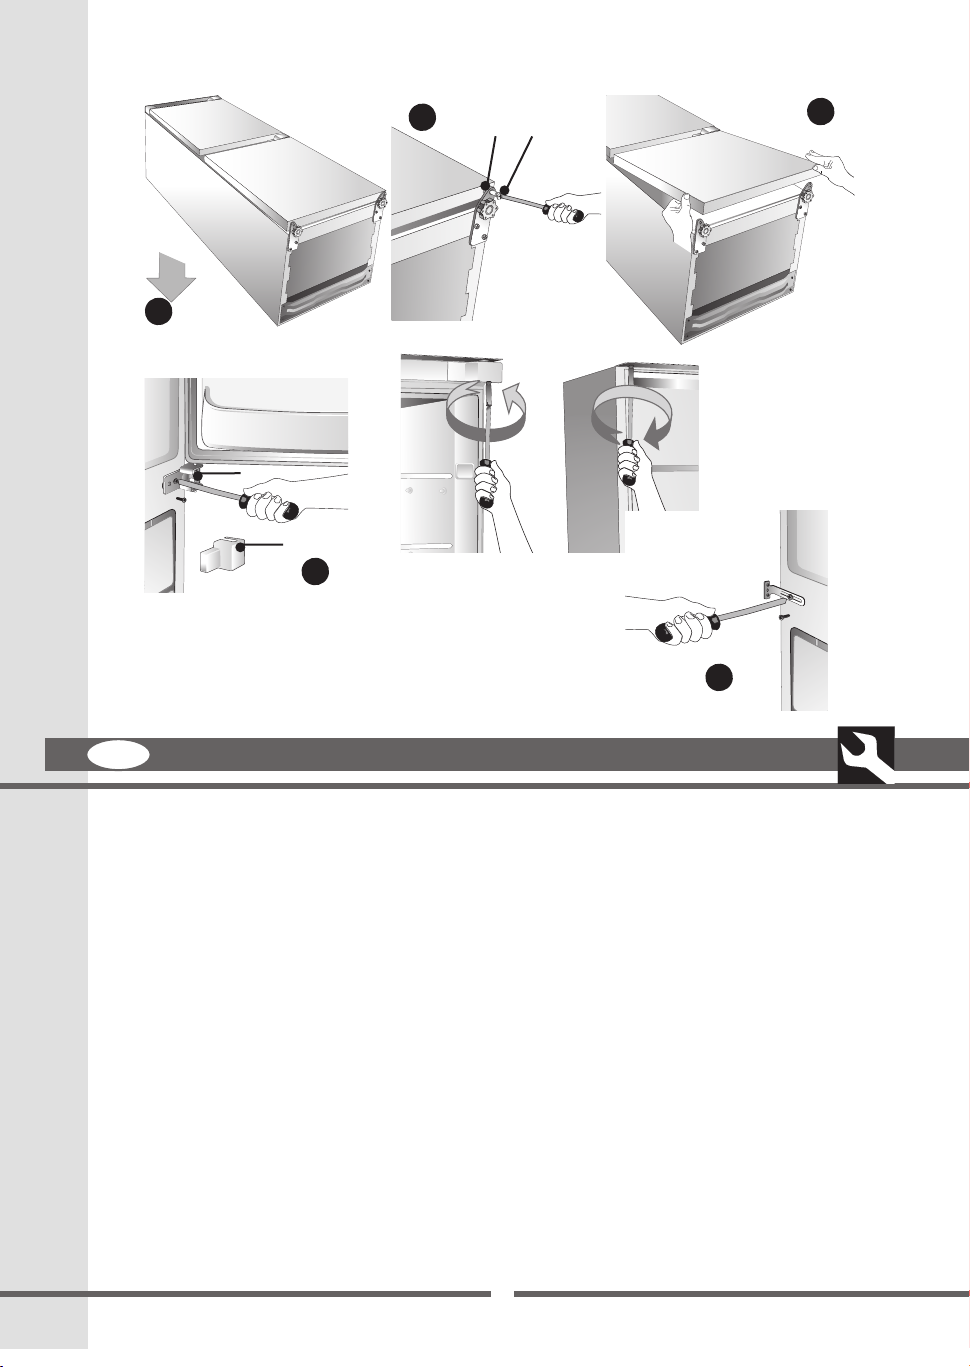
Page 8

2g
C
L
P
2l
D
2h
2i
2m
8
2g Fit hinge C and support L on the left side. (The
2h Refi t the middle support L on the right side.
2i Refi t the lower door.
2l Insert pin P and spacer D.
2m Remove the door opening/closing elements S and
POSITIONING AND INSTALLING THE APPLIANCE
hinge cover H, must be refi tted at the end of installation).
reassemble them on the opposite side.
GB
907
Page 9

m
6
3
GB
560
1070703
1773
540
3b
1780
560
8
4
5
3c
POSITIONING AND INSTALLING THE APPLIANCE
1741,5
856,5885
540
5
1745
5
5
570
5
9
When installing the appliance,
remember the following:
A Do not install it near to sources of heat such as heat-
ers, radiators, cookers, etc. or in direct sunlight.
B Make sure that during the automatic defrost, any
water on the back wall of the compartment runs into
the drain channel.
C After the appliance has been placed in its fi nal posi-
tion, leave it for about an hour before connecting it
to the power supply.
D Make sure that the appliance is working properly before
placing any food in it.
WARNING: DO NOT INSTALL THE APPLIANCE
NEAR TO ANY HEAT SOURCES AND LEAVE A GAP
OF AT LEAST 5 CM ABOVE IT
INSTALLATION IN THE TALL UNIT
HOUSING
The dimensions of the tall unit housing must correspond to those reported in the fi gure.
3a Insert the appliance in the housing against the side
panel adjacent to the opening. Check that the side
of the appliance is inset 53 mm in the unit.
3b Adjust the foot until the top panel is not in contact
with the unit.
3c Anchor the upper part of the appliance, using the
screws supplied, in the pre-drilled panel over the
front fascia.
907
Page 10

3d
3e 3f
B
A
3i
3g
10
3d Anchor the centre of the appliance to the wall of
3e Fix the two bottom feet in the holes in the base of
3f Where provided, apply the plastic joint gasket.
3g Check that the guides of door opener “A” are po-
3h Fix guides “B”, supplied, on the fridge unit door
3i Then screw in the other two fi xing screws to fi x
POSITIONING AND INSTALLING THE APPLIANCE
the unit using the special brackets.
the unit.
sitioned opposite the opening, otherwise remove
them and replace on the other side.
in the fi rst hole to allow the guide to rotate until it
engages fridge door opener “A”.
opener “B”, such that the guide is blocked and that
the door moves together with that of the unit.
3h
GB
907
Page 11

Green and Yellow
to Earth
Blue to
Neutral
13 amp
Fuse
Brown
to Live
Cord
Clamp
GB
ELECTRICAL CONNECTION
Check that the mains voltage complies with that indicated
on the rating plate located on the bottom left of the freezer
compartment. If the mains socket does not have an earth
connection or if the plug is not suitable for the mains supply
system, refer to a qualifi ed electrician. Do not use adapters
or extension leads, as these may overheat and burn.
Warning: this appliance must be earthed
If the appliance has been fi tted with a non-rewirable
plug of the incorrect type for the mains socket, cut off
the plug and fi t a new one. The removed plug must be
thrown away. Inserting an unsuitable plug into a 13 Amp
socket is likely to cause an electrical hazard. When a
non rewirable plug or rewirable 13 Amp (BS1363) plug
is used, it must be fi tted with a 15 Amp ASTA approved
(BS1362) fuse. If any other type of plug is used it must
be wired as follows. Connect the GREEN & YELLOW
wire to the earth terminal marked with the letter “E”
or earth symbol,
yellow. Connect the BLUE wire to the neutral terminal
marked with the letter “N” or coloured black. Connect
the BROWN coloured wire to the live terminal marked
with the letter “L” or coloured red.
or coloured green or green &
11
907
Page 12

4
3 2 16 5
12
USING THE FRIDGE COMPARTMENT
CONTROL CONTROL PANEL
1 BUTTONS:
- ON / OFF
- Temperature control
- SUPER mode activation
2 GREEN LED MINIMUM POSITION
3 GREEN LED MEDIUM POSITION
4 GREEN LED MAXIMUM POSITION
5 YELLOW LED super MODE
6 RED LED ALARM FUNCTION (FREEZER)
DESCRIPTION OF THE APPLIANCE
The appliance consists of two cells:
- A fridge (upper part) for storing fresh food and
drinks
- A freezer (lower part) for long-term storing of frozen
products (bottom compartment) and for freezing
fresh products (top compartment).
BEFORE STARTING THE FRIDGE
GB
When cleaning the internal compartments and accessories, follow the instructions reported in chapter “
Cleaning ”.
907
Page 13

1
T1
S6
GB
CONNECTING THE APPLIANCE TO THE MAINS SUPPLY
Check that the mains voltage corresponds to that indicated on the appliance’s rating plate and that the mains
socket is equipped with an earth connection.
immediately back on again, the compressor will
start to operate after approximately 10 minutes.
This is normal.
START-UP AND CONTROL OF REFRIGERATOR COMPARTMENT
On insertion of the plug in the mains socket, if the green
led (S2) (minimum position) does not light, this means
that the appliance is switched off.
To start up the appliance, press button T1 for at least
0.5 seconds. To interrupt operation, press T1 for at
least 4 seconds.
On power-up, operation is indicated by illumination of
USING THE FRIDGE COMPARTMENT
WARNING! If the appliance is switched off then
S2
13
the green led (S2) (minimum position) . If the freezer
compartment is warm, the red led (S6) (alarm) starts
to fl ash, and turns off automatically when the freezer
compartment reaches the temperature of -12°C .
907
Page 14

S5
S3
T1
S6
14
- Temperature programming and control: 3 different
The new setting is saved at the end of the fl ashing
The programmed functions are memorised also in
USING THE
temperatures can be selected, as indicated by the 3
green leds (S2-S3-S4). To change settings, press
button (T1); on each click the illuminated led turns
off and the next one fl ashes for 4 seconds according
to the sequence S2-S3-S4 - S5.
phase. Activation of SUPER mode (S5) is by means
of button (T1) after which the yellow led (S5) is
permanently lit.
the event of a power failure or when the appliance is
disconnected.
S4
FRIDGE
S2
COMPARTMENT
GB
• Keep all liquids in closed containers.
The NO-FROST system guarantees a constant
temperature and a more rapid freezing capacity.
The humidity-free, forced air circulation tends to
dry food up quickly and for this reason we advise
keeping all food in closed containers.
Note:
• The distance between the shelves and the rear internal
wall of the refrigerator ensures that air circulates
freely.
• Do not place food in direct contact with the rear wall
of the refrigerator compartment.
• Do not place food that is still warm into the compart-
ments.
907
Page 15

S5
S3
T1
S6
GB
Freezer compartment is started up automatically
After start-up the freezer compartment takes approximately three hours to reach the required temperature
for storing frozen food.
USING THE
FRIDGE
S4
COMPARTMENT
SUPER mode
Super mode is activated by pressing button (T1) repeatedly until the yellow led S5 illuminates.
SUPER mode stops automatically after approx. 27
hours, but it can be interrupted at any time by pressing
T1 as many times as required for the new setting. During SUPER mode, the compressor runs for 65 minutes
ON and 25 minutes OFF.
Temperature alarm
The alarm is activated when the internal temperature
of the freezer compartment exceeds -12 (for example
-11). On activation, the red led (S6) fl ashes.
S2
15
Possible causes:
- An excessive amount of food has been placed in the
freezer (see freezing methods).
- The door has been left open.
- There has been a power cut.
- There is a fault in the appliance.
907
Page 16

A
16
USING THE
FRIDGE
COMPARTMENT
NOTE
To optimise the use of space inside the freezer without
altering any of its operational characteristics, the 3
upper drawers can be removed, keeping only the bottom drawer.
IMPORTANT
- Any food showing signs of thawing must not, under
any circumstances, be refrozen.
- Do not store frozen food for longer periods that that
recommended.
FREEZER DEFROSTING
The freezer defrosting function is fully automatic and
does not require any user intervention.
GB
907
Page 17

GB
USING THE
FRIDGE
COMPARTMENT
17
RECOMMENDATIONS:
NEVER place ice cubes in the mouth or eat ice-lollies
that have just been taken out of the freezer, as these
can cause ice burns.
DO NOT place sealed containers containing liquids such
as soft-drinks or similar in the freezer.
Hot foods and drinks must be allowed to cool before
being placed in the freezer.
STORING FROZEN FOOD
It is impossible to accurately predict the effective storage period for frozen food in that this varies considerably according to the nature of the food itself.
To be safe, always follow the instructions reported on
the packaging of frozen food products.
ICE-CUBE PRODUCTION
Fill the ice-tray 3/4 full with water. Place it in the sliding
drawer (where fi tted) in the freezer compartment.
GENERAL ADVICE:
Make sure that the packaging is intact and that there are
no damp marks or swelling, in that these indicate that
the frozen product may already have deteriorated.
Any food that has started to thaw out must not under
any circumstances be re-frozen.
Do not store frozen foods for longer than the recommended time period.
907
Page 18

A
18
USING THE
FRIDGE
COMPARTMENT
PACKING FRESH PRODUCTS FOR
FREEZING
This freezer has two separate compartments.
- Upper drawer “A” is used for freezing fresh food.
- The two lower drawers are reserved exclusively for
storing frozen products.
For optimum freezing, activate the quick-freeze function
(SUPER) at least 3 hours beforehand.
Only freeze prime quality hermetically sealed products
to avoid loss of taste or drying out. Apply a label to each
pack, indicating the content and date of freezing. The
quantity of fresh food that can be frozen in 24 hours is
indicated on the appliance’s rating plate (8kg/24h).
Do not place food in the freezer in contact with already
frozen products. This will prevent the food from increasing in temperature. In this respect, it is important
to transfer frozen food from compartment “A” to the
lower drawers.
GB
907
Page 19

GB
If a power cut should occur, try to establish its duration.
If the forecast is less than 12 hours, leave the food in
the freezer and keep the door closed.
If the power cut lasts for longer than 12 hours and part
of the food starts to thaw out, this should be consumed
as soon as possible.
- Remove the food, wrap it in several layers of newspa-
- Remember that an increase in the temperature of the
WARNING! Do not use any mechanical devices or
WARNING: Unless otherwise approved by the
DEFROSTING
per and place it in the fridge or in a cool location.
food will greatly reduce its storage life.
other artifi cial methods other that those recommended by the manufacturer for accelerating the
defrosting process.
manufacturer, do not use electrical appliances
inside the food storage compartment.
19
907
Page 20

1
20
Before starting any cleaning, disconnect the ap-
The protections (wire grill, covers) must not
CLEANING
pliance from the mains electricity supply.
be removed by unqualifi ed personnel: do not
use the appliance if the protections have been
removed.
When cleaning the internal plastic
parts and the door gasket:
do not use abrasives or detergents of any kind.
- Use a warm solution of bicarbonate of soda (two
spoonfuls in two litres of water).
1 Cleaning the condenser
- This should be carried out at least twice a year.
- Clean using a domestic vacuum cleaner or a brush.
A dirty condenser will have a negative effect on the
appliance and reduce its performance.
For prolonged absences
- Empty the compartments.
GB
- Disconnect the appliance from the mains electricity
supply.
- Clean both the compartments and dry them.
- Leave the doors open to prevent bad smells or mould
from forming.
907
Page 21

R
V
GB
CLEANING
Cleaning the water drain
When cleaning the condenser, check that the rear drain
pipe R is not blocked.
- Remove drain pipe R from the container V and if
necessary clean it.
Power supply cable
- Periodically inspect the power cable to check its
condition.
- If the cable is damaged, do not use the appliance and
do not attempt any repairs. Call a qualifi ed technician
to replace the faulty cable.
21
907
Page 22

22
TROUBLESHOOTING
GB
1) The appliance does not work.
- Is there a power cut?
- Is the plug inserted properly in the mains socket?
- Is the power supply cable damaged?
- Is the temperature setting correct?.
2) The temperature inside the compartments is not
low enough.
- Do the doors close properly?
- Is the appliance installed near to a heat source?
- Is the temperature setting correct?.
- Is the condenser clean?
3) The temperature inside the fridge compartment is
too low.
- Is the thermostat in the right position?
4) The appliance is very noisy.
- Is the appliance in contact with other furniture or
objects?
- Are the pipes on the back touching or vibrating?
- Is the appliance level?
907
Page 23

1
3
C
C
2
25 W
4
GB
5) The alarm warning light N remains switched on
- Refer to the chapter entitled USE - “FREEZER COM-
6) The interior light does not work
- First check point 1, then: REPLACING THE LIGHT
- Disconnect the appliance from the mains electricity
- Remove light bulb cover C.
- Check the bulb and replace if necessary (for the bulb
7) There is water on the fl oor
- Is tray V inserted correctly and in contact with the
- Is drain pipe R correctly inserted in the tray?.
TROUBLESHOOTING
PARTMENT”.
BULB.
supply.
rating, refer to the fi gure). Replace cover C.
compressor?
23
907
Page 24

24
TECHNICAL ASSISTANCE SERVICE
GB
Before contacting the Assistance Service:
- Check whether it is possible to rectify the problem
by referring to the “Troubleshooting” guide.
- Restart the appliance to check whether the problem
has been resolved. If the problem still exists, disconnect the appliance from the mains electricity supply
and repeat the operation after one hour.
If the appliance is not working properly or not work-
ing at all, before calling the Technical Assistance
Service check that:
- The plug is inserted properly in the mains socket.
- The mains supply is working.
- The temperature is set correctly.
- The doors close properly.
- The power supply voltage corresponds to that of the
appliance (± 6%).
- If the problem still exists, call the Assistance Service.
Inform the Assistance Service of:
- The type of malfunction
- The appliance model
- The serial number
907
 Loading...