

Page 1

smeg
Istruzioni per l'uso e l'installazione
Instrucciones para el uso
Notice d'utilisation
User's book
Page 2
CONTENTS
1
➤ DESCRIPTION OF THE MACHINE
➤ SAFETY
➤ INSTALLATION
➤ WARNINGS
➤ SETTING-UP THE MACHINE
➤ ELECTRICAL CONNECTION
➤ WATER CONNECTION
➤ USEFUL ADVICE
➤ CLOTHING CARE LABELS
➤ BEFORE WASHING
➤ MAINTENANCE
➤ TROUBLESHOOTING
1-3
2
3
3
4
4
4
5
6
7
8
9
4
5
1
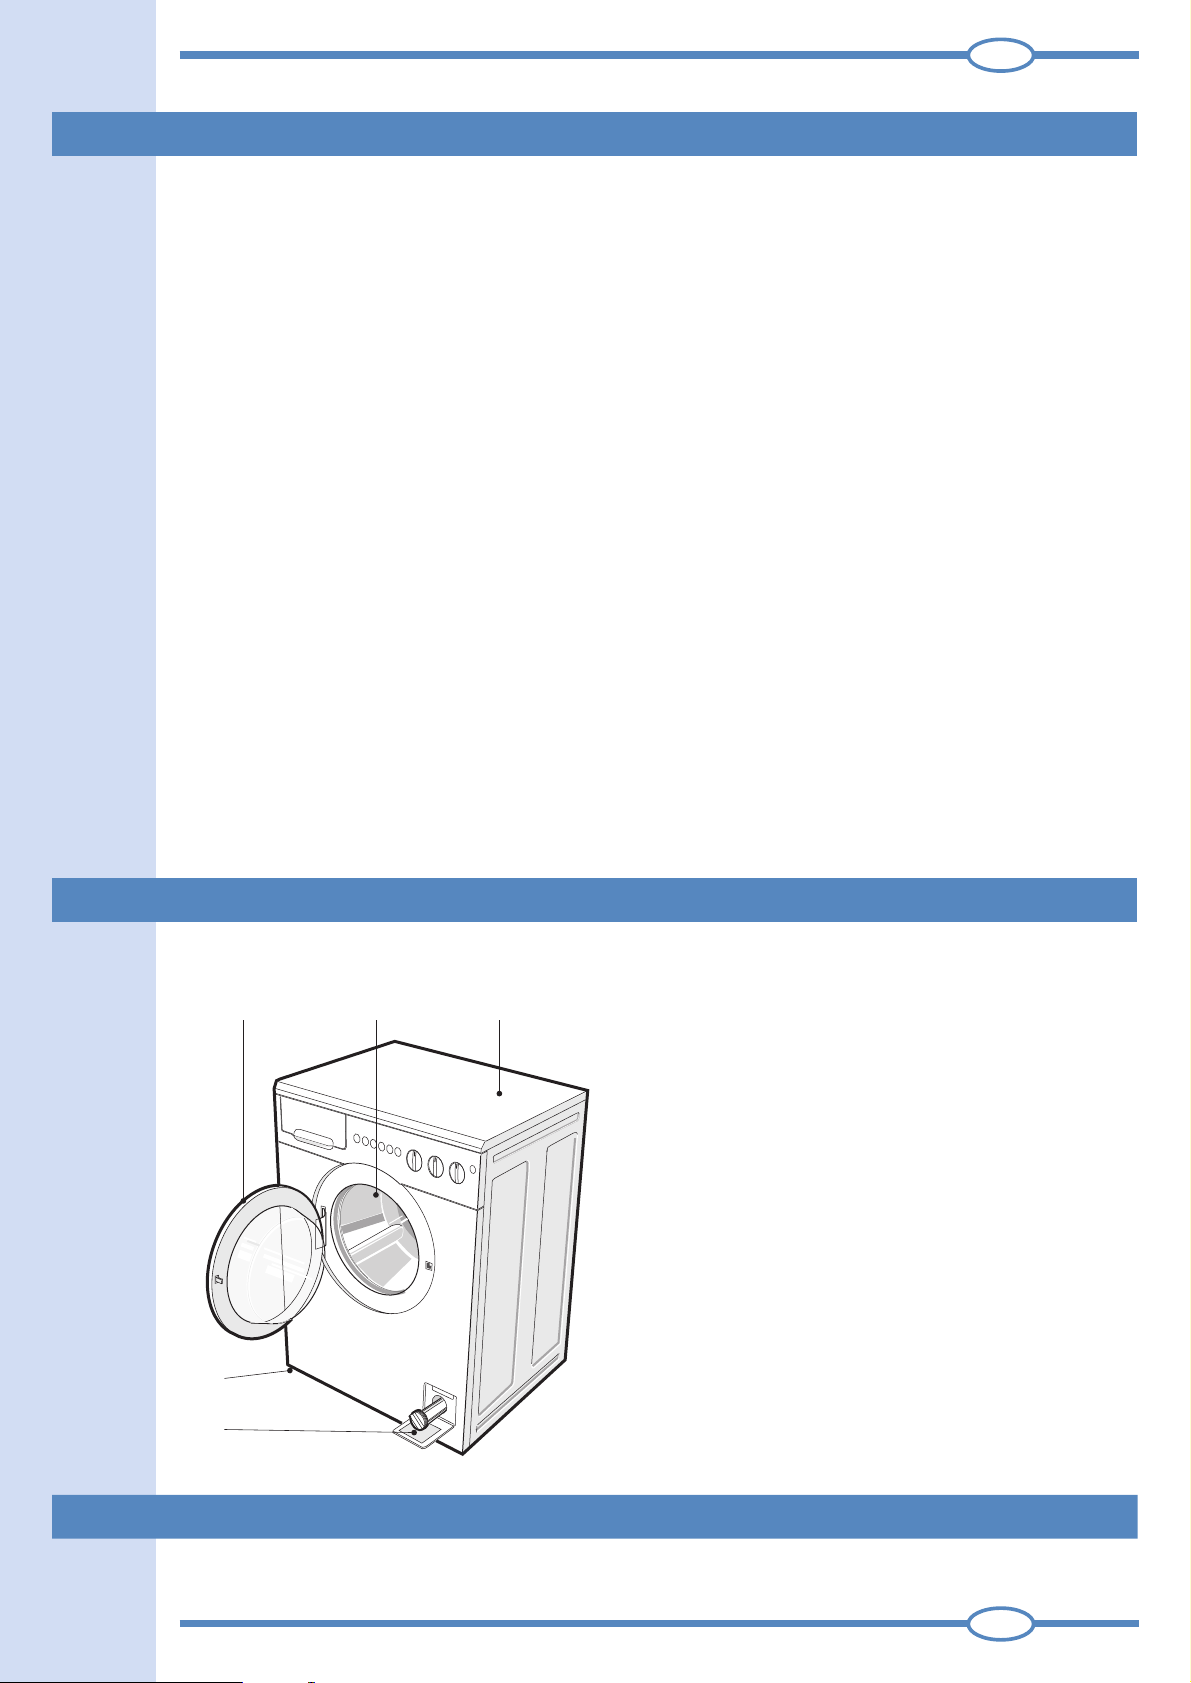
DESCRIPTION OF THE MACHINE
2
3
1 - GLASS DOOR
2 - DRUM
3 - SCRATCHPROFF TOP
4 - ADJUSTABLE FEET
5 - FILTER
ENGLISH
GB
Page 3

2
Thank you for having chosen our product.
This appliance is safe and easy to use. It has been constructed according to international
safety standards designed to protect the user. In order to familiarise yourself with the
machine and ensure its long working life, we strongly recommend that you read this
instruction manual carefully.
SAFETY
✔ The machine must not be installed
outdoors, even if protected by a roof, in
that atmospheric agents may cause
irreparable damages.
✔ This appliance has been designed for use
as a domestic washing machine. Any other
use is considered as improper and therefore
dangerous.
✔ The appliance must only be used by
adults.
✔ The appliance is very heavy and requires
utmost care when being moved.
✔ If the machine is to stand on a carpeted
floor, ensure that there is sufficient space for
air to circulate between the floor and the
bottom of the machine.
✔ The appliance must not be used or
touched barefoot or with wet or damp
hands or feet.
✔ Do not pull the power cable or appliance
to remove the plug from its socket.
✔ Do not use detergents designed for hand
washing, in that the excessive suds
produced could damage the internal
components.
✔ When the appliance is in operation, avoid
any contact with the water being
discharged through the drain hose, as it
may be very hot.
✔ Do not touch the door glass, as this will
tend to heat up during a wash.
✔ At the end of the wash, wait
approximately three minutes before
opening the door, as it is fitted with a safety
device that prevents it from being opened
accidentally.
✔ It is advisable to leave the door open
after completion of the wash cycle.
✔ When positioning the appliance, ensure
that the power supply cable is not kinked
or squashed and is accessible.
✔ If it becomes necessary to replace the
power supply cable, refer exclusively to an
authorised service centre.
✔ Do not use extension leads, especially in
a damp atmosphere.
GB
✔ In the case of faulty operation, switch off
the machine by removing the plug from its
socket using dry hands. Never try to access
internal components or attempt to repair
the machine, instead refer exclusively to an
authorised assistance centre.
Page 4
3
DESCRIPTION OF THE MACHINE
The washing machine is a domestic appliance capable of washing any type of fabric at
any time.
✔ The machine has been constructed in steel panels which have been treated and
painted to guarantees that its aesthetic qualities remain unaltered over time.
✔ The motor and all moving parts have been designed and manufactured to guarantee
the minimum possible noise levels.
✔ The large well-mounted stainless steel drum will ensure a better quality wash and help
to prolong the life of your washing.
✔ The easy to use control panel will satisfy all your washing and drying needs (see control
panel and programme table).
✔ The wide door makes loading and unloading your washing much easier.
✔ The very high stability of the machine is the result of extensive research by our technicians
on the equilibrium of masses in movement.
INSTALLATION
Installation must be carried out by qualified personnel in line with the instructions supplied
by the manufacturer. Incorrect installation may result in damage and injury.
The machine can be installed anywhere providing the ambient temperature is not less
than 3°C and the wires or pipes on the rear of the machine are not squashed.
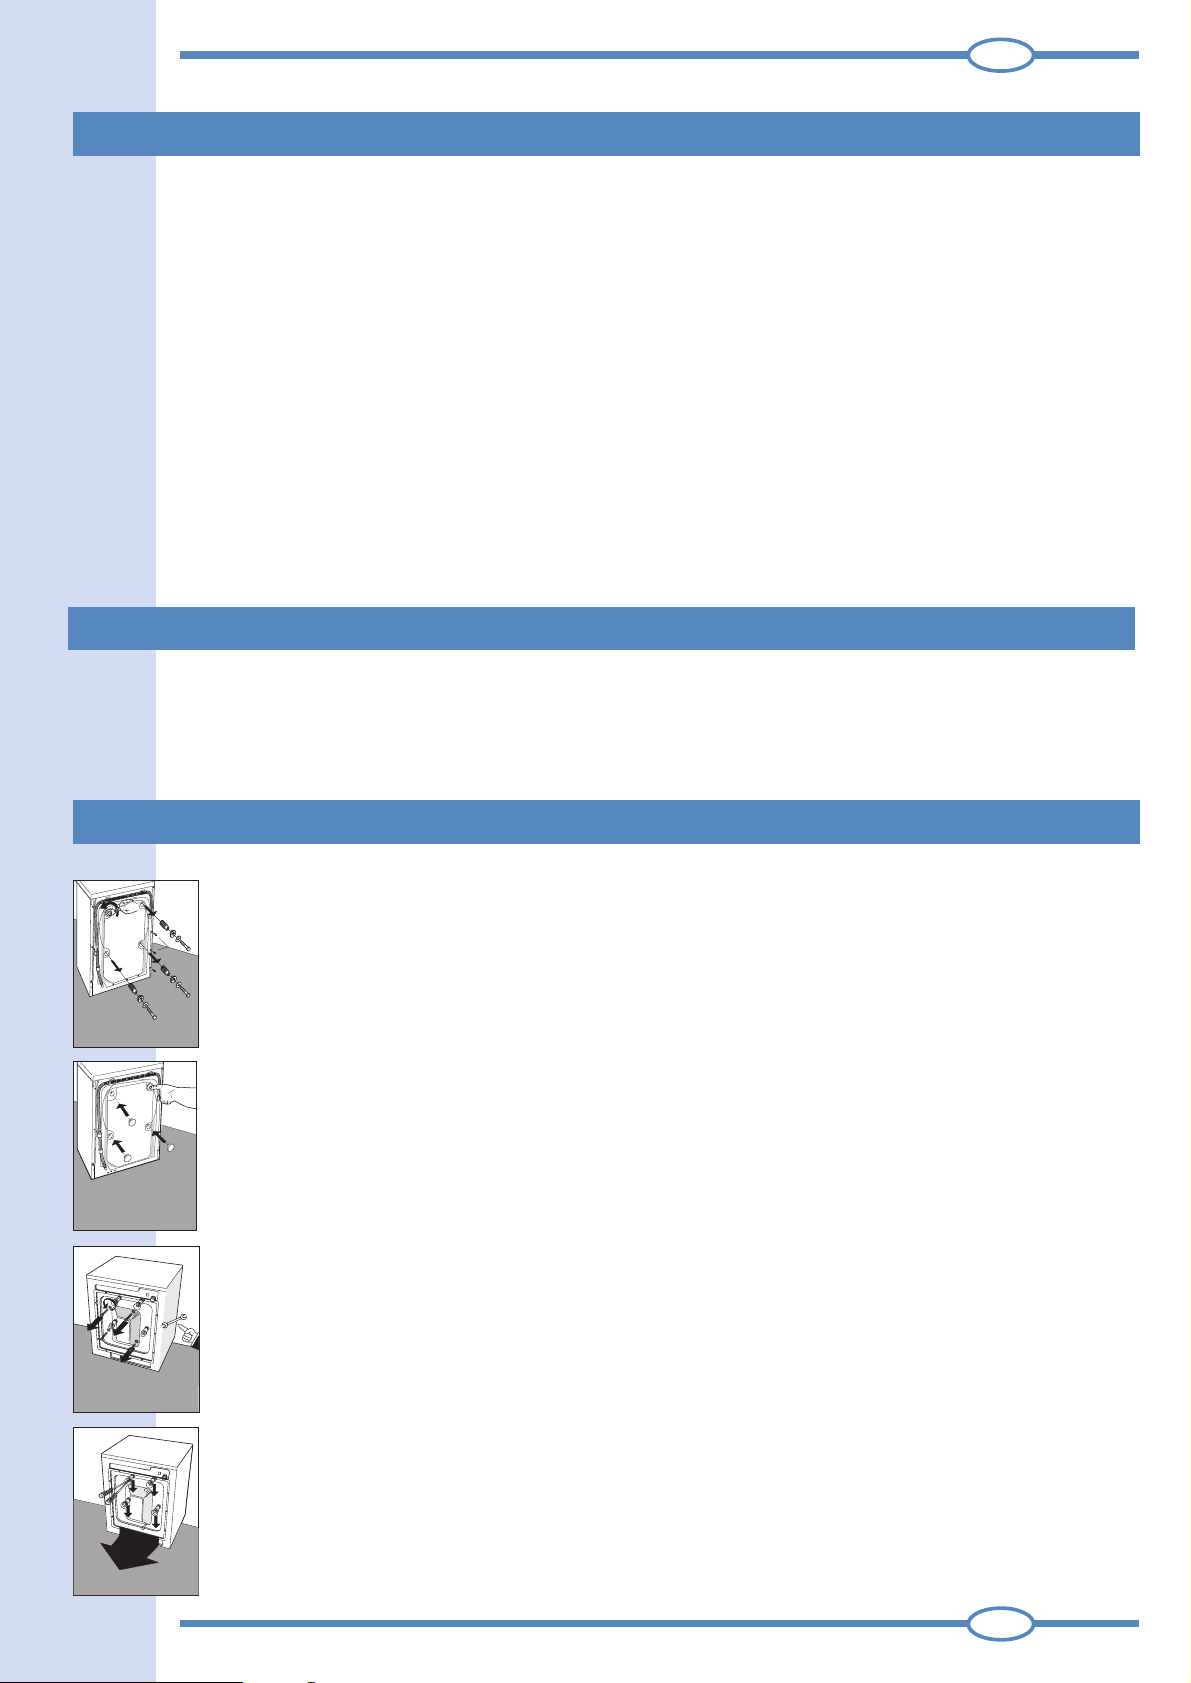
WARNINGS
▼ For transport reasons, the machine’s oscillating group is locked in place by 4 spacers
and screws. Before using the machine, remove the spacers and locking screws.
V
Keep the screws and spacers for future use.
▼ Close off the holes using the plugs supplied. The plugs can be found in the bag
containing the documents.
N.B. If the spacers cannot be removed from the machine in this way, open the rear panel,
remove them and replace the panel.
▼ For transport reasons, the machine’s oscillating group is locked in place by 4 spacers
and screws. Before using the machine, remove the locking screws with a suitable spanner.
▼ Insert a screwdriver in the holes and lever out the 4 plastic spacers as shown in the
figure.
N.B. If the spacers cannot be removed from the machine in this way, open the rear panel,
remove them and replace the panel.
GB
Page 5
4
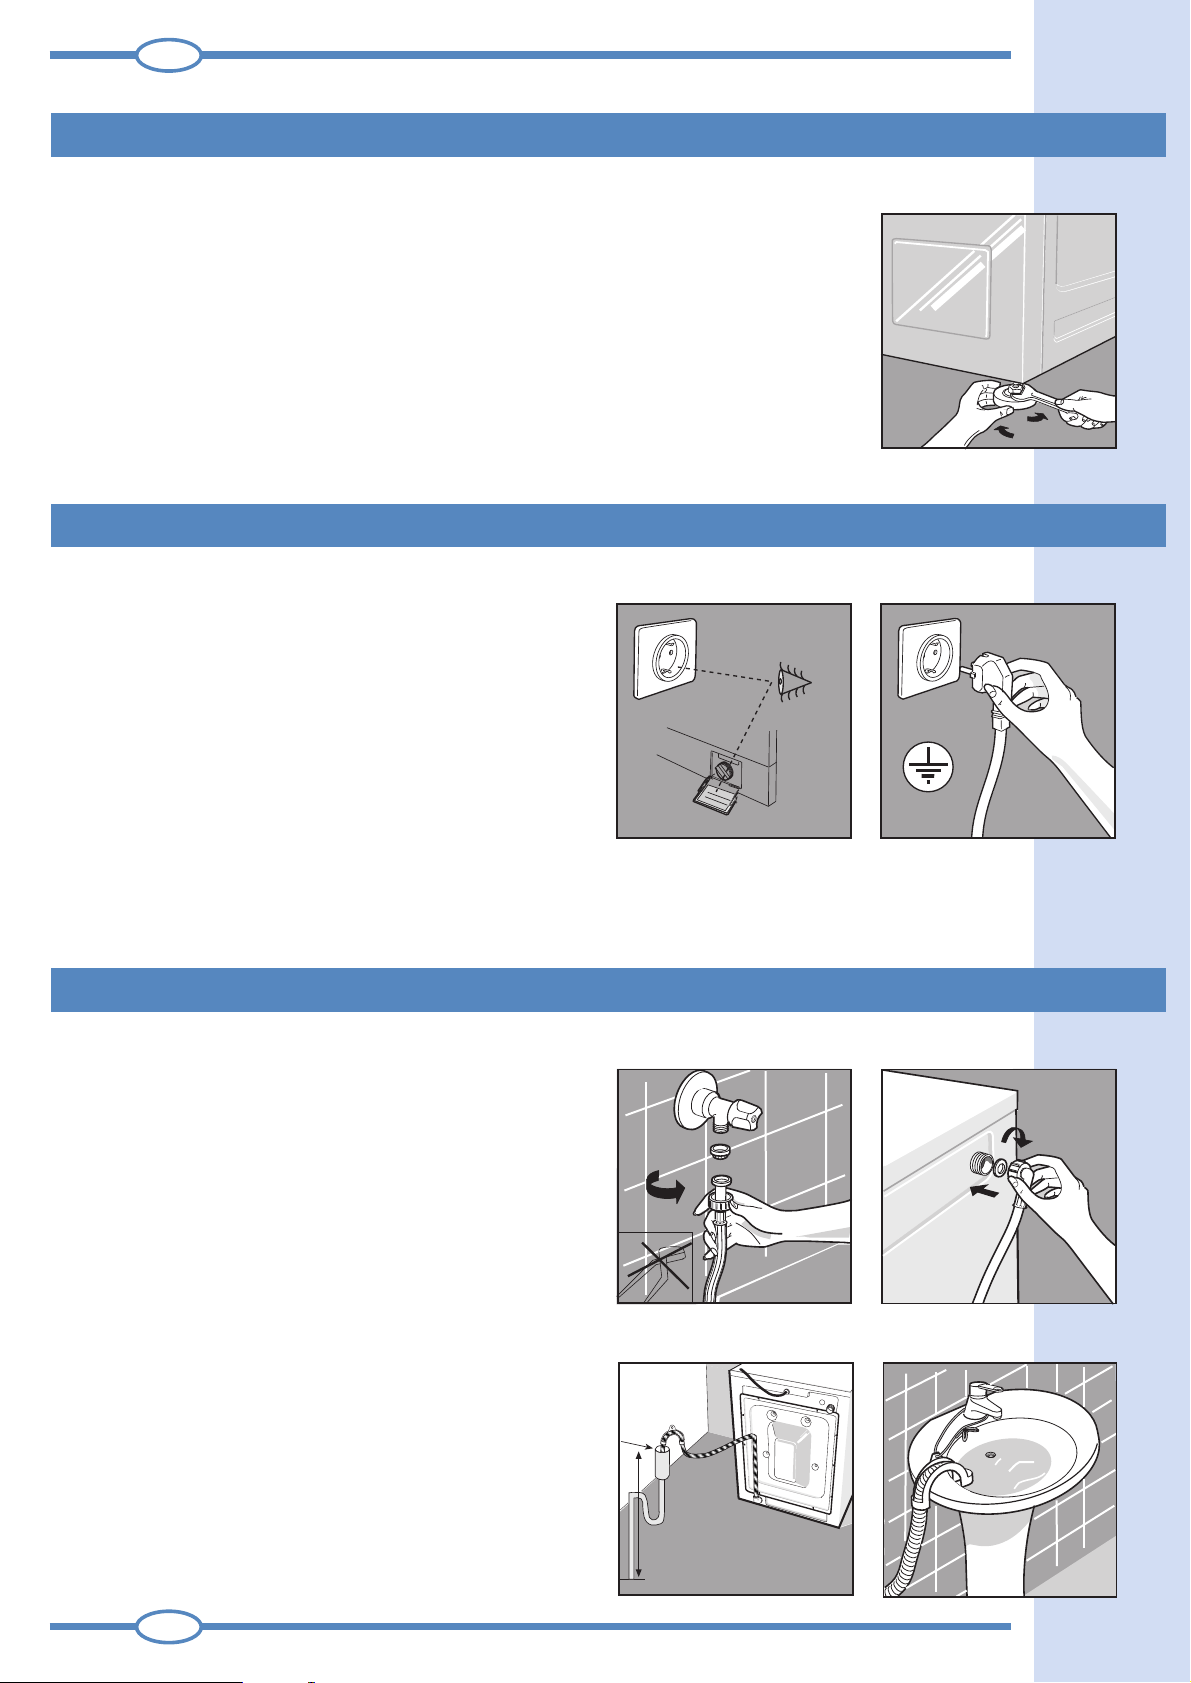
SETTING-UP THE MACHINE
▼ Place the machine near to the connection points and ensure that it is
level. To do this, adjust the feet by screwing or unscrewing them as required.
When the machine is level, tighten the lock nuts on the feet using a spanner.
ELECTRICAL CONNECTION
▼ Check that the power supply and socket are
correctly sized for the maximum load demand of
your machine. The power supply voltage is indicated
on the rating plate affixed to the filter door on the
bottom right of the washing machine.
The mains electricity supply must be equipped with
an earth. If this requirement is not complied with, the
manufacturer will not be held liable for any resulting
damage or injury.
WATER CONNECTION
▼ Allow a good quantity of water to flow out of
the system until it is clear and free of impurities,
especially if the plant is new or has not been used
for some time. Connect the water inlet pipe to
the valve, inserting the filter/washer supplied.
Check that the other end of the pipe is tightened
properly. Position the drain hose between a
minimum of 60 cm and a maximum 90 cm from
floor level.
N.B. To prevent siphoning, do not make the
machine drain hose connection air tight.
If the water system is not provided with a drain,
use the bracket supplied to position the drain pipe
over a washbasin then tie it to a tap.
Do not use old or used fill hoses. Use only those
supplied with the machine.
A
MIN. 60 CM
MAX.90 CM
GB
Page 6

5
USEFUL ADVICE
✔
Separate the washing according to type of fabric.
✔
Wash coloured and white articles separately.
✔
Check the clothing care labels affixed to the articles and set the appropriate programme
and temperature.
✔
In order to obtain good results from the wash, distribute the washing evenly inside the
machine alternating small items with larger ones.
✔
In order not to waste water, energy and detergent, it is advisable to load the machine
to its maximum recommended capacity.
✔
Do not use the pre-wash unless it is strictly necessary. This will reduce water, energy
consumption and time by an average of 10%.
✔
Try to avoid overloading the machine with articles in towelling only.
✔
Carefully check that there are no object left in the pockets of the articles that may block
the drain pump.
Stains exist that cannot be removed by machine washing alone.
The following paragraphs describe how to pre-treat stained fabrics before loading them
in the machine. This will help prevent an unsuccessful wash and the formation of stain rings.
✔
Wax: Scratch away as much of the wax as possible using a blunt knife, then iron with a
piece of silk paper between the iron itself and the stained item.
✔
Ball-point and felt-tip pens: Dab the stain with a cloth damped with 90
alcohol. Take care not to increase the stain.
✔
Rust: Use a rust remover, carefully following the manufacturer
✔
Chewing gum: Dilute it with acetone and remove using a clean cloth.
✔
Paint: Do not allow the paint to dry. Treat it immediately with the solvent indicated on
the paint container (water, turps, trichloroethylene), soap it and rinse.
’s instructions.
° colourless
✔
Lipstick:
✔
Nail varnish: Place the stained part of the item over a sheet of absorbent paper and
then dampen the reverse side of the item with acetone, frequently changing the absorbent
paper under the stain. Repeat the procedure until the stain has disappeared.
✔
Metal stain: Apply lemon juice until the stain has disappeared or greatly reduced in
intensity.
✔
Grass: Soap it delicately and treat with diluted bleach.
For woollen items, 90
Dab it with ether if the stain is on wool or cotton or use trichloroethylene if on silk.
° alcohol can produce good results.
GB
Page 7

6
HOW CAN I WASH ALMOST ANYTHINGS
Tennis shoes: tennis shoes or plimsolls can be machine washed. Just remove any mud from
them before starting the wash cycle.
Curtains: should be washed alone. They should first be folded to stop them creasing
excessively and then placed in a net bag or pillow case.
Quilted wind-cheaters: can be machine-washed. In this case limit the maximum machine
load to just over 50%. It is also advisable to carry out an extra rinse at the end of the wash
cycle.
Printed T-shirts and shirts: will last longer if washed inside-out.
CLOTHING CARE LABELS
Learn to recognise the symbols on the clothing care labels to obtain a better wash and
ensure that the articles have a longer life.
Washing Bleach Dry cleaningIroning Drying
Resistant fabric
Delicate fabric
9595
Wash up to 95
Wash up to 60
Wash up to 40
°C
6060
°C
4040
°C
cl
Bleach in cold
water
Do not bleach
Iron up to 200
Iron up to 150
Iron up to 100
Do not iron
° max
° max
° max
perchloride, aviation fuel
pure alcohol, R111 and R113
aviation fuel, pure alcohol
A
Dry clean with
solvent
P
Do not dry clean
F
Dry clean only with:
Dry clean only with:
and R113
Dry flat
Hang to dry
Dry on clothes
hanger
Machine dry at normal
temperature
Machine dry at low
temperature
Hand wash
3030
Wash up to 30
Do not wash in water
°C
GB
Do not machine dry
Page 8

BEFORE WASHING
7
closed
YES
open
Before each wash ensure that:
✔ the water connections are correct, the drain hose is properly positioned
(see water connection) and that the feed valve is open.
✔ with dry hands, insert the plug in the mains socket.
✔ sort the wash into types of fabric (refer to clothing care symbols).
✔ check that there are no objects left in any of the pockets of the items to
wash, as these may damage the washing, the appliance or the filter.
✔ open the door.
✔ load the washing and close the door.
▼ N.B. When adding detergent to the dispenser, remember to
avoid any spillage into the softener compartment, in that this
would create a soapy rinse and stain the fabrics white. Vice versa,
if softener is added to the detergent compartment, the quality of
the wash will be compromised.
NO
▼ N.B. When using a liquid detergent (recommended for programmes
without pre-wash), use the special container (if provided) and follow the
manufacturer’s instructions.
Remember to remove the liquid detergent container when using soap
powder.
✔ add low-suds detergent and softener (if required) recommended for
automatic washing machines. Follow the dosage instructions written on
the packet.
N.B. Excessive softener can damage the washing.
✔ close the detergent dispenser drawer.
Warning! Do not attempt to remove the detergent drawer
while the appliance is operating, as this will cause water
to flow out.
✔ select the required programme and temperature
according to the programme table.
GB
Page 9

8
MAINTENANCE
INTRODUCTION
▼ The washing machine is a domestic appliance that does not need any
particular maintenance, in that it has been designed to last. Nevertheless,
it is advisable to take one or two precautions. The external structure and the
parts of the washing machine in plastic must be cleaned with a soft damp
cloth only.
WARNING!! Never use chemicals, abrasive products, alcohol, soap, petrol or
other solvents to clean the appliance as these may cause damage.
PERIODICALLY CLEAN THE DETERGENT DRAWER
▼ The drawer must be cleaned whenever there are detergent residues
present. The detergent drawer can be removed by pulling it out and pressing
up from underneath at the same time.
CLEANING THE PUMP FILTER
▼ This operation should be carried out at least once a month. Make sure that there is no
water in the drum.
Place a shallow basin or rag under the filter door to catch any water that may be left in
the filter compartment. The filter can be removed by rotating it anticlockwise half a turn
and pulling outwards.
Clean the filter under running water, making sure that all the deposits are removed.
Replace the filter in its housing by screwing it in clockwise, Make sure it is properly seated
and locked in place.
GB
Page 10

9
TROUBLESHOOTING
Before calling the assistance service, check that the operations described below have
been carried out correctly; this will save both time and money.
The machine does not work (indicator light
off)
Make sure that:
1) The electricity supply has not been cutoff
2) The plug is inserted properly in the socket
3) The programmer knob has been pulled
outwards or the start/stop button (if fitted)
has been pressed (see using the washing
machine)
4) The door is closed.
The machine does not fill with water
Make sure that:
1) There is water in the mains supply
2) The feed valve is open
3) The fill hose is not kinked
4) With the machine unplugged from the
mains, clean the inlet filter between the
valve and the water fill hose.
The machine does not work (indicator light
on)
Make sure that:
1) The programmer knob is set at the
required programme
2) See problem “The machine does not fill
with water".
I cannot see any water during the wash
This is simply because the new technology
used in these machines guarantees double
the wash with half the water, this benefits
the environment and you save energy.
I can see too much foam
Make sure that:
The detergent used is that designed for
washing machines.
The machine will not drain or spin
Make sure that:
1) The drain hose is positioned correctly
2) The drain hose is not kinked
3) The detergent dose is correct and not
excessive
4) The detergent drawer is not caked-up
5) The detergent is the correct one for use
in washing machines.
The door will not open
Wait 3 minutes after the programme has
finished.
Try the machine to see if the problem has been solved.
model
220 V
kg wash
kg dry
5 / 100 N/cm
total w
Hz
A
N ° 204276237
heating wash W
heating dryer W
2
wash motor W
spin motor W
dryer motor W
pump W
If the problem persists, call the technical assistance service, stating:
1) The type of malfunction
2) The model of the washing machine
3) The serial number of the machine reported on the rating plate fixed to
the inside of the filter door.
The machine vibrates or is noisy
Make sure that:
1) Large items in the wash are not folded
(sheets, tablecloths, etc.)
2) The washing machine is properly levelled
3) The four locking screws and spacers
have been removed.
Does not dry (WASHER DRYER)
Make sure that:
1) The programme has been chosen
correctly
2) The water tap is turned on
3) The discharge filter is clean
4) The washing load is right.
service
GB
Page 11

461304913
02-04-2003
E. Crialesi s.r.l. - Fabriano
Page 12

smeg
Page 13
1
Wash programmes
Detergent drawer
Function buttons
On/Off light
Timer knob (P)
Temperature knob (K)
USING THE WASHING MACHINE
Add the detergent and softener following the doses recommended by the manufacturer.
Open the water fill valve. Select the required program by rotating the programmer knob
clockwise. Select the temperature using the temperature control (if present) according
to the load. Select the function buttons according to the model, then press the On/Off
button (where present) or pull the programmer knob outwards. The power on indicator
will light up. At the end of the wash cycle, press the On/Off button or, if this is not present,
push the programmer knob inwards. The power on indicator light will switch off. Wait
approximately 3 minutes before opening the door.
Eco
1/2
DESCRIPTION OF FUNCTIONS
▼ Economy wash button
This function limits lowers the temperature limit from 90°C to 60°C, while at the same time
increasing the intensity of the wash for loads of less than 3 Kg of dry washing.
▼ Anti-crease button
When this button is pressed, the machine will automatically stop with water still in the drum,
thus preventing the washing from creasing. Press the button again to complete the wash
cycle with a water drain and final spin.
N.B. this function is only enabled for the “delicates/synthetics” and “wool” programmes.
▼ No-spin button
Pressing this button will stop the wash cycle automatically (all programmes) without spinning.
▼ Half-load button
Pressing this button will save water and energy when the wash load in the machine is
approximately half of the maximum allowed.
▼ On/Off button
Pressing this button starts the washing machine once all the other necessary operations
have been carried out (see “Using the washing machine”).
Detergent drawer
Compartments:
1. Prewash detergent
2. Main wash detergent
3. Softener
Temperature knob
This is used to set the temperature of the wash
based on the instructions in the programme table.
The knob can also be set at 0°C to allow a cold
wash.
GB
Page 14

2
PROGRAMME TABLE (model 633ST)
Knob
(P)
1
2
3
4
5
6
7
8
Knob
(T)
max 90°
min 30°
max 90°
min 30°
max 60°
min 30°
max 40°
min 30°
max 60°
min 30°
Label
symbols
90
90
60
40
60
Prewash
Main
wash
Softener
Examples and
degree
of soiling
For sheets, shirts,
table cloths, towels,
in heavily soiled
resistant fabrics
For sheets, shirts,
table cloths, towels,
in heavily soiled
resistant fabrics
For sheets, shirts,
table cloths, towels,
in average soiled
resistant fabrics
For sheets, shirts,
table cloths in
delicate fabrics
To rinse or refresh
laundry in resistant
fabric, unused for a
long period of time
To rinse or refresh
laundry
Fast spin
Heavily soiled
synthetics with
all kinds of stains
Quantity
kg
Up to
3.5
Up to
3.5
Up to
3.5
Up to
3.5
Up to
3.5
Up to
3.5
Up to
3.5
Maxi-
mum
1,5
Programme
description
Pre-wash, wash,
rinse, softener,
drain and final spin
Wash, rinse,
softener, drain
and final spin
Wash, rinse,
softener, drain
and final spin
Wash, rinse,
softener, drain
and final spin
Rinse, softener,
drain and
final spin
Rinse, softener,
drain and
final spin
Drain and final spin
Pre-wash, wash,
rinse, softener,
drain and final spin
As
required
Use of function buttons
Eco
As
required
As
required
1/2
As
required
As
required
As
requiredAsrequired
As
requiredAsrequired
As
requiredAsrequired
As
required
As
required
As
required
As
required
As
required
As
required
9
10
11
max 60°
min 30°
max 40°
min 30°
max 40°
60
40
40
12
13
14
TECHNICAL CHARACTERISTICS (model 633ST)
Dimensions
Maximum recommended
load during washing*
White and
colour-fast synthetics
To rinse or refresh
synthetics unused for
a long period of time
Machine washable
wool
To rinse or refresh
synthetics unused for
a long period of time
To rinse or refresh
laundry
Delicate final spin
Maxi-
mum
1,5
Maxi-
mum
1,5
Maximum
1
Maxi-
mum
1,5
Maxi-
mum
1,5
Maxi-
mum
1,5
Wash, rinse,
softener, drain
and final spin
Wash, rinse,
softener, drain
and final spin
Wash with high
level water, rinse,
softener, drain
and final spin
Rinse, softener,
drain and final spin
Rinse, softener,
drain and final spin
Drain and final spin
Width 59.5 cm - Height 85 cm - Depth 33 cm
Cotton 3.5Kg - Synthetics 1.5Kg - Wool 1Kg
As
required
As
required
As
required
As
required
As
required
As
required
As
required
As
required
As
required
As
required
As
required
As
required
As
required
Max. spin
Water pressure
Maximum absorbed power
Electrical connection
* To ensure that the wash load is evenly balanced in the machine and to avoid excessive vibration during spinning, the
amount of washing must not be less than 1 kg.
min. 0.05 MPa - max. 1 MPa
See characteristics plate
600 Rpm
GB
Page 15

PROGRAMME TABLE (model 839ST)
3
Knob
(P)
1
2
3*
4
5
6
7
8
Knob
(T)
max 90°
min 30°
max 90°
min 30°
max 60°
min 30°
max 40°
min 30°
max 60°
min 30°
max 60°
min 30°
Label
symbols
90
90
60
40
60
60
Prewash
Main
wash
Softener
Examples and
degree
of soiling
For sheets, shirts,
table cloths, towels,
in heavily soiled
resistant fabrics
For sheets, shirts,
table cloths, towels,
in heavily soiled
resistant fabrics
For sheets, shirts,
table cloths, towels,
in average soiled
resistant fabrics
For sheets, shirts,
table cloths in
delicate fabrics
To rinse or refresh
laundry in resistant
fabric, unused for a
long period of time
Fast spin
Heavily soiled
synthetics with
all kinds of stains
White and
colour-fast synthetics
Quantity
kg
Up to
5
Up to
5
Up to
5
Up to
5
Up to
5
Up to
5
Maxi-
mum
2,5
Maxi-
mum
2,5
Programme
description
Pre-wash, wash,
rinse, softener,
drain and final spin
Wash, rinse,
softener, drain
and final spin
Wash, rinse,
softener, drain
and final spin
Wash, rinse,
softener, drain
and final spin
Rinse, softener,
drain and
final spin
Drain and final spin
Pre-wash, wash,
rinse, softener,
drain and final spin
Wash, rinse,
softener, drain
and final spin
As
required
As
required
Use of function buttons
Eco
As
required
As
required
1/2
As
required
As
required
As
requiredAsrequired
As
requiredAsrequired
As
required
As
required
As
required
As
required
As
required
As
required
As
required
As
required
As
required
9
10
11
12
13
14
max 40°
min 30°
max 35°
To rinse or refresh
40
35
* Reference program for power classification, in accordance with EN 60456
synthetics unused for
a long period of time
To rinse or refresh
synthetics unused for
a long period of time
Delicate final spin
Machine washable
wool
To rinse or refresh
laundry
Delicate final spin
Maxi-
mum
2,5
Maxi-
mum
2,5
Maxi-
mum
2,5
Maxi-
mum
1,5
Maxi-
mum
2,5
Maxi-
mum
2,5
Wash, rinse,
softener, drain
and final spin
Rinse, softener,
drain and
final spin
Drain and final spin
Wash with high
level water, rinse,
softener, drain
and final spin
Rinse, softener,
drain and final spin
Drain and final spin
As
required
As
required
As
required
TECHNICAL CHARACTERISTICS (model 839ST)
Dimensions
Maximum recommended
load during washing*
Width 59.5 cm - Height 85 cm - Depth 39 cm
Cotton 5Kg - Synthetics 2.5Kg - Wool 1.5Kg
As
required
As
required
As
required
As
required
As
required
As
required
As
required
As
required
Max. spin
Water pressure
Maximum absorbed power
Electrical connection
* To ensure that the wash load is evenly balanced in the machine and to avoid excessive vibration during spinning, the
amount of washing must not be less than 1 kg.
min. 0.05 MPa - max. 1 MPa
See characteristics plate
800 Rpm
GB
Page 16

461304914
02-04-2003
E. Crialesi s.r.l. - Fabriano
 Loading...