

Page 1
Instructions for use
Refrigerator
Page 2

Thank you for your confi dence in buying our
appliance and congratulations on the excellent
choice. We hope it will successfully serve its
purpose for many years.
The refrigerator is used in households for storage
of fresh food at temperatures exceeding 0°C.
142396
Before fi rst operation ...................................... 3
Description of the appliance ........................... 5
Location and installation ................................. 6
Reverse door swing .........................................8
Control panel ................................................... 9
Storing fresh food .......................................... 11
Defrosting......................................................... 14
Cleaning ........................................................... 15
Troubleshooting guide .................................... 16
Noise information ............................................18
2
Page 3
Before fi rst operation
Before connecting the appliance read these
•
instructions carefully. They describe the appliance
and provide instructions for its safe and correct
use. The instructions are prepared for different
types and models of the appliance so they may
contain descriptions of functions and components
your appliance may not have.
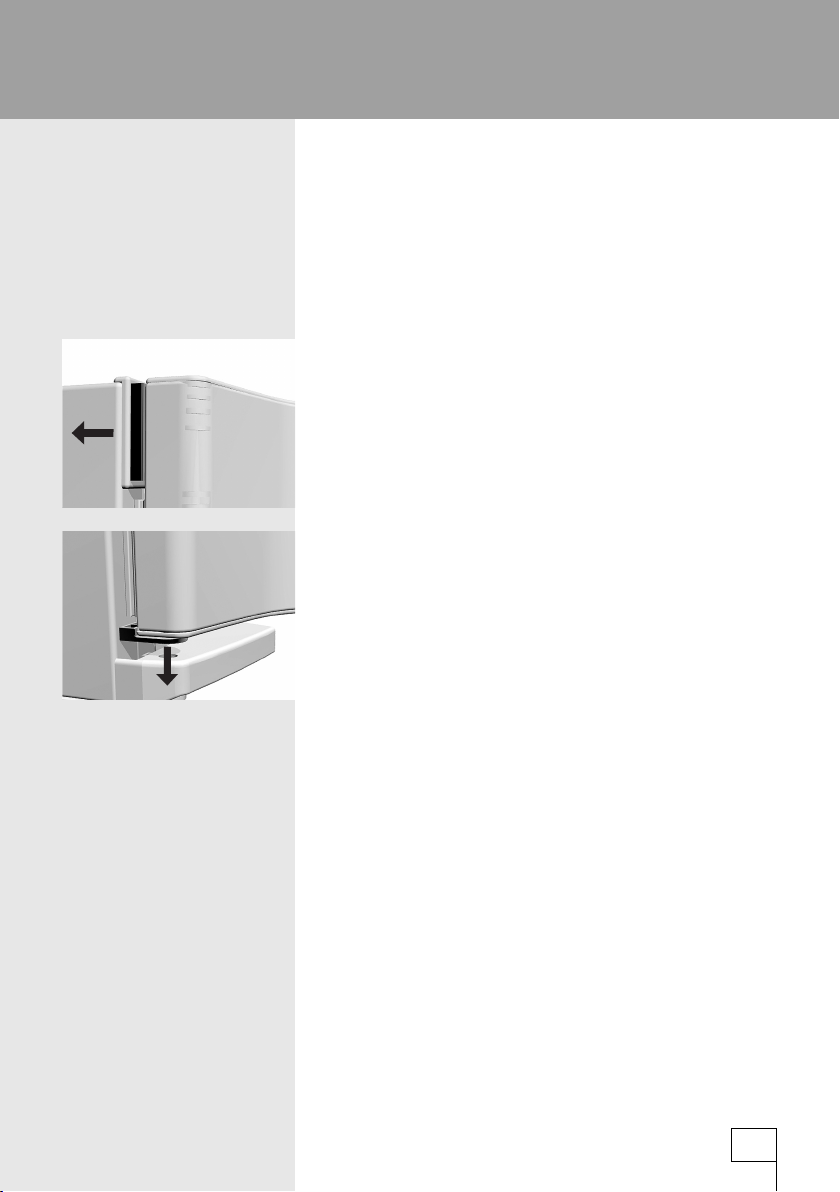
Remove the wrapping protecting the appliance
•
during transport. Door corners are fi tted with
protective spacers. Remove the spacers and
replace them with the attached pegs.
Before connecting the appliance to the mains
•
supply, leave it in upright position for about 2
hours. This will reduce possibility of malfunctions
in the cooling system resulting from prior transport
and handling.
The appliance must be connected to the
•
mains supply in accordance with the standing
regulations and local requirements.
The appliance must not be used in open air or
•
exposed to weather precipitation.
Always disconnect the appliance from power
•
supply (pull the power cord from wall socket)
before cleaning and before replacing the light
bulb.
If the power supply cord is damaged, in order to
•
avoid hazard it must be replaced by the service or
by qualifi ed personnel.
In case of long periods not using the appliance,
•
turn the appliance off with the ON/OFF button
and disconnect it from mains supply. Empty the
appliance, clean the interior and leave the door
ajar.
For the protection of environment, please contact
•
local Borough or Council for authorised removal.
Wrappings contain environmentally friendly
•
materials which can be recycled, recovered or
disposed without threat to the environment.
To prevent any pollution be careful not to damage
•
the insulation or refrigeration tubes at the rear wall
142396
3
Page 4
during the installation, cleaning and disposal of
the appliance.
Never let the children play with the appliance.
•
Self closing door hinge (certain models only) pulls
•
the door to the cabinet just before closing, thereby
preventing the door to remain ajar. Equally it limits
the door opening angle and prevents damage to
adjacent elements.
Rating plate with basic information is located in
•
the interior of the appliance. If the sticker plate is
not suitable for your language, replace it with the
attached one.
The symbol on the product or on its
packaging indicates that this product
may not be treated as household
waste. Instead it shall be handed over
to the applicable collection point for the
recycling of electrical and electronic
equipment. By ensuring this product
is disposed of correctly, you will help
prevent potential negative consequences
for the environment and human health,
which could otherwise be caused
by inappropriate waste handling of
thisproduct. For more detailed information
about recycling of this product, please
contact your local city offi ce, your
household waste disposal service or the
shop where you purchased the product.
142396
4
Page 5
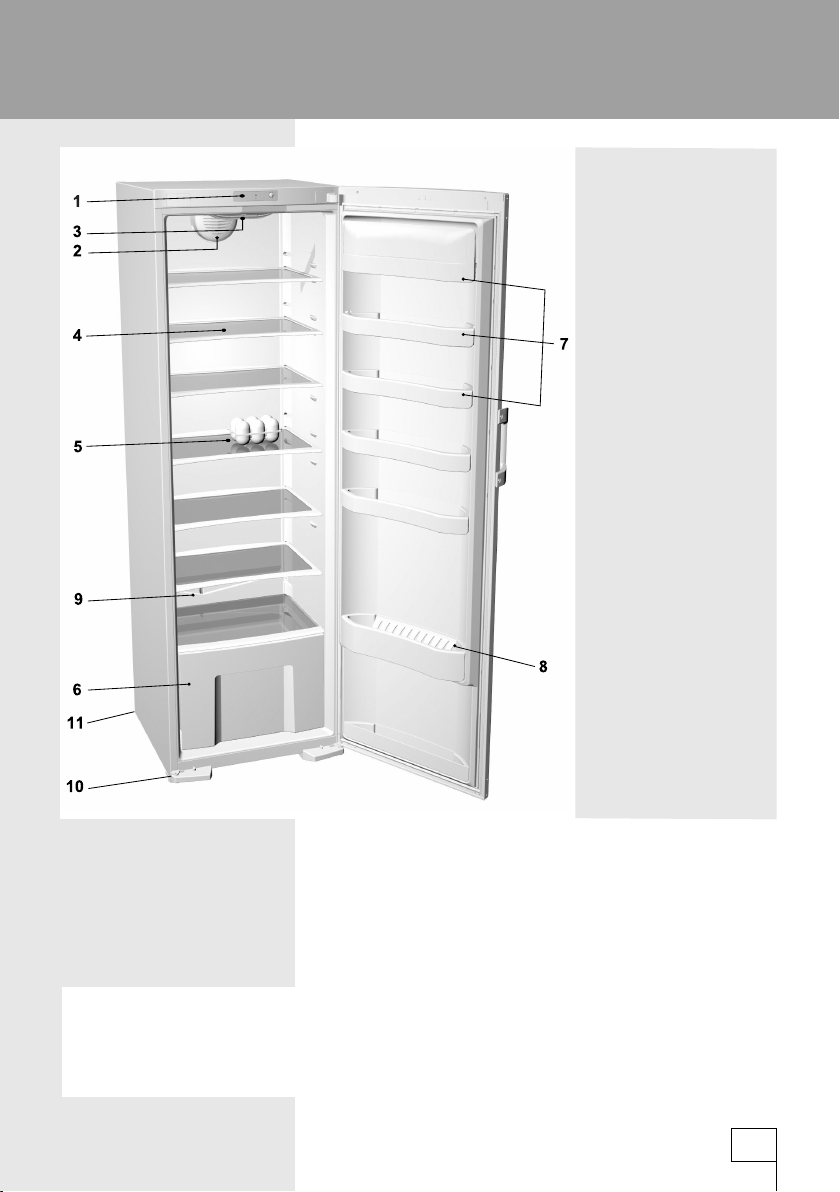
Description of the appliance
1 Control panel
2 Fan*
3 Interior light
4 Shelf (adjustable
height)
5 Foldable egg rack
(closed - six eggs, open
- 12 eggs)
6 Vegetable crisper
drawer with pull-out
guides (max. 18 kg)
7 Door shelf (options:
deep, shallow; covered
or no cover)
8 Twin row bottle rack
with safety holder*
9 Drain water outlet
groove
10 Legs
11 Wheels*
• Interior accessories of the appliance may vary according to the model.
• The pull-out guide drawers are extracted by lifting the rear end and pulling out at inclined angle.
Reinsert in opposite sequence.
* Certain models only.
142396
5
Page 6
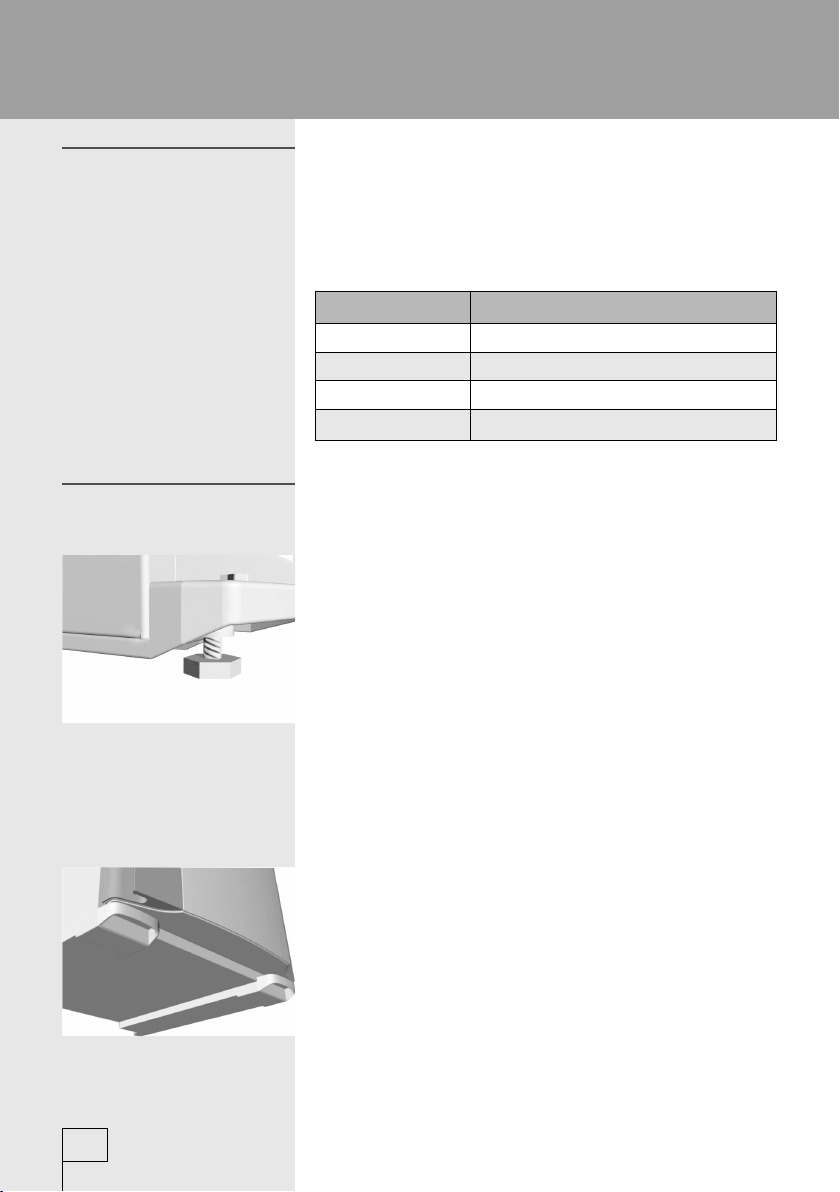
Installation and connection
Selecting the location
Positioning the
appliance
142396
Place the appliance in dry and well aired room.
•
The appliance operates best at temperature
ranges indicated in the chart below. See the
relevant class of the appliance, indicated on the
rating plate.
Class Ambient temperature
SN (subnormal) from +10°C to +32°C
N (normal) from +16°C to +32°C
ST (subtropical) from +18°C to +38°C
T (tropical) from +18°C to +43°C
Positioning the appliance requires two people in
order to avoid possible damage.
Place the appliance fi rmly on a fl at and solid base.
•
The appliance is fi tted with adjustable feet on the
front side, used to level the appliance. Rear side
of the appliance is fi tted with wheels facilitating
the positioning of the appliance at the preselected
place (certain models only).
The element above the appliance must be at
•
least 5 cm away to allow suffi cient cooling of the
condenser.
Avoid exposing the appliance to direct sunlight
•
or heat sources. If this is not feasible, install
insulation plate between the appliance and
adjacent heat source.
The bottom front corners of the appliance are
•
fi tted with handles to facilitate moving. The
appliance may stand independently or adjacent
to a furniture element or wall. Be sure to leave
enough space for the opening of the door, to
avoid damage to the appliance or injury to people.
Provide enough space around the appliance for
•
comfortable opening of the pull-out drawers.
6
Page 7

Connecting to power
supply
Use the power cord to connect the appliance to
•
the mains power. Wall outlet must be fi tted with
ground terminal (safety socket). The nominal
voltage and frequency is indicated on the relevant
label or rating plate of the appliance.
Mains power connection and earthing must be
•
made in accordance to standard regulations and
requirements.
The appliance is able to accommodate minor
temporary voltage fl uctuations which do not exceed
-10% to +6%.
7
142396
Page 8

Reverse door swing
Required tools; socket spanner nr. 8,
screwdriver, torx 25
Caution! After unscrewing of before fi xing hinges,
hold the door to prevent it from falling and
damaging.
1. Remove upper hinge cover (keep it for eventual
later use), together with cover on the opposite
side of the upper hinge cover (on the opposite
side you will insert the attached cover during the
assembly), and remove the cover on the opposite
side of the upper part of the door.
2. Unscrew upper hinge screws and remove the
door from the bottom hinge.
3. On the bottom side of the door unscrew the
swing stopper screws and remove the stopper
(A) keep this stopper for later use. Fix the
attached stopper with its bearing on the opposite
side of the door.
4. Unscrew the forced door closure system (B)
and fi x it to the opposite side of the door (certain
models only).
5. Remove handle screw covers, unscrew handle
screws, and remove plastic pegs on the opposite
side.
6. Tilt the appliance backward (max. 35°) to lean
to the rear side of the cabinet. Unscrew the leg
support screws (C) - left and right, and remove
the leg support cover (D). Unscrew and remove,
then reciprocally replace the position of end
switch (E) and decorative peg (F) (for models
with forced door closing system). Place this on
opposite side. Unscrew three screws fi xing the
bottom hinge (keep the hinge for later use), and
fi x the attached bottom hinge on the opposite
side.
7. Proceed with the assembly procedure in opposite
142396
sequence.
8
Page 9

Control panel
Control unit
The description refers to the appliance with all
available accessories, so that it could contain
certain settings our model may not have.
A Temperature selector and ON/OFF button
B Green LED: illuminated when the appliance is in operation
C The Digital temperature display indicates actual temperature inside the
appliance from +1°C to +9°C (certain models only).
9
142396
Page 10

The ON/OFF button
The appliance is switched on by turning the button
(A) towards Max. Green LED on. The appliance is
switched off when the arrow on the button points to
the ON/OFF mark
under mains power).
(the appliance, however, is still
Setting the temperature
Temperature of the appliance is set by turning the
•
button (A) to the position between the Min and
Max span.
Recommended setting of the thermostat knob is
•
to Eco position (around +5°C in appliances with
digital display).
If the room temperature, in which the appliance is
•
installed, is lower than 16°C, the recommended
setting of the thermostat knob is to the Max..
The digital display (certain models only) fl ashes
•
and indicates set temperature. When fl ashing
stops, setting is completed and the temperature
is automatically saved in memory. (Please allow
time to reach this desired temperature.)
Each time the appliance is switched on for the fi rst
•
time, the digital display (C) indicates temperature
of +9°C and fl ashes. This value remains on
display until the actual temperature falls below
the indicated value. Then fl ashing stops and the
digital display indicates the actual temperature
within the freezer.
142396
10
Page 11

Storing fresh food
Important precautions
for storing fresh food
Proper use of the appliance, adequately
packed food, correct temperature and
hygienic precautions produce substantial
impact on the quality of stored food.
Always respect the best before date,
printed on the packaging.
Food to be stored in the refrigerator
should be properly packed as to prevent
emission and/or reception of bacteria,
moisture and odours.
Never store infl ammable, volatile or
explosive substances.
Beverages with high alcohol percentages,
should be stored vertically in tightly sealed
bottles.
Some organic solutions like strong oils in
lemon and orange peel, acids in butter etc.
can cause damage in prolonged contact
with plastic surfaces or gaskets for longer
period of time they can cause accelerated
aging of the plastic material.
Any unpleasant odour inside the
refrigerator is a sign that something is
wrong with food or that your refrigerator
needs cleaning (see chapter Cleaning).
Should you be away for a lengthy time,
please ensure that all perishable food is
removed prior, from the appliance before
you leave.
11
142396
Page 12

Interior accessories
and space distribution
Equipment depends on the model.
The shelves can be placed optionally placed
•
on the guides inside the appliance. They are
protected against pulling out completely. To
remove the shelf, slightly lift up the back part and
pull towards you. Quickly perishable food should
be stored near the back i.e. the coldest part of the
shelves.
Certain models are equipped with wire bottle rack
•
which enables placing of bottles on the cork. It is
safeguarded against pulling out. It may be pulled
out only if empty, by lifting the front part and
pulling it towards you. Place the bottle rack in the
appliance in such way to avoid obstruction of door
closing by the length of the stacked bottles.
Maximum load of the rack is 9 bottles of 0,75 l, or
13 kg of total mass - see label at the right side of
the interior of the appliance.
The crisper drawer below the glass shelf at the
•
bottom of the refrigerator is used for storage of
fruit and vegetables. It retains the right level of
moisture and prevents drying out.
The door liner consists of various shelves or
•
holders used for storing cheese, butter, eggs,
yogurt, and a stock of other smaller packages,
tubes and cans. The bottom shelf is used for
storing bottles.
The fan (certain models only) helps to circulate
•
air evenly within and decreases moisture on the
storage racks.
142396
12
Page 13

Approximate storage
time of fresh foods
Food Time
eggs, marinades, smoked meat up to 10 days
cheese up to 10 days
carrots, etc… up to 8 days
butter up to 7 days
cake, fruit, TV-dinner dishes,
rpackages of uncooked meat
fi sh, raw minced meat, seafood up to 1 day
up to 2 days
13
142396
Page 14

Defrosting the appliance
Automatic defrosting
The appliance needs no special defrosting
procedure, because ice deposited at the inner back
wall is defrosted automatically.
Ice deposited on the inner back wall during the
compressor operation is defrosted when the
compressor stops operating, and condensed
water drops are drained through the outlet in the
inner back wall into the drain pan situated above
the compressor where it evaporates. In case of
excessive ice deposits at the inner rear wall of the
refrigerator (3-5 mm), switch the appliance off by
pressing the ON/OFF button and defrost it manually.
142396
14
Page 15

Cleaning
Prior to any cleaning. Please disconnect the
appliance from the mains (turn the thermostat
button to the position
from the mains outlet). Special antibacterial
protection in top layer of inner walls prevents growth
of bacteria and keeping the interior clean and germ
free.
Please remove traces of any detergents you may
have used.
Clean the exterior of the appliance with warm
•
water and mild liquid detergent.
For cleaning of plastic, coated, or aluminum parts
•
avoid using abrasive or special cleansing agents
(like the stainless steel polish), otherwise you may
damage the surface.
Clean coated and aluminum surfaces using the
•
soft cloth and alcohol based cleaning agent (like
glass cleaner).
Wash the interior of the appliance with liquid
•
detergent and lukewarm water, mixed with a little
vinegar.
The groove and drain outlet located below the
•
cooling panel at the rear wall collect the drained
water, so they must not be blocked up
(e.g: with food particles). Make sure you inspect
them periodically and clean if necessary (use
plastic straw to free the outlet hole).
The condenser on the rear wall must always be
•
clean and free of dust or kitchen fumes deposits,
therefore clean the dust periodically with non-
metallic brush or vacuum cleaner.
Additionally clean also the drip pan above the
•
compressor. If you removed the pan, please make
sure you replace it in same position, and check
that it is horizontal (very important).
Ice and/or frost deposits exceeding 3-5 mm
•
increase energy consumption, so should be
removed regularly. Do not use sharp pointed
objects, solvents or sprays.
After cleaning switch the appliance on and place
•
and pull the power cord
142396
15
Page 16

Troubleshooting guide
Fault: Cause/Remedy
The appliance does not
operate after connection to the
mains:
Cooling system operates
continuously without
intermittent stoppages:
Excessive ice formation at
the rear interior wall of the
refrigerator:
Water dripping from the
appliance:
Check if there is power in the socket and if the
•
appliance is switched on.
Ambient temperature too high.
•
Frequent opening of the door, (open too long).
•
Door not closed properly (particle between door
•
gasket, sagged door, check gasket sealing, etc...).
Excessive quantity of fresh food inserted at once.
•
• Refrigerator sensor (A) is crammed with fresh food.
Free the sensor and allow air to circulate around it.
Check air circulation for suffi cient cooling of the
•
compressor, and clean the condenser.
Frequent opening of the door, door open too long.
•
Placing hot food in the refrigerator.
•
Food is touching the rear interior panel.
•
Bad door sealing; clean or replace the gasket if
•
dirty or damaged.
Drain outlet is clogged, drain water drips past the
•
collection groove.
142396
16
Clean the clogged outlet using plastic straw.
•
Please thaw out larger ice deposits manually (see
•
chapter Defrosting).
Page 17

Fault: Cause/Remedy
Bulb replacement:
Green LED is fl ashing:
Error code appears on the
display (certain models only):
Troubleshooting helpful hints:
Before replacing the light bulb, disconnect the
•
appliance form the power supply. Using the
screwdriver remove the cover, replace the bulb with
a new one (E 14, max. same voltage as the factory
one) and fi t back the cover.
Please dispose of this correctly.
•
Light bulb is consumption material and is not
•
covered by the warranty!
If the green LED is fl ashing, call the nearest service
•
center.
If the character E1 appears on the digital display
•
call service assistance.
If you are not able to fi x the trouble by any of
•
the above tips, turn the thermostat button to the
position
,disconnect the power cord from the
mains outlet, wait 10 minutes, and reconnect the
appliance.
Should none of the above guidelines be of positive
help, please call for service assistance, quoting
information given on the rating plate either within,
or at rear of an appliance.
17
142396
Page 18

Noise level
The refrigerator - freezer appliances are cooled
by a compressor system which may have nominal
operational noise. This depends upon the location,
correct use and age of the appliance.
After starting the appliance, the operation of
•
the compressor (the refrigerant fl ow) may be
somewhat louder. This does not mean that
something is wrong with the appliance, neither
has it any infl uence on the lifetime of the
appliance. The noise is reduced and eventually
subsides.
Sometimes the appliance may have an unusual
•
and loud noise which is often the consequence of
inadequate positioning:
- The appliance should be placed on a fi rmly
solid and level base.
- It should not touch the wall or adjacent kitchen
units standing next to it (in case of vibration).
- Check whether the accessories in the interior
of the appliance are placed correctly in their
positions; also check the bottles, tins and other
vessels that might touch each other and rattle.
142396
THE MANUFACTURER RESERVES THE RIGHT
TO ALTER THE SPECIFICATIONS WITH NO
IMPACT TO THE FUNCTIONAL OPERATION OF
THE APPLIANCE.
18
Page 19

Page 20

HS 3966 COOLER CLA 142396/en (12-06)
 Loading...