

SMC Networks SMCRB5701-Z User Manual

User Manual
SMCRB5701-Z TouchScreen
FastFind Links
Introduction
Configuring the TouchScreen
Managing System Security
Managing Connectivity Between the TouchScreen
and Monitoring Stations
Managing Connectivity Between Home Devices
and the Internet
Managing Environmental Devices
Maintaining and Configuring the TouchScreen

SMC Networks
20 Mason
Irvine, CA. 92618
U.S.A.
Copyright © 2011 SMC Networks
All Rights Reserved
Information furnished by SMC Networks, Inc. (SMC) is believed to be accurate and reliable. However,
no responsibility is assumed by SMC for its use, or for any infringements of patents or other rights of
third parties which may result from its use. No license is granted by implication or otherwise under
any patent or patent rights of SMC. SMC reserves the right to change specifications at any time
without notice
No part of this publication may be reproduced or transmitted in any form or by any means, electronic
or mechanical, including photocopying and recording, or stored in a database or retrieval system for
any purpose without the express written permission of SMC.
Microsoft and Windows are registered trademarks of Microsoft Corporation. Apple and Macintosh are
registered trademarks of Apple, Inc. All other brands, product names, trademarks, or service marks
are property of their respective owners.
This product (Model: SMCSMCRB5701-Z) includes software code developed by third parties,
including software code subject to the GNU General Public License (―GPL‖) or GNU Lesser General
Public License (LGPL‖). As applicable, the terms of the GPL and LGPL, and information on obtaining
access to the GPL code and LGPL used in this product, are available to you at http://gpl.smc.com/.
The GPL code and LGPL code used in this product is distributed WITHOUT ANY WARRANTY and is
subject to the copyrights of one or more authors. For details, see the GPL Code and LGPL Code for
this product and the terms of the GPL and LGPL.
SMCRB5701-Z TouchScreen User Manual
July 18, 2011

Contents
Preface .................................................................................................................... vii
Document Organization .......................................................................................... viii
Changes to this Revision ........................................................................................ viii
Document Conventions ............................................................................................ ix
Safety and Warnings ................................................................................................ ix
Typographic Conventions .......................................................................................... x
1 Introduction ......................................................................................................... 11
Understanding Security Components....................................................................... 12
Understanding Security Zones ................................................................................. 12
Understanding Alarms ............................................................................................. 13
2 Configuring the TouchScreen ........................................................................... 14
Overview ................................................................................................................. 15
Subscriber Portal ..................................................................................................... 16
Understanding the TouchScreen Controls ............................................................... 16
Understanding the Screen ................................................................................. 17
Security Status Header ...................................................................................... 17
System & Zone Trouble Header ......................................................................... 18
Content Area ...................................................................................................... 22
Home Screen ............................................................................................... 23
TouchScreen Apps (Widgets)....................................................................... 25
Installing TouchScreen Apps ............................................................................. 26
Reordering Apps on the Home Screen ......................................................... 27
Uninstalling Apps ......................................................................................... 28
Low Power Mode ..................................................................................................... 30
Show Security Cameras and Live Video .................................................................. 31
3 Managing System Security ................................................................................ 33
Understanding Arming Modes ................................................................................. 34
Arm Away Mode ........................................................................................... 35
Arm Stay Mode ............................................................................................ 36
Arm Night Mode ........................................................................................... 37
Arming and Disarming the System ........................................................................... 37
Disarming the System .................................................................................. 38
Arming the System ....................................................................................... 41
Canceling the Arming Process ..................................................................... 43
SMCRB5701-Z TouchScreen Security System User Manual
iii

Contents
Quickarming the System .............................................................................. 44
Sending an Emergency Alarm ...................................................................... 45
Protecting Against Smash-and-Grab Attacks ............................................... 46
Managing Sensors ................................................................................................... 46
Disabling a Sensor ............................................................................................. 46
Viewing Your Zone Event History ....................................................................... 48
Managing Cameras ................................................................................................. 49
Editing Key Fobs ..................................................................................................... 55
Testing Your Alarms ................................................................................................ 55
4 Managing Connectivity Between the TouchScreen and Monitoring
Stations ............................................................................................................. 59
Viewing Signal Strength ............................................................................... 60
Testing Your Connectivity ............................................................................ 60
5 Managing Connectivity Between Home Devices and the Internet .................. 61
Overview ................................................................................................................. 62
Granting Home Network Router Access to the Internet ............................................ 63
Hiding Access to Your Home Network Router from the Internet ............................... 65
Managing the Passcodes in your Security System................................................... 66
Managing Keypad Codes ................................................................................... 66
Understanding the Duress Keypad Code ........................................................... 67
Managing Your Secret Word .............................................................................. 68
Viewing Your Security Account Information ............................................................. 68
6 Managing Environmental Devices ..................................................................... 69
Managing Lights ................................................................................................ ...... 70
Dimming or Turning Off Lights ................................................................ ........... 70
Modifying the Details of Your Lights ................................................................... 71
Adding a Lighting Device ................................................................................... 72
Removing a Lighting Device from the TouchScreen ........................................... 73
Managing Thermostats ............................................................................................ 73
7 Maintaining and Configuring the TouchScreen ............................................... 76
Rebooting the TouchScreen .................................................................................... 77
Recalibrating the TouchScreen ................................................................................ 77
Configuring TouchScreen Brightness and Dimming ................................................. 78
Manually Placing the TouchScreen in Night Mode ............................................. 79
Configuring Default Screen Brightness .............................................................. 79
Configuring Automatic Screen Dimming and Night Mode Dimming .................... 80
Configuring the Screen to Dim After a Period of Time Elapses (Night Mode) ..... 81
Configuring the Screensaver ................................................................................... 82
iv
SMCRB5701-Z TouchScreen Security System User Manual

Contents
Configuring Tones and Volume Levels .................................................................... 83
Setting Event Tones ........................................................................................... 83
Setting Tone Volume Used When a Zone Event Occurs .................................... 85
Cleaning the TouchScreen ...................................................................................... 86
Viewing TouchScreen Specifications ....................................................................... 86
Appendix A - Using the Key Pad .......................................................................... 87
Mounting the Key Pad ............................................................................................. 88
Changing Key Pad Batteries .................................................................................... 89
Checking System Status .......................................................................................... 89
Arming the System .................................................................................................. 89
Arm Away Mode................................................................................................. 89
Arm Stay ............................................................................................................ 90
Disarming the System .............................................................................................. 90
Sending an Emergency Police Alarm ....................................................................... 90
Appendix B - Using the Key Fob .......................................................................... 91
Changing the Batteries in the Key Fob ..................................................................... 92
Checking System Status .......................................................................................... 92
Arming the System .................................................................................................. 93
Arm Away Mode................................................................................................. 93
Arm Stay ............................................................................................................ 93
Disarming the System .............................................................................................. 93
Sending an Emergency Police Alarm ....................................................................... 93
Appendix C - TouchScreen Installation & Maintenance ..................................... 94
Battery Requirements .............................................................................................. 94
Installation Information ............................................................................................. 94
TouchScreen Installation Options ...................................................................... 94
Positioning the TouchScreen ............................................................................. 94
Mounting the TouchScreen on the Wall Mount ........................................................ 96
Separating the TouchScreen from the Wall Mount ................................................... 99
Recommendations for Sensor Installation and Placement ....................................... 99
Door/Window Sensors and Glass Break Detectors ............................................ 99
Glass Break Detectors ....................................................................................... 99
Motion Detectors .............................................................................................. 100
Smoke Detector Installation Recommendations ..................................................... 101
Camera Installation Recommendations ................................................................. 102
System Limitations ................................................................................................. 102
Emergency Preparation ......................................................................................... 102
v
SMCRB5701-Z TouchScreen Security System User Manual

Contents
Appendix D - Quick-Reference Tables ............................................................... 104
Appendix E - Compliances ................................................................................. 107
E.1 FCC Notice ...................................................................................................... 107
E.2 Device Purpose ............................................................................................... 107
E.3 UL1023 Notice................................................................................................. 107
E.4 UL985 Notice .................................................................................................. 107
E.5 UL1635 Notice................................................................................................. 108
E.6 ULC S545 Notice ............................................................................................. 108
E.7 UL985 Notice .................................................................................................. 108
E.8 ETL Notice ...................................................................................................... 108
E.9 Limitations of Security Products ...................................................................... 108
Index ..................................................................................................................... 109
SMCRB5701-Z TouchScreen Security System User Manual
vi
Preface
Congratulations on your purchase of the SMCRB5701-Z Security, Monitoring, and
Automation Gateway security system. This manual contains all the information you need to
use the security system.
By reading this document, you will learn how to:
Operate the TouchScreen device
Arm and disarm your security system
Send a panic alarm
View system status and arm/disarm the system
Manage connectivity between the TouchScreen and the Central Monitoring Stations
Manage pass codes
Manage security zones
Manage emergency dispatch contact information
View history logs
View account information
SMCRB5701-Z TouchScreen Security System User Manual
vii

Preface
Document Organization
This document consists of the following chapters and appendixes.
Chapter 1 – provides an overview of the Security system, describes the system
requirements, and provides a quick reference for setting up the Security system in a
customer premises.
Chapter 2 – describes how to configure the Security system.
Chapter 3 – describes how to manage system security.
Chapter 4 – describes how to manage connectivity between the TouchScreen and
monitoring stations.
Chapter 5 – describes how to manage connectivity between home devices and the
Internet.
Chapter 6 – describes how to manage lights and thermostats.
Chapter 7 - describes how to maintain and configure the TouchScreen.
Appendix A - describes how to use the key pad.
Appendix B - describes how to use the key fob.
Appendix C - provides TouchScreen installation and maintenance information.
Appendix D - includes quick-reference tables.
Changes to this Revision
Added a new ―Compliances‖ section on page vii.
Under ―Understanding Security Zones,‖ added a note below Table 1-1 about bypassing
zones.
Added the note on page 15.
Replaced Figure 2-1.
In Table 2-2:
– Revised the description for the message ―Broadband connection failed.‖
– Added the new message ―Camera Connection Failed.‖
– Revised the resolution for the message ―Sensor Battery Low.‖
– Revised the cause and resolution for the message ―Sensor Communication Failure.‖
– Revised the cause and resolution for the message ―Sensor Tamper Detected.‖
SMCRB5701-Z TouchScreen Security System User Manual
viii
Preface
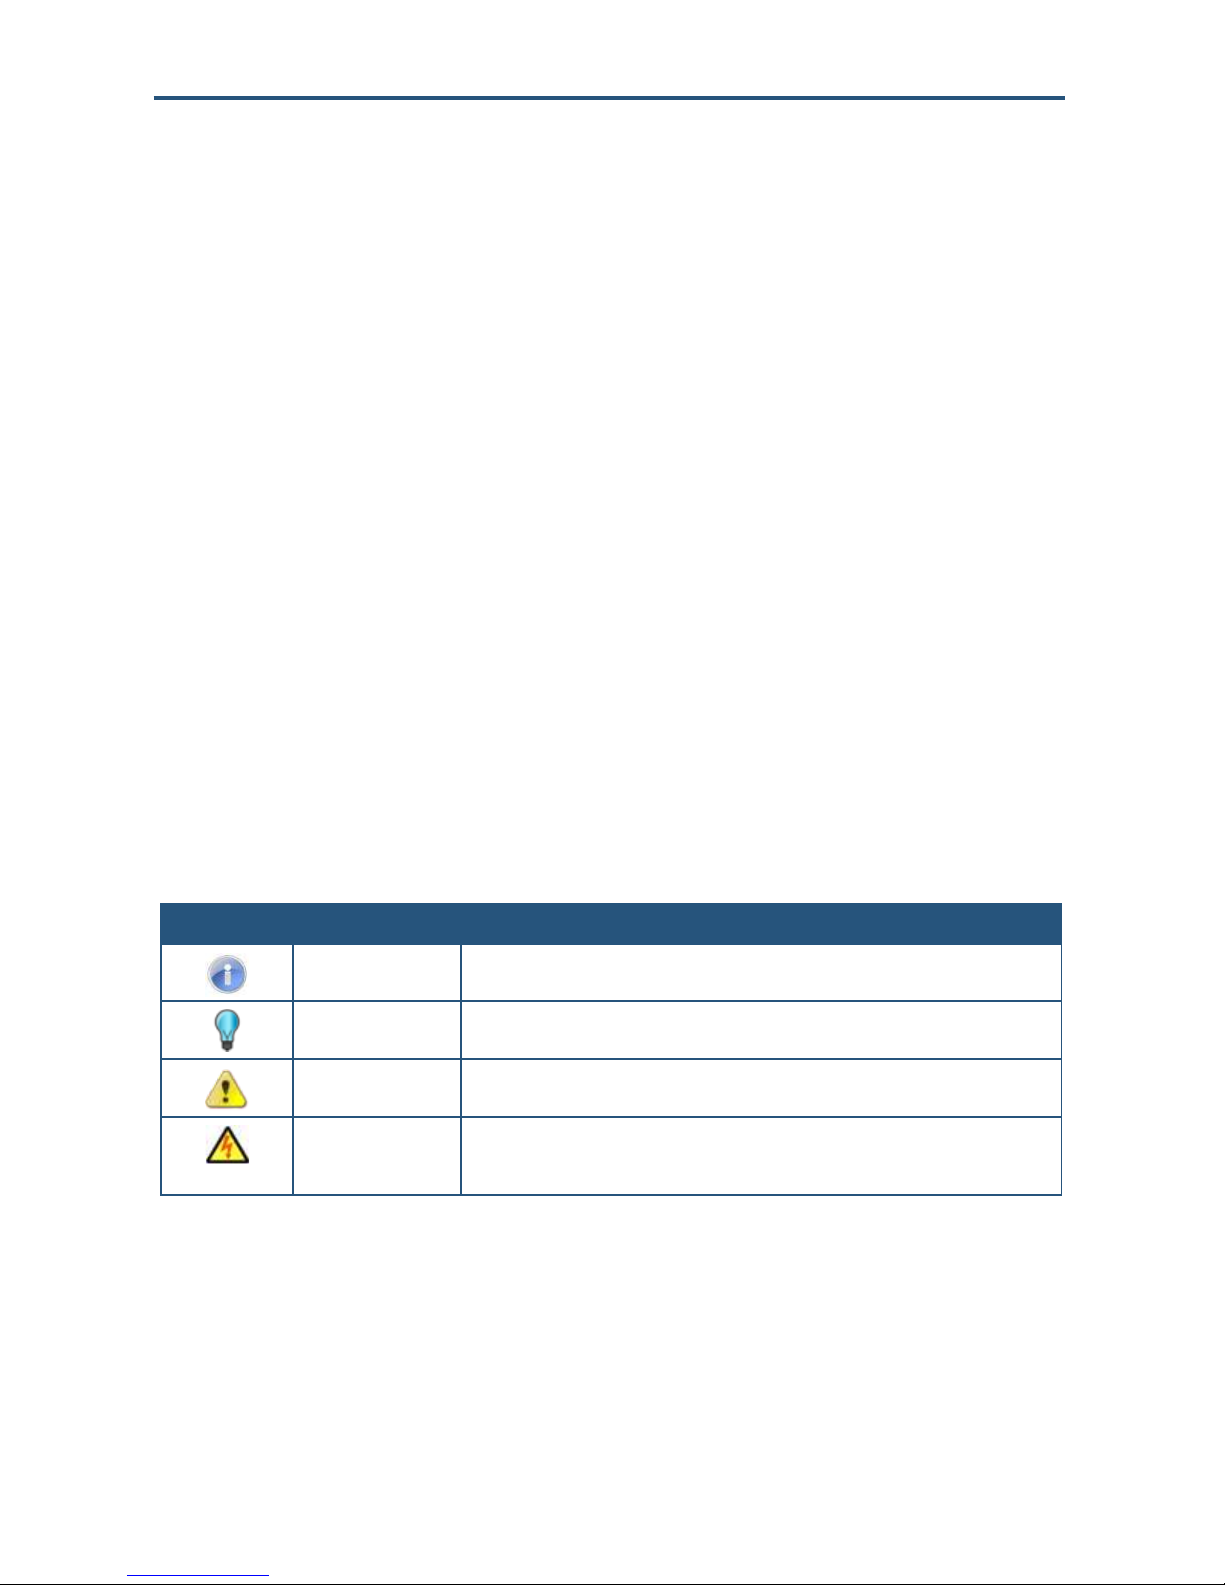
Symbol
Meaning
Description
Note
Notes emphasize or supplement important points of the main text.
Tip
Tips provide helpful information, guidelines, or suggestions for performing tasks more
effectively.
Warning
Warnings indicate that failure to take a specified action could result in damage to the
device.
Electric Shock Hazard
This symbol warns users of electric shock hazard. Failure to take appropriate
precautions such as not opening or touching hazardous areas of the equipment could
result in injury or death.
Updated the sections ―Understanding the TouchScreen Controls,‖ ―Low Power Mode,‖
and ―Show Security Cameras and Live Video.‖
Under ―Arming and Disarming the System,‖ added new second bullet about the Security
app screen appearing.
Revised the procedures ―Disabling a Sensor‖ and ―Viewing Your Zone Event History.‖
Revised the procedure ―Viewing Signal Strength‖ and ―Testing Your Connectivity.‖
Added new Chapter 6, ―Managing Environmental Devices.‖
Added the new section ―Recalibrating the TouchScreen.‖
Revised the procedure ―Cleaning the TouchScreen.‖
Revised the procedure ―Sending an Emergency Police Alarm.‖
Added new Appendix E - Compliances, which lists the compliance information for the
RB5701-Z TouchScreen.
Document Conventions
This document uses the following conventions to draw your attention to certain information.
Safety and Warnings
This document uses the following symbols to draw your attention to certain information.
SMCRB5701-Z TouchScreen Security System User Manual
ix
Preface
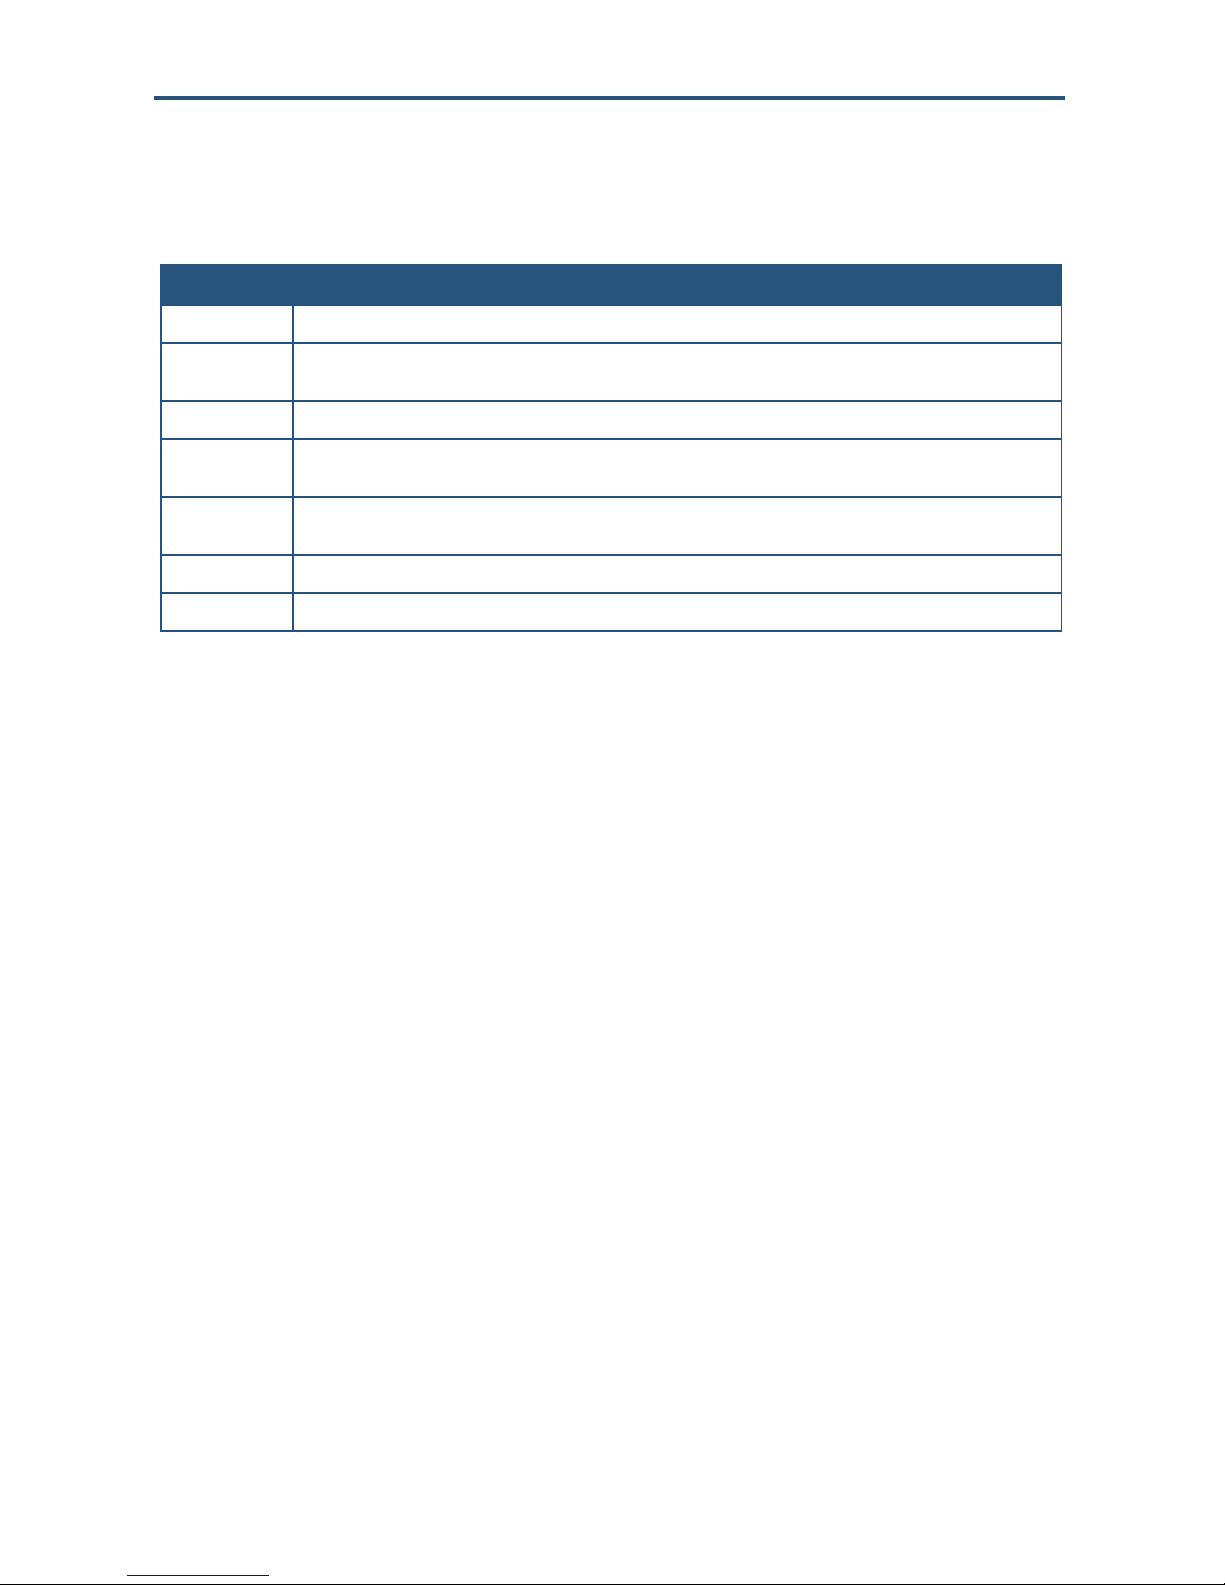
Convention
Description
Bold
Indicates text on a window, other than the window title, including menus, menu options, buttons, fields, and labels.
Italic
Indicates a variable, which is a placeholder for actual text provided by the user or system. Angled brackets (< >)
are also used to indicate variables.
screen/code
Indicates text that is displayed on screen or entered by the user.
< > angled
brackets
Indicates a variable, which is a placeholder for actual text provided by the user or system. Italic font is also used to
indicate variables.
[ ] square
brackets
Indicates optional values.
{ } braces
Indicates required or expected values.
| vertical bar
Indicates that you have a choice between two or more options or arguments.
Typographic Conventions
This document also uses the following typographic conventions.
x
SMCRB5701-Z TouchScreen Security System User Manual

1 Introduction
Before you configure the SMCRB5701-Z security system, become familiar with the concepts
described in the following sections in this chapter:
Understanding Security Components (page 12)
Understanding Security Zones (page 12)
Understanding Alarms (page 13)
SMCRB5701-Z TouchScreen Security System User Manual
11

Introduction
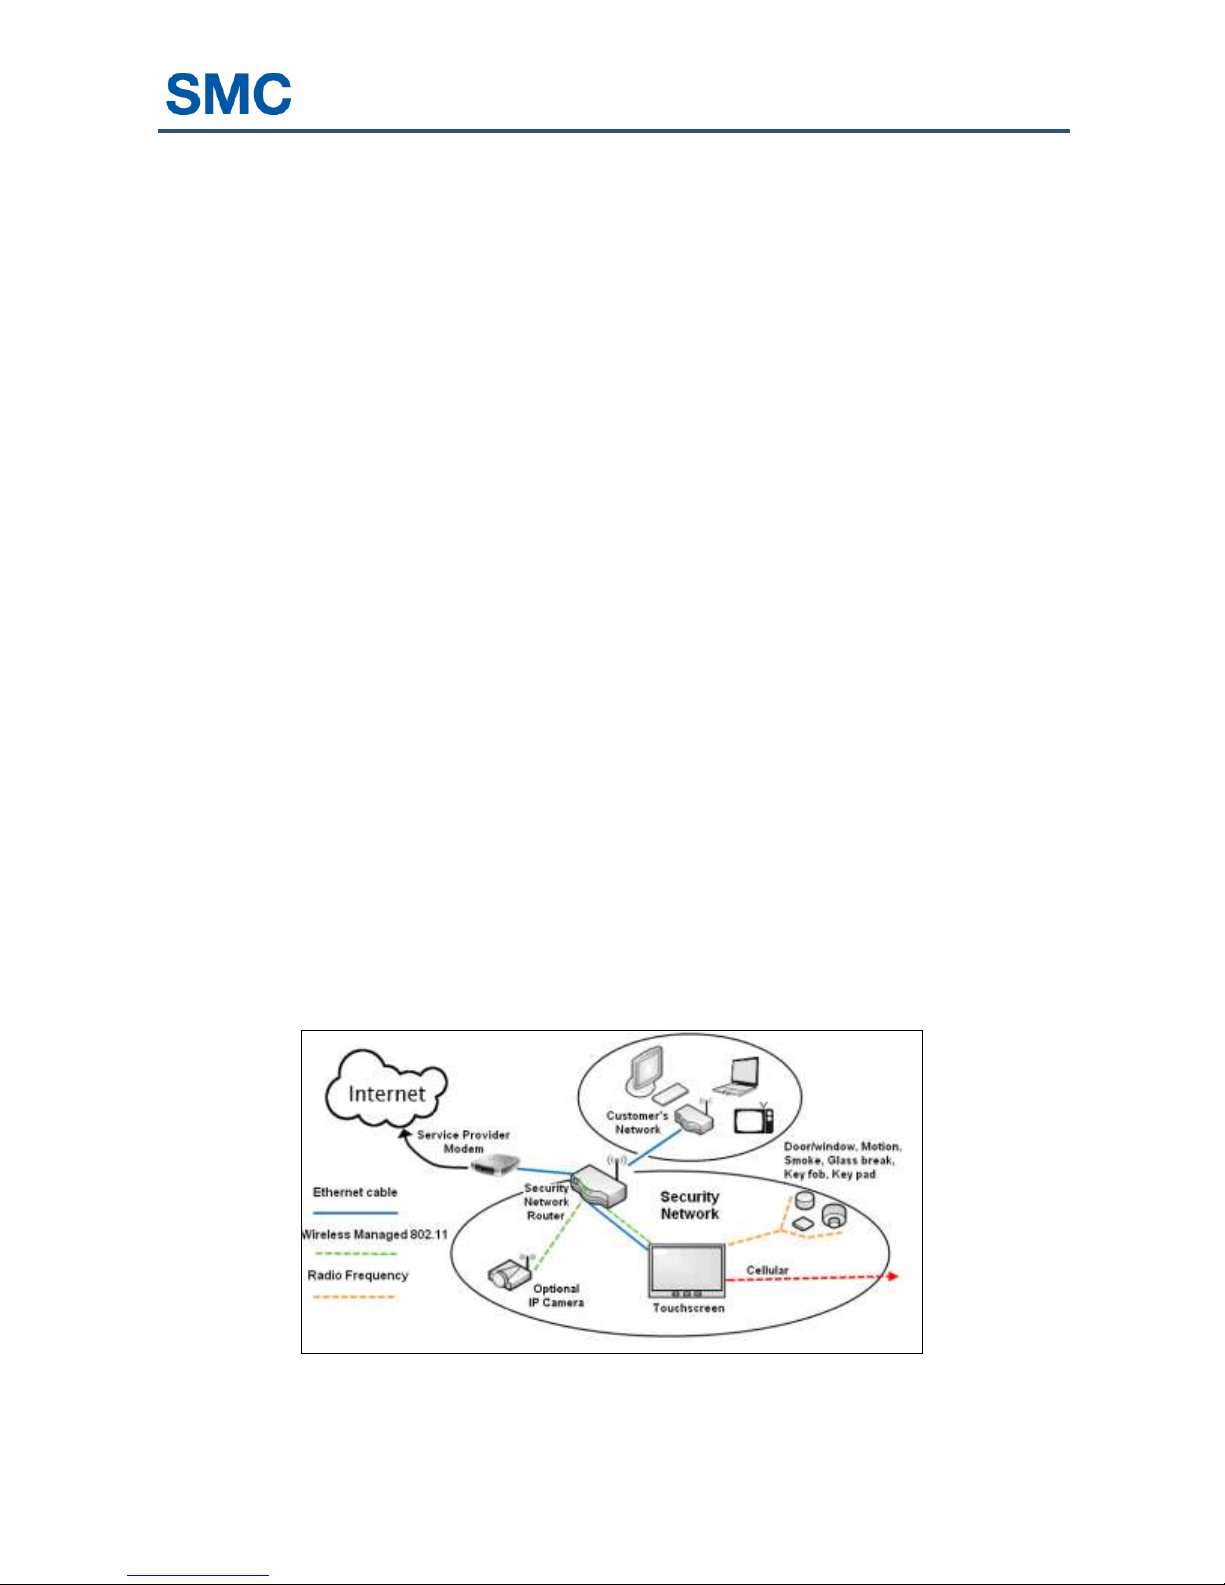
Understanding Security Components
The equipment associated with the Security system includes:
TouchScreen - the device used to interface with your security system.
A/C Adapter - provides power to the TouchScreen from an outlet in your secured
premises.
Doorway/Window Sensor - monitors the opening and closing of potential entry and exit
points.
Indoor Motion Sensor - monitors movement within the premises.
Indoor camera - can be configured to take a series of pictures if a particular sensor is
faulted. Up to six cameras can be installed in your security system.
Security Network Router - the hub of your security network. This device is installed
between your broadband modem and home network router.
Thermostats - remotely controls the indoor temperature of the premises.
Smoke Detector - sounds an alarm when smoke is detected.
Lights - devices that can be remotely controlled using the security system.
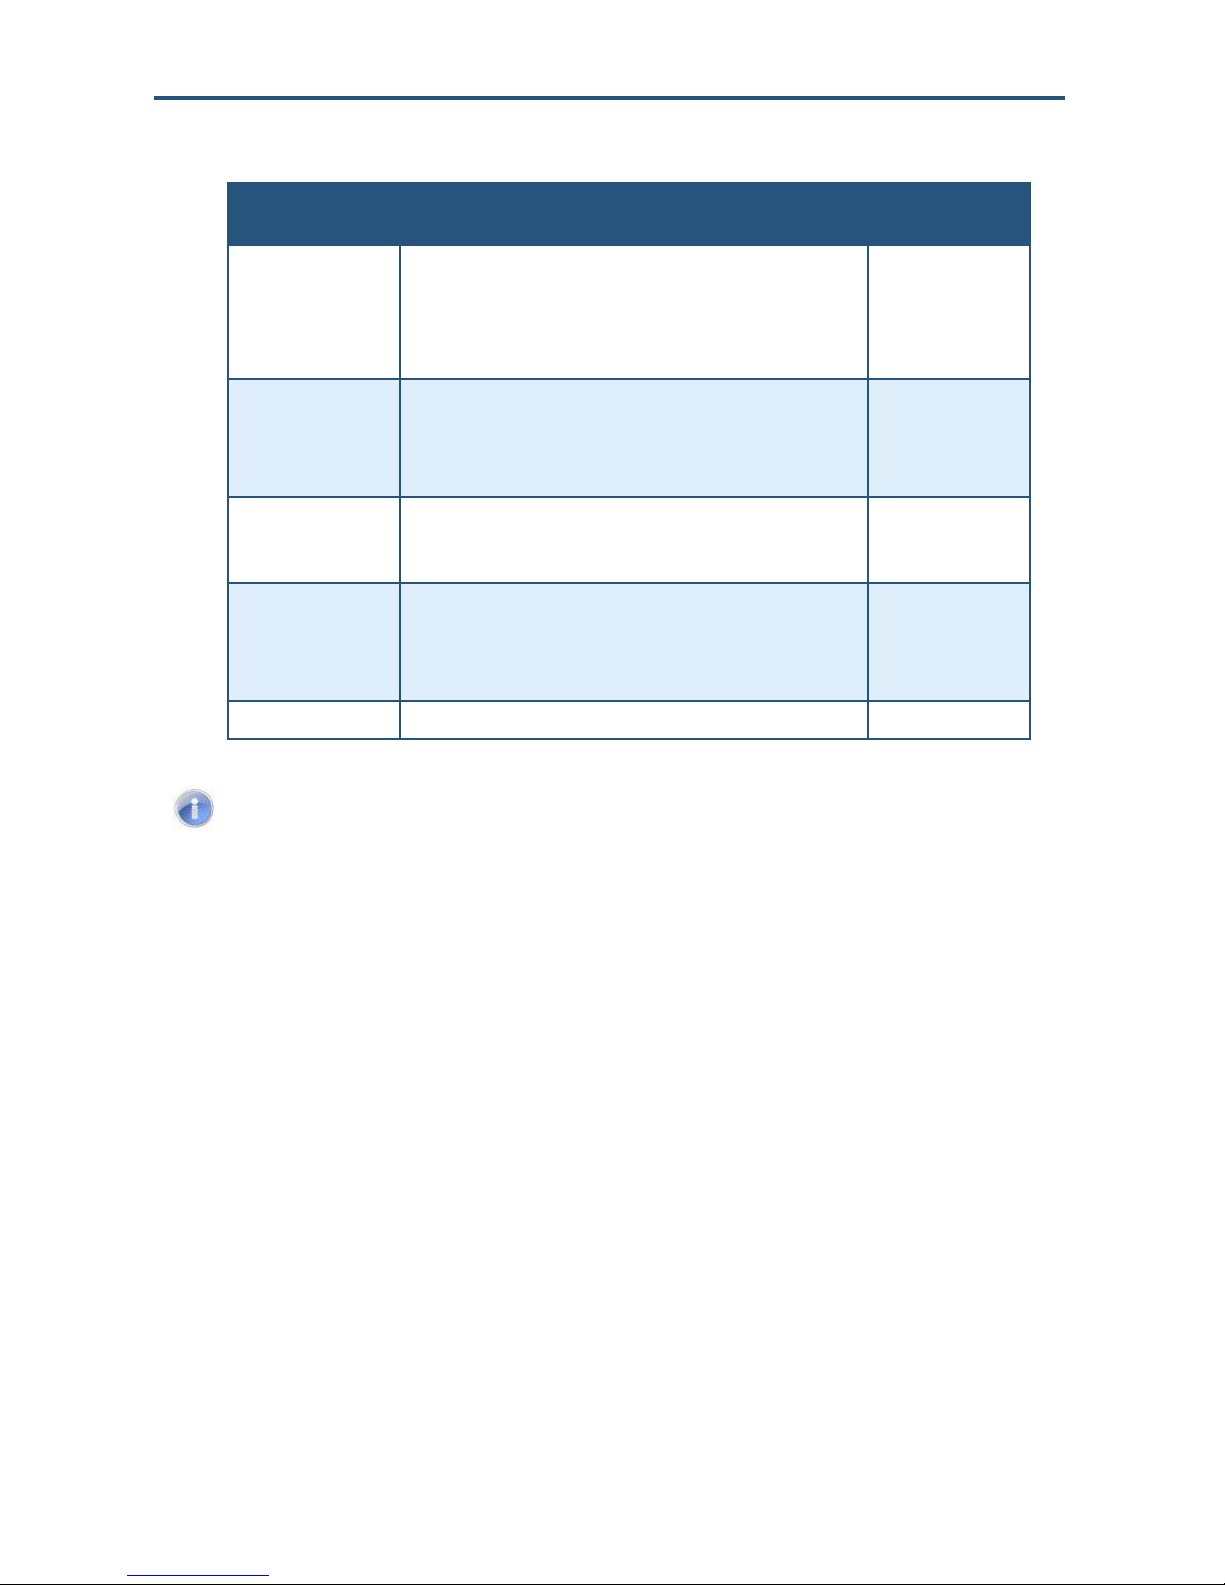
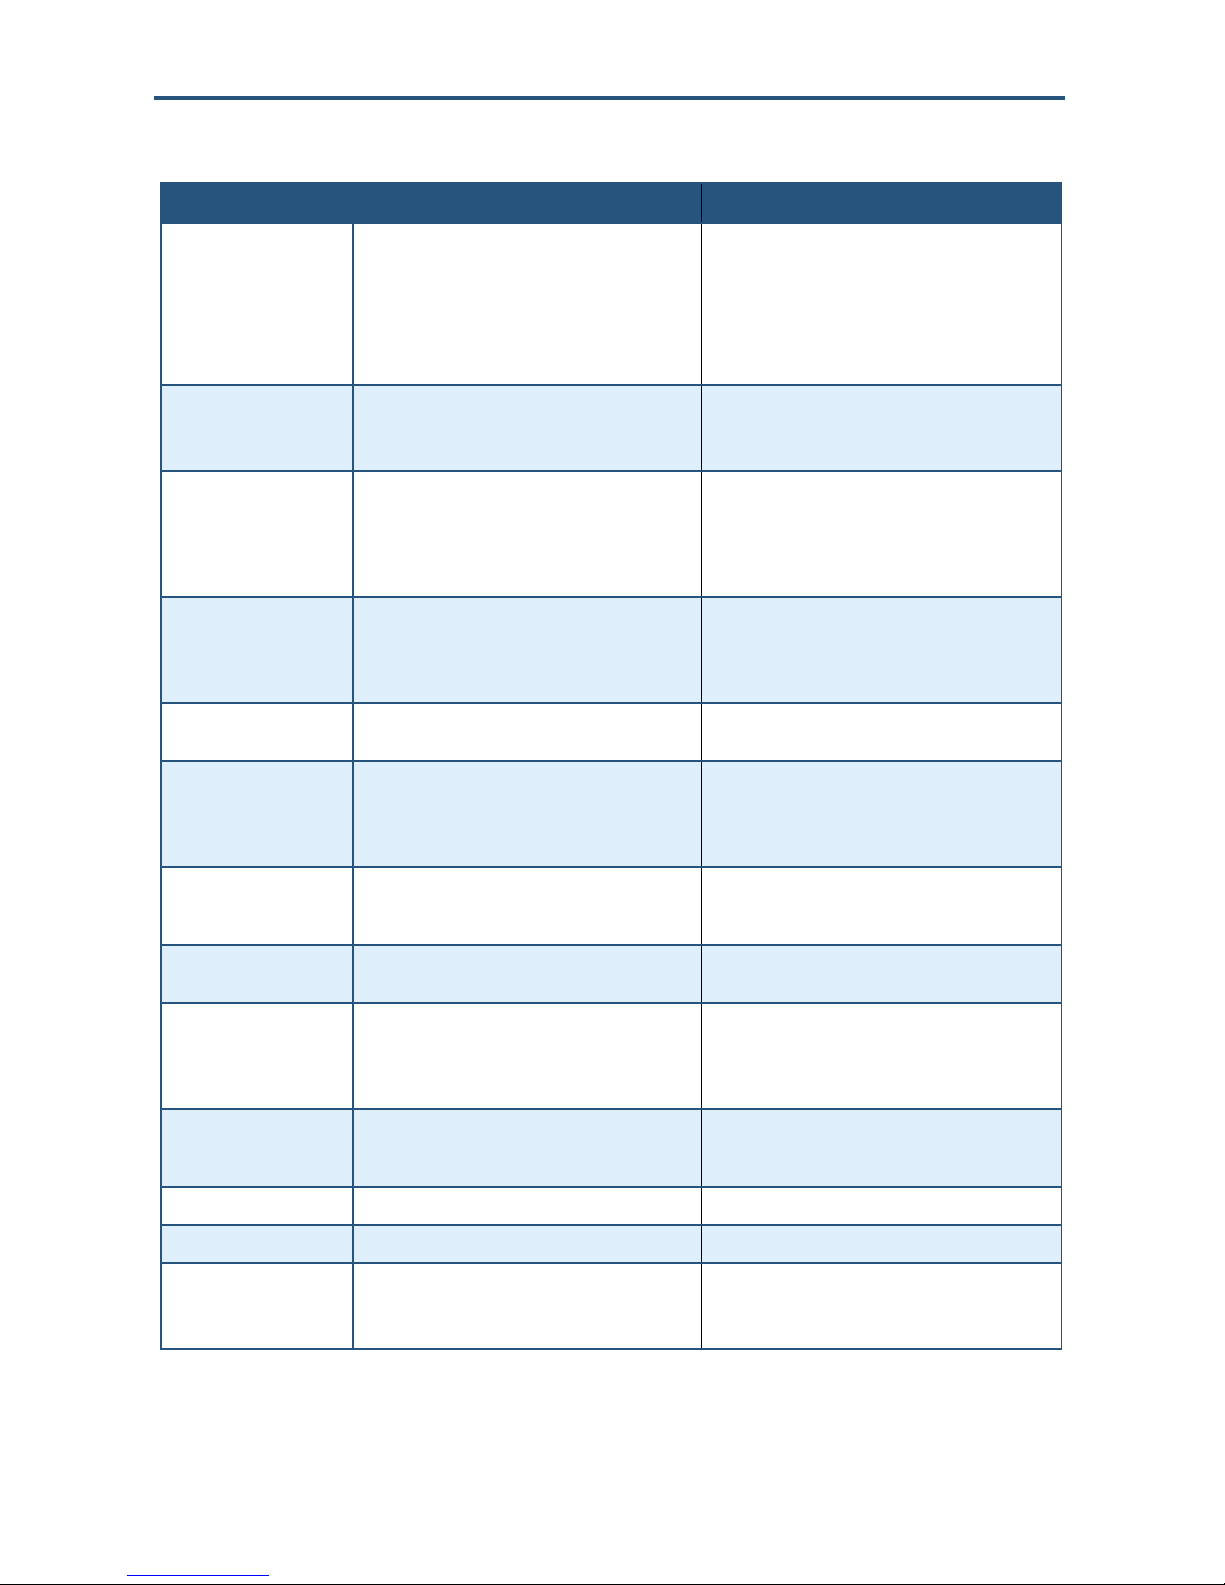
Understanding Security Zones
Security zones are the sensors that detect movement and the opening and closing of doors
and windows. The sensors communicate wirelessly with your TouchScreen. Security zones
are added to the system and configured by your installer. You can enable and disable each
security zone using the Security widget. For more information about Entry/Exit delays, see
―Understanding Arming Modes‖ on page 34 .
SMCRB5701-Z TouchScreen Security System User Manual
12
Introduction
Security Zone
Function
Description
Sensor Type
Entry/exit
For doorways that are used to enter the premises.
When the system is armed, faulting this type of sensor starts an
Entry Delay countdown rather than sending an immediate alarm.
During Exit Delay, this zone can be repeatedly faulted. Doorways
can be configured to be entry/exit or non-entry/exit.
Door/Window
Perimeter
If faulted when the system is armed or during an Entry/Exit delay, an
alarm is tripped.
Door/Window sensor
Motion detector
Glass Break detector
Interior Follower
Monitors the internal living spaces of the premises and triggers an
immediate alarm if the system is armed in Away mode.
Not armed when the system is in Armed Stay mode.
Motion detector
24-Hour Inform
When this security zone is tripped, there is no alarm; however, an
event is recorded in the history and the TouchScreen makes a
configured sound.
Door/Window sensor
Motion detector
Glass Break detector
24-Hour Fire
Generates an immediate fire alarm if triggered.
Smoke alarm
Note: To bypass a zone from the TouchScreen, touch Turn Zone Off and enter
your passcode. To bypass a zone from a Honeywell Vista 20P keypad, enter your
user code, press the Bypass key, and press the 2-digit number of the zone to be
bypassed.
Table 1-1. Types of Security Zones
Understanding Alarms
When an alarm is tripped, an audible alert sounds. From that point, you have a specific
amount of time (default: 30 seconds) to enter your keypad code. If a valid keypad code is not
entered within a specific time (default: 30 seconds) of the audible alarm sounding, a
message is sent to a central-monitoring station. For more information, see ―Disarming the
System‖ on page 38.
The central-monitoring station tries to contact the persons listed on the account. If the station
reaches a person listed on the account, the station asks for the Secret Word to affirm
whether a genuine emergency is occurring. If no one on the list can be contacted, or if the
person contacted gives the wrong Secret Word, the central-monitoring station dispatches
police or other appropriate emergency personnel immediately.
If the alarm is not cleared within 4 minutes, the system resets, so it can monitor additional
alarm events. If a sensor is faulted too many times, resulting in alarms, no more alarms are
sent to central monitoring for 48 hours or until the security system is disarmed.
SMCRB5701-Z TouchScreen Security System User Manual
13

2 Configuring the TouchScreen
This chapter described how to configure the TouchScreen.
The topics covered in this chapter are:
Overview (page 15)
Subscriber Portal (page 16)
Understanding the TouchScreen Controls (page 16)
Low Power Mode (page 30)
Show Security Cameras and Live Video (page 31)
SMCRB5701-Z TouchScreen Security System User Manual
14
Configuring the TouchScreen
Note: You cannot access the Security widget if the security system is armed.
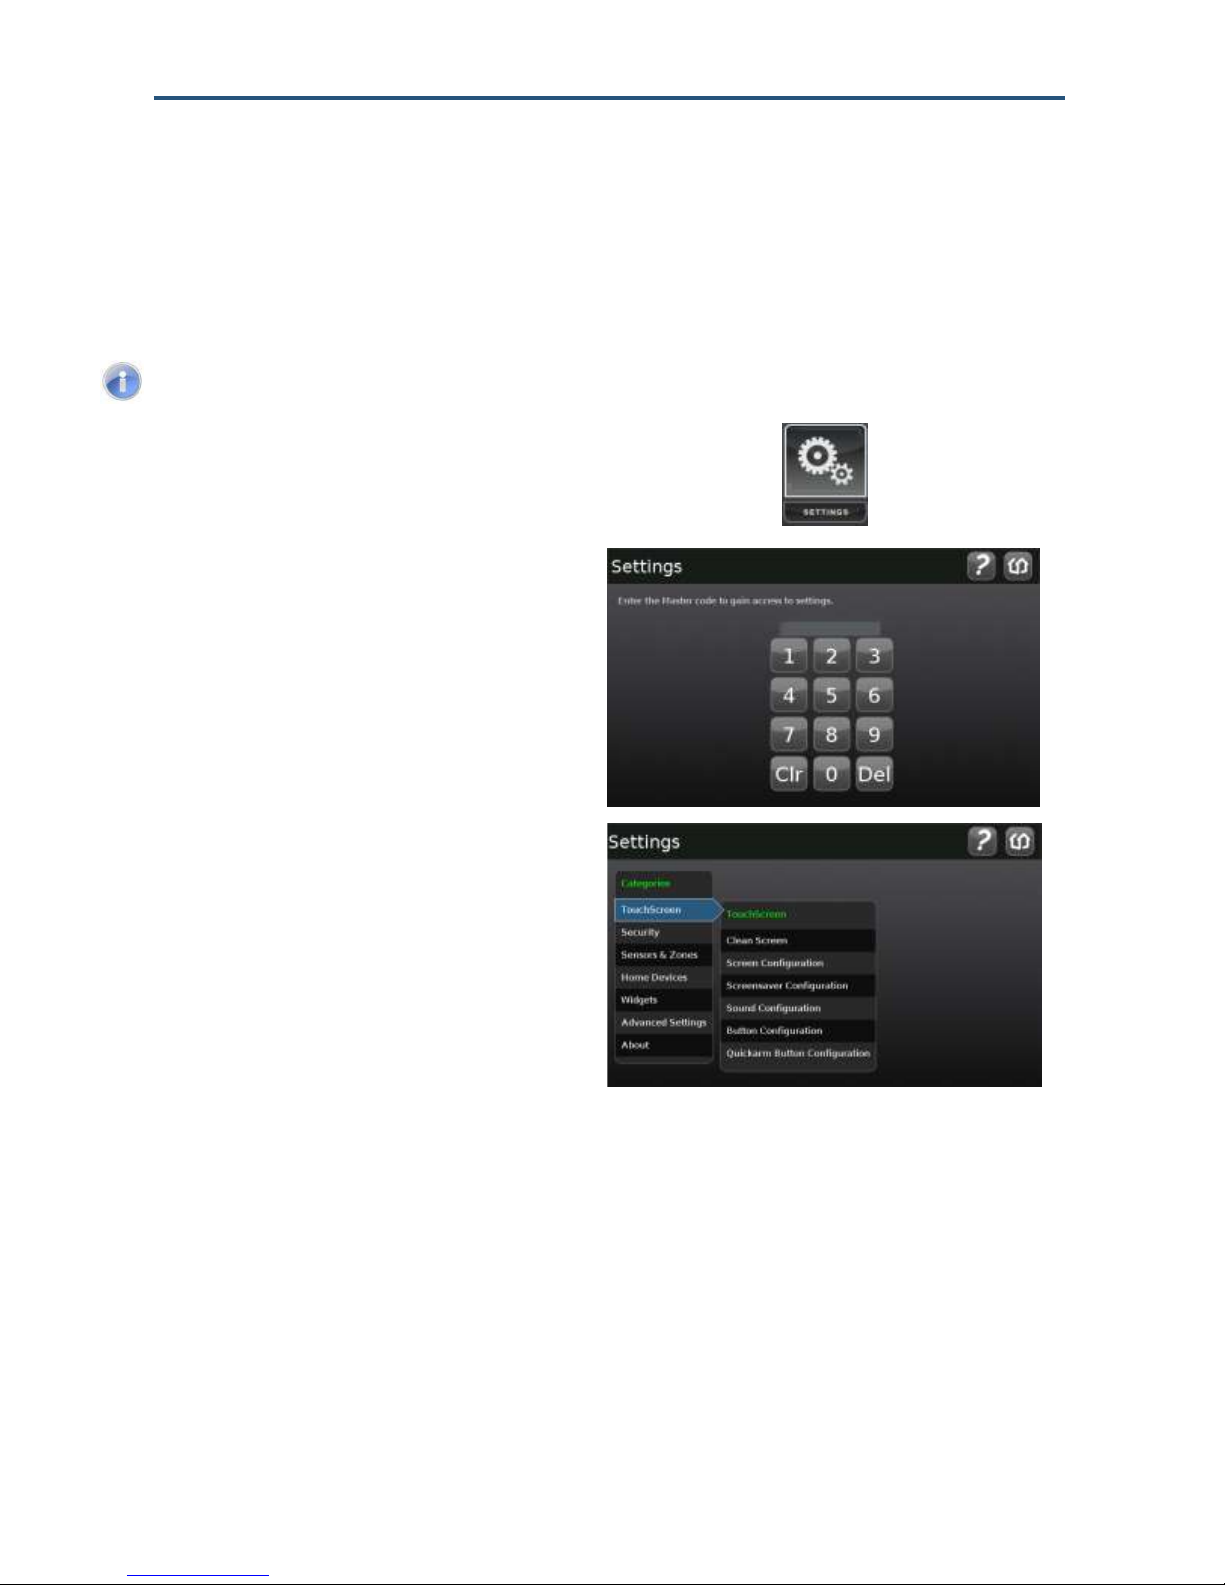
1.
From the Home screen (see Figure 2-1 on
page 16), touch the Settings app.
The Keypad screen appears.
2.
Touch the numbers to enter your keypad
code. The Settings menu appears.
Overview
The TouchScreen’s default settings are configured from the Settings widget. To access the
Settings widget, use the following procedure.
From the Settings app, you can:
– Manage Quickarm settings – see page 44.
– Manage how sensors are listed in TouchScreen reports and tools – see page 48.
– Manage your cameras – see page 49.
– Test your alarms – see page 55.
– View and test the TouchScreen’s connectivity to the central-monitoring stations – see
page 55.
– Manage your keypad codes and secret word – see page 66
SMCRB5701-Z TouchScreen Security System User Manual
15
Configuring the TouchScreen
– View your account information – see page 68.
– Manage your TouchScreen sounds, screensaver, and so on – see page 76.
– View technical information about your TouchScreen – see page 86.
Subscriber Portal
The Subscriber Portal is a Web-based tool that lets you connect to your Security system
remotely. You can access the Subscriber Portal from a PC or mobile Internet device. Many
operations that can be performed from the TouchScreen can also be performed from the
Subscriber Portal. Some operations, such as modifying your account information or
managing which widgets are accessible from your TouchScreen, can only be performed
from the Subscriber Portal.
Your installer has provided you with the URL address of the Subscriber Portal, along with a
username and password for accessing the Subscriber Portal.
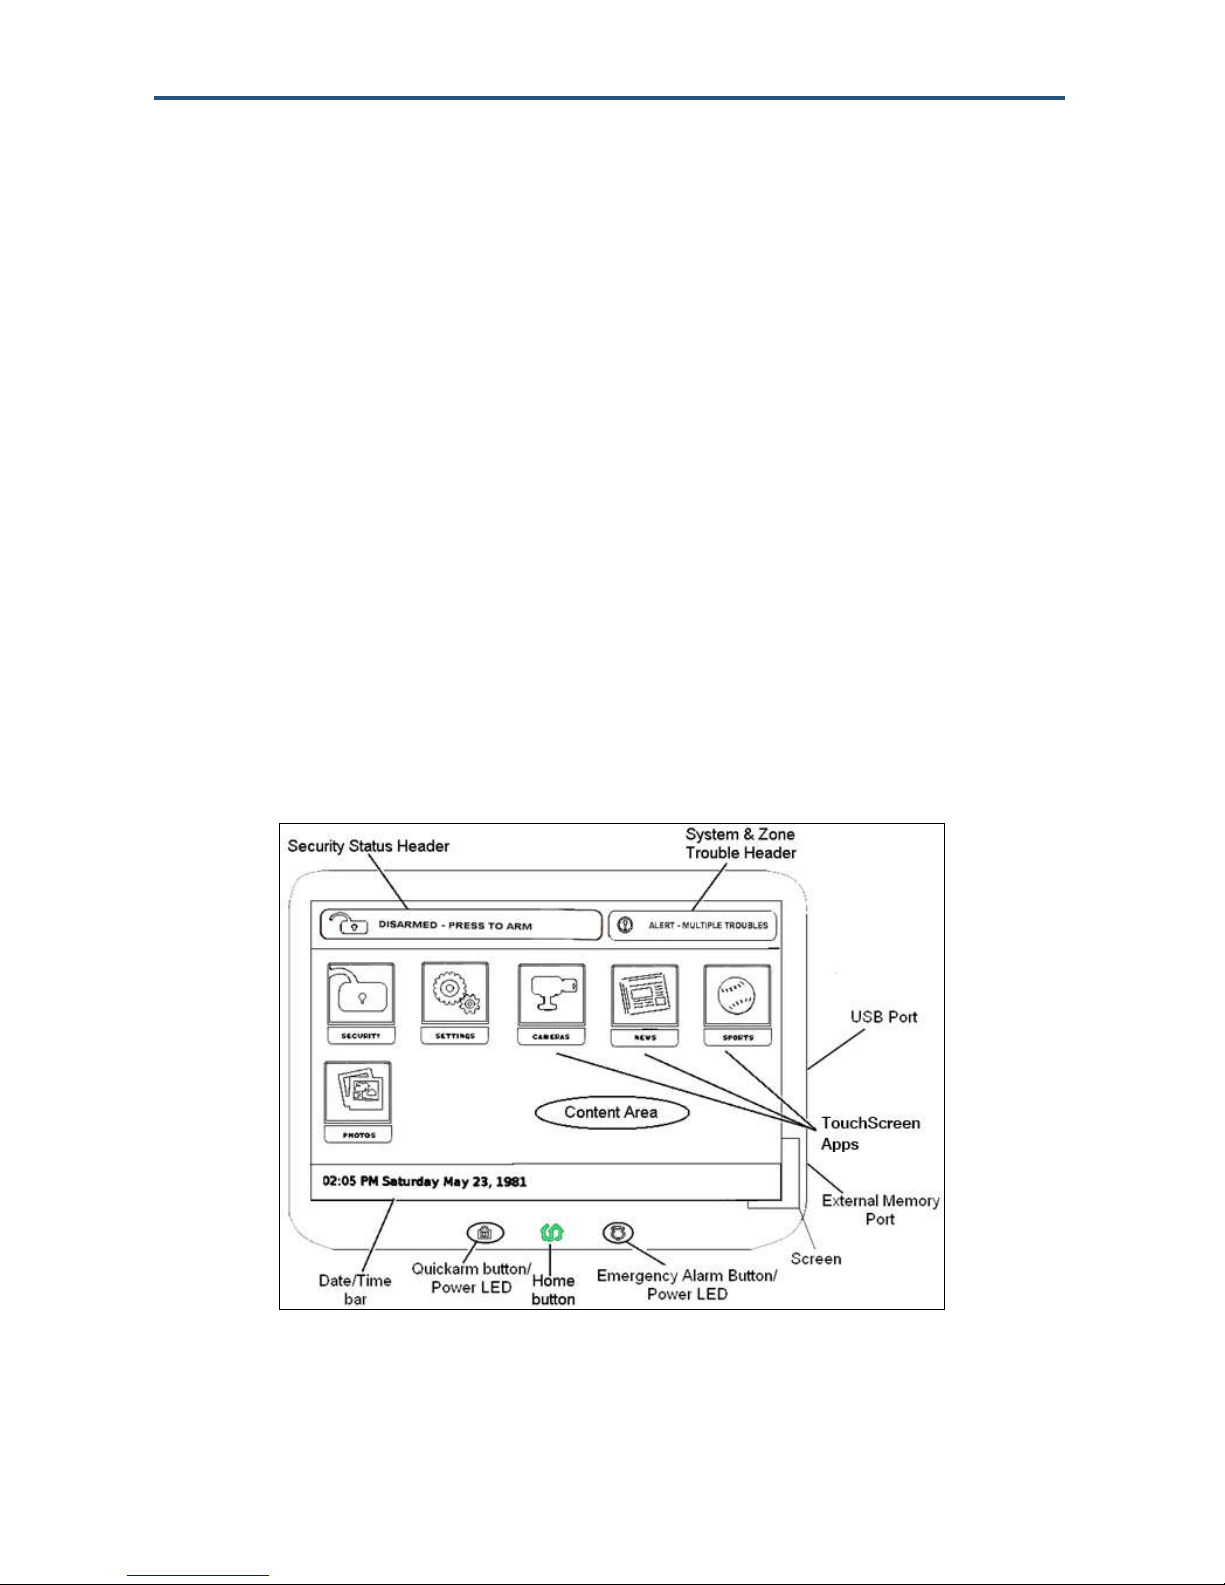
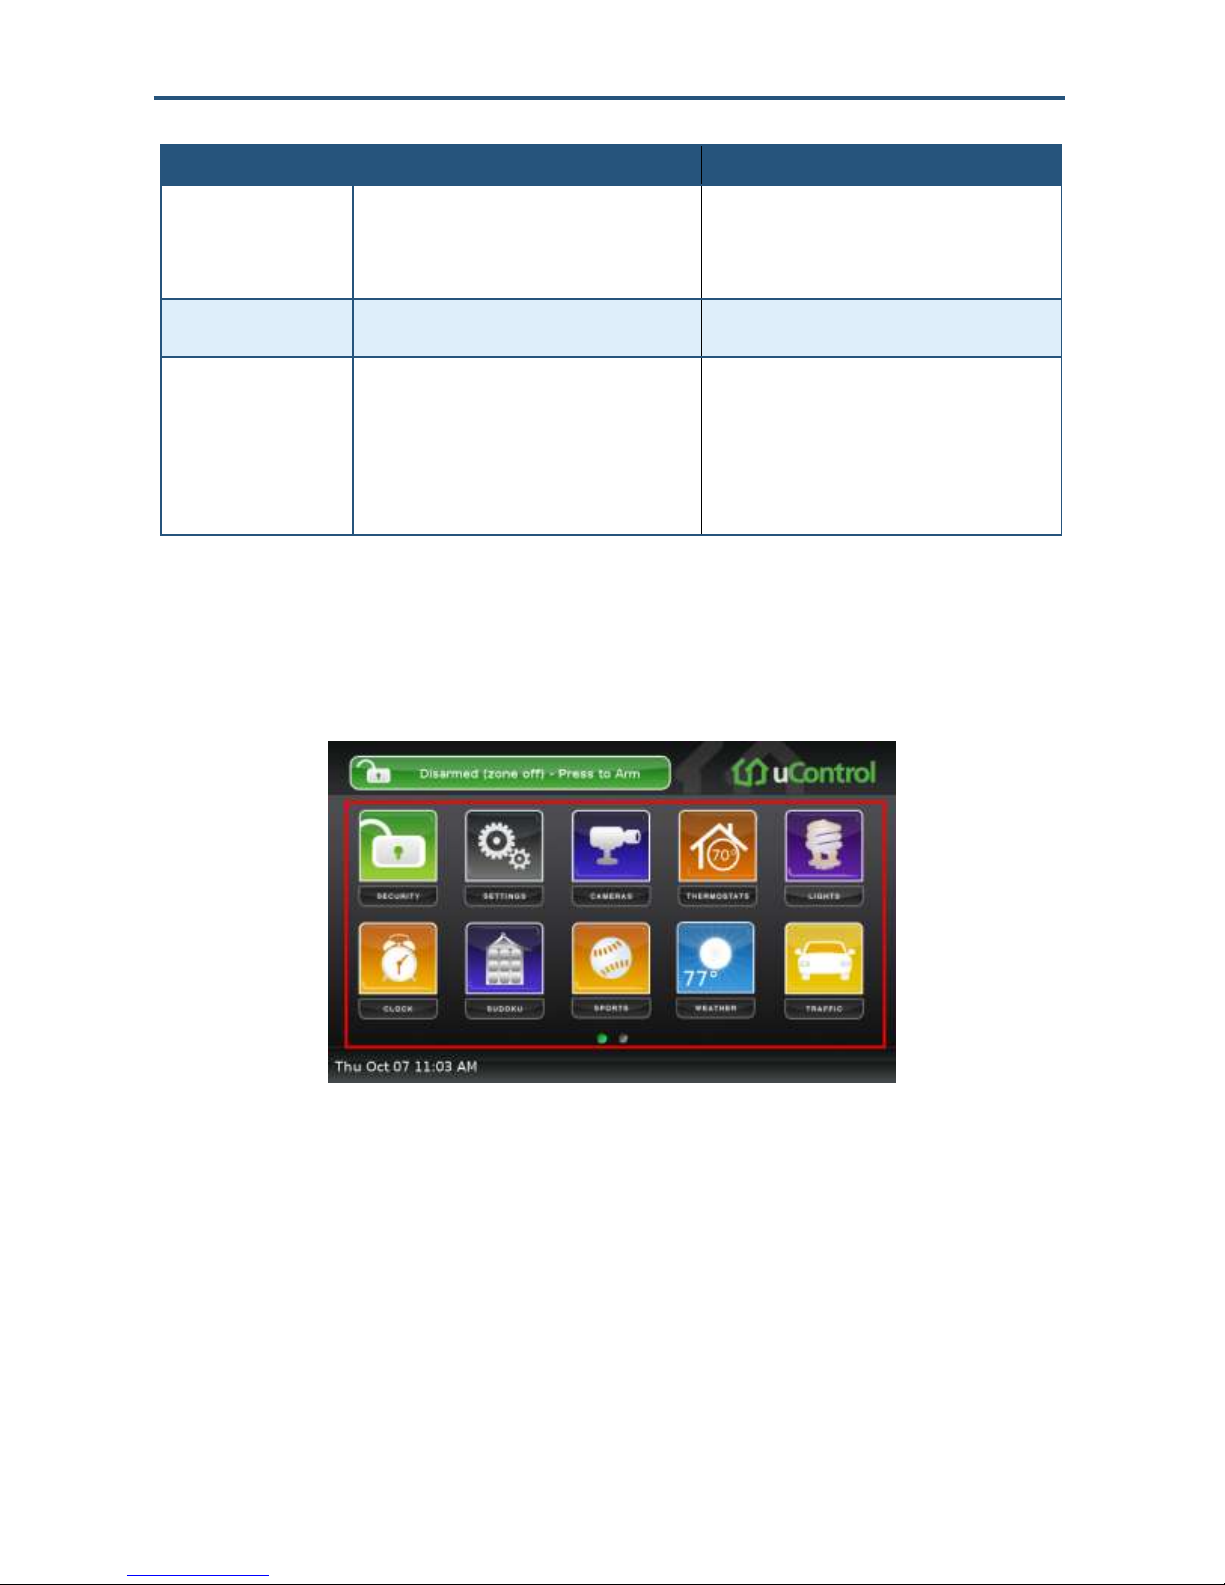
Understanding the TouchScreen Controls
Figure 2-1 shows the key areas of the TouchScreen and Table 2-1 describes them. For
more information, see the page number in the ―For More Information‖ column.
Figure 2-1. TouchScreen Device Home Screen
SMCRB5701-Z TouchScreen Security System User Manual
Table 2-1. TouchScreen Controls
16
Configuring the TouchScreen
Control
Description
For More
Information
Screen
Interfaces with your TouchScreen
See page 17
Home button
Press this button to go to the TouchScreen Home screen. The button is
located at the bottom-center in front of the device.
See page 23
Quickarm button
Press this button to start the Quickarm function. The button is located at
the bottom left in front of device. When A/C power is available, this button
is lit.
See page 44
Panic button
Press the button and then touch Fire to send an alarm for
emergency fire assistance, Medical to send an alarm for emergency
medical assistance, or Police to send an alarm for police assistance.
See page 45
Understanding the Screen
The TouchScreen screen is used to interface with your security system. It provides:
A real-time view of the system statuses
Tools to manage your security system
Additional optional applications
If the screen is black (showing nothing), it means the system is not receiving A/C power. The
display is powered off to conserve battery life.
The screen is organized into the following sections:
Security Status Header - see ―Security Status Header,‖ below.
System & Zone Trouble Header - see page 18.
Date/Time Bar - see Figure 2-1.
Content Area - see page 22.
Security Status Header
The Security Status header in the top-left area of the TouchScreen shows whether the
system is armed or disarmed, along with other information. Touch this header to arm or
disarm the system.
SMCRB5701-Z TouchScreen Security System User Manual
17

Configuring the TouchScreen
During troubles that would prevent arming, such as if a monitored door or window is opened,
an announcement replaces the Arm/Disarm status. For example:
If you touch this header at this time, the Arm System tab of the Security widget appears:
During the Exit Delay, the header changes to show the number of seconds before the
system is armed. For example:
During the Entry Delay, the header changes to show the number of seconds before the
system is armed. For example:
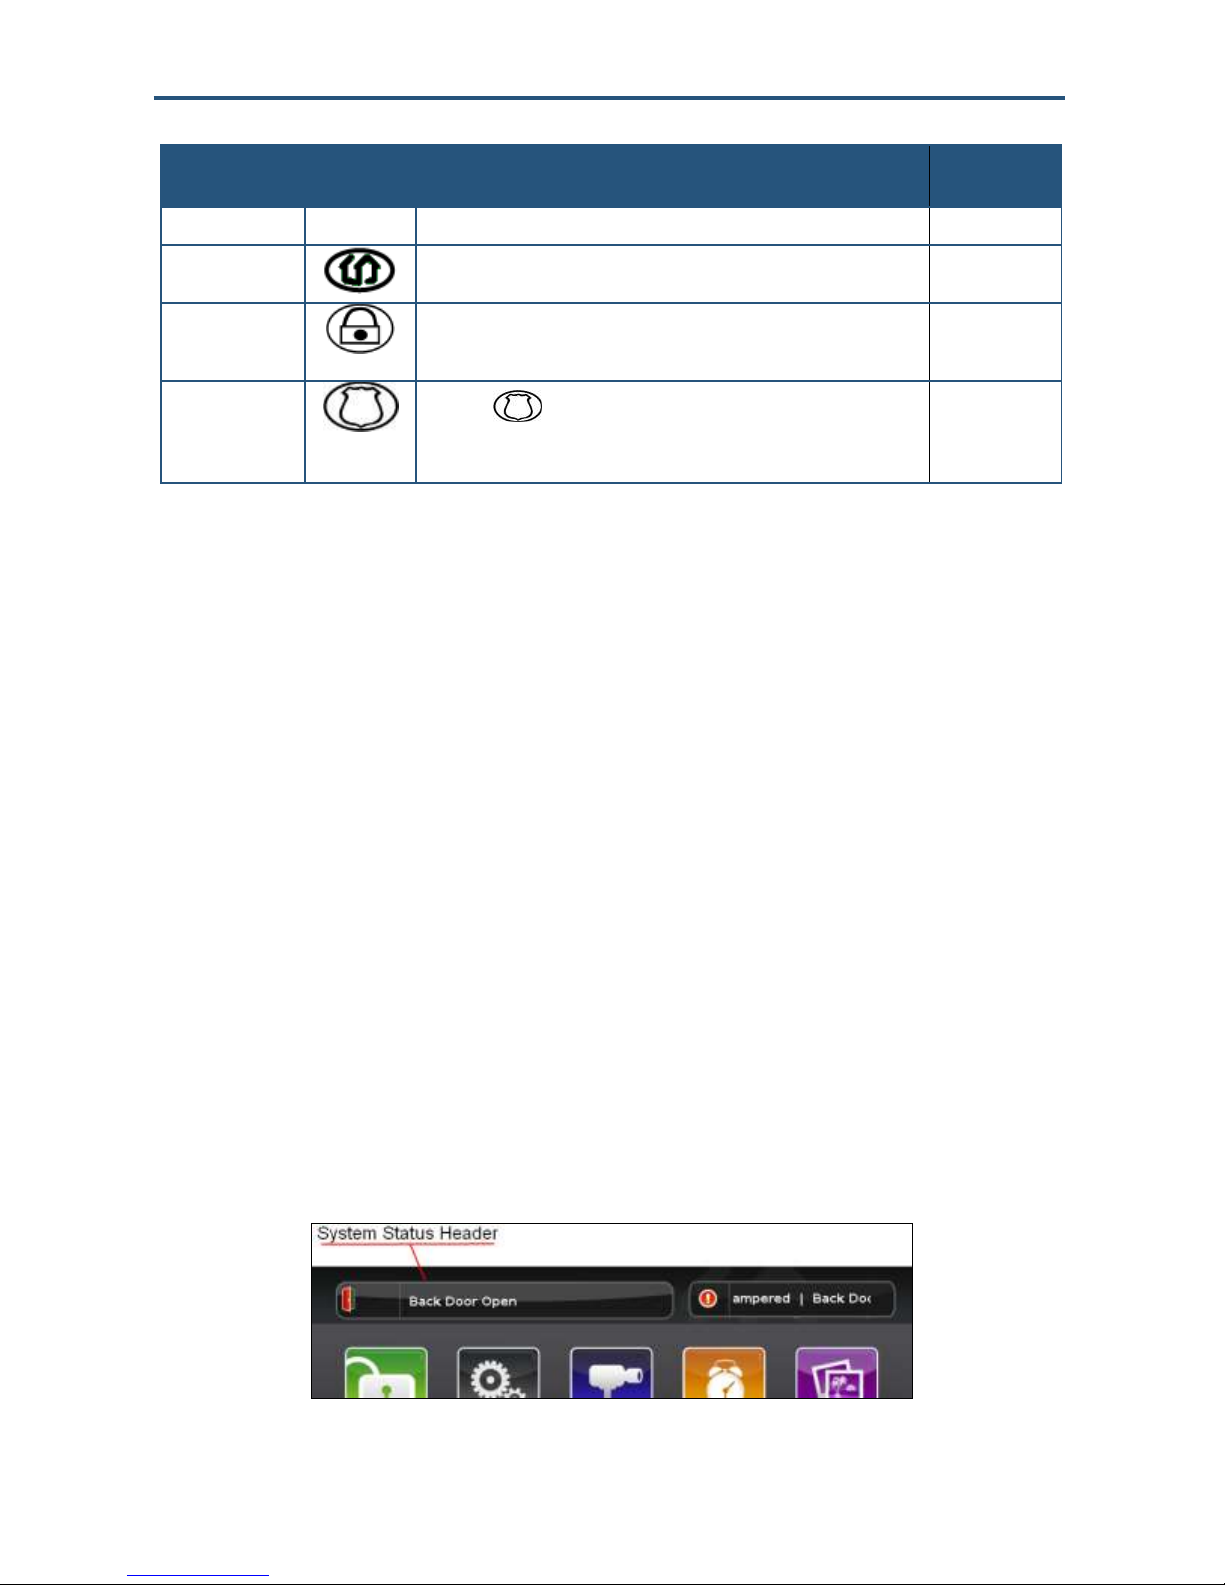
System & Zone Trouble Header
The System & Zone Trouble header appears in the top-right area of the TouchScreen when:
There is a connectivity (cellular, broadband, etc.) or a power problem with the
TouchScreen.
A sensor goes down, such as due to a battery failure.
A sensor is being tampered with, such as the cover being opened.
SMCRB5701-Z TouchScreen Security System User Manual
18
Configuring the TouchScreen
When the system reports trouble, it sounds an audible alert regularly to ensure you are
aware of the problem.
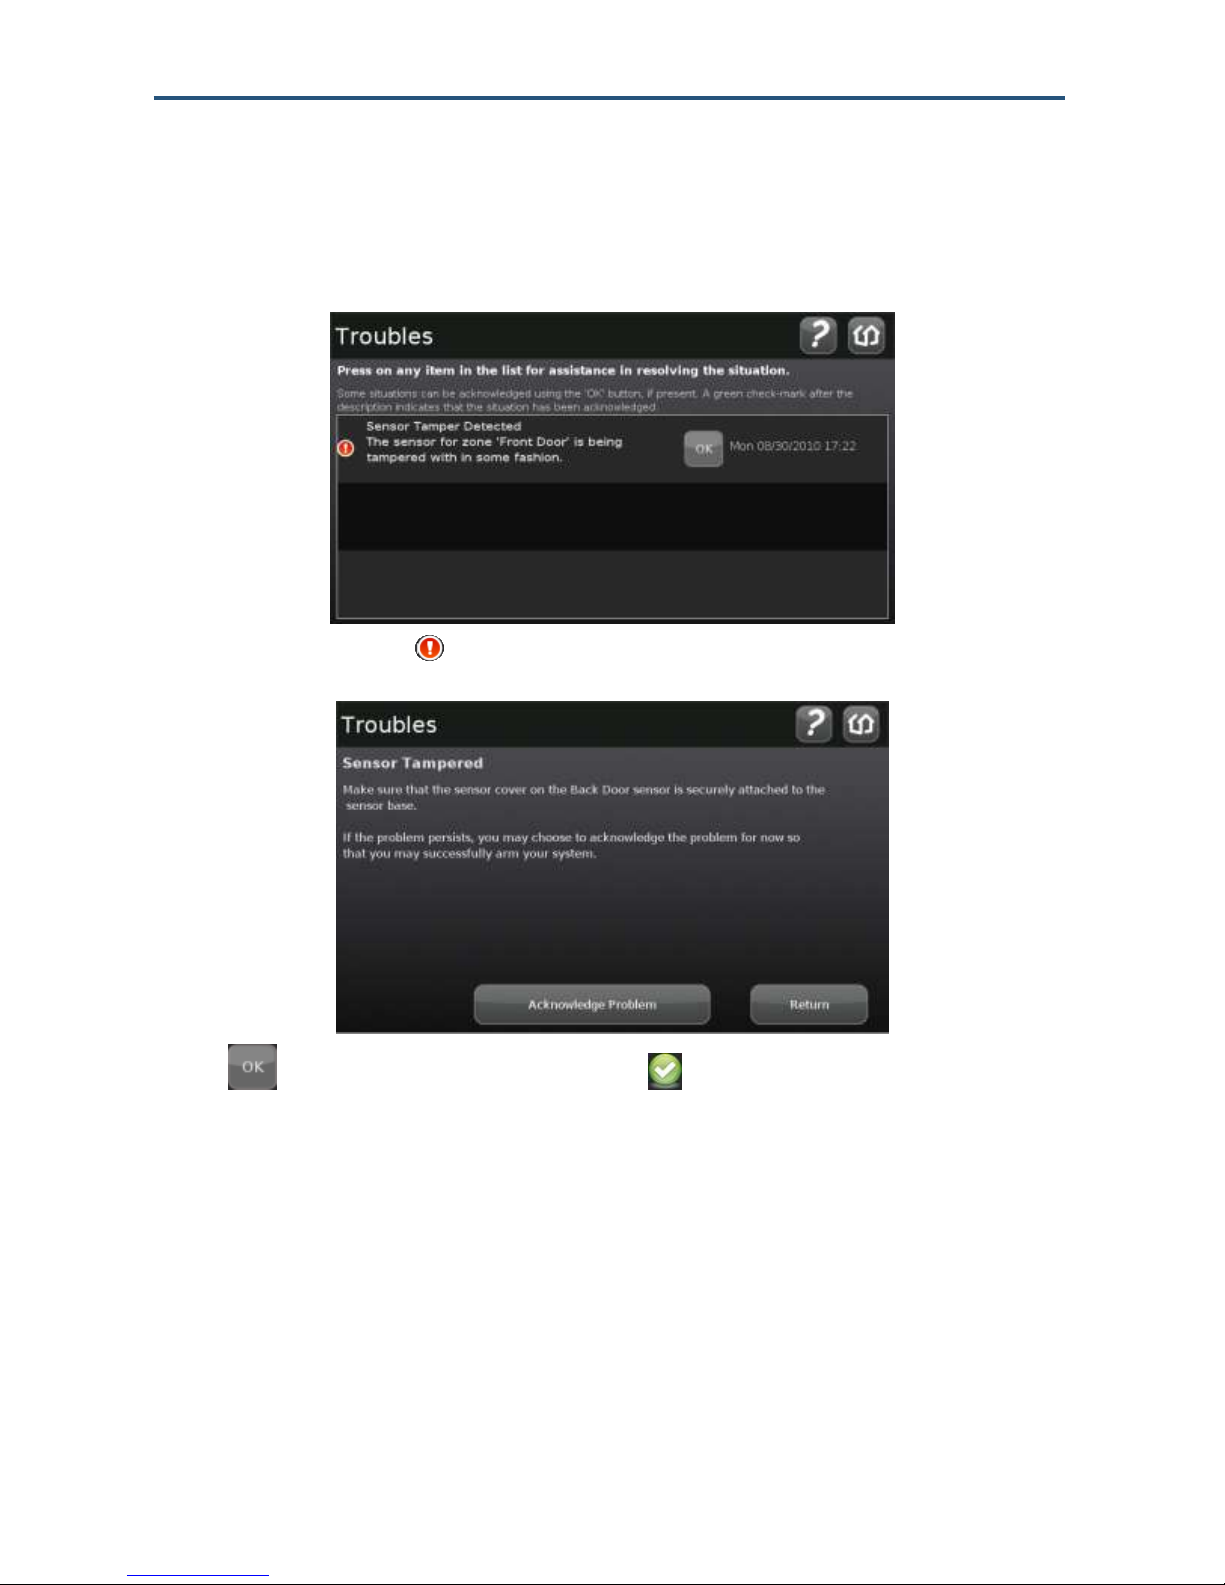
If a System & Zone header appears, touch it to display the Troubles list. The Troubles list
shows all the current troubles with TouchScreen and the sensors. For example:
Touch the text next to the to view help about resolving the trouble. For example:
Touch to mark the trouble as acknowledged . An acknowledged trouble mutes its
audible alerts for 12 hours. After that time, the trouble begins alerting again. You must
acknowledge it by tapping the OK button again to silence the alerts.
From the resolution information, you can:
Touch Return to view the Troubles list again, and choose to acknowledge the current
trouble or view the resolution information for other troubles.
Touch Acknowledge Problem to acknowledge the current trouble immediately and
return to the Troubles list.
SMCRB5701-Z TouchScreen Security System User Manual
19
Configuring the TouchScreen
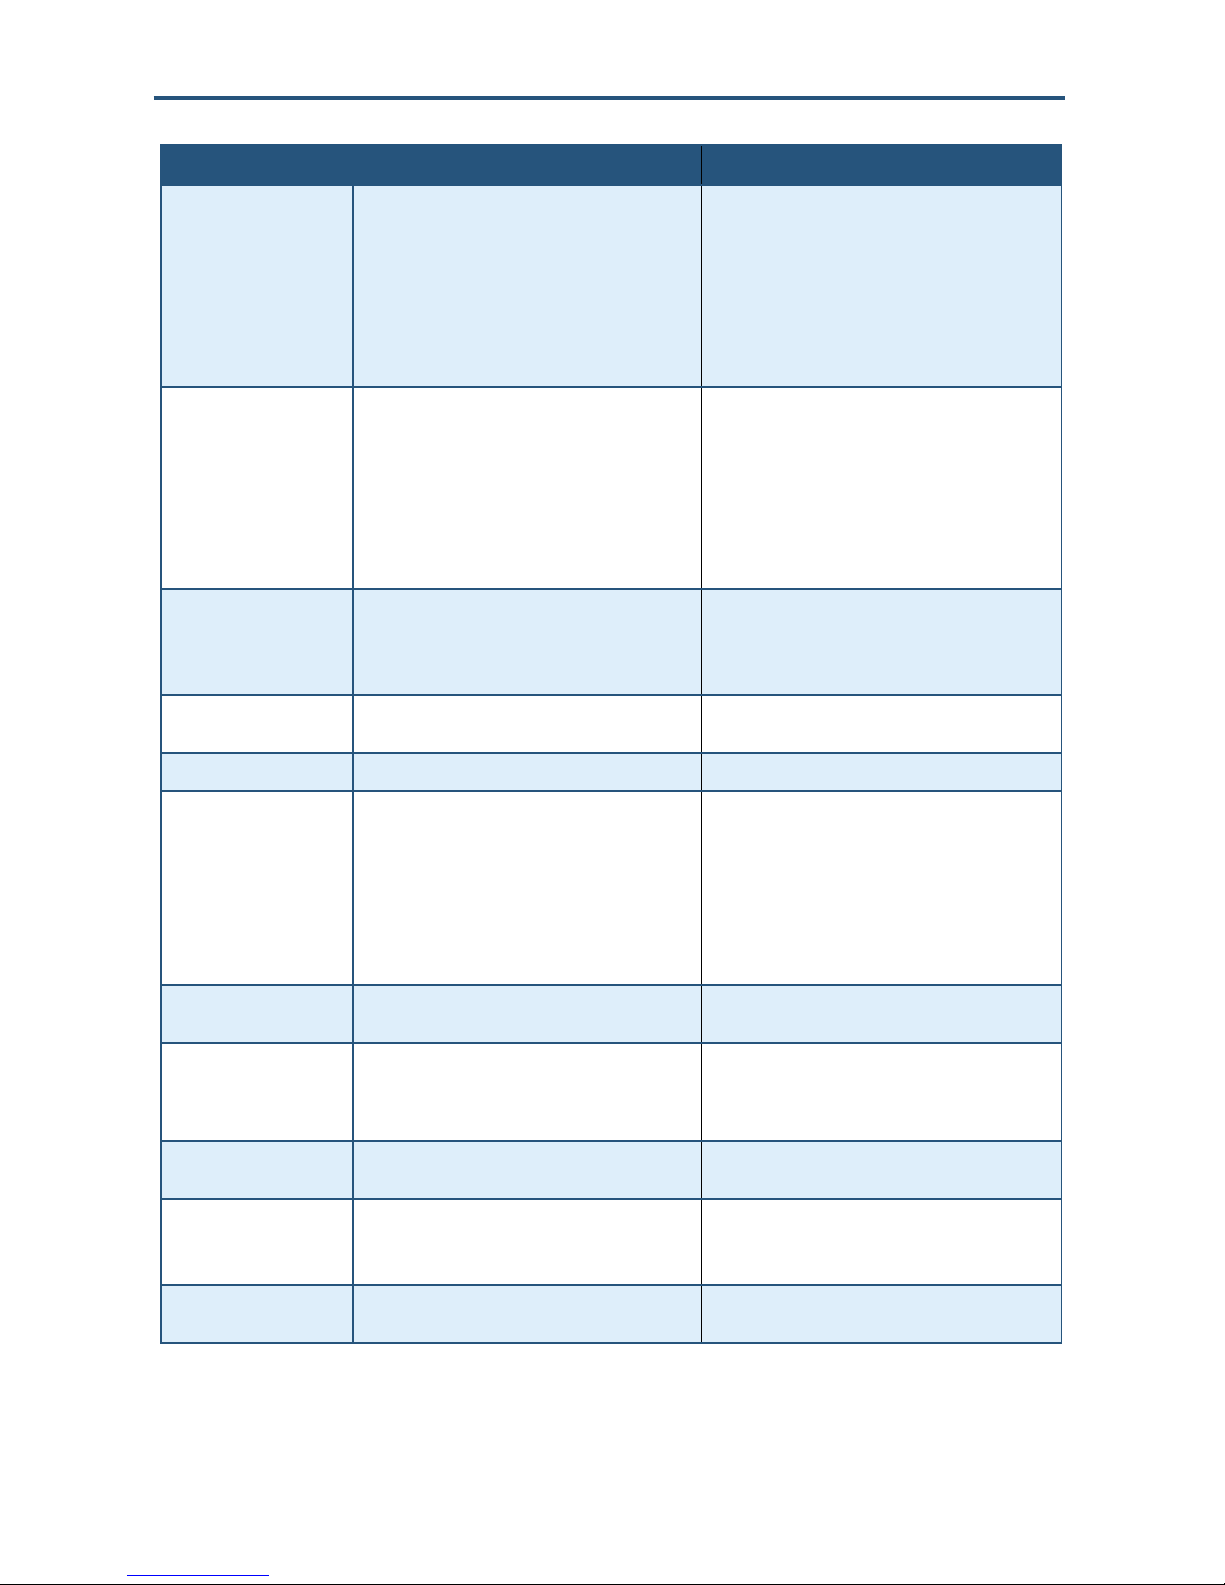
Component
Cause
Solution
AC Power Loss
TouchScreen is not receiving A/C power.
The system is in Low Power Mode (see “Low
Power Mode” on page 30).
Confirm that the power adapter is plugged into the
TouchScreen.
Confirm that the power adapter is plugged into an
unswitched outlet.
Confirm that the unswitched outlet has power.
Install the power adapter into another outlet.
Alarm communication
failed
The TouchScreen is neither accessing the
Internet through the local network nor has cellular
connectivity.
Restore Internet connectivity as soon as possible.
If the lack of cellular connectivity persists, contact
Customer Care.
Battery failure
The TouchScreen backup battery is dead and
there is a loss of external power.
After external power is restored, it takes
approximately 21 hours for the battery to fully
charge.
When AC power is restored, the battery will
recharge. If not, check the battery connection.
Battery Low
Battery for the identified sensor is low. See
“Sensor Battery Low” later in this table.
Confirm that the power adapter is plugged into an
unswitched outlet.
If A/C power is connected but has been off for an
extended period, the battery may still be charging.
Battery Removed
The TouchScreen battery has become detached.
Open the battery cover and check the battery
connection.
Broadband connection
failed
The TouchScreen is not accessing the Internet
through the local network, but the device still has
cellular connectivity.
Restore Internet connectivity as soon as possible.
Cellular connectivity allows only enough
communication with central monitoring to
communicate major events such as alarms.
Camera Connection
Failed
The TouchScreen cannot communicate with one
of your IP cameras.
Be sure the camera is powered on and within range
of the Wi-Fi router. The power indicator light on the
camera should be ON solid.
Cellular communication
failed
The TouchScreen cannot communicate over the
cellular network.
If this problem persists, contact Customer Care.
Communication Jammed
The TouchScreen has detected an attempt to jam
its communication with the sensors.
Someone is using a device designed to scramble
the radio-frequency (RF) signal of the sensors.
This could be a burglary in progress.
Lost Power
External power for the sensor or device named in
this alert is not connected. Applies to devices that
require external power.
Restore power to the sensor or device as soon as
possible to avoid draining the battery.
Low Battery Detected
Battery for the identified sensor is low.
Replace the battery as soon as possible.
Needs Cleaning
Sensor named in this alert is dirty or dusty
Clean the identified sensor.
Network connection failed
No broadband or cellular connectivity to the
TouchScreen.
Restore Internet connectivity as soon as possible.
Contact Customer Care to report your loss of
cellular connectivity.
Table 2-2. System & Zone Trouble Header Messages
SMCRB5701-Z TouchScreen Security System User Manual
20
Configuring the TouchScreen
Component
Cause
Solution
Sensor Battery Low
Battery for the sensor named in this alert is low. A
low battery report is issued when the battery
reaches 2.75v for sensors and key pads, and
2.6v for key fobs.
Replace the battery as soon as possible.
Replace with a battery of the same size and
capacity.
If you cannot replace the battery immediately, you
can acknowledge the problem (touch OK in the
Troubles list) for now to arm your system.
If the problem persists after replacing the battery,
contact Customer Care.
Sensor Communication
Failure
TouchScreen cannot communicate with the
identified sensor.
The most common cause for a sensor
communication failure is a low battery.
The TouchScreen checks its communication
integrity with the sensors every 27 minutes. This
message is posted when the sensor fails two
checks in a row.
Replace the battery or replace the sensor.
Replace the battery immediately with a battery of
the same size and capacity.
If you cannot replace the battery at this time, you
can acknowledge the problem for now to arm your
system.
If the problem persists after replacing the battery,
contact Customer Care.
Sensor Communication
Jammed
TouchScreen communications with the identified
sensor is being jammed.
Someone is using a device designed to scramble
the sensor’s RF signal.
This could be a burglary in progress.
Sensor Lost Power
External power for the identified sensor or device
is not connected.
Restore power to the sensor or device as soon as
possible to avoid draining the battery.
Sensor Needs Cleaning
Identified smoke detector is dirty or dusty.
Clean the identified smoke detector.
Sensor Tamper Detected
Cover of the identified sensor has been removed.
Be sure the sensor cover on the sensor is securely
attached to the sensor base.
For smoke detectors, be sure the cover is securely
positioned in the twist-lock position on the base.
If the problem persists, you can acknowledge the
problem (touch ACK) for now to arm your system
until Customer Care can provide a permanent
solution.
Sensor Test Button
Pressed
The Test button for the identified sensor was
pressed.
If a sensor test is not in progress, check the
identified sensor.
System Battery Low
The TouchScreen has lost A/C power and is on
battery backup. The battery voltage is 3.7v, which
is about 5% remaining power. Complete loss of
power to the TouchScreen is imminent.
Check the A/C adapter.
Restore A/C power to the TouchScreen as soon as
possible.
System not ready to Arm
A door or window is open.
Open the Security app and check the security
zones for an open door or window.
System Power Lost
The TouchScreen has lost A/C power and is on
battery backup.
Check the A/C adapter.
Restore A/C power to the TouchScreen as soon as
possible.
System Upgrade in
Progress Message
Firmware is being updated.
No action required. Message will go away when the
update completes.
SMCRB5701-Z TouchScreen Security System User Manual
21
Configuring the TouchScreen
Component
Cause
Solution
System will not Arm
You entered an invalid keypad code when trying
to arm the system.
Try to enter the security code again.
Use the Settings app to add, edit, and delete
keypad codes.
Contact Customer Care.
Tamper Detected
The cover of the identified sensor or device is
removed.
Check the sensor or device.
Zone Swinger Shutdown
A sensor has shutdown too many times, resulting
in alarms (default is one time). No more alarms
will be sent to central monitoring for 48 hours or
until the security system is disarmed.
The Swinger Shutdown feature prevents a
runaway TouchScreen from tying up the central
station.
Disarm the system to stop the swinger shutdown.
Contact customer care to discover the maximum
number of alarms sent to central monitoring before
swinger shutdown occurred for your system.
Content Area
The content area contains the interactive functionality of your TouchScreen. The
TouchScreen apps (widgets) are displayed here. When you use or modify an app, the
menus and tools appear here.
SMCRB5701-Z TouchScreen Security System User Manual
Figure 2-2. Content Area
22
Configuring the TouchScreen
Pressing the Home button at the bottom-center of the TouchScreen.
Touching the Home icon in the top-right of any screen, except the Home
screen.
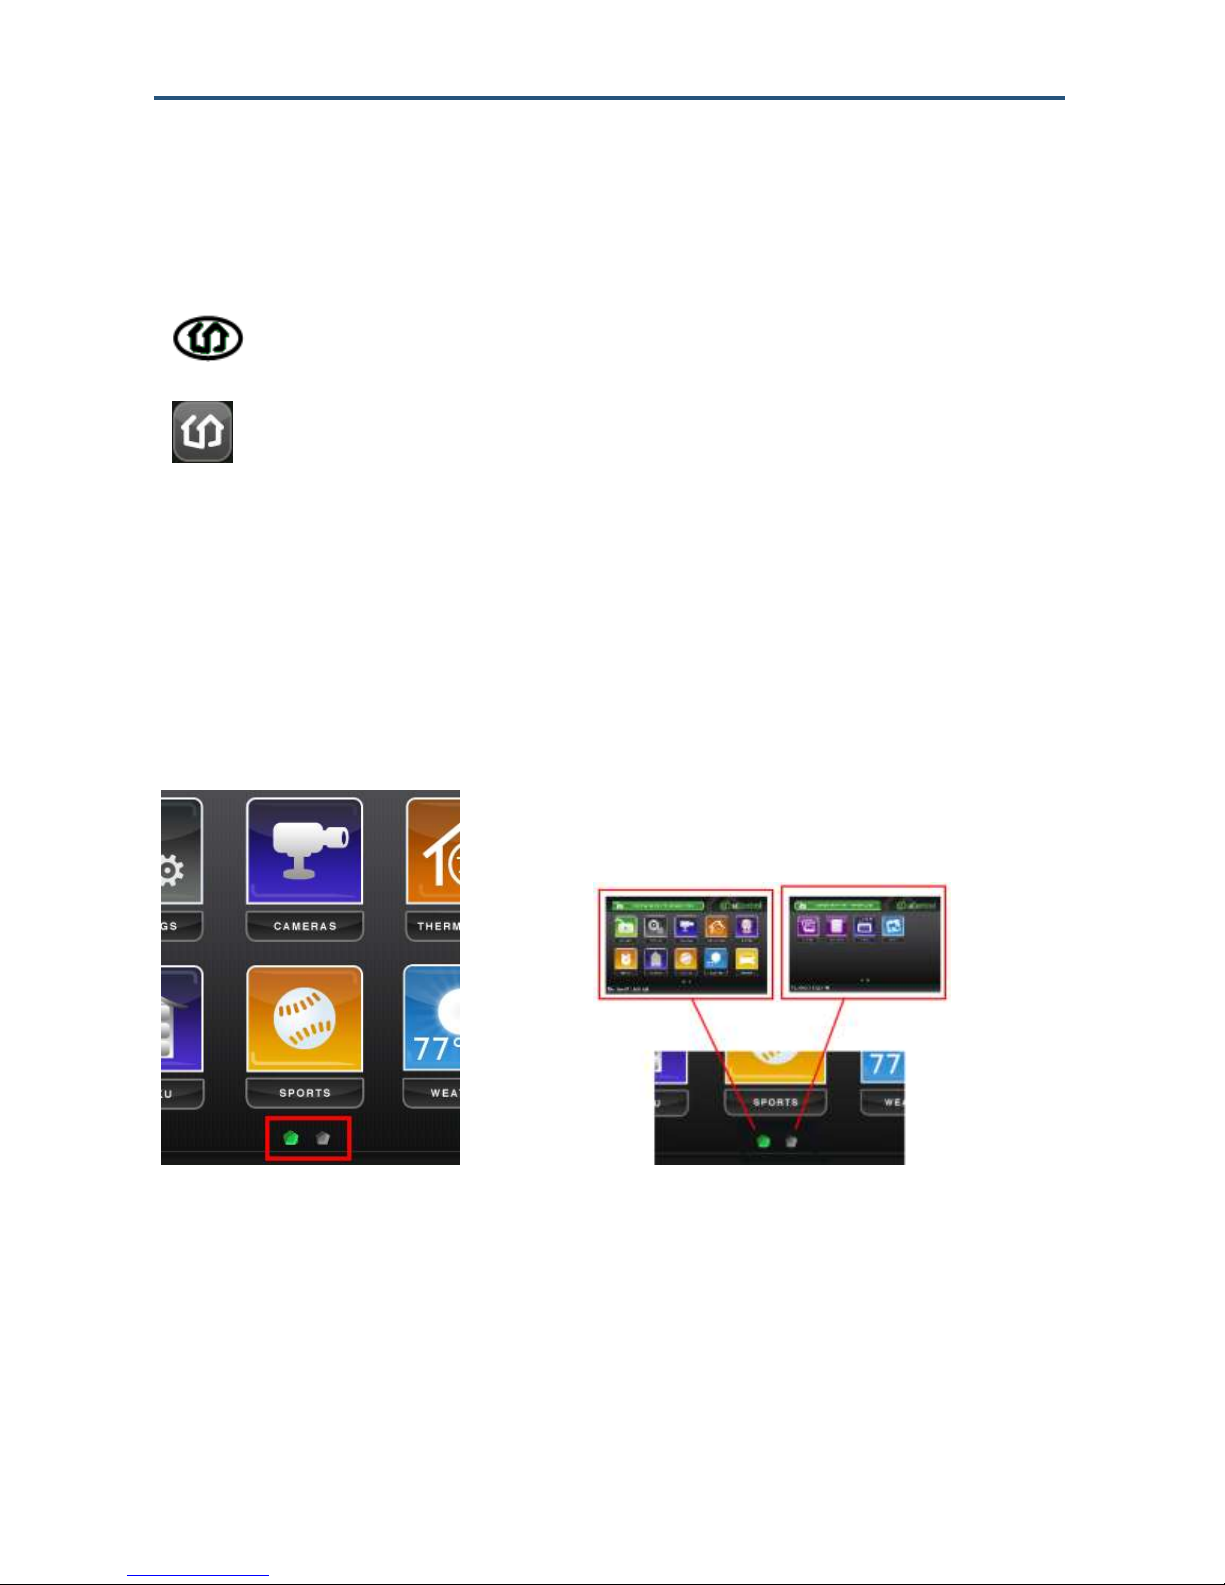
Home Screen
The Home screen is the default interface when you access the TouchScreen screen. Return
to this screen at any time by:
The Home screen displays up to 10 TouchScreen apps at a time. The apps resemble those
installed on a smart phone. If you have more than 10 apps installed on the TouchScreen, the
additional apps appear on additional screens.
Screen buttons below the apps denote the number of screens the TouchScreen is currently
using to accommodate all the installed apps In Figure 2-3, the two indicators mean the
TouchScreen has two screens to accommodate its installed apps.
Think of the multiple screens as residing next to each other in a line. The green indicator
represents the screen currently displayed.
Figure 2-3. Example of Two Screens Available on This TouchScreen
23
SMCRB5701-Z TouchScreen Security System User Manual
Configuring the TouchScreen
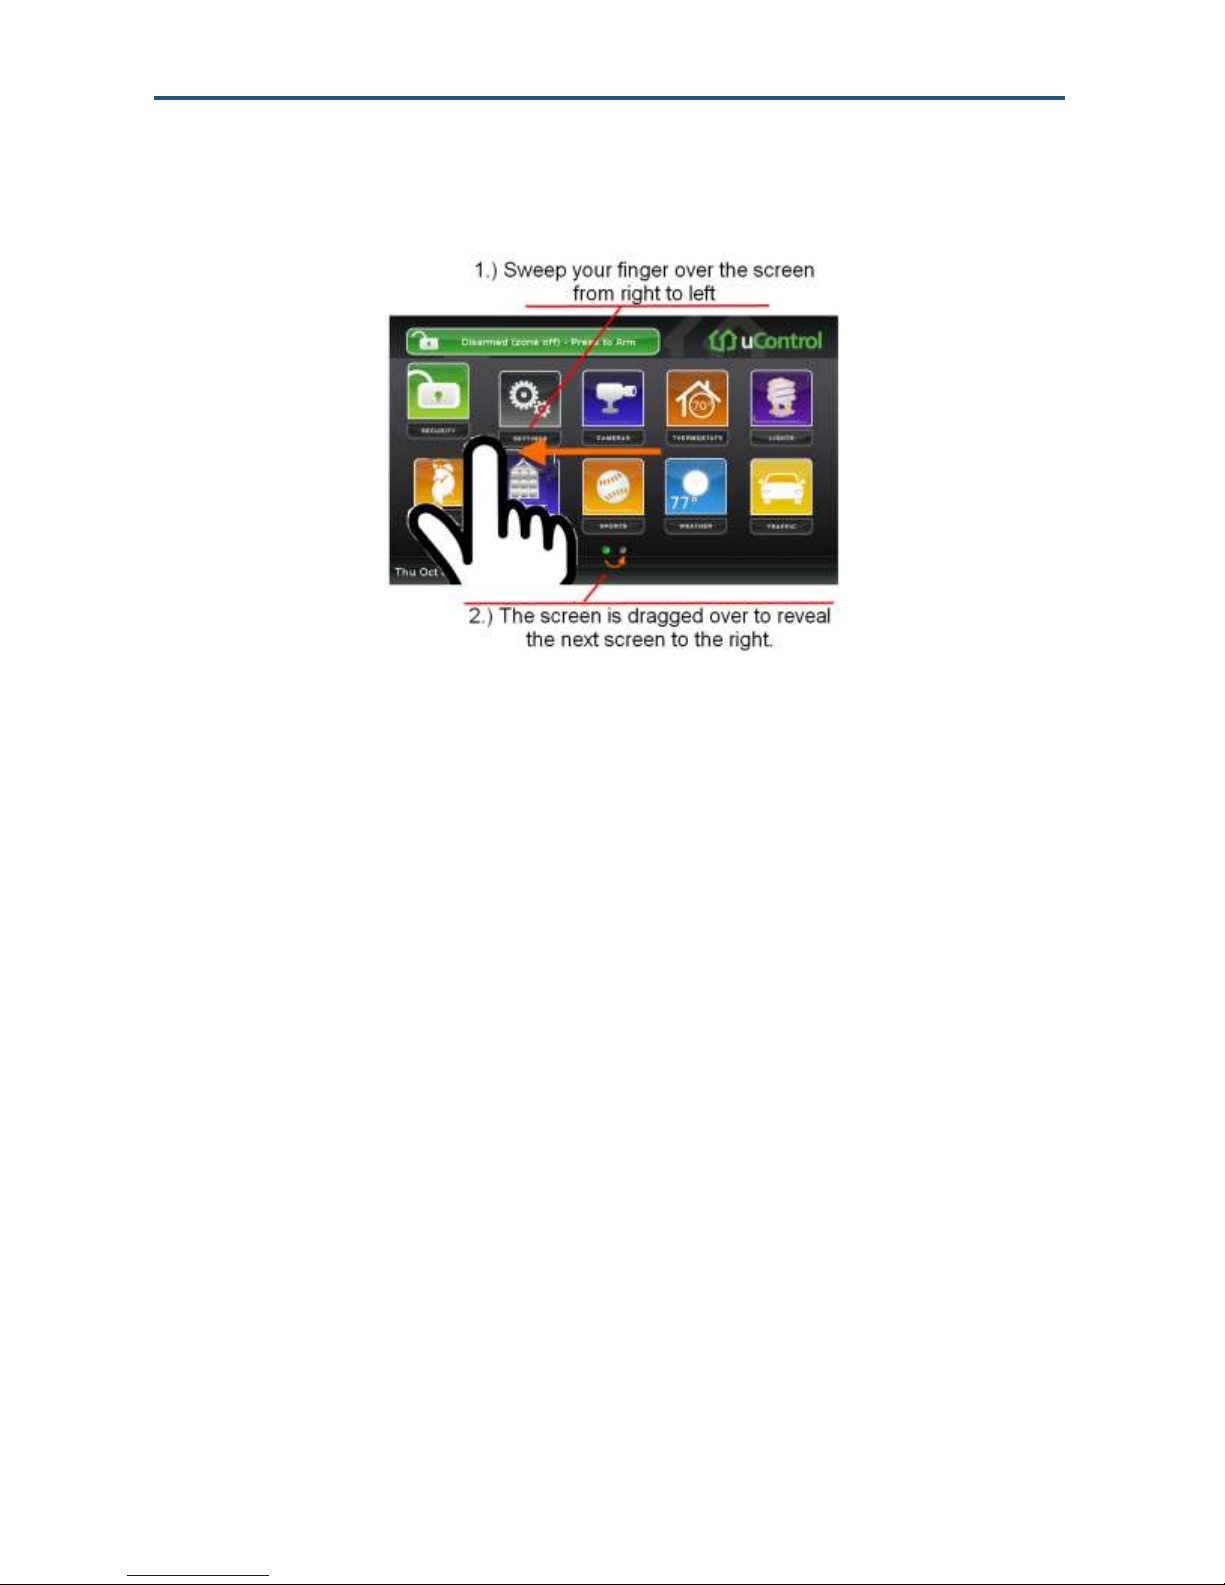
To access another screen of TouchScreen apps:
1. Swipe your finger from right to left across the TouchScreen.
2. To return to a previously viewed screen, sweep your finger from left to right across the
TouchScreen.
SMCRB5701-Z TouchScreen Security System User Manual
24
Configuring the TouchScreen
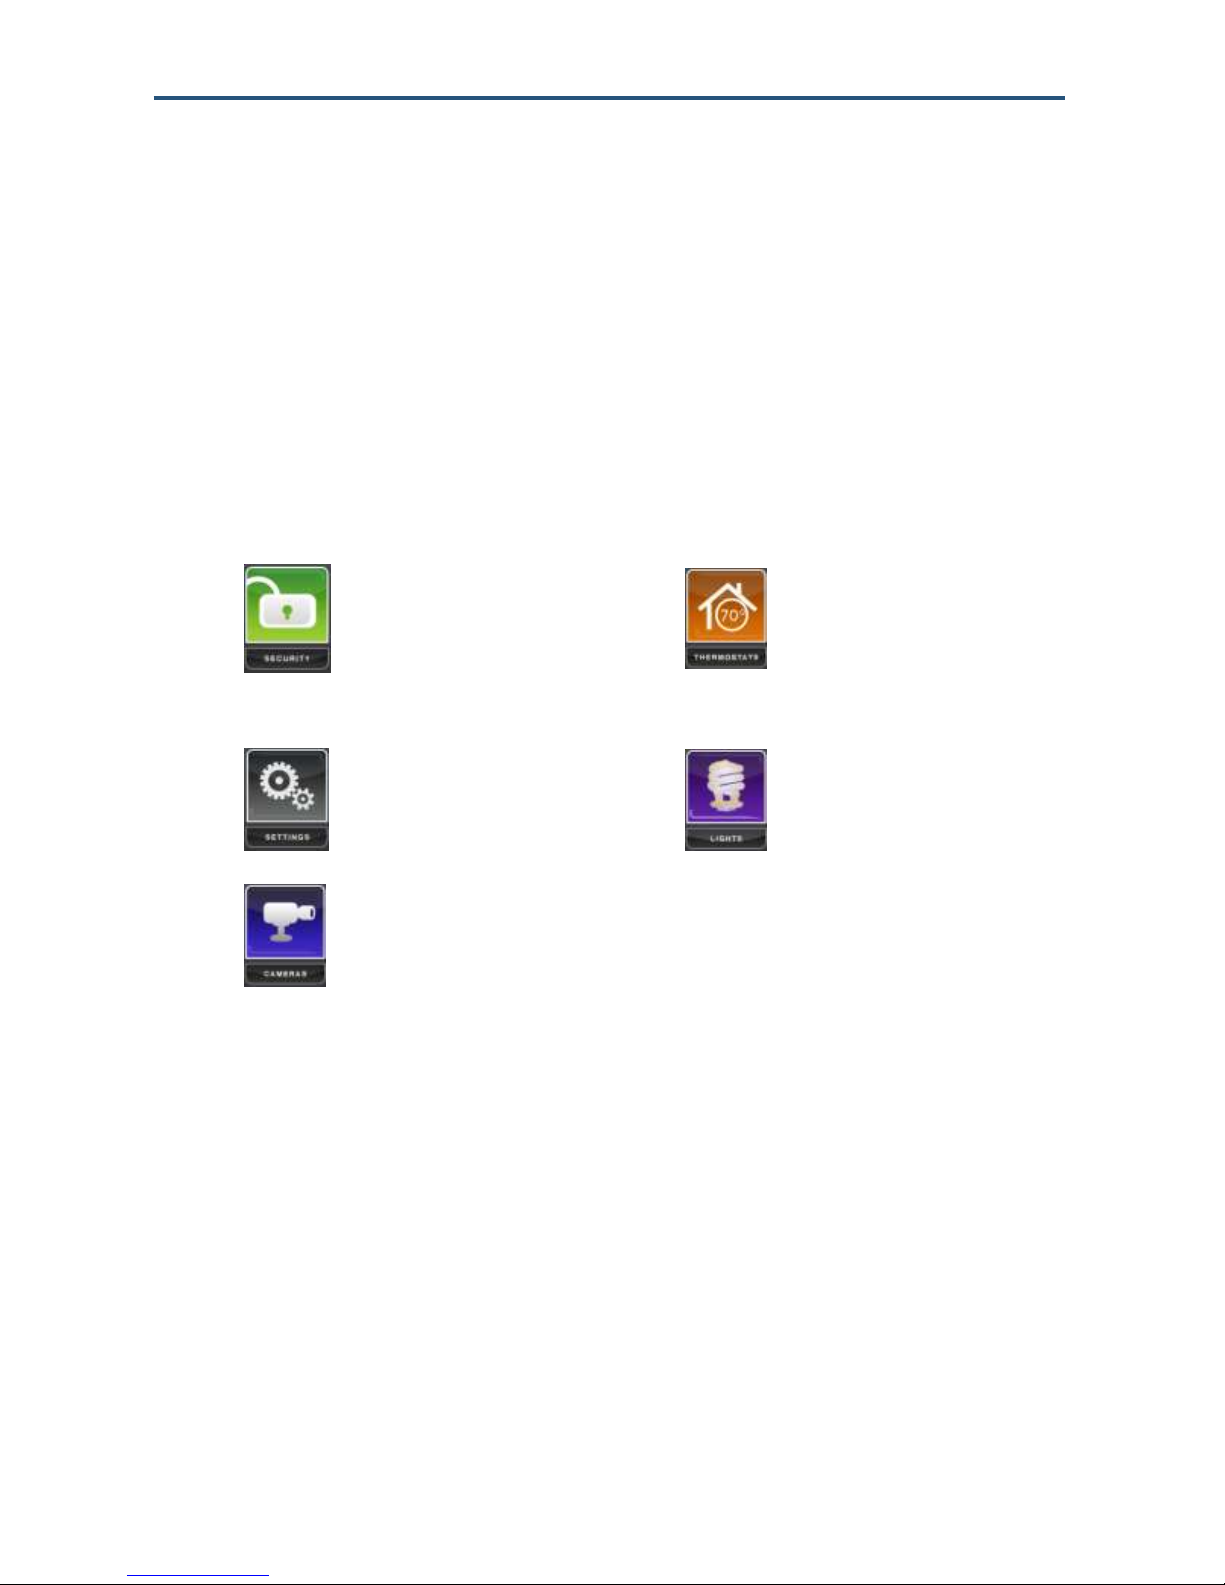
Select the Security app to
view options related to
arming or disarming the
system, enabling or
disabling security zones,
and viewing history logs’
recent security zone events.
Select the Thermostats app
to view the current state of all
your thermostats.
Select the Settings app to
access tools to modify the
TouchScreen
configurations.
Select the Lights app to view
the current state of all your
light control devices.
Select the Cameras app to
view a live feed of all the
cameras in your security
system.
TouchScreen Apps (Widgets)
TouchScreen apps are applications that provide additional functionality through the
TouchScreen. The Security and Settings apps are non-optional apps. The Cameras,
Thermostats, and Lights apps are automatically installed if you have those devices
connected to your system. All other apps can be fully managed from the TouchScreen using
the Settings app:
To install available apps to the TouchScreen, see page 26.
To reposition the order that apps are displayed in the Home screen, see page 27.
To uninstall apps from the TouchScreen, see page 28.
The following summary describes the available apps.
SMCRB5701-Z TouchScreen Security System User Manual
25
Configuring the TouchScreen
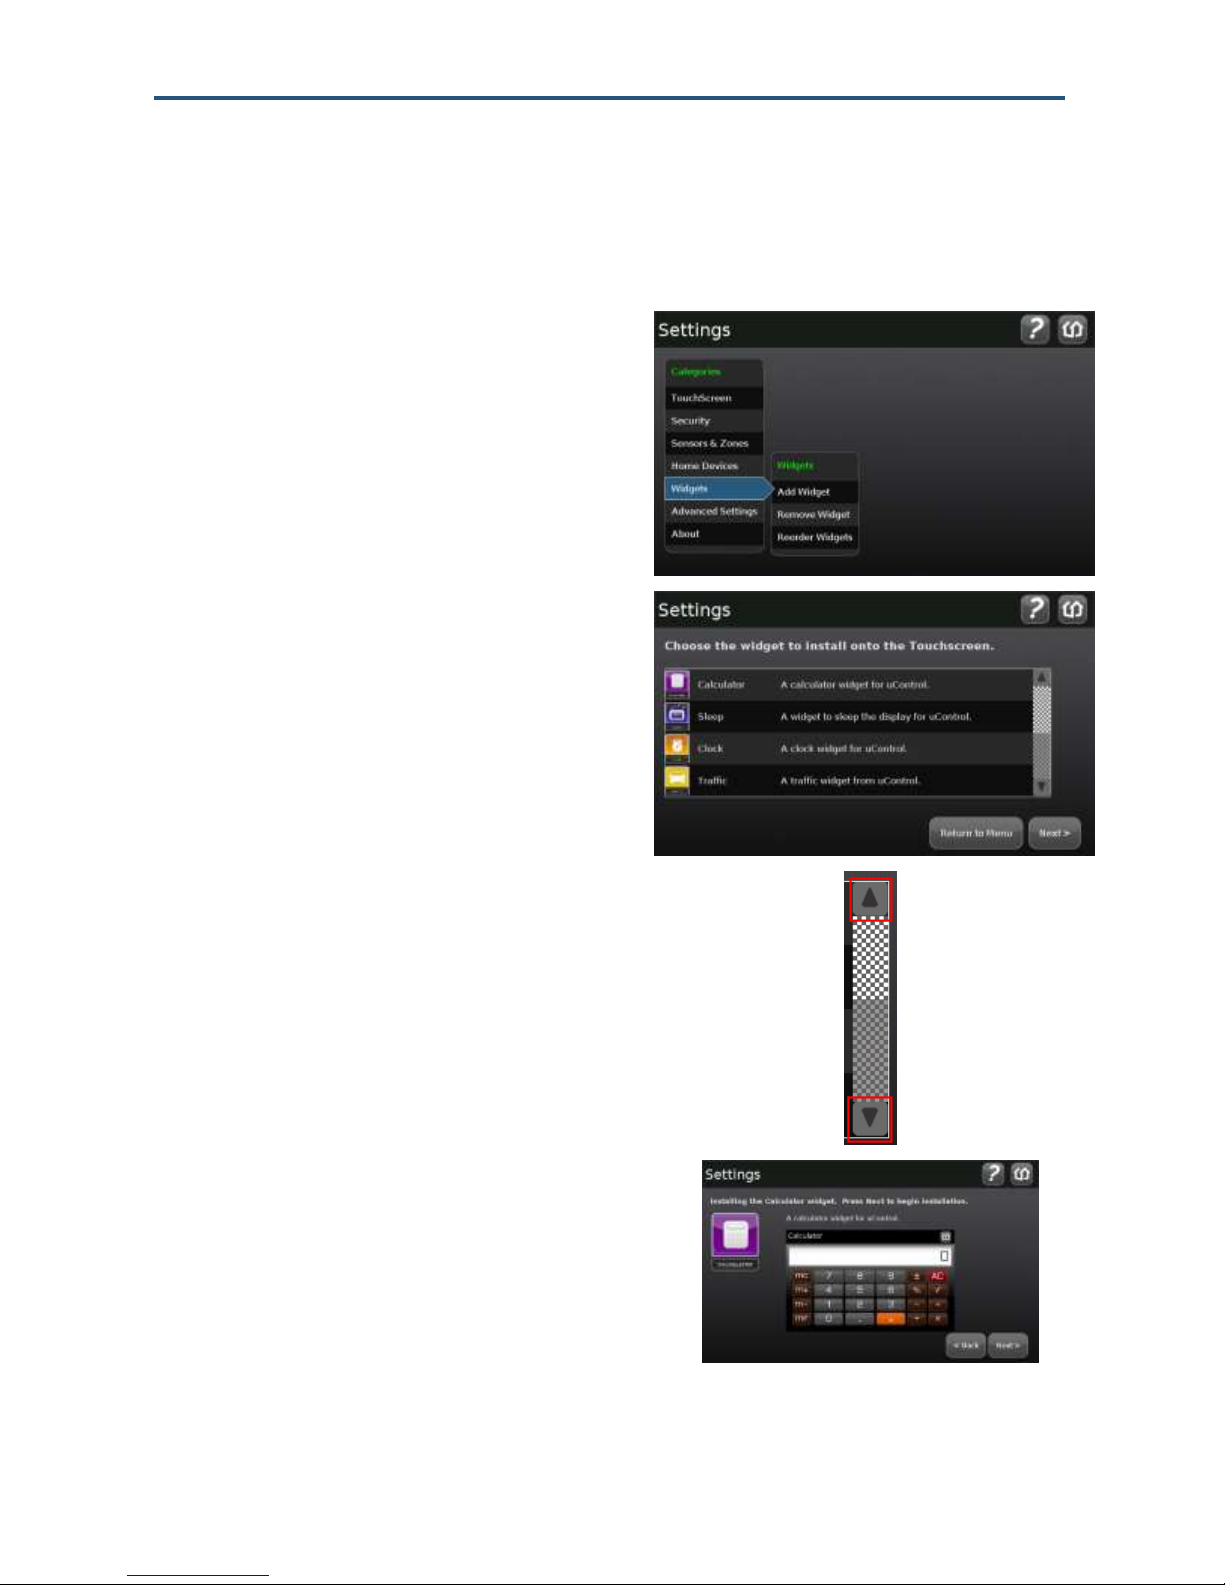
1.
From the Settings app (see ―Configuring
the TouchScreen‖ on page 14), touch
Widgets > Add a Widget.
A list of apps available for installation
appears.
2.
Touch the Up and Down arrows on the
scrollbar to expose additional apps.
3.
Touch the app you want to install and touch
Next. The app to be added appears, along
with a view of the initial screen of the app.
Installing TouchScreen Apps
You can install custom apps on your TouchScreen.
To install an app on the TouchScreen:
SMCRB5701-Z TouchScreen Security System User Manual
26
Configuring the TouchScreen
4.
Touch Next. The TouchScreen displays the
following confirmation:
The [name] widget was installed successfully.
5.
Touch Next to redisplay the list of apps available for installation.
Note: The TouchScreen will not receive your updates if your device does not currently have
broadband access. When broadband access is restored, the new apps are installed.
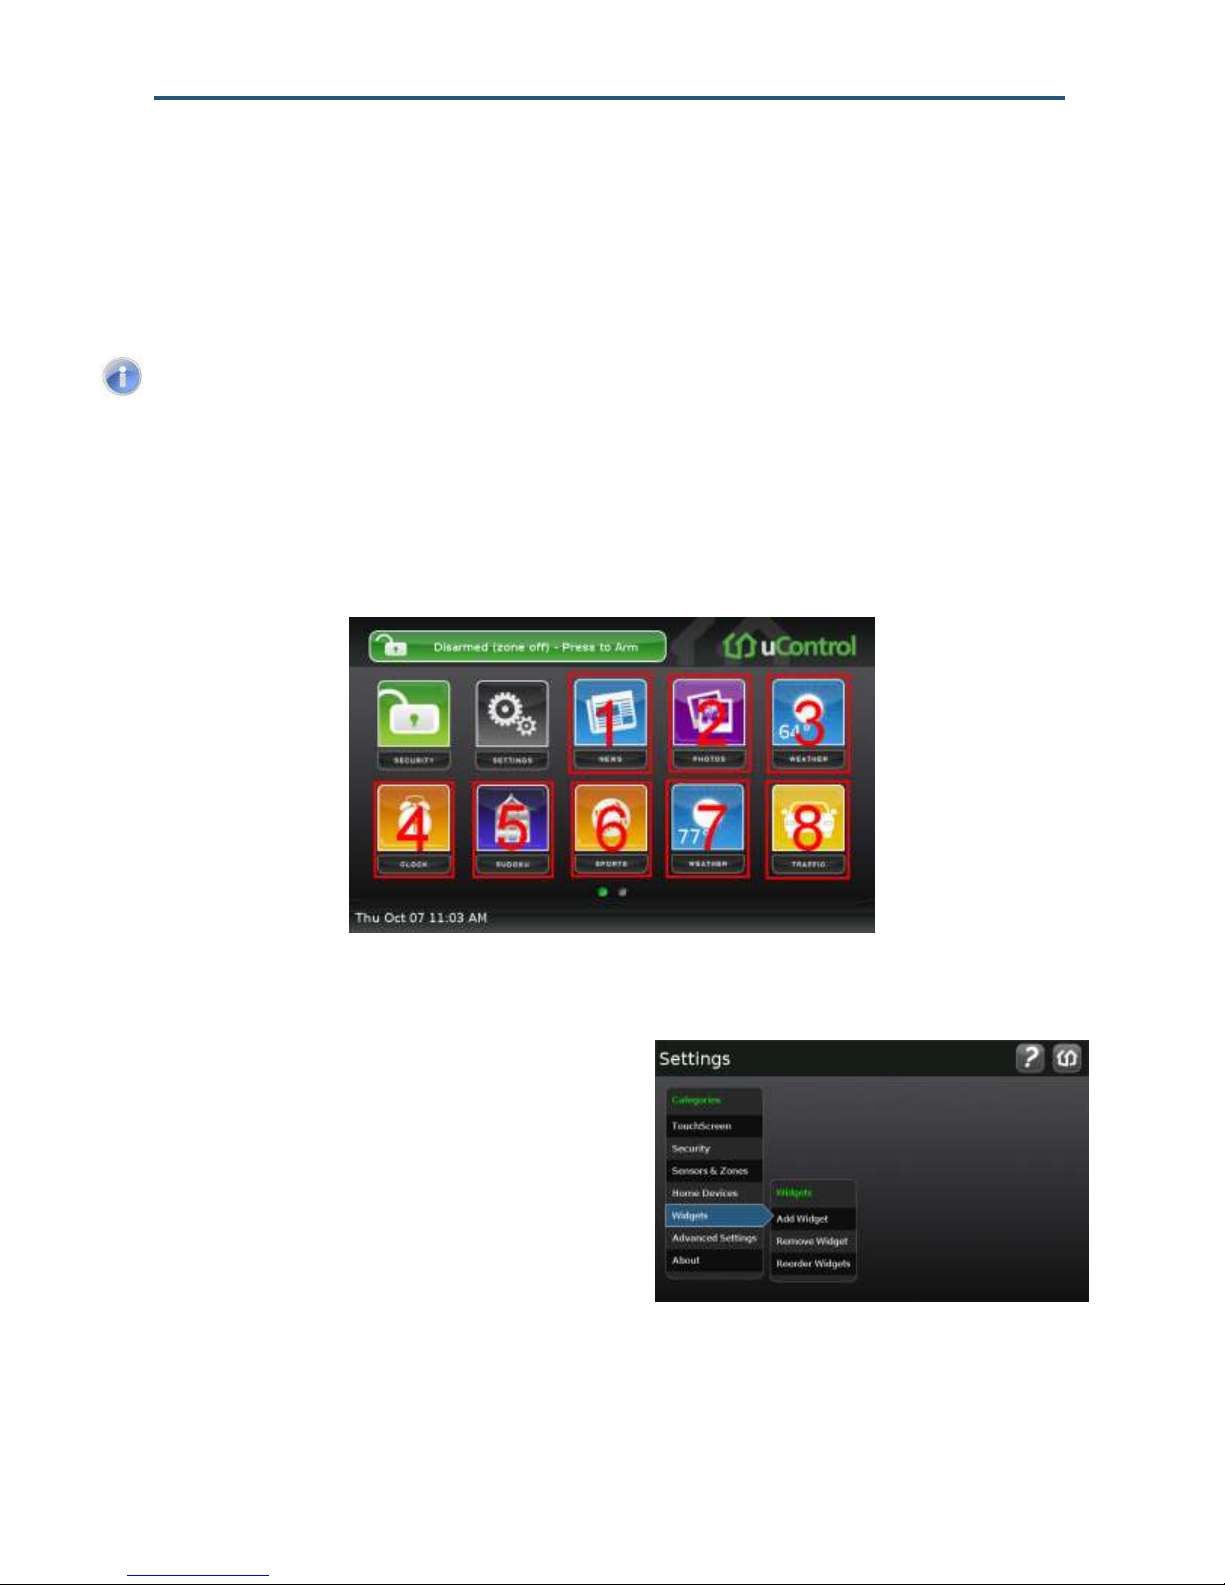
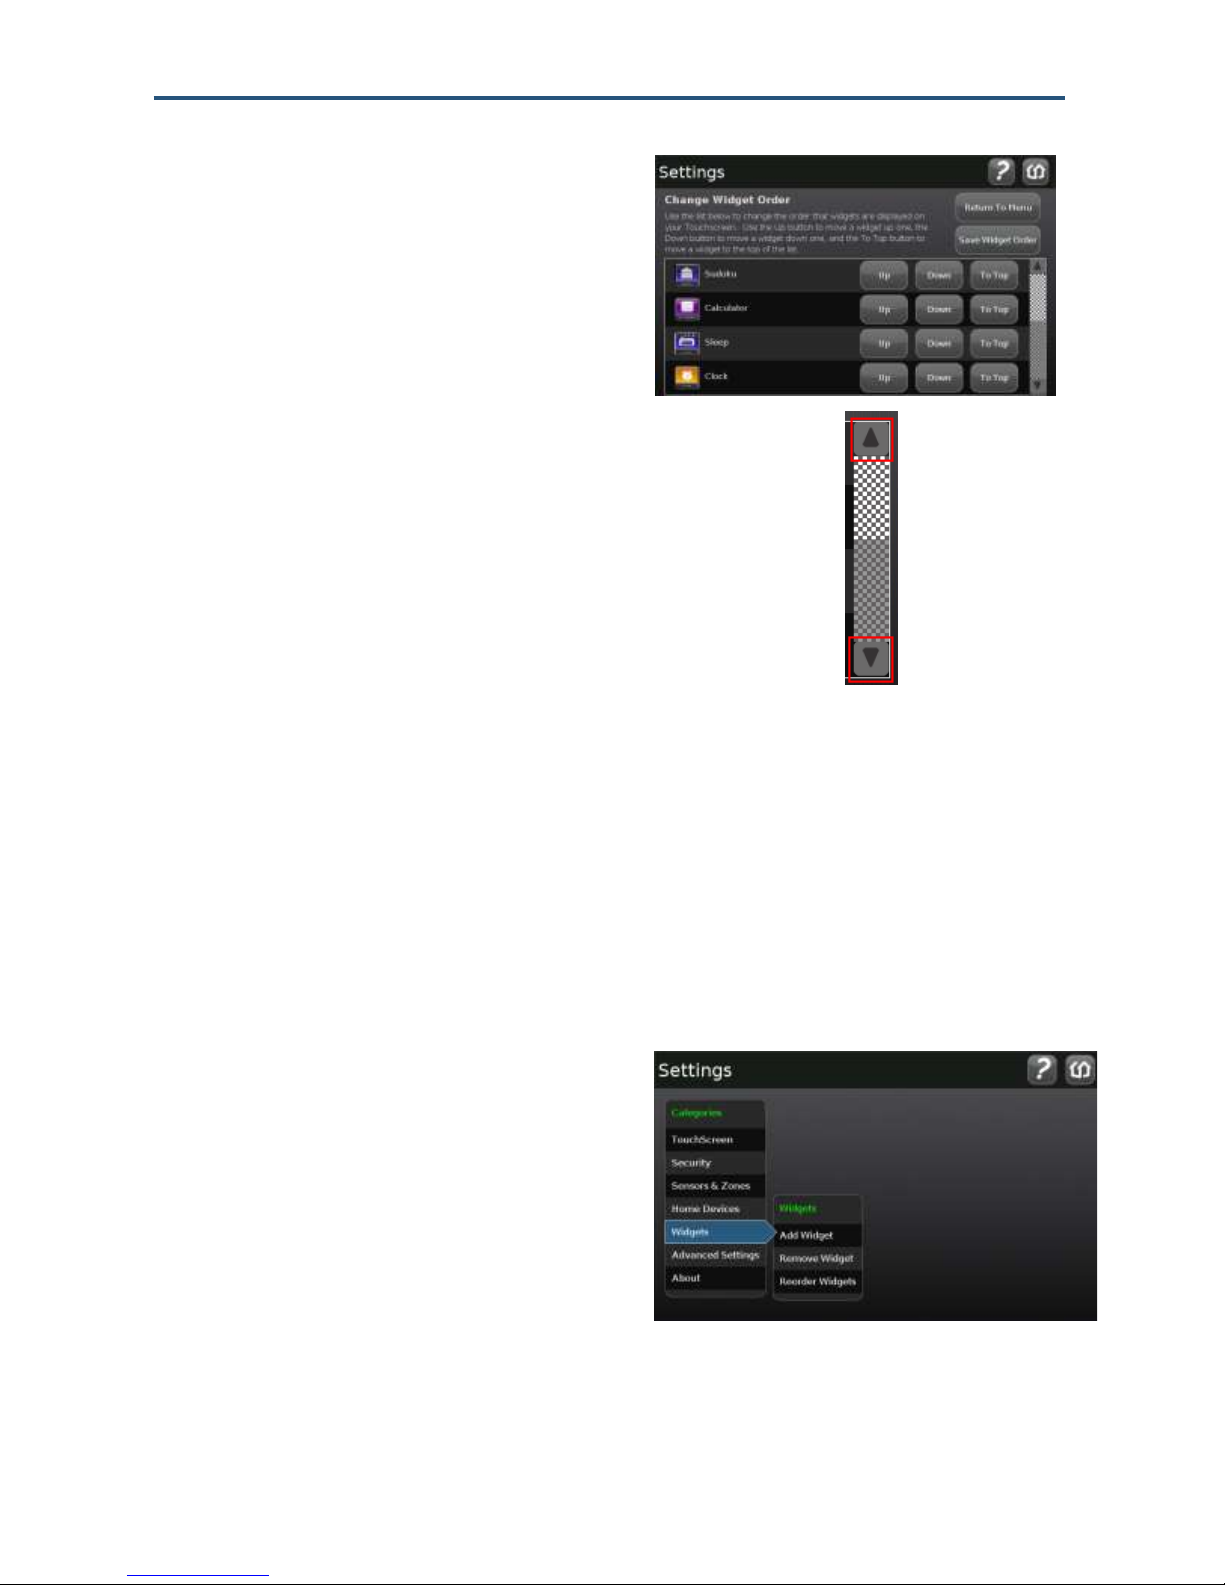
1.
From the Settings app (see ―Configuring
the TouchScreen‖ on page 14), touch
Widgets > Reorder Widgets.
Reordering Apps on the Home Screen
System apps and device apps are always displayed first in the Home Screen. Custom apps
are displayed, by default, in the order they were installed. The Home screen can
accommodate up to 10 apps. Additional apps are displayed on subsequent screens.
Figure 2-4. Examples of Apps on Home Screen
To change the order of the apps displayed in the Home screen:
27
SMCRB5701-Z TouchScreen Security System User Manual
Configuring the TouchScreen
A list of installed apps appears.
2.
Touch the Up and Down arrows on the
scrollbar to expose additional apps.
3.
Touch Up to move the app higher in the sequence of displayed apps, or Down to move it
lower. If you touch To Top, the app appears first in the list of sortable apps.
4.
When the apps are in the desired order, touch Save Widget Order.
5.
Touch Return to Menu to return to the Settings screen.
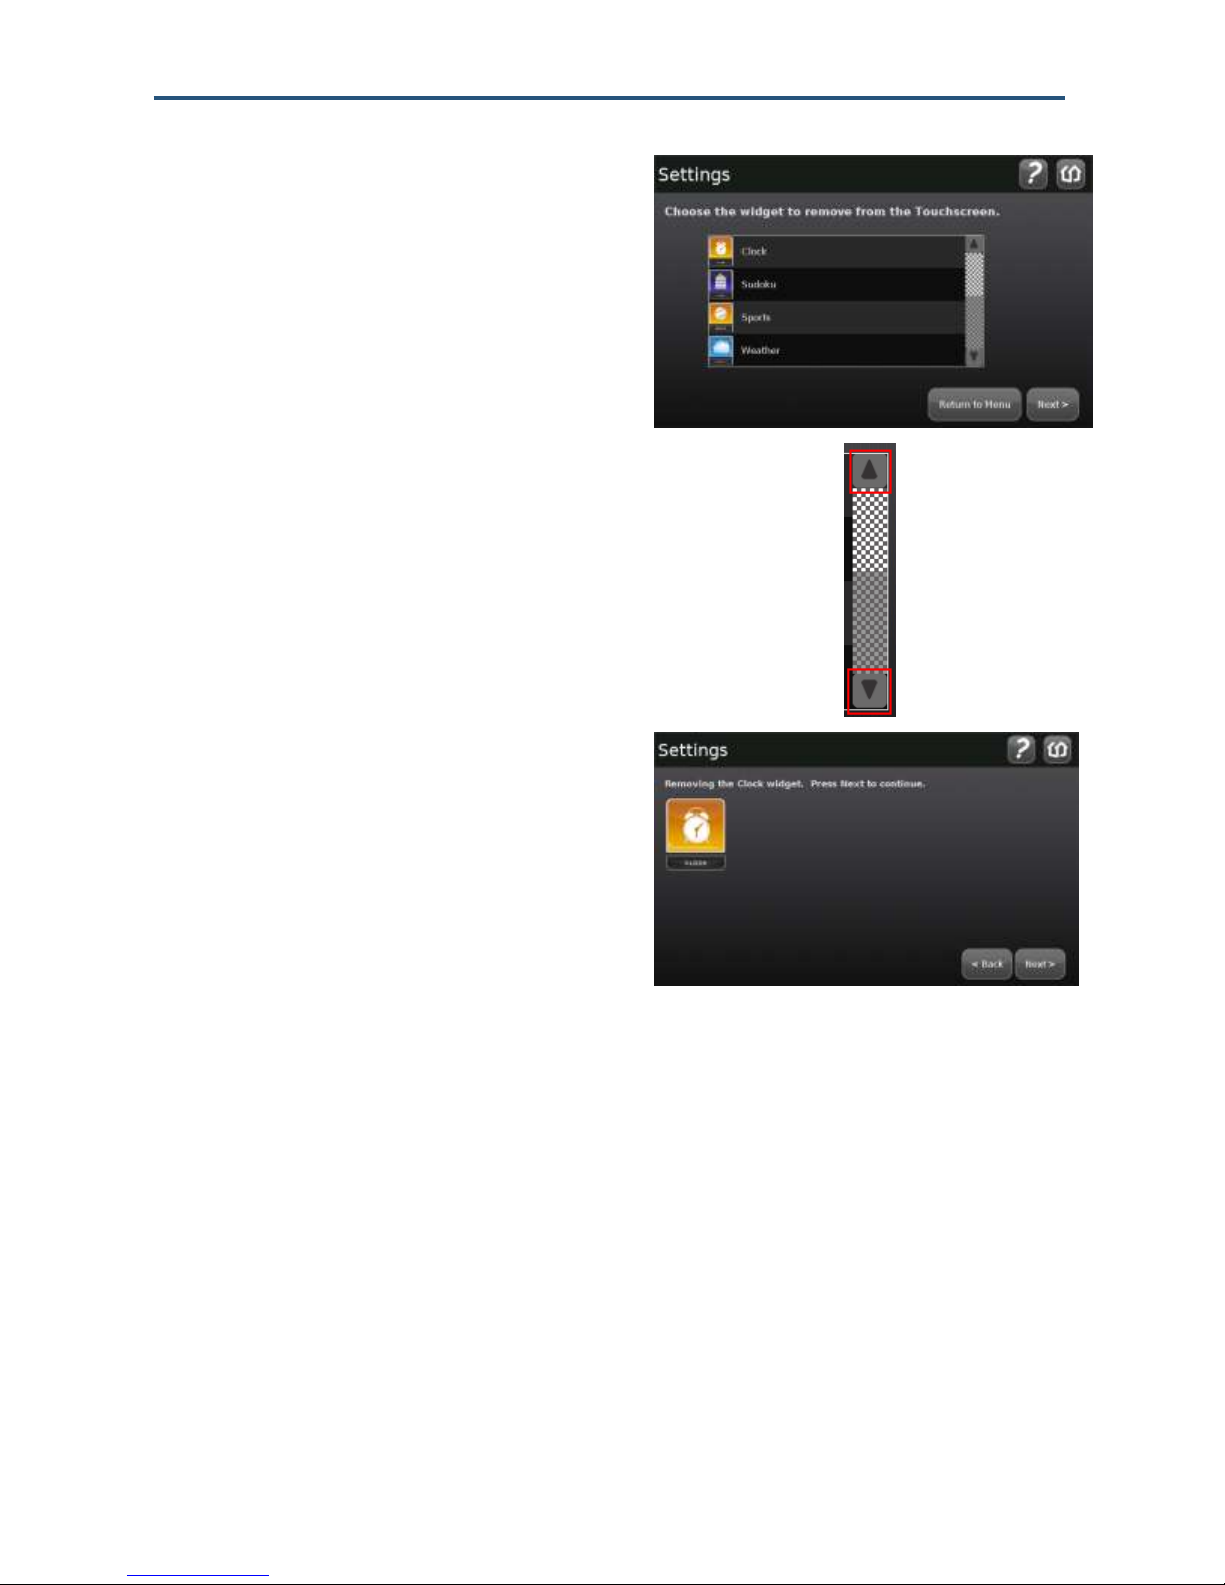
1.
From the Settings app (see ―Configuring
the TouchScreen‖ on page 14), touch
Widgets > Remove a Widget.
Uninstalling Apps
Custom apps can be uninstalled from the TouchScreen. System apps (Security and
Settings) and device apps (such as Cameras or Thermostats) cannot be uninstalled.
To uninstall an app:
SMCRB5701-Z TouchScreen Security System User Manual
28
Configuring the TouchScreen
. A list of installed apps appears.
2.
Touch the Up and Down arrows on the
scrollbar to expose additional apps.
3.
Touch the app you want to uninstall and
touch Next. The app being removed is
displayed.
4.
Touch Next. The TouchScreen displays the confirmation message:
The [name] widget has been removed.
5.
Touch Next to redisplay the list of installed apps.
29
SMCRB5701-Z TouchScreen Security System User Manual

Configuring the TouchScreen
Warning: Low Power Mode is an emergency backup mode that ensures your security system
will continue to communicate alarms during unforeseen power outages. During Low Power
Mode, your system loses remote control functionality and only broadcasts major system
events such as alarms.
Note: The Subscriber Portal and mobile devices might eventually report a loss of broadband
and cellular connectivity if the AC Power Loss message was not received for some reason. In
this case, they will not report AC Power Loss trouble.
Low Power Mode
The TouchScreen is powered by a back-up battery and A/C power. When A/C power is lost,
the TouchScreen places itself in Low Power mode.
If A/C power to the TouchScreen is lost, the following occurs:
1. The Quickarm button LED and the Panic Alarm button LED go dark.
2. The TouchScreen stops communicating over broadband with the central-monitoring
station and the system servers. If the premise loses power, the router will be down as
well.
3. The TouchScreen stops sending heartbeat signals to the system servers over
cellular.
4. The TouchScreen reports an AC Power Loss trouble in the Trouble Header.
5. If connectivity is available , the TouchScreen tries to send an AC Power Loss
message to the system servers over a cellular connection. If the system servers
receive the message, the Subscriber Portal and other mobile devices report AC
Power Loss trouble and will never report a Connectivity Loss trouble messages for
as long as Low Power Mode continues.
6. Fifteen seconds after the attempt to send the message, the TouchScreen screen
goes dark.
7. While in Low Power Mode:
– Tapping the screen ―wakes up‖ the TouchScreen temporarily to display the Home
screen; however you will not be able to use any TouchScreen apps that need to
communicate with remote sources. For example, you will not be able to use the
News app or Photo app at all.
– The TouchScreen stays awake only long enough to continue communicating with the
sensors and monitoring for other events.
SMCRB5701-Z TouchScreen Security System User Manual
30
 Loading...