

Page 1

EZ Switch 10/100
8-Port Fast Ethernet Switch
8 auto-MDI/MDI-X ports—connect to PCs or other
switches or hubs
One Gigabit port for high-speed uplink
Plug and play—nothing to configure
Auto-negotiation of speed and duplex mode
Full-duplex support on all ports
Half- and full-duplex flow control
Desktop and rack mountable
User Guide
SMC-EZ109DT
Page 2

Page 3

EZ Switch 10/100
User Guide
From SMC’s EZ line of low-cost workgroup LAN solutions
6 Hughes
Irvine, CA 92618
Phone: (949) 707-2400
May 2001
Pub. # 150524-R01
Page 4

Copyright
Information furnished by SMC Networks, Inc. (SMC) is believed to be accurate and reliable.
However, no responsibility is assumed by SMC for its use, nor for any infringements of patents
or other rights of third parties which may r esu lt fr o m its use. No license is granted by
implicatio n or otherwise under any pate nt or patent righ ts of SMC. SMC re se rves the right to
change specifications at any time without notice.
Copyright © 2001 by
SMC Networks, Inc.
6 Hughes, Irvine, CA.
All rights reserved. Printed in Taiwan
Trademarks:
SMC is a registered trademark; and EZ Switch is a trademark of SMC Networks, Inc. Other
product and company names are trademarks or registered trademarks of their respective
holders.
Page 5

L
IMITED WARRANTY
Limited Warranty
Limited Warranty Statement: SMC Networks, In c. (“SMC”) warrants its products
to be free from defects in workmanship and materials, under normal use and
service, for the applicable warranty term. All SMC products carry a standard 90-day
limited warranty from the date of purchase from SMC or its Authorized Reseller.
SMC may, at its own discretion, repair or replace any product not operating as
warranted with a similar or functionally equivalent product, during the applicable
warranty term. SMC will endeavo r to repair or replace any pr od uc t retur n ed und er
warranty within 30 days of receip t of the product.
The standard limited warranty can be upgraded to a Limited Lifetime* warranty by
registering new products wi th in 30 days of purc hase fro m SM C or its Au thor iz ed
Reseller. Registration can be accomplished via the enclosed product registration
card or online via the SMC web site. Failure to register will not affect the standard
limited warranty. The Limited Lifetime warranty covers a produc t during th e Life of
that Product, which is defined as the period of time during which the product is an
“Active” SMC product. A product is considered to be “Active” while it is listed on
the current SMC price list. As new technologies emerge, older technologies become
obsolete and SMC will, at its discretion, replace an older product in its product line
with one that incorporates these newer technologies. At that point, the obsolete
product is discontinued and is no longer an “Active” SMC product. A list of
discontinued products with their respective dates of discontinuance can be found at
http://www.smc.com/smc/pages_html/support.html.
All products that are replaced become the property of SMC. Replacement products
may be either new or reconditioned. Any replaced or repaired product carries
either a 30-day limited warran ty or the rem aind er of the in it ial war ran ty, whi cheve r
is longer. SMC is not responsible for any custom software or firmware,
configuration information, or memory data of Customer contained in, stored on, or
integrated with any products returned to SMC pursuant to any warranty. Products
returned to SMC should have any customer-installed accessory or add-on
components, such as expansion modules, removed prior to returning the product
for replacement. SMC is not responsible for these items if they are returned with the
product.
Customers must contact SMC for a Return Material Authorization number prior to
returning any product to SMC. Proof of purchase may be required. Any product
returned to SMC without a valid Return Material Authorization (RMA) number
clearly marked on the outside of the package will be returned to customer at
customer’s expense. For warranty claims within North America, please call our
toll-free customer support number at (800) 762-4968. Customers are responsible for
all shipping charges from their facility to SMC. SMC is responsible for return
shipping charges from SMC to customer.
WARRANTIES EXCLUSIVE: IF AN SMC PRODUCT DO ES NOT OPE RATE AS
WARRANTED ABOVE, CUSTOMER’S SOLE REMEDY SHALL BE REPAIR OR
REPLACEMENT OF THE PRODUCT IN QUES TION, AT SMC’S OPTION. THE
FOREGOING WARRANTIES AND REMEDIES ARE EXCLUSIVE AND ARE IN LIEU
Page 6

L
IMITED WARRANTY
OF ALL OTHER WARRANTIES OR CONDITIONS, EXPRESS OR IMPLIED, EITHER
IN FACT OR BY OPERATION OF LAW, STATUTORY OR OT HERWISE, INCLUDING
WARRANTIES OR CONDITIONS OF MERCHANTABILITY AND FITNESS FOR A
P ARTICULA R PUR POSE. SMC N EITHE R ASSUM ES NOR AUTH ORIZE S ANY OTHE R
PERSON TO ASSUME FOR IT ANY OTHER LIABILITY IN CONNECTION WITH
THE SALE, INSTALLATION, MAINTENANCE OR USE OF ITS PRODUCTS. SMC
SHALL NOT BE LIABLE UNDER THIS WARRANTY IF ITS TESTING AND
EXAMINATION DISCLOSE THE ALLEGED DEFECT IN THE PRODUCT DOES NOT
EXIST OR WAS CAUSED BY CUSTOMER'S OR ANY THIRD PERSON'S MISUSE,
NEGLECT, IMPROPER INSTALLATION OR TESTING, UNAUTHORIZED ATTEMPTS
TO REPAIR, OR ANY OTHER CAUSE BEYOND THE RANGE OF THE INTENDED
USE, OR BY ACCIDENT, FIRE, LIGHTNING, OR OTHER HAZARD.
LIMITATION OF LIABILITY: IN NO EVENT, WHETHER BASED IN CONTRACT OR
TORT (INCLUDING NEGLIGENCE), SHALL SMC BE LIABLE FOR INCIDENTAL,
CONSEQUENTIAL, INDIRECT , SPECIAL, OR PUNITIVE DAM AGES OF ANY KIND,
OR FOR LOSS OF REVENUE, LOSS OF BUSINESS, OR OTHER FINANCIAL LOSS
ARISING OUT OF OR IN CONNECTION WITH THE SALE, INSTALLAT ION,
MAINTENANCE, USE, PERFORMANCE, FAILURE, OR INTERRUPTION OF ITS
PRODUCTS, EVEN IF SMC OR ITS AUTHORIZED RESELLER HAS BEEN ADVISED
OF THE POSSIBILITY OF SUCH DAMAGES.
SOME STATES DO NOT ALLOW THE EXCLUSION OF IMPLIED WARRANTIES OR
THE LIMITATION OF INCIDENTAL OR CONSEQUENTIAL DAMAGES FOR
CONSUMER PRODUCTS , SO THE AB OVE LIMI TATIONS AND EXCLUSIONS MAY
NOT APPLY TO YOU. THIS WARRANTY GIVES YOU SPECIFIC LEGAL RIGHTS,
WHICH MAY VARY FROM STA TE TO STATE. NOTHING IN THIS WARRANTY
SHALL BE TAKEN TO AFFECT YOUR STATUTORY RIGHTS.
* SMC will provide warranty service for one year following discontinuance from the
active SMC price list. Under the limited lifetime warranty, internal and external
power supplies, fans, and cables are covered by a standard one-year warranty from
date of purchase.
SMC Networks, Inc.
6 Hughes
Irvine, CA 92618
Page 7

C
OMPLIANCES
FCC Class A
This equipmen t has been t ested and foun d to c omply with t he l imits for a Cl ass A dig ital
device pursuant to Part 15 of FCC Rules. These limits are designed to provide
reasonable protection against harmful interference when the equipment is operated in a
commercial environment.
This equipm ent generates, uses, and can radiate radio fr equency energy, and if not
installed and used in accordance with the instruction manual may cause harmful
interference to radio communications. Its operation in a residential area is likely to
cause harmful interference in which case the user will be required to correct the
interference at his own expense.
EC Conformance Declaration - Class A
SMC contact for these products in Europe is:
SMC Networks Europe,
Edificio Conata II,
Calle Fructuós Gelabert 6-8, 2
08970 - Sant Joan Despí,
Barcelona, Spain.
This information technology equipment complies with the requirements of the Low
Voltage Directive 73/23/EEC and the EMC Directiv e 89/336/EEC, and carries the CE
Mark accordingly. It conforms to the following specifications:
EMC: EN55024 (1998)/CISPR-22 (1995) Class A
IEC 61000-4-2 (1995) 4 kV CD, 8 kV AD
IEC 61000-4-3 (1995) 3 V/m
IEC 61000-4-4 (1995) 1.0 kV - (power line)
IEC 61000-4-5 (1995) 2 kV - (line to line)
IEC 61000-4-6 (1995) 3 V rms
IEC 61000-4-11 (1995) Voltage dip >95% - 10 ms
o
, 4a,
0.5 kV - (signal line)
1 kV - (line to ground)
30% - 500 ms
Voltage interruption >95% - 5000 ms
60% - 100 ms
i
Page 8

C
OMPLIANCES
Industry Canada - Class A
This digital apparatus does not exceed the Class A limits for radio noise emissions from
digital apparatus as set out in the interference-causing equipment standard entitled
“Digital Apparatus”, ICES-003 of Industry Canada.
Cet appareil numérique respecte les limites de bruits radioélectriques applicables aux
appareils numériques de Classe A prescrites dans la norme sur le matérial brouilleur:
“Appareils Numériques”, NMB-003 édictée par l’Industrie.
Safety Compliance
CSA/NRTL (C22.2.950, UL 1950)
EN 60950, (IEC 95 0)
ii
Page 9

C
OMPLIANCES
Wichtige Sicherheitshinweise (Germany)
1. Bitte lesen Sie diese Hinweise sorgfältig durch.
2. Heben Sie diese Anleitung fü r de n spät e re n Gebrauch auf.
3. Vor jedem Reinigen ist das Gerät vom Stromnetz zu trennen. Verwenden Sie keine
Flüssigoder Aerosolreiniger. Am besten eignet sich ein angefeuchtetes Tuch zur
Reinigung.
4. Die Netzanschlu ßsteckdose soll nahe dem Gerät angebracht und leicht zugänglich
sein.
5. Das Gerät ist vor Feuchtigkeit zu schützen.
6. Bei der Aufstellung des Gerätes ist auf sicheren Sta nd zu achten. Ein Kippen oder
Fallen könnte Beschädigungen hervorrufen.
7. Die Bel üftungsöffnungen dienen der Luftzirkulation, die das Gerät vor Überhitzung
schützt. Sorgen Sie dafür, daß diese Öffnungen nicht abgedeckt werden.
8. Beachten Sie beim Anschluß an das Stromnetz di e Anschlußwerte.
9. Verlegen Sie die Netzanschlußleitung so, daß niemand darüber fallen kann. Es sollte
auch nichts auf der Leitung abgestellt werden.
10. Alle Hinweise und Warnungen, die sich am Gerät befinden, sind zu beachten.
11. Wird das Gerät über einen längeren Zeitraum nicht benutzt, sollten Sie es vom
Stromnetz trennen. Somit wird im Falle einer Überspannung eine Beschädigung
vermieden.
12. Durch die Lüftungsöffnungen dürfen niemals Gegenstände oder Flüssigkeiten in das
Gerät gelangen. Dies könnte einen Brand bzw. elektrischen Schla g auslösen.
13. Öffnen sie niemals das Gerät. Das Gerät darf aus Gründen der elektrischen
Sicherhe it nur von authorisiertem Servicepersona l g e öffnet werden.
14. Wenn folgende Situationen a uf treten ist das Gerät vom Stromnetz zu trennen und
von einer qualifizierten Servicestelle zu überprüfen:
a. Netzkabel oder Netzstecker sind beschädigt.
b. Flüssig keit ist in das Gerät einge dru ng e n.
c. Das Gerät war Feuchtigkeit ausgesetzt.
d. Wenn das Gerät nicht der Bedienungsanleitung entsprechend funktioniert oder
Sie mit Hilfe dieser Anleitung keine Verbesserung erzielen.
e. Das Gerät ist gefallen und/oder das Gehäuse ist beschädigt.
f. Wenn das Gerät deutliche Anzeichen eines Defektes aufweist.
15. Zum Netzanschluß dieses Gerätes ist eine geprüfte Leitung zu verwenden. Für einen
Nennstrom bis 6 A und einem Gerätegewicht größer 3 kg ist eine Leitung nicht
leichter als H05V V-F, 3G, 0.75 mm
Der arbeitsplatzbezogene Schalldruckpegel nach DIN 45 635 Teil 1000 beträgt 70 dB(A)
oder weniger.
2
einzusetzen.
iii
Page 10

C
OMPLIANCES
iv
Page 11

T
ABLE OF
About the EZ Switch 10/100 . . . . . . . . . . . . . . . . . .1
Features and Benefits . . . . . . . . . . . . . . . . . . . . . . . . . . . . . . . . 2
Front Panel LEDs . . . . . . . . . . . . . . . . . . . . . . . . . . . . . . . . . . . 3
Rear Panel . . . . . . . . . . . . . . . . . . . . . . . . . . . . . . . . . . . . . . . . 4
Installing the Switch . . . . . . . . . . . . . . . . . . . . . . . .5
Equipment Checklist . . . . . . . . . . . . . . . . . . . . . . . . . . . . . . . . 5
Selecting a Site . . . . . . . . . . . . . . . . . . . . . . . . . . . . . . . . . . . . 5
Instructions . . . . . . . . . . . . . . . . . . . . . . . . . . . . . . . . . . . . . . . 6
Positioning the Switch . . . . . . . . . . . . . . . . . . . . . . . . . . . . 6
Applying Power . . . . . . . . . . . . . . . . . . . . . . . . . . . . . . . . 6
RJ-45 10/100 Mbps Connections . . . . . . . . . . . . . . . . . . . . . 7
Connecting to the Gigabit Uplink Port . . . . . . . . . . . . . . . . 7
Sample Applications . . . . . . . . . . . . . . . . . . . . . . . . . . . . . . . . 8
Troubleshooting . . . . . . . . . . . . . . . . . . . . . . . . . .10
Cables . . . . . . . . . . . . . . . . . . . . . . . . . . . . . . . . . . .11
Cable Specifications . . . . . . . . . . . . . . . . . . . . . . . . . . . . . . . . 11
RJ-45 Connector Pin Assignments . . . . . . . . . . . . . . . . . . . . . . 12
10BASE-T/100BASE-TX Pin Assignments . . . . . . . . . . . . . . 12
1000BASE-T Pin Assignments . . . . . . . . . . . . . . . . . . . . . . 13
1000BASE-T Cable Requirements . . . . . . . . . . . . . . . . . . . . . . 14
Cable Testing for Existing Category 5 Cable . . . . . . . . . . . 14
Adjusting Existi ng Category 5 Cabling to Run 1000BASE-T 15
C
ONTENTS
Specifications . . . . . . . . . . . . . . . . . . . . . . . . . . . . .16
v
Page 12

T
ABLE OF CONTENTS
vi
Page 13

A
BOUT THE
A
EZ S
WITCH
10/100
BOUT THE
EZ S
The EZ Switch 10/100 SMC-EZ10 9DT is an 8-port Fast Ethernet
switch with one Gigabit uplink port. The 10BASE-T/100BASE-TX
ports deliver dedicated 10/100 Mbps links to each attached LAN
segment. The Gi ga bit port opera tes at 100 and 1000 Mbps. Each
port on the switch supports automatic MDI/MDI-X detection. This
means that you can u s e eith er st ra ight -thr ough or cr oss over cab les
to connect to any other network device.
Auto-negotia tion is used to select the optimal transmission speed
and communication mode for each connection. With
store-and-forward switching and flow control, maximum data
integrity i s a lw ays mainta ined, even under heavy loading. Easy
installation and reliability make this plug-and-play switch an ideal
choice for smoot h Fast Ethernet integration.
WITCH
10/100
1
Page 14

A
BOUT THE
EZ S
WITCH
10/100
Features and Benefits
◆ Auto configuration for MDI/MDI-X cable connection allows
connections to servers, workstations, hubs or switches to be
made with straight-through cabling
◆ One Gigabit uplink port for high-speed uplink
◆ Auto-negotia tion of half or ful l d uplex on all ports
◆ IEEE 802.3 and 802.3u compliance ensures compatibility with
standards-based hubs, switches and cards from any vendor
◆ Half- and full-duplex flow control prevents packets from being
dropped under heavy loading
◆ “At-a-glance” LEDs for por t and sy s te m st at us monitoring
◆ Desktop and rack mountable
2
Page 15
A
BOUT THE
EZ S
WITCH
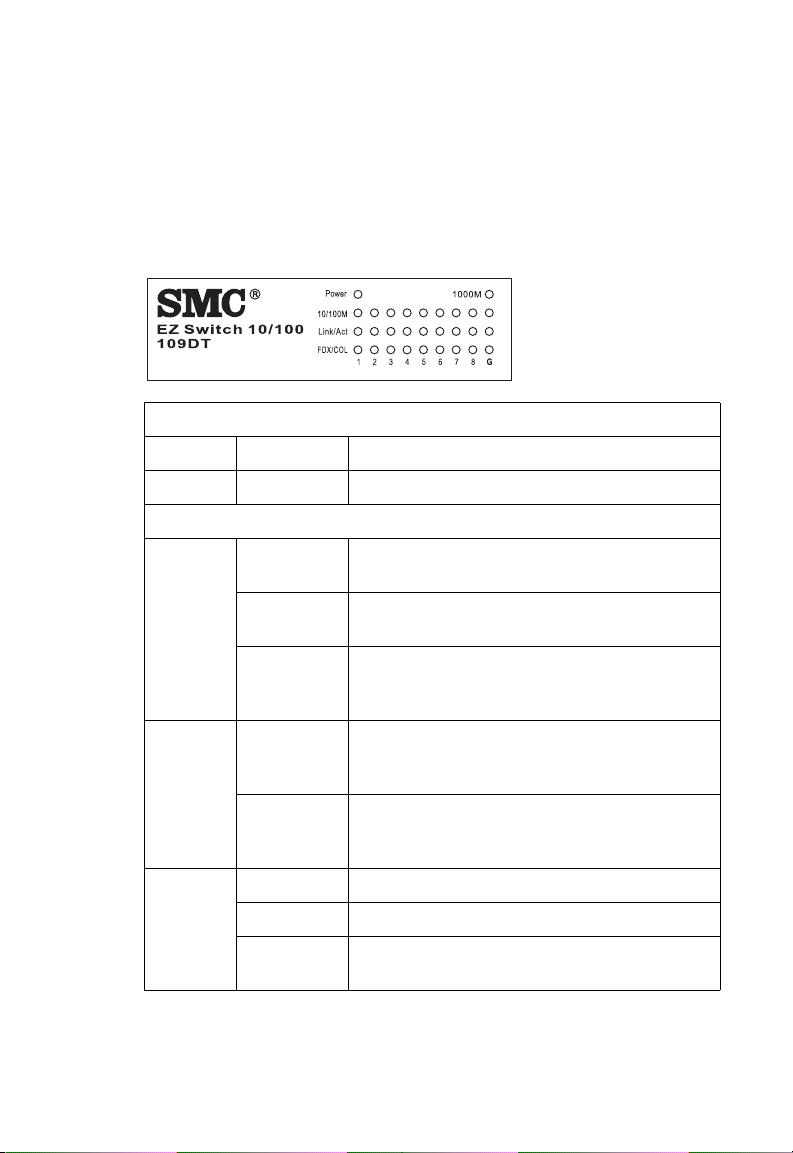
Front Panel LEDs
The front panel of the switch provides status LEDs for “at-a-glance”
system monitoring. The following table details the functions of the
various indicators:
Port and System Status LEDs
LED Condition Status
Power On The switch is receiving power.
Ports 1-8
10/100
LINK/
ACT
10/100M Off The port has established a valid network
FDX/
COL
Off The port has not established any network
connection.
On The port has established a valid network
connection.
Flashing The port has established a valid network
connection and traffic is passing through the
port.
connection and communications have been
set to 10 Mbps.
On The port has established a valid network
connection and communications have been
set to 100 Mbps.
On The port is in full-duplex mode.
Off The port is in half-duplex mode.
Flashing Packet collision is occurring in half-duplex
mode.
3
Page 16

A
BOUT THE
EZ S
WITCH
10/100
Port and System Status LEDs
LED Condition Status
Gigabit Port
LINK/
ACT
10/100M On The port has established a valid network
1000M On The port has established a valid network
FDX/
COL
Off The port has not established any network
connection.
On The port has established a valid network
connection.
Flashing The port has established a valid network
connection and traffic is passing through the
port.
connection and communications have been
set to 100 Mbps.
connection and communications have been
set to 1000 Mbps.
On The port is in full-duplex mode.
Off The port is in half-duplex mode.
Flashing Packet collision is occurring in half-duplex
mode.
Rear Panel
The AC power receptacle is located on the rear panel o f the
switch.
100-240V~ 50-60Hz 0.3A
4
Page 17

I
NSTALLING THE SWITCH
I
NSTALLING THE
S
Equipment Checklist
After unpacking the EZ Sw itch 10/100, check th e contents of the
box to be sure you h a ve received the following components:
• EZ Switch 10/100 SMC-EZ109DT
• Appropriate AC power cable
• Four adhesive foot pads & rackmount kit
• SMC Warranty Registration C a rd
•This User Guide
Selecting a Site
Be sure to follow the site selection guidelines below when
choosing a location:
WITCH
Select a suitable location for the switch:
• It should be access ible for installing, cabling and
maintaining th e switch.
• The temperatur e and humidity should be withi n the ranges
listed in the sp ecifications .
• The status LEDs should be clearly visible.
• There should be adequate space (approximately two
inches) on all sides for proper air flow.
Make sure twisted-pair cable is always routed away from
power lines, fluorescent lighting fixtures and other sources of
electrical interference such as radios and transmitters.
5
Page 18

I
NSTALLING THE SWITCH
Make sure that a properly grounded power outlet is within 2.44
meters (8 feet) of the switch and is powered from an
independent circuit breaker. As with any equipment, using a
filter or surge suppressor is recommended.
Instructions
Positioning the Switch
The EZ Switch 10/100 can be placed anywhere there is enough flat
space, such as on a desktop or a shelf.
1. Attach the four adhesi ve feet to the bottom of the switch.
2. Place the first switch on a firm, flat surface where you want to
install the stack
3. Repeat step 1 for each switch before stacking them. The rubber
foot pads cushion the switch against shocks and vibrations,
and provide space between each switch for ventilation.
Applying Power
Plug one end of the power cable into the power receptacle at the
back of the switch, and the other end into an appropriate electrical
outlet. Check the Power LED to be sure power is on.
6
Page 19

I
NSTALLING THE SWITCH
Note: It is not necessary to po w e r off the switch before
connecting or disconnecting any UTP cables, as these
actions will not disrupt the operation of other devices
attached to the switch.
RJ-45 10/100 Mbps Connections
For twisted-pair devices, connect each PC to an RJ-45 port on the
switch with a twisted-pair cable segment, maxi mum 100 meters
(328 feet). Use Category 3, 4, or 5 cable for 10 Mbps conn ec tions,
and Category 5 cable for all 100 Mbps connections.
Note: If an attached de vice does not support
auto-negotiation, the data rate will be sensed
automatically and the com munication mode will
default to half duplex.
Connecting to the Gigabit Uplink Port
The Gigabit uplink port operates at 1000 and 100 Mbps and
supports IEEE 802.3x flow control. Auto-negotiation is used to
select the opti m a l transmission spe ed and communication mode.
Use Category 5 or 5e cable of maximum length 100m (328 feet).
You should also test the cable installation for IEEE 802.3ab
compliance. See “1000BASE-T Cable Requirements” on page 14.
7
Page 20

I
NSTALLING THE SWITCH
Sample Applications
This switch segments your network, significantly increasing both
bandwidth and throughput. Any port on the switch can be
attached to a hub ( a shared collision domain) or pr ovide a
dedicated link t o a single n etwork device (such as a workstatio n or
server). When a port on the switch is connected to a hub (a 10 or
100 Mbps repeater), the bandwidt h provided by that port is shared
by all the devices c on nected to the attache d hub. However, when
a port is connected to an end nod e or to a devic e that breaks up
the collision domain (e.g., another switch, bridge or router), the
attached device has access to the fu l l bandwidth provided by that
port.
Bridging Functions - This switch provides fully t ransparent
bridging functi ons. I t au tom atical ly l earns nod e ad dresses , th at are
subsequently used to filt er and fo rwar d all tr affic based on the
destination address. When traffic passes between devices attached
to the same shared collision domain, those packets are filtered
from the switch. But when traffic must be pas s ed between unique
segments (i.e., different ports on the switch), the high-speed
switching fabric forwards the packets at near zero latency.
Switching Functions - Store-and-forward switching is us ed to
forward traffic to other ports. This scheme ensures data integrity
and provides a clean data stream.
Flexible Configuration - This switch is not only designed to
segment your netwo rk, but also to provi de a wide range of options
in setting up network connections. It can be used as a simple
stand-alone switch; or be connected with standard repeater hubs,
switches, or other network interconnection devices in vari ou s
configurations.
8
Page 21

I
NSTALLING THE SWITCH
Gigabit Uplink Port - You can use the Gigabit port to support
applications such as hig h-sp eed file serv er s, or fo r conn ecti ng to a
collapsed backbone switch.
In the figure below, the EZ Switch 10/100 is operating as a
collapsed backbone for a small LAN. It is providing dedicated 20
Mbps full-duplex connections to workstations and 200 Mbps
full-duplex connections to power users and servers. The Gigabit
port is used to provide a 2 Gbps full-duplex link to a server.
9
Page 22

T
ROUBLESHOOTING
1. Symptom
Power LED does not light after power on.
Probable Causes
Power outlet or po w er cord may be defective.
Possible Solutions
• Check for loos e connections.
• Check the power outlet by using it for another device.
• Replace the power cord.
2. Symptom
Link LED does not light after connection is made.
Probable Causes
Switch port, network car d or cable may be defective.
T
ROUBLESHOOTING
10
Possible Solutions
• Check that the switch and attached device are both
powered on.
• Be sure the network cab l e is conn ected to both devices.
• Verify that Category 5 cable is used for 100 Mbps
connections and that the len gt h of any cab l e doe s not
exceed 100 meters (328 feet).
• Check the network car d and cable conne ctions for defe cts.
• Replace the defect i ve card or cable if ne cessary.
Page 23

CABLE SPECIFICATIONs
Maximum 10BASE-T, 100BASE-TX and 1000BASE-T Cable Length
Cable Type Max. Length Connector
10BASE-T Cat. 3, 4, 5 100-ohm UTP 100 m (328 ft) RJ-45
100BASE-TX Cat. 5 100-ohm UTP 100 m (328 ft) RJ-45
1000BASE-T Cat. 5, 5e 100-ohm UTP 100 m (328 ft) RJ-45
C
ABLES
C
ABLES
11
Page 24

C
ABLES
RJ-45 Connector Pin Assignments
Caution: DO NOT plug a phone ja ck connector into a ny RJ-45
port. Use only tw isted- pai r c abl es wi th R J-45 con nect ors
that conform with FCC standards.
10BASE-T/100BASE-TX Pin Assignments
An Ethernet or Fast Ethernet twisted-pair link segment requires
two pairs of wires. Each wire pair is identified by two different
colors. Each wire pair must be attached to the RJ-45 connector in a
specific orientation detailed below.
Because all ports on this switch support automatic MDI/MDI-X
operation, you can use straight-through cables for all network
connections to PCs or servers, or to other switches or hubs. In
straight-through cable, pins 1, 2, 3, and 6, at one end of the cable,
are connected straight through to pins 1, 2, 3 and 6 at the other
end of the cable.
MDI-X port pinouts.
The table below shows the 1000BASE-T MDI and
12
Pin MDI-X Signal Name MDI Signal Name
1
2
3
6
4, 5, 7, 8
Receive Data plus (RD+)
Receive Data minus (RD-)
Transmit Data plus (TD+)
Transmit Data minus (TD-)
Not used at 10/100 Mbps
Transmit Data plus (TD+)
Transmit Data minus (TD-)
Receive Data plus (RD+)
Receive Data minus (RD-)
Not used at 10/100 Mbps
Page 25

1000BASE-T Pin Assignments
The table below shows the 1000BASE-T MDI and MDI-X port
pinouts. These ports require that all four pairs of wi re s be
connected. Note that for 1000BASE-T operation, all four pairs of
wires are used for both transmit and receive.
Use 100-ohm Category 5 or 5e unshielded twisted-pair (UTP) or
shielded twisted-pa ir (STP) cab le for 1000BASE-T connections.
Also be sure
exceed 100 meters (328 fe et)
Pin MDI Signal Name MDI-X Signal Name
1
2
3
4
5
6
7
8
that the length of an y twisted-pair c onnection doe s not
.
Transmit Data plus (TD1+)
Receive Data minus (RD1-)
Transmit Data plus (TD2+)
Transmit Data plus (TD3+)
Receive Data minus (RD3-)
Receive Data minus (RD2-)
Transmit Data plus (TD4+)
Receive Data minus (RD4-)
Transmit Data plus (TD2+)
Receive Data minus (RD2-)
Transmit Data plus (TD1+)
Transmit Data plus (TD4+)
Receive Data minus (RD4-)
Receive Data minus (RD1-)
Transmit Data plus (TD3+)
Receive Data minus (RD3-)
C
ABLES
13
Page 26

C
ABLES
1000BASE-T Cable Requirements
All Category 5 UTP cables that are used for 100B A S E-T X
connections shou ld also work for 1000BASE-T, providing that all
four wire pairs a r e connected. Ho w ever, it is recommended tha t
for all critical c onnections , or any new c able install ations, Category
5e (enhanced Category 5) cable should be used. The Category 5e
specification includes test parameters that are only
recommendations for Category 5.
Therefore, the first step in pre p a ring existing Category 5 cabling
for running 1000BASE -T is a simple te st of th e cabl e installat io n to
be sure that it complies with the IEEE 802.3ab standards.
Cable Testing for Existing Category 5 Cable
Installed Category 5 cabling mus t pa ss tests for Attenuatio n,
Near-End Crosstalk (NEXT), and Far- End Crosstalk (FE XT). This
cable testing information is specified in the ANSI/TIA/EIA-TSB-67
standard. Additionally, cables must also pass test parame te rs for
Return Loss and Equal-Level Far-End Crosstalk (ELFEXT). These
tests are specified in the ANSI /TIA/EIA-TSB-95 Bulletin, “The
Additional Transmission Perfo rmance Gui de lines for 100 O hm
4-Pair Category 5 Cabling.”
Note that when testing your cable installation, be sure to include
all patch cables between switches and end devices.
14
Page 27

Adjusting Existing Category 5 Cabling to Run 1000BASE-T
If your existing Category 5 installation does not meet one of the
test parameters for 1000BASE-T, there are basically three measures
that can be applied to try and correct the problem:
1. Replace any Category 5 patch cables with hig h- pe rformance
Category 5e cables.
2. Reduce the number of connectors used in the link.
3. Reconnect some of the connectors in the link.
C
ABLES
15
Page 28

S
PECIFICATIONS
S
PECIFICATIONS
Access Method
CSMA/CD
Ports
8 10BASE-T/1 00BASE-TX, with a uto-negotiation
1 100BASE-TX/1000BA SE-T with auto-negotiation
Network Interface
RJ-45: 100 ohm, UTP cable
10BASE-T - Categories 3, 4, or 5
100BASE-TX - Category 5
1000BASE-T - Ca tegory 5 or 5e
LEDs
System: Power
Ports 1-8: Link/A ct, FDX/COL, 10/100M
Gigabit Port: Link/Act, FDX/COL, 100M, 1000M
Switching Method
Store-and-forward
MAC Address Table
4K total
Memory Buffer
2 MBytes per system
Filtering/Forwarding/Learning Rates
Full line rat e
Flow Control
Full Duplex: IEEE 802.3x
Half Duplex: Back pressure
Size
250 x 117 x 37 mm (9.84 x 4.61 x 1.46 in.)
16
Page 29

Weight
0.85 kg (1.87 lbs)
Temperature
Operating: 0 to 40 °C (32 to 104 °F)
Storage: -40 to 85 °C (-40 to 185 °F)
Humidity
5% to 95% non-conden sing
Power Requirements
100 to 240 VAC (±10%) 50 to 60 Hz (±3 Hz)
Power Consumption
15 Watts maximum @100 - 240 VAC
Heat Dissipation
51 BTU/hr maximum @100 - 240 VAC
Maximum Current
0.4 A @ 115 VAC
0.2 A @ 240 VAC
Standards
IEEE 802.3
IEEE 802.3u
IEEE 802.3ab
S
PECIFICATIONS
EMC/Safety Compliances
CE Mark
FCC Class A
EN55024 (CISPR 22) Class A
IEC 61000-4-2/3/4/5/6/11
CSA/NRTL (C22.2.950, UL 1950)
TÜV/GS (EN60950 )
Warranty
Limited Lifetime
17
Page 30

S
PECIFICATIONS
18
Page 31

Page 32

FOR TECHNICAL SUPPORT, CALL:
From U.S.A. and Canada (24 hours, 7 days a week)
(800) SMC-4-YOU; (949) 707-2400; (949) 707-2460 (Fax)
From Europe (8:00 AM - 5:30 PM UK Greenwich Mean Time)
44 (0) 1188 748740; 44 (0) 1189 748741 (Fax)
INTERNET
E-mail address:
techsupport@smc.com
european.techsupport@smc-europe.com
Driver updates:
http://www.smc.com/support.html
World Wide Web:
http://www.smc.com/
FTP Site:
ftp.smc.com
FOR LITERATURE OR ADVERTISING RESPONSE, CALL:
U.S.A. and Canada: (800) SMC-4-YOU; Fax (949) 707-2460
Spain: 34-93-477-4920; Fax 34-93-477-3774
UK: 44 (0) 1188 748700; Fax 44 (0) 1189 748701
Southern Europe: 33 (1) 41.18.68.68; Fax 33 (1) 41.18.68.69
Central/Eastern Europe: 49 (0) 89 92861-200; Fax 49 (0) 89 92861-230
Nordic: 46 (8) 564 33145; Fax 46 (8) 87 62 62
Middle East: 971-48818410; Fax 971-48817993
South Africa: 27 (0) 11-3936491; Fax 27 (0) 11-3936491
PRC: 86-10-6235-4958; Fax 86-10-6235-4962
Taiwan: 886-2-2747-4780; Fax 886-2-2747-9220
Asia Pacific: (65) 238 6556; Fax (65) 238 6466
Korea: 82-2-553-0860; Fax 82-2-553-7202
Japan: 81-45-224-2332; Fax 81-45-224-2331
Australia: 61-2-9416-0437; Fax 61-2-9416-0474
India: 91-22-8204437; Fax 91-22-8204443
6 Hughes
Irvine, CA 92618
Phone: (949) 707-2400
Model Number: SMC-EZ109DT
Publication Number: 150524-301 E052001-R01
 Loading...