

Page 1

SMCBR24Q User Manual
Page 1
Page 2

SMCBR24Q User Manual
Table of Contents
1. How To Install SMCBR24Q ................................................................................................... 6
Hardware Features.......................................................................................................... 6
Feature List........................................................................................................................ 6
LED Status.........................................................................................................................6
Reset Button...................................................................................................................... 6
Q-Button............................................................................................................................. 6
2. How To Manage SMCBR24Q – Home Mode ...................................................................... 7
Login................................................................................................................................... 7
Mode .................................................................................................................................. 7
Site Map............................................................................................................................. 7
System Summary ............................................................................................................ 8
Basic Setup ................................................................................................................... 11
Network............................................................................................................................ 11
Password ......................................................................................................................... 14
Time ................................................................................................................................. 16
MAC Clone ...................................................................................................................... 17
Remote Internet Passport.............................................................................................. 19
On-Line Scheduler.......................................................................................................... 19
Web Site Hit Rate ........................................................................................................... 19
Application Usage........................................................................................................... 21
Performance Optimization..............................................................................................23
Block List.......................................................................................................................... 26
Advanced Setup ............................................................................................................ 28
DMZ Host......................................................................................................................... 28
Forwarding....................................................................................................................... 28
UPnP ................................................................................................................................ 31
DDNS ............................................................................................................................... 32
Advanced Routing...........................................................................................................33
VPN Pass Through......................................................................................................... 35
Remote Management..................................................................................................... 36
System Management...................................................................................................... 37
Log................................................................................................................................. 40
Q-button in the Home Mode .......................................................................................... 43
3. How To Manage SMCBR24Q – SOHO Mode ................................................................... 45
Page 2
Page 3

SMCBR24Q User Manual
Login................................................................................................................................. 45
Mode ................................................................................................................................ 45
Site Map........................................................................................................................... 46
System Summary .......................................................................................................... 47
Setup ............................................................................................................................. 50
Network............................................................................................................................ 50
Password ......................................................................................................................... 53
Time ................................................................................................................................. 54
DMZ Host......................................................................................................................... 55
Forwarding....................................................................................................................... 56
UPnP ................................................................................................................................ 59
MAC Clone ...................................................................................................................... 60
DDNS ............................................................................................................................... 60
Advanced Routing...........................................................................................................61
DHCP ............................................................................................................................64
Setup ................................................................................................................................ 64
Status ............................................................................................................................... 67
Security.......................................................................................................................... 67
General ............................................................................................................................ 67
Access Rules................................................................................................................... 69
Content Filter................................................................................................................... 73
VPN Pass Through......................................................................................................... 74
System Management..................................................................................................... 76
Dual WAN ........................................................................................................................ 76
QoS .................................................................................................................................. 80
Diagnostic........................................................................................................................ 83
Factory Default................................................................................................................ 86
Firmware Upgrade.......................................................................................................... 87
Setting Backup ................................................................................................................ 88
Log................................................................................................................................. 89
System Log...................................................................................................................... 89
System Statistics............................................................................................................. 92
Q-button in the SOHO Mode ......................................................................................... 93
Page 3
Page 4

SMCBR24Q User Manual
Introduction
SMCBR24Q is a 4-port QoS router which can be easily used at home and in a SOHO environment. It
contains two WAN ports and four Ethernet 10/100 LAN ports. The SMCBR24Q combines flexible and
easy-to-use QoS, parental control, firewall, and NAT with Fast Ethernet connections.
The flexible and easy-use QoS is a very practical function for bandwidth management. It supports traffic
prioritization, guaranteed bandwidth, and limited bandwidth. By using these useful functions, every user
behind SMCBR24Q can have his/her own bandwidth to access internet without having to worry about traffic
congestion caused by randomly shared bandwidth. SMCBR24Q’s QoS function is ideal for bandwidth
sensitive applications such as VoIP and media streams since it can guarantee those specific applications or
users the minimum essential bandwidth rates.
For home, SMCBR24Q’s easy-to-use parental control utilities (access rules, bandwidth management, and
content filtering), can help parents easily setup the access rules for their children to limit internet access
time and protect children from accessing unwanted websites.
For SOHO, SMCBR24Q will allow two separate broadband connections of many types, including Cable and
DSL for failover and load balancing/ connection backup with the unique two WAN ports.
SMCBR24Q also features built-in firewall to block various kinds of malicious attacks and curious intruders.
The product uses stateful packet inspection (SPI) to inspect all data packets based on the established
security policies. It also provides automatic protection from Denial of service (DoS) attacks such as SYN
flooding, IP Spoofing, LAND, ping of death and all reassembly attacks. NAT functionality with firewall
conceals network address avoiding the disclosure as public information and also provides a solution for IP
address depletion problem. The product also has reverse NAT capabilities that enable users to host various
internet services in the private IP address space such as web servers or e-mail servers.
SMCBR24Q also features easy to use WEB UI configuration for end users with different operation systems
and with Setup Wizard support, end users can configure the router easily right out of the box.
Page 4
Page 5

Main features:
- Flexible and easy-to-use QoS
Guaranteed bandwidth (Min. bandwidth rate)
Limited bandwidth (Max. bandwidth rate)
Supports traffic prioritization
- Flexible and easy-to-use Parental Control
Access rules
Bandwidth Management
Content Filtering
- Firewall Security
Denial of Service (DoS) prevention
Stateful Packet Inspection (SPI)
SMCBR24Q User Manual
IP filtering: allows you to configure IP address filters
Port filtering: allows you to configure TCP/UDP port filters
- Networking
Smart Link Backup
Load Balance
DHCP Client/Server
PPPoE
NAT with popular ALG support
NAT with port forwarding
NAT with port triggers
DNS Relay
ARP
ICMP
FTP/TFTP
Password protected configuration or management sessions for web access
- Network Management
Comprehensive web based management and policy settings
Built-in Setup Wizard simplifies installation
Monitoring, Logging, and Alarms of system activities
Locate and configure all devices with the same subnet
Parental control Utility for home user
Page 5
Page 6

1. How to Install SMCBR24Q
Hardware Features
Feature List
WAN: 2 RJ-45 10/100Base-T Ethernet Ports
LAN: 4 RJ-45 10/100Base-T Ethernet ports
CPU: Intel IXP425-266MHz
SDRAM: 16 Mbytes SDRAM
Flash ROM: 8 Mbytes Flash
Sys. Power: 3.3V@2.5A
EMI/EMC: FCC Class B, CE Class B
Operating Temp. 0ºC to 40ºC (32ºF to 104ºF)
Operation Requirement
Dimensions 16.38 x 16.21 x 6.99 cm/ 6.4 x 6.3 x 2.7 in
Storage Temp. 0ºC to 70ºC (32ºF to 158ºF)
Operating Humidity 10% to 85% Non-Condensing
Storage Humidity 5% to 90% Non-Condensing
SMCBR24Q User Manual
LED Status
LED Color Description
System Green Green On: Power On
DIAG Orange
Q-button Green Green On: Button On
1~2 WAN Ports Green
1~4 LAN Ports Green
Orange On: System not ready
Orange Off: System ready
Green On: Ethernet Link
Green Blinking: Activity
Green On: Ethernet Link
Green Blinking: Activity
Reset Button
Action Description
Push button for 4 seconds
Push button for 10 seconds
Warm Reset
Diag LED : Red Blinking slowly
Factory Default
Diag LED : Red Blinking fast
Q-Button
Action Description
Push the button on Green LED and Q-button On
Push the button off Green LED and Q-button Off
Page 6
Page 7

2. How to Manage SMCBR24Q – Home Mode
Login
SMCBR24Q User Manual
In the web browser, enter the IP address “192.168.2.1” as SMCBR24Q’s URL. Enter User Name and
Password then OK. The default User Name and Password are 'smcadmin' when you first power up the
Router.
Mode
You can choose between Home Mode and SOHO Mode. The default is Home Mode. It is suggested for
home users to use Home mode to apply individual and basic settings for family members. SOHO mode
provides more advanced functions, and SOHO mode is suggested for SOHO users. If you need to change
modes, please save your settings before changing modes.
Note: The Utility will only work with Home Mode.
Site Map
You can click the site map button to view the site map. Click on desired tab subject and it will hyperlink to
the page you have chosen.
Page 7
Page 8

SMCBR24Q User Manual
System Summary
The System summary screen displays the router’s current status, settings, and all PCs that are connected
to the SMCBR24Q.
System Information
System up time: The length of time in Days, Hours, and Minutes that the SMCBR24Q has been active.
WAN1/2 IP: Shows the current WAN1/2 IP Address of the Router, as seen by external users on the
Internet and hyperlinks to WAN Connection type in Basic Setup page. When users select obtain an IP
automatically, it will show two buttons, release and renew. Users can click the release button to release
the current IP address and click renew button to update the DHCP Lease Time or to get a new IP address.
Page 8
Page 9

User Usage
SMCBR24Q User Manual
This page will display the real time percentages of bandwidth usage for individual users and it is based on the
max downstream rate provided by IS P. If dual WANs are used, you can see on this page who is using WAN 1
and who is using WAN 2. Parents have the option to use bandwidth control for the specific family member by
the user’s usage information.
User Bandwidth
All PCs connected to SMCBR24Q will be recorded and displayed here.
User Name: SMCBR24Q will display PC’s host name automatically, and will also have the option to rename it.
IP: IP address issued to the PC by SMCBR24Q DHCP Server.
Page 9
Page 10

SMCBR24Q User Manual
Interface: The default is WAN 1. If dual WANs are used, you can assign WAN 1 or WAN 2 to the users from
the Interface drop-down menu for bandwidth management.
Min. Rate (Kbit/Sec): You can set up Min. Rate to guarantee bandwidth for individual user. The default is zero.
Total Min. Rate you allocate for all users will not exceed the max upstream rate provided by ISP.
Max. Rate (Kbit/Sec): You can set up Max. Rate to limit bandwidth for individual user. The default is the max
upstream rate provided by ISP. If you set up the max rate as 0 Kbit/Sec for the specific user, that user will not
be able to access the internet.
Delete: You can click the trash can icon to delete the users whose bandwidth you don’t need to manage
anymore.
Note 1:
happen, at the command prompt of a client computer, type ipconfig /release. After the computer finishes
performing the command, type ipconfig /release, then type ipconfig /renew.
Note 2:
Any deleted on-line client can be recovered by an ipconfig /release & ipconfig /renew. To make this
Any configurations here except the default will make the Q-button a hot key. For more details,
please refer to Q-button–Home Mode.
ISP Bandwidth
Enter the max upstream and downstream rates provided by ISP. The default rate is 512 Kbit/Sec.
Any configurations here except the default will make the Q-button a hot key. For more details,
Note:
please refer to Q-button–Home Mode.
For more information, click the Help button. Click the Save Settings button to save System Summary settings
or click the Cancel button to undo changes.
Page 10
Page 11

SMCBR24Q User Manual
Basic Setup
The Setup screen contains all of the router’s basic setup functions. For most users, the default values for the
device should be satisfactory. The device can be used in most network settings without changing any of the
values. Some users will need to enter additional information in order to connect to the Internet through an ISP
(Internet Service Provider) or broadband (DSL, cable modem) carrier.
Network
Network
Host Name & Domain Name: Enter a host and domain name for the Router. Some ISPs (Internet Service
Providers) may require these names as identification and these settings can be obtained from your ISP. In
most cases, leaving these fields blank will work.
LAN Setting
This is the Router’s LAN IP Address and Subnet Mask. The default value is 192.168.1.1 for IP address and
255.255.255.0 for the Subnet Mask.
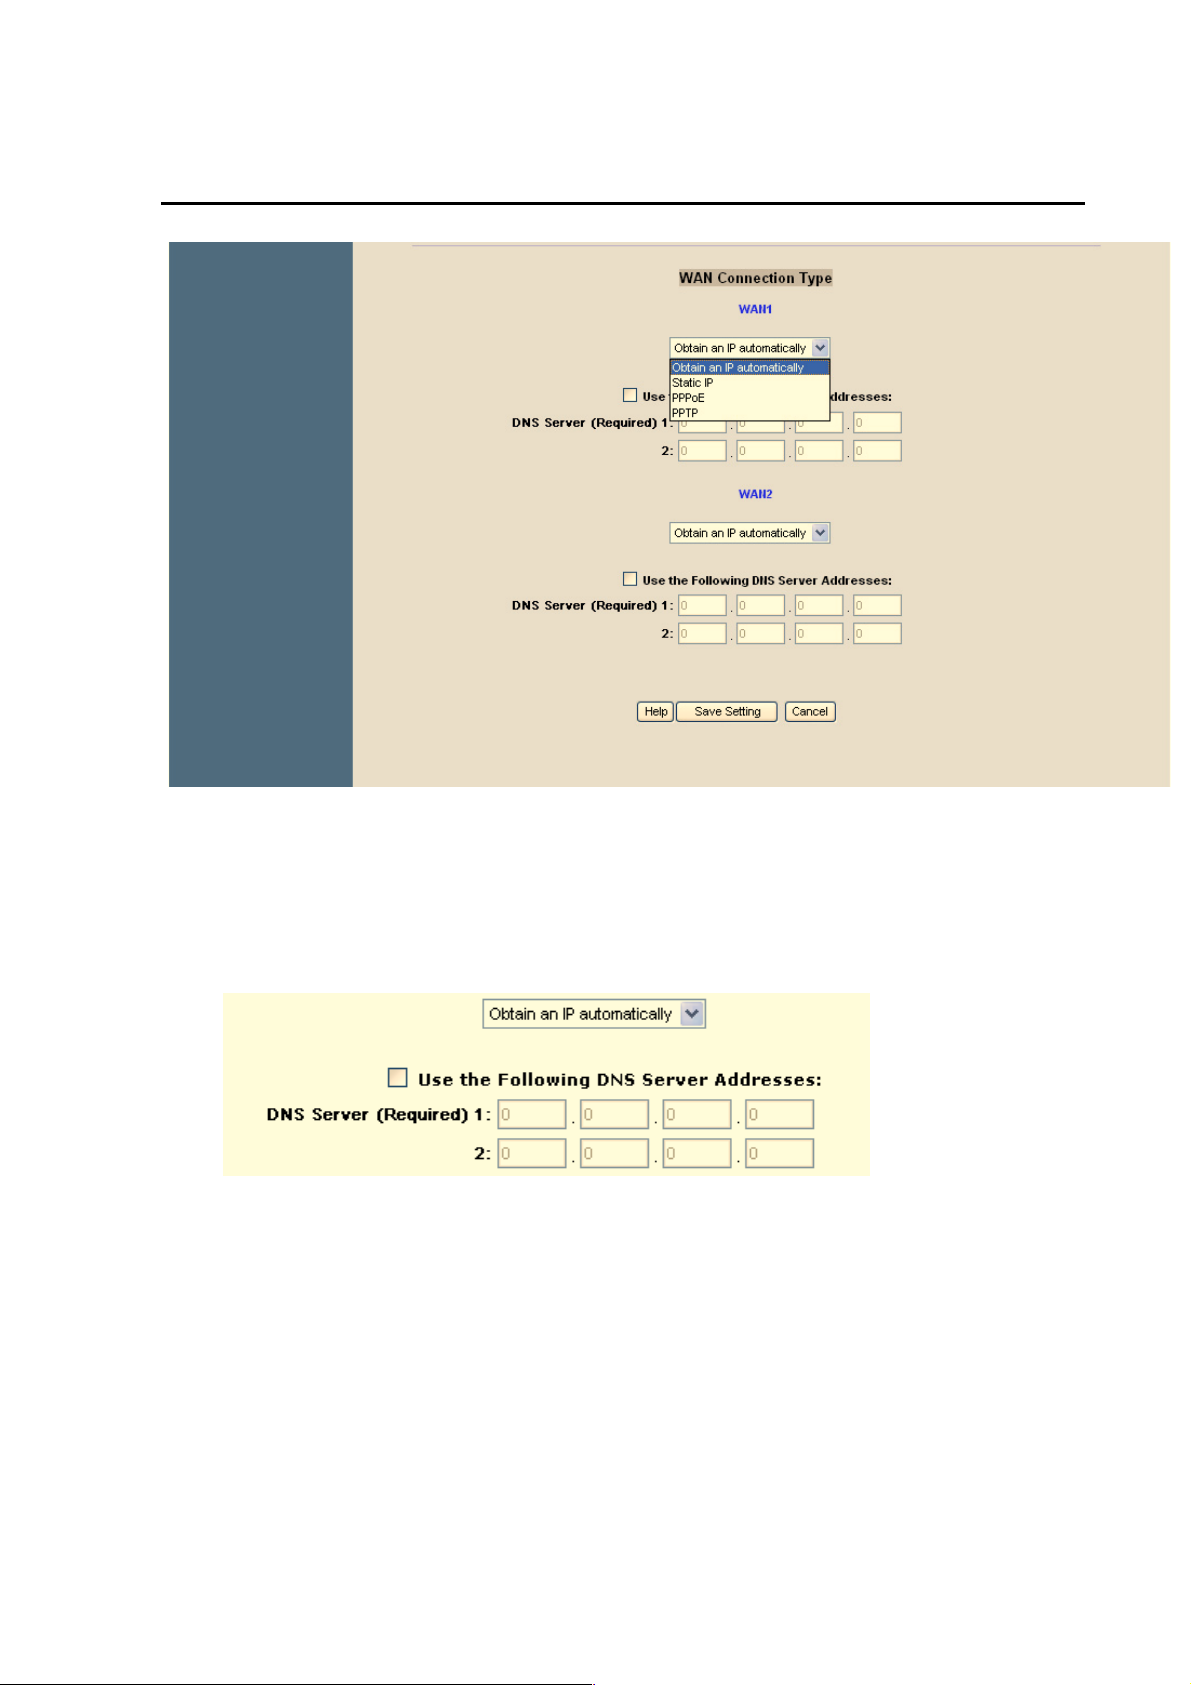
WAN Connection Type:
Page 11
Page 12
SMCBR24Q User Manual
Obtain an IP automatically:
If your ISP is running a DHCP server, select Obtain an IP automatically option. Your ISP will assign these
values automatically. Check the Following DNS Server Addresses. Multiple DNS IP Settings are common. In
most cases, the first available DNS entry is used.
Static IP:
If you have a specify WAN IP Address, Subnet Mask, Default Gateway Address and DNS Server, select
Static IP. You can get this information from your ISP.
Page 12
Page 13

SMCBR24Q User Manual
PPPoE (Point-to-Point Protocol over Ethernet):
Please check with your ISP to make sure whether PPPoE should be enabled or not.
If they do use PPPoE,
1. Enter your Username and Password.
2. If you select Connect on Demand option, the PPPoE connection will be disconnected if it has
been idle for a period longer than the Max Idle Time setting.
3. If you select Keep Alive option, the Router will keep the connection alive by sending out a few data
packets at Redial Period, so your Internet service thinks that the connection is still alive.
PPTP (Point-to-Point Tunneling Protocol):
Page 13
Page 14

SMCBR24Q User Manual
1. Enter the Specify WAN IP Address, Subnet Mask, and Default Gateway Address that is the PPTP
server’s IP that resides in the Modem.
2. Enter your Username and Password.
3. If you select Connect on Demand option, the connection will be disconnected if it has been idle for
a period longer than the Max. Idle Time setting.
4. If you select Keep Alive option, the Router will keep the connection alive by sending out a few data
packets at Redial Period, so your Internet service thinks that the connection is still alive.
For more information, click the Help button. Click the Save Settings button to save the Basic Setup settings
or click the Cancel button to undo the changes.
Password
The SMCBR24Q's default password is 'smcadmin', and it is strongly recommended that you change the
Router's password. If you leave the password blank, all users on your network will be able to access the
Router simply by entering the unit’s IP address into their web browser’s location window.
Page 14
Page 15

SMCBR24Q User Manual
Old Password:
Enter the old password. The default Password is ‘smcadmin’ when you first power up the Router.
(Note: The password cannot be recovered if it is lost or forgotten. If the password is lost or forgotten, you will
need to reset the Router to its factory default state.)
New Password:
Enter a new password for the Router. Your password must be less than 64 characters long and it can not
contain any spaces.
Confirm New Password:
Re-enter the password for confirmation.
For more information, click the Help button. Click the Save Settings button to save the Password settings or
click the Cancel button to undo the changes.
Page 15
Page 16

SMCBR24Q User Manual
Time
SMCBR24Q uses the time settings to time stamp log events, to automatically update the Content Filter List,
On-Line Scheduler, and for other internal purposes.
Set the local time using Network Time Protocol (NTP) automatically or manually.
Automatically:
Select the Time Zone and enter the Daylight Saving and NTP Server.
(Note: Default NTP Server is time.nist.gov. If you want to configure as other NTP Server, please fill in NTP
Server field.)
Manual:
Enter the Hours, Minutes, Seconds, Month, Day and Year.
Page 16
Page 17

SMCBR24Q User Manual
For more information, click the Help button. Click the Save Settings button to save the Time settings or click
the Cancel button to undo the changes.
MAC Clone
Some ISPs require you to register a MAC address. This "clones" your network adapter's MAC address onto
the Cable/DSL Firewall Router, and prevents you from having to call your ISP to change the registered MAC
address to the Cable/DSL Firewall Router's MAC address. The Cable/DSL Firewall Router's MAC address is
a 12-digit code assigned to a unique piece of hardware for identification, like a social security number.
Page 17
Page 18

SMCBR24Q User Manual
Input the MAC Address to User Defined WAN MAC Address field or select MAC Address from this PC.
For more information, click the Help button. Click the Save Settings button to save the MAC Clone settings
or click the Cancel button to undo the changes.
Page 18
Page 19

Remote Internet Passport
On-Line Scheduler
SMCBR24Q User Manual
The SMCBR24Q allows or denies Internet access for the selected users in units of hour, day, entire AM, or
entire PM.
Select Users: Select the users from the drop-down menu.
On-Line Scheduler screen: Click on any hour to allow or deny Internet access. Green indicates allowed
Internet access, and Red indicates blocked Internet access.
Allow: To allow Internet access for an entire day, AM, or PM, click the day of the week, Entire AM, or Entire PM in the
row.
Block: To block Internet access for an entire day, AM, or PM, click the day of the week, Entire AM, or Entire PM in the
row.
For more information, click the Help button. Click the Save Settings button to save the On-line Scheduler
settings or click the Cancel button to undo the changes.
Page 19
Allow
Block
Page 20

Web Site Hit Rate
SMCBR24Q User Manual
The Website Hit Rate tab shows the top 10 websites by frequency the selected user has visited today, last
six days, and their related information, Ranking, Web Site, and Hit Rates. This also allows you to block the
selected website.
Select Users: Select the users from the drop-down menu.
Select Date: Select the date from the drop-down menu.
Refresh Data: Click the R e f r e s h D a t a button to update the data.
Ranking: The rankings of the top 10 websites are in a descending order.
Web Site: Click the website address and Internet Explorer will open at that address to find out the site
contents.
Hit Rates: This shows how many times the web has been visited.
Block: Check the box to block the site by clicking once. Click again to unblock the site. The default is
“unblock”.
After saving the settings, the blocked website will be listed in the Website Block list.
Page 20
Page 21

SMCBR24Q User Manual
For more information, click the Help button. Click the Save Settings button to save the Website Hit Rate
settings or click the Cancel button to undo the changes.
Application Usage
This Application Usage tab shows the current usages of applications. The max number of applications is 20.
You will be able to determine which application is consuming most bandwidth currently.
Select Users: Select the users from the drop-down menu,
Refresh Data: Click the Refresh Data button to update the data.
Ranking: The rankings of the applications by bandwidth consumption are in a descending order.
Application names: The field shows the application name. The field of any undefined application name is
blank. You can enter the desired name in the blank field.
Protocol: This indicates the protocol used by the application.
Port No.: This indicates the port number used by the application.
Page 21
Page 22

SMCBR24Q User Manual
Usage (%): This shows the value of the current usages of the top 20 applications by percentage of the
selected user’s usable bandwidth.
Block: Check the box to block the application by clicking once. Click again to unblock the site. The default is
“unblock”.
After saving the settings, the blocked website will be listed in the Application Block list.
For more information, click the Help button. Click the Save Settings button to save the Application Usage
settings or click the Cancel button to undo the changes.
Page 22
Page 23

Performance Optimization
SMCBR24Q User Manual
Page 23
Page 24

SMCBR24Q User Manual
The screen displays the 19 default suggested applications where you can optimize their performance and
view their Application Names and Performance Optimization. You can also add or edit new applications
whose performance you wish to optimize. Before enabling the bandwidth suggestion, please make sure you
have allocated the min. bandwidth rate for this family member.
Select Users. Select the users from the drop-down menu,
Enable: To enable Performance Optimization check the box by clicking once and pushing the Q-button
on (located on the top of the front panel of the router). Click again or push the Q-button off to undo your
setting. The default is “disable”.
Application Names: The field shows the application names.
Performance Optimization: After enabled, select Normal, Good, or Better performance level by clicking the
radio button. The default is “Good”
Any configurations here except the default will make the Q-button a hot key. For more details,
Note:
please refer to Q-button–Home Mode.
For more information, click the Help button. Click the Save Settings button to save the Performance
Optimization settings or click the Cancel button to undo the changes.
Page 24
Page 25

SMCBR24Q User Manual
To create a new application:
Click the Add/Edit New Applications button. Then the Application Management screen will appear.
To add an application, enter the name of the application in the Application Name field. Select protocol from the
Protocol drop-down menu, enter range in the Port Range fields and fill out a value in kbps in the Recommended
bandwidth to a good degree field. Then click the Add to list button.
To modify an application, select the application from the list on the right. Change its name, protocol setting, port
range, or recommended bandwidth to a good degree. Then click the Modify button.
To delete an application, select the application from the list on the right. Then click the Delete button.
When you are finished making changes on the Application Management screen, click the Save Setting button to
save changes.
If you want to cancel your changes, click the Cancel Changes button. To close the Application Management
screen and return to the Performance Optimization screen, click the Exit button.
Page 25
Page 26
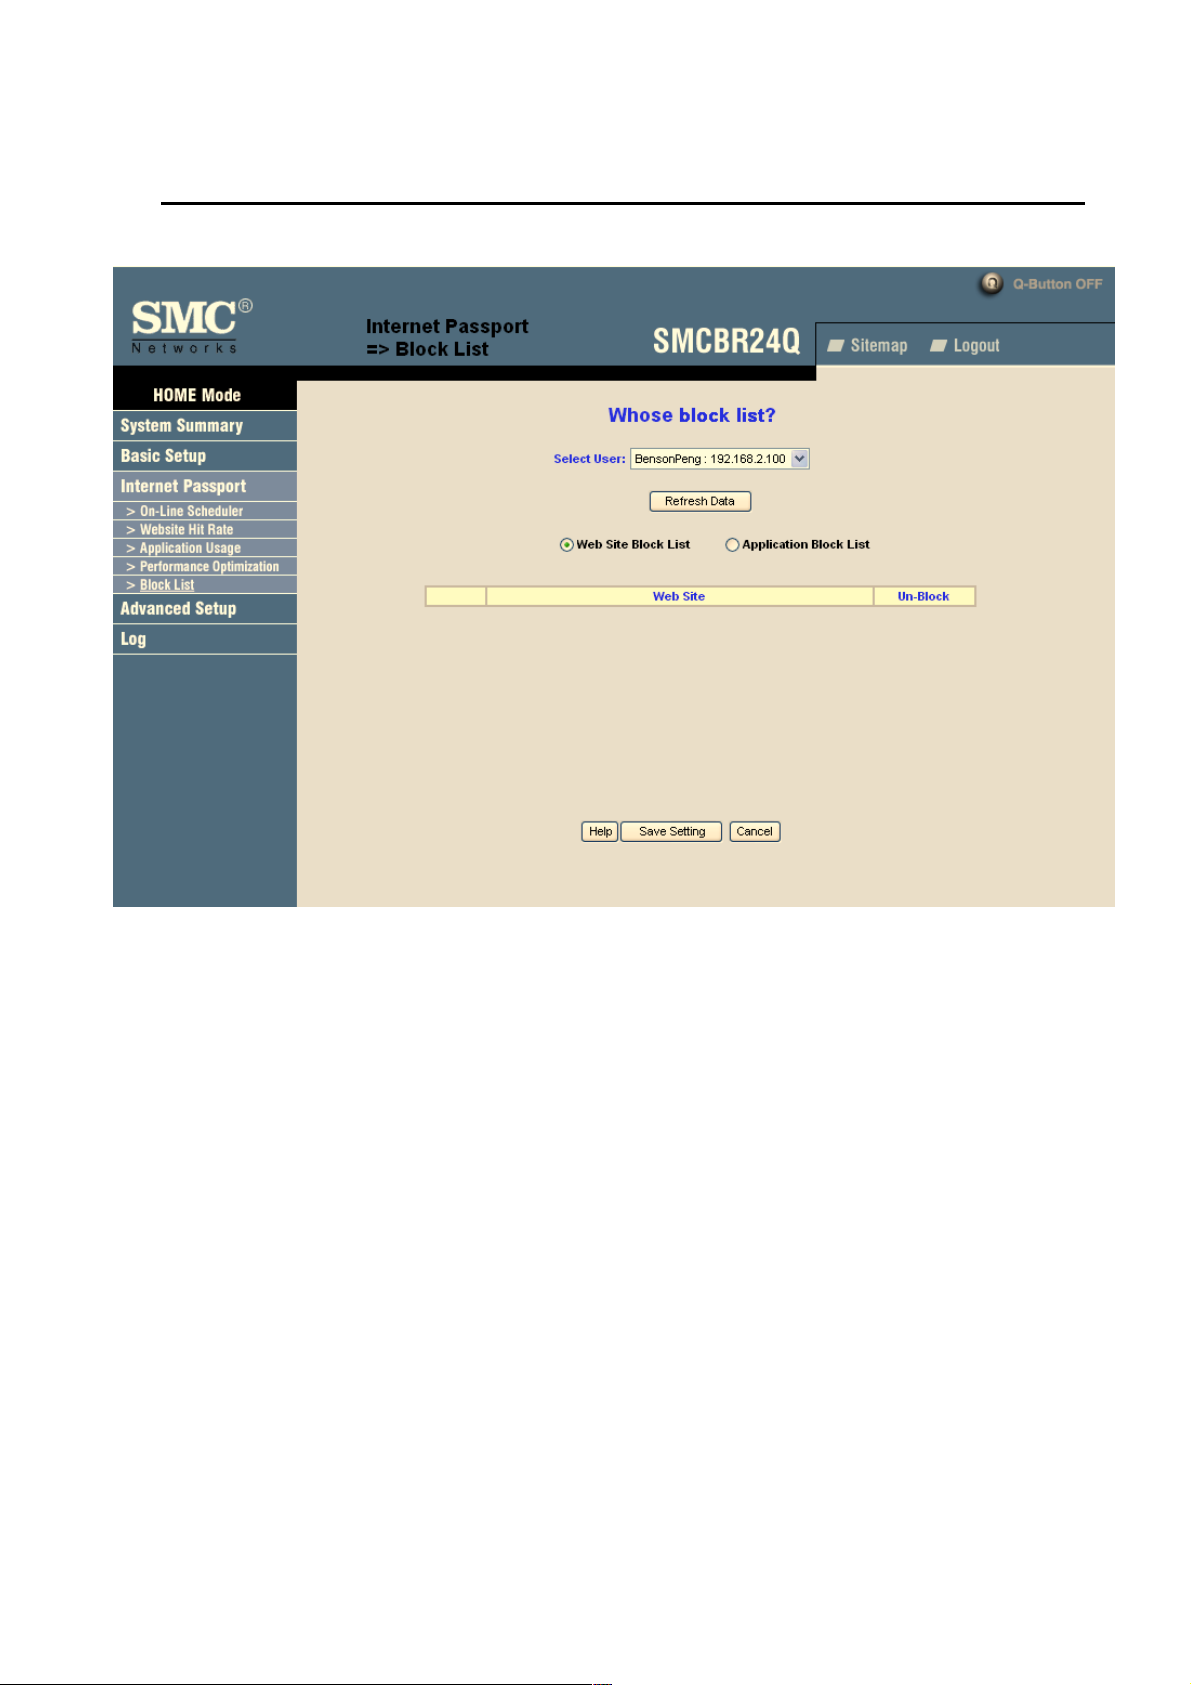
Block List
SMCBR24Q User Manual
The Block List screen shows two lists, Web Site Block List and Application Block List.
You can view all blocked websites and applications on this screen and can also unblock these blocked websites
and applications.
Web Site Block List
Select Users: Select the users from the drop-down menu.
Refresh Data: Click the Refresh Data button to update the data.
Web Site: Click the website address and Internet Explorer will open at that address to find out the site contents.
Unblock: You can cancel your settings by clicking the checked box and the website will turn to unblock.
Page 26
Page 27

SMCBR24Q User Manual
Application Block List
Select Users: Select the users from the drop-down menu,
Refresh Data: Click the Refresh Data button to update the data.
Application Block List: Click the radio button to see blocked applications.
Application Names: The field shows the blocked application names.
Protocol: This indicates protocol used by the application.
Port No.: This indicates port number used by the application.
Unblock: You can cancel your settings by clicking the checked box.
For more information, click the Help button. Click the Save Settings button to save the Block List settings or
click the Cancel button to undo the changes.
Page 27
Page 28

SMCBR24Q User Manual
Advanced Setup
DMZ Host
The DMZ (Demilitarized Zone) Host feature allows one local user to be exposed to the Internet for a
special-purpose service such as Internet gaming and video-conferencing.
Enter the DMZ Private IP Address to access DMZ Host settings.
For more information, click the Help button. Click the Save Settings button to save the DMZ Host settings or
click the Cancel button to undo the changes.
Page 28
Page 29

SMCBR24Q User Manual
Forwarding
Port forwarding can be used to set up public services on your network. When users from the Internet make
certain requests on your network, the Router can forward those requests to computers equipped to handle
the requests. For example, if you set the port number 80 (HTTP) to be forwarded to IP Address 192.168.1.2,
then all HTTP requests from outside users will be forwarded to 192.168.1.2.
You may use this function to establish a Web server or FTP server via an IP Gateway. Be sure that you
enter a valid IP Address. (You may need to establish a static IP address in order to properly run an Internet
server.) For added security, Internet users will be able to communicate with the server, but they are not
actually connected. The packets are simply forwarded through the Router.
Port Range Forwarding:
1. Select the Service from the pull-down menu.
2. If the Service you need is not listed in menu, please click the Service Management button to add new
Service and enter the Protocol and Port Range. Then click the Save Setting button.
Page 29
Page 30

SMCBR24Q User Manual
3. Enter the IP Address of the server that you want the Internet users to access. Then enable the entry.
4. Click the Add to List button, and configure as many entries as you would like. You also can delete
selected application.
Port Triggering
Some Internet applications or games use alternate ports to communicate between server and LAN host.
When you want to use those applications, enter the triggering (outgoing) port and alternate incoming port in
Page 30
Page 31

SMCBR24Q User Manual
this table. The Router will forward the incoming packets to the LAN host.
1. Enter the range of port numbers, application name, and incoming port range.
2. You can click the Add to List button to add Port Triggering or Delete selected application.
For more information, click the Help button. Click the Save Settings button to save the Forwarding settings or
click the Cancel button to undo the changes. Click the Show Tables to see the details.
UPnP
UPnP forwarding can be used to set up public services on your network. Windows XP can modify those
entries via UPnP when UPnP function is enabled by selecting Yes.
1. Users need to click the Service Management to enter the Service Name, Protocol, External Port,
Internal Port, and then click Add to list and then Save Settings.
2. Enter the Host Name or IP Address of the server that you want the Internet users to access, and then
enable the entry by checking the Enable box.
3. Click the Add to List button, and configure as many entries as you would like to. The max. entry is 30.
You can also delete the entry by clicking the Delete selected application button.
4. Users can also change the IP address and Disable the entry. Click the selected entry, change IP or
Page 31
Page 32

SMCBR24Q User Manual
disable the entry by clicking the checked Enable box to be blank. Finally, click the Update this Application
button.
For more information, click the Help button. Click the Save Settings button to save the UPnP settings or
click the Cancel button to undo the changes. Click the Show Tables to see the details. Click the Show
Tables to see the details.
DDNS
DDNS(Dynamic DNS) service allows you to assign a fixed domain name to a dynamic WAN IP address.
This allows you to host your own Web, FTP or other type of TCP/IP server in your LAN.
Before configuring DDNS, you need to visit www.dyndns.org
service is provided by DynDNS.org).
and register a domain name. (The DDNS
Page 32
Page 33

SMCBR24Q User Manual
DDNS Service The DDNS feature is disabled by default. To enable this feature, just check the box.
Username, Password, and Host Name: Enter the Username, Password, and Host Name of the account
you set up with DynDNS.org.
Your IP Address: The Router’s current Internet IP Address is displayed here. Because it is dynamic, this
will change.
For more information, click the Help button. Click the Save Settings button to save the DDNS settings or
click the Cancel button to undo the changes.
Advanced Routing
The Router's dynamic routing feature can be used to automatically adjust to physical changes in the
network layout. The Router uses the dynamic RIP protocol. It determines the route that the network packets
take based on the fewest number of hops between the source and the destination. The RIP protocol
regularly broadcasts routing information to other routers on the network.
Working Mode: Select Gateway mode if your Router is hosting your network’s connection to the Internet.
Select Router mode if the Router exists on a network with other routers, including a separate network
gateway that handles the Internet connection.
Page 33
Page 34

SMCBR24Q User Manual
Dynamic Routing:
Choose the TX: protocol you want for transmitting data on the network. (RIP1 / RIP2)
Choose the RX: protocol you want for receiving data from the network. (RIP1 / RIP2)
Static Routing:
You will need to configure Static Routing if there are multiple routers installed on your network. The static
routing function determines the path that data follows over your network before and after it passes through
the Router. You can use static routing to allow different IP domain users to access the Internet through this
device. This is an advanced feature. Please proceed with caution.
This Router is also capable of dynamic routing (see the Dynamic Routing tab). In many cases, it is better to
use dynamic routing because the function will allow the Router to automatically adjust to physical changes
in the network layout. In order to use static routing, the Router's DHCP settings must be disabled.
To set up static routing, you should add routing entries in the Router's table that tells the device where to
send all incoming packets. All of your network routers should direct the default route entry to the SMC
Router.
Enter the following data to create a static route entry.
1. Destination IP: Enter the network address of the remote LAN segment. For a standard Class C
IP domain, the network address is the first three fields of the Destination LAN IP, while the last field
Page 34
Page 35

SMCBR24Q User Manual
should be zero.
2. Subnet Mask: Enter the Subnet Mask used on the destination LAN IP domain. For Class C IP
domain, the Subnet Mask is 255.255.255.0.
3. Default Gateway IP: If this Router is used to connect your network to the Internet, then your Gateway
IP is the Router's IP Address. If you have another router handling your network's Internet connection,
enter the IP Address of that router instead.
4. Enter hop count (max. 15)
5. Interface:
For more information, click the Help button. Click the Save Settings button to save the Advanced Routing
settings or click the Cancel button to undo the changes. Click the Show Routing Tables to see the current
routing table.
Select LAN, WAN1 or WAN2.
VPN Pass Through
Page 35
Page 36

SMCBR24Q User Manual
IPSec Pass Through
Internet Protocol Security (IPSec) is a suite of protocols used to implement secure exchange of packets at
the IP layer. To allow IPSec tunnels to pass through the Router, IPSec Pass Through is enabled by default.
PPTP Pass Through
Point to Point Tunneling Protocol (PPTP) Pass Through is the method used to enable VPN sessions. PPTP
Pass Through is enabled by default.
L2TP Pass Through
Layer 2 Tunneling Protocol (L2TP) Pass Through is the method used to enable VPN sessions. PPTP Pass
Through is enabled by default.
For more information, click the Help button. Click the Save Settings button to save the VPN Passthrough
settings or click the Cancel button to undo the changes.
Remote Management
Page 36
Page 37

SMCBR24Q User Manual
The SMCBR24Q supports remote management. If you want to manage this Router through the WAN
connection, you have to 'Enable' this option. User can enter the port number for remote management. The
default is disabled.
For more information, click the Help button. Click the Save Settings button to save the Remote
Management settings or click the Cancel button to undo the changes.
System Management
Diagnostics
SMCBR24Q has several tools built in to help with trouble shooting network problems.
DNS Name Lookup
The Internet has a service called the Domain Name Service (DNS) which allows users to enter an easily
remembered host name, such as www.SMCBR24Q.com, instead of numerical TCP/IP addresses to access
Internet resources. SMCBR24Q has a DNS lookup tool that will return the numerical TCP/IP address of a
host name.
Page 37
Page 38

SMCBR24Q User Manual
Enter the host name to lookup in the Look up the name field and click the Go button. SMCBR24Q will then
query the DNS server and display the result at the bottom of the screen.
Note: The IP address of the DNS server must be entered in the Network Settings tab in the General
button for the Name Lookup feature to function.
Ping
The Ping test bounces a packet off a machine on the Internet back to the sender. This test shows if
SMCBR24Q is able to contact the remote host. If users on the LAN are having problems accessing services
on the Internet, try pinging the DNS server, or other machine at the ISP’s location. If this test is successful,
try pinging devices outside the ISP. This will show if the problem lies with the ISP’s connection.
Enter the IP address of the device being pinged and click the Go button. The test will take a few seconds to
complete. Once completed, a message showing the results will be displayed at the bottom of the Web
browser window.
Note: Ping requires an IP address. SMCBR24Q’s DNS Name Lookup tool may be used to find the IP
address of a host.
Factory Default
The "Factory Default" button can be used to clear all of your configuration information and restore
SMCBR24Q to its factory state. Only use this feature if you wish to discard all other configuration
preferences.
Page 38
Page 39

SMCBR24Q User Manual
Firmware Upgrade
Users can download the new version of firmware into computer in advance, and then select the file. Finally,
click the Firmware Upgrade Right Now button.
Import Configuration File:
You will need to specify where your preferences file is located. When you click "Browse", your browser will
bring up a dialog which will allow you to select a file which you had previously saved using the "Export
Settings" button. After you have selected the file, click the "Import" button. This process may take up to a
minute. You will then need to restart your SMCBR24Q in order for the changes to take effect.
Page 39
Page 40

SMCBR24Q User Manual
Export Configuration File:
When you click the "Export" button, your browser will bring up a dialog asking you where you would like to
store your preferences file. This file will be called "SMCBR24Q.exp" by default, but you may rename it if you
wish. This process may take up to a minute.
Log
There are three parts in Log Setting.
Page 40
Page 41

SMCBR24Q User Manual
Syslog
Enable Syslog: If check the box, Syslog will be enabled.
Syslog Server: In addition to the standard event log, the SMCBR24Q can send a detailed log to an
external Syslog server. Syslog is an industry-standard protocol used to capture information about network
activity. The SMCBR24Q Syslog captures all log activity and includes every connection source and
destination IP address, IP service, and number of bytes transferred. Enter the Syslog server name or IP
address in the Syslog Server field. Restart the SMCBR24Q for the change to take effect.
E-mail
Mail Server: If you wish to have any log or alert information E-mailed to you, then you must enter the name
or numerical IP address of your SMTP server. Your Internet Service Provider can provide you with this
information.
Send E-mail To: This is the E-mail address to which your log files will be sent. You may leave this field
blank if you do not want to receive copies of your log information.
Send E-mail: The menu determines the frequency of log e-mail messages (None, Hour, Daily, When Full),
and at the time you set up
When system alert, send log immediately.
E-mail Log Now: Clicking E-mail Log Now immediately sends the log to the address in the Send E-mail to
Filed.
Log Status
When log overflows: In some cases, your log buffer may fill up. This will only happen if there is a problem
sending out the E-mail (for instance, if you have not properly filled in the "Mail Server" and "Send Log To"
fields, or if there is a problem with your mail server). The default behavior is to Overwrite Log and discard
its contents. However, you can select Stop Log to shut down and prevent traffic from traveling through the
SMCBR24Q if the log is full.
There are four buttons follow the setup section.
View System Log: Once you press this button, the new window will pop up System Log.
Page 41
Page 42

SMCBR24Q User Manual
Outgoing Log Table: Once you press this button, the new window will pop up and show you the outgoing
packet information including LAN IP, Destination URL/IP and Service/Port number.
Incoming Log Table: Once you press this button, the new window will pop up and show you the incoming
packet information including Source IP and Destination Port number.
Clear Log Now: This button will clear out your log without E-mailing it. Only use this button if you don't mind
losing your log information.
SMCBR24Q is able to perform a report includes the Device Name, Status, IP Address, Received Packets,
Sent Packets, Total Packets, Received Bytes, Sent Bytes, Total Bytes, Error Packets Received and
Dropped Packets Received for LAN, WAN1 and WAN2.
Page 42
Page 43

SMCBR24Q User Manual
Q-button in the Home Mode
The Q-button is a user friendly design. It provides a basic bandwidth management method with
just one push. The end user can enjoy smooth Internet applications without any hassles.
Q-button, Q-button LED and Q-button icon
The Q-button is on the front panel with an LED above the button and an icon in the upper right corner of the
UI indicating its current status. The default is ‘off”. When the Q-button is off (shown in Fig. 2), the green LED
is off and the icon is grayed out. When the Q-button is on (shown in Fig. 2), the green LED is on and the
icon turns yellow.
Fig. 1: Q-button off
Fig. 2: Q-button on
If no bandwidth management configuration by the UI or Utility:
When the button is pushed on without any bandwidth management configurations, the router distributes the
available bandwidth provided by the ISP evenly to the min. rate of bandwidth of each PC on the LAN. The
max. rate of each PC is 100% of the available bandwidth provided by the ISP.
Page 43
Page 44

SMCBR24Q User Manual
If any bandwidth management configuration by the UI or Utility:
Any bandwidth management configurations will make the Q-button a hot key. That means any
configurations of User bandwidth or ISP bandwidth in the System Summary page or those in the
Performance Optimization page. The end user can set the bandwidth management with the
Q-button pushed off in advance. Once the Q-button is on, the pre-settings will be enabled. The end
user can also set the bandwidth management with the Q-button pushed on.
Note: bandwidth management settings will only work with the Q-button pushed on.
Page 44
Page 45

3. How to Manage SMCBR24Q – SOHO Mode
Login
SMCBR24Q User Manual
Enter User Name and Password then click OK.
The Router's default User Name and Password are 'smcadmin' when you first power up the Router.
Mode
You can choose between Home Mode and SOHO Mode. The default is Home Mode. It is suggested for
home users to use Home mode to apply individual and basic settings for family members. SOHO mode
provides more advanced functions, and SOHO mode is suggested for SOHO users. If you need to change
modes, please save your settings before changing modes.
Note: The Utility does not work with SOHO Mode.
Page 45
Page 46

SMCBR24Q User Manual
Site Map
You can click the site map button to view site map. Click on desired tab subject and it will hyperlink to the
page you have chosen.
Page 46
Page 47

SMCBR24Q User Manual
System Summary
The Summary screen displays the router’s current status and settings. This information is read only. If you
click the button with underline, it will hyperlink to related setup pages.
System Information
Serial Number:
The serial number of the SMCBR24Q.
System up time:
The length of time in Days, Hours, and Minutes SMCBR24Q has been active.
Firmware version:
The current version number of the firmware installed on this unit.
CPU:
SMCBR24Q processor: Intel IXP420.
DRAM:
DRAM size on the board: 16MB.
Flash:
Flash on the board: 16MB.
Configuration
The Configuration shows you how to configure the basic setting of the router step by step.
To enable the function, click the Wizard button.
Page 47
Page 48

SMCBR24Q User Manual
Network Setting Status
LAN IP: It shows the current IP Address of the Router, as seen by internal users on the Internet, and
hyperlinks to LAN Setting in Setup page.
WAN1/2 IP
and hyperlinks to WAN Connection type in Setup page. When users select Obtain an IP automatically and
it shows two buttons, release and renew. Users can click the release button to release the current IP
address and click renew button to update the DHCP Lease Time or to get a new IP address. When users
select PPPoE or PPTP, and it shows Connect / Disconnect.
Mode
DNS
DDNS
DMZ Host
disabled.
: It shows the current WAN1 IP Address of the Router, as seen by external users on the Internet
: It shows the Working Mode (Gateway or Router) and hyperlinks to Dynamic Routing in Setup page.
: It shows all DNS Server Addresses and hyperlinks to WAN Connection Type in Setup page.
: It shows the status (Enable / Disable) and hyperlinks to DDNS in Setup page.
: It shows DMZ Private Address and hyperlinks to DMZ Host in Setup page. The default is
Page 48
Page 49

SMCBR24Q User Manual
Firewall Setting Status
SPI (Stateful Packet Inspection): It shows the status (On/Off) and hyperlinks to the General in Firewall
page.
DoS (Deny of Service):
Block WAN Request:
page.
It shows the status (On/Off) and hyperlinks to the General in Firewall page.
It shows the status (On/ Off) and hyperlinks to the Block WAN Request in Firewall
Log Setting Status
It hyperlinks to System Log of Log page of More.
If you have not set up the mail server in Log page, it shows “E-mail cannot be sent because you have not
specified an outbound SMTP server address.”
If you have set up the mail server but the log has not been come out due to Log Queue Length and Log
Time Threshold settings, it shows “E-mail settings have been configured.”
If you have set up the mail server and the log has been sent to the mail server, it shows “E-mail settings
have been configured and sent out normally.”
If you have set up the mail server and log can not be sent to mail sever successfully, it shows “E-mail
cannot be sent out, probably use incorrect settings.”
Page 49
Page 50

SMCBR24Q User Manual
Setup
The Setup screen contains all of the router’s basic setup functions. For most users, the default values for the
device should be satisfactory. The device can be used in most network settings without changing any of the
values. Some users will need to enter additional information in order to connect to the Internet through an ISP
(Internet Service Provider) or broadband (DSL, cable modem) carrier.
Network
Network
Host Name & Domain Name: Enter a host and domain name for the Router. Some ISPs (Internet Service
Providers) may require these names as identification, and these settings can be obtained from your ISP. In
most cases, leaving these fields blank will work.
LAN Setting
This is the Router’s LAN IP Address and Subnet Mask. The default value is 192.168.1.1 for IP address and
255.255.255.0 for the Subnet Mask.
Page 50
Page 51

SMCBR24Q User Manual
WAN Connection Type:
Obtain an IP automatically:
If your ISP is running a DHCP server, select Obtain an IP automatically option. Your ISP will assign these
values automatically. Check the Following DNS Server Addresses. Multiple DNS IP Settings are common. In
most cases, the first available DNS entry is used.
Static IP:
If you have a specify WAN IP Address, Subnet Mask, Default Gateway Address and DNS Server, select
Static IP. You can get this information from your ISP.
PPPoE (Point-to-Point Protocol over Ethernet):
You have to check with your ISP to make sure whether PPPoE should be enabled or not. If they do use
PPPoE,
Page 51
Page 52

SMCBR24Q User Manual
1. Enter your Username and Password.
2. If you select Connect on Demand option, the PPPoE connection will be disconnected if it has been
idle for a period longer than the Max Idle Time setting.
3. If you select Keep Alive option, the Router will keep the connection alive by sending out a few data
packets at Redial Period, so your Internet service thinks that the connection is still alive.
PPTP (Point-to-Point Tunneling Protocol):
2. Enter the Specify WAN IP Address, Subnet Mask and Default Gateway Address that is the PPTP
server’s IP that resides in the Modem.
2. Enter your Username and Password.
3. If you select Connect on Demand option, the connection will be disconnected if it has been idle for
a period longer than the Max Idle Time setting.
4. If you select Keep Alive option, the Router will keep the connection alive by sending out a few data
packets at Redial Period, so your Internet service thinks that the connection is still alive.
Page 52
Page 53

SMCBR24Q User Manual
Password
The Router's default password is 'smcadmin', and it is strongly recommended that you change the Router's
password. If you leave the password as blank, all users on your network will be able to access the Router
simply by entering the unit’s IP address into their web browser’s location window.
Old Password:
Enter the old password. The default Password is ‘admin’ when you first power up the Router.
(Note: The password cannot be recovered if it is lost or forgotten. If the password is lost or forgotten, you will
need to reset the Router to its factory default state.)
New Password:
Enter a new password for the Router. Your password must be less than 64 characters long and it can’t contain
any spaces.
Confirm New Password:
Re-enter the password for confirmation.
Page 53
Page 54

SMCBR24Q User Manual
Administrator Inactivity Time-out:
This setting allows you to configure the length of inactivity that can elapse before you are automatically logged
out of the Web Management Interface. Once logged out, you have to re-login. The default value is 5 minutes.
For more information, click the Help button. Click the Save Settings button to save the Password settings
or click the Cancel button to undo the changes.
Time
SMCBR24Q uses the time settings to time stamp log events, to automatically update the Content Filter List,
On-Line Scheduler and for other internal purposes.
Set the local time using Network Time Protocol (NTP) automatically or manually.
Automatically:
Select the Time Zone and enter the Daylight Saving and NTP Server.
Manual:
Enter the Hours, Minutes, Seconds, Month, Day and Year.
Page 54
Page 55

SMCBR24Q User Manual
For more information, click the Help button. Click the Save Settings button to save the Time settings or
click the Cancel button to undo the changes.
DMZ Host
The DMZ (Demilitarized Zone) Host feature allows one local user to be exposed to the Internet to use a
special-purpose service such as Internet gaming and video-conferencing.
Page 55
Page 56

SMCBR24Q User Manual
Enter the DMZ Private IP Address to access DMZ Host settings.
For more information, click the Help button. Click the Save Settings button to save the DMZ Host settings
or click the Cancel button to undo the changes.
Forwarding
Port forwarding can be used to set up public services on your network. When users from the Internet make
certain requests on your network, the Router can forward those requests to computers equipped to handle
the requests. For example, if you set the port number 80 (HTTP) to be forwarded to IP Address 192.168.1.2,
then all HTTP requests from outside users will be forwarded to 192.168.1.2.
You may use this function to establish a Web server or FTP server via an IP Gateway. Be sure that you
enter a valid IP Address. (You may need to establish a static IP address in order to properly run an Internet
server.) For added security, Internet users will be able to communicate with the server, but they will not
actually be connected. The packets will simply be forwarded through the Router.
Page 56
Page 57

SMCBR24Q User Manual
Port Range Forwarding:
1. Select the Service from the pull-down menu.
2. If the Service you need is not listed in menu, please click the Service Management button to add new
Service and enter the Protocol and Port Range. Then click the Save Setting button.
3. Enter the IP Address of the server that you want the Internet users to access. Then enable the entry.
Page 57
Page 58

SMCBR24Q User Manual
4. Click the Add to List button, and configure as many entries as you would like. You also can Delete the
selected application.
Port Triggering
Some Internet applications or games use alternate ports to communicate between server and LAN host.
When you want to use those applications, enter the triggering (outgoing) port and alternate incoming port in
this table. The Router will forward the incoming packets to the LAN host.
1. Enter the range of port numbers and enter the application name, and enter the incoming port range.
2. You can click the Add to List button to add Port Triggering or Delete selected application.
For more information, click the Help button. Click the Save Settings button to save the Forwarding settings
or click the Cancel button to undo the changes. Click the Show Tables to see the details.
Page 58
Page 59

SMCBR24Q User Manual
UPnP
UPnP forwarding can be used to set up public services on your network. Windows XP can modify those
entries via UPnP when UPnP function is enabled by selecting Yes.
1. Users have to click the Service Management first to enter the Service Name, Protocol and External
Port and Internal Port, and then Add to list and Save Settings. Otherwise, there will be no entry in Service
menu.
2. Enter the Host Name or IP Address of the server that you want the Internet users to access, and then
enable the entry.
3. Click the Add to List button, and configure as many entries as you would like to. The max entry is 30.
You also can delete the selected application.
4. Users also can change the IP address and Disable the entry. Click the selected entry, change IP or
Disable, then click Update this Application button.
For more information, click the Help button. Click the Save Settings button to save the UPnP settings or
click the Cancel button to undo the changes. Click the Show Tables to see the details.
Page 59
Page 60

SMCBR24Q User Manual
MAC Clone
Some ISPs require that you register a MAC address. This "clones" your network adapter's MAC address
onto the Cable/DSL Firewall Router, and prevents you from having to call your ISP to change the registered
MAC address to the Cable/DSL Firewall Router's MAC address. The Cable/DSL Firewall Router's MAC
address is a 12-digit code assigned to a unique piece of hardware for identification, like a social security
number.
Input the MAC Address to User Defined WAN MAC Address field or select MAC Address from this PC .
For more information, click the Help button. Click the Save Settings button to save the MAC Clone settings
or click the Cancel button to undo the changes.
DDNS
DDNS(Dynamic DNS) service allows you to assign a fixed domain name to a dynamic WAN IP address.
This allows you to host your own Web, FTP or other type of TCP/IP server in your LAN.
Page 60
Page 61

SMCBR24Q User Manual
Before configuring DDNS, you need to visit www.dyndns.org and register a domain name. (The DDNS
service is provided by DynDNS.org).
DDNS Service The DDNS feature is disabled by default. To enable this feature, just check the box.
Username, Password, and Host Name: Enter the Username, Password, and Host Name of the account
you set up with DynDNS.org.
Your IP Address: The Router’s current Internet IP Address is displayed here. Because it is dynamic, this
will change.
For more information, click the Help button. Click the Save Settings button to save the DDNS settings or
click the Cancel button to undo the changes.
Advanced Routing
The Router's dynamic routing feature can be used to automatically adjust to physical changes in the
network's layout. The Router uses the dynamic RIP protocol. It determines the route that the network
Page 61
Page 62

SMCBR24Q User Manual
packets take based on the fewest number of hops between the source and the destination. The RIP
protocol regularly broadcasts routing information to other routers on the network.
Working Mode: Select Gateway mode if your Router is hosting your network’s connection to the Internet.
Select Router mode if the Router exists on a network with other routers, including a separate network
gateway that handles the Internet connection.
Dynamic Routing:
Choose the TX: protocol you want for transmitting data on the network. (RIP1 / RIP2)
Choose the RX: protocol you want for receiving data from the network. (RIP1 / RIP2)
Static Routing:
You will need to configure Static Routing if there are multiple routers installed on your network. The static
routing function determines the path that data follows over your network before and after it passes through
the Router. You can use static routing to allow different IP domain users to access the Internet through this
device. This is an advanced feature. Please proceed with caution.
This Router is also capable of dynamic routing (see the Dynamic Routing tab). In many cases, it is better to
use dynamic routing because the function will allow the Router to automatically adjust to physical changes
in the network layout. In order to use static routing, the SMCBR24Q’s DHCP settings must be disabled.
Page 62
Page 63

SMCBR24Q User Manual
To set up static routing, you should add routing entries in the Router's table that tells the device where to
send all incoming packets. All of your network routers should direct the default route entry to SMC Router.
Enter the following data to create a static route entry:
1. Destination IP: Enter the network address of the remote LAN segment. For a standard Class C
IP domain, the network address is the first three fields of the Destination LAN IP, while the last field
should be zero.
2. Subnet Mask: Enter the Subnet Mask used on the destination LAN IP domain. For Class C IP
domain, the Subnet Mask is 255.255.255.0.
3. Default Gateway IP: If this Router is used to connect your network to the Internet, then your Gateway
IP is the Router's IP Address. If you have another router handling your network's Internet connection,
enter the IP Address of that router instead.
4. Enter hop count (max. 15)
5. Interface:
Click Add to list to add route entry or click Delete Selected IP to delete the static route entry.
For more information, click the Help button. Click the Save Settings button to save the Advanced Routing
settings or click the Cancel button to undo the changes or click the Show Routing Table button to view the
Select LAN or WAN
current routing table.
Page 63
Page 64

SMCBR24Q User Manual
DHCP
Setup
The Router can be used as a DHCP (Dynamic Host Configuration Protocol) server on your network. A
DHCP server assigns available IP addresses to each computer on your network automatically. If you
choose to enable the DHCP server option, you must configure all of the PCs on your LAN to connect to a
DHCP server.
Page 64
Page 65

SMCBR24Q User Manual
If the Router's DHCP server function is disabled, you have to carefully configure the IP address, Mask, and
DNS settings of every computer on your network. Be careful not to assign the same IP Address to different
computers.
Make any changes to the available fields as described below.
Page 65
Page 66

SMCBR24Q User Manual
Enable DHCP Server: Check the box to enable the DHCP Server. If you already have a DHCP server on
your network, leave the box blank.
Dynamic IP
Client Lease Time: This is the lease time assigned if the computer (DHCP client) requests one. The range
is 5 ~ 43,200 Minutes.
Range Start/End: Enter a starting IP address and ending IP address to make a range to assign dynamic
IPs. The default range is 100~149.
Static IP
The administrator can assign the Static IP for the specific client based on this user’s MAC address. Enter
the Static IP Address and MAC Address, and then click the Add to list button. You can set up to 30 static
IP entries.
DNS
You can assign the DNS server(s) to the DHCP clients. This is optional, and the Router will use these for
quicker access to functioning DNS service.
WINS Server
Windows Internet Naming Service (WINS) is a service that resolves NetBIOS names to IP addresses. The
WINS is assigned if the computer (DHCP client) requests one. If you do not know the WINS, leave it as 0.
For more information, click the Help button. Click the Save Settings button to save the Setup settings or
click the Cancel button to undo the changes.
Page 66
Page 67

SMCBR24Q User Manual
Status
A Status page is available to review DHCP Server Status. The DHCP Server Status reports the IP of DHCP Server,
the number of Dynamic IP Used, DHCP Available, and Total.
information. You will see the related information (Client Host Name, IP Address, MAC Address, and Leased
Time) of all network clients using the DHCP server. You can click the Trash Can button to delete the line,
and the previously issued IP Address of Client Host will be released. Or you can click Refresh button to
refresh the Client Table.
Client Table shows the current DHCP Client
Security
General
From the Firewall Tab, you can configure the Router to deny or allow specific internal users from accessing
the Internet. You can also configure the Router to deny or allow specific Internet users from accessing the
internal servers. You can set up different packet filters for different users that are located on internal (LAN)
or external (WAN) side based on their IP addresses or their network Port number.
Page 67
Page 68

SMCBR24Q User Manual
Firewall
The default is enabled. If users disable the Firewall function, SPI, DoS, Block WAN Request will be
disabled, Remote Management will be enabled and Access Rules and Content Filter will be disabled.
SPI (Stateful Packet Inspection)
The Router's Firewall uses Stateful Packet Inspection to maintain connection information that passes
through the firewall. It will inspect all packets based on the established connection, prior to passing the
packets for processing through a higher protocol layer.
DoS (Denial of Service)
Protect internal networks from Internet attacks, such as SYN Flooding, Smurf, LAND, Ping of Death, IP
Spoofing and reassembly attacks.
Block WAN Request
This feature is designed to prevent attacks through the Internet. When it is enabled, the Router will drop
both the unaccepted TCP request and ICMP packets from the WAN side. The hacker will not find the
Router by pinging the WAN IP address. If DMZ is enabled, this function will be disabled.
Page 68
Page 69

SMCBR24Q User Manual
Remote Management
This Router supports remote management. If you want to manage this Router through the WAN connection,
you have to 'Enable' this option. User can enter the port number for remote management.
Multicast Pass Through
IP Multicasting occurs when a single data transmission is sent to multiple recipients at the same time. Using
this feature, the Router allows IP multicast packets to be forwarded to the appropriate computers.
MTU (Maximum Transmission Unit)
This feature specifies the largest packet size permitted for network transmission. It is recommended that
you enable this feature. Default of MTU size is 1500 bytes.
For more information, click the Help button. Click the Save Settings button to save the General settings or
click the Cancel button to undo the changes
Access Rules
Network Access Rules evaluate network traffic's Source IP address, Destination IP address, and IP protocol
type to decide if the IP traffic will be allowed to pass through the firewall.
The ability to define Network Access Rules is a very powerful tool. Using custom rules, it is possible to
disable all firewall protection or block all access to the Internet. Use extreme caution when creating or
deleting Network Access Rules.
SMCBR24Q has the following Default Rules.
* All traffic from the LAN to the WAN is allowed.
* All traffic from the WAN to the LAN is denied.
Custom rules can be created to override the above SMCBR24Q default rules, but there are four additional
default rules that will always be active, and custom rule can not override these four rules.
* HTTP service from LAN side to SMCBR24Q is always allowed.
* DHCP service from LAN side is always allowed.
* DNS service from LAN side is always allowed.
* Ping service from LAN side to SMCBR24Q is always allowed.
Page 69
Page 70

SMCBR24Q User Manual
Besides the Default Rules, all configured Network Access Rules are listed in the table, and you can choose
the Priority for each custom rule. Click the Edit button to Edit the Policy, and click the Trash Can icon to
delete the rule.
Click Add New Rule button to add new Access Rules, or click the Restore to Default Rules button to
restore to the default rules, and all custom rules will be deleted.
Add a new Policy
Page 70
Page 71

SMCBR24Q User Manual
Services
Action
Select the Allow or Deny radio button depending on the intent of the rule.
Service
Select the service from the Service pull-down menu. If the service you need is not listed in the menu, click
the Service Management button to add new Service. Enter Service Name, Protocol and Prot Range, and
click Add to list and Save Setting.
Page 71
Page 72

SMCBR24Q User Manual
Log
User can select Log packet match this rule or Not log.
Source Interface
Select the Source Interface (LAN, WAN1, WAN2, Any) from the pull-down menu. Once DMZ is enabled, the
options will be LAN, WAN1, DMZ, Any.
Source IP
Select Any, Single or Range, and enter IP Address for single and range.
Destination IP
Select Any, Single or Range, and enter IP Address for single and range.
Scheduling
Apply this rule (time parameter)
Select the time range and the day of the week for this rule to be enforced. The default condition for any new
rule is always enforced.
Page 72
Page 73

SMCBR24Q User Manual
For more information, click the Help button. Click the Save Settings button to save the Access Rules
settings or click the Cancel button to undo the changes
Content Filter
Forbidden Domains
When the Block Forbidden Domains check box is selected, the SMCBR24Q will block web access to sites
on the Forbidden Domains list.
Page 73
Page 74

SMCBR24Q User Manual
Scheduling
The Time of Day feature allows you to define specific times when Content Filtering is enforced. For
example, you could configure the SMCBR24Q to filter employee Internet access during normal business
hours, but allow unrestricted access at night and on weekends.
Apply this rule:
Always: When selected, Content Filtering is enforced at all times.
From: When selected, Content Filtering is enforced during the time and days specified. Enter the time
period, in 24-hour format, and select the day of the week that Content Filtering is enforced.
For more information, click the Help button. Click the Save Settings button to save the Content Filtering
settings or click the Cancel button to undo the changes.
Page 74
Page 75

VPN Pass Through
SMCBR24Q User Manual
IPSec Pass Through
Internet Protocol Security (IPSec) is a suite of protocols used to implement secure exchange of packets at
the IP layer. IPSec Pass Through is enabled by default.
PPTP Pass Through
Point to Point Tunneling Protocol (PPTP) Pass Through is the method used to enable VPN sessions. PPTP
Pass Through is enabled by default.
L2TP Pass Through
Layer 2 Tunneling Protocol (L2TP) Pass Through is the method used to enable VPN sessions. PPTP Pass
Through is enabled by default.
For more information, click the Help button. Click the Save Settings button to save the VPN Passthrough
settings or click the Cancel button to undo the changes
Page 75
Page 76

SMCBR24Q User Manual
System Management
Dual WAN
There are two functions provided for users – Smart Link Backup and Load Balance.
Smart Link Backup: Users can choose which WAN port to be primary. Once primary WAN is chosen,
other WAN will become backup by default.
Network Service Detection
This tool can detect the network connection status of ISP by pinging Default Gateway, ISP Host, Remote
Host or DNS Lookup Host.
Retry count: The count of ping. The default is 5.
Retry timeout: The interval between two ping actions. The default is 30 seconds.
When Fail:
Generate the Error Condition in the System Log: The Router will generate the System Log when ping fails
to inform users that the ISP connection is disconnected.
Page 76
Page 77

SMCBR24Q User Manual
Remove the Connection: This WAN Interface will be suspended when the network connection to ISP is not
active. The traffic on this WAN will be dispatched to the other WAN port. Once connection to ISP is
re-established, the traffic will be dispatched back.
If you enable NSD, you have to choose at least one option from following four items.
Default Gateway: If you check this item, the Router will ping the default gateway first.
ISP Host: After pinging Default Gateway, the Router will ping ISP Host “Retry timeout” later. The ISP Host
is provided by IS P.
Remote Host: Enter the IP address of Remote Host that you’re going to ping.
DNS Lookup Host: Enter the Host Name or Domain Name that you’re going to ping.
If Load Balance (Auto) is selected, it will be automatically computing the max. bandwidth of WAN1 and
WAN2 by using Weighted Round Robin to balance the loading.
Network Service Detection
This tool can detect the network connection status of ISP by pinging Default Gateway, ISP Host, Remote
Host or DNS Lookup Host.
Retry count: The count of ping. The default is 5.
Page 77
Page 78

SMCBR24Q User Manual
Retry timeout: The interval between two ping actions. The default is 30 seconds.
When Fail:
Generate the Error Condition in the System Log: The Router will generate the System Log when ping fails
to inform users that the ISP connection is disconnected.
Remove the Connection: This WAN Interface will be suspended when the network connection to ISP is not
active. The traffic on this WAN will be dispatched to the other WAN port. Once connection to ISP is
re-established, the traffic will be dispatched back.
If you enable NSD, you have to choose at least one option from the following four items.
Default Gateway: If you check this item, the Router will ping the default gateway first.
ISP Host: After pinging Default Gateway, the Router will ping ISP Host “Retry timeout” later. The ISP Host
is provided by IS P.
Remote Host: Enter the IP address of Remote Host that you’re going to ping.
DNS Lookup Host: Enter the Host Name or Domain Name that you’re going to ping.
Page 78
Page 79

SMCBR24Q User Manual
Bandwidth
Enter the max. upstream and downstream bandwidth provided by ISP.
Protocol Binding
SMCBR24Q supports the Protocol Binding functionality. It allows users to specify the internal IP or/and
Service going through the specified WAN port.
Service: Users can choose the Service from the drop-down menu, or click the service management to add
new Service. The default Service is SMTP.
Source IP: Users can specify the internal IP to go through the specific WAN port. If users need the Service
Binding only, entering zero in Source IP filed is suggested.
Destination IP: Users can specify the specific Service from the internal Source IP to Destination IP go
through the specific WAN port, and enter the Destination IP. If users need the Service Binding only,
entering zero in Destination IP filed is suggested.
If users need IP Binding only, please select ‘All’ from the Service drop-down menu.
Interface: Choose WAN1 or WAN2.
Enable: Users can check the enable box to enable this Protocol Binding rule.
Click Add to list button to add the Protocol Binding rule to list, and users can set up to 30 rules, or click
Delete selected application button to delete the selected rule.
Page 79
Page 80

SMCBR24Q User Manual
For more information, click the Help button. Click the Save Settings button to save the Dual-WAN settings
or click the Cancel button to undo the changes
QoS
QoS (Quality of Service) refers to the capability of a network to provide better service to selected network
traffic. The SMCBR24Q provides two types of functionality, and only one type of functionality can work at
one time.
1. Rate Control for minimum bandwidth (guarantee bandwidth) and maximum bandwidth (limit bandwidth)
by Service and/or IP Address.
2. Priority for services.
Both functionalities can control Inbound or Outbound traffic.
Bandwidth
Bandwidth information you configured in Dual-WAN page will be displayed here for your reference for
setting up the Min. Rate, Max. Rate, or priority. The quantity of WAN interface will be displayed according to
your configuration in Setup and Dual-WAN page. The bandwidth information may be changed. Click the
save setting button when done.
Bandwidth Management Type: The SMCBR24Q provides two type of bandwidth management.
Rate Control
The SMCBR24Q provides Rate Control for guarantying or limiting the specific Service and/or IP address for
inbound traffic or outbound traffic at specific minimum rate or maximum rate.
Page 80
Page 81

SMCBR24Q User Manual
Rate Control
Interface: Check the WAN interface box, and the Rate Control Rule will apply to the selected interface (s).
Service: Select the Service from the drop-down menu. If the Service you need to control is not in the drop
down menu list, please click Service Management to add the Service.
IP: Enter the IP Address or IP range you need to control. The default is zero which includes all internal IP
addresses.
Direction: Select Upstream for outbound traffic or Downstream for inbound traffic from the drop-down
menu.
Rate (Kbit/sec): Enter the Mini. Rate for guaranteeing bandwidth.
Min.
Max. Rate (Kbit/sec): Enter the Max Rate for limiting bandwidth.
Enable: Check the box and push the Q-button on to enable this Rate Control Rule.
Add to list: After set up the rule, click the Add to list button. The max entry is 30.
Page 81
Page 82

SMCBR24Q User Manual
For more information, click the Help button. Click the Save Settings button to save the QoS Rules settings
or click the Cancel button to undo the changes. Click Summary button to view the summary of Rate
Control rule.
Summary
All Rate Control rules will be displayed in the Summary table. Users can click the Edit button to edit the rule.
Any configurations here except the default will make the Q-button a hot key. For more details,
Note:
please refer to Q-button–SOHO Mode.
Priority
The SMCBR24Q provides three types of priorities for the service. They are High, Middle and Low priorities.
Interface: Check the Interface box, and the Bandwidth Management Priority rule will apply to the selected
interface(s).
Service: Select the service from the drop-down menu. If the Service you need to control is not in the drop
down menu list, please click Service Management to add the Service.
Page 82
Page 83

SMCBR24Q User Manual
Direction: Select Upstream for outbound traffic or Downstream for inbound traffic from the drop-down
menu.
Priority: The default priority for the service is middle, so users can select high or low for the specific service.
Services in high priority will share 60% of total system bandwidth, and services in low priority will share
10% of total bandwidth.
Enable: Check the box and push the Q-button on to enable this Priority rule.
Add to list: After set up the rule, click the Add to list button. The max entry is 30.
Any configurations here except the default will make the Q-button a hot key. For more details,
Note:
please refer to Q-button–SOHO Mode.
Click the Save Settings button to save the QoS Priority settings, click the Cancel Changes button to undo
the changes, or click Summary button to view the summary of Priority rule.
All Priority rule set by the users will be displayed in Summary table by interface. Users can click the Edit
button to edit the rule.
Diagnostic
SMCBR24Q has two tools built in to help with trouble shooting network problems.
Page 83
Page 84

SMCBR24Q User Manual
DNS Name Lookup
The Internet has a service called the Domain Name Service (DNS) which allows users to enter an easily
remembered host name, such as www.SMCBR24Q.com, instead of numerical TCP/IP addresses to access
Internet resources. SMCBR24Q has a DNS lookup tool that will return the numerical TCP/IP address of a
host name.
Enter the host name to lookup in the Look up the name field and click the Go button. Do not add the prefix
, otherwise the result will be Address Resolving Failed. SMCBR24Q will then query the DNS server
http://
and display the result at the bottom of the screen.
Note: The IP address of the DNS server must be entered in the Network Settings page for the Name
Lookup feature to function.
Ping
Page 84
Page 85

SMCBR24Q User Manual
The Ping test bounces a packet off a machine on the Internet back to the sender. This test shows if
SMCBR24Q is able to contact the remote host. If users on the LAN are having problems accessing services
on the Internet, try pinging the DNS server or other machine at the ISP’s location. If this test is successful,
try pinging devices outside the ISP. This will show if the problem lies with the ISP’s connection.
Enter the IP address of the device being pinged and click the Go button. The test will take few seconds to
complete. Once completed, a message showing the results will be displayed at the bottom of the Web
browser window. The results include Packets transmitted/ received/ loss and Round Trip Time (Minimum,
Maximum, and Average).
Note: Ping requires an IP address. SMCBR24Q’s DNS Name Lookup tool may be used to find the IP
address of a host.
Page 85
Page 86

Factory Default
SMCBR24Q User Manual
The "Factory Default" button can be used to clear all of your configuration information and restore
SMCBR24Q to its factory state. Use this feature only if you wish to discard all other configuration
preferences.
Page 86
Page 87

Firmware Upgrade
SMCBR24Q User Manual
Firmware Upgrade
Users can use the following download function to download the new version of firmware into computer in
advance and select the file to upgrade. Finally, click the Firmware Upgrade Right Now button to initiate
the firmware upgrade.
Firmware Download
Users can click the Firmware Download from SMC Web Site button to link to the download page of
Support of SMC website, and select the SMCBR24Q from the pull-down menu.
Page 87
Page 88

Setting Backup
SMCBR24Q User Manual
Import Configuration File:
You will need to specify where your preferences file is located. When you click "Browse", your browser will
bring up a dialog which will allow you to select a file which you had previously saved using the "Export
Settings" button. After you have selected the file, click the "Import" button. This process may take up to a
minute. You will then need to restart your SMCBR24Q in order for the changes to take effect.
Export Configuration File:
When you click the "Export" button, your browser will bring up a dialog asking you where you would like to
store your preferences file. This file will be called "SMCBR24Q.exp" by default, but you may rename it if
you wish. This process may take up to a minute.
Page 88
Page 89

Log
System Log
SMCBR24Q User Manual
There are three parts in System Log: Syslog, E-mail, and Log Setting.
Syslog
Enable Syslog: If check the box, Syslog will be enabled.
Syslog Server: In addition to the standard event log, the SMCBR24Q can send a detailed log to an
external Syslog server. Syslog is an industry-standard protocol used to capture information about network
activity. The SMCBR24Q Syslog captures all log activity, every connection source, destination IP address,
IP service, and number of bytes transferred. Enter the Syslog server name or IP address in the Syslog
Server field. Restart the SMCBR24Q for the change to take effect.
E-mail
Enable E-Mail Alert: If check the box, E-Mail Alert will be enabled.
Mail Server: If you wish to have any log or alert information E-mailed to you, then you must enter the name
or numerical IP address of your SMTP server. Your Internet Service Provider can provide you with this
information.
Send E-mail To: This is the E-mail address to which your log files will be sent. You may leave this field
blank if you do not want to receive copies of your log information.
Page 89
Page 90

SMCBR24Q User Manual
Log Queue Length (entries): The default is 50 entries. SMCBR24Q will e-mail log when Log entries are
over 50.
Log Time Threshold (minutes): The default is 10 minutes. SMCBR24Q will e-mail the log every 10
minutes or when the log criteria is met in the Log Queue Length or Threshold Settings..
E-mail Log Now: Clicking E-mail Log Now immediately sends the log to the address in the Send E-mail
to Filed.
Log Setting
Alert Log
Checks the following events box for receiving alert log. Syn Flooding, IP Spoofing, Win Nuke, Ping of Death
and Unauthorized Login Attempt.
General Log
Checks the following events box for receiving log. System Error Messages, Deny Policies, Allow Policies,
Content Filtering, Data Inspection, Authorized Login, Configuration Changes.
There are four setup buttons available in Log Setting screen
View System Log: Once you press this button, the new window will pop up the Log, and user can choose
view ALL, System Log, Access Log, Firewall Log and VPN Log.
Page 90
Page 91

SMCBR24Q User Manual
Outgoing Log Table: Once you press this button, the new window will pop up and it will display the
outgoing packet information including LAN IP, Destination URL/IP and Service/Port number.
Incoming Log Table: Once you press this button, the new window will pop up and it will display the
incoming packet information including Source IP and Destination Port number.
Clear Log Now: This button will clear out your log without E-mailing it. Only use this button if you don't mind
losing your log information.
Page 91
Page 92

System Statistics
SMCBR24Q User Manual
SMCBR24Q is able to perform the system statistics on Device Name, Status, IP Address, MAC Address,
Subnet Mask, Default Gateway for LAN, WAN1 and WAN2.
Page 92
Page 93

SMCBR24Q User Manual
Q-button in the SOHO Mode
The Q-button is a user friendly design. It provides a basic bandwidth management method. The
end user can enjoy smooth Internet applications without any hassles with just one push.
Q-button, Q-button LED and Q-button icon
The Q-button is on the front panel with an LED above the button and an icon in the upper right corner of the
UI indicating its current status. The default is off. When the Q-button is off (shown in Fig. 2), the green LED
is off and the icon is grayed out. When the Q-button is on (shown in Fig. 2), the green LED is on and the
icon turns yellow.
Fig. 1: Q-button off
Fig. 2: Q-button on
If no configuration in the QoS page by the UI:
When the button is pushed on without any configurations in the QoS page, the router distributes the
available bandwidth provided by the ISP evenly to the min. rate of bandwidth of each PC on the LAN. The
max. rate of each PC is 100% of the available bandwidth provided by the ISP.
If any configuration in the QoS page by the UI:
Any QoS configurations will make the Q-button a hot key. The end user can set the bandwidth
management in the QoS page with the Q-button pushed off in advance. Once the Q-button is on,
the pre-settings will be enabled. The end user can also set the bandwidth management with the
Q-button pushed on.
Note: bandwidth management settings will only work with the Q-button pushed on.
Page 93
Page 94

SMCBR24Q User Manual
Page 94
 Loading...