

3, Setting of auto-preset value of OUT1
•
Press the button to display [A1L].
•After measurement starts, operate the device and change the
p
ressure.
•When the pressure change is detected, a set value will appear automatically.
(
When OUT1 setting is not necessary, press the and buttons
simultaneously for 1 second or more to skip to [AP2]).
4
, Selection of auto-preset OUT2
•Press the button to display [AP2].
5
, Preparation and setting of OUT2 device
•Prepare the sensor for which OUT2 is to be set, and perform
the setting of OUT2 in the same manner as that for OUT1.
•After [A2L] is displayed and measurement starts, when the
pressure change is detected, a set value will appear automatically.
(When OUT2 setting is not necessary, press the and buttons
simultaneously for 1 second or more to return to measurement mode).
6, Completion of setting
•Press the button and complete auto-preset mode. After that, measurement
mode returns.
The set values are displayed in auto-preset as follows.
ON = A - (A - B)/4 A = Max. pressure
OFF = B + (A - B)/4 B = Min. pressure
Auto-preset is being set
A
uto-preset is ready
Setting of Special Function
F
ine adjustment function of displayed value
This removes irregularities between CH1 to CH4 output values, to allow the same
d
isplayed value.
It is possible to make fine adjustment within ±5%F.S. of the measured data on the
d
isplayed value for each pressure sensor.
C
opy function
W
ith the Copy function, 5 items can be copied, Pressure setting value, Range setting,
D
isplay unit, Output type and Response time.
A
uto-shift function
T
his function corrects the set value of each switch output according to a change of
p
ressure source. Even if the pressure source is changed, the controller can make a
c
orrection on switch output.
A
utomatic identification function
This function identifies the pressure range of the sensor connected to the controller.
W
hen [Aon] is set at the Auto identification mode, when power is re-applied this
function activates.
(
This function is only applicable for use with the SMC PSE530 series pressure
sensors).
To set this function, refer to the SMC website (URL http://www.smcworld.com)
Other Settings
P
eak / Bottom hold display
Key lock
Zero clear
Channel selects
C
hannel scans
To set each of these functions, refer to the SMC website
(URL http://www.smcworld.com
) for more detailed information, or contact SMC.
Maintenance
H
ow to reset the product after a power cut or forcible de-energizing
T
he setting of the product will be retained as it was before a power cut or de-energizing.
The output condition is also basically recovered to that before power cut or de-energizing,
b
ut may change depending on the operating environment. Therefore, check the safety of the
whole installation before operating the product. If the installation is using accurate control,
w
ait until the product has warmed up (approximately 20 to 30 minutes).
Troubleshooting
If the error cannot be reset after the above measures are taken, then please contact SMC.
Error Indication
This function is to display error location and content when a problem or an error occurs.
Over current
Error
The switch output load current is
more than 80 mA.
Turn the power off and remove the
cause of the over current. Then turn
the power on.
Error Name Error Display Error Type Troubleshooting
Zero-clear Error
During the zero clear operation,
pressure above ±5%F.S.
(±2.5%F.S. for compound pressure)
has been applied.
After 2 s, the mode will reset to the
measurement mode.
Perform zero clear operation again
after restoring the applied pressure
to an atmospheric pressure
condition.
Pressurizing Error
Pressure has exceeded the upper
limit of the set pressure range.
Check the connection and wiring of
each sensor. Adjust the applied
pressure to a level within the set
pressure range.
System Error
Displayed in the case of an internal
data error.
Turn the power off and turn it on
again.
If resetting fails, an investigation by
SMC CORPORATION will be
required.
Note: Specifications are subject to change without prior notice and any obligation on the part of the manufacturer.
© 2011 SMC Corporation All Rights Reserved
Akihabara UDX 15F, 4-14-1, Sotokanda, Chiyoda-ku, Tokyo 101-0021, JAPAN
Phone: +81 3-5207-8249 Fax: +81 3-5298-5362
URL http://www.smcworld.com
OUT1
O
UT2
A sensor may be disconnected or
incorrectly wired.
Pressure has exceeded the lower
limit of the set pressure range.
Auto-preset
W
hen the auto-preset function is selected, the set pressure can be calculated and
memorized from a measured value. The set value is automatically optimized by
r
epeating suction and release.
1
, Selection of auto-preset OUT1
•Press the button in Measurement mode to select channel,
a
nd then, press the button to display [AP1].
2
, Preparation of OUT1 device
•Prepare the sensor for which OUT1 is to be set.
Auto-preset is ready
3
, Setting of OUT2 [P_3] and [P_4] (CH1 only)
•
Press the or button to change the
s
et value as in 1, 2 above.
Direct output mode
R
everse output mode
Displays in turn
D
irect output mode
R
everse output mode
D
isplays in turn
4
, Setting of Auto-shift compensation
•
[C_5] ([C_3] for CH2 to CH4) and the auto-shift
c
orrected value will be displayed in turn.
I
f the auto-shift input function is off, the
c
orrection value will display zero.
•
Press the button to return to measurement
mode.
C
H1
C
H2 to 4
D
isplays in turn
Auto-preset is being set
Specifications
Outline with Dimensions (in mm)
Refer to the product catalogue or SMC website (URL http://www.smcworld.com) for
more information about the product specifications and outline dimensions.
Refer to the SMC website (URL http://www.smcworld.com) for more information
about troubleshooting.
5, Selection of pressure setting method
•There are two methods for pressure setting: manual and auto-preset, either one of
which can be selected. The auto-preset is provided for
an automatic optimum set-up by using a sample for a
case in which switch output is used to check
adsorption.
•Press the or button to select pressure setting
method. Press the button to set.
•All of the settings are completed, and the controller will return to measurement mode.
Connector
Connecting / Disconnecting
When mounting the connector, insert it straight
i
nto the socket, holding the lever and
c
onnector body, and push the connector until
t
he lever hooks into the housing, and locks.
W
hen removing the connector, press
d
own the lever to release the hook from
the housing and pull the connector
straight out.
Multi Channel
Pressure Sensor Controller
Operation Manual
PSE200 Series
Safety Instructions
Installation
M
ounting with panel mount adapter
F
ix the panel mount adapter to the product with the mounting screws
(
nominal size: 3 x 8 L, 2 pcs.) supplied.
•Panel mount adapter (Model: ZS-26-B)
P
anel mount adapter + Front protective cover (Model: ZS-26-01)
□48 conversion adapter (Model: ZS-26-D)
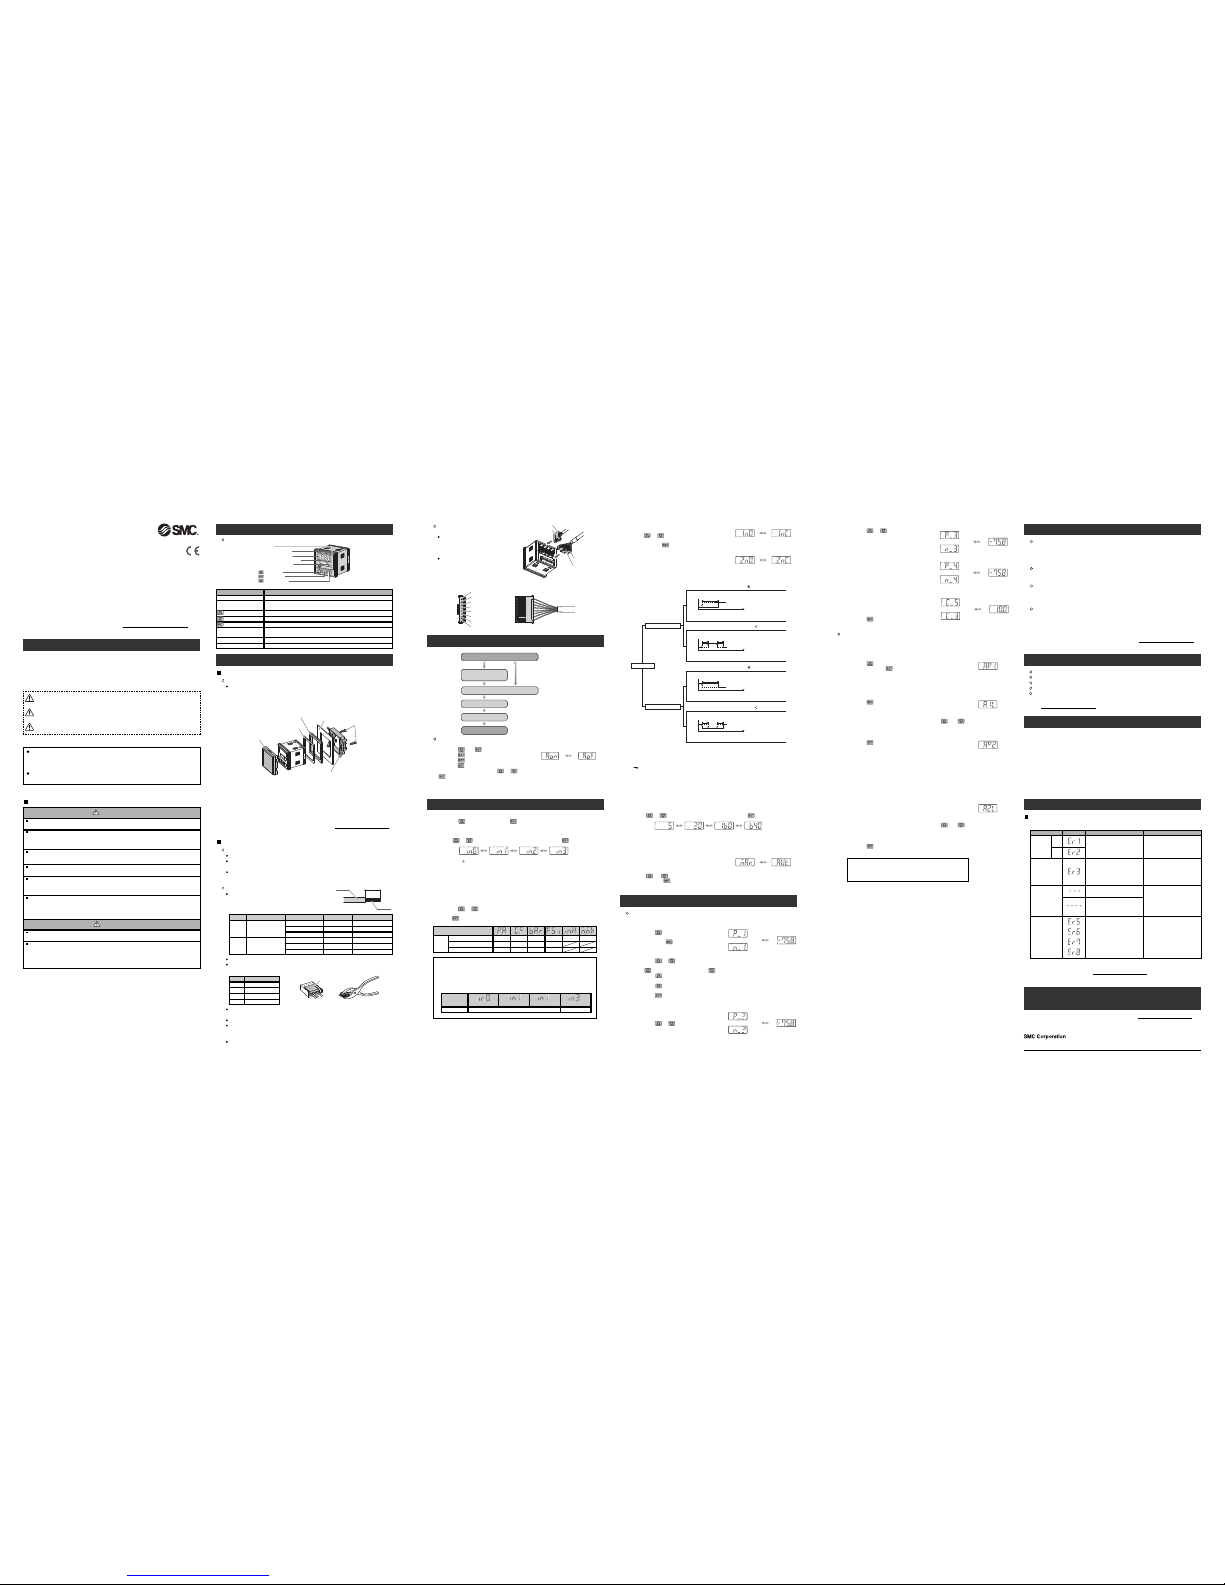
Safety Instructions
Summary of Product parts
Mounting and Installation
M
P
a
k
P
a
S
E
T
C
H
P
R
E
S
S
U
R
E
1
2
3
4
O
U
T
1
O
U
T
2
Switch output display (Red)
Unit label
Unit display (Orange)
Channel display (Red)
L
CD display (Orange)
button (UP)
button (DOWN)
button (SET)
N
ames of individual parts
CAUTION indicates a hazard with a low level of risk which, if
n
ot avoided, could result in minor or moderate injury.
Caution:
Warning:
Danger:
WARNING indicates a hazard with a medium level of risk
w
hich, if not avoided, could result in death or serious injury.
DANGER indicates a hazard with a high level of risk which, if
n
ot avoided, will result in death or serious injury.
Switch output display (Red) Indicates when OUT1 (CH1 to CH4) and/or OUT2 (CH1) is ON.
LCD display (Orange)
Displays the current status of pressure, setting mode, selected indication unit and
error code.
button (UP)
Selects the mode or increases the ON/OFF set value.
button (DOWN)
Selects the mode or decreases the ON/OFF set value.
button (SET)
P
ress this button to change the mode or set a value.
D
escription
F
unction
Thank you for purchasing an SMC PSE200 Series Multi Channel Pressure Sensor
Controller.
Please read this manual carefully before operating the product and make sure you
understand its capabilities and limitations.
Please keep this manual handy for future reference.
To obtain more detailed information about operating this product,
please refer to the SMC website (URL http://www.smcworld.com
) or
contact SMC directly.
These safety instructions are intended to prevent hazardous situations and/or
equipment damage.
These instructions indicate the level of potential hazard with the labels of
"Caution", " Warning" or "Danger". They are all important notes for safety and
must be followed in addition to International standards (ISO/IEC) and other safety
regulations.
Operator
This operation manual is intended for those who have knowledge of machinery
using pneumatic equipment, and have sufficient knowledge of assembly,
operation and maintenace of such equipment. Only those persons are allowed
to perform assembly, operation and maintenance.
Read and understand this operation manual carefully before assembling,
operating or providing maintenance to the product.
D
o not operate the product outside of the specifications.
Do not use for flammable or harmful fluids.
Fire, malfunction, or damage to the product can result.
Verify the specifications before use.
Do not disassemble, modify (including changing the printed circuit board) or repair.
An injury or failure can result.
Do not operate in an atmosphere containing flammable or explosive gases.
Fire or an explosion can result.
This product is not designed to be explosion proof.
Do not use the product in a place where static electricity is a problem.
Otherwise it can cause failure or malfunction of the system.
If using the product in an interlocking circuit:
•Provide a double interlocking system, for example a mechanical system
•Check the product regularly for proper operation
Otherwise malfunction can result, causing an accident.
The following instructions must be followed during maintenance:
•Turn off the power supply
•Stop the air supply, exhaust the residual pressure and verify that the air is released before performing
maintenance work
Otherwise an injury can result.
After maintenance is complete, perform appropriate functional inspections and leak tests.
Stop operation if the equipment does not function properly or there is a leakage of fluid.
When leakage occurred from other parts except piping, the product might break.
Cut off power supply and stop supplying fluid.
Do not apply fluid at leaking condition.
Safety cannot be assured in the case of unexpected malfunction.
Do not touch the terminals and connectors while the power is on.
Otherwise electric shock, malfunction or damage to the product can result.
Warning
Caution
Unit display (Orange)
Indicates the selected unit. For the Controller without unit selection function, the unit
is fixed to SI (MPa or kPa).
Pin No.
7 Green CH4_OUT1
8 Yellow Auto shift input
6 Red CH3_OUT1
5 Grey CH2_OUT1
4 White CH1_OUT2
3 Black CH1_OUT1
2 Blue DC(-)
1
Brown DC(+)
3
, Setting of output style
1
)The output style for OUT1 can be set.
•
Press or button and select the normally
o
pen or the normally closed.
N
ext, press the button to set.
2
)The operating mode and output style for OUT2 can
be set. (only CH1)
•
Use the same procedure as for OUT1.
4
, Setting of response time
•Set response time of switch output. Output chattering is prevented by setting the
response time.
•Press the or button to select response time. Press the button to set.
Direct output
mode
[Default setting]
Reverse output
mode
Manual setting
[Default setting]
Auto-preset
Flow Setting
Manual setting
Manually select a set value for the controller for each respective channel.
1, Setting of OUT1 [P_1] (for CH1 to CH4)
•Press the button during the
Measurement mode to select channel, and
then, press the button to display set
values.
•[P_1] or [n_1] and set value are displayed
in turn.
•Press the or button to change the
set value.
The button is to increase and the button is to decrease.
Press the button once to increase by one digit, and press it continuously to
keep increasing the set value.
Press the button once to decrease by one digit, and press it continuously to
keep decreasing the set value.
•Press the button to finish the setting.
Pressure Setting
□48 conversion adapter
(Model: ZS-26-D)
Front protective cover
(Model: ZS-26-01)
W
aterproof seal
(Accessory)
Panel
Mounting serews
Panelmount adapter
(
Model: ZS-26-B)
P
ower / Output connector pin numbers
Unit label A label is attached for the unit selection function (kgf/cm2, bar, psi, inHg, mmHg).
Channel display (Red) Indicates the channel selected (CH1 to CH4).
A
utomatic identification function release
(When at least 1 sensor other than PSE530 series will be connected.)
•Press the and buttons simultaneously for 2 seconds or more to display [FSt].
•Press the button to display [CPy].
•Press the button to display [SH1], and then
p
ress the button again.
•
If [Aon] is displayed, press the or button to display [AoF], and then press the
b
utton.
∗: The default setting for the automatic identification function is ON.
Selection of Pressure range, Output style,
Response time and Pressure setting
method.
I
nput of set value for pressure to perform switch output.
S
election or setting of Fine adjustment function of
displayed value, Copy function, Auto-shift function and
A
utomatic identification function.
I
nitial Setting
Pressure Setting
Setting of Special Function
Measurement mode
D
etects pressure, displays values and
p
erforms switching. Other functions such
as zero clear can also be set if necessary.
For connecting at least
1
sensor other than PSE530 series.
F
or connecting only
PSE530 series.
M
easurement mode
Automatic identification
f
unction release
Initial setting is required for each channel. To start initialization, select the channel to be set
by pressing the button, then press the button for 2 seconds or longer.
1, Setting of pressure range
•Select the pressure range suitable for the sensor connected.
•Press the or button and select the pressure range. Press the button to set.
( ) ( ) (
) ( )
For compound
101 kPa
For vacuum
-101 kPa
[
Default setting]
For low pressure
101 kPa
For positive pressure
1 MPa
Auto identification ON
(Only PSE530 series)
Auto identification OFF
(Other than PSE530 series)
2, Selection of display unit (with unit conversion function)
The indication unit can be selected freely.
Pressing the or button will change the unit and will automatically convert set
values.
Press the button to set and to move to setting the output mode.
Unit
label
For compound and vacuum
For low pressure
For positive pressure
kPa
kPa
MPa
kgf/cm2
kgf/cm2
kgf/cm2
bar
bar
bar
psi
psi
psi
LCD display
inHg mmHg
In order to display the selected units, the appropriate units label is supplied.
Select and use the appropriate label from the table.
•When [M] is included in the controller model number (fixed SI units), set up the
controller to display the units according to the table below.
•When [M] is not included in the controller model number (with unit conversion),
the appropriate units label should be used from the table above.
LCD display
(Compound)
Unit display
kPa
(Vacuum) (Low pressure) (Positive pressure)
MPa
∗: When automatic identification mode is ON, the controller will change to the pressure range
required for the connected pressure sensor (PSE530 only) when power is supplied.
∗: When the pressure range setting is changed, the set value changes, so the pressure setting
must be performed again.
5 ms
[Default setting]
20 ms 160 ms 640 ms
Direct output mode
Reverse output mode
Displays in turn
Reverse output mode
Direct output mode
Switch output
(
D
e
f
a
u
l
t
s
e
t
t
i
n
g
)
Switch output
Switch output
Hysteresis Hysteresis
O
N
OFF
Hysteresis
ON
OFF
P_1
P_3
P_2
P_4
n_2
n_4
n_1
n_3
n_2
n
_4
n_1
n
_3
Switch output
Hysteresis Hysteresis
O
N
O
FF
Switch output
Hysteresis
ON
OFF
P_2
P_4
OUT1
OUT2
OUT1
OUT2
OUT1
O
UT2
OUT1
O
UT2
P_1
P_3
H
igh pressure:
For Compound/Positive
High vacuum:
For vacuum
High pressure:
F
or Compound/Positive
H
igh vacuum:
For vacuum
High pressure:
F
or Compound/Positive
High vacuum:
For vacuum
High pressure:
For Compound/Positive
High vacuum:
F
or vacuum
Hysteresis mode (P_1, P_3 P_2, P_4)
Window comparator mode (P_1, P_3 P_2, P_4)
Window comparator mode (n_1, n_3 n_2, n_4)
H
ysteresis mode (n_1, n_3 n_2, n_4)
•When the hysteresis is set at 2 digits or less in hysteresis mode, if the input pressure
f
luctuates around the set value, switch output may cause chattering.
•In window comparator mode the hysteresis is fixed at 3 digits. When setting, allow 7
digits or more between P1 and P2 (and P3 and P4).
Less than 7 digits will not allow correct operation.
2, Setting of OUT1 [P_2] (for CH1 to CH4)
•[P_2] or [n_2] and set value are displayed in
turn.
•Press the or button to change the
set value.
Direct output mode
Reverse output mode
Displays in turn
Initial Setting
L
ever
C
onnector for sensor lead wire
Power/Output
l
ead wire connector
L
ever
Direct output
m
ode
[Default setting]
Reverse output
m
ode
∗: The panel mount adapter can be rotated by 90 degrees for mounting.
∗: Front panel of this Controller meets IP65 (if 48 conversion adapter is used, it meets IP40).
However, if the panel mount adapter is not secure or the instrument is not seated correctly,
water might enter. The screws should be further tightened 1/4 to 1/2 turns after assembly.
Attaching the connector to the sensor wire
Strip the sensor wire as shown to the right.
(Refer to the table below for corresponding connector
and wire gauge).
Wiring
Connection
Connections should only be made with the power supply turned off.
Use separate routes for the controller wiring and any power or high voltage wiring.
Otherwise, malfunction may result due to noise.
Ensure that the FG terminal is connected to ground when using a commercially
available switch-mode power supply.
Sheath
20 mm or more
Insulator
26-24
(28)
AWG No.
0.14-0.2
(0.08)
Conductor size (mm2)
22-20 0.3-0.5
Check that the above preparation has been performed correctly, then part A shown
should be pressed in by hand to make temporary connection.
Part A should then be pressed in using a suitable tool, such as pliers.
The e-con connector cannot be re-used once it has been fully crimped. In cases of
connection failure such as incorrect order of wires or incomplete insertion, please use
a new connector.
If the sensor is not connected correctly, [----] or [---] will be displayed.
0.8 to1.0
1.0 to1.2
Overall diameter (mm)
1.0 to1.2
1.2 to1.6
1.2 to1.6
1.6 to2.0
Red
Yellow
Connector colour
Green
Blue
Orange
Grey
ZS-28-C
ZS-28-C-1
SMC product No. (1 pc.)
ZS-28-C-3
ZS-28-C-4
ZS-28-C-2
ZS-28-C-5
Lead wire table
Do not cut the insulator.
Insert the corresponding wire colour shown in the table into the pin number printed
on the sensor connector, to the bottom.
1
2
Pin No.
3
Brown (DC+)
NC
Wire colour
Blue (DC-)
4 Black (IN: 1 to 5 V)
A
Refer to the product catalogue or SMC website (URL http://www.smcworld.com)
for more information about panel cut-out dimensions.
 Loading...