

Page 1
TigerStore™
2 Bay Network Attached Storage
SMCNAS02
Page 2

SMCNAS02
User’s Guide
Revision 1.8
January 2008
Page 3

TRADEMARKS
All brand and product names are trademarks or registered trademarks of their
respective companies.
NOTE
The information in this manual is subject to change without notice.
Page 4

SMC Networks, Inc. Warranty Statement
This SMC Networks, Inc. product comes with a 2-year limited warranty from the date of
purchase. SMC Networks, Inc. warrants in good operating condition for the warranty period. This
warranty does not include non-SMC Networks, Inc. installed components. If the SMC Networks,
Inc. product malfunctions during the warranty period, SMC Networks, Inc. will, at its discretion,
repair or replace the product at no charge, provided the product has not been subjected to misuse,
abuse or non-SMC Networks, Inc. authorized alterations, modifications or repairs. When
returning a product, include your original proof of purchase. Return requests cannot be pr ocessed
without proof of purchase. Shipment of returned product to SMC Networks, Inc. is the
responsibility of the purchaser. All expressed and implied warranties for the SMC Networks, Inc.
product line including, but not limited to, the warranties of merchantability and fitness for a
particular purpose, are limited in duration to the above period.
Under no circumstances shall SMC Networks, Inc. Be liable in any way to the user for damages,
including any lost profits, lost savings or other incidental or consequential damages arising out of
the use of, or inability to use, the SMC Networks, Inc. products. SMC Networks, Inc. Reserves
the right to revise or update its products, software, or documentation without obligation to notify
any individual or entity.
<Important Notice>
Please have your proof of purchase receipt to get warranty support. All defective products shall be
returned with a copy of proof of purchase. In no event shall SMC Networks, Inc. 's liability exce ed
the price paid for the product from direct, indirect, special, incidental, or consequential damages
resulting from the use of the product, its accompanying software, or its documentation. SMC
Networks, Inc. does not offer refunds for any product.
All rights reserved. SMC Networks, Inc. devices are designed for home or office use. SMC
Networks, Inc. cannot be made liable for any damages, loss of data or damage following thereof
(including, without limitation, damages for loss of business profits, business interruption, loss of
business information, or other pecuniary loss) arising out of the use of or inability to use this SMC
Networks, Inc. product, even if SMC Networks, Inc. has been advised of the possibility of such
damages.
We reserve the right to upgrade our products in keeping with technological advances.
SMC Networks, Inc. warrants your product against any defect in material and workmanship,
under normal use, for the designated warranty period. The warranty becomes effective from the
date of shipment. In the event this product is found to be defective within the warranty period,
SMC Networks, Inc. will, at its discretion, repair or replace the defective product.
Page 5

This warranty is void if:
• The product was operated/stored in abnormal use or maintenance conditions;
• The product is repaired, modified or altered
• The product was subjected to abuse, neglect, electrical fault, improper packaging,
accident or acts of nature;
• The product was installed improperly;
• The serial number of the product is defaced or missing;
For storage products: Under various circumstances, such as damage from extreme conditions like
floods, power fluctuations, damage caused during the installation of the drive, damage caused by
improper or improperly used packaging, or physical misuse or abuse, the data on a disk drive may
be inaccessible through normal operations. However, the data may be recoverable through
extraordinary means offered through a specialized data recovery service.
SMC Networks, Inc. does not perform any data recovery services. If you are unable to acces s data
on your drive due to damage such as that mentioned above, you may wish to consider contacting
an independent data recovery service. The disk drives used in this product are covered under the
original manufacturer’s warranty,
SMC Networks, Inc. cannot be made liable for any damages or loss of data as a result of improper
use or damage to the disk drives. The disk drives used in this product are covered under the
original manufacturer’s warranty.
Page 6

Important Notes
z When ejecting the USB device from your NAS system, make sure to
disconnect from the Samba connection first.
z Your SMCNAS02 does not support any USB hub connected to the
USB ports.
z When installing hard disk drive to your SMCNAS02, SMC suggest
using the same vendor and the same size hard disk.
Page 7

vi
Table of Contents
Important Notes ................................................................. v
Table of Contents ................................................................................ vi
Chapter 1 Introduction ................................................................... 1
1.1 Package Contents ............................................................................... 2
1.2 Specifications ...................................................................................... 3
Hardware ....................................................................................... 3
Software ........................................................................................ 3
1.3 System View ....................................................................................... 4
Front Components ......................................................................... 4
Rear Components ......................................................................... 6
Chapter 2 Setting Up
...................................................................... 7
Step 1. Install the Hard Disks ..................................................................... 7
Step 2. Connect to the Network ............................................................... 10
Step 3. Connect to Power ........................................................................ 11
Step 4. Configure Your Storage System .................................................. 11
Chapter 3 Configurin
g Your Storage System ............................ 13
3.1 Installing and Starting the Storage System Management ................ 14
For Windows PC .......................................................................... 14
For Apple Mac OS X (10.4.11 or above) ..................................... 24
System Power-on Without Hard Disk Drive ................................ 32
System Power-on With Full New Hard Disk Drives ..................... 47
3.2 Starting Storage System Management ............................................. 57
3.3 My NAS Page ................................................................................... 61
System Setting ............................................................................ 62
Network Setting ........................................................................... 64
3.4 Users & Groups Page ....................................................................... 75
Users ........................................................................................... 75
Groups ......................................................................................... 86
Quota Management ..................................................................... 88
3.5 Shared Folders Page ........................................................................ 90
Add Shared Folder ...................................................................... 91
Assign Access ............................................................................. 92
Delete Shared Folder .................................................................. 93
Page 8

3.6 Disk Page........................................................................................... 94
3.7 Advanced Page ................................................................................. 95
Alerts ............................................................................................ 95
Firmware ...................................................................................... 98
iTunes Server ............................................................................. 101
Media Server .............................................................................. 104
Printer Server ............................................................................. 106
UPS ............................................................................................ 109
USB Backup ............................................................................... 111
Download Station ....................................................................... 117
System Log ................................................................................ 123
Shut Down .................................................................................. 124
Reboot ........................................................................................ 126
3.8 Logging Out of Storage System Management ................................ 128
3.9 How to reinstall your SMCNAS02 ..................................................... 130
Chapter 4 Map Share
s ............................................................... 131
Windows PC ............................................................................... 131
For Apple Mac OS X .................................................................. 134
Chapter 5 Using One-Touch Backup
....................................... 135
5.1 Connecting a USB Device ............................................................... 135
5.2 Using the Card Reader .................................................................... 136
Chapter 6 ActiveDirec
tory Support .......................................... 139
Environment Setup ..................................................................... 139
Page 9

1
Chapter 1 Introduction
Your SMCNAS02 is a great storage solution for small business and home
network environments. With this high-speed networked storage, network users
can easily access and share music, pictures, and video files. Also, it has a
program for discovering the storage system automatic assigned IP address.
Your SMCNAS02 can accommodate up to 2 hard disks with standard single (if
you only have one disk), RAID 0 or 1 and JBOD in BIG configurations,
providing up to 2 TB (terabytes) of shared network storage. Supporting
industry-standard protocols, you can easily add your storage device to your
existing network. In addition, network management and security are greatly
simplified through the Web-based User Interface (UI).
Additional features include:
z RAID Mode
z RAID Degrade
z Quota Management
z HW (hardware) Health Monitor
z UPS (uninterruptible power supply)
z Reset to Factory Default Setting
z One-touch Backup
z Event Log
z Software shutdown by using Web Management
z Can function as a FTP server and printer server
z DHCP client support
z Active Directory support
z UPnP-AV media and iTunes Server
Page 10

2
1.1 Package Contents
Includes the following:
z SMCNAS02 Storage System
z HDD Rail × 2
z Power Adapter
z Power Cord
z RJ-45 Ethernet Cable
z Set of Screws
z Utility Disc
z Quick Start Guide
Page 11

3
1.2 Specifications
NOTE: Specifications are subject to change without notice.
Hardware
Processor
LSI NAS201
System Memory
128 MB of DDR2 SDRAM
Flash Memory
8 MB
Hard Disk Drive Bay/Type
Up to two 3.5-inch SATA (Serial ATA)
Storage Capacity
Provides up to greater than 2 TB
One Touch Button
Backup files from digital camera, mass storage,
and Card Reader
USB-UPS Support
HID power device standard
Network
Automatic MDIX Ethernt Port
(10/100/1000 Mbps)
Others
• USB port for still images, mass storage,
printer
• Card Reader (MMC, SD, MS card)
Power Supply
DC output 12 V / 5 A
Dimension
(H)140 x (W)120 x (D)240 mm
Weight
1.8 kg
Environment
• Operating temperature:
0
0
C (32 0F) to 40 0C (104 0F)
• Storage relative humidity:
5 % to 90 % non-condensing
Software
Network Client Support
• Microsoft Windows
• Mac (10.4.x or above)
• Linux/Unix
Network Protocol
• TCP/IP
• HTTP
• FTP
• SMB/CIFS
NFS
Application for NAS Management
• Data Sharing, Protection
• Data Backup and Recovery software (for
Windows only)
• Web User Interface
Disk Configuration
Single, RAID 0/1, and JBOD (in BIG)
Browser
• Internet Explorer 5.5 or above
• Firefox 1.1 or above
• Safari Browser
Others
• English language support
• Real Time Clock (RTC)
• Programmable system clock
• Network time protocol support
• DHCP Client support
• Hardware/Software power off
• Reset button to return to factory default
setting
• Firmware upgradeable
• FTP server and printer server support
• Media Server (DLNA v.1.0) support
• iTunes Server
• Event logs and email alerts
• Hot swap and automatic rebuild
• Hardware monitor / temperature sensor
• BitTorrent P2P protocol support
• Daylight saving
Page 12
4
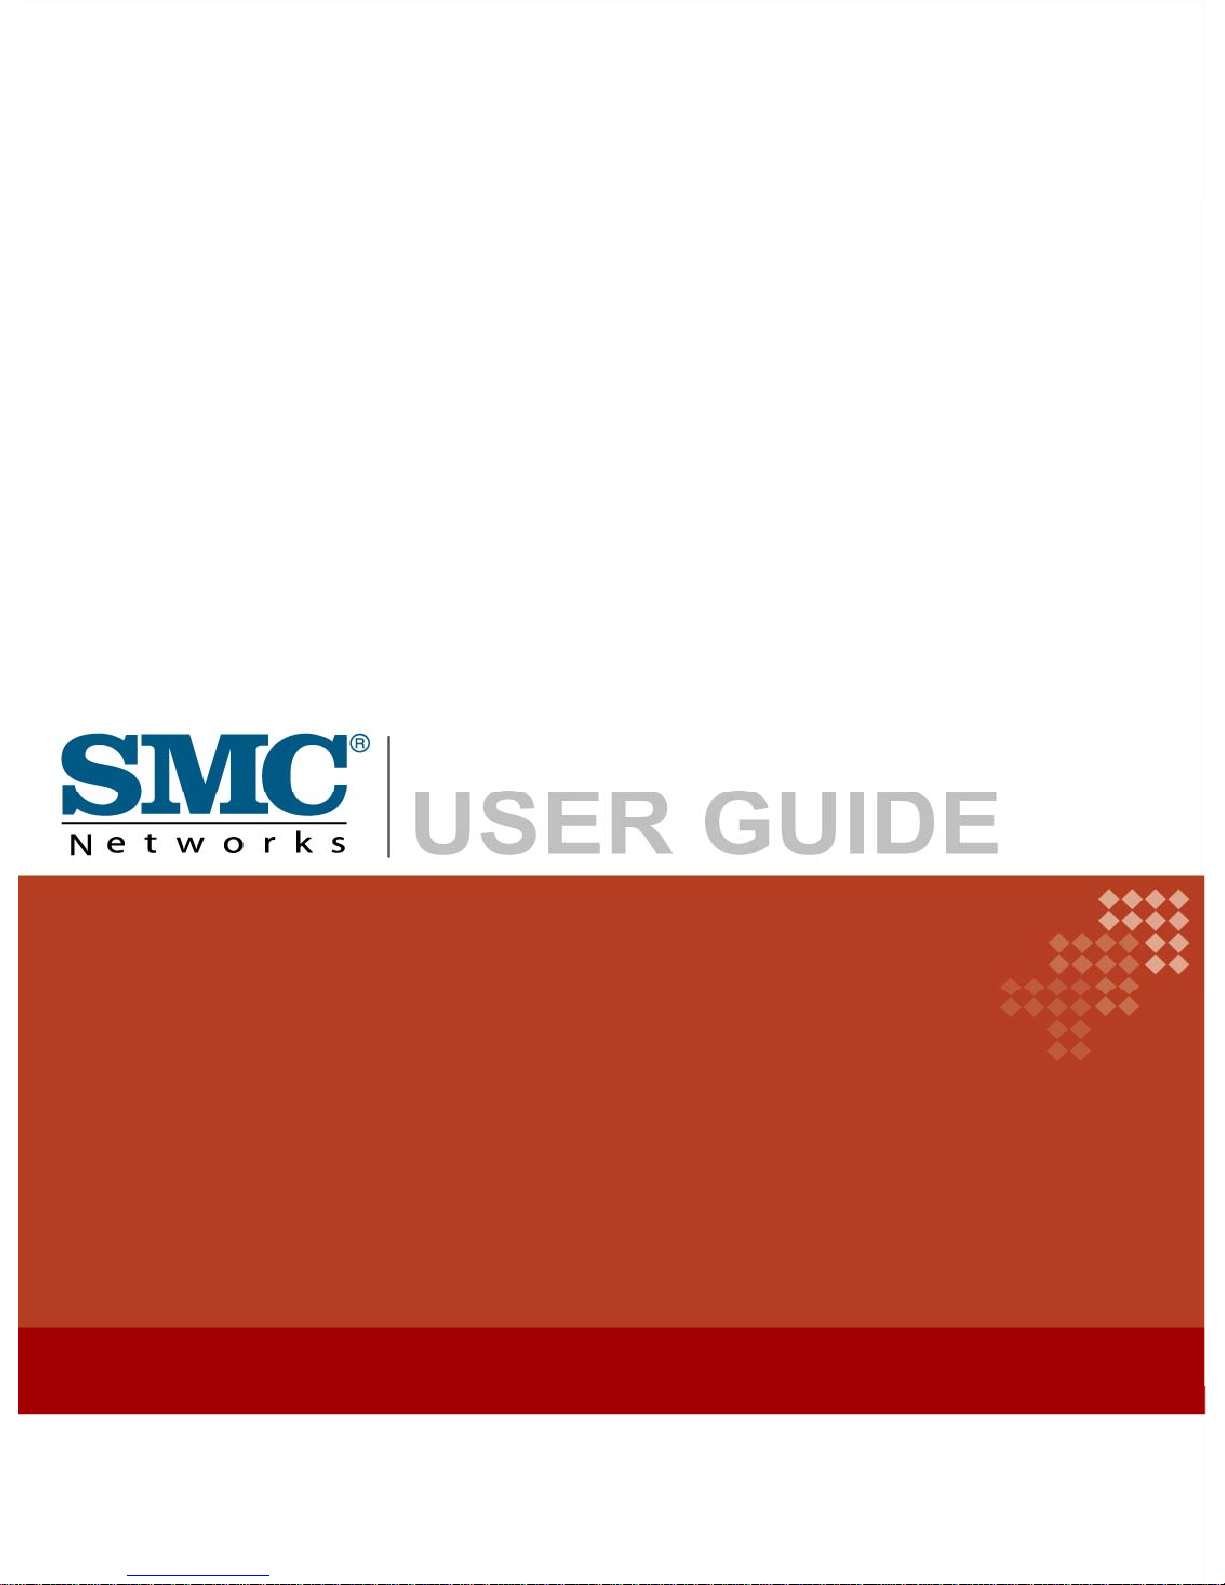
1.3 System View
Front Components
Ref Component Description
n
Hard Disk Drive
Compartment
Contains two hard disk drive slots.
o
Compartment
Cover Opening
Slot
Allows you to pull open the hard disk drive compartment
cover.
p
Device Indicators
Power
Glows blue to indicate the power is on.
Network
Glows green to indicate system is connected to network.
Blinks green to indicate system is trying to establish a
network connection.
Page 13
5
Ref Component Description
p
Device Indicators (continued)
RAID
Glows blue to indicate RAID function is implemented.
Blinks blue to indicate RAID function is rebuilding the
hard disk drive.
Glows red to indicate RAID function is inactive/
malfunction.
HDD1
(right slot)
Glows blue to indicate hard disk drive 1 is on standby.
Blinks blue to indicate read/write functions of har d disk
drive 1.
HDD2
(left slot)
Glows blue to indicate hard disk drive 2 is on standby.
Blinks blue to indicate read/write functions of har d disk
drive 2.
OTB
Glows blue to indicate system is connected with USB
storage device(s), or SD/MMC/MS card through Card
Reader slot.
Blinks blue upon pressing the One-Touch Backup button
to indicate read/write function.
q
One-Touch
Backup Button
Allows you to backup files from digital camera, mass
storage device, or Card Reader.
r
Card Reader
Accepts a MMC (MultiMediaCard), SD (Secure Digital),
or MS (Memory Stick) card for rem ovable st orage m edia.
s
USB Port
Connects to a USB device, such as a USB mass storage
device.
Page 14
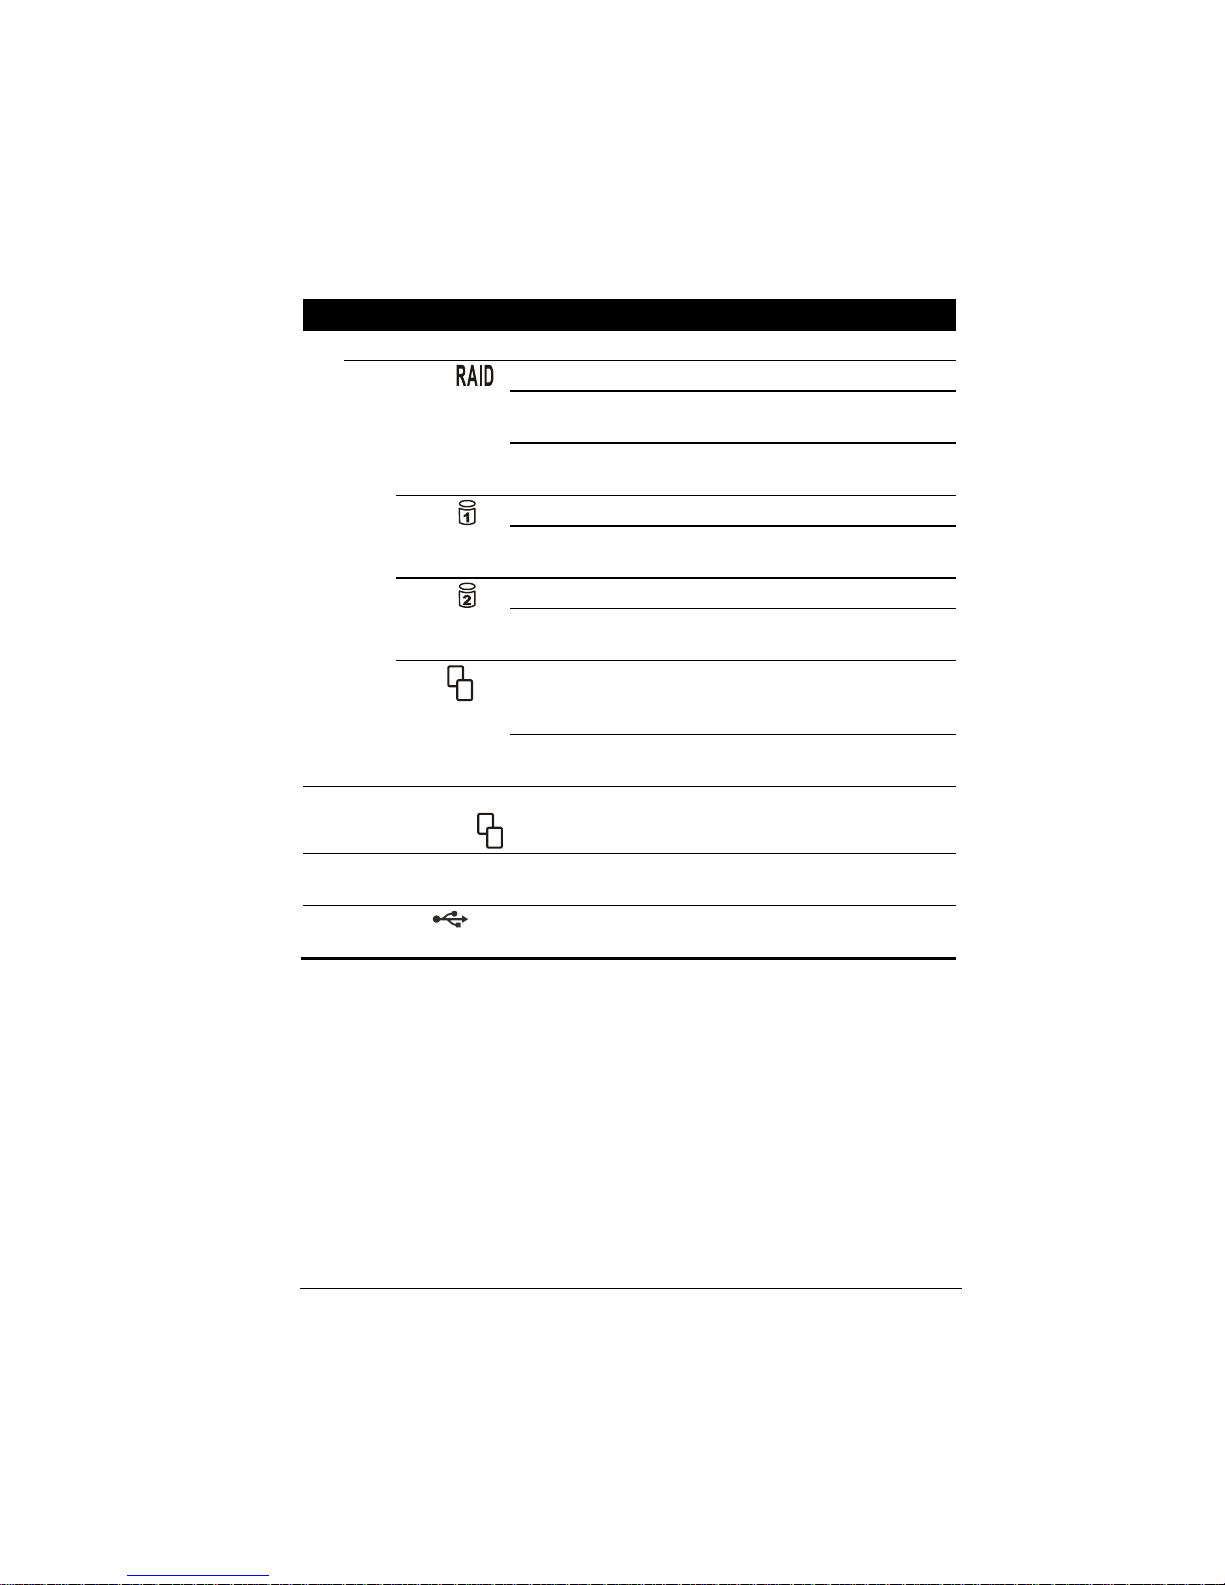
6
Rear Components
Ref Component Description
n
Power Switch
Turns the power on (I) and off (O).
o
Power Connector
DC IN
Connects to the power adapter.
p
Reset Switch
RESET
Allows you to reset the system to the factory default
username, password, DHCP, and IP.
q
RJ-45 Connector
LAN
Connects the LAN cable.
Green LED (upper) – glows green when the system has an
available connection to LAN.
Yellow LED (lower) – blinks yellow when the system is
accessing the LAN.
r
USB Ports
Connect USB devices, such as USB mass storage device
or digital camera, print server and UPS power systems.
s
Ventilation
Opening
Maintain proper operating temperature. Do not cover or
block the openings.
Page 15
7
Chapter 2 Setting Up
Step 1. Install the Hard Disks
WARNING: This section is only applicable for installing new hard disk(s) that has never
installed NAS middleware before. If the hard disk has already installed NAS middleware,
then proceed to chapter 3 – DO NOT insert hard disk at this point.
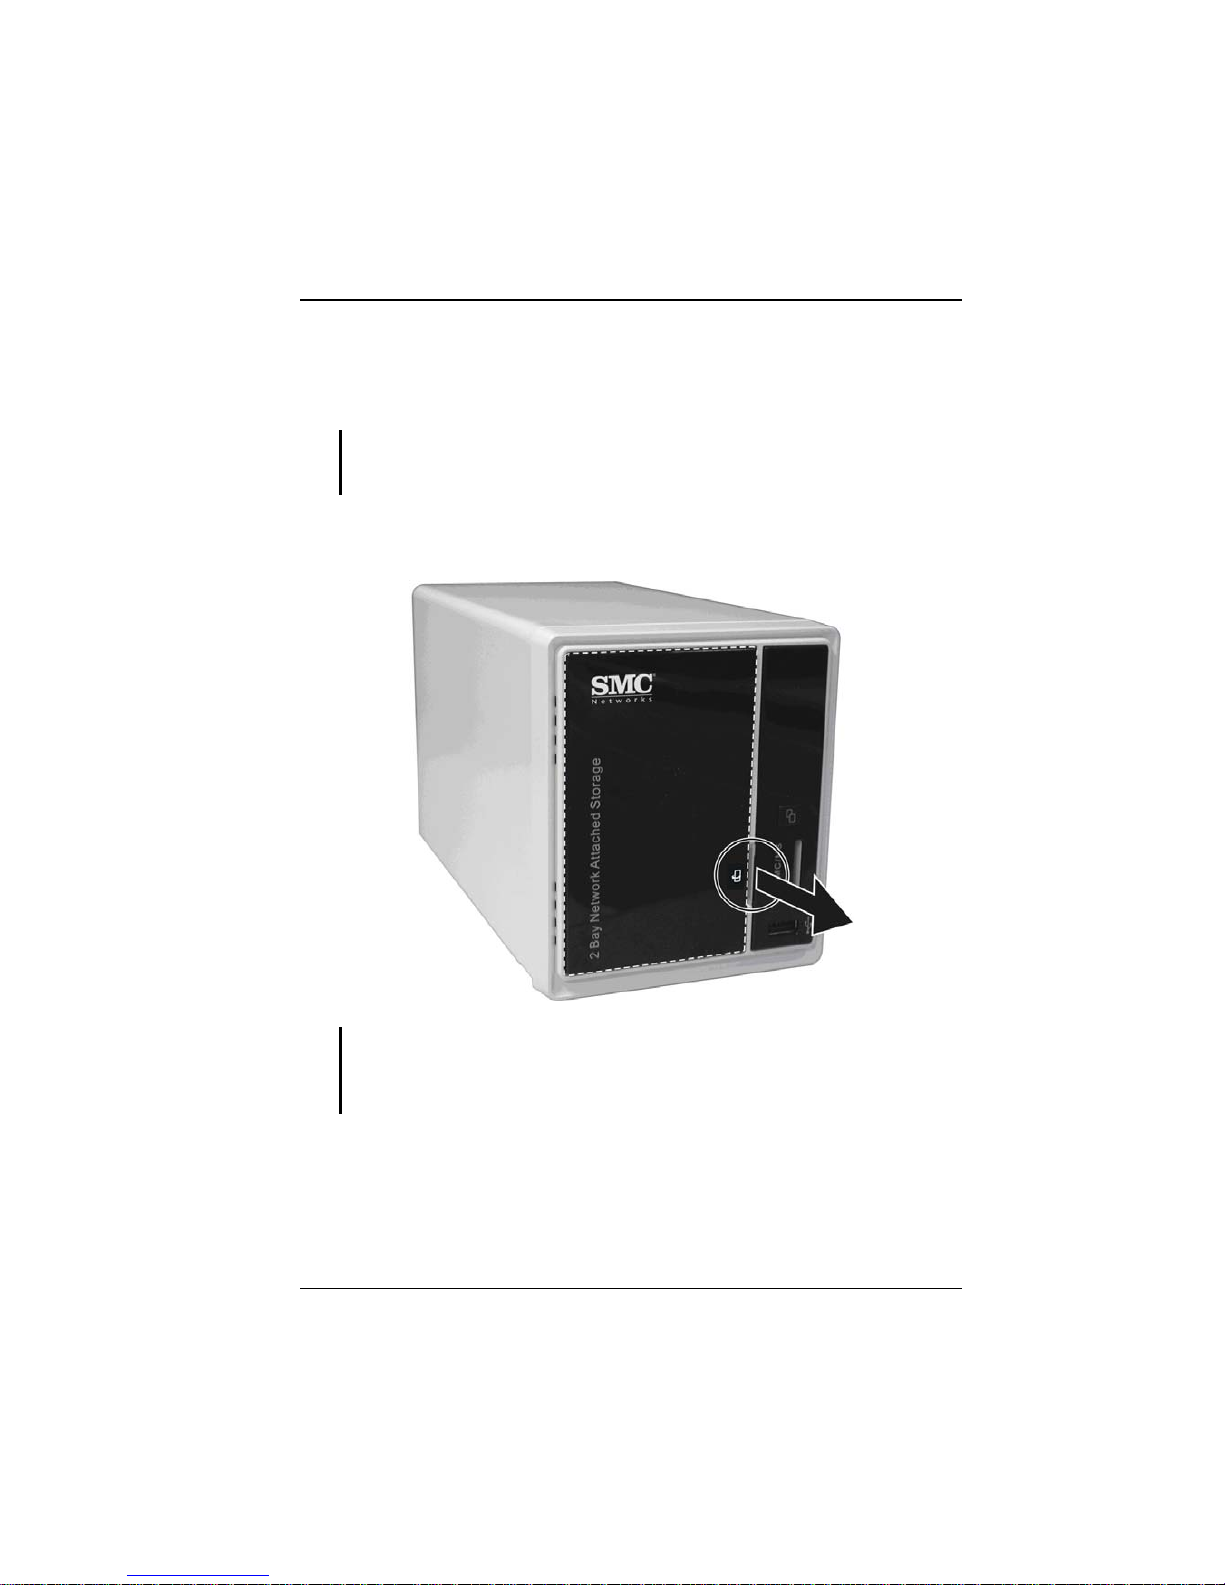
1. Pull off the hard disk drive compartment cover from the device by pulling
on the indented portion.
CAUTION: Be gentle when pulling off the cover. Pulling it vigorously could damage the
cover hinges and device. The compartment cover was designed as a flat surface for the
protection and safety of data and hard disks. It is not encouraged to open the compartment
cover frequently.
Page 16
8
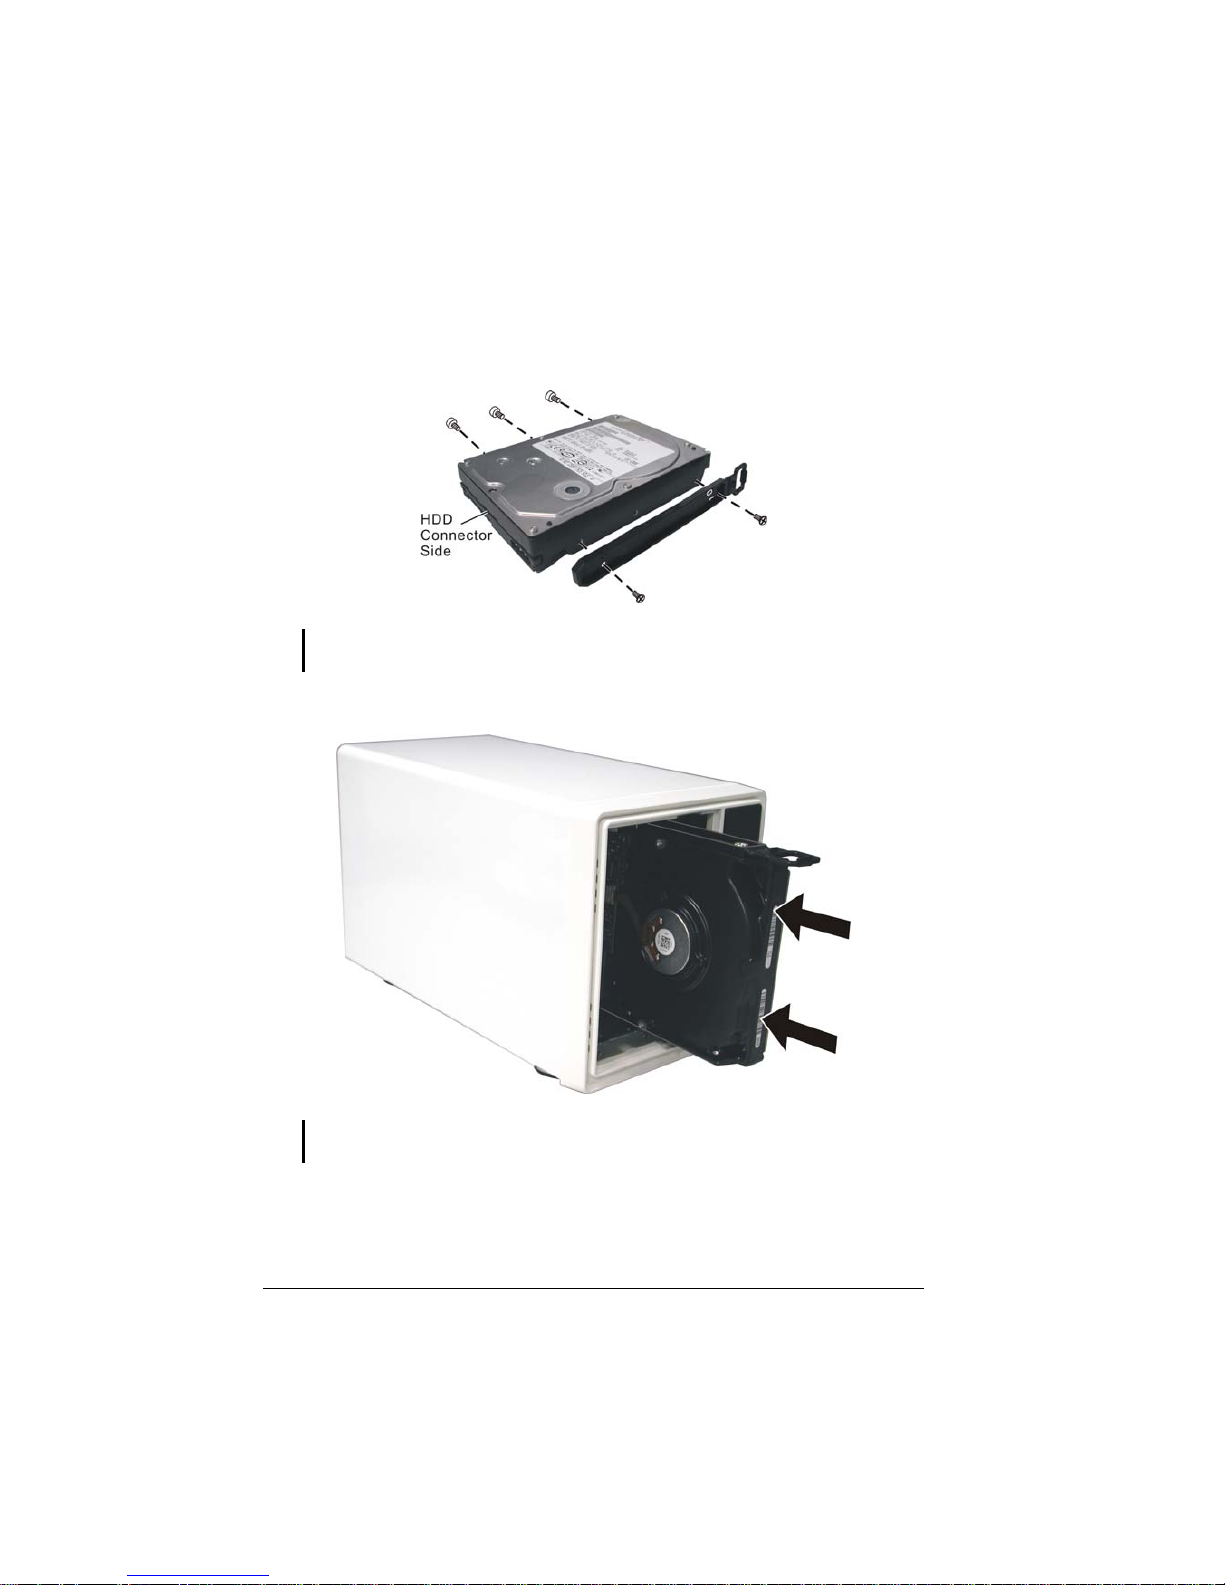
2. Fasten two screws on "1" position to secure the HDD rail on the hard disk
drive. Fasten three screws on the opposite side of the hard disk drive
(without HDD rail).
NOTE: When installing a particular hard disk drive for the first time on your NAS, make
sure to first turn on the storage device before inserting the hard disk drive.
3. Slide the hard disk drive all the way into the right slot.
NOTE: Install the first hard disk drive on the right slot, the second hard disk drive on the left
slot. This is important when implementing RAID.
4. Repeat step 2 and 3 to install the second hard disk drive.
Page 17
9
5. Slide the second hard disk drive all the way into the left slot.
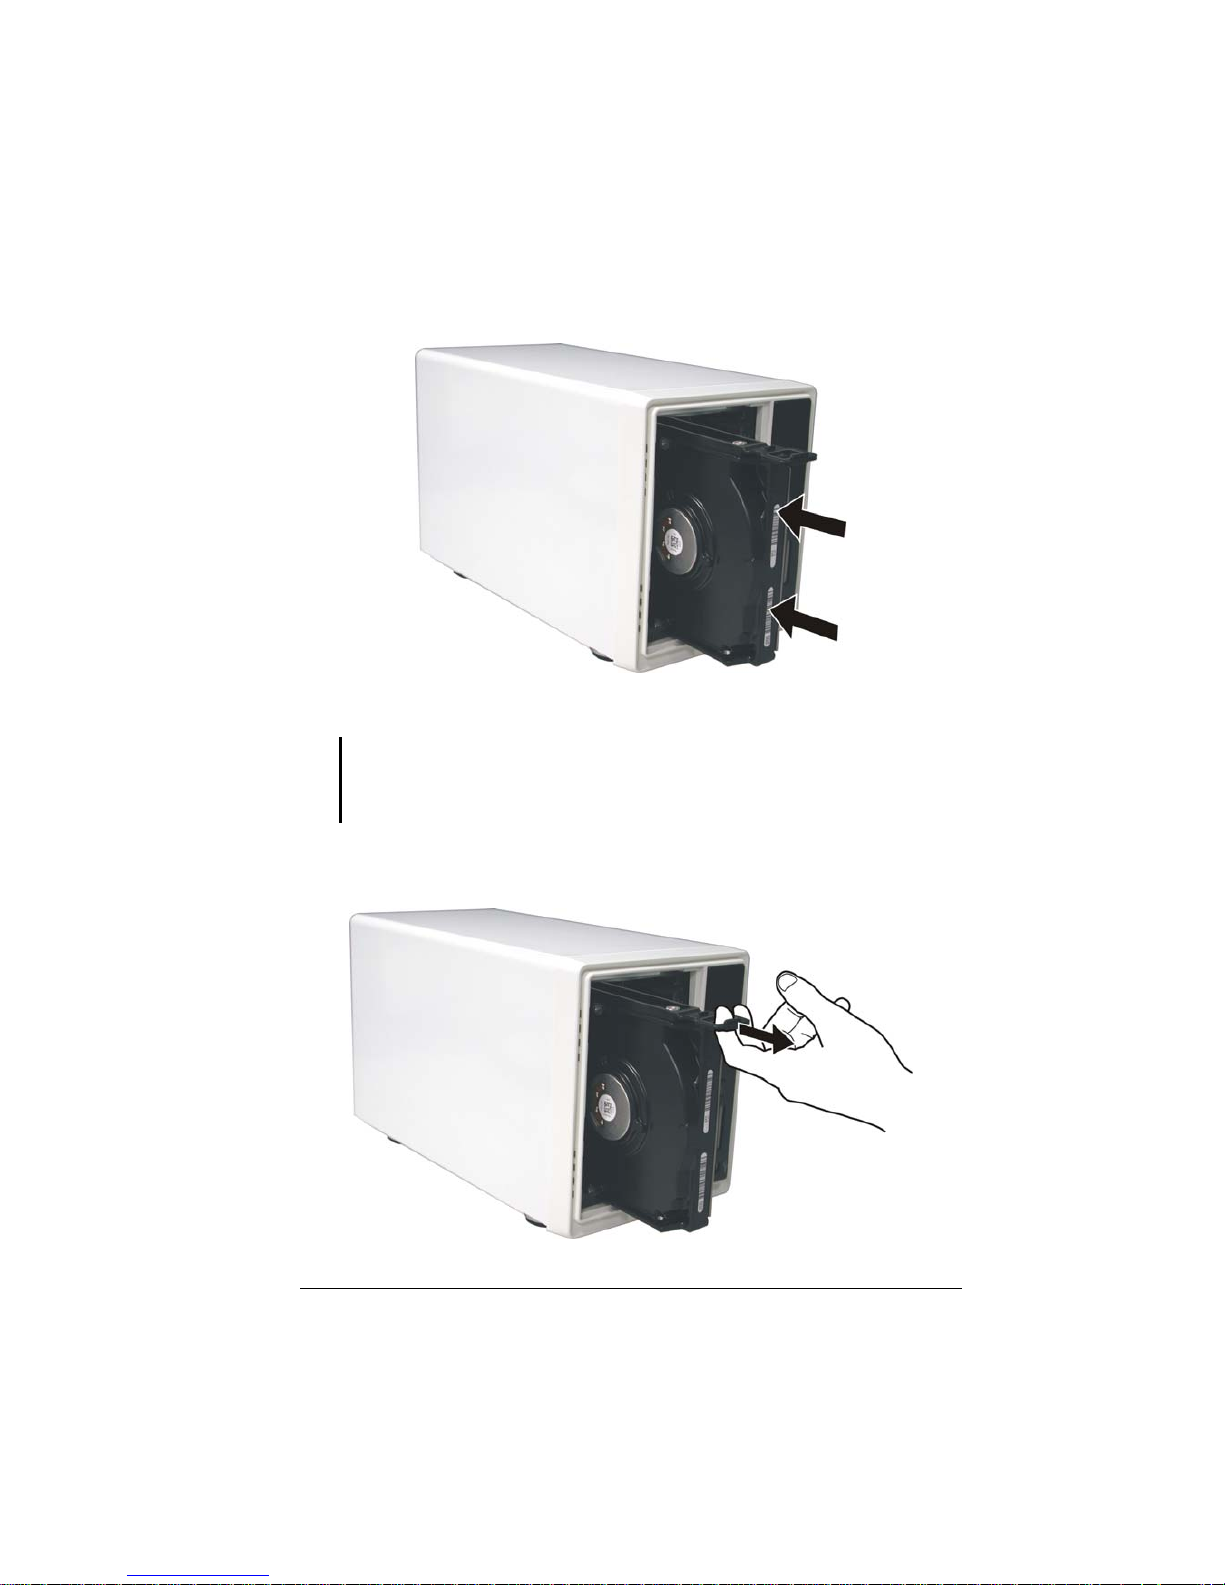
6. Place the hard disk drive compartment cover back on the storage device.
CAUTION: Be gentle when replacing the cover to avoid damaging the cover hinges and
device. Replacing it vigorously could damage the cover hinges and device. The
compartment cover was designed as a flat surface for the protection and safety of data and
hard disks. It is not encouraged to open the compartment cover frequently.
In the event that you would need to remove a hard disk drive, pull on the plastic
handle and slide the disk off the compartment.
Page 18

10
NOTE: If you have two hard disk drive installed, remove the hard disk drive on the left slot
first, then remove the hard disk drive on the right slot.
Step 2. Connect to the Network
1. Make sure that the computer is connected to a router.
2. Connect one end of the Ethernet cable to the network connector (LAN) on
the back of your storage system (NAS) and the other end to a router.
Or you can connect both your computer and storage system (NAS) to one
switch, and this switch is connected to the network which has a DHCP
server.
Page 19
11
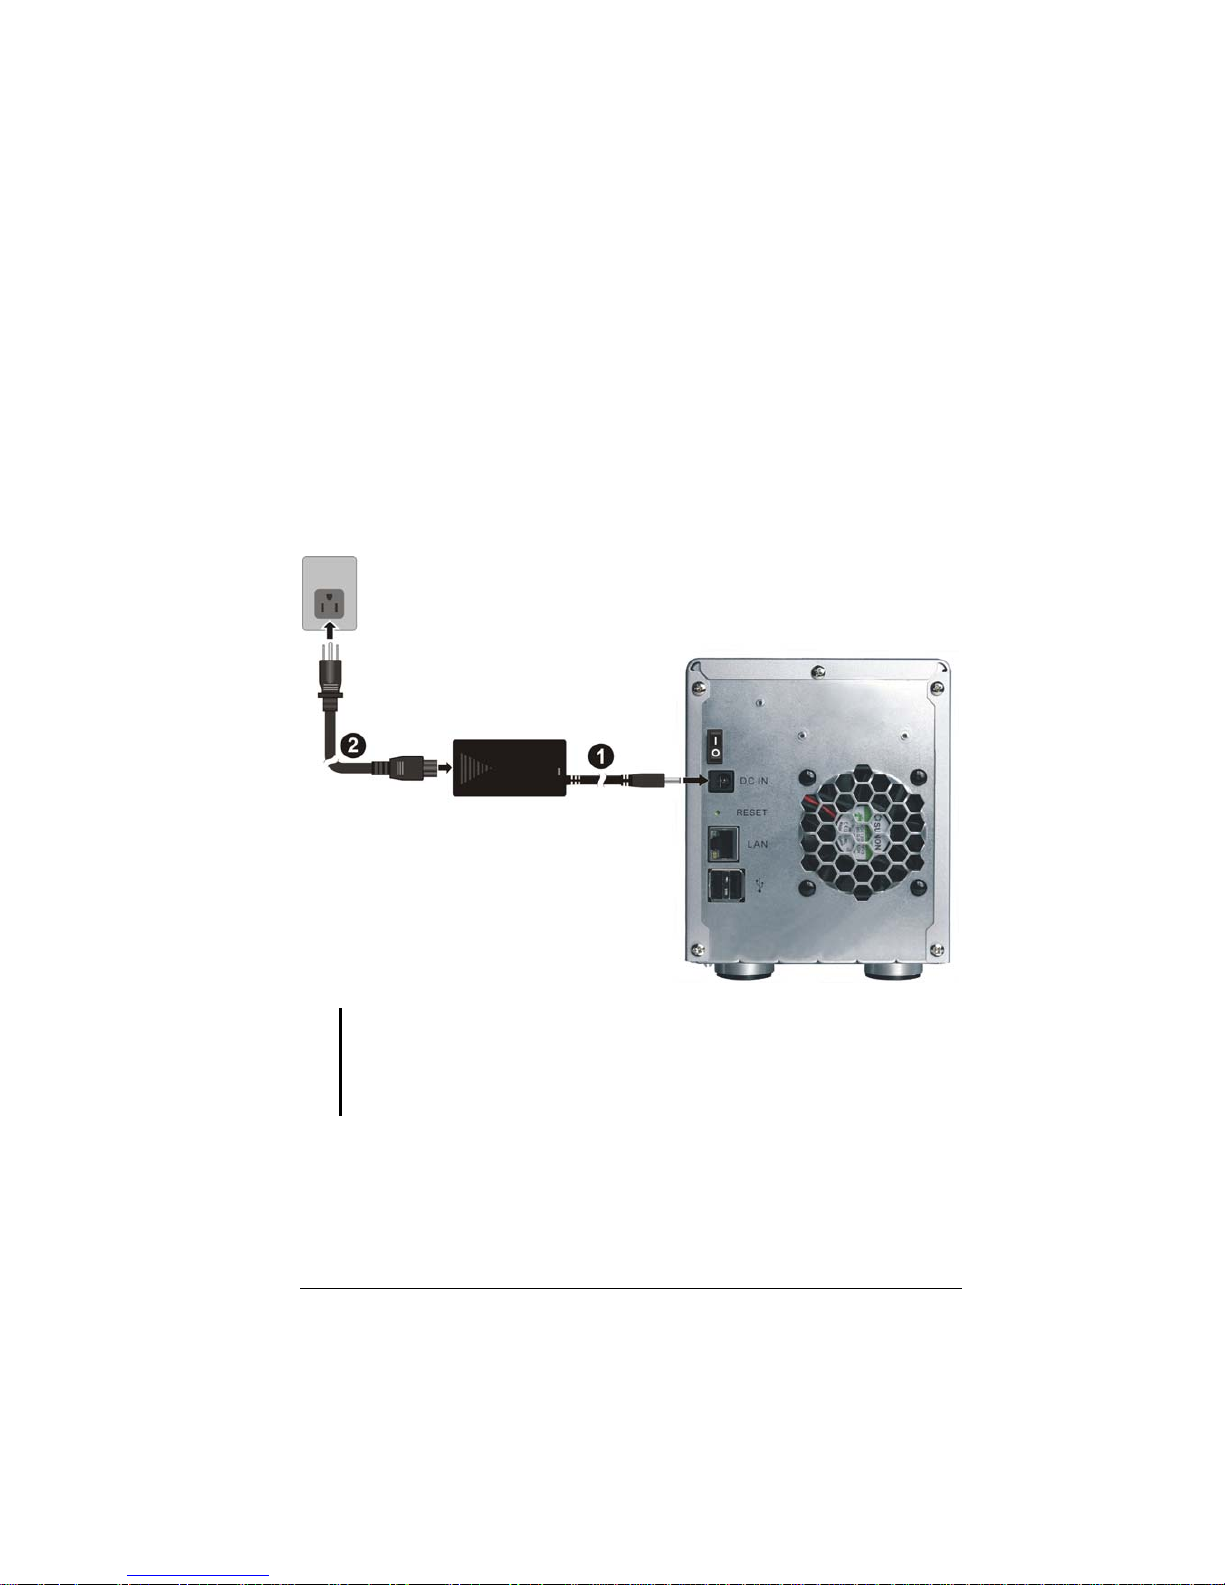
Step 3. Connect to Power
1. Make sure that your storage system is turned off (Power switch on the “O”
position).
2. Plug the DC cord of the AC adapter to the power connector (DC IN) on the
rear of the storage system (n).
3. Plug the female end of the AC power cord to the AC adapter and the male
end to an electrical outlet (o).
CAUTION:
z When you disconnect the AC adapter, disconnect from the electrical outlet first and
then from the storage device. A reverse procedure may damage the AC adapter or
the storage device.
z When unplugging the connector, always hold the plug head. Never pull on the cord.
Step 4. Configure Your Storage System
See the next chapter for the software configuration instructions.
Page 20

Page 21

13
Chapter 3 Configuring Your Storage
System
An SMCNAS02 network consists of a SMCNAS02 server and several clients
connected via network links.
SMCNAS02
Page 22
14
3.1 Installing and Starting the Storage System Management
You need to install Storage System Management before you can perform any
system configurations.
IMPORTANT:
z If you are using the hard disk drive that has been installed with NAS middleware
before, then follow the steps on the section “System Power-on Without Hard Disk
Drive.”
z If you are using full new hard disk drives that have never installed NAS middleware
before, then follow the steps on the section “System Power-on With Full New Hard
Disk Drives.”
For Windows PC
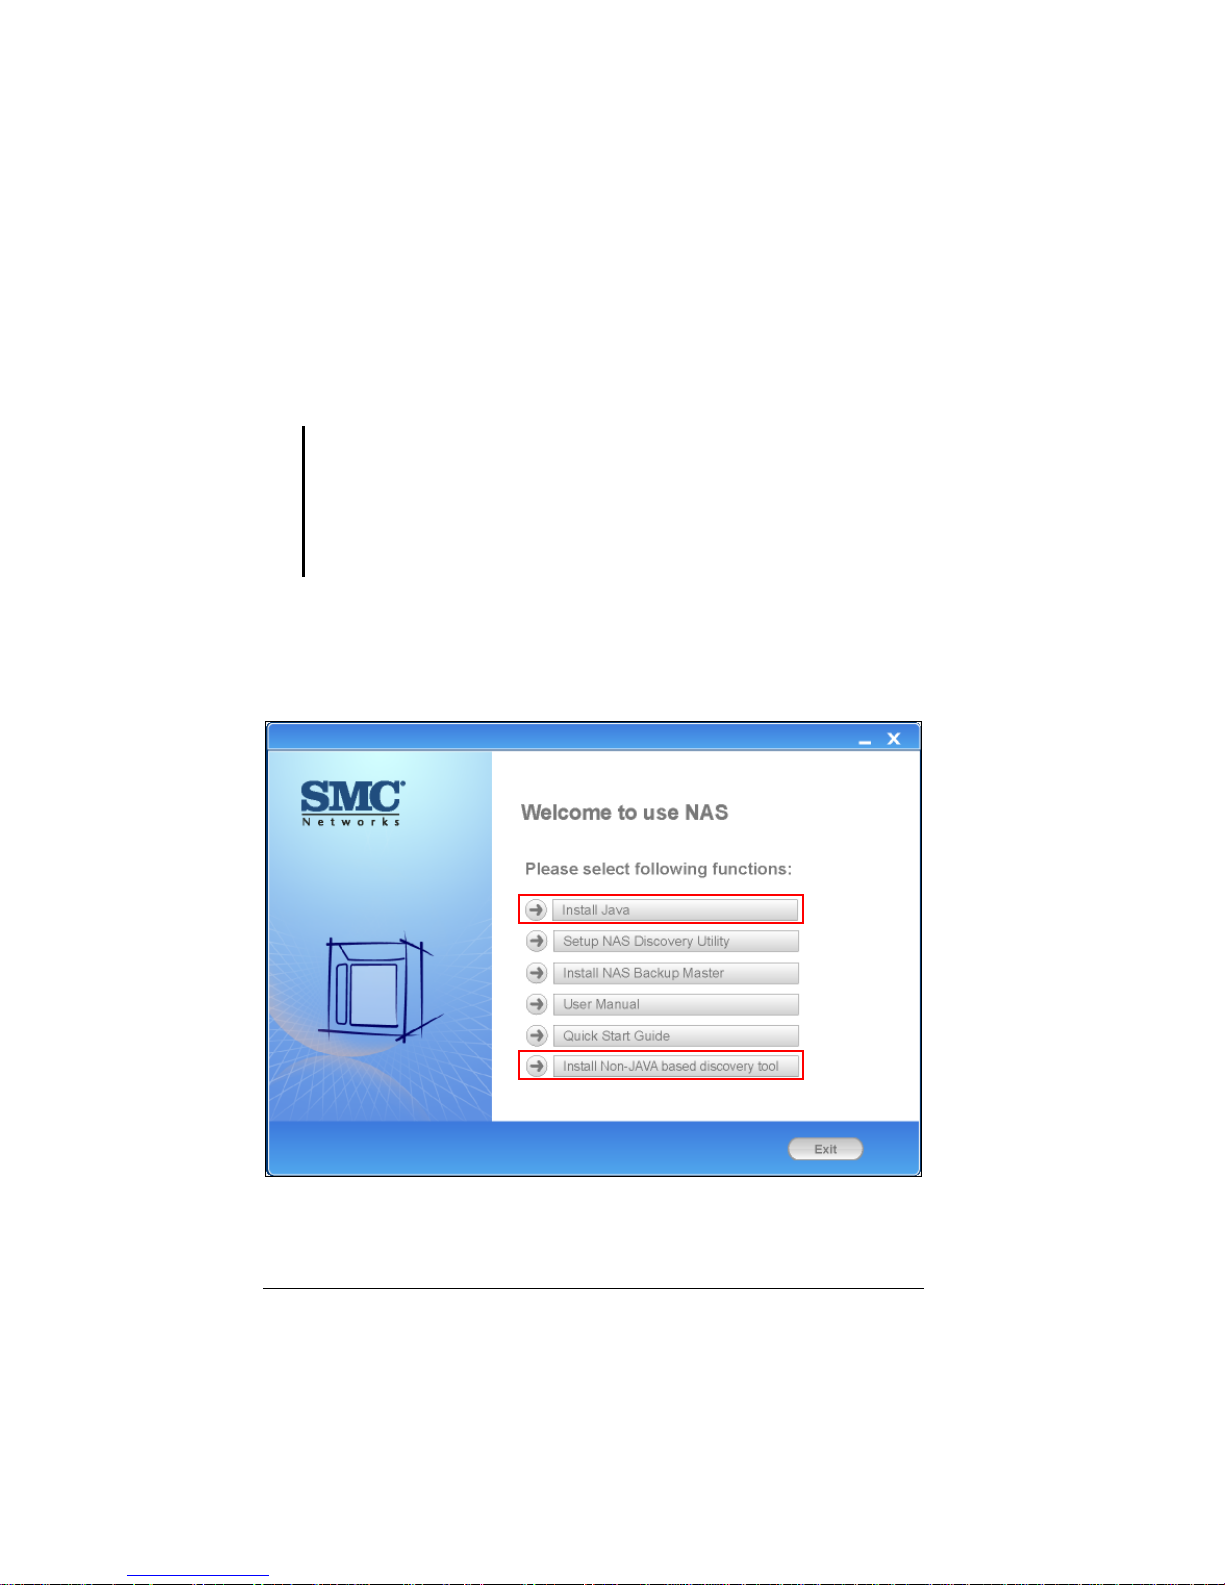
1. Insert the included utility disc into your computer and the following screen
appears (if not, click on the file AutoRun.exe on the utility disc).
Page 23
15
2. Click Install Java to install JAVA script on your computer and the following
screen appears. (Please make sure your computer has internet connection to
be able to access the online installation of JAVA.)
NOTE: You can also click Install Non-JAVA based discovery tool to install non-JAVA
based discovery tool.
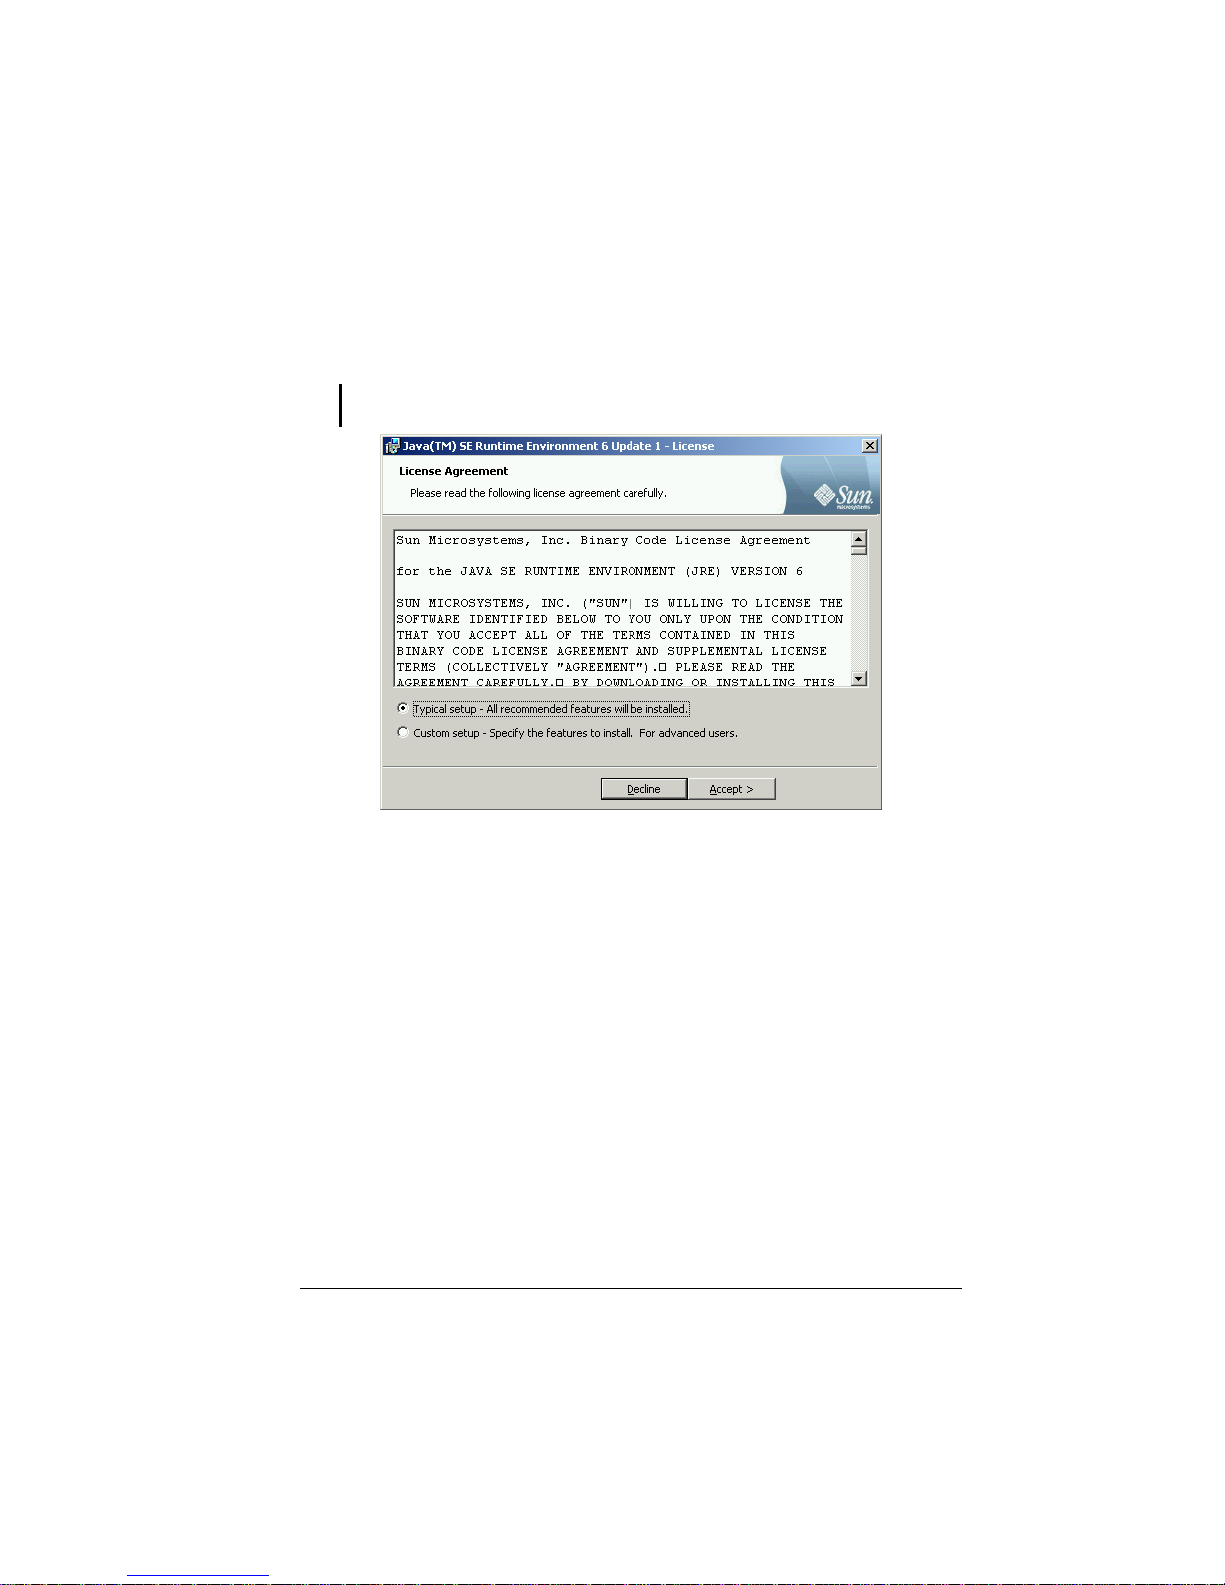
3. After reading the license agreement, click Accept and the following screen
appears showing the progress of installation (this may take a couple of
minutes).
Page 24
16
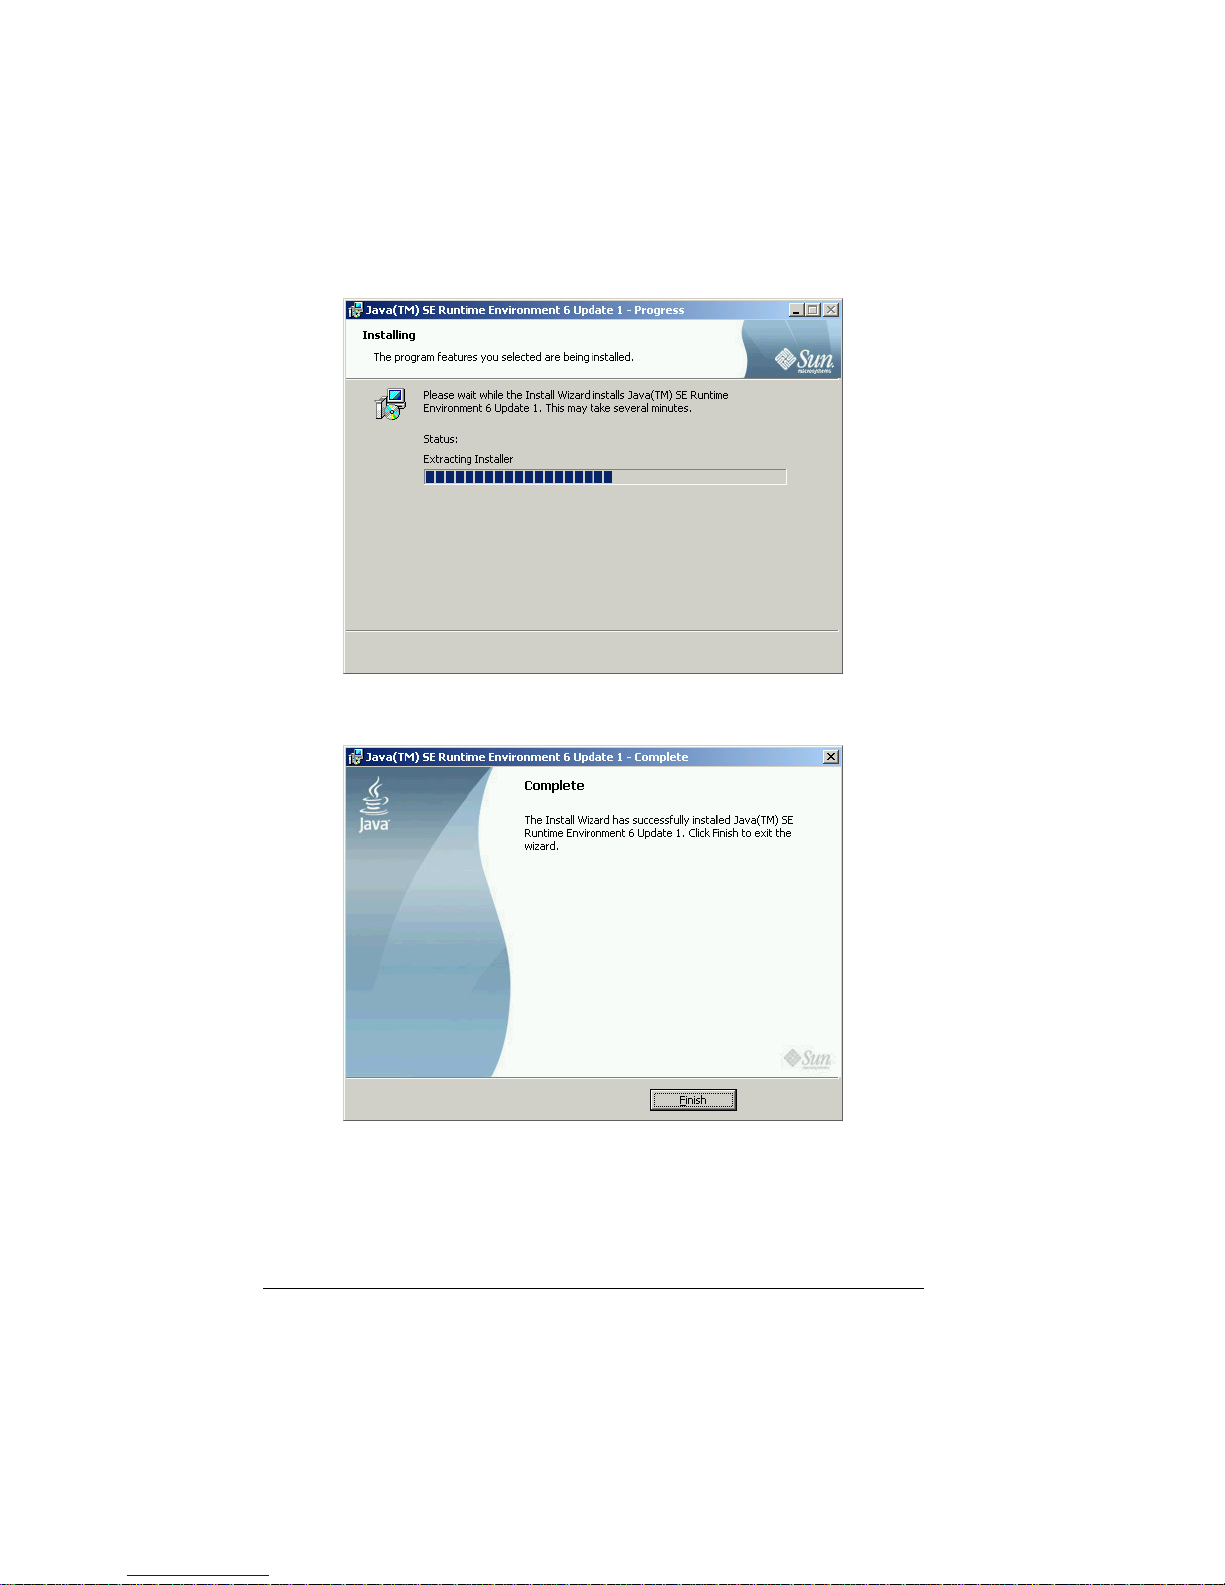
4. Click Finish when the following screen appears to exit installation.
Page 25
17
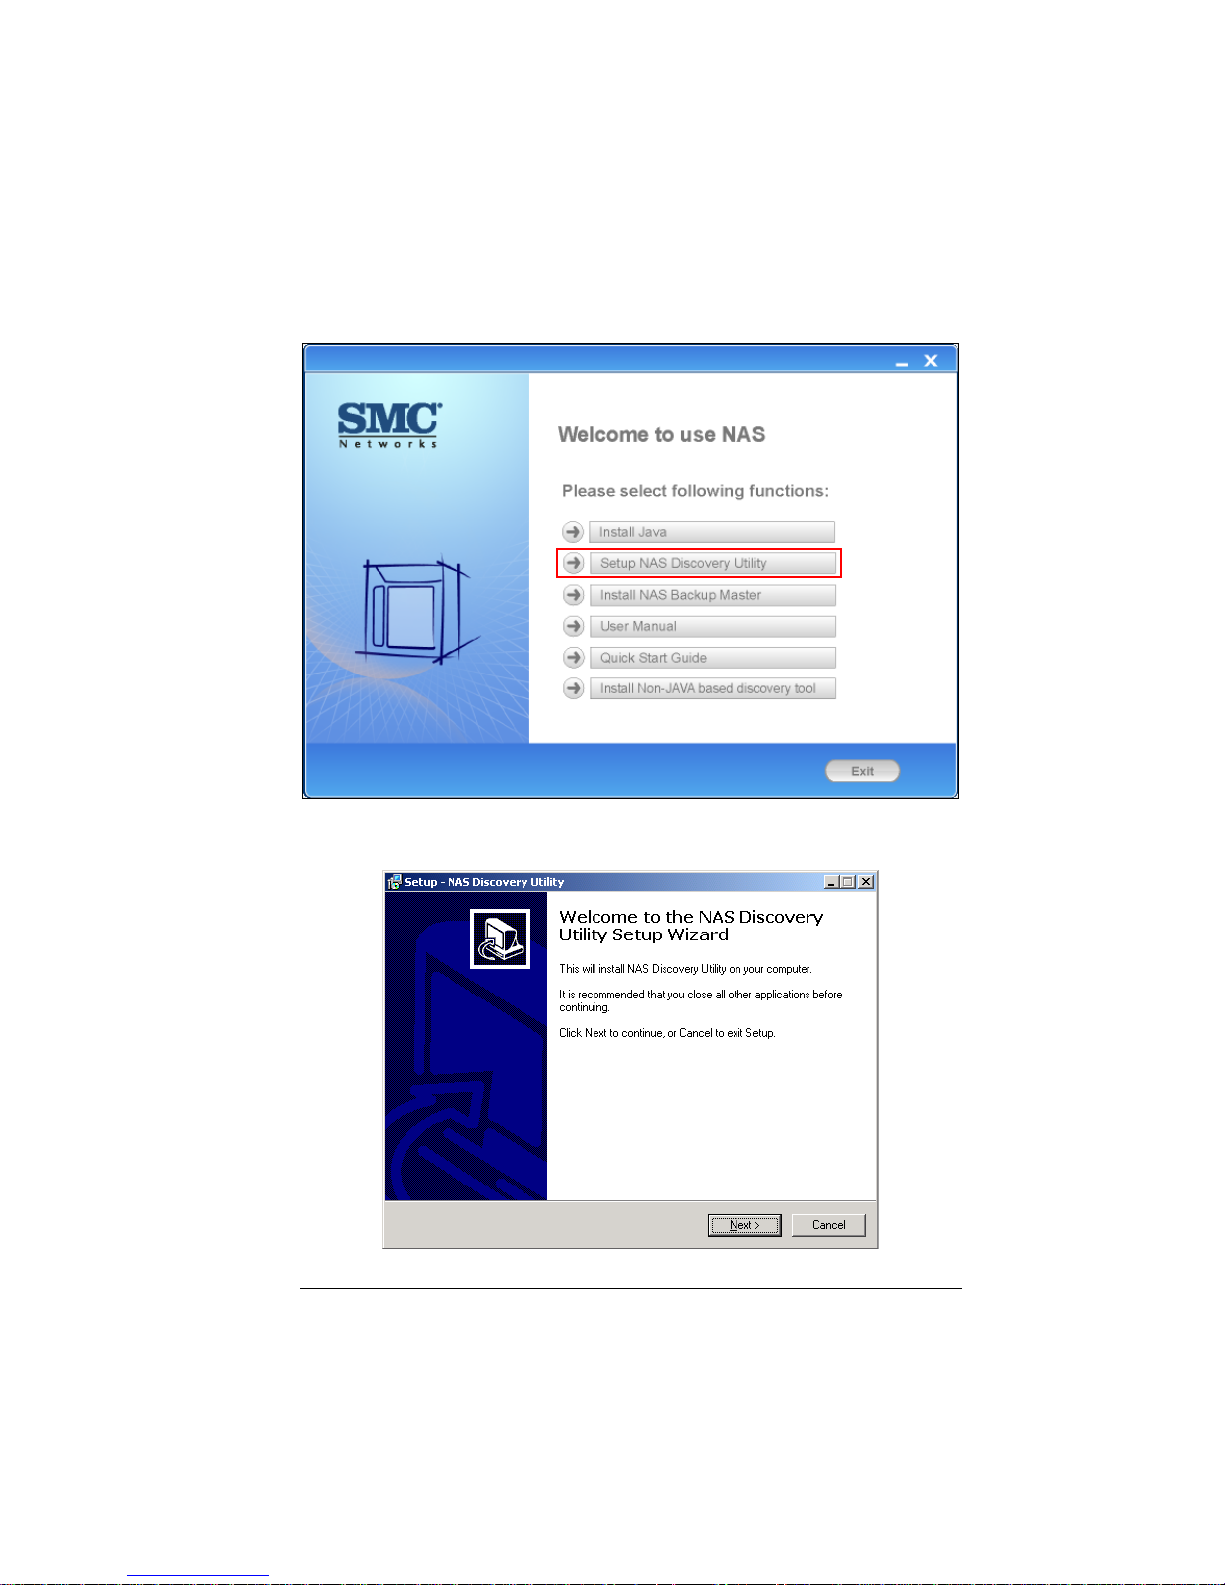
5. Click Setup NAS Discovery Utility.
6. The following screen appears. Click Next.
Page 26
18
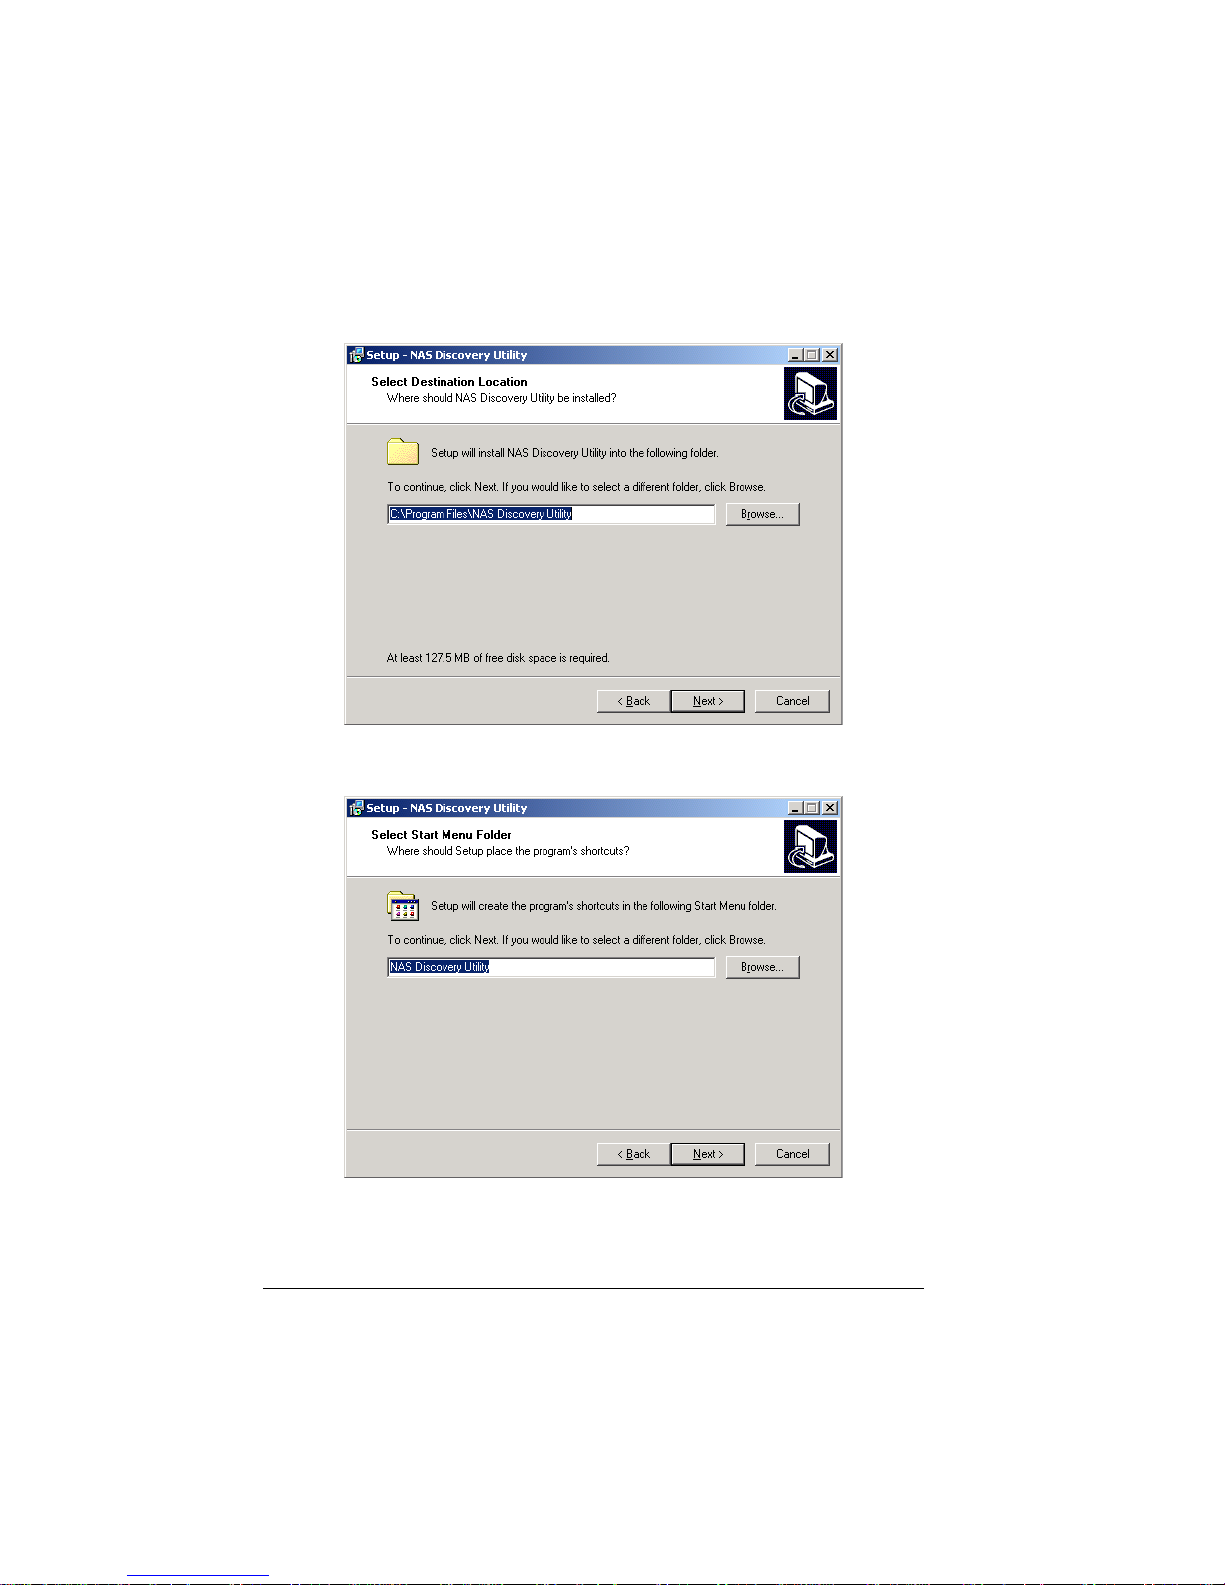
7. Select the destination to install the NAS Discovery Utility and click Next.
8. The Select Start Menu Folder screen appears, click Next.
Page 27
19
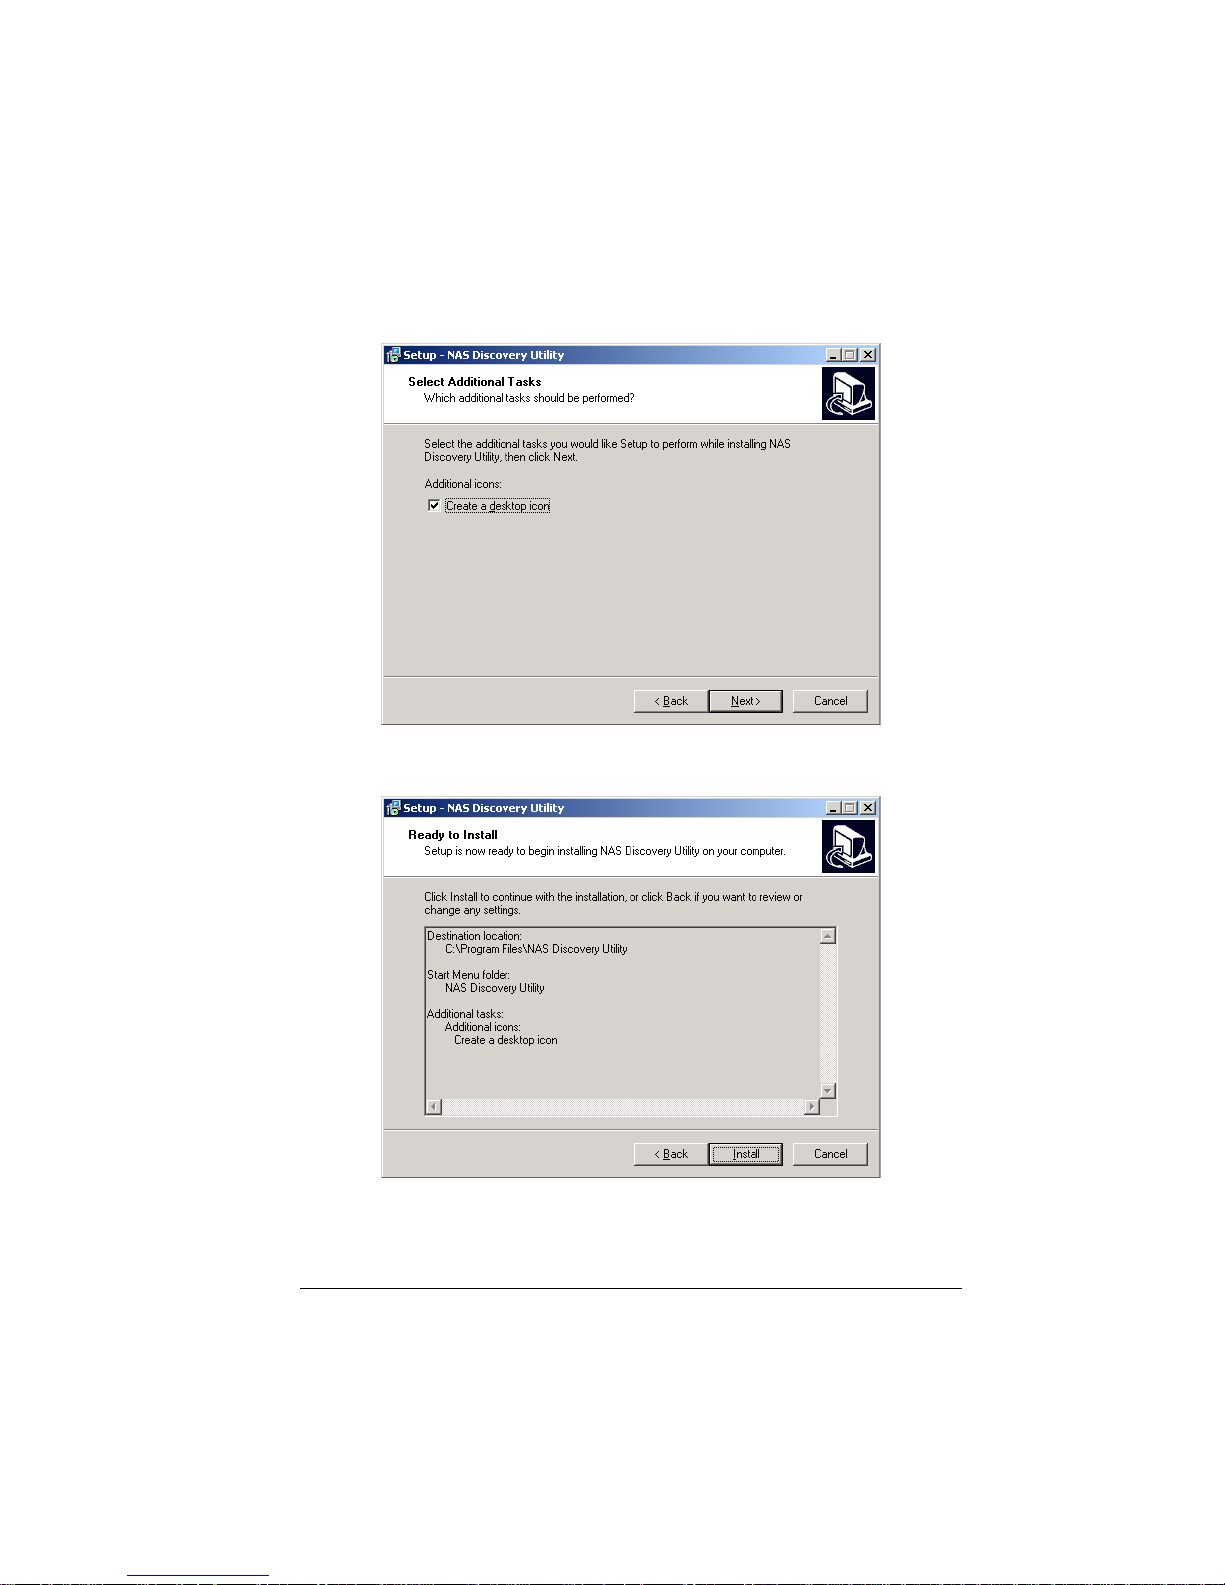
9. Click the Create a desktop icon checkbox to enable it and click Next.
10. When the Ready to Install screen appears, click Install.
Page 28
20
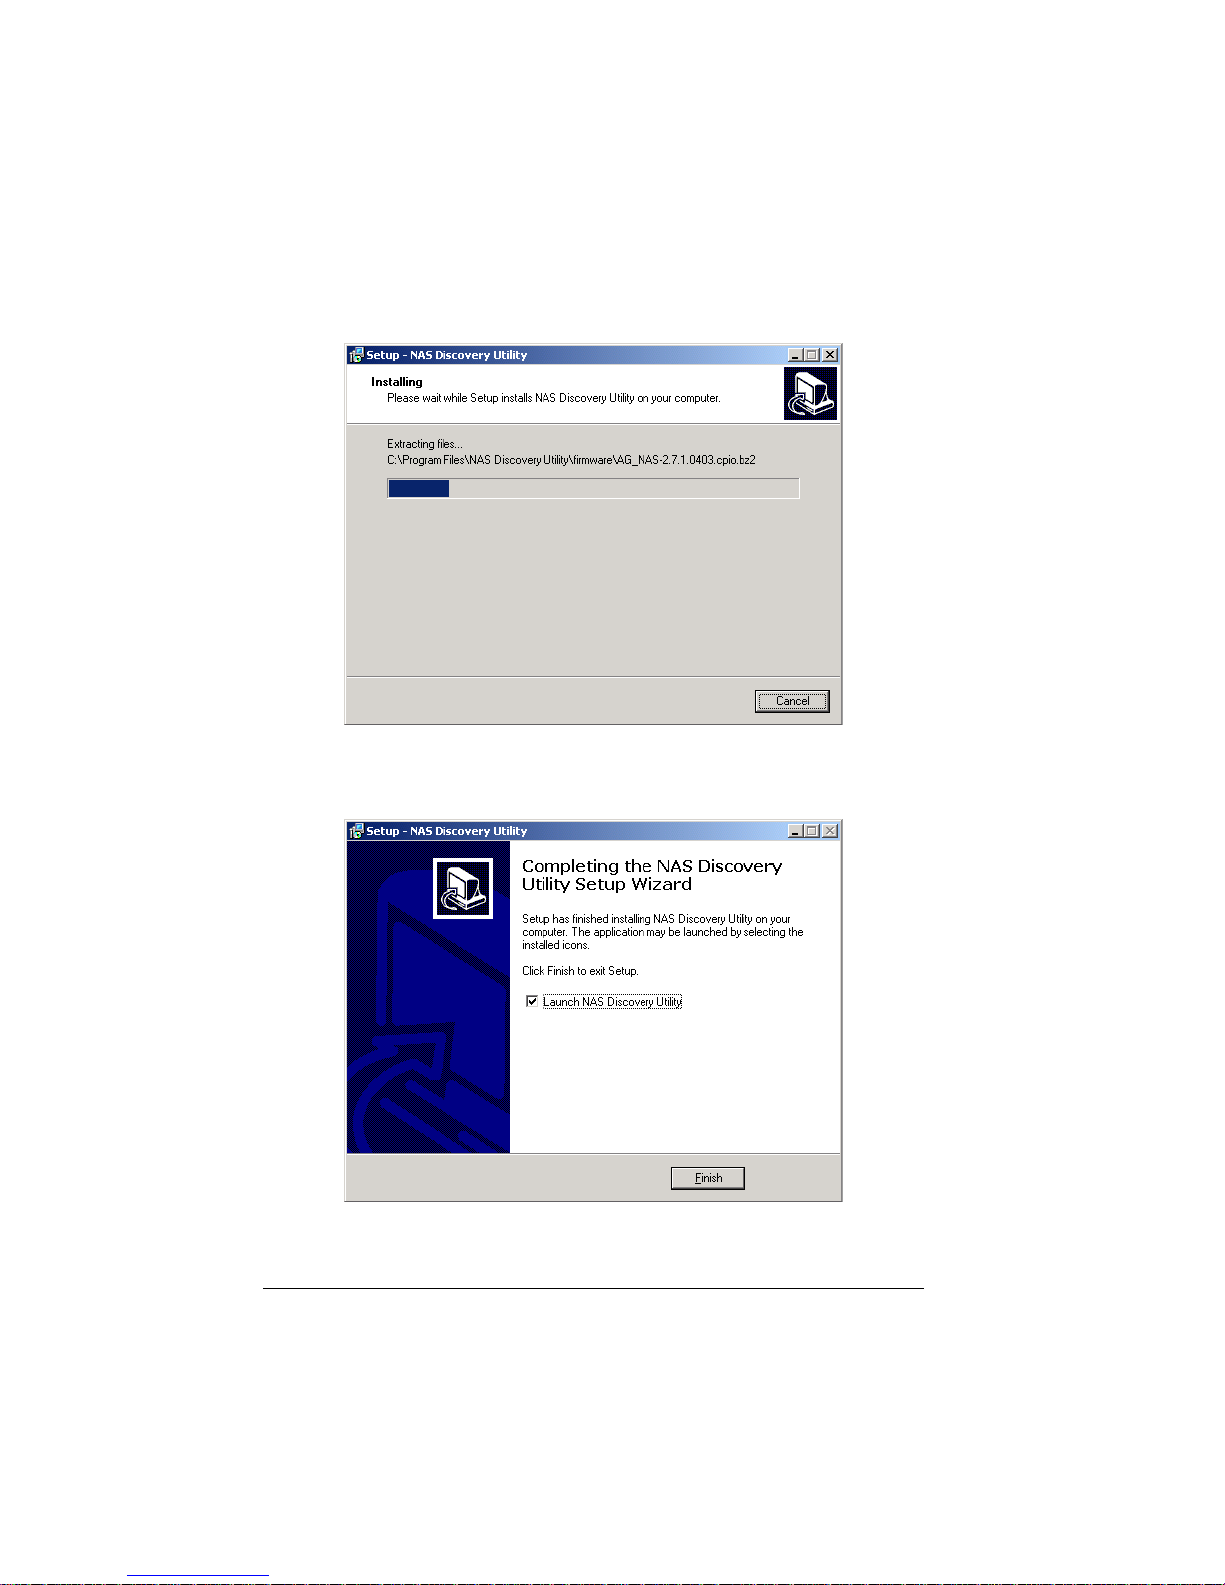
11. The progress of installation will be shown onscreen.
12. When the following screen appears, click Finish to exit the installation
process.
Page 29
21
JAVA-based
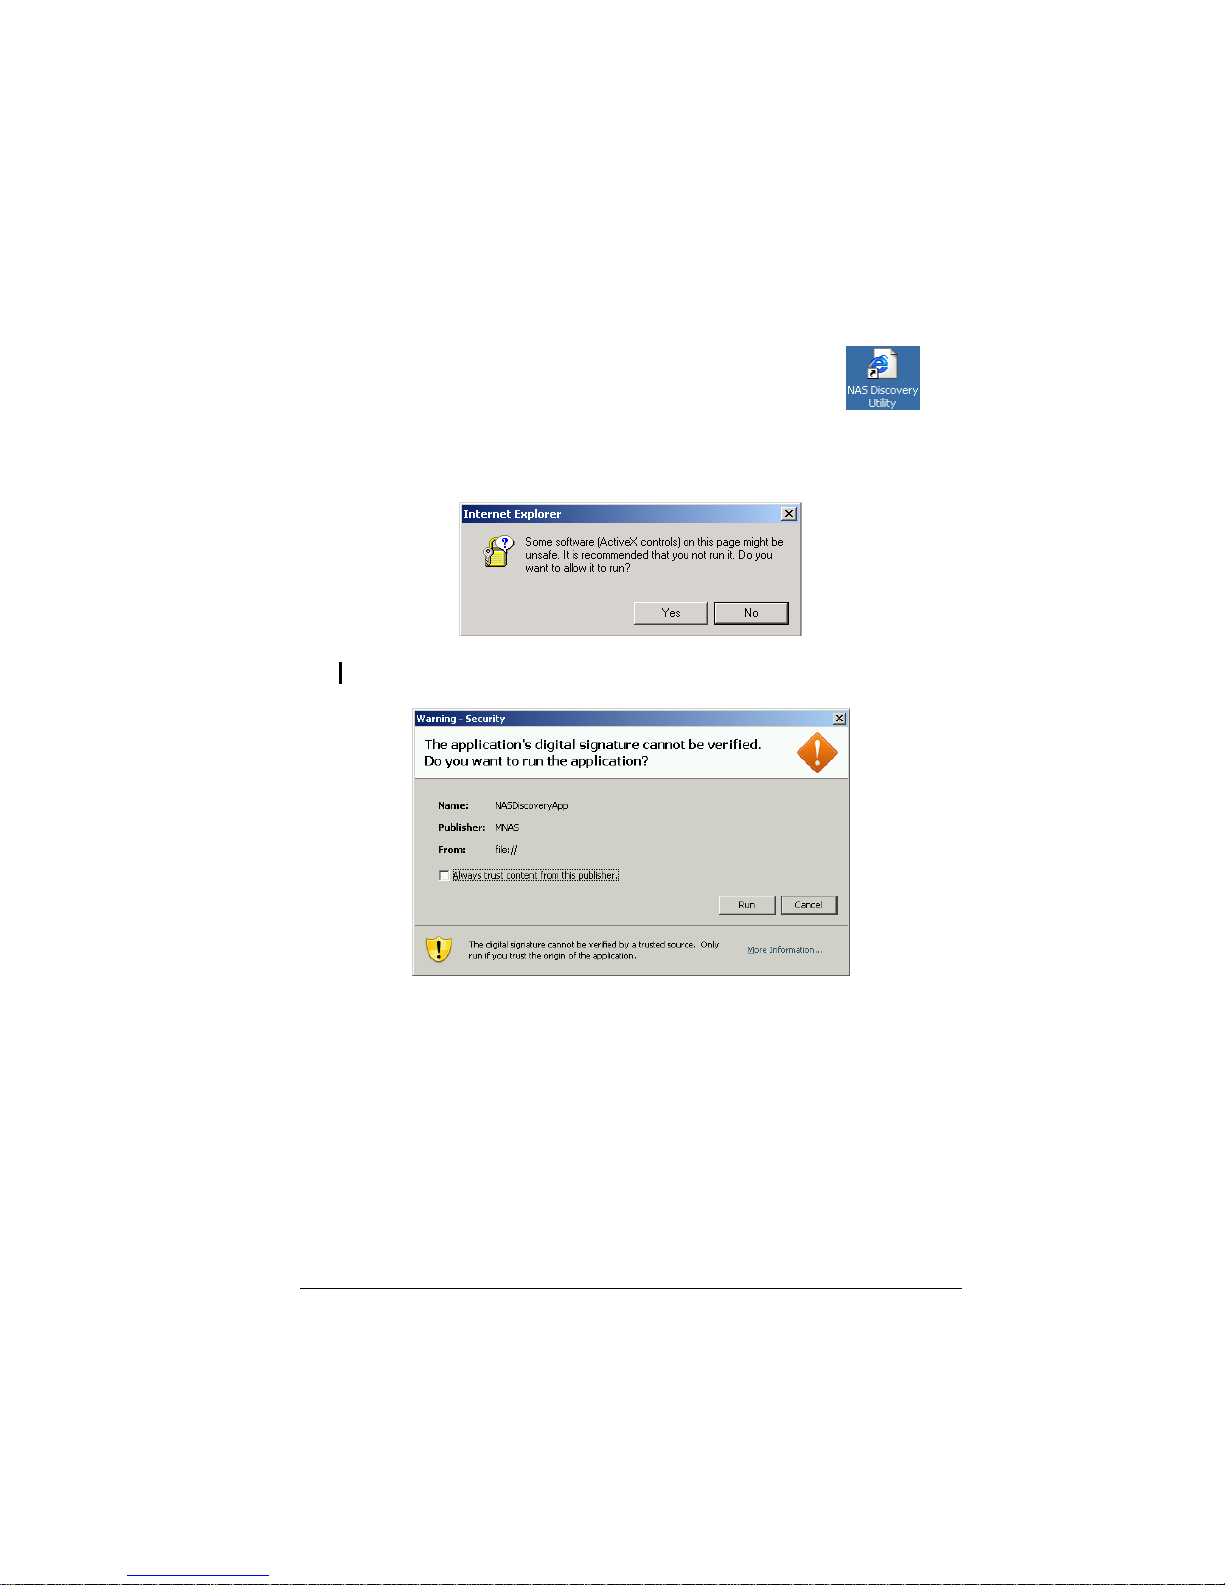
13. Click the NAS Discovery Utility shortcut icon on your desktop
or you can launch the NAS Discovery Utility by clicking Start Æ Programs
Æ NAS Discovery Utility Æ NAS Discovery Utility. Click Yes when the
following screen appears to allow ActiveX controls.
NOTE: If the following screen appears, click Run to allow the digital signature verification.
Page 30
22
14. The following screen appears.
Page 31

23
Non-JAVA based
13. Click the NAS Discovery Utility shortcut icon on your desktop
or you can launch the NAS Discovery Utility by clicking Start Æ Programs
Æ NAS Discovery Utility Æ NAS Discovery Utility.
14. The following screen appears.
Page 32

24
For Apple Mac OS X (10.4.11 or above)
1. Insert the included utility disc into your computer and open the MAC
AutoRun folder, and then click the AutoRun.app program.
2. The following screen appears. Click Setup NAS Discovery Utility.
Page 33

25
3. The Welcome to the NAS Discovery Utility Installer screen appears. Click
Continue.
4. Select the destination to install the NAS Discovery Utility and click
Continue.
Page 34

26
5. The Easy Install on “iDisk HD” screen appears, click Install.
6. The installer requires that you type the password of your Mac OS X
Administrator account.
Page 35

27
7. The Installing NAS Discovery Utility screen appears and progress of
installation will be shown.
8. When the following screen appears, click Close to exit the installation
process.
Page 36

28
9. To get the latest font library, click MAC Æ Software Update to
update to the latest MAC Operation System version.
10. The system would start to check for software update.
Page 37

29
11. To set the Safari Cookies, click Safari Æ Preferences.
Then Security to accept Cookies “Only from sites you navigate to”.
Page 38

30
12. Click the NAS Discovery Utility icon
in the hard drive
installation directory or launch NAS Discovery Utility by clicking
Applications Æ NAS Discovery Utility.
13. Click Trust to allow digital signature verification if the following screen
appears.
Page 39

31
14. The following screen appears.
NOTE:
z The NAS Discovery Utility must use the Safari web browser when system is using
the Mac OS X (10.4.11 or above).
z Use Mozilla Firefox to install SMCNAS and type in the SMCNAS IP in the Firefox
address field.
z When using the Safari web browser to log in to web management, make sure to
have the correct setting: Safari Æ Preferences Æ Security Æ Accept Cookies
Æ Only from sites you navigate to.
When using Mozilla Firefox to log in to web management type in the NASIP at the
Firefox web browser.
Page 40

32
System Power-on Without Hard Disk Drive
IMPORTANT: If you are using the hard disk drive that has been installed with NAS
middleware before, then follow the steps on this section. You can also Reset your System
to default by following this section. But be aware, that all data will be lost, as hard disks will
be formatted during this process!
15. When the discovery tool has discovered the SMCNAS02, it will show
“Zero-Disk Mode” on the Firmware Version column. Click “Configure
RAID Profile” on the Configuration URL column.
16. The following screen appears. Log in by root and no password is required.
Page 41

33
17. After logging in the following screen appears. Insert the hard disk drive all
the way into the right slot (see chapter 2 portion on proper hard disk
installation) and after around 30 seconds, click REFRESH (if no hard disk
drive appears, click REFRESH again).
Page 42

34
18. When the hard disk drive appears on screen, click CONFIGURE.
19. The following screen appears. Click OK.
Page 43

35
20. The following screen appears. Insert another hard disk drive all the way into
the left slot and after around 30 seconds, click REFRESH (if no hard disk
drive appears, click REFRESH again).
Page 44

36
21. The following screen appears, then click Configure.
Page 45

37
22. The following screen appears.
NOTE:
z Whenever you insert a hard disk drive, you can use the default RAID mode (if one
hard disk drive only default is Single, if two hard disk drives it will be JBOD). Or
change the RAID mode by clicking CHANGE to use Raid 0 or Raid 1.
z If you did not click REFRESH and CONFIGURE each time you insert a hard disk
drive, it will have the wrong RAID mode and the inserted disk might be invalid.
Page 46

38
23. If you use the default mode (JBOD or Single) without changing the RAID
mode, click Upgrade and the following screen appears. Click OK to jump to
step 29.
24. If you change the RAID mode, the following screen appears. Click OK.
Page 47

39
25. The system will reboot and the following screen appears, wait for
approximately 3 ~ 5 minutes.
Page 48

40
26. After rebooting, log in by root again and no password is required.
Page 49

41
27. The following screen appears, click Upgrade.
28. When the confirmation message appears, click OK.
Page 50

42
29. System will start to format the hard disk drive. After formatting, the
confirmation message will appear. Click OK.
30. The following screen appears.
Page 51

43
31. Click Browse to select and install the Full Install Image (around 46MB)
“AG_NAS_Vx.x.x-SMC.cpio.bz2” file. This file is stored under the
default C:\Program Files\NAS Discovery
Utility\Firmware directory, otherwise it can be found under the
firmware folder of the directory where you previously installed the NAS
Discovery utility.
Important: Please do not use the smaller (around 34MB) Firmware
Upgrade file here that is also available on the SMC website.
Page 52

44
32. Then click Upgrade. The following screen appears. The system will start to
install into the NAS hard disk drive.
Page 53

45
33. If the NAS Discovery Utility screen is not on your computer anymore, again
click the NAS Discovery Utility shortcut icon on your desktop or you can
launch the NAS Discovery Utility by clicking Start Æ Programs Æ NAS
Discovery Utility Æ NAS Discovery Utility.
34. The Status column will show various stages of the upgrade process:
(total 45 minutes or more depending on the size of the hard disk)
z Upload % Done
z Verifying Checksum
z Extracting Firmware
z Installing OS
z Installing Kernel
z Installing Media Server
z Installing KHTTPD
z Installing Samba
z Installing Configurator
z Installing NASUtils
Page 54

46
35. When the following screen appears, click the Click to Configure NAS under
the Configuration URL column to log in to Storage System Management.
Proceed to the next section for details on Storage System Management.
Page 55

47
System Power-on With Full New Hard Disk Drives
IMPORTANT: If you are using full new hard disk drives that have never installed NAS
middleware before, then follow the steps on this section.
1. When the discovery tool has discovered the SMCNAS02, it will show
“Zero-Disk Mode” on the Firmware Version column. Click “Configure
RAID Profile” on the Configuration URL column.
2. The following screen appears. Log in by root and no password is required.
Page 56

48
3. After logging in the following screen will show two hard disk drives. The
default RAID mode is RAID 1.
4. If you use the default RAID mode, click Upgrade and the following screen
appears. Click OK to jump to step 10.
Page 57

49
5. If you change the RAID mode, the following screen appears. Click OK.
6. The system will reboot and the following screen appears, wait for
approximately 3 ~ 5 minutes.
Page 58

50
7. After rebooting it will display your new RAID mode, log in again.
Page 59

51
8. The following screen appears, click Upgrade.
9. When the confirmation message appears, click OK.
Page 60

52
10. System will start to format the hard disk drive. After formatting, the
confirmation message will appear. Click OK.
11. The following screen appears.
Page 61

53
12. Click Browse to select and install the Full Install Image (around 46MB)
“AG_NAS_Vx.x.x-SMC.cpio.bz2” file. This file is stored under the
default C:\Program Files\NAS Discovery Utility\Firmware directory,
otherwise it can be found under the firmware folder of the directory where
you previously installed the NAS Discovery utility.
Important: Please do not use the smaller (around 34MB) Firmware
Upgrade file here that is also available on the SMC website.
Page 62

54
13. Then click Upgrade. The following screen appears. The system will start to
install into the NAS hard disk drive.
Page 63

55
14. If the NAS Discovery Utility screen is not on your computer anymore, again
click the NAS Discovery Utility shortcut icon on your desktop or you can
launch the NAS Discovery Utility by clicking Start Æ Programs Æ NAS
Discovery Utility Æ NAS Discovery Utility.
15. The Status column will show various stages of the upgrade process:
(total 45 minutes or more depending on the size of the hard disk)
z Upload % Done
z Verifying Checksum
z Extracting Firmware
z Installing OS
z Installing Kernel
z Installing Media Server
z Installing KHTTPD
z Installing Samba
z Installing Configurator
z Installing NASUtils
Page 64

56
16. When the following screen appears, click the Click to Configure NAS under
the Configuration URL column to log in to Storage System Management.
Proceed to the next section for details on Storage System Management.
Page 65

57
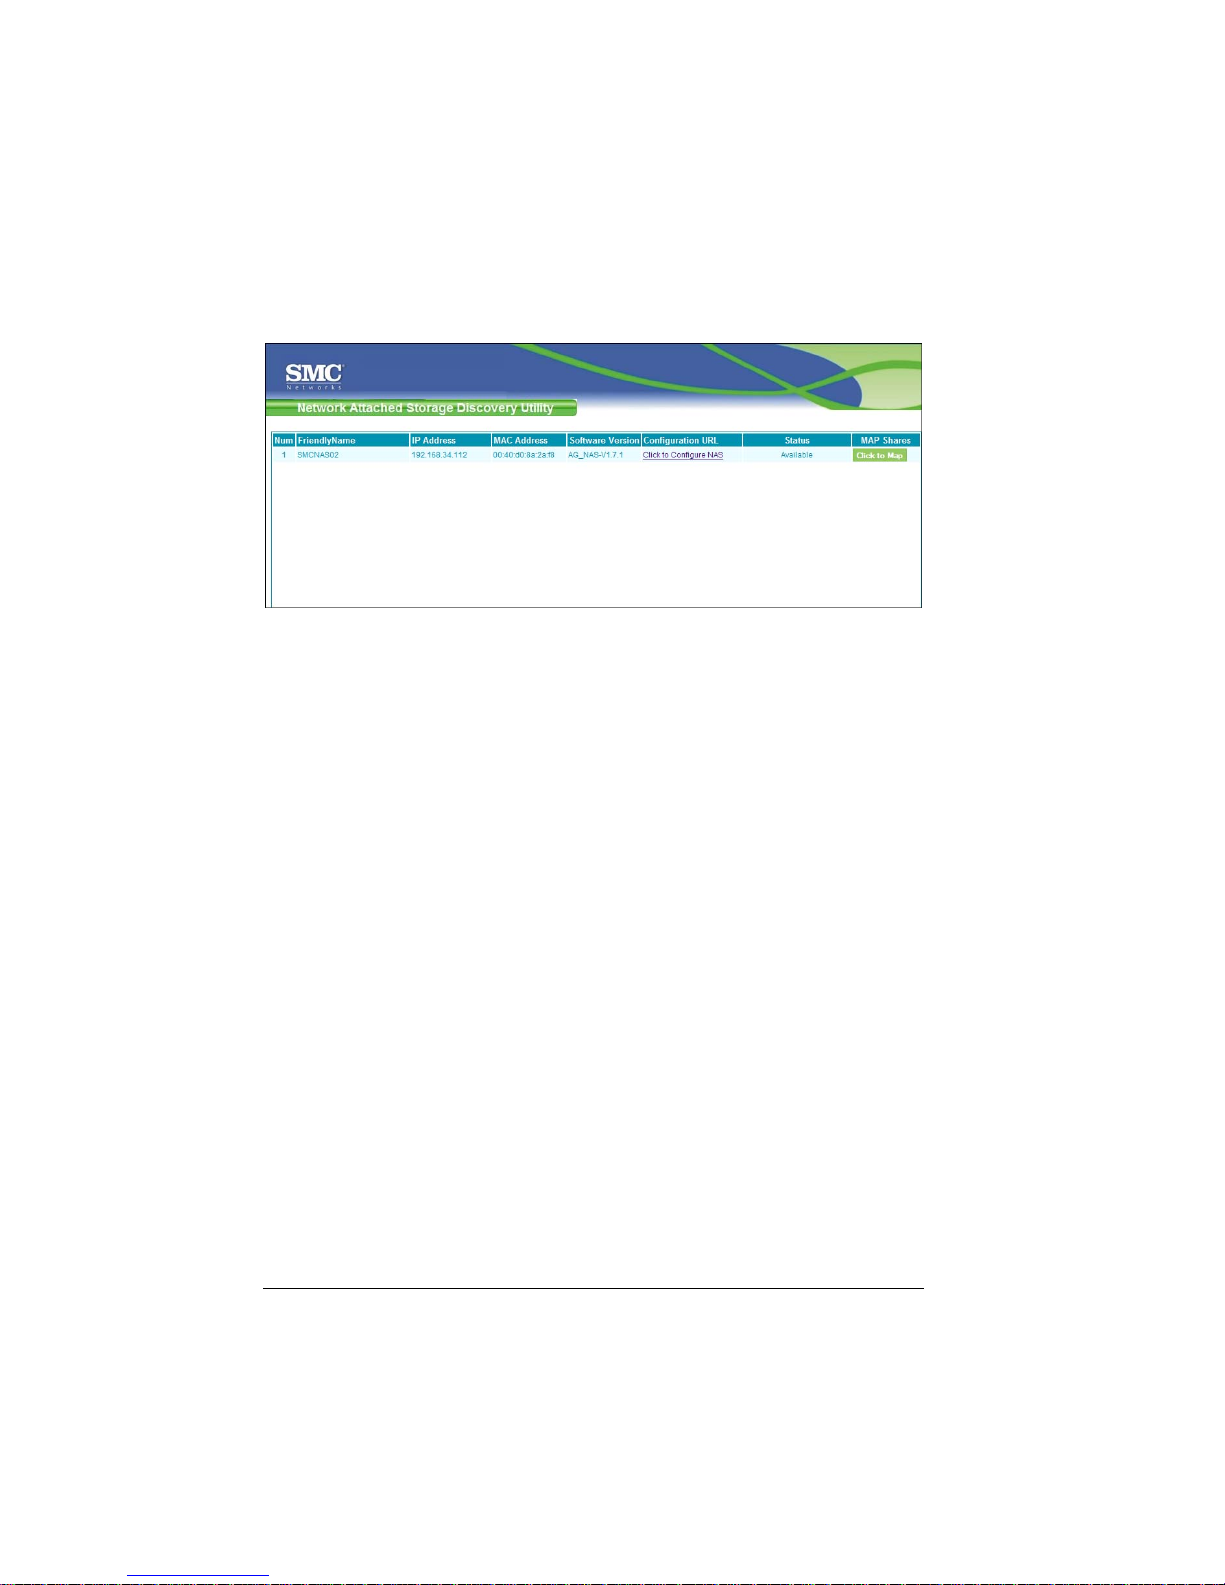
3.2 Starting Storage System Management
JAVA-based
1. Click the NAS Discovery Utility shortcut icon on your desktop or you can
launch the JAVA-based NAS Discovery Utility by clicking Start Æ
Programs Æ NAS Discovery Utility Æ NAS Discovery Utility.
NOTE: If the following screen appears, click Yes to allow ActiveX controls.
NOTE: If the following screen appears, click Run to allow the digital signature verification.
Page 66

58
2. When the following screen appears, click the Click to Configure NAS on the
Configuration URL column to log in the Storage System Management.
Page 67

59
Non-JAVA based
1. Click the NAS Discovery Utility shortcut icon on your desktop or you can
launch the non-JAVA based NAS Discovery Utility by clicking Start Æ
Programs Æ NAS Discovery Utility Æ NAS Discovery Utility.
2. When the following screen appears, click the Configure NAS Device on the
Configuration URL column to log in the Storage System Management.
Page 68

60
3. The system automatically scans the network for storage systems. This might
take a few minutes. The following screen appears.
4. Enter the default User name “admin” and the default Password
“smcadmin” then select the desired language.
5. Click Log In. The Storage System Management homepage contains six tabs
namely, My NAS, Users & Groups, Shared Folders, Disk, Advanced, and
Logout appears.
Page 69

61
3.3 My NAS Page
Displays a list of your storage system information (NAS name, Middleware and
Flash version, MAC and IP address, Subnet mask, Gateway IP address, Disk
Mode, System and Data utilization) and Current Connections (Shared folders,
Users, and Login Time).
System utilization: shows the current system data partition usage.
Data utilization: shows the current data partition usage.
Page 70

62
System Setting
Allow you to specify the storage system name, date, time, time zone, NTP
server name or IP address, administrator name, and password.
1. On the My NAS page, click System setting and the following screen appear.
NOTE: Be careful when changing the Storage System Name. Inform your clients of any
change of this column for providing available function, including shared folders or backups.
Page 71

63
To change this . . . Do this . . .
Storage system name
Enter the new name to use for the specific
storage system. The name can be up to 15
characters long and can include letters,
numbers, and hyphens.
Date, Time, Time zone
In the Date fields, enter or select the month,
day, and year.
In the Time fields, enter or select the hour,
minute, and second.
In the Time zone list, select the time zone.
NTP server name or IP address
Enter the name or IP address of the Network
Time Protocol server from which the storage
system could adjust its time automatically. You
can use an NTP server name only if it is
resolvable/recognizable.
NOTE: The NTP server name’s maximum
number of characters is 64. Can include only
letters (uppercase and lowercase A~Z),
numbers (0~9), hyphens (–), underli nes (_), and
dots (.).
The IP address’ maximum number of cha racter
is 15 (including the three “.”). The format is
xxx.xxx.xxx.xxx and the value of xxx is
between 0 and 255.
Administrator name
Password
Confirm password
In the Administrator name field, enter the
administrator name for logging in to the
Storage System Management.
NOTE: Maximum number of characters is 15.
In the Password and Confirm password fields,
enter the password for logging in to the Storage
System Management. The administrator name
and password are case-sensitive.
NOTE: Maximum number of characters is 8.
Can include any printable ASCII characters but
not ( ' ).
2. After making the necessary changes, click Apply.
3. When the confirmation message appears, click OK for the changes to take
effect.
Page 72

64
Network Setting
Allow you to configure the network settings that include the workgroup name,
MAC address, and FTP server settings.
NOTE:
z The time between ADS's and the Samba server must be in sync (use NTP).
z You only can choose the “workgroup” of NAS or “AD full domain”
z If AD domain is selected, user cannot use the local user account to connect to NAS
via Samba.
z “~”, “!”, “#”, “$”, “%”, “^”, “&”, “(“, “)”, “-“, “{“, “}”, “.”, “'”, and space can be included in AD
account.
Page 73

65
1. Click Network setting and the following screen appear.
Page 74

66
To change this . . . o this . . .
Workgroup name
Enter the new name for the specific workgroup.
NOTE: Maximum number of characters is 15.
Can include only letters (uppercase and
lowercase A~Z), numbers (0~9), hyphens (–)
and underlines (_). The first character must be a
letter (uppercase and lowercase A~Z).
Get an IP address
automatically
If you have a DHCP server on your network,
the server can get its IP address from that
DHCP server automatically.
Use this IP address
IP address
Subnet mask
Gateway IP address
DNS server settings
If you do not have a DHCP server, you must
specify an IP address, subnet mask, gateway IP
address, and DNS server.
NOTE: Maximum number of characters is 15
(including the three “.”). The format is
xxx.xxx.xxx.xxx and the value of xxx is
between 0 and 255.
FTP server settings
Allows your storage device to perform as an
FTP server, and it is highly recommended to
download the data transfer tool
from http://filezilla.sourceforge.
net/.
If you select AD full domain you have to fill in the AD full domain name, AD
server’s full domain controller name, AD administrator name, and the AD
administrator password.
Page 75

67
Enable FTP Server
To enable FTP server, take note of the following:
z Transfer Mode
Default is “passive” mode.
Page 76

68
Select “Passive” when you enable Firewall protection on your Windows
OS.
z Port
Default is “21” unless specified.
You can set one of the port range from 49152 to 65535.
z Code Page
Default is “UTF-8”.
For Japanese OS and you wish to upload/download file with Japanese
filename, then select “Japanese.”
For Japanese OS and you wish to upload/download file with English or
Traditional/Simplified Chinese filename, then select “UTF-8.”
Page 77

69
NOTE:
z If you use Filezilla v2.2.x (you are recommended to use Filezilla (shareware) as your
FTP data transfer tool), DO NOT enable the Use multiple connections to transfer
files setting.
z If you use Filezilla v3.0.x, please do not set Filezilla to “passive” mode no matter
NAS set to which mode or with/without firewall or not
Page 78

70
z Click File and the following screen appears.
Page 79

71
z Click New Site.
z Select “Use passive mode” on Passive transfer mode settings when using
Windows OS with Firewall enabled and,
select “Force” on Use UTF8 on server if available. Then click OK.
Page 80

72
NOTE:
z If you use Filezilla v2.2.x (you are recommended to use Filezilla (shareware) as your
FTP data transfer tool), DO NOT enable the Use multiple connections to transfer
files setting.
z If you use Filezilla v3.0.x, please do not set Filezilla to “passive” mode no matter
NAS set to which mode or with/without firewall or not
z The user name of FTP is [Domain name]+[user name],
e.g. DABD-AD+Erica
z When using Workgroup mode, please just use local user name (Default)
Page 81

73
If you choose the option Use this IP address, the following appears.
2. After making the necessary changes, click Apply.
3. When the confirmation message appears, click OK for the changes to take
effect.
WARNING: If you change the Static IP (Use this IP address) back to Dynamic IP (Get an
IP address automatically), you need to shutdown the Storage System Management and
restart it again.
Page 82

74
Page 83

75
3.4 Users & Groups Page
Displays a list of all currently configured users and lets you add, modify, and
remove users. This area also allows you to add, modify, and remove groups as
well as perform quota management.
Users
1. Click the Users & Groups button on the Storage System Management
homepage. The following screen appears.
2. Click “Add” and the following screen appears, allowing you to specify the
type of user (Windows/Mac OS X or Linux/Other Mac) you want to add.
Page 84

76
3. Select Windows/Mac OS X user (CIFS) for Windows/Mac OS X user or,
select Linux/Other Mac user (NFS) for Linux/other Mac user.
4. Add the users. After the user is added, you can assign the user to shared
folders by clicking Shared Folders to assign/restrict access (see later section
for further details).
NOTE: Windows users can be joined into groups as well as assign several users to a
shared folder.
Page 85

77
For Windows/Mac OS X Users (CIFS)
5. Click Add and the following screen appear. You must provide the requested
user information.
Page 86

78
To change this . . . Do this . . .
User name
Password
Confirm password
In the User name field, enter the user name.
NOTE: Maximum number of characters is 24
Can include only letters (uppercase and
lowercase A~Z), numbers (0~9), hyphens (–),
underlines (_), dots (.), and @ sym bol. The first
character must be a letter (uppercase and
lowercase A~Z). Must not be any of the
following uppercase or lowercase words such
as “root”, “backupuser”, “nobody”, “ftp”,
“anonymous”, and “www”.
In the Password and Confirm password fields,
enter the password for accessing any shared
folders.
NOTE: Maximum number of characters is 24.
Can include any printable ASC II characte rs but
not ( ' ).
6. Click Apply and the new user would be added. Repeat the above steps until
you have added all the users that you want to add at this time.
Page 87

79
7. Click Remove and the following screen appears, allowing you to specify the
type of user (Windows/Mac OS X) you want to delete.
Page 88

80
8. Click Edit and the following screen appears, allowing you to specify the
type of user (Windows/Mac OS X) you want to edit.
9. Enter the pertinent information and click Apply.
Page 89

81
10. The following screen appears.
NOTE: When AD domain is selected, “Users” page would display domain users with prefix
of “(Domain)”.
Page 90

82
For Linux/Other Mac OS Users (NFS)
4. Click Next and the following screen appear. You must provide the requested
user information.
5. Click Apply.
Page 91

83
6. Click Shared Folders and the following screen appears.
Page 92

84
7. Select the shared folder and click Assign Access. The following screen
appears.
Page 93

85
8. Select the authorized user(s) and grant access right. Then click Apply.
NOTE: If you grant shared folder access right to Linux user, the Linux user can
“mount –t nfs –o tcp NASIP:/content/shared foldername
PCmountfolder” at Linux PC (Fedora 5/6/7) to mount the file to NAS as well as
read/write the file to NAS.
Page 94

86
Groups
Placing users into groups makes it easier to give several users access to the same
shared folder at once.
1. Click Groups under the Users & Groups page. The following screen appears.
NOTE: Only Windows users can be included in groups.
Page 95

87
2. Click Add and the following screen appear. Enter a group name and add all
or selected users to this group.
You can also remove all or selected users from a group.
3. Click Apply.
Page 96

88
Quota Management
Allows the administrator to limit (enlarge/shrink) user disk space.
NOTE: Before enabling/disabling Quota Management, make sure that iTunes is not
enabled, no USB device is mounted, and there is no existing Samba connection to your
storage device (see later section for details).
1. Click Quota management under the Users & Groups page. The following
screen appears.
Page 97

89
To change this . . . Do this . . .
Enable quota for all users
Quota size on the SATA disk
Administrator password
Click the checkbox to set quota for all
Windows users.
In the Quota size on the SATA disk field, enter
the quota size (MB).
In the Administrator password field, enter the
password for logging in to the Storage System
Management. The password is case-sensitive.
NOTE: Maximum number of characters is 8.
Can include any printable ASC II characte rs but
not ( ' ).
Users
Displays a list of available users.
Set the Quota Size of guest on
the SATA disk
Administrator password
For setting the quota of the specific user on the
SATA disk. In the Set the Quota Size of guest
on the SATA disk field, select No Limit or Quota
Size and enter the quota size (MB).
In the Administrator password field, enter the
password for logging in to the Storage System
Management. The password is case-sensitive.
NOTE: Maximum number of characters is 8.
Can include any printable ASC II characte rs but
not ( ' ).
2. After making the necessary changes, click Apply after keying in the
Administrator password for all users in the upper segment or select one
specific user in the lower segment and set his/her quota to No limit or Quota
Size, then key in the Administrator password and click Apply.
3. When the confirmation message appears, click OK for the changes to take
effect.
Page 98

90
3.5 Shared Folders Page
Displays a list of all currently configured and shared folders and allow you to
add shared folders, change the right of access for users or remove them.
1. Click the Shared Folders button on the Storage System Management
homepage. The following screen appears.
Page 99

91
Add Shared Folder
2. Click Add to create shared folder and the following screen appears.
3. Enter the name of the new shared folder and click Next.
NOTE: Maximum number of characters is 64. Can include only letters (uppercase and
lowercase A~Z), numbers (0~9), hyphens (–), underlines (_), and dots (.). First character
must be a letter (uppercase and lowercase A~Z). Must not be any of the following
uppercase or lowercase words such as “com1,” “com9,” “lpt1,” “lpt9,” “con,” “nul,” “prn,”
“aux,” “homes,” “spool,” “usbdisk1,” “usbdisk2,” “usbprint1,” or “usbprint2.”
Page 100

92
Assign Access
4. Select the shared folder whose user access you want to change (add or
remove user).
5. Click Assign Access and the following screen appear.
 Loading...