

SMC Networks IZH10 Series Operation Manual
When zero clear was performed, a charge
exceeding ±5%F.S of the default zero point was
p
resent.
∗
: After approx. 1 s. error display, the sensor
returns to measurement mode.
This time will depend on the deviation of the
product itself and ambient environment during
zero clear operation.
Return to a condition without
charge, and retry zero clear
operation.
Insertion of batteries
Slide the cover of the case open to insert the batteries.
Use 2 x AA (LR6) alkaline dry cell batteries.
When inserting the batteries, pay attention to the polarities and insert them in
the correct direction.
After insertion, ensure the cover is closed correctly.
Assembly
Error Display Error Type Troubleshooting Method
The sensor is broken.
Stop using immediately and
contact SMC.
Error in internal data.
The charge has exceeded the lower limit of the
measurable voltage range, or the measuring
distance is not suitable.
Turn off the power supply
once, and turn it on again. If
the error persists contact
SMC.
Remove the charge until the
value is within the
measurable voltage range.
Also, check the measuring
distance.
The charge has exceeded the upper limit of the
measurable voltage range, or the measuring
distance is not suitable.
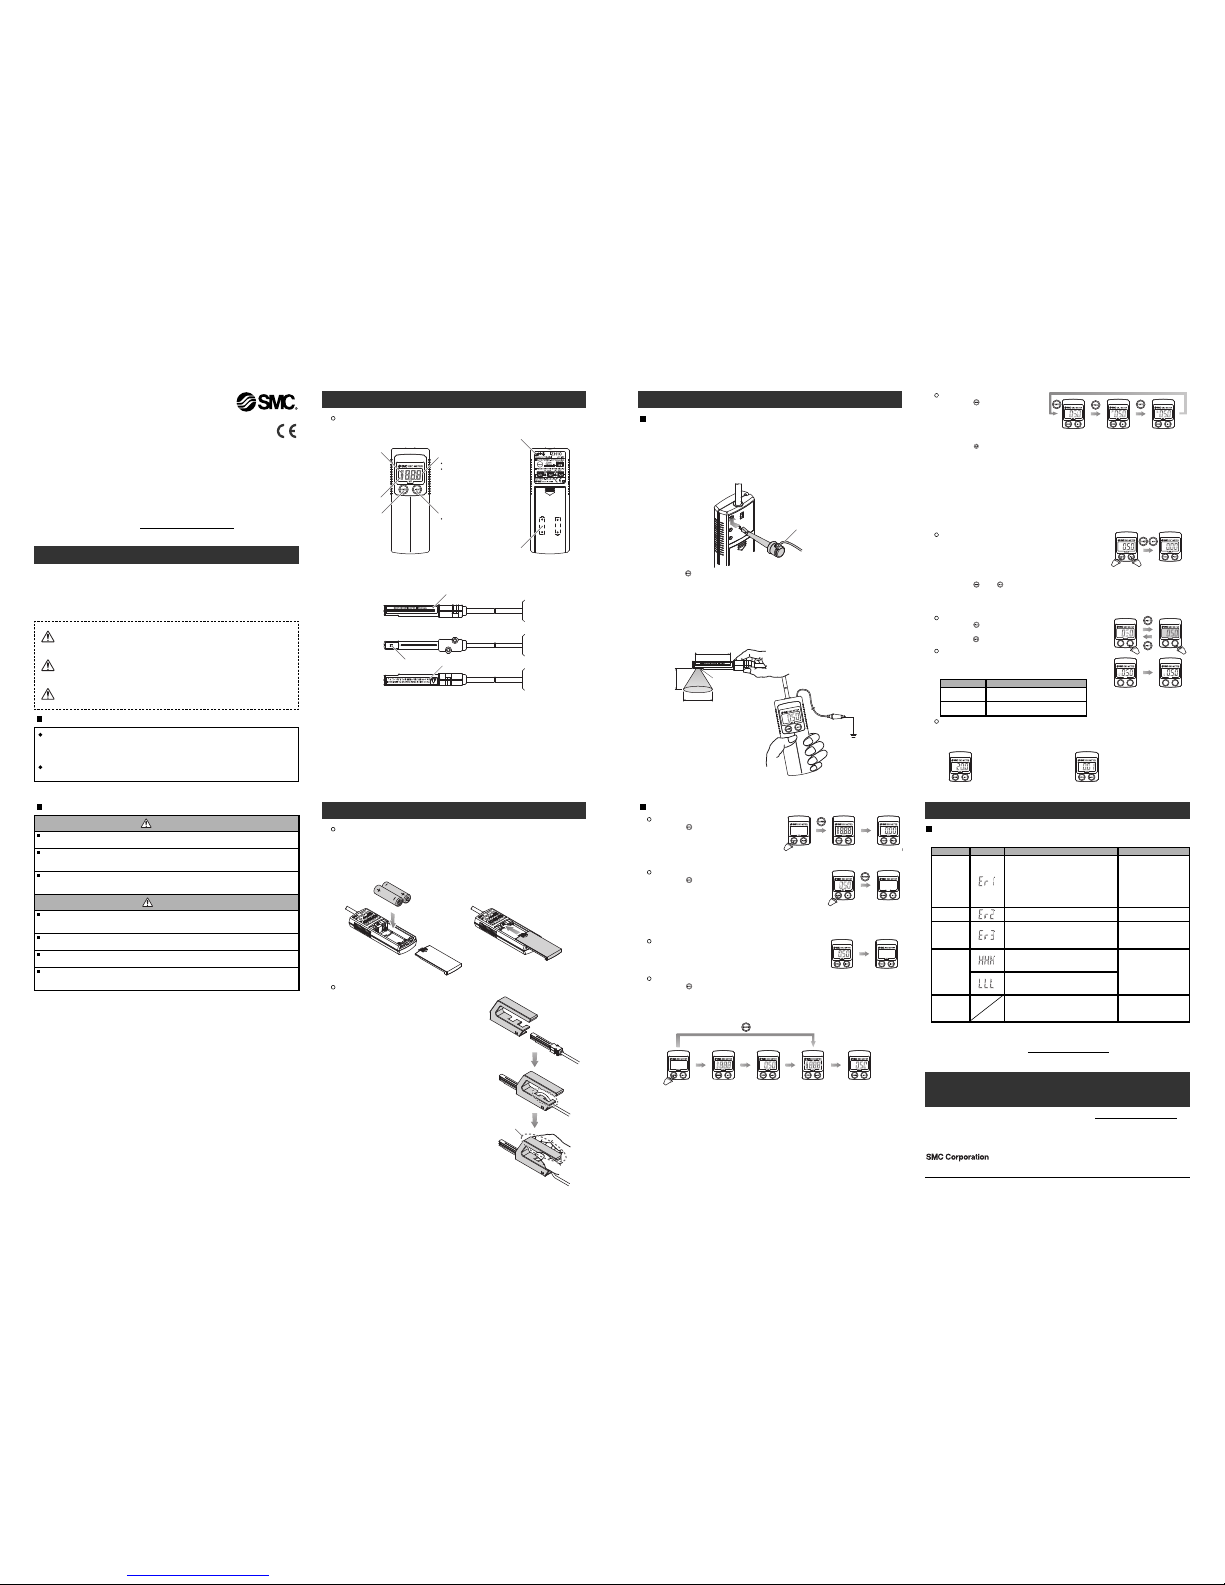
LCD
Charge amount
Peak/Bottom hold value
LIGHT button
Back light ON/OFF
Battery saving: "L"
Peak hold: "P"
B
ottom hold: "b"
Power button
S
witch on and off
the power supply
LR6 dry cell battery
(2 pcs.)
Ground terminal
Mounting of the high voltage measuring handle (option)
1. Insert the sensor into the handle in the
direction shown.
2. Fix the cable to the handle as shown.
3. The assembly is complete and the handle is
now ready for use.
Procedure
Setting / Adjustment
1
. Insert the batteries.
2. Connect the ground wire.
Connect the ground wire to a point suitable for connection to an external
protective earthing system.
The position for attaching the ground wire to the Handheld meter is shown
below.
Stop using immediately and
contact SMC.
3. Press the button.
4. Move the sensor closer to the position 50 mm away from the measured target.
Gradually bring the sensor closer to the measured target from a distance, and
stop measurement immediately if the displayed value indicates overflow
(HHH) or underflow (LLL).
(The target has a high charged potential that is highly dangerous. The
m
easured value does not change even if the distance is shortened.)
5. Check the display.
D
etecting port
Distance to a measured target
Detecting range
Reference of 50 mm
P
rotected earth
Ground wire
∗
: The detecting range of the sensor is 180 mm (at a detection distance of 50 mm).
Handle
Names of individual parts
•Display
Function settings
Power ON
When the is pressed with the power
supply off, the power supply will be
turned on.
All indications are displayed for 1 s.
after the power supply is turned on.
1 s. after
All indications Instantaneous
v
alue indicatio
Detecting port
Sensor label
Caution label for sensor
•Sensor
Power OFF
When the is pressed for 3 s. or more with the
power supply on, the power supply will be turned off.
Also, no button operation for a certain period will turn
off the power supply.
(For details, refer to Auto power-OFF function.)
Turn off the power supply after using the product to keep the life of batteries
as long as possible.
Auto power-OFF
If no button is pressed for 5 min. or more with the
power supply on, the power supply will turn off
automatically.
3 s. after
6 s.
All indications Instantaneous
value indication
Instantaneous
value indication
Flashing
Auto power-OFF extension
When the is pressed for 6 s. or more with the power supply off, the
continuous operating time with no button operation will extend to 15 min.
(When this auto power-off extension is activated, indications on the display
will keep flashing for 3 s.)
Peak / Bottom hold value
When the is pressed with the
power supply on, the indication
will be changed to instantaneous
value, peak hold value, bottom
hold value and instantaneous
value, in that order.
∗: Release the after "P" or "b" is displayed so as not to turn off the power supply.
•Peak hold value
The maximum charged potential and "P" are displayed.
The maximum charged potential is continuously detected and updated from
w
hen the peak hold is started. If the value over the held maximum charged
potential is detected, the display will change.
•Bottom hold value
The minimum charged potential and "b" are displayed.
The minimum charged potential is continuously detected and updated from
when the bottom hold is started. If the value under the held minimum
charged potential is detected, the display will change.
Zero clear
A
displayed value can be adjusted to zero at
measured charged potential in a range of ±5%F.S. of
default potential.
(There will be a slight displacement, depending on
the deviation of the sensor itself and ambient
environment of the sensor when the zero clear is performed.)
When the and are pressed for 6 s. or more with the power supply on,
the displayed value is reset to zero, and then the measuring mode is
recovered automatically.
Once the power supply is turned off, the offset value for zero clear is cleared.
Back Light
When the is pressed while the charged potential
is displayed, the back light will turn on.
Press the button again to turn off the back light.
Z
ero clear
error
Error Name
Sensor failure
System error
Cable broken
Measurement
error
The cable is broken and the product cannot
measure correctly. The charge amount is
detected, but not reflected in the displayed
value.
Battery low
When the battery voltage becomes low "L" will be
displayed. The display will vary depending on how
much battery is left.
Display resolution change
The display resolution changes depending on the measured charged potential
value.
L
(Flashing)
The batteries are low.
Prepare to replace with new batteries.
Display Content
L
(On continuously)
T
h
e
b
a
t
t
e
r
i
e
s
a
r
e
v
e
r
y
l
o
w
.
R
epl
ac
e
w
i
t
h
new
bat
t
er
i
es
i
m
m
edi
at
el
y
.
3 s.
kV
5 min.
6 s.
I
nstantaneous
value indication
kV kV
P
OWER
LIGHT
P
OWER
LIGHT
k
V
k
V
POWER
LIGHT
POWER
LIGHT
I
nstantaneous
value indication
P
eak hold value Bottom hold value
Handheld Electrostatic
Meter
Operation Manual
IZH10
Thank you for purchasing an SMC IZH10 Series Handheld Electrostatic Meter.
Please read this manual carefully before operating the product and make sure you
understand its capabilities and limitations.
Please keep this manual handy for future reference.
To obtain more detailed information about operating this product, please
refer to the SMC website (URL http:// www.smcwor ld.com
) or co ntact SMC
directl y.
Safety Instructions
These safety instructions are intended to prevent hazardous situations and/or
equipment damage.
These instructions indicate the level of potential hazard with the labels of
"Caution", "Warning" or "Danger". They are all important notes for safety and must
be followed in addition to International standards (ISO/IEC) and other safety
regulations.
CAUTION indicates a hazard with a low level of risk
which, if not avoided, could result in minor or
moderate injury.
Operator
This operation manual is intended for those who have knowledge of machinery
using pneumatic equipment, and have sufficient knowledge of assembly,
operation and maintenance of such equipment. Only those persons are
a
llowed to perform assembly, operation and maintenance.
Read and understand this operation manual carefully before assembling,
operating or providing maintenance to the product.
Caution:
Warning:
Danger:
WARNING indicates a hazard with a medium level of
risk which, if not avoided, could result in death or
serious injury.
DANGER indicates a hazard with a high level of risk
w
hich, if not avoided, will result in death or serious
injury.
Safety Instructions
Do not disassemble, modify (including change of printed circuit board) or repair.
An injury or failure can result.
Do not operate in an atmosphere containing flammable or explosive gases.
Fire or an explosion can result.
T
he product is not designed to be explosion proof.
Do not handle with wet hands.
This can cause electric shock.
Provide grounding to ensure safety and accurate measurement.
Improper grounding of the ground wire can cause electrical charge to build up at the sensor and ground terminal of
the product and discharge to the user.
Do not contact the sensor with the measured target.
It can cause failure.
Avoid strong impact on the product
Do not drop, hit or apply excessive shock to the product while handling.
It can cause failure.
D
o not operate outside of the specification.
Fire, malfunction or damage can result.
Please use it after confirming the specification.
Warning
Caution
Summary of Product parts
Troubleshooting
Error Indication
This function is to display error location and content when a problem or an error occurs.
If the error cannot be reset after the above measures are taken, then please
contact SMC.
±1 to ±20 kV
Minimum display unit:
0.1 kV
0 to ±0.99 kV
Minimum display unit:
0.01 kV
<Display example>
Akihabara UDX 15F, 4-14-1, Sotokanda, Chiyoda-ku, Tokyo 101-0021, JAPAN
Phone: +81 3-5207-8249 Fax: +81 3-5298-5362
URL http://www.smcworld.com
Note: Specifications are subject to change without prior notice and any obligation on the partof the manufacturer.
© 2011 SMC Corporation All Rights Reserved
Specifications
Outline with Dimensions (in mm)
Refer to the product catalogue or SMC website (URL http://www.smcworld.com) for
more information about the product specifications and outline dimensions.
Refer to the SMC website (URL http://www.smcworld.com) for more information
about troubleshooting.
 Loading...