

SMC Networks HECR Series, HECR008-W, HECR012-W Installation And Maintenance Manual

Installation and Maintenance Manual
Water Cooled Thermo Con for Rack Mount
HECR Series
Original Instructions
1 Read Before Using
Thank you for purchasing SMC’s Thermo-con (hereinafter referred to as
the “product”). This “Installation and Maintenance Manual” (hereinafter
referred to as “this manual”) briefly explains the essential safety instruction
procedures to start and stop the product and reset its alarms. Read this
manual before using.
2 Safety Instructions
This manual contains essential information for the protection of users and
others from possible injury and/or equipment damage.
Read this manual before using the product, to ensure correct handling,
and read the manuals of related apparatus before use.
Keep this manual in a safe place for future reference.
These instructions indicate the level of potential hazard by label of
“Caution”, “Warning” or “Danger”, followed by important safety
information which must be carefully followed.
To ensure safety of personnel and equipment the safety instructions in
this manual and the product catalogue must be observed, along with
other relevant safety practices.
Caution
If instructions are not followed there is a
possibility of injury or equipment damage.
Warning
If instructions are not followed there is a
possibility of serious injury or loss of life.
Danger
In extreme conditions, there is a possibility of
serious injury or loss of life.
This manual provides the following symbols in addition to “Danger”,
“Warning”, and “Caution” to present warning details in an easy-to-
understand manner.
This symbol warns you of potential electrical shock.
This symbol warns you of potential burns.
During operation or maintenance of the product, do not disable the
interlock function of any device. Otherwise unexpected personnel injury
or damage to the product may occur.
When turning on/off the power observe the procedure. Otherwise
unexpected malfunction or danger may occur.
When maintaining, cleaning or in case of emergency, turn off the power
source.
After identifying a problem be sure to check the cause and take
necessary countermeasures before turning on the power.
The product is operated at high voltage.
The compatibility of equipment is the responsibility of the person
who designs the system or decides its specifications.
Since the products specified here can be used in various operating
conditions, their compatibility with the specific system must be based on
specifications or after analysis and/or tests to meet specific requirements.
Only trained personnel should handle or operate the product.
Transportation, installation and maintenance of the product can be
dangerous and should be done by persons who have full knowledge and
experience on the product and system. Cover panels of the product should
be opened only by qualified service technicians or qualified personnel.
Do not modify or reconstruct the unit.
Read all warning and caution labels carefully and keep them in mind.
Do not peel off or rub alert warning and caution labels. Confirm locations
of alert warning and caution labels.
Do not service machinery/equipment or attempt to remove
components until safety is confirmed.
2 Safety Instructions Continued
1) Inspection and maintenance of machinery/equipment should only be
performed after confirmation of safe locked-out positions.
2) When equipment is to be removed, confirm the safety process as
mentioned above. Switch off electrical supplies and ensure any high
temperature parts have cooled to ambient temperature.
3) Before machinery/equipment is re-started, ensure all safety measures
are taken so the product and system can be started in a safe manner.
4) Do not use this product outdoor (indoor use).
Do not use this product outside of the specifications. Contact SMC
if it is to be used in any of the following conditions.
1) Conditions and environments beyond the given specifications.
2) Installations in conjunction with atomic energy, railway, air navigation,
vehicles, medical equipment, food and beverage, recreation equipment,
emergency stop circuits, press applications, or safety equipment.
If abnormal conditions occur, such as abnormal noise or smoke, or water
leakage, take the following actions。
1) Shut down power.
2) Contact an authorised SMC dealer for repair.
After shutting down the power supply, ensure a time interval at least
3sec between ON and OFF. Restarting the product within that interval
may cause it to malfunction.
Do not use devices that generate electromagnetic radiation such as
cellular phones near the product. There is a possibility that this can
cause the product to malfunction.
This unit has several interlock functions, which activate when a dangerous
operation or condition occurs to stop the product and make it safe. This is
a function to protect personnel and restrict operation that may cause
damage to the product or facility, and to remove dangers related to safety.
When dispose the product, contact an industrial waste disposal
company for disposal of the product. To minimize the risk, drain the fluid
from the product when it is scrapped. If the fluid is left inside, an accident
and damage can result during transportation.
3 Specifications
3.1 General Description and Intended Use
This product uses a built in pump to circulate liquid (water or 20% EG) at a
constant temperature, controlled by Thermo-Electric (Peltier) Modules. This
circulating fluid cools parts of the customer’s machine that generates heat.
3.2 General Specifications
Item
Spec.
Model No.
HECR008-W
HECR012-W
Operation temp. range
10.0 to 60.0 C (No dew condensation)
Indication temp. range
-9.9 to 80.0 C
Ambient environment
Temp: 10 to 35 C
Humidity : 35 to 80%RH
Altitude : up to 1000m
Environment : No corrosive gas, solvent such as thinner and flammable gas
Storage environment
Temp :-40 to 70 C (No dew condensation and icing)
Humidity : 5 to 95%RH
Environment : No corrosive gas, solvent such as thinner and flammable gas
Accuracy related to temp
Indication accuracy: +/- 0.2 C.
Temperature drift: +/- 0.2C
Stability: +/- 0.01 to 0.03 C
(Circulating fluid OUT is directly connected with IN)
Cooling capacity
(Set Temp. 20C and Facility
water Temp. 20C, 10L/min)
Approx. 800W
(Circulating fluid flow rate 3L/min)
Approx. 1200W
(Circulating fluid flow rate 3L/min)
Circulating fluid
system
Circulating fluid
Water, Ethylene glycol solution up to 20%
Tank capacity
Approx.1.3L
Pump capacity
Refer to performance chart.
Port size
IN/OUT: Rc3/8 , Drain: CPC PLCD16004
Wetted materials
Stainless steel, EPDM, NBR, Ceramic, PPE, PPS, Carbon, Polyethylene, POM
Facility water
system
Required flow rate
10 to 15 L/min
Temperature range
10 to 35 C
Pressure range
0.5 MPa or less
Port size
IN/OUT: Rc3/8
Wetted materials
SUS304
Power supply
Single phase AC100 to 240V(+/- 10%),
50/60Hz
Single phase AC200 to 240V(
+/- 10%
),
50/60Hz
Current consumption
Max.10A(100V)
Max.4A(240V)
Max.7A (200V)
Max.6A (240V)
Inrush current
50A or less
Over current protection
14A
circuit protector
Voltage interruptions
20ms or less
Insulation resistance
50M or more (DC500V)
Over voltage category
Category II
Pollution degree
Pollution degree II
Limitation of hazardous
substance
RoHS compliant products
3 Specifications Continued
Item
Spec.
Model No.
HECR008-W
HECR012-W
Acoustic noise
48dBA
Cooling method
Water cooled
Main functions
Auto tuning, Off set function, Learning control function, External tuning control function,
Temperature sensor fine control function, Setting value memory function, Upper / lower
temperature limit alarm function, Output shut off alarm, Communication,
Input operation and
indications
Membrane key sheet
LCD display panel (with back light)
Output shut off alarm,
Upper / lower temperature limit alarm : Relay contact specification
DC30V, 2A (Resistance load)
DC30V, 1A (Induction load)
Communications
RS-232C / RS-485
Communications:
Setting of target temperature, Reading of the value detected by temperature sensor,
Reading of warning status, Setting and of off-set value, Setting and reading of control
operation, Setting and reading of PID values, Reading of output ratio.
For operation by communication, it is necessary to order
“Communication Manual”.
Use shielded cable for serial communications.
Temp. sensor
Resistance thermometer sensor (Pt100, 3-wire, class A, 1mA)
(Both internal sensor and external sensor)
Painting color
Urban white
Mass (at dry)
Approx 20kg
Approx 21kg
Option
With flow switch: Low flow rate alarm occurs at less than 0.7L/min
NPT fitting: Fluid IN/OUT fittings
With foot and no rack bracket
High head pump
Contents of package
Thermo-con 1pc
Installation and Maintenance Manual 1pc
Power supply connector 1pc
3.3 Performance Charts
Values on the performance charts are not guaranteed values but
representative values. Allow margins for safety when selecting the model.
3.3.1 Cooling Capacity
HECR008-W
0
500
1000
1500
2000
2500
0 10 20 30 40 50 60 70
Cooling capacity W
Circulating fluid temp. deg .C
Facility water temp. 10deg.C
Facility water temp. 35deg.C
Facility water temp. 20deg.C
Circulating fluid:Water
Circulating fluid f low rate:3L/min
Facility water flow rate:10L/min
0
500
1000
1500
2000
2500
0 10 20 30 40 50 60 70
Cooling capacity W
Circulating fluid temp. deg .C
Facility water temp. 20deg.C
Circulating fluid:Et hylene glycol 20%
Circulating fluid flow rate:3L/min
Facility water flow rate:10L/min
*Cooling capacity decrease about 50W when high head pump option selected.
HECR012-W
0
500
1000
1500
2000
2500
3000
0 10 20 30 40 50 60 70
Cooling capacity W
Circulating fluid temp. deg .C
Facility water temp. 10deg.C
Facility water temp. 20deg.C
Facility water temp. 35deg.C
Circulating fluid:Water
Circulating fluid flo w rate:3L/min
Facility water flow rate:10L/min
0
500
1000
1500
2000
2500
3000
0 10 20 30 40 50 60 70
Cooling capacity W
Circulating fluid temp. deg. C
Facility water temp. 20deg.C
Circulating fluid:Et hylene glycol 20%
Circulating fluid flo w rate:3L/min
Facility water flow rate:10L/min
*Cooling capacity decrease about 50W when high head pump option selected.
3.3.2 Heating Capacity
HECR008-W
0
500
1000
1500
2000
2500
0 10 20 30 40 50 60 70
Heating capacity W
Circulating fluid temp. deg .C
Facility water temp. 35deg.C
Facility water temp. 20deg.C
Facility water temp. 10deg.C
Circulating fluid:Water
Circulating fluid f low rate:3L/min
Facility water flow rate:10L/min
0
500
1000
1500
2000
2500
0 10 20 30 40 50 60 70
Heating capacity W
Circulating fluid temp. deg .C
Facility water temp. 20deg.C
Circulating fluid:Et hylene glycol 20%
Circulating fluid flo w rate:3L/min
Facility water flow rate:10L/min
3 Specifications Continued
HECR012-W
0
500
1000
1500
2000
2500
3000
0 10 20 30 40 50 60 70
Heating capacity W
Circulating fluid temp. deg .C
Facility water temp. 10deg.C
Facility water temp. 35deg.C
Facility water temp. 20deg.C
Circulating fluid:Water
Circulating fluid flo w rate:3L/min
Facility water flow rate:10L/min
0
500
1000
1500
2000
2500
3000
0 10 20 30 40 50 60 70
Heating capacity W
Circulating fluid temp. deg.C
Facility water temp. 20deg.C
Circulating fluid:Et hylene glycol 20%
Circulating fluid flo w rate:3L/min
Facility water flow rate:10L/min
3.3.3 Pump Capacity
HECR008/012-W
0.00
0.02
0.04
0.06
0.08
0.10
0.12
0.14
0.16
0.18
0.0 1.0 2.0 3.0 4.0 5.0
Pressure MPa
Circulating fluid flo w rate L/min
Ethylene glycol 20%
Water
0.00
0.05
0.10
0.15
0.20
0.25
0.30
0.35
0.0 1.0 2.0 3.0 4.0 5.0 6.0 7.0
Pressure MPa
Circulating fluid flo w rate L/min
Ethylene glycol 20%
Water
3.3.4 Pressure Loss in Facility Water Circuit
HECR008-W HECR012-W
0.00
0.02
0.04
0.06
0.08
0.10
0 5 10 15 20
Pressure loss MPa
Facility water flow rate L/ min
0.00
0.02
0.04
0.06
0.08
0.10
0 5 10 15 20
Pressure loss MPa
Facility water flow rate L/ min
3.4 Connector Specifications
Description
No.
Signal
Style and Part No.
Power supply
connector
(IEC60320,C14)
HECR008-W
HECR012-W
N L
E
N
AC100 to 240V
AC200 to 240V
L
AC100 to 240V
AC200 to 240V
E
PE
Communication
connector
Note: Always
use shielded
cable connected
to this connector.
RS-232C
RS-485
5 4 3 2 1
9 8 7 6
D-sub 9 pin (socket type)
Fixed screw: M2.6
1
Unused
BUS + 2 RXD (RD)
Unused 3 TXD (SD)
Unused 4 Unused
Unused 5 SG
SG
6-8
Unused
Unused
9
Unused
BUS -
Signal・
External
temperature
sensor
connector
Note: Always
use shielded
cable connected
to this connector.
1-2
Unused
8 1
15 9
D-sub 15 pin (Socket type)
Fixed screw: M2.6
3-5
PT-RTD
6
Output Cutoff Alarm a contact
(OPEN During Alarm)
7
Output Cutoff Alarm Common
8
Output Cutoff Alarm b contact
(CLOSE During Alarm)
9
Temperature Alarm a contact
(OPEN During Alarm)
10
Temperature Alarm Common
11
Temperature Alarm b contact
(CLOSE During Alarm)
12-14
Unused
15
FG
HEC-OM-U015
First edition : 2017. Oct
Normal
When high head pump option selected
3 Specifications Continued
3.5 Model number of product
The product can be ordered with the model number configured as shown
below.
3.6 Product Serial Number Code
The production serial number code printed on the label indicates the year
and month of production as per the following table:
Year
Month
2015
2016
2017
….
2021
2022
2023
….
T U V
…. Z A B ….
Jan
o
To
Uo
Vo
….
Zo
Ao
Bo
….
Feb
P
TP
UP
VP
….
ZP
AP
BP
….
Mar
Q
TQ
UQ
VQ
….
ZQ
AQ
BQ
….
Apr
R
TR
UR
VR
….
ZR
AR
BR
….
May
S
TS
US
VS
….
ZS
AS
BS
….
Jun
T
TT
UT
VT
….
ZT
AT
BT
….
Jul
U
TU
UU
VU
….
ZU
AU
BU
….
Aug
V
TV
UV
VV
….
ZV
AV
BV
….
Sep
W
TW
UW
VW
….
ZW
AW
BW
….
Oct
X
TX
UX
VX
….
ZX
AX
BX
….
Nov
y
Ty
Uy
Vy
….
Zy
Ay
By
….
Dec
Z
Tz
UZ
VZ
….
ZZ
AZ
BZ
….
4 Special Features
Auto tuning
This function sets the values necessary for the control system such as
PID (proportional band, integral time, derivative time and ratio of cooling/
heating gain) automatically.
If the controlled temperature fluctuates constantly after reaching the
target temperature, perform auto tuning. Controller calculates optimum
control PID and set automatically. Auto tuning may require time
depending on the conditions.
1) Select "2" in control operation.
2) Pressing [AT] key to light "AT" indicator and start auto tuning.
3) Pressing [AT] key stops auto tuning. (“AT” indicator turns off)
4) ”AT" indicator turns off when auto tuning is complete. If not completed
after 20min. [ERR19] (AT abnormal) occurs.
4 Special Features Continued
Offset function
This function controls the temperature slide by an offset value from set
point temperature. When the circulating fluid travels to the target object,
a certain deviation occurs between the temperature just before the
object and the set temperature of the product due to the influence of
ambient temperature on the piping. In this case, if the deviation is input
as the offset value, the temperature of the circulating fluid just before the
object can match with the setting value. Internal sensor value for the
alarm does not include the offset value. For example, if -0.15 °C is set
here, the actual reference temperature for control is lower than the
indicated SV by 0.15 °C. Internal sensor value for the alarm does not
include the offset value.
Learning control function
This function lets the product measure the temperature of circulating
fluid flowing before temperature target object by an external temperature
sensor and adjusts the offset function automatically to the set value at a
certain sampling interval. The external temperature sensor needs to be
prepared separately by the customer.
1) Install an external temperature sensor to the target object.
2) Select “3” in control operation.
3) Thermo-con controls the external sensor value to the set point.
4) When the temperature is not stable, then set the sampling interval
larger.
External tuning control function
This function makes the temperature of circulating fluid consistent to the
external (ambient) temperature all times. This function lets the product
measure the temperature from a temperature sensor mounted in the
customer preferred location, then it adjust the temperature of the fluid
automatically to the temperature detected by the sensor. The separate
temperature sensor needs to be prepared separately by the customer.
1) Install an external temperature sensor to the room.
2) Select “4” in control operation.
3) Thermo-con controls the fluid temperature to the ambient temperature.
4) When the temperature is not stable, then set the sampling interval larger.
Temperature sensor fine control function
This is a function to finely control the measurement temperature of the
control sensor within the range of -9.99 to 9.99 °C separate from offset
function. Control sensor can be corrected by inputting difference
(calibration value) between temperature of standard and that of control
sensor. For example, if -0.15 °C is set here, the actual reference
temperature for control is lower than the indicated SV by 0.15 °C.
Internal sensor value for alarm = Internal sensor value – Fine control value
Setting value memory function
Even if the power is turned off the set values are saved and will be
restored at power on.
Upper / Lower temperature limit alarm function
This function raises an alarm when temperature of the circulating fluid is
out of allowable upper and lower range. When the alarm is raised, WRN is
indicated on LCD. If circulating fluid temperature returns to within allowable
upper/ lower range, this alarm is automatically cancelled. The allowable
upper and lower range of temperature can be set between 0.1 and 10 °C.
Output shut off alarm function
The product has a self-check function that can detect faults with the
product and interrupts the output to the thermo modules, stopping
operation (However, operation continues with ERR 15 and ERR 18). This
function gives an alarm if a critical error happens, the display shows ERR
and an alarm number. At the same time, the warning output connector
gives an output through a relay contact. This warning cannot be removed
unless the power is cycled. When the power is being cycled leave at least
3 seconds between turning the power off and turning the power back on.
5 Installation
5.1 Installation
Pay special attention to the safety of all personnel when installing and
transporting the product.
Do not install the product unless the safety instructions have been read
and understood.
The product is heavy, be careful when installing or moving the product.
Always transport the product using both handles.
5 Installation Continued
Leakage from the product may damage peripheral equipment. Install a
drain pan under the product to capture leakage. Furthermore, mount
devices like a leak sensor on the installed drain pan to detect leakage so
that it can alert operators around the area.
Install the product above 0.6m from the floor.
5.2 Environment
Do not use in an environment where the product is directly exposed to
water, oil, corrosive gases, chemicals, salt water or steam.
The product should be installed upright on a stable base.
Do not install the product in a location where the air inlet and air outlet
vents are blocked. Also do not use the product in a sealed enclosure.
Do not use in an explosive atmosphere.
Do not mount the product in a location where it can be exposed to
prolonged sunlight. Use a protective cover.
Do not mount the product in a location where it is subject to strong
vibrations and/or shock. Check the product specifications.
Do not use the product where it can be exposed to strong electrical or
magnetic emissions.
Do not mount the product in a location where it is exposed to noise
sources (such as discharging equipment, large relay and thyristor).
Do not mount the product in a location with an altitude of more than
1000 meters.
Do not mount the product where it is exposed to materials such as
silicone, which may generate harmful gas.
Install the product in a location where the ambient temperature range is
between 10 to 35°C and the relative humidity range is between 35 to
80%. No dew condensation is allowed on the unit.
Do not mount the product in a location exposed to radiant heat.
5.3 Mounting
When mounting the product to a cabinet, use a design which shall hold
the weight at the bottom. Ensure safety with transportation test if the
product is to be installed on a transportation device such as a trailer.
Mount the product using the fixing holes in the front of the product. Use
M5,M6 screws (bolts) or equivalent to the fix the product.
Be sure to correctly tighten all screws to the required torque.
(M5:3.0Nm, M6:5.2Nm)
5.4 Piping
Ensure that the power source and the power supply of the product is
turned off (or the power plug must come off )
Ensure the flow rate of the circulating fluid is as high as possible to
maintain the temperature stability. Therefore, the length of the external
piping should be minimized and internal diameter should be as large as
possible. Piping must have sufficient strength for the maximum
discharge pressure of the circulating circuit.
Likewise, if a tube is bent or multiple elbow fittings are used, the piping
resistance will increase and the flow rate will decrease. If the flow rate
falls, the temperature stability will decrease.
If installing a tank externally, only a sealed tank should be used. Do not
use an open tank.
Ensure that the INLET and OUTLET for circulating fluid and facility water
are connected correctly. If any valves are used ensure that they do not
restrict the flow, otherwise low flow may cause an alarm.
When installing piping or fittings, ensure sealant material does not enter
inside the port. When using seal tape, leave 1.5 to 2 threads exposed on
the end of the pipe/fitting.
Be sure to correctly tighten the fitting fittings to the required torque
(Rc1/4:12 to 14 N・m, Rc3/8:15 to 20N・m).
5.5 Wiring
Ensure that the power source and the power supply of the product is turned
off before connecting the various connectors and power supply cable.
Supply disconnecting device according to IEC60974-1 and IEC60947-3
for the product must be provided in the end system.
Do not install the disconnecting device in the place where the operation
is difficult. And also the switch of the disconnecting device must comply
with the direction of the switch specified by IEC60447.
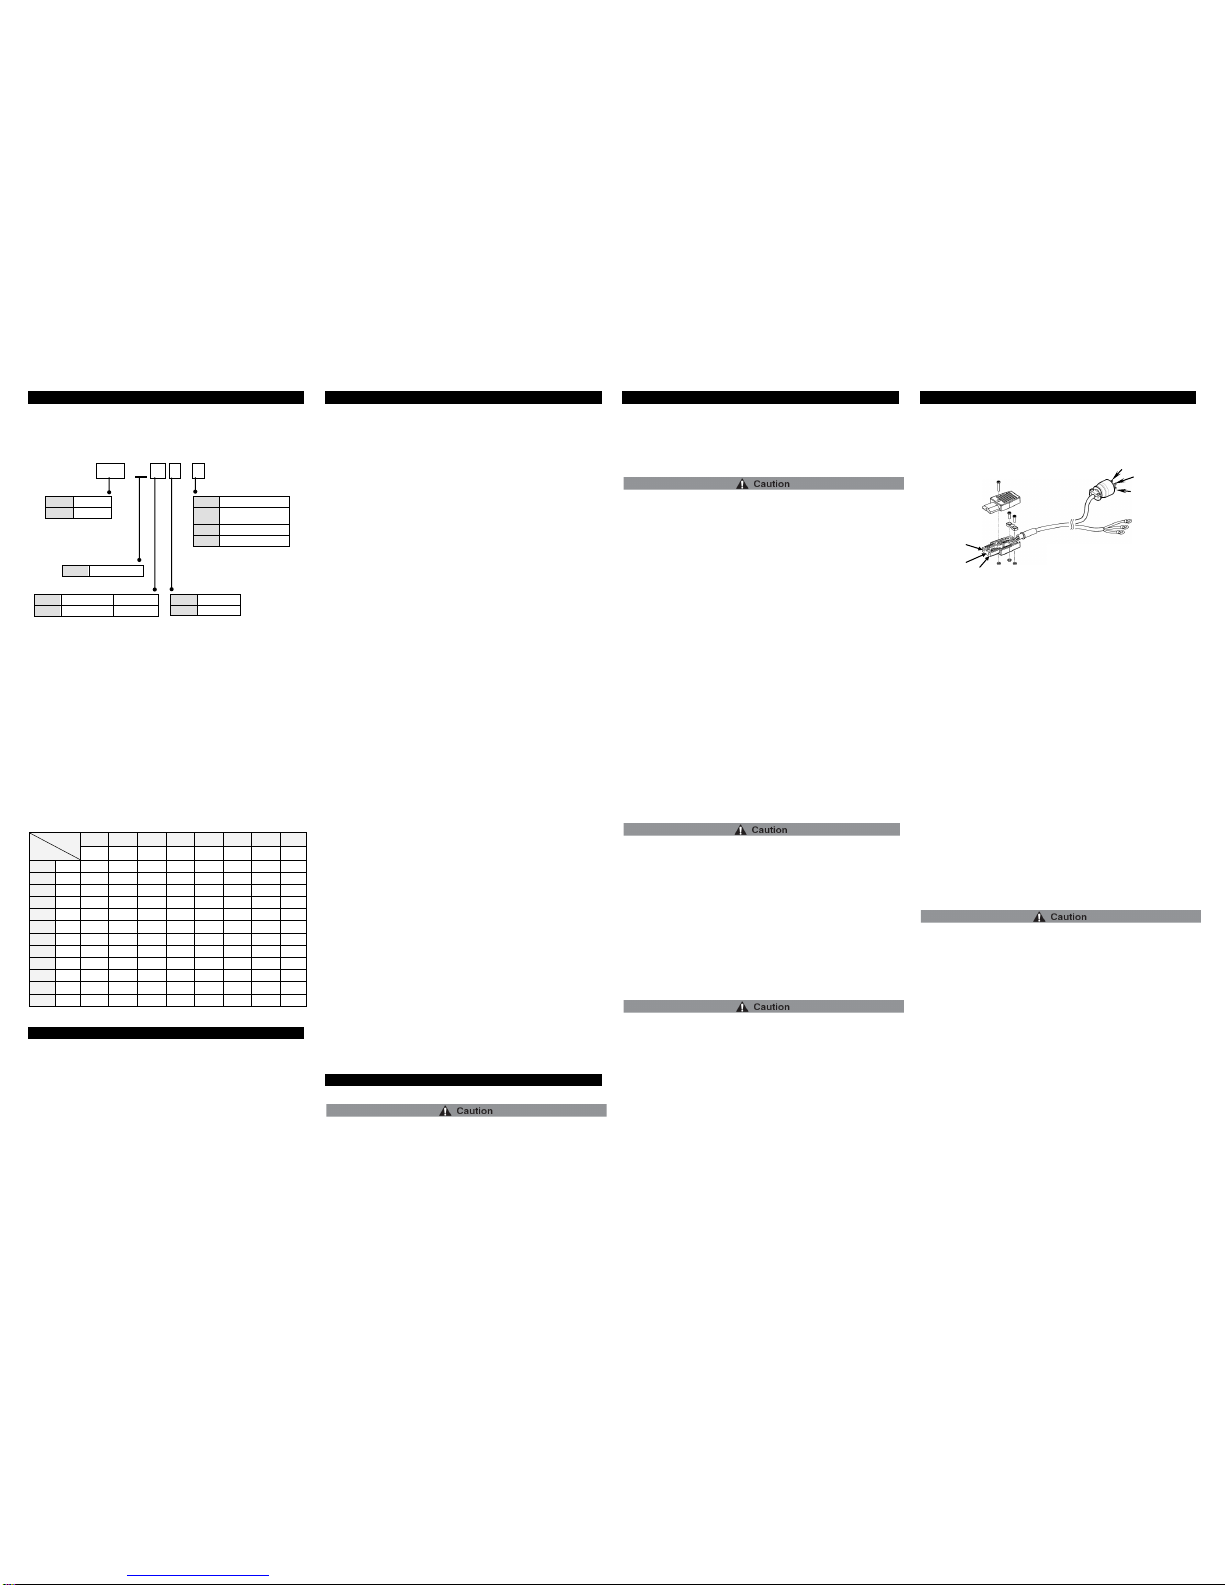
Preparation and wiring of power supply cable
5 Installation Continued
1) Strip the sheath from both ends of the cable.
2) Disassemble the power supply connector. Crimp one end of the cable
to L, N, E inside of the connector, then reassemble the power supply
connector.
3) Connect the other end of the cable to a plug or terminals
(e.g. crimped terminal).
Ensure that there is enough space between the power supply cable and
the communication cable of the product and power cables of other
equipment.
Ensure the power supply and ground connections are made correctly.
Be sure to provide the grounding. The PE line of the power supply cable
is available for grounding. Do not connect the ground in common with
the ones for equipment that generates strong electromagnetic noise or
high frequency.
When an external temperature sensor is connected, connect the sensor
with a shield cable. Use a platinum resistant temperature sensor
(Pt100ohm, 3-wiring type, class A, 1mA).
Connect the host to this unit with a twisted pair shield cable when applying
communication function or external sensor and alarm output function.
When using the Communication connector and Signal/External temperature
sensor, connect the circuit separated from the mains circuit by reinforced
insulation.
Ensure that external instruments connecting to this product provide the
enclosure complied with UL61010-1 and use the cable which provide flame
resistance (over VW-1).
5.6 Preparation for facility water
When the flow rate of facility water is not specified range, acoustic noise
or vibration may be generated, or outlet of facility water become hot.
When the flow rate of the facility water is not enough, cooling capacity
will decline. Meanwhile, when the flow rate is extremely small, alarm
(ERR14) may occur and the temperature of the facility water might be
extremely high. If a resin tubing is used for piping under these
circumstances, the tubing might get softened and exploded. Therefore,
be sure to cool the facility water over time and flow the facility water with
a proper flow rate.
Keep the facility water temperature between 10 and 35°C. (No dew
condensation). Note that the cooling and heating capacity is changed
depending on facility water temperature. Also, if lower-temperature
facility water is supplied, dew may condense in the product and the
equipment could be damaged. Keep the temperature above the
atmospheric pressure dew point.
The maximum operating pressure is 0.5MPa. Keep the pressure as low
as possible to prevent water hammer.
5.7 Filling the product
1. Ensure that the power source and the power supply of the product is
turned off (or the power plug must come off).
2. Remove the reservoir cap.
(When setting the product again, confirm the level of fluid does not exceed the “H” mark)
3. If using Ethylene Glycol, refer to the suppliers Material Safety Data Sheet
(MSDS) and wear Personal Protective Equipment (PPE) as appropriate.
4. Fill the circulating fluid into the reservoir. Stop filling once the level of
fluid reaches the “H” mark.
5. Turn on the power switch to fill the piping with the fluid.
6. When the piping is filled with the circulating fluid, the level of the
reservoir decreases and low fluid level alarm (ERR20) arises
accordingly. Then, turn off the power supply once again.
7. Repeat the step from 4 to 6 until ERR20 alarm doesn’t appear anymore.
8. Then, replace the cap on the reservoir and tighten it securely.
9. Keep the fluid level between H and L of the level indicator.
N
E (Earth)
L
Crimped
terminal
L
E
N
Plug
Cable quantity and size;
3 cores, 14AWG (include earth)
HECR 008 - W 5 * - *
Cooling capacity
008
800W
012
1200W
Piping thread type
Nil
Rc N NPT
Cooling method
W
Water-cooled
Option
Nil
None
E
With foot,
no rack bracket
F
With flow switch
P
High head pump
Power supply
2
AC200-240V
HECR012 5 AC100-240V
HECR008
 Loading...