

SMC Networks EX600-AX,EX600-AY,EX600-AM Operation Manuals
Installation
•Direct mounting
(1)When joining six or more units, fix the middle
part of the complete EX600 unit with an
intermediate reinforcing brace (EX600-ZMB1)
before mounting using 2-M4x5 screws.
Tightening torque: 0.7 to 0.8 Nm.
(2)Fix and tighten the end plates at one end of the
unit. (M4)
Tightening torque: 0.7 to 0.8 Nm.
Fix the end plate at the valve side while referring
to the operation manual of the corresponding
valve manifold.
Fieldbus system
Operation Manual
EX600-AX/EX600-AY/EX600-AM
Thank you for purchasing an SMC EX600 Series Fieldbus system.
Please read this manual carefully before operating the product and make sure you
understand its capabilities and limitations.
Please keep this manual handy for future reference.
To obtain more detailed information about operating this product,
please refer to the SMC website (URL http://www.smcworld.com
) or
contact SMC directly.
Safety Instructions
These safety instructions are intended to prevent hazardous situations and/or
equipment damage.
These instructions indicate the level of potential hazard with the labels of
"Caution", "Warning" or "Danger". They are all important notes for safety and must
be followed in addition to International standards (ISO/IEC), Japan Industrial
Standards (JIS) and other safety regulations.
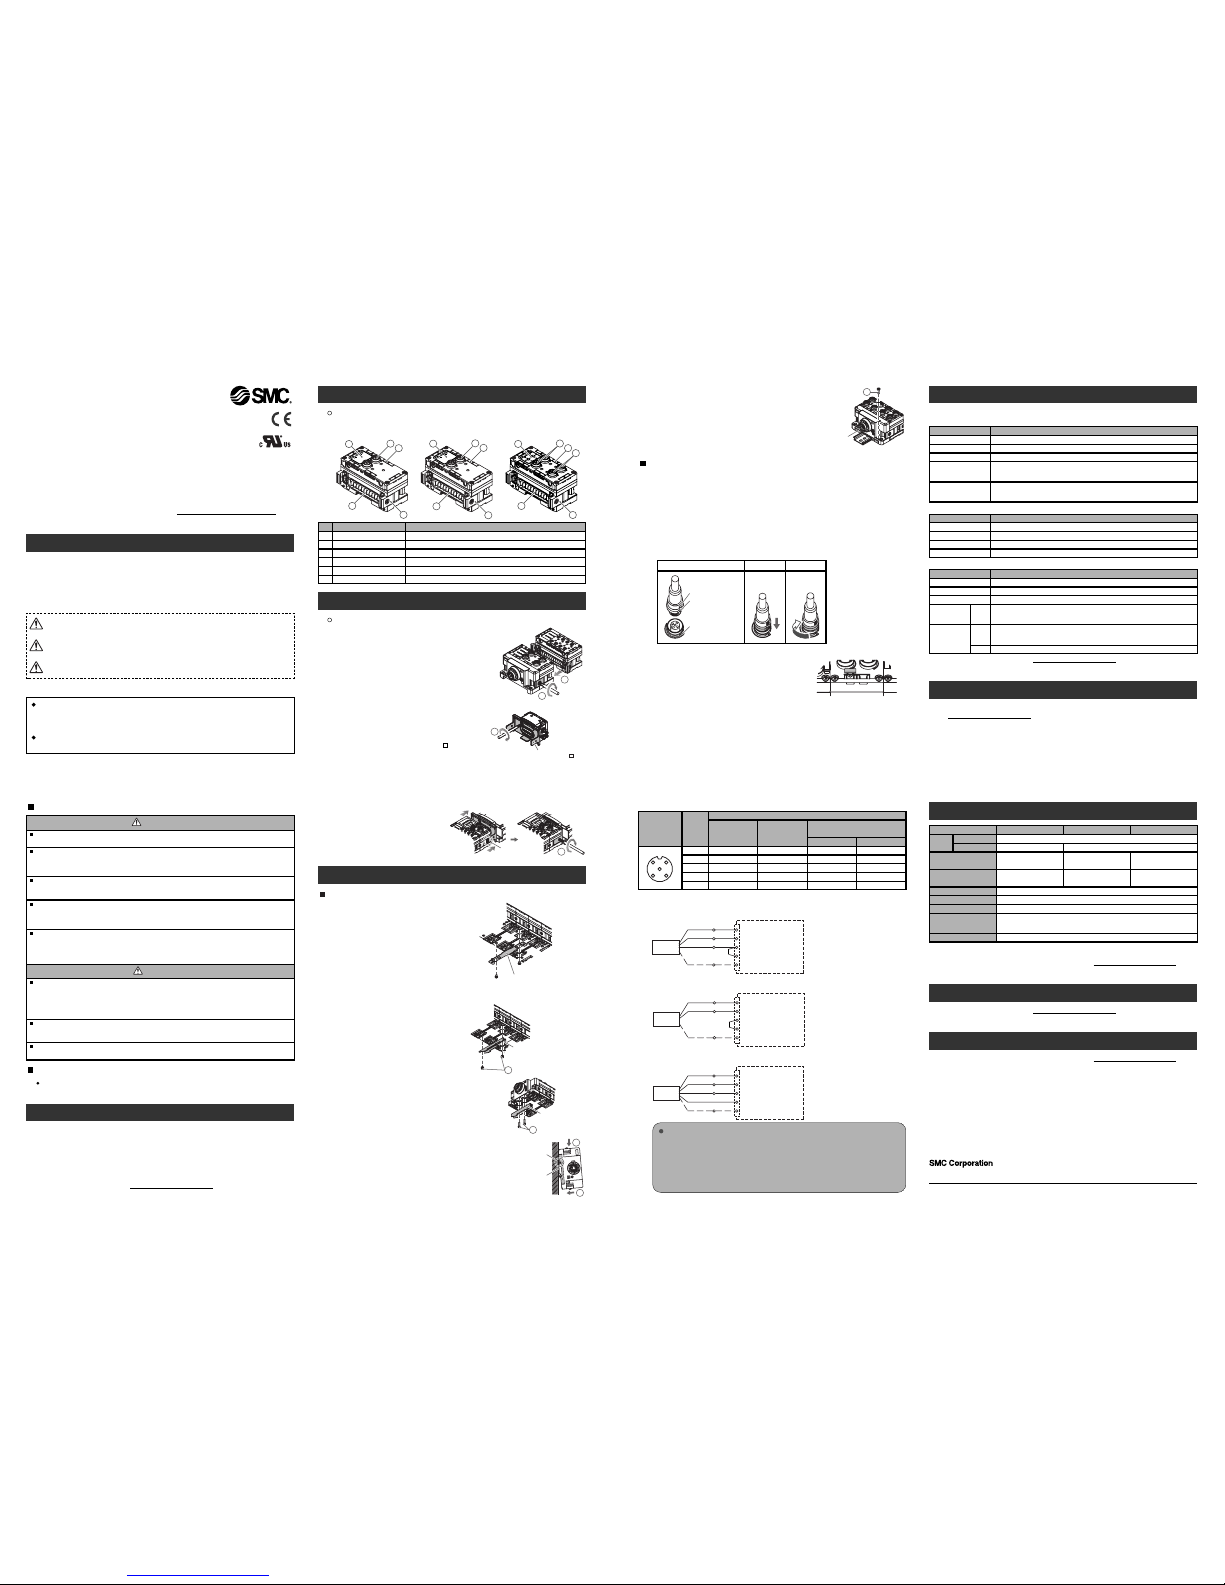
Names and Functions of Product
Mounting and Installation
Names of individual parts
Intermediate reinforcing brace
(EX600-ZMB1)
Assembly
Composing the unit as a manifold
(1)Connect the unit to the end plate.
The Digital unit, Analog unit can be connected in any
order.
Tighten the bracket of the joint using tightening torque
1.5 to 1.6 Nm.
(2)Add more units.
Up to 10 units (including the SI unit) can be
connected to one manifold.
(3)Connecting the SI unit.
After connecting the necessary units, connect the
SI unit.
Connecting method is the same as above (1), (2).
(4)Mounting the valve plate.
Mount the valve plate (EX600-ZMV ) to the valve
manifold using the valve set screws. (M3x8)
Apply 0.6 to 0.7 Nm tightening torque to the
screws.
1
2
4
Valve plate
(EX600-ZMV )
•DIN rail mounting
(Available for series other than SY series. Refer
to the catalog for SY series.)
(1)When joining six or more units, fix the middle
part of the complete EX600 unit with an
intermediate reinforcing brace (EX600-ZMB2)
before mounting, using 2-M4x6 screws.
Tightening torque: 0.7 to 0.8 Nm.
(2)Mount the end plate bracket (EX600-ZMA2) to the end
plate at the opposite end to the valves, using 2-M4x14
screws.
Tightening torque: 0.7 to 0.8 Nm.
(5)Fix the manifold by tightening the DIN rail fixing
screws of the EX600-ZMA2. (M4x20)
Tightening torque: 0.7 to 0.8 Nm.
The tightening torque at the valve side depends on
the valve type.
Refer to the operation manual of the corresponding
valve manifold.
Wiring
•Connect the M12 or M8 connector cable. M12 connector is applicable for SPEEDCON
connector.
SPEEDCON connector wiring method is explained below.
(1)Align the mark B on the metal bracket of the cable side connector (plug/socket) with
the mark A.
(2)Align the mark C on the unit and insert the connector into the unit vertically.
If they are not aligned, the connector cannot be joined properly.
(3)When the mark B of the connector has been turned 180 degrees (1/2 turn), wiring is
completed. Confirm that the connection is not loose. If turned too far, it will become
hard to remove the connector.
(1)
Mark A at cable end
Mark B at cable end
Mark C on the unit
(2)
(3)
•Mounting the marker
Signal name of the input or output devices and unit
address can be written to the marker, and it can be
installed to each unit.
Mount the marker (EX600-ZT1) into the marker groove
as required.
Intermediate reinforcing brace
(EX600-ZMB2)
1
End plate bracket
(EX600-ZMA2)
2
End plate bracket
(EX600-ZMA2)
5
CAUTION indicates a hazard with a low level of risk which, if
not avoided, could result in minor or moderate injury.
Caution:
Warning:
Danger:
WARNING indicates a hazard with a medium level of risk
which, if not avoided, could result in death or serious injury.
DANGER indicates a hazard with a high level of risk which, if
not avoided, will result in death or serious injury.
Operator
This operation manual is intended for those who have knowledge of machinery
using pneumatic equipment, and have sufficient knowledge of assembly,
operation and maintenace of such equipment. Only those persons are allowed
to perform assembly, operation and maintenance.
Read and understand this operation manual carefully before assembling,
operating or providing maintenance to the product.
NOTE
The direct current power supply to combine should be UL1310 Class2 power
supply when conformity to UL is necessary.
Safety Instructions
Do not operate the product outside of the specifications.
Do not use for flammable or harmful fluids.
Fire, malfunction, or damage to the product can result.
Verify the specifications before use.
Do not disassemble, modify (including changing the printed circuit board) or repair.
An injury or failure can result.
Do not operate in an atmosphere containing flammable or explosive gases.
Fire or an explosion can result.
This product is not designed to be explosion proof.
If using the product in an interlocking circuit:
•Provide a double interlocking system, for example a mechanical system.
•Check the product regularly for proper operation.
Otherwise malfunction can result, causing an accident.
The following instructions must be followed during maintenance:
•Turn off the power supply.
•Stop the air supply, exhaust the residual pressure and verify that the air is released before performing
maintenance.
Otherwise an injury can result.
Provide grounding to assure the safety and noise resistance of the Fieldbus system.
Individual grounding should be provided close to the product with a short cable.
Warning
Caution
After maintenance is complete, perform appropriate functional inspections.
Stop operation if the equipment does not function properly.
Safety cannot be assured in the case of unexpected malfunction.
Maintenance
•Maintenance should be performed according to the Safety Instructions.
•Perform regular maintenance and inspections.
There is a risk of unexpected malfunction.
•Do not use solvents such as benzene, thinner etc. to clean each unit.
They could damage the surface of the body and erase the markings on the body.
Use a soft cloth to remove stains.
For heavy stains, use a cloth soaked with diluted neutral detergent and fully squeezed, then wipe up
the stains again with a dry cloth.
When handling the unit or assembling/replacing units:
•Do not touch the sharp metal parts of the connector or plug for connecting units.
•Take care not to hit your hand when disassembling the unit.
The connecting portions of the unit are firmly joined with seals.
•When joining units, take care not to get fingers caught between units.
An injury can result.
Refer to the SMC website (URL http://www.smcworld.com) to obtain more detailed
information about maintenance.
Status display LED
Description Function
Displays the status of the unit.
Connector (analog input) Connector for Analog input device.
Connector (analog output) Connector for Analog output device.
Joint bracket Bracket for joining to adjacent units.
Unit connector (plug) Transmits signals and power supplies to adjacent units.
2
4
5
6
1
3
4
5
6
1
4
5
6
1
2
3
•Analog input unit
•EX600-AXA
1
No.
2
3
5
6
Marker groove Groove to mount a marker.4
•Analog output unit
•EX600-AYA
•Analogl I/O unit
•EX600-AMB
(5)Connect the SI unit and the valve manifold.
Insert the valve plate to the valve plate
set groove on the side of SI unit.
Then, tighten it with the valve plate
set screws (M4x6) to fix the plate.
Tightening torque for set screws 0.7
to 0.8 Nm.
Analog characteristics
24 VDC Class2, 2 A
Power
supply
-
-10 V to 10 V
-20 mA to 20 mA
•Analog input unit
Off
Display
Green LED is On
Red LED is On
0 and 1 red LEDs
are On
Red LED is flashing
The power supply for control and input is Off.
Content
The product is operating normally.
The power supply of input device has a short circuit.
Either of the following conditions:
•The current value of the analog input device has exceeded the upper or lower limit.
•When the range is set by current input type, voltage is input from the analog input device.
Either of the following conditions:
•The upper or lower limit of the range is exceeded.
•The upper or lower limit of the measuring value (with user's setting value) is exceeded.
•Analog output unit
Off
Display
Green LED is On
Red LED is On
Red LED is flashing
The power supply for control and input is Off.
Content
The product is operating normally.
The power supply of output device has a short circuit.
The upper or lower limit of the output value (with user's setting value) is exceeded.
•Analog I/O unit
Off
Green LED is On
Red LED is On
0 and 1 red
LEDs are On
Red LED is
flashing
The power supply for control and input is Off.
Content
The product is operating normally.
The power supply of input or output devices has a short circuit.
Either of the following conditions:
•The current value of the analog input device has exceeded the upper or lower limit.
•When the range is set by current input type, voltage is input from the analog input device.
Either of the following conditions:
•The upper or lower limit of the range is exceeded.
•The upper or lower limit of the measuring value (with user's setting value) is exceeded.
Input
Output
The upper or lower limit of the output value (with user's setting value) is exceeded.
•Connector pin assignment
24 V
(control and input)
Signal name
Input +
0 V
(control and input)
Input
-
FE
1
2
3
4
5
12
34
5
Configuration
24 V (output)
Output
0 V (output)
0 V (output)
FE
Analog output unit
EX600-AYA
24 V
(control and input)
Analog I/O unit
EX600-AMB
Input +
0 V
(control and input)
Input
-
FE
Input connector
24 V (output)
Output
0 V (output)
0 V (output)
FE
Output connector
Analog input unit
EX600-AXA
Pin
number
Control and input
Input signal range
Output signal range
EX600-AXAModel
EX600-AYA EX600-AMB
24 VDC Class2, 2 A
-
0 V to 10 V
0 mA to 20 mA
-
0 V to 10 V
0 mA to 20 mA
0 V to 10 V
0 mA to 20 mA
LED Display
The status display LED shows the follwing unit state.
Troubleshooting
Refer to the LED Display. Refer to the SMC website
(URL http://www.smcworld.com
) to obtain more detailed information about
troubleshooting.
Specification
Refer to the product catalog or SMC website (URL http://www.smcworld.com) to
obtain more detailed information about product specifications.
Outline with Dimensions
Refer to the product catalog or SMC website (URL http://www.smcworld.com) to
obtain more detailed information about outline dimensions.
Note: Specifications are subject to change without prior notice and any obligation on the part of the manufacturer.
© 2009 SMC Corporation All Rights Reserved
Akihabara UDX 15F, 4-14-1, Sotokanda, Chiyoda-ku, Tokyo 101-0021, JAPAN
Phone: +81 3-5207-8249 Fax: +81 3-5298-5362
URL http://www.smcworld.com
-10 to 50 oC (Max. surrounding air temperature rating: 50 oC)
Operating temperature range
-20 to 60 oCStorage temperature range
For use in Pollution Degree 2 Environment (UL508)Pollution degree
10 to 57 Hz: constant amplitude 0.75 mm p-p
57 to 150 Hz: constant acceleration 49 m/s
2
for 2 hours each in direction X, Y and Z respectively (De-energized)
Vibration resistance
147 m/s23 times each in directions of X, Y and Z respectively (De-energized)Impact resistance
Refer to the SMC website (URL http://www.smcworld.com) to obtain more detailed
information about analog characteristics.
Display
Refer to the SMC website (URL http://www.smcworld.com
) to obtain more detailed
information about LED display.
Output
(3)Hook the DIN rail mounting groove to the DIN rail.
(4)Press the manifold using its side hooked to the
DIN rail as a fulcrum until the manifold is locked.
3
4
DIN rail
DIN rail mounting groove
5
Valve plate
mounting groove
•Examples of wiring with input devices
•When using a sensor whose analog output signal is 0 V standard type.
•When using a 2-wire current output type sensor.
•When using a differential output type sensor.
Precautions for handling
When an analog sensor is connected to the Analog input or I/O unit, pay attention
to the following cautions.
EX600 analog input has a differential input specification, and it receives 2-pin
(input +) signal based on 4-pin (input
-
). Because of the specification, if 4-pin is
not connected, it will not be able to read the signal input properly. Therefore,
when using an analog sensor that does not have the differential output type,
3-pin and 4-pin should be connected externally.
Sensor
24 V
1: 24 V (Control and input)
FE
4: Input (
-
)
5: FE
0 V
Output
2: Input (+)
3: 0 V (Control and input)
Analog input or I/O unit
Short circuit
Sensor
24 V
1: 24 V (Control and input)
FE
4: Input (
-
)
5: FE
Output
2: Input (+)
3: 0 V (Control and input)
Analog input or I/O unit
Short circuit
Sensor
24 V
1: 24 V (Control and input)
FE
4: Input (
-
)
5: FE
0 V
Output (+)
Output (
-
)
2: Input (+)
3: 0 V (Control and input)
Analog input or I/O unit
*1: Input terminals are not isolated from Power source.
*2: Do not connect outside Power source to Input and Output terminals.
Input
 Loading...