

Page 1

Page 2

SMC2531W-B EU
EliteConnect
™ 2.4GHz 802.11b
High Power Wireless PC Card
User Guide
From SMC's EZ Connect™ line of small office, home office
networking products
March 2004
Page 3

TABLE OF CONTENTS
System Requirements . . . . . . . . . . . . . . . . . . . . . . 1
Package Contents . . . . . . . . . . . . . . . . . . . . . . . . . . 3
Getting Started . . . . . . . . . . . . . . . . . . . . . . . . . . . . 5
Driver Installation - Option 1 (Recommended)
Other Setup Processes . . . . . . . . . . . . . . . . . . . . . . . . . . . . . .10
. . . . 7
Driver Installation - Option 2 . . . . . . . . . . . . . . . . 11
Windows 98SE . . . . . . . . . . . . . . . . . . . . . . . . . . . . . . . . . . . . .11
Windows Me . . . . . . . . . . . . . . . . . . . . . . . . . . . . . . . . . . . . . . .12
Windows 2000 . . . . . . . . . . . . . . . . . . . . . . . . . . . . . . . . . . . . .13
Windows XP . . . . . . . . . . . . . . . . . . . . . . . . . . . . . . . . . . . . . . .14
Driver Verification . . . . . . . . . . . . . . . . . . . . . . . . . 15
Windows 98/Me . . . . . . . . . . . . . . . . . . . . . . . . . . . . . . . . . . . .15
Windows 2000 . . . . . . . . . . . . . . . . . . . . . . . . . . . . . . . . . . . . .15
Windows XP . . . . . . . . . . . . . . . . . . . . . . . . . . . . . . . . . . . . . . .16
Utility Installation . . . . . . . . . . . . . . . . . . . . . . . . . 17
Windows 98SE/Me/2000/XP . . . . . . . . . . . . . . . . . . . . . . . . . .17
Utility Configuration . . . . . . . . . . . . . . . . . . . . . . . 21
Configuration . . . . . . . . . . . . . . . . . . . . . . . . . . . . . . . . . . . . . .22
Link Information . . . . . . . . . . . . . . . . . . . . . . . . . . . . . . . . . . . .24
IP Information . . . . . . . . . . . . . . . . . . . . . . . . . . . . . . . . . . . . . .25
Site Survey . . . . . . . . . . . . . . . . . . . . . . . . . . . . . . . . . . . . . . . .26
Version Information . . . . . . . . . . . . . . . . . . . . . . . . . . . . . . . . .27
Disable Wireless Zero Configuration
in Windows XP . . . . . . . . . . . . . . . . . . . . . . . . . . . 29
i
Page 4

Table of Contents
Maximum Distance Table . . . . . . . . . . . . . . . . . . .31
Troubleshooting . . . . . . . . . . . . . . . . . . . . . . . . . .33
Technical Specifications . . . . . . . . . . . . . . . . . . . .37
Frequently Asked Questions . . . . . . . . . . . . . . . .41
Terminology . . . . . . . . . . . . . . . . . . . . . . . . . . . . . .45
Compliances . . . . . . . . . . . . . . . . . . . . . . . . . . . . . . i
Legal Information and Contacts . . . . . . . . . . . . . . iii
ii
Page 5

SYSTEM REQUIREMENTS
• An available PCMCIA Type II slot.
• Windows 98SE/Me/2000/XP.
• A minimum of 32MB RAM and 300 MHz CPU.
• A minimum of 1 MB available hard disk space for utility
and driver installation.
•
Another IEEE 802.11b compliant device installed in your network,
such as the SMC2804WBRP-G Barricade™ g 2.4GHz 54 Mbps
Wireless Cable/DSL Broadband Router with USB Print Server,
or another PC with a wireless adapter, such as the SMC2662W
EZ Connect™ 2.4GHz 11 Mbps Wireless USB Adapter.
1
Page 6

PACKAGE CONTENTS
After unpacking the EliteConnect™ 2.4GHz 802.11b High Power
Wireless PC Card, check the contents of the box to be sure you
have received the following components:
• 1 SMC2531W-B EU High Power Wireless PC Card.
• 1 EZ Installation Wizard and Documentation CD.
• Quick Installation Guide.
Immediately inform your dealer in the event of any incorrect,
missing or damaged parts. If possible, please retain the carton
and original packing materials in case there is a need to return
the product.
Please register this product and upgrade the product warranty
at SMC's Web site: www.smc.com
or www.smc-europe.com.
3
Page 7

GETTING STARTED
Warning:
1. Turn on your computer and insert the EZ Installation Wizard
and Documentation CD. Run the utility software and then shut
down your machine when complete.
2. Find an available Type II or Type III PCMCIA slot in your
computer.
3. With the PC Card's 68-pin connector facing the PCMCIA slot
and the "EliteConnect™ Wireless PC Card" label facing up,
slide the card completely into the PCMCIA slot as shown below.
Network cards are sensitive to static electricity.
To protect the card, avoid touching its electrical
components and always touch the metal chassis
of your computer before handling the card.
4. For Windows 98SE/Me/2000, PCMCIA card and socket
services compliant with revision 2.10 of the PCMCIA
specification are required. Please check the documents
of your PCMCIA driver for confirmation.
5
Page 8

Getting Started
5.
The card will be automatically installed during the Operating
System's boot-up process. Once complete, you may take
advantage of the wireless functionality this adapter has
to offer.
Note:
The PCMCIA slot allows you to hot swap PC Cards
any time, even when your computer is on.
6
Page 9
D
RIVER
I
NSTALLATION
-
PTION
O
Note: Installation processes will require the use of your
original, licensed copy of Windows. Please have
your Windows CD available BEFORE proceeding
with the installation.
This installation method makes the process as simple and
Plug-and-Play as possible. Simply run the EZ Installation Wizard,
reboot your machine and insert your EliteConnect™ 2.4GHz
802.11b High Power Wireless PC Card. It's as easy as 1-2-3.
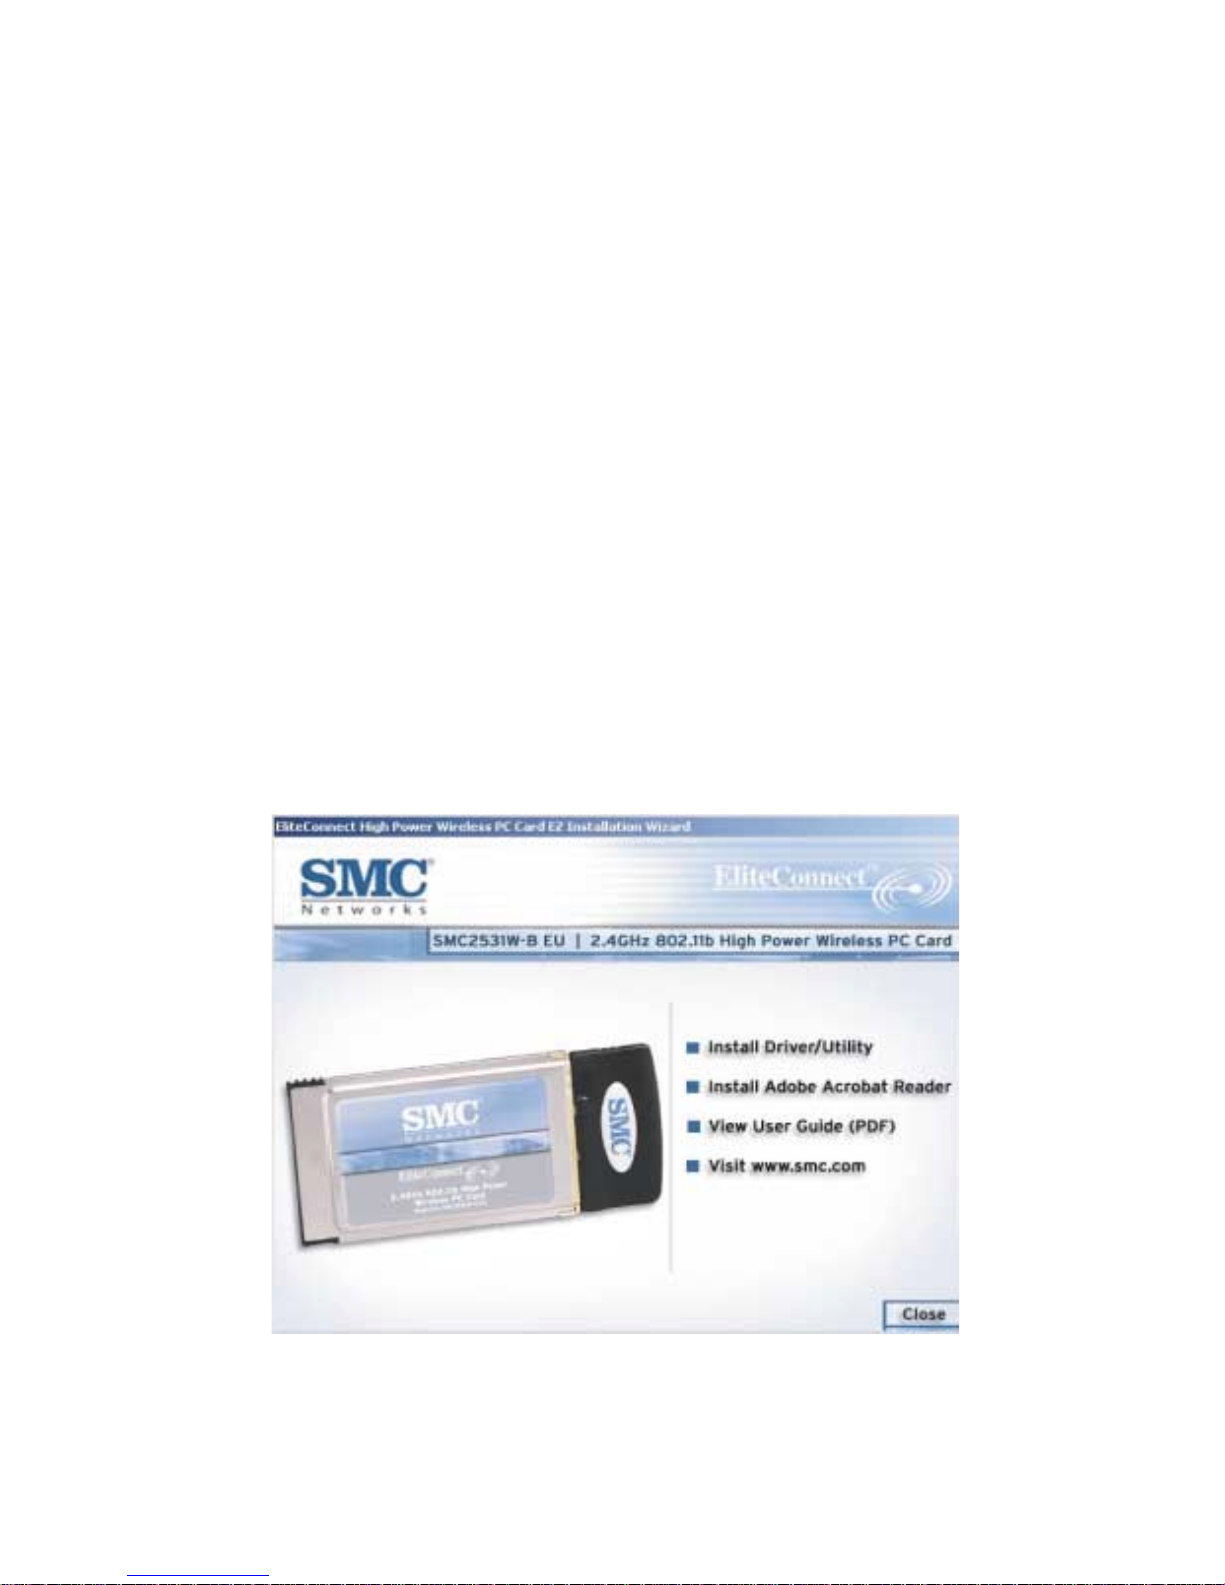
Step 1: Insert the EZ Installation Wizard and Documentation CD.
Step 2: Click the [Install Driver/Utility] button.
1 (R
ECOMMENDED
)
7
Page 10

Driver Installation - Option 1 (Recommended)
Step 3: The installation wizard will begin. Click [Next].
Step 4: You will be given the option to choose the location where
the Configuration Utility will be installed. It is recommended to
leave this at the default value. Click [Next] to continue.
8
Page 11
Driver Installation - Option 1 (Recommended)
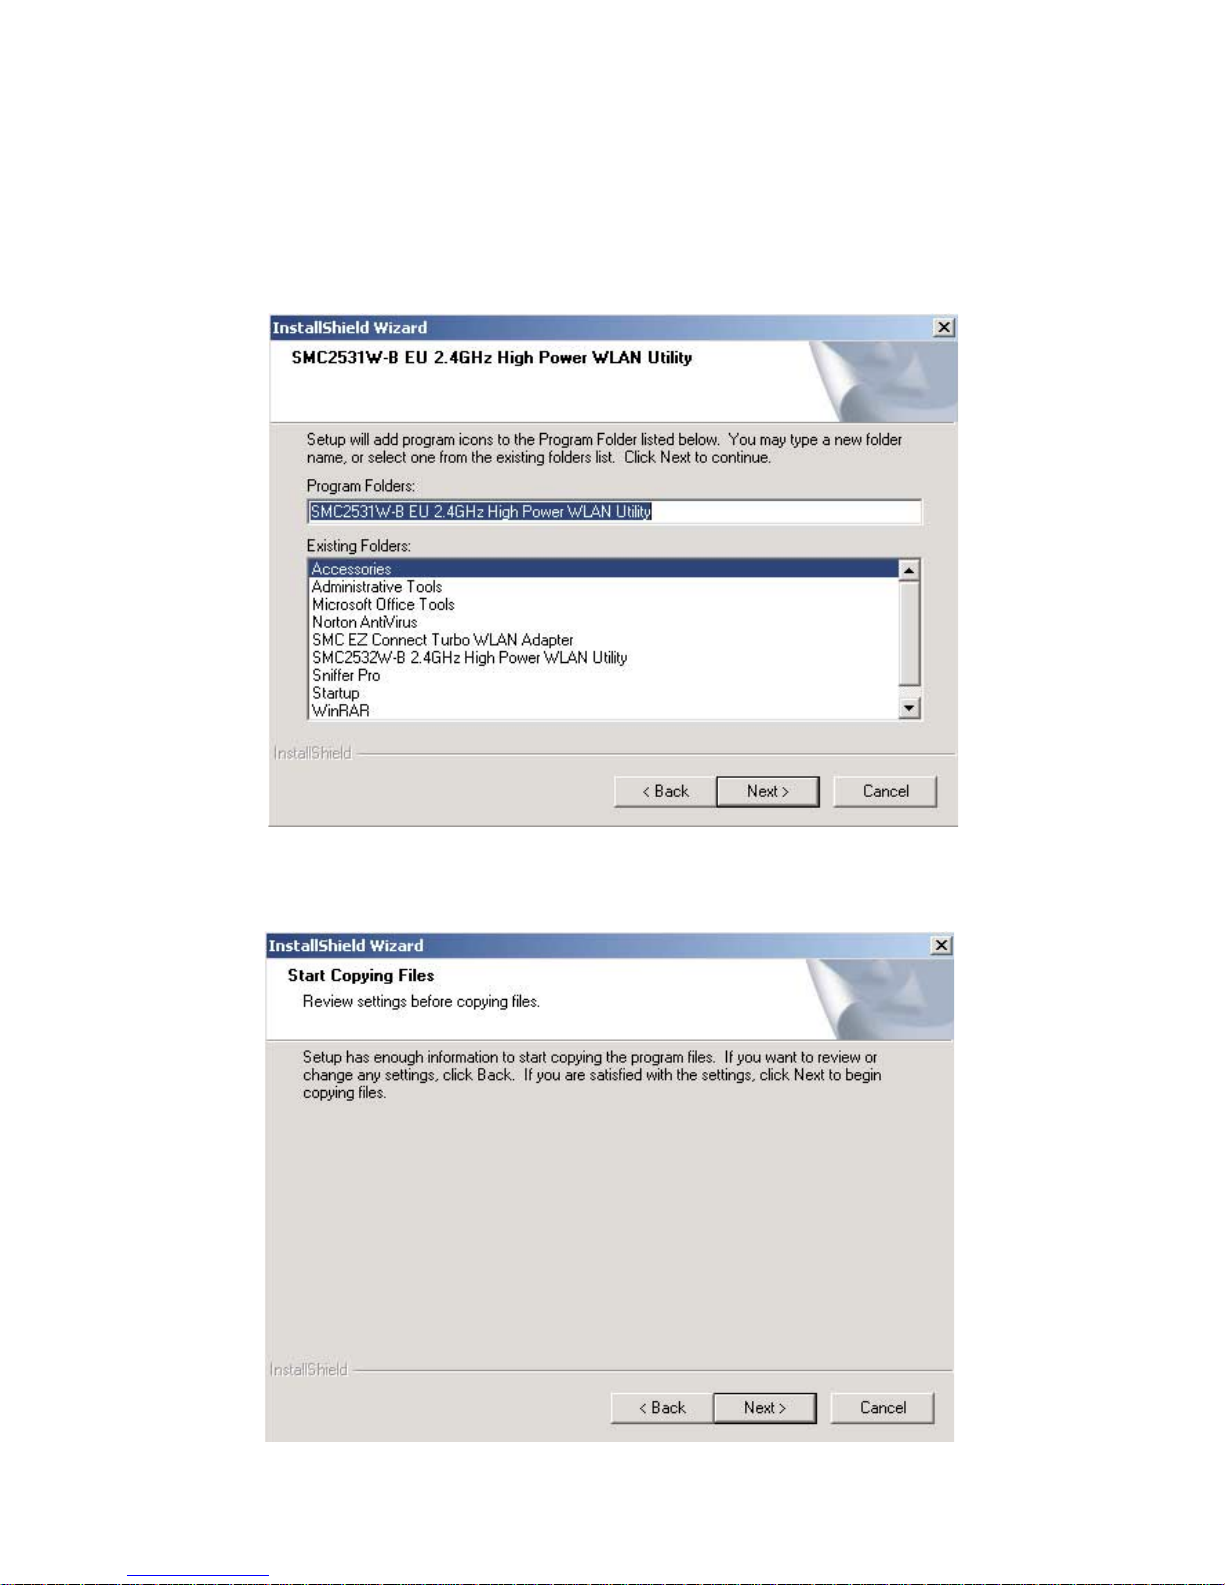
You will also be given the option to choose the Folder name that
will appear in the [Start] menu. It is recommended to leave this at
the default value. Click [Next] to continue.
Step 5: Click [Next] to begin copying the utility files to your
computer.
9
Page 12
Driver Installation - Option 1 (Recommended)
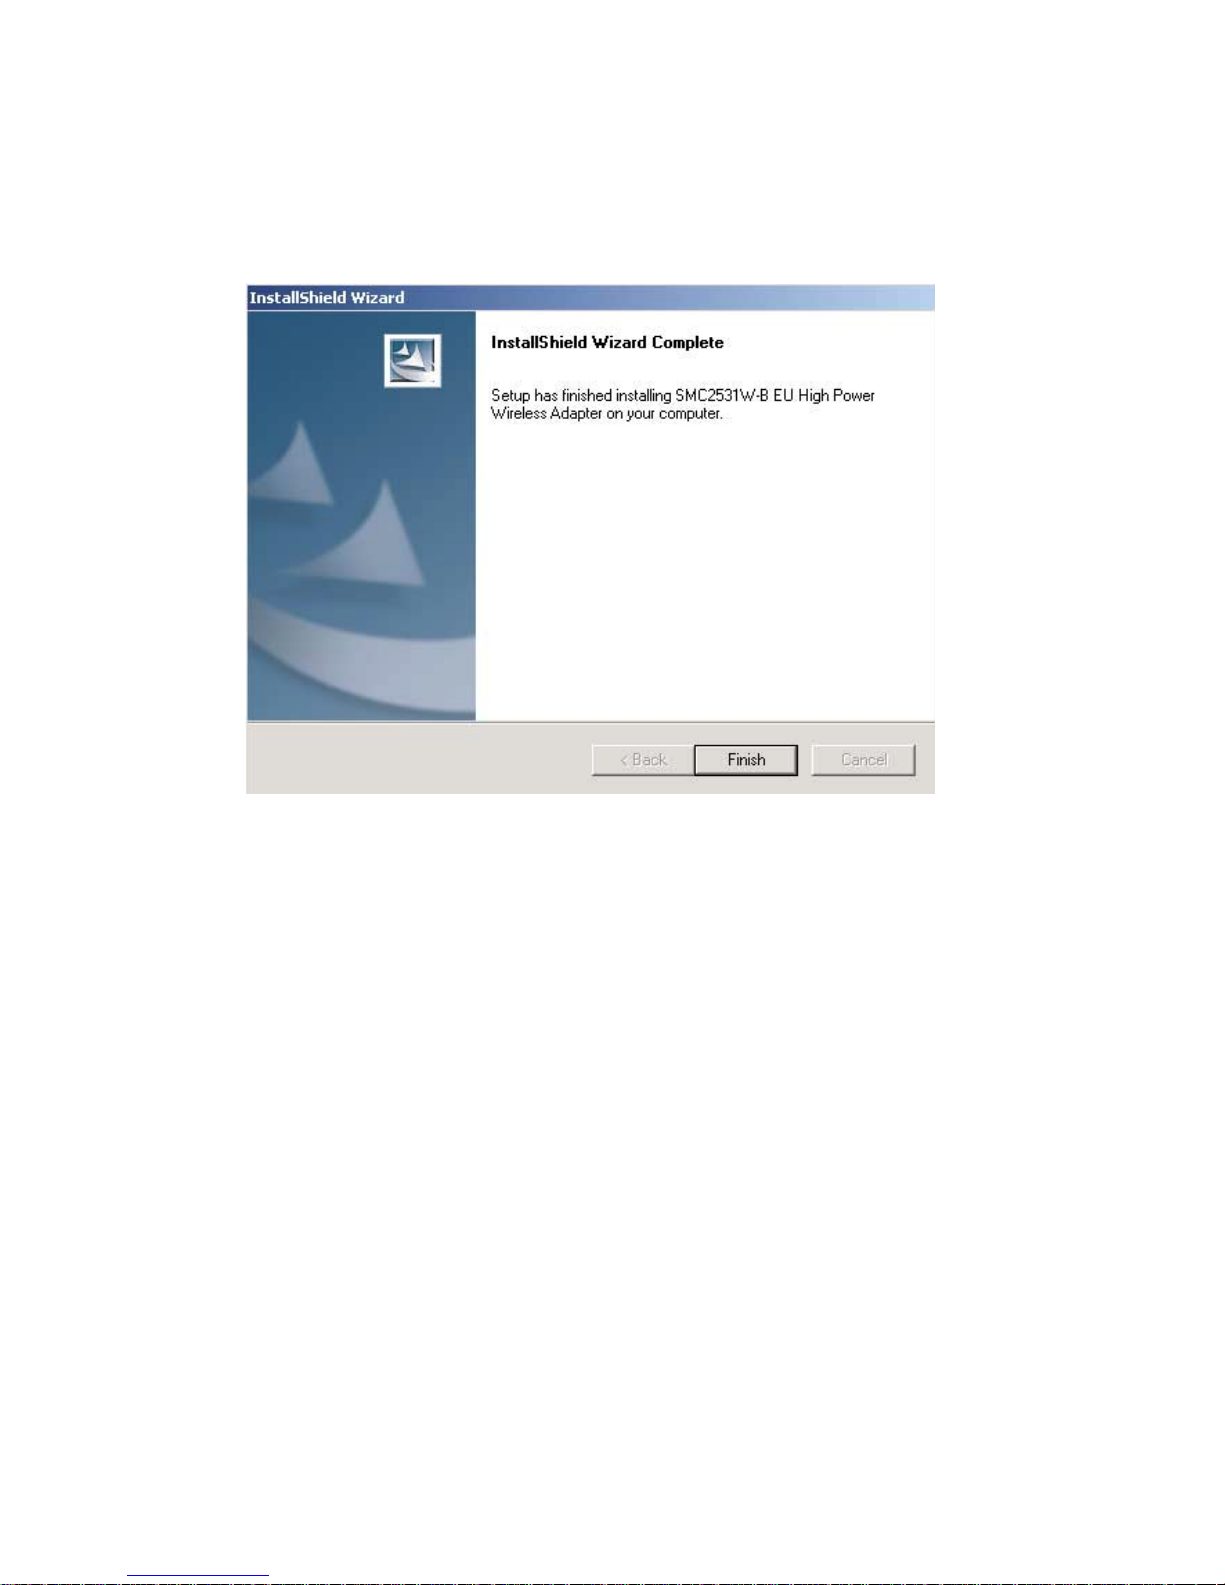
You have now completed the utility installation process.
Click [Finish] to exit the wizard.
Step 6: Please shut down your machine and insert your
PC Card. Finally, boot up the operating system.
Other Setup Processes
The following are Operating System-specific options that may
appear during this installation procedure:
Windows 98SE/Me: If you are using Windows 98SE, you
must have your original Windows CD on hand. In Windows Me,
the installation process is fully Plug-and-Play.
Windows 2000/XP: Select [Install the software automatically]
if prompted and click [Next] to complete the installation.
Continue to the Utility Configuration section for documentation
on how to use the utility application for your SMC2531W-B EU.
10
Page 13

D
RIVER
I
NSTALLATION
-
Windows 98SE
Note:
Step 1: After you have inserted the SMC2531W-B EU in your
machine, the Operating System will automatically recognize
the adapter and prompt you for the appropriate drivers. Click
the [Next] button to begin the installation.
Step 2: Insert the Driver CD and select the [Search for the
best driver for your device] option and click [Next].
Installation processes will require the use of your
original, licensed copy of Windows. Please have
your Windows CD available BEFORE proceeding
with the installation.
PTION
O
2
Step 3: Clear all checkboxes except for [Specify a location:].
Then press the [Browse…] button and look for the drivers
on your CD-ROM. Browse to x:\driver. (Note: The "x" equals
the letter of your CD-ROM drive. In most cases, this is D.)
Step 4: The system should find the drivers. Click the [Next]
button to continue the installation. The wizard will show
"
SMC2531W-B EU
Note: If the system could not find the drivers, click the [Back]
button, and select the [Display a list of all the drivers...]
option. Select [Network Adapters] from the list of devices,
press [Have Disk] and once again browse to the location
of the drivers.
Step 5: Once the system has copied the SMC drivers from the
CD, it may then request files from your original Windows disk.
Please insert the Windows CD at this time.
EliteConnect™ High Power Wireless Adapter".
11
Page 14

Driver Installation - Option 2
Step 6: The system will copy the files. Do NOT press [Cancel].
Step 7:
Once all the necessary files are copied from the Windows
CD, the driver install process will be complete. Click [Finish] to
exit the wizard.
Step 8: You will then be prompted to reboot the machine. Press
[Yes]. Upon reboot, the SMC2531W-B EU will be initialized and
ready for use.
Windows Me
Note: Installation processes will require the use of your
original, licensed copy of Windows. Please have
your Windows CD available BEFORE proceeding
with the installation.
Step 1: After you have inserted the SMC2531W-B EU in your
machine and turned it back on, the OS will automatically recognize
the adapter and prompt you for the appropriate drivers. Select
the [Specify the location of the driver] option. Then click the
[Next] button to begin the installation.
Step 2: Insert the Driver CD and select the [Specify a location:]
option. Clear the [Removable Media] checkbox. Then press the
[Browse] button and look for the drivers on your CD. This should
be located in x:\driver. (Note: The x equals the letter of your
CD-ROM drive. In most cases, this is D.) Then click [Next].
Step 3: The system should find the drivers. Click the [Next]
button to continue the installation.
Note: If the system could not find the drivers, click the [Back]
button, and select the [Display a list of all the drivers]
option. Select [Network Adapters] from the list of devices,
press [Have Disk] and once again browse to the location
of the drivers.
12
Page 15

Step 4: Once all the necessary files have been copied, the driver
installation is complete. Click [Finish] to exit the wizard.
Step 5: You will then be prompted to reboot the machine. Press
[Yes]. Upon reboot, the SMC2531W-B EU will be initialized and
ready for use.
Windows 2000
Step 1: After you have inserted the SMC2531W-B EU in
your machine and turned it back on, the Operating System
will automatically recognize the adapter and prompt you
for the appropriate drivers. Click the [Next] button to begin
Windows 2000
the installation.
Step 2: Insert the Driver CD and select the [Search for a
suitable driver...] option. Then click [Next].
Step 3: Clear all checkboxes except for [Specify a location].
Then click [Next].
Step 4: You will then be prompted to enter the location of the
drivers. This should be x:\driver. (Note: The x equals the letter
of your CD-ROM drive. In most cases, this is D.) Then click [OK].
You can also click [Browse] and browse to the location of the
drivers on the CD for further verification.
Step 5: The system should find the drivers. Click the [Next]
button to continue the installation.
Note: If the system could not find the drivers, click the
[Back] button, and select the [Display a list of the
known drivers...] option. Select [Network Adapters]
from the list of devices, press [Have Disk] and
once again browse to the location of the drivers.
Step 6: You have now completed the driver installation.
Click [Finish] to initialize the adapter.
13
Page 16
Driver Installation - Option 2
Windows XP
Step 1: After you have inserted the SMC2531W-B EU in
your machine and turned it back on, the Operating System
will automatically recognize the adapter and prompt you for
the appropriate drivers. Select [Install from a list or specific
location] and click the [Next] button to begin the installation.
Step 2: Insert the Driver CD and check the [Include this location
in the search] option. Make sure the [Search removable media]
option is not checked. Click [Browse] and find the location of the
drivers. This should be x:\driver. (Note: The x equals the letter of
your CD-ROM drive. In most cases, this is D.) Then click [Next].
Step 3: This process will be completed once the drivers are
copied to the hard drive and installed. Please click [Finish]
to exit the wizard.
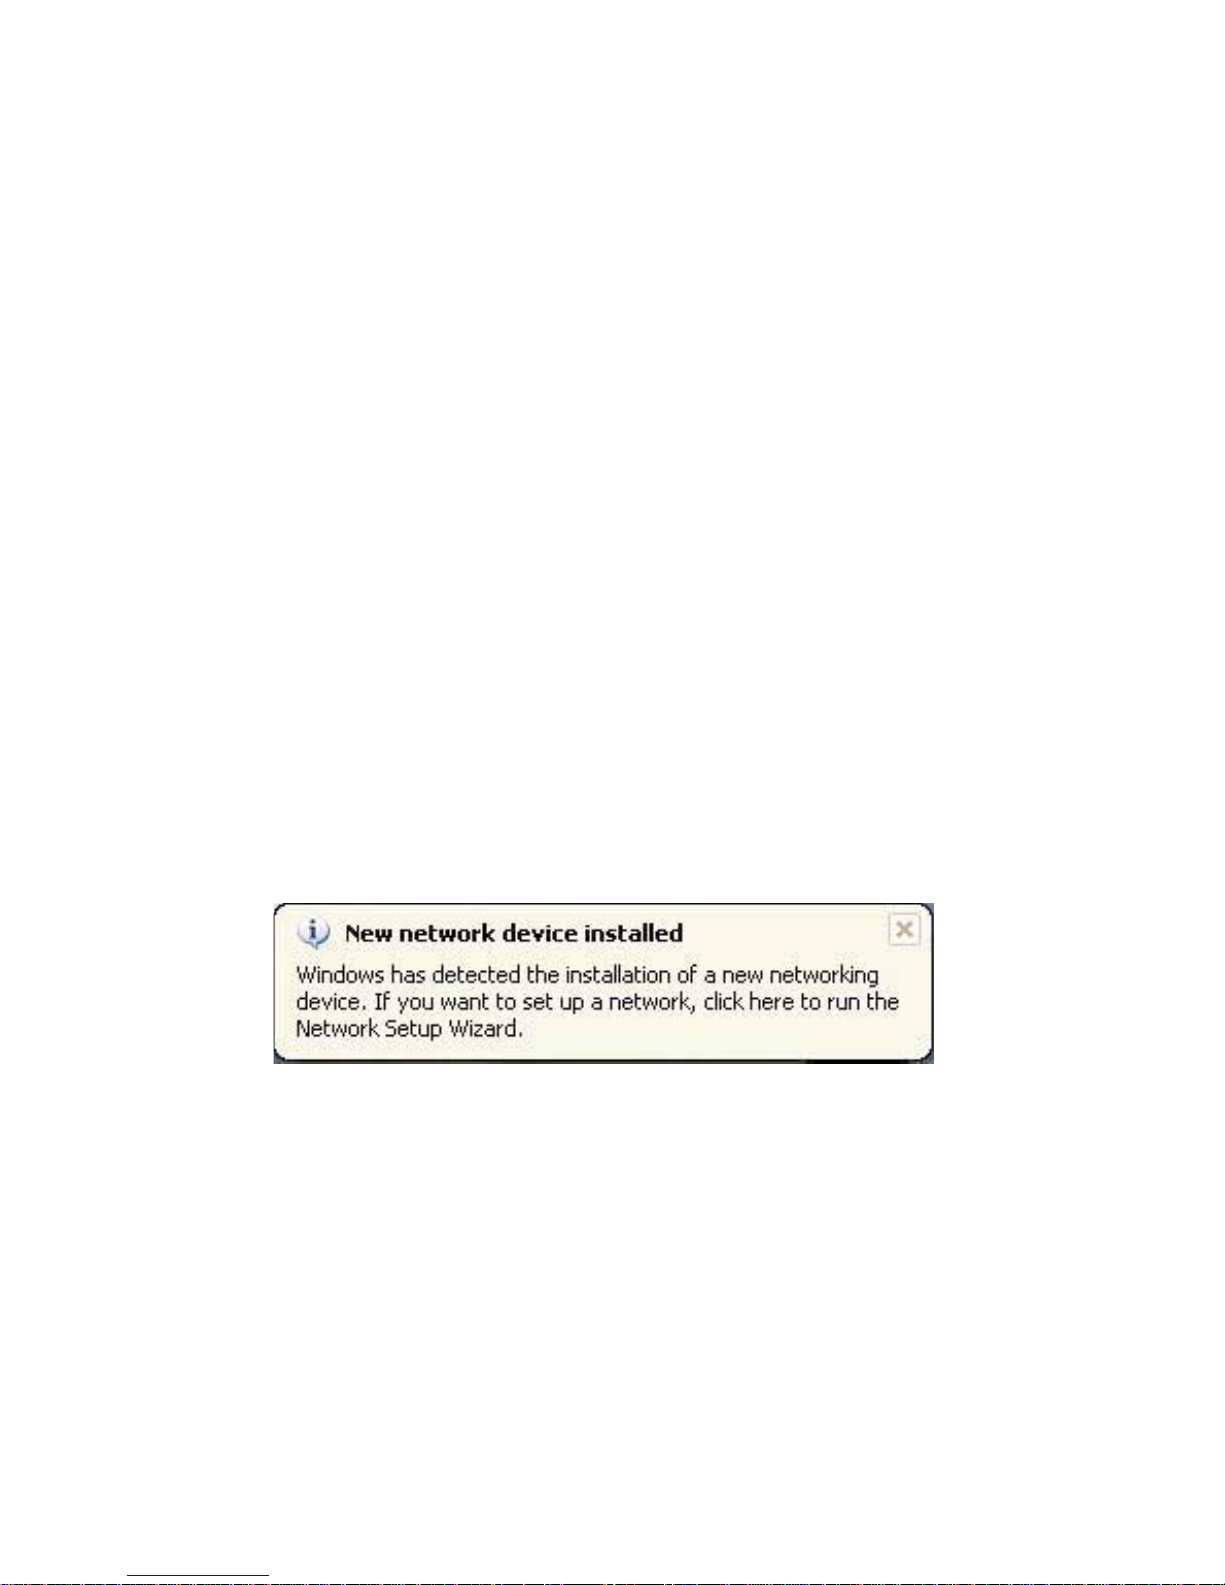
After clicking [Finish], you will see the following message in your
system tray:
14
Page 17

DRIVER VERIFICATION
Windows 98/Me
Step 1: Right-click the [My Computer] icon on your desktop
and click [Properties].
Step 2: Then go to the [Device Manager] tab and open the
[Network adapters] section. You should see your SMC2531W-B
EU EliteConnect™ High Power Wireless Adapter in this menu.
Highlight it and click [Properties].
Step 3:
If there are any error messages displayed here, you will need to
click the SMC adapter and click [Remove]. Then reboot the machine
and go through the installation process again.
The Device Status shows: [This device is working properly].
Windows 2000
Step 1: Right-click the [My Computer] icon on your desktop
and click [Properties].
Step 2: Then go to the Hardware tab and click [Device Manager].
Open the [Network adapters] section. You should see your
SMC2531W-B EU EliteConnect™ High Power Wireless Adapter
in this menu. Right-click your adapter and click [Properties].
Step 3:
If there are any error messages displayed here, you will need to
The Device Status shows: [This device is working properly].
right-click the SMC adapter and click [Uninstall]. Then reboot the
machine and go through the installation process again.
15
Page 18

Driver Verification
Windows XP
Step 1: Click [Start] and click [Control Panel]. Then click the
[Performance and Maintenance] icon and select [System].
Step 2: Then go to the Hardware tab and click [Device Manager].
Open the [Network adapters] section. You should see your
SMC2531W-B EU EliteConnect™ High Power Wireless Adapter
in this menu. Right-click the adapter and click [Properties].
Step 3:
If there are any error messages displayed here, you will need to
right-click the SMC adapter and click [Uninstall]. Then reboot the
machine and go through the installation process again.
The Device Status shows: [This device is working properly].
16
Page 19

UTILITY INSTALLATION
Windows 98SE/Me/2000/XP
This Installation method makes the process as simple and Plugand-Play as possible. Simply run the EZ Installation Wizard, reboot
your machine and insert your SMC2531W-B EU EliteConnect™
High Power Wireless Adapter. It's as easy as 1-2-3.
Step 1: Insert the EZ Installation Wizard and Documentation CD.
Step 2: Click the [Install Driver/Utility] button.
17
Page 20

Utility Installation
Step 3: The installation wizard will begin. Click [Next].
Step 4: You will be given the option to choose the location where
the Configuration Utility will be installed. It is recommended to
leave this at the default value. Click [Next] to continue.
18
Page 21

Utility Installation
You will also be given the option to choose the Folder name that
will appear in the [Start] menu. It is recommended to leave this at
the default value. Click [Next] to continue.
Step 5: Click [Next] to begin copying the utility files to your
computer.
19
Page 22

Utility Installation
You have now completed the utility installation process.
Click [Finish] to exit the wizard.
Step 6: Please shut down your machine and insert your
PC Card. Finally, boot up the operating system.
20
Page 23

UTILITY CONFIGURATION
When the utility program is running, there will be a quick launch
icon in the lower right-hand corner of the taskbar. The icon will be
GREEN if you have a good connection to a wireless network. If it
is red, you will need to verify the network settings and check to
be sure that the Wireless Access Point on your network is turned
on. You may also need to re-position the Access Point and place
it in a higher position so that you are able to gain more wireless
signal strength.
Double-click the quick launch icon in the system tray to bring up
the Configuration Utility. This provides quick access to management
statistics and adapter settings.
The Configuration Utility includes the following tabs:
[Configuration]
This tab allows you to implement Profile Management,
edit SSID data, change the Tx Rate and Operating mode,
and enable 64/128-bit WEP.
[Link Information]
This tab allows you to view/monitor network status,
throughput and wireless channel information.
[IP Information]
This tab displays TCP/IP data and allows you to Release
and Renew your IP addresses.
21
Page 24

Utility Configuration
[Site Survey]
This tab displays all the Access Points within range of the wireless
adapter's signal. It allows you to select your desired WLAN.
[Version Information]
This tab shows the driver and utility version information.
Configuration
When the Configuration Utility is initialized, the [Configuration]
window may be immediately shown. This will show you the current
selected profile of the wireless card. Click [New] to enter a new
name for the current profile. Click [Save] to save the current settings
to the selected profile. Click [Delete] to delete the current profile.
22
Page 25

Configuration
The options for [Operating Mode:] are [802.11 Ad Hoc] and
[Infrastructure]. Ad Hoc networks consist of wireless clients only.
In Infrastructure networks, wireless clients connect to wired LANs
via Wireless Access Points. The options for Transmit Rate are
[Auto], [1 Mbps], [2 Mbps], [5.5 Mbps], and [11 Mbps]. The
[Channel:] can only be changed when you are connected to a
Ad Hoc WLAN. The channel must be configured to the same radio
channel as that used by the other wireless clients in your group.
For more secure data transmissions, it is recommended to
enable WEP on your WLAN. The utility supports HEX, ASCII
and Passphrase key entries.
For the HEX Key Format, the security is enabled by entering
10-digit keys for the 64-bit WEP configuration, and 26-digit keys
for a 128-bit WEP configuration. Allowed hex keys are 0-9, A-F
and a-f. Select the desired encryption strength (64-bit or 128-bit)
and then enter the appropriate keys in [Key 1], [Key 2], [Key 3] or
[Key 4]. Remember to select the correct [Default Key:] and then
click [Apply changes].
For the ASCII Key Format, the security is enabled by entering
5-digit keys for the 64-bit WEP configuration, and 13-digit keys
for a 128-bit WEP configuration. Then enter the appropriate keys
in Key 1, 2, 3, or 4. Remember to select the correct [Default Key:]
and then click [Apply Changes].
You can also check the [Passphrase] option and enter the desired
value in the box to the right of [Passphrase]. You must be sure
to use the same passphrase on all other wireless clients/Access
Points. A passphrase string can consist of up to 32 alphanumeric
characters.
23
Page 26

Utility Configuration
Link Information
[Associated BSSID]
This field shows the MAC Address of the associated Access Point.
[Channel]
This field displays the channel configured on your Access Point.
[Current Tx Rate]
This field displays the current transmit rate value.
[Throughput]
This field displays the number of packets sent and received.
[SSID]
This field displays the workgroup name of the wireless network
that you are connected to.
24
Page 27

[Link Quality:]
This field shows the relative link quality (e.g., lack of frame
errors) of the wireless connection to the Access Point.
[Signal Strength:]
This field shows the relative signal strength of the wireless
connection to the Access Point.
IP Information
IP Information
The [IP Information] screen displays network connection
information and allows you to [Release] and [Renew] your
IP settings.
25
Page 28

Utility Configuration
Site Survey
The [Site Survey] tab scans and displays all Access Points on the
wireless LAN. The data is organized by columns signifying the
[SSID], [BSSID], [Channel], [Encryption], [Signal] and [Network
Type]. The key symbol in the Encryption column signifies that the
network is encrypted. You will need to obtain the WEP information
from the network administrator. To choose a network, simply
double-click the SSID listed in the [SSID] column.
26
Page 29

Version Information
The [Version Information] screen displays the driver
and application version information and dates.
Version Information
27
Page 30

DISABLE WIRELESS ZERO
CONFIGURATION IN
WINDOWS XP
It is recommended that you use the SMC2531W-B EU Configuration
Utility to manage your High Power Wireless PC Card. If you are
using the SMC utility in Windows XP, you will need to disable the
Wireless Zero Configuration. Follow the instructions below.
Go to [Control Panel] and open [Network Connections]. Right-click
the [Wireless Network Connection] and select [Properties]. Select
the [Wireless Networks] tab and uncheck the [Use Windows to
configure my wireless network settings] check box.
29
Page 31

MAXIMUM DISTANCE TABLE
Important Notice
Maximum distances posted below are actual tested distance
thresholds. However, there are many variables such as barrier
composition and construction, as well as local environmental
interference that may impact your actual distances and cause
you to experience distance thresholds far lower than those
posted below. If you have any questions or comments regarding
the features or performance of this product, or if you would like
information regarding our full line of wireless products, you can
visit us at www.smc.com or www.smc-europe.com. SMC Networks
stands behind every product sold with a 30-day satisfaction
guarantee and a limited-lifetime warranty.
802.11b Wireless Distance Table
Environmental
Condition
Outdoors:
A line-of-sight environment
with no interference or
obstruction between the
Access Point and users.
Indoors:
A typical office or home
environment with floor to
ceiling obstructions between
the Access Point and users.
11 Mbps 5.5 Mbps 2 Mbps 1 Mbps
120 m
(394 ft)
85 m
(279 ft)
Speed and Distance Ranges
225 m
(738 ft)
165 m
(541 ft)
465 m
(1525 ft)
315 m
(1033 ft)
830 m
(2722 ft)
475 m
(1558 ft)
31
Page 32

TROUBLESHOOTING
Common Installation Problems
Problems are often caused by conflicts with other devices installed
in the same computer, or software that has been configured
incorrectly. If you encounter a problem with the EliteConnect™
SMC2531W-B EU 2.4GHz High Power PC Card, use the following
checklists to identify and correct the problem.
If your computer cannot find the Wireless Card, or the network
driver does not install correctly, check the following items before
contacting SMC Technical Support.
• Make sure the card is securely seated in the PCMCIA slot.
Check for any hardware problems, such as physical damage
to the card.
• Try the card in another PCMCIA slot. If this fails, test the card
in a completely different system or try using a second Wireless
Card in that particular slot.
• Check for resource conflicts.
• Make sure your computer is using the latest BIOS available.
Contact the manufacturer of the laptop, motherboard for
information on updating the BIOS (e.g. Dell, Toshiba, etc).
• If there are other network cards in the computer, they may be
causing conflicts. Remove all other cards from the computer
and test the Wireless Card separately.
33
Page 33

Troubleshooting
Network Connection Problems
There may be a network connection problem if the LED on the
card does not light, or if you cannot access any network resources
from the computer. Check the following items before contacting
SMC Technical Support.
• Make sure the correct network card driver is installed for your
operating system. If necessary, try uninstalling and reinstalling
the driver. To do this, first shut down your machine and remove
your SMC adapter. Then boot up and open up your [Start]
menu, go to [Programs], click the [SMC2531W-B EU 2.4GHz
High Power WLAN Utility] program folder and choose [Uninstall].
Reboot the machine when requested to do so. Then insert
your Driver CD and run the Setup.exe utility again. Then shut
down the computer, reinsert your SMC adapter and boot up
the machine. The OS should properly reinstall the adapter
during this time.
• Make sure the computer and other network devices are
34
receiving power. If you suspect a power outlet to be faulty,
plug another device into it to verify that it is working.
• If your wireless station cannot communicate with a computer
on the Ethernet LAN when configured for Infrastructure mode,
try changing the wireless channel on the AP. Make sure the
SSID is the same as that used by the AP for a station with
roaming disabled, or the same as that used by the AP's in the
extended service set (ESS).
Page 34

Troubleshooting
•
The Access Point you are trying to attach to is defective or may
not be configured properly to accept your signal. Check with
the administrator of your wireless network for more information
on connecting to the LAN. Also run the necessary diagnostics
on the AP to make sure the unit is fully operational.
• If you cannot access the Internet, be sure to check with the
ISP for further instructions once the drivers for the Wireless
Card are installed properly.
35
Page 35

TECHNICAL SPECIFICATIONS
Important Note:
The factory default settings of this router have been done in
a way to provide you with uninterrupted access and use of the
Internet. With this background for cost reasons we recommend
that you enter into a "flat rate" contract with your DSL-line provider.
Standards:
IEEE 802.11b
Wireless Data Rates (With Automatic Fall-back):
802.11b = 1/2/5.5/11 Mbps
Data Modulation Techniques:
802.11b (DSSS) = DBPSK, DQPSK, CCK
Host Interface:
16-bit PCMCIA V2.1 Type II, 5V key
Memory Size:
128Kx16 SRAM, 128Kx8 flash ROM
Sensitivity:
11 Mbps: <-85 dBm
5.5 Mbps: <-88 dBm
2 Mbps: <-90 dBm
1 Mbps: <-93 dBm
Operating Range:
Up to 2,722 ft
Network Configuration:
Ad-Hoc (Peer-to-Peer)
Infrastructure
Radio Signal Type:
Direct Sequence Spread Spectrum (DSSS)
37
Page 36

Technical Specifications
Media Access Protocol:
CSMA/CA (Collision Avoidance) with ACK architecture 32-bit MAC
Security:
64/128-bit Wired Equivalent Privacy (WEP)
802.1x/Cisco LEAP/EAP TLS/EAP TTLS/EAP MD5
WPA (WiFi Protected Access)*
Channel Support (2.4GHz RF):
ETSI - 1-13
RF Output Power:
100 mW
Operating Systems:
Windows 98SE/Me/2000/XP
Antenna Type:
Two MMCX reverse connectors, support RX diversity
Antenna Gain:
0.23 dBi
LED Indicators:
Network Link (green)
Power (orange)
Power Voltage:
5.0 VDC ± 5%
Power Consumption:
Transmission mode - <450mA
Receive mode - <350mA
Power Save mode - 60mA
Dimensions:
3.38 in (L)* 2.13 in (W)* 0.2 in (H) without Antenna
Compliance:
ETSI 300 328, 300 826
WiFi Compliant
38
Page 37

Technical Specifications
Temperature Range:
Operating: -0 C - +55 C
Storage: -10 C - +65 C
Humidity (non-condensing): 90%
* Available under Windows XP.
Support for Windows 98SE/Me/2000 will be available Q2 2004
39
Page 38

FREQUENTLY ASKED
QUESTIONS
• What is a Wireless LAN?
o A local area network that transmits over the air typically
in an unlicensed frequency such as the 2.4GHz band.
A wireless LAN does not require lining up devices for line
of sight transmission like IrDA. Wireless access points
(base stations) are connected to an Ethernet hub or server
and transmit a radio frequency over an area of several
hundred to a thousand feet which can penetrate walls and
other non-metal barriers. Roaming users can be handed
off from one access point to another like a cellular phone
system. Laptops use wireless network cards that plug into
an existing PCMCIA slot or that are self contained on PC
cards, while stand-alone desktops and servers use plug-in
cards (ISA, PCI, etc.).
• What is AD-HOC?
o An AD-HOC network is a peer to peer network where all
the nodes are wireless clients. As an example, two PC's
with wireless adapters can communicate with each other
as long as they are within range. A wireless extension
point can extend the range of an AD-HOC network.
• What is the 802.11 standard?
o
A family of IEEE standards for wireless LANs first introduced
in 1997. 802.11 provides 1 or 2 Mbps transmission in the
2.4GHz band using either a frequency hopping modulation
41
Page 39

Frequently Asked Questions
(FHSS) technique or direct sequence spread spectrum
(DSSS), which is also known as CDMA. The 802.11b
standard defines an 11 Mbps data rate in the 2.4GHz band,
802.11g-draft standard defines 54 Mbps in the 2.4GHz band,
and the 802.11a standard defines 54 Mbps in the 5GHz band.
• What is Infrastructure?
o In order for your wireless components to interact with
traditional wired networks they need a media bridge to
translate for them. This is where INFRASTRUCTURE
or Network mode comes into play. An ACCESS POINT
is attached to the network using CAT-5 Ethernet cable
attaching to a hub, switch or another PC. Wireless PC's
can then communicate to Wired Ethernet computers
through this access point. The total range of the network
is limited to a radius around this Access Point. To increase
the range, extra Access Points may be wired into the
network. These Access Points talk to each other over
the hard-wired Ethernet cables however, they cannot
communicate wirelessly to one another and they must
be wired to the same network. Individual wireless PC's
can move between Access Points on the same network
seamlessly due to a feature called ROAMING.
• What is Tx Rate?
o Tx-Rate or TRANSFER RATE is the current speed at
which the network component is operating. SMC-802.11b
products can operate at speeds of 1Mb, 2Mb, 5.5Mb,
& 11Mbps. A wireless card set to AUTO will attempt to
connect at whatever speed will give the best throughput
on the network.
42
Page 40

• What is RTS Threshold?
o (Request To Send)
An RS-232 signal sent from the transmitting station to the
receiving station requesting permission to transmit. RTS is
a collision avoidance method used by all 802.11b wireless
networking devices. In most cases you will not need
to activate or administer RTS. Only if you find yourself in
an Infrastructure environment where all nodes are in range
of the Access Point but may be out of range of each other.
It is recommended to leave this setting at its default value
leaving this feature disabled.
Frequently Asked Questions
• What is Authentication Algorithm?
o Authentication Algorithm is the means by which one station
is authorized to communicate with another. In an Open
System, any station can request authorization in accordance
with the WECA standard. In a Shared key system, only
stations that possess a secret encrypted key may participate
in the network. This is a low level security key which allows
the equipment with the shared key algorithm to see each
other on the wireless lan.
• What is DBI?
o The ability of the antenna to shape the signal and focus
it in a particular direction is called Antenna Gain, and is
expressed in terms of how much stronger the signal in
the desired direction is, compared to the worst possible
antenna, which distributes the signal evenly in all directions
(an Isotropic Radiator). To express the relationship to the
Isotropic reference, this is abbreviated: "dBi". The typical
omni-directional "stick" antenna is rated at 6-8 dBi,
43
Page 41

Frequently Asked Questions
indicating that that by redirecting the signal that would have
gone straight up or down to the horizontal level, 4 times as
much signal is available horizontally. A parabolic reflector
design can easily achieve 24 dBi.
• What is WEP?
o Short for Wired Equivalent Privacy, WEP is a security
protocol for wireless local area networks (WLANs)
defined in the 802.11b and 802.11a standards.
WEP is designed to provide the same level of security as
that of a wired LAN. LANs are inherently more secure than
WLANs because LANs are somewhat protected by the
physicalities of their structure, having some or all part of
the network inside a building that can be protected from
unauthorized access. WLANs, which are over radio waves,
do not have the same physical structure and therefore are
more vulnerable to tampering.
WEP aims to provide security by encrypting data over radio
waves so that it is protected as it is transmitted from one
end point to another. The Wired Equivalent Privacy (WEP)
feature uses the RC4 PRNG algorithm developed by RSA
Data Security, Inc.
If your wireless access point supports MAC filtering, it is
recommended that you use this feature in addition to WEP
(MAC filtering is much more secure than encryption).
44
Page 42

TERMINOLOGY
10BaseT
The Physical Layer Specification for Twisted-Pair Ethernet using
Unshielded Twisted Pair wire at 10Mbps. This is the most popular
type of LAN cable used today because it is very cheap and easy
to install. It uses RJ-45 connectors and has a cable length span
of up to 100 meters. There are two versions, STP (Shielded
Twisted Pair) which is more expensive and UTP (Unshielded
Twisted Pair), the most popular cable. These cables come in
5 different categories. However, only 3 are normally used in LANs,
Category 3, 4 and 5. CAT 3 TP (Twisted Pair) cable has a network
data transfer rate of up to 10Mbps. CAT 4 TP cable has a network
data transfer rate of up to 16Mbps. CAT 5 TP cable has a network
data transfer rate of up to 100Mbps.
Access Point
A device that is able to receive wireless signals and transmit
them to the wired network, and vice versa - thereby creating
a connection between the wireless and wired networks.
Ad Hoc
An ad hoc wireless LAN is a group of computers, each with
LAN adapters, connected as an independent wireless LAN.
Adapter
A device used to connect end-user nodes to the network; each
contains an interface to a specific type of computer or system
bus, e.g. EISA, ISA, PCI, PCMCIA, CardBus, etc.
Auto-Negotiation
A signaling method that allows each node to define its
operational mode (e.g., 10/100 Mbps and half/full duplex)
and to detect the operational mode of the adjacent node.
45
Page 43

Terminology
Backbone
The core infrastructure of a network. The portion of the network
that transports information from one central location to another
central location where it is unloaded onto a local system.
Base Station
In mobile telecommunications, a base station is the central radio
transmitter/receiver that maintains communications with the mobile
radiotelephone sets within its range. In cellular and personal
communications applications, each cell or micro-cell has its own
base station; each base station in turn is interconnected with
other cells' bases.
BSS
BSS stands for "Basic Service Set". It is an Access Point and
all the LAN PCs that are associated with it.
CSMA/CA
(Carrier Sense Multiple Access with Collision Avoidance)
DHCP (Dynamic Host Configuration Protocol)
This protocol automatically configures the TCP/IP settings
of every computer on your home network.
DNS
DNS stands for Domain Name System, which allows Internet host
computers to have a domain name (such as www.smc.com) and
one or more IP addresses (such as 192.34.45.8). A DNS server
keeps a database of host computers and their respective domain
names and IP addresses, so that when a domain name is requested
(as in typing " www.smc.com" into your Internet browser), the
user is sent to the proper IP address. The DNS server address
used by the computers on your home network is the location of
the DNS server your ISP has assigned.
46
Page 44

Terminology
DSL
DSL stands for Digital Subscriber Line. A DSL modem uses
your existing phone lines to transmit data at high speeds.
Ethernet
A standard for computer networks. Ethernet networks are
connected by special cables and hubs, and move data around
at up to 10 million bits per second (Mbps).
ESS
ESS (ESS-ID, SSID) stands for "Extended Service Set". More
than one BSS is configured to become an Extended Service Set.
LAN mobile users can roam between different BSSs in an ESS
(ESS-ID, SSID).
Fast Ethernet NIC
Network interface card that is in compliance with the IEEE 802.3u
standard. This card functions at the media access control (MAC)
layer, using carrier sense multiple access with collision detection
(CSMA/CD).
Fixed IP
(see Static IP)
Full-Duplex
Transmitting and receiving data simultaneously. In pure digital
networks, this is achieved with two pairs of wires. In analog
networks, or digital networks using carriers, it is achieved by
dividing the bandwidth of the line into two frequencies, one
for sending, one for receiving.
Hub
Central connection device for shared media in a star topology.
It may add nothing to the transmission (passive hub) or may
contain electronics that regenerate signals to boost strength
as well as monitor activity (active/intelligent hub). Hubs may be
47
Page 45

Terminology
added to bus topologies; for example, a hub can turn an Ethernet
network into a star topology to improve troubleshooting.
IP Address
IP stands for Internet Protocol. An IP address consists of a series
of four numbers separated by periods, that identifies an single,
unique Internet computer host. Example: 192.34.45.8.
ISP (Internet Service Provider)
An ISP is a business that provides connectivity to the Internet
for individuals and other businesses or organizations.
LAN
A communications network that serves users within a confined
geographical area. It is made up of servers, workstations,
a network operating system and a communications link. Servers
are high-speed machines that hold programs and data shared by
network users. The workstations (clients) are the users' personal
computers, which perform stand-alone processing and access
the network servers as required.
Diskless and floppy-only workstations are sometimes used, which
retrieve all software and data from the server. Increasingly, "thin
client" network computers (NCs) and Windows terminals are also
used. A printer can be attached locally to a workstation or to a
server and be shared by network users. Small LANs can allow
certain workstations to function as a server, allowing users access
to data on another user's machine. These peer-to-peer networks
are often simpler to install and manage, but dedicated servers
provide better performance and can handle higher transaction
volume. Multiple servers are used in large networks.
MAC Address MAC (Media Access Control Address)
A MAC address is the hardware address of a device connected
to a network.
48
Page 46

Terminology
MDI / MDI-X (Medium Dependent Interface)
Also called an uplink port, it is a port on a network hub or switch
used to connect to other hubs or switches without requiring a
crossover cable. The MDI port does not cross the transmit and
receive lines, which is done by the regular ports (MDI-X ports)
that connect to end stations. The MDI port connects to the MDI-X
port on the other device. There are typically one or two ports on a
device that can be toggled between MDI (not crossed) and MDI-X
(crossed).
Medium Dependent Interface - X (crossed)
A port on a network hub or switch that crosses the transmit lines
coming in to the receive lines going out.
NAT (Network Address Translation)
This process allows all of the computers on your home network to
use one IP address. The NAT capability of the Barricade, allows
you to access the Internet from any computer on your home
network without having to purchase more IP addresses from your
ISP. Network Address Translation can be used to give multiple
users access to the Internet with a single user account, or to map
the local address for an IP server (such as Web or FTP) to a
public address. This secures your network from direct attack by
hackers, and provides more flexible management by allowing
you to change internal IP addresses without affecting outside
access to your network. NAT must be enabled to provide multi-user
access to the Internet or to use the Virtual Server function.
Packet Binary Convulational Code(tm) (PBCC)
A modulation technique developed by Texas Instruments Inc. (TI)
that offers data rates of up to 22Mbit/s and is fully backward
compatible with existing 802.11b wireless networks.
49
Page 47

Terminology
PCI (Peripheral Component Interconnect)
Local bus for PCs from Intel that provides a high-speed data path
between the CPU and up to 10 peripherals (video, disk, network,
etc.). The PCI bus runs at 33MHz, supports 32-bit and 64-bit data
paths, and bus mastering.
PPPoE (Point-to-Point Protocol over Ethernet)
Point-to-Point Protocol is a method of secure data transmission
originally created for dial-up connections. PPPoE is for Ethernet
connections.
Roaming
A function that allows your to move through a particular domain
without losing network connectivity.
Static IP
If your Service Provider has assigned a fixed IP address; enter
the assigned IP address, subnet mask and the gateway address
provided by your service provider.
Subnet Mask
A subnet mask, which may be a part of the TCP/IP information
provided by your ISP, is a set of four numbers configured like
an IP address. It is used to create IP address numbers used
only within a particular network (as opposed to valid IP address
numbers recognized by the Internet.
TCP/IP (Transmission Control Protocol/Internet Protocol)
This is the standard protocol for data transmission over the
Internet.
TCP (Transmission Control Protocol)
TCP and UDP (User Datagram Protocol) are the two transport
protocols in TCP/IP. TCP ensures that a message is sent accurately
and in its entirety. However, for real-time voice and video, there
is really no time or reason to correct errors, and UDP is used
instead.
50
Page 48

Terminology
UDP (User Datagram Protocol)
A protocol within the TCP/IP protocol suite that is used in place
of TCP when a reliable delivery is not required. For example, UDP
is used for real-time audio and video traffic where lost packets
are simply ignored, because there is no time to retransmit. If UDP
is used and a reliable delivery is required, packet sequence
checking and error notification must be written into the applications.
51
Page 49

COMPLIANCES
EC Conformance Declaration
SMC contact for these products in Europe is:
SMC Networks Europe,
Edificio Conata II,
Calle Fructuós Gelabert 6-8, 2
08970 - Sant Joan Despí,
Barcelona, Spain.
This RF product complies with R&TTE Directive 99/5/EC. For the evaluation
of the compliance with this Directive, the following standards were applied:
• Electromagnetic compatibility and radio spectrum matters (ERM)
EN300 328-1 (2001-12)
EN300 328-2 (2001-12)
• Electromagnetic Compatibility (EMC) Standard for radio equipment
and services
EN301 489-1
EN301 489-17
• Safety Test
EN60950
o
, 4a,
Safety Compliance
Wichtige Sicherheitshinweise (Germany)
1.
2. Heben Sie diese Anleitung für den späteren Gebrauch auf.
3. Vor jedem Reinigen ist das Gerät vom Stromnetz zu trennen.
4. Die Netzanschlu ßsteckdose soll nahe dem Gerät angebracht und leicht
5. Das Gerät ist vor Feuchtigkeit zu schützen.
6. Bei der Aufstellung des Gerätes ist auf sicheren Stand zu achten.
Bitte lesen Sie diese Hinweise sorgfältig durch.
Verwenden Sie keine Flüssigoder Aerosolreiniger. Am besten
eignet sich ein angefeuchtetes Tuch zur Reinigung.
zugänglich sein.
Ein Kippen oder Fallen könnte Beschädigungen hervorrufen.
i
Page 50

Compliances
7. Die Belüftungsöffnungen dienen der Luftzirkulation, die das Gerät vor
Überhitzung schützt. Sorgen Sie dafür, daß diese Öffnungen nicht
abgedeckt werden.
8. Beachten Sie beim Anschluß an das Stromnetz die Anschlußwerte.
9. Verlegen Sie die Netzanschlußleitung so, daß niemand darüber fallen
kann. Es sollte auch nichts auf der Leitung abgestellt werden.
10. Alle Hinweise und Warnungen, die sich am Gerät befinden, sind zu
beachten.
11. Wird das Gerät über einen längeren Zeitraum nicht benutzt, sollten
es vom Stromnetz trennen. Somit wird im Falle einer Überspannung
Beschädigung vermieden.
12. Durch die Lüftungsöffnungen dürfen niemals Gegenstände
Flüssigkeiten in das Gerät gelangen. Dies könnte einen
elektrischen Schlag auslösen.
13.
Öffnen sie niemals das Gerät. Das Gerät darf aus Gründen der elektrischen
Sicherheit nur von authorisiertem Servicepersonal
geöffnet werden.
oder
Brand bzw.
Sie
eine
14. Wenn folgende Situationen auftreten ist das Gerät vom Stromnetz
zu trennen und von einer qualifizierten Servicestelle zu überprüfen:
a. Netzkabel oder Netzstecker sind beschädigt.
b. Flüssigkeit ist in das Gerät eingedrungen.
c. Das Gerät war Feuchtigkeit ausgesetzt.
d.
Wenn das Gerät nicht der Bedienungsanleitung entsprechend funktioniert
oder Sie mit Hilfe dieser
e. Das Gerät ist gefallen und/oder das Gehäuse ist beschädigt.
Wenn das Gerät deutliche Anzeichen eines Defektes
f.
Anleitung keine Verbesserung erzielen.
aufweist.
15. Stellen Sie sicher, daß die Stromversorgung dieses Gerätes nach der
EN 60950 geprüft ist. Ausgangswerte der Stromversorgung sollten die
Werte von AC 7,5-8V, 50-60Hz nicht über oder unterschreiten sowie den
minimalen Strom von 1A nicht unterschreiten. Der arbeitsplatzbezogene
Scha
lldruckpege
weniger.
l nach DIN 45 635 Teil 1000 beträgt
70dB(A)
oder
ii
Page 51

LEGAL INFORMATION
AND
SMC's Limited Warranty Statement
SMC Networks Europe ("SMC") warrants its products to be free from defects in
workmanship and materials, under normal use and service, for the applicable
warranty term. All SMC products carry a standard 2 year limited warranty from
the date of purchase from SMC or its Authorized Reseller. SMC may, at its own
discretion, repair or replace any product not operating as warranted with a similar
or functionally equivalent product, during the applicable warranty term. SMC will
endeavour to repair or replace any product returned under warranty within 30
days of receipt of the product. As new technologies emerge, older technologies
become obsolete and SMC will, at its discretion, replace an older product in its
product line with one that incorporates these newer technologies.
The standard limited warranty can be upgraded to a 5 year Limited Lifetime *
warranty by registering new products within 30 days of purchase from SMC or its
Authorized Reseller. Registration can be accomplished via the enclosed product
registration card or online via the SMC web site. Failure to register will not affect
the standard limited warranty. The Limited Lifetime warranty covers a product
during the Life of that Product, which is defined as a period of 5 years from the
date of purchase of the product from SMC or its authorized reseller.
CONTACTS
All products that are replaced become the property of SMC. Replacement
products may be either new or reconditioned. Any replaced or repaired product
carries, either a 30-day limited warranty or the remainder of the initial warranty,
whichever is longer. SMC is not responsible for any custom software or firmware,
configuration information, or memory data of Customer contained in, stored on, or
integrated with any products returned to SMC pursuant to any warranty. Products
returned to SMC should have any customer-installed accessory or add-on
components, such as expansion modules, removed prior to returning the product
for replacement. SMC is not responsible for these items if they are returned with
the product.
Customers must contact SMC for a Return Material Authorization number prior
to returning any product to SMC. Proof of purchase may be required. An y product
returned to SMC without a valid Return Material Authorization (RMA) number
clearly marked on the outside of the package will be returned to customer at
customer's expense. Customers are responsible for all shipping charges from
their facility to SMC. SMC is responsible for return shipping charges from SMC to
customer.
iii
Page 52

Legal Information and Contacts
WARRANTIES EXCLUSIVE: IF A SMC PRODUCT DOES NOT OPERATE AS
WARRANTED ABOVE, CUSTOMER'S SOLE REMEDY SHALL BE REPAIR OR
REPLACEMENT OF THE PRODUCT IN QUESTION, AT SMC'S OPTION. THE
FOREGOING WARRANTIES AND REMEDIES ARE EXCLUSIVE AND ARE IN LIEU
OF ALL OTHER WARRANTIES OR CONDITIONS, EXPRESSED OR IMPLIED,
EITHER IN FACT OR BY OPERATION OF LAW, STATUTORY OR OTHERWISE,
INCLUDING WARRANTIES OR CONDITIONS OF MERCHANTABILITY AND
FITNESS FOR A PARTICULAR PURPOSE. SMC NEITHER ASSUMES NOR
AUTHORIZES ANY OTHER PERSON TO ASSUME FOR IT ANY OTHER
LIABILITY IN CONNECTION WITH THE SALE, INSTALLATION, MAINTENANCE
OR USE OF ITS PRODUCTS. SMC SHALL NOT BE LIABLE UNDER THIS
WARRANTY IF ITS TESTING AND EXAMINATION DISCLOSE THE ALLEGED
DEFECT IN THE PRODUCT DOES NOT EXIST OR WAS CAUSED BY
CUSTOMER'S OR ANY THIRD PERSON'S MISUSE, NEGLECT, IMPROPER
INSTALLATION OR TESTING, UNAUTHORIZED ATTEMPTS TO REPAIR, OR
ANY OTHER CAUSE BEYOND THE RANGE OF THE INTENDED USE, OR BY
ACCIDENT, FIRE, LIGHTNING, OR OTHER HAZARD.
LIMITATION OF LIABILITY: IN NO EVENT, WHETHER BASED IN CONTRACT
OR TORT (INCLUDING NEGLIGENCE), SHALL SMC BE LIABLE FOR
INCIDENTAL, CONSEQUENTIAL, INDIRECT, SPECIAL, OR PUNITIVE
DAMA GES OF ANY KIND, OR FOR LOSS OF REVENUE, LOSS OF BUSINESS,
OR OTHER FINANCIAL LOSS ARISING OUT OF OR IN CONNECTION WITH
THE SALE, INSTALLATION, MAINTENANCE, USE, PERFORMANCE, FAILURE,
OR INTERRUPTION OF ITS PR ODUCTS , EVEN IF SMC OR ITS AUTHORIZED
RESELLER HAS BEEN ADVISED OF THE POSSIBILITY OF SUCH DAMAGES.
iv
SOME COUNTRIES DO NOT ALLOW THE EXCLUSION OF IMPLIED
WARRANTIES OR THE LIMITATION OF INCIDENTAL OR CONSEQUENTIAL
DAMA GES FOR CONSUMER PR ODUCTS , SO THE ABOVE LIMITA TIONS AND
EXCLUSIONS MAY NOT APPLY TO YOU. THIS WARRANTY GIVES YOU
SPECIFIC LEGAL RIGHTS, WHICH MAY VARY FROM COUNTRY TO
COUNTRY. NOTHING IN THIS WARRANTY SHALL BE TAKEN TO AFFECT
YOUR STATUTORY RIGHTS.
* Under the limited lifetime warranty, internal and external power supplies, fans,
and cables are covered by a standard one-year warranty from date of purchase.
Full Installation Manual
Full installation manuals are provided on the Installation CD-Rom. Manuals
in other languages than those included on the CD-Rom are provided on
www.smc-europe.com
(section support).
Page 53

Legal Information and Contacts
Firmware and Drivers
For latest driver, technical information and bug-fixes please visit
www.smc-europe.com
Contact SMC
Contact details for your relevant countries are available on www.smc-europe.com
and www.smc.com
Statement of Conditions
(section support).
.
In line with our continued efforts to improve internal design, operational function,
or reliability, SMC reserves the right to make changes to the product(s) described
in this document without notice. SMC does not assume any liability that may occur
due to the use or application of the product(s) described herein. In order to obtain
the most accurate knowledge of installation, bug-fixes and other product related
information we advise to visit the relevant product support page at
www.smc-europe.com
is subject to change without notice.
before you start installing the equipment. All information
and/
Limitation of Liability
In no event, whether based in contr act or tort (including negligence), shall SMC be
liable for incidental, consequential, indirect, special or punitive damages of any
kind, or for loss of revenue, loss of business or other financial loss arising out of
or in connection with the sale, installation, maintenance, use, perf ormance, f ailure
or interruption of its products, even if SMC or its authorized reseller has been
adviced of the possiblity of such damages.
Copyright
Information furnished by SMC Networks, Inc. (SMC) is believed to be accurate
and reliable. However, no responsibility is assumed by SMC for its use, nor for
any infringements of patents or other rights of third parties which may result from
its use. No license is granted by implication or otherwise under any patent or
patent rights of SMC. SMC reserves the right to change specifications at any
time without notice.
Trademarks
SMC is a registered trademark and EZ Connect is a trademark of SMC Networks,
Inc. Other product and company names are trademarks or registered trademarks
of their respective holders.
v
Page 54

 Loading...