

Page 1
EtherCard PLUS
Elitel6 Series
High performance 16-bit Ethernet local area network adapters
• EUtel6for all coaxial wiring
• Elitel6T for thick coaxial and unshielded twisted pair wiring
• EUtel6 Combo for all coaxial and unshielded twisted pair wiring
SMC
Page 2

Warninty and
Service Policy
If you experience difficulty with your SMC
Ethernet Network Systems Product and are
unable to diagnose or correct the problem,
you may return the product to your place of
purchase for repair Please be certain that
your product is properly packed before shipment. If possible, use the original packaging.
Note:
All SMC products are warranted only
when configured in accordance with the
specifications listed in the appropnate guides.
hi-Wurniiily Service
All SMC Ethernet Network Systems Products
are warranted by Standard Microsystems
Corporation against defects in workmanship
and materials for a period of five (5) years
from date of delivery to the end user. During
the warranty period. Standard Microsystems
Corporation will repair or, if necessary,
replace defective components at no charge.
Consult your Authori/!ed SMC Dealer or
Distributor for In-Warranty Service.
This warranty does not apply if the product
has been damaged by accident or misuse, or
as a result of repairs or modifications made
by unauihori7ed personnel.
No other warranty is expressed or implied.
Standard Microsystems Corporation is not
liable for consequential damages.
Oiit-of-Wnrraiily Service
Beyond the five
Standard Microsystems Corporation will
repair or replace defective components for a
reasonable fee. All service work is warranted
by Standard Microsystems Corporation for an
additional ninety (90) day period from date of
shipment of the repaired product. Consult
your Authorized SMC Dealer or Distributor
for service repairs.
I*(>lir\
All SMC Ethernet Network Systems Products
are sold on the basis of descriptive specifications in effect at the time of sale. Standard
Microsystems Corporation reserves the nght
(51
year warranty period,
on Changes
to make periodic changes or improvements to
any SMC product, but has no obligation to
modify or update products once
sold.
Tech Support llolline
For technical support, please contact your
place of purchase. Then, if further assistance
is required, call our Tech Support Department, toll-free, between 8:30 AM and 6:00
PM,
E.S.T.,
Monday through Friday:
800-992-4762 (USA)
800-443-5345 (Canada)
Or, you may prefer to contact us through our
CompuServe bulletin board. If you are a
CompuServe subscnber, just type "GO SMC"
at the CompuServe prompt (!) and follow the
instructions to become an SMC Forum member. If not, you can obtain an access number
and personal password by contacting our
Tech Support Department and requesting an
SMC Forum Kit.
Page 3
Table of Contents
FCC
3
7
7
8
14
18
18
19
19
22
22
23
28
28
29
30
Notice
Introduction
Ethernet Adapter Features
Ethernet Adapter Overview
LED Indicators
Quick Installation
Adapter Installation
Configuration and Installation
Steps For Installing/Configuring the Adapter
Avoiding Configuration Conflicts
Input/Output (I/O) Base Address
RAM Base Address
Memory Management Utility Conflicts
IRQ Level
Configuring the Adapter
Software Configuration Using Setup
Introduction
Configuring the Adapter Using the Setup Program
Software Configuration Procedure
Interactive Method
30 Conrimand Line Method
Diagnostics
34 Before Installing the Program
34 Screen Prompts
34 Starting Diagnostics
34 Diagnostic Oven/iew
37 Main Menu Options:
37 Set Configuration Menu
37 Set Configuration
37 Main Menu
39 Basic Adapter Test
40 Initiate/Respond to Test Messages
42 Exit to Operating System
LAN Software Installation
44 Driver Installation
45 To Generate a Network Server for NetWare 286 V2.2
45 Loading NetWare 286 V2.2
49 To Generate a Workstation for NetWare 286 V2,2
51 Loading
52 Using NETCFG
53 To Generate a Sen/er for NetWare 386 V3.11
DOS ODI
Workstation
Page 4
53 Loading NetWare 386 V3.11
54 To Generate a Workstation Shell for NetWare 386 V3.11
55 To Install the LAN Manager
55 Loading LAN Manager V.2.0
Installing a Boot ROM
58 Inserting the ROM
58 Installing a Boot ROM
59 ROM Window Size
Network Interconnections
62 Connecting to
62 Thin Ethernet
63 Thin Ethernet Segment
64 Interconnecting Thin and Thick Ethemet
66 Connecting to Thick Ethemet Cable
66 Thick Ethemet
67 Thick Ethemet Network
69 10BaseT Twisted-Pair Interconnection
69 Link Status
69 Unshielded Twisted Pair
71 Interface Cable Wiring
72 Concentrators
and
Thin
Ethernet Cable
Base Address
72 Using StarLAN 10 Concentrators
Troubleshooting
76 DIAGNOSE: Basic Adapter Test
76 DIAGNOSE: Set Configuration
76 Using DIAGNOSE for Troubleshooting
77 DIAGNOSE: Initiate/Respond to Messages
78 Network Operating Software Problems
79 Technical Assistance
'ices
82 Appendix
86 Appendix
89 Appendix
Index
91 Index
A:
Network Components and Setup
B:
Specifications
C:
System Configuration Chart
Page 5
FCC
Notice
This equipment has been tested and
found to comply with the limits for a
Class B digital device, pursuant to
part 15 of the mies. Operation is sub-
ject to the following two conditions:
(1) this device may not cause hannful
interference, and (2) this device must
accept any interference received, including interference that may cause
undesired operation.
This equipment generates, uses and
can radiate radio frequency energy,
and,
if not installed and used in accordance with the instructions, may
cause hannful interference to radio
communications. However, there is
no guarantee that interference will
not occur in a particular installation.
If interference problems do occur
please consult the system equipment
owner's manual for suggestions.
Some of these suggestions include
relocation of the computer system
away from the television or radio or
placing the computer AC power
nection on a different circuit or outlet.
Changes or modifications to this
product without the express approval
of Standard Microsystems Corporation could result in non FCC compliance,
and void the users authority
to operate this equipment
This product was tested and certified
with a shielded interconnecting cable;
therefore, a shielded cable is required
to be used with this product.
If necessary, the user should consult the
dealer or an experiaiced radioAelevision technician for additional suggestions.
con-
SMC (Standard Microsystems Corp.]
80 Arkay Drive
Hauppauge, New York 11788
For Technical Support:
800-992-4762 (USA)
800-833-8334SMC (Canada)
For Literature:
800-SMC-4YOU (USA)
800-833-4SMC (Canada)
Page 6

St
•I
I
Page 7
Ethemet Adapter Overview
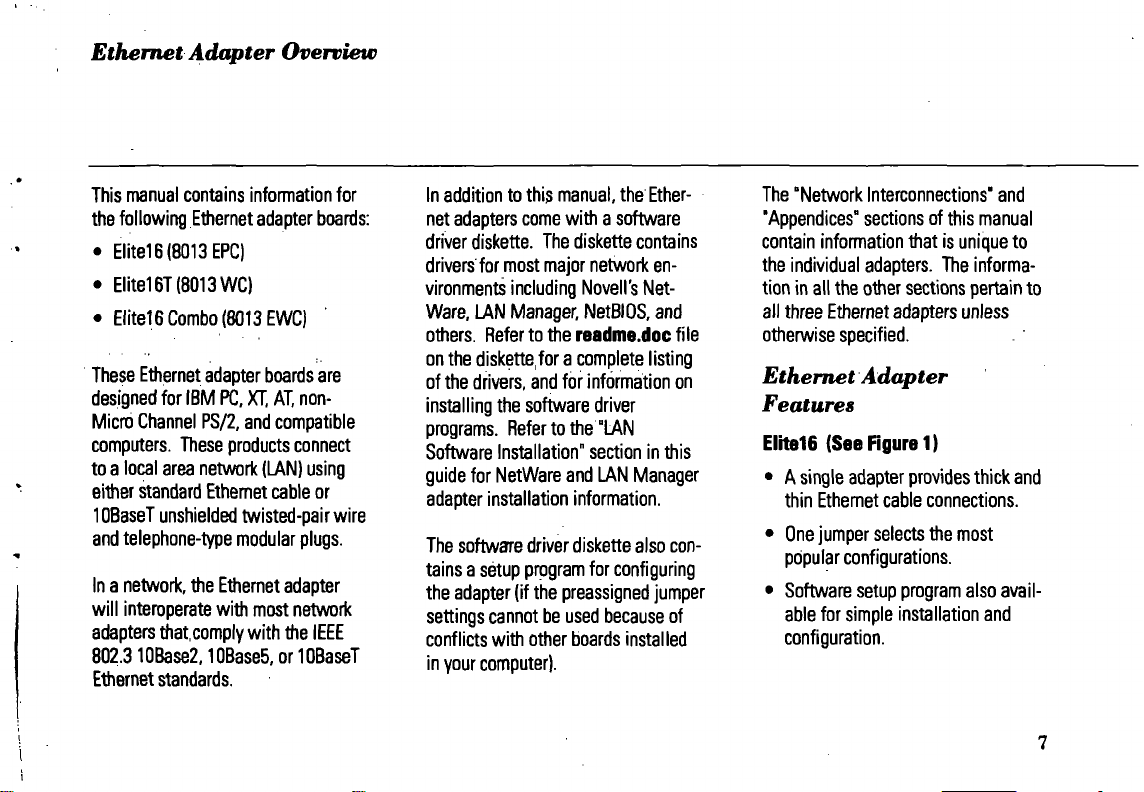
This manual contains infonnation for
the following Ethernet adapter boards:
• Elite16(8013EPC)
• Elite16T(8013WC)
• Eliteie Combo (8013 EWC)
These Ethernet adapter boards are
designed for IBM
Micro Channel PS/2, and compatible
computers. These products connect
to a local area network (LAN) using
either standard Ethemet cable or
lOBaseT unshielded twisted-pair wire
and telephone-type modular plugs.
In a network, the Ethemet adapter
will intemperate with most network
adapters that,comply with the IEEE
802.310Base2,10Base5, or lOBaseT
Ethernet standards.
PC,
XT, AT,
non-
In addition to this
net adapters come with a software
driver
diskette.
drivers for most major network environments including Novell's NetWare,
LAN Manager, NetBIOS, and
others. Refer to the readme.doc file
on
the diskette,for a complete listing
of the drivers, and for information on
installing the software driver
programs. Refer to the-LAN
Software Installation" section in this
guide for NetWare and LAN Manager
adapter installation information.
The software driver diskette also
tains a setup program for configuring
the adapter (if the preassigned jumper
settings cannot be used because of
conflicts with other boards installed
in your computer).
manual,
The diskette contains
the
Ether-
con-
The "Network Interconnections" and
"Appendices" sections of this manual
contain information that is unique to
the individual adapters. The information in all the other sections pertain to
all three Ethernet adapters unless
otherwise specified.
Ethemet Adapter
Features
Elite16 (See Figure 1)
• A single adapter provides thick and
thin Ethemet cable connections.
•
One
jumper selects the most
popular configurations.
• Software setup program also available for simple installation and
configuration.
Page 8
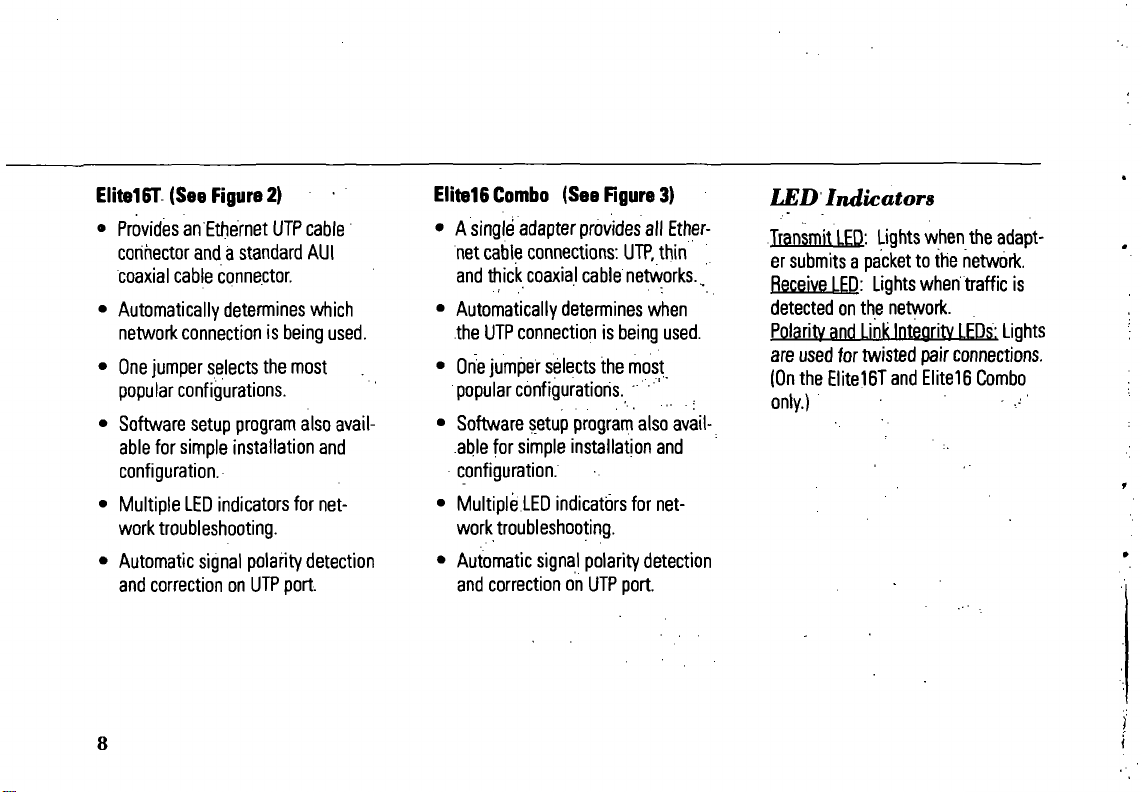
ElitelGT (SeeFigui'e2)
• Provides an Ethernet
conhector and a standard AUI
coaxial cable connector.
• Automatically detennines which
network connection is being used.
•
One
jumper selects the most
popular configurations.
• Software setup program also avail-
able for simple installation and
configuration.
• Multiple
work troubleshooting.
• Automatic signal polarity detection
and correction on
LED
UTP
cable
indicators for net-
UTP
port.
ElitelG Combo (See Figure 3)
• A single adapter provides all
net cable connections:
and thick coaxial cable networks.,
• Automatically detennines when
the
UTP
connection is being used.
•
One
jumper selects the most
popular configurations. '
• Software setup program also available for simple installation and
configuration.
• Multiple
work troubleshooting.
• Automatic signal polarity detection
and correction on
LED
indicators for net-
UTP
UTP,
port.
Ether-
thin
LED Indicators
Transmit
er submits a packet to the network.
Receive
detected on the network.
Polarity
are used for twisted pair connections.
(On
only.)
LED:
Lights when the adapt-
LED:
Lights when traffic is
and
Link Integrity
the Elite!6T
LEDs:
and
Elite16 Combo
Lights
Page 9
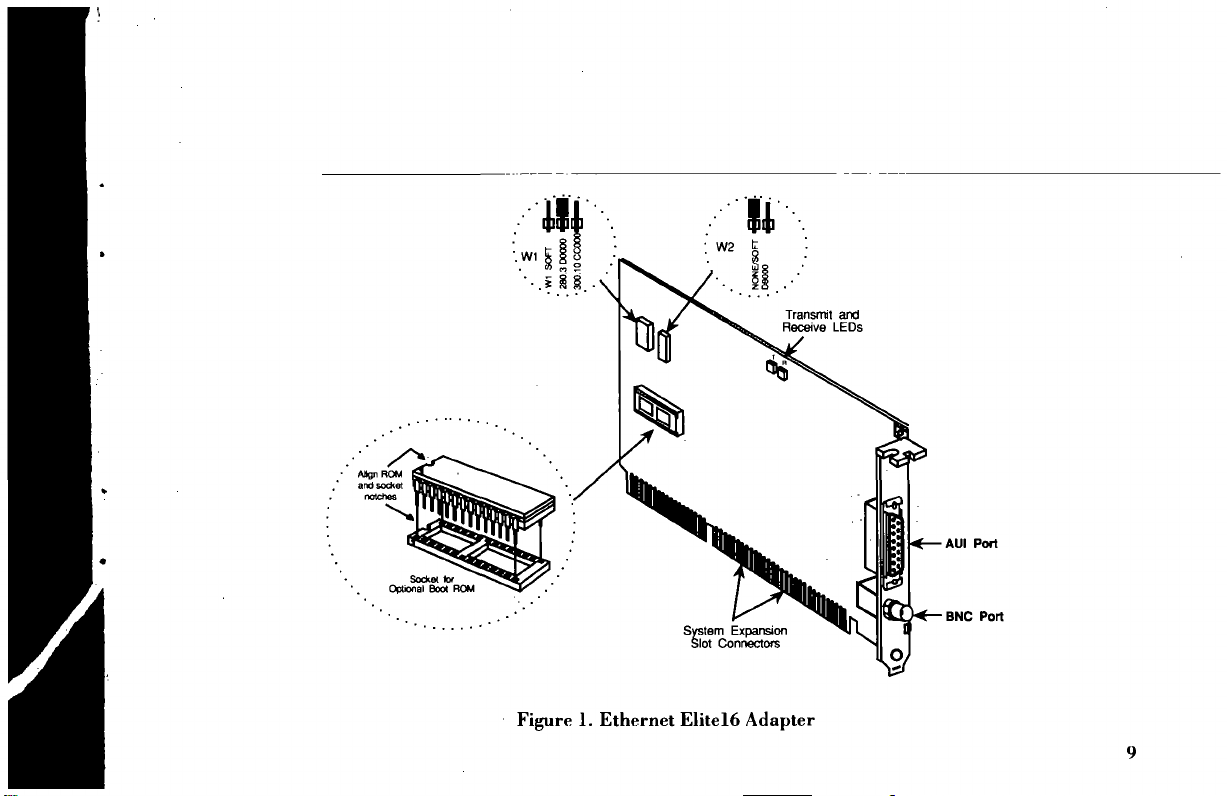
Socket
Optional Boot
ky
ROM
System Expansion
Slot Connectors
Figure 1. Ethernet Elitel6 Adapter
AUI Port
BNC Port
Page 10
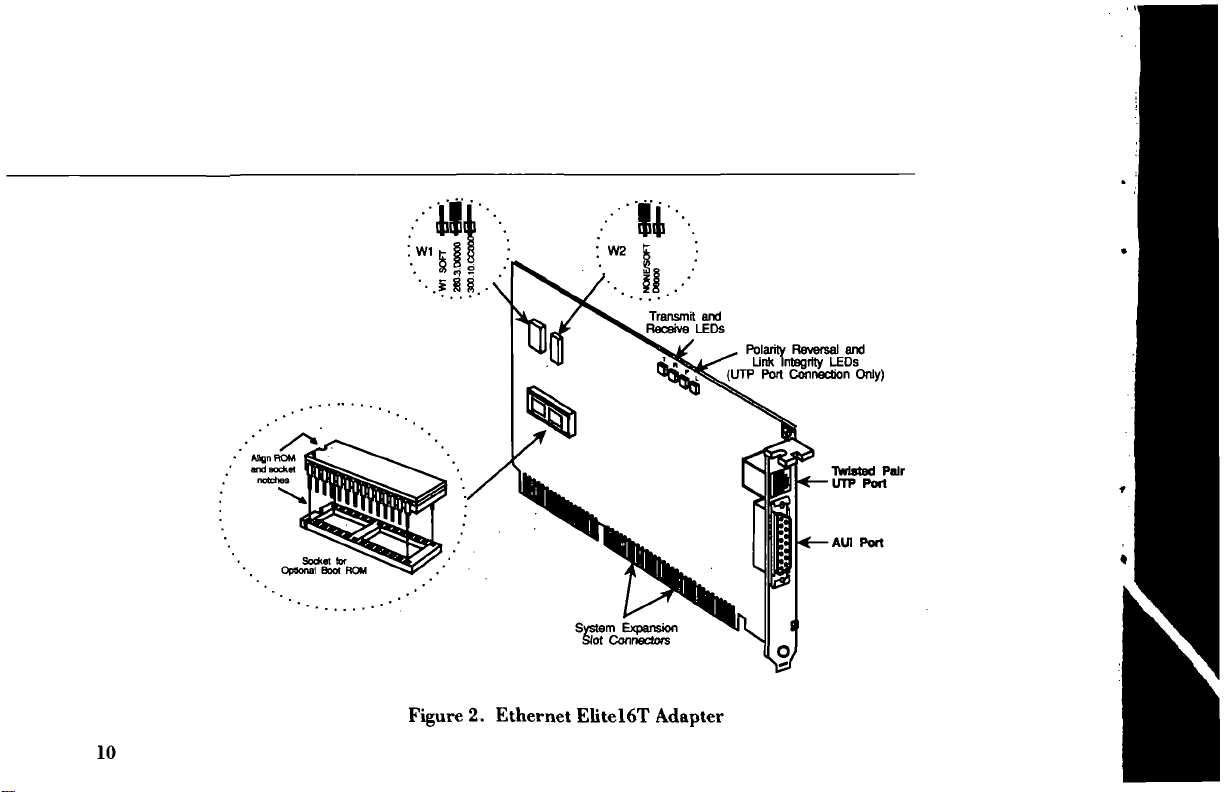
Polarity Reversal and
Unk Integrity LEDs
(UTP Port Connection Only)
IVrtsted Pair
•UTP Port
10
Sotitet tor
Optional Boot ROM
System Expansion
Slot Connectors
Figure 2. Ethernet Elitel6T Adapter
-AUI Port
Page 11
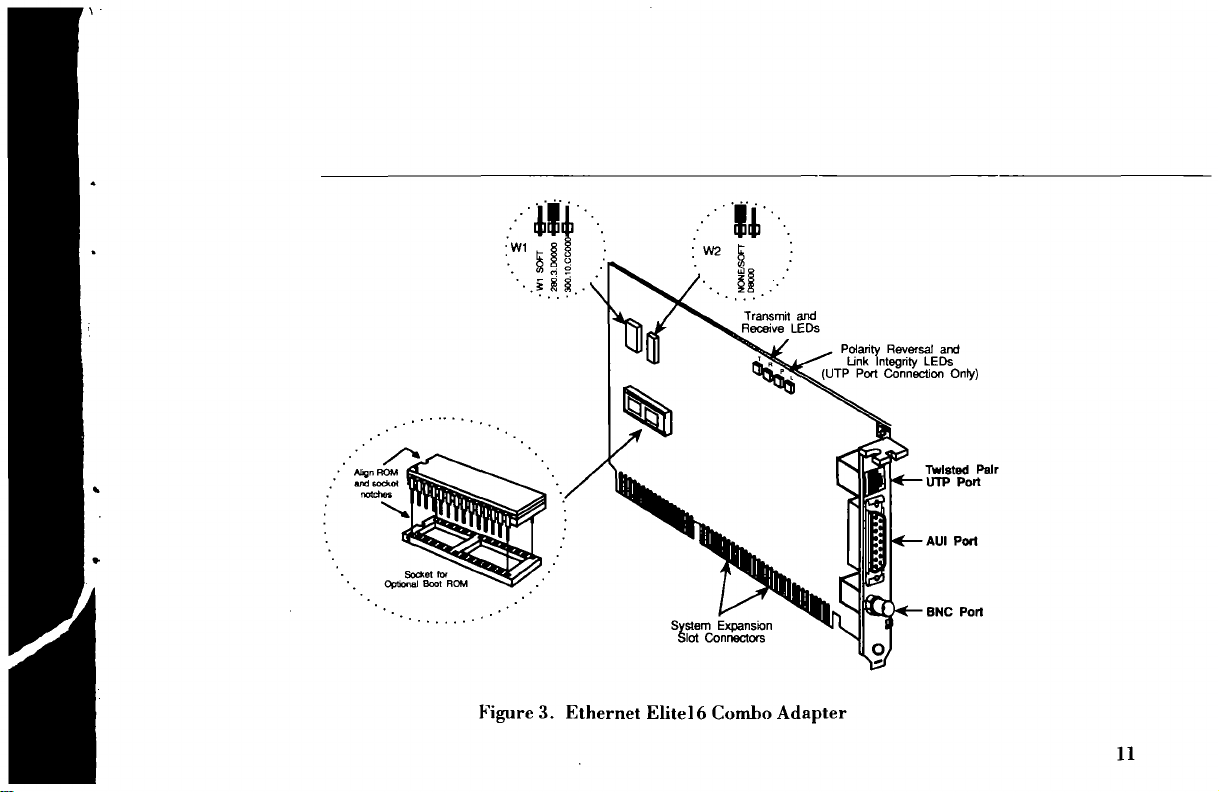
Figure 3. Ethernet Elite 16 Combo Adapter
Polarity Reversal and
Link Integrity LEDs
• Port Connection Only)
Twisted Pair
UTP Port
11
Page 12

Quick Installation
13
Page 13
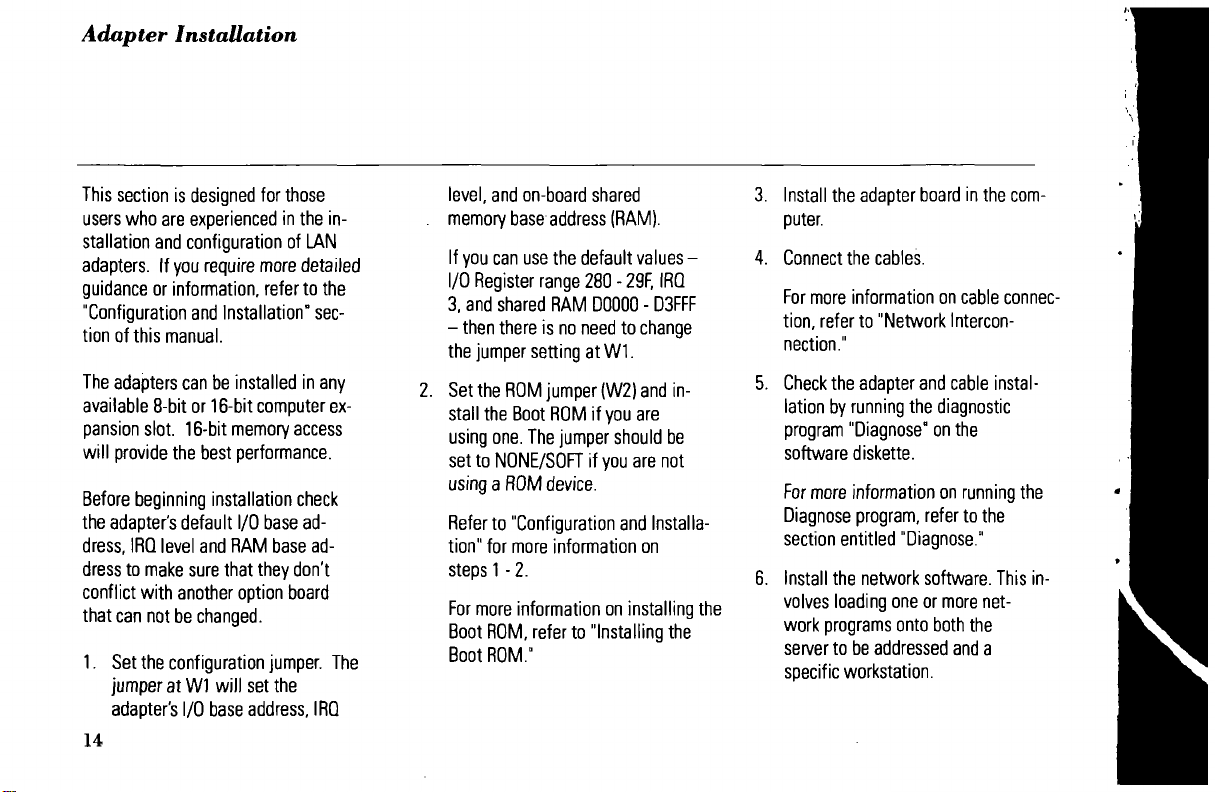
Adapter Installation
This section
users who are experienced
stallation and configuration
adapters.
guidance
"Configuration and Installation" section
The adapters can
available
pansion slot. 16-bit memory access
will provide
Before beginning installation check
the adapter's default
dress,
dress
conflict with another option board
that can
1.
Set the configuration jumper.
is
designed
If
you require more detailed
or
infonnation, refer to
of
this manual.
8-bit
or
the
IRQ level and RAM base ad-
to
make sure that they don't
not
be changed.
jumper
at Wl
adapter's
I/O
for
those
in the in-
of LAN
be
installed
16-bit computer ex-
best perfomiance.
1/0
base ad-
will
set the
base address,
the
in any
The
IRQ
14
level,
and on-board shared
.
memory base address (RAM).
If you can use
I/O
Register range 280 - 29F,
3, and shared RAM
-
then there
the jumper setting
2.
Set the ROM jumper (W2) and
stall
the
using one. The jumper should
set
to
using a ROM device.
Refer to "Configuration and Installa-
tion"
for
steps 1 - 2.
For more information
Boot ROM, refer
Boot ROM."
the
default values
is no
need
at
Boot ROM
NONE/SOFT
more infonnation
if
to
DOOOO - D3FFF
to
Wl.
if
you
are
you
are not
on
installing
"Installing
IRQ
change
in-
be
on
the
-
the
3. Install
4.
5. Check the adapter and cable instal-
6. Install
the
adapter board
puter.
Connect the cables.
For more information on cable connection,
refer
to
"Network Intercon-
nection."
lation
by
running
program "Diagnose" on
software diskette.
For more information on running
Diagnose program, refer
section entitled "Diagnose."
the
network software. This
volves loading one
work programs onto both
server
to
be addressed and
specific workstation.
the
diagnostic
or
more net-
in the
the
to the
the
a
com-
the
in-
Page 14
Several network programs are discussed in the chapter entitled
"LAN Software Installation": NetWare 286 v2.2 and later, NetWare
386v3.11 and later, and LAN
Manager V2.0.
If
an
optional
the adapter, you may need to
prepare the network software for
ROM
Once
these steps are completed, you
can reboot your computer
the network through your Elite
ROM
operation.
was installed on
and
access
16
card.
15
Page 15
Configuration
Installation
and
17
Page 16
Steps For InstaUingI
Configuring the Adapter
Avoiding Configuration
Conflicts
This section lists the steps for install-
ing and configuring your adapter, and
tells where to find specific information.
It is important that
the steps in the order indicated.
1.
Read the section, "Avoiding
figuration Conflicts." Although, for
most installations, the default factory settings for the Ethemet adapter will not create configuration
conflicts, it is important that you
be avyare of the settings commonly
used by other devices and computer functions.
2.
Configure the adapter. Refer to
the section, "Configuring the
Adapter."
3. If you want to install an optional
ROM device (to connect a diskless
PC
to a network, for example),
you
perfonn
IB
Con-
refer to the section "Installing a
Boot
ROM."
•
4.
Install the adapter
puter.
Refer to the section, "Adapt-
er Installation."
5. Connect the adapter to thin
net, standard (thick) Ethernet or unshielded twisted pair
to the
section,
nection."
6. Configure the software
Refer to the
stallation."
7.
Load
the network software pack-
age.
Refer to the section, "Loading
the Networi( Software."
in
your
com-
cable.
"Network Intercon-
driver.
section,
"Software In-
.
Ether-
Refer
In most cases the adapter's preconfigured jumper settings for I/O base
address, RAM base address, and IRQ
level will not conflict with other
devices or functions in your computer
To
verify that the preconfigured
jumper settings are satisfactory for
your installation, it is important that
you be acquainted with the configuration settings typically used by other
devices and computer functions. This
will also enable
tings if they are not satisfactory for
your installation.
This section provides information on
configurations used by other devices
and computer functions.
formation,
figuration Chart in Appendix C to
record the configurations of devices
and computer functions in your computer.
Refer to this chart when select-
you
to change the set-
Read
then use the System
the in-
Con-
Page 17

ing configuration options for the Ethernet adapter (The first row lists the
Ethernet adapter's preconfigured settings.)
280), select an
than 280. Make sure that the address
you select
device.
1/0
base address other
is
not used by some other
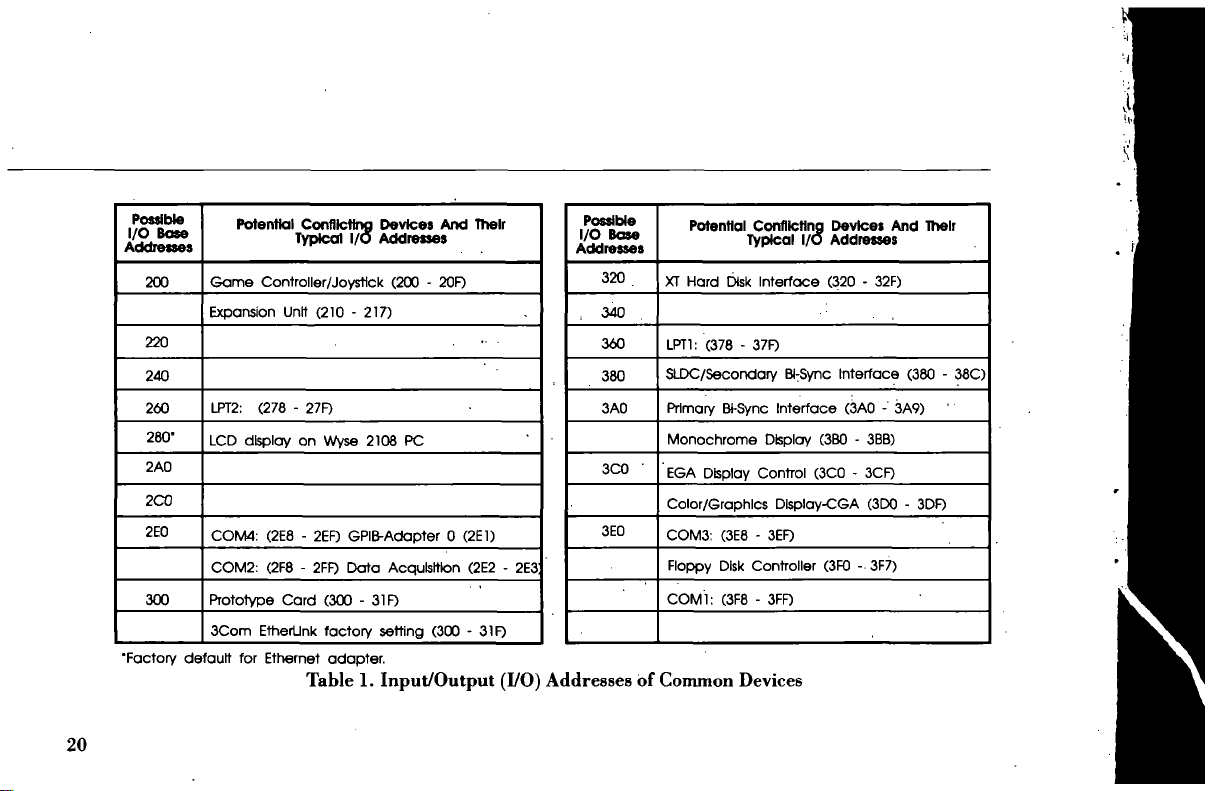
Input/Output (I/O) Base
Address
The Ethemet adapter requires 32
tiguous I/O addresses (20 hex).
I/O base address is used
location
of
this address space.
Table 1 lists all possible
dresses for your Ethemet adapter
column 1. rjotice that the range
200 - 3E0 (hex). Column 2 lists potential conflicting devices and their
cal I/O addresses. Use this table as
guide when selecting an
dress for your adapter If,
ample, you have a Wyse 2108 PC
(which typically uses
to
I/O
I/O
I/O
con-
The
assign the
base ad-
in
is
typi-
base ad-
for ex-
base address
a
All addresses without a description
Column 2 are generally available for
use.
Be aware, though, that
puters with small built-in LED
displays (to shpw disk cylinder data
clock speed) may also use these address spaces.
com-
or
LCD
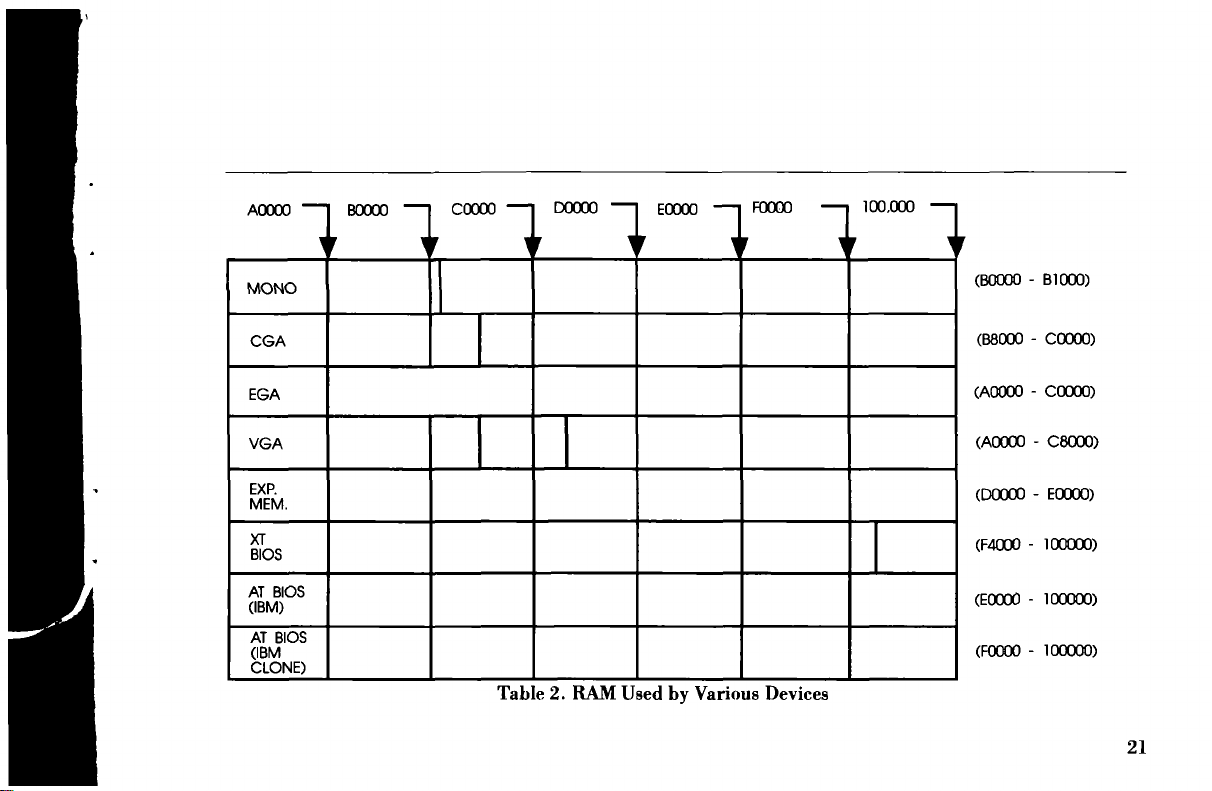
RAM Base Address
Refer to Table.2 when selectirig
RAM base address. Table 2 shows
the RAM address spaces generally
used by other devices and computer
functions (shaded area).
tant that you select a RAM base ad-
dress that
is
not being
used.
It is
a
impor-
in
or
19
Page 18
Possible
I/O Base
Addresses
200
220
240
260
280'
2A0
2C0
2E0
300
Potential Confllcttna Devices And Their
Game Controller/Joystick (200 - 20F)
Expansion Unit (210 - 217)
LPT2:
(278 - 27F)
LCD display on Wyse 2108 PC
COM4:
(2E8 - 2EF) GPIB-Adapter 0 (2E1)
COM2:
(2F8 - 2FF) Data Acqulsmon (2E2 - 2E3:
Prototype Card (300 - 31F)
3Com EthertJnk factory setting (300 - 31F)
•Factory default for Ethernet adapter.
20
Typical I/O Addresses
Possitile
I/O Base
Addresses
320
.. 340
360
380
3A0
3C0 •
3E0
Potential Conflicting Devices And Their
Typical I/O Addresses
XT Hard [jlsk Interfoce (320 - 32F)
LPTl:
(378 - 37F)
SLDC/Secondary BI:Sync Interface (380 - 38C)
Primary Bt-Sync Interface (3A0 - 3A9)
Monochrome Display (3B0 - 3BB)
EGA Display Control (3C0 - 3CF)
Color/Graphics DIsplay-CGA (3D0 - 3DF)
COM3;
(3E8 - 3EF)
Floppy Disk Controller (3F0 - 3F7)
COMl:
(3F8 - 3FF)
Table 1. Input/Output (I/O) Addresses bf Common Devices
Page 19
AOOOO 1 BOOOO COOOO DOCOO EOOOO FOOGO
M }f M ir V i
MONO
100,000 —
(BOOOO - BIOOO)
CGA
EGA
VGA
EXP.
MEM.
XT
BIOS
AT BIOS
(IBM)
AT BIOS
(IBM
CLONE)
(B8000 - COOOO)
(AOOOO - COOOO)
(AOOOO - C8000)
(DOOCO - EOOOO)
(F4000 - 100000)
(EOOOO - 100000)
(FOCXX) - 100000)
Table 2. RAM Used by Various Devices
21
Page 20
Memory Management
Utility Conflicts
If you are using memory management
utilities (for example, QEMM or 386Max).
it is
important that you know
how to exclude the Ethemet adapter's
RAM address space from your
memory management driver This
necessary because many memory
utilities use the area
mally used by the Ethernet adapter
The task
of
excluding the Ethernet
adapter's RAM base address space
from your memory management driver
is usually accomplished by a
mand line option in the CONFIG.SYS
file.
A similar situation exists with
programs such as Windows in 386
mode, which maps memory between
640 Kbytes and 1 Mbyte. Again, the
22
in
memory nor-
com-
is
best solution is
to
exclude the Ether-
net adapter's RAM address space
from the memory rnanagernent driver
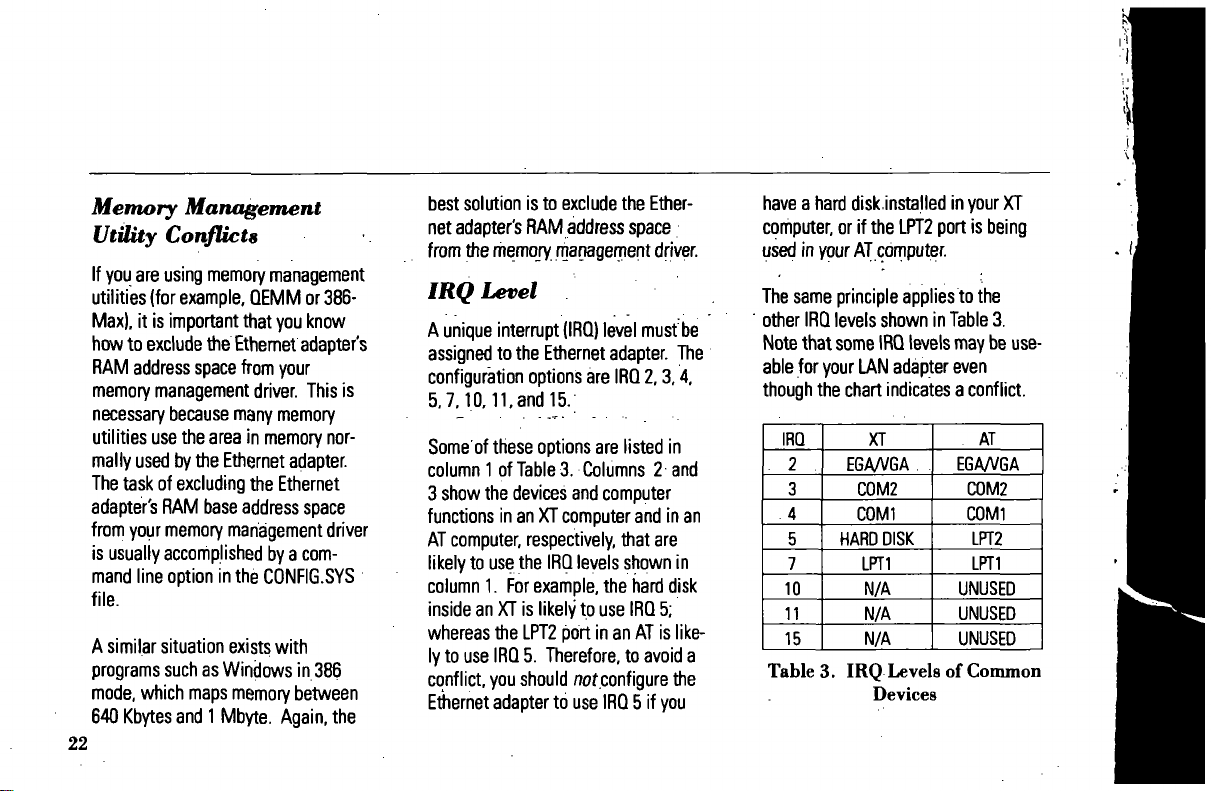
IRQ Level
A unique intermpt (IRQ) level must be
assigned to the Ethernet adapter.
configuration options are IRQ 2,3,4,
5,7,10,11,
Some
column 1 of
and 15.;
of
these options are listed
Table 3. Columns
3 show the devices and computer
functions in an XT computer and in an
AT computer, respectively, that are
likely to use the IRQ levels shown
column 1. For example, the hard disk
inside an XT
is
likely to use IRQ
whereas the LPT2 port in an AT
ly
to
use IRQ 5. Therefore,
conflict, you should nofconfigure the
Etfiernet adapter to use IRQ
to
5 if
The
in
2 and
in
5;
is
like-
avoid
a
you
have a hard disk.installed in your XT
computer,
or if
the LPT2 port
is
being
used in your AT computer
The same principle applies to the
other IRQ levels shown in Table
3.
Note that some IRQ levels may be useable for your LAN adapter even
though the chart indicates a conflict.
IRQ
. 2
3
.4
5
7
10
11
15
XT
EGAA/GA
COM2
COMl
HARD DISK
LFT1
N/A
N/A
N/A
. .
AT
EGA/VGA
COM2
COMl
LPT2
LPTl
UNUSED
UNUSED
UNUSED
Table 3. IRQ Levels of Common
Devices
Page 21
For
example,
VGA video adapters are installedand
potentially can use
plications do not; hence,
available for use with the Ethernet
adapter Likewise, even though you
have a printer installed at
IRQ 7
is because most applications do not
use LPTl with intermpts.
even though EGA and
IRQ
2,
most ap-
IRQ
2 may be
LPTl,
using
may not create a problem. This
The Ethernet adapter has been
designed for maximum configuration
flexibility using a minimum number of
jumpers. This is achieved primarily
through the use of the Wl jumper
block.
Wl jumper block allows you to
choose among three options: two
preassigned hardware configuration
settings and one setting which .
enables you to select any valid
figuration via the software setup program that comes with the adapter
The setup program provides a variety
of additional configuration settings
from which to choose.
Note:
The factory-configured I/O
base address associated with the soft
jumper setting is
RAM base address and the
tings are disabled to avoid conflicts.
240,
and both the
IRQ
con-
set-
In addition to jumper block Wl, there
is a W2 jumper block. W2 enables
you to select memory space for
tional ROM device. See Figures 1,2,
and3 inthe Introduction. •
an
op-
Wl:
The
W1
jumper block sets the .
adapter's I/O base address, IRQ level,
and on-board shared memory base address
(RAM).
Table 4 shows the settings associated with the three
possible jumper configurations.
If the factory default setting (I/O base
address
280,
IRQ
3,
RAM base ad-
dress D0000-D3FFF) conflicts with
the configuration of another board or
computer
jumper setting (1/0 base address 30031F,
CCOOO). Most configuration conflicts
function,
IRQ
10,
RAM base address .
use the other
23
Page 22
can be avoided using one of these
two choices.
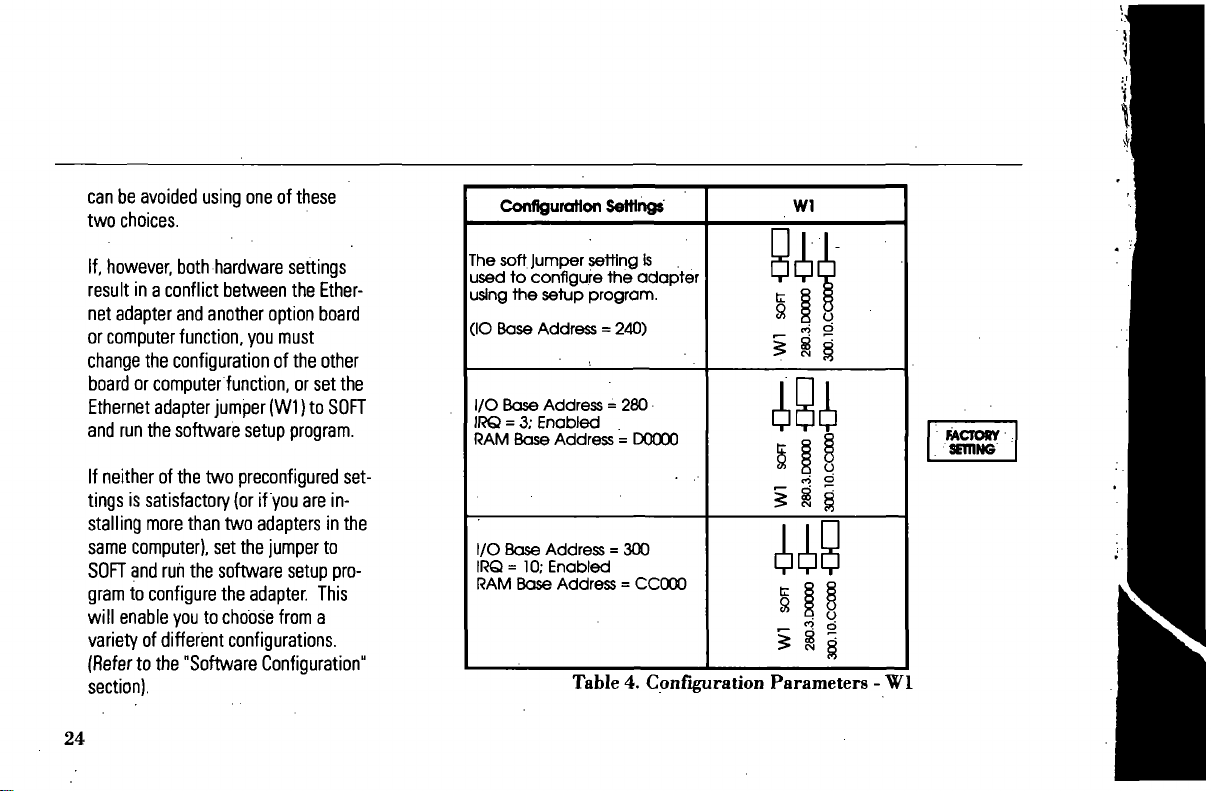
Configuration Settings
Wl
If, however, both hardware settings
result in a conflict between the Ethernet adapter and another option board
or computer
change the configuration of the other
board or computer
Ethernet adapter jumper (Wl) to SOFT
and run the software setup program.
If neither of the two preconfigured settings is satisfactory (or if you are installing more than two adapters in the
same computer), set the jumper to
SOFT
gram to configure the adapter This
will enable you to choose from a
variety of differisnt configurations.
(Refer to the "Software Configuration"
section).
24
function,
and run the software setup pro-
you must
function,
or set the
Tfie soft Jumfser setting Is
used to configure ttie adapter
using ttie setup program.
(IC Base Address = 240)
I/O Base Address = 280
IRQ = 3; Enabled
R/Mvl
Base Address = DOOOO
I/O Base Address = 300
IRQ = 10; Enabled
RAM Base Address = CCOOO
Table 4. Configuration Parameters - Wl
m
m o
wy
Mciooy
SETTING
Page 23

W2:
The Wl jumper block (refer to Table 5
in the "Installing a Boot
tion) is used with an optional boot
ROM
device. The jumper should be
set to NONE/SOF if you are not
using a
ROM
device. Ttie "Installing a
Boot ROM' section provides detailed
instructions on inserting and configuring an optional boot ROM.
Selection between coaxial and
twisted pair network interface is automatic. When connected to a valid
twisted pair link, the adapter will
switch into twisted pair interface
mode (indicated by "link" LED on).
When no valid twisted pair link is
found (indicated by "link"
adapter will switch into coaxial mode.
ROM"
LED
sec-
off) the
After
you
have configured the adapter
and (if desired) installed an optional
boot
ROM
device, you are ready to in-
stall the adapter in your computer
25
Page 24
Vt
Software Configuration
Using Setup
27
Page 25
Configuring the Adapter
Using the Setup Program
Introduction
The adapter comes configured from
the factory to use I/O registers in the
range 280-29F
shared RAM at
If the factory default configuration
conflicts with the configuration of
another board or computer function,
consider changing the jumper at Wl.
Refer to Table 4.
If the values associated with the
other preassigned jumper setting also
conflict, set the jumper at Wl to SOFT
and run the software setup program
to select a configuration.
This section explains how to use the
software setup
to the settings associated with SOFT
at Wl, the setup program can be used
to change the ROM base address
28
(hex),
IRQ
3,
DOOOO - D3FFF
program.
In addition
and
(hex).
(that is, the setting associated with
SOFT
at
W2),
and other configuration
parameters. See Table 6.
Before ainning the software setup program,
make sure that-
• You have installed the adapter in
your computer Refer to the section in your computer's user
documentation that describes how
to install option boards.
Note:
Always handle the adapter
by its edges.
• Network software is not running
on the computer. If networi<
software is running on the computer,
remove the networic
software from your CONFIG.SYS or
AUTOEXEC.
Then,
otherwise unload the network
BAT
files, if necessary.
reboot the computer (or
software) to ensure proper
functioning of the configuration
software.
• If more than one LAN adapter is to
be installed, make sure you know
the identification of the adapter
you want to configure. If a single
adapter is to be installed, the
setup program will automatically
find it. If there is more than one
adapter, you must tell the setup
program which adapter to
figure.
Each Ethernet adapter can
be identified by its 12-character
node address (located on the NET-
WORK
ADDRESS
the adapter), or by its I/O base ad-
dress.
con-
label attached to
Page 26

Software Configuration
Procedure
Software changes can be made
without the
configured for
you entered using the setup program
(I/O base address, IRQ, and RAM base
address) will not take affect until you
set W1
the ROM base address to be
figured with the value you
W2 jumper block must be set to
NONE/SOFT after the changes have
been made.
If necessary, you can use the
figuration software in one computer
to configure an adapter that will be in-
stalled jn a second computer, such as
a "diskless" workstation. If
this,
base address does not conflict with
VV1
jumper block being
SOFT.
However, values
to
SOFT.
Similariy, in order for
con-
enter,
the
con-
you
do
make sure that the adapter's 1/0
any other option board installed in the
computer used for configuration.
Once you have installed the Ethemet
adapter in your computer, and you are
sure that network software is not
ning on the computer, you are ready
to configure theadapter using the
setup program. Use either the interactive method to configure the adapter
(where the program prompts
use a command line.
After installing the Ethernet adapter,
use the software setup program to
configure the adapter only if:
• Neither of the two preconfigured
Wl jumper settings is suitable because of conflicts with other
devices.
-OR-
you),
run-
or
• You are installing.more than two .
adapters in the same computer,
thus requiring more than two
configurations.
-OR-
•
You
wish to configure tvvisted pair
to disable link integrity
29
Page 27
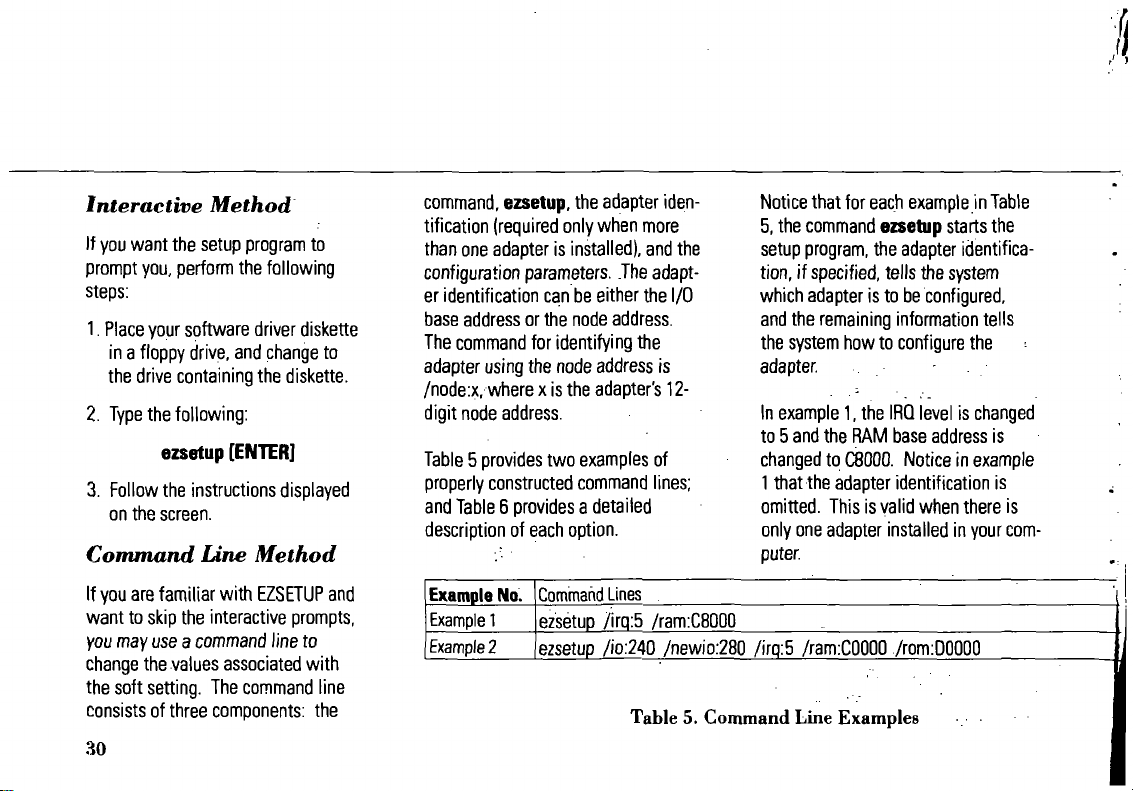
Interactive Method
If you want the setup program to
prompt
you,
perfonn the following
steps:
1.
Place your software driver diskette
in a floppy drive, and change to
the drive containing the diskette.
2.
Type the following:
ezsetup [ENTER]
3. Follow the instructions displayed
on the screen.
Command line Method
command,
tification (required only when more
than one adapter is installed), and the
configuration parameters. The adapter identification can be either the I/O
base address or the node address.
The command for identifying the
adapter using the node address is
/node:x,where x is the adapter's 12digit node address.
Table 5 provides two examples of
properiy constructed command lines;
and Table 6 provides a detailed
description of each option.
ezsetup, the adapter
iden-
Notice that for
5, the command ezsetup starts the
setup program, the adapter identification,
if
which adapter is to be configured,
and the remaining infonnation tells
the system how to configure the
adapter.
In example
to 5 and the RAM base address is
changed to
1 that the adapter identification is
omitted.
only one adapter installed in your com-
puter
each
example
specified,
tells the system
1,
the IRQ level is changed
C8000.
Notice in example
This is valid when there is
in
Table
If
you
are familiar with EZSETUP and
want to skip the interactive prompts,
you may
change the values associated with
the soft setting. The command line
consists of three components: the
30
use
a command line to
Example No.
Example 1
Example 2
Command
ezsetup /irq:5 /ram:C8000
ezsetup /io:240 /newio:280 /irq:5 /ram:COOOO /rom:D0000
Lines
Table 5. Command Line Examples
Page 28

In example 2, the I/O base address is
changed to 280, the IRQ level is
changed to 5, the RAM base address
is changed to
. base address is changed to
you omit a configuration parameter
from the command line, the program
uses the default (refer to Table 6). To
obtain a^list of alj the commands you
can use, type: /?..
/Vote;
lower case letters is
COOOO,
and the ROM
DOOOO.
Any combination of upper and
valid.
If
31
Page 29

Command
/?
/default
/factory
f\o.x
/irq:x
/linkJnV.x
/netconn:/
/newio:x
/node:x
/ram:x
/rom:x
/romsi2e.x
32
Description
Displays all setup program commands.
Forces the adapter to the follow/ing settings when the jumper is set to SOR: I/O address
CCOOO. This command produces the same result as /factory, except that
Forces the adapter to the default, factory-set values for the
address CCOOO).
Identifies the cun-ent I/O base address of the adapter you want to configure. The factory setting for the 1/0 base address at the
SOF jumper location is 240.
Specifies the interrupt level (IRQ). Possible values for x
Specifies whether link integrity is enabled or disabled where x is either e (enabled) or d (disabled). This command is avail-
able for EW and W adapter models only. For the
Specifies which kind of network connection you want. Possible values for x are: 1 =
(no link integrity). UsethiscommandwiththeEPC,WC, and EWC series cards.
Specifies a new I/O base
3A0,3C0,and3E0(hex).
Identifies the node address of the adapter you want to configure, x
ADDRESS label attached to the adapter. This command is an altemative to using the fio command to identify the adapter.
Specifies the RAM base address. The parameter x
AOOOO. For RAM base address above 1 MByte, 6 digits (choices) have to be specified. Example: BCOOOO.
Specifies the base address of the boot
dress must be on a boundary of the ROM size.
Specifies the size of the
address.
Acceptable values for xare 200,220,240,260,280,2A0,2C0,2E0,300,320,340,360.380,
ROM.
ROM
window in Kbytes. Possible values for x
EPC,
Possible values for xare any address between 80000 and
SOFT
are
2,3,4,5,7,10,11, or
WC,
and EWC cards, use the /netconn command instead.
can
be any 16-Kbyte boundary between 80000 and
IRQ
is enabled.
jumper position (I/O address 240,
is
the 12-digit node address printed on the NETWORK
are 0 (ROM
240,
IRQ
2,
RAM base address
IRQ 2
15.
This command enables the
BNC/1
OBaseT; 2 = AUI/1 OBaseT
FFCOOO.
FCOOO.
disabled), 16,32, and 64.
(disabled), RAM base
IRQ
specified.
or
3 = TP
Example:
Note: The ad-
Table 6. ConHguratiGn Options
Page 30

'/.
Diagnostics
33
Page 31

Diagnostic Overview
The diagnostic program provided
the software diskette
the correct configuration and operation
of a LAN adapter board before install-
ing the network software.
is
used
to
on
verify
Before Installing the Progrtun
1.
Ethernet boards must be on a proper-
ly temiinated cable. Use a BNC "T"
connector with
minators, an AUI loopback connec-
tor,
or
connect to a properly
functioning lOBaseT concentrator.
2.
Boot the
Networic memory resident (TSR)
programs and device drivers should
be loaded while the diagnostic program
is
active, so you may need
porarily rename your CONFIG.SYS
two 50
PC
to
a DOS prompt.
Ohm ter-
to
and
not
tem-
34
AUTOEXEC.BAT files. Network
software must
ning
the
not
be loaded when
diagnostic program.
run-
Screen Prompts
The following screen options are used
throughout the entire diagnostic program menu system.
Enter=Select: Press [Enter]
the highlighted option.
ESC=Cancel: Press [ESC]
to the previous screen.
Menu,
press [ESC]
diagnostic program.
F1=Help: Displays additional informa-
tion about any item on
To return
[ESC].
to the
to
select
to
back
up
At
the Main
to
exit
the
the
menu.
menu options press
Arrow Keys: Use
move the cursor to the desired location.
In addition, several other function keys
are used with specific menus. These
keys are described later in this section.
t, i,
->, and«-
to
Starting Diagnostics
1.
To mn the diagnostic program,
change
to
the directory with
diagnostic program - \DIAGNOSE
on the software diskette.
2.
Type: DIAGNOSE
then press [Enter]
The Introduction Screen appears.
3. Press [Enter] to access the Entry
Menu.
4.
Press [Enter] again.
the
Page 32

LftN Adapter DlaHnostlo Uer. 3.B1 Thursdaw ftuqust B. 1991 IB'26 aw
BOARD SELECTION MENU
Use t or i to select a board to be diagnosed.
Then press Enter.
The "Choose a Board
to
Diagnose" op-
tion will be highlighted.
5. Press [Enter] to select this option.
The Board Selection Menu appears
shown
in
Figure 4. A list
able adapters
is
displayed for your
of
avail-
selection.
as
Enter=SelBct ESC=Cancel Fl=Help
Figure 4. Board Selection Menu
If an error message appears, this
cates that either an adapter board
is not present in the PC
responding properly
or is not
If
two adapter boards are installed in the same
machine,
.
listed in the Board Selection menu
each board should
be
and must have a unique interrupt
and
1/0
address assigned
If only one board
is
you're certain there
to it.
displayed, and
is
more than
35
indi-
Page 33

LAN Adapter Diagnostic Uer. 3.B1 Thursday August B. 1991 lBi4a an
MAIN MENU
Use t or.I to select one of the rollouing.
Then press Enter.
Then press Enter
Set Configuration
Basic Adapter Test
Initiate Test Messages
Respond to Test Messages
Exit to Operating SysteM
Enter=Select ESC^Cancel Fl=Help
Figure 5. Main Menu
36
one adapter board in the
PC,
then
the same 1/0 address may have
been assigned to both boards; To
fix
this,
tum off the
PC
and check
the 1/0 address on all boards.
Change the 1/0 addresses so that
each board has a unique value.
Restart the
PC
and ream the
diag-
nostic program.
6. Use the arrow keys to highlight the
board you want to diagnose and
press [Enter], or simply type the list
number to the left of the board (for
instance,
1)
to select that board.
The current board parameters appear
These items will be described
later.
Press [Enter] to access the Main Menu
(Figure
5).
If your adapter is configured
with different parameters, the option
Page 34

Main Menu
Set Coi^Tguration
to coaect these parameters
cessed from this menu.
can
be ac-
Main Menu Options:
Several options appear in the Main
Menu.
Each is described briefly below.
Choose a Board
Select this option to choose a new
adapter to be
section described how this is done.
Set Cnnfigiiratinn:
Select this option to display the
figuration infonnation read from the
board and perform temporary
figuration changes. The pemnanent
adapter settings are not
page 37 for details.
Basic Adapter Test:
Select this option
to
Diagnose:
diagnosed.
to
run a diagnostic
The previous
con-
con-
affected.
See
test on the selected adapter See page
39
for details.
Initiate Test Messages:
Select this option to send messages
another node running DIAGNOSE
Responder
details.
Respond to Test Messages:
Upon selecting this option, the pro-
gram waits for a Test Message
received from another node on
same networic using DIAGNOSE and
running "Initiate Test Messages."
received Test Messages are echoed
back to the Initiator. See page 40
details.
Exit to Operating System:
Select this option to exit the diagnostic
program and retum
mode.
See page 40
to
DOS.
in
for
to
the
All
to
be
for
Set Configuration Menu:
When you select the "Set Configuration"
option, a screen like Figure 6 ap-
pears.
The node address for the
selected adapter appears at the top
along with its adapter type as
mined by the
pears a list
current
change any
-Base
-IRQ Inten-upt
-RAM Size
-RAM Base Address
-ROM Size
-ROM Base Address
-Network Connection
To
change one
parameters, use the an^ow keys to
program.
of
parameters
values.
Use this option
of
these parameters:
I/O
Address
of
the displayed
deter-
Below this ap-
and
their
to
high-
37
Page 35

LAN Adapter Diagnostic Uer. 3.B1
SET CONFIGURATION MENU 1
Board Type' 8813EUC
Netuork Address: B8
Use t or 1 to select one of the folloulng.
Press Enter, and select the ualue for that paraneter.
Base I/O Address
IRQ Interrupt
RAM Size
RAM Base Address
ROM Size
ROM Base Address
Netuork Connection
Thursday August B. 1331 1B<1B aM
BB CB AS Cl ZB
LAN Type' TP Ethernet
IBK
D4aBB
Disabled
CBBBB
IBBaseT or AUI
light that parameter
and
press [Enter].
A list of optional settings appears.
Use
the arrow keys to highlight the set-
ting you require and press
[Enter].
new setting is now displayed.
Notes:
1.
The
RAM
Address you select here is
only for the purpose of this program and has no effect
on
any
other network software used
ward.
The
after-
EntBr=Options ESC^^Cancel
Figure 6. Set Configuration Menu
38
Fl=Help FlB=Conflgurotlon
Conplete
2.
The program will not stop a user
from making an invalid selection.
Some of the choices presented may
conflict with other installed devices.
Please refer to the "Configuration
flicts"
section to make sure that the
Con-
Page 36

Basic Adapter Test
choices you select do not cause a
flict. If there is a conflict, cycle
When you're
save the changes you've made, or
press [ESC] to exit without change.
finished,
press
power.
[Fl 0]
con-
to
The Basic Adapter Test is used to
verify that the major functions of the
adapter operate properly
If any of the tests
notifies you of the error
actions to take to solve the problem.
Tests are performed on the following:
-I/O Port Accessibility
-LAN Address ROM
-On-board RAM
-Network Controller Registers
-On-Board
-Intemal Loopback
-Interrupt Generation
The test has failed if:
1.
An en-or message displays at
tom of the screen in a red box.
ROM
fail,
the program
and
(if installed)
suggests
the
bot-
2.
The test hangs up at a certain blink-
ing line and never
blinking line is the test that failed.
If either of these two conditions
Read the eaor message or blinking line
and write it
the error message or blinking line to
find the problem. Common problems in-
clude:
• Not temiinating an Ethernet net-
• Hardware or software conflicts
If the board fails, recheck the board settings,
and temninator, or remove other boards
from the
down.
work
with IRQ, Base 1/0, or
dress.
try a different BNC "T" connector
PC.
completes.
Cycle power Use
RAM
The
occur:
Ad-
39
Page 37

InitiatelRespond
Messages
to
Test
The "Initiate Test Messages" and
"Respond
are used to verify that the network cabling
receive information.
The Responder echoes the messages
back and the Initiator makes sure
receives the same messages
mitted.
another node on the same network
must be using DIAGNOSE and have
"Respond To Test Messages" mnning.
The best test environment is two PC's
directly cabled, but this test can be run
with any PC using an SMC Ethemet
card on the networt<.
To run the initiate/respond test, follow
this procedure:
to
Test Messages" options
is
properly set up
In order to mn this test,
to
transmit and
it
it
trans-
40
1.
At
the chosen PC on the network,
select the "Respond
sages' option from the Main
Menu.
Press [Enter]. A prompt appears on the screen: "Waiting
Respond
any key to stop."
This PC
messages and is called the
Responder
2.
At a
Messages" from the Main Menu.
Press [F2] and all active Responders
are displayed with their network
addresses. Select the Responder
you want to test by using the
an-ow keys.
3. Press [Enter] to begin the test.
to
Test Messages. Priess
is
now ready to respond
different
to
Test Mes-
PC,
select "Initiate Test
to
to
test
The test will perform 1000 iterations
after finding the first available
Responder
been previously selected.
If the error message "No Responder
Found"
puters cannot communicate across the
network. A common reason for this
failure is faulty cabling, "T" connectors,
or terminators that are bad. Seethe
"Troubleshooting" section in this
manual for other suggestions.
When the test is complete, press [F4]
at either computer to see the test
results as shown
screen provides you with statistics
both the Initiator and Responder terminals. You can tell whether the In-
if
a Responder has not
displays, then the two
in
Figure 7. This
com-
on
Page 38

itiator and Responder passed by refer-
ring to this screen.
The Show Statistics screen also
provides a number of function key
operations:
•
To update data without clearing
the counter setting, press [F4].
This automatically updates data
as
the test continues. To clear these
statistics, press [F6].
•
To exit this test and retum to the
Respond menu, press [Esc].
•
To change the test parameters,
such as number
of
iterations or the
test pattern, press [F6] at either the
Initiate
or
Respond menu.
screen with a list
of
parameters appears. For most
A
all test
of
these parameters, use youranrow
Uer.
1 TRANSMIT STATISTICS
1 Franes Sent
Broadcast Sent
Multicast Sent
Collisions
Tx Aborts
Lost CHS
Tx Underruns
No CD Heartbeat
OUC - Collisions
Tx Overlapped
Xnt Retries
Link
Link
ESC=Cancel Fl=Help
i
Figure 7. Show Statistics Screen
3.B1 Thursday August B, 1991 IB
RECEIVE STATISTICS
e
Fra«es Received
Broadcast Received
B
Multicast Received
B
CRC Errors
B
Allgntent Errors
B
Rx Overruns
B
Missed Franes
B
Rcvr Disabled
B
Deferring
B
Runt Packets
B
Bad Next Packet Ptr
B
M1 scoMpare/Checksuti
Integ
rlty s
polar
F4=Update
Stats
Lgnal present
Ity correct
Fb=ClBar
Stats
Z4
an r
B
B
B
B
B
B
B
B
a
a
a
B
41
Page 39

Exit to Operating System
keys to highlight the parameter you
want to change, then use the
[Spacebar] to change the setting.
Each time you depress the
[Spacebar], the value will change.
To
change either the test pattern
and destination address
in the value you require. When
you're finished, press [Esc] to
retum to the Respond Menu.
For a definition of each parameter
used during this procedure, press
[Fl ]
at the appropriate screen and
a list of relevant definitions appear.
42
field,
type
Select the Exit option when all diagnostic procedures have been completed
and you want to return to DOS.
For more information on how to
operate the diagnostic program, refer
to the user.doc file located on the
software diskette.
Page 40

LAN Software Installation
43
Page 41

Driver Installation
The software diskette that comes with
the adapter contains drivers for most
major networic environments, including
Novell's NetWare, Microsoft's LAN
Manager, IBM's LAN Server, and
others. Many of the drivers, including
NetWare and LAN Manager, simplify
the installation process by automatically finding the Ethemet adapter. To
install NetWare 286
all you need to do is create an
and copy it and the NET3, NET4, or
NET5
files onto your system..
For other drivers, you may need to
modify the I/O base address, IRQ level,
and RAM base address, so that the settings of the driver match the settings
of your adapter. Refer to the
install.doc file contained in the
driver's directory for detailed instructions.
V2.1,
for example,
IPX
file
44
To load network operating system
software other
Manager onto the computer, refer to
the instructions provided with your network software package. If
ROM
was installed on the adapter, you
may need to prepare the network .
software for
the instructions provided with the ROM
device and your network software.
This section provides instructions for
loading the following network operating system software:
• NetWare 286 V2.2
• NetWare 386 V3.11
• LAN Manager V2.0
If
you
are using other types of drivers,
please refer to the install.doc file and
relevant driver manuals.
than
NetWare and LAN
ROM
operation. Refer to
an
optional
The following sections describe the
steps required to load and configure
the NetVVare shells for both NetWare
286 and NetWare 386 versions.
in all cases, there are two basic opera-
tions
you
must complete in order to in-
stall the NetWare shell.
1.
Load the NetWare program on your
workstation.
2.
Load the NetWare program
server
In addition, if
you must load the NetWare program
onto the relevant
NetWare 286 and 386 treat this instal-
lation the same way A brief explanation of how to load and configure LAN
Manager 2.0 concludes this chapter
you
are using DOS ODI,
workstation.
on
Both
your
Page 42

Loading NetWare 286 V2.2
Note:
These instructions are
tended
to
be comprehensive
figurations, but will work
majority
of
the cases.
not
for
in the
all
in-
con-
<ESC> = Cancel
Help
<Alt><riB> = Quit
The procedures
in
this section are
for
NetWare 286 V2.2 and later. This version
of
NetWare 286
easier to load and configure than
is
considerably
v2.1.
To Generate a Network Server
for NetWare 286 V2.2:
1.
Make backup copies
of
the NetWare
SYSTEM -1 and SMC SuperDisk
diskettes and store
2.
Insert the copy
floppy into the sen/er's drive
3. Access drive
4.
Type: INSTALL and press [Enter]
of
the SYSTEM
A:.
the
originals.
-1
A;.
A screen like Figure 8 appears.
Advanced Installation
Maintain existing systen
Upgrade froM NetUare vZ.x
Figure 8. Workstation Options Menu
45
Page 43

5. Select the "Advanced Installation" option.
<ESC> = Cancel <Fl > = Help <Alt><F10> = Quit
A message screen appears.
6. Press [Enter].
A screen like Figure 9 appears.
7. Select either the "Dedicated" or "Non-
dedicated"
If
you
option.
have designated this server for
exclusive NetWare use, then
specify "Dedicated". All hard disk
partitions in the server are assigned to NetWare use.
If
you
have partitioned this server's
hard disk for use with more than
one platfomn, specify "Non-dedicated".
You are prompted to designate which hard disk partitions will
be used by the NetWare program.
46
Operating Systen Generation
Operating systen node' JQ^^^Q^^
Nondedlcated netuork address'
Nunber of connunication buffers: ISB
Uill this i«chinB be the ssrver? No
Include core printing services? VBS
Netuork board A
DriVBr:
(PrBss <EntBr> to see list)
Configuration Option:
Netuork address'
Netuork board B
To scroll the screen, use the arrou
highlighted field uith <Enter> or <Delete>. Uhen all the
infornation is correct, save and continue uith <F1B>.
keys.
Modify
Figure 9. Workstation System Configuration
1
Page 44

8. Highlight the "Network Board
tion and press [Enter].
A list
of all
available network boards
appears.
9. Press [Insert].
10.
Insert the SuperDisk diskette into
drive A: and press [Enter],
The appropriate LAN drivers are in-
stalled and
appears highlighted
shown
A list
appears like
the new
in
Figure
of
acceptable adapter settings
the
SMC option
in the
10.
one
in
list
Figure 11.
A" op-
as
<ESC> = Cancel <F1> = Help <Alt><F18> = Quit
Operating Systen Generation
Nunber of corviunication buffers' 15B
Uill this Machine be the server? No
Include core printing services? Ves
Mndiosv kelidsl othdlkdis keis u/AT 1 v.X.XXEC (XXXXXX)
Mndiosv kelidsl othdldlsd keis u/AT Z v.X.XXEC (XXXXXX)
Odestsn Nodkela ajoekslkdlskls xodle u/AT 1 v.X.XXX (XXXXX)
Rsdidsu disleig Isidlsckd lueuadjcna u/AT Z v.X.XXXX (XXXXX)
Driver:
CPress <Enter> to see list)
Highlight your choice: then press <EntBr>.
Figure 10. Workstation System Configuration 2
47
Page 45

<ESC> = cancel <F1> = Help <Alt><Fia>
Operating Systen Generation
Nondedlcated netuork address:
Nunber of connunication buffers: 15B
Uill this Machine be the server? No
Second Softuare Configured Adapter
Third Softuare Configured Adapter
Fourth Softuare Configured Adapter
IRQ=3.
I/O Base^ZSBh, RAM at DBBB:B for IBk
IRQ=5.
I/O BasB=3BBh. RAM at CABB'B for 8k
IRQ=1B.
I/O Base=ZABh, RAM at CCBB'B for IBk
IRO=Z,
I/O Base=Z4Bh. RAM at DBBB'B for 3Zk
First Micro Channel Adapter
Second Micro Channel Adapter
IB'
Third Micro Channel Adapter
11:
Fourth Micro Channel Adapter
IZ:
Driver Configurable by Junpers Utility
Figure 11. Adapter Settings Options
48
12.
Select the option corresponding to
the settings of the network adapter
board.
Option 0, first software configured
adapter, is recommended.
You are prompted to provide a network
address for the selected board.
13.
Type in a unique networic address.
For more infonnation on installing this
networic
address,
refer to "Networic
Address" in the Novell Concepts
manual.
14.
If
you
have another adapter board
installed in the server, continue to
the "Network Board B' option and
repeat steps 9 through 13 to define
settings and driver specifications.
I;
Page 46

Continue to define each network board
in your
server,
until all boards are
defined.
15.
When you're
16.
Cursor
temn Generation" screen until you
get to the channel option selections.
A list of channel options appears
immediately below the Network
Board selections.
17.
Assign hard disk space for each
channel designated.
Follow all prompts and refer to the
Novell User's Manual for instructions on defining channels.
finished,
down
the "Operating Sys-
press [FIO].
To Generate a Workstation for
NetWare 286 V2.2:
1.
Make backup copies of the NetWare
LAN_DRV_200 and SMC
Disk diskettes and store the
originals.
2.
Insert the copy of the
into drive A:.
3. Access drive A:.
4.
Type: WSGEN
and press [Enter] twice.
A list of available adapter boards ap-
pears on the screen.
5. Press [Insert].
6. Insert the SuperDisk diskette into
drive A: and press [Enter].
Super-
WSGEN
floppy
If the file was read successfully, a message appears like this:
DRIVER FILE FOR SMC
ETHERCARD PLUS VXXX
READ SUCCESSFULLY.
where xxx is the version number
7. Press [Enter].
The SMC EtherCard PLUS board is now
installed and highlighted as shown
in Figure 12.
8. Press [Enter] to select this board.
A configuration screen like Figure 13 is
displayed.
9. Select the configuration setting that
matches the setting on your board
and press [Enter] to confimri your
choice.
Option 0, First Software Configured
Adapter, is recommended.
49
Page 47

<
Escape> Cancel <F1> = Help <Alt><Fia> = Exit
Select the driver that Matches the netuork board in your uorkstation.
The program displays a screen indicat-
'
ing the choice you've just made
and prompts you
to
reconfirm this
choice.
50
AMdJ aJieullsMuosklskcMBi v.XX.XX (XXXXX)
BMdk uinhgslceeodkskncd vX.XXXX (XXXXXX)
Gijnospirun esxxl call inebberte vZ.&B (XXXXXX)
HLL spcirn BicleMandd vl.15 (XXXXXX)
lUE thsliginge vZ.&B (XXXXXX)
Jeurdde MN67 vZ.BZEC (XXXXXX)
Neurdle liMliM V3.BZEC (XXXXXX)
Psodks keisghdks lieldlsl Idis V.3.53XX (XXXXXX)
Rsidls disldkoskd isldisldislcl v.7.XXX (XXXXXX)
Highlight the correct driver: then press <EntBr>.
If the driver you uant is not listed, press <Insert>
Figure 12. Updated Configuration List
10.
Select
YES,
GENERATE.
11.
Insert the WSGEN diskette again
when prompted and press [Enter].
The program creates a NetWare shell
for your DOS workstation.
12.
When prompted, insert
the
LAN_DRV_200 diskette again
strike any key
If successful, a message appears stating that the installation
plete. You
are
returned
is
com-
to
the DOS
prompt.
Continue the installation
NetWare 286 V2.2 on
connected
to
this network.
by
loading
all
workstations
and
Page 48

Loading DOS ODI
Workstation
<Escope> = Cancel < Fl > = Help <fllt><F10> = Exit
Select the configuration option that notches the setting on your netuork
board.
Netuork Board Driver:
SMC EtherCard PLUS v.X.XXEC (XXXXXX)
Second Softuare Configured Adapter
Third Softuare Configured Adapter
Fourth Softuare Configured Adapter
IRg=3.
I/O Base=ZBeh. RAM at J>0Ba:0 for l&k
Highlight the configuration you uant. then press <Enter>
Figure 13. Available Adapter Options Menu
This section tells you how
to set up
and install a workstation that uses
DOS ODI. The procedure
this type
of
workstation
for
is the
installing
same
whether you are loading NetWare
or 386.
To install DOS ODI workstations,
do
the following:
1.
Refer
to
Novell DOS ODI installation
menu.
2.
Copy the NEICFG file
tory where
Note:
NEICFG file
adapter
figured
Base
the
There
is no
if the
is
an AT adapter
for
the default settings;
I/O
Address = 280
Interrupt IRQ =
to the
direc-
ODI driver resides.
need
to
use
SMC PLUS
con-
3
RAM Base Address = DOOO.
286
the
51
Page 49

If a NEICFG file already exists on the
directory, follow these steps to update that file.
Append the new NEICFG file to the
old one using the
DOS COPY
com-
mand as follows:
copy c:\adi\net.cfg+a:net.cfg
c:\od
i/net.cfg
This file is used to configure the entire
system,
not just the driver
Using
NET.
CFG
To use and edit the NEICFG file, you
must do the following:
1.
There is no need to use or edit the
NEICFG file if the SMC PLUS
adapter is an AI adapter
configured with the following default
settings:
52
Base I/O Address: 280
Interrupt IRQ: 3
RAM Base Address: DOOO.
2.
If the adapter being used is software-
configurable, then only the Base
1/0 Address must be specified.
3. To change the base 1//0 address, use
the line in
Port#l 280 20
NET.CFG
which reads
and change 280 to the appropriate
Base I/O Address.
4.
To
change the IRQ, use the line in
NEICFG which reads:
Iiit#l 3
and change 3 to the appropriate IRQ.
5.
To
change the RAM Base Address,
use the line in NEICFG which
reads
Mem #1 OOODOOOO 2000/10
and change
RAM Base
Mem #1 000C8000 2000/10
DOOOO
Address.
to the appropriate
For example:
will cause the driver to use C8000 as
the RAM Base Address.
When using
NET.CFG
with Micro
Channel machines, use the PS/2
Slot
entry.
Find the line which
reads:
PS/2 Slot ?
and change the ? to the desired slot
number
Note:
Ihe '#' in the first
column
of the
NEICFG file denotes an ignored
line.
Remove this symbol from all
used lines and insert them into all
unused lines, or delete unused
lines altogether
Page 50

Loading NetWare 386
V3.ll
7,
To
change the protocol name, use the
line in NEICFG which reads:
Protocol name ID
name type
where name is the protocol name, ID'\s
the protocol ID number, and
name type is the frame type being
used for the protocol.
For example.
Protocol IPX 8137 EthemetJI
indicates that the protocol name is
being changed to IPX - designated
protocol ID 8137 - within the
net
11
frame type,
8, To reassign the link-level frame type,
use the line in NEICFG which
reads
either:
Frame name
or
Envelope Type name
Ether-
For example, if you type this line.
Frame E'niERNET_802.2
The frame type is reassigned as
net
802,2,
The default frame type
is ETHERNET_802,3,
For additional instructions, refer to the
NetWare
and the sections entitled "Install ODI
workstations" and "Customize ODI
workstation configurations with
NEICFG"
Manual.
ODI Shell
in the NetWare Users
for
DOS
Ether-
manual
To Generate a Server for
NetWare 386 V3.ll:
The procedures in this section are for
NetWare 386
configuration for this version of NetWare on the server is much
volving a series of easy-to-use prompts
which apply for both woricstation and
sen/er installations.
If
you
from diskette, follow these instructions.
1,
Make backup copies of both the
SYSTEM
diskettes.
2,
Insert the SYSTEM
drive A:,
3, Access drive a:.
4,
Type: SERVER
V3,11.
Installation and
easier,
want to install NetWare 386
-1
and SYSTEM -2
-1
diskette into
in-
53
Page 51

5. Type
6. Type the IPX intemal network number
7. Insert the SYSTEM-2 diskette into
8. Type: A:INSTALL
9. Continue through the installation,
the
server name,
This number
server address,
drive
lowing
is
A:.
the
prompts as indicated.
usually the same
as the
fol-
Create an appropriate directory
files before copying.
2.
Type: SERVER
3. Type the server name.
4.
Type the IPX intemal network number
This number
server address.
5. Insert the SYSTEM-2 diskette into
drive
A:.
is
usually the same
for
as the
the
To Generate a Workstation
SheU for NetWare 386 V3.ll:
The instructions
386 on a workstation
same as the procedure
NetWare 286 on a workstation. For instructions on this installation and
figuration, refer back
Generate a Workstation Shell
Ware 286 V2.2."
for
installing NetWare
is
exactly the
for
installing
to
page 49 on
for
con-
"To
Net-
For additional help, refer
NetWare 386 User's Manual
and
the
386.doc file.
If you want
the hard disk, follow these instmctions.
1.
Copy all files on
54
to
install
SYSTEM diskettes
partitioned
for
NetWare 386.
all the
to the
the
program from
relevant
to the
hard disk
6. Type: A:INSTALL
7. Continue through the installation,
lowing
the
prompts as indicated.
For additional help, refer
Ware 386 User's Manual and
install.doc file on
Disk.
to
the
SMC Super-
the
Wef-
the
fol-
Page 52

Loading LAN Manager
V.2.0
The procedures in this section are for
LAN Manager
V2.0.
For other installa-
tion and configuration instructions,
refer to your LAN Manager User's
manual.
The following instructions apply only to
installing the LAN Manager
platform.
Do not start LAN Manager
on
a DOS
until after it's installed. Use the
Microsoft instructions to complete the
installation procedure. Microsoft in-
cludes support for the SMC
PLUS
family adapters. Select the SMC adapter
from the list provided by Microsoft.
To Install the LAN Manager:
1,
Copy the LAN Manager driver to the
driver directory used by LAN
Manager.
For example, when installing a LAN
Manager server or enhanced
workstation using the nonnal direc-
tory structure type:
COPY MACSMC.DOS
MAN\DRIVERS\ETIIERNET
C:\LAN-
When installing a LAN Manager basic
workstation type:
COPY MACSMC.DOS
MAN
2.
Modify the PROTOCOL.INI in accord-
C:\LAN-
ance with the adapter type.
a. For jumper-configured adapters,
use a text editor to add the
following lines to the file:
[MACSMC - F]
DriverName = MACSMC8
lOBase - 0x280
RAMAddresit - OxDOOO
IRQ-3
Replace the above lOBase,
RAMAddress, and
IRQ
values
with the values appropriate for
your adapter
card.
If you aren't
sure which adapter type you
have,
refer to Section 1.0 or use
the setup
above.
A more
complete explanation of these
parameters and their
appropriate values are provided
in section 5.0. If
you
have a
software-configurable or Micro
Channel adapter, you can
simplify your parameters by
using step 2b.
b. For software-configurable and
Micro Channel adapters, use a
text editor to add the following
lines to the file:
[MACSMC_MF]
DriverName = MACSMC6
3. Reboot the system and bring up LAN
Manager using the instructions
supplied by the LAN Manager
ven-
dor
55
Page 53

For additional instructions, refer to
either the LAN Manager User's
Manual or the install.doc file included with the SuperDisk.
56
Page 54

Installing a Boot ROM
57
Page 55

Installing a Boot ROM
A socket is provided on the adapter
for installing an optional ROM
device - for example, a boot ROM
device, which enables the computer
to load the operating system software
over the network. Boot ROMs are
available from your dealer
To install an optional
insert the ROM device into the ROM
socket and configure the
dow size and base address.
ROM,
ROM
you must
win-
Inserting the ROM
Hold the ROM device without touching its pins. See Figure 1,2, or 3 in
the Introduction for an illustration of
this procedure. Carefully insert the
device into the socket, making sure
that the notch in the
aligned with the notch in the device
socket, and all pins are positioned
58
ROM
device is
over socket openings. Gently move
the device from side to side
seat the pins. Verify that all pins are
fully seated in the socket.
as
you
Note
Only Boot ROMs V2.0 and later
should be used with these three
adapter boards.
Page 56

ROM Window Size and
Base Address
Most ROM devices designed
used with
quire
configure a 16-Kbyte ROM, move
jumper
7).
respond
D8000 - DBFFF
is occupied, you must set the
jumper back
the software setup program
lish the ROM base address
location.
If necessary, you can change the ROM
window
when a ROM
or 0 Kbytes when the ROM
abled.
a special purpose 32-Kbyte
Kbyte ROM device, you must use
setup program.
the
Ethemet adapter
16
Kbytes
of
address space.
at
W2
to
D8000 (refer to Table
This will enable the ROM
to
addresses
If
this memory range
to
NONE/SOF and
size.
The default setting,
is
enabled,
To change
the
If
you aren't sure
to be
re-
to
in the
range,
W2
to
estab-
at
another
is 16
Kbytes,
is
dis-
window size
or
64-
To
the
use
for
the
what size ROM you have, consult the
ROM's installation instmctions.
ROM Bate Addren
None/Soft
W2
Si
D8000
(UMd only with 16
Kbyte
ROM
devtee)
Table 7. Boot ROM Options
MCIORY
•TTwe
59
Page 57

Network Interconnections
61
Page 58

Thin Ethemet
Follow die Instructions In this section to
connect your ElhelS and ElltelB Combo
adapter to tiiin Etiiemet
62
cable.
Connecting to Thin
Ethemet Cable
1,
Attach the BNC
cluded with your adapter) to the
BNC networi< port at the rear of
the computer
2.
Attach one end of the coaxial cable
to an open end of the
tor
on
the first computer Align
the notches in the cable-end with
the posts on the "T" connector,
push the cable in, and twist about
one-quarter
bending or kinking of the cable.
"I"
connector
tum.
Avoid severe
"I"
connec-
(in-
Attach the other end of the cable to
an open end of the "T° connector
at the rear of the second com-
puter.
Continue making connec-
tions to the rest of the computers.
The interconnection cable must
not exceed the recommended
length (185 meters for 10Base2 or
300 meters for the extended
length option) prescribed by the
protocol
used,
Ihe interconnection cable can be attached to
nal repeaters to extend the
network.
3. When all computers have been
connected,
terminator to each end of the entire segment.
attach a 50 ohm cable
sig-
Page 59

Figure 14. Attaching the
Cable & Terminator
T-Connector,
Thin Ethemet Segment
A thin Ethernet cable segment is the
length of the cable between termina-
tions.
The Ethernet adapter functions
with 185
(extended length option) cable
ments without any jumper changes.
Two types of thin Ethernet cabling are
commonly
tended length option. Pick one type
of cabling and consistently obey the
protocol of that type throughout your
network. If you mix the rules, for example,
permitted by 10Base2 with the 100
nodes per segment permitted under
the extended length option, your network may have an excessive number
of errors or may not operate at all.
If your network uses standard 185meter cable segments, all thin
(IEEE
10Base2) or 300 meter
seg-
used:
IEEE 10Base2 and ex-
using the two repeater links
Ether-
net cable segments in the network
can be up to 185 meters
standard length cable segments may
be connected in line using commercially available repeaters,. The total
networic span with five standard
length segments is 925 meters. No
more than four repeaters can be on
the signal path from one node to any
other node. The standard 185 meter
segment length is recommended because it allows you to use common
thin Ethernet components which
form to the
If your network is using extended-
length 300-meter segments, all thin
Ethernet cable segments in the network can be up to 300 meters
Three 300-meter cable segments may
be connected in line using repeaters.
IEEE
long.
standard .
Five
con-
long.
63
Page 60

The total network span with three ex-
tended length segments is 900
meters. No more than two repeaters
can be in the signal path from one
node to any other node. If
you
are
using extended length segments, all
repeaters and transceivers must be
designed for 300-meter
addition,
all LAN adapter boards
(other than this adapter) must be
operation.
In
con-
figured to the extended segment
length,
if a configuration choice is re-
quired.
Interconnecting Thin and
Thick Ethemet
Thin Ethernet cable segments can be
connected to thick Ethemet cable
ments through a signal repeater or a
BNC-to-N type adapter If
you
are
drop
Cabli
seg-
interconnecting through a repeater,
attach the repeater to the Ethemet
cable through a transceiver. (This
must be done when connecting any
cable segments in an Ethemet net-
work.)
Note that
adapters to extend 185-meter
you
cannot use Ethemet
segments to 300-meter cable segments
unless all LAN adapters and repeaters
used in the network are capable of
operation on the extended segment
length.
64
Figure 15. Interconnecting Thin and Thick Ethernet
Page 61

;
- •. -
CHARACTERISTICS
Standard
Data Rate
Segment Length
Maximum number
Maximum number
of
segments between nodes
of
repeaters between nodes
Network Span
Maximum nurriber
Maximum number
of
nodes per segment
of
nodes per network
Minimum space between nodes
Cable Type
STANDARD LENGTH SEGMENT
IEEE
802.3 10BASE2
10 Mbits'per second
185m
3 coax* + 2 repeater links
4 when using 2 repeater links
925m
30
1024
0.5m
RG58 A/U orC/U, 50
Ohm.
BNC connectors
A coax segment contains nodes while a repeater link segment does not.
A repeater link segment is used for
extending
the distance between coax segments.
Table 8. Thin Ethernet Network Characteristics
single shield,
EXTENDED LENGTH SEGMENT
IEEE 802.3 10BASE2
10 Mbits per second
300m
3 coax*; no repeater links
2
900m
100
1024
0.5m
RG58
A/U or
C/U,
50
Ohm,
single shield,
BNC connectors
65
Page 62

Thick Ethemet
Follow the instructions in this section
to connect your
ElitelS Combo adapter to thick Ethemet
cable.
ElitelS,
ElitelBTand
66
Ihe
AUI
port is used to attach a thick
Ethernet
ElitelO,
adapters. The adapter boards will
operate on an Ethernet network by
attaching an AUI drop-cable to the
AUI port and to a trunk coaxial cable
through a media attachment unit
(MAU) transceiver Ihe MAU acts as
the interface to an Ethernet network
using thick cable or any Ethernet
medium.
port
with other types of cabling such as
fiber-optic.
AUI
drop-cable to your
Elite16Tand Elitel6 Combo
The adapter board's AUI
can
also be used for operation
Connecting to Thick
Ethemet Cable
1,
Starting with the first computer to
be
connected,
cable to the AUI port
net adapter (Figure 16);
A sliding latch is provided on the AUI
port that locks the cable to the
connector The sliding latch is
Figure 16. Attaching the AUI
attach a drop-
on
Drop Cable
the
Ether-
Page 63

snug and requires some effort to
lock in place.
2.
Attach an MAU transceiver at a
marked location on the Ethernet
cable (Ethernet trunk coaxial
cable is marked at 2.5 meter
vals).
Several types of cable tap
kits are available; follow the instmctions provided with the kit
you are using.
3. Connect the other
end
of the AUI
drop-cable to the MAU transceiver (Figure 17), Secure the AUI
connector with the sliding latch.
4.
Attach all of the computers and
ments to the main or "spine"
Ethernet cable in similar fashion.
inter-
seg-
• Use a signal repeater to attach
each additional cable segment or
"rib"
(500 meters
each,
maximum).
• Attach a 50 ohm cable terminator
at each open end of every spine
segment.
Thick Ethernet
Cable X
-,^
Figure 17. Attaching the
Transceiver
Thick Ethemet Network
A thick Ethernet cable segment is a
continuous thick coaxial cable up to
500 meters in length. Typically, a thick
Ethernet network is composed of a
main cable segment, or "spine," with
additional segments, or
attached to the main cable segment
through repeaters, Computers are
generally attached to the rib
ments, but may also be attached to
the spine segment.
Thick Ethemet network connections
are made through AUI drop cables.
Ihe
AUI
drop cable can be up to 50
meters in length. One end of the drop
cable is attached to the AUI port on
the Ethernet adapter The other end
of the drop cable is attached to the
thick Ethemet cable segment
through a transceiver (See Figure 23)
"ribs,"
seg-
67
Page 64

CHARACTERISTICS
THICK ETHERNET
68
Maximum Cable Segment Length
Maximum Segments In-Une
Network Span with Repeaters
MAU Attachments Per Segment
Adapter Port Selection - W3
Cable Type
Minimum Node Spacing
Table 9. Thick Ethernet Network Characteristics
500 meters
3 (+two repeater links)
2500 meters
100
AUI Port
Rugged/Insulated Trunk Coaxial
2.5 meters (between tap marks)
Page 65

Unshielded Twisted Pair
Follow the instructions in this section The twisted-pair network port on the
to connect your ElitelGT and ElitelS
Combo adapter to and unshielded
twisted pair (UTP) network port.
Ethernet adapter board is a modular,
RJ-45 eight-pin socket.
the twisted-pair network interface
cable has a mating, RJ-45
pin modular
the function of each pin.
plug.
Each
end of
type,
eight-
Table 10 defines
1 OBaseT Twisted-Pair
Interconnection
The following items are required to interconnect the network computers to
a
1 OBaseT
• A twisted-pair interface cable for
each computer
• A local concentrator for interconnecting computers or a wall jack
wired for 10BaseT twisted-pair
cable that leads to a concentrator
in a wiring closet.
twisted-pair networic
1.
Insert the modular plug at one end
of the interface cable into the .
RJ-45 twisted-pair wire networi(
port at the rear of the computer
2.
Attach the other end of the
face cable to an input port of
1
OBasel-compatible concentrator
inter-.
a
link Status
When the computer has been con-,
nected to a concentrator port and
both systems are powered
the connection by observing the green
link integrity
above the twisted-pair network port
on
the adapter
status light is off, it is assumed that
you are usingcoaxial and that port
will be enabled. When a valid connection exists, the link status LEDs at the
adapter board and at the concentrator
are lit. If the
LED
indicator provided
board.
LEDs
are not lit, and the
on,
verify
If the link^
69
Page 66

computer
and
concentrator are
powered on, check the modular plug
connection at the adapter board and
at the concentrator
and
all wiring.
The polarity status LED is ON if the
polarity of the twisted pair receive
wires is normal. It is
OFF
if the
polarity is reversed. The adapter will
automatically correct for reversed
polarity.
Using Existing Phone
Cable
The existing telephone wiring in your
building can be used for network interconnection if the wiring meets
mum standards and any wall jacks are
wired correctly Before starting the installation,
verify that all twisted-pair
wires meet the requirements
70
mini-
described in Appendix A "Networi(
Components and Setup".
The existing telephone wiring may
consist of a separate eight-conductor,
twisted-paircable routed to each wall
jack, or it may consist of dozens of
twisted-pair conductors in a cable
bundle.. If a cable bundle is
Wire
Pair
1
1 •
2
2 . .
3
3
4
• 4
orange/white band
white/orange band
green/white band
white/green band
used,
Color Code
blue/white band
white/blue band
solid gray
solid orange
the
Table 10. Example Color & Wire-Pair Configuration
conductors for
each
phone line have
been separated from the bundle and
attached to the wall jack: .
In either
case,
the an-angement of
twisted-pairs at the wall jack in a typi-
cal telephone installation is usually
not acceptable for network signal
transmissions. The two twisted-wire
Modular Wall
Function
network signals
network signals
network signals
network signals
telephone
telephone
telephone
telephone
Pin Number
2
1
6
3
4
5
8
7
Page 67

pairs required for network signals
must be wired to the wall jack in the
following arrangement:
Pair 1 - attach to pins 1 and 2,
Pair 2 - attach to pins 3 and 6,
The twisted-wire pairs for telephone
signals (if used) are attached to the
remaining pins,
Detemnine which conductors are
twisted together, record the wire
colors for each pair and note the pin
to which each wire is
attached.
For
example, an eight-condijctor cable
may have the color
and
wire-pair
configuration shown in Table-10.
Networic interconnections are usually
made in a wiring closet.
You must be able to identify and
separate the conductors which are
canning networic signals from the
conductors that are used for telephone
operation,
Ihe color code and wire-
pair arrangement of telephone cable
will vary from one manufacturer to
another
Interface Cable Wiring
The twisted-pair interface cable
provided has an eight-pin modular
plug at each end that mates with the
twisted-pair network port
adapter boardand with an RJ-45
modular wall jack. If
your own interface cables to.use as
dedicated networi< wiring, or as extension cables, refer to Figure 18 for
wiring infonnation.
on
you
are making
the LAN
Pair 4
Pairs
Pair 2 ; 1
Pain
RN
NO.
^eaeaeaeanaeaeas^
PIN
NO.
Figure 18. Interface Cable Wiring
Wiring Closet Termination
If you are using the existing wiring in
the building, concentrators are typically mounted inside the wiring closet,
where the telephone conductors are
terminated at a wiring panel. A
ment of twisted-pair wire is attached .
to the conductors from each network
computer
seg-
71
Pair 4
Pairs
Pair 2
Pain
Page 68

at the termination panel and plugged
intOa concentrator port. Refer to
the notes
conductors used for network signals.
If installing a new network
wire pairs for'each computer may be
attached directly to an RJ-45 plug and
connected to a concentrator port. The
wire pairs may also be terminated at
a wiring panel (or other temiination
device) and then connected to a
1 OBaseT
twisted-pair wire segment that has an
RJ-45 plug at one end. Connect each
set of twisted-pair wires to a
centrator port in the same manner
Most concentrator manufacturers pro-
vide a means for connecting
centrators in a daisy-chain fashion.
Refer to the concentrator's installation
guide for specific information.
you
made to identify the .
cable,
the
concentrator port through a
con-
con-
72
Concentrators
The Ethernet adapter when used with
twisted-pair cable must always
nect to a concentrator. This results in
a star-wired networic with the
centrator at the center of the star
The Ethemet adapter is compatible
with 10BaseT concentrators from a
variety of vendors such as SynOptics
Communications, David Systems, Net-
Worth,
and Cabletron,
Ihe Ethernet adapter is also com-
patible with the AT&T and Hewlett
Packard "StarLAN 10" twisted-pair
signalling method by using software
setup.
con-
con-
Using StarLAN 10
Concentrators
AT&T and Hewlett Packard StarLAN
10
compatible adapters operate over
StarLAN-type wiring and use 10 Mbps
Ethernet speeds and protocols, but
original StarLAN 10 products did not
provide the Link Integrity feature ror..
quired by the lOBasel
Ethernet 10Basel.adapter can
operate with StarLAN 10 products
that
do
not
have Link
ing that
you
disable the Link Integrity
test function on the adapter
able the Link Integrity test function,
run the software setup program and
select Link_lnt = D.
Note:
If the thin Ethemet (BNC)
connection is
tion must
used,
be
turned off (Linkjnt = D).
standard.
jntegrity provid-
the Link_lnt op-
To
Your
dis-
Page 69

Standard
Data Rate
Maximum length of connecting cable between
a computer and concentrator
Maximum number of (computers) nodes
per network
Twisted pair cable
Table 11. Unshielded Twisted Pair Network Characteristics
IEEE 802.3 lOBaseT
10 Mbits per second
lOOm
1024
AT&T
D-inside
wire (DIW&PDS),
IBM Type 3
73
Page 70

Troubleshooting
75
Page 71

Using DIAGNOSE
Troubleshooting
for
This section explains what to do
your Ethemet adapter
ing.
Ihe diagnostic program provided
the software diskette can be used
conjunction with this infonnation
assist
you
in
locating the source
problem
if
the installed adapter does
not mn properly
tion that will pinpoint a specific problem has also been listed here for your
convenience.
with running DIAGNOSE, please see
the "Diagnostic" section in this
manual.
Before mnning DIAGNOSE, make sure
that the adapter is completely seated
in the computer's expansion slot, and
no cables inside the computer are
loose.
If
is
Ihe
Main Menu op-
you are not familiar
if
not function-
on
in
to
of
a
76
DIAGNOSE: Basic
Adapter Test
If allthe other workstations
nected to the server are working
properiy and your workstation is the
only one affected, the problem
probably in the hardware or software
of the adapter
utility verifies
PC
are operational.
If the diagnostic Basic Adapter Test
passes, the hardware
operating properly
the most common hardware problem
is that another device is conflicting
with the Ethernet adapter
you
just installed. This
if
the network card and
If
con-
is
is
probably
the test fails,
DIAGNOSE:
If
you
are having a problem with the
hardware configuration, you can
check this option
figuration information
received from the board.
Before attempting
figuration conflict, review the section
in this manual on avoiding configuration conflicts. Also review the
sysmap.doc file
driver diskette for up-to-date information on the normal configuration set-
tings
of
done
this,
tion for your Ethemet adapter
Set
Configuration
to
see what
to
resolve a
on
the software
all boards. Once you have
choose another configura-
is
con-
being
con-
Page 72

DIAGNOSE: Imtiate/Respond
to Messages
If Other workstations are a Iso affected,
the source ofthe problem is
the cabling or file server This utility
will check the networic cabling.
1.
To
determine whether the problem
is the cabling or the file
server,
run
the diagnostic program using
remote loopback between two
nodes. If the remote loopback test
passes without errors, the problem
is probably the file
cabling.
If the test fails the prob-
server,
not the
lem is probably the cabling.
2.
Check the cable connection to
other
computers.
In an Ethemet
network using thin cable, check
the computers that are daisy
chained to the computer
you
are
troubleshooting. In an Ethemet
network using thick cable, check
the drop cable connection at the
transceiver
3, If
you
think
you
have a cabling
problem,
try splitting segments to
isolate the cable defect, or replace
the cable with one known to be
good,
. i
4,
Verify that the network cable is
securely attached to either the
BNC,
AUI,
or
UTP
port,
5, If the BNC or AUI port is used,
verify that 50 ohm cable
ter-
minators are installed as required.
Terminators must be 50 ohm im-
pedance (within 2%) or en;ors may
occur Temninators are installed at
both ends of every cable segment.
6, Make sure that the interconnect-
ing cables meet
IEEE
standard
requirements.
77
Page 73

Network Operating
Software Problems
If the problem is not found in the .
hardware, then check the software;
1,
Make sure that
quired software drivers from the
driver diskette as instructed in the
documentation included with your
networking software,
2,
If you are using Novell NetWare,
type the following at the DOS
prompt:
you
copied any re-
ipxi
This enables you to verify that -
• The driver
propriate for the type of adapter
you have,
• The driver is the latest version,
(You can verify the version number
with your dealer)
you
are using is ap-
78
If running ipx i does not uncover a
problem,
nical assistance.
If you are using a driver other than the
Novell
driver settings match the actual
net adapter setting as specified in the
install.doc file provided with the
driver-
ROM Device
Prior to troubleshooting an installed
ROM device, verify that the adapter,
cabling,
If you are still experiencing difficul-
ties,
1.
contact your dealer for
driver,
verify the software
and file server are woricing.
then check the ROM device,
If a ROM device is installed on the
adapter, verify that the ROM
device is correct for the computer
system and networic software you
are using. Make sure that every
tech-
Ether-
-
pin on the
firmly in the socket..
2,
Verify the boot image files have
been installed properiy
server as specified
operating system documentation,.
ROM
device is seated
by
on
the file
the networic
Page 74

Technical Assistance
You
can get assistance with installing
your Ethemet adapter by calling your
dealer Before calling for technical
help,
be prepared to supply the follow-
ing information:
1,
Computer system manufacturer
and model, BIOS manufacturer,
BIOS date,
system clock
memory size, monitor type
monochrome, high resolution,
etc),
parallel),
2,
DOS
manufacturer and version,
software driver
driver file size and date,
3, Applications software name,
manufacturer, version, and date.
BIOS
version,
speed,
and printer type (serial or
version,
network software
version,
CPU
bus speed,
(color,.
software
type,
4,
Contents of the AUTOEXECBAT
and CONFIG.SYS files in the root
directory of the computer(s) having
problems,
5, Error codes or messages displayed
by diagnostic programs, network
operating system, or applications
software.
6, The type of interconnecting cable
used (please be specific)
resistance value of terminators installed.
7, Types of LAN adapters used in the
network. The configuration
parameters (I/O address,
nel,
RAM size and base address,
ROM size
LAN adapter(s) having problems,
8, Other option boards and functions
installed in the computer
and
base address) of the
and
IRQ
and
the
chan-
their
configuration parameters (I/O address,
IRQ level, RAM size and
base address,
address). Possible option boards
include; graphics adapters, mouse
controllers, extended memory
boards, tape controllers, modems,
other LAN adapters, and printer
controllers,
9, Type of concentrator used in a
twisted pair network (manufacturer and model number).
ROM
size and base
79
Page 75

80
Page 76

Appendices
81
Page 77

Appendix A
Network Components and Setup
The components specified in this
section,
sembled
dealer.
reference purposes only: equivalent
products from other manufacturers may
be used.
as well as precut and
cables,
The manufacturers listed are for
are available from your
preas-
82
The following components make up
an Ethernet network and are used
with the Eliteie, Elite 161 and Elite16
Combo adapters unless otherwise
specified.
and 3 in the "Introduction" section of
this manual for specific adapter port
references.
LAN adapter - A LAN adapter is the
interface between the computer and
the networic
adapter has three types of networic
ports.
• The
• The BNC port is used for direct thin
Please see Figures 1,2,
cable.
Your Ethernet
UTP
port is used for lOBaseT
unshielded twisted pair connection,
(Eliteiei
Ethernet networic connection,
(Eliteie and Eliteie Combo)
and
Elite16 Combo)
• The
AUI
port is used for connecting
a transceiver to a thick Ethernet
network using thick cable or any
Ethemet medium, (ElitelB, Eliteiei
and Eliteie Combo)
Repeater - A repeater is used to
nect cable segments together The
repeater retimes and transmits data
signals as they pass from one
ment to another Single port and multiport repeaters are available for
coaxial or fiber optic cable.
Transceiver -
is used to connect
thick Ethemet coaxial cable. Transceivers are also available for connection to thin Ethernet, twisted-pair, and
fiber-optic cable.
An
external transceiver
AUI
drop-cables to
con-
seg-
Page 78

Thin Ethemet Cable and
Components
charge
(ESD).
221586-1.
AMP part number is
Thick Ethemet Cable and
Components
Ihe following infonnation pertains to
the Eliteie and Eliteie Combo adapters,
BNC'T' connector - Used to attach
the Ethernet adapter to thin Ethernet
cable:
Cable terminator - A terminator with
50
ohm
nominal impedance must be
installed at each end of every cable
segment, A thin Ethernet temninator
has a BNC coaxial connector. Coaxial
50 ohm BNC plug terminator Anixter
part number is 073989.
"T"
connector cover - A plastic "clam-
shell"
cover which insulates the BNC
"I"
connector from electrostatic dis-
Thin Ethernet cahlfi (RG58 A/U or C/U
coaxial cable) - Stranded tinned cop-
per, 50 ohm nominal impedance, for
use with BNC-type coaxial connec-
tors.
The Beiden part numbers for
cable only are 9907 and 89907
(plenum rated).
Note:
Coaxial cable designated RG58
U is similar in appearance to RG58
A/U cable but does not comply with
the
IEEE
thin Ethernet standard.
The following information pertains to
the Eliteiei and Eliteie Combo
adapters.
AUI drop-cable - The interface cable
between the Ethemet adapter and a
MAU attached to the trunk coaxial
cable or other thick Ethemet medium.
The drop-cable has a 15-pin AUI
nector at each end and may be up to
50 meters in length. Ihe Beiden part
numbers for cable only are
89901 (plenum rated).
Cable tenninator - A terminating
resistor with 50 ohm nominal im-
pedance must be installed at each
end of every trunk coaxial cable
ment. A thick Ethernet terminator has
9901
con-
and
seg-
83
Page 79

an
N-type
coaxial connector Anixter
part number
DB-15 AUI connector- Used
is
080870.
at
each
endof the AUI drop-cable. Anixter
part numbers are 081424 (female,
solder type), 080867 (slide lock),
081425 (male, solder type), 080868
(locking post).
Figure
A-1
shows the
pin
locations
for
the male connector. The pin locations
for the female are
this,
of
the AUI connector has been
shorted
to
fuse will open
the voltage from
approximately one hour from
the short circuit
the
mirror image
ground, a thermistor type
the
circuit and remove
pin
13:
It
requires
the
time
is
removed
for
the
of
thermistor
pin
13.
to
restore the +12 volts
to
Thick Ethemet cable (Ethemet tmnk
coaxial cable) - Solid tinned-copper
conductors,
ings,
with
Beiden part numbers
2.5
meter tap-in maric-
50 ohm nominal impedance,
N-type
coaxial connectors.
for
The
cable only
are 9880 and 89880 (plenum rated).
84
No Connection
No Connection
DC Power Common
Data In A
Data In Shield
Data Out A
Control In A
Control In Shield
No Connection
Power Shield
DC Power +
Data In B
Data Out Shield
Data Out B
Control In B
Protective Ground
(Shell)
Figure A-1. Mail AUI Ccmnector Pin Functions
Page 80

Unshielded Twisted Pair
Cable
Ihe following infonnation pertains to
the Eliteiei and Eliteie Combo
adapters.
•
Unshielded,
(2 pairs)
• 22,24, or
• Characteristic impedance of 85 to
110 ohms at 10 MHz
• Maximum attenuation of 11.5
dB/100 meters at 10 MHz
• Maximum attentuation of 7.2
dB/100 meters at 5 MHz
• RJ-45 modular
0037,
• Crimper
equivalent
twisted-wire pairs
26
gauge
plugs:
or equivalent
tool:
Molex 11-01-0026 or
Molex 90075-
RJ-45 modular wall socket:
Molex
95015-0003. or equivalem
Note;
Telephone-type cable common-
ly known as "silver
satin"
is NOT
ACCEPTABLE. Silver satin cable is
flat in shape and typically has a silver
vinyl jacket. Use of silver satin cable
can cause a false data collision on the
networic.
AT&T
D-lnside
4-Pair/Non-Plenum
4-Pair/Plenum
25-Pair/Non-Plenum
25-Pair/Plenum
6-Pair
Twisted
2-Pair
Twisted
4-Pair
Twisted
Table
A-1.
Unshielded Twisted Pair Cable
Wire (DIW
IBM
Type
and
PDS)
DIW
4/24
Wl 000
C-Plenum4R1000
DIW 25/24
C-4'lenum25R1000
Beiden - 9566
Beiden-9562
Data Set Cable Company - 2404
3
Rl
000
85
Page 81

Appendix
B
Specifications
EUTE16
ADAPTER:
General
Hardware compatibility;
Software compatibility
Standards supported;
I/O
base address; 200
Intermpt request channel:
RAM buffer size:
RAM buffer base address;
RAM base above 1 Mbyte:
RAM speed: 100
86
. . .
IBM PC,
Channel PS/2, and compatible
computers.
....
NetWare, LAN Manager (DOS,
OS/2),
LAN Server, DECnet-DOS/PCSA,
DEC Pathworks, TCP/IP PC/NFS,
UNIX, Xenix and others.
....
16
IEEE 802.3 10Base2,10Base5
and Ethernet Version 2, Extended
Length Option
. .
IRQ2/9,
. .
80000
. .
100000
XI AI
non-Micro
OS/2 Extended Edition,
to
3E0 (hex)
3,4, 5,
7,10,11
Kbytes
to
FEOOO
(hex)
to
FFCOOO
(hex)
ns
or 15
ROM window size:
ROM base address: 80000
ROM type: 27512 (200ns)
16
Kbytes
to
FCOOO
(hex)
Electrical
Power (adapter only): 5
Power (external transceiver): . -H12VDC,
VDC,
1.1 Amps, max.
0.5
Amps, max.
Environmental
Operating temperature
(ambient): 0°C/32°Fto55°C/13rF
Storage temperature: -20°C/-4°Fto70°C/158°F
Operating humidity: 10%
Storage humidity: 5%
to
90% (non-condensing)
to
95% (non-condensing)
Physical
Height (without bracket):
Length (without bracket):
. . . 3.90
. . . 6.3
inches (9.906 cm)
inches (16.15 cm)
Page 82

ELITE
16T
ADAPTER:
General
Hardware compatibility:
Software compatibility
Standards supported: IEEE 802.3 10Base5and
I/O
base address; 200to3E0(hex)
Intermpt request channel:
RAM buffer size:
RAM buffer base address:
RAM base above 1 Mbyte:
RAM speed: 100
...
. . . .
. .
..:...
. .
IBM PC, XT,
Channel PS/2, and compatible
computers.
NetWare, LAN Manager (DOS,
OS/2),
LAN Server. DECnet-DOS/PCSA,
DEC Pathworks, TCP/IR PC/NFS,
UNIX, Xenix and others.
lOBasel Ethernet Version
1RQ2/9,
.16
Kbytes
80000
. .
100000
ns
AI
non-Micro
OS/2 Extended Edition,
3,4, 5,
7,10,11
to
FCOOO
(hex)
to
FFCOOO
(hex)
or 15
2
ROM window size:
ROM base address; 80000
ROM type; 27512 (200ns)
16
Kbytes
to
FCOOO
(hex)
Electrical
Power (adapter only);
Power (external transceiver): .+12 VDC, 0.5 Amps,
5
VDC,
1.1
Amps, max.
max.
Environmenttd
Operating temperature
(ambient): 0°C/32°Fto55°C/13rF
Storage temperature: -20°C/-4°Fto70°C/158°F
Operating humidity: 10%
Storage humidity: 5%
to
90% (non-condensing)
to
95% (non-condensing)
Physical
Height (without bracket):
Length (without bracket):
. ,
,3,90 inches (9,906
. . .6.3
inches (16.15 cm)
cm)
87
Page 83

EUTE16T COMBO
ADAPTER:
General
Hardware compatibility:
Software compatibility
Standards supported:
1/0
base address: 200
Intermpt request channel:
RAM buffer size:
RAM buffer base address:
RAM base above 1 Mbyte:
RAM speed: 100
, . .
IBM PC,
Channel PS/2, and compatible
computers.
. , . .
....
16
NetWare, LAN Manager (DOS,
OS/2),
LAN Server, DECnet-DOS/PCSA,
DEC Pathworks, TCP/IP PC/NFS,
UNIX, Xenix and others.
IEEE 802,3 lOBasel 10Base2
10Base5, Ethernet Version
, ,
IRQ2/9,3,4,
, ,
80000
. .
100000
XI AI
non-Micro
OS/2 Extended Edition,
to
3E0 (hex)
5,
7,10,11
Kbytes
to
FCOOO
(hex)
to
FFCOOO
(hex)
ns
and
2
or 15
ROM window jize:
ROM base address; 80000
ROM type;
16
2751
Kbytes
to
FCOOO
(hex)
Electrical
Power (adapter only); 5
Power (external
transceiver); . +12
VDC,
1,0 Amps, max,
+12VDC, 0,1 Amps, max.
VDC,
0,5
Amps,
max.
Envirorunental
Operating temperature
(ambient): 0°C/32°Fto55°C/13rF
Storage temperature; -20°C/-4°Fto70°C/158°F
Operating humidity: 10%
Storage humidity; 5%
to
90% (non-condensing)
to
95% (non-condensing)
Physical
Height (without bracket);
, , . 3.90 inches (9.906 cm)
88
Length (without bracket):
. . .6.3
inches (16.15 cm)
Page 84

Appeiidix C
System Configuration Chart
For
future reference, record the
figuration parameters for
each
con-
board
in your computer in the spaces
provided in the System Configuration
Chart. The first row shows the recommended Ethernet adapter settings.
Write down the name of the option
board,
the expansion slot it occupies,
the interrupt level
(IRQ),
and the
memory space reserved for the board.
For information on option boards that
are already installed in your computer,
consult the user instructions provided
with
them,
or ask your dealer for as-
sistance.
Board
Ethemet
Adapter
Board
VO
Address
280
(hex)
VO
Address
IRQ
3
iim
RAM Base
Address
DOOOO
RAM Base
Address
ROM Base
Addims
D8000
ROM Base
Address
Slot*
Slo»'
Slot*
Slot*
Slot*
Slot*
Slot*
Slot*
89
Page 85

Index
-Adapter
Configuration, 23
Configuration
B
Basic Adapter
.
Initiate Test
Responder,
Boot
ROM
See
ROM
Cabling
Eliteie
Eliteie Combo
Eliteiei
Components
Eliteie
Eliteie
Eliteiei
Parameters, 24
Test,
39 .
Messages, 40
40
Adapter,
Adapter,
Combo, 82
Adapter,
Adapter,
and
Setup
Adapter,
83
83-85
82
82
83-85
Concentrators
StarLAN
Configuration
Avoiding Configuration
Software Configuration
Diagnostics
Basic Adapter
exit
Initiate test
Introduction, 34
Main
Respond
Set Configuration, 37
Set
Starting
Features, 7
10,72
to
operating
Messages, 40
Menu, 37
to
Test
Configuration
the Diagnostics, 34 .
Eliteie
Adapter,
Conflicts, 18
Procedure, 29
Test,
39
system, 42
Messages, 40
Menu, 37
7
Eliteie Combo
Eliteiei
Adapter,
1/0
Base
Address,
1/0
Common Device
Installation
Quick Adapter
Steps
for Installing, 18
IRQ
Levels
of
Common
Jumper Settings
Factory Jumper
W1,23-28
W2.23
- 25
W3,25
Adapter,
19
Installation, 13
Settings, 23
8
8
Ports, 20
Devices, 22
91
Page 86

M
U\N
Driver Configurations Menu, 45 - 46 -
47
- 48 - 50
LAN Software Installation
V2.2,45
Generating Server for NetWare 386
V3.11,53
Generating Workstation for NetWare
286 V2.2,49
386V3.n,54
LAN Software Supported, 44
LED Indicators, 8
- 51
Driver Installation, 44
Generating Server for NetWarevoo ..
Generating Workstation for NetWare
Introduction, 44
Loading LAN Manager
Loading NetWare 286 V2.2,45
Loading NetWare 386 V3.11,53
Loading
ODI
Workstation, 51
V2.0,
55
92
Memory
Memory Management Conflicts, 22
RAM Used by Various Devices, 21
N
NetWare
Generating a Network Server, 53
Generating a Woricstation
Networic Components and Setup, 82
ODI Woricstation Installation, 51-53
Ports
AUI,
66 - 77
BNC,
62 - 77
UTP 69 - 77
Shell,
45
Quick Installation & Configuration Instmctions, 14
RAM
Base
Address,
Buffer Base Address, 86 - 87 - 88
Buffer
Size,
Device Usage, 21
Repeater, 82
ROM
Address Range, 88
Base
Address,
Installing/Inserting, 58
Setup Options
Configuration Options
Setup Program
Adapter Configuration, 28
19
86-87-88
59-86-87-88
Table,
31
Page 87

Command Line Method, 30
Interactive Method, 30
Software Configuration Procedure
See Configuration
Specifications
Eliteie Adapter, 86
Eliteiei Adapter, 87
Eliteiei Combo Adapter, 88
StarLAN,
System Configuration Chart, 89
Thick Ethernet
Thick Ethemet (Eliteie, 161 and 16
Combo)
Thin Ethernet
72
Cable and Components, 83
Cable Segments, 67
Networic Characteristics, 68
Cable Connections, 66
Cable and Components, 83
Networic Characteristics, 65
Thin Ethemet (Eliteie & Eliteie Combo)
Cable Connections, 62
Thin Ethernet (Eliteie & Elite16Combo)
Interconnecting Thin and Thick, 64
Troubleshooting, 75
Diagnostic Program, 76
ROM Device, 78
U
Unshielded Twisted Pair
Cable Specifications, 85
Unshielded Twisted Pair (Eliteiei & 16
Combo)
Interconnection, 69
Interface Cable Wiring, 71
Link Status, 69
Using Existing Phone
Cable,
70
93
Page 88

Page 89

Page 90

SMC
(Standard Microsystems Corporation)
80 Arkay Drive
Hauppauge. New York 11788
•i
?,
For Technical Support, call:
(800) 992-4762 in U.S.A.
(800) 4,3:^.'5345 in Canada
For Literature, call:
(800) SMC-1-YOU in U.S.A.
(800) 833-4-SMC in Canada
,•; 16-273-3100 Elsewhere
For information on SMC
LAN Products, call:
l-8()0-NET-LKADER
Q
' o
I.-' .
79-ooor)->:i-o(M»
 Loading...