

Page 1
SERVICE MANUAL
CF5/UR5/UR0
ATV 50/100 ATV with F/N/R
3 in 1 engine
Standard Motor Corporation
Page 2
1-
01-01-01-01-01-0
1.
Thi
s
not
iackcha
1-
0
Sy
m
is
nand
1. Sym
b
2. Gene
r
3. Servi
c
4. Spec
i
5. Torq
u
6. Trou
b
General
chapter
o
ce, cautio
n
nowledge
pters.
1. Sym
b
bols an
d
eeded. In
marks,
e
Warni
n
Cauti
o
Engine
Greas
Gear
o
Oil se
a
Rene
w
Brake fl
Special t
o
ols and
al Safe
t
e Prec
a
fication
s
e Value
s
les Dia
g
Informa
ffer you t
h
and the
t
and skills
ols and
marks a
r
case su
p
xplanatio
g
Mfon M
oil
Li
oi
li
m
e C
il
G
r
e
l
Ap
R
uid U
ols S
p
S
MC
Marks
y
utions
nosis
tion
e general
ools tong
u
before sta
Marks
e used in
plement
a
ns will b
e
eans that
llowed.
eans that
mits to us
l. Warrant
ited engi
n
hassis gr
e
ear oil s
e
commend
ply with li
eplace wit
se recom
m
ecial tool
s
ATV5
0
informati
o
e setting,
rt to do an
this man
l informa
t
added to
serious i
n
equipmen
t
SAE #
2
will not
c
e oil.
ase is rec
o
rials are
ed )
thium-soa
a new p
a
ended br
a
/10
0
Se
n of SMC
please re
a
y repair/in
s
ual to ind
ion of pr
o
the text i
jury or e
v
damage
s
0 or JAS
O
over the
mmende
d
recomm
e
p base lu
b
rt before
i
ke fluid
D
rvice
M
1
2
3
10
12
14
ATV 50/1
0
d carefull
y
pection j
o
cate wha
t
cedures
i
stead of
en death
may resu
FC clas
s
damage t
h
.
nded. (
G
ricant.
nstallatio
n
OT4.
anua
l
Chapt
e
0 with 2
s
and mak
bs as me
n
and wh
e
s needed
using th
e
may resul
t
lt if proce
d
or simila
at cause
d
ear oil
S
.
er 1 Gen
troke eng
i
e sure yo
u
tioned at
re the sp
e
for thes
e
symbols
t if proce
d
ures are
n
r class 2
s
by not a
AE #40
-
ral Infor
m
ne, safety
have wel
furthering
cial serv
i
symbols
or marks
ures are
n
ot followe
d
troke eng
pply with
t
or above
1 -
ation
l
ce
.
ot
.
ine
he
is
Page 3
1-
0
Bel
o
Ca
r
If y
o
are
ause
Ex
h
Ga
Ga
sspa
Ga
s
chil
Us
e
Pro
ver
iKee
Ho
Co
mThe
ser
v
Ba
t
Gene
r
w is som
e
bon mo
n
u must ru
. Run yo
u
an extrac
Cautio
n
aust cont
a
oline
oline is a
rk should
Cautio
n
oline is hi
ren.
d trans
m
Cautio
n
longed co
n
fied. We r
e
p the use
d
compo
n
Cautio
n
ponents
o
y remain
v
ice work
o
tery
Cautio
n
Batte
r
when
Batte
r
not b
e
imme
d
water
If you
veget
a
Keep
al infor
m
of the g
e
oxide
n your en
g
r engine i
n
tor.
ins toxic
g
low ignitio
n
be allowe
d
ghly flam
m
mission
tact with
u
commen
d
oil beyo
n
nents
f the eng
i
ery hot e
v
n these p
y emits e
x
charging
t
y contain
s
spray on
iately wit
h
and then
g
swallow it
ble oil an
electrolyt
e
S
MC
ation r
e
neral info
r
ine, ensu
r
an open
as which
point an
d
in the w
o
able, and
oil
sed tran
s
that you
w
d reach o
f
ne and e
x
en after t
h
arts, wear
plosive g
a
he battery
sulfuric a
c
your eyes
water. If
y
o to hos
p
by mistak
d then im
m
beyond r
e
ATV5
0
fer to y
mation to
e the pla
c
area, if yo
may caus
e
explosiv
e
rk place o
r
may expl
o
mission oi
ash you
r
children.
haust sys
t
e engine
h
insulated
ses; Flam
.
id (electr
o
or skin. If
ou get b
a
ital to see
e, drink a
l
ediately
g
ach of ch
/10
0
Se
our ow
n
your own
s
e is well v
e
u have to
one to lo
material.
where g
a
de under
l may cau
s
hands wi
t
em can b
e
as been
s
gloves an
d
e is strictl
y
lyte) whi
c
you get b
a
ttery acid
an ophth
a
ot of wate
o to see
a
ildren.
rvice
M
safety
afety duri
ntilated.
N
run your e
se consci
o
Work in a
soline is
b
some con
d
e skin ca
n
h soap an
come ext
r
topped fo
wait until
prohibite
d
h can cau
s
ttery acid
in your ey
e
lmologist.
r or milk,
a
doctor.
anua
l
Chapt
e
ng the rep
ever run
y
gine in a
usness a
n
well-ventil
eing store
itions, ke
e
cer altho
u
d water ri
g
emely hot
r some ti
m
cooling o
f
. Keeps t
h
e serious
on your s
k
s, flush it
nd take s
o
er 1 Gen
air/servic
e
your engi
n
closed ar
e
d even re
ated plac
e
d.
ep it awa
y
gh it mig
h
ht after c
o
after engi
e. When
p
f.
e place
w
burns so
b
in, flush i
t
off immed
me laxati
v
-
ral Infor
m
time.
e in a clo
s
a, be sur
e
sult in de
a
, no flam
e
from
t not be
ntacting.
ne runnin
g
erforming
ell ventila
t
e careful
off
iately with
e such a
s
2 -
ation
ed
to
th.
or
.
ed
do
Page 4
Br
a
Do
cle
a
Inh
a
Br
a
Spi
l
cle
a
the
1-
0
1.
A
2.
3.
W
v
4.
5.
W
ke pad/
s
not use a
n
ner or th
e
Cautio
n
ling brake
ke fluid
Cautio
n
ling brake
n towel o
n
brake flui
d
3. Servi
c
lways us
Using n
o
ATV an
d
Special to
o
compone
n
Using wro
hen ser
v
interchan
g
ehicle.
Clean the
deposit a
c
cause da
m
ash and
dry with c
o
seals bec
a
on them.
hoe
air hose
o
equivale
n
shoe or pa
d
fluid on p
a
the abo
v
beyond r
e Preca
e with SM
C
n-genuin
e
out of S
M
ls are de
s
ts without
ng tools
m
icing this
A
eable wit
h
outside of
cumulate
d
age.
clean par
t
mpresse
d
use most
S
MC
r a dry br
t to avoid
ash may
c
inted, pla
e-mention
each of c
h
utions
genuine
parts for
S
C warran
t
igned for
damagin
g
ay result i
n
TV, use
o
the Engli
s
the parts
o
on the p
a
s with hig
h
air. Pay
s
cleaning
a
ATV5
0
sh to cle
a
dust flying
ause diso
r
stic, or ru
b
ed parts f
o
ildren.
parts and
MC ATV
y service.
remove a
n
the parts
parts da
m
nly metri
c
h system
,
r the cov
e
rt's surfac
e
ignition
p
pecial att
e
gents ha
v
/10
0
Se
n compo
n
.
ders and c
a
ber parts
r protecti
o
recomme
may dam
a
d install o
being wor
aged.
tools. M
e
, using wr
o
r before r
e
e may fall
oint solve
n
ntion to
O
e an adve
rvice
M
ents of th
e
ncer of th
e
ay caus
e
n when s
e
nded oils.
ge the
f
ked on.
tric bolts,
n
ng tools
a
moving it
into the e
n
t, and blo
-rings or
o
rse effect
anua
l
Chapt
e
brake sy
s
breathing
damage
t
rvicing th
e
uts, and
s
nd fasten
e
rom the
A
gine, cha
s
il
SMC
G
er 1 Gen
stem; use
system
to the par
t
brake sy
s
crews ar
e
rs may d
a
TV. Other
w
sis, or br
a
enuine Par
t
-
ral Infor
m
a vacuum
s. Place a
tem. Kee
not
mage thi
s
ise, dirt
a
ke syste
m
s
3 -
ation
p
nd
to
Page 5
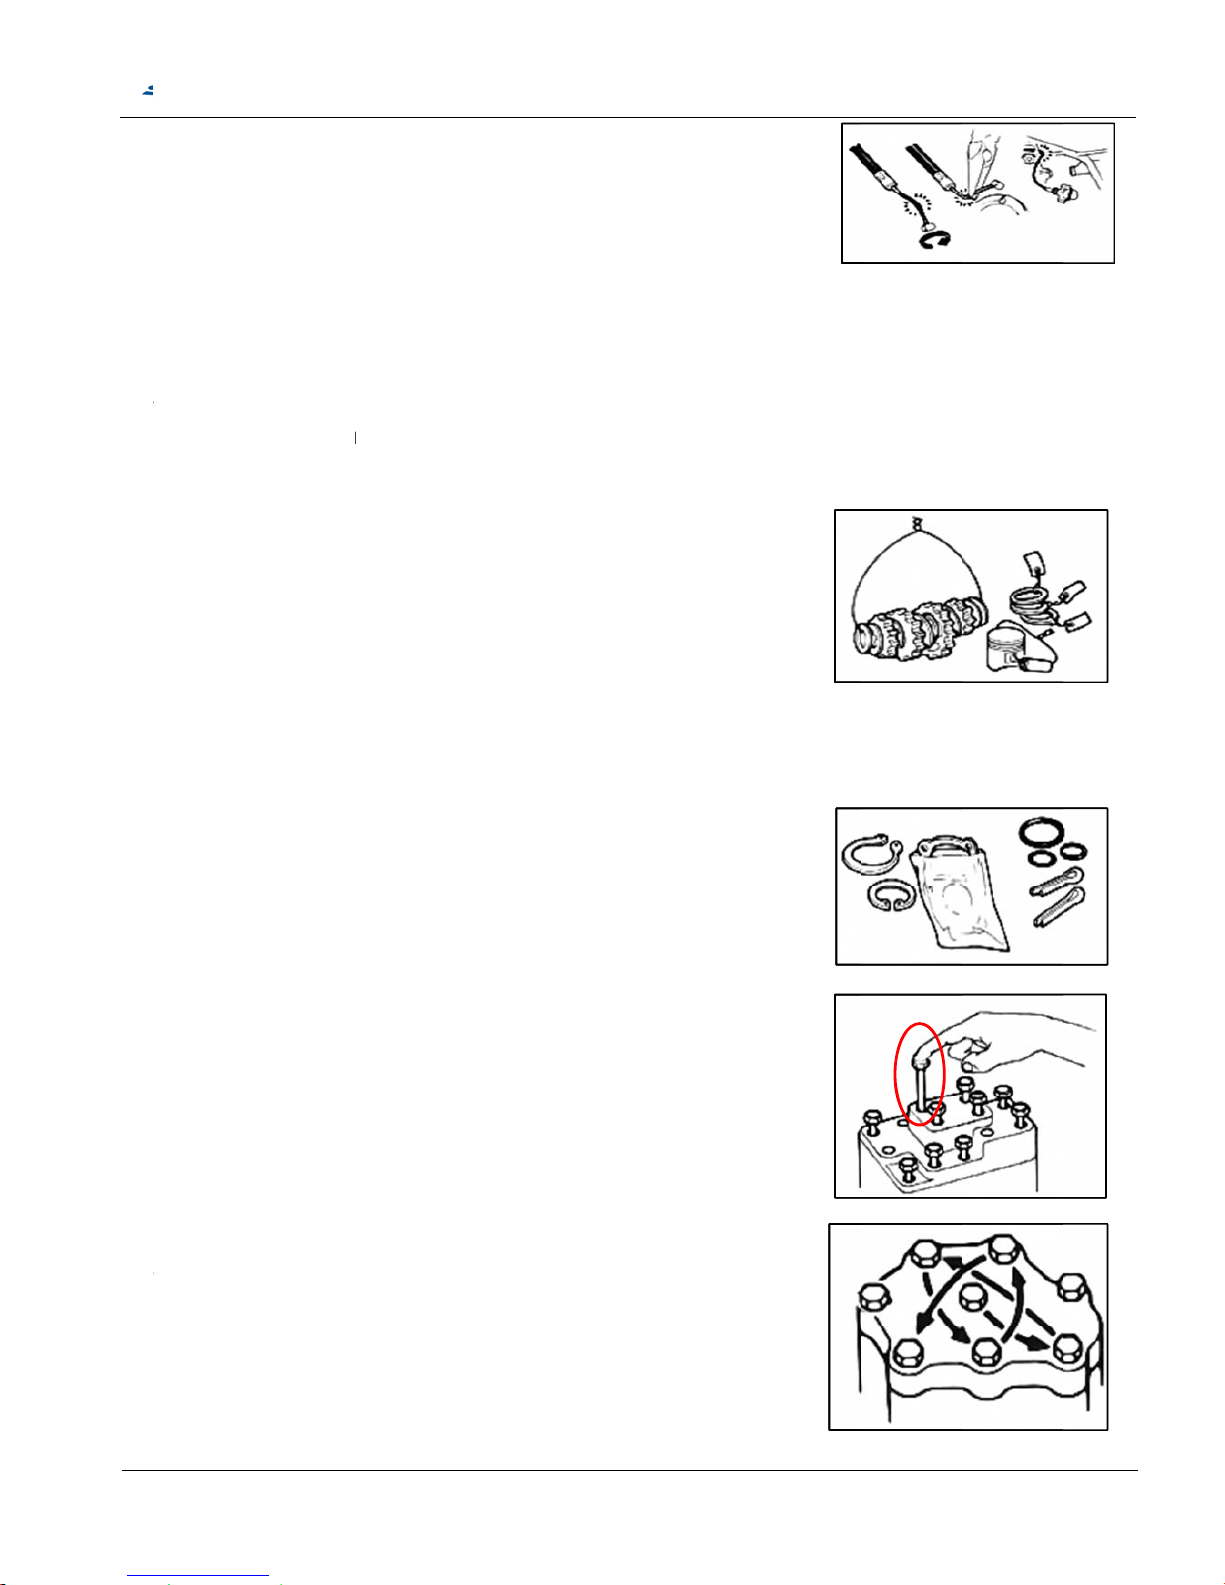
6.
7.
8.
W
9.
10.
11.
12.
13.
w
Never be
n
and prem
a
Rubber p
a
Check the
necessar
y
hen loo
s
pattern an
loosen fir
s
Store com
proper as
s
of installat
number ta
Note the r
e
ensure th
e
Compone
n
disassem
b
snap ring
s
he lengt
h
boxes is d
installed. I
compare i
t
he same
w
assembly
ighten a
s
ighten al
l
ith speci
a
important
c
appropriat
Bolts and
f
o the thre
d or twist
a
ture worn
rts may b
e
se parts b
e
.
ening a c
o
d work fro
m
t, small fa
s
plex com
p
emble or
d
ion later o
r
b for the s
assembl
e
y will be r
e
ts not to
b
led includ
, and split
of bolts
a
ifferent fro
n case of
c
s length
w
ith other
should ha
v
semblies
w
the faste
n
l tool first
ompone
n
e increme
n
asteners
s
ads.
S
MC
control
c
out.
come det
e
fore inst
a
mponent
inside o
teners m
a
onents su
er and tie
you can l
equence t
o
position
o
assembl
e
e reused
ing gaske
t
pins.
nd screw
s
m one an
o
onfusion,
ith other
b
bolts, it is
e the sa
m
ith differ
e
ers with fi
diagonall
y
ts should
ts to avoi
hould be
ATV5
0
able to pr
e
riorated
w
llation to
m
which has
ut. Loose
n
y receive
ch as tran
s
them tog
e
abel the a
s
avoid th
e
f the imp
o
d in corre
c
should be
s, metal s
e
for asse
m
ther, be s
Insert the
olts, if its l
a correct
b
e length.
nt dimen
s
ngers, the
from insi
d
e tighten
e
d warp un
l
kept clean
/10
0
Se
vent uns
m
hen old,
a
ake sure
different
s
the small
too much
mission
p
ther with
a
ssembly p
mistake.
rtant com
ct dimensi
replaced
w
al rings,
O
blies, cov
ure they a
bolt into t
h
ength out
s
olt. Bolts
f
ion fasten
n tighten t
e toward
d 2 to 3 ti
ess other
w
and dry.
D
rvice
M
ooth con
t
nd prone
t
that they
a
ized faste
fasteners
stress.
arts in th
e
wire for
e
arts by Ar
a
ponents b
e
ons (dept
h
hen
-rings, oil
er plates
o
e correctl
y
e hole to
ide the h
o
or the sa
m
ers as foll
o
he big on
e
outside,
mes with
ise indic
a
o not ap
p
anua
l
Chapt
e
rol
o be dam
a
re in goo
d
ners, ope
r
first. If th
e
ase
bic
fore disa
s
, distance
seals,
r
le is
e
ws:
s
ted.
ly oil
er 1 Gen
ged by s
o
conditio
n
ate with a
bigger o
n
sembling
or positio
n
-
ral Infor
m
lvent and
, replace i
f
diagonal
es are
them to
).
4 -
ation
oil.
Page 6
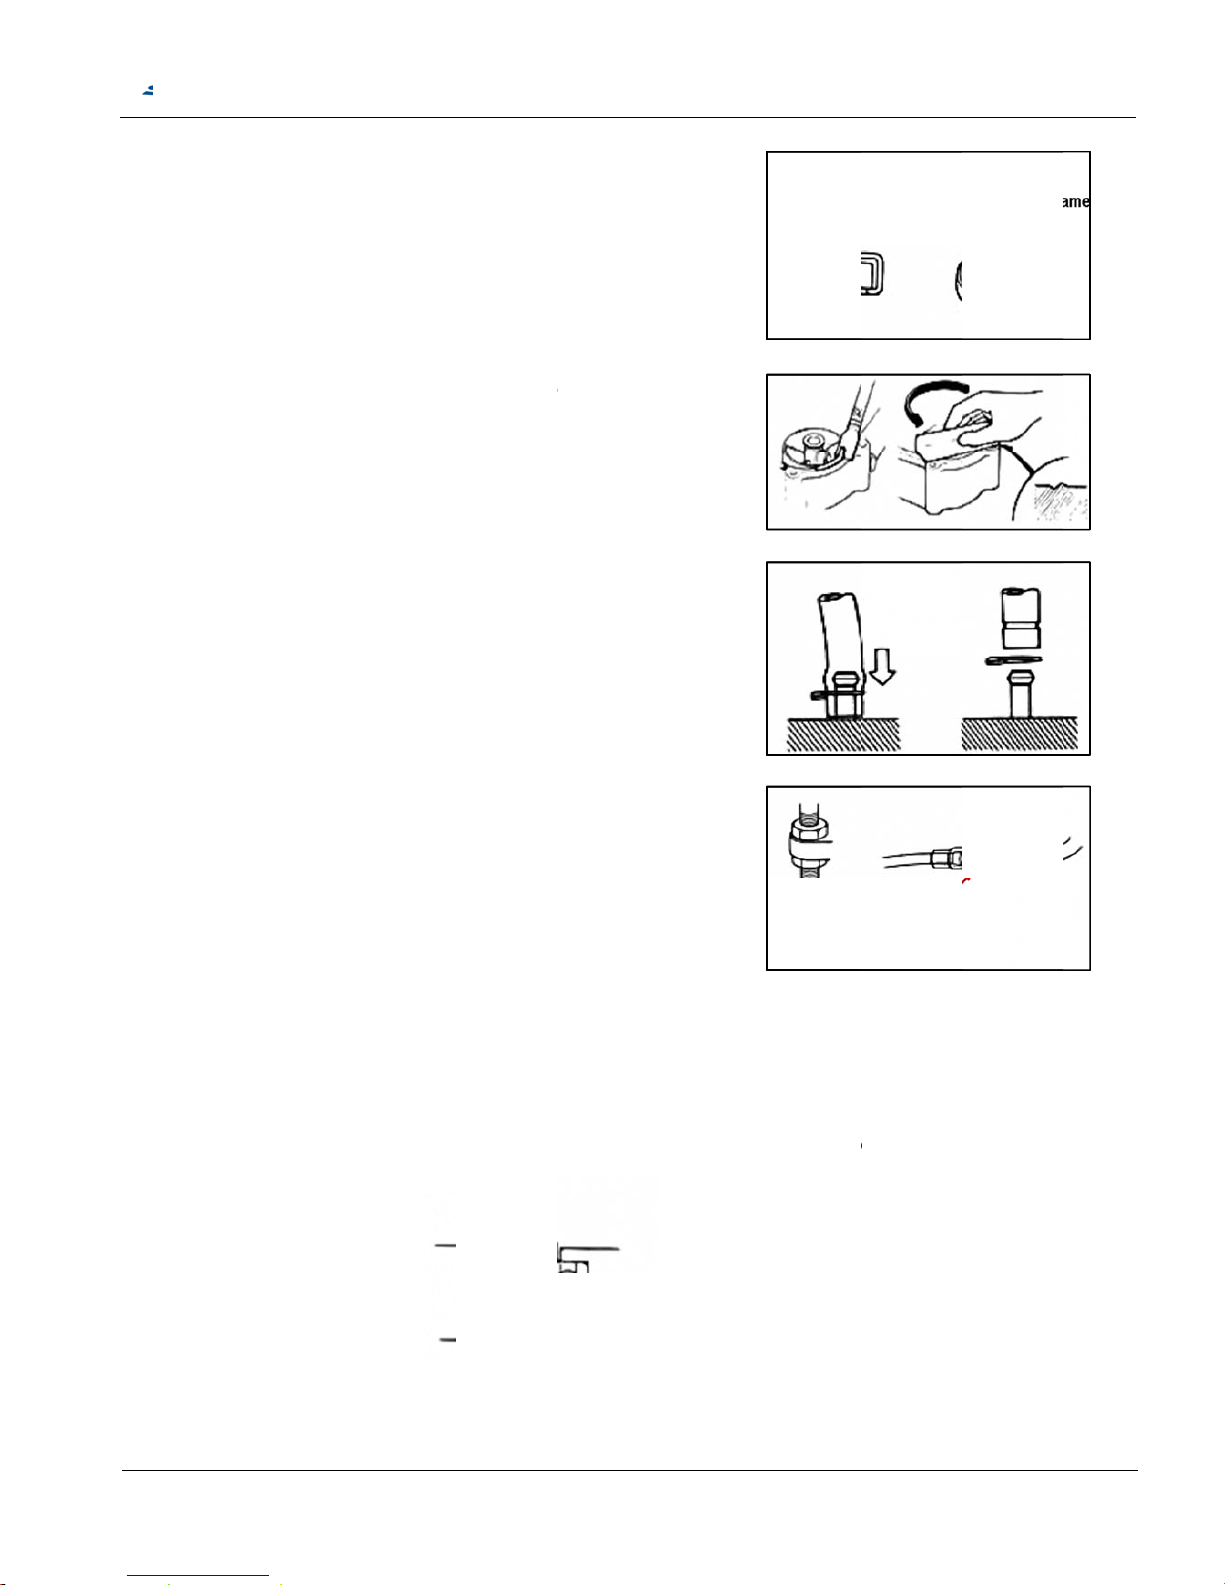
14.
15.
16.
17.
18.
When oil
he oil se
a
outside, a
n
installed f
o
oil seal.
Remove r
e
reinstallati
has any d
a
he ends
o
should be
so that th
e
ightening
Rubber a
n
he origin
a
he beari
n
removing
a
inner race
bearing, u
s
seal is in
s
l with the
n
d check t
h
r smooth
n
sidues of
on, grind
w
mage.
f rubber
h
pushed a
s
re is eno
u
the clamp
d plastic
b
l correct
p
g tool sh
o
ball bea
r
or outer r
a
e equal f
o
(B
o
S
MC
talled, fill t
ame of th
e shaft o
n
ess and f
o
the old g
a
ith a grin
d
oses (for
far as th
e
gh room
b
s.
oots shou
ositions a
s
uld be pr
e
ing. Dam
a
ce). In thi
rce on b
o
th of the
s
ATV5
0
he groove
e manufa
c
which th
e
r burrs th
a
sket or se
a
stone if t
h
uel, vacu
u
y can go
t
elow the
e
ld be prop
designe
d
ssed agai
n
ge may r
e
s case, th
e
th races.
e exampl
e
/10
0
Se
with grea
s
turer faci
n
oil seal i
s
t may da
m
alant befo
r
e contact
m, or co
o
o their co
n
nlarged e
n
erly reinst
a
.
st two (in
sult if the
t
bearing
s
s can re
s
rvice
M
e, install
g
to be
age the
e
surface
lant)
nections
ds for
lled to
ner and o
u
ool is pre
s
hould be
r
ult in bea
r
anua
l
Chapt
e
ter) beari
n
sed again
eplaced.
T
ing dama
g
er 1 Gen
g races
w
st only on
e
o avoid d
ge)
-
ral Infor
m
hen
race (eit
h
amaging t
h
5 -
ation
er
e
Page 7
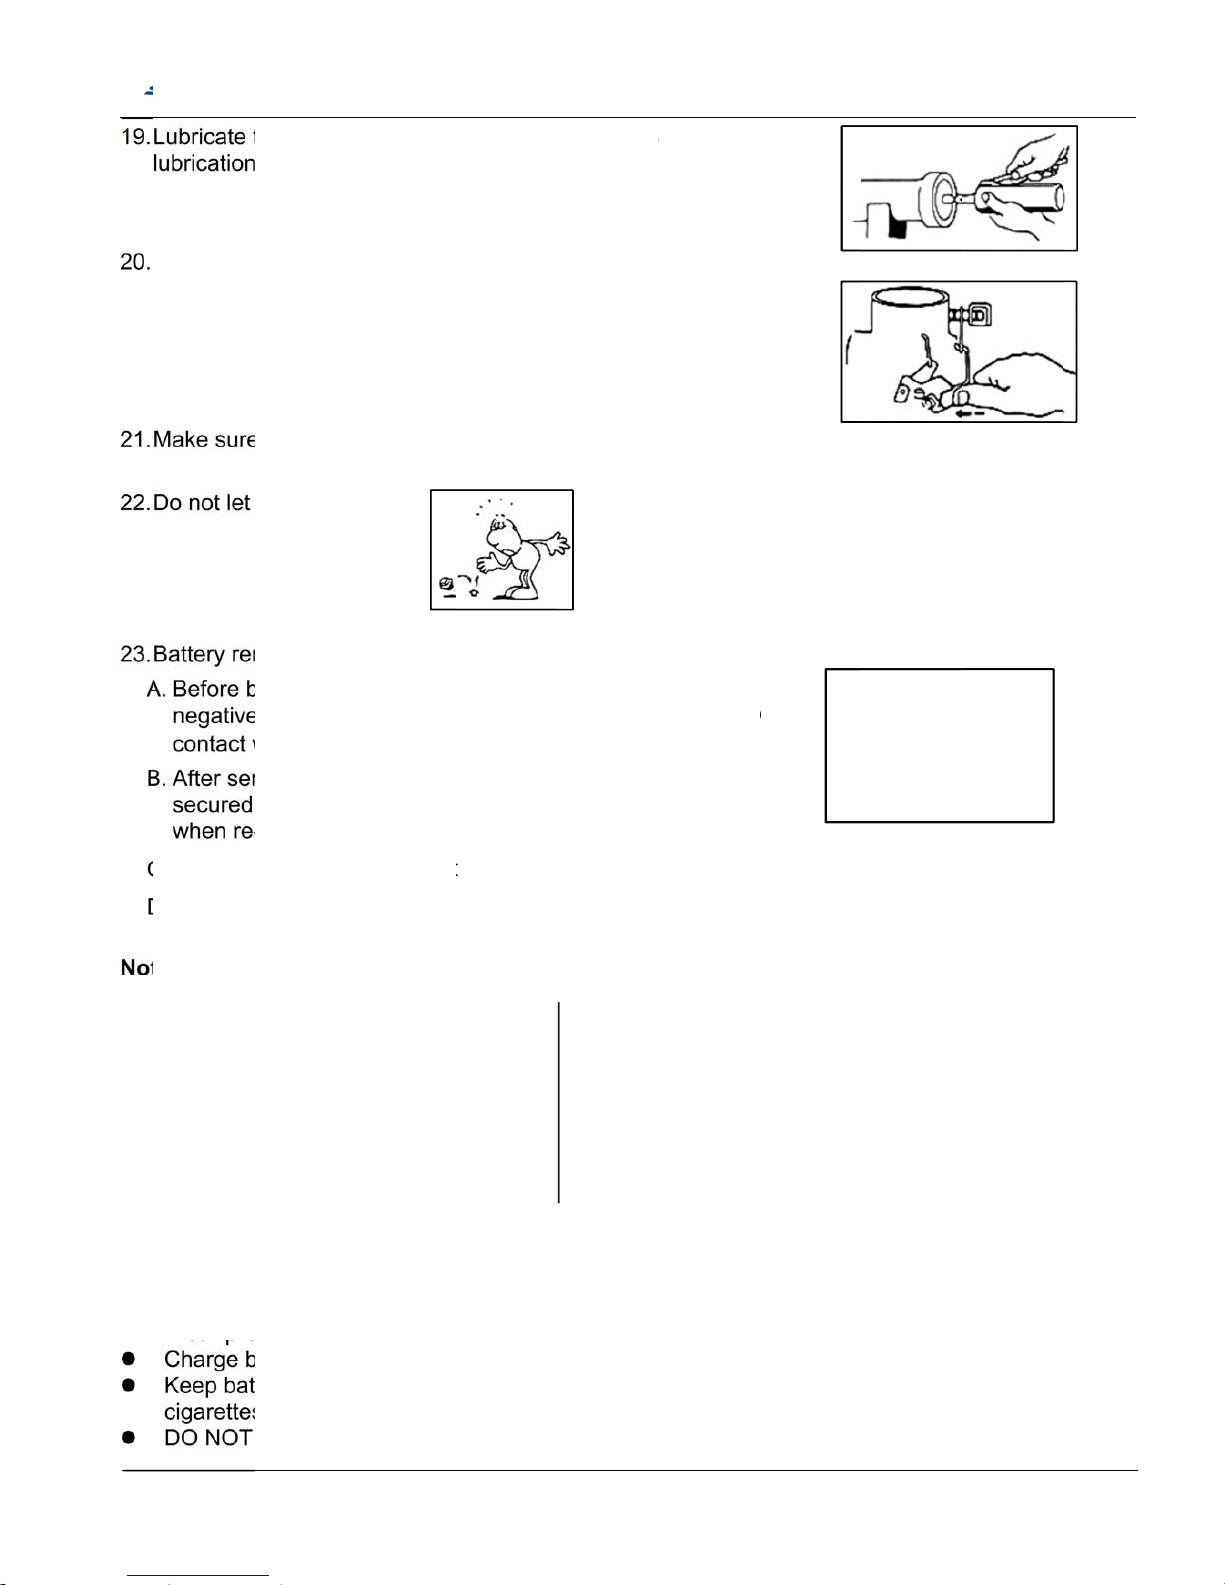
he rotatio
n
points be
f
sitions a
n
service s
a
parts fall
d
oval/inst
a
attery re
m
(-) cabl
e
ith body
t
vice com
p
. Battery p
install the
two pole
s
re that th
e
.
Voltage
rate expl
o
stic sulfu
r
tective ey
e
atteries in
teries aw
a
).
SMOKE
w
S
MC
ball face
ore asse
m
d operati
o
fety for e
a
own.
llation.
oval oper
a
firstly. T
o
o prevent
leted, ma
k
ositive (+)
battery c
o
ide of bat
t
battery p
o
and cond
sive hydr
o
ic acid. T
h
gear wh
e
a well-ve
n
y from fir
e
hen char
g
ATV5
0
with spec
i
bling.
n for inst
a
ch other
w
tion, it ha
s
ols like o
p
from shor
t
e sure all
cable sho
rd. .
ery have t
o
st caps a
r
tion of c
h
gen gas
a
erefore,
a
n handlin
g
tilated a
r
e
, sparks o
r
ing or ha
n
/10
0
Se
fied lubric
a
lled parts
hen con
d
to remo
v
en-end w
r
-circuit an
connectio
uld be co
n
be grea
s
re located
arge in b
a
nd contai
lways foll
o
or worki
n
a.
open fla
m
dling batt
e
rvice
M
nt on the
is in corre
c
ucting by
e the batt
e
ench do n
o
create s
p
n points is
nected fir
s
ed after c
o
in properl
y
ttery
n electrol
y
w these p
g near b
a
es (e.g.,
w
ries.
anua
l
Chapt
e
t and
wo perso
n
ry
t
ark.
tly
nnected
t
after the
e which i
s
reventive
m
tteries.
elding e
q
er 1 Gen
s.
he cables
.
battery p
o
made of
p
easures:
uipment, l
-
ral Infor
m
sts had b
e
oisonous
ighted
6 -
ation
en
Page 8
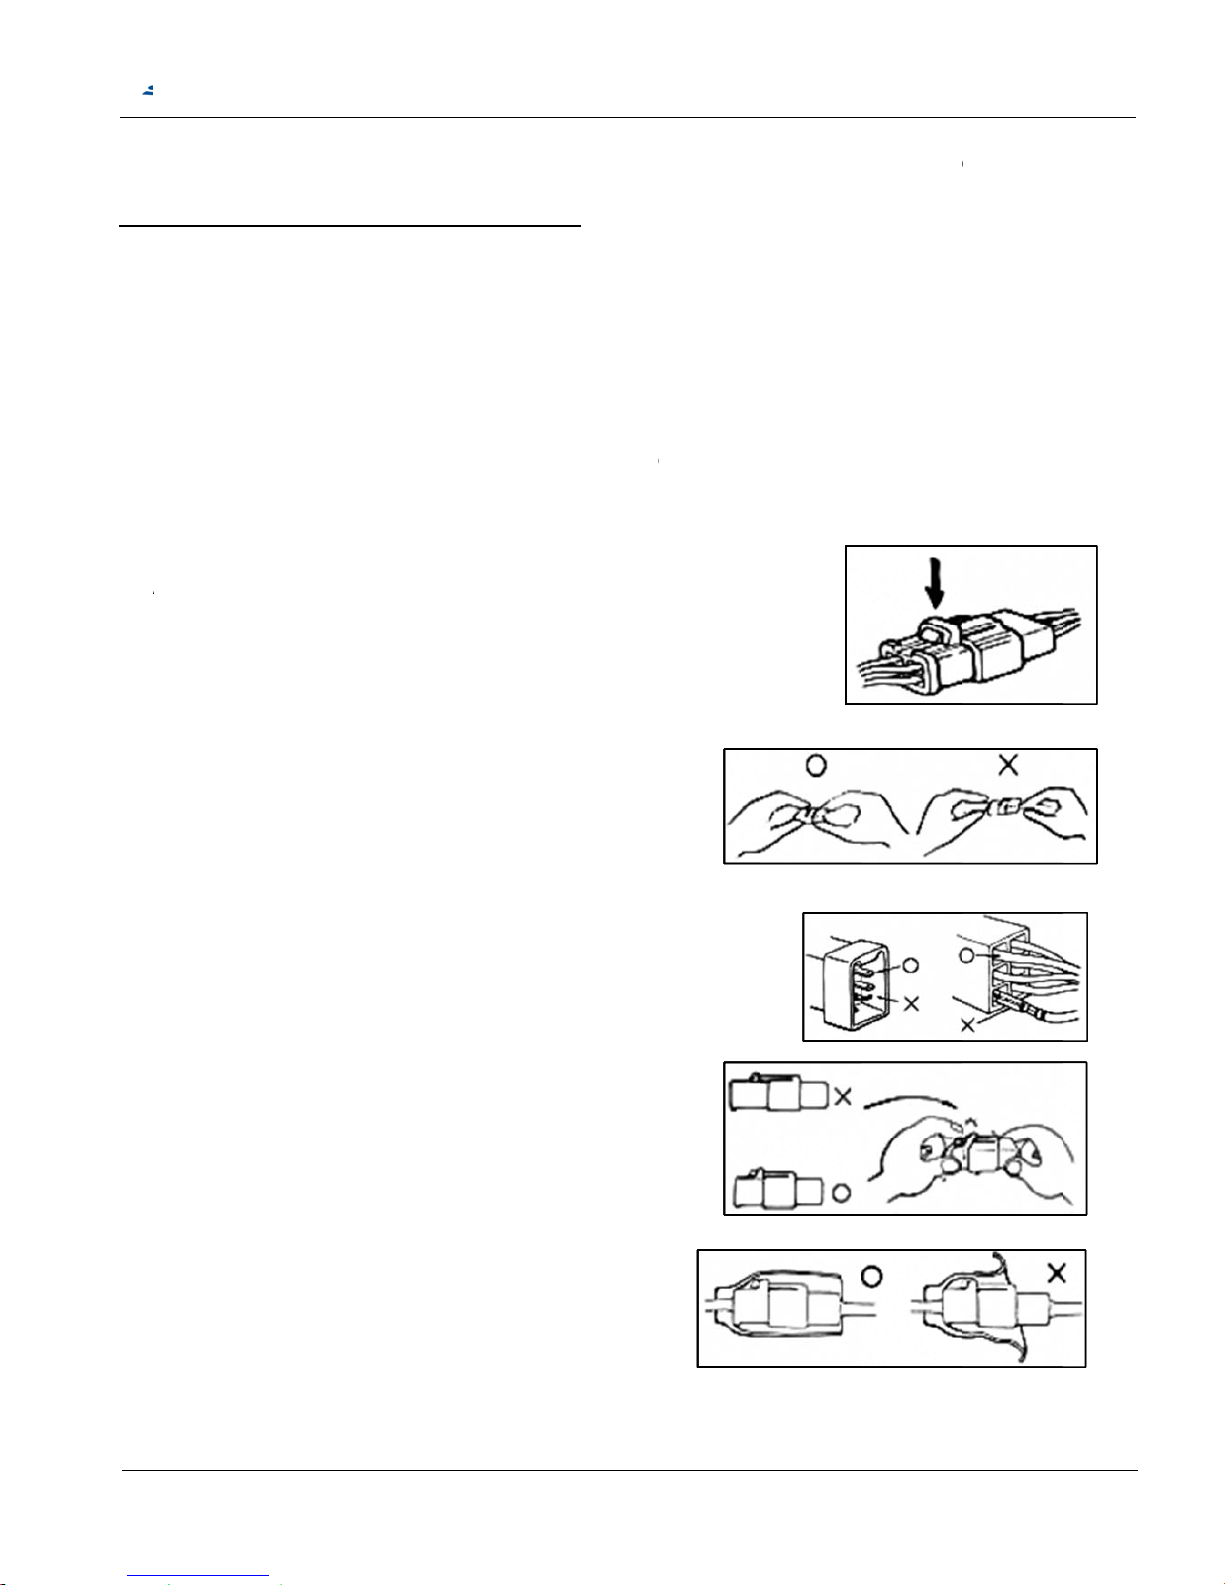
FI
REXT
IN
T
24.
25.
A
KEEP B
A
A
void bo
d
ST AID I
N
ERNAL
Skin —
W
Eyes —
F
ERNAL
Drink lar
g
vegetabl
e
If fuse bur
capacity f
u
Connecto
r
. When
s
compl
e
B. Do not
wires.
H
C. Make
s
D. Insert
t
locker
s
locker
s
loose.
E. Check
conne
c
TTERIES
ily conta
c
CASE O
F
ash with
w
lush with
e quantiti
e
oil. Get i
m
ned, it ha
s
se.
unlock/in
s
eparatin
g
tely, unlo
c
pull the w
old the c
o
ure if the
c
he conne
c
on two c
o
are locke
if the con
n
tor boot c
o
S
MC
AND EL
E
t with ele
c
BODILY
ater.
water for
1
s of wate
mediate
to find ou
ert
a connec
t
ked it firs
t
ires as re
m
nnector
b
onnector
tor compl
e
nnector s
i
d in prope
ector is c
o
mpletely
ATV5
0
CTROLY
T
trolyte as
CONTAC
5 minute
s
or milk f
o
medical a
t
the caus
e
or, it lock
e
.
oving a c
o
ody.
pins are b
e
tely. If th
e
des, mak
e
rly. Check
vered by
t
and secur
e
/10
0
Se
E OUT O
it can cau
s
T:
and get i
m
llowed wit
tention.
and solv
e
r has to I
n
onnector
o
nt, extru
d
re are tw
o
sure the
if any wir
e
he twin
d properl
y
rvice
M
F REACH
e severe
b
mediate
h milk of
m
d it. And
t
sert the t
e
r
ed or loo
s
.
anua
l
Chapt
e
OF CHIL
D
urns or p
e
medical a
t
agnesia,
b
hen repla
c
rminal
en.
er 1 Gen
REN.
rmanent
e
tention.
beaten eg
g
e with sp
e
-
ral Infor
m
ye injury.
or
cified
7 -
ation
Page 9
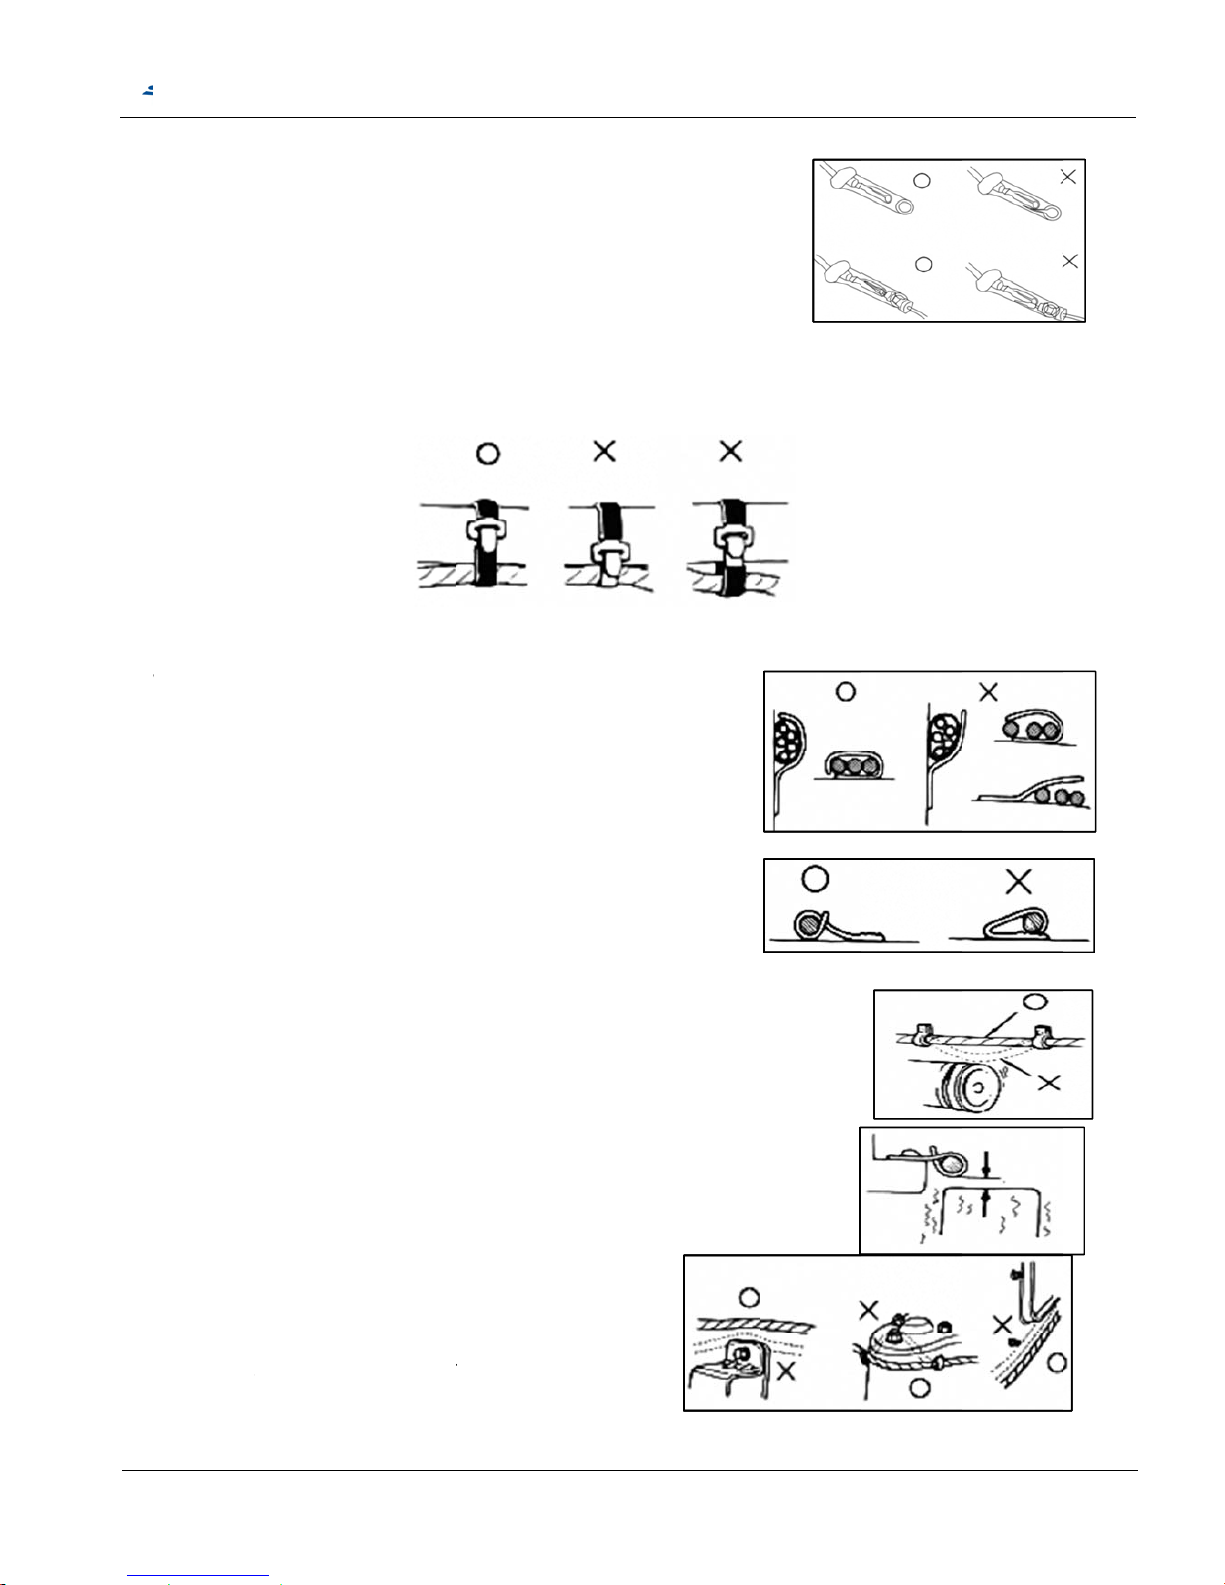
26.
27.
W
28.
29.
30.
31.
F. Before
termin
a
Secure wi
r
locations.
harnesse
s
ire ban
d
properly.
Do not sq
u
Do not let
compone
n
Keep wire
Route wir
e
corners a
n
and scre
w
terminal
c
l is loose.
es and wi
Tighten th
.
and wire
eeze wir
e
the wire h
a
ts as routi
harnesse
s
harness
e
d also av
o
s.
S
MC
onnection
re harnes
s
e bands s
o
harness
h
s against
t
rness co
n
ng the ha
r
far away
s to avoid
id the pro
j
ATV5
0
check if t
es to the
f
that only
ave to b
e
he weld o
tact with
r
ness.
from the
h
sharp ed
g
ected en
d
/10
0
Se
he boot is
rame with
the insul
a
clamped
r its clam
p
otating, m
ot parts.
es or
s of bolts
rvice
M
crack or t
h
respectiv
e
ted surfac
secured
.
oving or v
i
anua
l
Chapt
e
e
wire ban
d
s contact
brating
er 1 Gen
s at the
d
the wires
-
ral Infor
m
esignated
or wire
8 -
ation
Page 10
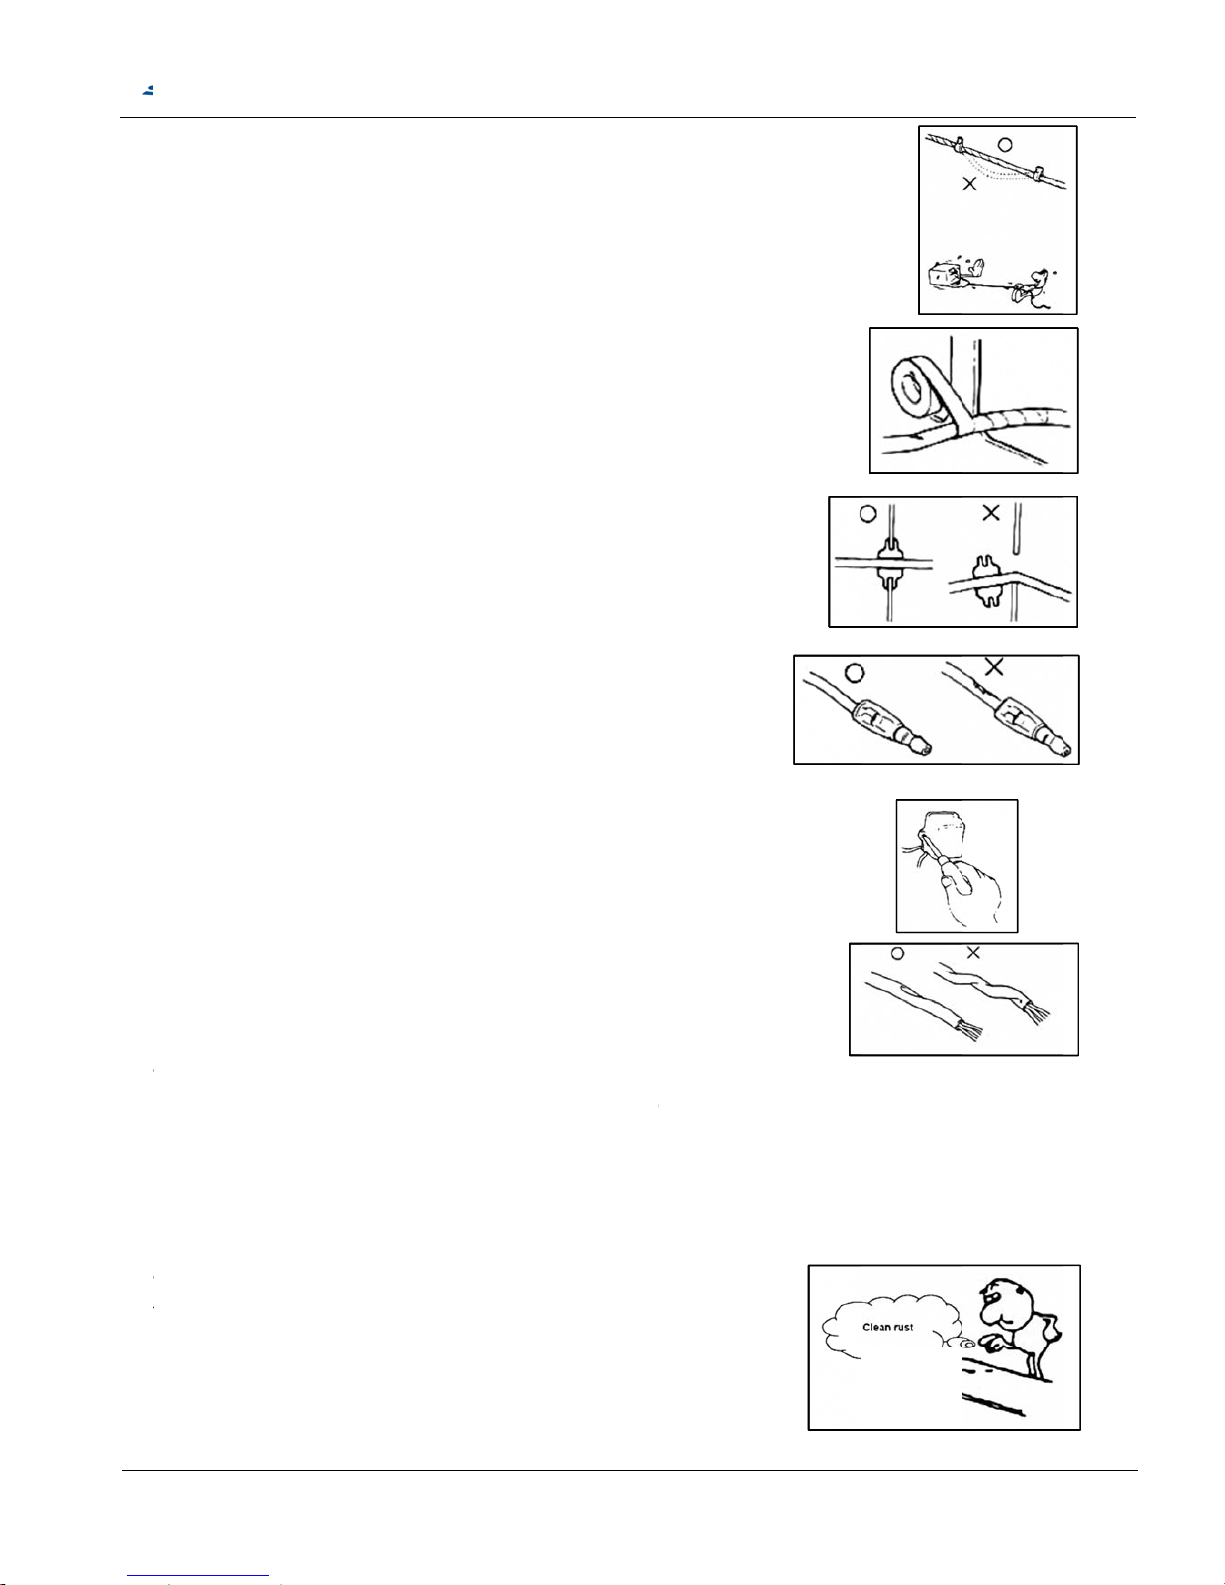
32.
33.
34.
35.
36.
37.
38.
W
39.
40.
W
f
Route har
n
slack.
Protect w
contact a
tape is to
Secure th
e
Never us
e
broken.
W
replace th
e
Never cla
m
compone
n
Do not let
ire harn
e
slack, be
r
Before op
e
instrumen
t
ith sand
ound. An
d
esses so
ires or wir
e
sharp ed
g
be applie
d
rubber b
o
wires or
h
rap electri
m.
p or squ
e
ts.
the wire h
a
sses rout
ubbed ag
a
rating a t
e
. And the
n
paper to
c
then con
S
MC
that they
n
harness
e
e or corn
e
.
ot firmly
a
arnesses
cal tape a
r
eze the
w
rness be
e
ed along t
h
inst or int
e
st instru
m
, conduct
lean rust
o
duct conn
e
ATV5
0
either pul
s with ele
c
r. Thorou
g
s applyin
g
which ins
u
ound the
d
ire harnes
n twisted
e handle
b
rfere with
ent, oper
a
test in ac
c
n connec
t
ction ope
/10
0
Se
l too tight
n
trical tap
e
hly clean
it on wir
e
lation ha
s
amaged
p
s as instal
as install
a
ar should
adjacent
o
tor shoul
d
ordance
w
or pins/te
r
ration late
r
rvice
M
or have
e
or tube i
f
he surfac
e
harness.
been
arts or
ling other
tion.
not be pu
r surroun
read the
o
ith the in
s
minals if
.
anua
l
Chapt
e
xcessive
they
where
led too tig
ding parts
peration
m
truction.
er 1 Gen
ht or have
in all stee
anual of
-
ral Infor
m
excessiv
e
ring positi
o
the
9 -
ation
n.
Page 11

1-
0
1.
Di
mSeaWhe
Gro
Wei
En
g
Cyli
Bor
e
Dis
p
Co
m
Lub
Car
Sp
a
Sta
r
Igni
tGen
Bat
tEngEng
Air-
F
Tra
nGea
Fin
a
Fin
a
Ge
a
Ge
aFue
Fu
e
Ch
a
Fro
nRea
Bra
k
Bra
k
F.
B
R.
B
Tir
e
Fro
n
He
aRea
Fla
s
4 Speci
f
SMC CF5
ension (Lx
W
t height
el base
und Cleara
ght
ine
nde
r
* Stroke
lacement:
pression
R
ricant :
bureto
r
rk
ting
ion
erator
ery :
ine Oil
ine Oil
ilter
smission (
r Shifting :
l ratio
:
l Drive :
r box oil
:
r Ratio :
l : Unl
e
l tank: 8.1
L
ssis : Ste
e
t Suspens
r Suspensi
e (F/R)
e (F/R)
rake oper
a
rake oper
a
: Tubeles
s
t/Rear: (F
)
(
R
d Light (ty
p
r Light: 12
V
her Light :
ication
s
series A
T
xH): 165
5
: 845mm
: 1080mm
nce : 23
5
: Un-laden
: 2 Stroke,
A
: Single, H
o
: 40 x 39.2
m
49.3 cc
atio : 7.8:1
mixed with
: Mikuni V
M
: NGK BP
R
: Electrical
: C.D.I.
:
A
CG Fly
W
MF type,
F
: 2Stroke
E
: 1.1L
: Wet type
e
F-R): C.V.
T
F- R (shift
s
1.59(35/2
2
Chain Dri
v
SAE #40,
Forward:
4
aded gas
o
l tube fra
m
ion: Doubl
e
on: Single
s
: Front dua
: Front dua
tion: Front
tion: Front
pedal for
i
AT 21x7-1
) AT 21x1
0
e 1): 12V
3
5W* 1 (L
E
12V 10W*
4
S
MC
50, CV
T
mm/1028
m
mm
Mass = 14
2ir
Cooled
rizontal
m
fuel by oil
p
16 (18m
m
7HS x 1
starte
r
/Kic
k
heel Mag
n
actory def
a
ngine Oil,
S
lement
Automati
c
elector fu
n
T)
e, 428*88
0.12L
1.15~17.3
7
line
e
A-arm; sh
o
wing Arm;
l hydraulic
d
l drum bra
k
RH side ha
LH side h
a
ntegrate fr
o
0 or others
-8 or othe
r
5W/35W*1
D)
ATV5
0
with rev
e
m/1025m
m
kg; with fu
e
ump
), MJ:#65,
Starter
eto 90W
ult: YUAS
A
AE #20 or
with centri
f
ction in re
v
; Reverse:
ck absorb
e
shock abs
o
isc / Rear
e / Rear si
n
ndle brake
ndle brake
nt and rea
s
(Hi/Low-B
e
/10
0
Se
rse gear,
l Mass =
1
PJ:#17.5,
N
/GS Batte
r
JASO FC
c
ugal clutc
h
erse with
p
34.86- 14.
: 72 mm
t
rber: 63m
m
single hydr
gle drum
b
lever for fr
o
lever for r
e
r wheeler
a
am)
rvice
M
Chain dri
48 kg
J:E-1(#42
6
y YTX4L-B
lass or ab
o
.
edal brake
)
71
ravel, 5-Se
travel, 5-
S
ulic disc (
O
rake (optio
nt wheele
r
ar wheeler
/
t the same
anua
l
Chapt
e
e.
)
/GTX4L-
B
ve.
tion adjus
t
ection adj
u
ption 1)
2)
parking br
a
time
er 1 Gen
S
able pre-lo
ustable pre
ke; R side
-
ral Infor
m
aded
-loaded
footrest br
a
10 -
ation
ke
Page 12

2.
Di
mSeaWhe
Gro
Wei
En
g
Cyli
Bor
e
Dis
pCom
Lub
Car
Sp
a
Sta
r
Igni
tGen
Bat
tEngEng
Air-
F
Tra
nGea
Fin
a
Fin
aGeaGeaFue
Fu
eCha
Fro
nRea
Bra
k
Bra
k
F.
B
R.
B
Tir
e
Fro
n
He
a
Re
a
Fla
s
SMC CF0
ension (Lx
W
t height
el base
und Cleara
ght
ine
nde
r
* Stroke
lacement:
pression
R
ricant :
bureto
r
rk
ting
ion
erator
ery :
ine Oil
ine Oil
ilter
smission
r Shifting :
l ratio
:
l Drive :
r box oil
:
r Ratio :
l : Unl
e
l tank: 8.1
L
ssis : Ste
e
t Suspens
r Suspensi
e (F/R)
e (F/R)
rake oper
a
rake oper
a
: Tubeles
s
t/Rear: (F
)
(
R
d Light (ty
p
r Light: 12
V
her Light:
1
series A
T
xH): 165
5
: 845mm
: 1080mm
nce : 23
5
: Un-laden
: 2 Stroke,
A
: Single, H
o
: 52 x 45m
m
95.2 cm3
atio : 5.8:1
mixed with
: Mikuni V
M
: NGK BP
R
: Electrical
: C.D.I.
:
A
CG Fly
W
MF type,
F
: 2 Stroke
E
: 1.1L
: Wet type
e
: C.V.T A
u
F-N- R (sh
i
1.59(35/2
2
Chain Dri
v
SAE #40,
Forward:
4
aded gas
o
l tube fra
m
ion: Doubl
e
on: Single
s
: Front dua
: Front dua
tion: Front
tion: Front
pedal for
i
AT 21x7-1
) AT 21x1
0
e 1): 12V
3
5W* 1 (L
E
2V 10W*
4
S
MC
100, CV
mm/1028
m
mm
Mass = 14
4ir
Cooled
rizontal
fuel by oil
p
16 (18m
m
7HS x 1
starte
r
/Kic
k
heel Mag
n
actory def
a
ngine Oil,
lement
tomatic wit
ft selector
f
T)
e, 428*88
0.12L
1.15~17.3
7
line
e
A-arm; sh
o
wing Arm;
l hydraulic
d
l drum bra
k
RH side ha
LH side h
a
ntegrate fr
o
0 or others
-8 or othe
r
5W/35W*1
D)
ATV5
0
with re
v
m/1025m
m
kg; with fu
e
ump
), MJ:#77.
5
Starter(op
t
eto 90W
ult: YUAS
A
AE #20 o
r
h centrifug
a
unction in
r
; Reverse:
ck absorb
e
shock abs
o
isc / Rear
e / Rear si
n
ndle brake
ndle brake
nt and rea
s
(Hi/Low-B
e
/10
0
Se
erse gea
r
l Mass =
1
, PJ:#17.5
ional)
/GS Batte
r
JASO FC
l clutch.
everse wit
h
34.86- 14.
: 72 mm
t
rber: 63m
m
single hydr
gle drum
b
lever for fr
o
lever for r
e
r wheeler
a
am)
rvice
M
, Chain d
r
50 kg
, NJ:E-1(#
4
y YTX5L-B
class or ab
pedal bra
k
71
ravel, 5-Se
travel, 5-
S
ulic disc (
O
rake (optio
nt wheele
r
ar wheeler
/
t the same
anua
l
Chapt
e
ive.
26)
/GTX5L-
B
ove.
e)
tion adjus
t
ection adj
u
ption 1)
2)
parking br
a
time
er 1 Gen
S
able pre-lo
ustable pre
ke; R side
-
ral Infor
m
aded
-loaded
footrest br
a
11 -
ation
ke
Page 13
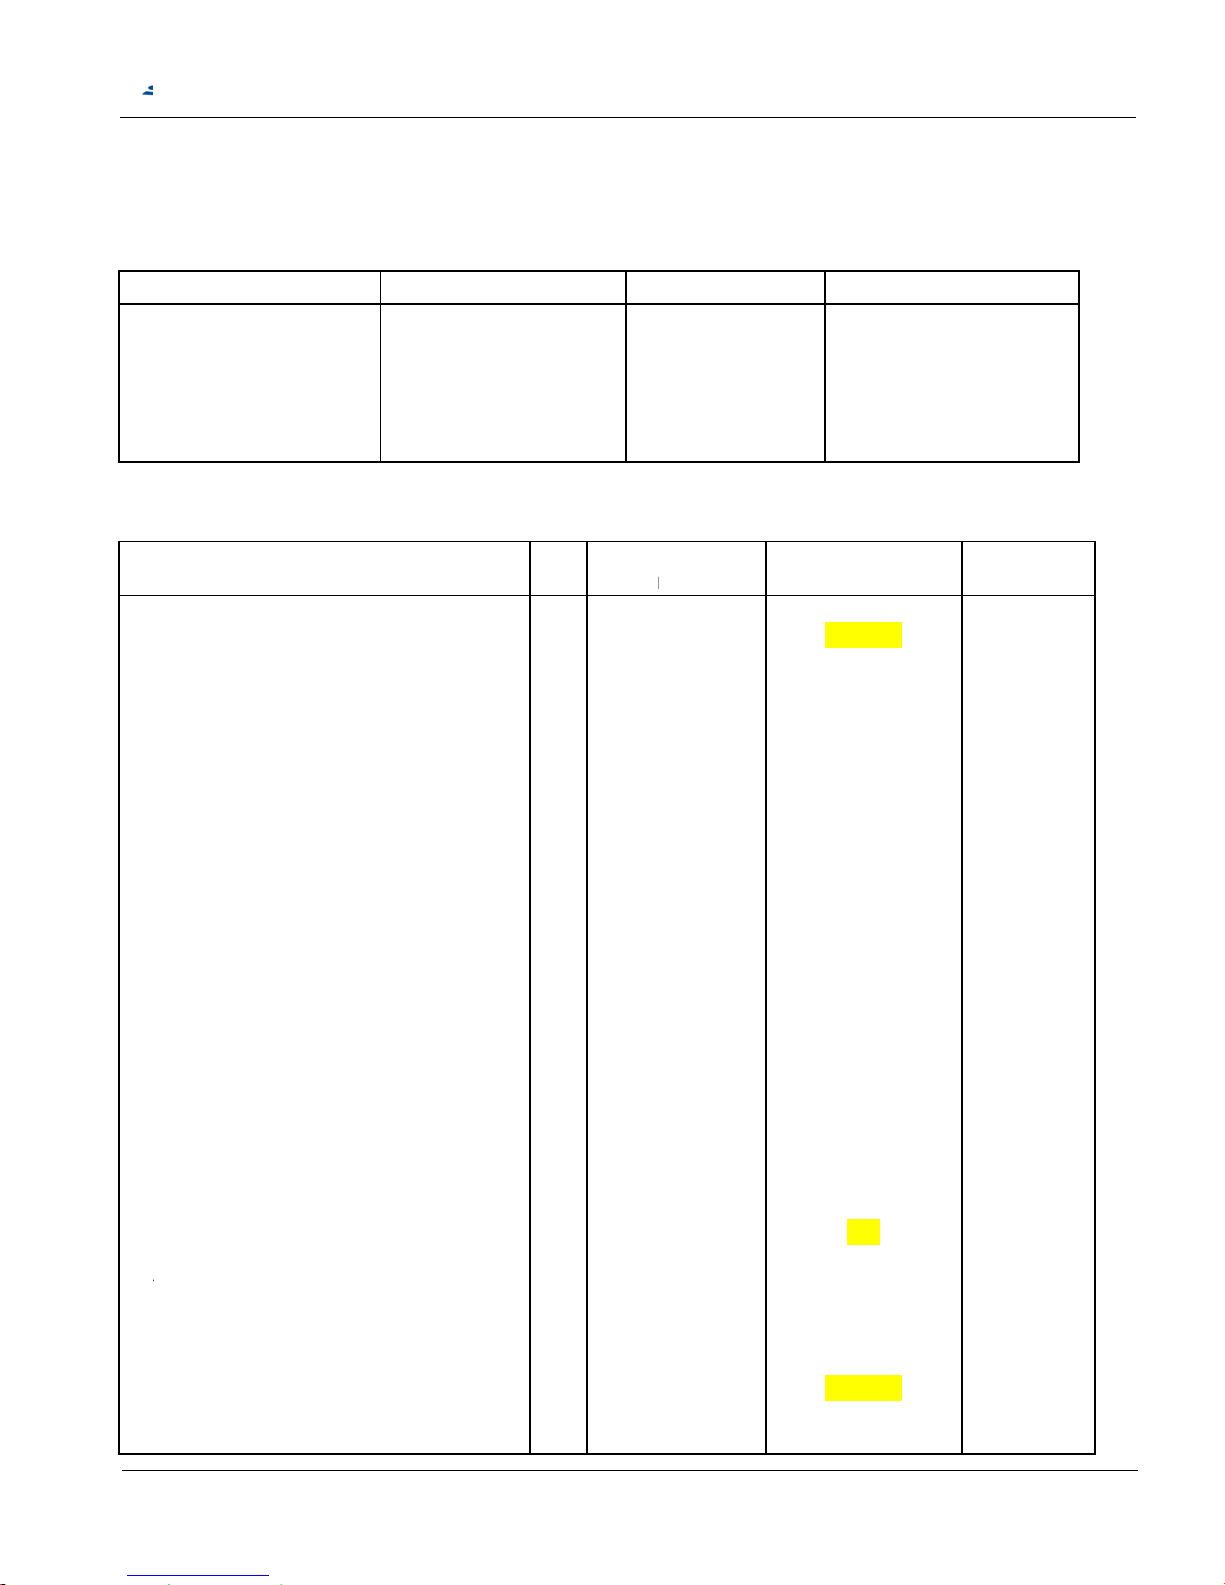
1-
0
Th
e
val
u
A.
5m
6m
8m
10
m12m
B.
Sp
a
Cyl
Cyl
A
ir
A
ir
Fa
n
Oil
Ca
rCar
A
ir
Int
a
Oil
Oil
Ge
a
Cr
a
ca
sL.R
Kic
Idl
eOne
Cl
uCluExhMufPro A.C
Ma
Ge
a
5. Tool
T
torque v
a
es for not
Standard
Ite
m
m Bolt, N
u
m Bolt, N
u
m Bolt, N
u
m Bolt,
N
m Bolt,
N
Engine T
o
rk Plug
inder hea
d
inder hea
d
Shroud
Shroud c
o
Bolt
pump bolt
buretor u
p
buretor fl
o
cleaner fi
x
ke bolt (r
e
plug cap
drop bolt
(
r box bol
t
nkcase c
o
e)
Crankca
s
k Nut
gear plat
e
way clut
c
tch
tch carrie
r
aust Pipe
fler bolt
tector, m
u
. Generat
o
gnet (A.C.
r shifting
orque
v
lues listed
listed in t
h
Toque V
a
t
t
t
ut
ut
rque
Item
/cylinder
s
nut
ver
per bolt
at bolt
ing bolt
ed valve)
drain bolt
)
ver bolt (t
r
e bolt
bolt
h bolt
(cylinder
s
ffler
r nut (fly
w
G. coil) sc
lever nut
S
MC
alue se
t
in table a
r
e table.
lue
Torqu
00135
tud bolt
ansmissi
o
ide)
heel/roto
r
rew
ATV5
0
ting
e for mor
e
e Value (
k
.45~0.60
.80~1.20
.80~2.00
.00~4.00
.00~6.00
Q
’
n
)
1443142242411
6161211122212
1
/10
0
Se
importan
t
g-m)
5m
6m
6m
8m
10
m
ty
Thr
e
(
m
1
1
4070706060504040606
1
4
0
806
1
1
0
6
0
6
0
6101028060806100606
rvice
M
tighten to
Item
m Screw
m Screw
m Screw
m Screw
m Screw
ad Dia.
m)
*1.22
*1.00
*1.00
*1.00
6.0
*1.00
*0.8
*0.7
*0.7
*1.00
*1.00
*1.50
*1.25
*1.00
*1.00
*1.00
*1.00
*1.00
*1.25
*1.00
*1.00
*1.00
*1.25
*1.00
*1.25
*1.00
*1.00
anua
l
Chapt
e
rque valu
e
T
o
Torqu
e
(kg
1.5
~
1.4
~
1.3
~
0.5
~
0.1
~
0.5
~
0.3
~
0.15
~
0
0.7
~
0.7
~
0.2
~
1.5
~
0.7
~
0.7
~
0.7
~
0.7
~
0.6
~
2.5
~
3.5
~
5
0.7
~
2.2
~
0.7
~
3.8
~
1.0
~
1
er 1 Gen
s. Please
rque Val
u
0.45~
0
1.00~
1
0.70~
1
2.00~
3
3.50~
4
Value
-m)
2.0
2.0
1.5
0.8
0.2
0.8
0.5
0.25
.2
1.0
1.0
0.4
2.0
1.0
1.0
1.0
1.0
1.0
3.5
4.5
.0
1.0
3.0
1.0
4.2
1.6
.0
-
ral Infor
m
see stand
a
e (kg-m)
.60
.40
.10
.00
.50
sugges
2.0
1.0
1.4
0.7
0.2
0.7
0.4
0.2
0.2
0.9
1.1
0.3
1.8
1.2
1.2
1.2
0.9
0.8
4.0
3.0
0.9
2.6
0.9
3.8
0.8
12 -
ation
rd
t
Page 14
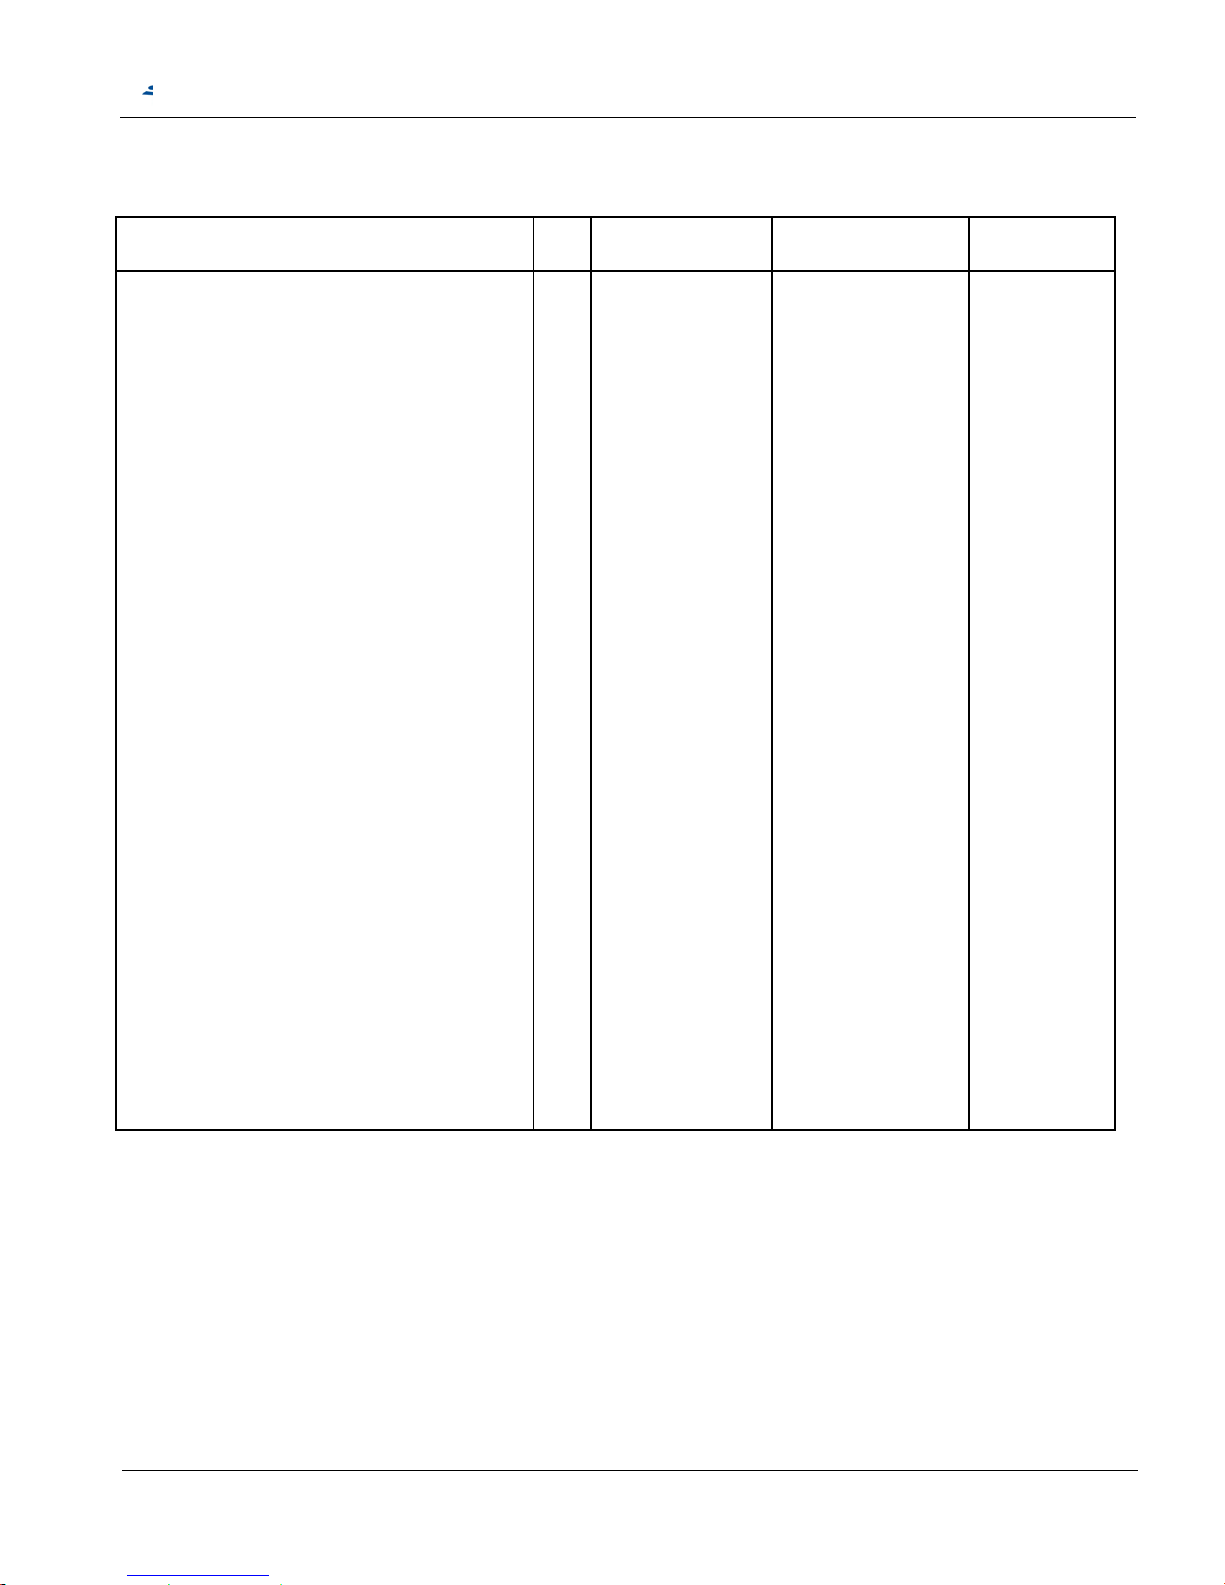
C.
Ste
Ste
Fro
Fro
Ste
Tie
-
Tie
-
Fro
Fro
Re
aRea
Fro
Re
a
En
g
F.e
n
Sw
iUndChaFooReaRea
Re
aRea
Fo
oFoo
Ex
hHan
Chassis
P
ering colu
m
ering colu
m
nt Shock
a
nt Arm (U
p
ering Knu
c
rod (lock
n
rod end a
nt hub
nt Wheel
r collar w
h
r Wheel
nt shield
b
r shield b
o
ine Moun
t
gine and
ng-Arm
er guard
in suppor
t
trest L&R
r Shock
A
r axles h
e
r axles h
e
r Brake H
t brake b
o
t brake b
o
aust Pipe
dlebar H
o
arts Tor
q
Item
n holder
n holder
bsorber (
u
per-Fram
kle and u
p
ut)
nd steerin
g
eel
olt
lt
ing
frame
er
bsorber (
u
xagon nu
t
xagon nu
t
ub Bolt
lt
lt
holder (fr
a
lder
S
MC
ue Value
and fram
e
and handl
pper & lo
w
e)
per arm
column
pper) bolt
(IN)
(EX)
me)
ATV5
0
Q
e bar
er)
2142244
2828411144411
1
4
1
2
2
2
/10
0
Se
’ty
Thr
e
(
1
1
1
1
1
1
1
1
0
810101010101014
1
0
1
410080810140810081028
2
810
1
008
0
808
rvice
M
ad Dia.
mm)
*1.25
*1.25
*1.25
*1.25
*1.25
*1.25
*1.25
*1.50
*1.25
*1.50
*1.25
*1.25
*1.25
*1.25
*1.50
*1.25
*1.25
*1.25
*1.25
*1.50
*1.50
*1.25
*1.25
*1.25
*1.25
*1.25
anua
l
Chapt
e
Torqu
(k
g
1.
82.24.0
34.023
7
4
1
42248
21.8
22.010
1
0
5
4.
01.0
1.
81.0
er 1 Gen
e Value
-m)
/2.3
/3.5
/3.0
.0
/6.0
.5
.0
.0
.5
2.0
.5
.6
.6
.5
.5
.3
/2.8
.6
/3.0
/16
/16
.0
/6.0
/1.6
/2.8
/1.5
-
ral Infor
m
Rema
r
13 -
ation
ks
Page 15
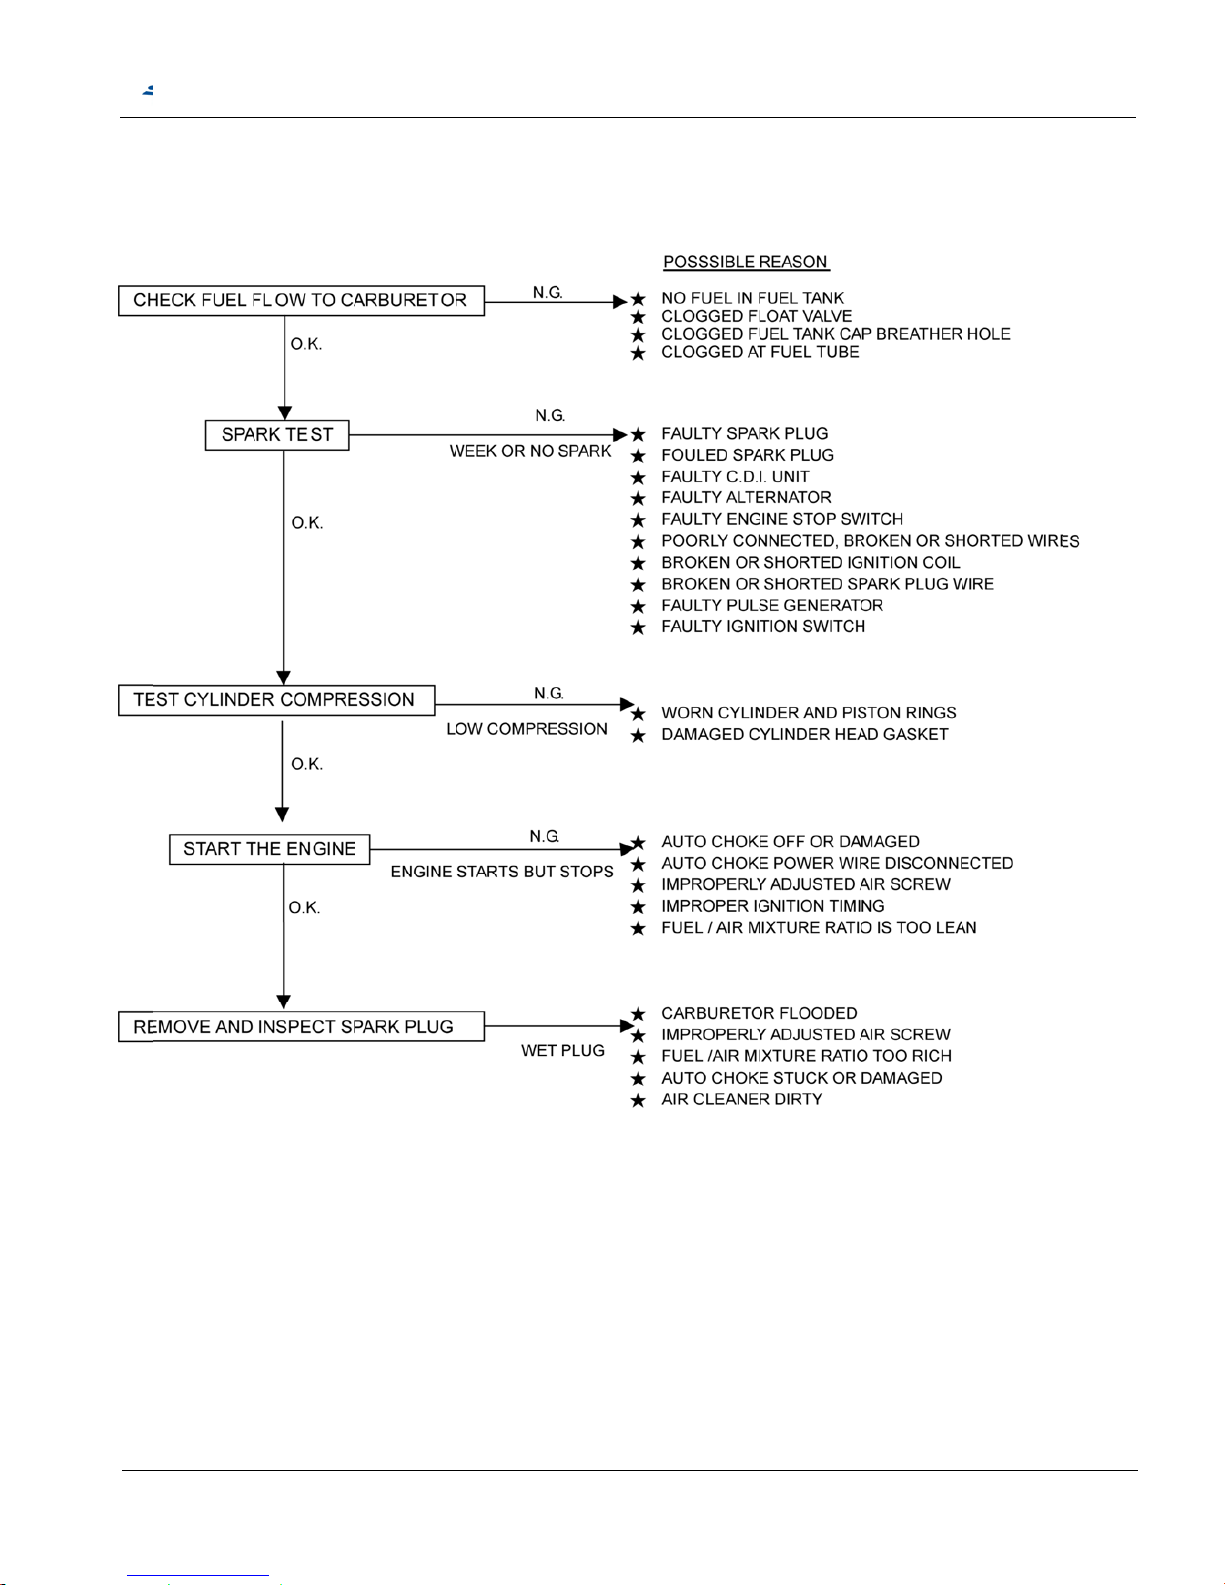
1-
0
A.
E
6.Trou
b
ngine d
o
les Diag
es not st
a
S
MC
nosis
rt
ATV50/10
0
Se
rvice Manua
l
Chapteer 1 Gen- ral Infor
m
14 -
ation
Page 16
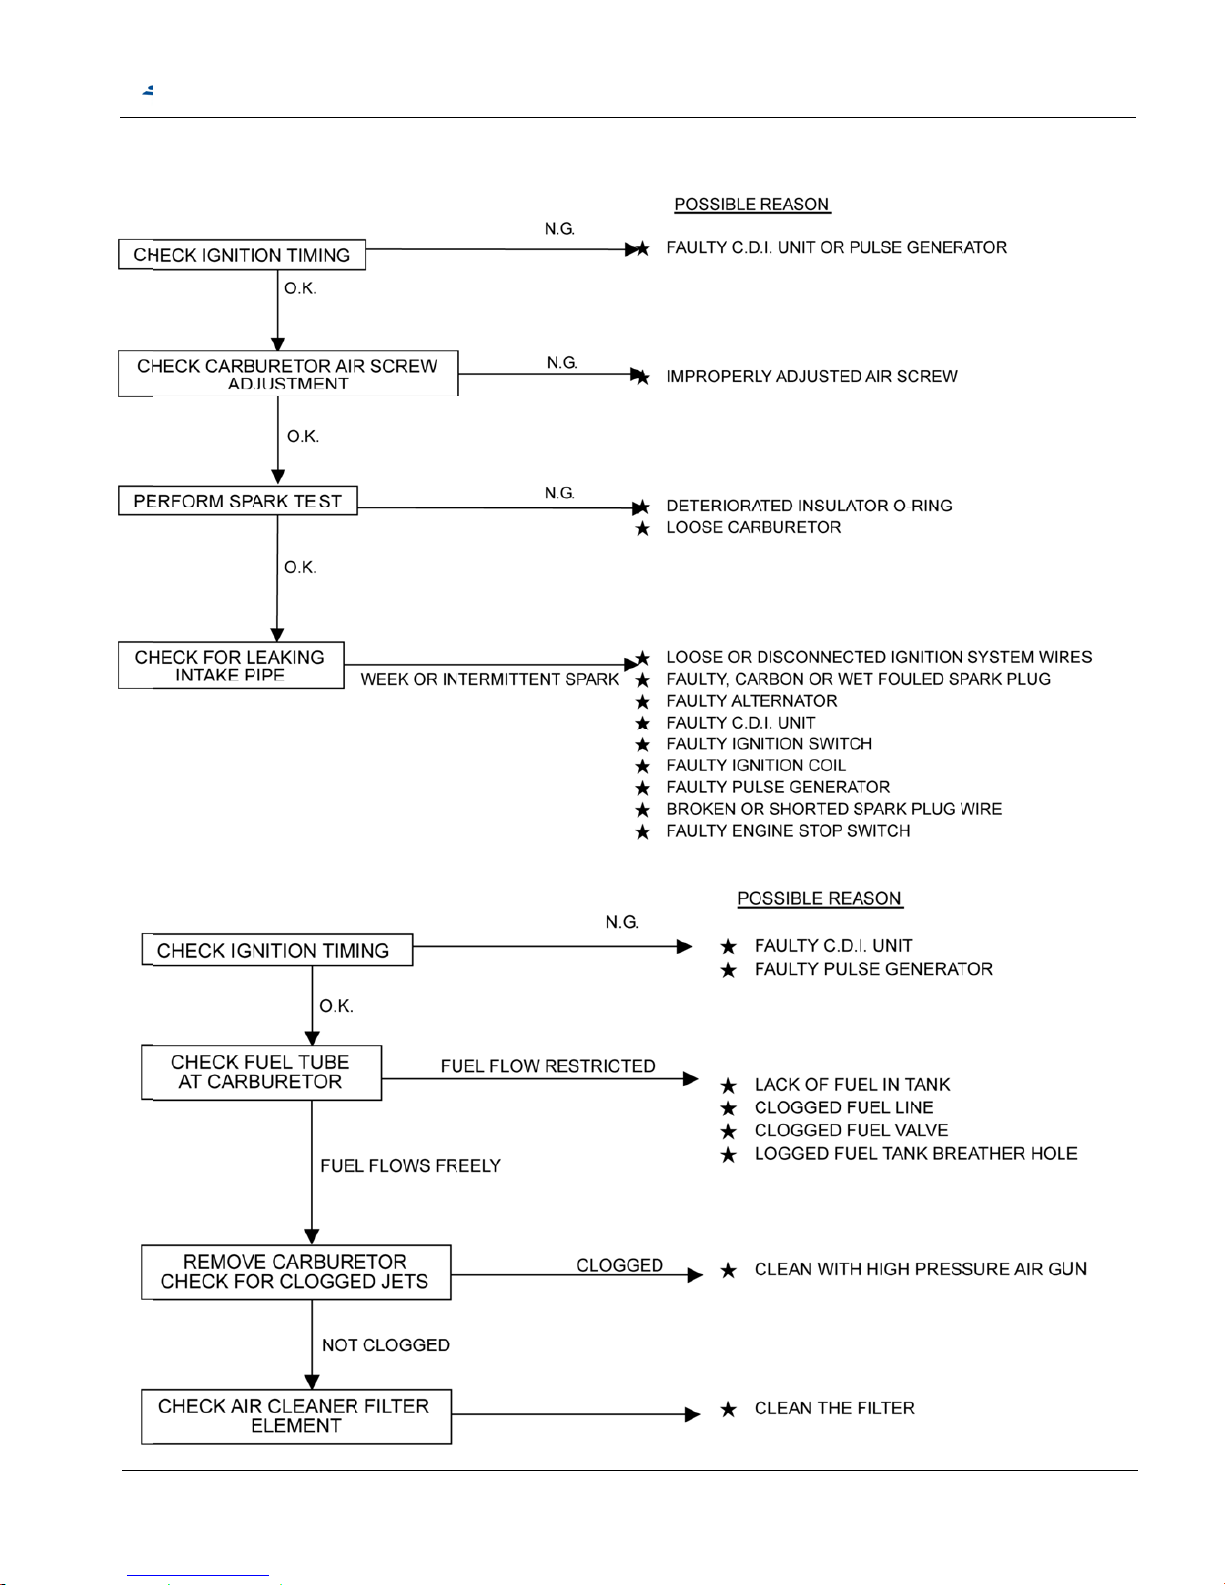
B.
E
C.
E
ngine p
o
ngine p
o
or perfor
m
or perfor
m
S
MC
ance at
ance at
ATV5
0
ow and i
d
igh spe
e
/10
0
Se
le speed
d
rvice Manua
l
Chapteer 1 Gen- ral Infor
m
15 -
ation
Page 17
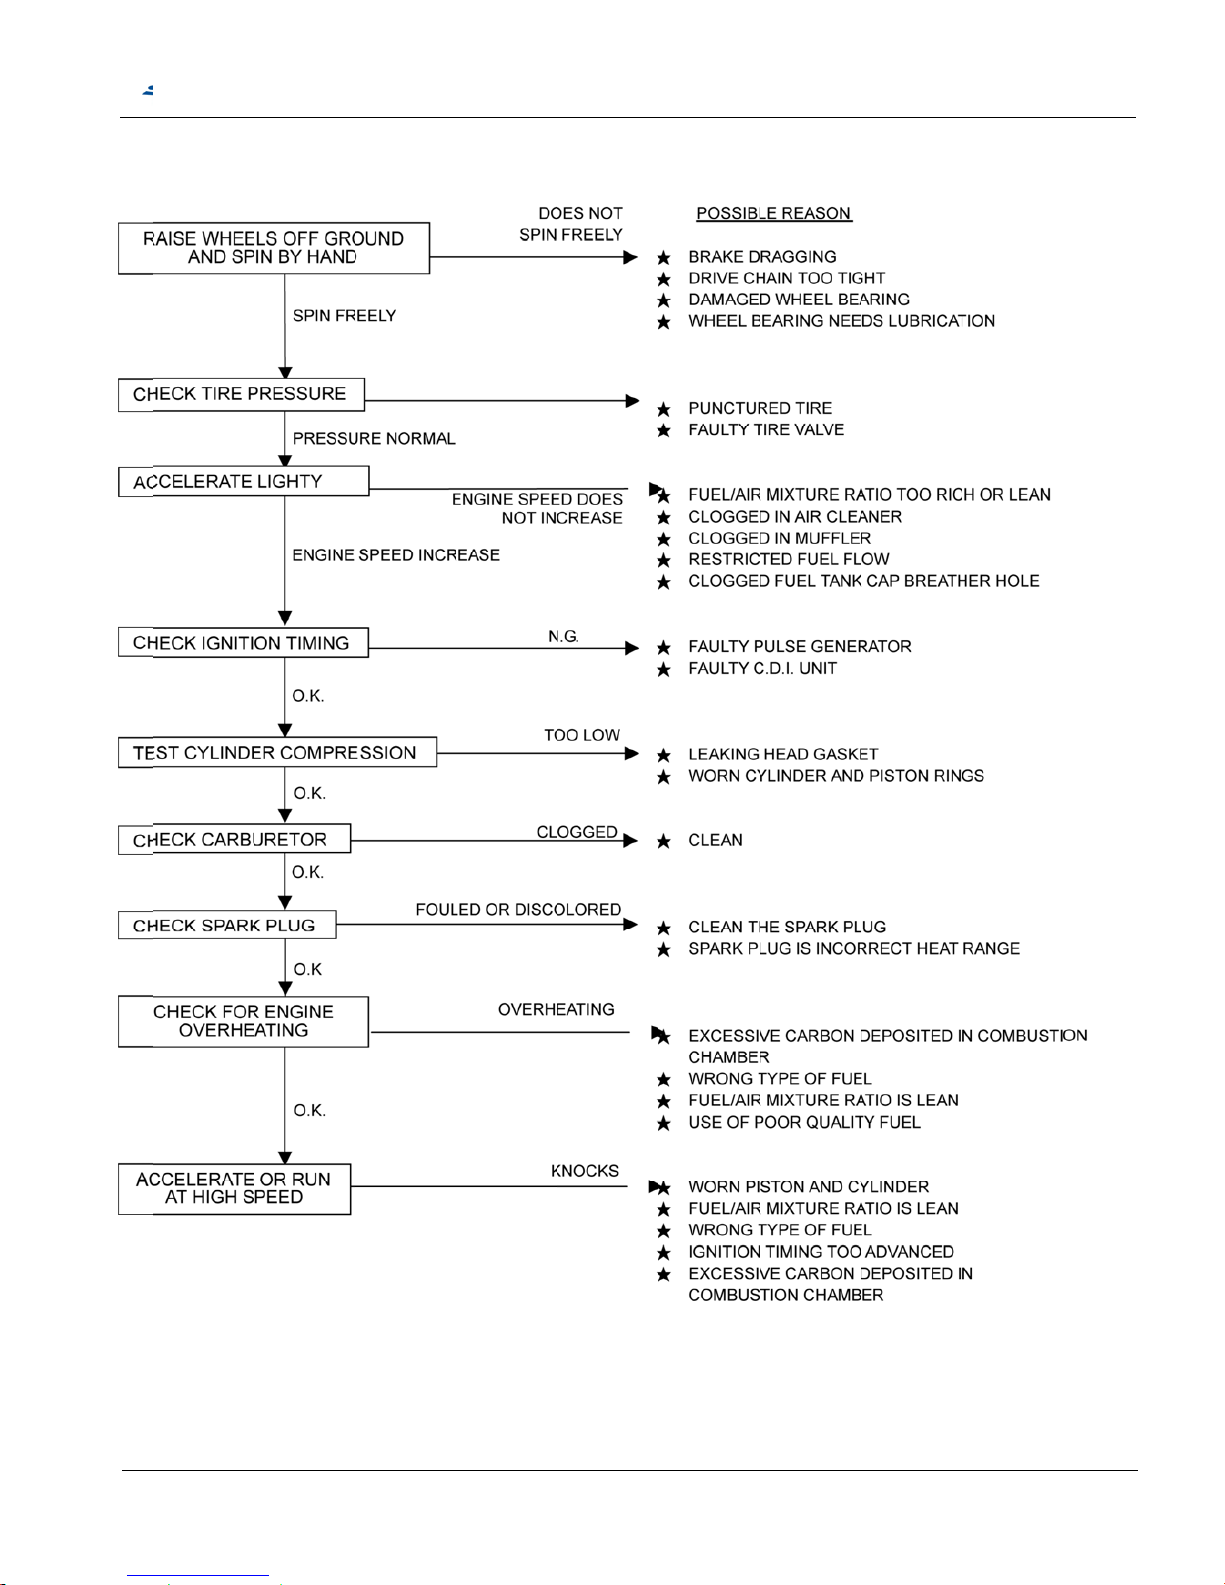
D.
P
oor Performance
S
MC
ATV50/10
0
Se
rvice Manua
l
Chapteer 1 Gen- ral Infor
m
16 -
ation
Page 18
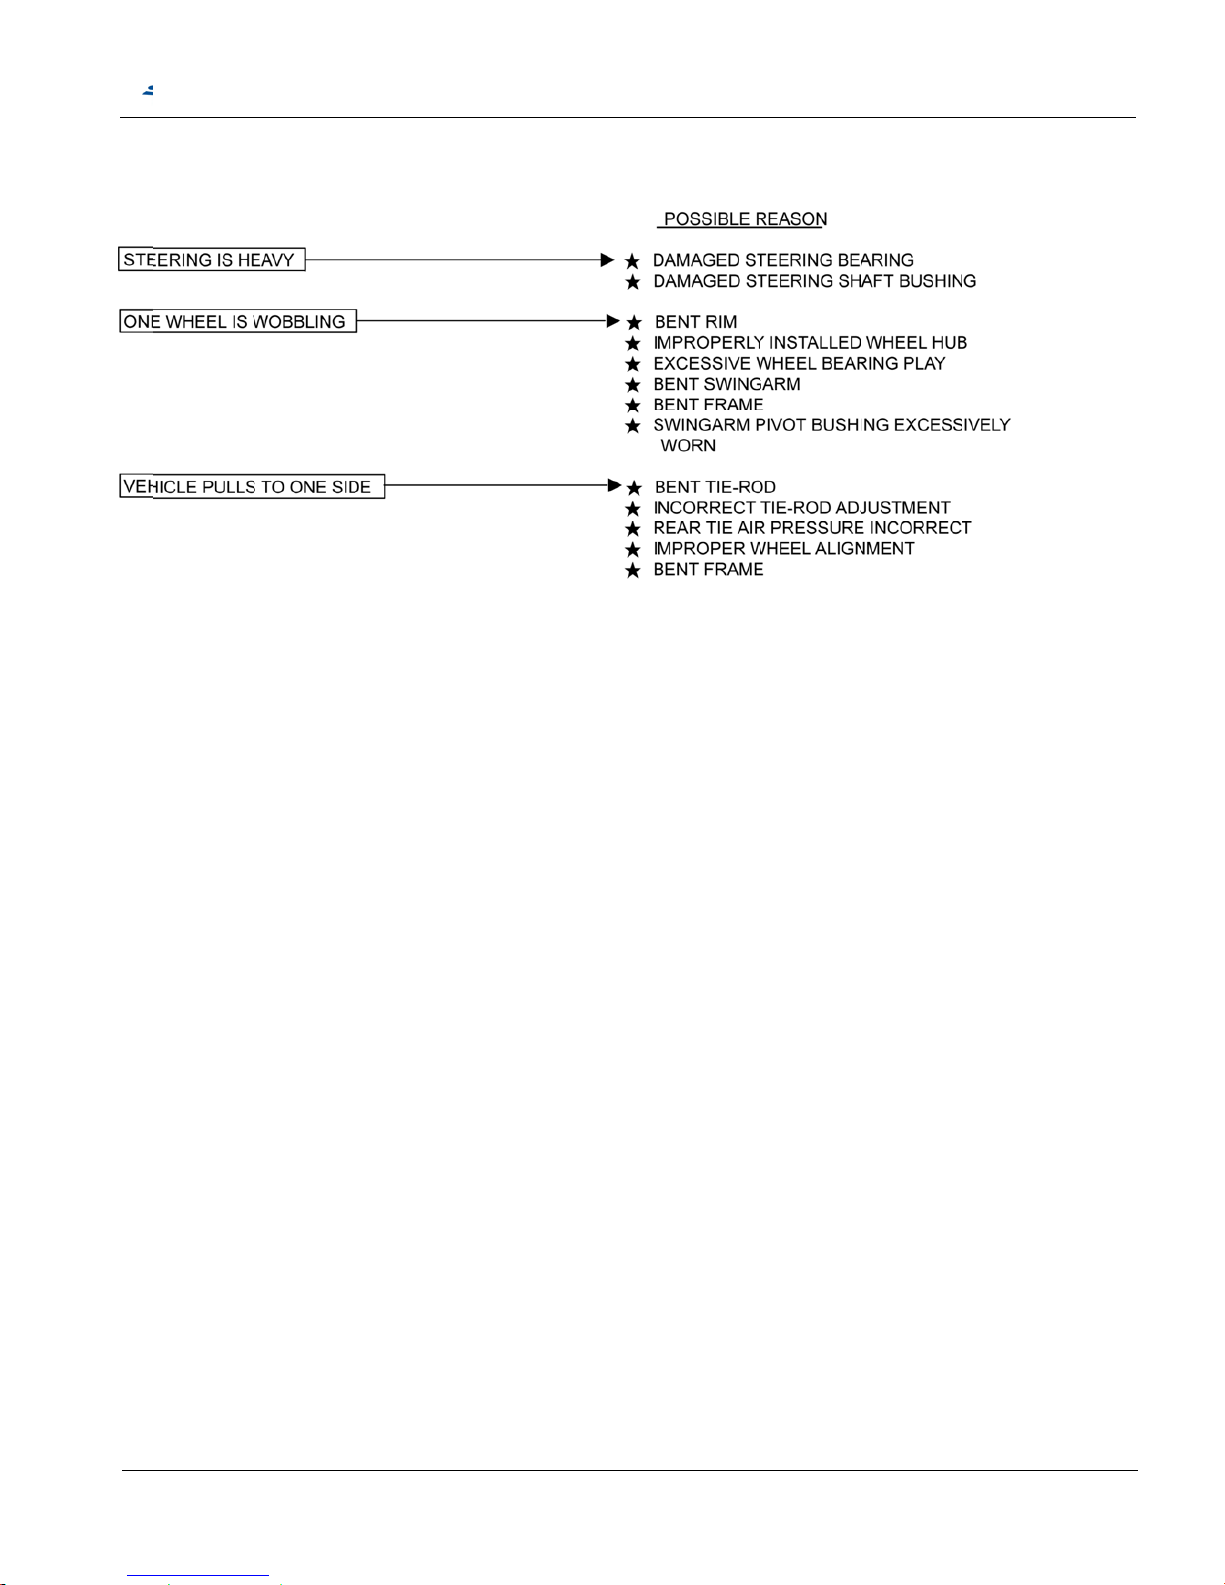
A.
P
oor Steering
S
MC
ATV50/10
0
Se
rvice Manua
l
Chapteer 1 Gen- ral Infor
m
17 -
ation
Page 19
2-
02-02-02-02-02-02-02-02-0
2-1
2-1
2-1
2-1
2-1
2-1
2-1
2-1
2-1
2-
0
1. Tech
n
2. Perio
d
3. Fuel
H
4. Throt
t
5. Air C
l
6. Spar
k
7. Idle
S
8. Drivi
n
9. Brak
e
0. Brak
e
1. Brak
e
2. Clutc
h
3. Susp
e
4. Steer
i
5. Whe
e
6. Nuts,
7. Toe-I
n
8. Gear
1 Tech
n
Cl
e
Spar
k
“
F
Tire
d
ical Da
t
ical Ma
oses
le Cabl
e
eaner
Plug
peed A
d
g Chai
n
Syste
m
Syste
m
Light S
Wear
nsion
ng Han
d
l/Tire
Bolts Ti
Oil
ical Dat
a
Fuel Tank
2T Eng
i
Gea
r
arance of
t
plug
Brake leve
r
” Mark in
s
Idling
s
imension
Tire pr
e
Batt
e
SMC
a
intenan
c
justme
n
(drum
b
(Disk
B
witch/St
le
ghtness
of Oil
&
Capacity
ne Oil
Oil
hrottle val
v
T
y
G
a
free play
tatic timing
peed
F
R
ssure
ry
ATV 5
0
e Sche
d
t
rake)
rake)
arting I
n
Pressu
r
e
pe
p
ront
ear
/10
0
S
ule
hibitor
S
e Capa
c
50 CC: 1
2
YT
100CC: 1
2
Y
T
ervice
M
C
witch
ity
1.
10.1NG0B
18
AT21
x
AT21
x
12 p
s
V3Ah (typ
e
4L-BS or
V4Ah (typ
e
X5L-BS or
anua
l
hapter 2
8.1L.
L, SAE 2
0
2L, SAE 4
0
4~6 mm
K BPR7H
S
.6~0.7 mm
3~5 mm
TDC 18º
0±100 rp
m
7-10 / or o
t
10-8 / or o
t
i (0.81 kgf/c
m
: MF batt
e
GS Battery
: MF batt
e
GS Batter
y
Maintena
n
15
16
18
18
18
19
19
20
21
22
24
24
24
25
25
25
26
26
hers
hers
2)
ry, default:
GTX4L-B
S
ry, default:
GTX5L-B
S
-
1
ce Inform
a
YUASA
)
YUASA
)
5-
tion
Page 20
2-
0
Ha
v
A
ut
sch
It
1
2
3
4
5
6
7
8
9
1
1
1
1
1
4
1
1
1
1
1
2
2
2
2
2
4
2
2 Perio
d
e your A
T
horized D
e
edule is e
s
em
Ch
e
Ite
m
*
*
*
A
*
A
*
*
0 *
1 *
*
3 *
*
5 *
6 *
7 *
W
8 *
W
9 *
0 *
1 *
*
3 *
*
5
ical Ma
V checke
d
aler to m
a
tablished
ck
s
Ma
Kil
o
Ma
Engine oil (
2
Gear Oil
Engine idle
s
Fuel Filter(f
u
Spark plug
ir cleaner
e
ir Cleaner
t
Carburetor
Throttle ope
limiter
Fuel lines (c
cracks/dam
a
Upper and l
o
Steering Sh
a
in check)
Front and R
e
absorber ch
e
Front /Rear
check
Front / Rear
shoe/pad w
e
Front and R
e
Level/Leaka
Wheel rim c
h
Wheel Hub
B
looseness/d
a
Tire (Wear/
P
Nuts, Bolt,
B
check and l
u
Fr. & Rr. St
e
pivot
CVT driving
CVT driving
Driving Cha
i
Battery Volt
a
SMC
intenan
c
, adjuste
d
intain the
by taking
t
intenance
meter
intenance In
stroke)
peed
el cup)
lement (Re
m
ube
ration /Spee
heck or
ge)
Fram
ew A
-Arm
ft (lubricant
ar shock
ck
brake free p
l
brake or
ar
ar Brake Fl
ge Check
eck for da
m
earing
mage
ressure)
ush, fasten
e
bricant.
ering Knuc
k
belt/weight
r
Clutch
n
ge
ATV 5
0
e Sche
d
, and rec
o
ATV at th
e
he hours
o
30
0
terval 20
hEngFue
ark)
C
/Steering/S
u
, Toe
ay
uid
age
r
le
T
ollers
/10
0
S
ule
rded mai
n
optimum
r kilomet
e
KM
r
ine mainten
a
A
dd 2 strok
R
I
l and air sy
s
lean or repl
a
(more of
t
I
spension/B
r
I
Replac
e
I
I
ransmissio
ervice
M
C
tenance d
condition
.
rs as a re
Every 3
M
1000 KM
60 hr
nce
e oil into oil
t
I
tem
ce if neces
s
en when in
w
I
I
I
I
ake/ Wheel
L
I/
L
I
I
whenever
w
I
I
I
I
I
L
n
I/
L
I
anua
l
hapter 2
ata period
The abo
v
erence w
h
on. Ev
20
0120
ank, when
o
ary for Eve
r
et or dusty
& Tires
orn to the li
Maintena
n
ically by y
o
e mainten
ichever c
o
ery 6 Mon.
00 KM
0 hr
il warning l
a
R
I
I
I
y 1000 KM
areas)
I
I
I
I
L
I/L
I
I
mited
I
I
I
I
I
L
I
I
I/L
I
-
1
ce Inform
a
ur SMC
ance
mes first.
Remark
s
mp is “on”
6-
tion
Page 21

2
2
2
Co
d
Re
m
1.
Are
2.
Man
3.
C
4.
P
a
b
- C
A
the
ma
i
pro
d
6 *
7 *
8 *
e: I ~ I
n
C ~
c
*Sh
o
arks:
ir cleane
r
placemen
aintenan
c
d after th
e
heck batt
e
reventive
. Ignition
s
after-bur
n
. Carbon
d
system w
h
UTION:
T
time, or h
a
ntenance
uct warr
a
Dashboard/
s
Lights /elect
Front and r
e
spection
,
leaning
(
uld be p
e
needs to
t after ridi
n
e should
ATV ha
s
ry before
maintena
n
ystem: pe
r
or overh
e
eposit re
m
en powe
r
he user
m
ve SMC
d
of your ve
h
nty.
SMC
peedomete
r
rical equipm
ar brake sw
i
cleanin
g
replaced
rform an
d
be clean
g on (1)
d
be perfor
m
accumul
a
riding AT
V
ce
form mai
n
ating occ
u
oval: re
m
is obviou
s
ust perfor
ealer for
a
icle will l
e
ATV 5
0
El
e
nt
tch
, and adj
u
if necess
a
settle b
y
very 100
0
usty rain
d
ed more
ted a high
. Re-cha
r
tenance
a
rs.
ove carb
lower th
a
m the peri
o
periodic
m
ad to poo
r
/10
0
S
ectrical Syst
I
I
I
stment
ry)
local de
a
0 KM driv
e
ays (2) s
a
often if th
e
er mileag
e
ge battery
nd check
w
on deposi
n ever.
d check
&
aintena
n
perform
a
ervice
M
C
em
I
I
I
R ~ Repl
a
L ~ Lubri
c
ler or se
r
and req
u
nd area (
3
ATV is f
r
.
or replac
e
hen con
t
ts in cylin
d
service
a
ce progra
m
nce, brok
e
anua
l
hapter 2
cement
ation
vice stati
o
ires mor
e
) snow d
a
equently
o
a new b
a
inuous ab
n
er head,
nd keep t
h
. Failure
n of your
v
Maintena
n
I
I
I
n
frequentl
y
ys.
perated i
n
ttery, if it
n
normal ig
n
piston he
a
e service
to follow t
h
ehicle an
d
-
1
ce Inform
a
cleaning
high sp
e
ecessary.
ition, misf
i
ds, exha
u
records a
l
e periodi
c
out of
7-
tion
or
ed
re,
st
l
Page 22
2-
.
W
G
a
of
2-
Fr
e
2-
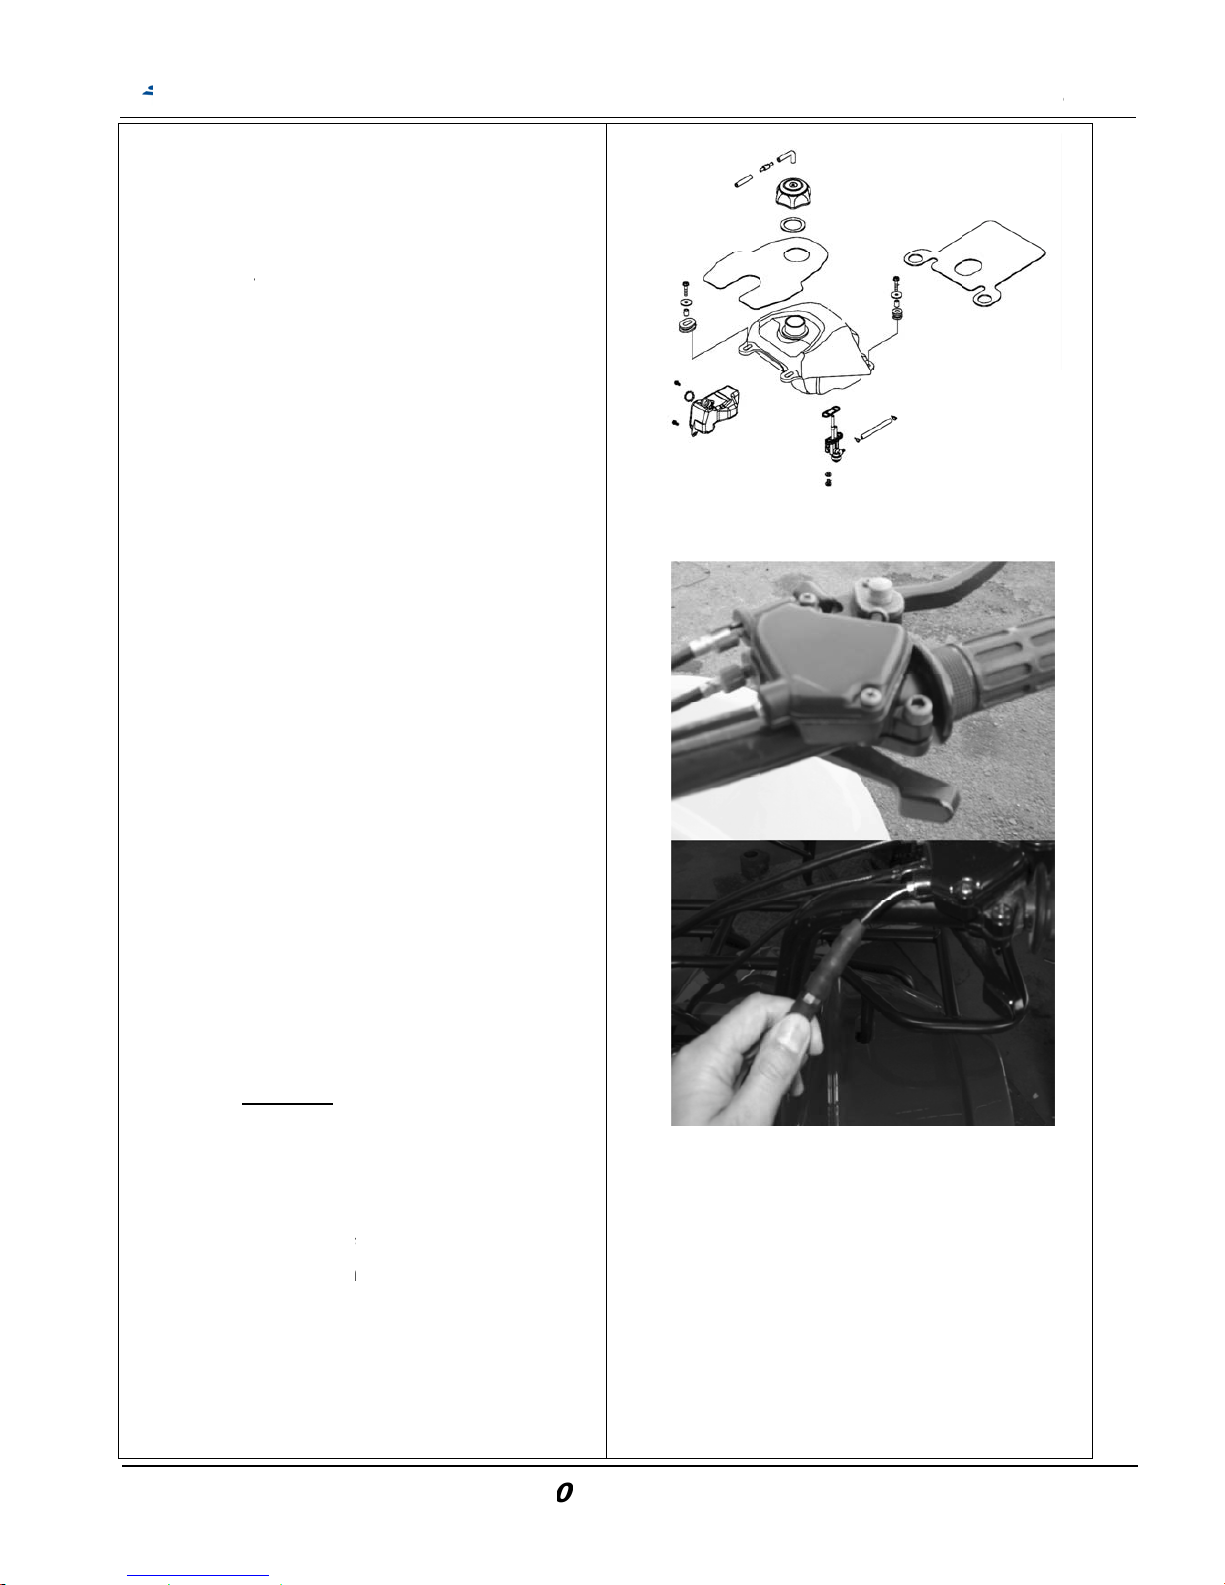
03 Fuel
/
Check fu
e
any dete
r
leaking.
R
necessa
r
Check th
e
tank to th
damage,
replace
w
arning
soline is
a
fire is stri
c
04 Thro
t
Have a
w
handle in
back orig
Check h
a
Lubricat
e
smooth.
Check th
e
cable/oil
p
Replace
i
damage
d
Measure
flange p
a
a. Rem
o
and t
h
adjus
t
b. Tight
e
accel
e
e play: 4
05. Air
C
Remove
t
with full
s
Remove
3
cover an
d
Clean th
e
high-flas
h
for dry.
Replace
w
Oil Hos
e
l tank, fu
e
ioration, d
eplace it
w
y.
oil tank,
e oil pum
p
bend or o
i
ith new o
n
low igniti
o
tly prohibi
t
tle Cabl
ide open
o
any positi
inal (full C
ndle if its
o
the cable
throttle
c
ump cabl
t if deterio
.
the throttl
e
rt.
ve rubber
en adjust
ment scre
n the fixin
ration op
e
~6 mm.
leaner
he LH fo
o
ize type.
screws
f
then re
m
element
w
point sol
v
ith new
o
SMC
s
l cock, an
amage, b
e
ith new
o
oil hose b
e
if any de
t
l leaking.
C
e if nece
s
n materi
a
ed as de
a
e
f throttle
v
on and rel
losed) po
s
peration
i
if operati
o
able/carb
u
e if functi
o
rated, twi
s
lever fre
e
boot, loos
it by turni
n
w.
g nut, and
ration co
n
trest guar
d
rom the ai
ove the c
o
ith non-fl
a
ent and t
h
ne if nece
ATV 5
0
d fuel hos
e
nd or fuel
ne if
tween oil
erioration,
orrect it
a
sary.
l so any ki
ling it.
alve as
ease it to l
ition.
s smooth.
n is not
retor
n correctl
y
ted or
play in it
s
en fixing n
g the
check
dition.
(if equip
p
cleaner
ver.
mmable
o
en squee
z
ssary
/10
0
S
if
nd
nd
et
.
ut,
ed
e it
ervice
M
C
anua
l
hapter 2 Maintena
n
-
1
ce Inform
a
8-
tion
Page 23
C
a
N
e
to
S
othethecle
2-
R
eabcd
S
p
ef.g
Ti
g
2-
C
a
1.
2.
S
p
18
ution
ver use g
a
clean the
e
ap the el
e
n squeez
e
element
s
aner cov
e
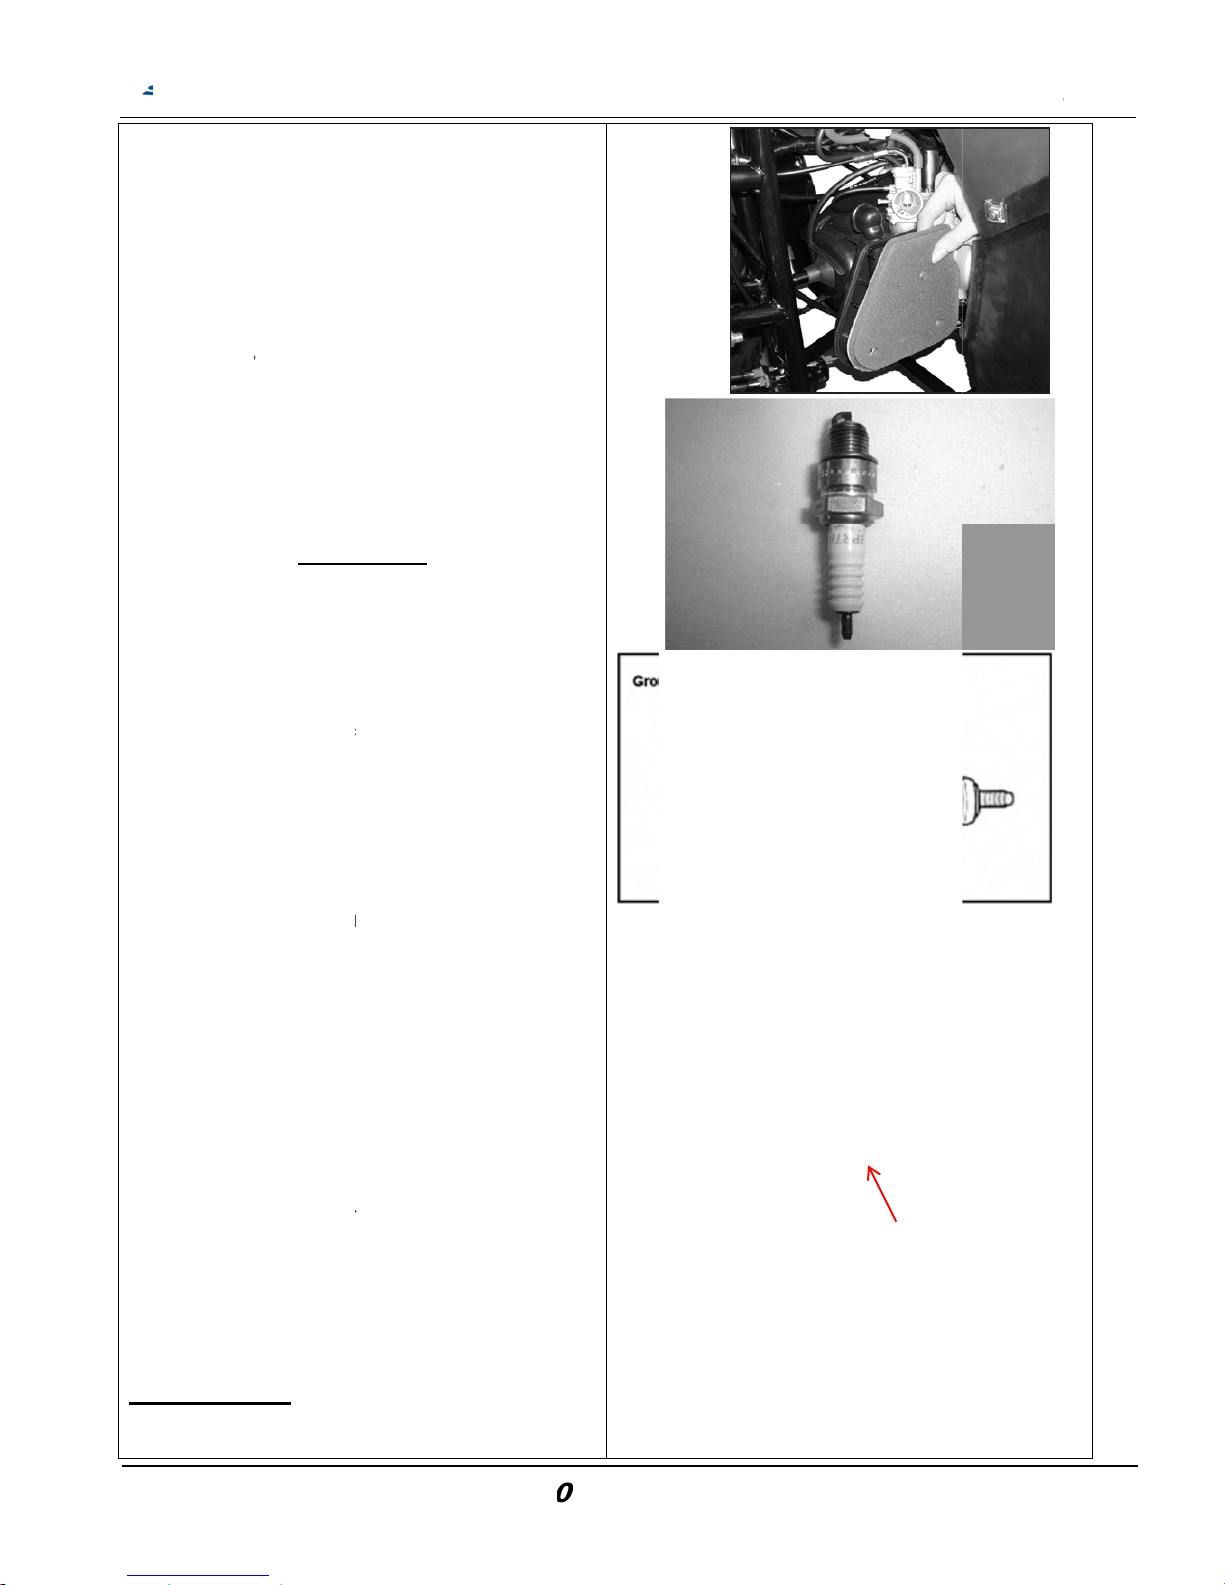
06. Spa
r
commen
d
. Remove
. Clean di
r
. Remove
. Measur
e
ark plug
g
. Carefull
y
plug to
a
Hold sp
a
spark pl
u
. Tighten
t
with plu
g
hten tor
q
07. Idle
S
ution
Inspectio
have to
b
engine th
adjusted.
Idle spee
be done
a
is enoug
h
running f
o
Warm up
Turn the
in) to
g
clockwis
e
Start the
screw un
t
ecified id
00 ± 100
r
soline or
lement.
ment into
it out. In
s
eat and t
h
r.
k Plug
ed spark
p
spark plu
g
t around t
spark plu
g
spark plu
ap 0.6 ~
0
bend gro
u
djust the
g
rk plug w
a
g by scre
w
he plug b
y
socket a
ft
ue: 2.0 k
g
peed A
n & adjust
m
e perform
e
at needed
d check a
n
fter engi
n
that oper
r 10 min
u
the engin
e
Idle adju
s
et highe
r
(Turn ou
t
engine an
d
il around
1
le speed:
pm
SMC
acid orga
n
cleaning
e
tall the el
e
en install
lug : NG
K
cap.
he spark
p
.
g gap.
.7 mm
nd electr
o
ap if nec
e
sher and
ing it.
turning 1
/
er install
e
-m / 20N
-
djustm
e
ent for i
d
d after all
adjustme
n
d adjust
m
e is being
ates engi
n
tes.)
.
t screw c
l
Idle sp
e
) to get lo
w
adjust th
,750~18
5
ATV 5
0
ized solv
e
ngine oil
a
ment ont
o
the air
- BPR7H
S
lug hole.
de of the
ssary.
nstall the
2 turn mo
d.
m
nt
le speed
parts in
t have b
e
ent have
t
warm up.
e from sto
ockwise (
t
ed. Cou
n
er Idle sp
e throttle
s
0 rpm.
/10
0
S
nt
nd
re
en
o
(It
p to
urn
nter
eed
top
ervice
M
C
anua
l
hapter 2 Maintena
n
Adjust Scr
e
-
1
ce Inform
a
w
9-
tion
Page 24
2-
a.
b.
1.
2.
c.
In
s
ex
08. Driv
i
Inspect t
h
The st
a
A
djust th
e
Loose th
e
connecti
o
rear hub,
by turn t
h
After adj
u
four lock
Clean th
e
When t
h
it shoul
d
lubricat
e
Using c
o
lubricat
e
Clean t
h
wipe it
d
Inspect
t
or dam
a
Replac
e
or dam
a
pect the
d
cessive w
e
ng Chai
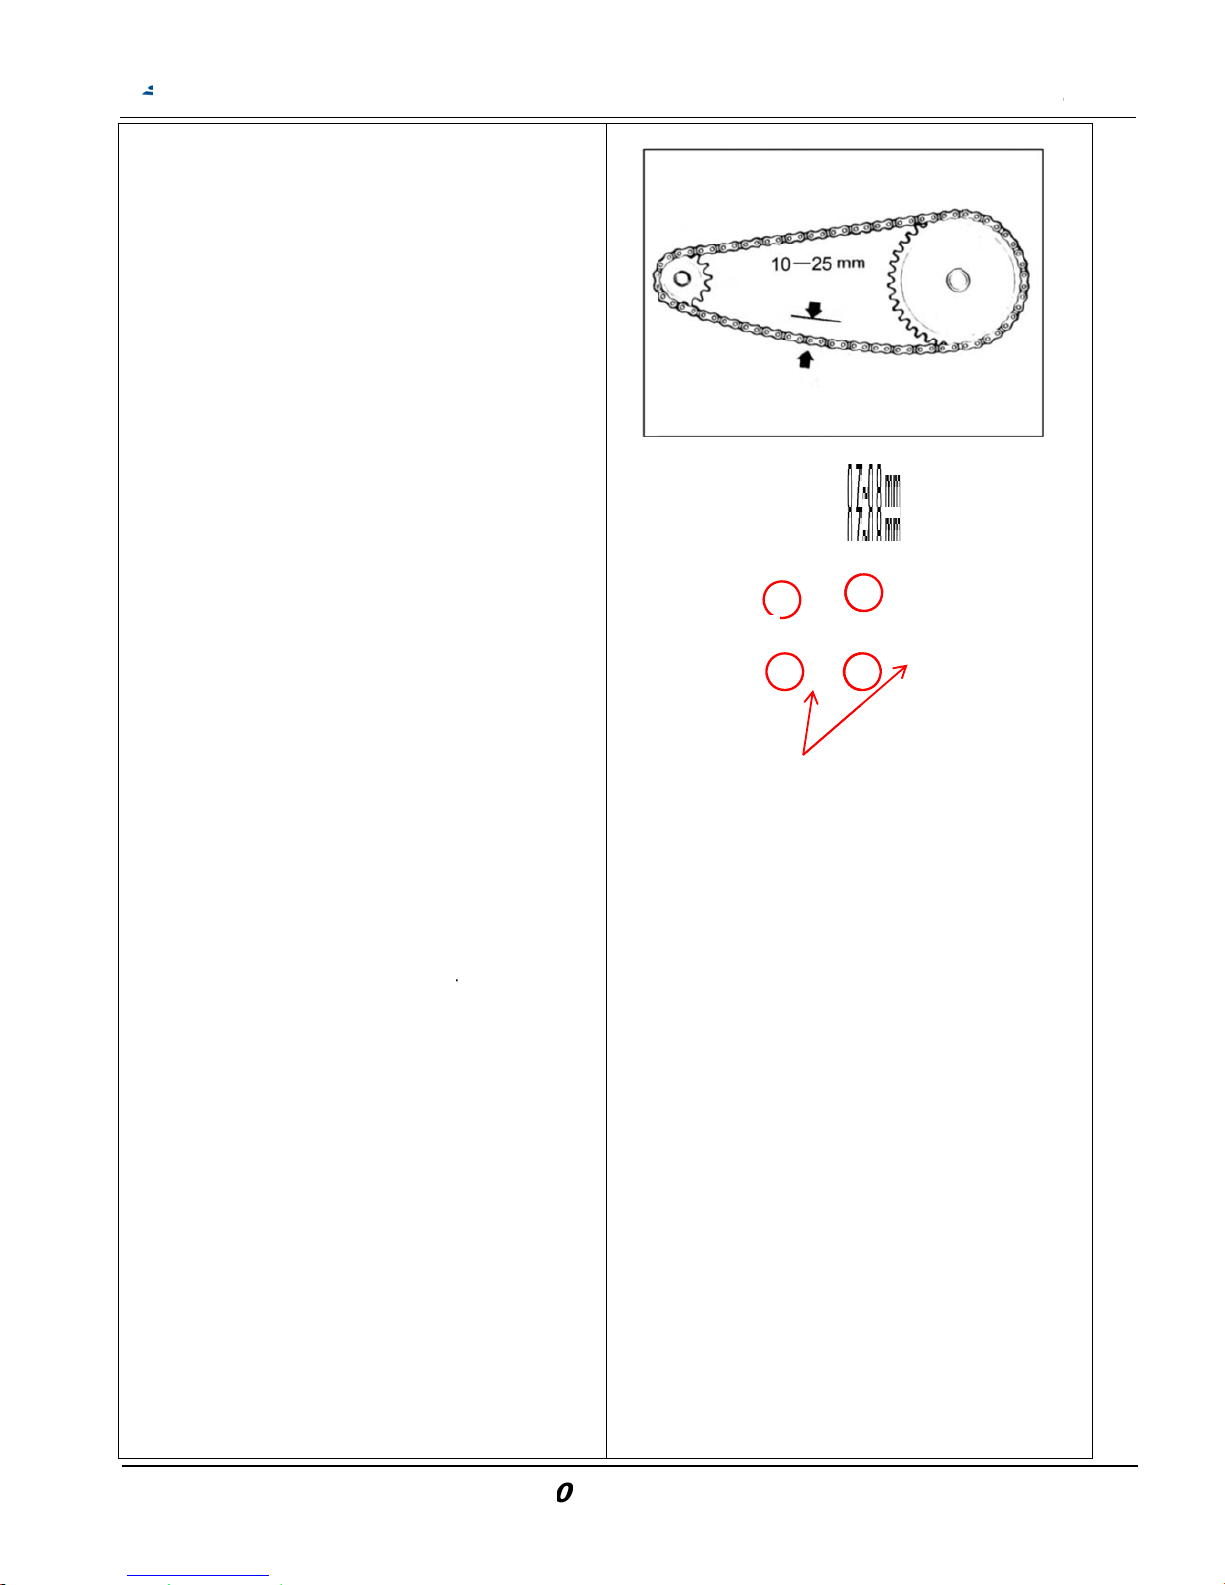
e chain sl
ndard is
1
chain sl
a
lock bolt
s
n betwee
n
then adju
s
e adjustin
g
st to the s
bolts.
Driving
C
e drive ch
be remo
v
d by spe
c
mmercial
the drive
e drive ch
ry.
he drive
c
ge.
the chain
ged.
rive spro
c
ar or da
m
SMC
n
ack.
0-25mm.
ck.
(4 pcs) o
rear swi
n
t the driv
e
nut.
uitable sla
hain
ain beco
m
ed, clean
e
ify lubrica
t
chain lub
r
chain.
ain with k
e
hain for p
o
, if it is wo
r
ket teeth,
age, repl
a
ATV 5
0
n the
g arm an
d
chain sla
k, tighten
es very di
d and
or.
icant to
rosene a
n
ssible we
a
n excessi
v
f it is
ce it.
/10
0
S
ck
the
rty,
d
ar
ely
L
ervice
M
C
Adju
ock bolt
anua
l
hapter 2
st bolt
Maintena
n
-
2
ce Inform
a
0-
tion
Page 25

2-
a.
M
e
en
pl
a
b.
M
ethemm
c.
M
ethe
09 Brak
e
Inspect t
h
excessiv
e
Replace
o
asure the
d of the b
r
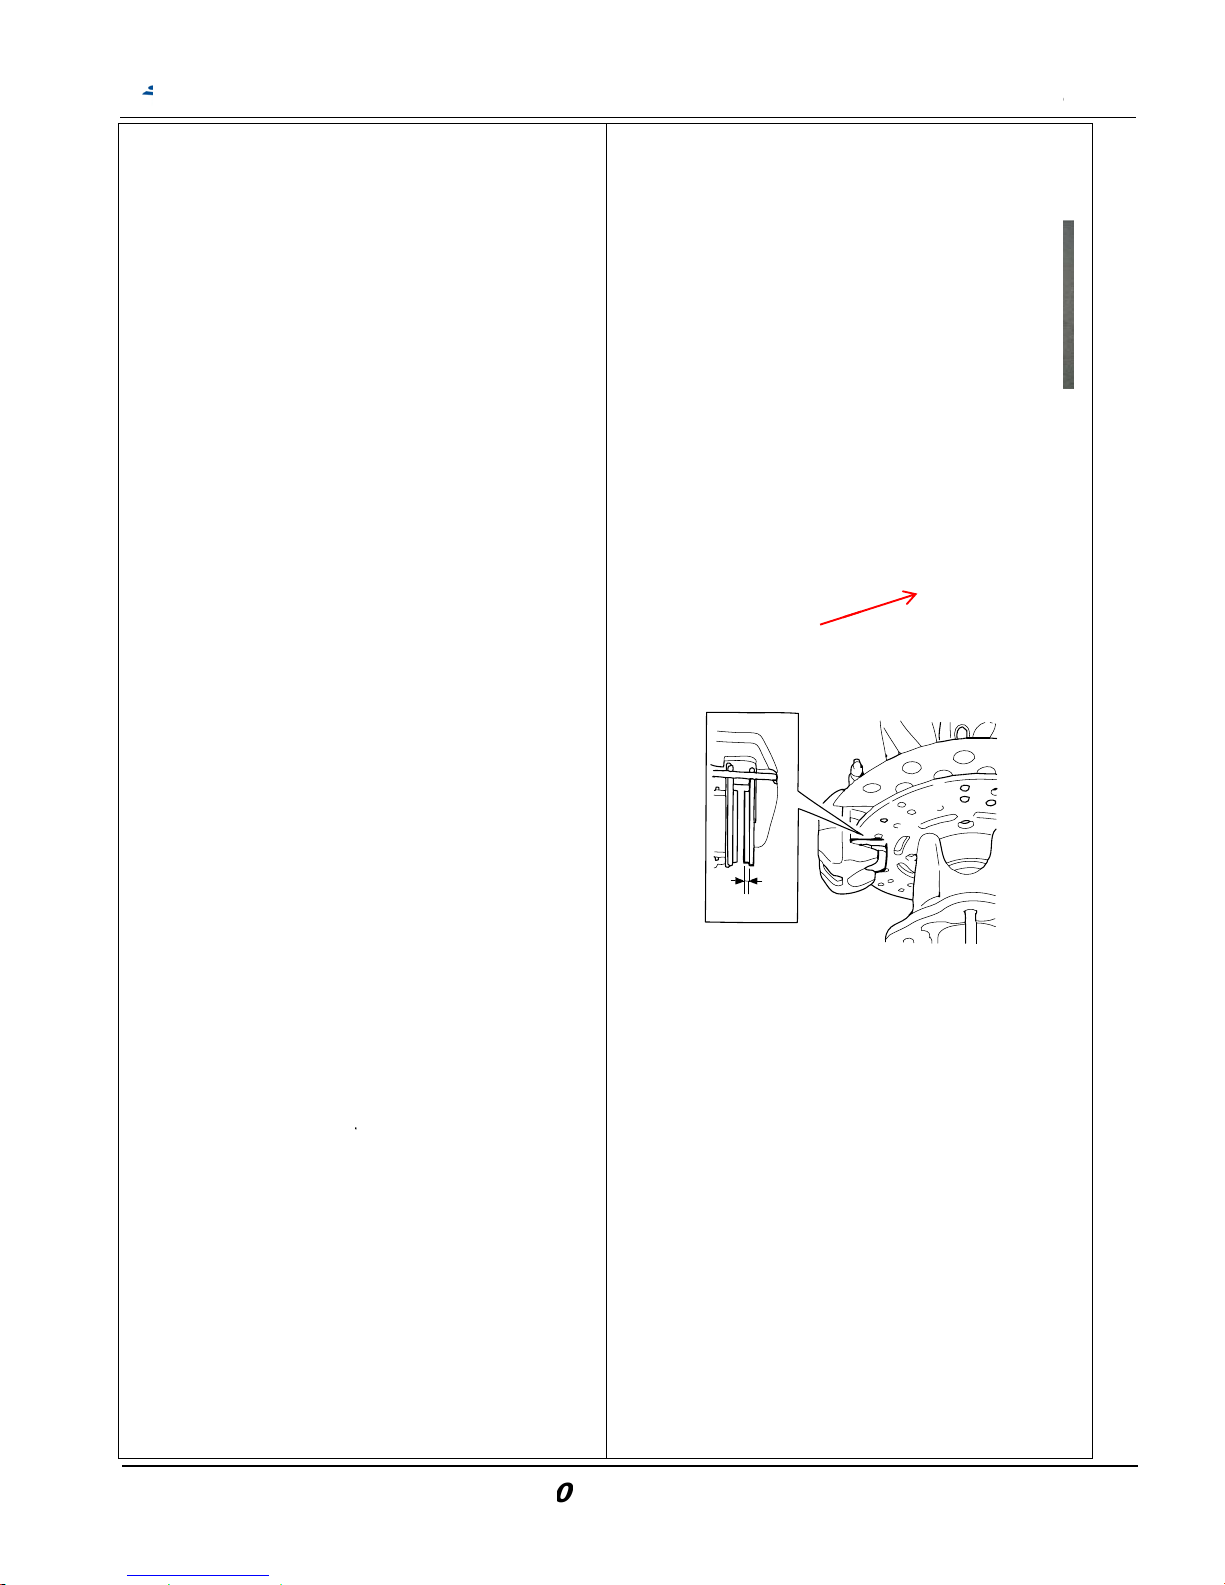
y is 15-2
5
Inspect t
h
front /rea
excessiv
e
or repair
asure the
end of th
.
Inspect t
h
excessiv
e
or repair
asure the
end of th
Syste
m
e front br
a
free play
r repair if
free play
o
ake lever.
mm.
e integrat
r drum br
a
play or o
t
if necessa
free play
o
e lever. T
h
e rear br
a
play or o
t
if necessa
free play
o
e pedal.
SMC
(drum
b
ke lever
a
or other d
necessar
y
f the bra
k
The stan
d
e brake (f
o
ke and co
her dama
ry.
f the rear
e standar
d
ke pedal
a
her dama
ry.
f the rear
ATV 5
0
rake)
nd cable
f
amage.
.
e lever at
ard of fre
e
ot pedal)
f
trol cabl
e
ge. Repla
c
brake lev
e
is 10-20
nd cable
f
ge. Repla
c
brake lev
e
/10
0
S
or
the
or
for
e
r at
or
e
r at
ervice
M
C
anua
l
hapter 2
Maintena
n
-
2
ce Inform
a
1-
tion
\
Page 26

2-
T
h
ac
co
th
e
co
a.
M
a
co
b.
C
hreslim
ch
le
v
C
a
In
in
un
D
o
ha
wi
lno
c.
abcde
f.
d.
Ad
R
e
(r
e
10. Bra
k
e Disk br
a
ive the th
r
mbine bra
right han
ntrolled b
y
Brake
S
ke sure t
h
rrosion or
Brake
F
eck brak
e
ervoir. If t
it, add br
a
eck brake
el found.
ution
order to
m
horizontal
til handle
s
not oper
a
d been re
m
l spread o
n-compati
Air Ble
e
Operati
. Open th
e
sufficient
bleed/oil
c
. Open th
e
the calip
e
. Connect
a
valve.
. Loose th
e
. Use a va
c
bubble/oi
fluid bec
o
Closed t
h
caliper.
Added
B
d brake fl
u
commen
d
commend
e Syste
m
ke versio
n
ee caliper
king syste
m
dle bar si
d
cable to t
ystem
H
e brake h
o
leaking oil
luid
fluid level
he level is
ke fluid to
system fo
r
aintain br
a
position,
d
top.
te the bra
oved. Ot
h
ut if opera
t
ble brake
f
d / Bra
k
on
brake flui
d
brake flui
d
hange.
rubber c
a
r.
transpar
drain val
v
uum dra
w
l brake flu
i
me clear
(
e drain v
a
rake Fl
id to UP
P
ed brake
f
) brake flu
SMC
(Disk
B
, apply by
(front 2 a
n
. The br
a
e is parki
n
he rear ca
ose
ses cont
a
.
in the bra
lower tha
n
UPPER li
leaking if
ke fluid in
o not rem
o
ke lever a
f
erwise, t
h
e the lev
e
luid toget
h
e fluid
C
reservoi
r
while doi
p of draini
ent hose t
o
e.
er to drai
n
d, until no
new).
lve on fro
n
uid
ER limit l
e
luid: DOT
3
id.
ATV 5
0
rake)
foot peda
d rear 1)
a
ke lever
o
g brake
liper side.
in no
ke fluid
the LO
W
it. Also
low brak
e
the reser
v
ve the c
a
ter the ca
p
e brake fl
u
r. Do not
m
er.
hange
cap. Add
ng the air
ng valve
o
draining
out the a
air bubbl
e
t/rear dis
k
vel.
or DOT4
/10
0
S
l, to
s a
n
ER
oir
p
id
ix
the
n
ir
or
ervice
M
C
anua
l
hapter 2
Maintena
n
-
2
ce Inform
a
2-
tion
Page 27
C
a
N
efrobra
e.
B
r
T
hlimRema
C
a
T
ofro
It i
re
p
B
r
M
a
th
e
li
m
C
a
D
o
ca
pi
s
ba
on
ution
ver mix o
r
m damagi
ke perfor
m
Parking
b
A
pply th
then pu
s
release
brake.
To rele
a
lever ag
release.
Check t
h
parking
adjust t
h
side.
ake Lini
e indent
m
itation.
place the
rk closed
ution
check fro
nt wheel f
i
s not nec
e
lacing th
e
ake Pa
d
ke sure t
h
lining pa
d
itation gr
o
ution
not oper
a
liper bein
g
ton. In or
d
lance, the
e set.
use dirty
ng brake
s
ance.
rake
e right ha
n
h down t
h
the lever t
o
se the pa
r
ain and st
o
e brake f
o
brake. Adj
e adjustin
ng Wea
r
ark on br
a
brake lini
n
to the ed
g
nt brake li
n
rst.
ssary to r
e
brake lini
s Repla
c
e brake li
n
s if the b
r
ove close
te the bra
removed
er to mai
n
brake pa
d
SMC
brake flui
d
ystem or
r
d brake l
e
e button
s
activate
king brak
e
pper will
j
rce when
ust the br
a
g bolt on t
h
ke lining i
g pad if th
e of brak
e
ing must
move bra
ng.
ement
ing condi
t
ake lining
to the bra
k
ke pedal
a
to avoid p
tain brak
e
s must be
ATV 5
0
to preven
educing
ver and h
o
topper an
d
he parkin
g
, apply th
e
ump up a
n
set up th
e
ke force
b
e rear cal
s the wea
r
e wear li
m
disc.
e remov
e
ke hose w
ion. Repl
a
wear
e disc.
fter the
shing ou
t
power
replaced
b
/10
0
S
t
ld,
d
y
iper
it
hen
ce
y
ervice
M
C
A
dju
anua
l
hapter 2
st bolt
Maintena
n
-
2
ce Inform
a
3-
tion
Page 28
2-
T
h
as
M
aop
2-
R
u
o
p
If
t
ch
2-
W
D
oLo
m
a
F
r
R
e
11. Bra
k
Inhibit
o
e brake li
g
brake pe
d
ke sure t
h
erated onl
12. Clut
c
n the AT
V
ening gra
d
he ATV is
eck clutch
13. Sus
p
arning
not ride t
h
oseness,
w
ke poor s
t
ont sus
p
Press d
o
several
t
Check i
f
bound
&
Replac
e
Tighten
ar sus
p
Press d
o
several
t
Check i
f
bound
&
Replac
e
e Light
S
r Switc
ht switch
i
al applied
at electri
c
y under b
r
h Wear
and incr
e
ually to c
h
in forwar
d
condition.
ension
e ATV wi
t
ear or d
a
ability an
d
ension
wn the fr
o
imes to c
h
it is dam
a
rebound)
relative p
all nuts a
n
ension
wn the re
imes to c
h
it is dam
a
rebound)
relative p
SMC
witch/
S
h
s to light
u
.
al starter
c
ake applyi
ase throttl
eck clutc
h
moving a
Replace i
h poor su
s
mage sus
drive-abi
l
nt suspe
n
eck its o
p
ged (oil le
arts if da
m
d bolts.
ar suspen
s
eck its o
p
ged (oil le
arts if da
m
ATV 5
0
tarting
p brake li
g
an be
ng.
e valve
operatio
n
d shakin
g
if need.
pension.
ension w
ity.
sion for
eration.
aking / ba
d
age foun
d
ion for
eration.
aking / ba
d
age foun
d
/10
0
S
ht
.
,
ill
.
.
ervice
M
C
anua
l
hapter 2
Adju
Maintena
n
st bolt
-
2
ce Inform
a
4-
tion
Page 29
2-
C
a
C
h
int
ba
Li
fTu
ch
2-
C
a
Ti
r
rid
C
h
or
A
p
12
C
hnoMe
su
R
e
Fr
oRe
2-
P
ethe
all
se
C
h
an
14. Stee
ution
eck all wi
r
erfered wi
t
r.
the front
rn handle
eck if turni
15. Whe
ution
e pressur
e
ing.
eck if tire
other mat
e
pointed t
psi (Off-r
o
eck if fron
rmal.
asure tire
rface.
place the
nt tire: 1
ar tire: 2.
0
16. Nut
s
rform peri
o
Periodic
a
bolts and
curely.
eck all fixi
d wire hol
d
ring Ha
n
es and ca
h the rota
t
wheel out
from right
ng is smo
o
el/Tire
check s
h
surface is
rials.
ire press
u
ad reco
m
t and rear
thread de
tire if the
d
.5 mm
mm
, Bolts T
dical mai
l Mainten
a
nuts on th
ng pins, s
n
ers for s
e
SMC
dle
bles if the
y
ion of ste
e
of ground
.
to left alte
thly.
ould be d
o
ticked wit
h
re:
mended)
tires’ pres
pth from ti
epth is s
m
ightnes
s
ntenance
i
nce Sch
e
e frame a
r
ap rings,
curity.
ATV 5
0
are
ring hand
native an
d
ne before
nails, sto
sure is in
re central
aller than
n accord
w
dule. Che
c
e tightene
d
hose cla
m
/10
0
S
le
nes
:
ith
k if
d
p,
ervice
M
C
anua
l
hapter 2 Maintena
n
-
2
ce Inform
a
5-
tion
Page 30
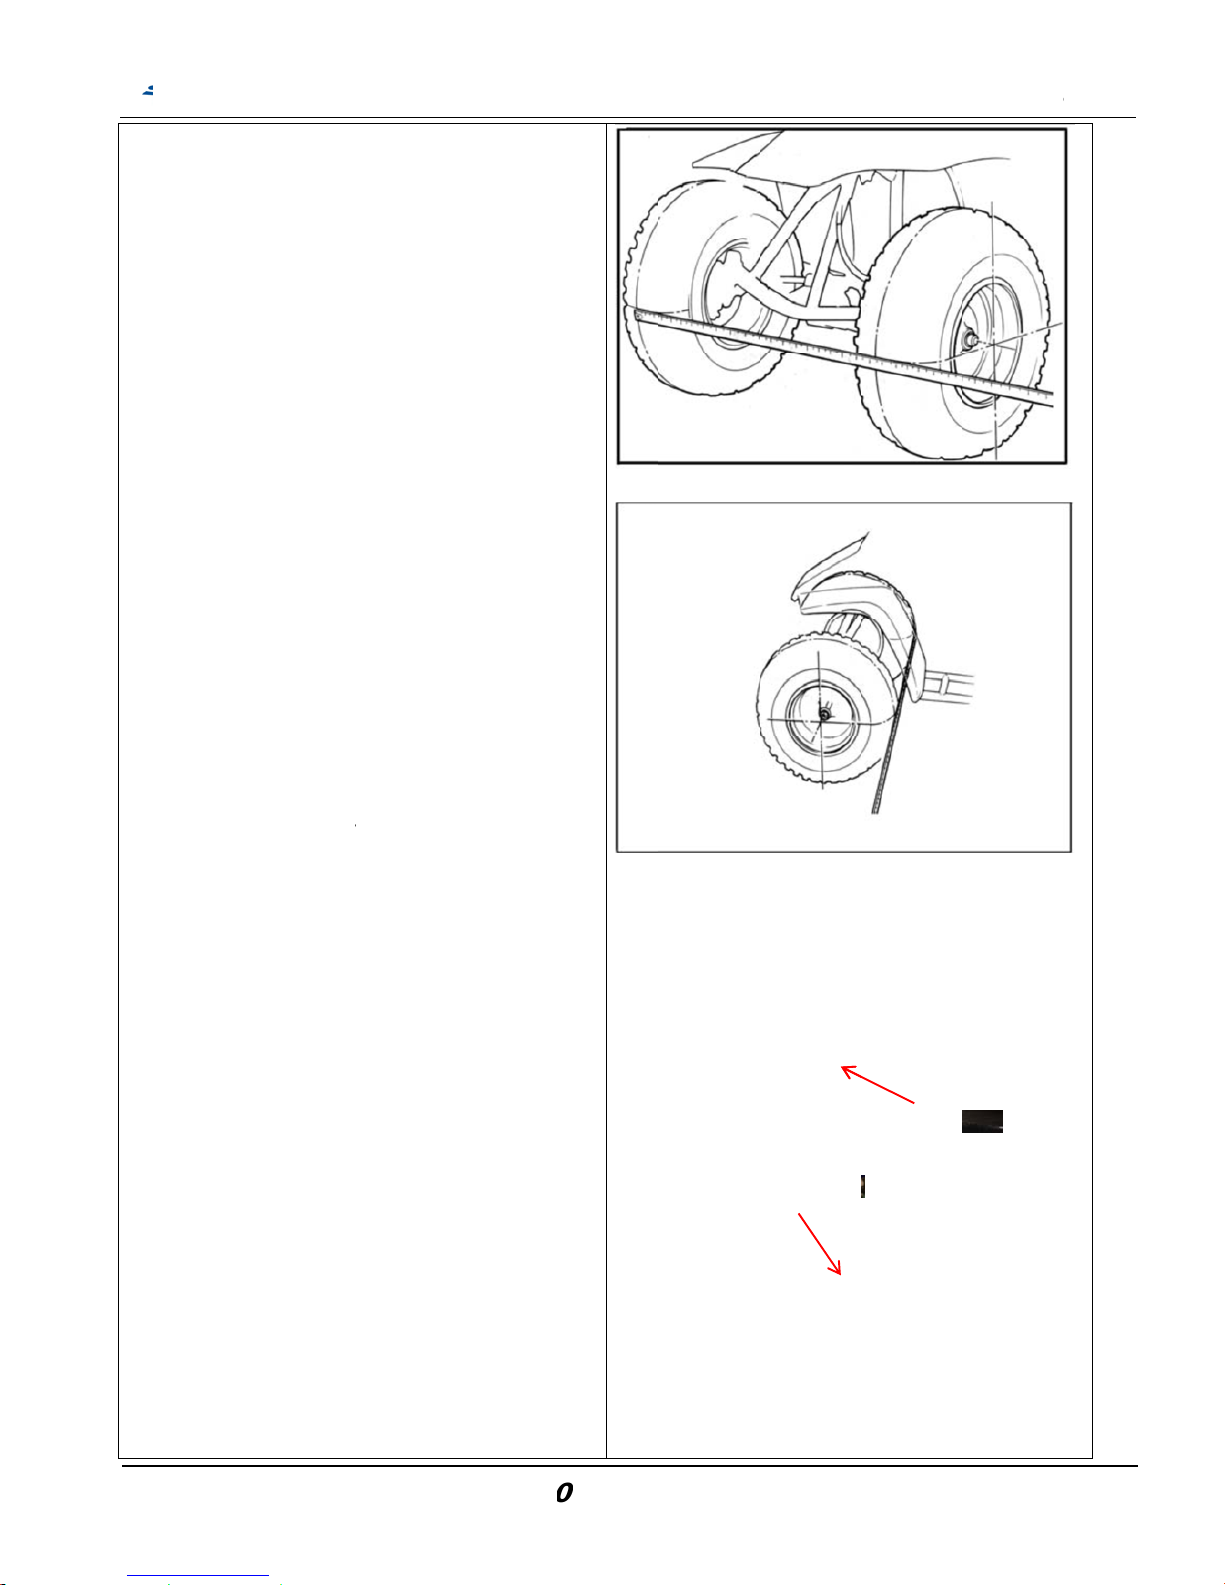
2-
a.
b.
c.
d.
e.
f.
T
o
g.
T
o
2.
G
eTh
en
U
n
oil
T
h
be
C
aSA
17 Toe-i
Let the
v
front wh
Mark th
e
the axle
Measur
e
Carefull
y
wheels
h
on the ti
center h
Measur
e
Calcula
t
rear me
a
e-in: 5±1
0
If the to
e
changin
g
by turni
n
j
oint. Ti
g
rque: 35-
4
18 GEA
R
ar oil nee
d
ere is a g
e
gine.
screw thi
s
flow out.
e re-add
o
side gear
b
pacity of
E #40, 0.
1
n
ehicle on
eels facin
g
centers
o
center he
i
the dista
n
move th
e
ave turn
e
res are ali
g
eight.
the dista
n
e the diffe
suremen
t
mm
-in is out
o
the leng
t
g the tie-
r
hten the l
o
3 N.m
OIL
s to be c
h
ar oil rele
a
release
b
il hole is
o
ox.
Gear Oil
:
2L
SMC
level grou
straight
a
f the tires
ght.
ce betwe
vehicle
b
d 180 °, s
o
ned with
ce betwe
rence in t
h
s.
f standar
d
h of the ti
e
od while h
ck nuts.
anged ev
e
se bolt a
t
olt and ca
n the engi
ATV 5
0
d and th
e
head.
to indicat
e
en the ma
ack, let th
e
the mar
k
he axle
en the ma
e front an
d
, adjust it
-rods equ
olding the
ry year.
the rear
o
let the di
ne case
/10
0
S
rks.
s
rks.
by
ally
ball
f
rty
ervice
M
C
Oi
anua
l
hapter 2
l filler cap
Maintena
n
Drain bol
t
-
2
ce Inform
a
6-
tion
Page 31

Note:
SMC
ATV 50/10
0
S
ervice
M
C
anua
l
hapter 2 Maintena
n
-
2
ce Inform
a
7-
tion
Page 32
3-
03-03-0
3-
0
Ge
Sp
To
r
En
gExhExh
Ex
h
1. Prec
a
2. Rem
o
3. Engi
n
1. Prec
a
neral In
f
The engi
n
The follo
w
Carburet
o
Drive pul
l
Start mot
A
C. Gen
e
AIR clea
cificati
o
que
ine hang
e
aust Pipe
aust muffl
aust muffl
Engin
e
utions i
n
val of E
n
e Instal
l
utions i
n
ormatio
n
e has to b
e
ing parts c
a
ey, drive b
e
or.
rator, oil p
u
ner
n
r bolt
mounting
er mounti
n
er connec
t
oil capacit
y
SM
C
Opera
t
gine
ation
Opera
t
supported
n be servi
c
lt, clutch,
a
mp and st
bolt
g bolt
ion nut
Ite
m
ATV 5
0
ion
ion
with speci
a
ed as eng
i
nd movabl
rt one-wa
y
4.5 k
g
0.9 kg
2.6 k
g
1.2 k
g
R2T
/10
0
S
l service t
o
ine being
m
e drive fac
e
clutch.
-m/ 45N
m
-m/ 9Nm
-m/ 26N
m
-m/ 12N
m
eplacemen
t
Gear Oil
T engine oil
ervice
M
28
29
35
ols that ca
n
ounted on
assembly
anua
l
Chapt
e
be lifted
o
frame:
er 3 Engin
r adjustabl
e
Capacit
y
49.3 c.c.
120 c.c.
1.1L
-
2
e Remova
l
.
8 -
Page 33
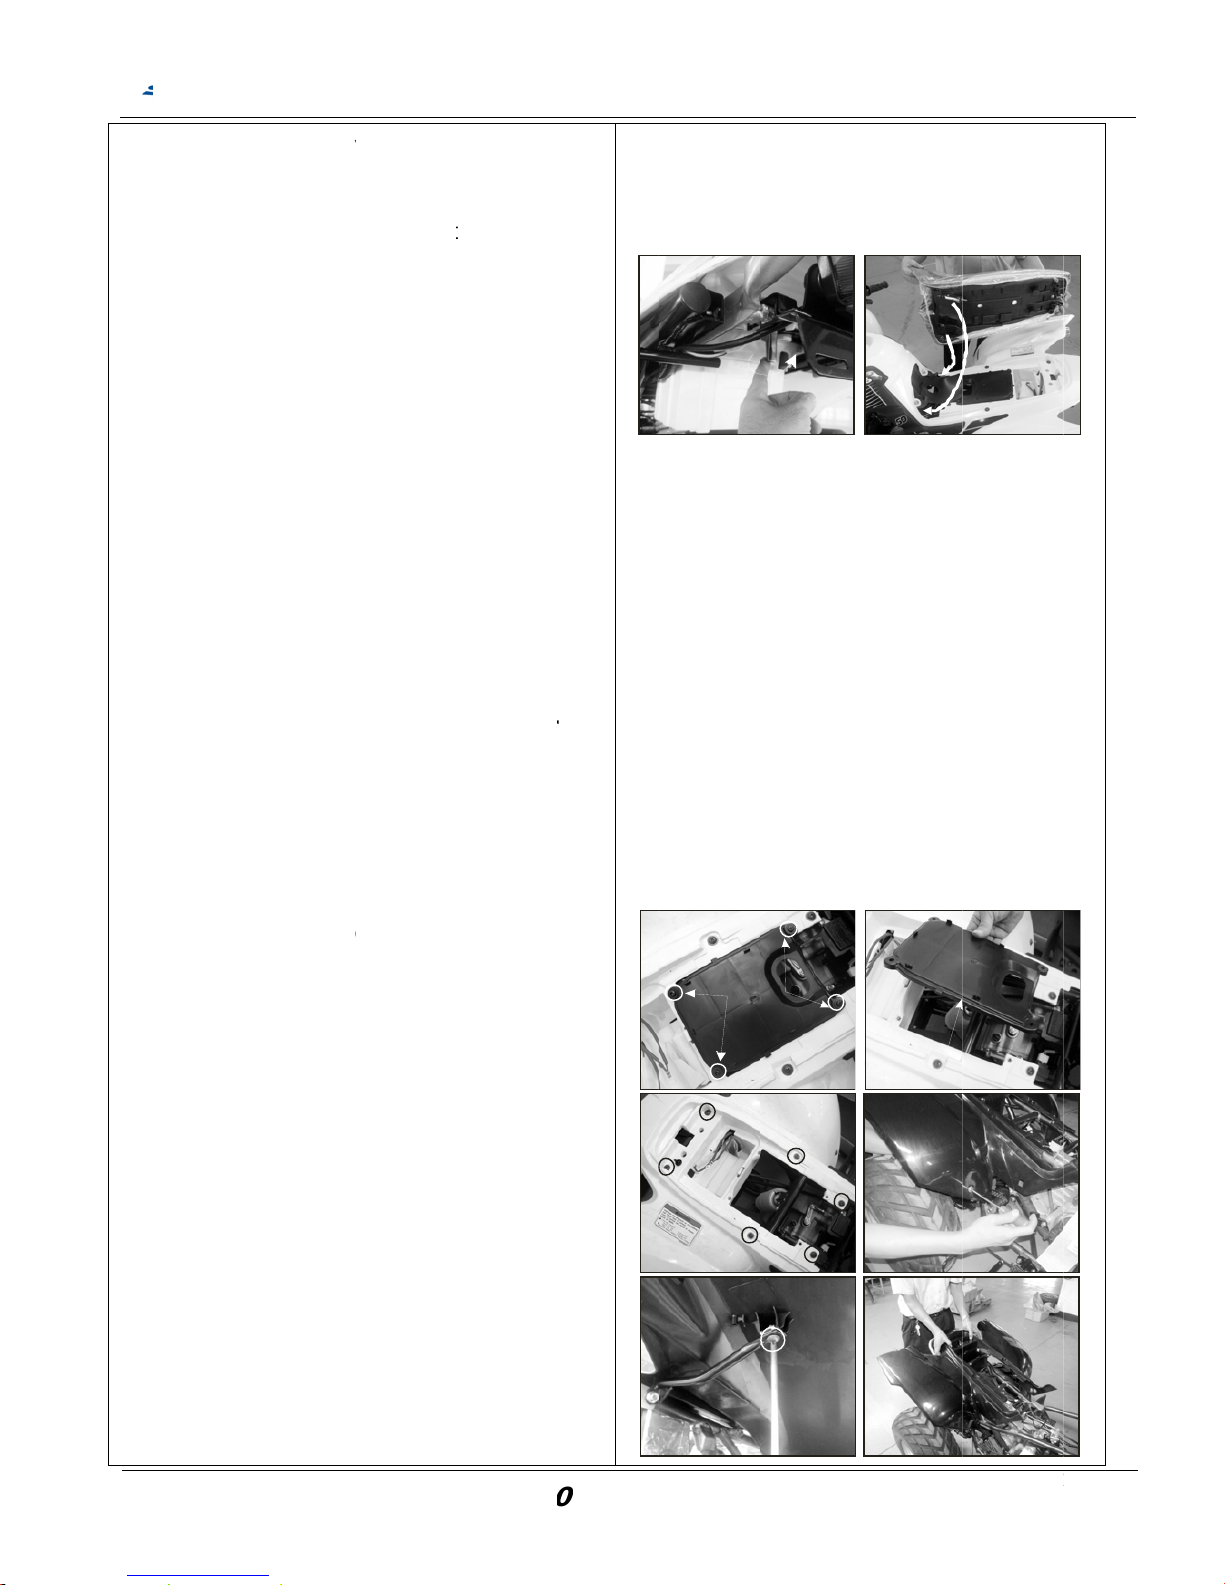
3-
0
En
gnec
tra
n
a.
R
b.
R
c.
R
d.
R
2. Engi
n
ine shall
b
essary re
p
smission
a
emove t
h
Shift the
s
below th
e
Remove
Remove
emove t
h
Remove
Firstly r
e
them re
m
terminal
.
Remove
rear fend
emove t
h
Remove
side of th
Remove
emove t
h
Remove
cleaner
c
Remove
rear fend
fender st
a
fender.
e Remo
v
e remove
air or adj
u
nd comb
u
e seat, r
e
eat open
seat to r
e
the seat
the rear c
a
e battery
the batter
y
move ne
g
ove the
b
.
the cord a
er throug
h
e R and
L
the 6 tapp
e side co
v
the R and
e air cle
a
4 pan hea
d
ap, and r
e
the 10 pa
n
er side (u
n
y side) a
n
.
SM
C
al
d in the c
o
stment in
stion sys
t
ar carrier
lever on t
h
lease the
rrier if an
y
and batt
e
cord.
ative term
attery po
s
nd fuse c
a
the side
h
side of
s
ing screw
s
er
L side co
v
ner cap
&
screws
o
move the
head scr
e
der the s
e
d remove
ATV 5
0
nditions o
f
the
em only.
e rear sid
seat catc
h
.
ry fuse.
inal (-) an
d
itive (+)
se out fro
m
ole.
ide cover
at R and
er.
rear fen
d
n the air
cap
ws on th
e
at side an
the rear
/10
0
S
e
.
L
er
d
ervice
M
SCR
E
anua
l
Chapt
e
WS
er 3 Engin
CLE A N E R C
A
-
2
e Remova
l
SE CAP
9 -
Page 34
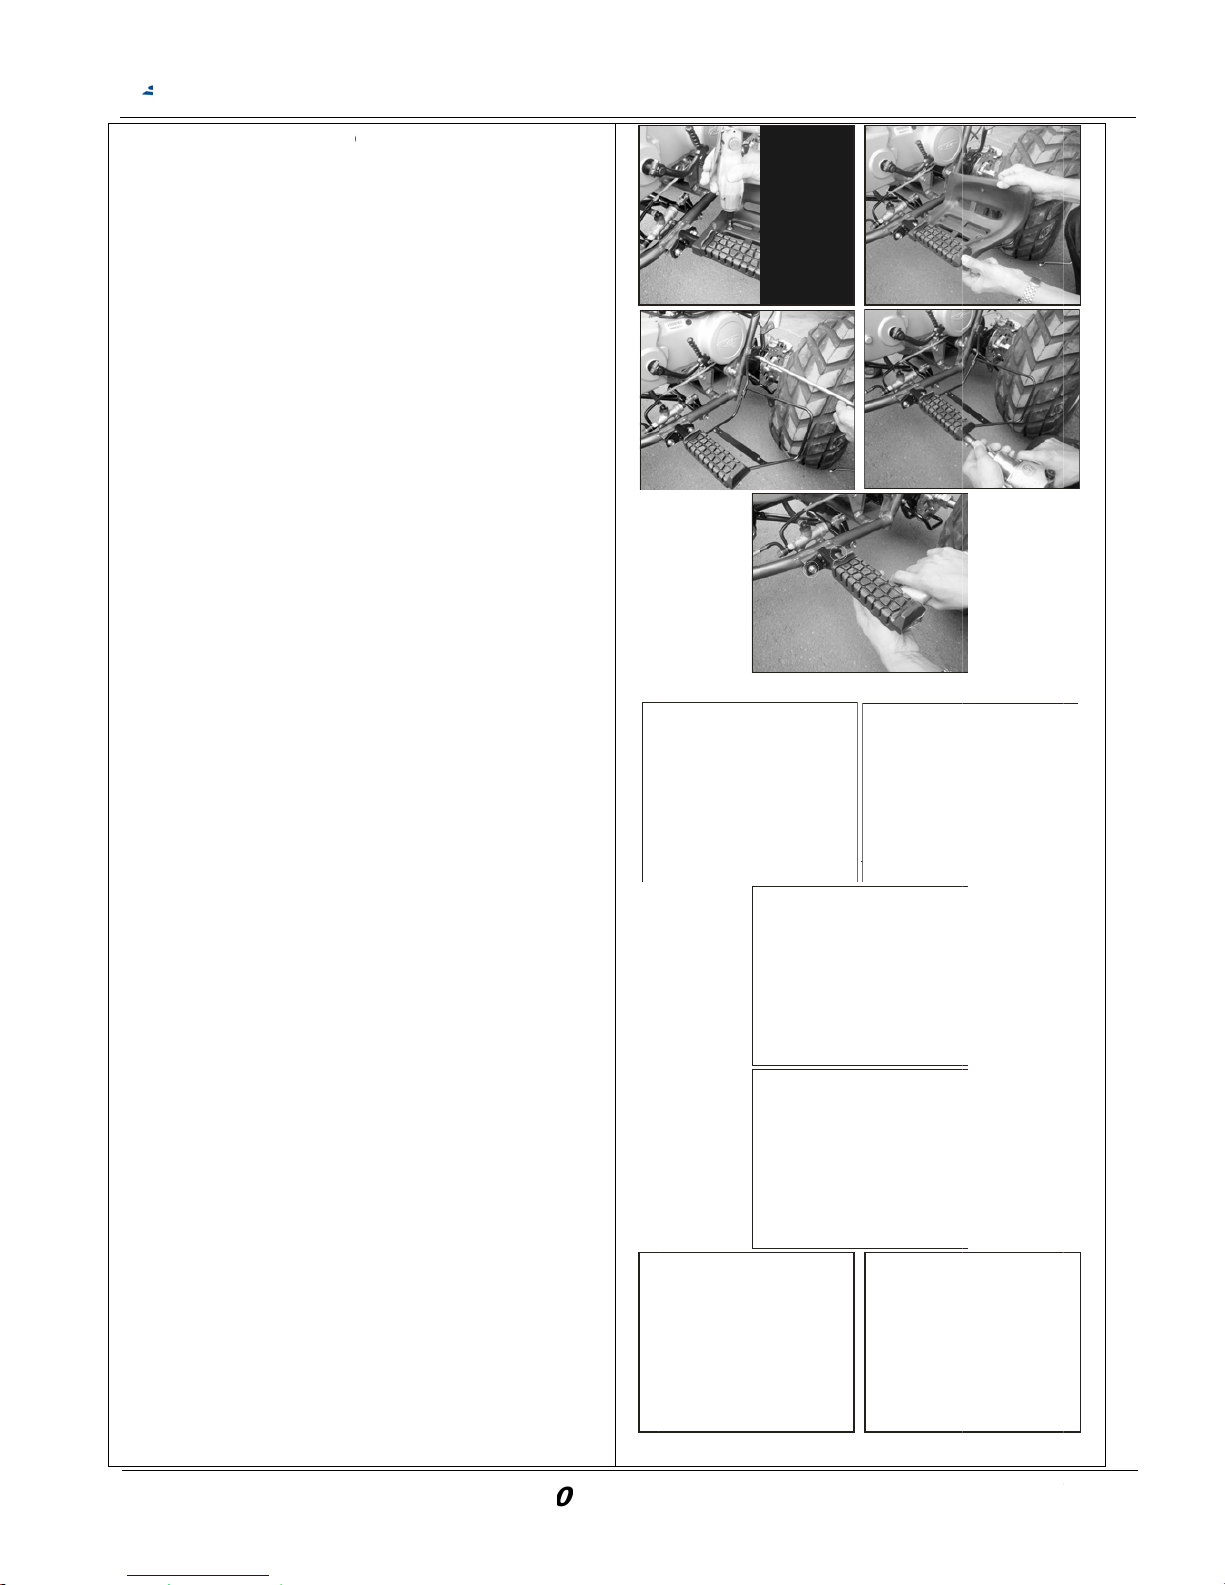
e.
Rcov
f. s
c
sid
e
g.
Rcab
h.
R
emove R
er
Screw o
u
mudguar
d
footrest
m
Remove
stay and
stay.
Remove
footrest
b
bar from
rew out
t
, remov
e
Remove
tapping
s
cooling s
emove o
le assy)
a
emove t
h
Remove
Pull out t
h
& L footr
e
t 3 bolts o
cover, a
n
udguard
c
out 3 bolt
s
then rem
o
2 bolts ea
c
ar, and th
e
frame.
he air co
o
(open) t
h
the 2 pan
crew, and
hroud
ut the oil
p
nd oil ho
s
e cylind
e
the deflec
t
e cylinde
r
SM
C
st stay
a
n each R
a
d then re
m
over
each R a
n
ve out the
h on R a
n
n remov
e
ling shr
o
e air shr
o
head scre
w
then rem
o
ump ca
b
e from o
r air shro
u
or
air shrou
d
ATV 5
0
nd mudg
u
nd L foot
r
ove out
t
d L mudg
mudguar
d
d L side
o
the footr
e
ud at rig
h
ud.
s and on
e
ve the air
le (throttl
l pump.
d
/10
0
S
ard
est
he
uard
f
st
t
e
e
ervice
M
SCR
E
anua
l
Chapt
e
W, TAPPI N
G
THROTTLE
C
er 3 Engin
ABLE
AIR SHRO U
D
-
3
e Remova
l
0 -
Page 35
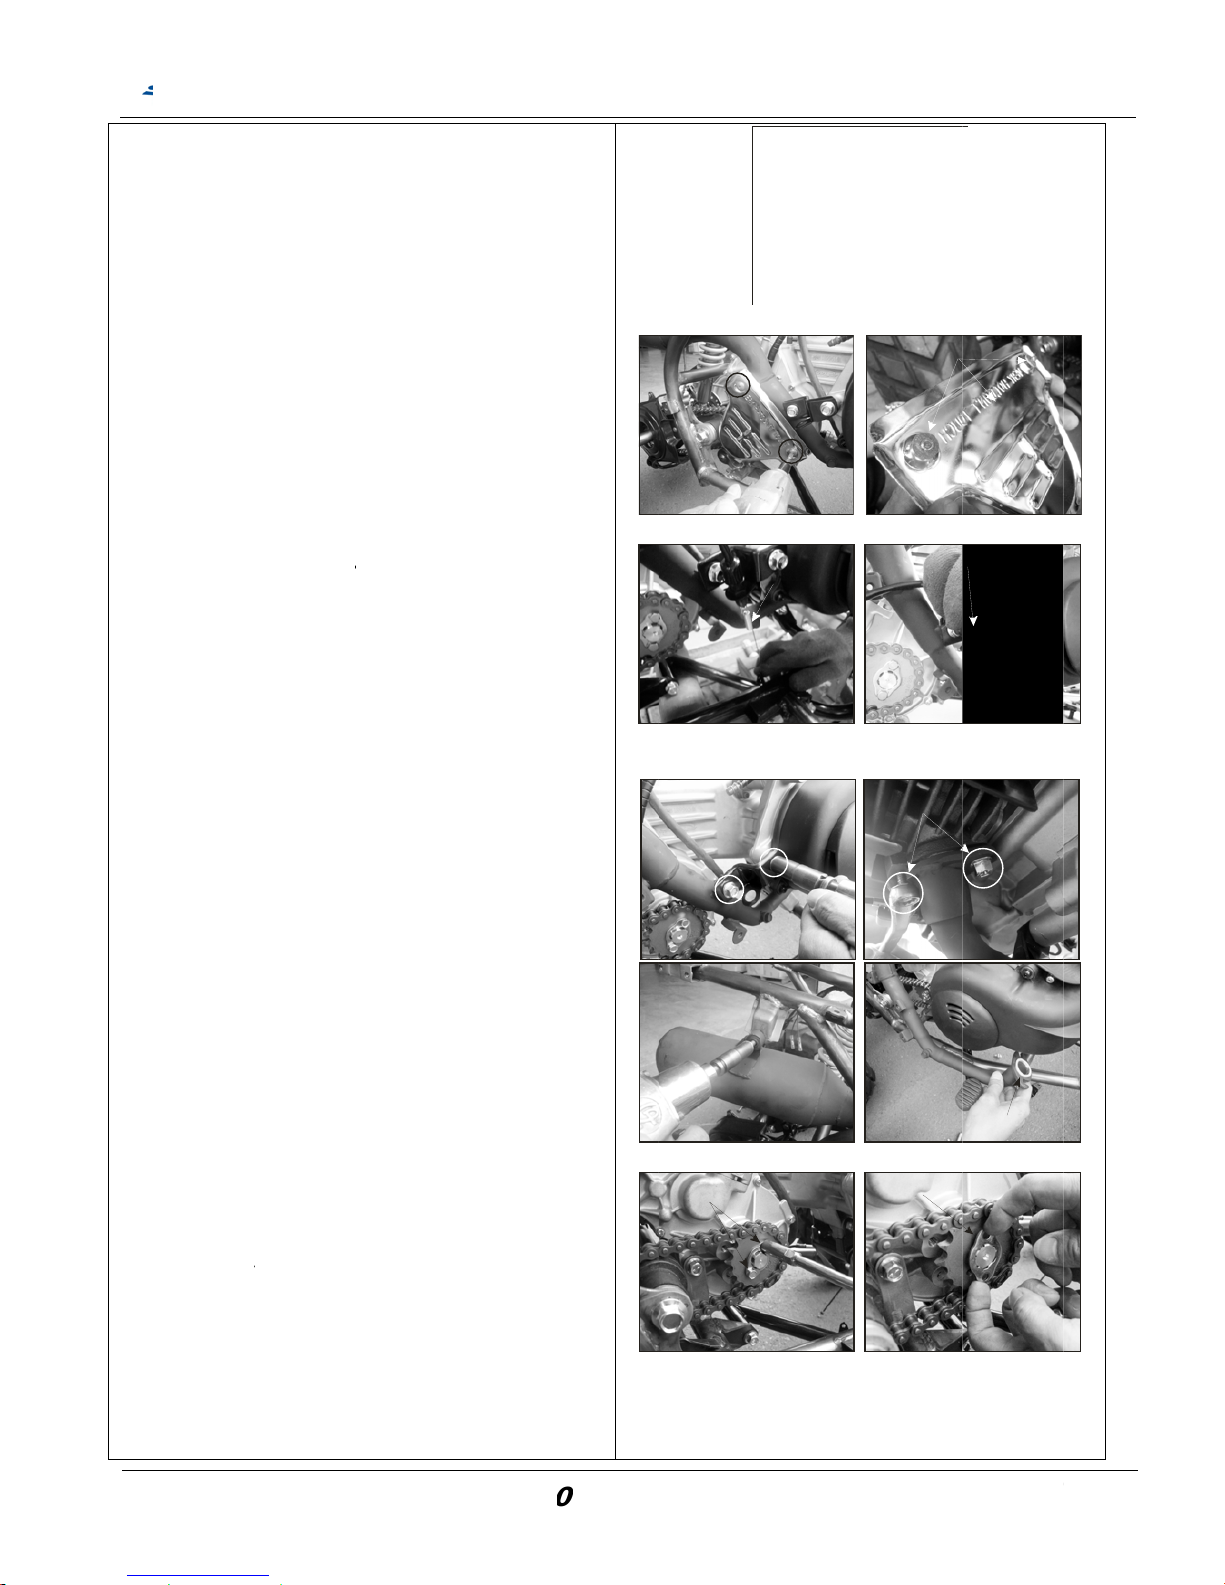
i. r
e
j. r
e
k.
R
Tig
Ex
h
Tig
Mu
f
l. r
e
move th
e
Screw o
u
Remove
move th
e
Remove
Remove
emove t
h
Remove
exhaust
s
hten torq
u
aust pipe
Remove
engine c
a
rear fram
hten torq
u
fler tighte
n
Remove
move th
e
Screw o
u
fixing pla
t
Remove
t
sprocket.
exhaust
t 2 fixing
s
the exhau
s
stop swi
t
the stop s
w
the stop s
w
e exhaus
out 2 flan
g
ide.
e:
tighten bo
the 2 han
g
se (conn
e
e side.
e:
bolt: : 2.
6
out the ex
h
drive ch
a
t the bolts
e
the sproc
k
SM
C
pipe prot
e
crew
t protect
o
ch & spr
i
itch spri
n
itch
t muffler
a
e nuts on
lt: : 0.9kg-
ing flang
e
cting with
kg-m/ 26
N
aust muf
f
in
on the dri
et and dri
v
ATV 5
0
ctor.
ng
g
ssy
the cylind
e
m/ 9Nm
bolts on t
bracket)
a
m
ler assy.
e sprock
e
ing chain
/10
0
S
r
he
nd
t
from
ervice
M
SPRING,
S
BOLTS
anua
l
Chapt
e
TOP SWITCH
er 3 Engin
PLATE W AS
H
PLATE W AS
H
SWITCH AS
BOLTS
GASKET,
PLATE, FIXI
N
-
3
e Remova
l
ER
ER
S'Y, R EAR STO
P
XHAUST P IP
E
G
1 -
Page 36
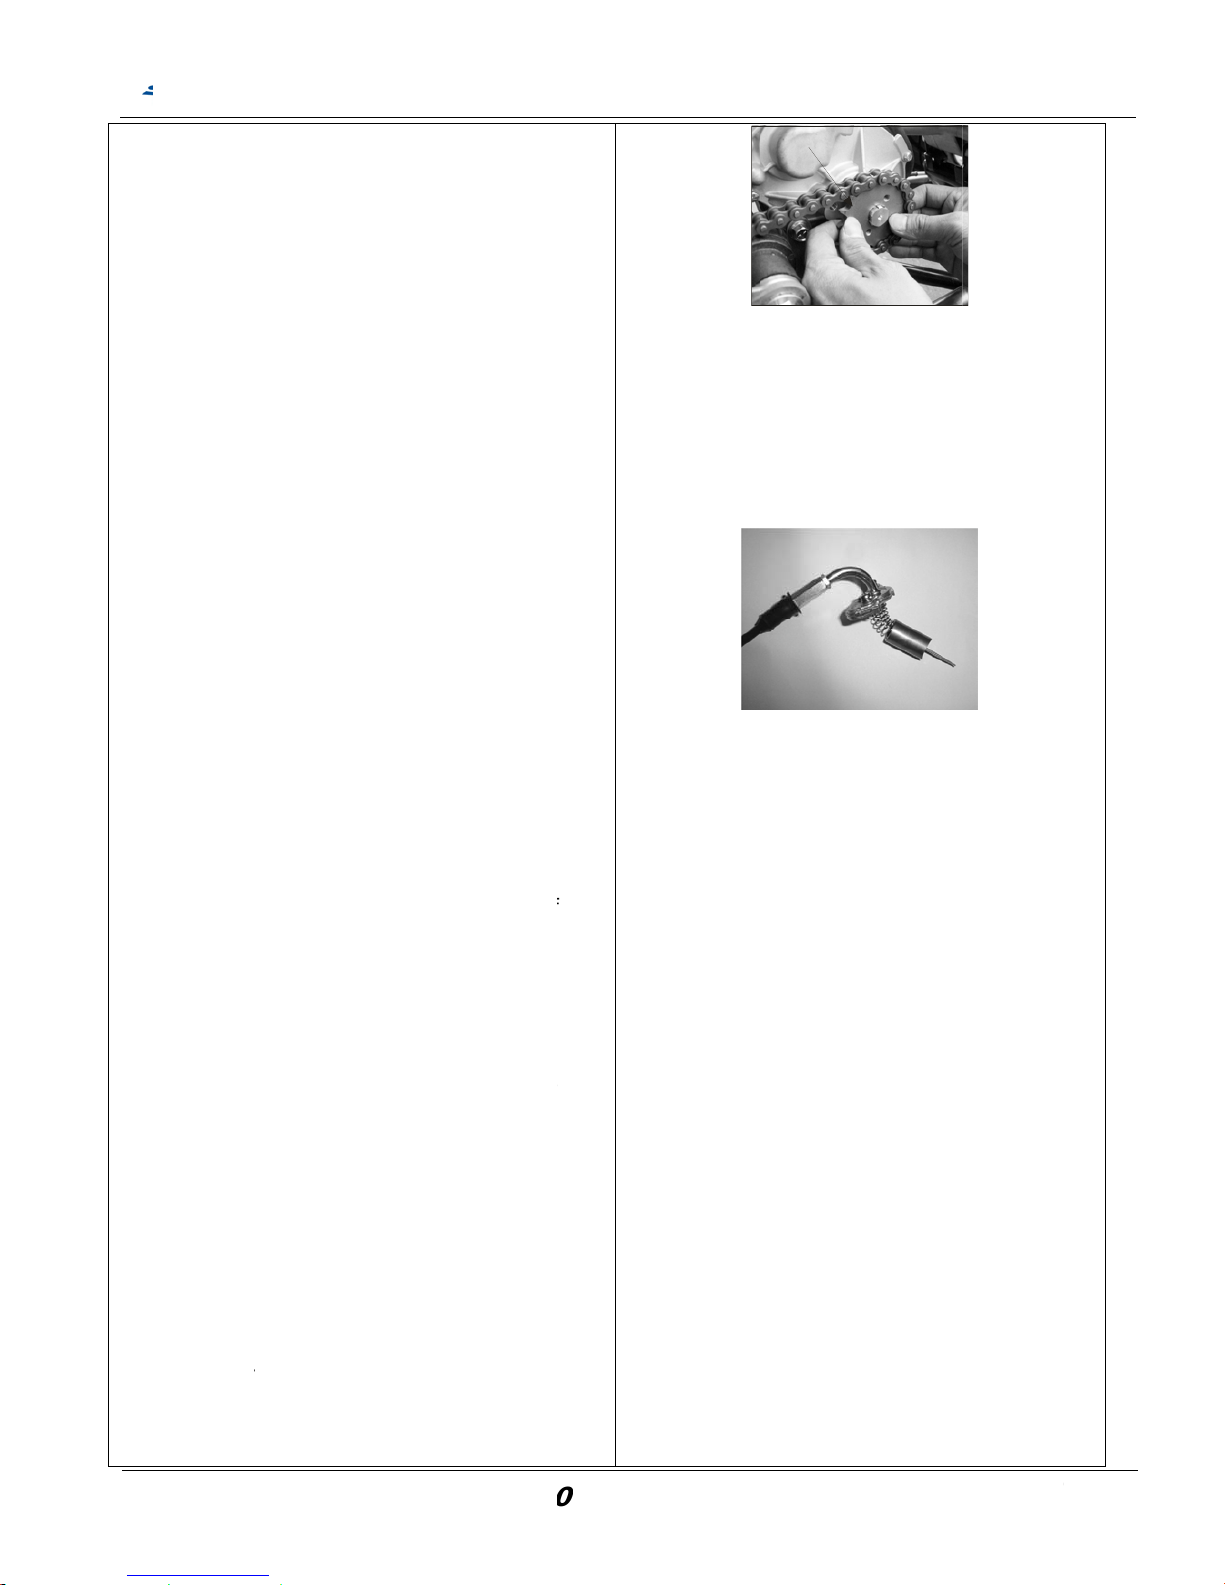
m.
d
coi
l
n.
R
car
Tig
Ca
r
o.
D
wir
e
p.
D
e
Tig
Sp
e
isconne
c
)
Remove
cap) fro
m
emove c
a
buretor
Switch th
pan und
e
carburet
o
drain out
remove t
h
careful n
o
Remove
carburet
o
hten torq
u
buretor to
p
Remove
t
Disconn
e
wire har
n
isconne
c
harnes
s
Disconn
e
harness.
Disconn
e
wire har
n
Disconn
e
isconne
c
ngine ca
s
Loo
s
LH
c
Pull
o
hten torq
u
edometer
t the spa
out the ig
n
cylinder
h
bles and
e fuel coc
k
the carb
u
r fuel drai
n
the fuel.
A
e fuel ho
s
t to spill
o
the throttl
e
e:
cap bolt:
he oil pu
m
ct the aut
o
ess.
t the ele
c
.
ct the sta
r
ct the A.
C
ess
ct the sta
r
t the spe
e
e.
en the fixi
rankcase.
ut the sp
e
e:
cable bol
t
SM
C
rk plug c
a
ition coil (
s
ead
fuel/oil h
o
to off po
s
retor, loo
s
bolt at b
o
fter fuel b
e
e on the
c
ut the fuel
cable fro
m
: 0.2 kg-
m
p hose/ a
i
-by start
e
trical cou
t motor co
. Generat
o
t motor wi
r
dometer
ng bolt on
edomete
r
: : 1.1kg-
m
ATV 5
0
p (ignitio
park plug
se from
ition, put
a
e the
ttom side
ing drain
arburetor.
.
top of
/ 2Nm
r breathe
h
r coupler
f
plers fro
m
upler from
r coupler
f
e coupler
.
cable fro
m
the rear u
cable.
/11Nm
/10
0
S
n
to
out,
Be
ose
rom
wire
from
p of
ervice
M
S
anua
l
Chapt
e
PROC KET DR
I
er 3 Engin
V
E
-
3
e Remova
l
2 -
Page 37
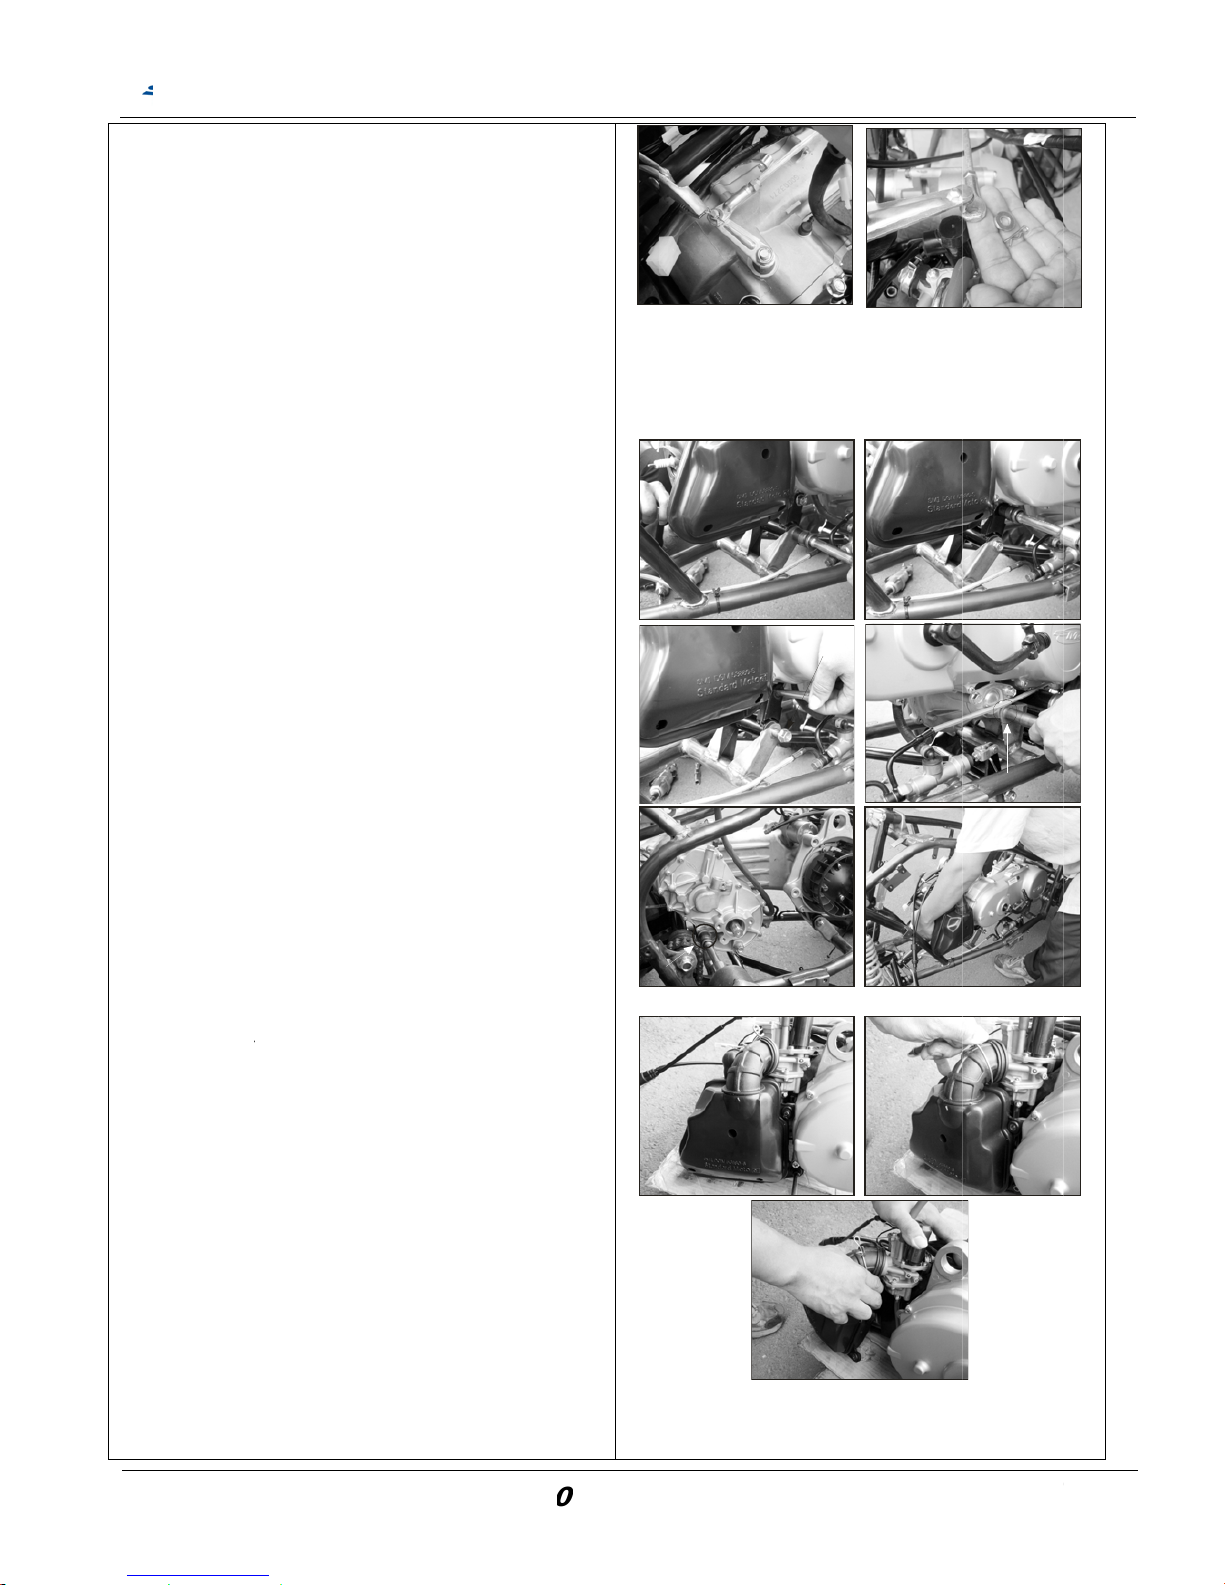
q.
Reng
r. r
e
s. r
Tig
Air
emove t
h
ine case.
Remove
the engi
n
Disconn
e
cable fro
m
move th
e
Disconn
e
Remove
emove th
e
Remove
t
case sid
e
Loosen t
h
carburet
o
Pull and
r
hten torq
u
cleaner b
o
e gear s
h
cotter pin
f
e case.
ct the re
m
engine
h
engine
ct the en
g
out the en
air clea
n
the 2 fixin
g
e air clea
emove th
e
e:
lt: 0.9kg-
m
SM
C
ifting lev
e
rom the s
h
ove the g
e
older
ine hange
gine from
t
er
screw o
n
ner air du
c
air clean
/ 9Nm
ATV 5
0
r from
ifting lev
e
ar shiftin
g
r bolts
he left sid
the LH e
n
t clamp fr
o
er assy.
/10
0
S
r on
e.
gine
m
B
O
ervice
M
LT
anua
l
Chapt
e
BOLT
er 3 Engin
-
3
e Remova
l
BOLT
3 -
Page 38
t.
R
u.
R
Tig
AIR
v.
R
Tig
Sta
emove th
Remove
intake an
Remove
emove t
h
Remove
Remove
gasket.
hten torq
u
intake /R
e
emove t
h
Remove
Disconn
e
only) an
d
hten torq
u
rt Motor b
o
e carbure
the clamp
d carbure
t
the carbu
r
e intake
p
the 4 soc
k
the intake
,
e:
ed valve
e start m
o
the 2 fixin
g
ct the ear
t
remove
o
e:
lt: 1.3kg-
m
SM
C
tor
in connec
t
or
etor.
ipe and
r
et bolts
reed valv
bolt: 1.1k
g
tor
bolts
h cord (1
0
ut the sta
r
/13Nm
ATV 5
0
ing betwe
eed valv
e
e assy an
d
-m/11Nm
0CC mod
e
t motor.
/10
0
S
en
l
B
O
ervice
M
SO
R
LTS
C
anua
l
Chapt
e
CKET BOLT
EED VALVE
A
ORD COMP
er 3 Engin
SSEMBL
Y
GASKET
-
3
e Remova
l
4 -
Page 39

5-
0
Ch
edam
Ins
trem
Ca
u
3. Engi
n
ck the bu
s
age.
all the en
g
oval.
tion
Be caref
u
engine.
Do not b
e
Cables
w
accorda
n
e Instal
l
h of engi
n
ine in the
l when re
m
nd or twi
s
ires have
t
ce with n
o
SM
C
ation
e hanger
reverse p
r
oving an
t the wire
s
o be rout
e
rmal layo
u
ATV 5
0
parts for
a
ocedures
installin
g
and tube
s
d in
t.
/10
0
S
ny
of
the
.
ervice Manua
l
Chapt
e
er 3 Engin
-
3
e Remova
l
5 -
Page 40

N
O
TE:
SMC ATV 50/10
0
S
ervice Manua
l
Chapteer 3 Engin
-
3
e Remova
l
6 -
Page 41
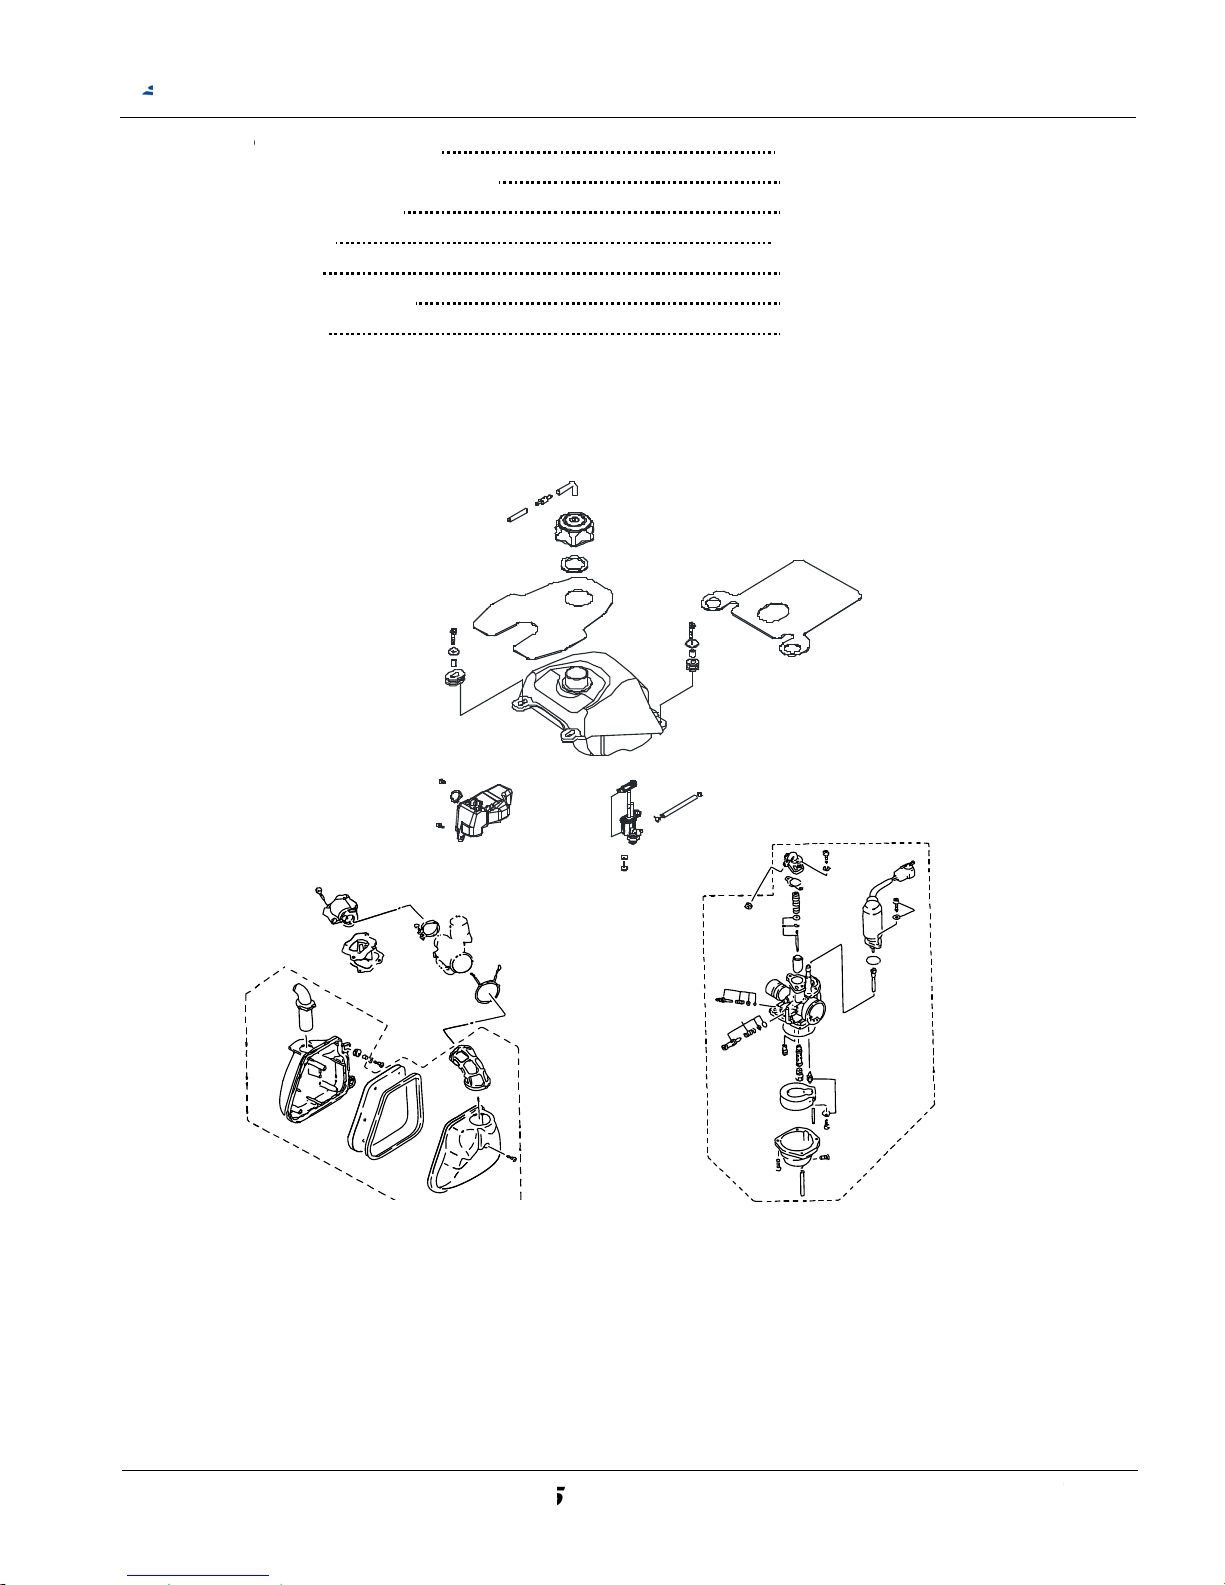
4-
04-04-04-04-04-04-0
4-
0
1. Mech
a
2. Prec
a
3. Trou
b
4. FUEL
5. Carb
u
6. Intak
e
7. Air C
l
1. Mec
h
anism D
utions i
n
le Shoo
TANK
retor
, Reed
V
eaner
anism
D
S
M
iagram
Opera
t
ting
alve
iagram
C AT
V
5
ion
/100S
e
rvice
M
3
3
3
4
0
4
4
4
anua
l
Chapt
e
7
8
9
0
2
3
er 4 Fuel
S
-
3
ystem
7 -
Page 42
4-
0
A.
W
a
Ga
sand
Ca
B.
C
a
I.
D
M
a
Idl
Idl
T
h
Pil
C.
TSpe
Vac
Fu
e
2. Prec
a
General
rning
oline is a
strictly pr
o
utions
Do not b
e
When di
s
after re-
a
There is
a
Specific
rburetor d
. number
in injecto
r
e injector
e speed
rottle han
d
ot screw
ool
cial serv
i
uum/air
p
l level ga
utions i
n
Informa
t
low ignitio
hibit flam
nd off thr
o
assembli
n
ssembly
drain sc
r
ation
ITEM
iameter
le clearan
ce tools
ressure
p
uge
S
M
Opera
t
ion
n point an
d
e when w
o
ttle cable
.
g fuel sys
t
ew in the
f
ce
ump
C AT
V
5
ion
explosiv
e
rking with
Damage
d
em parts,
loat cham
/100S
e
material
s
gasoline.
throttle c
a
pay atten
t
ber for dr
a
rvice
M
, so alwa
y
ble will
m
ion to O-ri
ining resi
d
MIKUN
I
Ø18
m
VM
1#65#17
1800 ±
1
1~3
m
1 1/2
t
anua
l
Chapt
e
s work in
a
ake unsta
g positio
n
ual gasoli
n
VM16
m
6
.5
00rpm
m
urns
er 4 Fuel
S
a well-ven
ble drivab
i
, replace
w
ne.
-
3
ystem
tilated pla
c
lity.
ith new
o
8 -
e
ne
Page 43

4-
0
Po
En
Le
a
Ri
c
Int
e
3. Trou
b
or engi
n
No fuel i
n
Clogged
f
Too muc
h
No spark
Clogged
gine idl
e
Improper
Ignition
m
Fuel/air
m
Air clean
e
Insulatio
n
Fuel tan
k
n Mixtu
Fuel jet
o
Fuel tan
k
Fuel flow
Float lev
e
Vacuum
h Mixtu
r
Float ne
e
Float lev
e
Air duct i
n
Air clean
e
rmitten
Malfuncti
le Shoo
e start
fuel tank
fuel tube
fuel in c
y
from spa
r
air cleane
r
s unste
a
adjustme
n
alfunctio
n
ixture rat
i
r dirty
leakage
cap brea
t
re
f carburet
o
cap brea
t
s in the tu
b
l in carbu
r
piston stic
k
e
dle valve
i
l too high
carburet
o
r elemen
t
tly misfi
on of ignit
i
S
M
ting
linder
k plug(ma
l
dy, stal
t to the
o not goo
d
hing hole
c
r clogged
hing hole
c
e unsmo
o
etor too l
o
and clos
e
n carbure
t
r is clogg
dirty
re as ac
c
on syste
m
C AT
V
5
function o
f
l or run
s
idle speed
logged
logged
th.
w.
d
or faulty
ed
elerati
o
/100S
e
f ignition
s
poorly
screw
n
rvice
M
ystem )
anua
l
Chapteer 4 Fuel
S
-
3
ystem
9 -
Page 44
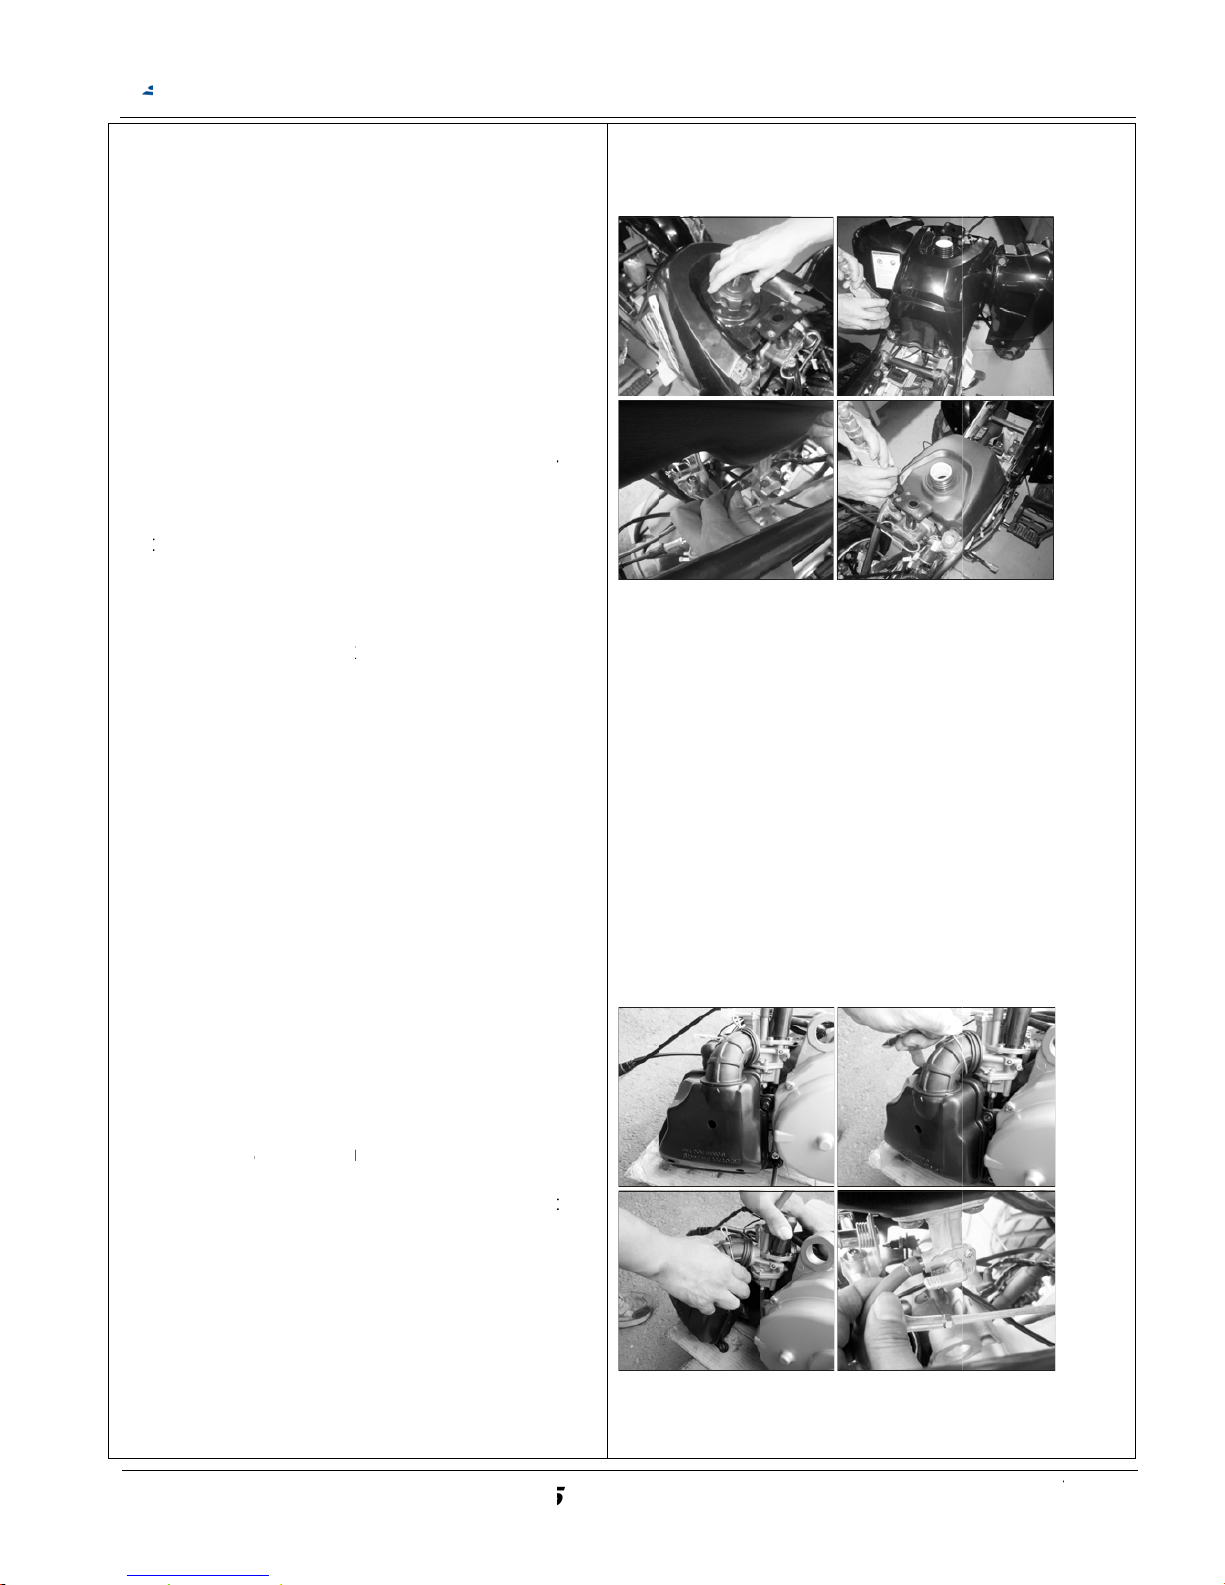
4.
4
a.
(for
ch
a
No
tspa
Wi
p
b.
c.
4-
0
a.
1.
R Rle L
r
2.
D
w
3.
L
c
Not
e
(bel
FUEL T
A
REMOVA
L
Remove
Remove
Turn the
Disconn
e
carburet
o
Remove
Remove
Unscrew
detail re
m
pter for e
a
e: Keep
rks.
e up spill
e
Fuel tank
/
need to r
e
Chec
k
leaki
n
Chec
k
on th
e
surfa
c
Chec
k
crack
fuel c
o
Installati
o
Follow th
e
5. Carb
u
REMOVA
L
emove th
e
emove th
e
ft crankca
s
oosen the
a
move the
isconnect
t
ire.
oosen the
arburetor.
: Turn off
t
ow fuel tan
NK
the seat a
n
the side c
o
fuel cock
s
ct the
r.
the front p
the fuel ta
n
the fuel t
a
oving ste
p
ch mentio
gasoline
d gasolin
e
fuel coc
k
move th
e
the fuel t
g or dam
a
the fuel
c
body sid
e
e, seal d
a
the fuel
h
or fuel lea
ck and c
a
n
reverse
w
retor
air cleane
r
2 air clea
n
e.
air duct cla
m
air cleaner
he fuel lin
e
intake cla
m
he fuel pip
e
k) to “off” p
o
S
M
d rear fe
n
vers
witch to
O
fuel lin
e
anel, han
d
k cap an
d
nk fixed 4
, please
r
ned fram
e
away fro
at once.
/hose Ins
p
fuel tan
k
ank if any
ge.
ock, if an
y
, fuel tan
k
mage.
ose, if an
y
king, and
t
rburetor.
ay of rem
o
.
er mountin
p on carb
and auto-
c
p and rem
o
by turn th
sition.
C AT
V
5
der.
FF positi
o
from
le bar.
front fen
d
bolts.
efer to fur
t
parts)
m flame
s
ection(n
o
and cov
e
cracks,, f
u
fuel leaki
contact
bended,
ighten we
l
val.
bolt on th
uretor and
hoke elect
ve out the
fuel cup
/100S
e
n
the
er.
ther
or
rs)
el
ng
l on
e
ric
rvice Manua
l
Chapteer 4 Fuel
S
-
4
ystem
0 -
Page 45
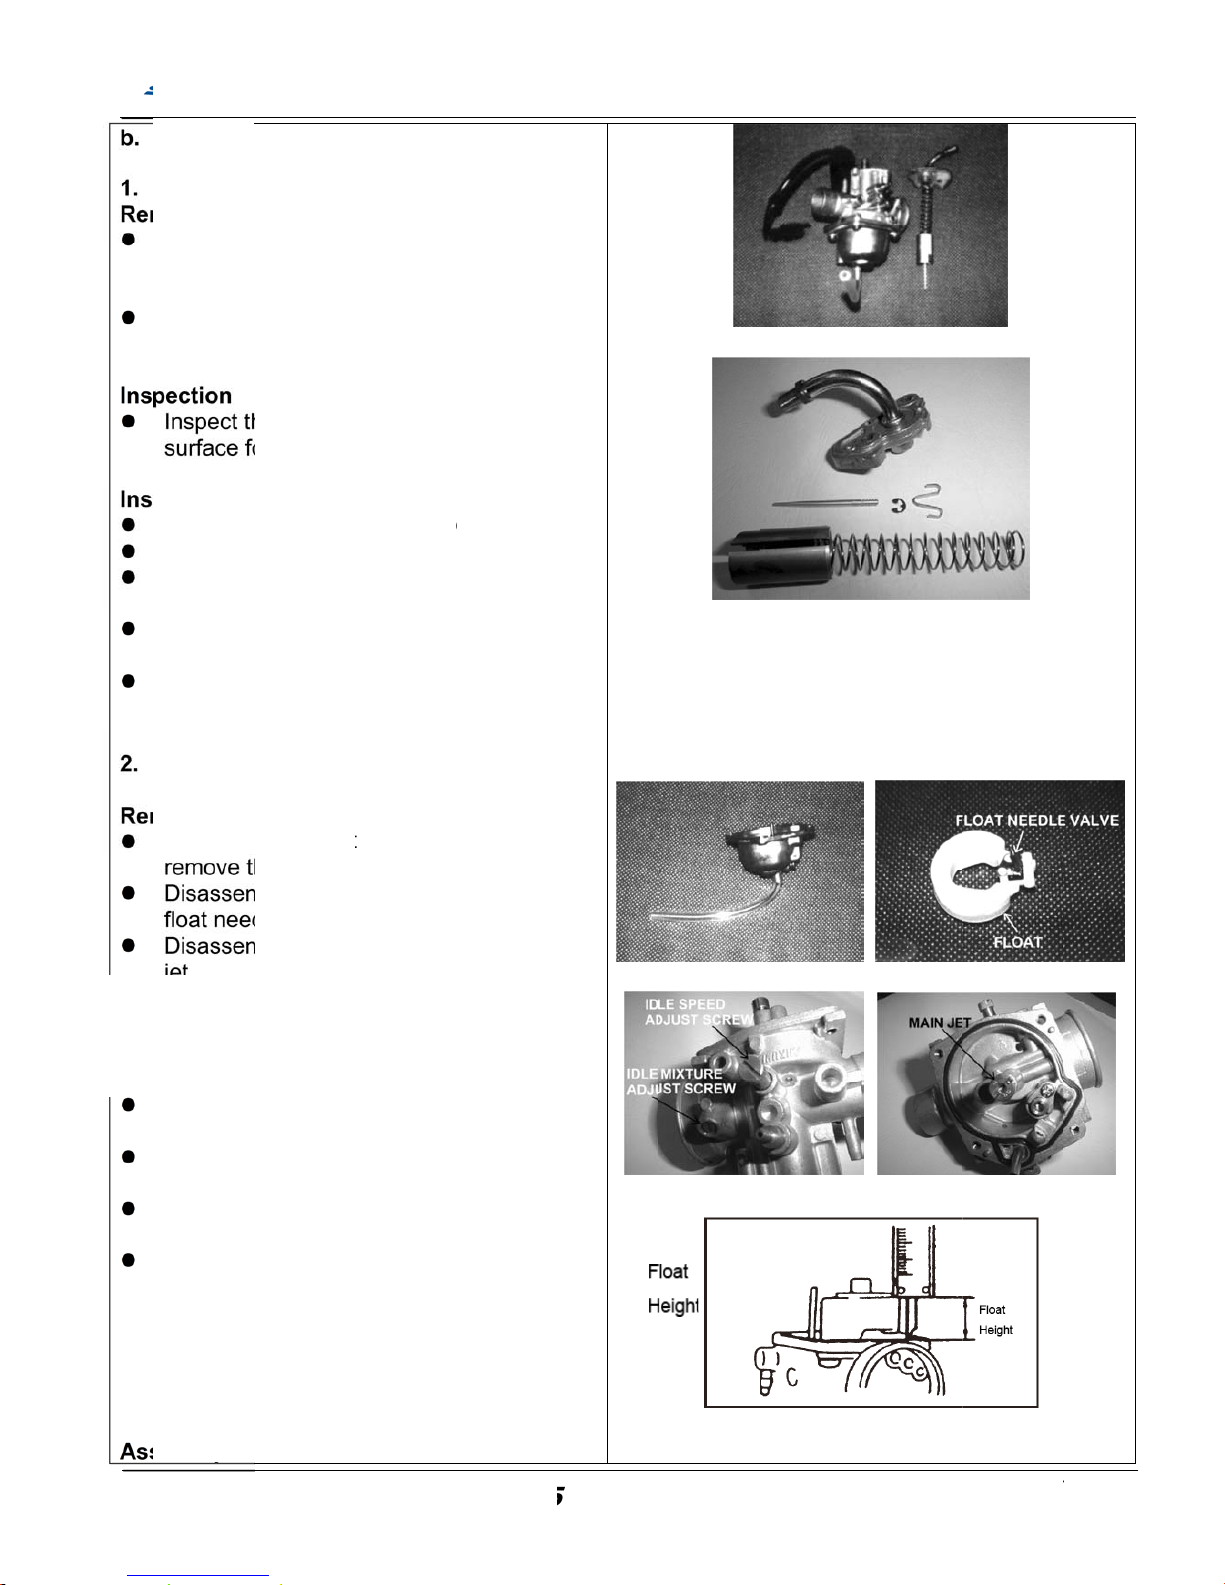
bly of Ca
r
r cap/ th
r
the throttl
e
le depres
s
the needl
e
jet needl
e
e throttle
r wear, s
c
needle c
l
jet needl
e
the throt
t
lve.
throttle v
a
just
d install t
h
r.
mber/adj
u
the floa
t
e float ch
bly the f
le valve.
bly the p
bly the i
air screw.
ll the jets
l based s
o
pressed a
i
e seat of
t
amage.
carbureto
r
ce betwe
e
ithout th
e
float.
ght :15.0
S
M
buretor
c
ottle valv
e
cable fro
m
ing the th
r
clip retai
n
and nee
d
valve and
ratches o
r
ip on the j
e
into the
t
le cable,
s
lve groov
e
e carbure
t
st screw
s
chambe
r
amber co
v
loat arm
p
ilot jet, m
a
dle speed
and scre
w
lvent and
with co
m
he float n
e
upside d
o
n the pla
n
gasket)
a
mm ~ 17.
0
C AT
V
5
ompone
n
/jet need
the thro
t
ottle valv
e
er (or spri
le clip.
jet needle
dirt.
t needle.
hrottle val
v
pring and
with the
or cap to
t
screws
er.
in, float
in jet, ne
e
adjust s
c
s for we
a
clean the
pressed
a
edle valv
e
wn, mea
s
e of the
b
nd the u
p
mm
/100S
e
ts
le.
tle
ng
e.
the
idle
he
and
and
dle
rew
r or
jets
ir.
for
ure
owl
per
rvice Manua
l
Chapteer 4 Fuel
S
-
4
ystem
1 -
Page 46
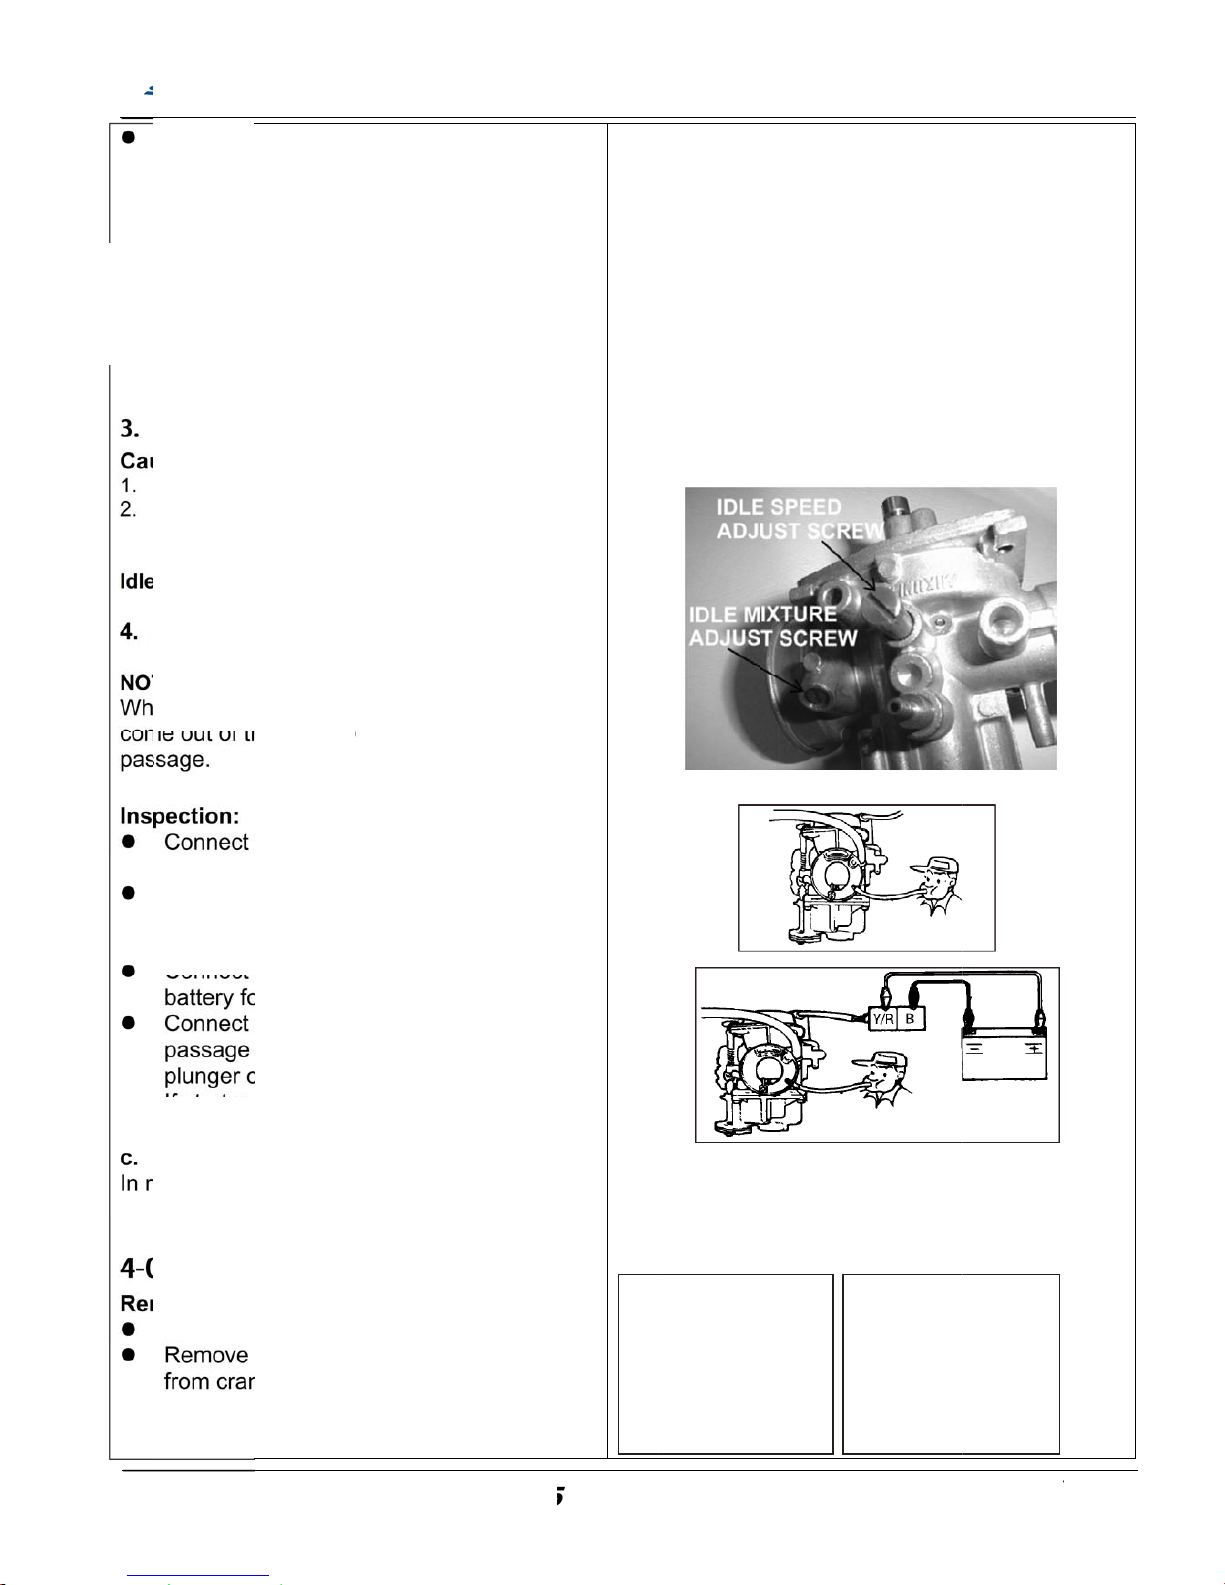
parts in s
o
compre
s
ly the rev
e
bly.
r cover
b
2 Nm
able free
nt of Idle
meter wh
e
le speed a
d
standard t
u
: 1800 ± 1
e(Auto-b
ter plung
e
e other si
d
a 3.3 m
m
and blow
i
rter plun
g
ke unit.
I
the auto c
h
r five min
u
a 3.3 m
m
and blow
pens, rep
l
plunger cl
o
n of carb
u
y of remo
v
, Reed
V
the 4 soc
k
the air int
a
kcase.
S
M
lvent and
sed air. A
s
rse order
o
olt torqu
e
play adju
s
Speed
n adjustin
g
justing scr
e
rns.
00 rpm
y starter)
r is open,
e of the
s
hose to
nto the h
o
er open
s
f closed,
oke unit l
tes.
hose to
into the
h
ace the a
u
ses, auto
retor
al.
alve
et bolts o
n
ke and r
e
C AT
V
5
blow it dr
y
sembly is
f
:
tment (2
engine R
P
w gently,
t
air should
tarter air
he starte
r
se.
, replace
perform
s
eads to a
he starte
r
ose. If st
a
to choke
u
choke is
o
the air in
t
ed valve
a
/100S
e
~ 5
M.
hen
air
the
tep
12V
air
rter
nit.
k.
ake
ssy
rvice
M
SOC
K
anua
l
Chapt
e
ET BOLT
er 4 Fuel
S
-
4
ystem
2 -
Page 47
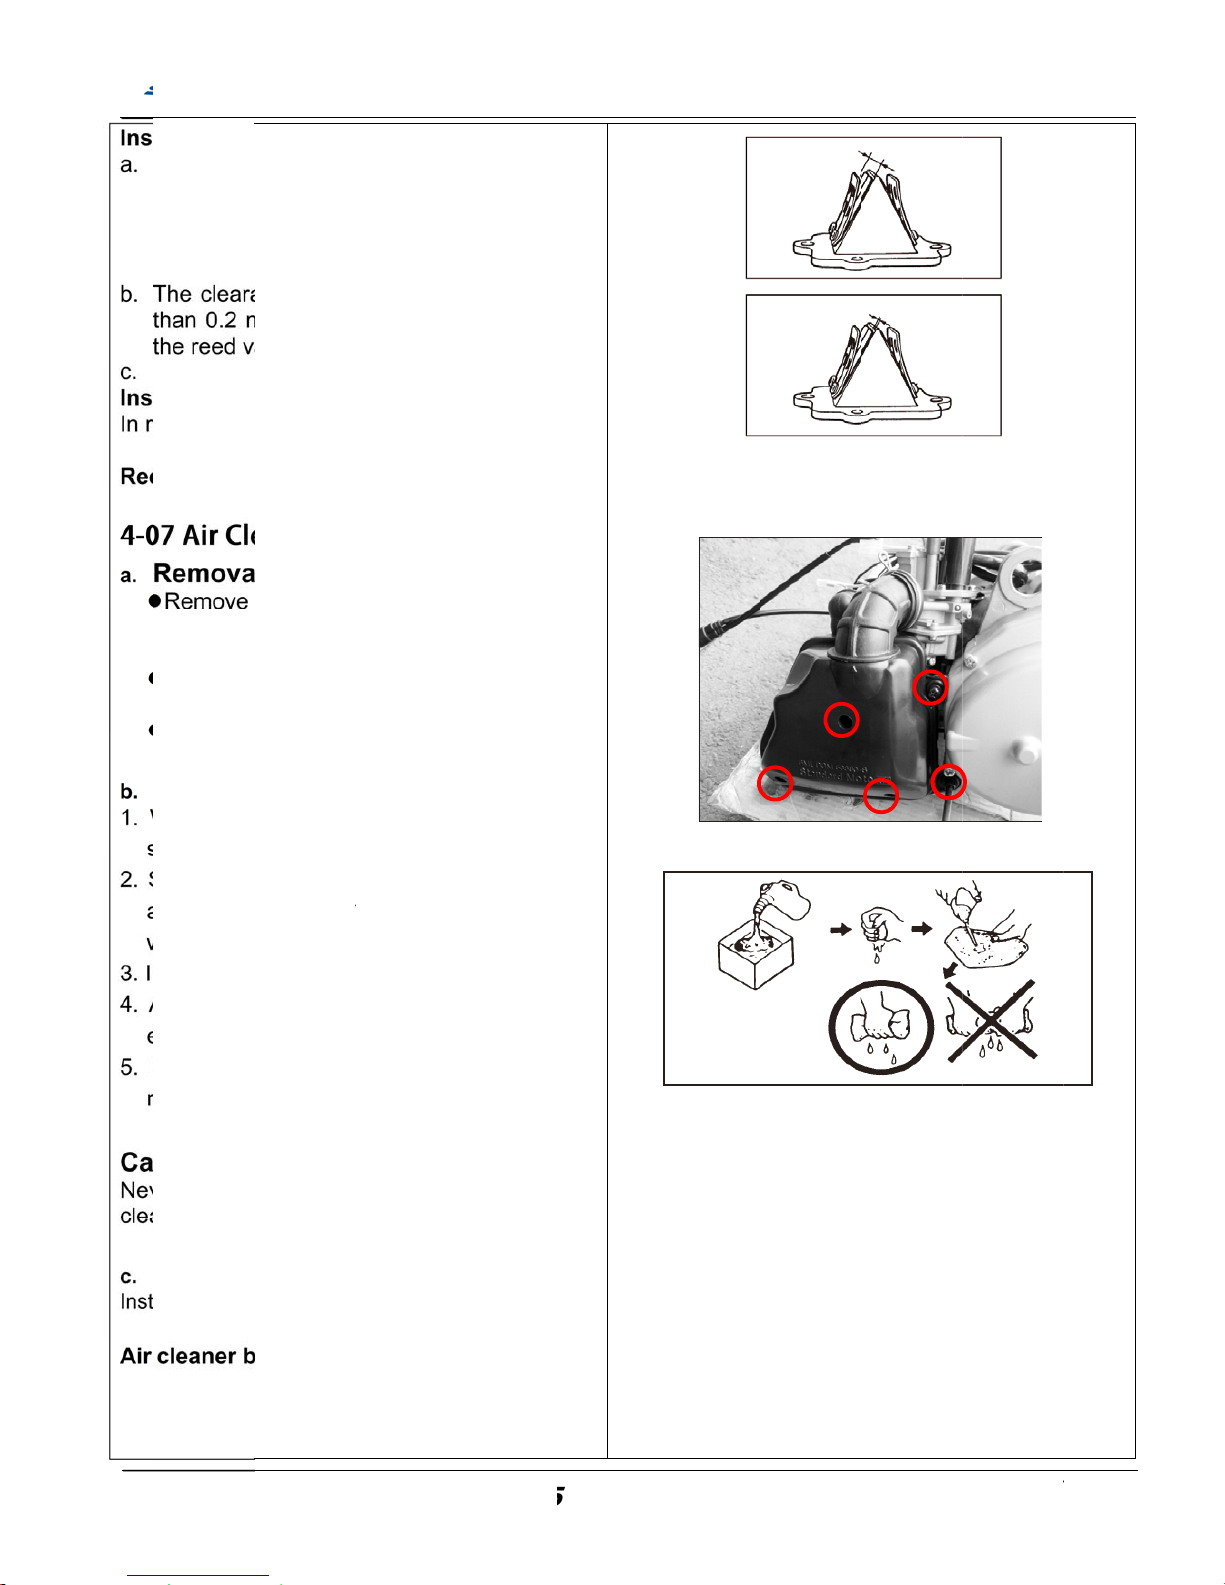
stopper h
e
of specifi
c
the valve
nce of re
e
m. if out
lve.
y of remo
v
rque: 1.1
aner
l
the 2 air c
l
clamp on
nnect fro
m
3 screws
o
ve the air
the air cle
a
air cle
a
element
g
e excess
ry. Do no
t
ezing it.
element.
e motor
o
ould be w
e
he eleme
r access.
oline or
a
ent.
on
in the reve
olt torqu
e
S
M
ight shou
l
ation, adj
u
d valve
s
of specifi
c
al.
mgf • kg
/
eaner fixi
n
the air an
d
carburet
n the air
c
cleaner c
o
ner elem
e
ner ele
m
ently but
solvent
o
twist the
If damage
d
il to the
e
t but not
d
nt assem
b
cid organi
z
rse order o
f
: 0.9 mgf
C AT
V
5
d be 6.0 ~
st the sto
p
hould be
l
ation, rep
l
11 Nm
g bolts ,
breathe
t
or.
leaner co
v
ver
nt
ent
thoroughl
y
ut of the
f
filter ele
m
, replace
lement w
h
ripping.
ly and p
ed solve
n
removal.
• kg/ 9 N
m
/100S
e
6.4
per
less
ace
ube
er,
in
ilter
ent
it.
ich
arts
t to
rvice Manua
l
Chapteer 4 Fuel
S
-
4
ystem
3 -
Page 48

N
o
tes:
S
M
C AT
V
5
/100Service Manua
l
Chapteer 4 Fuel
S
-
4
ystem
4 -
Page 49
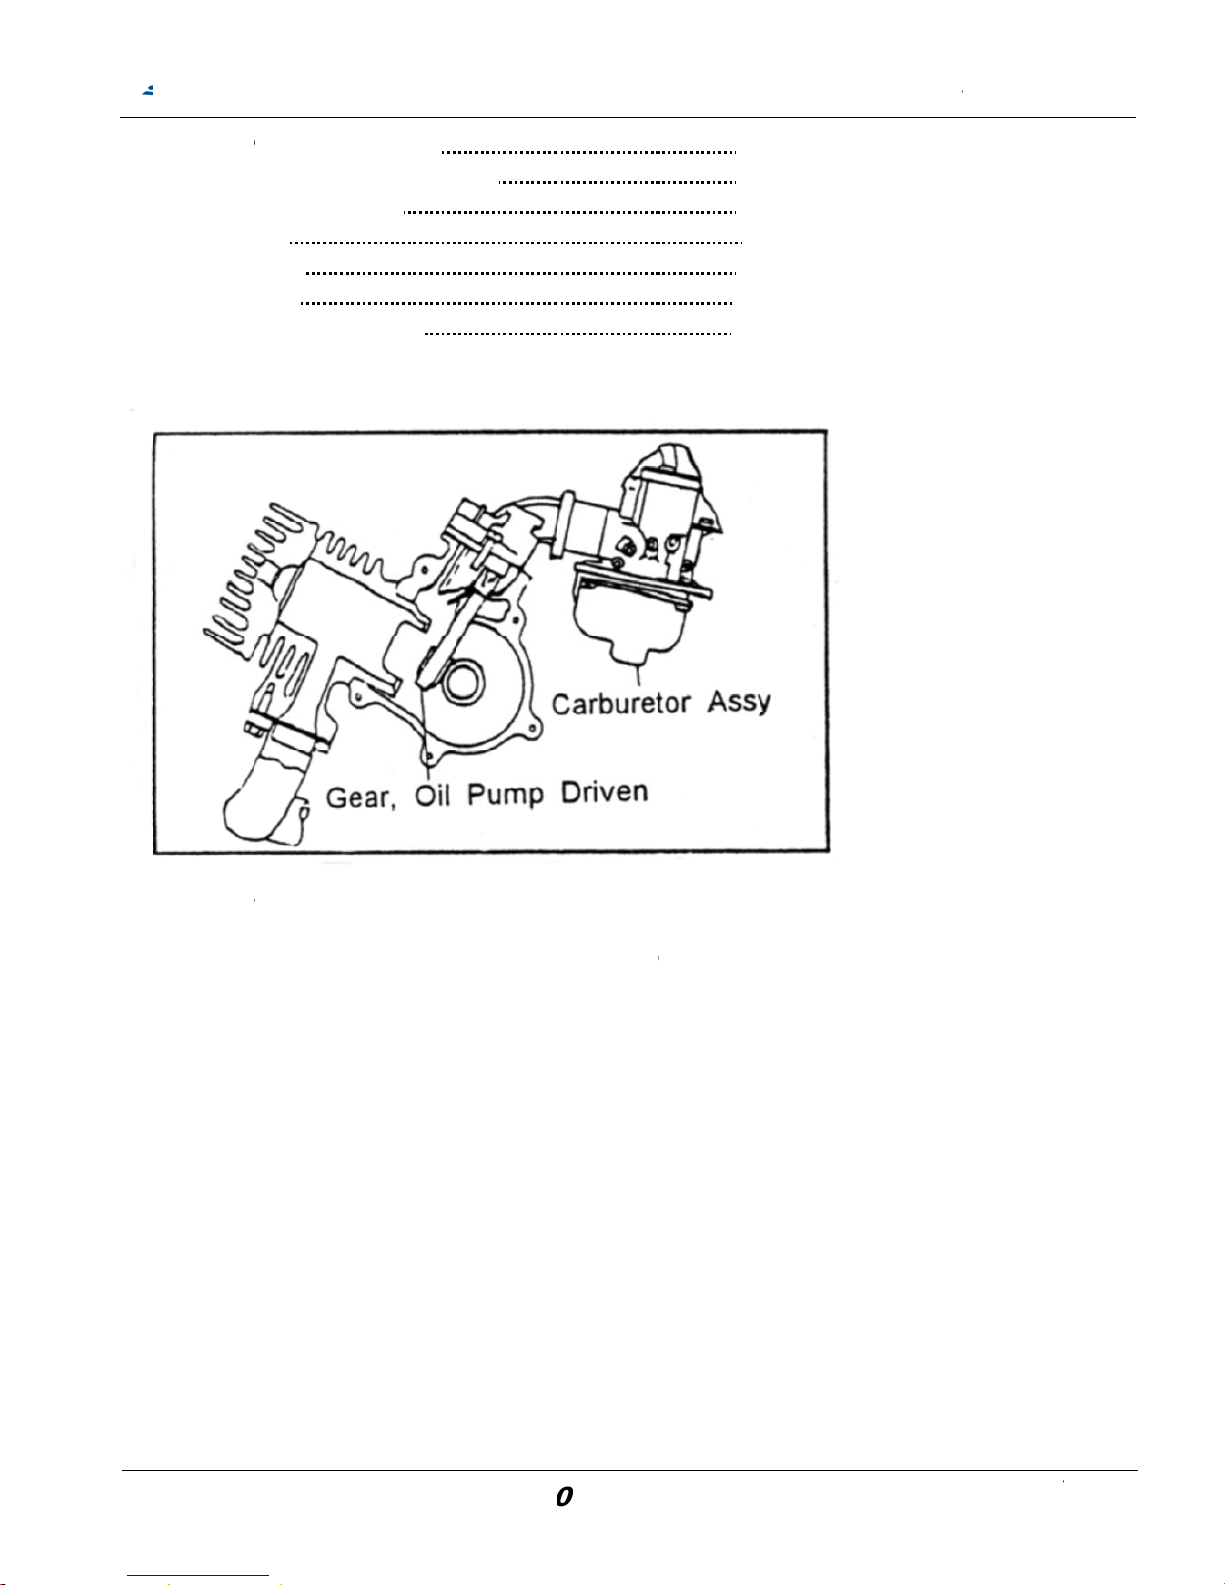
5-
05-05-05-05-05-05-0
5-
0
Th
ePum
cra
n
Th
e
1. Mech
a
2. Prec
a
3. Trou
b
4. Oil T
a
5. Oil g
a
6. Oil p
u
7. Air c
o
1. Mec
h
engine c
r
p gears
r
kcase to
oil drops
anism D
utions i
n
le Shoo
nk
uge
mp
oling S
y
anism
D
ankshaft
d
otate the
p
mix with t
h
and foam
SMC
iagram
Opera
t
ting
stem
iagram
rives the
p
lunger sh
a
e mixture
cover the
c
ATV5
0
ion
ump gea
r
ft in oil p
u
of air-fuel
ylinder in
/10
0
S
s of oil pu
mp. This
s
flow evenl
ner wall,
p
ervice
M
45
46
46
47
47
47
48
p.
haft sent
y.
iston surf
a
anua
l
Chapte
r
he lubric
a
ce and pi
s
5 Oil lub
r
ting oil int
o
ton rings.
-
4
icant Syst
e
the
5 -
m
Page 50

5-
0
Ha
v
will
en
g
Also
5-
0
NO
OI
L
2. Prec
a
ing enou
g
be seriou
s
ine is seri
o
you nee
d
3. Trou
b
ENOUG
H
The oil le
Oil tube
w
Oil has l
e
Oil tube
w
Oil tube
w
PUMP C
A
Always i
n
External
o
Worn cyl
i
Worn pis
t
utions i
n
h oil supp
scratche
d
us scratc
to check
le Shoo
OIL SUP
vel in oil t
a
as not fix
akage fro
m
as broke
n
as clogg
e
NNOT
W
sufficient
il leaks i
n
nder hea
d
on rings
SMC
Opera
t
ly to engin
, and the
n
hed, you
n
the comb
u
ting
PLY TO E
nk is too l
ed well.
tube en
d
.
d. (Air bu
b
ORK.
oil level.
lubricant
gasket
ATV5
0
ion
e is very i
m
this engi
n
eed to ch
a
stion syst
NGINE
ow.
s.
ble, forei
g
oil tank.
/10
0
S
portant.
I
e will sto
p
nge the
p
em and lu
n materia
ervice
M
f the oil q
u
, even ca
iston, pist
o
rication s
l…)
anua
l
Chapte
r
antity is n
o
not work
n rings a
n
stem car
e
5 Oil lub
r
ot enough
again. W
h
d cylinde
r
fully.
-
4
icant Syst
e
, this engi
n
en this
together.
6 -
m
e
Page 51
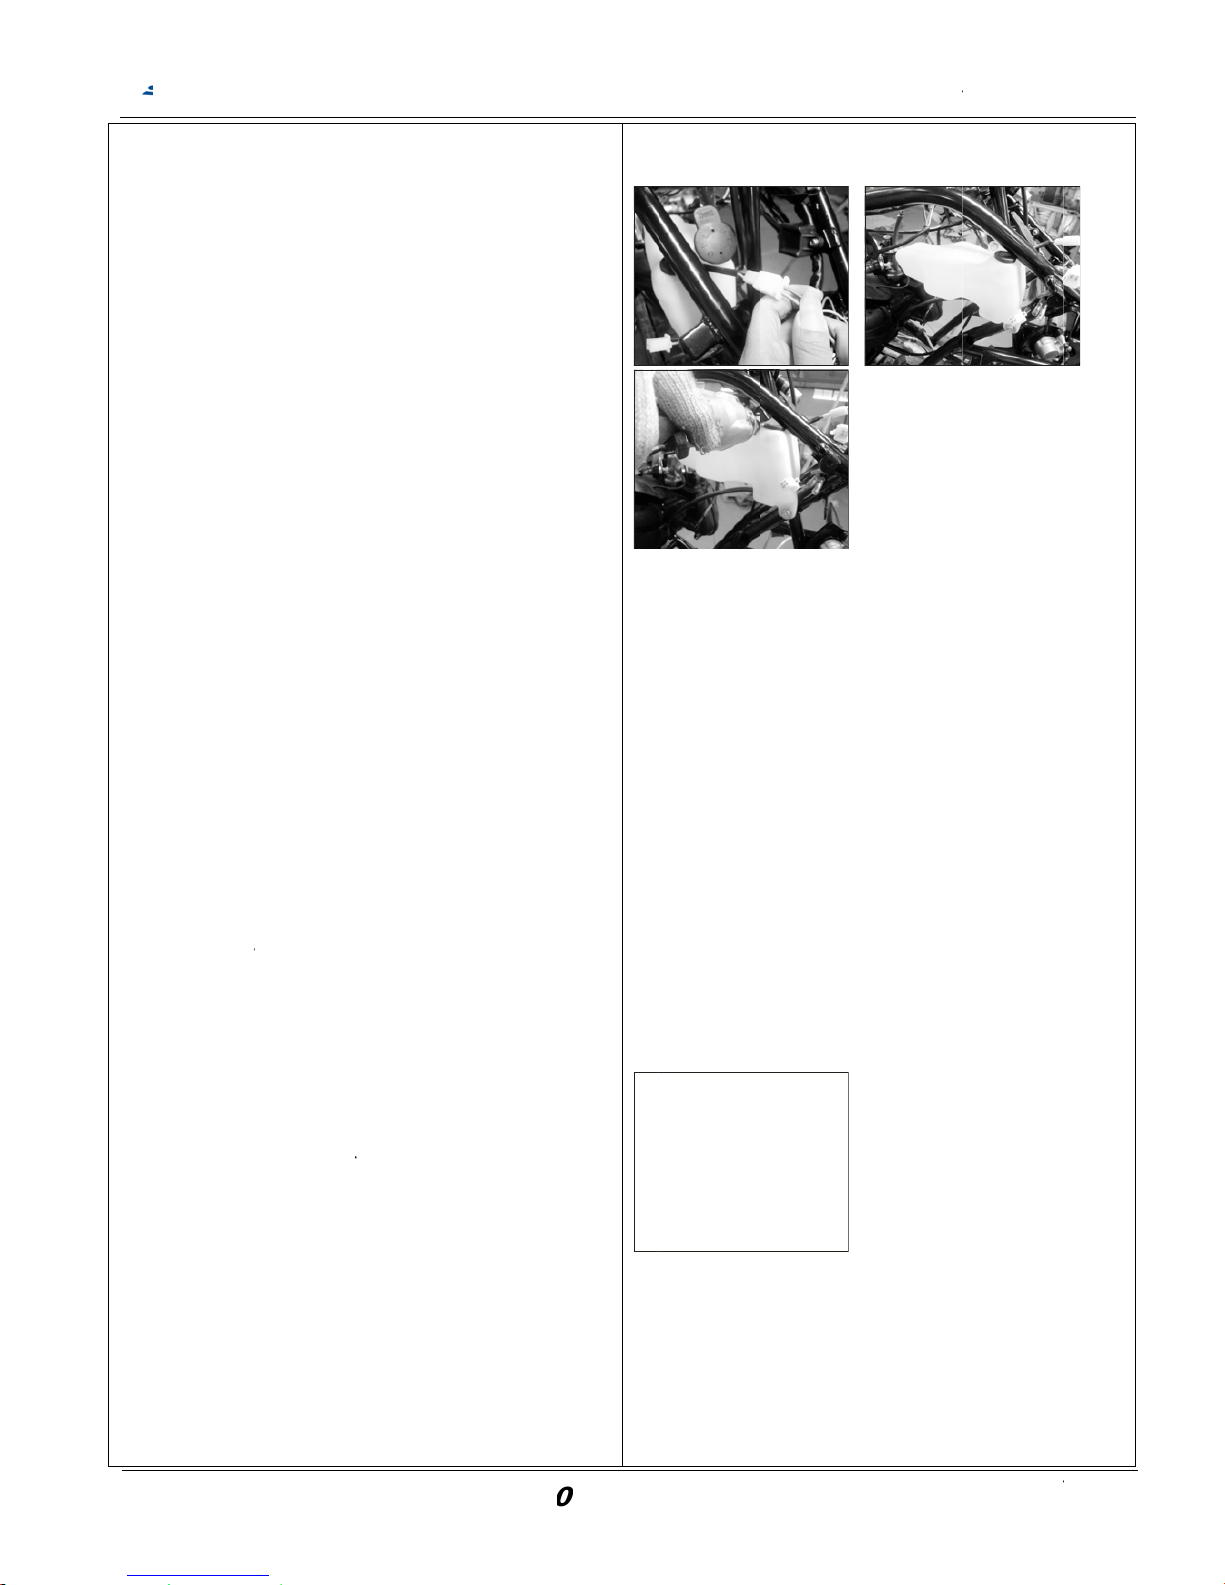
5.
0
a.
b.
c.
5-
0
Csp
u
R
5-
0
Th
e
inc
r
car
b
the
co
n
a.
b.
4 Oil Ta
n
Removal
Remove
tank, rig
h
shroud. (
Disconn
e
Disconn
e
Screw o
remove.
Oil tank/
h
Chec
k
or da
m
Chec
k
or fu
e
tighte
the oi
l
Installati
o
Follow th
e
5. Oil g
a
heck the f
u
peedomet
e
osition an
d
pper positi
o
eplace wit
h
6. Oil p
u
quantity
o
eased by
t
uretor th
r
right side
trol cable
o
Removal
Rem
o
and o
Rem
o
Rem
o
out th
Inspectio
n
pump fro
m
Rem
o
Disco
side.
.
Push
crank
s
k
the front t
o
t side of fl
Refer to c
h
ct the cou
ct the oil
h
ut two b
o
ose Insp
e
the oil ta
n
age.
the oil h
o
l leaking,
c
n well. Av
o
l hose.
n
reverse
w
uge ins
p
nction of
o
turn on
w
off when
o
n.
new if ou
t
mp
f oil that
d
he engin
e
ottle open
of the eng
f throttle.
ve the cla
il out hos
e
ve the thr
o
ve the sc
r
e oil pum
p
(no nee
d
crankc
a
ve the sp
a
nnect the
o
the electri
c
haft.
SMC
p cover,
f
oor panel,
apter 3 &
pler of oil
g
ose from
o
lts on th
e
ction
k if any c
r
se, if any
logged a
n
id any air
ay of rem
o
ection
il gauge, if
hen oil ga
u
il gauge s
e
of functio
n
eliver out
speed an
width. Oil
ine and c
o
mps on th
e
at oil pu
m
ttle cable
ew of oil
p
.
to remo
v
se)
rk plug c
a
il hose o
n
al start t
o
ATV5
0
ront fend
e
engine c
o
?)
auge.
il pump.
oil tan
k
acks, lea
k
bended, c
r
d if being
bubble in
s
val.
oil lamp on
ge at low
nsor shift t
o
.
from oil p
u
d the
pump is u
nnected b
oil in ho
s
p side.
from oil p
u
ump and
p
e the oil
p.
the carb
u
crank the
/10
0
S
r fuel
oling
and
ing
ack
ide
mp
nder
y a
e
mp.
ull
retor
ervice Manua
l
Chapte
r
5 Oil lub
r
-
4
icant Syst
e
7 -
m
Page 52
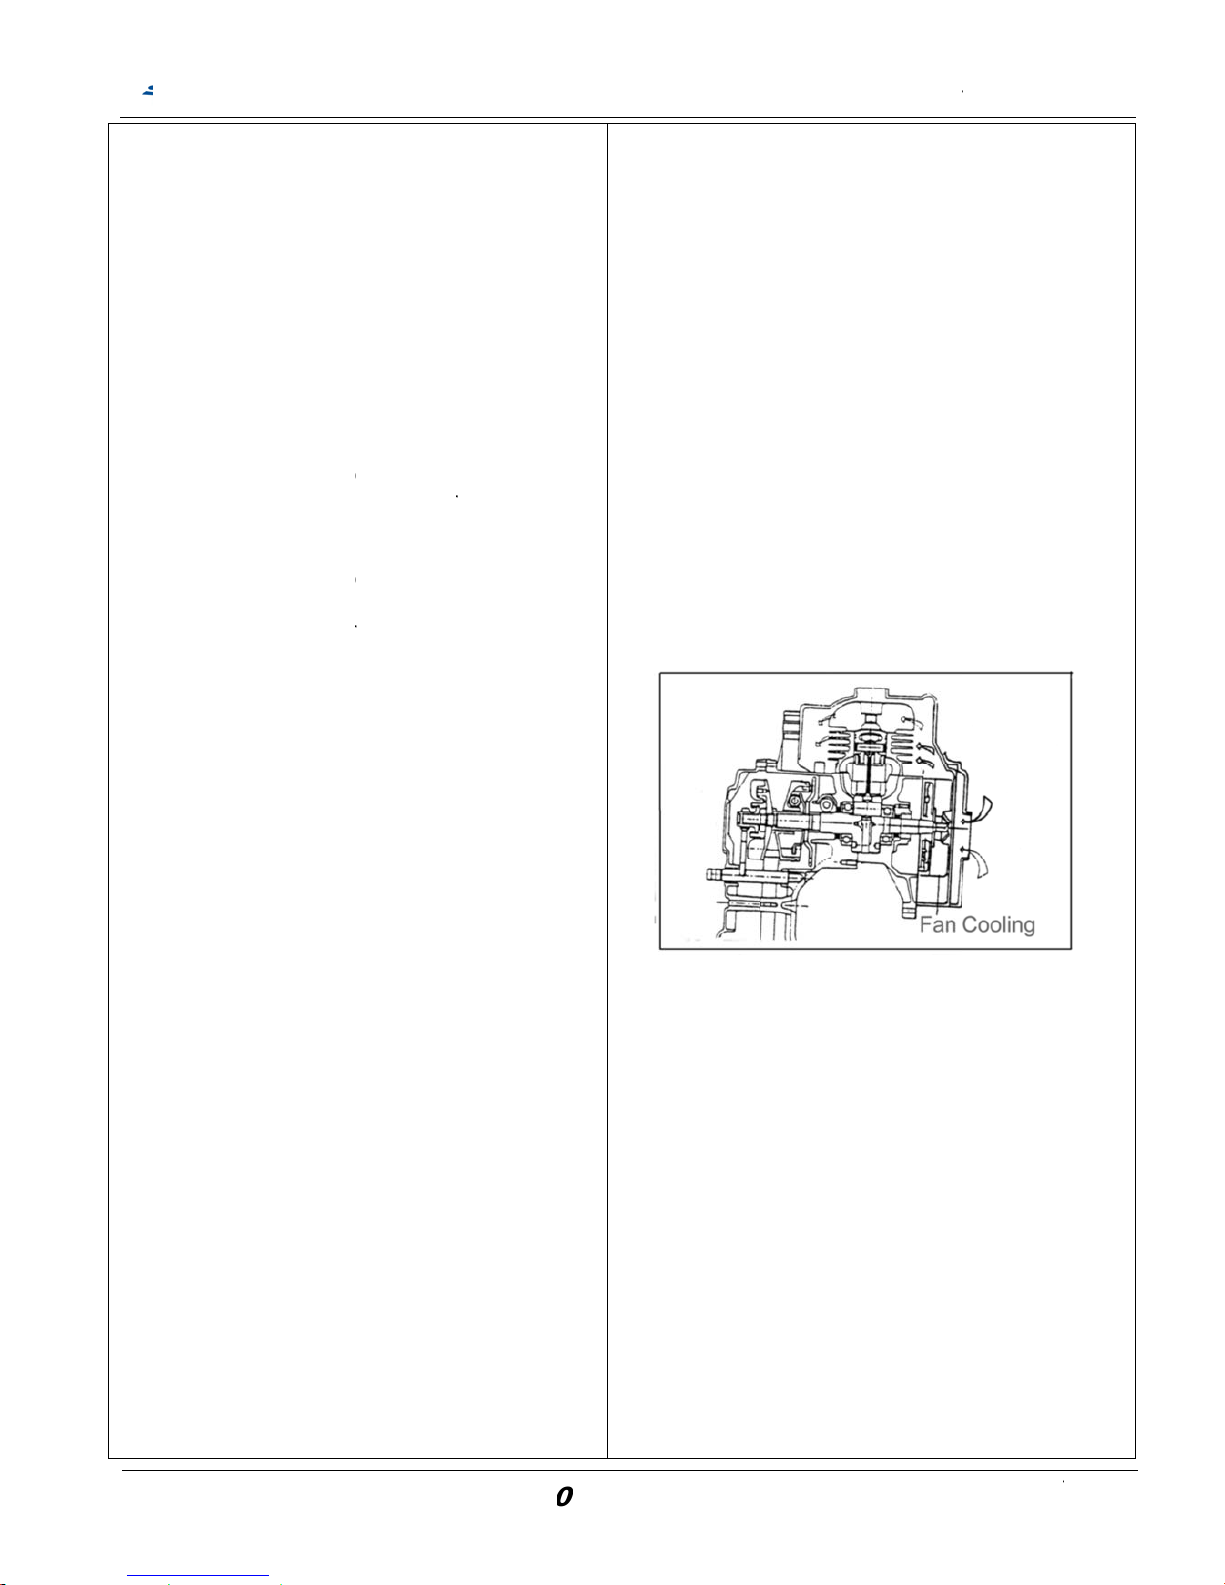
c.
5-
0
Th
ecoo
is f
ohea
So,
Ma
k
shr
o
fun
c
Chec
k
come
s
syste
m
Repl
a
Installatio
n
Instal
l
crank
c
Make
Conn
e
sure t
hose.
Conn
e
Apply
crank
come
s
Conn
e
Conn
e
plug
o
7 Air co
engine-c
o
ling fan is
rced to fl
o
d by air c
o
the cylind
e sure th
e
ud/cylind
e
tion well.
if the oil
b
out, ple
a
if air bu
b
ce with n
e
.
the oil pu
ase and
t
sure the
g
ct the oil
h
here is no
ct the oil
o
the electr
i
the oil pu
m
out by oi
ct the oil
o
ct the sp
a
n cylinde
r
oling sy
s
oling fan
on the rig
h
w through
oling shr
o
er and pis
t
air cooli
n
r air shro
u
SMC
eing pum
se check
t
ble or clo
g
w oil pum
p
mp onto t
h
ighten the
ears are
e
ose from
air bubbl
e
ut hose.
cal starte
r
p and co
l pump. (a
ut hose t
o
rk plug c
a
head.
tem.
sucks the
t side of
e
cylinder fi
ud and cy
on will no
t
g fan/ air
c
d are wel
ATV5
0
p out. If n
o
he oil flo
w
ged insid
e
if neces
s
e engine
fixing scr
e
ngaged
w
oil tank.
M
on the oil
/throttle t
o
nfirm the
o
ir bleedin
g
carburet
o
p to spar
k
air. The
ngine. Th
e
n and cyli
n
linder shr
o
over hea
t
ooling
l install an
/10
0
S
t oil
e.
ary.
w.
ell.
ake
il
)
r.
air
der
ud.
.
d
ervice Manua
l
Chapter 5 Oil lub
r
-
4
icant Syst
e
8 -
m
Page 53

N
o
tes:
SMC
ATV50/10
0
S
ervice Manua
l
Chapter 5 Oil lub
r
-
4
icant Syst
e
9 -
m
Page 54
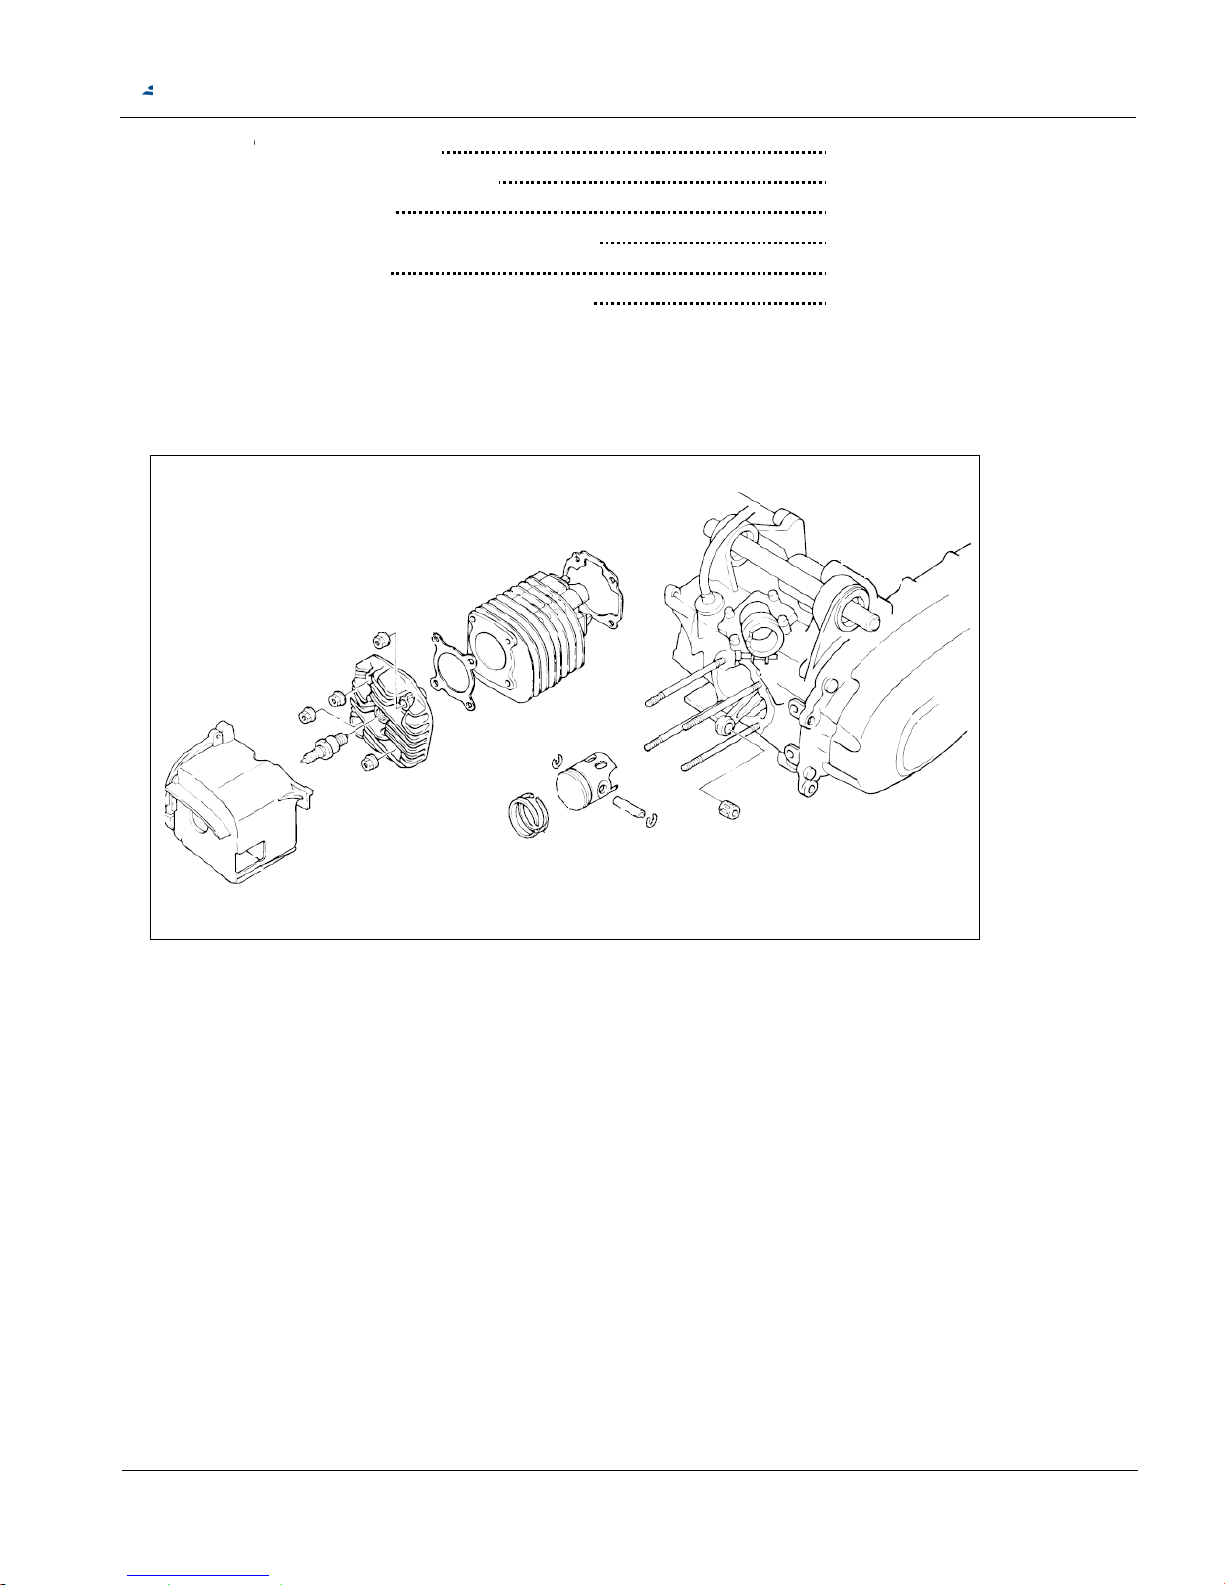
6-
06-06-06-06-06-0
6-
0
1. Mech
a
2. Prec
a
3. Trou
b
4. Cylin
d
5. Parts
6. Cylin
d
1. Mec
h
anism D
utions i
n
leshoot
er / Pis
t
inspect
i
er/Pist
o
anism
D
SM
C
iagram
Opera
t
ing
on/ Rin
g
on
n/Ring
i
iagram
ATV5
0
ion
s Rem
o
nstallati
/10
0
S
val
on
ervice
M
anua
l
Chapt
e
50
51
51
52
54
56
er 6 Cylin
d
-
5
er Head/
V
0 -
alves
Page 55
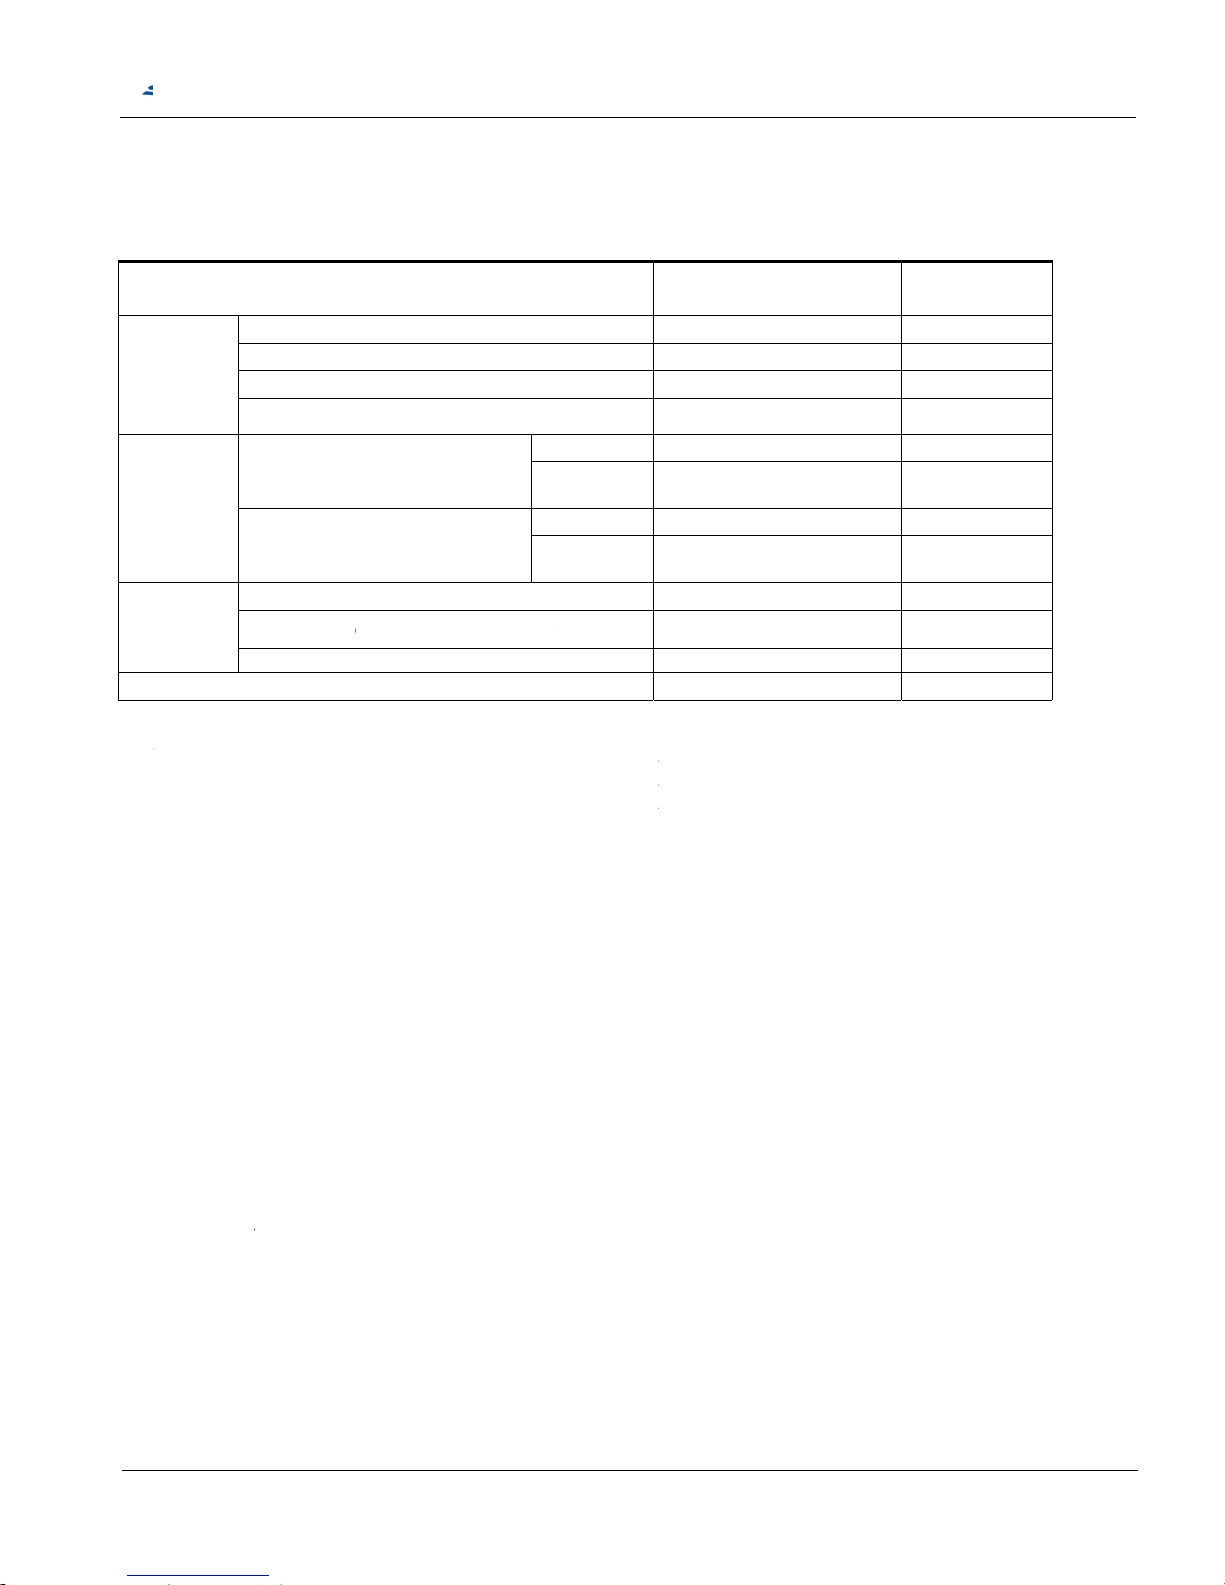
6-
0
G
e
●
C
Ppis
Ppis
T
o
C
y
Ex
Sp
6-
0
Lo
w
Hi
g
Ex
c
Ex
c
Ov
e
2. Prec
a
neral I
n
This chap
t
piston/pis
ylinder
iston &
ton ring
C
iston &
ton ping
Clearanc
e
rque V
a
linder head
haust pipe
s
ark plug
3. Troub
Compr
e
Cylinder
Cylinder
Cylinder
o
h compr
e
Excessiv
e
essive n
o
Piston a
n
Excessiv
e
ess smo
k
Cylinder
o
Improper
Piston or
rheating
Excessiv
e
Engine c
o
Oil suppl
y
Wrong ig
utions i
formati
o
er is cont
a
ton ring/pi
s
C
learance
b
and
Clearanc
e
pi
Clearanc
e
between
p
lue
Nut
tud bolt
leshoot
i
ssion
head gas
k
head war
p
r piston r
i
ssion
carbon
b
ise
d cylinder
carbon
b
e
r piston r
i
installatio
cylinder
w
carbon
b
oling sys
t
is out of
nition timi
n
SM
C
n Opera
n
ined main
ton pin a
n
Item
ID of Cylin
d
Cylind
e
Circular
d
ylinder hea
d
etween pis
t
ring groove
of the mo
u
ston ring
OD of
p
between
p
OD of pis
iston pin h
o
ng
et leaking
ed or cra
c
ngs worn
uild-up o
n
worn out
uild up
ngs worn
n of pisto
n
all scored
uild-up o
n
em (fan,
c
order.
g
ATV5
0
tion
tenance a
n
d clip.
er bore
ricity
egree
Warpage
on ring
fi
r
th of
f
iston
iston and c
y
ton pin
le and pisto
or damag
e
ked
out
piston he
a
out
rings
or scratc
h
the pisto
n
ylinder air
/10
0
S
d service
st ring
second
ring
first ring
second
ring
ylinder
n pin
1.4kgf-m
/
0.9kgf-m
/
2.0kgf-m
/
d
ad or in c
o
ed
or comb
u
shroud…
ervice
M
for cylind
e
Standar
d
40.0
0
0.0
3
0.0
3
0.1
0.1
39.9
5
0.0
3
9.99
6
0.0
0
14Nm
9Nm
20Nm
mbustion
stion cha
m
etc.) work
s
anua
l
Chapt
e
r head, C
y
value (m
0-40.015
----
----
----
-0.05
-0.05
5-0.35
5-0.35
8-39.972
4-0.047
-10.000
8-0.015
chamber
ber
badly.
er 6 Cylin
d
linder, an
d
m)
U
s
valu
40000
-
5
er Head/
V
reed valv
e
age
e (mm)
0.10
.05
.03
.03
0.1
0.1
0.6
0.6
--.10
----
----
1 -
alves
Page 56
6
R
a
b
c
d
e
f
.
g
-04. Cyl
i
emoval
. Refer t
o
proces
s
. Use sp
a
spark pl
. Remov
e
head. T
cylinder
. Remov
e
you can
. Remov
e
Remov
e
bearing
. Remov
e
residue
s
contact
nder /
P
the chap
t
to remov
e
rk plug w
r
ug.
the 4 fixi
n
hen remo
v
head gas
k
the cylin
d
see the
w
one pist
o
the pisto
n
at conne
c
the cylin
d
or foreig
n
surfaces
o
SM
C
iston/ R
i
er 3 for e
n
the engi
n
ench to r
e
g nuts fr
o
e the cyli
n
et..
er careful
hole pisto
n pin clip.
pin, pist
o
ting rod s
m
er gasket
material
s
f cylinder
a
ATV5
0
ngs
gine rem
o
e from fra
move the
m cylinde
r
der head
/
ly, and th
e
.
n and ne
e
all end si
d
. Clean up
from the
t
nd crank
c
/10
0
S
val
me.
n
dle
de.
all
wo
ase.
ervice Manua
l
Chapt
e
er 6 Cylin
d
-
5
er Head/
V
2 -
alves
Page 57
C
Wre
h
C
D
i.
aution
et the re
s
sidues c
a
. Spread
remove
opposit
e
aution
on’t let th
e
Remov
e
Use
nuts
)
two
n
dire
c
Use
on t
h
idues by
s
n be rem
o
each pist
o
it by liftin
g
the gap.
clip drop
the cylin
d
the two fl
a
to screw
uts by tu
r
tion.
wrench to
e crankc
a
SM
C
olvent so
t
ved more
n ring lub
r
up at a p
o
into engi
n
er stud b
o
nge nuts
(
in a little
b
n each by
remove o
u
se.
ATV5
0
hat the
easily.
icant and
int just
e crankca
s
lts.
cylinder h
e
it, and loc
k
reverse
t the stud
/10
0
S
se.
ad
the
bolts
ervice Manua
l
Chapteer 6 Cylin
d
-
5
er Head/
V
3 -
alves
Page 58
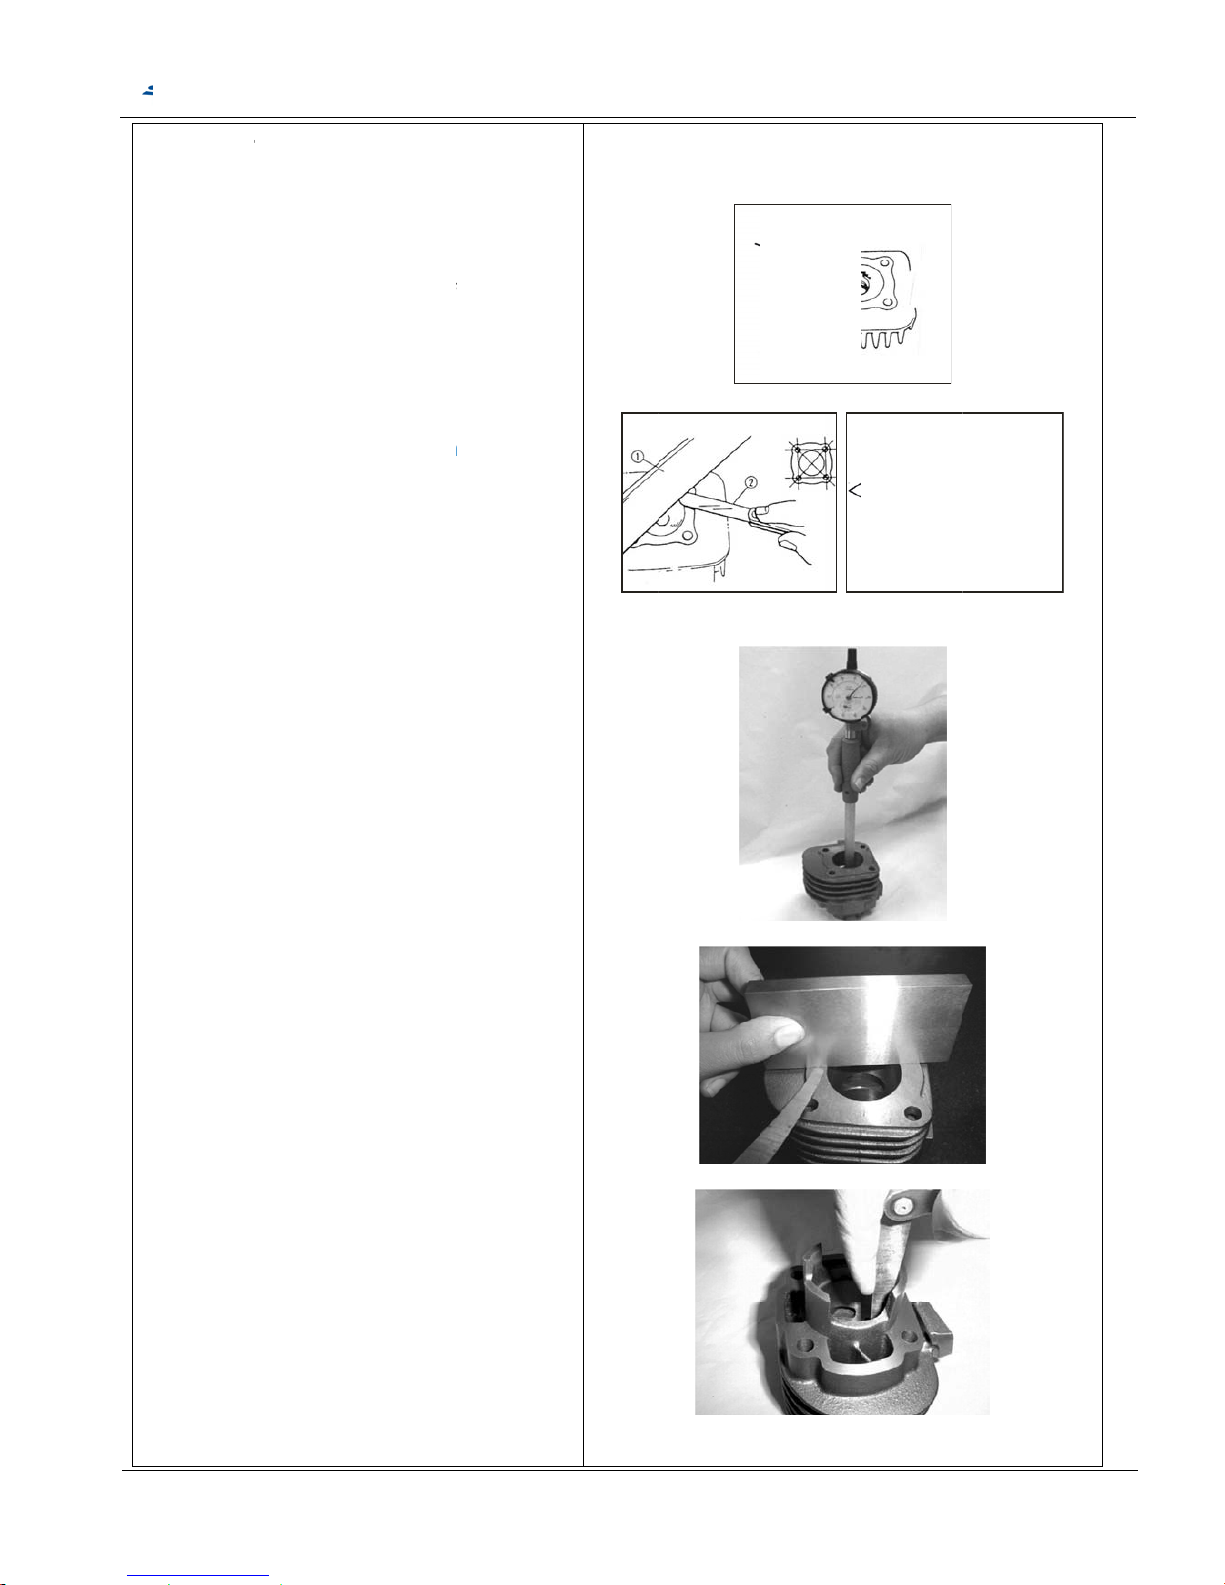
6
a
b
T
O
S
S
-05. Par
t
. Cylinde
r
Check
distort.
Clean
t
cylind
e
Check
surfac
e
thickn
e
measu
cylind
e
If too
m
to scr
a
crisscr
o
. Cylinde
r
Inspec
dama
g
Measu
three l
e
aper limit:
ut of roun
Check
surfac
e
and fe
e
ervice lim
i
Insert
e
cylind
e
ervice lim
i
ts inspe
c
Head In
s
the cylind
e
Replace
w
he carbo
n
r head at
t
the cylind
e
if wrap,
u
ss gauge
re the ga
p
r head co
n
uch gap,
tch and m
ss patter
n
/piston/ri
t the cylin
d
e.
re the cyli
n
vels in X
0.05 mm
d: 0.03 m
m
the cylind
e
for warp
ler gaug
e
it: 0.10 m
m
ach pisto
n
r, and me
a
it: 0.10 m
m
SM
C
tion
pection
r head if
a
ith new if
residues
he combu
r head c
o
se 0.03
m
and straig
between
r
tact.
use thin s
a
odify. S
a
and gen
t
ng inspe
c
er bore f
o
der inner
and Y-axi
s
r head m
a
with a str
a
.
ring into
sure the
e
ATV5
0
ny dama
g
necessar
y
on the
stion area
.
ntact
m
htedge to
uler and
nd paper
nd it in a
le.
tion
r wear or
diameter
a
.
ting
ight edge
the
nd gap.
/10
0
S
e
,
.
t
ervice Manua
l
Chapt
e
er 6 Cylin
d
-
5
er Head/
V
4 -
alves
Page 59
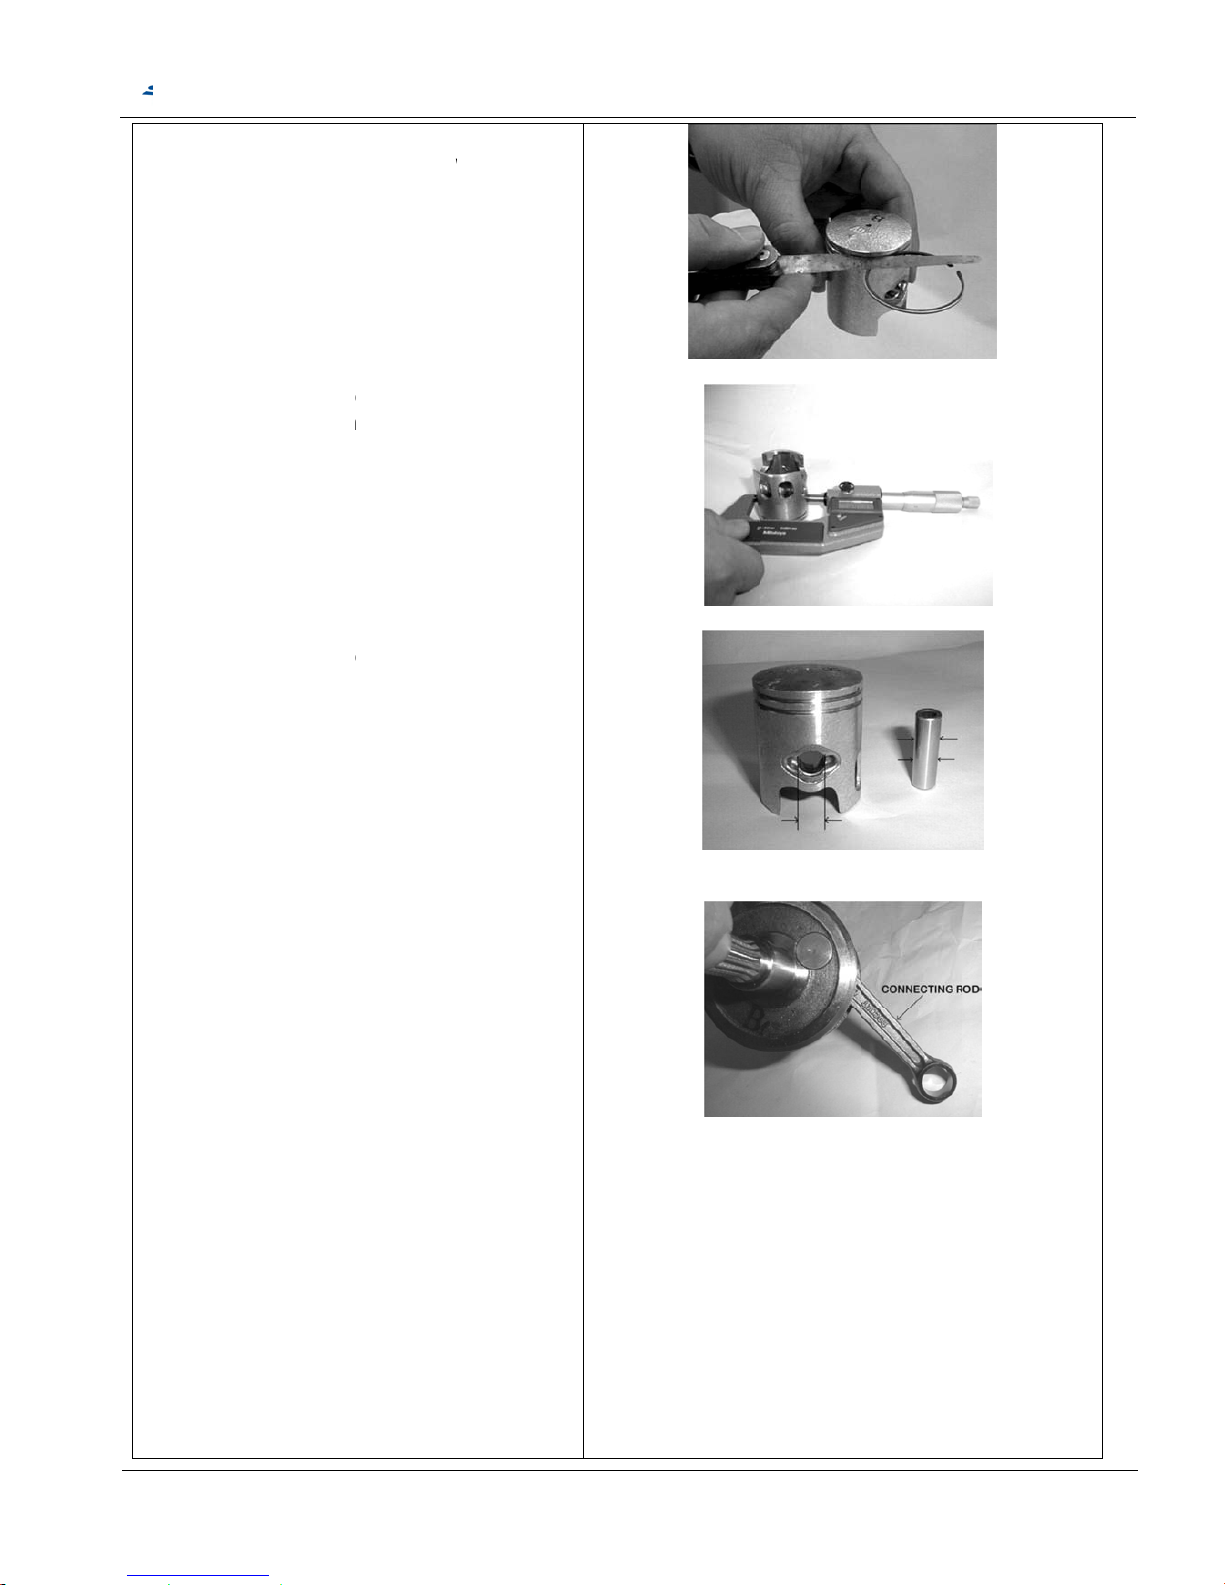
S
S35
P
9
1
P
1
1
S
Measu
and gr
o
ervice lim
i
Measu
10 m
m
ervice lim
i
9.9 mm (f
o
1.9 mm (f
o
Measu
piston
in outer d
i
.96 mm (f
o
1.6 mm (f
o
in bore s
e
0.04 mm
(
2.04 mm
(
Measu
inner
d
micro
m
ervice lim
i
14.06
m
15.06
m
re the cle
a
ove.
it: 0.06 m
m
re the pist
o
high fro
m
it:
r 50cc en
r 100cc e
re the pist
o
pin outer
d
ameter s
e
r 50cc en
r 100cc e
rvice limit:
for 50cc e
for 100cc
re the con
iameter w
eter.
it:
m (for 5
0
m (for 1
0
SM
C
rance bet
w
n outer d
the skirt’
s
gine)
ngine)
n pin bor
e
iameter.
rvice limit:
gine)
ngine)
ngine)
engine)
necting ro
d
ith an insi
d
cc engine
0cc engin
ATV5
0
een ring
iameter at
bottom.
, and the
small en
e
)
)
/10
0
S
d
ervice
M
anua
l
Chapt
e
er 6 Cylin
d
-
5
er Head/
V
5 -
alves
Page 60
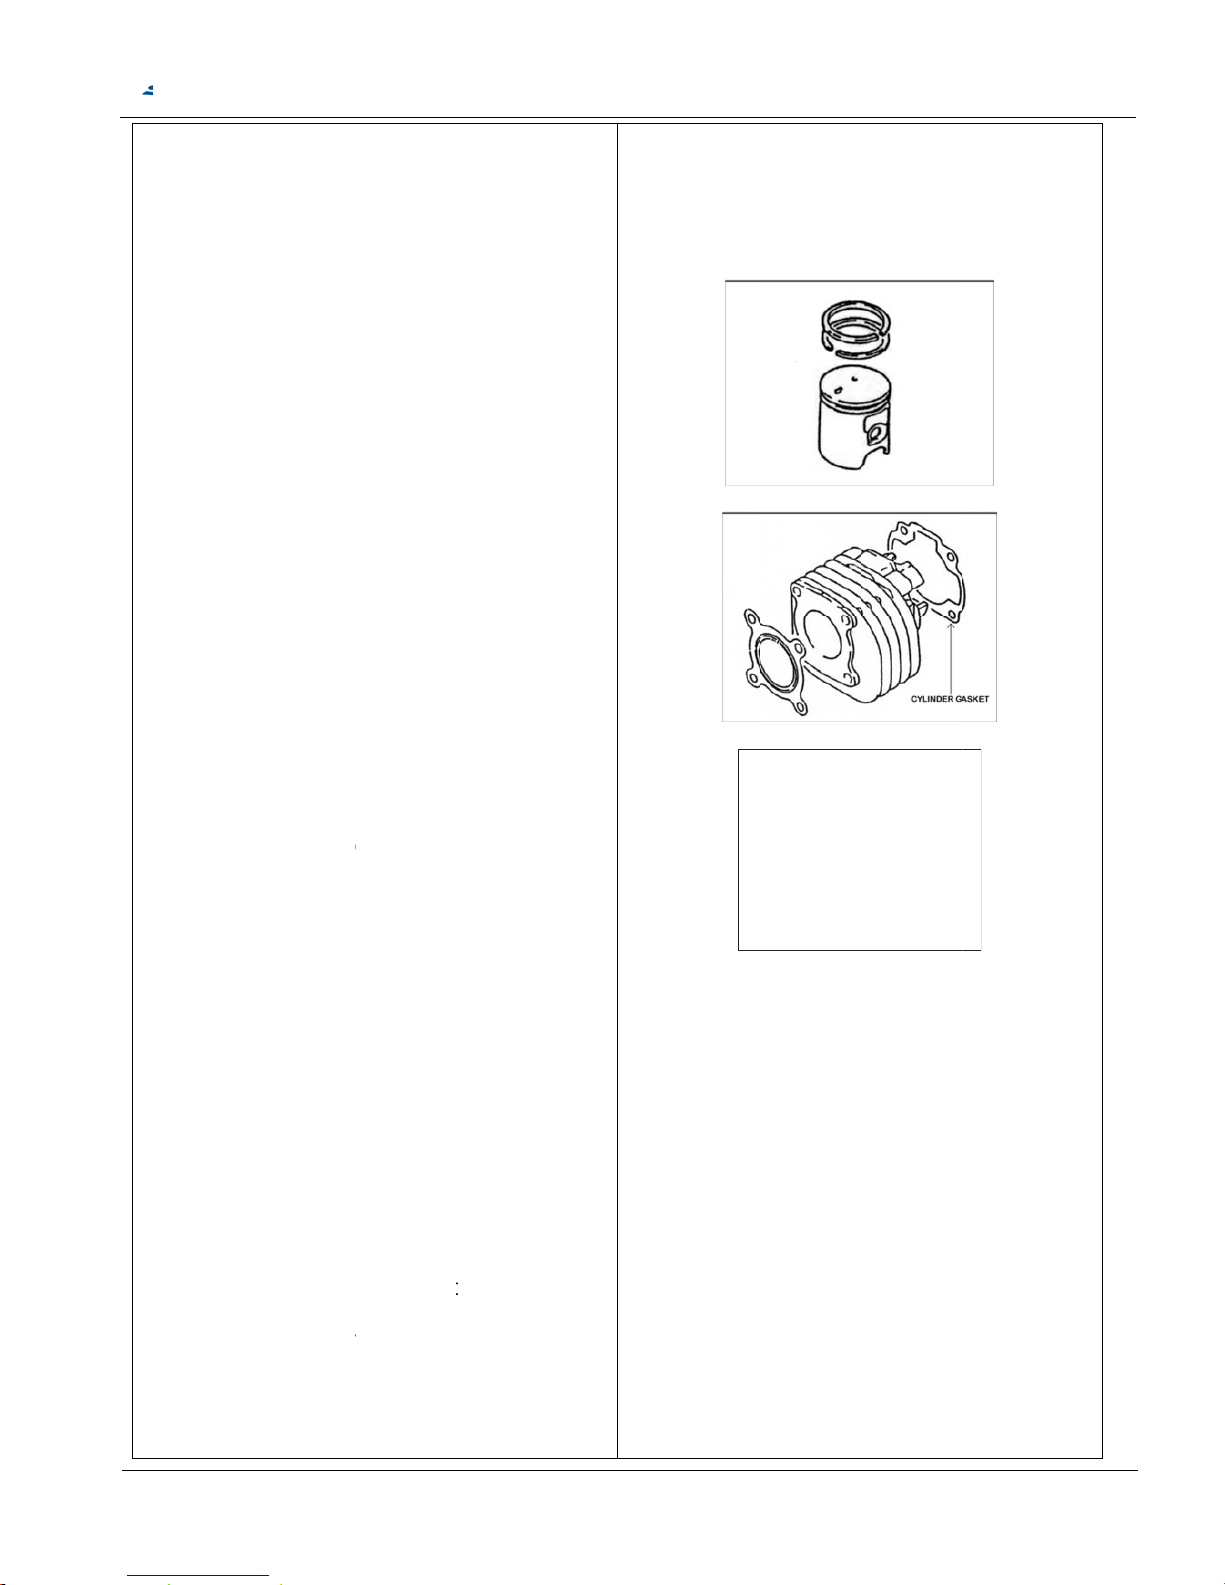
6in
T
T
-06 Cyli
n
stallati
o
Install
t
remov
e
he torque
Install
t
facing
by spr
e
Clean
t
careful
into th
e
Apply
s
rod s
m
bearin
g
Install
t
1. Ins
t
fac
i
2. Do
wit
h
Install
a
Apply
a
rings a
compr
e
Repla
c
Install
t
Tighte
n
he torque
der/Pis
n
he stud b
o
d.
is 10-14N
he piston
up. Do no
t
ading the
he cylind
e
not to dr
o
crankca
s
ome oil t
o
all end an
d
.
he piston,
all the pis
t
ng the ex
h
not align t
h
the pisto
n
new cyli
n
thin coat
nd cylind
e
ssing the
e a new c
y
he cylind
e
the cylin
d
is 10-14N
SM
C
ton/Rin
g
lt onto cr
a
.m
rings with
damage
t
ends too
f
r gasket
s
p any gas
e.
inside of
install th
piston pi
n
on with th
aust pipe
.
e piston
p
cutout.
der gask
e
of engine
r wall. Ins
t
piston rin
g
linder he
a
r head.
er-mount
.m
ATV5
0
nkcase if
the marks
he piston
ar.
urface bei
et materi
a
he conne
c
e new ne
e
and clip.
e arrow m
a
in clip en
d
t.
oil to the
p
all the cyli
n
s.
d gasket.
ng bolt.
/10
0
S
rings
ng
l
ting
dle
ark
gap
iston
der,
ervice Manua
l
Chapt
e
er 6 Cylin
d
-
5
er Head/
V
6 -
alves
Page 61

Note:
SMC ATV50/10
0
S
ervice Manua
l
Chapteer 6 Cylin
d
-
5
er Head/
V
7 -
alves
Page 62
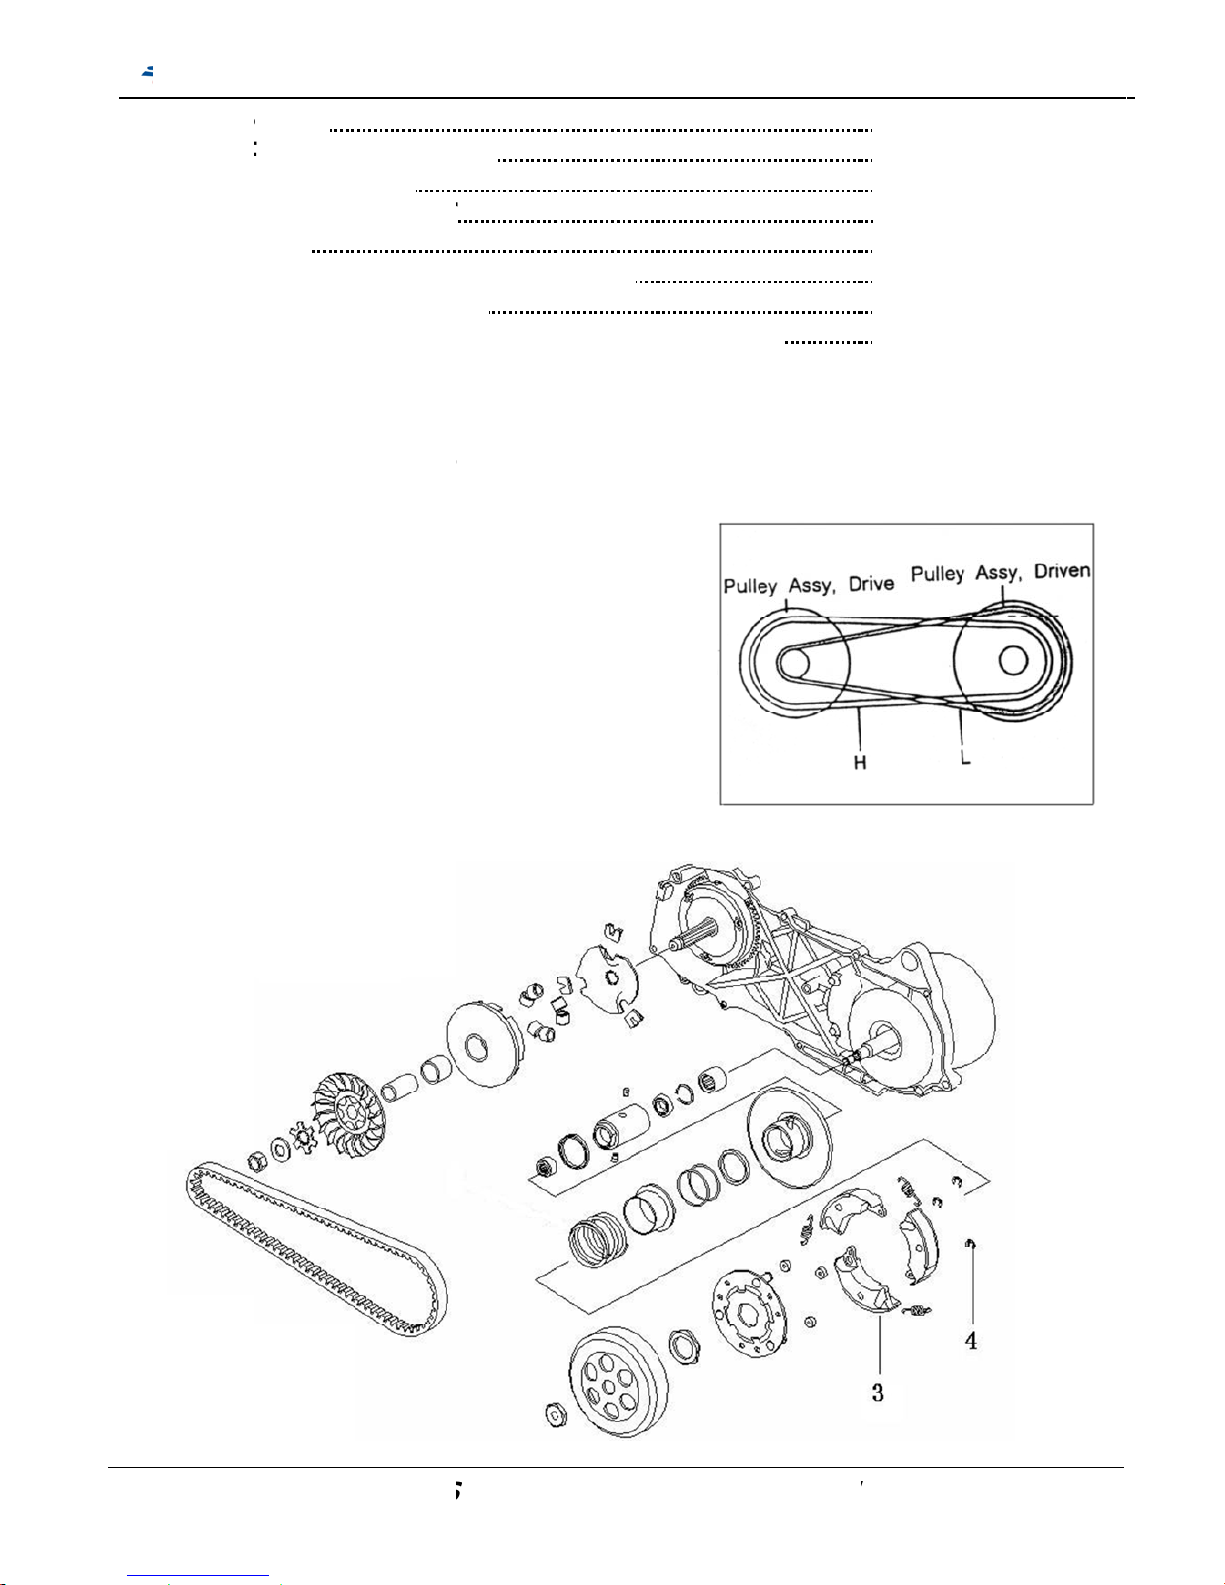
7-
07-07-07-07-07-07-07-0
7-
0
Thi
s
tra
n
Wh
to
b
pit
c
dri
v
the
rati
o
rad
i
low
1. Mech
a
2. Main
t
3. Trou
b
4. Left
C
5. Drive
6. Move
7. Rear
D
8. Re-In
s
1. Mech
transmis
s
smission,
en engine
elt by the
h circle of
en pulley
i
radius of
p
is theref
o
us. (In th
e
speed)
anism
enance
D
le Diag
n
rankca
s
Belt
able Dri
v
riven
P
tallatio
n
anism D
ion is the
which ca
n
speed inc
centrifuga
l
belt in dri
v
s forced t
o
itch circle
re altere
d
drawing,
S
escrip
t
osis
e Cove
r
ing Fac
ulley A
s
of the
F
iagram
combinati
o
change t
h
rease, the
force fro
m
e pulley
w
move to
t
is decrea
s
by the alt
e
“H” mean
s
MC AT
V
ion
e(MDF)
sy
r. Driv
e
n of auto
m
e transmi
s
drive pull
e
six roller
s
ill be larg
e
he center
ed. The t
r
ration of
p
high spe
e
5/10
0
S
Assy
/R. driv
e
atic cent
ssion rati
o
y will be
p
s. Then th
e
r. The bel
of shaft, t
h
ansmissi
o
itch circl
e
d, “L” me
a
ervice
n pulle
y
rifugal clu
t
automati
c
ush
at
en
n
’s
ns
Chapt
e
Manual
5
8
5
9
5
9
6
0
6
0
6
1
6
2
6
3
ch and V-
b
ally.
r 7 CVT d
elt contin
u
-
5
riving Sys
t
ous varia
8-
em
ble
Page 63
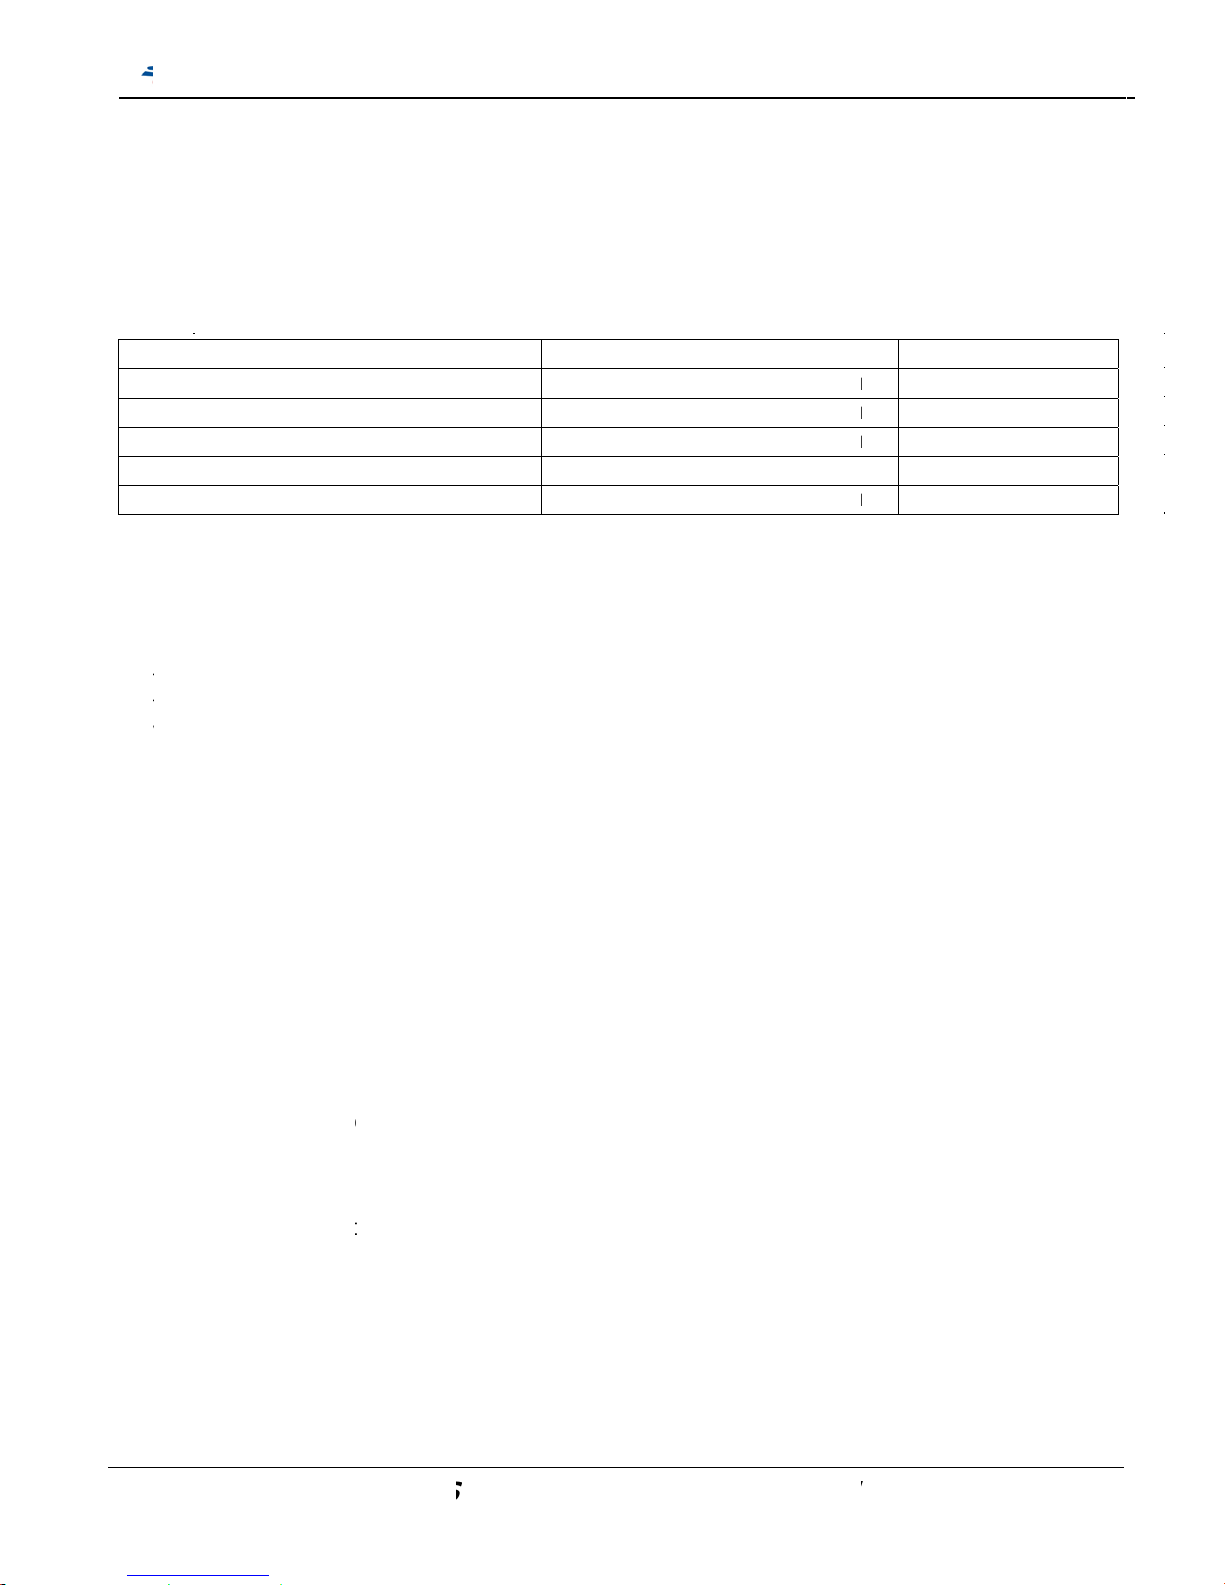
7-
0
Pr
e
Ge
Sp
I
tDO
I
T
F
To
r
Dr
Cl
u
Sp
e
Clu
t
Clu
t
Uni
v
7-
0
En
1.
2.
3.
4.
Sh
1.
2.
In
s
1.
2.
3.
4.
2. Main
t
caution
neral In
f
Drive fac
e
Drive bel
t
cificati
o
em
riving bel
t
D of weig
of
clutc
h
hickness
o
ree lengt
h
que valu
e
ive face n
u
tch outer
cial Serv
i
ch spring
ch nut wr
e
ersal hol
d
3. Trou
b
gine ca
n
Worn driv
e
Worn driv
e
Worn or d
Broken dr
udder o
r
Broken cl
u
Worn clut
c
ufficien
t
Worn driv
e
Insufficie
n
Worn roll
e
Driven pu
l
enance
s in Op
e
ormatio
n
, clutch o
and driv
e
n
width
ht roller
outer (ho
u
f clutch we
i
of driven
t: 4.5kgf-
m
nut: 4.0kg
f
ce Tools
compress
nch
er
le Diag
n
be star
t
Belt
face
amaged c
l
iven pulle
y
misfire
tch weig
h
h weight
horsep
o
belt
t spring fo
ley opera
t
S
Descrip
t
ration
uter, and
d
pulley m
u
sing)
ght
pulley spri
n
/ 45Nm
-m / 40N
m
or
osis
ed but
A
utch weig
h
when d
r
t
wer or
rce of driv
e
ion un-sm
o
MC AT
V
ion
riven pull
e
st be free
g
TV can
n
t
iving
poor hi
g
n pulley
othly
5/10
0
S
y can be
of any gr
e
S
ot be
m
h spee
d
ervice
serviced
o
ase.
tandard v
a
oved
perfor
m
Chapt
e
Manual
n the vehi
c
lue
16.6
m
15.0
m
112.0
m
2.0
94.0
m
ance
r 7 CVT d
le.
mm
mm
mm
mm
mm
-
5
riving Sys
t
Limit
14.
6
14.
5
112.
3
1
.
91.
0
9-
em
mm
mm
mm
0 mm
mm
Page 64
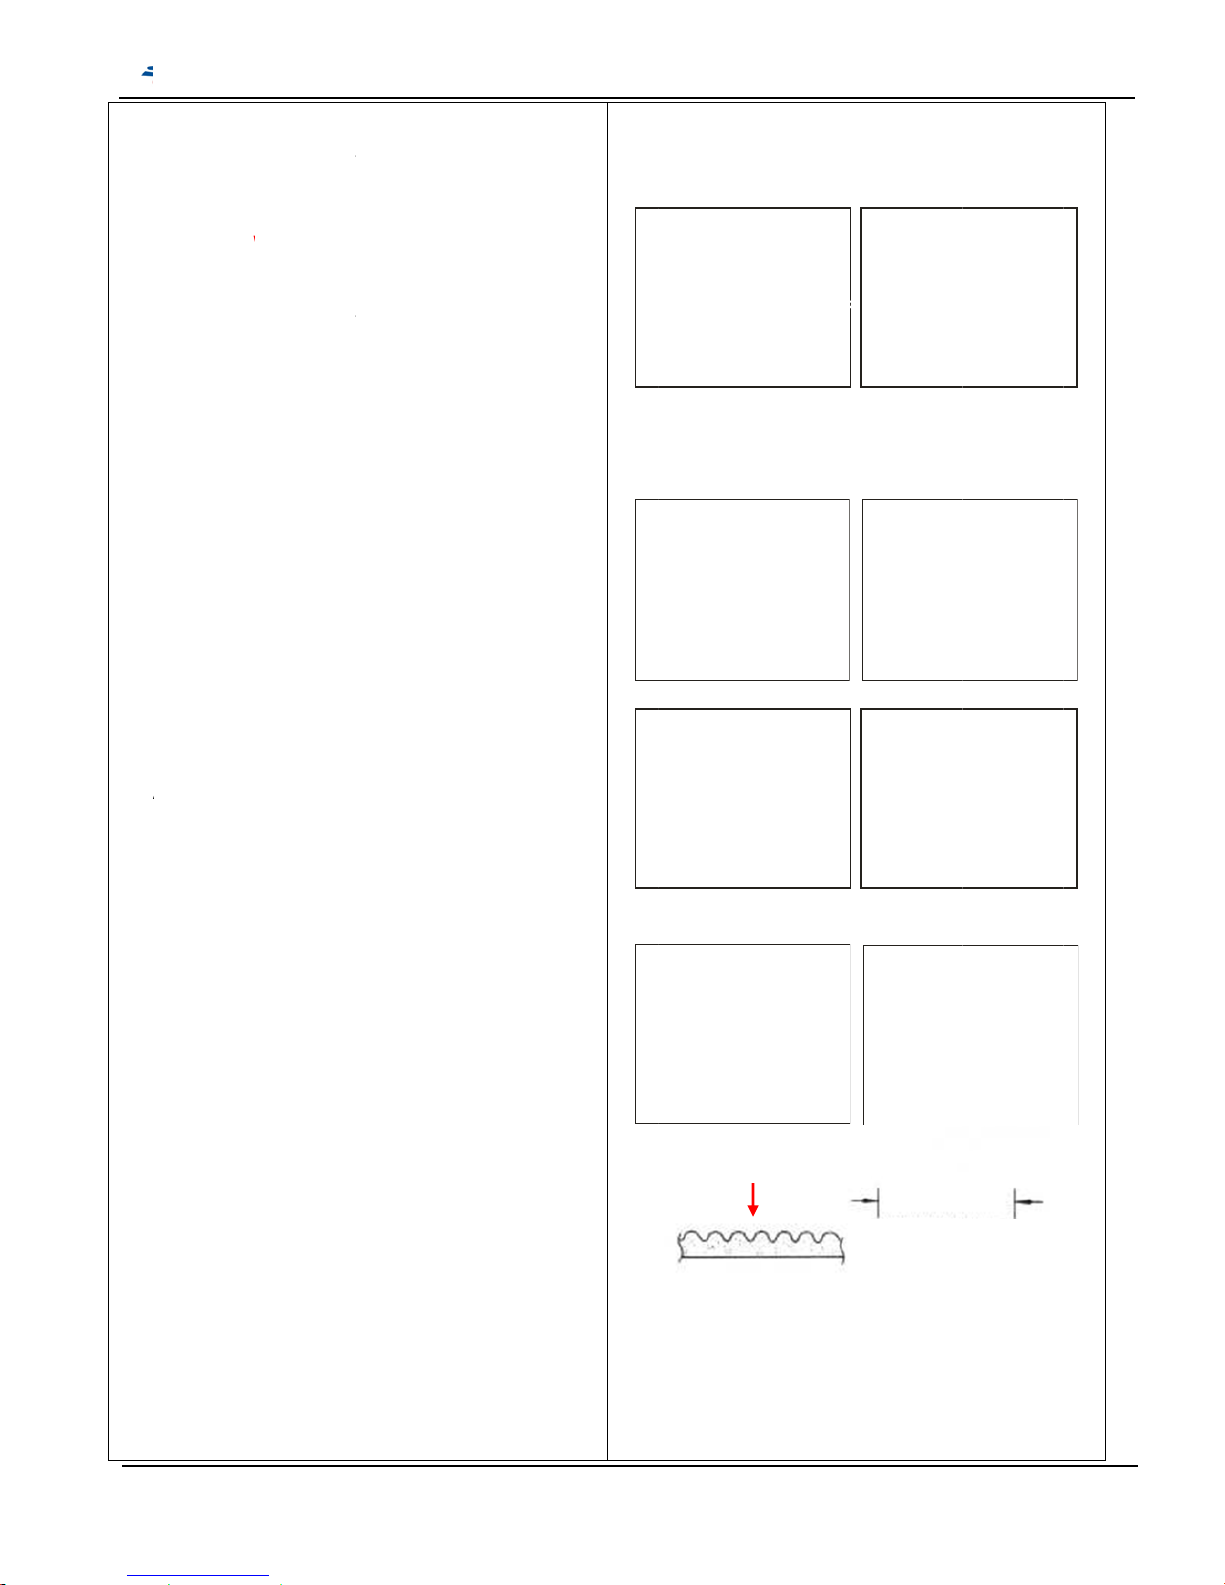
7-
0
Le
f
Re
mRem
Le
f
Ins
t
pro
c
To
r
1.2
7-
0
Re
m
a.
b.
A
c.
Ins
p
Ch
e
it if
Me
asho
Se
r
Re
p
Ca
u
4. Left
C
t crank
c
ove left
c
ove 2 do
w
t crank
c
all left cra
n
edure of
r
que of cr
a
kgf-m/12
5. Drive
oval
Loosen 1
n
remove th
e
Remove t
h
ssy).
Loos
e
Speci
one
w
Rem
o
shea
v
face (
w
Remove t
h
sheave) a
n
ection
ck the dri
v
necessar
y
sure the
w
wn.
vice Limi
t
lace the
b
tion
Using the
The surfa
c
rankcas
ase co
v
rankcase
el pin an
ase co
v
kcase co
v
emoval.
nkcase
c
Nm
Belt
ut from th
e
clutch o
u
e movabl
e
n 1nut fro
al tool an
d
ay, conic
a
ve the dri
v
e) by rem
o
with fan),
M
e driven
p
d belt.
e belt for
.
idth of dr
: 14.6 m
m
elt if exce
e
genuine p
a
es of drive
SM
C
e Cover
er remo
v
cover bolt
s
d gasket.
er instal
er in the
r
over bolt
:
clutch o
u
ter.
drive fa
c
m the driv
e
take out
c
l spring w
a
e pulley
a
ving out
f
DF assy
,
ulley (sec
crack or
w
ive belt as
ds the s
e
rts for repl
a
belt or pull
ATV 5
0
al
(9 bolts).
lation
everse
ter, and t
h
e assy (M
D
pulley wi
law wash
e
sher and
ssy (prim
a
ixed drive
collar.
ondary
ear. Repl
a
diagram
rvice limit.
cement.
y must be
/10
0
S
en
F
th
,
nut.
rily
ce
free
ervice
M
Belt
t
anua
l
Chapt
e
ooth
r 7 CVT d
CLA W WASH
E
CONI CAL SP
R
Widt
-
6
riving Sys
t
ONE- WAY
ING WASHER
NU
T
h
0 -
em
Page 65
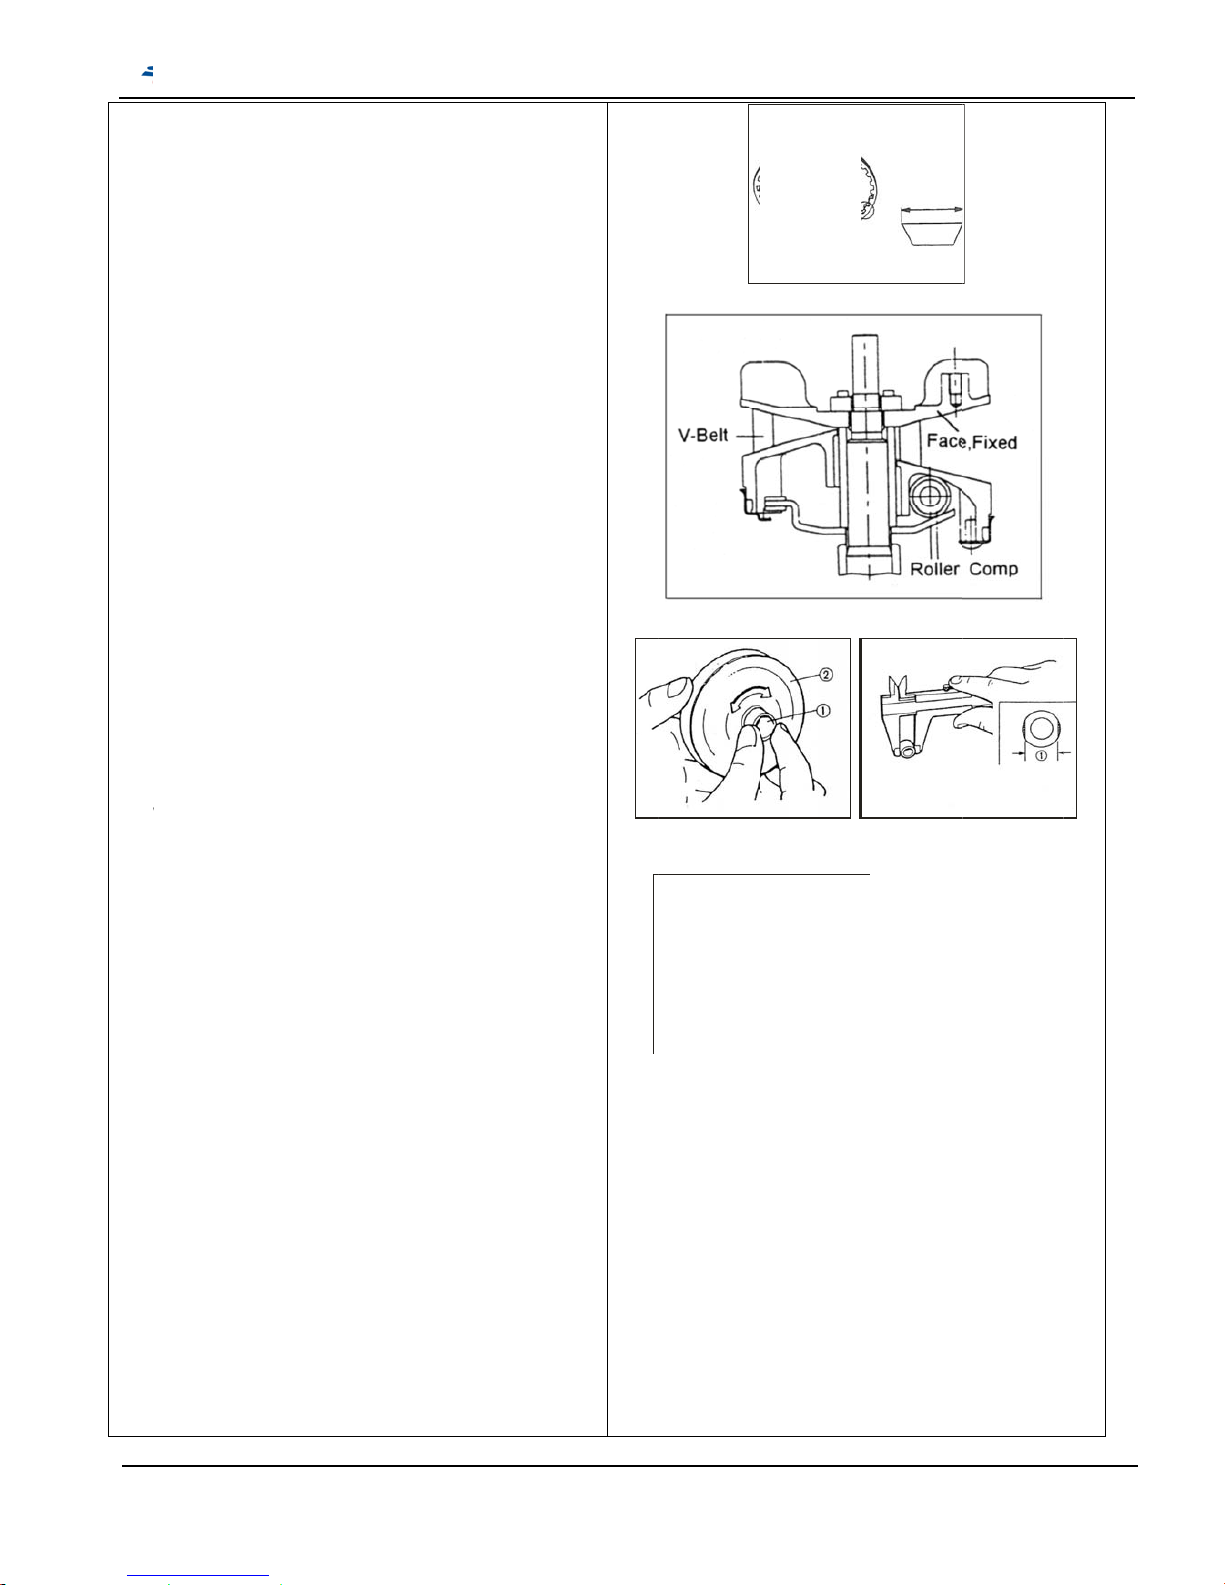
7-
0
Du
epus
for
c
tur
n
the
bel
t
Ins
p
1.
Ins
e
dri
v
2.
W
Th
e
fac
e
wei
ce
n
are
ne
c
Me
a
if e
x
Se
r
of grease.
Clean up
a
6. Mov
(MDF
to the in
c
h the mov
e. Then t
h
ing radiu
s
exterior o
f
temperat
u
ection
MDF com
rt the MD
e face co
m
eight R
o
weight r
o
by mean
ht rollers
trifuge for
c
worn out
o
essary.
sure eac
h
ceed the
s
vice limit
:
ll grease
o
eable D
r
Assy)
reasing e
n
able drive
e belt is p
. The alu
m
fixed driv
e
re.
p movem
F boss (c
o
p, and c
h
ller
llers are t
o
s of centri
f
are worn
o
e will be
a
r damag
e
roller’s o
u
ervice li
m
14.50 m
m
SM
C
r dirt befor
e
iving F
a
gine spe
e
face by c
e
ressed an
d
inum fan
i
face. It
c
ent
llar) into t
h
eck for fr
e
press m
o
uge force
.
ut or da
m
ffected.
C
d. Replac
e
ter diam
e
it.
ATV 5
0
installatio
ce Assy
d, the roll
e
ntrifugal
enlarges
s installe
d
an reduce
e movea
b
e movem
e
vable driv
e
Thus, if
aged, the
heck if rol
l
it if
ter. Repla
c
/10
0
S
n.
rs
its
on
the
le
nt.
e
ers
e it
ervice
M
V
anua
l
Chapt
e
-BELT
r 7 CVT d
16~14.5 mm
-
6
riving Sys
t
1 -
em
Page 66
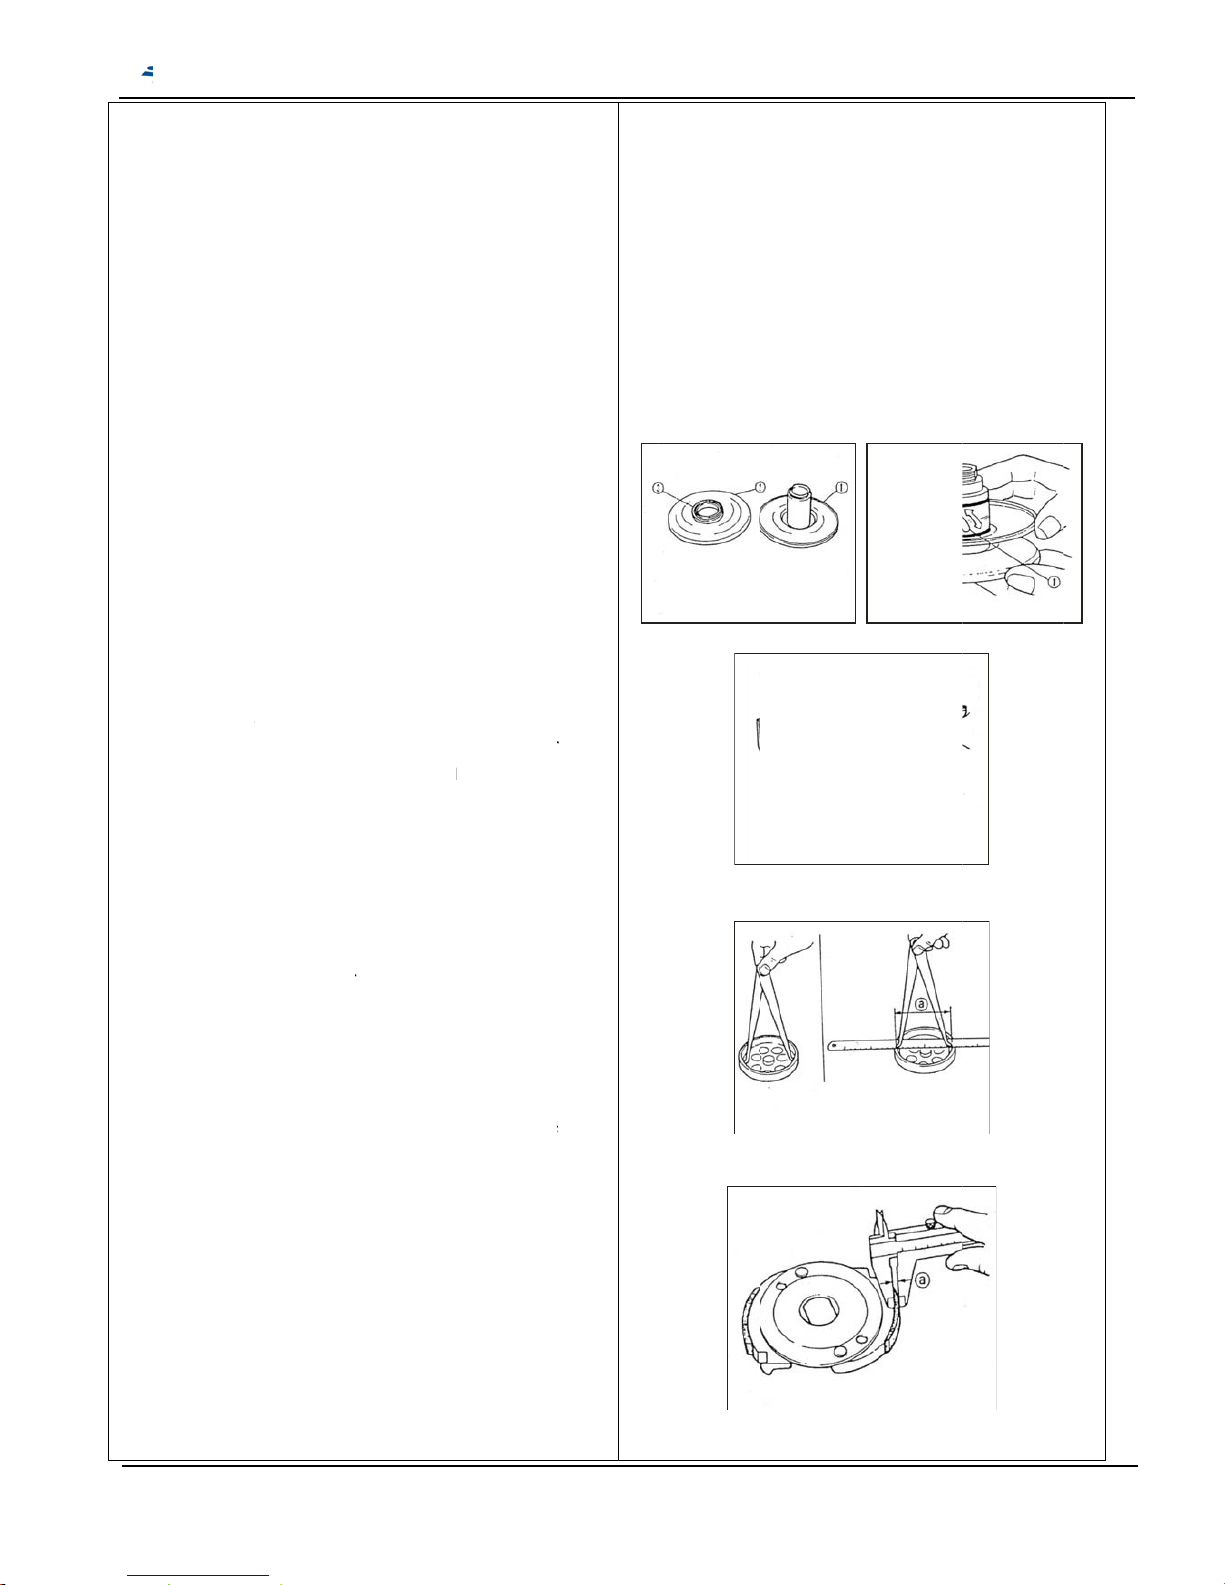
7-
0
a.
b.
1.
2.
3.
NO
poli
4.
7. Drive
Assy
Disasse
m
Remove t
h
and remo
v
spring, sli
d
seat, oil s
e
Inspectio
n
Moveme
n
heave:
Check
the sli
d
smoot
h
Check
are da
m
Check
damag
Clutch c
o
Measure t
Replace it
Standard
:
Service L
Clutch o
u
Chec
k
crack
Chec
k
housi
n
Clutch ho
u
(Wear Li
m
E :After
u
shed parti
c
Clutch w
e
Chec
k
servi
c
Clutch we
i
(Wear Li
m
Chec
k
sprin
g
new
s
n Pulley
bly
e fixing n
u
e the clut
c
ing shea
v
als.
.
t of fixed
turn and
c
ing sheav
e
ly.
the two s
h
aged or
w
the sheav
e
ed or wor
n
mpress s
he length
o
if exceed
s
94 mm.
imit : 91
m
ter housi
n
the clutc
h
or damag
e
the inne
r
g if we
a
sing insid
it : 112.3
m
sing the
s
les with
a
ight.
the clutc
h
e limit.
ght lining
t
it : 1.0mm
the clutc
h
, if crack
o
et if nece
s
SM
C
(secon
d
t on the
c
h weight
a
e and fix
s
sheave a
n
heck the
m
and fixe
d
eaves, if
b
orn.
guide pi
n
.
pring.
f sliding
s
service li
m
m
g.
outer ho
u
.
diameter
r to the li
m
e diamete
r
m)
and pape
r
cloth
weight, i
f
hickness
:
)
weight li
n
r damage
sary.
ATV 5
0
ary She
a
lutch weig
ssy, com
p
heave, sp
d sliding
ovement
sheave i
f
oth surfa
c
groove i
s
heave sp
r
it.
sing if w
e
of clutch
o
it.
: 112mm
, clean of
f
wear to t
h
2.0mm
ing and
. Replace
/10
0
S
ve)
ht,
ress
ring
on
es
ing.
ar,
uter
the
e
with
ervice Manua
l
Chapt
e
r 7 CVT d
-
6
riving Sys
t
2 -
em
Page 67
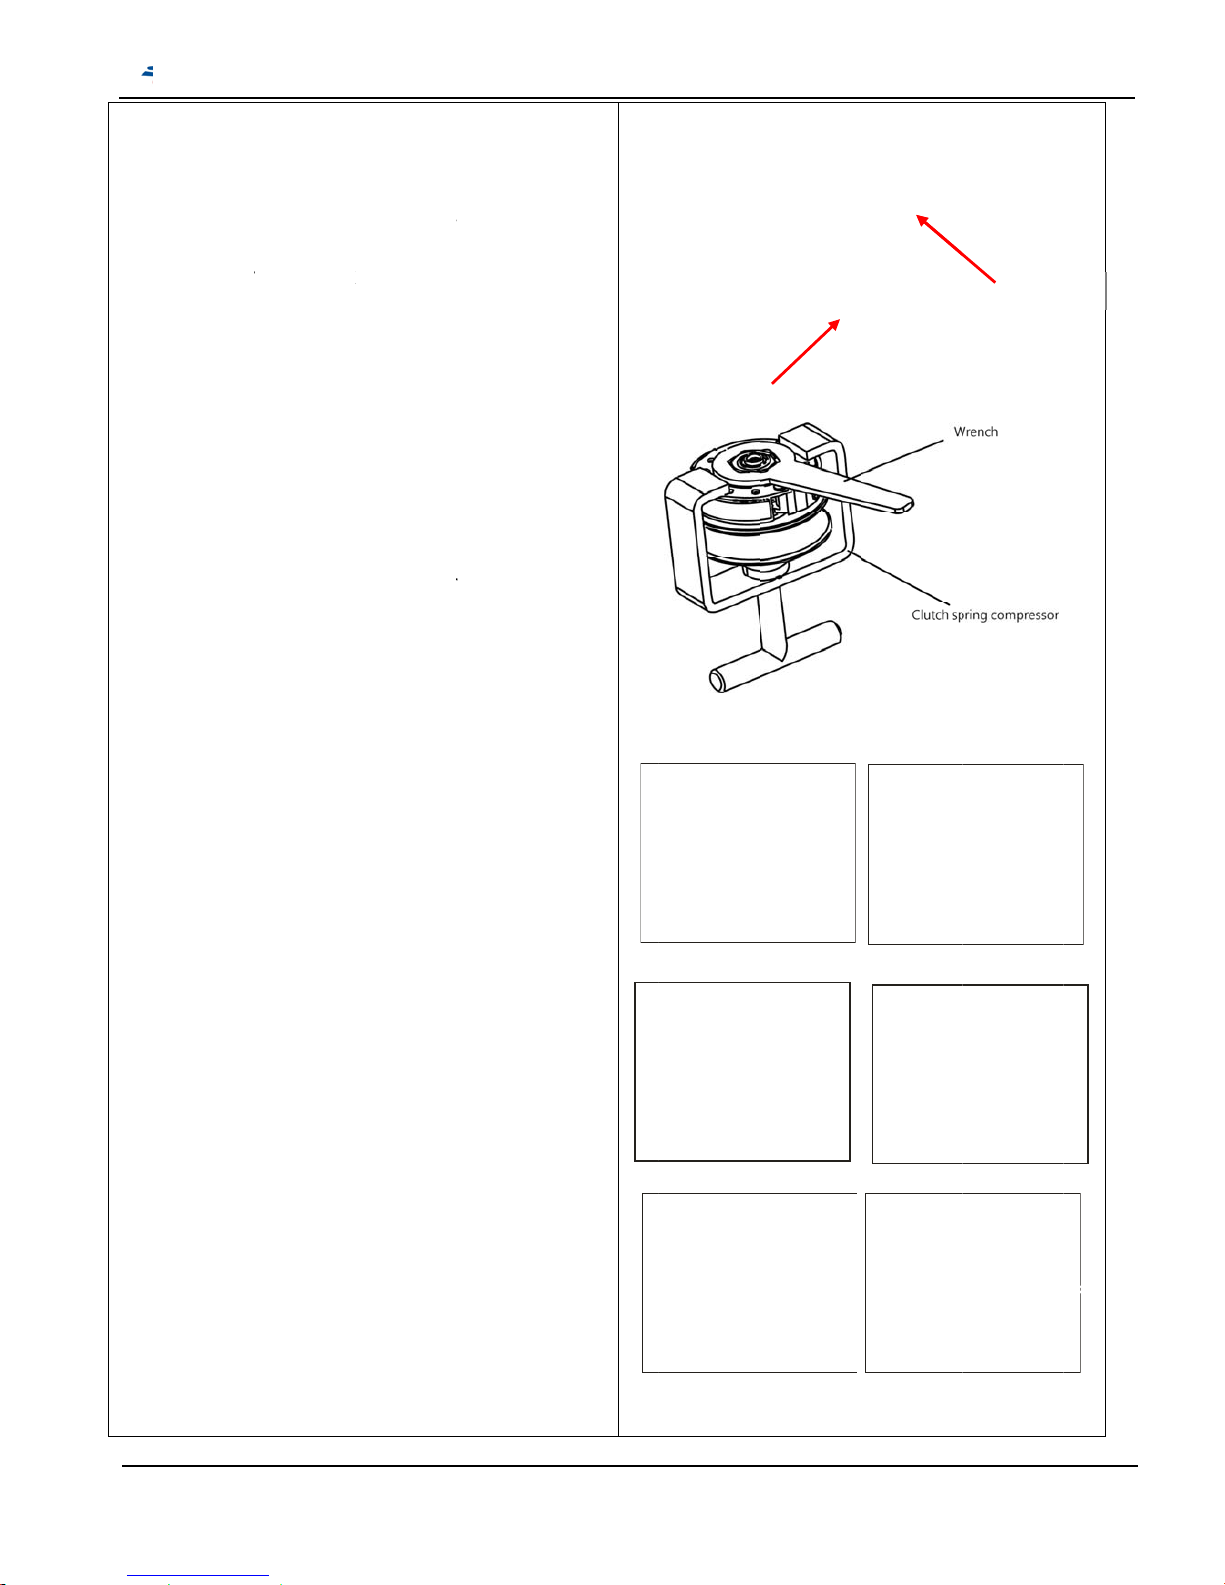
5.
c.
Tig
h
7-
0
Tor
q
Tor
q
Driven sh
Chec
k
dama
Chec
k
big cl
e
Rotat
e
finge
r
in sm
o
Chec
k
close
d
ssembl
y
sheave A
s
Chec
k
or da
m
nece
s
and s
l
Instal
l
sprin
g
the s
p
the fi
x
ten Torqu
8.
Instal
pulle
y
Install th
e
to the cr
a
Press th
e
down, an
Install th
e
drive sh
a
front driv
e
Install th
e
claw wa
s
washer
a
ue for fix
e
Tighten t
h
ue for fix
e
Install th
e
crankcas
front cra
n
eave bea
r
if the inn
e
ge. Repla
c
if needle
arance.
R
the insid
s to chec
k
oth and
s
if the be
a
and fixe
d
of Drive
n
sy)
the beari
age, repl
sary) and
liding she
a
the rear
p
compres
s
ring and
c
ing nut wi
t
e: 5.0kgf-
m
lation o
f
and re
a
MDF as
s
nkshaft.
rear driv
e
d insert th
rear drivi
ft and put
pulley.
front fixe
d
her, one
w
nd tighten
d drive fa
e clutch
o
d drive fa
dowel pi
n
e cover g
a
kcase co
v
SM
C
ing Insp
e
r bearing
e it if nec
e
bearing is
eplace it i
f
e of inner
if the bea
r
ilent.
ring outer
. Replace
Pulley (s
ng, oil rin
g
ace with n
install to t
h
ve.
ulley ass’
y
or and w
r
lutch weig
h special
t
/ 50Nm
the fro
n
r drive
n
’y with dri
v
n pulley s
e belt.
ng pulley
a
the drive
b
driving f
a
ay, conic
a
the fixing
ce nut: 4.
5
uter nut.
ce nut: 4.
0
and put
o
sket and
t
er with fla
ATV 5
0
ction
oil seal is
ssary.
damage
o
necessa
r
earing wi
ing rotati
o
parts are
it if neces
econdary
/oil seal if
ew one (if
e fix she
a
with clut
c
ench. Pre
s
ht assy, ti
g
orque.
t drive
pulley.
e boss (c
o
liding she
a
ssy to th
e
elt onto t
h
ce (with f
a
l spring
nut.
kgf-m/ 45
N
kgf-m/ 40
N
n the ne
w
hen install
nge bolts.
/10
0
S
r too
y.
th
n is
sary.
wear
ve
h
sing
hten
llar)
ve
rear
e
n),
m
m
L.
the
C
LCO
O
ervice
M
AW WASHER
O
NICAL SPRI N
G
uter ball
b
anua
l
Chapt
e
NE-WA
Y
WAS HER
NUT
earing
r 7 CVT d
N
-
6
riving Sys
t
eedle bea
r
3 -
em
ing
Page 68

N
O
TE:
SMC ATV 50/10
0
S
ervice Manua
l
Chapter 7 CVT d
-
6
riving Sys
t
4 -
em
Page 69
8-
08-08-08-08-0
8-
0
Thi
s
thr
oone
8-
0
Ge
To
r
Sta
Idl
e
1. Mech
a
2. Main
t
3. One
W
4. Elect
r
5. Kick
s
1. Mech
ATV 50
e
ugh idle g
way clut
c
2. Main
t
neral In
f
Before th
que valu
e
rting moto
gear plat
e
anism
enance
D
ay Clu
t
ical Sta
r
tarter
anism D
quipped
w
ear or kic
k
h at the le
f
enance
ormatio
n
e service
o
r bolt: 1.3
k
bolt: 0.8
k
S
M
escrip
t
ch (Star
t
ting Mo
t
iagram
ith electri
c
start by
s
t side of
c
Descrip
t
f one wa
y
gf-m /13N
gf-m/8N
m
C ATV
ion
clutch)
or
al starter
pindle ge
a
rankcase.
ion
clutch, pl
e
m
50/100
and kick s
r and kick
ease refer
C
Servic
e
65
65
66
67
68
tarter (opt
i
pinion se
t
to chapte
r
hapter 8
E
Manua
l
onal). By
a
, to crank
t
8, the C
V
ngine St
a
pply the
s
the crank
s
T system
-
rting Syst
e
tarting m
o
haft throu
g
removal.
65-
m
tor
h
Page 70
ay Clut
ing menti
o
r 7, for fr
o
ut 2 pan h
gear pla
t
e plate w
a
e idle ge
a
e start cl
u
ring, star
t
her.
gear toot
h
r, if Burrs/
C
with new.
art clutch
ckwise “
B
he start
c
t be mov
e
n. Repla
c
idle gear
s
. The sha
f
t be loose
h spare p
a
SMC
ch(Start
ned servi
c
nt pulley
/
ead scre
w
e.
sher on t
h
and plat
e
tch ass’y,
er boss a
n
of idle g
e
hips/Rou
(one way
c
”, and ch
e
lutch sho
u
d when tu
r
e with ne
w
haft on t
h
t should b
e
or move.
rts, if we
a
JMAX
70
Clutch)
e, please
MDF ass
y
, and rem
o
e idle ge
a
washe
r
starter wh
d starter
ar start cl
u
ghness/W
lutch)
ck if rotat
e
ld hold fir
m
n clockwi
s
set if bro
k
e L.
tightly fi
x
or dam
a
00 ATV
S
ve
r.
eel,
tch
ea
r
ly
e
en.
ed
ge.
ervice CManual
hapter 8
E
ngine St
a
-
6
rting Syst
e
6 -
m
Page 71
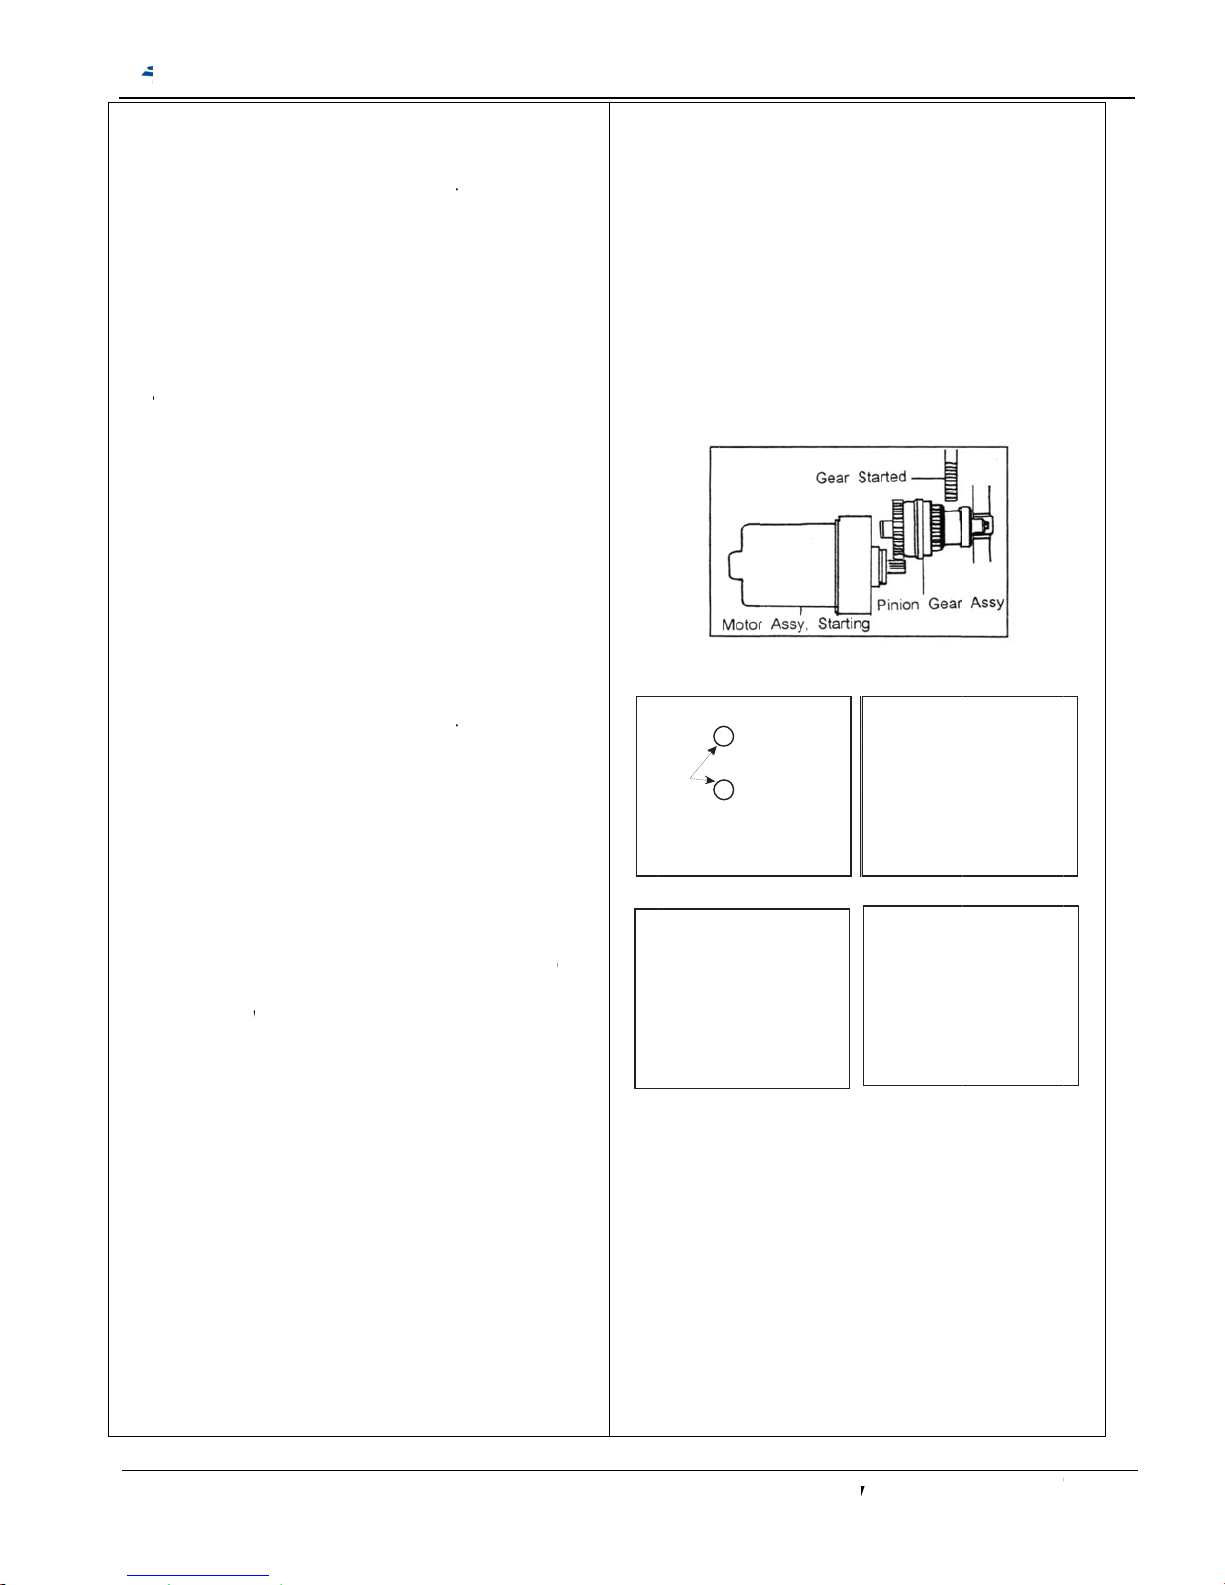
c.
To
r
8-
0
Sta
en
g
left
a.
b.
c.
In r
e
plu
g
(idl
eeng
To
rSta
Re-install
Add gre
a
bearing.
Install th
e
disasse
m
Grease t
h
gear and
plate wa
s
Tighten t
h
screw in
s
que valu
e
4. Elect
r
rter Motor
ine. The
s
hand bra
k
Removal
Disconn
e
Remove
Disconn
e
model)
Pull out
a
Inspectio
n
Check th
e
power if
m
Check th
e
wear or
d
Replace
w
necessa
r
Installati
o
verse wa
in the st
a
gear cor
r
age well.
que:
rting mot
o
ation
se to the
s
start clut
c
bly.
e needle
then inst
a
her.
e idle ge
a
pecific to
r
: 0.8kgf-
m
ical Sta
r
is installe
d
tarter mot
o
e is appli
e
ct the ele
c
out the st
a
ct the ear
t
nd remov
e
.
motor fu
otor can
gear en
d
amage.
ith new
s
y.
n.
y of start
m
rt motor g
espond),
m
r bolt: 1.
SMC
tart clutch
h in reve
r
bearing in
s
ll the idle
g
r plate wi
t
que.
/8Nm
ting Mo
on the u
p
r can act
d.
tric coupl
e
rter moto
r
h cord (fo
r
the start
e
nction by
c
run corre
c
, if the ge
a
tart motor
otor rem
o
ear end t
o
ake sur
e
3kgf-m /1
3
JMAX
70
needle
se way of
ide the id
ear with
2
h 2 pan h
e
or
per side
o
only when
r.
fixing 2 b
o
100 CC
r motor.
onnects
w
tly.
r tooth ar
e
ass’y if
val. Whe
n
the engin
e
of the ge
a
Nm
00 ATV
S
le
ad
f
the
lts.
ith
e
e
r
B
O
ervice
C
LTS
C
Manual
hapter 8
E
RD CO MP
ngine St
a
-
6
rting Syst
e
7 -
m
Page 72
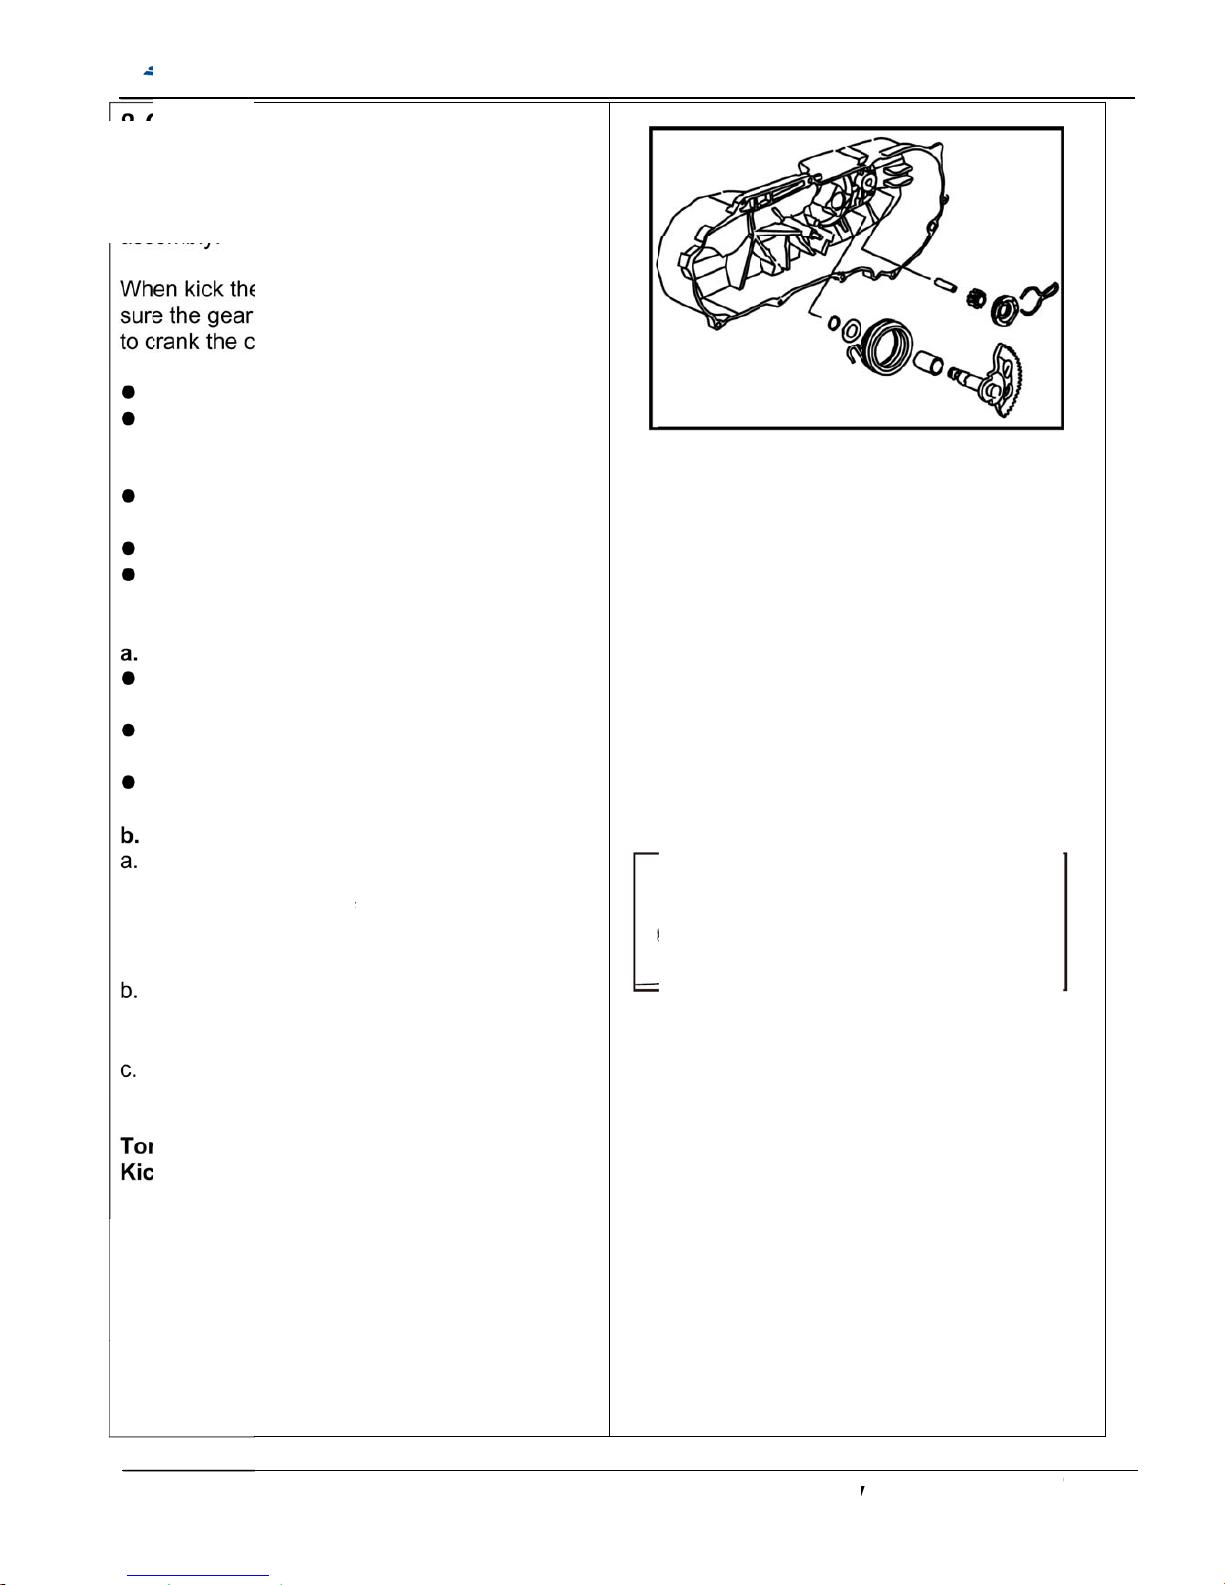
tarter (
O
r is fixed
ompose
d
pring, bu
s
starter, fi
is engage
rankshaft
f
ly
the kick st
rew and t
h
.
the clamp
nkcase c
o
the spindl
e
the clip sp
inion ass
y
each pa
r
spring b
o
ormally.
e gear, s
p
rn spring
a
er onto th
stall the
f
cover.
pring ont
o
kick start
e
r.
ighten b
o
SMC
ptional
)
at the left
c
by kick st
h and pic
k
rst slightly
d, and the
or startin
g
arter by lo
o
en pull o
u
on spindl
e
ver.
gear, bo
s
ring, and t
.
ts if wear,
und/rebo
u
ring with
c
nd spindl
e
e left cran
k
ixing clip
a
the cran
k
r pinion g
e
lt: 0.9kg
f
-
JMAX
70
.
rankcase
arter, spin
d
pinion
push to
m
m kick ha
r
the engin
sing the
t the kick
at outsid
e
s, washe
r
hen remo
v
rusty or g
e
nd force i
are.
gear, col
case cov
e
t outside
o
case
ar and th
e
m / 9Nm
00 ATV
S
dle
ake
dly
e.
of
.
e
ar
f
lar,
r
f
ervice CManual
hapter 8
E
ngine St
a
-
6
rting Syst
e
8 -
m
Page 73

N
O
TE:
SMC
JMAX 7000 ATV Service CManual
hapter 8 Engine St
a
-
6
rting Syst
e
9 -
m
Page 74
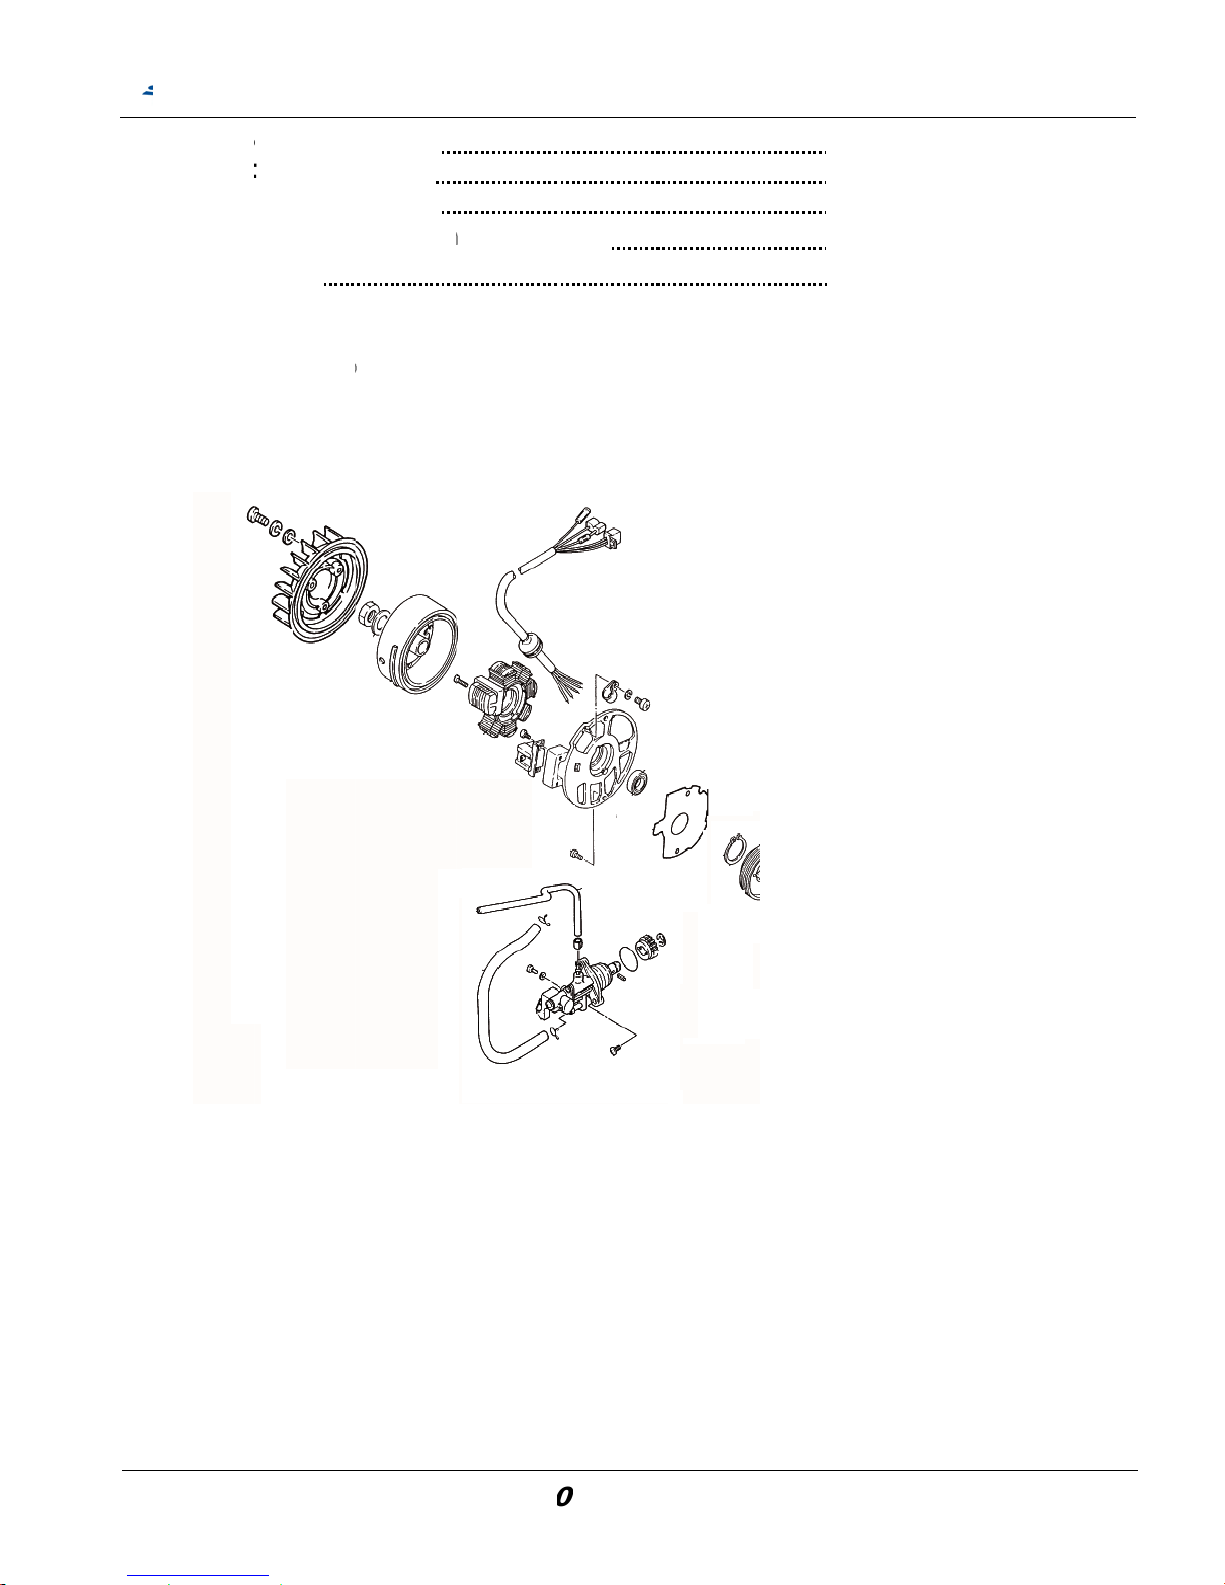
9-
09-09-09-09-0
9-
0
1. Mech
a
2. Main
t
3. A.C.
G
4.
Oil p
u
5. Cran
k
1. Mech
anism D
enance
N
enerat
o
mp and
shaft
anism
D
SM
C
iagram
otice
r Assy
oil pu
m
iagram
ATV 5
0
p drive
g
/10
0
S
Chap
t
ear
rvice
M
er 9 A.C.
G
anua
l
enerator
/
70
71
72
73
75
Oil Pump
/C
-
7
rankshaf
t
0 -
Page 75

9-
0
To
r
A
ir
Co
o
Fly
w
Sta
t
Oil
R.
C
Oil
Sp
e
A.C
Uni
v
Cr
aCra
2. Main
t
que valu
e
shroud fixi
ling fan fi
x
heel nut
or fixing
b
Pump Bol
t
rankcas
e
seal stop
p
cial tool
s
.G. flywh
e
ersal hol
d
nkshaft p
u
nkshaft in
s
enance
ng bolt:
ing bolt:
olt:
:
bolt
er bolt
el puller
er
ller
taller
SM
C
Notice
ATV 5
0
0.7kgf-m
/
0.7kgf-m
/
3.8 kgf-
m
0.8kgf-m
/
0.4kgf-m
/
1.2kgf-m
/
0.9kgf-m
/
/10
0
S
Chap
t
7Nm
7Nm
/38Nm
8Nm
4Nm
12Nm
9Nm
rvice
M
er 9 A.C.
G
anua
l
enerator/Oil Pump
/C
-
7
rankshaf
t
1 -
Page 76
9-
0
a.
3. A.C.
G
Remova
Remove
chapter
3
Remove
and rem
o
wheel.
Remove
the A.C.
G
Use flyw
h
flywheel,
clockwis
e
fly wheel
Remove
cranksh
a
Screw o
u
push do
w
and then
crankcas
Remove
enerat
o
l
the air co
o
, engine r
e
the 4 scre
w
ve out th
e
out the fla
n
. flywhee
l
eel puller
,
and then
u
the midd
l
from right
the KEY
W
ft.
t the 2 bol
n the sea
l
remove t
h
e.
the gaske
t
SM
C
r Assy.
ling shrou
moval)
s on the
cooling f
a
ge nut a
n
.
screw th
e
se wrenc
e push bo
side of cr
a
OODRU
F
ts on the
s
rubber o
n
e Stator
A
.
ATV 5
0
d. (refer t
o
air cooling
n from fly
d washer
puller int
o
to turn
lt to pull o
u
nkshaft.
F from th
e
tator plat
e
the stato
r
ssy from
R
/10
0
S
Chap
t
fan,
on
the
t the
, and
coil
.
rvice
M
er 9 A.C.
G
anua
l
enerator
/
WOODR UFF
K
Oil Pump
/C
EY
-
7
rankshaf
t
2 -
Page 77
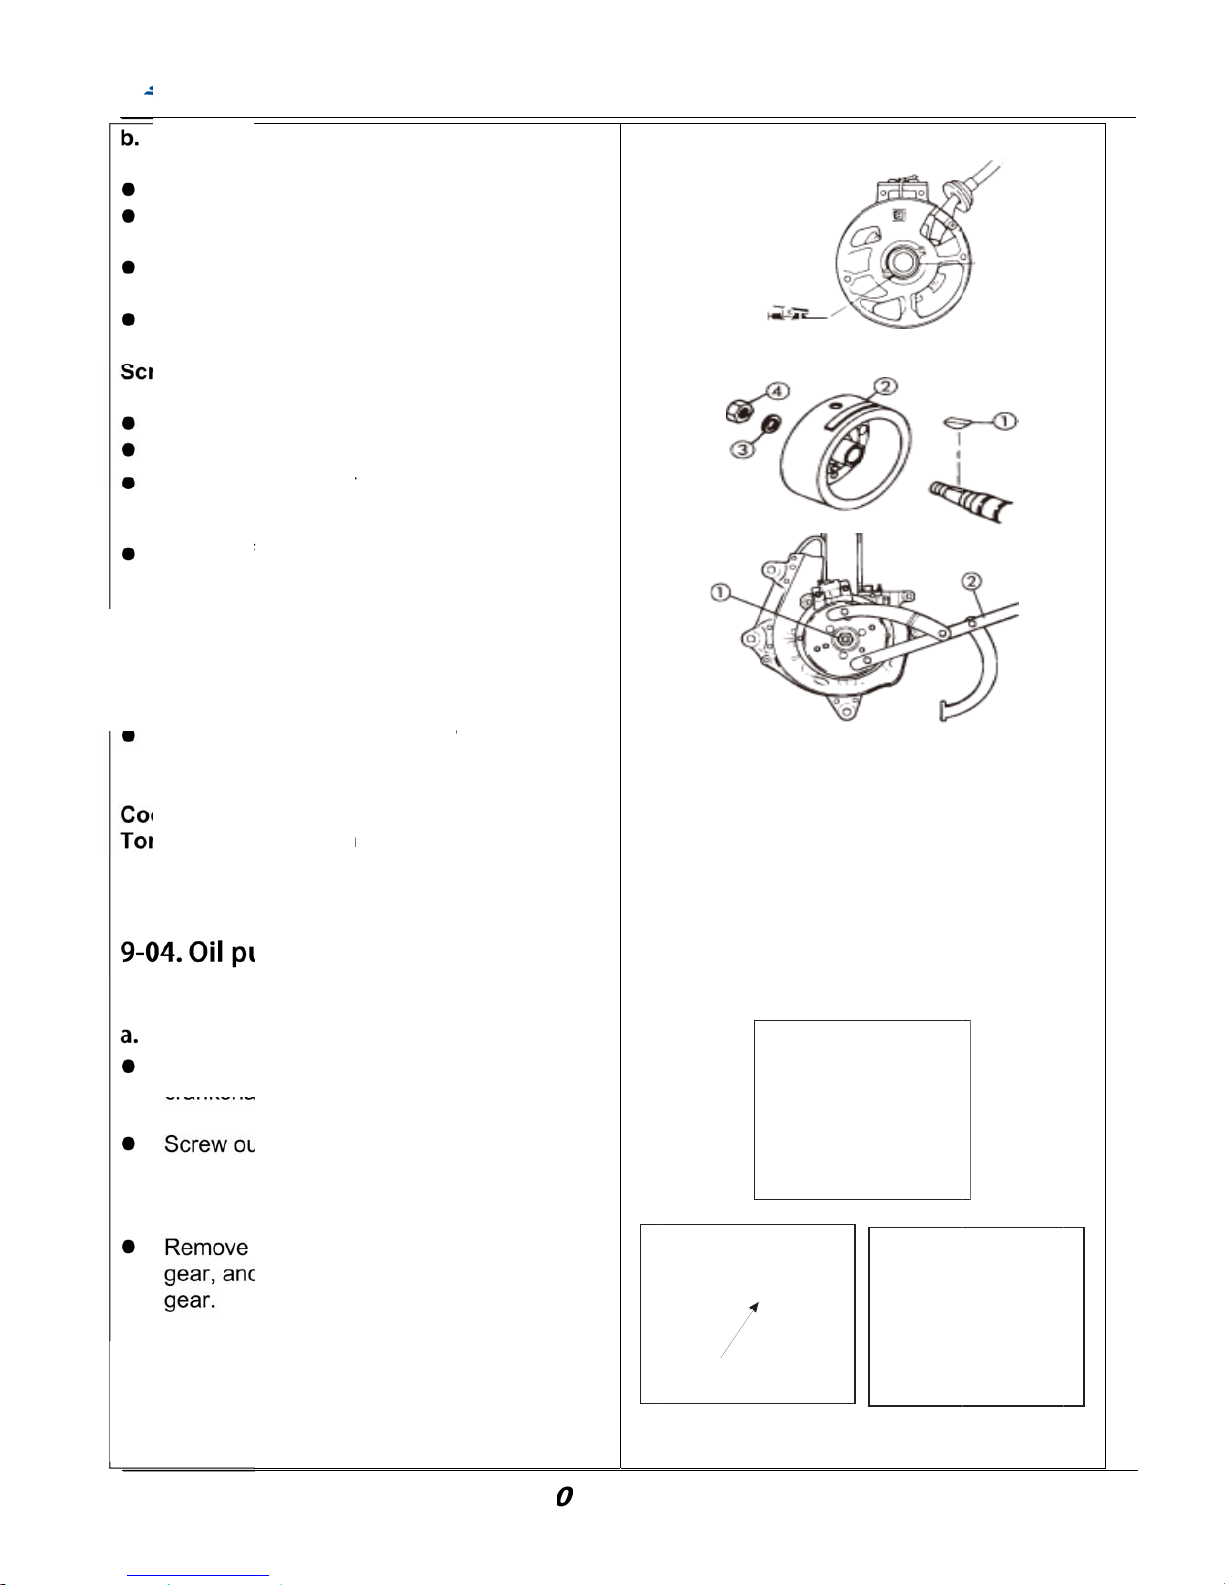
ation.
gasket
ase with l
i
wheel ca
b
tor asse
m
r assemb
l
odruff ke
y
flywheel
in washe
r
lywheel h
o
nd tighte
n
.
neto Nu
tgf
-m/38
N
cooling f
a
rews
crew
-m/7 N
m
mp an
d
A
.C. Gen
e
ft (refer to
t 2 screw
s
the cir-cli
p
then tak
e
SM
C
thium soa
le throug
h
bly
y): 0.8 kg
and nu
t
lding tool
flywheel
m
n onto fly
w
oil pu
m
rator Ass
y
9-03)
remove t
h
on the oil
out the oi
ATV 5
0
p base on
the cran
k
-m/8Nm
to hold t
(magneto
heel by
p drive
from
e oil pum
pump dri
v
l pump dri
v
/10
0
S
Chap
t
the
case
he
p.
e
e
rvice
M
er 9 A.C.
G
CIRCLIP
anua
l
enerator/Oil Pump
/C
-
7
rankshaf
t
3 -
Page 78
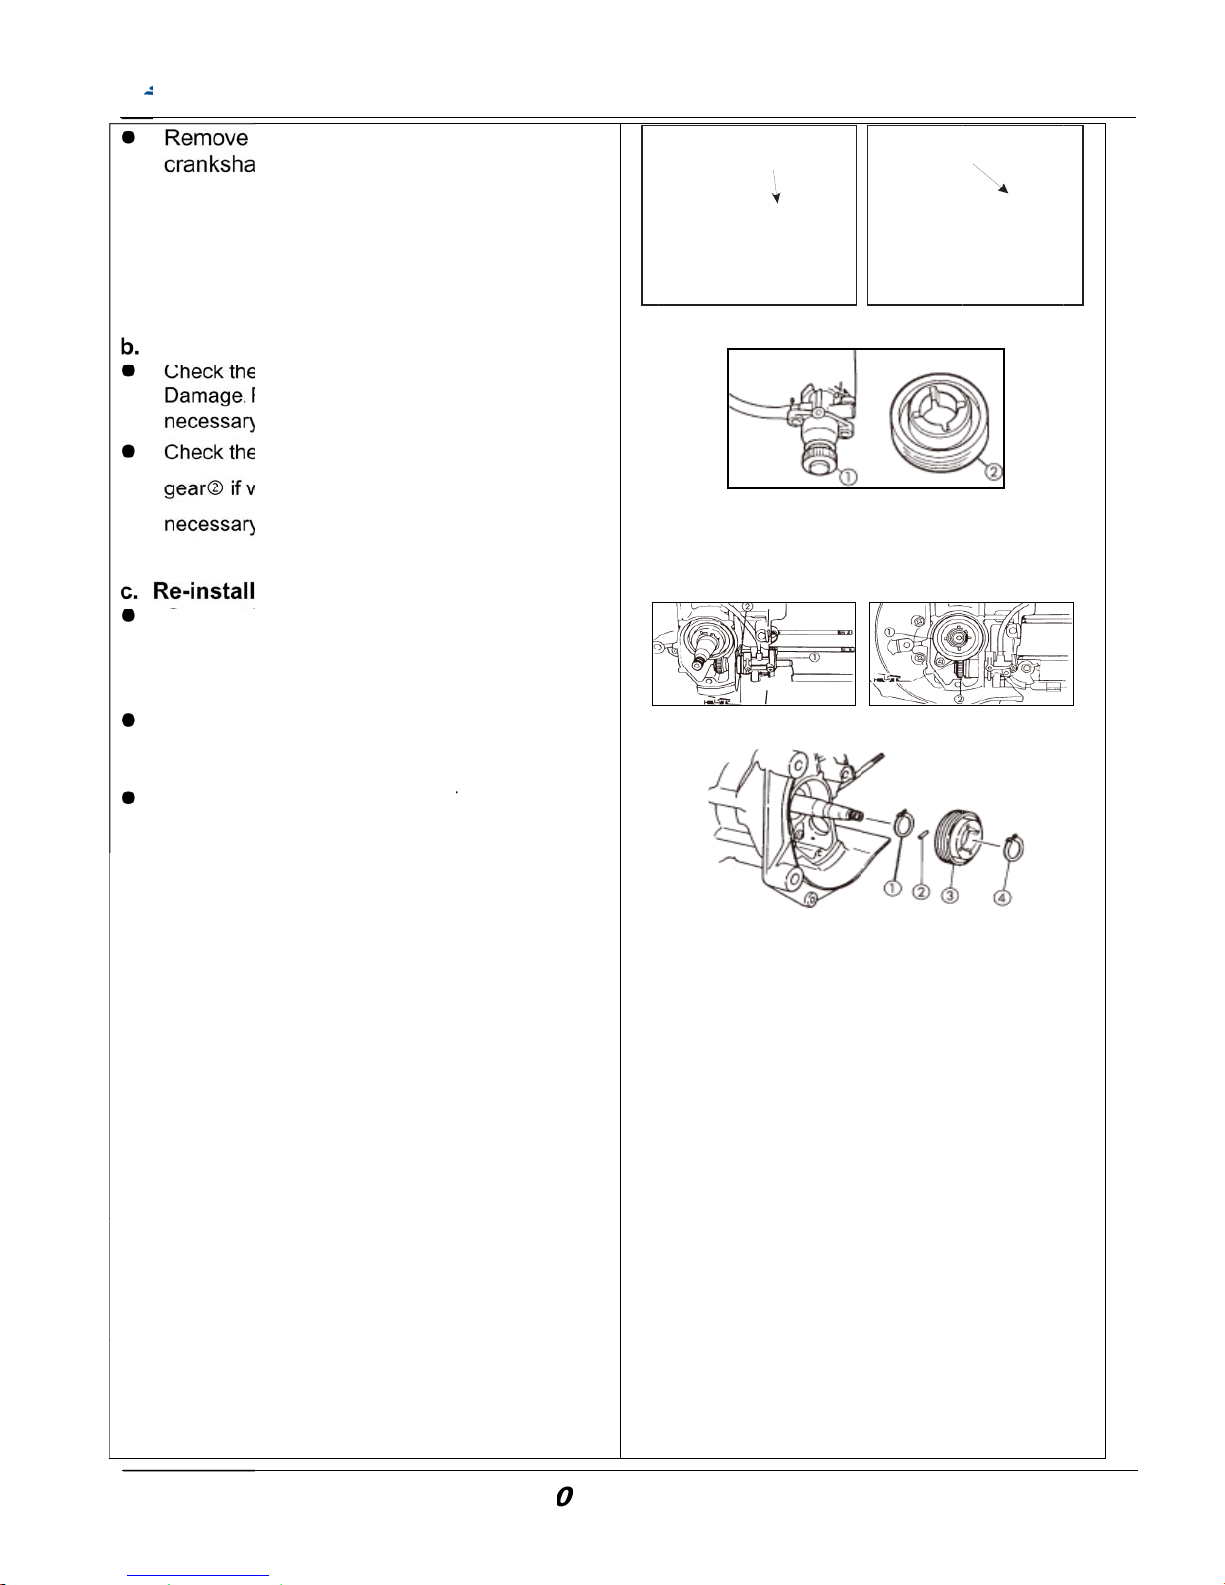
the pin an
d
ft
oil pump
d
eplace th
e
.
drive gear
orn or da
m
.
ation.
e lithium
s
side of oil
oil seal.
clip &
r in rev
e
oil pump
.
SM
C
cir-clip o
riven gear
oil pump
a
teeth of th
e
age. Repl
a
oap base
pump dri
v
, Pin a
n
rse way
o
Make su
r
ATV 5
0
n the
eeth if
W
ssy if
oil pump
d
ce it if
grease o
n
e / driven
d oil pum
p
f disasse
m
e the gea
r
/10
0
S
Chap
t
ear/
rive
to
gear,
bly.
is
rvice
M
er 9 A.C.
G
P
anua
l
enerator
/
IN
Oil Pump
/C
CIRCL
-
7
rankshaf
t
P
4 -
Page 79
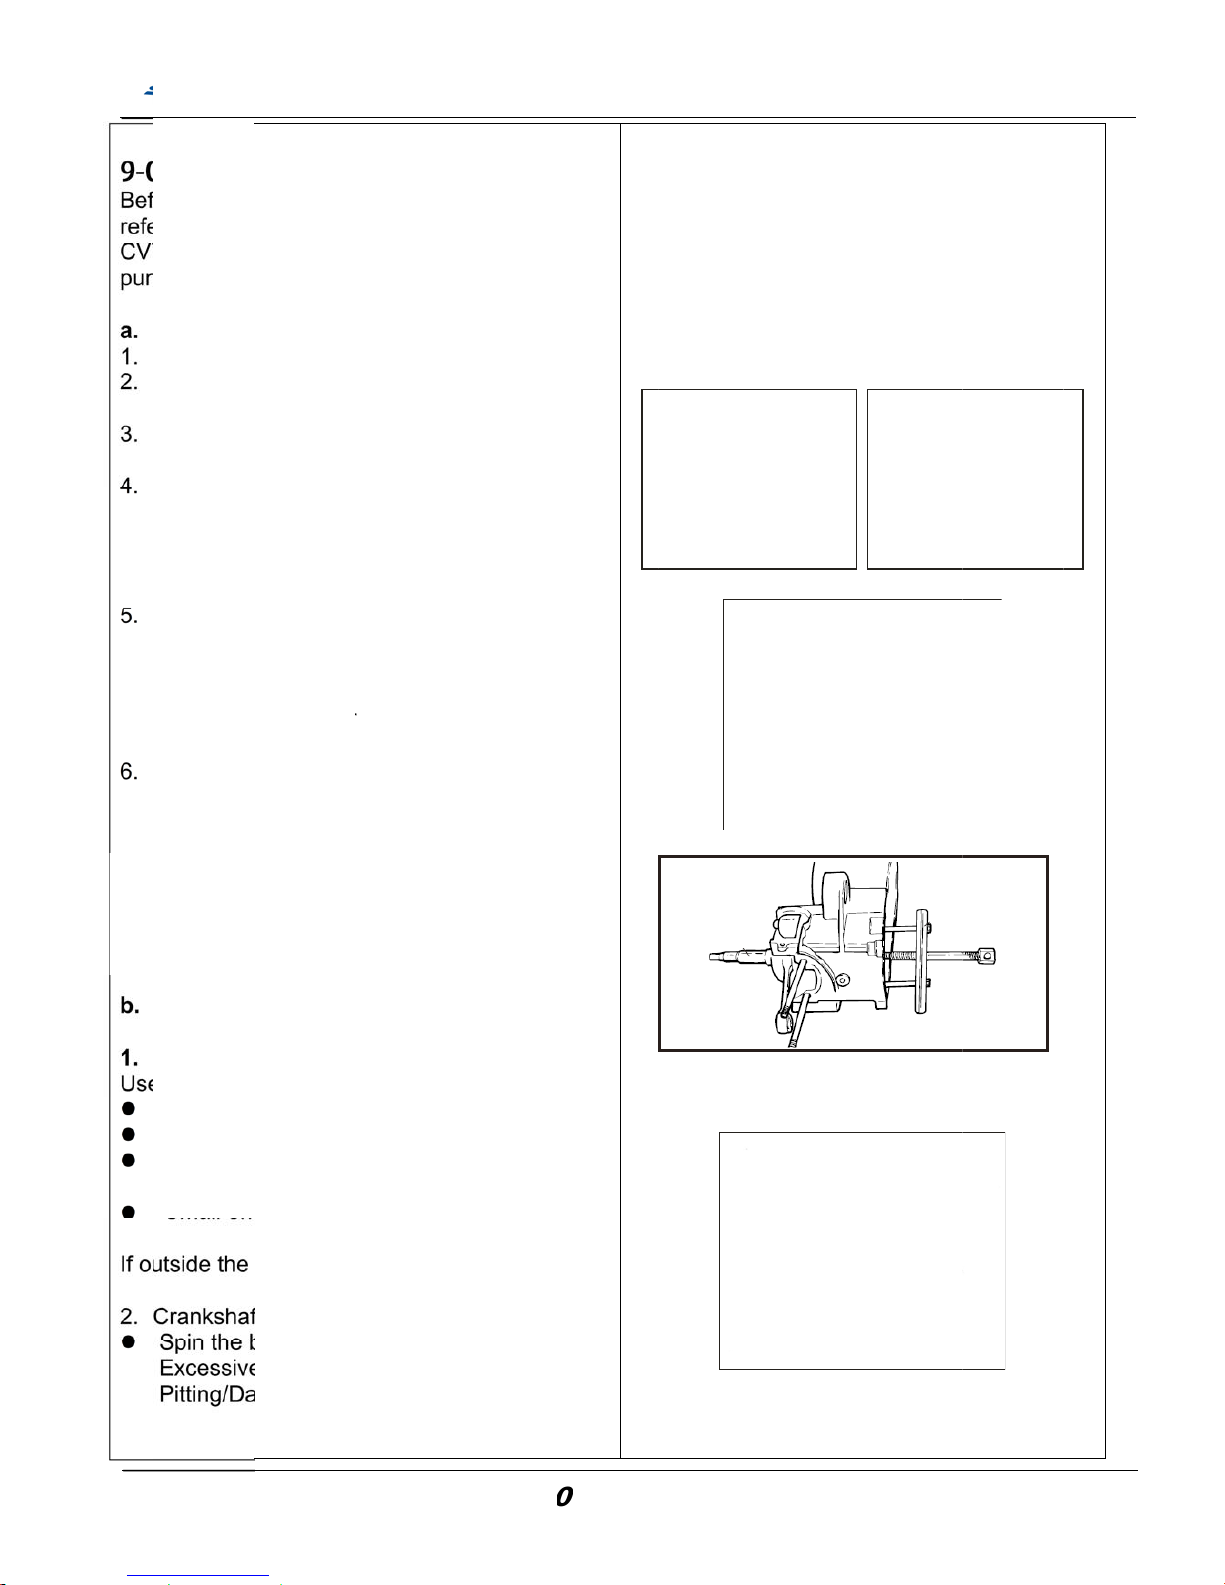
case/cr
a
sing cran
k
us chapte
and A.C.
G
ar remov
a
e air-inta
k
screw a
n
e 6 pan h
case sep
a
nuts of t
h
dy is para
, slightly l
o
body of t
h to turn
c
cranksh
a
right cra
n
e rubber
h
for easie
r
me steps
from L. C
ent on c
r
dial gaug
ft width "
A
limit " C
"
ng rod big
free pla
y
value, rep
l
t bearing
c
earing in
n
play/Rou
mage
C
SM
C
nkshaf
t
shaft rem
rs for engi
enerato
r
,
l.
e/reed va
l
d remove
ead bolts
o
rate tool,
f
e tool, bu
t
llel with th
e
osen one
he tool.
lockwise
a
ft, then s
e
kcase. W
ammer t
o
crankcas
e
above, to
rankcase.
ankshaft
:
es and thi
c
" : 37.90
: 0.03m
m
end side
“
" F" : 0.4
~
ace with
n
heck
er race
ghness
C
hange
ATV 5
0
oval, plea
s
ne remov
a
oil pump/
o
ve/gasket
the oil se
a
n R.
ully tighte
n
ensure th
box. If
of the scr
e
nd apply
parate an
hen press
u
strike the
case
push out t
kness ga
u
~37.95 m
m
D”: 0.2~0.
0.8 mm
ew crank
s
hange
/10
0
S
Chap
t
e
l,
oil
.
l
the
at
ws
d
re is
he
ge.
5
haft.
rvice
M
er 9 A.C.
G
anua
l
enerator/Oil Pump
/C
-
7
rankshaf
t
5 -
Page 80
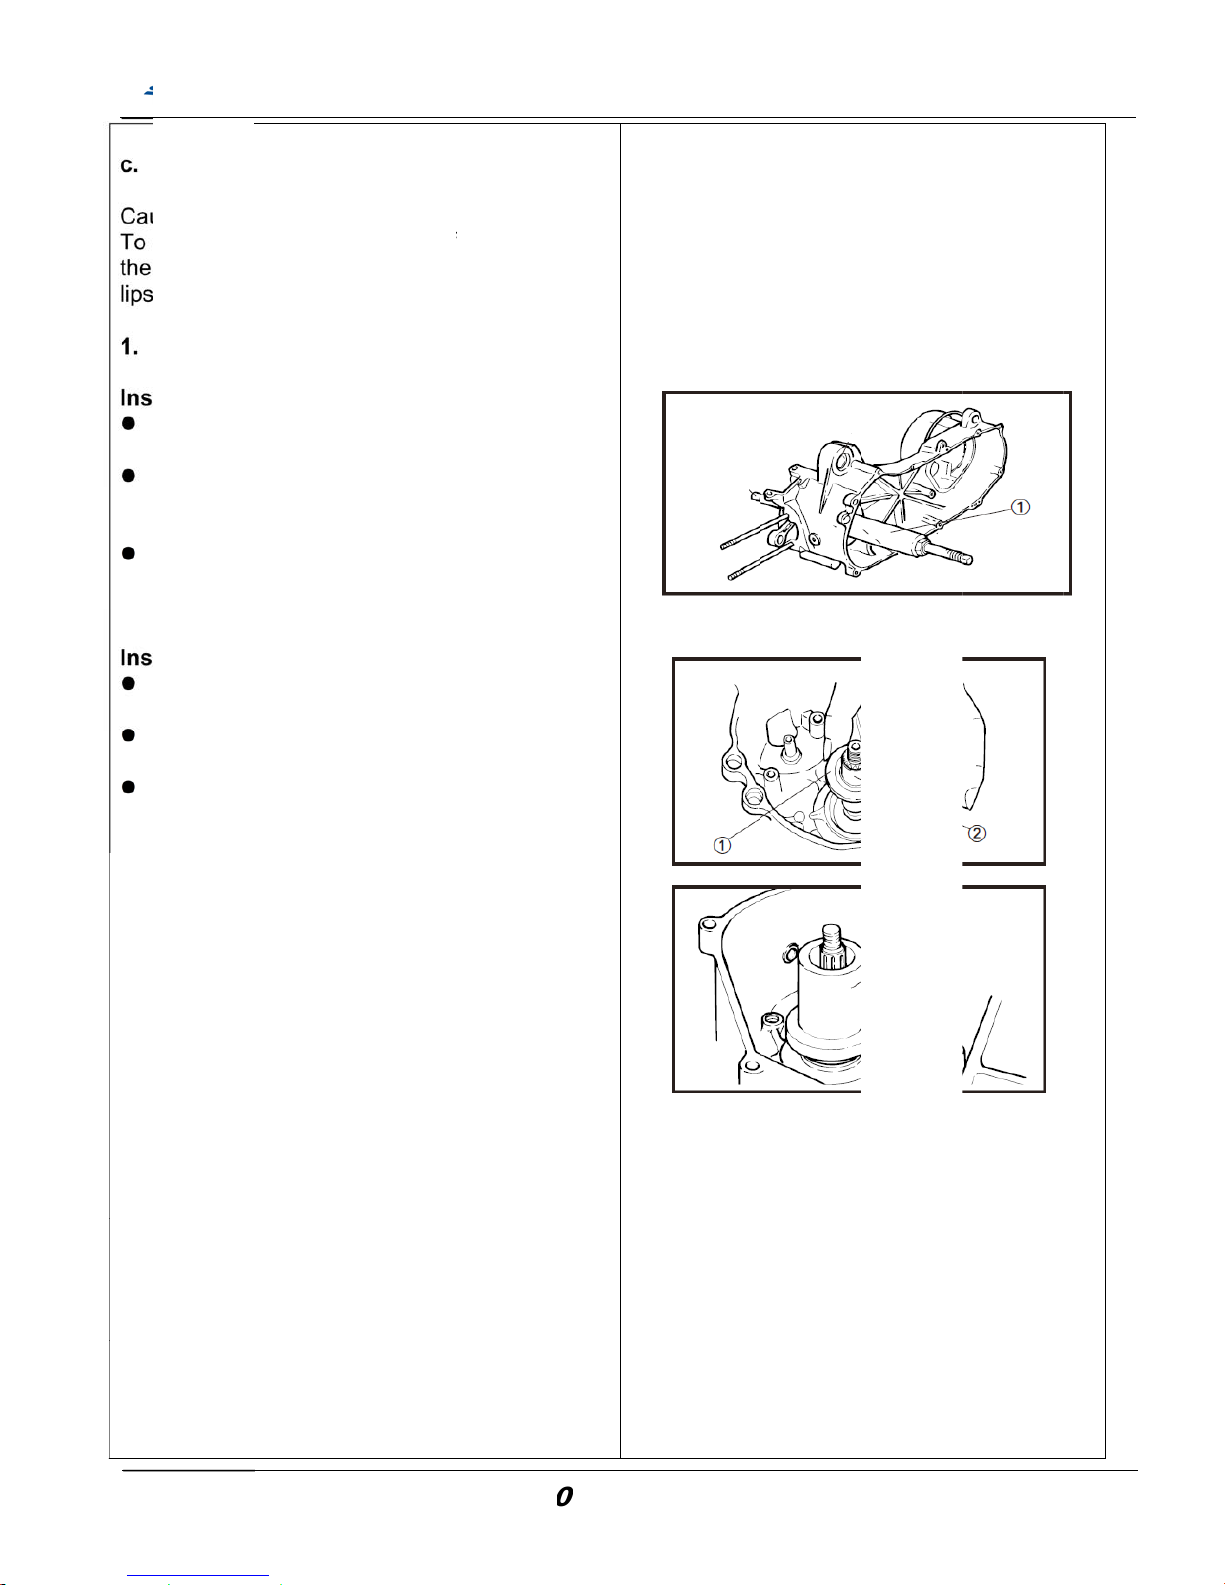
n.
tching the
procedu
r
e and ea
c
case sid
e
nkshaft.
Cranksh
ft through
connectin
g
h one ha
n
shaft inst
a
crankshaf
t
ft assemb
l
seal at o
u
ith new
o
ium soap
b
.
uide a
n
al
SM
C
cranksha
f
e, lubricat
h bearing
.
aft Installi
n
the L cran
rod at to
p
d while tu
r
lling tool
w
installing
y bottoms
tside of
L
il seal on
e
ase grea
s
d seal dri
v
ATV 5
0
and to e
a
e the oil s
e
with engi
n
g tool to t
kcase hol
e
dead ce
n
ning the
n
ith the ot
h
tool until t
h
against t
h
. Crankc
a
ach time
e onto th
e
er to in
/10
0
S
Chap
t
se
al
e oil.
he
.
ter
ut of
er.
e
e
ase
oil
stall
rvice
M
er 9 A.C.
G
anua
l
enerator/Oil Pump
/C
-
7
rankshaf
t
6 -
Page 81
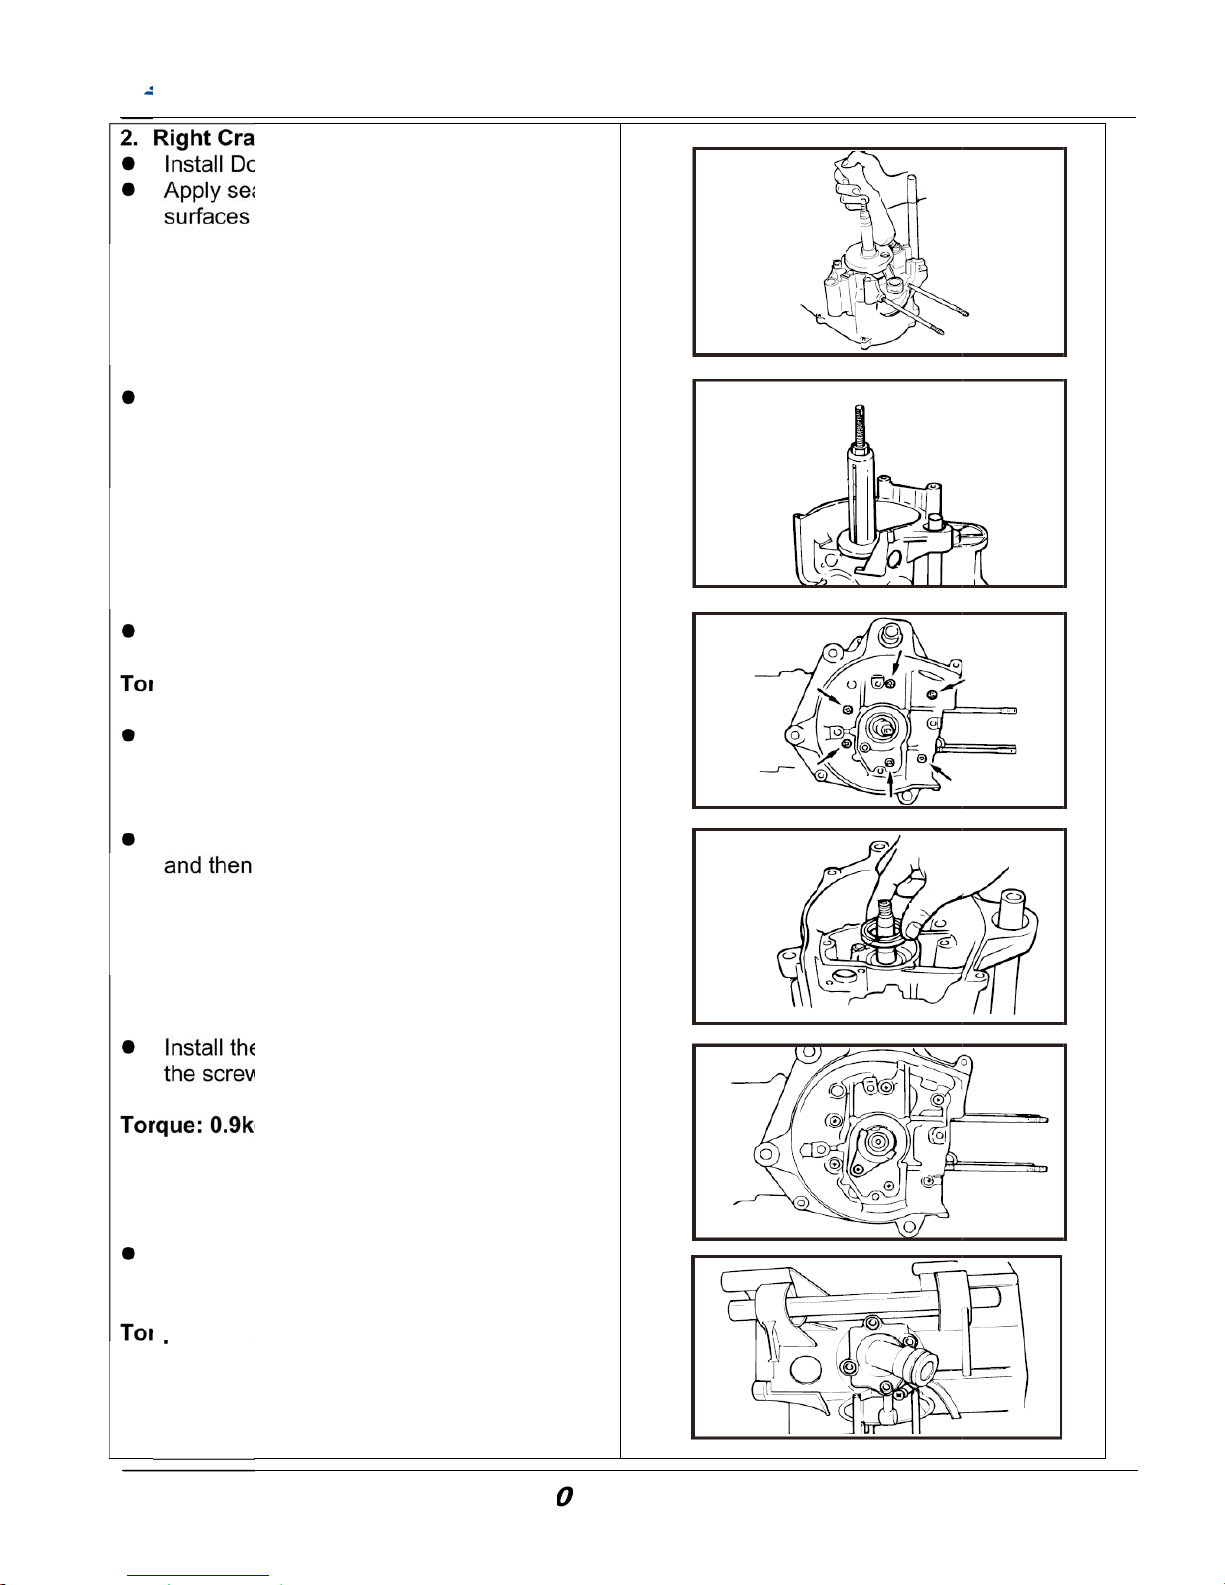
nkcase
wel pins
a
lant (pac
k
of both ca
Cranksh
ft through
ll the right
ft and cra
n
e Crankc
-m/12 N
Cranksh
h, operat
e
oil seal,
a
install the
oil seal s
t
.
-m/ 9 N
m
Gasket,
R
-m/11N
m
SM
C
nd engin
e
ing paste
)
se helves.
aft Installi
n
the R cra
n
crankcas
e
kcase.
ase holdin
m
aft operati
the repai
r
pply grea
s
oil seal.
opper pla
t
eed valv
e
ATV 5
0
mount sp
a
to the m
a
g tool to t
kcase hol
e
onto
g screws.
on. If
process.
e on oil s
e
e and tig
h
and air I
n
/10
0
S
Chap
t
acer
ting
he
e
al lip
ten
take
rvice
M
er 9 A.C.
G
anua
l
enerator/Oil Pump
/C
-
7
rankshaf
t
7 -
Page 82

N
O
TE:
SMC ATV 50/10
0
S
Chap
t
rvice
M
er 9 A.C.
G
anua
l
enerator/Oil Pump
/C
-
7
rankshaf
t
8 -
Page 83
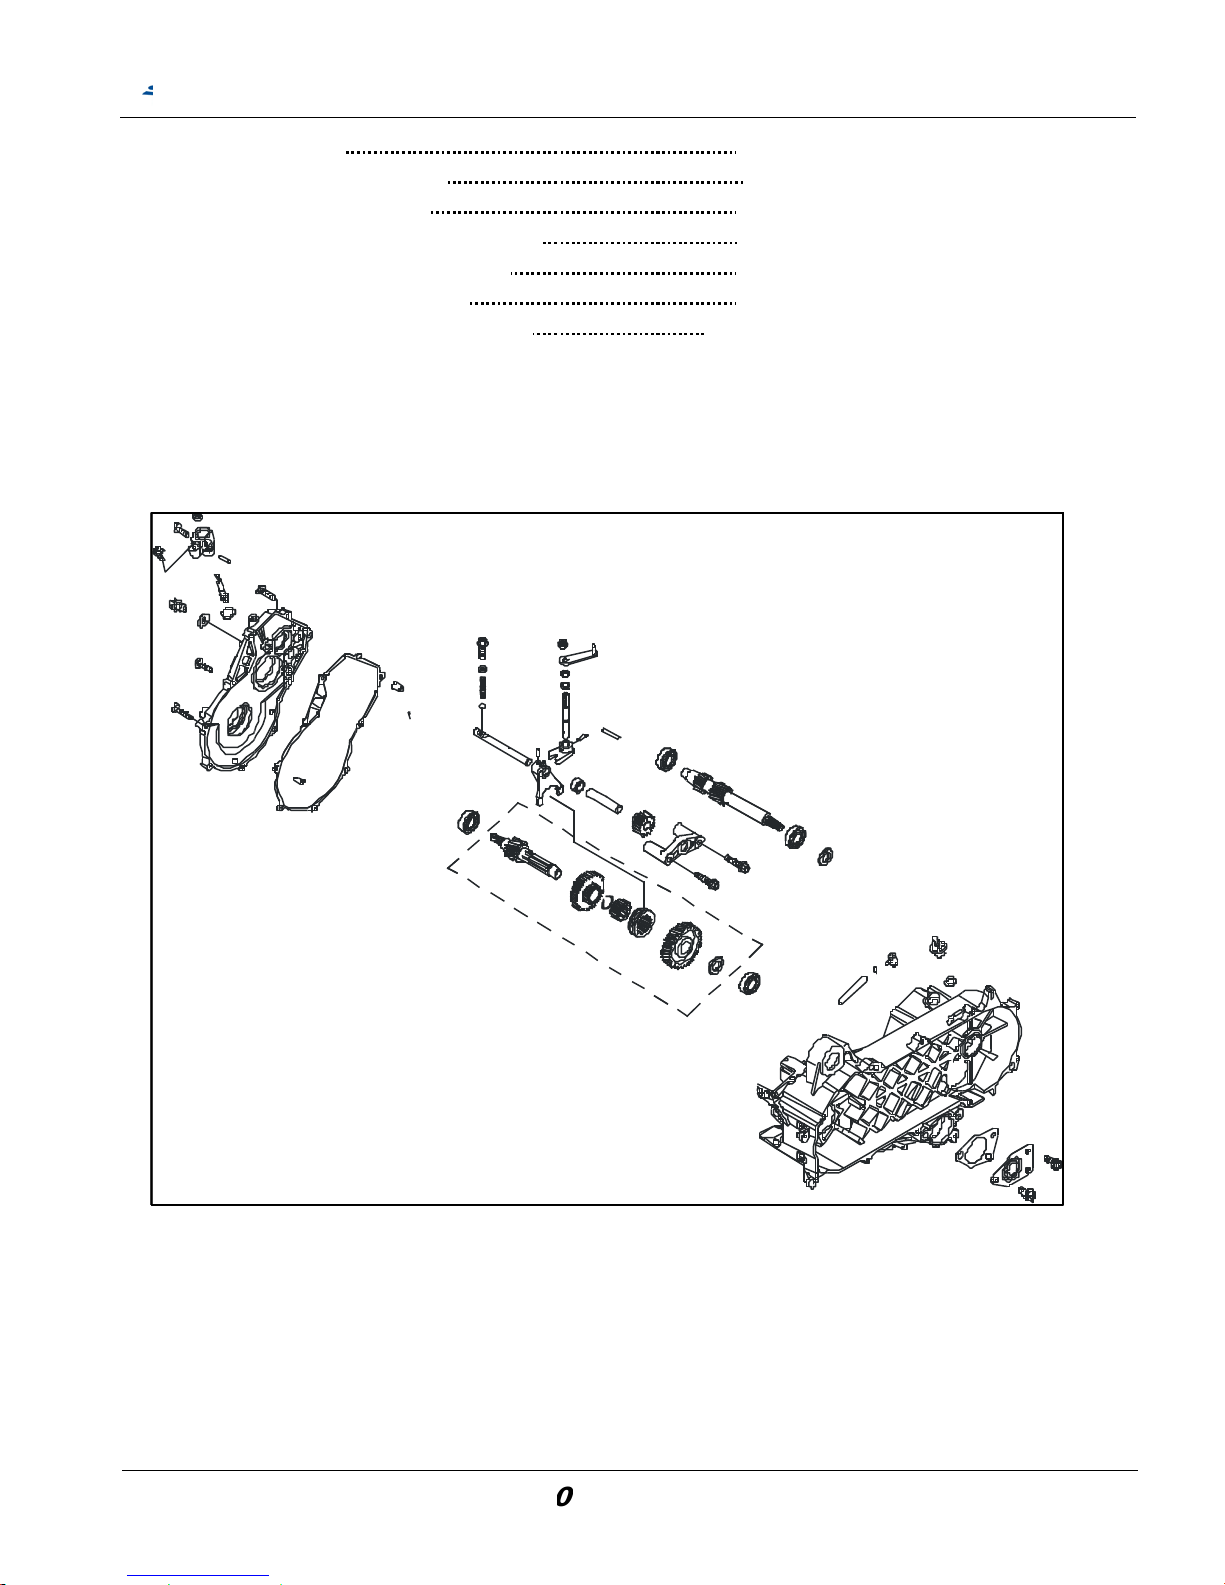
10
-10-10-10-10-10-10-
10
-
01. Mec
h
02. Mai
n
03. Tro
u
04. Tra
n
05. Tra
n
06. Bea
r
07. Tra
n
01. Me
c
anism
tenanc
e
ble Dia
g
smissio
smissio
ing Rep
smissio
hanism
SM
C
Notice
nosis
n Disas
s
n Inspe
c
laceme
n
n Reass
Diagra
m
ATV 5
0
embly
tion
t
embly
/10
0
S
ervice
M
79
80
80
81
82
83
83
anua
l
Chapter 10 Transmi
s
-
7
sion Gear
s
9 -
Page 84
10
-
Thi
sRem
-
E-C
S
p
It
e
OID
S
T
o
G
eGe
B
o
B
oBo
T
oSp
B
eNeDrDrInn
1
0
E
n
N
o
G
e
02. Mai
n
Section
c
ove follo
w
ngine re
m
VT syste
m
ecifica
m
D of shift
of shift f
o
hift fork cl
rque val
u
ar oil drai
n
ar oil fill b
lt for tran
s
lts for idle
lts for dri
v
ols
ecial t
o
o
aring driv
e
edle bear
i
ive shaft
a
ive shaft
p
er bearin
g
-03. Tro
gine ca
n
Damag
e
Burnt o
u
Damag
e
ise
Worn o
r
Worn g
e
ar oil l
e
a
Excessi
v
Worn o
r
tenanc
e
oncerns
d
ing com
p
ove
tion
fork shaft
rk
aw thickn
e
e
bolt:
olt:
0
mission c
a
gear seat
e axle co
v
ls
ng driver
nd oil sea
l
uller:
puller
uble D
i
a
be start
e
d drive g
e
t drive ge
a
d gear sh
burnt gea
ar
ks
e gear oil
damage
o
SM
C
Notice
isassemb
l
onents be
ss
1.8kgf-m/
1
.3 kgf-m/
3
se cover:
(for spee
d
er: 1.2kgf
-
driver
gnosis
d but
v
e
ar
r
ift system
r
.
il seal
ATV 5
0
y-assemb
fore disas
s
c
h
S
8Nm
Nm
1.2kgf-m/
ometer g
e
m/12Nm
hicle c
a
n
/10
0
S
ly of the tr
a
embling
c
apter 3
ection 7
S
t
13.
9
14.
05.9
12Nm
ar):
not mo
v
ervice
M
nsmissio
n
rankcase.
andard v
a
84~14.00
00~14.01
30~6.000
e
.
anua
l
Chapter 1
0
gears fo
r
lue
mm
mm
mm
Transmi
s
repair pu
Limi
13.9
14.0
5.7
3
-
sion Gear
s
pose.
t (mm)
66 mm
34 mm
0 mm
80 -
Page 85
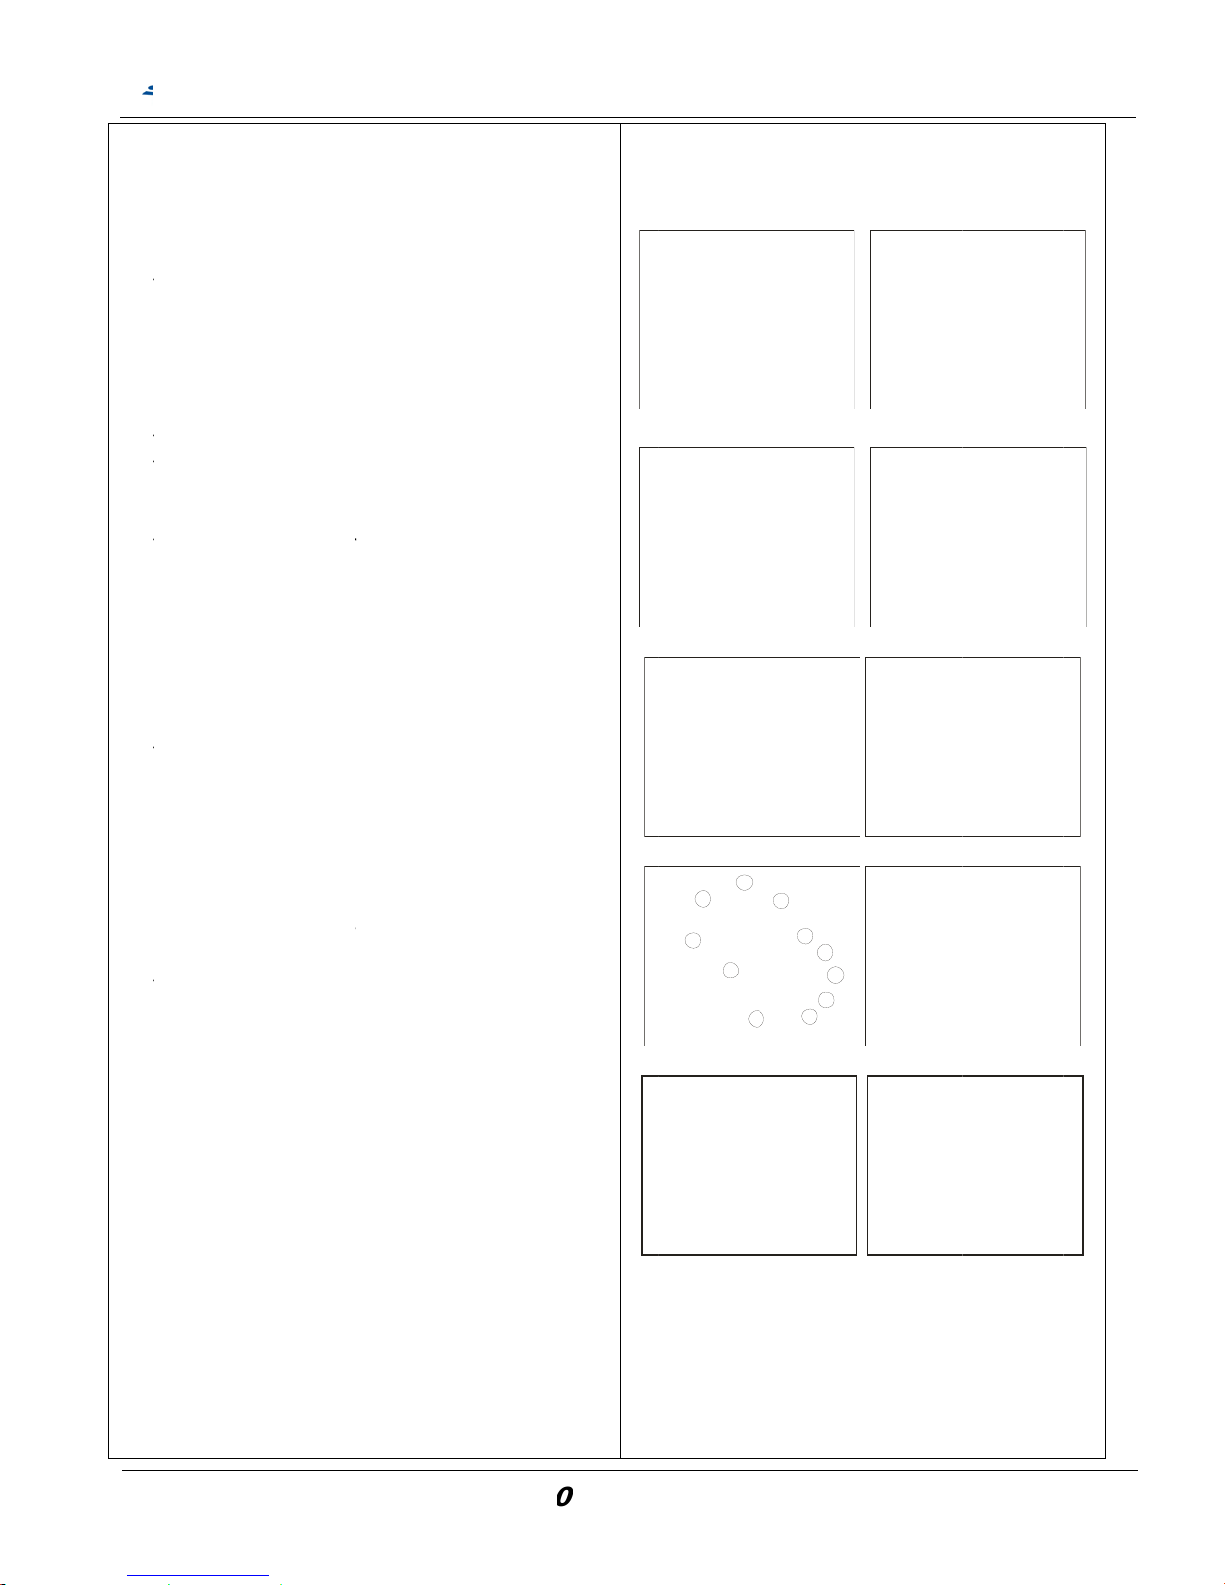
10
-
a.
1.
t
Tor
2.
f
f
3.
t
4.
f
5.
t
6.
04.Tran
ransmis
s
Remove t
h
ransmissi
gear oil. A
f
que:
Remove t
h
rom trans
ixing bolt.
Screw out
he compr
e
shift fork
s
Remove t
h
rom the g
Remove t
h
gear box
c
ransmissi
Remove t
h
crankcas
e
smissio
n
ion cov
e
e drain b
o
on cover
a
ter drain
o
e speedo
mission c
a
the flang
e
ssion sp
r
haft.
e flange
n
ear shift c
a
e 11 scre
w
over and
t
on case c
o
e gasket
a
.
SM
C
Disass
e
r remova
l
lt on the
b
nd then d
r
ut the oil,
meter gea
se cover
b
bolt, was
h
ing, steel
b
ut and ge
a
m axle.
s on the
hen open
ver.
nd dowel
ATV 5
0
mbly
ottom of t
h
ain out th
e
ighten th
e
r body/ge
a
y loosen
t
er and re
m
all for ge
a
r shifting
transmissi
the
pin from l
e
/10
0
S
e
bolt.
he
ove
r
lever
on
ft
ervice Manua
l
Chapter 1
0
Transmi
s
-
sion Gear
s
81 -
Page 86
ion gear
s
chain sp
e dowel
p
hift fork t
o
.
primary
d
e main a
x
ase (hol
d
or speed
e 2 flang
e
idle gear,
r.
ear or da
m
smissio
function
fork, shift
ear and tr
and chec
k
gears, s
h
age.
SM
C
remova
l
rocket dri
v
in from g
e
ward the
t
rive gear
le assem
b
er) and i
d
ometer g
e
bolt from
idle gear
p
age.
n Gear I
n
of main a
x
the dog c
l
ansmissio
n
if smoot
h
aft, shift
f
ATV 5
0
e axle ( fi
n
ar shift ca
op of
ly and shi
f
le gear
ar)
idle gear
b
in and idl
e
specti
o
le assy wi
utch towa
r
gear
ly.
ork if
/10
0
S
al
m
ft
ase
n
th
d
ervice Manua
l
Chapter 10 Transmi
s
-
sion Gear
s
82 -
Page 87
10
-cas
a.
1.
2.
t
3.
w
b.
10
-
ge
a
1.
2.
3.
t
06. L. C
r
e cove
r
Inspection
Screw out
cover and
gasket, ch
damage.
Check the
ransmissi
smoothly
w
Check the
drive gear
ith new i
f
Bearing &
Use the b
e
installer t
o
07 Inst
a
rs.
Check the
smoothly.
Install the
Install the
he shift w
ankcas
e
the 3 flan
g
remove d
r
eck the oi
l
bearings
o
on case c
o
ithout ro
u
oil seals
o
if oil leaki
n
necessa
r
seal rem
o
aring re
m
replace t
h
llation
o
gear shift
primary d
r
main axle
ork with d
o
SM
C
/ Tran
s
e bolt on
ive axle c
o
seal, if oil
n the left
ver, turn
a
gh feeling
n the driv
e
g or dam
a
y
val and in
s
over/insta
l
e bearing
f trans
m
cam axle
ive gear
assy with
g clutch.
ATV 5
0
mission
the drive
a
ver and
leaking o
r
crankcas
e
nd check
.
axle, pri
m
ge. Repl
a
tall
ler and oil
and seal.
ission
if turn
shift folk.
A
/10
0
S
xle
and
if
ary
ce
seal
lign
ervice Manua
l
Chapter 1
0
Transmi
s
-
sion Gear
s
83 -
Page 88
4.
A
5.
6.
To
r
7.
t
To
r
8.
9.
A
Tor
10.
To
r
lign the
g
and then i
n
cam axle.
Install the
Install the
screws.
que: 1.2k
g
Install the
ighten wit
que: 1.2k
g
Install the
lign the
g
position a
n
que: ???
Fill in the
g
que of oil
ear shift
c
stall the
d
(final) driv
transmiss
i
-m/12N
m
drive axle
h bolts.
-m / 12
N
gear shifti
n
ear shift l
e
d then tig
ear box o
bolt: 0.3
SM
C
am with g
e
owel pin
o
e shaft wit
on gear c
o
cover wit
h
m
g lever a
n
ver for F/
N
hten the b
o
il and tigh
t
kgf-m/3 N
ATV 5
0
ar shift f
o
nto gear
s
h sprocke
t
ver with
gasket a
n
d grease
/R gear
lt.
en the oil
m
/10
0
S
rk,
hift
.
d
it.
bolt.
ervice Manua
l
Chapter 1
0
Transmi
s
-
sion Gear
s
84 -
Page 89

N
O
TE:
SMC ATV 50/10
0
S
ervice Manua
l
Chapter 10 Transmi
s
-
sion Gear
s
85 -
Page 90
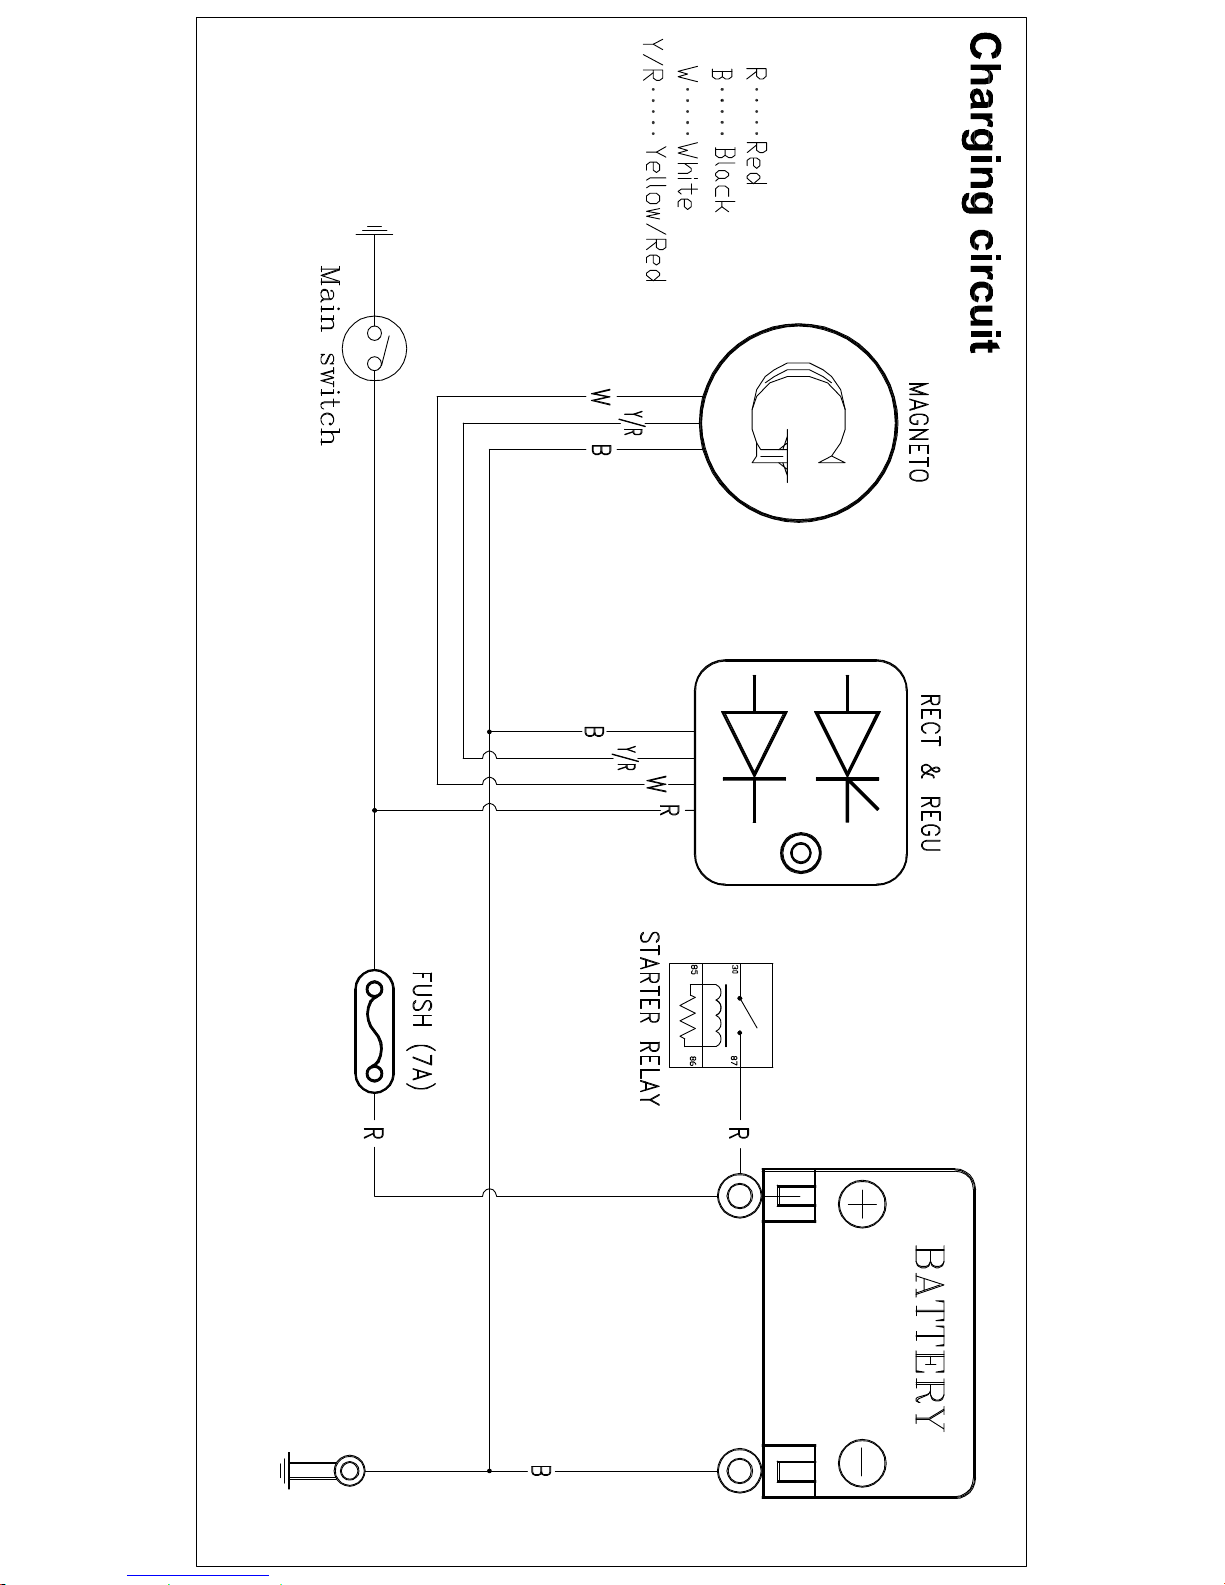
Page 91
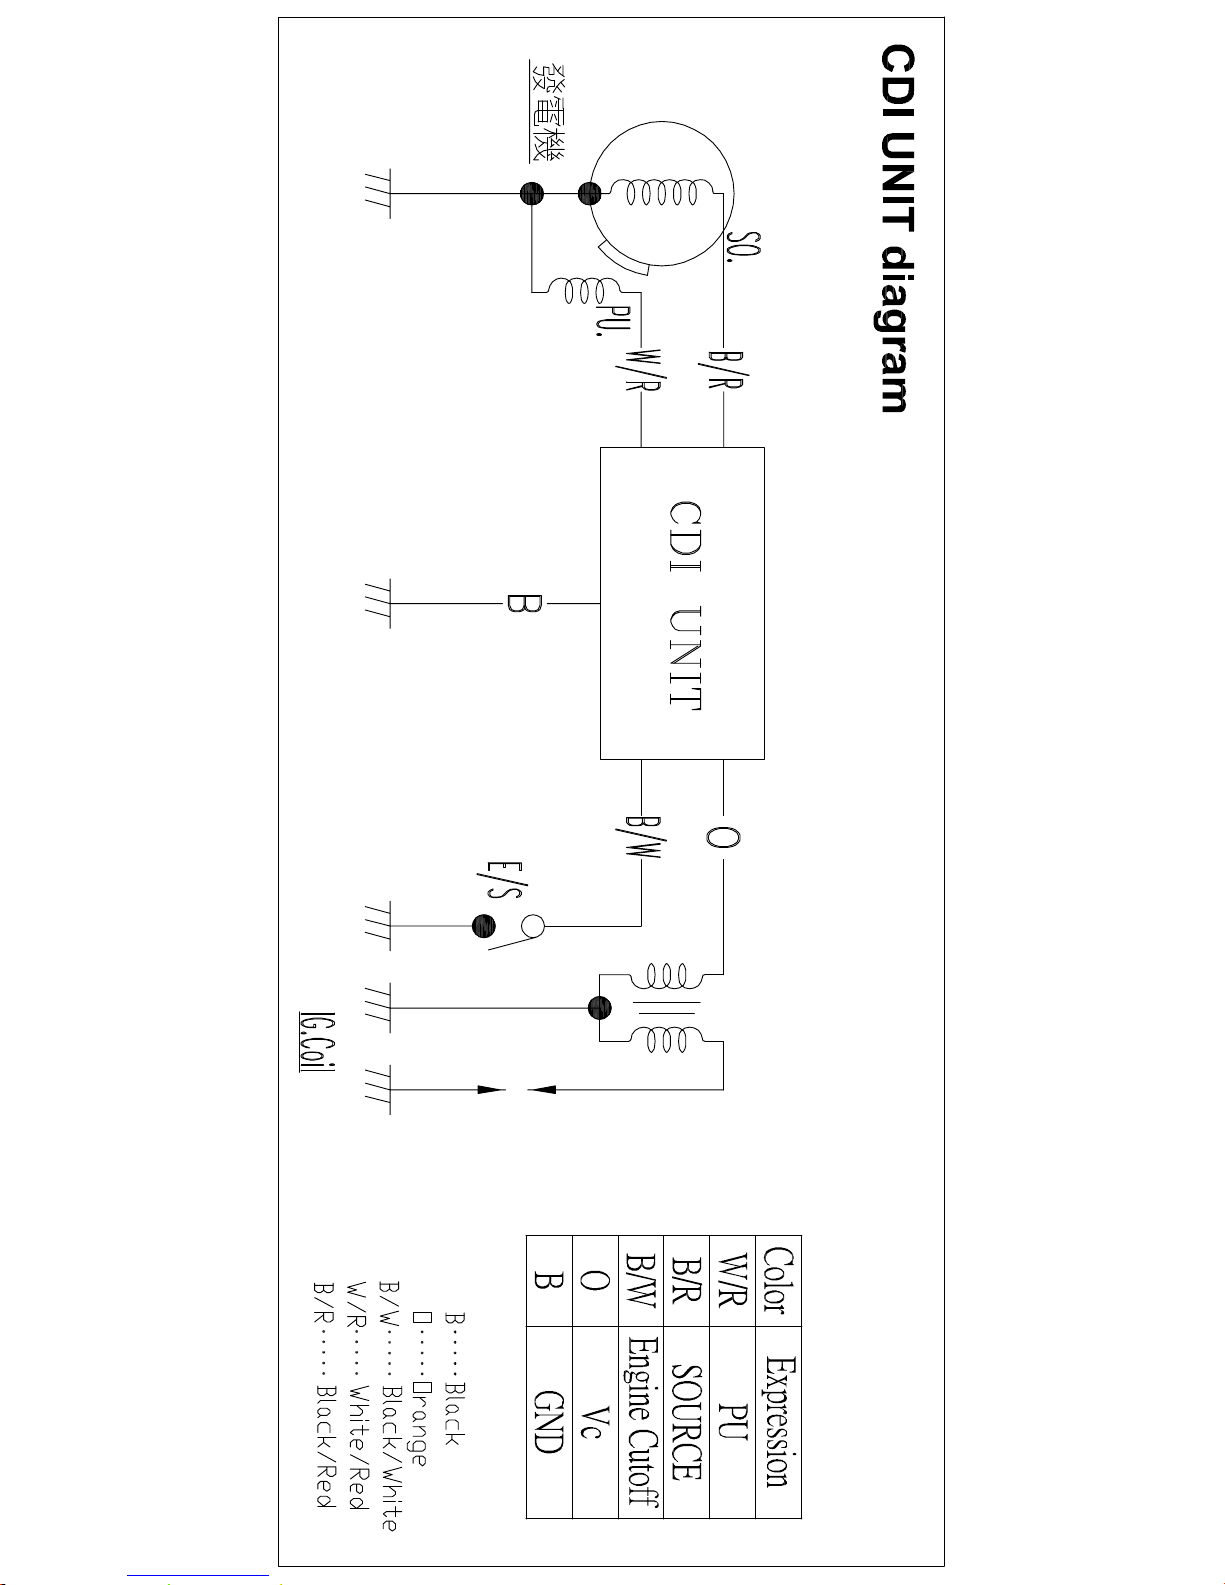
Page 92
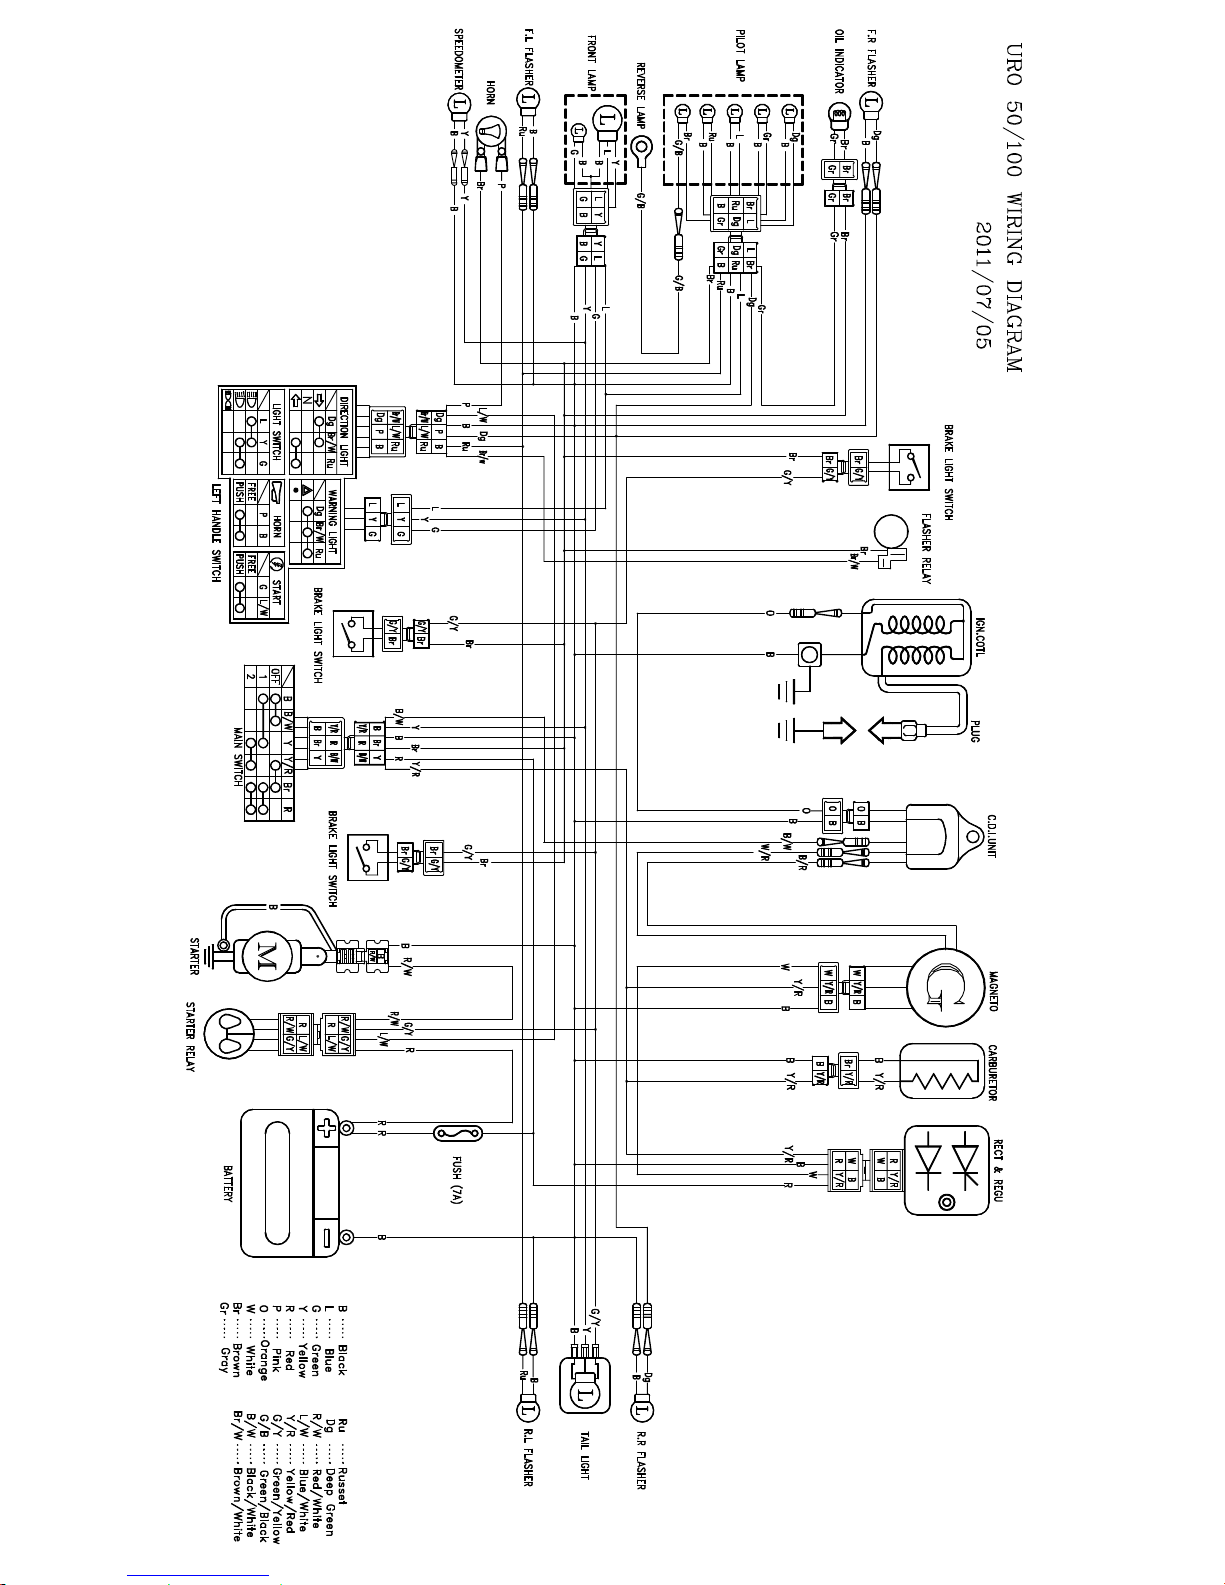
Page 93
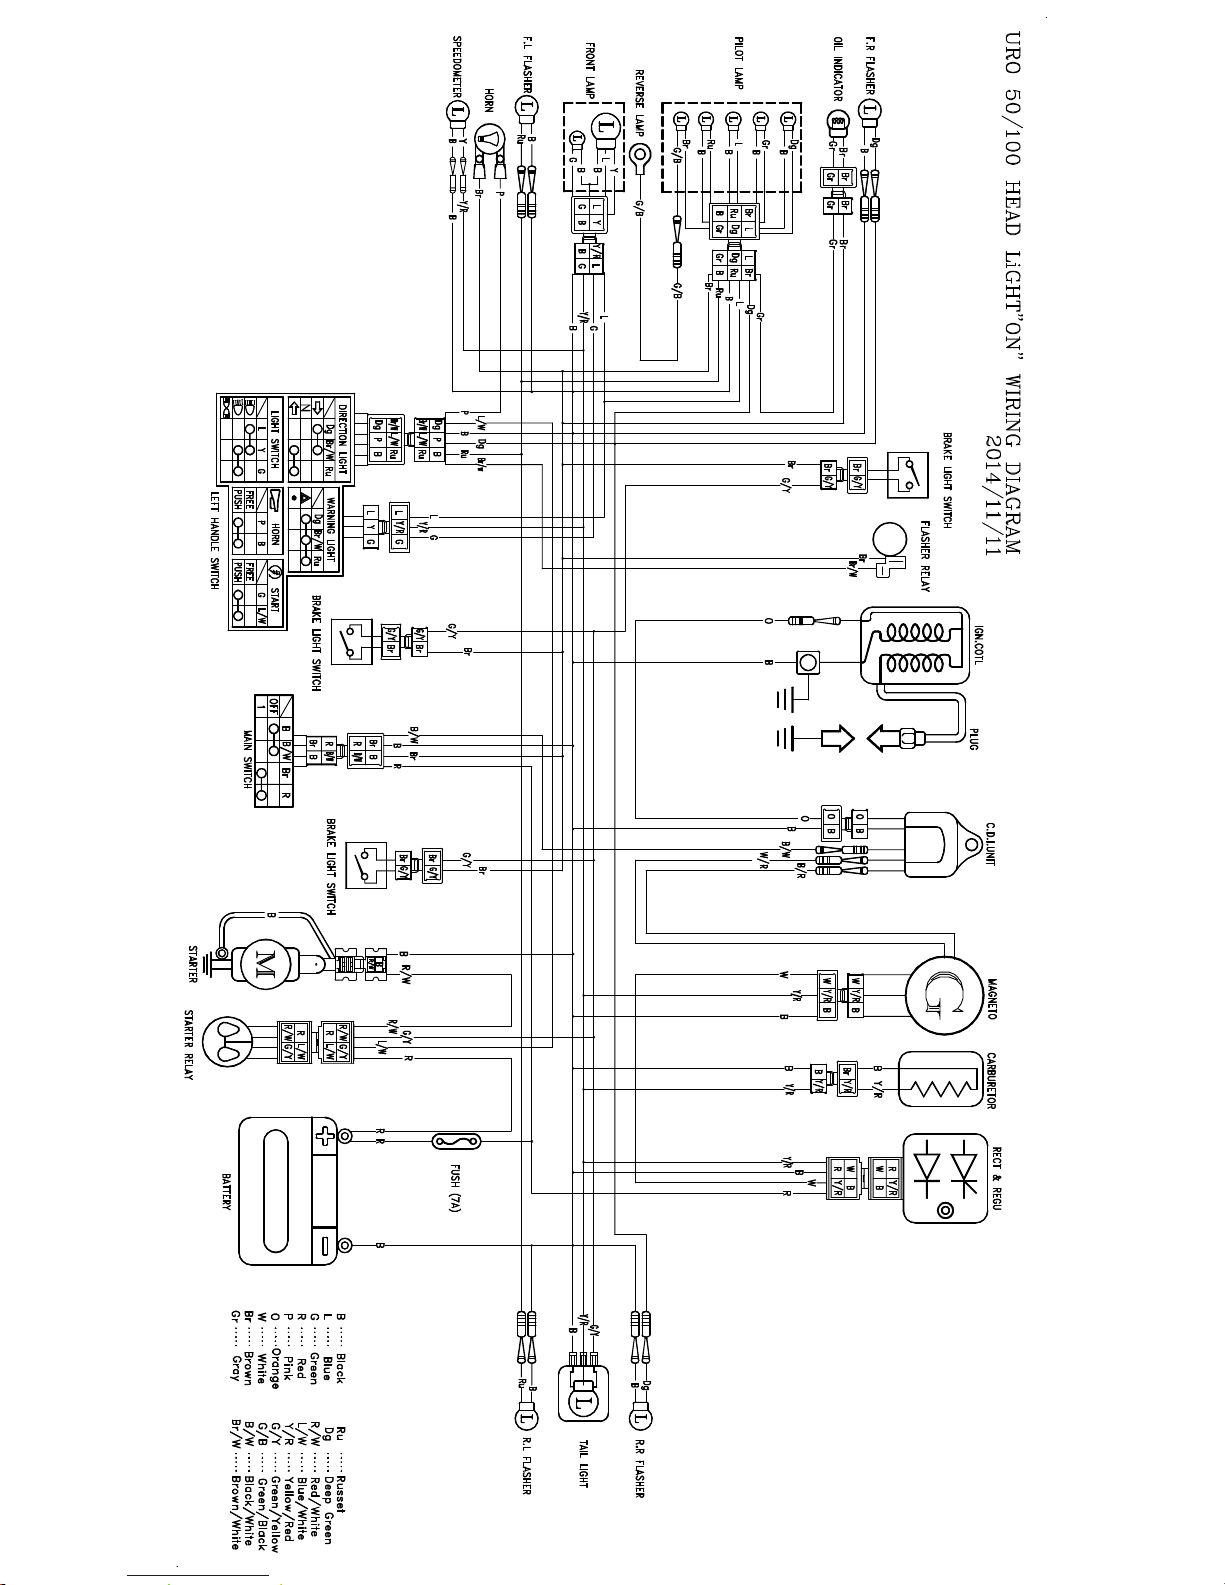
 Loading...