

SMC Networks 7204BRB,SMC7204BRB Quick Installation Manual

SMC7204BRB
4-port ADSL Router with
built-in ADSL Modem (Annex B)
Model Number: SMC7204BRB
Quick Installation Guide
Guide d’installation rapide
Guía de inicio rápido
Beknopte installatiehandleiding
Manual de instalação rápida
4-port ADSL Router with built-in ADSL Modem
Routeur ADSL 4 ports avec modem ADSL intégré
Router ADSL de 4 puertos con módem ADSL integrado
4-poorts ADSL-router met ingebouwde ADSL-modem
Router ADSL de 4 Portas com Modem ADSL Integrado

English
2
•One ADSL Barricade
TM
.
•One Power adapter.
•One RJ-45 Ethernet cable.
•One RJ-11 Standard phone/DSL line cable.
•One Installation utility and Documentation CD.
• Quick Installation Guide.
Note: ADSL splitters/microfilters are included with some models.
Package Contents
English 2 - 21
Deutsch 22 - 41
Français 42 - 61
Español 62 - 81
Nederlands 82 - 101
Português 102 - 121
Front Panel
English
4
Hardware Description
TM
, you must have
LED Label
Color Status
Green Steady
Green Blink
Yellow Steady
Yellow Blink
OFF
Power
Green
Power On
N/A
N/A
N/A
Power Off
Link
Green
ADSL line
is trained.
Training
N/A
N/A
No
Connection
TX/RX
Green
DSL Transmitting/
Receiving
TX/RX
N/A
N/A
No TX/RX
Ethernet
1 2 3 4
Green / 100 Mbps
Yellow / 10 Mbps
Link
Transmitting/
Receiving
Link
Transmitting/
Receiving
No Connection

English
6
This Quick Installation Guide provides basic instructions for
connecting the ADSL BarricadeTMto a computer or LAN and to the
Internet.
• Section 1 describes how to set up the hardware.
• Section 2 describes how to configure Internet properties on
your computer(s).
• Section 3 shows you how to configure ISP settings using
Auto Setup utility.
This Guide assumes that you have already established an ADSL
service with your Internet service provider (ISP). These
instructions provide a basic configuration that should be
compatible with your home or small office network setup.

English
8
TM
.
TM
, attach one
TM
. If you are using the
Step 3. Attach the power connector
Connect the AC power adapter to the Power connector on the back
of the device and plug in the adapter to a wall outlet or power
strip.
Step 4. Power up your systems
Turn on and boot up your computer(s) and any LAN device such
as hubs or switches.

10
English
3. In the [LAN or High-Speed Internet] window, right-click on
the icon corresponding to your network interface card (NIC)
and select [Properties]. (Often, this icon is labeled [Local
Area Connection].) The [Local Area Connection] dialog box
displays a list of currently installed network items.
4. Ensure that the check box to the left of the item labeled
[Internet Protocol TCP/IP] is checked, and click [Properties].
5. In the [Internet Protocol (TCP/IP) Properties] dialog box,
click the radio button labeled [Obtain an IP address
automatically]. Also click the radio button labeled [Obtain
DNS server address automatically].
6. Click [OK] twice to confirm your changes, and close
the [Control Panel].
TM
.
TM
automatically assigns all required

English
12
4. If [Internet Protocol (TCP/IP)] does not appear as
an installed component, click [Install…].
5. In the [Select Network Component Type] dialog box,
select [Protocol], and then click [Add…].
6. Select [Internet Protocol (TCP/IP)] in the [Network Protocols]
list, and then click [OK]. You may be prompted to install files
from your Windows 2000 installation CD or other media.
Follow the instructions to install the files.
7. If prompted, click [OK] to restart your computer with the new
settings. Next, configure the PCs to accept IP information
assigned by the ADSL Barricade
TM
.
8. In the [Control Panel], double-click the [Network and Dial-up
Connections] icon.

English
14
Windows 98/Me/SE
1. In the Windows task bar, click the [Start] button,
point to [Settings], and then click [Control Panel].
2. Double-click the [Network and Dial-up Connections] icon.
3. In the [Network and Dial-up Connections] window, right-click
the [Network] icon, and then select [Properties]. The [Network
Properties] dialog box displays a list of currently installed
network components. If the list includes [Internet Protocol
(TCP/IP)], then the protocol has already been enabled. Skip to
Step 11.

English
16
16
9. In the [Control Panel], double-click the [Network and Dial-up
Connections] icon.
10. In the [Network and Dial-up Connections] window, right-click
the [Network] icon, and then select [Properties].
11. In the [Network Properties] dialog box, select [TCP/IP],
and then click [Properties].
12. In the [TCP/IP Settings] dialog box, click the radio button
labeled [Server assigned IP address]. Also click the radio
button labeled [Server assigned name server address].
13. Click [OK] twice to confirm and save your changes,
and then close the Control Panel.
Note: For Windows 95 and NT, please see the installation
instructions in the User Guide contained on the CD Rom.
TM
.
English
18
TM
for your ISP.
TM
for your ISP.
TM
4. Select your country from the drop down list, then click [Next]
to continue. If your country is not listed, click [Custom] and
skip to section Custom.
5. Select your ISP/Network provider from the drop down list, then
click [Next] to continue. If your ISP/Network Provider is not
listed, click [Custom] and skip to section Custom.
6. Enter the Username and password supplied by your ISP, then
click [Next] to continue.
Note: You will only be required to enter a username and password if
your ISP uses protocol PPPoA or PPPoE. If your ISP uses
RFC1483 Bridging no further input is required, simply click
[Next] to continue.
If your ISP uses RFC1483 Routed after clicking [Next] you
will be required to enter the IP address, Netmask, Gateway
address, Primary and Secondary DNS address supplied by
your ISP. Click [Next].

English
20
with the settings you have entered. This
Custom
If your Country or ISP is not listed, you will be required to
manually enter your ISP settings. This is done using the option
[Custom]. For custom installation you will also need to know
the following settings supplied by your ISP:
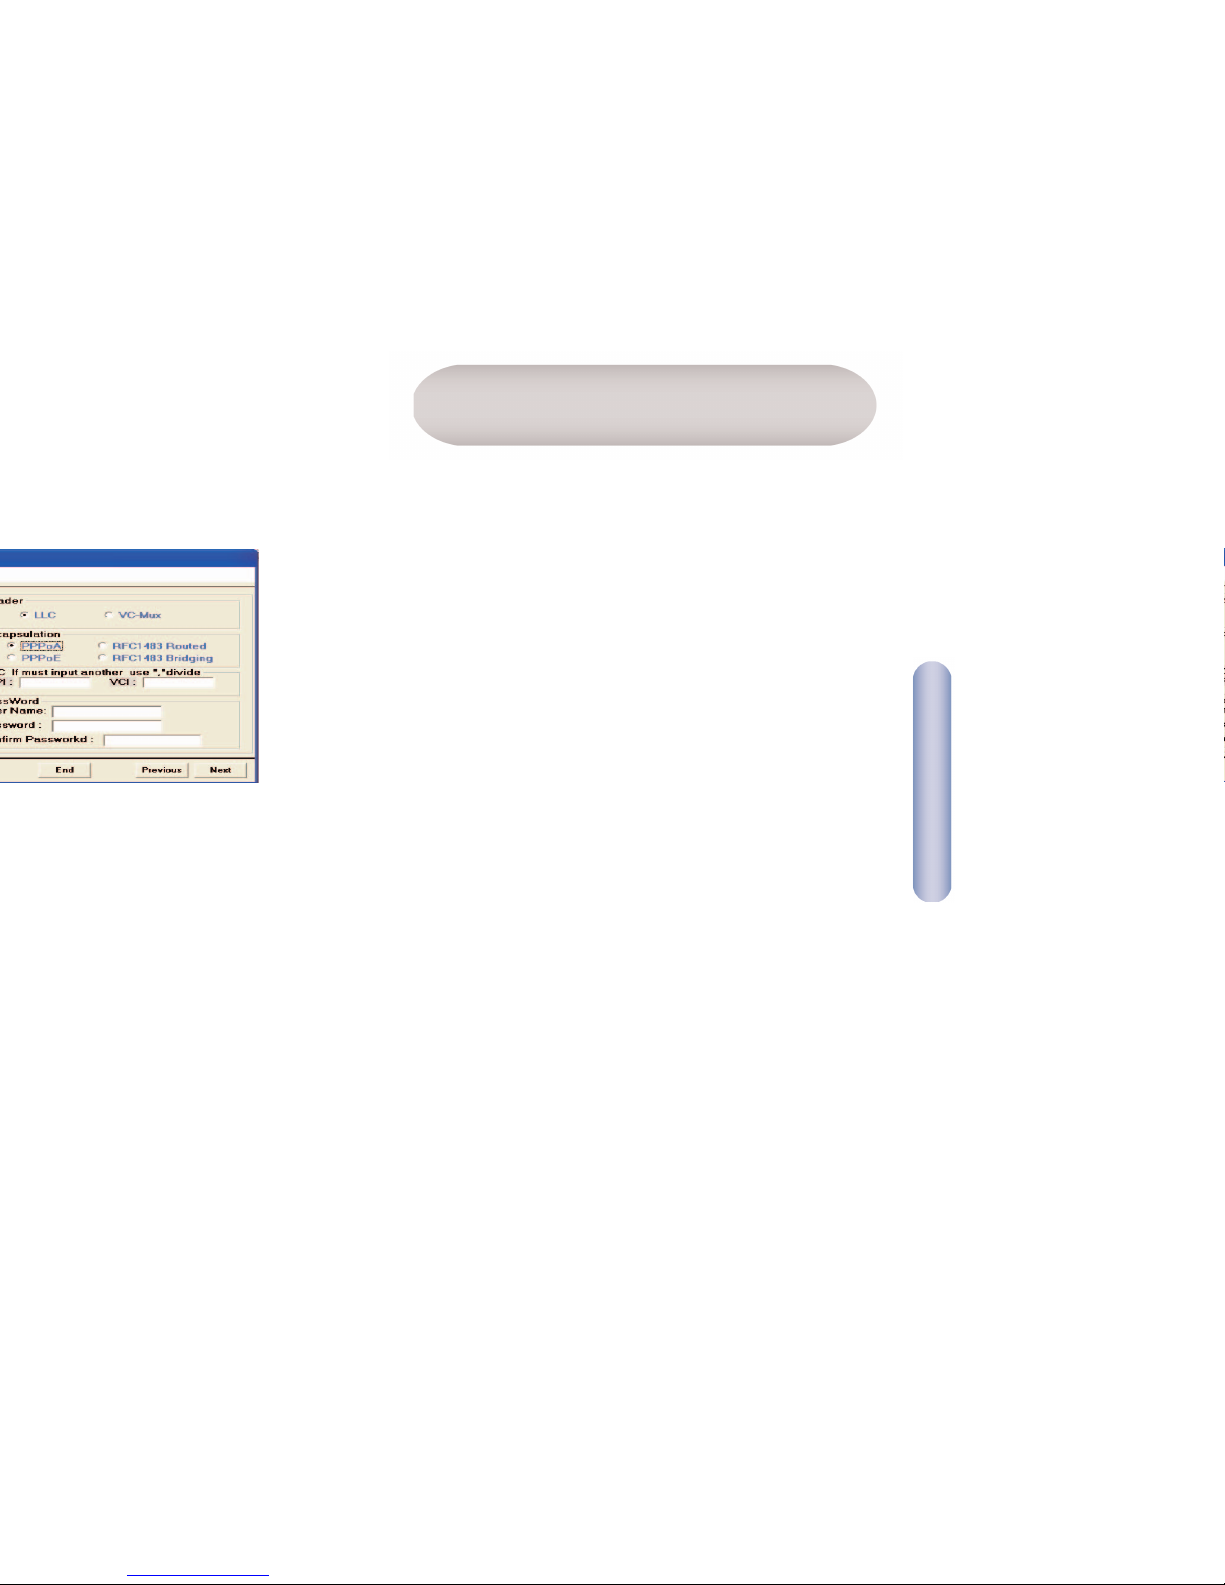
What Protocol? (PPPoA, PPPoE, RFC1483 Bridging
or RFC1483 Routed).
What Encapsulation? (VC-Mux or LLC).
What are the VPI/VCI circuit numbers? E.g. 0/38.
Deutsch
22
• Ein ADSL BarricadeTM.
•Ein Netzteil.
•Ein RJ-45-Ethernet-Kabel.
• Ein standardmäßiges RJ-11-Telefon/DSL-Leitungskabel.
• Eine CD mit Installationshilfsprogramm und Dokumentation.
• Eine Installationskurzanleitung.
Hinweis: Bei einigen Modellen werden ADSL-Splitter/-Mikrofilter
geliefert.
Bei bestimmten Modellen wird ein RJ-11-zu-RJ45-Kabel
mitgeliefert, das eine Verbindung mit einem ISDN-Splitter
ur Herstellung von U-R2-Kompatibilität ermöglicht.
Lieferumfang
Deutsch
24
Vorderseite
HardwarebeschreibungSystemanforderungen
verwenden zu können, müssen Sie über
LEDBeschriftung
Farbstatus
Leuchtet grün
Blinkt grün
Leuchtet gelb
Blinkt gelb
AUS
Netzspannung
Grün
Eingeschaltet
-
-
-
Ausgeschaltet
Link
Grün
ADSL-Leitung
wird verwendet
Herstellung der
Verbindung
-
-
Keine
Verbindun g
TX/RX
Grün
DSL-Senden/
-Empfang
TX/RX
-
-
Kein TX/RX
Ethernet
1 2 3 4
Grün / 100 Mbit/s
Gelb / 10 Mbit/s
Verbindung
Senden/Empfang
Verbindung
Senden/Empfang
Keine Verbindung

Deutsch
26
In dieser Broschüre finden Sie Hinweise für das Anschließen des
ADSL BarricadeTMan einen Computer oder ein LAN und zur
Verbindung des Geräts mit dem Internet.
• In Abschnitt 1 wird das Einrichten der Hardware beschrieben.
• In Abschnitt 2 wird das Konfigurieren der Internet-
Eigenschaften für Ihre(n) Computer beschrieben.
• In Abschnitt 3 lernen Sie, wie die ISP-Einstellungen mit dem
Programm AutoSetup konfigurieren.
Es wird vorausgesetzt, dass Sie bereits über Ihren Internet Service
Provider (ISP) Zugriff auf den ADSL-Service haben. Anhand dieser
Anweisungen kann eine Basiskonfiguration erstellt werden, die mit
Ihrem Heim- oder Kleinunternehmensnetzwerk kompatibel ist.

Deutsch
28
TM
.
TM
zu verbinden, schließen Sie
TM
an.
TM
mit einem Einzel-Computer und
Schritt 3. Anschließen des Netzteils
Verbinden Sie das Wechselstrom-Netzteil mit dem Stromanschluss
an der Rückseite des Geräts und stecken Sie die andere Seite des
Netzteils in eine Wandsteckdose oder Steckerleiste ein.
Schritt 4. Starten des Systems
Schalten Sie den/die Computer ein und starten Sie ihn/sie. Starten
Sie auch andere LAN-Geräte wie Hubs oder Switches.

Deutsch
30
3. Klicken Sie im Fenster [LAN or High-Speed Internet] (LAN
oder Hochgeschwindigkeits-Internet) mit der rechten
Maustaste auf das Symbol, das Ihrer Netzwerkkarte entspricht,
und wählen Sie [Properties] (Eigenschaften). (Dieses Symbol
trägt oft die Bezeichnung [Local Area Connection] (LANVerbindung). Das Dialogfeld [Local Area Connection] (LANVerbindung) zeigt eine Liste der derzeit installierten
Netzwerkobjekte an.
4. Sorgen Sie dafür, dass das Kontrollkästchen links neben dem
Objekt [Internet Protocol TCP/IP] (Internetprotocol TCP/IP]
aktiviert ist, und klicken Sie auf [Properties] (Eigenschaften).
5. Klicken Sie im Dialogfeld [Internet Protocol (TCP/IP)
Properties] (Eigenschaften von Internetprotokoll (TCP/IP)) auf
die Optionsschaltfläche [Obtain an IP address automatically]
(IP-Adresse automatisch beziehen). Klicken Sie ebenfalls auf
die Optionsschaltfläche [Obtain DNS server address
automatically] (Adresse des DNS-Servers automatisch
beziehen).
6. Klicken Sie zwei Mal auf [OK], um Ihre Änderungen zu
bestätigen und die Systemsteuerung zu schließen.
TM
Ihren PCs automatisch

Deutsch
32
4. Wenn [Internet Protocol (TCP/IP)] (Internetprotokoll
(TCP/IP)) nicht als installierte Komponente erscheint, klicken
Sie auf [Install…] (Installieren).
5. Wählen Sie im Dialogfeld [Select Network Component Type]
(Typ der Netzwerkkomponente auswählen) die Option
[Protocol] (Protokoll) und klicken Sie dann auf [Add…]
(Hinzufügen).
6. Wählen Sie [Internet Protocol (TCP/IP)] (Internetprotokoll
(TCP/IP) in der Liste [Network Protocols] (Netzwerkprotokoll]
und klicken Sie dann auf [OK]. Möglicherweise werden Sie
aufgefordert, Dateien von Ihrer Windows 2000-InstallationsCD oder anderen Speichermedien zu installieren. Befolgen Sie
die Anweisungen zum Installieren der Dateien.
7. Wenn Sie dazu aufgefordert werden, klicken Sie auf [OK], um
den Computer mit den neuen Einstellungen zu starten.
Anschließend müssen Sie die PCs so konfigurieren, dass sie
vom ADSL Barricade
TM
zugewiesene IP-Adressen übernehmen.
8. Doppelklicken Sie in der Systemsteuerung auf das Symbol
[Network and Dial-up Connections] (Netzwerk- und DFÜVerbindungen).

Deutsch
34
Windows 98/Me/SE
1. Klicken Sie in der Windows-Task-Leiste auf die Schaltfläche
[Start], wählen Sie [Settings] (Einstellungen) und klicken Sie
dann auf [Control Panel] (Systemsteuerung).
2. Doppelklicken Sie auf [Network and Dial-up Connections]
(Netzwerk- und DFÜ-Verbindungen).
3. Klicken Sie im Fenster [Network and Dial-up Connections]
(Netzwerk- und DFÜ-Verbindungen) mit der rechten Maustaste
auf das Symbol [Network] (Netzwerk) und wählen Sie dann
[Properties] (Eigenschaften). Das Dialogfeld [Network
Properties] (Netzwerkeigenschaften) zeigt eine Liste der
derzeit installierten Netzwerkkomponenten an. Wenn in der
Liste der Eintrag [Internet Protocol (TCP/IP)]
(Internetprotokoll (TCP/IP)) enthalten ist, ist das Protokoll
bereits aktiviert. Fahren Sie in diesem Fall mit Schritt 11 fort.

Deutsch
36
9. Doppelklicken Sie in der Systemsteuerung auf das Symbol
[Network and Dial-up Connections] (Netzwerk- und DFÜVerbindungen).
10. Klicken Sie im Fenster [Network and Dial-up Connections]
(Netzwerk- und DFÜ-Verbindungen) mit der rechten Maustaste
auf das Symbol [Network] (Netzwerk) und wählen Sie dann
[Properties] (Eigenschaften).
11. Wählen Sie im Dialogfeld [Network Properties]
(Netzwerkeigenschaften) die Option [TCP/IP] und klicken Sie
dann auf [Properties] (Eigenschaften).
12. Klicken Sie im Dialogfeld [TCP/IP Settings] (Eigenschaften von
TCP/IP) auf die Optionsschaltfläche [Server assigned IP
address) (Vom Server zugewiesene IP-Adresse). Klicken Sie
ebenfalls auf die Optionsschaltfläche [Server assigned name
server address] (Vom Server automatisch zugewiesene NamensServer-Adresse).
13. Klicken Sie zwei Mal auf [OK], um Ihre Änderungen zu
bestätigen und die Systemsteuerung zu schließen.
Hinweis: Beachten Sie für Windows 95 und NT die
Installationshinweise im Handbuch auf der CD-ROM.
zugewiesene IP-Adressen übernehmen.

Deutsch
38
TM
für
TM
4. Wählen Sie Ihr Land in der Dropdown-Liste und klicken Sie dann
auf [Next] (Weiter), um fortzufahren. Wenn Ihr Land nicht
aufgeführt ist, klicken Sie auf [Custom] (Benutzerdefiniert) und
fahren Sie mit dem Abschnitt Benutzerdefinierte ISP-Angaben
fort.
5. Wählen Sie Ihren ISP/Netzwerkanbieter in der Dropdown-Liste
und klicken Sie dann auf [Next] (Weiter), um fortzufahren. Wenn
Ihr ISP/Netzwerkanbieter nicht aufgeführt ist, klicken Sie auf
[Custom] (Benutzerdefiniert) und fahren Sie mit dem Abschnitt
Benutzerdefinierte ISP-Angaben fort.
6. Geben Sie die von Ihrem ISP gelieferten Angaben für
Benutzernamen und Kennwort ein und klicken Sie dann auf
[Next] (Weiter), um fortzufahren.
Hinweis: Sie müssen nur einen Benutzernamen und ein Kennwort
eingeben, wenn Ihr ISP das Protokoll PPPoA oder PPPoE
verwendet. Wenn Ihr ISP RFC1483 Bridging verwendet,
sind keine weiteren Angaben erforderlich. Klicken Sie nur
auf [Next] (Weiter), um fortzufahren.
Wenn Ihr ISP RFC1483 Routed verwendet, müssen Sie nach
dem Klicken auf [Next] (Weiter) die Werte eingeben, die
Sie von Ihrem ISP für IP-Adresse, Netzmaske, GatewayAdresse sowie primäre und sekundäre DNS-Adresse erhalten
haben. Klicken Sie auf [Next] (Weiter).
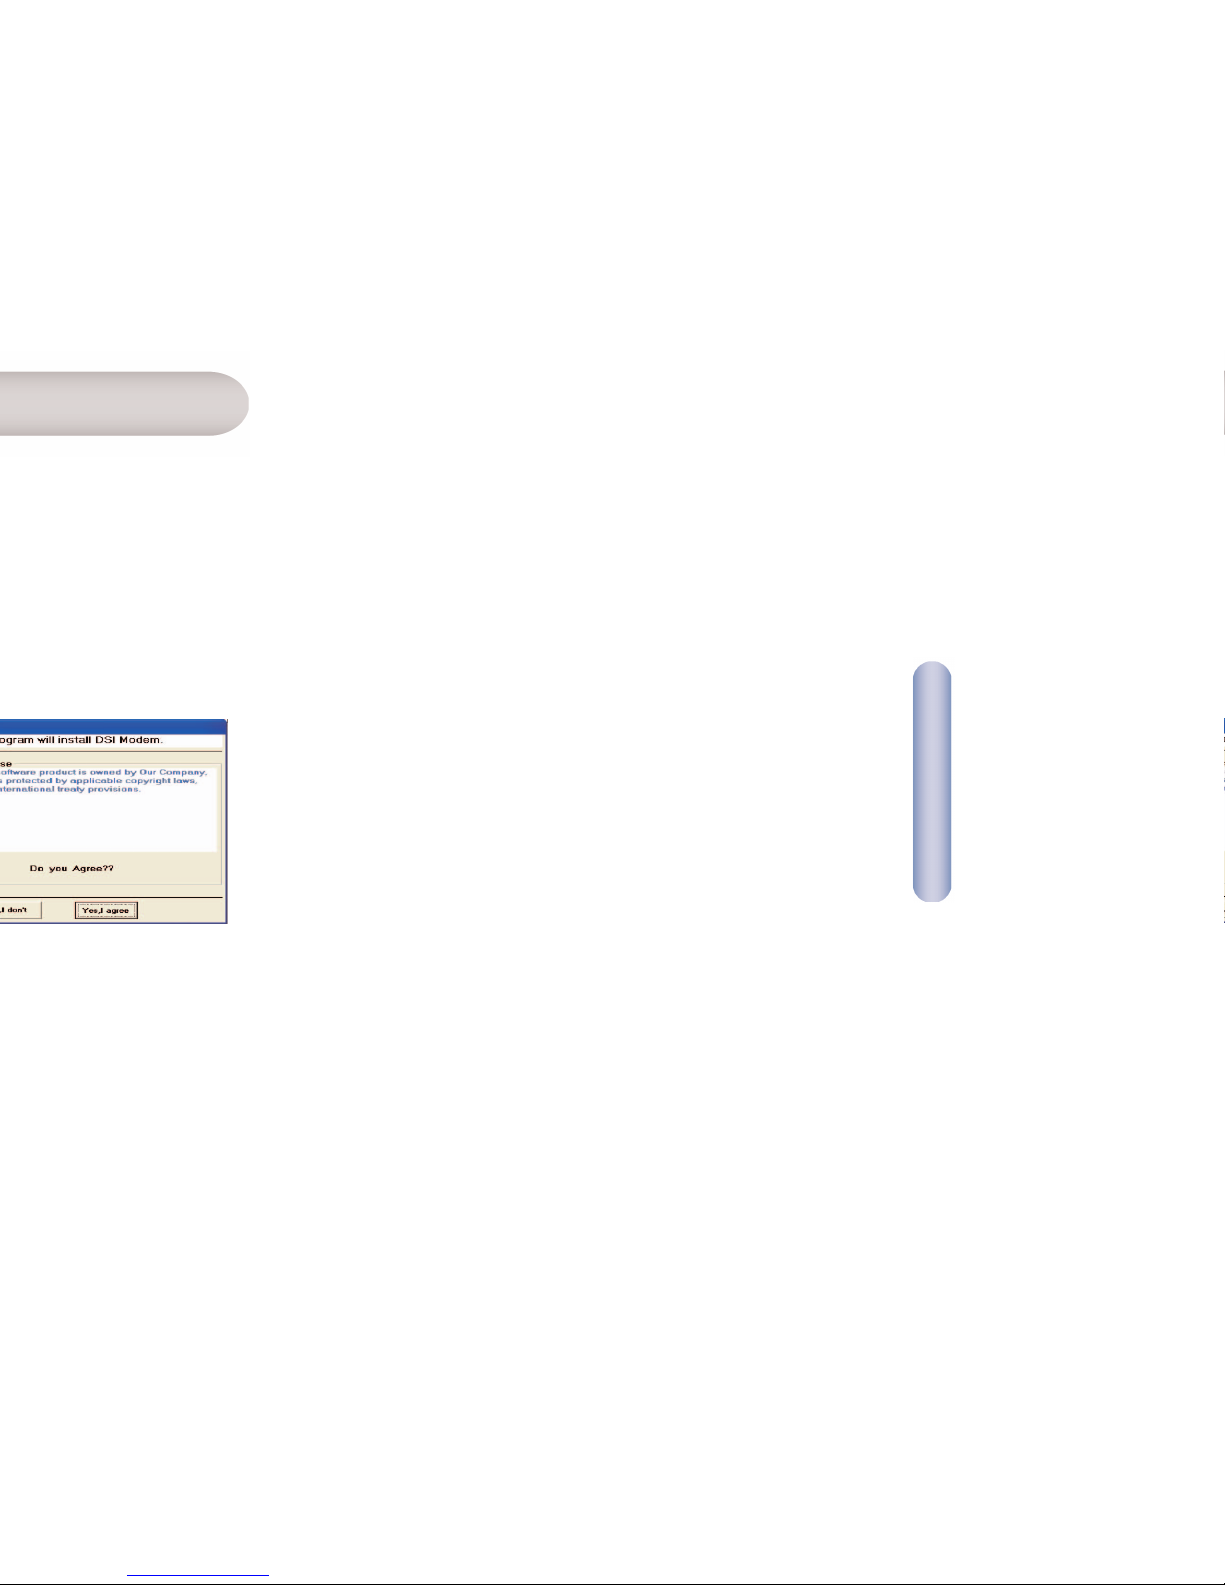
 Loading...