

SMC Networks 7004AWBR - annexe 1, EZ Networking SMC7004AWBR, SMC7004AWBR Quick Installation Manual

Quick Installation Guide
Installationskurzanleitung
Guide d'installation rapide
Guía de inicio rápido
Guida rapida all'avvio
Snabbinstallation
EZ 3-Click Installation - Barricade™2.4GHz 11 Mbps Wireless Cable/DSL Broadband Router with Print Server
EZ 3-Click Installation - Barricade™2,4 GHz 11 MBit/s Wireless Kabel-/DSL-Breitband-Router mit Printserver
Installation EZ 3-Click - Routeur Barricade™sans fil haut débit Câble/DSL 2.4GHz 11Mbps avec serveur d’impression
Instalación EZ 3-Click - Router de banda ancha de cable/DSL con acceso inalámbrico de 2,4 GHz
y 11 Mbps Barricade™con servidor de impresión
Configurazione guidata EZ 3-Click - Router a banda larga wireless via cavo/DSL 2,4GHz 11 Mbps Barricade
™
dotato di Print Server
EZ 3-Click Installation - Barricade™2,4 GHz 11 Mbps trådlös kabel/DSL-bredbandsrouter med skrivarserver
SMC7004AWBR
Barricade™2.4GHz 11 Mbps Wireless
Cable/ DSL Broadband Router with Print Server
Model Number: SMC7004AWBR
Publication Number: 150200006400A
Edition Number: E022002-R01 F1.0
Part Number: 01-750-9819-QIG
Issue: May 2003

BarricadeTM2.4 GHz 11 Mbps Wireless Cable/DSL Broadband
Router with Print Server
SMC7004AWBR
Thank you for choosing the SMC Networks Barricade
™
Wireless
Cable/DSL Broadband Router. This EZ Quick Installation Guide
provides simple setup instructions. For more additional
information, see the manual included on the CD-ROM.
Box Contents:
• One Barricade
™
Wireless Broadband Router
• One Power Adapter
• One Ethernet Cable
• One Quick Installation Guide
• One EZ 3-Click Installation Wizard, Drivers and Documentation
CD-ROM
Before you begin verify the following:
• All of the box contents are included.
• At least one windows-based computer has a CD-ROM Drive*
• You have any additional CAT-5 Ethernet cables required to
connect other computers.
• Each computer has an internal or external Ethernet Network
adapter correctly installed.
• A Cable/DSL modem is installed and the Internet connection
is working on at least one computer.
*Note: A CD-ROM drive is only required if you want to use the EZ 3-Click
Installation Wizard application to configure your Barricade
™
. The process
can be completed manually through the web interface. Directions are
outlined in the manual.
Contents
English
1 2
Step 1... Unpack
Note: If the PC you are
running this installation
utility from has a static IP
address, you will need to
change the IP settings to
DHCP. For information on
how to do this, please see
the manual.
English 2 - 8
Deutsch 9 - 15
Français 16 -22
Español 23 -29
Italiano 30 -36
Svenska 37 -43
Compliances, Copyright & Notes 44 -48
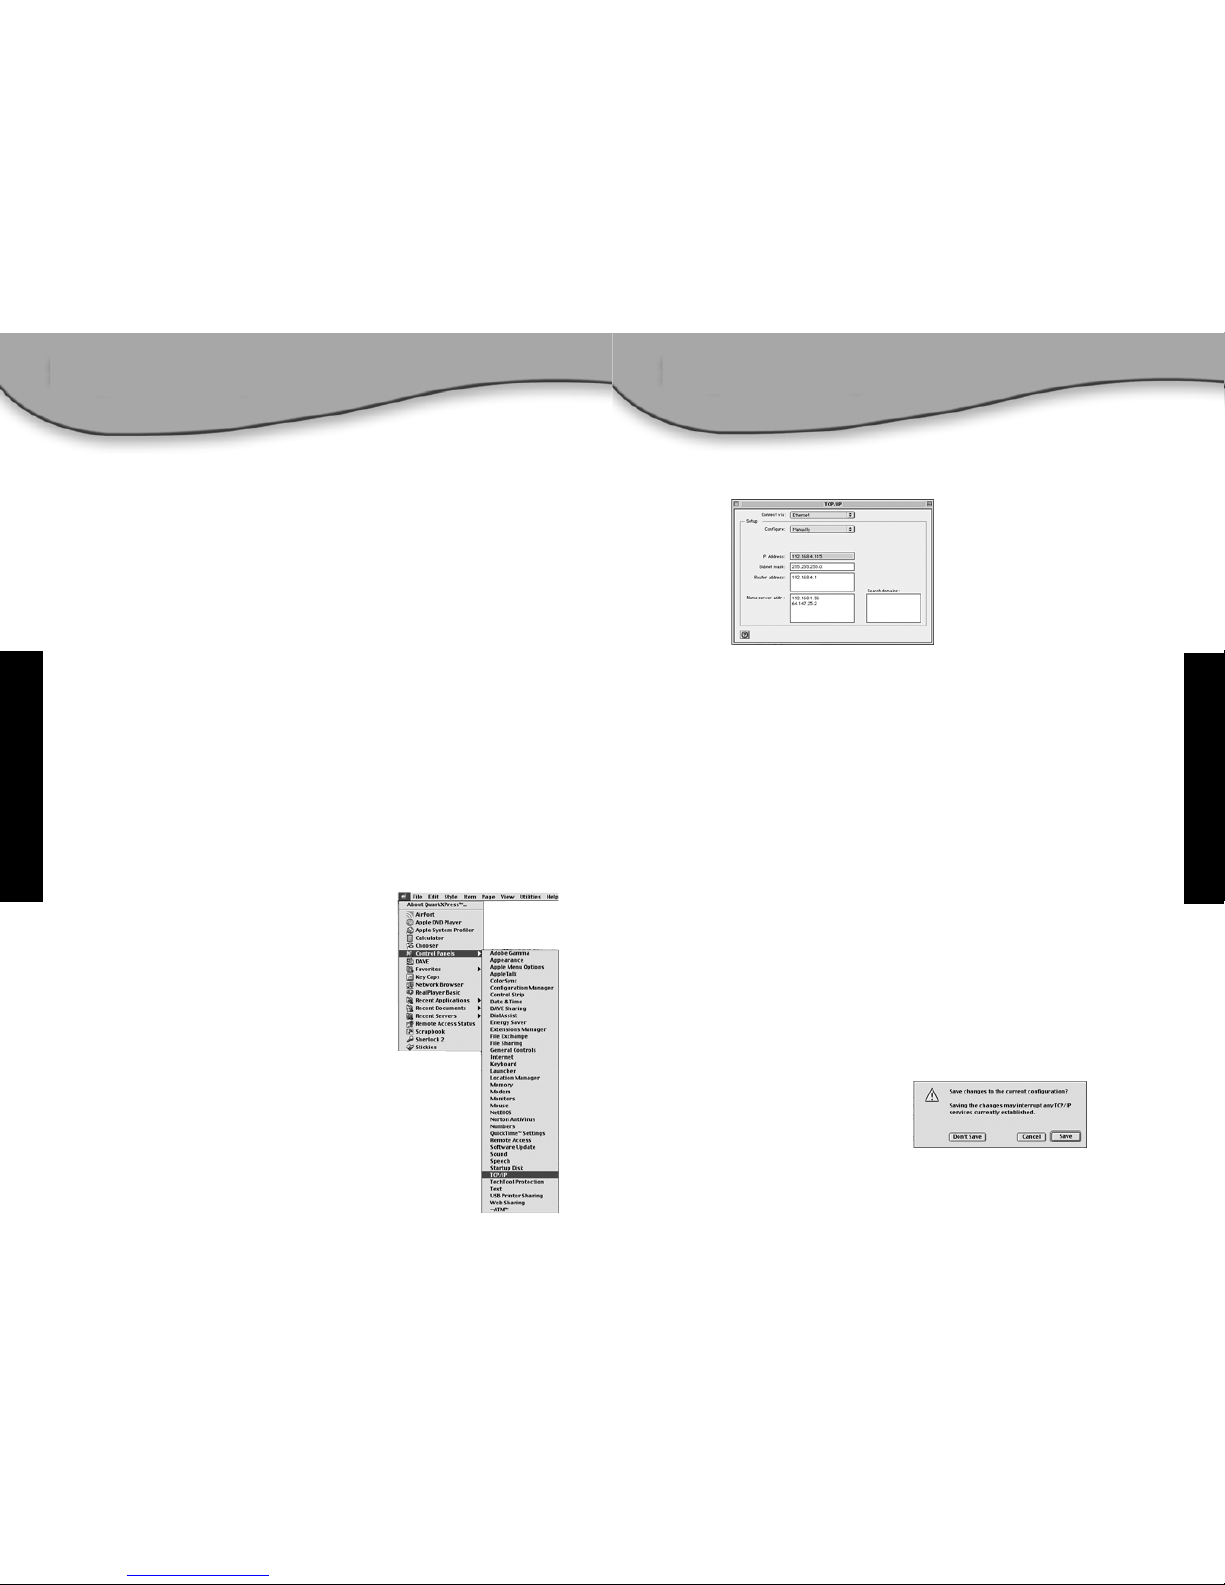
Once you have all of your computers connected, you are ready
to install the EZ 3-Click Installation Wizard.
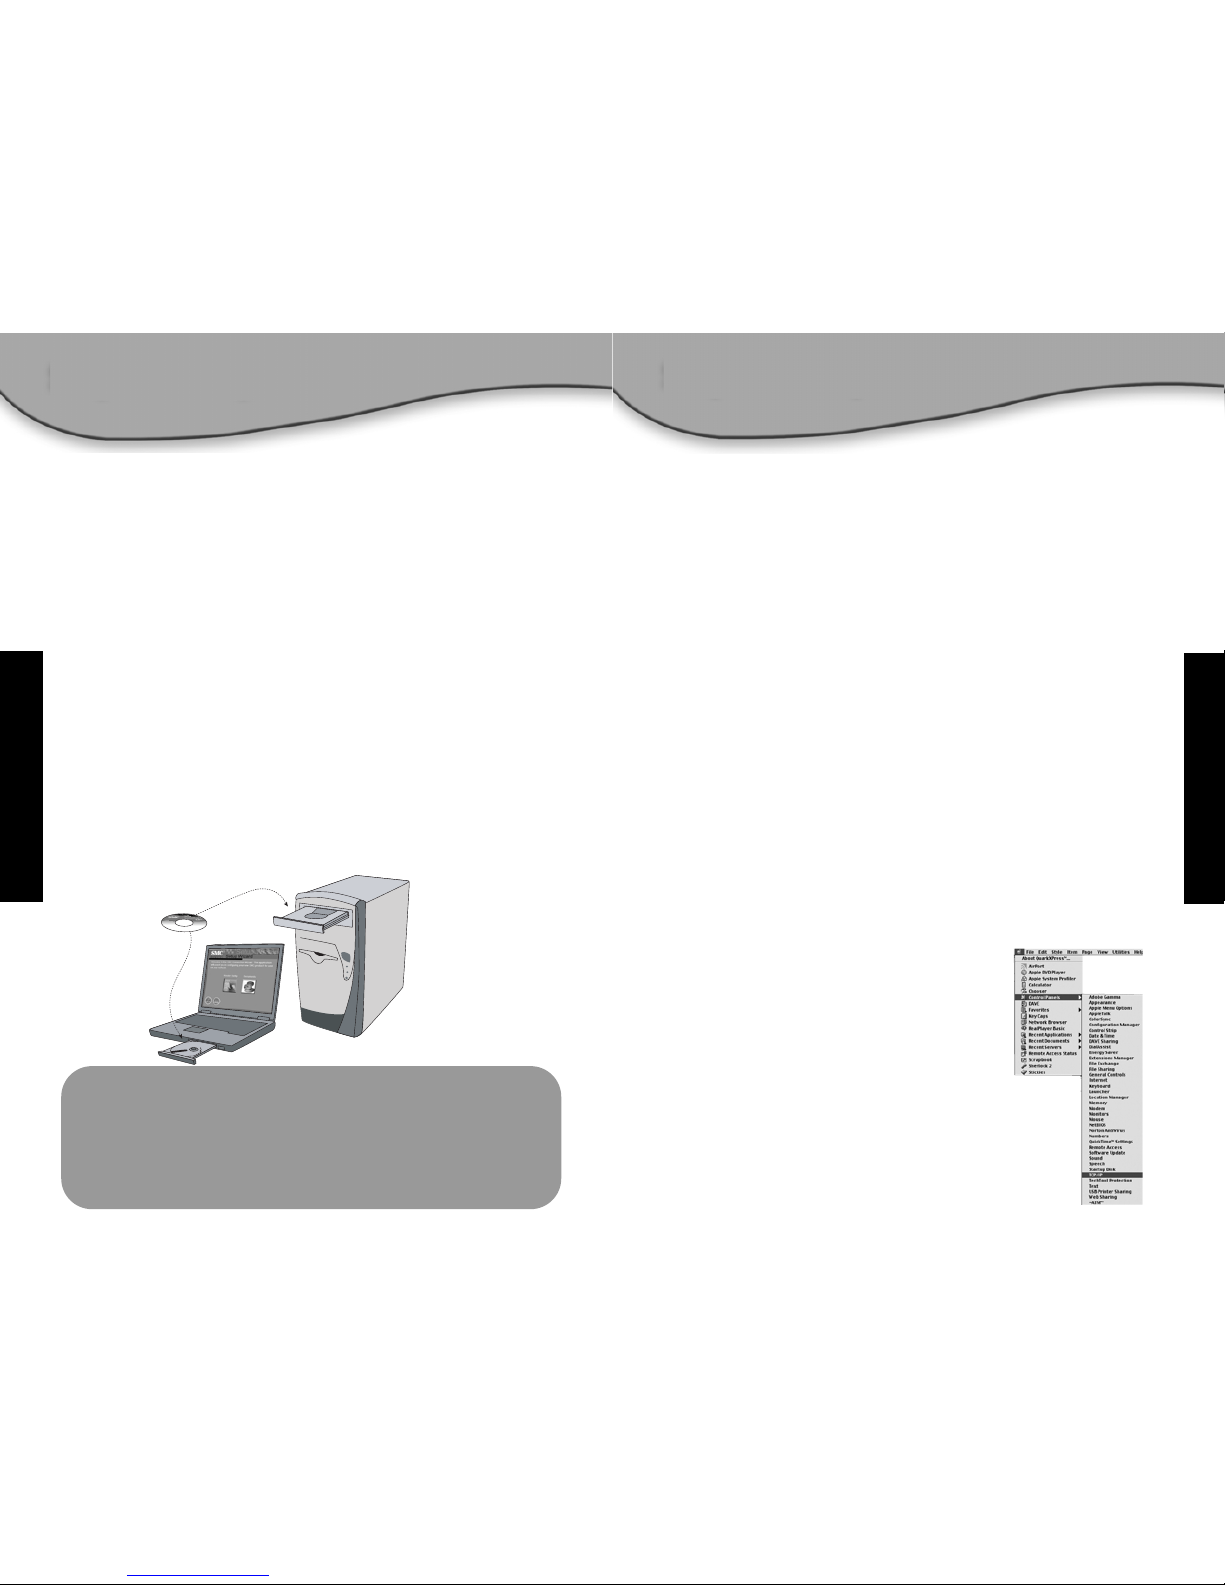
• Remove the CD-ROM from the box.
• If the computer is off, turn it on.
• When the computer boots up, insert the CD-ROM into the
CD-ROM drive of the computer that is connected to the
Barricade
™
.
Note: The screen shown below will appear only if the Autorun feature is
enabled. If the EZ 3-Click Installation Wizard does not start automatically,
follow the steps below to start the program:
1. Double-click the [My Computer] icon.
2. Double-click on CD-ROM or Compact Disc icon to view the
contents of the CD.
3. Click on the [EZ Install] Icon to launch the program.
English
English
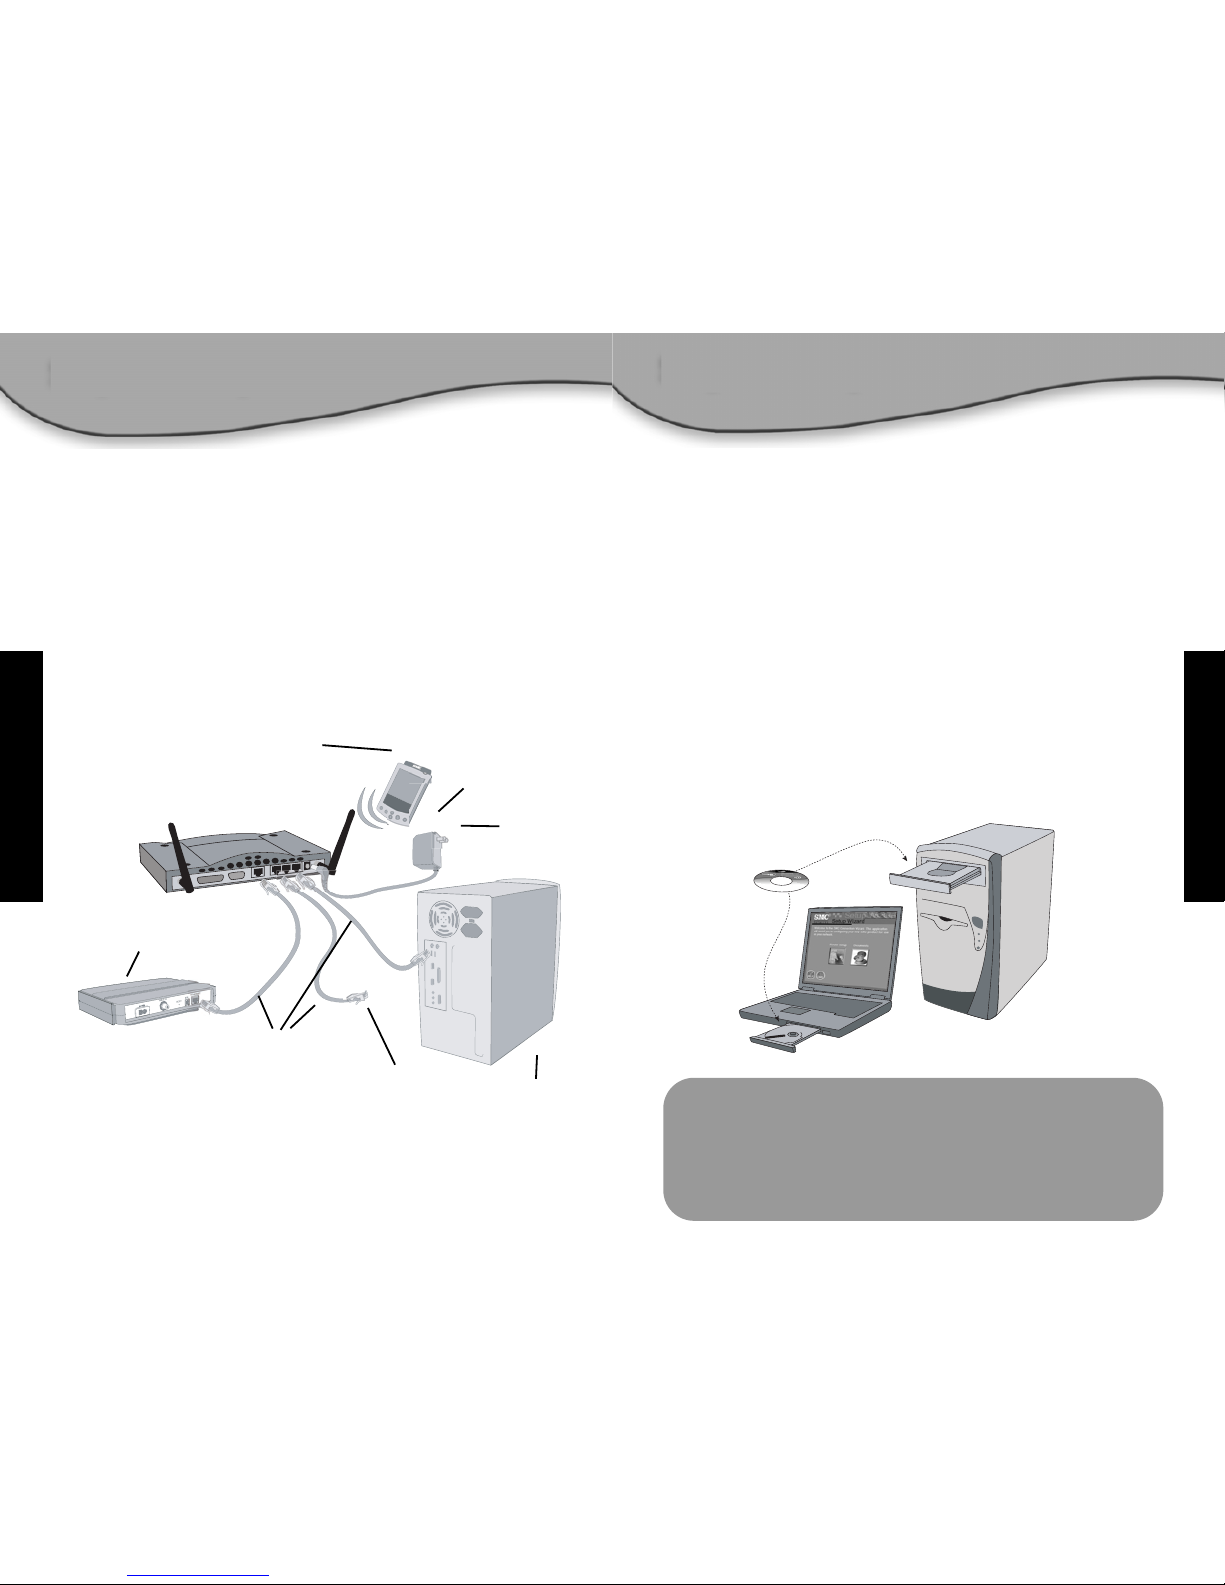
Connect all of the computers that you want to have share your
Internet connection. This is necessary to detect that each device
is properly connected. It is safe to connect and disconnect
Ethernet cables from your computer(s), Barricade™, or broadband
modem when it is turned on.
Use the diagram below to assist you with setting up your network.
Note: Please use standard Category 5 (CAT-5) Ethernet cables with RJ-45
connectors.
3
4
Step 2... Get Connected
Computer One
Power Adapter
Broadband
Modem(Cable/DSL)
Ethernet
Cables
To Computer
Two
To AC Wall
Outlet
PDA with
Wireless Compact
Flash Card
Step 3... Begin
MMaacciinnttoosshh UUsseerrss!!
If you are setting up the Barricade
™
Router in an ALL
Macintosh network, please see Appendix A for specialized
directions on configuring and setting up the Barricade
™
manually. The EZ 3-Click Installation Wizard is not compatible
with the MacOS.
Configuring Your Macintosh Computer
Once you have connected the Barricade
™
Router to your Broadband
modem, then connect your Macintosh to the Barricade™, you are
ready to configure your computer to connect to your Barricade™.
Once you have connected these devices, using CAT-5 Ethernet
cabling, please check the Barricade
™
port lights to verify that
you have a good connection.
• The WAN light verifies that you have good connection from your
broadband modem to the Barricade
™
.
• The PORT light verifies that you have a good connection
between a computer and the Barricade
™
. This light will also
display the connection speed (10Mbps or 100Mbps).
If you connect all the devices together and don’t get a valid
WAN / PORT light status, then please check the cables.
Once you have verified that you have a good network connection
to all of your devices, then you will need to check your computers
network settings. To do this, please follow the following steps:
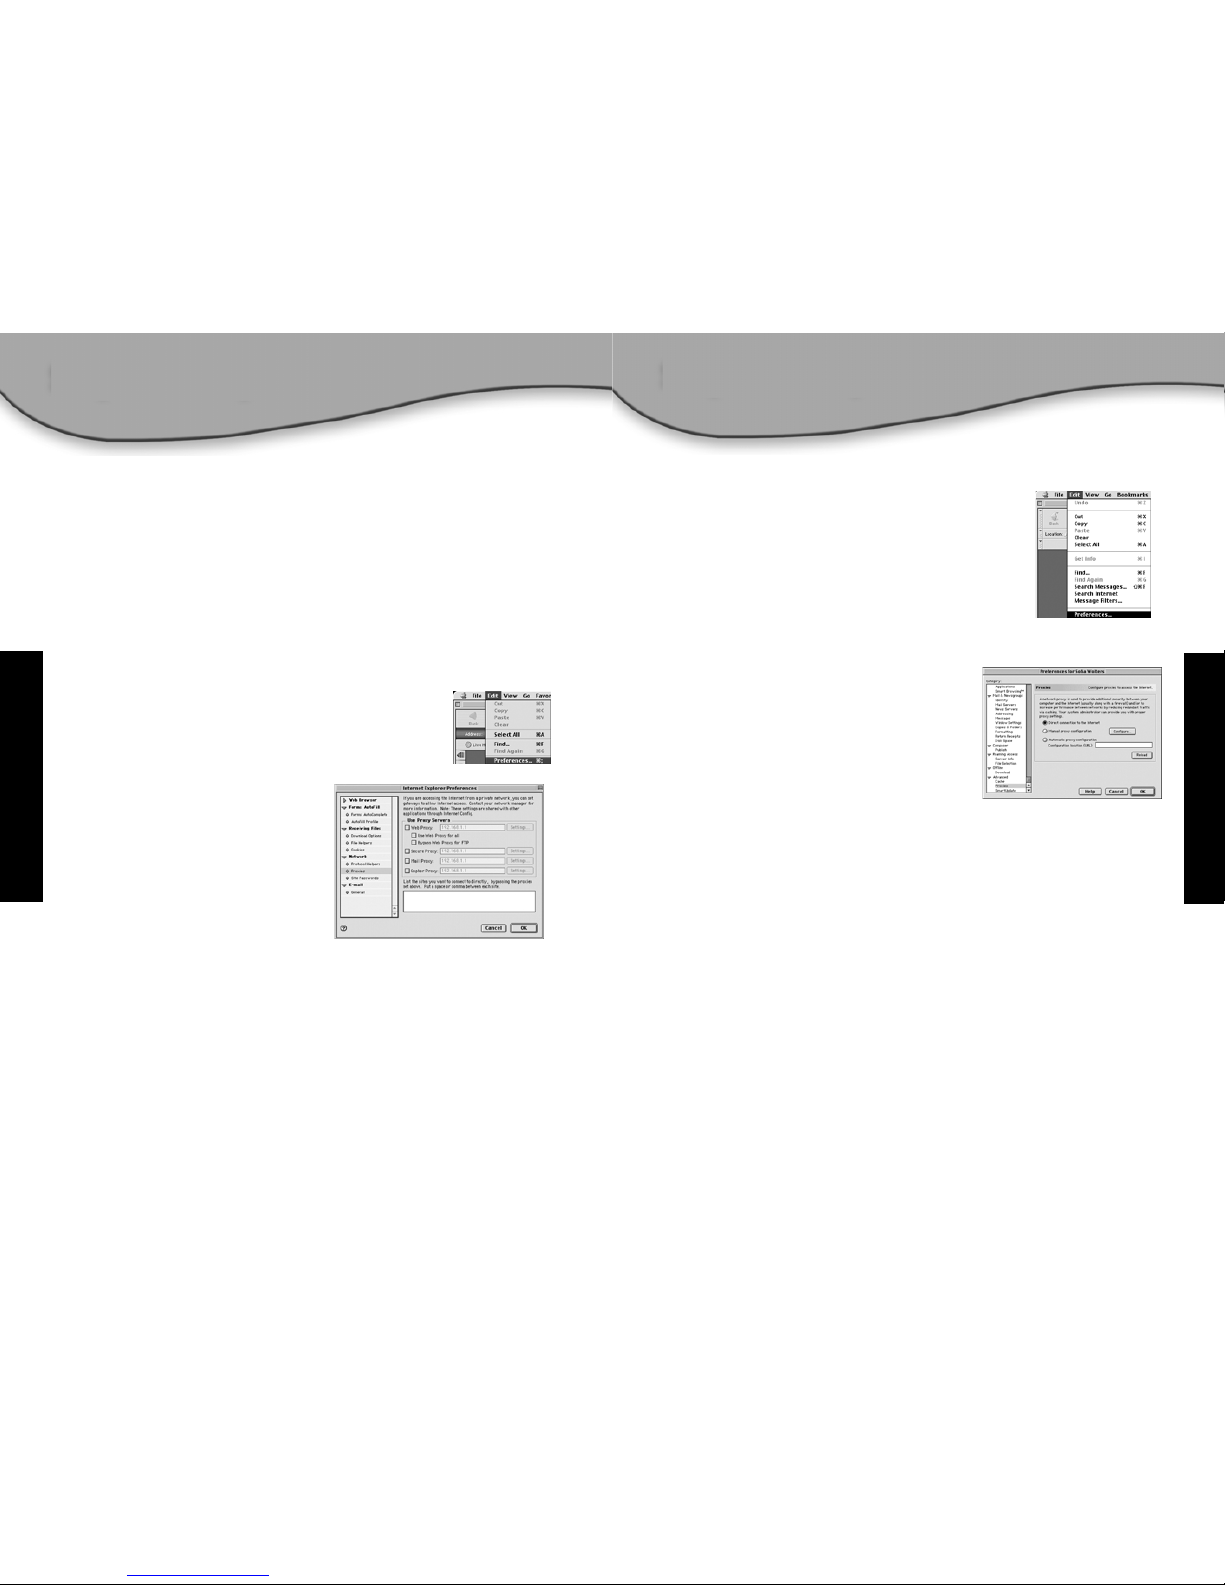
Step 1 - Configure TCP/IP Settings
1. Pull down the Apple Menu, then click
the [Control Panels] option and select
[TCP/IP].
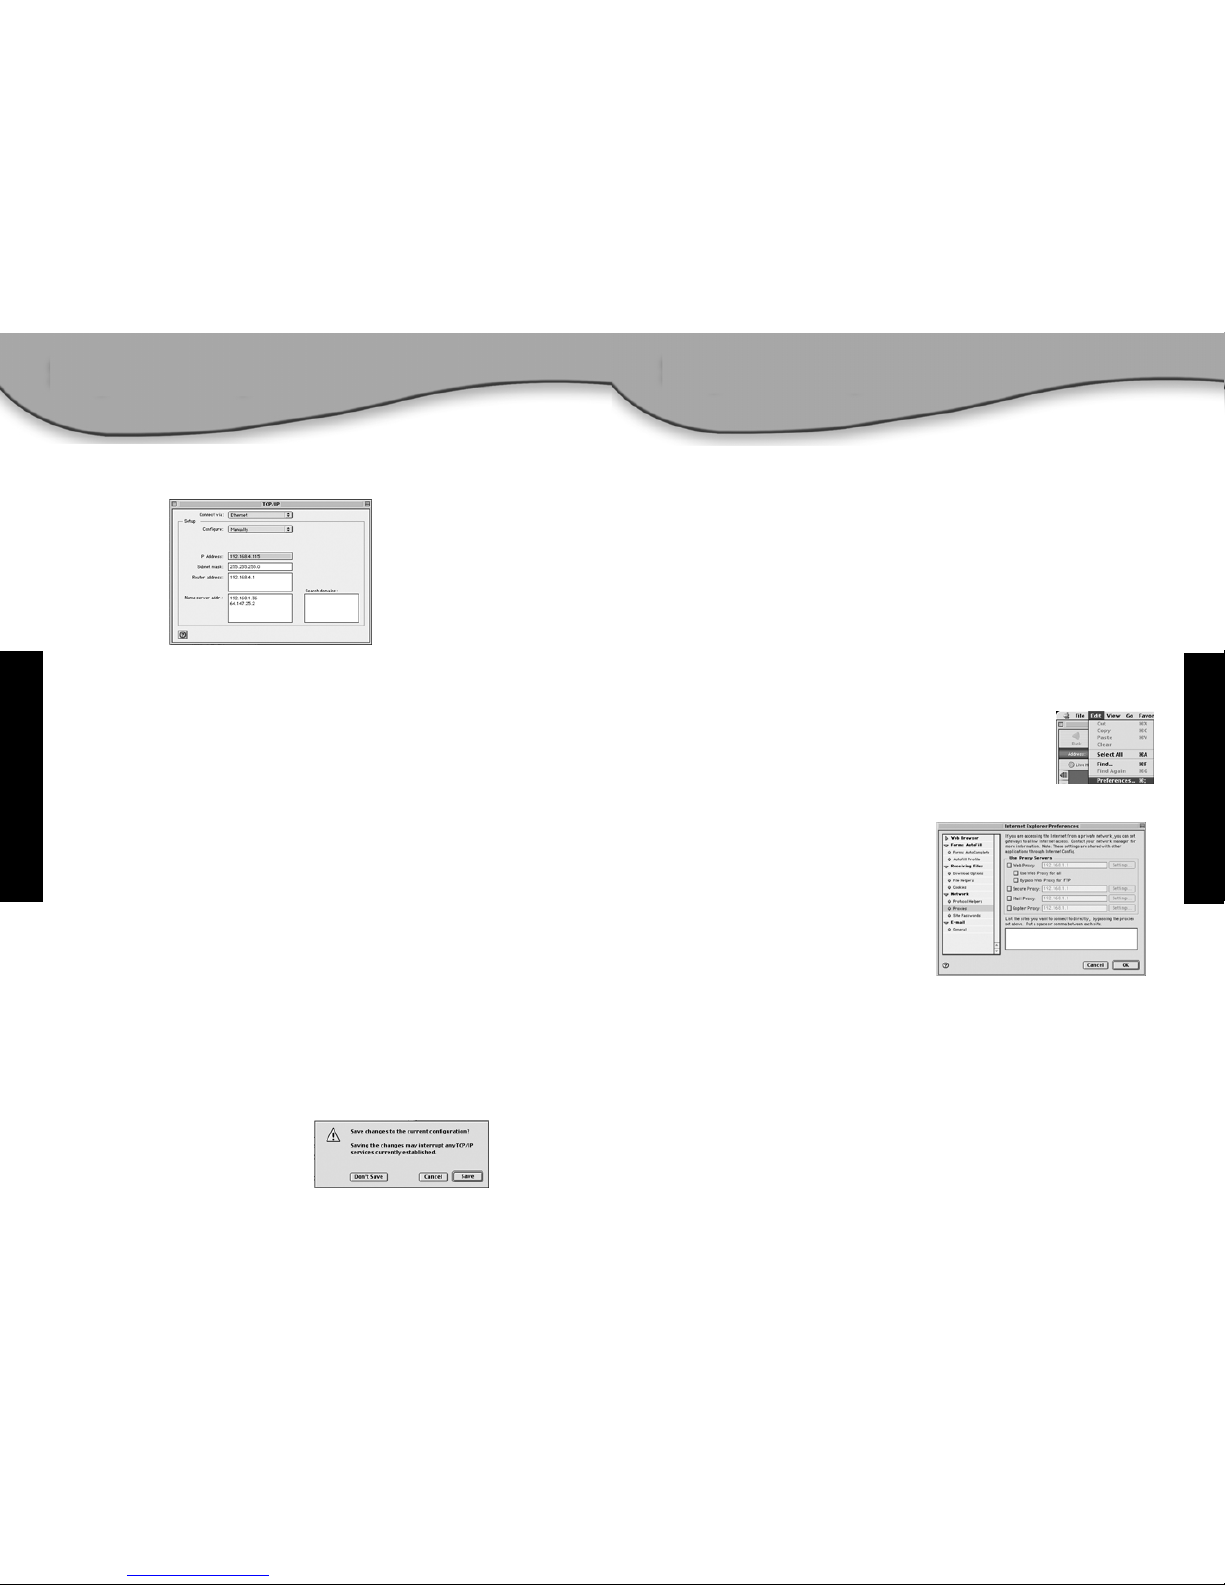
2. In the TCP/IP dialog box, make sure that [Ethernet] is selected
in the [Connect Via:] field.
If the [Using DHCP Server] is already selected in the [Configure]
field, then your computer is already configured for a DHCP
connection. Please verify your IP information against the
information outlined below:
• IP address is now 192.168.2.xxx (Where xxx is a number
from 1-253).
• Subnet Mask is 255.255.255.0.
• Default Gateway is 192.168.2.1.
If you have that information listed in your IP information then
you are ready to configure the Barricade
™
. Please go to:
Step 2 – Disable HTTP Proxy.
If not, then please continue with the steps below.
3. Set the [Configure] option to [Using DHCP Server], then close
the TCP/IP dialog box and you will be prompted to save the
settings.
4. Click the [Save] button to save the new changes.
English
English
5 6
Step 2 - Disable HTTP Proxy
Once you have a valid IP address on your computer, you are ready
to configure the Barricade
™
for your Internet Provider. Before you
can access the web-based administration page, you will need to
verify that the HTTP Proxy feature of your Web browser is disabled.
To do this, please follow the steps below depending
on the browser you are using.
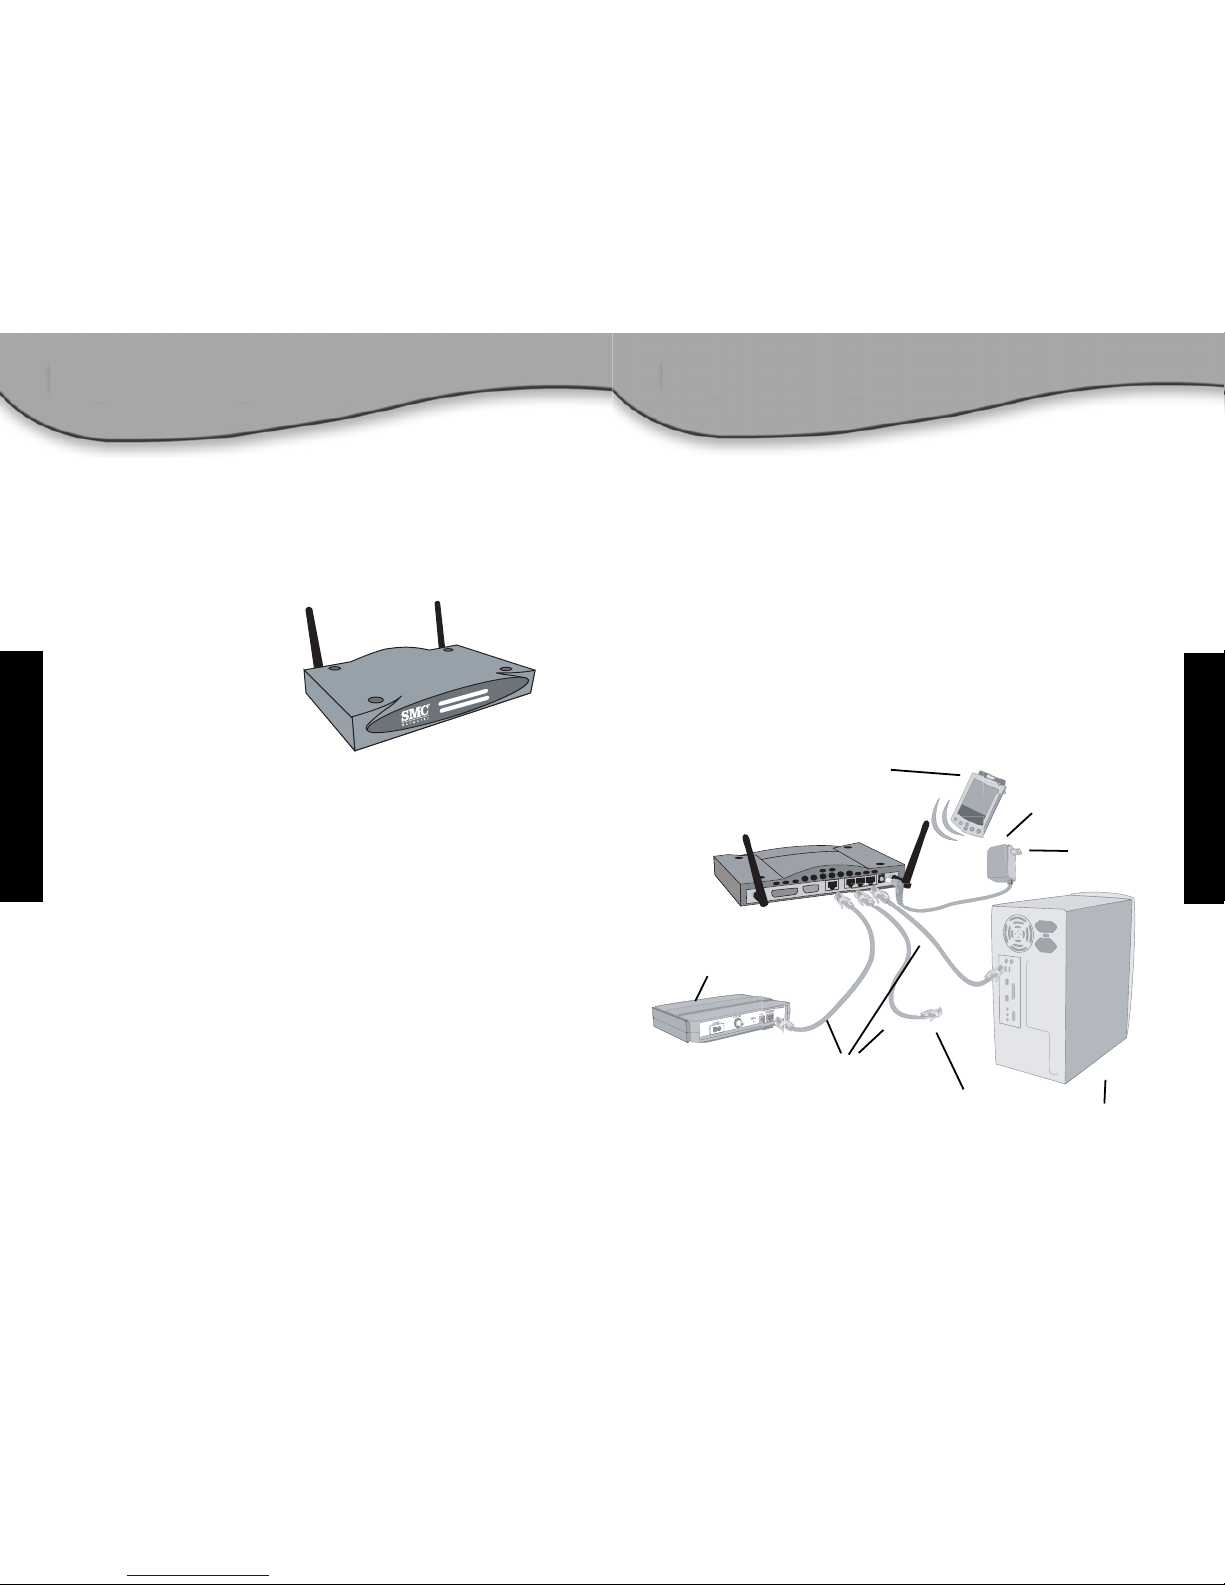
Internet Explorer
1. Open Internet Explorer and click [Stop].
Click [Edit] and select [Preferences].
2. In the Internet Explorer
Preferences window, under
Network, select [Proxies].
3. Uncheck all checked boxes
and click [OK].
English
English
Netscape
1. Open Netscape and click [Stop].
Click [Edit] and select [Preferences].
2. In the [Preferences] dialog box, on the
left-hand column labeled [Category],
click the [Advanced] option.
3. Under the [Advanced] category, select
the [Proxies] option.
4. Select [Direct Connection to the
Internet] option and click [OK].
Step 3 – Configure the Barricade
™
When you can access the web-based Administration page, follow
the configuration steps outlined in the manual. Because the
Barricade™uses a platform-independent design, the configuration
for Windows-based machines is the same for computers running on
Apple OS.
7 8
BarricadeTM2,4 GHz 11 MBit/s Wireless Kabel-/DSL-BreitbandRouter mit Printserver
SMC2804AWBR
Danke, dass Sie sich für den Barricade
™
Wireless Kabel-/DSLBreitband-Router von SMC Networks entschieden haben. Dieses
Handbuch enthält eine einfache Konfigurationsanleitung. Weitere
Informationen finden Sie im Handbuch auf der CD-ROM.
Lieferumfang:
• Ein Barricade
™
Wireless Breitband-Router
• Ein Netzteil
• Ein Ethernet-Kabel
• Eine Installationskurzanleitung
• Eine CD-ROM mit EZ 3-Click-Installationsassistent, Treibern und
Dokumentation
Prüfen Sie vor Beginn Folgendes:
• Der Packungsinhalt ist vollständig.
• Mindestens ein Windows-basierter Computer verfügt über
ein CD-ROM-Laufwerk.*
• Sie verfügen über alle zusätzlichen Ethernet-Kabel (Kat. 5), die
für den Anschluss an andere Computer erforderlich sind.
• An jedem Computer ist ein interner oder externer Ethernet-
Netzwerkadapter ordnungsgemäß installiert.
• Ein Kabel-/DSL-Modem ist installiert und mindestens ein
Computer hat eine Internet-Verbindung.
*Hinweis: Ein CD-ROM-Laufwerk ist nur erforderlich, falls Sie Ihren
Barricade
™
mit dem EZ 3-Click-Installationsassistent konfigurieren möchten.
Der Prozess kann manuell über die Web-Schnittstelle beendet werden.
Anweisungen hierzu finden Sie im Handbuch.
Schließen Sie alle Computer an, die Ihre Internet-Verbindung
nutzen sollen. Dies ist notwendig, um zu prüfen, ob alle Geräte
ordnungsgemäß angeschlossen sind. Sie können Ethernet-Kabel
problemlos mit Ihrem Computer bzw. mit Ihren Computern, Ihrem
Barricade™oder Breitbandmodem verbinden oder die Verbindung zu
diesen trennen, während diese Geräte eingeschaltet sind.
Richten Sie Ihr Netzwerk mit Hilfe des nachstehenden Diagramms ein.
Hinweis: Bitte verwenden Sie Ethernet-Standardkabel der Kategorie 5
(CAT-5) mit RJ-45-Steckern.
Deutsch
10
Deutsch
9
Schritt 1... Auspacken
Hinweis: Wenn der PC, von
dem Sie dieses Installationshilfsprogramm ausführen, über
eine statische IP-Adresse
verfügt, müssen Sie die IPEinstellungen in DHCP ändern.
Weitere Informationen zu den
hierzu erforderlichen Schritten
finden Sie im Handbuch.
Erster Computer
Netzteil
Breitbandmodem
(Kabel/DSL)
Ethernet-
Kabel
Zum zweiten
Computer
Zur
Netzsteckdose
PDA mit
Wireless Compact
Flash-Karte
Schritt 2... Anschließen
Wenn Sie alle Computer verbunden haben, können Sie
den EZ3-Click-Installationsassistenten installieren.
• Nehmen Sie die CD-ROM aus dem Paket.
• Wenn der Computer ausgeschaltet ist, schalten Sie ihn ein.
• Legen Sie die CD-ROM beim Start des Computers in das
CD-ROM-Laufwerk des Computers ein, der mit dem Barricade
™
verbunden ist.
Hinweis: Der Bildschirm unten wird nur angezeigt, wenn die Autostartfunktion aktiviert ist. Wenn der EZ 3-Click-Installationsassistent nicht
automatisch startet, befolgen Sie die unten aufgeführten Schritte, um
das Programm zu starten:
1. Doppelklicken Sie auf das Symbol [My Computer] (Arbeitsplatz)
auf Ihrem Desktop.
2. Doppelklicken Sie auf die CD-ROM- oder das CD-Symbol,
um den Inhalt der CD anzuzeigen.
3. Klicken Sie auf [EZ Install] (Installation), um das Programm
zu starten.
Konfiguration Ihres Macintosh-Computers
Nachdem Sie den Barricade
™
Router mit Ihrem Breitbandmodem und
dann Ihren Macintosh mit dem Barricade™verbunden haben, können
Sie Ihren Computer für die Verbindung zu Ihrem Barricade™konfigurieren.
Nachdem Sie diese Geräte mit Ethernet-Kabel (Kat. 5) verbunden
haben, prüfen Sie bitte die Port-LEDs des Barricade
™
, um zu prüfen,
ob eine gute Verbindung besteht.
• Die WAN-LED zeigt an, dass zwischen dem Breitbandmodem
und dem Barricade
™
eine gute Verbindung besteht.
• Die PORT-LED zeigt an, dass zwischen einem Computer und dem
Barricade
™
eine ordnungsgemäße Verbindung besteht. Diese LED
zeigt zudem die Verbindungsgeschwindigkeit an (10 Mbit/s oder
100 Mbit/s).
Wenn Sie alle Geräte miteinander verbinden und keinen
ordnungsgemäßen WAN-/PORT-LED-Status erhalten, prüfen
Sie bitte die Kabel.
Wenn Sie sichergestellt haben, dass zu all Ihren Geräten eine
ordnungsgemäße Netzwerkverbindung hergestellt wurde, müssen
Sie die Netzwerkeinstellungen Ihres Computers überprüfen. Führen
Sie hierzu die folgenden Schritte aus:
Schritt 1. Konfiguration der TCP/IPEinstellungen
1. Öffnen Sie das Menü [Apple], klicken Sie
auf [Control Panels] (Kontrollfelder) und
wählen Sie dann [TCP/IP] aus.
Deutsch
Deutsch
HHiinnwweeiiss ffüürr MMaacciinnttoosshh--BBeennuuttzzeerr::
Wenn Sie den Barricade™in einem Netzwerk mit ausschließlich Macintosh-Computern einrichten, lesen Sie bitte
in Anhang A die speziellen Anweisungen zur manuellen
Konfiguration und Einrichtung des Barricade™. Der EZ 3-ClickInstallationsassistent ist nicht mit MacOS kompatibel.
Schritt 3... Anfangen
11 12
2. Vergewissern Sie sich, dass im Dialogfeld [TCP/IP] die Option
[Ethernet] im Feld [Connect Via:] (Verbindung) ausgewählt ist.
Wenn die Option [Using DHCP Server] (DHCP Server) bereits im
Feld [Configure] (Konfigurationsmethode) ausgewählt ist, ist Ihr
Computer bereits für eine DHCP-Verbindung konfiguriert. Bitte
vergleichen Sie Ihre IP-Informationen mit den unten aufgeführten
Informationen:
• Die IP-Adresse ist jetzt 192.168.2.xxx (xxx ist hierbei eine Zahl
von 1-253).
• Die Subnetzmaske (Subnet Mask) ist 255.255.255.0.
• Der Standardgateway (Default Gateway) ist 192.168.2.1.
Wenn diese Informationen bei Ihren IP-Informationen aufgelistet
werden, können Sie den Barricade
™
konfigurieren. Bitte fahren Sie
mit folgendem Schritt fort: Schritt 2. Deaktivieren des HTTP-Proxy.
Fahren Sie andernfalls mit den nachstehenden Schritten fort.
3. Setzen Sie die Option [Configure] (Konfigurationsmethode)
auf [Using DHCP Server] (DHCP Server) und schließen Sie das
Dialogfeld [TCP/IP]. Anschließend werden Sie aufgefordert,
die Einstellungen zu speichern.
4. Klicken Sie auf [Save] (Sichern), um die neuen Änderungen
zu speichern.
Schritt 2. Deaktivieren des HTTP-Proxy
Wenn Sie über eine gültige IP-Adresse für Ihren Computer
verfügen, können Sie den Barricade
™
für Ihren Internet-Anbieter
konfigurieren. Bevor Sie auf die Web-basierte Administrationsseite
zugreifen können, müssen Sie sich vergewissern, dass die HTTPProxy-Funktion Ihres Web-Browsers deaktiviert ist. Führen Sie
hierzu bitte je nach dem von Ihnen verwendeten Browser die
entsprechenden Schritte aus.
Internet Explorer
1. Öffnen Sie den Internet Explorer und klicken
Sie auf die Schaltfläche [Stop] (Abbrechen).
Klicken Sie auf [Tools] (Extras) und anschließend
auf [Internet Options] (Einstellungen).
2. Wählen Sie im Fenster
[Preferences] (Einstellungen)
unter [Network] (Netzwerk) die
Option [Proxies] (Proxys) aus.
3. Deaktivieren Sie alle Optionen
und klicken Sie auf [OK].
Deutsch
Deutsch
13
14
 Loading...