

Page 1

USER GUIDE
SMCWSP-100
Wi-Fi SIP Phone
Page 2

Page 3

Wi-Fi SIP Phone
User Guide
20 Mason
Irvine, CA 92618
Phone: (949) 679-8000
Pub. # 149100039200E
June 2007
E062007-EK-R02
Page 4

Information furnished by SMC Networks, Inc. (SMC) is believed to be accurate and
reliable. However, no responsibility is assumed by SMC for its use, nor for any
infringements of patents or other rights of third parties which may result from its use. No
license is granted by implication or otherwise under any patent or patent rights of SMC.
SMC reserves the right to change specifications at any time without notice.
Copyright © 2007 by
SMC Networks, Inc.
20 Mason
Irvine, CA 92618
All rights reserved. Printed in Taiwan
Trademarks:
SMC is a registered trademark; and EZ Switch, TigerStack and TigerSwitch are
trademarks of SMC Networks, Inc. Other product and company names are trademarks or
registered trademarks of their respective holders.
Page 5

Limited Warranty
Limited Warranty Statement: SMC Networks, Inc. (“SMC”) warrants its products to be
free from defects in workmanship and materials, under normal use and service, for the
applicable warranty term. All SMC products carry a standard 90-day limited warranty from
the date of purchase from SMC or its Authorized Reseller. SMC may, at its own discretion,
repair or replace any product not operating as warranted with a similar or functionally
equivalent product, during the applicable warranty term. SMC will endeavor to repair or
replace any product returned under warranty within 30 days of receipt of the product.
The standard limited warranty can be upgraded to a Limited Lifetime* warranty by
registering new products within 30 days of purchase from SMC or its Authorized Reseller.
Registration can be accomplished via the enclosed product registration card or online via
the SMC Web site. Failure to register will not affect the standard limited warranty. The
Limited Lifetime warranty covers a product during the Life of that Product, which is
defined as the period of time during which the product is an “Active” SMC product. A
product is considered to be “Active” while it is listed on the current SMC price list. As new
technologies emerge, older technologies become obsolete and SMC will, at its discretion,
replace an older product in its product line with one that incorporates these newer
technologies. At that point, the obsolete product is discontinued and is no longer an
“Active” SMC product. A list of discontinued products with their respective dates of
discontinuance can be found at:
http://www.smc.com/index.cfm?action=customer_service_warranty.
All products that are replaced become the property of SMC. Replacement products may
be either new or reconditioned. Any replaced or repaired product carries either a 30-day
limited warranty or the remainder of the initial warranty, whichever is longer. SMC is not
responsible for any custom software or firmware, configuration information, or memory
data of Customer contained in, stored on, or integrated with any products returned to
SMC pursuant to any warranty. Products returned to SMC should have any
customer-installed accessory or add-on components, such as expansion modules,
removed prior to returning the product for replacement. SMC is not responsible for these
items if they are returned with the product.
Customers must contact SMC for a Return Material Authorization number prior to
returning any product to SMC. Proof of purchase may be required. Any product returned
to SMC without a valid Return Material Authorization (RMA) number clearly marked on
the outside of the package will be returned to customer at customer’s expense. For
warranty claims within North America, please call our toll-free customer support number
at (800) 762-4968. Customers are responsible for all shipping charges from their facility to
SMC. SMC is responsible for return shipping charges from SMC to customer.
WARRANTIES EXCLUSIVE: IF AN SMC PRODUCT DOES NOT OPERATE AS
WARRANTED ABOVE, CUSTOMER’S SOLE REMEDY SHALL BE REPAIR OR
REPLACEMENT OF THE PRODUCT IN QUESTION, AT SMC’S OPTION. THE
FOREGOING WARRANTIES AND REMEDIES ARE EXCLUSIVE AND ARE IN LIEU OF
ALL OTHER WARRANTIES OR CONDITIONS, EXPRESS OR IMPLIED, EITHER IN
FACT OR BY OPERATION OF LAW, STATUTORY OR OTHERWISE, INCLUDING
WARRANTIES OR CONDITIONS OF MERCHANTABILITY AND FITNESS FOR A
PARTICULAR PURPOSE. SMC NEITHER ASSUMES NOR AUTHORIZES ANY OTHER
PERSON TO ASSUME FOR IT ANY OTHER LIABILITY IN CONNECTION WITH THE
SALE, INSTALLATION, MAINTENANCE OR USE OF ITS PRODUCTS. SMC SHALL
v
Page 6

NOT BE LIABLE UNDER THIS WARRANTY IF ITS TESTING AND EXAMINATION
DISCLOSE THE ALLEGED DEFECT IN THE PRODUCT DOES NOT EXIST OR WAS
CAUSED BY CUSTOMER’S OR ANY THIRD PERSON’S MISUSE, NEGLECT,
IMPROPER INSTALLATION OR TESTING, UNAUTHORIZED ATTEMPTS TO REPAIR,
OR ANY OTHER CAUSE BEYOND THE RANGE OF THE INTENDED USE, OR BY
ACCIDENT, FIRE, LIGHTNING, OR OTHER HAZARD.
LIMITATION OF LIABILITY: IN NO EVENT, WHETHER BASED IN CONTRACT OR
TORT (INCLUDING NEGLIGENCE), SHALL SMC BE LIABLE FOR INCIDENTAL,
CONSEQUENTIAL, INDIRECT, SPECIAL, OR PUNITIVE DAMAGES OF ANY KIND, OR
FOR LOSS OF REVENUE, LOSS OF BUSINESS, OR OTHER FINANCIAL LOSS
ARISING OUT OF OR IN CONNECTION WITH THE SALE, INSTALLATION,
MAINTENANCE, USE, PERFORMANCE, FAILURE, OR INTERRUPTION OF ITS
PRODUCTS, EVEN IF SMC OR ITS AUTHORIZED RESELLER HAS BEEN ADVISED
OF THE POSSIBILITY OF SUCH DAMAGES.
SOME STATES DO NOT ALLOW THE EXCLUSION OF IMPLIED WARRANTIES OR
THE LIMITATION OF INCIDENTAL OR CONSEQUENTIAL DAMAGES FOR
CONSUMER PRODUCTS, SO THE ABOVE LIMITATIONS AND EXCLUSIONS MAY
NOT APPLY TO YOU. THIS WARRANTY GIVES YOU SPECIFIC LEGAL RIGHTS,
WHICH MAY VARY FROM STATE TO STATE. NOTHING IN THIS WARRANTY SHALL
BE TAKEN TO AFFECT YOUR STATUTORY RIGHTS.
* SMC will provide warranty service for one year following discontinuance from the active
SMC price list. Under the limited lifetime warranty, internal and external power supplies,
fans, and cables are covered by a standard one-year warranty from date of purchase.
SMC Networks, Inc.
20 Mason
Irvine, CA 92618
vi
Page 7

Compliances
Federal Communication Commission Interference Statement
This equipment has been tested and found to comply with the limits for a Class B digital
device, pursuant to Part 15 of the FCC Rules. These limits are designed to provide
reasonable protection against harmful interference in a residential installation. This
equipment generates, uses and can radiate radio frequency energy and, if not installed
and used in accordance with the instructions, may cause harmful interference to radio
communications. However, there is no guarantee that interference will not occur in a
particular installation. If this equipment does cause harmful interference to radio or
television reception, which can be determined by turning the equipment off and on, the
user is encouraged to try to correct the interference by one of the following measures:
• Reorient or relocate the receiving antenna
• Increase the separation between the equipment and receiver
• Connect the equipment into an outlet on a circuit different from that to which the receiver
is connected
• Consult the dealer or an experienced radio/TV technician for help
This device complies with Part 15 of the FCC Rules. Operation is subject to the following
two conditions: (1) This device may not cause harmful interference, and (2) this device
must accept any interference received, including interference that may cause undesired
operation.
FCC Caution: Any changes or modifications not expressly approved by the party
responsible for compliance could void the user's authority to operate this equipment.
IMPORTANT NOTE:
FCC Radiation Exposure Statement
This equipment complies with FCC radiation exposure limits set forth for an uncontrolled
environment. End users must follow the specific operating instructions for satisfying RF
exposure compliance.
This transmitter must not be co-located or operating in conjunction with any other antenna
or transmitter.
IEEE 802.11b or 802.11g operation of this product in the U.S.A. is firmware-limited to
channels 1 through 11.
Canada RSS Statement
This Class B digital apparatus complies with Canada RSS-210.
Cet appareil numérique de la classe B est conforme à la norme CNR-210 du Canada.
i
Page 8

Japan VCCI Class B
EC Conformance Declaration
Marking by the above symbol indicates compliance with the Essential Requirements of
the R&TTE Directive of the European Union (1999/5/EC). This equipment meets the
following conformance standards:
• EN 60950-1 (IEC 60950-1) - Product Safety
• EN 300 328 - Technical requirements for 2.4 GHz radio equipment
• EN 301 489-1, EN 301 489-17 - EMC requirements for radio equipment
This device is intended for use in the following European Community countries:
• Austria • Belgium • Denmark
• Finland • France • Germany
• Italy • Luxembourg • Netherlands
• Norway • Spain • Sweden
• Switzerland • United Kingdom • Portugal
• Greece • Ireland • Iceland
Requirements for indoor vs. outdoor operation, license requirements and allowed
channels of operation apply in some countries as described below:
• In Italy the end-user must apply for a license from the national spectrum authority to
operate this device outdoors.
• In Belgium outdoor operation is only permitted using the 2.46 - 2.4835 GHz band:
Channel 13.
• In France outdoor operation is only permitted using the 2.4 - 2.454 GHz band: Channels
1 - 7.
ii
Page 9

Contents
Chapter 1: Introduction 1-1
Package Checklist 1-1
Hardware Description 1-2
AC Power Charger 1-3
Mini USB Cable 1-3
Chapter 2: Installing the Battery 2-1
Charging the Battery 2-2
Powering On the Phone 2-3
Chapter 3: Getting Started 3-1
Finding Wireless Networks 3-1
Basic VoIP Settings 3-3
Understanding the Phone’s LCD Display 3-5
The Main Menu 3-6
Making a Call 3-7
Chapter 4: Managing Contacts 4-1
Adding a Contact 4-1
Deleting Contacts 4-2
Editing Contact Details 4-3
Searching for Contacts 4-4
Adding a Contact to Speed Dial 4-5
Chapter 5: Call Features 5-1
Call Waiting 5-1
Call Hold/Resume 5-2
Three-Way Conference Call 5-4
Call Transfer 5-5
Call History 5-6
Speed Dial 5-7
Chapter 6: Network and VoIP Settings 6-1
Wi-Fi Network Settings 6-1
iii
Page 10

Contents
Network Security Settings 6-3
Network Status 6-5
VoIP Settings 6-6
Chapter 7: General Phone Settings 7-1
Setting the Appearance 7-2
Setting the Phone Date and Time 7-3
Setting the Display Language 7-3
Resetting the Phone 7-4
Setting Ring Profiles 7-5
Setting Sound Control 7-5
Setting Speed Dial Actions 7-6
Chapter 8: Applications 8-1
Using the Calculator 8-2
Using the Calendar 8-3
Using the Clock 8-5
Making Notes 8-6
Displaying System Information 8-7
Displaying World Times 8-8
Appendix A: Specifications A-1
Appendix B: Software Upgrade B-1
Using the Update Wizard B-1
Appendix C: License Information C-1
The GNU General Public License C-1
iv
Page 11

Chapter 1: Introduction
The SMCWSP-100 is a Wi-Fi (IEEE 802.11b/g) wireless phone that enables you to
make Voice over Internet Protocol (VoIP) calls without using a computer. The phone
enables you to use your Session Initiation Protocol (SIP) VoIP service with complete
mobility, allowing you to talk from any location where you have a network connection
through a nearby access point.
Package Checklist
The SMCWSP-100 Wi-Fi SIP Phone package includes these items:
• One Wi-Fi SIP Phone (SMCWSP-100)
• One Lithium-Ion battery
• One headset
• One mini USB cable
• One AC power charger
• Quick Start Guide
• Documentation CD
Inform your dealer if there are any incorrect, missing or damaged items. If possible,
retain the carton, including the original packing materials. Use them to repack the
product in case there is a need to return it.
1-1
Page 12
Introduction
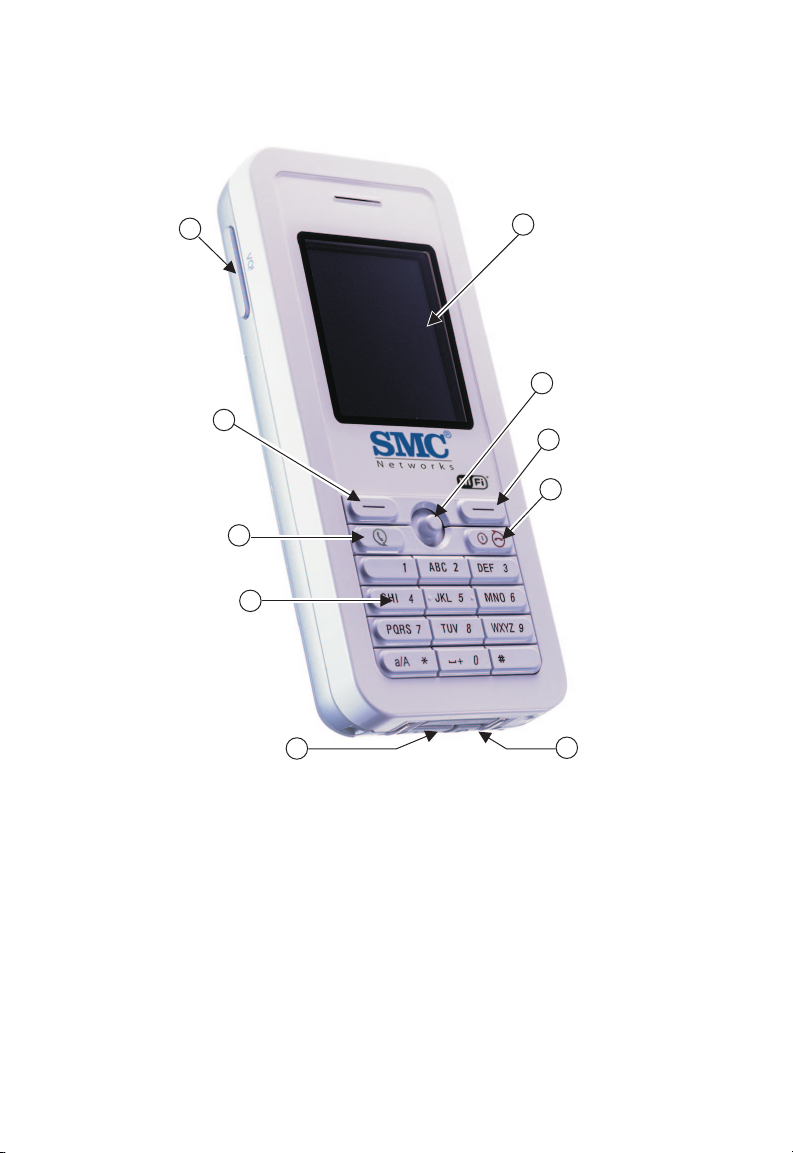
Hardware Description
Volume
10
Button
Left
Soft Key
Send
Alphanumeric
Keypad
9
8
Key
7
USB/Power
Charge Port
LCD
1
Display
Navigation
2
Key
Right
3
Soft Key
End/Power
4
Key
Headset
6
5
Jack
Before preparing the Wi-Fi SIP Phone for use, first become familiar with its main
keys, buttons, and other hardware features.
1. LCD Display — Color software menu display.
2. Navigation Key — Four-direction software navigation key. Pressing the key
down selects the current option.
3. Right Soft Key — Negative action key. Cancels or returns to previous menu.
4.End/Power Key — Ends an active call. Turns the power on and off.
• Press for more than two seconds to power the phone on.
• Press for more than four seconds to power the phone off.
5. Headset Jack — Jack for headset connection.
1-2
Page 13

Hardware Description
6. USB/Power Charge Port — Power charger connection for charging battery.
7. Alphanumeric Keypad — Includes 0-9, A-Z, *, and # keys.
• The [a/A *] key selects upper- or lower-case characters, numbers, or
hexadecimal.
• The [ 1 ] key selects common punctuation marks during text input.
• The [ # ] key selects special characters and symbols during text input.
8.Send Key — Calls a selected contact.
9.Left Soft Key — Positive action key. Selects menu option.
10. Volume Button — Adjusts volume of the speaker.
Keypad Lock — The phone keypad can be locked by pressing the Left Soft Key
(Options) and then the Navigation Key. Pressing the Left Soft Key and then the
[a/A *] key unlocks the keypad.
AC Power Charger
The Wi-Fi SIP Phone will charge an installed battery when connected to the AC
power charger, and the power charger is connected to a power source. The power
charger automatically adjusts to any voltage between 100-240 volts at 50 or 60 Hz.
No voltage range settings are required.
Mini USB Cable
The Wi-Fi SIP Phone includes a mini USB cable that can be used to charge the
phone’s battery from a connected PC.
The mini USB cable can also be used to download updated software to the phone.
1-3
Page 14

Introduction
1-4
Page 15

Chapter 2: Installing the Battery
After unpacking the Wi-Fi SIP Phone, you must first install and charge the battery
pack before turning on the phone.
Warning: Risk of explosion if battery is replaced by an incorrect type. Dispose of
used batteries according to the instructions.
1. Remove Battery Compartment Cover — Place the phone face down. Push
and slide down the battery compartment cover until it becomes free.
2. Install Battery — Place the battery into the compartment. Be sure the text label
on the battery is facing out and the battery’s three metal contacts point to the
top of the phone.
Push Off
Install Battery
3. Replace Battery Compartment Cover — Slide the battery compartment cover
back onto the phone until it clicks firmly into place.
Caution: Use only the Lithium-Ion battery pack supplied with the phone. Do not try
to install any other battery. To obtain replacement batteries, contact your
local dealer.
2-1
Page 16
Installing the Battery
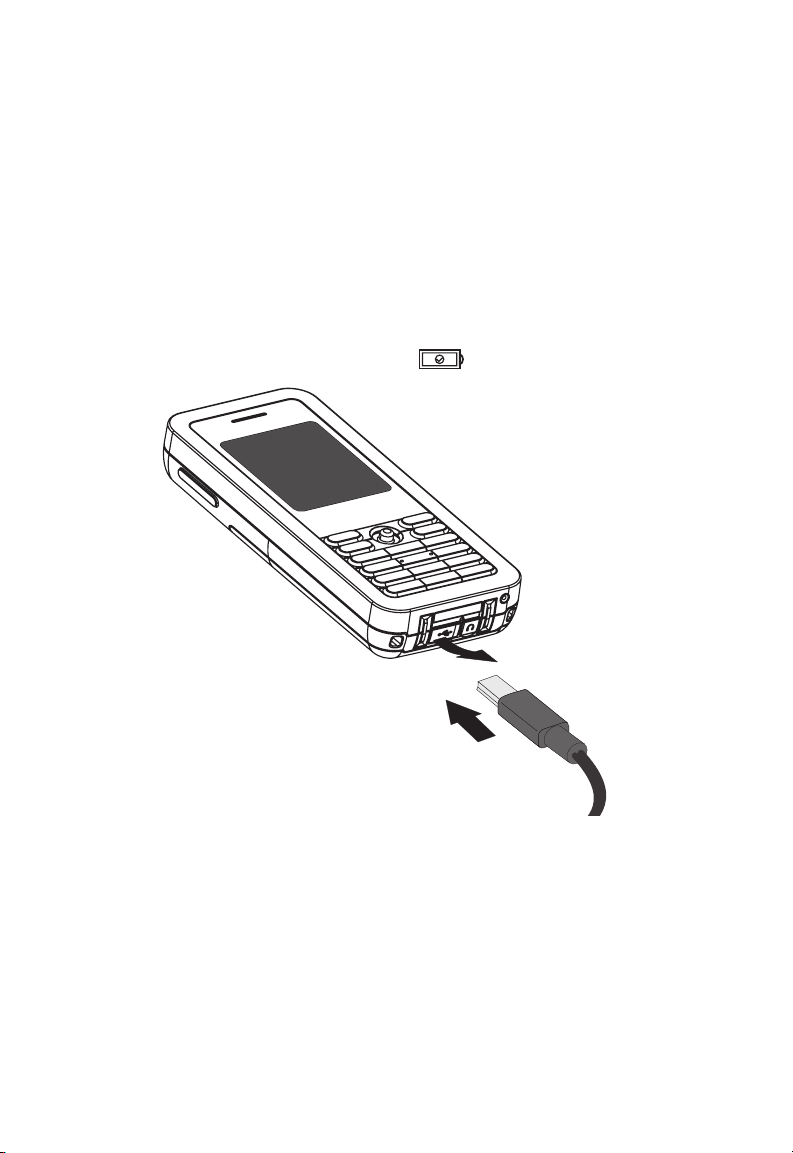
Charging the Battery
1. Connect the AC Power Charger — Lift up the rubber cover on the mini USB
charger port and connect the power charger to the port. Then, plug the charger
into an AC electrical outlet.
Note: The power charger automatically adjusts to any voltage between 100-240
volts at 50 or 60 Hz.
2. Fully Charge Battery — For the first time charge, allow eight hours to fully
charge the battery.
Note: For the first time use, please wait until the phone is fully charged before powering
on. When the phone is fully charged, the symbol is displayed.
Lift Cover
Connect
Charger
3. Disconnect the Power Charger — When the battery is fully charged, remove
the power charger from the phone and push down the charger port’s rubber
cover.
After the battery has been fully charged first time, following charges require only
three hours. You do not have to power off the phone while charging, just connect the
charger as described above and wait until the LCD display indicates the battery is
fully charged.
2-2
Page 17
Powering On the Phone
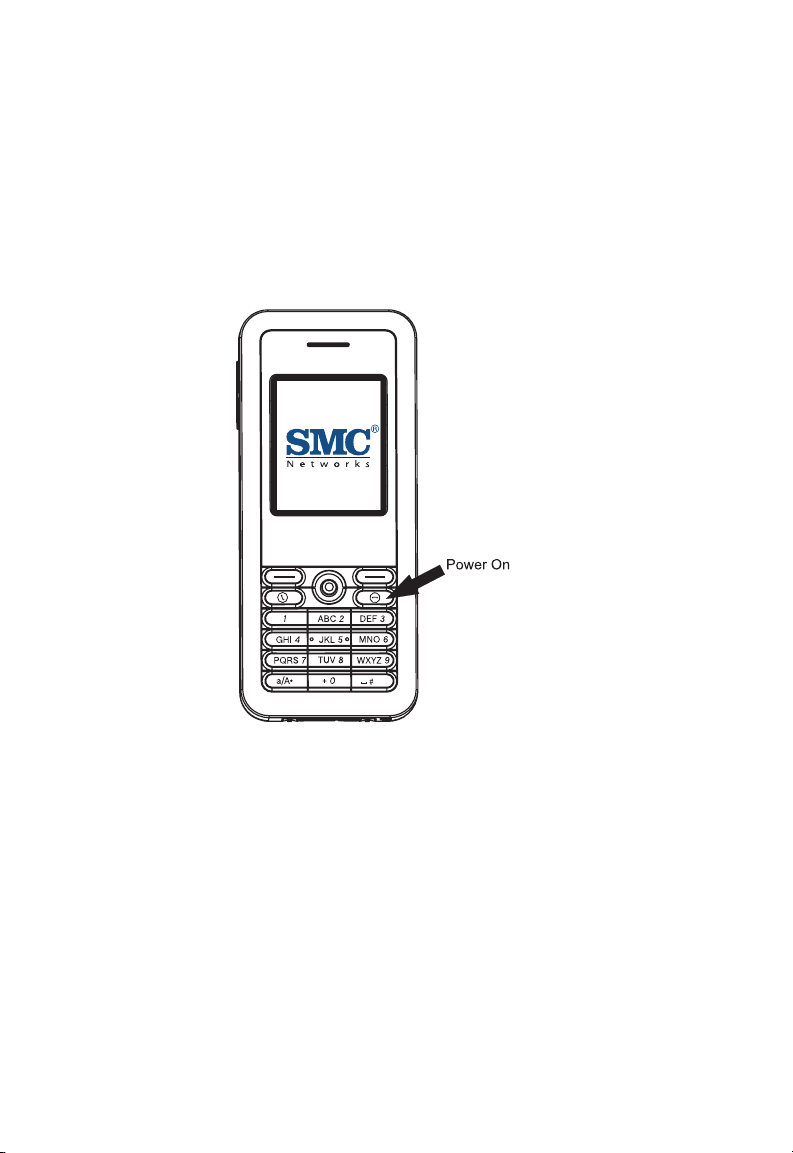
Powering On the Phone
Push and hold down the End/Power key for more than two seconds to power on the
phone. The LCD display turns on showing an image of a white sun on a yellow
background.
Allow 30 seconds for the phone to start up.
Go to Chapter 3 “Getting Started” to learn how to set up a Wi-Fi network connection
and start using the phone.
2-3
Page 18

Installing the Battery
2-4
Page 19
Chapter 3: Getting Started
The Wi-Fi SIP Phone requires a wireless connection to a Wi-Fi network access point
to operate. In addition, the access point network must provide access to a VoIP SIP
server, either on the local network or over the Internet, to be able to make calls.
You can set the phone to connect to specific wireless networks or search for any
nearby networks. Wireless network information is stored in the phone’s memory as
“Preferred Networks,” which are searched for each time the phone is powered on.
When powering on the Wi-Fi SIP Phone for the first time, there are no Preferred
Networks in the phone’s memory. You need to select a wireless network and set up
your VoIP SIP details before you can start making calls.
Finding Wireless Networks
When the Wi-Fi SIP Phone is used for the first time, you must set up a Wi-Fi network
connection. Follow these steps:
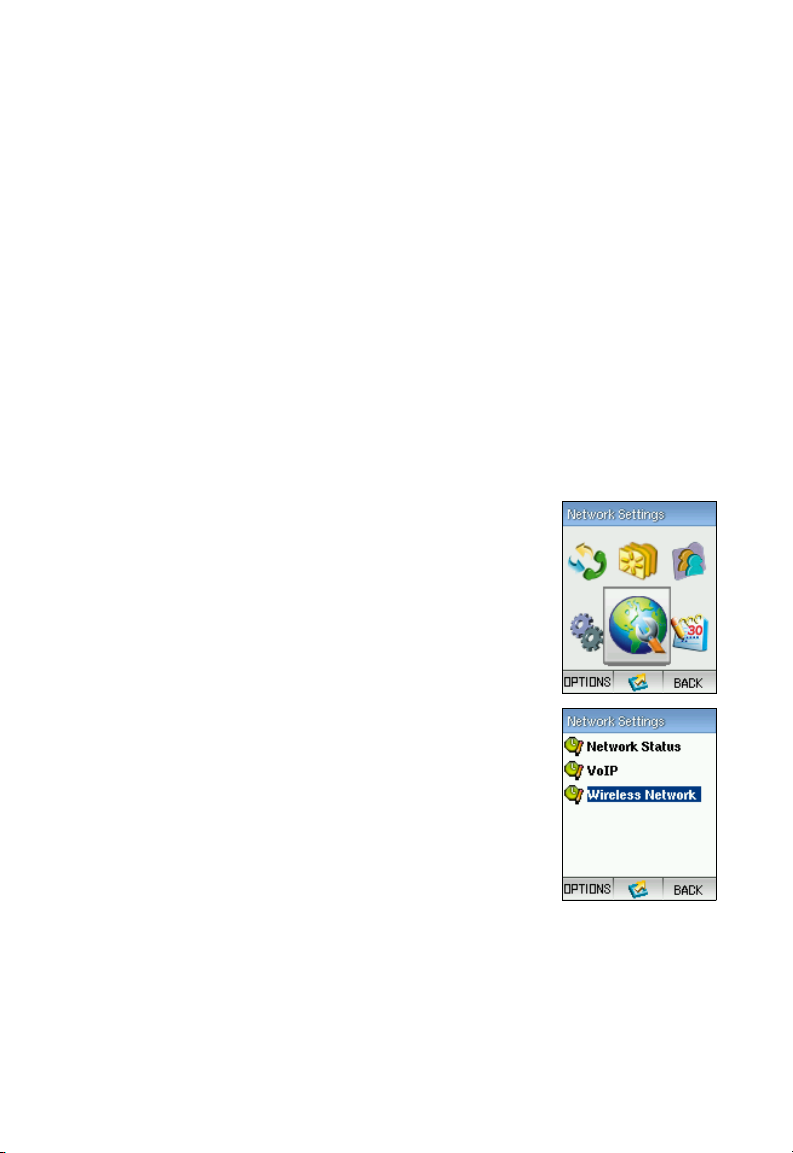
1. Press the Navigation Key to select the main menu.
2. From the main menu, select Network Settings.Then,
from the Network Settings menu, select “Wireless
Network.”
3-1
Page 20
Getting Started
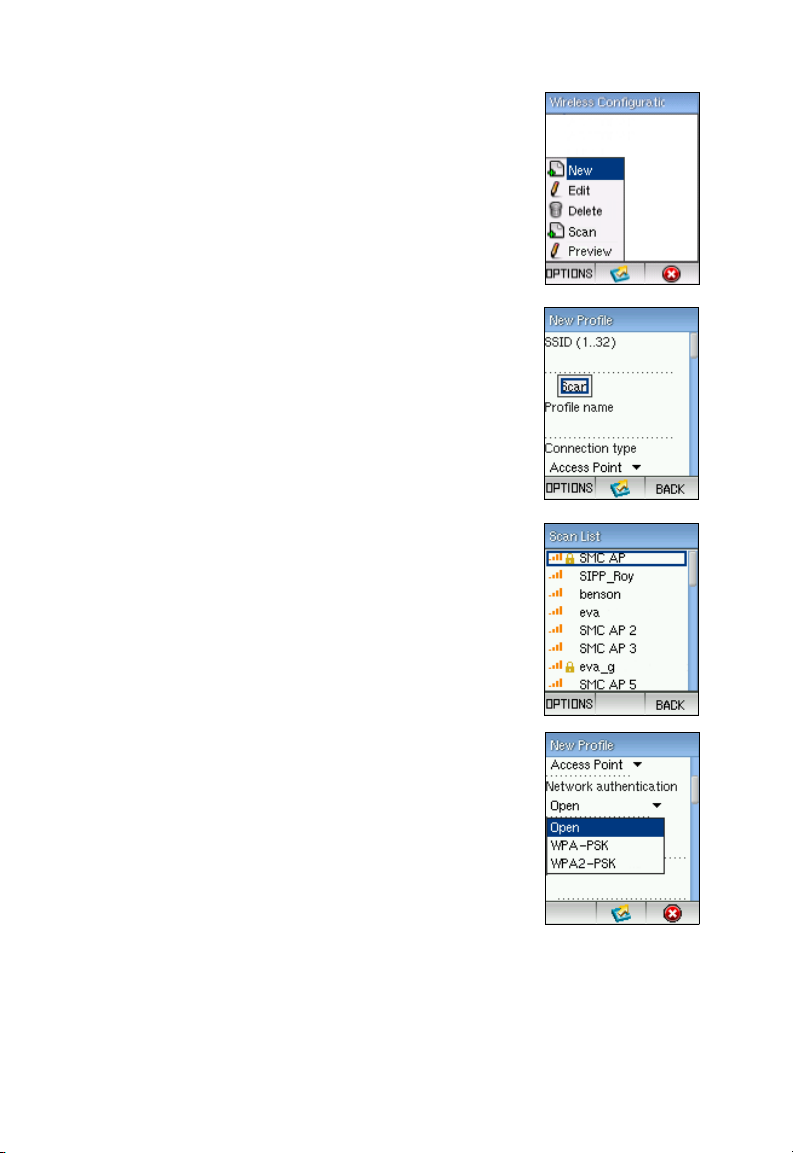
3. Press the Left Soft Key to select the options, then select
“New.”
4. In the New Profile screen, move the Navigation Key
down to highlight “Scan,” then press down to perform a
search for nearby Wi-Fi networks.
5. A list of detected Wi-Fi networks displays. From the list,
select the wireless network that you want to connect to
and press down on the Navigation Key.
Normally, you need to be within 90 m (300 ft) of a
network’s wireless access point to be able to connect to
it. If the network you want to connect to is not on the list,
move to another location and try again.
6. The New Profile screen displays again with the Wi-FI
network name already configured. You can change
other settings for the wireless network, such as IP
address configuration. (The default setting is DHCP.)
If authentication is required by the network, select the
authentication type and enter the encryption key value,
as provided by the wireless network operator.
The wireless network information is retained in the
Wireless Configuraion list. The wireless networks in the
list are stored in the phone’s memory and will be used
every time the phone is powered on.
3-2
Page 21
Basic VoIP Settings
Basic VoIP Settings
Once you have established a network connection, you need to enter your SIP VoIP
service account details as provided by your SIP service operator.
Follow these steps:
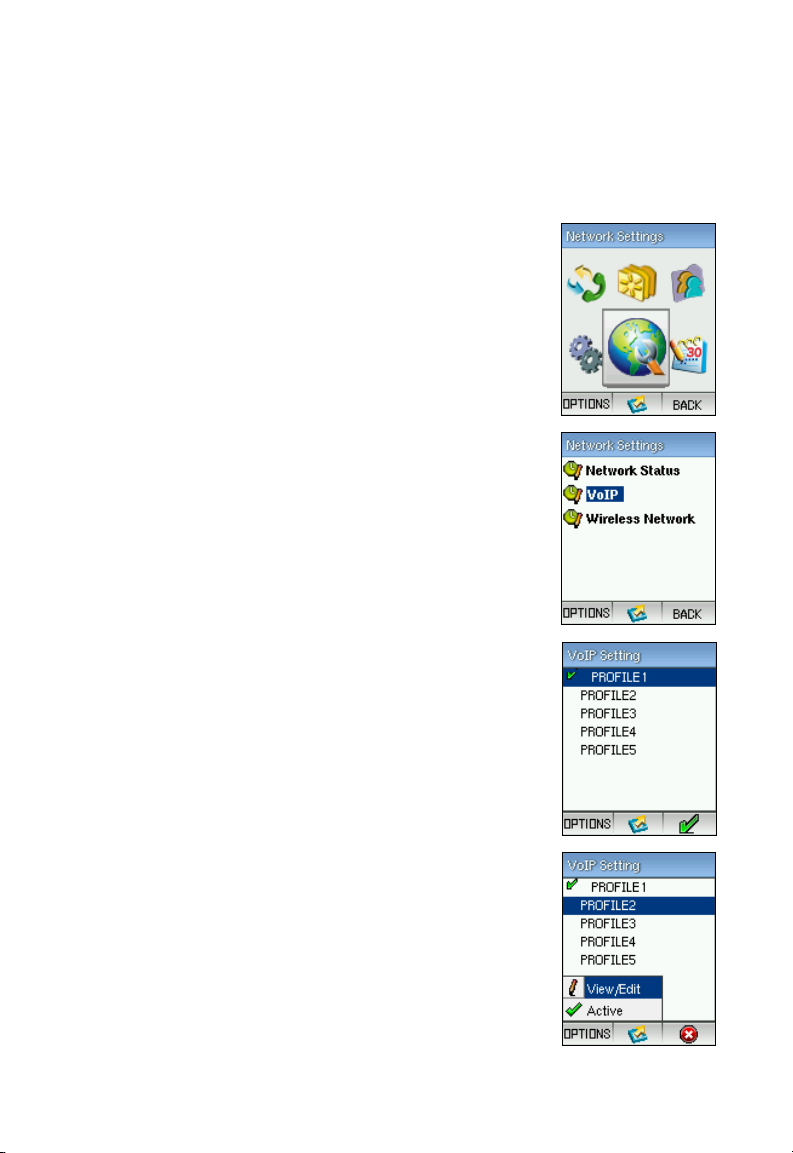
1. Press the Navigation Key to select the main menu.
2. From the main menu, select Network Settings.Then,
from the Network Settings menu, select “VoIP.”
3. From the VoIP Setting menu, select the profile that you
are going to view or edit..
Note: If you have an SMC PBX SIP server installed in your
network for VoIP services, your SIP Phone will
automatically configure a VoIP setting profile. The
profile name "SMC" will be displayed instead of
PROFILE5.
4. Press the Left Soft Key to access the Options menu,
then select View/Edit.
3-3
Page 22
Getting Started
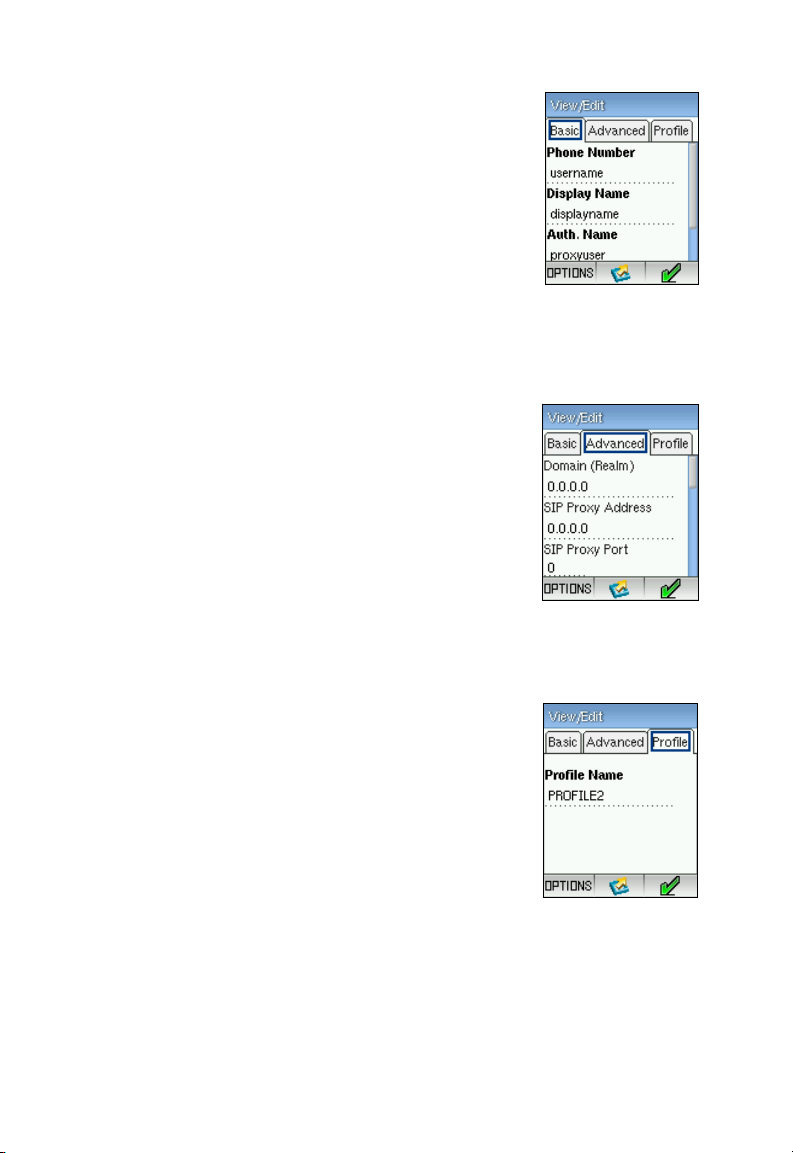
5. On the SIP configuration, Basic tab screen, enter details
as provided by your SIP service provider.
The minimum SIP details required are:
• Phone Number — Your SIP account phone number.
• Display Name — The name that identifies you to other
SIP service users when you make calls.
• Auth. Name — Your SIP account username that
uniquely identifies you to the SIP server.
• Auth. Password — An alphanumeric string that
uniquely identifies the SIP user’s permission rights.
6. On the SIP configuration, Advanced tab screen, enter
the following details as provided by your SIP service
provider:
• SIP Proxy Address — The Domain name or IP
address of the SIP proxy server.
• SIP Proxy Port — The proxy server port number,
normally 5060.
• SIP Registrar Address — The Domain name or IP
address of the SIP registrar server.
• SIP Registrar Port — The SIP registrar server port number, normally 5060.
7. On the SIP configuration, Profile tab screen, enter the
profile name you want to use.
When you finish configuring the VoIP details, the phone will restart automatically.
When the phone has restarted, it automatically connects to the wireless network and
logs into the SIP proxy server. The successful login is indicated by your user name
displayed in the upper-left part of the main screen.
3-4
Page 23
Understanding the Phone’s LCD Display
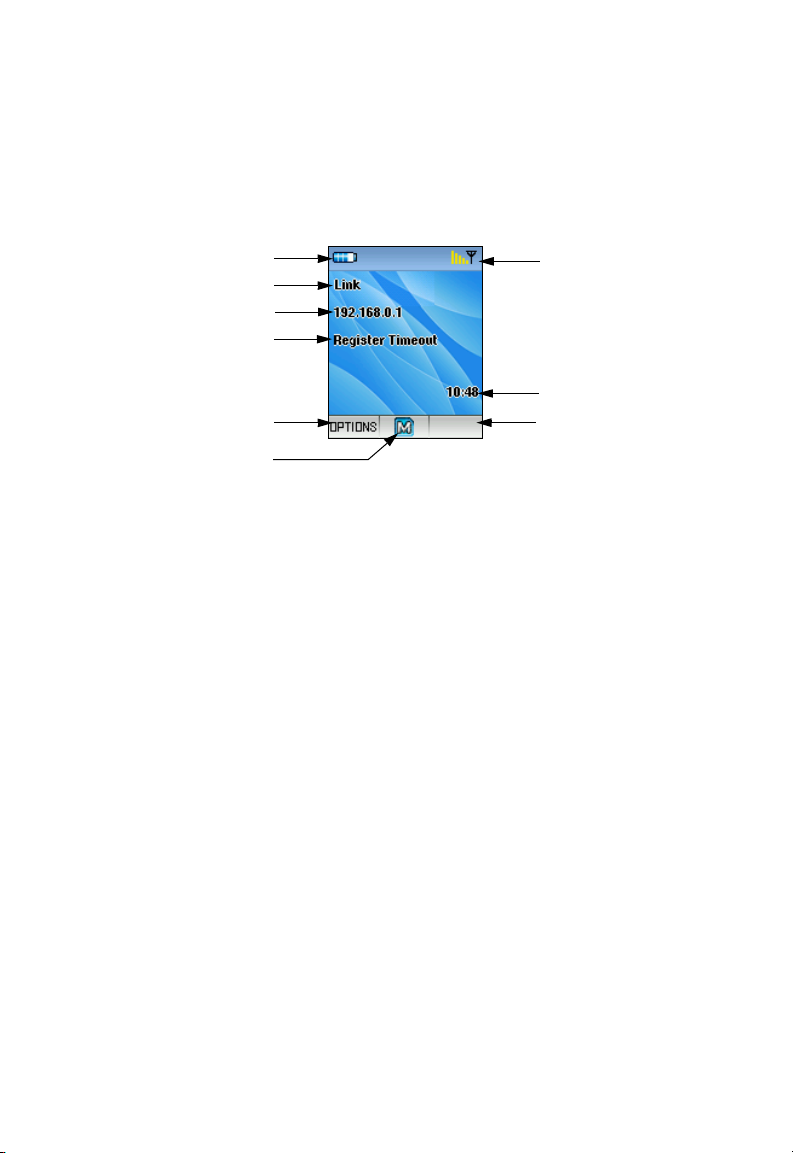
Understanding the Phone’s LCD Display
The Wi-Fi SIP Phone’s color LCD display provides various status indicators and
access to the menu-based interface. The illustration below shows the main screen
and its elements.
Battery Status
Network Status
IP Status
SIP Status
Left Soft Key Action
Navigation Key Action
Battery Status — Indicates the status of the battery. Shows a fully charged or
partially charged level, and when charging:
Wireless Signal Status — Indicates the strength of the Wi-Fi network signal.
Network Status — Indicates the status of the Wi-Fi network connection or the
current connected network.
IP Status — Indicates the network IP status or current IP address of the phone.
SIP Status — Indicates the SIP service status.
Current Time — The current time set on the phone. You can set the phone’s time
and date by using the Menu to select “Phone Settings” and then “Date/Time.”
Navigation Key Action — The action that happens when you press down on the
Navigation Key. Typically, the Navigation Key selects the current menu item or
confirms a setting. From the main screen, this provides access to the main menu.
Right Soft Key Action — The action that happens when you press the Right Soft
Key. Typically, the Right Soft Key cancels the last action or returns to the previous
menu.
Left Soft Key Action — The action that happens when you press the Left Soft Key.
Typically, the Left Soft Key selects the Options menu.
Wireless Signal Status
Current Time
Right Soft Key Action
3-5
Page 24

Getting Started
The Main Menu
The main menu provides access to all network and phone settings, plus other
features. The menus are easy to move through using the four-way Navigation key.
Just move the Navigation key up or down to highlight a menu item, then push down
on the key to select it.
The following table outlines the phone menu structure.
Wi-Fi SIP Phone Main Menu
Menu Description
Call History Lists missed calls, incoming and outgoing calls
Contacts Your contacts list
Applications Access to other phone features
Phone Settings Access to phone settings and call features
Network Settings Network configuration, SIP settings, and current wireless
Calendar Access to the calendar application
network status
3-6
Page 25

Making a Call
To make a VoIP call, follow these steps:
Making a Call
1
1. Press the keypad keys to directly enter the number you want to call.
2. Press the Send button to make the call. Wait for the call to connect and be
answered.
3. While the call is in progress, the contact number and length of time the call is
active are displayed.
4. When you have finished the call, press the End button.
23 4
3-7
Page 26

Getting Started
3-8
Page 27

Chapter 4: Managing Contacts
Your Wi-Fi SIP Phone contact list displays names that you frequently call. At first,
your contact list will be empty. You need to manually add names and numbers to
build up your contacts list.
As well as a SIP number, the contacts list can include home, work, and mobile
numbers. The list can also store other information on each contact, such as an
e-mail address.
Adding a Contact
To add a new contact name to your contact list, follow these steps:
1
23
4
5
1. Press the Navigation Key to select the main menu and then use the Navigation
key to select “Contacts.”
2. From the Contacts screen, use the Left Soft Key to select Options.
3. From the Options menu, select “New.”
4. Enter the following details for the new contact:
• Name — The name of the contact.
4-1
Page 28

Managing Contacts
• Nick — (Optional) An alias for the name of the contact.
• Emails — (Optional) Specifies an e-mail address for the contact.
• Category — You can assign each contact to a personal or business category,
or just leave it as undefined. The assigned category can then be used to
restrict displayed contact names.
• Ringtone — Assigns a specific ringtone to the contact.
• Contact Numbers — Select the phone icon for the number you want to enter.
For example, home phone number or business mobile. Enter phone numbers
for one or more of the defined icons.
5. Press the Right Soft Key when you are finished to return to the contacts list.
The new contacts entry is displayed in the list.
Deleting Contacts
You can remove specific names from your contacts list or clear the whole list entirely.
To delete a contact entry, follow these steps:
1
1. Select Contacts from the main menu, then use the Navigation key to highlight
the name you want to delete.
2. Press the Left Soft Key to access the Options menu, then select Delete.
(Selecting “Delete All” clears the whole contacts list.)
3. Press the Left Soft Key to confirm the delete action.
4. The deleted entry is no longer displayed in the contacts list.
23
4
4-2
Page 29
Editing Contact Details
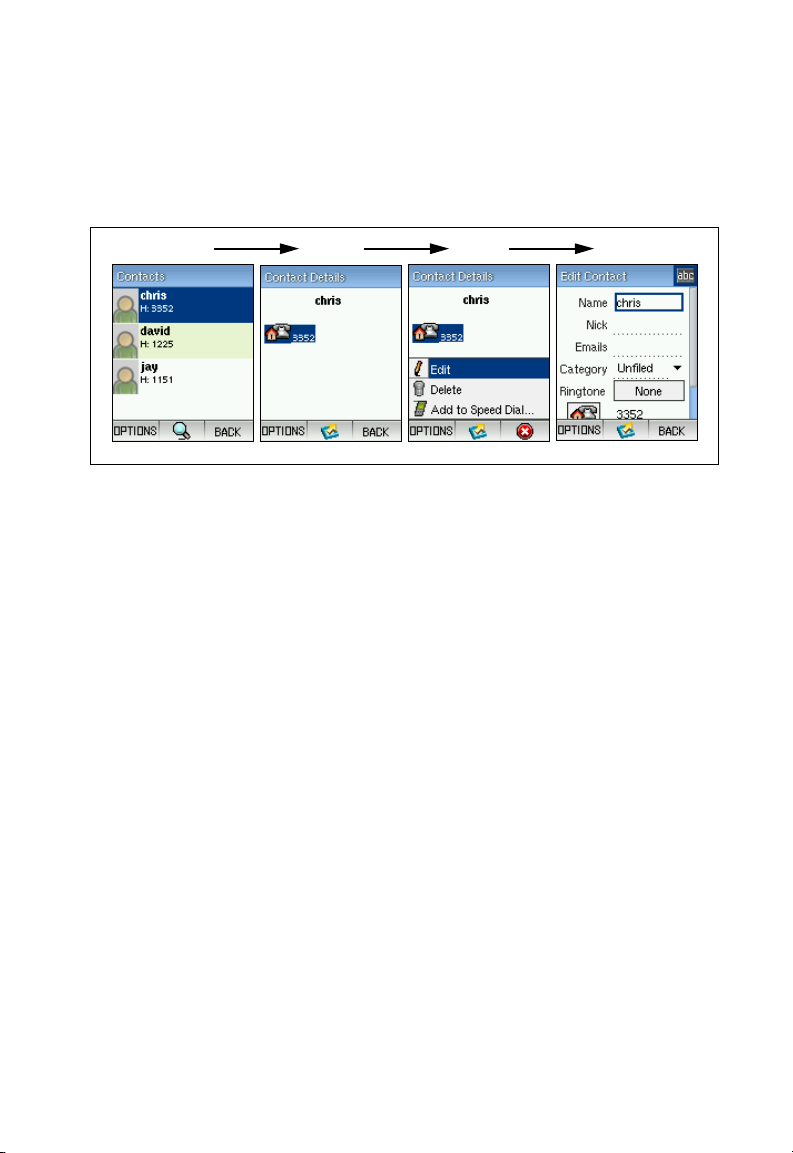
Editing Contact Details
When you have entered all the details for your contacts, you can still make changes
by using Edit on the Options menu.
Follow these steps:
1
1. Select Contacts from the main menu, then use the Navigation key to highlight
the name you want to edit.
2. Press the Navigation Key to select the contact name.
3. Use the Left Soft Key to access the Options menu, then select Edit.
4. Change the contact details as you require. When finished, use the Right Soft
Key to return to the contacts list.
23
4
4-3
Page 30

Managing Contacts
Searching for Contacts
You can search for contacts in your list by entering the letters of a name using the
keypad. As each key is pressed, the displayed list is restricted to names that start
with those letters. Names are listed in alphabetical order.
For a typical example, see these steps:
1
1. Select Contacts from the main menu.
2. Press the “MNO 6” key to restrict to names that start with “m,” “n,” or “o.”
3. Press the “GHI 4” key to restrict to names that start “mg,” “mh,” or “mi.”
23
4-4
Page 31

Adding a Contact to Speed Dial
Adding a Contact to Speed Dial
The Speed Dial feature allows you to assign contact phone numbers or other phone
applications to a keypad number for quick access. It is possible to use one and two
digit Speed Dial numbers up to “99.”
To use a Speed Dial number, press and hold down the keypad number. For two digit
Speed Dial numbers, press and hold down the second digit of the number.
To assign a contact phone number to a Speed Dial key, follow these steps:
1
23
6
1. Press the Navigation Key to select the main menu and then use the Navigation
key to select “Contacts.”
2. In the contacts list, use the Navigation key to highlight the name you want to set
to a Speed Dial number, then press the Navigation Key to select it.
3. In the contact details, highlight the phone number you want to set to Speed Dial.
4
5
4. Use the Left Soft Key to access the Options menu, then select Add to Speed
Dial.
5. The Speed Dial list displays with the contact number set to the next available
Speed Dial number. Move the Navigation Key up and down to select the
preferred Speed Dial number.
4-5
Page 32

Managing Contacts
6. Use the Navigation Key to select another Speed Dial number, if required. Press
the Navigation Key to confirm the setting.
4-6
Page 33

Chapter 5: Call Features
This chapter shows how to use various call functions of the Wi-Fi phone and also
view your call history.
Call Waiting
The Wi-Fi phone can notify you of a second incoming call and place it in a wait state.
When “call waiting” is enabled, a call-waiting tone alerts you to a second incoming
call. You can then choose to finish the current call or just press the Call key to
immediately answer the incoming call while placing the current call on hold.
To set up call waiting, follow these steps:
1
1. Press the Navigation Key to select the main menu and then use the Navigation
key to select “Settings.”
2. In the Settings menu, use the Navigation key to highlight “Call Options,” then
press the Navigation Key to select it.
3. In the Call Options menu, use the Navigation key to highlight “On,” then press
the Navigation Key to cancel or activate the feature.
23
5-1
Page 34

Call Features
Call Hold/Resume
This feature allows you to put a caller on hold while a second call is answered or
made. The phone call on hold can be resumed when you are available to talk again.
To use call hold and resume, follow these steps:
1
8
23
67
5
9
4
1. Make a call.
2. Press the Left Soft Key to select the options. Select “Hold.”
3. The phone call is on hold.
4. You can now make a second call.
5. The second call is active while the first call is on hold.
5-2
Page 35

Call Hold/Resume
6. You can use the Swap feature to swap the call status of two different phone
calls. Press the Left Soft Key to select the options. Select “Swap.”
7. The status of the two calls are swapped. The first call is again active and the
second call placed on hold.
8. To end the active call, press the Left Soft Key to select the options. Select
“End.”
Note: If you want to end both the active call and the call on hold, select “End all
calls.”
9. To resume the call on hold, press the Left Soft Key to select the options. Select
“Resume.”
Note: Only one call can be held at one time. The option of “Resume” appears only
when you have a call on hold and terminate the active call.
5-3
Page 36

Call Features
Three-Way Conference Call
This feature allows you to establish a three-party conference call.
To use three-way conference call, follow these steps:
1
7
1. Make a call.
2. Press the Left Soft Key to select the options. Select “Hold.”
3. The phone call is on hold.
4. You can now make a second call.
23
6
5
4
5. The second call is active while the first call is on hold.
6. Press the Left Soft Key to select the options. Select “Join.”
7. Now the first and second calling parties can all talk together. When you have
finished the call, press the End button or press the Left Soft Key and select
“End.”
Note: When you end a three-way conference call, you will end
second calls at the same time. You cannot terminate one call but preserve
the other.
5-4
both the first and
Page 37

Call Transfer
Call Transfer
This feature allows you to transfer a call from your phone to another phone.
To use call transfer, follow these steps:
1
1. Make a call.
2. Press the Left Soft Key to select the options. Select “Hold.”
3. The phone call is on hold.
4. Make a second call.
23
6
5
4
5. The second call is active while the first call is on hold.
6. Press the Left Soft Key to select the options. Select “Transfer” and the first
caller on hold will be transferred to the second caller. Your phone will be
automatically hung up.
5-5
Page 38

Call Features
Call History
All incoming, outgoing, and missed calls are logged by the phone. You can access
the call history directly from the main screen by pressing the Call key, or from the
main menu. The call history logs the last 10 calls made and received by the phone. If
a calling number is already in the contacts list, the contact details are also displayed.
To access the call history from the main menu, follow these steps:
1
1. Press the Navigation Key to select the main menu and then use the Navigation
key to select “Call History.”
2. In the Call History screen the tab with the blue phone icon lists outgoing calls,
the green icon lists incoming calls, and the orange icon lists missed calls. Press
the Right Soft key to return to the main menu.
2
5-6
Page 39

Speed Dial
Speed Dial
The Speed Dial feature allows you to assign contact phone numbers or other phone
applications to a keypad number for quick access. It is possible to use one and two
digit Speed Dial numbers up to “99.”
To use a Speed Dial number, press and hold down the keypad number. For two digit
Speed Dial numbers, press and hold down the second digit of the number.
There are three basic ways to assign an action to a Speed Dial number. For a
contact phone number, it can be assigned directly from the entry in the contacts list.
For other phone applications, such as the calendar, the assignment can be set from
the Speed Dial set up on the Phone Settings menu or from the Applications menu.
To assign a contact phone number to a Speed Dial key, follow these steps:
1
23
6
1. Press the Navigation Key to select the main menu and then use the Navigation
key to select “Contacts.”
2. In the contacts list, use the Navigation key to highlight the name you want to set
to a Speed Dial number, then press the Navigation Key to select it.
3. In the contact details, highlight the phone number you want to set to Speed Dial.
4
5
4. Use the Left Soft Key to access the Options menu, then select Add to Speed
Dial.
5-7
Page 40

Call Features
5. The Speed Dial list displays with the contact number set to the next available
Speed Dial number. Move the Navigation Key up and down to select the
preferred Speed Dial number.
6. Use the Navigation Key to select another Speed Dial number, if required. Press
the Navigation Key to confirm the setting.
5-8
Page 41

Chapter 6: Network and VoIP Settings
A Wi-Fi wireless network is defined by its Service Set Identifier (SSID) or network
name. Wireless clients that want to connect to a network must set their SSID to the
same SSID of the network service. To use the Wi-Fi phone you must either manually
set an SSID or use its “scan” feature to search for nearby Wi-Fi networks.
Some Wi-Fi networks use security, usually through the use of a “key” text string or
passphrase. The Wi-Fi Phone supports WEP and WPA-PSK security. Check with
the network operator for the security keys to use.
The Wi-Fi Phone uses Session Initiation Protocol (SIP) as the control mechanism
that sets up, initiates, and terminates calls between a caller and a called party. The
SIP messaging makes use of “Proxy,” “Redirect,” and “Registration” servers to
process call requests and find the location of called parties across the Internet.
When SIP has set up a call between two parties, the actual voice communication is
a direct peer-to-peer connection using the standard Real-Time Protocol (RTP),
which streams the encoded voice data across the network.
Voice over Internet Protocol (VoIP) service providers operate SIP proxy servers that
allow you to register your Wi-Fi Phone on their system so that you can make
telephone calls over the Internet. Your VoIP service provider will provide you with the
connection details that need to be set up on the Wi-Fi Phone to be able to use their
service.
Wi-Fi Network Settings
The Wi-Fi Phone requires a wireless connection to a Wi-Fi network access point to
operate. You can set the phone to connect to specific wireless networks or search
for any nearby networks. Wireless network information is stored in the phone’s
memory as “Preferred Networks,” which are searched for each time the phone is
powered on.
You can search or “scan” for Wi-Fi networks that are within range of your location. A
list of detected networks displays the network name and the strength of the radio
signal. When possible, you should try to connect to networks with a strong signal.
6-1
Page 42

Network and VoIP Settings
To configure wireless network settings, follow these steps:
1
23
67
1. Press the Navigation Key to select the main menu and then use the Navigation
key to select “Network Settings.”
2. From the Network Settings menu, select “Wireless Network.”
3. Press the Left Soft Key to select the options. Select “New” to find and set up a
new network. For existing networks, you can select “Edit” to change settings, or
“Delete” to remove the network from your list.
4
5
4. In the New Profile screen, either enter the SSID (network name) of the new
network or use “Scan” to perform a search for nearby Wi-Fi networks.
Set the connection type to “Access Point” and configure network security, if
required by the network operator. For more details on the security options, see
“Network Security Settings” on page 7-3.
5. Select Dynamic Host Configuration Protocol (DHCP) to assign IP settings, or
manually enter details as provided by the network operator. Note that when you
select DHCP, you do not have to configure the IP Address, Gateway, IP
Netmask, or DNS entries.
The Wi-Fi Phone must have a valid IP address to be able to connect to SIP
servers and make calls. Most wireless network operators will use DHCP to
automatically assign IP addresses. DHCP is the default setting.
6-2
Page 43

Network Security Settings
6. If needed, you can set the maximum wireless data rate and transmit power. If
located close to an access point, you can reduce the transmit power while
maintaining a high data rate.
7. When configuration settings are complete, press the Right Soft key to return to
the Wireless Configuration list. The new network is added to the list.
You can select the network you want to connect to from the options menu.
Changing your network selection requires the phone to restart.
Network Security Settings
Wireless networks can be configured as “open systems” that broadcast a beacon
signal including the configured SSID. Wireless clients with a configured SSID of
“any” can read the SSID from the beacon and automatically set their SSID to allow
immediate connection to the network. Secure wireless networks implement one of
several types of user authentication and data encryption to prevent unauthorized
access.
Wired Equivalent Privacy (WEP) provides a basic level of security, preventing
unauthorized access to the network and encrypting data transmitted between
wireless clients and the access point. WEP uses static shared keys (fixed-length
hexadecimal or alphanumeric strings) that are manually distributed to all clients that
want to use the network.
Wi-Fi Protected Access (WPA) employs a combination of technologies to provide an
enhanced security solution for wireless networks. The WPA Pre-shared Key
(WPA-PSK) mode for small networks uses a common password phrase that must be
manually distributed to all clients that want to connect to the network.
WPA2 is a futher security enhancement that includes the now ratified IEEE 802.11i
wireless security standard. Both WPA and WPA2 provide very robust security
through the support of the Advanced Encryption Standard (AES) and Temporal Key
Integrity Protocol (TKIP) encryption ciphers.
If the network you want to connect to uses security, the network operator should
provide details of the security used and the appropriate encryption keys.
The Wi-Fi Phone supports the following security mechanisms:
• WEP shared key
• WPA Pre-shared Key
• WPA2 Pre-shared Key
6-3
Page 44

Network and VoIP Settings
The Network Profile screen contains these items:.
Network Authentication – The basic authentication types
available on the phone. By first selecting the authentication
type, only valid settings are then displayed.
• Open – No user authentication is used.
• WPA PSK – The WPA Pre-shared Key (PSK) mode for
small networks that uses a common password string that is
manually distributed. Requires the PSK pass-phrase string
to be entered. Either TKIP or AES can be set as the
encryption cipher.
• WPA2 PSK – The WPA2 Pre-shared Key (PSK) mode for small networks that uses
a common password string that is manually distributed. Requires the PSK
pass-phrase string to be entered. Either TKIP or AES can be used as the
encryption cipher.
Data Encryption – Selects the data encryption to use for the selected Network
Authentication method:
• None – No data encryption method is used.
• WEP – Use Wired Equivalent Privacy (WEP) keys for encryption. WEP encryption
requires a 64 or 128 bit key to be entered. This option is only available when
Network Authentication is set to Open.
• AES – Use Advanced Encryption Standard (AES) keys for encryption. WPA2 uses
AES Counter-Mode encryption with Cipher Block Chaining Message
Authentication Code (CBC-MAC) for message integrity. The AES Counter-Mode/
CBCMAC Protocol (AES-CCMP) provides extremely robust data confidentiality
using a 128-bit key. Use of AES-CCMP encryption is specified as a standard
requirement for WPA2.
• TKIP – Use Temporal Key Integrity Protocol (TKIP) keys for encryption. WPA
specifies TKIP as the data encryption method to replace WEP. TKIP avoids the
problems of WEP static keys by dynamically changing data encryption keys.
Key Index – If you select WEP security, you need to select
the active transmit key to use for encryption. The index
number (1 to 4) must be the same as used on the network
access point.
Network Key – Enter a key value that matches the security
setting.
• 64 Bit WEP: Enter keys as 5 alphanumeric characters or 10
hexadecimal digits.
• 128 Bit WEP: Enter keys as 13 alphanumeric characters or 26 hexadecimal digits.
• WPA/WPA2 PSK: Enter a key as an easy-to-remember form of letters and
numbers. The key must be from 8 to 63 characters, which can include spaces.
6-4
Page 45

Network Status
Network Status
To check details of your current network connection, use the Network Status screen
on the Network Settings menu.
Follow these steps:
1
1. Press the Navigation Key to select the main menu and then use the Navigation
key to select “Network Settings.”
2. From the Network Settings menu, select “Network Status.”
3. Use the Navigation Key to scroll down and view all the connection details.
When finished, press the Right Soft key to return to the Network Settings menu.
23
6-5
Page 46

Network and VoIP Settings
VoIP Settings
Voice over Internet Protocol (VoIP) service providers operate SIP proxy servers that
allow you to register your Wi-Fi Phone on their system. Session Initiation Protocol
(SIP) is one of the leading signaling protocols for VoIP. The Wi-Fi Phone uses SIP as
the control mechanism that sets up, initiates, and terminates calls between a caller
and a called party. The SIP messaging makes use of “Proxy,” “Redirect,” and
“Registration” servers to process call requests and find the location of called parties
across the Internet.
The SIP server details and settings must be provided by your VoIP service provider.
To configure VoIP settings, follow these steps:
1 2
8
1. Press the Navigation Key to select the main menu and then use the Navigation
key to select “Network Settings.”
2. From the Network Settings menu, select “VoIP.”
3. From the VoIP Setting menu, select the profile to configure, then press the Left
Soft Key to access the Options menu. Select View/Edit.
3
67
4
5
Note: If you have an SMC PBX SIP server installed in your network for VoIP
services, your SIP Phone will automatically configure a VoIP setting profile.
The profile name "SMC" will be displayed instead of PROFILE5.
6-6
Page 47

VoIP Settings
4. On the VoIP configuration, Basic tab screen, enter these details as provided by
your SIP service provider:
• Phone Number — Your SIP account phone number.
• Display Name — The name that identifies you to other SIP service users
when you make calls.
• Auth. Name — Your SIP account username that uniquely identifies you to the
SIP server.
• Auth. Password — An alphanumeric string that uniquely identifies the SIP
user’s permission rights.
5. On the VoIP configuration, Advanced tab screen, enter the following details as
provided by your SIP service provider:
• Domain (Realm) — The address of the SIP domain. This can be in the form
of an IP address or a URL, as specified by your SIP provider.
• SIP Proxy Address — The Domain name or IP address of the SIP proxy
server.
• SIP Proxy Port — The SIP proxy server port number, normally 5060.
• SIP Registrar Address — The Domain name or IP address of the SIP
registrar server.
• SIP Registrar Port — The SIP registrar server port number, normally 5060.
Scroll down the Advance tab screen and enter the following details if your
network uses NAT. STUN (Simple Traversal of UDP through NAT (Network
Address Translation)) is a protocol for assisting devices behind a NAT firewall
or router with their packet routing. The problem of NAT firewalls can also be
solved using a proxy server to control SIP traffic.
• Use Outbound Proxy — Press the Navigation Key to enable or disable the
funtion.
Outbound Proxy Addr. — The Domain name or IP address of the
Outbound proxy server.
Outbound Proxy Port — The Outbound proxy server port number,
normally 5060.
• Use STUN Server — Press the Navigation Key to enable or disable the
funtion.
STUN Server Address — Specifies the IP address of the STUN server.
STUN Server Port — Specifies the port used by the server.
• Register Timer (sec) — The time the phone waits for a response from the
registrar server.
• DTMF Type — Sets the method of sending of dual-tone multi-frequency
(touch tone) phone signals over the SIP connection.
6-7
Page 48

Network and VoIP Settings
6. On the SIP configuration, Profile tab screen, enter the profile name you want to
use.
7. To activate the account, highlight the profile name and press the Left Soft Key
to access the Options menu, then select Active.
8. The selected SIP account is activated.
6-8
Page 49

Chapter 7: General Phone Settings
General phone settings are available from the Settings menu.
Follow these steps:
1
1. Press the Navigation Key to select the main menu and then use the Navigation
key to select “Settings.”
2. Use the Navigation Key to scroll down and view all the menu items. Press the
Navigation Key to select a menu item. The following items are available:
• Appearance — Sets the wallpaper display. See page 7-3.
• Call Options — Sets call waiting functions. See page 5-1.
• Date/Time — Sets the phones date, time, and time zone. See page 7-3.
• Language — Sets the phone display language. See page 7-3.
• Reset Phone to Default — Resets phone settings to factory defaults. See
page 7-4.
• Reset Wlan & VoIP — Resets WLAN & VoIP settings to factory defaults. See
page 7-4.
• Ring Profiles — Sets a phone ring profile. See page 7-5.
• Sound Control — Sets a ring type and volume. See page 7-5.
• Speed Dial — Configures speed dial functions. See page 7-6.
2
7-1
Page 50

General Phone Settings
Setting the Appearance
The appearance setting allows you to change the background image of your phone
display.
To set a wallpaper from the Settings menu, follow these steps:
1
23
6
1. From the Settings menu, select “Appearance.”
2. Use the Navigation key to highlight “Wallpapers” and then press the Navigation
Key to select it.
3. In the wallpaper list, use the Navigation key to highlight the image you want to
set as the background display, then press the Navigation Key to select it.
4
5
4. Press the Navigation Key again to confirm the selection.
5. Press the Right Soft Key until returning to the main screen.
6. The selected background image is displayed.
7-2
Page 51

Setting the Phone Date and Time
Setting the Phone Date and Time
To set the phone’s system clock, select Date/Time from the
Settings menu.
Select the time zone (T.Z.) so that the phone can
automatically update the time from it’s network connection.
Otherwise, enter the time manually in hours and minutes.
Select Date to set up the correct year, month, and day.
Select the Format tab to set the required date and time
display format.
Setting the Display Language
To set the phone’s screen display language, select Language
from the Settings menu.
Select the language you want to use.
7-3
Page 52

General Phone Settings
Resetting the Phone
To restore the phone’s factory default settings, select Reset
Phone to Default from the Settings menu.
Press the Left Soft Key to confirm the reset.
Note: Resetting the phone to default will also clear your
previous WLAN & VoIP settings.
To clear the phone’s WLAN and VoIP settings, select Reset
WLAN & VoIP from the Settings menu.
Press the Left Soft Key to confirm the reset.
7-4
Page 53

Setting Ring Profiles
To set the phone’s ring profile for different environments,
select Ring Profiles from the Settings menu.
Select the ring profile you want to use. Or, use the Options
menu to change a profile or create a new profile.
When you select Edit or New from the Options menu, you
can set a specific volume, enable Auto Answer and vibrate
alert. For the three standard profiles you cannot change the
profile name.
The Calls tab allows you to set the ring tone and the type of
ringing pattern; off, once, continuous, or ascending.
Setting Ring Profiles
Setting Sound Control
To set the phone’s general ring and key sounds, select
Sound Control from the Settings menu.
Select the volume, tone, and ring type. If required, activate
the vibrate alert, auto answer, and keypad sounds.
7-5
Page 54

General Phone Settings
Setting Speed Dial Actions
The phone’s Speed Dial feature allows you to assign contact phone numbers or
other phone applications to a keypad number for quick access. It is possible to use
one and two digit Speed Dial numbers up to “99.”
To use a Speed Dial number, press and hold down the keypad number. For two digit
Speed Dial numbers, press and hold down the second digit of the number.
Many phone actions can be assigned to a Speed Dial number directly from the
options in the feature set up screen.
To set a Speed Dial number from the Settings menu, follow these steps:
1
23
4
5
1. From the Settings menu, select “Speed Dial.”
2. In the Speed Dial screen, use the Navigation Key to scroll down and highlight
an available Speed Dial number. If you select a number already assigned, you
can change the Speed Dial action for that number.
3. Press the Left Soft Key to display the Options menu and then select “Set.”
4. From the list of available actions, select the one you want to assign to the
Speed Dial number.
5. The Speed Dial screen displays the action assigned to the new number. Press
the Right Soft Key to return to the Settings menu.
7-6
Page 55

Chapter 8: Applications
Several personal applications are available from the Applications menu. The
Contacts, Call History, and Calendar applications are also available directly from the
main menu.
To display the Applications menu, follow these steps:
1
1. Press the Navigation Key to select the main menu and then use the Navigation
key to select “Applications.”
2. Use the Navigation Key to scroll down and view all the menu items. Press the
Navigation Key to select a menu item. The following items are available:
• Calculator — Provides basic calculator functions. See page 8-2.
• Calendar — Opens the calendar application. See page 8-3.
• Call History— Access to the call history lists. See page 5-2.
• Clock — Displays the time and date. See page 8-5.
• Contacts — Access to your list of contacts. See page 4-1.
• Notes — Enter personal notes. See page 8-6.
• System Info — Displays system information. See page 8-7.
• World Time — Displays the local time for world locations. See page 8-8.
2
8-1
Page 56

Applications
Using the Calculator
The phone calculator provides basic functions, such as add,
multiply, and divide.
Use the keypad to enter numbers and the “#” key to select
the function required. Press the Navigation Key for the
calculation result.
The calculator Options menu allows you to clear the
calculation or copy the result so that it can be pasted into
other applications, such as Notes.
8-2
Page 57

Using the Calendar
Using the Calendar
The phone calendar provides a simple way to organize your daily events, with
reminder alarms and notes.
To access the calendar application, follow these steps:
1
1. Press the Navigation Key to select the main menu and then use the Navigation
key to select “Calendar.”
2. The Calendar application always starts with a display of the current day’s
events. Press the Left Soft Key to display the Options menu.
3. Select “Month” to switch to the month view. (Select “Settings” if you want to
change the time that each day starts.)
4. Use the Navigation key to select specific days and move to other months. Press
the Navigation key to display the events for a specific day.
2 3 4
8-3
Page 58
Applications
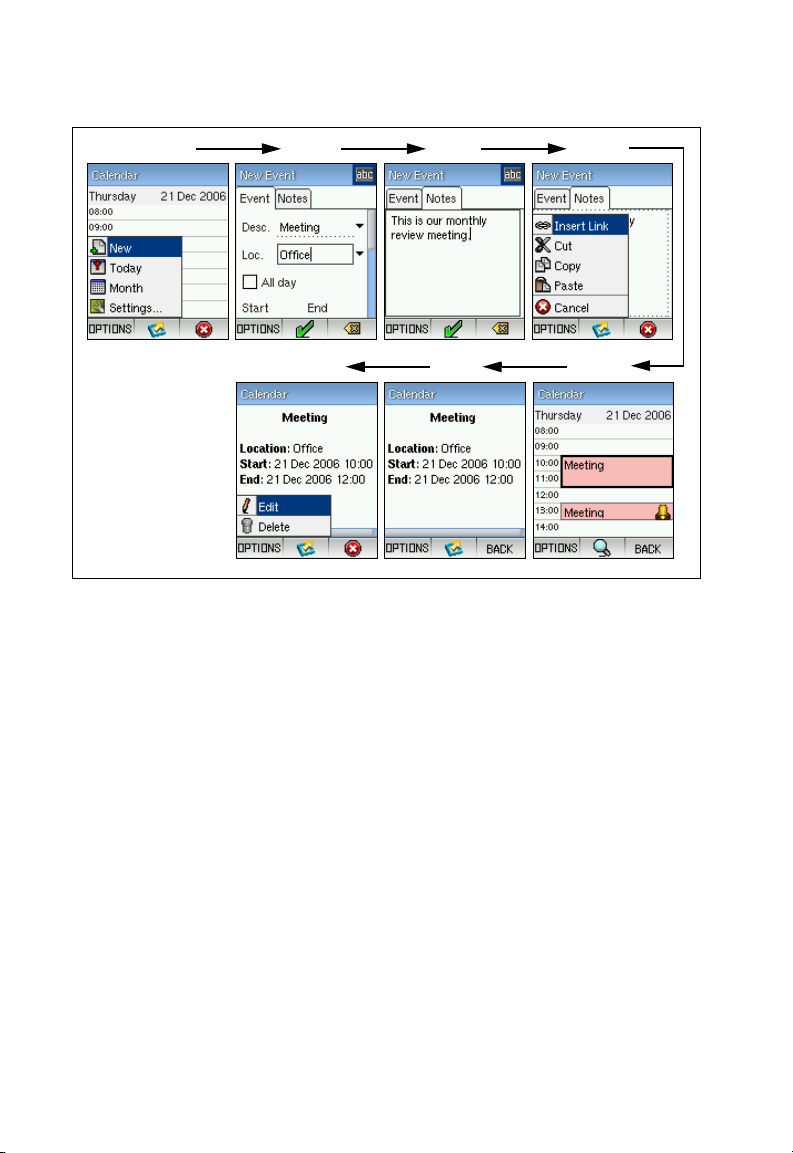
To set up calendar events, follow these steps:
1
23
67
1. From the day view, press the Left Soft Key to display the Options menu and
select “New.”
2. Select a description of the event (Meeting, Lunch, Dinner, Travel) and the
location (Office, Home). Then select “All day” or set the start and end time of
the event. You can also set an alarm to repeat at defined intervals to remind
you of the event.
4
5
3. If required, select the “Notes” tab and enter your own text message that relates
to the details of the event.
4. From the “Notes” tab, press the Left Soft Key to access the Options menu. You
can cut, copy, and paste text or information from other applications (such as the
calculator). You can also use the “Insert Link” option to copy information from
other calendar events or your contacts list.
5. When you have finished the set up for the event, press the Right Soft Key to
return to the day view. The new event is displayed.
6. You can use the Navigation key to select events in your calendar. Press the
Navigation key to list the details of the event.
7. Press the Left soft Key to display the Options menu. Select “Edit” to change
details of the event, or “Delete” to remove it fromt he calendar.
8-4
Page 59

Using the Clock
The Clock application provides a clock display as well as a
stopwatch and daily alarm.
Press the Left Soft Key to display the Options menu and
access the stopwatch and alarm settings.
To start and stop the stopwatch, press the “*” key. To reset
the stopwatch or for lap/split times, press the “#” key. When
stopped, you can use the Navigation keys to scroll back
through the lap/split times.
Using the Clock
The daily alarm allows you to set one alarm time for specific
days of the week, Set the alarm to “Enabled” then set the
time. Use the Navigation key to select the days of the week
that the alarm should apply.
8-5
Page 60

Applications
Making Notes
The Notes application allows you to store short text notes
and keep them in a named file on the phone.
In the Notes application, select “New” to open a new file and
enter your text.
Press the Left Soft Key to display the Options menu. Select
“Properties” to name your file.
When you have completed your note text, press the
Navigation key then the Right Soft Key to return to the file
list. The new notes file is displayed in the list
Press the Navigation key to select any notes file and make
changes. Use the Options menu to delete notes files.
8-6
Page 61

Displaying System Information
Displaying System Information
The Applications menu provides access to general system
information, such as software and hardware versions. From
the Applications menu, select “System Info.”
Select the “Flash” tab to check system memory availability.
8-7
Page 62

Applications
Displaying World Times
The World Time application displays the local time for various
world locations.
The drop-down list displays five fixed locations and any other
locations recently selected from the world map. Use the
Navigation key to select either the list or the map.
You can enlarge the world map by selecting the magnifying
glass icon. Use the Navigation key to scroll up/down or left/
right to locate cities. The loca time is displayed in the yellow
text box, Press the Navigation key to add the location to the
list.
8-8
Page 63

Appendix A: Specifications
Battery Life
Use Time: 3 hrs
Standby Time: 50 hrs
Li-Ion 3.7 V minimum 1100 mAH
Physical Size
115 x 49 x 18 mm (4.53 x 1.93 x 0.71 in.)
Temperature
Operating: 0 to 40 °C (32 to 104 °F)
Storage: -20 to 70 °C (-4 to 158 °F)
Humidity
10% to 85% (non-condensing)
Maximum 802.11b/g Channels
FCC/IC: 1-11
ETSI: 1-13
France: 10-13
MKK: 1-14
Operating Frequency
2.4 ~ 2.4835 GHz (US, Canada, ETSI)
2.4 ~ 2.497 GHz (Japan)
Data Rate
802.11g: 6, 9, 11, 12, 18, 24, 36, 48, 54 Mbps (automatic fall back)
802.11b: 1, 2, 5.5, 11 Mbps (automatic fall back)
Modulation Type
802.11g: CCK, BPSK, QPSK, OFDM
802.11b: CCK, BPSK, QPSK
RF Output Power
802.11b: 16 dBm
802.11g: 12 dBm
Antenna Gain
5.5 dBi
Emissions
FCC Part 15B Class B
VCCI Class B
EN61000-3-2
EN61000-3-3
A-1
Page 64

Specifications
Radio Signal Certification
FCC Part 15C
EN 300-328
EN 301 489-1
EN 301 489-17
ARIB STD-T66
ARIB STD-33
DGT LP0002
Temperature
IEC 68-2-14
Vibration
IEC 68-2-36, IEC 68-2-6
Shock
IEC 68-2-29
Drop
IEC 68-2-32
Standards
IEEE 802.11b/g
A-2
Page 65

Appendix B: Software Upgrade
Using the Update Wizard
The Wi-Fi SIP Phone’s software can be updated through a USB connection to a PC.
When you have the software upgrade file copied to your local PC, you are ready to
start the update process.
Make sure the mini-USB cable is not connected to the phone and the phone is
completely turned off, then follow these steps:
1. Run the update firmware file. The application window displays, as illustrated
below.
B-1
Page 66

Software Upgrade
2. Press “Next” to enter the next window display.
3. Press “Next” to enter the next window display and connect the mini-USB cable
from the PC to the phone.
Note: If you have problems with the USB connection to the phone, try resetting the
phone by removing the battery from the phone and then re-installing it again.
B-2
Page 67

Using the Update Wizard
4. Wait for the file download process to start. The file download normally takes
15-20 minutes. Do not interrupt the download or disconnect the USB cable
during this time.
5. When the file download and flash write process has completed, the “Your
phone has been updated” message is displayed. Click “Finish”.
6. Disconnect the mini-USB cable.
7. Power on the phone to run the upgrade software.
B-3
Page 68

Software Upgrade
B-4
Page 69

Appendix C: License Information
This product includes copyrighted third-party software subject to the terms of the
GNU General Public License (GPL), GNU Lesser General Public License (LGPL), or
other related free software licences. The GPL code used in this product is distributed
WITHOUT ANY WARRANTY and is subject to the copyrights of one or more
authors. For details, refer to the section "The GNU General Public License" below,
or refer to the applicable licence as included in the source-code archive.
The GNU General Public License
GNU GENERAL PUBLIC LICENSE
Version 2, June 1991
Copyright (C) 1989, 1991 Free Software Foundation, Inc.
59 Temple Place, Suite 330, Boston, MA 02111-1307 USA
Everyone is permitted to copy and distribute verbatim copies of this license
document, but changing it is not allowed.
Preamble
The licenses for most software are designed to take away your freedom to share
and change it. By contrast, the GNU General Public License is intended to
guarantee your freedom to share and change free software--to make sure the
software is free for all its users. This General Public License applies to most of the
Free Software Foundation's software and to any other program whose authors
commit to using it. (Some other Free Software Foundation software is covered by
the GNU Library General Public License instead.) You can apply it to your
programs, too.
When we speak of free software, we are referring to freedom, not price. Our
General Public Licenses are designed to make sure that you have the freedom to
distribute copies of free software (and charge for this service if you wish), that you
receive source code or can get it if you want it, that you can change the software or
use pieces of it in new free programs; and that you know you can do these things.
To protect your rights, we need to make restrictions that forbid anyone to deny you
these rights or to ask you to surrender the rights. These restrictions translate to
certain responsibilities for you if you distribute copies of the software, or if you
modify it.
For example, if you distribute copies of such a program, whether gratis or for a fee,
you must give the recipients all the rights that you have. You must make sure that
they, too, receive or can get the source code. And you must show them these terms
so they know their rights.
C-1
Page 70

License Information
We protect your rights with two steps: (1) copyright the software, and (2) offer you
this license which gives you legal permission to copy, distribute and/or modify the
software.
Also, for each author's protection and ours, we want to make certain that everyone
understands that there is no warranty for this free software. If the software is
modified by someone else and passed on, we want its recipients to know that what
they have is not the original, so that any problems introduced by others will not
reflect on the original authors' reputations.
Finally, any free program is threatened constantly by software patents. We wish to
avoid the danger that redistributors of a free program will individually obtain patent
licenses, in effect making the program proprietary. To prevent this, we have made it
clear that any patent must be licensed for everyone's free use or not licensed at all.
The precise terms and conditions for copying, distribution and modification follow.
GNU GENERAL PUBLIC LICENSE TERMS AND CONDITIONS FOR COPYING,
DISTRIBUTION AND MODIFICATION
1. This License applies to any program or other work which contains a notice
placed by the copyright holder saying it may be distributed under the terms of
this General Public License. The "Program", below, refers to any such program
or work, and a "work based on the Program" means either the Program or any
derivative work under copyright law: that is to say, a work containing the
Program or a portion of it, either verbatim or with modifications and/or
translated into another language. (Hereinafter, translation is included without
limitation in the term "modification".) Each licensee is addressed as "you".
Activities other than copying, distribution and modification are not covered by
this License; they are outside its scope. The act of running the Program is not
restricted, and the output from the Program is covered only if its contents
constitute a work based on the Program (independent of having been made by
running the Program). Whether that is true depends on what the Program does.
2. You may copy and distribute verbatim copies of the Program's source code as
you receive it, in any medium, provided that you conspicuously and
appropriately publish on each copy an appropriate copyright notice and
disclaimer of warranty; keep intact all the notices that refer to this License and
to the absence of any warranty; and give any other recipients of the Program a
copy of this License along with the Program.
You may charge a fee for the physical act of transferring a copy, and you may at
your option offer warranty protection in exchange for a fee.
3. You may modify your copy or copies of the Program or any portion of it, thus
forming a work based on the Program, and copy and distribute such
modifications or work under the terms of Section 1 above, provided that you
also meet all of these conditions:
C-2
Page 71

The GNU General Public License
a). You must cause the modified files to carry prominent notices stating that
you changed the files and the date of any change.
b). You must cause any work that you distribute or publish, that in whole or in
part contains or is derived from the Program or any part thereof, to be
licensed as a whole at no charge to all third parties under the terms of this
License.
c). If the modified program normally reads commands interactively when run,
you must cause it, when started running for such interactive use in the
most ordinary way, to print or display an announcement including an
appropriate copyright notice and a notice that there is no warranty (or else,
saying that you provide a warranty) and that users may redistribute the
program under these conditions, and telling the user how to view a copy of
this License. (Exception: if the Program itself is interactive but does not
normally print such an announcement, your work based on the Program is
not required to print an announcement.)
These requirements apply to the modified work as a whole. If identifiable
sections of that work are not derived from the Program, and can be reasonably
considered independent and separate works in themselves, then this License,
and its terms, do not apply to those sections when you distribute them as
separate works. But when you distribute the same sections as part of a whole
which is a work based on the Program, the distribution of the whole must be on
the terms of this License, whose permissions for other licensees extend to the
entire whole, and thus to each and every part regardless of who wrote it.
Thus, it is not the intent of this section to claim rights or contest your rights to
work written entirely by you; rather, the intent is to exercise the right to control
the distribution of derivative or collective works based on the Program.
In addition, mere aggregation of another work not based on the Program with
the Program (or with a work based on the Program) on a volume of a storage or
distribution medium does not bring the other work under the scope of this
License.
4. You may copy and distribute the Program (or a work based on it, under Section
2) in object code or executable form under the terms of Sections 1 and 2 above
provided that you also do one of the following:
a). Accompany it with the complete corresponding machine-readable source
code, which must be distributed under the terms of Sections 1 and 2 above
on a medium customarily used for software interchange; or,
b). Accompany it with a written offer, valid for at least three years, to give any
third party, for a charge no more than your cost of physically performing
source distribution, a complete machine-readable copy of the
corresponding source code, to be distributed under the terms of Sections 1
and 2 above on a medium customarily used for software interchange; or,
C-3
Page 72

License Information
c). Accompany it with the information you received as to the offer to distribute
corresponding source code. (This alternative is allowed only for
noncommercial distribution and only if you received the program in object
code or executable form with such an offer, in accord with Subsection b
above.)
The source code for a work means the preferred form of the work for making
modifications to it. For an executable work, complete source code means all
the source code for all modules it contains, plus any associated interface
definition files, plus the scripts used to control compilation and installation of the
executable. However, as a special exception, the source code distributed need
not include anything that is normally distributed (in either source or binary form)
with the major components (compiler, kernel, and so on) of the operating
system on which the executable runs, unless that component itself
accompanies the executable.
If distribution of executable or object code is made by offering access to copy
from a designated place, then offering equivalent access to copy the source
code from the same place counts as distribution of the source code, even
though third parties are not compelled to copy the source along with the object
code.
5. You may not copy, modify, sublicense, or distribute the Program except as
expressly provided under this License. Any attempt otherwise to copy, modify,
sublicense or distribute the Program is void, and will automatically terminate
your rights under this License. However, parties who have received copies, or
rights, from you under this License will not have their licenses terminated so
long as such parties remain in full compliance.
6. You are not required to accept this License, since you have not signed it.
However, nothing else grants you permission to modify or distribute the
Program or its derivative works. These actions are prohibited by law if you do
not accept this License. Therefore, by modifying or distributing the Program (or
any work based on the Program), you indicate your acceptance of this License
to do so, and all its terms and conditions for copying, distributing or modifying
the Program or works based on it.
7. Each time you redistribute the Program (or any work based on the Program),
the recipient automatically receives a license from the original licensor to copy,
distribute or modify the Program subject to these terms and conditions. You
may not impose any further restrictions on the recipients' exercise of the rights
granted herein. You are not responsible for enforcing compliance by third
parties to this License.
8. If, as a consequence of a court judgment or allegation of patent infringement or
for any other reason (not limited to patent issues), conditions are imposed on
you (whether by court order, agreement or otherwise) that contradict the
conditions of this License, they do not excuse you from the conditions of this
License. If you cannot distribute so as to satisfy simultaneously your
obligations under this License and any other pertinent obligations, then as a
C-4
Page 73

The GNU General Public License
consequence you may not distribute the Program at all. For example, if a
patent license would not permit royalty-free redistribution of the Program by all
those who receive copies directly or indirectly through you, then the only way
you could satisfy both it and this License would be to refrain entirely from
distribution of the Program.
If any portion of this section is held invalid or unenforceable under any
particular circumstance, the balance of the section is intended to apply and the
section as a whole is intended to apply in other circumstances.
It is not the purpose of this section to induce you to infringe any patents or other
property right claims or to contest validity of any such claims; this section has
the sole purpose of protecting the integrity of the free software distribution
system, which is implemented by public license practices. Many people have
made generous contributions to the wide range of software distributed through
that system in reliance on consistent application of that system; it is up to the
author/donor to decide if he or she is willing to distribute software through any
other system and a licensee cannot impose that choice.
This section is intended to make thoroughly clear what is believed to be a
consequence of the rest of this License.
9. If the distribution and/or use of the Program is restricted in certain countries
either by patents or by copyrighted interfaces, the original copyright holder who
places the Program under this License may add an explicit geographical
distribution limitation excluding those countries, so that distribution is permitted
only in or among countries not thus excluded. In such case, this License
incorporates the limitation as if written in the body of this License.
10. The Free Software Foundation may publish revised and/or new versions of the
General Public License from time to time. Such new versions will be similar in
spirit to the present version, but may differ in detail to address new problems or
concerns.
Each version is given a distinguishing version number. If the Program specifies
a version number of this License which applies to it and "any later version", you
have the option of following the terms and conditions either of that version or of
any later version published by the Free Software Foundation. If the Program
does not specify a version number of this License, you may choose any version
ever published by the Free Software Foundation.
11. If you wish to incorporate parts of the Program into other free programs whose
distribution conditions are different, write to the author to ask for permission.
For software which is copyrighted by the Free Software Foundation, write to the
Free Software Foundation; we sometimes make exceptions for this. Our
decision will be guided by the two goals of preserving the free status of all
derivatives of our free software and of promoting the sharing and reuse of
software generally.
C-5
Page 74

License Information
NO WARRANTY
1. BECAUSE THE PROGRAM IS LICENSED FREE OF CHARGE, THERE IS NO
WARRANTY FOR THE PROGRAM, TO THE EXTENT PERMITTED BY
APPLICABLE LAW. EXCEPT WHEN OTHERWISE STATED IN WRITING THE
COPYRIGHT HOLDERS AND/OR OTHER PARTIES PROVIDE THE
PROGRAM "AS IS" WITHOUT WARRANTY OF ANY KIND, EITHER
EXPRESSED OR IMPLIED, INCLUDING, BUT NOT LIMITED TO, THE
IMPLIED WARRANTIES OF MERCHANTABILITY AND FITNESS FOR A
PARTICULAR PURPOSE. THE ENTIRE RISK AS TO THE QUALITY AND
PERFORMANCE OF THE PROGRAM IS WITH YOU. SHOULD THE
PROGRAM PROVE DEFECTIVE, YOU ASSUME THE COST OF ALL
NECESSARY SERVICING, REPAIR OR CORRECTION.
2. IN NO EVENT UNLESS REQUIRED BY APPLICABLE LAW OR AGREED TO
IN WRITING WILL ANY COPYRIGHT HOLDER, OR ANY OTHER PARTY
WHO MAY MODIFY AND/OR REDISTRIBUTE THE PROGRAM AS
PERMITTED ABOVE, BE LIABLE TO YOU FOR DAMAGES, INCLUDING
ANY GENERAL, SPECIAL, INCIDENTAL OR CONSEQUENTIAL DAMAGES
ARISING OUT OF THE USE OR INABILITY TO USE THE PROGRAM
(INCLUDING BUT NOT LIMITED TO LOSS OF DATA OR DATA BEING
RENDERED INACCURATE OR LOSSES SUSTAINED BY YOU OR THIRD
PARTIES OR A FAILURE OF THE PROGRAM TO OPERATE WITH ANY
OTHER PROGRAMS), EVEN IF SUCH HOLDER OR OTHER PARTY HAS
BEEN ADVISED OF THE POSSIBILITY OF SUCH DAMAGES.
END OF TERMS AND CONDITIONS
C-6
Page 75

Page 76

TECHNICAL SUPPORT
From U.S.A. and Canada (24 hours a day, 7 days a week)
Phn: 800-SMC-4-YOU / 949-679-8000
Fax: 949-502-3400
ENGLISH
Technical Support information available at www.smc.com
FRENCH
Informations Support Technique sur www.smc.com
DEUTSCH
Technischer Support und weitere Information unter www.smc.com
SPANISH
En www.smc.com Ud. podrá encontrar la información relativa a
servicios de soporte técnico
DUTCH
Technische ondersteuningsinformatie beschikbaar op www.smc.com
PORTUGUES
Informações sobre Suporte Técnico em www.smc.com
SWEDISH
Information om Teknisk Support finns tillgängligt på www.smc.com
INTERNET
E-mail address: techsupport@smc.com
Driver updates
http://www.smc.com/
index.cfm?action=tech_support_drivers_downloads
Worl d W ide We b
http://www.smc.com/
SMCWSP-100
20 Mason • Irvine, CA 92618 • Phn: 949-679-8000 • www.smc.com
 Loading...