

Page 1

WSKP100
Wi-Fi Phone
User Guide
www.smc.com
The whole world
can talk for free.
Skype.Com
Page 2

Page 3

User Guide
Guide
Wi-Fi Phone
IEEE 802.11b/g Wireless Phone
with Skype Support
Page 4

WSKP100
E112006-EK-R04
149100035700E
Page 5

Two-Year Warranty
Two-Year Warranty Statement: SMC Networks, Inc. (“SMC”) warrants its products to be free
from defects in workmanship and materials, under normal use and service, for the applicable
warranty term. All SMC products carry a standard (2) Year limited warranty from the date of
purchase from SMC or its Authorized Reseller. SMC may, at its own discretion, repair or replace
any product not operating as warranted with a similar or functionally equivalent product, during
the applicable warranty term. SMC will endeavor to repair or replace any product returned
under warranty within 30 days of receipt of the product. Registration can be accomplished
online via the SMC web site. Failure to register will not affect the standard (2) year warranty.
The (2) year warranty covers a product for two years from the original date of purchase. As new
technologies emerge, older technologies become obsolete and SMC will, at its discretion,
replace an older product in its product line with one that incorporates these newer technologies.
All products that are replaced become the property of SMC. Replacement products may be
either new or reconditioned. Any replaced or repaired product carries either a 30-day limited
warranty or the remainder of the initial warranty, whichever is longer. SMC is not responsible for
any custom software or firmware, configuration information, or memory data of Customer
contained in, stored on, or integrated with any products returned to SMC pursuant to any
warranty. Products returned to SMC should have any customer-installed accessory or add-on
components, such as expansion modules, removed prior to returning the product for
replacement. SMC is not responsible for these items if they are returned with the product.
Customers must contact SMC for a Return Material Authorization number prior to returning any
product to SMC. Proof of purchase may be required. Any product returned to SMC without a
valid Return Material Authorization (RMA) number clearly marked on the outside of the
package will be returned to customer at customer’s expense. For warranty claims within North
America, please call our toll-free customer support number at (800) 762-4968. Customers are
responsible for all shipping charges from their facility to SMC. SMC is responsible for return
shipping charges from SMC to customer.
Page 6

WARRANTIES EXCLUSIVE: IF AN SMC PRODUCT DOES NOT OPERATE AS
WARRANTED ABOVE, CUSTOMER’S SOLE REMEDY SHALL BE REPAIR OR
REPLACEMENT OF THE PRODUCT IN QUESTION, AT SMC’S OPTION. THE
FOREGOING WARRANTIES AND REMEDIES ARE EXCLUSIVE AND ARE IN LIEU OF
ALL OTHER WARRANTIES OR CONDITIONS, EXPRESS OR IMPLIED, EITHER IN
FACT OR BY OPERATION OF LAW, STATUTORY OR OTHERWISE, INCLUDING
WARRANTIES OR CONDITIONS OF MERCHANTABILITY AND FITNESS FOR A
PARTICULAR PURPOSE. SMC NEITHER ASSUMES NOR AUTHORIZES ANY OTHER
PERSON TO ASSUME FOR IT ANY OTHER LIABILITY IN CONNECTION WITH THE
SALE, INSTALLATION, MAINTENANCE OR USE OF ITS PRODUCTS. SMC SHALL
NOT BE LIABLE UNDER THIS WARRANTY IF ITS TESTING AND EXAMINATION
DISCLOSE THE ALLEGED DEFECT IN THE PRODUCT DOES NOT EXIST OR WAS
CAUSED BY CUSTOMER’S OR ANY THIRD PERSON’S MISUSE, NEGLECT,
IMPROPER INSTALLATION OR TESTING, UNAUTHORIZED ATTEMPTS TO REPAIR,
OR ANY OTHER CAUSE BEYOND THE RANGE OF THE INTENDED USE, OR BY
ACCIDENT, FIRE, LIGHTNING, OR OTHER HAZARD. LIMITATION OF LIABILITY: IN
NO EVENT, WHETHER BASED IN CONTRACT OR TORT (INCLUDING
NEGLIGENCE), SHALL SMC BE LIABLE FOR INCIDENTAL, CONSEQUENTIAL,
INDIRECT, SPECIAL, OR PUNITIVE DAMAGES OF ANY KIND, OR FOR LOSS OF
REVENUE, LOSS OF BUSINESS, OR OTHER FINANCIAL LOSS ARISING OUT OF
OR IN CONNECTION WITH THE SALE, INSTALLATION, MAINTENANCE, USE,
PERFORMANCE, FAILURE, OR INTERRUPTION OF ITS PRODUCTS, EVEN IF SMC
OR ITS AUTHORIZED RESELLER HAS BEEN ADVISED OF THE POSSIBILITY OF
SUCH DAMAGES. SOME STATES DO NOT ALLOW THE EXCLUSION OF IMPLIED
WARRANTIES OR THE LIMITATION OF INCIDENTAL OR CONSEQUENTIAL
DAMAGES FOR CONSUMER PRODUCTS, SO THE ABOVE LIMITATIONS AND
EXCLUSIONS MAY NOT APPLY TO YOU. THIS WARRANTY GIVES YOU SPECIFIC
LEGAL RIGHTS, WHICH MAY VARY FROM STATE TO STATE. NOTHING IN THIS
WARRANTY SHALL BE TAKEN TO AFFECT YOUR STATUTORY RIGHTS.
* SMC will provide warranty service for 90 days following discontinuance from the active
SMC price list. Under the two-year warranty, internal and external power supplies, fans,
batteries, power chargers, and cables are covered by a standard 90-day warranty from
date of purchase.
SMC Networks, Inc.
38 Tesla
Irvine, CA 92618
Page 7

Compliances
Federal Communication Commission Interference Statement
This equipment has been tested and found to comply with the limits for a Class B digital
device, pursuant to Part 15 of the FCC Rules. These limits are designed to provide
reasonable protection against harmful interference in a residential installation. This
equipment generates, uses and can radiate radio frequency energy and, if not installed
and used in accordance with the instructions, may cause harmful interference to radio
communications. However, there is no guarantee that interference will not occur in a
particular installation. If this equipment does cause harmful interference to radio or
television reception, which can be determined by turning the equipment off and on, the
user is encouraged to try to correct the interference by one of the following measures:
• Reorient or relocate the receiving antenna
• Increase the separation between the equipment and receiver
• Connect the equipment into an outlet on a circuit different from that to which the receiver
is connected
• Consult the dealer or an experienced radio/TV technician for help
This device complies with Part 15 of the FCC Rules. Operation is subject to the following
two conditions: (1) This device may not cause harmful interference, and (2) this device
must accept any interference received, including interference that may cause undesired
operation.
FCC Caution: Any changes or modifications not expressly approved by the party
responsible for compliance could void the user's authority to operate this equipment.
IMPORTANT NOTE:
FCC Radiation Exposure Statement
This equipment complies with FCC radiation exposure limits set forth for an uncontrolled
environment. End users must follow the specific operating instructions for satisfying RF
exposure compliance.
This transmitter must not be co-located or operating in conjunction with any other antenna
or transmitter.
IEEE 802.11b or 802.11g operation of this product in the U.S.A. is firmware-limited to
channels 1 through 11.
Canada RSS Statement
This Class B digital apparatus complies with Canada RSS-210.
Cet appareil numérique de la classe B est conforme à la norme CNR-210 du Canada.
i
Page 8

Japan VCCI Class B
Taiwan DGT (NCC)
根據交通部低功率管理辦法規定:
第十二條 經型式認證合格之低功率射頻電機,非經許可,公司、商號或使用者均不得擅
第十四條 低功率射頻電機之使用不得影響飛航安全及干擾合法通信;經發現有干擾現象
自變更頻率、加大功率或變更原設計之特性及功能。
時,應立即停用,並改善至無干擾時方得繼續使用。前項合法通信,指依電信
法規定作業之無線電通信。低功率射頻電機須忍受合法通信或工業、科學及醫
療用電波輻射性電機設備之干擾。
EC Conformance Declaration
Marking by the above symbol indicates compliance with the Essential Requirements of
the R&TTE Directive of the European Union (1999/5/EC). This equipment meets the
following conformance standards:
• EN 60950-1 (IEC 60950-1) - Product Safety
• EN 300 328 - Technical requirements for 2.4 GHz radio equipment
• EN 301 489-1, EN 301 489-17 - EMC requirements for radio equipment
• EN 50385 - The Compliance of Radio Base Stations and Fixed Terminal Stations for
Wireless Telecommunication Systems with the Basic Restrictions or the Reference
Levels Related to Human Exposure to Radio Frequency Electromagnetic Fields (110
MHz - 40 GHz)
This device is intended for use in the following European Community countries:
• Austria • Belgium • Denmark
• Finland • France • Germany
• Italy • Luxembourg • Netherlands
• Norway • Spain • Sweden
• Switzerland • United Kingdom • Portugal
• Greece • Ireland • Iceland
Requirements for indoor vs. outdoor operation, license requirements and allowed
channels of operation apply in some countries as described below:
• In Italy the end-user must apply for a license from the national spectrum authority to
operate this device outdoors.
• In Belgium outdoor operation is only permitted using the 2.46 - 2.4835 GHz band:
Channel 13.
• In France outdoor operation is only permitted using the 2.4 - 2.454 GHz band: Channels
1 - 7.
ii
Page 9

Contents
Chapter 1: Introduction 1-1
Package Checklist 1-1
Hardware Description 1-2
AC Power Charger 1-3
Mini USB Cable 1-3
Chapter 2: Installing the Battery 2-1
Charging the Battery 2-2
Powering On the Phone 2-3
Chapter 3: Getting Started 3-1
First-Time Startup 3-1
Understanding the Phone’s LCD Display 3-3
The Main Menu 3-5
The Power Key Menu 3-6
Creating a New Skype Account 3-7
Setting Up Your Contacts 3-8
Making a Call 3-8
Chapter 4: Managing Contacts 4-1
Adding a Skype Contact 4-1
Adding a SkypeOut Contact 4-3
Searching for Contacts 4-4
The Contacts Options Menu 4-5
Blocking a Contact 4-6
Chapter 5: Making and Receiving Skype Calls 5-1
Skype-to-Skype Calls 5-1
Receiving Skype Calls 5-2
SkypeOut Calls 5-3
Dialing a Direct Call 5-4
Receiving SkypeIn Calls 5-5
Putting a Call on Hold 5-6
Muting the Microphone 5-7
Diverting a Call 5-8
iii
Page 10

Contents
Sending Skype Voicemail 5-9
Listening to Skype Voicemail 5-10
Recording a Voicemail Greeting 5-11
History Lists 5-12
Chapter 6: Personal Skype Settings 6-1
Changing Your Skype Status 6-1
Setting Your Profile 6-2
Changing Your Password 6-3
Privacy Settings 6-4
Chapter 7: Wi-Fi Network Settings 7-1
Finding Wi-Fi Networks 7-1
Preferred Networks 7-2
Setting Access to Open Networks 7-3
Chapter 8: General Settings 8-1
Changing the Display Language 8-1
Changing Display Settings 8-2
Setting Alert Tones 8-3
Setting the Time and Date 8-4
Displaying Phone Settings 8-6
Clearing Phone Settings 8-7
Advanced Settings 8-8
Appendix A: Specifications A-1
iv
Page 11

Chapter 1: Introduction
The WSKP100 is a Wi-Fi (IEEE 802.11b/g) wireless phone that enables you to make
™ calls without using a computer. The phone enables you to use your
Skype
normal Skype account with complete mobility, allowing you to talk from any
location where you have an Internet connection through a nearby access point.
Package Checklist
The WSKP100 Wi-Fi Phone package includes these items:
•One Wi-Fi Phone (WSKP100)
• One Lithium-Ion battery
•One headset
•One mini USB cable
•One AC power charger
•Quick Start Guide
•User Manual CD
Inform your dealer if there are any incorrect, missing or damaged items. If
possible, retain the carton, including the original packing materials. Use them to
repack the product in case there is a need to return it.
1-1
Page 12
Introduction
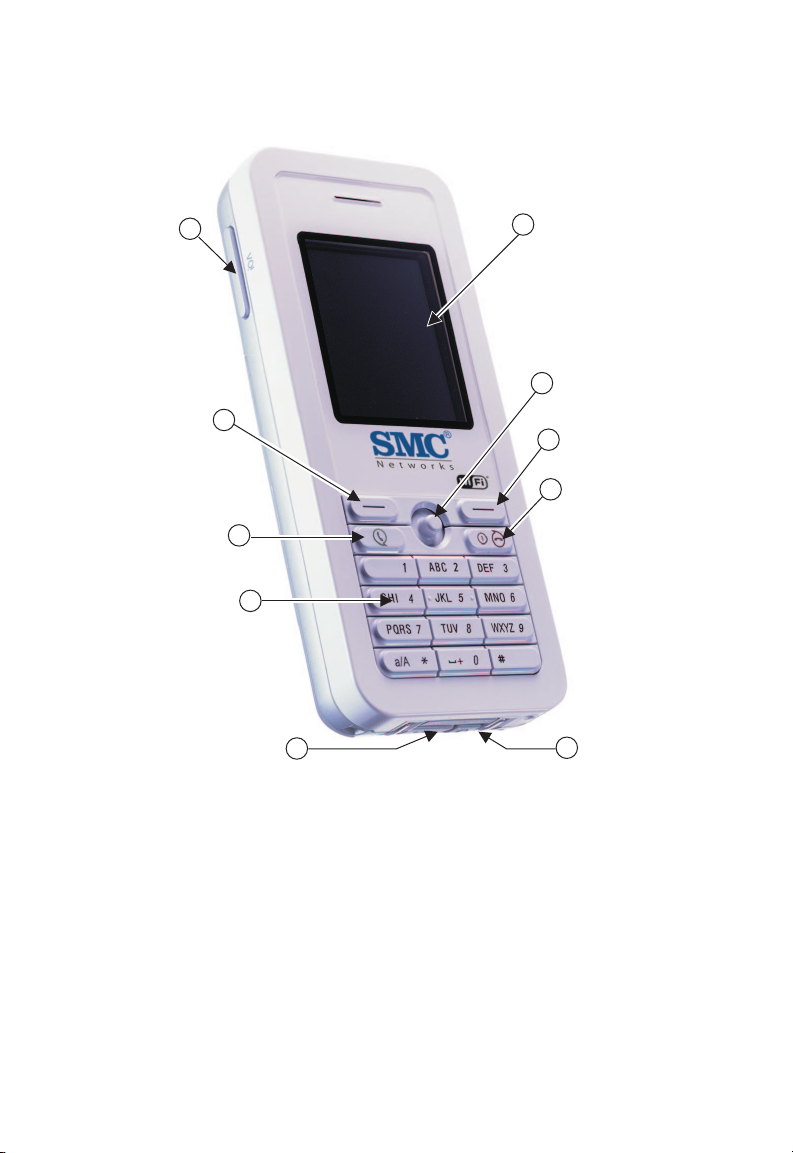
Hardware Description
Volume
10
Button
Left
Soft Key
Send
Alphanumeric
Keypad
9
8
Key
7
USB/Power
Charge Port
LCD
1
Display
Navigation
2
Key
Right
3
Soft Key
End/Power
4
Key
Headset
6
5
Jack
Before preparing the Wi-Fi Phone for use, first become familiar with its main keys,
buttons, and other hardware features.
1.LCD Display — Color software menu display.
2. Navigation Key — Four-direction software navigation key. Pressing the key
down selects the current option.
3.Right Soft Key — Negative action key. Cancels or returns to previous menu.
4.End/Power Key — Ends an active call. Turns the power on and off.
• Press for more than two seconds to power the phone on.
• When on, press for two to four seconds to access the Power Key menu.
• Press for more than four seconds to power the phone off.
1-2
Page 13

Hardware Description
5.Headset Jack — Jack for headset connection.
6.USB/Power Charge Port — Power charger connection for charging battery.
7.Alphanumeric Keypad — Includes 0-9, A-Z, *, and # keys.
• The [a/A *] key selects upper- or lower-case characters, numbers, or
hexadecimal.
• The [ 1 ] key selects common punctuation marks during text input.
• The [ # ] key selects special characters and symbols during text input.
8.Send Key — Calls a selected contact.
9.Left Soft Key — Positive action key. Selects menu option.
10. Volume Button — Adjusts volume of the speaker.
Keypad Lock — The phone keypad can be locked by pressing the Left Soft Key
together with the [a/A *] key. Pressing the two keys again unlocks the keypad.
AC Power Charger
The Wi-Fi Phone will charge an installed battery when connected to the AC power
charger, and the power charger is connected to a power source. The power
charger automatically adjusts to any voltage between 100-240 volts at 50 or 60
Hz. No voltage range settings are required.
Mini USB Cable
The Wi-Fi Phone includes a mini USB cable that can be used to charge the
phone’s battery from a connected PC.
1-3
Page 14

Introduction
1-4
Page 15
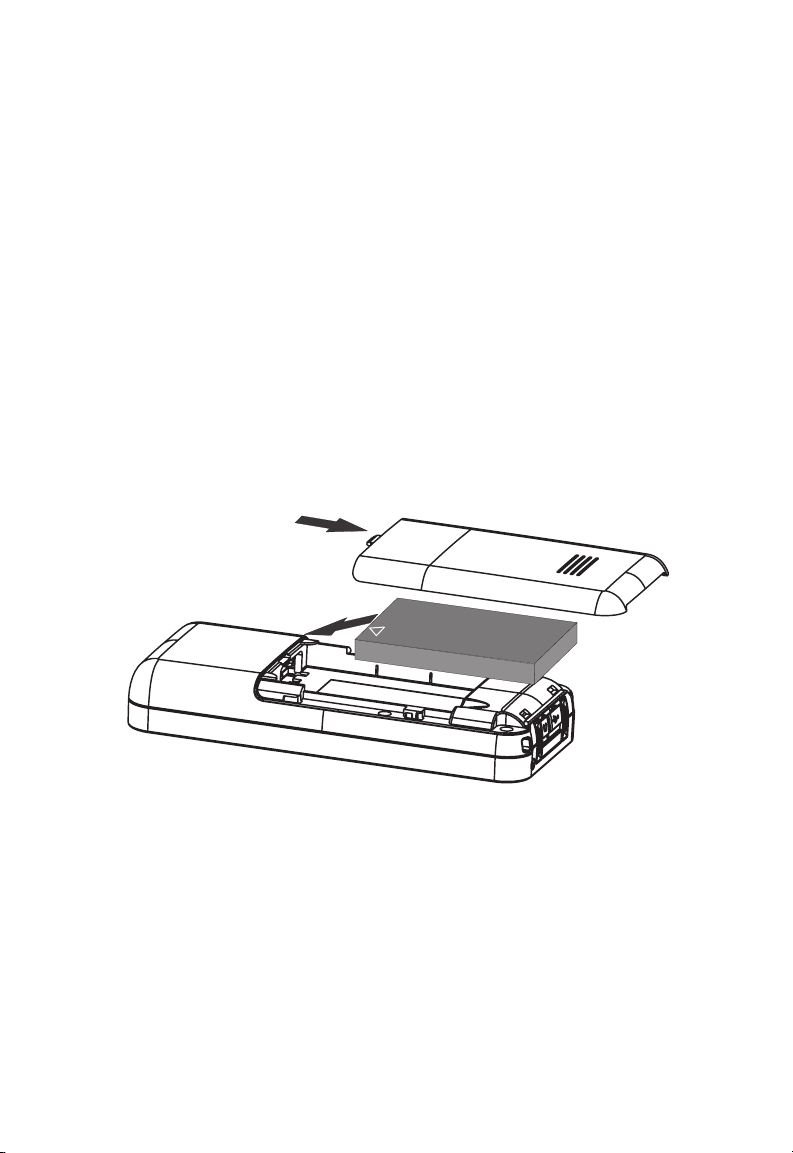
Chapter 2: Installing the Battery
After unpacking the Wi-Fi Phone, you must first install and charge the battery
pack before turning on the phone.
Warning: Risk of explosion if battery is replaced by an incorrect type. Dispose of
used batteries according to the instructions.
Caution: Use only the Lithium-Ion battery pack supplied with the phone. Do not
try to install any other battery. To obtain replacement batteries, contact
your local dealer.
1. Remove Battery Compartment Cover — Place the phone face down. Push
and slide down the battery compartment cover until it becomes free.
2. Install Battery — Place the battery into the compartment. Be sure the text
label on the battery is facing out and the battery’s three metal contacts
point to the top of the phone.
Push Off
Install Battery
3. Replace Battery Compartment Cover — Slide the battery compartment
cover back onto the phone until it clicks firmly into place.
2-1
Page 16
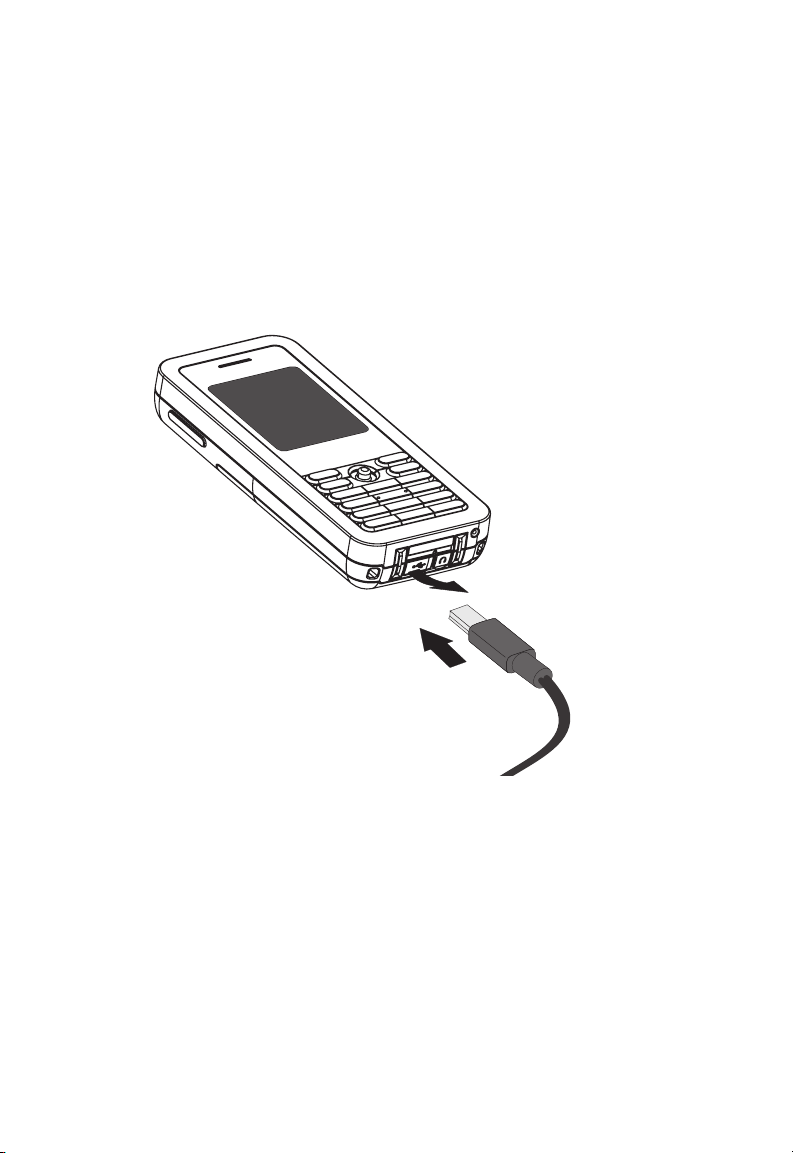
Installing the Battery
Charging the Battery
1. Connect the AC Power Charger — Lift up the rubber cover on the mini USB
charger port and connect the power charger to the port. Then, plug the
charger into an AC electrical outlet.
Note: The power charger automatically adjusts to any voltage between 100-240 volts
at 50 or 60 Hz.
2.
Fully Charge Battery — For the first time use, allow eight hours to fully
charge the battery before turning on the phone.
Lift Cover
Connect
Charger
3. Disconnect the Power Charger — When the battery is fully charged, remove
the power charger from the phone and push down the charger port’s rubber
cover.
Note: When you next have to charge the phone’s battery, you do not have to power
off the phone. Just connect the charger as described above and wait until the
LCD display indicates the battery is fully charged. After the first charge, the
charge time is about three hours.
2-2
Page 17

Powering On the Phone
Powering On the Phone
Push and hold down the End/Power key for more than two seconds to power on
the phone. The LCD display turns on showing an image of a white sun on a yellow
background.
Allow 30 seconds for the phone to start up.
Go to Chapter 3 “Getting Started” to learn how to set up a Wi-Fi network
connection and start using the phone.
Power On
ABC
2
GHI
PQRS
a/A
1
4
7
*
JKL
TUV
DEF
3
MNO
6
5
8
WXYZ
9
+
0
#
2-3
Page 18

Installing the Battery
2-4
Page 19
Chapter 3: Getting Started
The Wi-Fi Phone requires a wireless connection to a Wi-Fi access point to
operate. In addition, the access point network must provide access to the
Internet to make Skype calls.
You can set the phone to connect to specific wireless networks or search for
“open” networks. Wireless network information is stored in the phone’s memory
as “Preferred Networks” that are searched for each time the phone is powered
on.
When powering on the Wi-Fi Phone for the first time, there are no Preferred
Networks in the phone’s memory. You need to select a wireless network and sign
into your Skype account before you can start making calls.
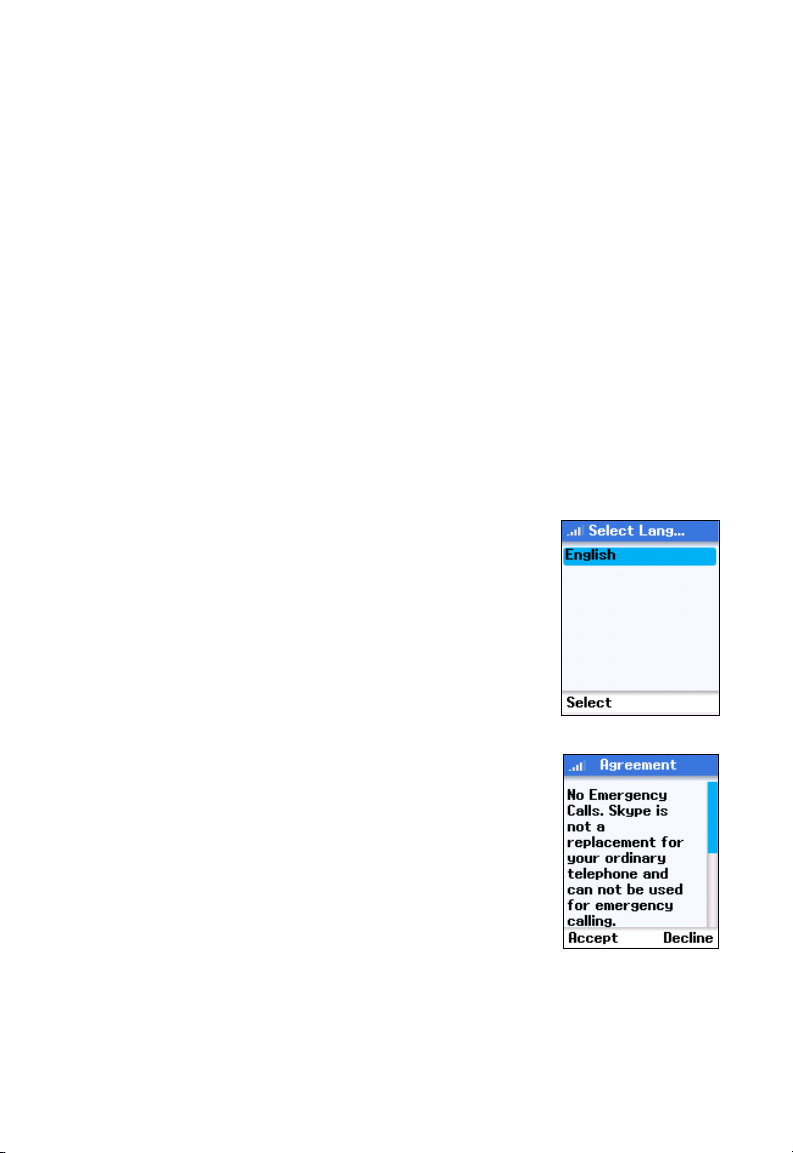
First-Time Startup
When the Wi-Fi Phone is used for the first time, follow these steps to set up the
phone and make a network connection:
1. Select the language of the display. The default is
English.
2. Scroll down and read the entire Skype Agreement
statement.
You must accept the Agreement to use the phone.
Press the Left Soft Key to accept the Agreement.
3-1
Page 20
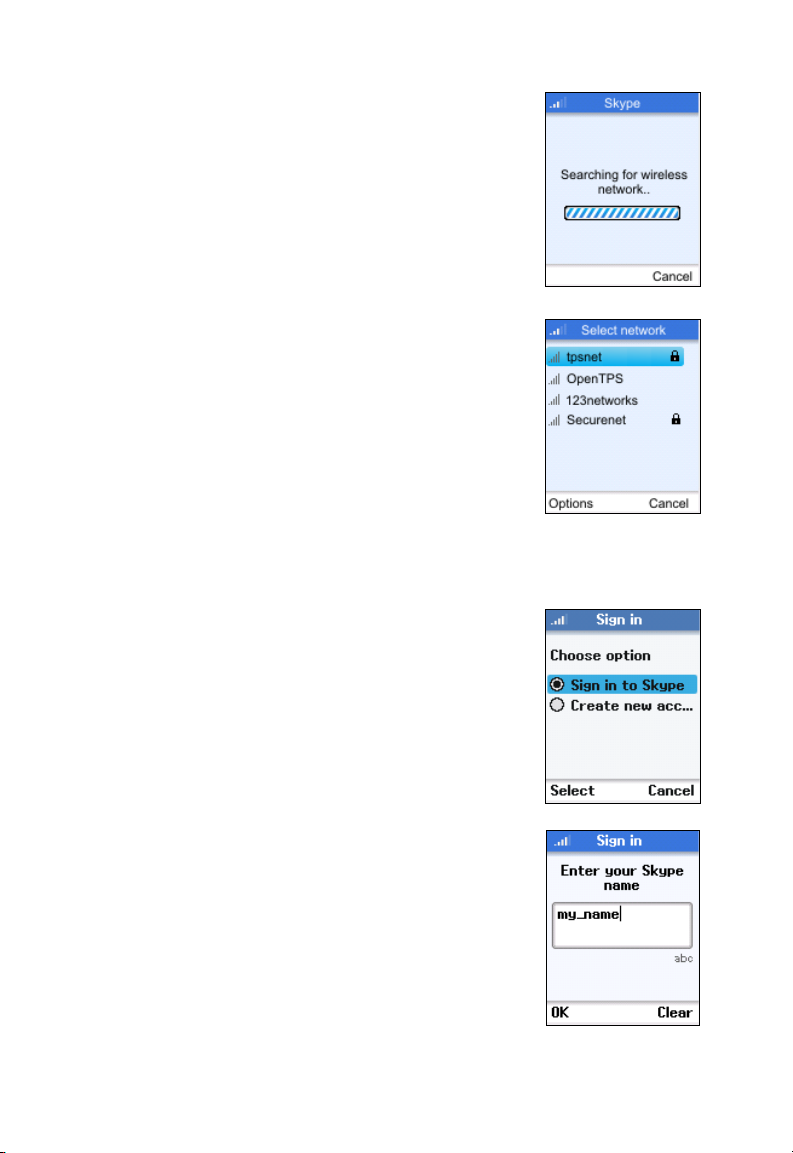
Getting Started
3. The phone scans for nearby wireless networks and
lists those that it finds.
Normally, you need to be within 90 m (300 ft) of a
network’s wireless access point to be able to connect
to it. If the network you want to connect to is not on
the list, move to another location and try again.
4. From the wireless networks list, select the wireless
network that you want to connect to and press the
Left Soft Key to access Options menu. Then select
“Connect.”
If a security key is required, the phone prompts for the
key value. Security keys should be provided by the
wireless network operator.
The access point information is stored in the phone’s
memory as a “Preferred Network” and will be used
next time the phone is powered on.
5. If you already have a Skype account, sign in with your
user name and password.
Note: If you are already signed into your Skype account from
your PC, you should sign out first before using the
phone. You cannot sign into your Skype account from
two devices at the same time.
You can also create a new account using the phone.
See “Creating a New Skype Account” on page 3-7.
When your Skype sign in is successful, you can start
making calls. Your current Contacts should display in
the Contacts screen.
Large Contact lists may take a few minutes to
download during an initial sign in.
3-2
Page 21

Understanding the Phone’s LCD Display
Understanding the Phone’s LCD Display
The Wi-Fi Phone’s color LCD display provides various status indicators and
access to the menu-based interface. The illustration below shows the main
screen and its elements.
Wireless Signal Status
Skype Online Status
Skype Credit
Left Soft Key Action
Battery Status — Indicates the status of the battery. The following states may be
displayed:
The battery is at a very low level and should be charged immdiately.
The battery is at a partially charged level.
The battery is fully charged.
The battery is charging from a low level.
The battery is charging, reaching a partially charged level.
The battery is charging, reaching a fully charged level.
Wireless Signal Status — Indicates the strength of the Wi-Fi network signal. The
following states may be displayed:
There is no detectable wireless signal.
Battery Status
Notifications
Current Time
Right Soft Key Action
There is a weak wireless signal.
There is a good wireless signal.
There is a strong wireless signal.
Phone Notifications — The notification icons alert you of certain events or
settings. The following icons may be displayed:
Missed Call. A missed call is listed on the Call List screen.
3-3
Page 22

Getting Started
New Voicemail. A voicemail has been received, but has not yet been
heard.
Details Request. An new request has been received and is listed on the
pending Details Request History screen.
Silent. The silent mode is active. No ring tones or alerts will be heard.
Keypad Locked. The keypad is currently locked.
Services Expiry. Your Skype Credit for one or more services is close to
expiry.
Headset Attached. The headset is currently attached to the phone.
Skype Online Status — Indicates your current Skype online status. The following
states may be displayed:
Online. The normal status when you are signed in to Skype.
Offline. When you are not signed in to Skype.
Do Not Disturb. You can set this status to indicate that you are busy.
Skype Me. Makes your Skype name availalbe for anyone to call.
Away. You can set this status to indicate that you are away.
Not Available. You can set this status to indicate that you are not
available to answer calls.
Invisible. Indicates to others that you are offline, but you are still signed
in to Skype and can make calls.
Current Time — The current time set on the phone. You can set the phone’s time
and date by using the Menu to select “Settings” and then “Time and Date.”
Skype Credit — Your current Skype Credit balance.
Right Soft Key Action — The action that happens when you press the Right Soft
Key. Typically, the Right Soft Key cancels the last action or returns to the previous
menu. From the main screen, this provides access to your Contacts.
Left Soft Key Action — The action that happens when you press the Left Soft
Key. Typically, the Left Soft Key selects the current menu item or confirms a
setting. From the main screen, this provides access to the user menu.
3-4
Page 23

Understanding the Phone’s LCD Display
The Main Menu
The main menu provides access to all your Skype and phone settings. The
menus are easy to move through using the four-way Navigation key. Just move
the Navigation key up or down to highlight a menu item, then push down on the
key to select it.
The following table outlines the phone menu structure.
Wi-Fi Phone Main Menu
Menu Description
Contacts Your Contacts and their Skype status
History Lists missed calls, incoming and outgoing calls,
Status Sets status and user profile, and signs out
Add Contact
Search Searches for Skype Contacts online
Services
Settings Access to other phone settings
Network Network search, Preferred networks and open network
General Change your Skype password, set auto sign in, and reset
Call divert Records your Skype Voicemail message and changes
Privacy Sets Skype privacy settings for calls
Tones Sets the phone’s ring tones and volume
Time and Date Sets the time and date
Manage Blocked Users View current blocked Contacts
Phone Settings Sets the display brightness and contrast, and the display
Information Displays current phone information, including network
Voicemails, and detail requests
Adds a Skype or SkypeOut
Sets up Skype Credit, SkypeIn
connection
the phone
settings for SKype Voicemail calls
timeout
connection status, software version, and hardware
version
™ number to your Contacts
™, and Skype Voicemail™
3-5
Page 24

Getting Started
The Power Key Menu
Another menu is available on the phone that provides quick access to power off
the phone, change your Skype status, view Wi-Fi netwofk information, and other
frequently needed settings.
To access the Power Key menu, press the End/Power key for more than two
seconds and then release it. Be sure not to press the key for more than four
seconds, which immediately switches the phone off.
The menu lists items depending on your current network connection and Skype
sign in status. If you are not connected to a network and not signed in to Skype,
only a few menu items are displayed. If you are connected and signed in, the full
menu displays.
Wi-Fi Phone Power Key Menu
Menu Description
Switch Off Powers off the phone
Silent/Sounds On Sets the ring tone volume to off/on
Change Status Changes your Skype online status
My Profile Allows you to change your Skype profile information
Sign In/Out Signs in or out from Skype
Find/View Networks Displays list of detected Wi-Fi networks
Network Details Displays network connection information
3-6
Page 25

Creating a New Skype Account
Creating a New Skype Account
If you have not previously set up a Skype account, you need to create one before
using the phone. When the Skype sign in screen displays after power on, you are
given the option to create a new account.
To creat a new Skype account, follow these steps:
1
234
1. From the Sign in option screen, select “Create new account.”
2. Enter a Skype Name for your account. Names must be from 6 to 30
characters.
You can use any mixture of lower or upper case letters, numbers, and
punctuation marks. However, you cannot use spaces or start your name with
a number or punctuation mark. The [a//A *] key selects upper-case input.
The [ 1 ] key selects common punctuation marks, and the [ # ] key allows
other symbols to be selected.
A check is made to see if your entered name is already in use by someone
else. If the name is already in use, you will have to try another name.
3. Enter a password of between 4 and 20 characters.
You can use any mixture of lower or upper case letters, numbers, and
punctuation marks. However, you cannot use spaces or start your name with
a number or punctuation mark. Also, you cannot have a password that is the
same as your Skype name.
You need to enter your password a second time to confirm it.
4. When your new account has been created, you can sign in and start using
the phone.
See “Setting Up Your Contacts” on page 3-8 and “Making a Call” on page
3-8.
3-7
Page 26

Getting Started
Setting Up Your Contacts
If you created a new Skype account, you can set up your own Contacts before
starting to make calls. Follow these steps:
1
23
1. Press the Left Soft Key to select the menu and use the Navigation key to
scroll down and select “Add Contact.”
2. From the Add Contact menu, select “Skype” to set up a Skype Name, or
“SkypeOut Number” to set up a SkypeOut name and number.
Valid Skype names are from 6 to 30 characters.
3. After entering your contact name and/or number, press the Left Soft Key to
add the contact to your list.
For more information, see Chapter 4, "Managing Contacts."
Making a Call
To make a Skype-to-Skype call, follow these steps:
1
23 4
1. Press the Right Soft Key to select Contacts and then use the Navigation key
to scroll down and select the contact name you want to call.
3-8
Page 27

Making a Call
2. Press the Send key to make the call. Wait for the call to connect and be
answered.
3. While the call is in progress, the contact name and length of the call are
displayed.
4. When you have finished the call, press the End key.
Note: You can also make a call without selecting a contact name from Contacts.
From the idle screen, just type the Skype Name and then press the Send key.
For more information on making calls, see Chapter 5, "Making and Receiving
Skype Calls."
3-9
Page 28

Getting Started
3-10
Page 29

Chapter 4: Managing Contacts
Your Skype Contacts display all the names you can make calls to. If you are new
to Skype and have just created a new account, your Contacts will be empty. You
need to find the names of users and add them to your list.
Skype protects the privacy of users by requiring contact details that are added
to Contacts. When you want to add a contact to your list, a contact details
request is sent to the user. The user can accept or deny the request. When a
request is accepted, you can see when the contact is online and make calls to
them. You can also view their personal profile details.
Skype allows you to also block Contacts that you have previously shared details
with. When you block a contact, you will always appear offline to them and they
will not be able to call you.
Adding a Skype Contact
To add a new contact name to your Contacts, you can either search for the name
or enter the name directly. Follow these steps:
1
8
23
76
4
5
4-1
Page 30

Managing Contacts
9
1. Press the Left Soft Key to select the menu and use the Navigation key to
scroll down and select “Add Contact.”
2. From the Add Contact menu, select “Skype” to set up a Skype name.
3. After entering your contact name, press the Left Soft Key.
4. To enable the contact to see when you are online, select “Yes.”
5. The name is added to your Contacts, but it still requires contact details from
the user.
6. Edit the text to send with your contact details request. Press the Left Soft
Key when you are finished.
7. A request is sent to the entered name. If the name is not valid, an error
message is displayed.
8. When the contact request has been sent, a confirmed message is displayed.
9. If you check your Contacts, you see the new name with the grey status icon,
which indicates the request has not yet been accepted by the contact.
4-2
Page 31

Adding a SkypeOut Contact
Adding a SkypeOut Contact
SkypeOut allows you to make calls to traditional landline and mobile phones. To
use SkypeOut, you have to buy Skype Credit first. Skype Credit allows you to
purchase a number of different products and services from Skype. To purchase
Skype Credit, go to www.skype.com.
SkypeOut numbers (even local numbers) must be entered in the following format:
“00”+”country code” + “area code” + “number”. You can also use “+” or “011”
before the country code.
To add a new SkypeOut number to your Contacts, follow these steps:
1
23
4
5
1. Press the Left Soft Key to select the menu and use the Navigation key to
scroll down and select “Add Contact.”
2. From the Add Contact menu, select “SkypeOut Number” to set up a
SkypeOut name and number.
3. Enter the contact's name, then press the Left Soft Key.
4. Enter the contact's SkypeOut number, then press the Left Soft Key.
5. The name is added to your Contacts.
4-3
Page 32

Managing Contacts
Searching for Contacts
You can search for Contacts to add to your list by selecting “Search” on the main
menu. Follow these steps:
1
23
4
5
1. Select “Search” from the main menu.
2. Enter the name you want to search for. Entered text is used to search Skype
names, full names, and e-mail addresses.
Press the Left Soft Key to start the search.
3. A search may take a while to complete. You can stop a search at any time by
pressing the Left Soft Key.
4. When the search completes or is stopped, the result list is displayed.
5. You can scroll down through the list to find specific names. Press the Left
Soft Key to access the options menu. The following options are available:
More Results — Displays the next 20 names in the list.
Search Again — Repeats the search.
Call — Calls the selected name.
Add to Contacts — Adds the selected name to your Contacts.
View Profile — Displays the selected name’s profile.
4-4
Page 33

The Contacts Options Menu
The Contacts Options Menu
For each contact name there are options available that apply to the specified
contact only.
To access the Contacts options menu, follow these steps:
1
1. Select a contact name in the list and then press the Left Soft Key.
2. The menu allows you to perform the following actions specific to the
contact.
• Call — Calls the contact.
• Send Voicemail — Sends a voicemail message to the contact.
• View Profile — Displays the contact’s profile details. The details that are
displayed are set by the contact.
• Advanced — Provides access to a menu of other actions.
3. Select Advanced from the options menu to access other actions.
• Rename — Changes the name of the contact as displayed in your
Contacts.
• Remove — Removes the contact from your list.
• Block — Blocks or unblocks the contact.
• Exchange Contact Details — Share details with the contact.
• Add a Contact — Adds a new contact to your list. This performs the same
procedure as “Add Contact” on the main menu.
23
4-5
Page 34

Managing Contacts
Blocking a Contact
To block a name on your Contacts, follow these steps:
1
1. Press the Right Soft Key to select Contacts, then use the Navigation key to
scroll down and select the name you want to block.
2. Use the Left Soft Key to select Options and then from the Options menu,
select “Advanced.”
3. Use the Navigation key to scroll down to “Block” and then press the Left Soft
Key.
4. When the Contacts displays, the name has the blocked status indicated.
23 4
4-6
Page 35

Chapter 5: Making and Receiving Skype Calls
This chapter shows how to make various types of Skype calls using the Wi-Fi
phone and also check your call history.
Skype-to-Skype Calls
Skype-to-Skype calls are calls to other online Skype users in your Contacts. To
make a Skype call, first check that you have a valid network connection, then
follow these steps:
1
2
3
4
1. Press the Right Soft Key to select Contacts and then use the Navigation key
to scroll down and select the contact name you want to call.
2. Press the Send key to make the call.
Wait for the call to connect, ring, and be answered.
3. When a call is accepted, the “Call in progress” message is displayed for
about three seconds followed by the call details, which include the contact
name and call duration.
4. When you have finished the call, press the End key.
5-1
Page 36

Making and Receiving Skype Calls
Receiving Skype Calls
When receiving a Skype call from Contacts, follow these steps:
1
1. When the incoming call message displays, press the Send key to accept and
start the call. You can also press the Right Soft Key to reject the call.
2. When a call is accepted, the “Call in progress” message is displayed for
about three seconds followed by the call details, which include the contact
name and call duration.
3. When you have finished the call, press the End key.
2
3
5-2
Page 37

SkypeOut Calls
SkypeOut Calls
SkypeOut allows you to call any ordinary telephone number from your Wi-Fi
phone. To use SkypeOut, you must have Skype Credit that covers more than the
cost of a one minute call to the destination number’s country.
To purchase Skype Credit, go to www.skype.com.
Note that SkypeOut numbers must start with “+” or “00” followed by the country
code, area code and then the phone number.
When you have set up your contact as a SkypeOut number, follow these steps:
1
2
5
1. Press the Right Soft Key to select Contacts and then use the Navigation key
to scroll down and select the contact name you want to call.
2. If you have set up more than one SkypeOut number for the contact, select
the number you want to call.
3. Press the Send key to make the call.
3
4
Wait for the call to connect, ring, and be answered.
4. When a call is accepted, the “Call in progress” message is displayed for
about three seconds followed by the call details, which include the contact
number and call duration.
5. When you have finished the call, press the End key.
5-3
Page 38

Making and Receiving Skype Calls
Dialing a Direct Call
If you have purchased Skype Credit for SkypeOut calls, you can enter the phone
number directly without first setting up a SkypeOut contact.
To call a number directly, dial the number as follows:
1
1. Dial the number and press the Send key.
2. Wait for the call to connect, ring and be answered.
3. When you have finished the call, press the End key.
2
5-4
Page 39

Receiving SkypeIn Calls
Receiving SkypeIn Calls
SkypeIn allows someone that is not a Skype user to call your Skype account
using an ordinary telephone number.
SkypeIn is a subscription service. You can purchase SkypeIn by going to
www.skype.com.
When receiving a SkypeIn call, follow these steps:
1
1. The incoming call message displays the calling number. Press the Send key
to accept and start the call. You can also press the Right Soft Key to reject
the call.
2. When a call is accepted, the “Call in progress” message is displayed for
about three seconds followed by the call details, which include the calling
number and call duration.
3. When you have finished the call, press the End key.
2
3
5-5
Page 40

Making and Receiving Skype Calls
Putting a Call on Hold
To put an active call on hold, follow these steps:
1
1. Press the Left Soft Key to select Options during the call.
2. Select “Hold the call” from the Options menu.
3. To resume the call, press the Left Soft Key. To end the call, press the Right
Soft Key.
2
3
5-6
Page 41

Muting the Microphone
Muting the Microphone
During a call, you can mute the microphone so that the caller cannot hear your
voice. Follow these steps:
1
1. Press the Left Soft Key to select Options during the call.
2. Select “Mute microphone” from the Options menu.
3. To unmute the call, press the Left Soft Key. To end the call, press the Right
Soft Key.
2
3
5-7
Page 42

Making and Receiving Skype Calls
Diverting a Call
With call forwarding, you can redirect incoming Skype calls to another mobile or
landline number. This enables you to receive Skype Calls when you are not on
Skype.
To forward calls to an ordinary phone number, you have to buy Skype Credit first.
To forward calls to your own voicemail, you must first have a Skype Voicemail
subscription. For more information, go to www.skype.com.
To divert calls, follow these steps:
1
2
3
4
5
1. Press the Left Soft Key to select the menu and use the Navigation key to
scroll down and select “Settings.”
2. From the Settings menu, select “Call divert.”
3. From the list, select “Call Forwarding.” (To forward calls to your voicemail,
select "Voicemail" for this step.)
4. Select “Yes” to enable call forwarding.
5. Enter the Skype contact name or SkypeOut number to which the call is
forwarded. Then press the Left Soft Key to confirm the setting.
Note: After you enter a number, the number is saved in the phone’s memory until
you change it. This means that you can turn off call forwarding and when you
turn it back on the number is available.
5-8
Page 43

Sending Skype Voicemail
Sending Skype Voicemail
If you have Skype Voicemail. you can send voicemail messages to any of your
contacts, even if they don’t have Skype Voicemail. To purchase a Skype
Voicemail, go to www.skype.com.
To send a Skype Voicemail message to a contact, follow these steps:
1
2
3
4
5
1. Press the Right Soft Key to select Contacts and then use the Navigation key
to scroll down and select the contact name you want to call.
2. Press the Left Soft Key to select Options and then select “Send voicemail.”
3. Start recording your voicemail message. Press the Right Soft Key to end the
message.
4. Immediately after you end the recording, the phone starts sending the
voicemail.
5. When the voicemail has been sent, a message is displayed for five seconds.
5-9
Page 44

Making and Receiving Skype Calls
Listening to Skype Voicemail
When you have a Skype Voicemail subscription, other people can send you
voicemails.
To listen to your voicemails, follow these steps:
1
1. Press the Left Soft Key to select the menu and use the Navigation key to
scroll down and select “History.”
2. From the History menu, select “Voicemails.”
3. Select a voicemail from the list. Press the Left Soft Key to display the
Options menu.
4. Select “Play” to listen to the voicemail.
5. When the voicemail message is finished, press the End key.
2
3 4
5-10
Page 45

Recording a Voicemail Greeting
Recording a Voicemail Greeting
When you have a Skype Voicemail subscription, you can record your own
welcome message.
To record a welcome message, follow these steps:
1
2
3 4
5
1. Press the Left Soft Key to select the menu and use the Navigation key to
scroll down and select “Settings.”
2. From the Settings menu, select “Call divert.”
3. From the Call divert menu, select “Welcome message.”
4. Start to record your greeting message.
5. When you have finished the recording, press the End key.
5-11
Page 46

Making and Receiving Skype Calls
History Lists
All missed calls, incoming and outgoing calls, voicemails, and detail requests are
logged by the phone. You can access the list of logged calls from the main menu.
Follow these steps:
1
1. Press the Left Soft Key to select the menu and use the Navigation key to
scroll down and select “History.”
2. From the Call List menu, select the list you want to display.
3. From the list of calls, select the call you are looking for.
4. Press the Left Soft Key to display the options menu.
234
5-12
Page 47

Chapter 6: Personal Skype Settings
The Wi-Fi Phone allows you to change your Skype status, personal profile details,
password and privacy settings.
Changing Your Skype Status
To set your Skype status, follow these steps:
1
1. Press the Left Soft Key to select the menu and then use the Navigation key
to scroll down and select “Status.”
2. From the Settings menu, select “Change status.”
3. Select the status you want to set.
4. Press the Left Soft Key to confirm.
Note: You can also use the Power Key Menu to change your Skype status. Please
refer “The Power Key Menu” on page 3-6 for details.
23
6-1
Page 48

Personal Skype Settings
Setting Your Profile
Entering details in your Skype profile is optional. You can fill in all the public and
private profile details or leave them blank. For the public profile details that all
Skype users can see, you may want to fill in at least country and city details to
help other Skype users to confirm your identity.
To set your profile details, follow these steps:
1
23
4
5
1. Press the Left Soft Key to select the menu and then use the Navigation key
to scroll down and select “Status.”
2. From the Settings menu, select “My Profile.”
3. Select “Details shown to all.” (You can also select “Private details” to change
your e-mail address.)
4. Select the profile detail you want to change.
5. Press the Left Soft Key to edit the details.
6-2
Page 49

Changing Your Password
To change your Skype password, follow these steps:
Changing Your Password
1
23
6
1. Press the Left Soft Key to select the menu and then use the Navigation key
to scroll down and select “Settings.”
2. From the Settings menu, select “General.”
3. From the General Settings menu, select “Change Password.”
4. First enter your current password, then press the Left Soft Key.
4
5
5. Enter your new password, then press the Left Soft Key.
6. Enter your new password again, then press the Left Soft Key to confirm.
6-3
Page 50

Personal Skype Settings
Privacy Settings
Skype not only protects your privacy by showing your online presence only to
your contacts, it offers other privacy settings that restrict calls to only those that
you want to receive.
To change your Skype privacy settings, follow these steps:
1
1. Press the Left Soft Key to select the menu and then use the Navigation key
to scroll down and select “Settings.”
2. From the Settings menu, select “Privacy.”
3. From the Privacy menu, select “Calls.”
4. Change your privacy setting to restrict calls to those only from your
contacts, or to authorize each call individually.
23
4
6-4
Page 51

Chapter 7: Wi-Fi Network Settings
The Wi-Fi Phone automatically searches for Wi-Fi networks on start up. You can
select a specific network to connect to, or set the phone to connect to any
“open” networ k.
Networks that you have previously connected to are saved as “Preferred”
networks. On start up, the phone will look for Preferred networks first and try to
make a connection. If no networks can be found, an error message is displayed.
Finding Wi-Fi Networks
You can search for Wi-Fi networks that are within range of your location. The
results list displays the network name and the strength of the radio signal. When
possible, you should try to connect to networks with a strong signal.
To search for networks, follow these steps:
1
23
4
5
1. Press the Left Soft Key to select the menu and then use the Navigation key
to scroll down and select “Settings.”
2. From the Settings menu, select “Network.”
3. From the Network Settings menu, select “Networks in range.”
Note: You can also search for networks from the Power Key menu.
7-1
Page 52

Wi-Fi Network Settings
4. Wait while the phone searches for Wi-Fi networks.
5. A list of detected networks displays. Select the network you want to connect
to. Networks listed with the padlock icon are secure networks.
Note: Networks that display icon require a network access key.
Press the Left Soft Key for the Options menu.
If no networks are found by the search, an error message
is displayed. You should change your l oc ation before trying
again. Normally, you need to be within 90 m (300 ft) of a
network’s wireless access point to be able to connect to it.
Preferred Networks
The preferred networks information stored in the phone enables you to
automatically connect to networks you normally use. Once you have set up a
network’s name and security, the phone will use the information during start up
to search and connect automatically.
To access settings for preferred networks, follow these steps:
1
1. Select “Settings” from the main menu and then “Network.”
2. From the Network Settings menu, select “Preferred networks.”
3. From the preferred networks list, select a network name and then press the
Left Soft Key for the Options menu.
23
4
7-2
Page 53

Setting Access to Open Networks
4. From the preferred networks list, select a network name and then press the
Left Soft Key for the Options menu.
Add Current — Adds the current connected network to the preferred list.
Open networks can be added in this way.
Define New Network — Manually defines a preferred network. Enter the
network name, then set up other settings and security options as instructed
by the network operator.
Move Up/Down/to Top — Moves the preferred network name up or down in
the list, or to the top of the list.
Properties — Lists the networks settings. You can select specific settings to
make changes.
Remove Network — Deletes the network from the preferred list.
Remove all networks — Deletes all networks from the preferred list.
Setting Access to Open Networks
By default, the phone tries to connect to preferred networks first and then, when
set, to any open network.
To set the phone to automatically find and connect to open public hotspots,
follow these steps:
1
1. Select “Settings” from the main menu and then “Network.”
2. From the Network Settings menu, select “Auto-connect.”
3. Use the Navigation key to Select “Yes” and then press the Left Soft Key.
23
7-3
Page 54

Wi-Fi Network Settings
7-4
Page 55

Chapter 8: General Settings
Many phone settings are available through the user menu. Use the Navigation
key to move through the menus and the Left Soft Key to select items that you
want to change.
Changing the Display Language
To change the display language, follow these steps:
1
1. Press the Left Soft Key to select the menu and then use the Navigation key
to scroll down and select “Settings.”
2. From the Settings menu, select “General.”
3. From the General Settings menu, select “Language.”
4. Select the display language you want to use and then press the Left Soft
Key.
23
4
8-1
Page 56

General Settings
Changing Display Settings
To change the display contrast, brightness, and timeout, follow these steps:
1
23
4
1. Press the Left Soft Key to select the menu and then use the Navigation key
to scroll down and select “Settings.”
2. From the Settings menu, select “Phone Settings.”
3. From the Phone Settings menu, select the item you want to change.
4. Move the Navigation Key left or right to change the Brightness and Contrast
setting, or up and down to change the Timeout setting. Press the Left Soft
Key to confirm the settings.
8-2
Page 57

Setting Alert Tones
Setting Alert Tones
To change the phone’s ring tones, volume, and vibrate status, follow these steps:
1
Keypad Tones
23
Incoming CallRing TonesRing Volume
Vibrate AlertNotification Alert
4
1. Press the Left Soft Key to select the menu and then use the Navigation key
to scroll down and select “Settings.”
2. From the Settings menu, select “Tones.”
3. From the Tones menu, select the item you want to change.
4. There are six items on the Tones menu; Incoming Call Alert, Ringing Tone,
Ringing Volume, Vibrating Alert, Notification Tones, and Keypad Tones. Move
the Navigation Key to change a setting, then press the Left Soft Key to
confirm the setting.
8-3
Page 58

General Settings
Setting the Time and Date
To change time and date settings, follow these steps:
1
Date Separator Date Format Date
23
Daylight SavingTime Format
TimeTimezon e
4
Time S e p a r a t o r
1. Press the Left Soft Key to select the menu and then use the Navigation key
to scroll down and select “Settings.”
2. From the Settings menu, select “Time and Date.”
3. From the Time and Date menu, select the item you want to change.
4. Operate the item by referring the followings:
Time — Move the Navigation Key left and right to select “hh” or “mm”. Move
the Navigation Key up and down or press the keypad to set the time.
8-4
Page 59

Setting the Time and Date
Timezone — Move the Navigation Key up and down to find and select your
time zone from the list.
Daylight saving— Move the Navigation Key up and down to select
“Standard” or “Datelight saving”.
Time format — Move the Navigation Key up and down to find and select the
preferred time format.
Time separator— Move the Navigation Key left and right or up and down to
select the preferred time separator.
Date — Move the Navigation Key left and right to select “dd”, “mm” or “yyyy”.
Move the Navigation Key up and down or press the keypad to set the time.
Date format — Move the Navigation Key up and down to find and select the
preferred date format.
Dateseparator— Move the Navigation Key left and right or up and down to
select the preferred date separator.
8-5
Page 60

General Settings
Displaying Phone Settings
To display a list of current phone and network settings, follow these steps:
1
1. Press the Left Soft Key to select the menu and then use the Navigation key
to scroll down and select “Settings.”
2. From the Settings menu, select “Information.”
3. Scroll down through the list to view the setting details.
Note: You can reset all the phone’s settings from the Settings>General>Reset menu.
23
8-6
Page 61

Clearing Phone Settings
Clearing Phone Settings
You can clear all phone settings and reset them to factory default values. There is
also an option to retain network settings, but clear all others.
To clear phone settings, follow these steps:
1
23
4
5
1. Press the Left Soft Key to select the menu and then use the Navigation key
to scroll down and select “Settings.”
2. From the Settings menu, select “General.”
3. From the General Settings menu, select “Reset.”
4. Choose to clear all settings or keep only network settings and then press
the Left Soft Key.
5. Confirm the reset by pressing the Left Soft Key. Wait while the phone resets
to default values. After the “Reset Complete” message is displayed, the
phone returns to the General Settings menu.
8-7
Page 62

General Settings
Advanced Settings
Skype functions on most networks without any special settings required.
However, some networks use restrictive firewalls that tightly control incoming
and outgoing Internet traffic, which prevents Skype from functioning properly. If
you find that your Wi-Fi Phone does not function from the network you are using,
ask the network operator or system administrator for the settings required to
enable Skype to function properly.
The Advanced option on the Settings menu provides access to the network
connection settings that may be required for some networks. If you are not
familiar with firewalls and networking terms, it may be best to ask a system
administrator or knowledgeable friend to help make the settings for you.
Note: This section only provides a brief summary of the advanced settings available
and a knowledge of networking is assumed. For more information, go to
www.skype.com.
To access the phone’s advanced settings, follow these steps:
1
1. Press the Left Soft Key to select the menu and then use the Navigation key
to scroll down and select “Settings.”
2. From the Settings menu, select “Advanced.”
3. From the Advanced menu, select the items you need to configure as
instructed by the network administrator.
Software Updates — Checks if software updates are available for the
phone.
Network Proxy — Specifies if proxy servers on the local network are to be
used for Skype traffic.
Skype Ports — Specifies the TCP/UDP port to be used for incoming and
outgoing Skype traffic.
23
8-8
Page 63

Appendix A: Specifications
Battery Life
Use Time: 3 hrs
Standby Time: 50 hrs
Li-Ion 3.7 V minimum 1100 mAH
Physical Size
115 x 49 x 18 mm (4.53 x 1.93 x 0.71 in.)
Temperatu re
Operating: 0 to 40 °C (32 to 104 °F)
Storage: -20 to 70 °C (-4 to 158 °F)
Humidity
10% to 85% (non-condensing)
Maximum 802.11b/g Channels
FCC/IC: 1-11
ETSI: 1-13
France: 10-13
MKK: 1-14
Operating Frequency
2.4 ~ 2.4835 GHz (US, Canada, ETSI)
2.4 ~ 2.497 GHz (Japan)
Data Rate
802.11g: 6, 9, 11, 12, 18, 24, 36, 48, 54 Mbps (automatic fall back)
802.11b: 1, 2, 5.5, 11 Mbps (automatic fall back)
Modulation Type
802.11g: CCK, BPSK, QPSK, OFDM
802.11b: CCK, BPSK, QPSK
RF Output Power
802.11b: 16 dBm
802.11g: 12 dBm
Antenna Gain
5.5 dBi
Emissions
FCC Part 15B Class B
VCCI Class B
EN61000-3-2
EN61000-3-3
A-1
Page 64

Specifications
Radio Signal Certification
FCC Part 15C
EN 300-328
EN 301 489-1
EN 301 489-17
ARIB STD-T66
ARIB STD-33
DGT LP0002
Temperatu re
IEC 68-2-14
Vibratio n
IEC 68-2-36, IEC 68-2-6
Shock
IEC 68-2-29
Drop
IEC 68-2-32
Safety
UL/cUL (UL 60950-1)
IEC 60950-1 (CB)
Standards
IEEE 802.11b/g
A-2
Page 65

Page 66

WSKP100
E112006-EK-R04
149100035700E
 Loading...