

Page 1

EZ Connect™Network Kit
User Guide
Benutzerhandbuch
Manuel d'installation
Manual de usuario
Guida dell'utente
SMC-EZ6505TX KIT
V2.1 / 08-2002
SMC-EZ6505TX_UK/GE/FR/SP/IT.qxd 23/9/02 12:47 pm Page 1
Page 2

Hello and welcome!
The SMC EZ Connect Network Kit contains everything you need to
quickly and easily connect computers in your home or office
together to form your own network or extend and improve your
existing network.
The SMC EZ Connect Network Kit continues the SMC Home and
Small Office network range and offers the fastest performance out
of all of the products.
We know that you want to get started, but before you go any
further and start plugging things in, please read through this
manual as it will make the installation as easy to understand as
possible.
Simply follow the A,B,C steps and you will be up and running very
quickly.
Thank you for choosing SMC for your networking requirements. For
more information on the rest of the SMC Home and Small office
networking range either view the brochure contained on the CD or
go to www.smc-europe.com for full information and support.
Operating systems
This network kit is compatible and comes with drivers for the
following operating systems:
•
Microsoft Windows for Workgroup 3.11,
•
Microsoft Windows (r) 95/ 98/ NT/ 2000, XP
•
Netware 4.11, 5.0, FreeBSD 3.0, Linux,
•
SCO Unixware 7
It is not necessary that both PCs run the same operating system.
Computer
A PC or Power Macintosh with an available PCI slot.
English
1 2
English 2 - 17
Deutsch 18 - 31
Français 32 - 45
Español 46 - 62
Italiano 63 - 78
Copyright & Specifications 79 - 80
SMC-EZ6505TX_UK/GE/FR/SP/IT.qxd 23/9/02 12:47 pm Page 3
Page 3

Step A
Install the SMC1233A-TX 10/100Mbps Fast Ethernet LAN Card
Make sure that all computers are turned OFF and disconnected
from the power cord.
Before installing the cards in your computers, make sure you have
the operating system installation disks or CD-ROM (especially for
Windows based computer)and the installation CD provided in the
SMC package.
The steps to install EACH network card are as follows:
•
Shut down the operating system.
•
Turn off the computer.
•
Unplug the computer main power cable for added security and
to avoid an electric shock.
•
Remove the computer cover.
•
Identify an available PCI expansion slot in each computer (PCI
slots are usually smaller slots).
•
Remove the corresponding plate from the computer chassis.
•
Insert the network card and tighten the bracket screw of the
network card into your computer.
Replace the computer cover and reconnect the power cord to
the computer.
•
Repeat each step to install a network card in each computer.
English
English
3 4
Package Checklist
Become familiar with the contents of the SMC EZ Connect
Network Kit:
•
One Quick Start Guide
This step-by-step guide will take you through each step
of the installation in easy to understand terms.
•
One 5-port 10/100Mbps EZ Switch
The switch is the main network unit where all network
capable devices are connected
•
Two SMC1233A-TX 10/100Mbps Fast Ethernet
Network Cards
Each card slides into an available PCI expansion slot in
the computer. A network card gives the computer the
capability to exchange data with other machines on the
network.
•
Two Network Cables (length = 5m each)
The straight-through network cables are used to
connect network capable devices to the hub.
These cables cannot be used to directly connect two
computers. In this case, a cross-over cable is required.
•
One Installation CD
This CD contains the software drivers so that you can
install the Network cards.
•
External Power Supply (UK/Europe)
This unit is required to power the SMC EZ Switch.
Always ensure that the power supply is plugged in
firmly and located in a secure place to avoid network
disruption.
SMC-EZ6505TX_UK/GE/FR/SP/IT.qxd 23/9/02 12:47 pm Page 5
Page 4

English
English
Step B
Windows 95/98/2000 ME Network Driver Installation
This section provides instructions for installing a Windows
networkdriver. All versions of Windows may not respond the same.
The typical steps for installing under Windows 95/98/2000/ME.
PCs are as follows:
1. Restart Windows 95/98/2000. Make sure you have your SMC
Installation CD and Windows 95/98/2000 CD available for driver
installation procedures.
2. "New Hardware Found" window displays and loads "New
Hardware Wizard" program. "New Hardware Wizard" specifies the
network hardware device (controller) to be installed.
Click "Next".
3. Select "Display a list of drivers in a specific location" so that
you can choose the driver you need.Click "Next".
4. You will be prompted to “Install from Disk“. Insert the SMC CD
containing the drivers and enter the path to the CD-ROM
(e.g. d:\Drivers \Win95 or Win98) and click “OK“. Network card.
Click “Next”.
5. Screen will display “SMC1233A-TX 10/100 PCI NIC” Click “OK”.
6. our device will be recognised as a “SMC1233A-TX 10/100Mbps
PCI NIC”. Click “Next”.
7. Your SMC network card is now successfully installed.
Click “Finish“.
8. Select “Yes“ when prompted to restart the computer..
Install the SMC EZ Switch
•
Place the computers and the switch:
-close to an electrical outlet
-close enough together to connect the two network cables
•
Insert the power supply into the switch and electrical outlet.
•
Ensure that the “Power“ light is on (green).
Connect the Cables, Switch and Computers
•
Plug one end of the network cable into each network card.
•
Plug the other end of each network cable into Port 1
and Port 2 of the switch.
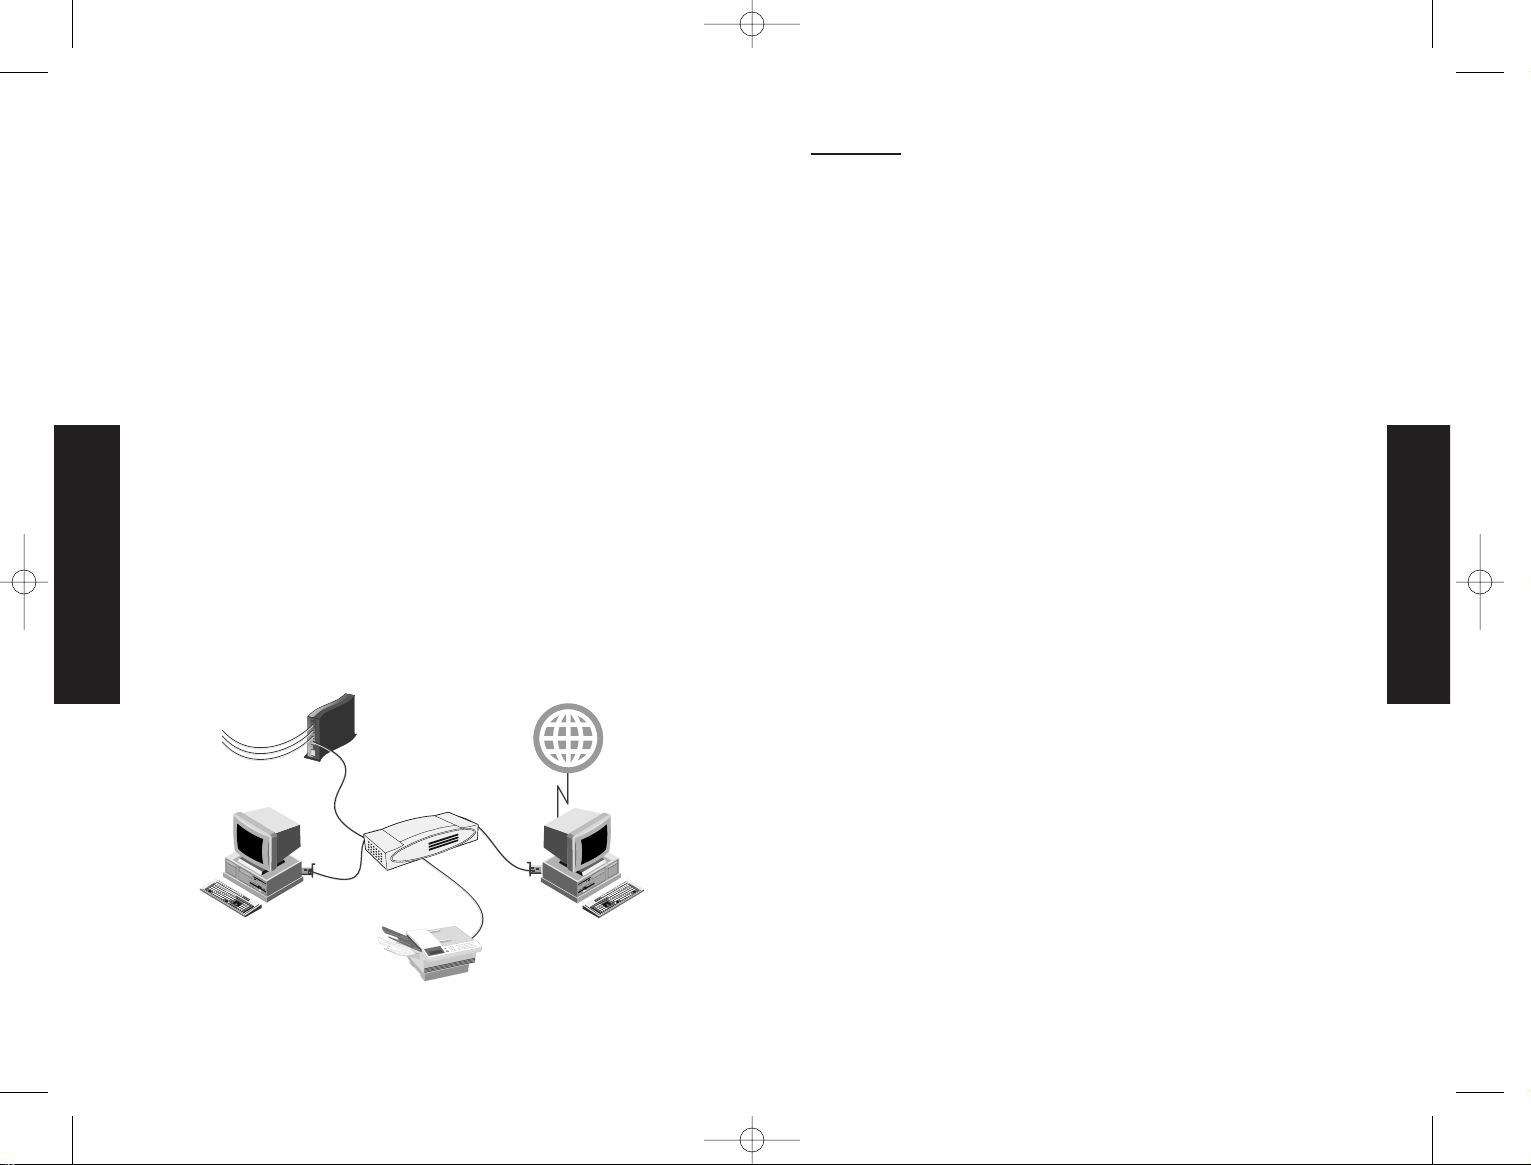
Cascading Switches and Other Network Devices
All the ports on the switch support automatic MDI/MDI-X
configuration for cable connections. This allows you to use straightthrough cable to connect to other switches or hubs from any port on
the switch. No crossover cables or other device settings are needed.
If you plan to use longer cables make sure to use only Category 5
UTP cable with minimum length 100 m.
You may now turn ON the computers.
You may connect additional network equipment to expand your
network as indicated in the diagram.
5 6
SMC-EZ6505TX_UK/GE/FR/SP/IT.qxd 23/9/02 12:47 pm Page 7
Expand
Erweitern
Cascade
Internet
devices
PC
Printer
PC
Page 5

Windows XP Installation
Windows XP has a built in driver for the SMC1233A-TX card.
The adapter card will be installed automatically. It will appear as
e.g. ADMtek 983 10/100 network adapter card in the device
manager.
Troubleshooting Driver Installation
1. Double-click "My Computer" on your Windows desktop, doubleclick "Control Panel”, and then double--click "System".
2. Click on "Device Manager".
3. Double-click on "Network Adapters".
English
English
7 8
You may be prompted to copy from the Windows 95/98 CD. Make
sure you enter the path to the Windows installation files on the
Windows CD (e.g.D:\Drivers\smc1233atx\win98). Click "OK".
9. Your SMC network card is now successfully installed in Windows
95/98. Click "Finish".
10.Select "Yes" when prompted to restart the computer.
SMC-EZ6505TX_UK/GE/FR/SP/IT.qxd 23/9/02 12:47 pm Page 9
Page 6

Step C
How to Set-up a Peer-To-Peer Network in Win 95/98
This section describes how to connect 2 (or more) PCs together in
a network workgroup with the equipment provided in the SMC EZ
connect network Kit. Each PC in the network should already have
an SMC network card installed and be running in Win 95/98. The
network cards should be linked to the SMC EZ switch by the
network cables provided in this kit.
1. Click "Start", "Settings", "Control Panel" and double
click "Network".
2. Within the "Configuration" tab, change the setting of the
"Primary Network Logon" to "Client for Microsoft Networks".
Click "File and Print Sharing" and select "I want to be able to
give others access to my files".
Click "OK".
3. Now click on "Add" and choose "Protocol" from the "Select
Network Component Type" window and then click "Add". Choose
"Microsoft" and select "NET BEUI" from Network Protocols.
Click "OK".
This needs to be done on both PC’s
4.Click "Identification" tab and choose computer name to identify
your computer on the network (e.g.PC1). Also choose a
workgroup name (e.g. Home network). Click "OK".
4. If there is a problem with the installation of the driver, an
exclamation point appears next to "SMC1233A-TX PC 10/100
Network card". Double-click on "SMC1233A-TX PCI 10/100 Network
card". The "Properties" window opens and a message regarding the
status of the device displays in the window. You will likely need to
verify the network device or computer settings. If problem
persists, uninstall and reinstall drivers.
9 10
English
English
SMC-EZ6505TX_UK/GE/FR/SP/IT.qxd 23/9/02 12:48 pm Page 11
Page 7

Start sharing Files
The following example illustrates how PC2 may access the "C:Drive"
from PC1.
1. From PC1,double click on "My Computer" from Windows Desktop.
Right click on the disk drive or folder you want to share.
2. Select "Sharing" from the context menu:
A window similar to this one will appear:
3. Select a "Share Name" for the drive or folder that you want to
share and select the access type you wish to set. Click "OK".
4. From PC2, click on Network Neighborhood from Windows
Desktop, then choose PC1 machine.
You now have access to the selected resources on PC1.
Congratulations! You have established a peer-to-peer network
between PC1 and PC2.
Warning! You must use exactly the same workgroup name on
both PC’s. If they are different, the PC’s will not be able to
communicate with each other.
5. You may be prompted to insert Windows 95/98 CD. Insert the CD
and click "OK".
6. Click "Yes" to restart your computer.
7. Repeat steps 1-6 for the next PC (e.g.PC2) you want to be in
your network workgroup.
8. To verify your network connection between PC1 and PC2,double
click on "Network Neighborhood" on your Windows desktop. You
should see PC1 and PC2 as members of your network workgroup.
9. You are now ready to share files between the networked
computers.
11 12
English
English
SMC-EZ6505TX_UK/GE/FR/SP/IT.qxd 23/9/02 12:48 pm Page 13
Page 8

A window similar to this one will appear.
3. Select "Share This Folder" then specify a "Share Name" for the
drive folder you want to share.
4. Select "Permissions" and set the permissions that you wish to
set. Click "OK".
5. From PC2 click on "My Network Places" from the windows
desktop, you should then be able to browse the "Entire Network"
to see the shared resource on PC1.
Congratulations! You have established a peer-to-peer network
between PC1 and PC2.
How to set up a Peer-to-Peer Network in Win XP
1. Click "Start", "Control Panel" and double click "System".
2. Within the "Computer Name" tab, click on "Change". This will
bring up the Computer name change menu that will allow you to
specify your computer name and workgroup.
3. Choose a name for you computer so that it can be identified on
your network (e.g. "PC1"). Also choose a workgroup name (e.g.
Home Network) and click "OK".
Warning: You must use exactly the same workgroup name on all
of your computers. The spelling and spacing must be exactly
the same.
4. You will be prompted to re-start your PC for the changes to take
effect.
5. Click "OK" to restart computer.
6. Repeat steps 1-6 for the next PC (e.g. PC2) you want to be in
your network workgroup.
7. To verify your network connection between PC1 and PC2 click on
"Start", "My Network Places", "Entire Network" then "Microsoft
windows network". You should see PC1 and PC2 as members of
your network workgroup.
8. You are now ready to share files between the networked
computers.
Start sharing files
1. From PC1 double click on "My Computer" from windows desktop.
Right click on the disk drive or folder you want to share.
1. Select "Sharing and Security" from the menu:
13 14
English
English
SMC-EZ6505TX_UK/GE/FR/SP/IT.qxd 23/9/02 12:48 pm Page 15
Page 9

Hub
Computers
Hub
Computers
Hub
Computers
Switch
Server
Server
Switch
Computers
•
5 port 10Mbps hub has a bandwidth of 10Mbps
•
5 port 10/100Mbps hub, has a bandwidth of 110Mbps
•
5 port 10/100Mbps Switch has a bandwidth of 1000Mbps.
Therefore, the performance of the Switch is 100 times better than
a 10Mbps hub and almost 10 times better than a 10/100Mbps hub.
"Network Design" section
A switch can be used in a number of different ways. You can
either connect computers directly into it, connect groups of hubs
into it or do both.
Fig A.
Connecting computers directly into the Switch
Computers
In this diagram, every computer is connected straight into the
Switch. This means that every user has their own dedicated
bandwidth of 200Mbps. The performance will be very fast and will
not slow down when the amount of network traffic increases. If
one of the users is downloading a very large file, the performance
of the other users will not be effected.
Fig B.
How a switch works
A Switch works very differently to a normal Hub. The main
difference is that a Switch looks at the network packet and only
sends it to the person that it was intended for. This reduces the
amount of traffic flying around on the network and improves your
performance. A standard Hub cannot do this and how it works is
simply to send any packet that it receives to everybody connected
to it. This means that there is a lot of information going to each
computer that did not need to be delivered.
The main factor that effects the performance, is that the Switch
supports Full Duplex. This means that it can send and receive
information at the same time, therefore doubling the speed at
which it works and doubling the amount of information that can
be sent than a normal hub.
A hub only works at Half Duplex. This means that it can only send
or receive a packet of information at one time. Only one computer
can talk at any one time when connected to a hub which reduces
the speed in which you can receive your information. When more
than one computer is requesting information at the same time,
you get what is called a collision. This is when two packets of
information collide on the same cable. This happens when the
Hub is sending a packet of information when the receiving
computer is sending a packet of information. The more people
that are connected to a hub means that there are more chances of
collisions and a greater chance of your network performance
slowing down.
You do not get collisions when you are connected to a switch as it
only sends network packets to the computer that requested the
information and it can also send and receive at the same time.
Bandwidth is very important on an Ethernet network and a switch
offers much more bandwidth than a hub can. The more bandwidth
you have on your network, the better your network will perform.
15 16
English
English
SMC-EZ6505TX_UK/GE/FR/SP/IT.qxd 23/9/02 12:48 pm Page 17
Page 10

Hub
Computers
Hub
Computers
Hub
Computers
Switch
Printer
Server
Computers
In this diagram, there is already and existing network made up of 3
groups of hubs and 2 servers. The Switch is placed at the center of
the network to direct the traffic around the network. This seperates
the traffic from groups of hubs and this dramatically improves the
performance of the network. Because the traffic is seperated, every
user has more bandwidth and therefore better performance.
Fig C.
Connecting hubs, other Switches and computers into the Switch
The diagram above shows how Switches can be used in a number
of ways. The Switch at the centre of the network is redirecting
traffic to the different groups of hubs, the server, the printer and
another Switch. If you are linking switches together, you need to
use the uplink port. The two devices will not be able to
communicate with each other if there are connected via a standard
port (unless you are using cross-over cable)
English
Deutsch
Hallo und willkommen!
Das SMC EZ Connect Network Kit enthält alles, was Sie zum
schnellen und einfachen Zusammenschließen von Computern zu
Hause oder im Büro zu einem Netzwerk oder zum Erweitern Ihres
vorhandenen Netzwerks benötigen.
Das SMC EZ Connect Network Kit ist ein weiteres Produkt des
SMC-Spektrums von Netzwerkprodukten für den Betrieb zu Hause
und in kleinen Büros und bietet die beste Leistung aller
vergleichbaren Produkte.
Auch wenn Sie es eilig mit der Installation haben: Lesen Sie, bevor
Sie loslegen, für eine problemlose Hardwareinstallation das
vorliegende Handbuch.
Befolgen Sie einfach die Schritte A, B und C, danach können Sie
sofort anfangen.
Danke für die Auswahl von SMC-Netzwerklösungen. Informationen
über die weiteren Netzwerkprodukte von SMC für zu Hause und für
kleine Büros finden Sie in der Broschüre auf der CD oder unter
www.smc-europe.com, wo auch zusätzliche Hinweise und Angaben
zur Unterstützung aufgeführt sind.
Betriebssysteme
Dieses Netzwerk-Kit ist mit den folgenden Betriebssystemen
kompatibel und mit den entsprechenden Treibern ausgestattet:
•
Microsoft Windows für Workgroups 3.11,
•
Microsoft Windows (r) 95/ 98/ NT/ 2000, XP
•
Netware 4.11, 5.0, FreeBSD 3.0, Linux,
•
SCO Unixware 7
Es ist nicht erforderlich, dass beide PCs unter demselben
Betriebssystem laufen.
Computer
Ein PC oder Power Macintosh mit einem freien PCI-Steckplatz.
17 18
SMC-EZ6505TX_UK/GE/FR/SP/IT.qxd 23/9/02 12:48 pm Page 19
Page 11

Deutsch
Deutsch
Prüfen des Verpackungsinhalts
Machen Sie sich mit dem Lieferumfang des SMC EZ Connect
Network Kit vertraut:
•
Ein Handbuch für den Schnellstart
Dieses Handbuch führt leicht verständlich durch alle
Installationsschritte.
•
Ein EZ Switch (10/100 MBit/s) mit 5 Ports
Dieser Switch ist die Haupteinheit im Netzwerk, an die
alle Netzwerkgeräte angeschlossen sind
•
Zwei Fast Ethernet-Netzwerkkarten SMC1233A-TX
(10/100 MBit/s)
Jede Karte wird in einen freien PCIErweiterungssteckplatz des Computers eingeführt. Über
eine Netzwerkkarte kann der Computer Daten mit
anderen Geräten in Netzwerk austauschen.
•
Zwei Netzwerkkabel (jedes 5 m lang)
Diese 1:1-Netzwerkkabel werden zum Anschluss von
Netzwerkgeräten an den Switch verwendet.
Die Kabel können nicht zur direkten Herstellung einer
Verbindung zwischen zwei Computern verwendet
werden. In diesem Fall ist ein Crossover-Kabel
erforderlich.
•
Eine Installations-CD
Diese CD enthält die Softwaretreiber für die Installation
der Netzwerkkarten.
•
Externes Netzteil (Großbritannien/Europa)
Dieses Gerät wird zur Stromversorgung des SMC EZ
Switch benötigt. Sorgen Sie dafür, dass das Netzteil
immer ordnungsgemäß eingesteckt ist und sich an
einem sicheren Ort befindet, damit die
Betriebssicherheit des Netzwerks gewährleistet ist.
19 20
Schritt A
Installieren der SMC1233A-TX Fast Ethernet LAN-Karte
(10/100 MBit/s)
Alle Computer müssen AUSGESCHALTET und durch Ziehen des
Netzkabels von ihrer Stromversorgung getrennt werden.
Vor dem Installieren der Karten in den Computern müssen die
Installationsdatenträger für das Betriebssystem (besonders für
Windows-Computer) und die mit dem SMC-Produkt gelieferte
Installations-CD bereitliegen.
Folgende Schritte gelten für die Installation JEDER Netzwerkkarte:
•
Fahren Sie das Betriebssystem herunter.
•
Schalten Sie den Computer aus.
•
Ziehen Sie das Netzkabel des Computers, damit kein Risiko eines
elektrischen Schlags besteht.
•
Entfernen Sie die Abdeckung des Computers.
•
Suchen Sie einen freien PCI-Erweiterungssteckplatz in jedem
Computer (die PCI-Steckplätze sind in der Regel die kürzeren
Steckplätze).
•
Entfernen Sie das entsprechende Abdeckblech vom
Computergehäuse.
•
Führen Sie die Netzwerkkarte ein und drehen Sie die
Befestigungsschraube der Netzwerkkarte fest.
Bringen Sie die Abdeckung des Computers wieder an und stecken
Sie das Netzkabel des Computers ein.
•
Wiederholen Sie die einzelnen Schritte für die Installation jeder
Netzwerkkarte im Computer.
SMC-EZ6505TX_UK/GE/FR/SP/IT.qxd 23/9/02 12:48 pm Page 21
Page 12
Installieren des SMC EZ Switch
•
Platzieren Sie die Computer und den Switch folgendermaßen:
-nahe an einer Steckdose
-so nahe aneinander, dass die beiden Netzwerkkabel
angeschlossen werden können
•
Stecken Sie die Anschlüsse des Netzteils in die Buchse des
Geräts und in die Steckdose ein.
•
Die “Power”-Lampe muss grün leuchten.
Anschließen der Kabel, des Switch und der Computer
•
Stecken Sie ein Ende des Netzwerkkabels in jede Netzwerkkarte.
•
Stecken Sie das andere Ende jedes Netzwerkkabels in Port 1
oder Port 2 des Switch.
Alle Ports besitzen Auto-MDI Funktion - kein Einsatz von Crossover Kabel notwendig.
Wenn Sie längere Kabel benötigen, verwenden Sie ausschließlich
UTP-Kabel der Kategorie 5 mit einer maximalen Länge von 100 m.
Sie können die Computer jetzt EINSCHALTEN.
Sie können jetzt zusätzliche Netzwerkhardware anschließen (siehe
Abbildung).
21 22
Schritt B
Installation der Netzwerktreiber für Windows 95/98
In diesem Abschnitt finden Sie Hinweise zur Installation der
Windows-Netzwerktreiber. Die Vorgehensweise hängt vom
verwendeten Betriebssystem ab. Bei verschiedenen WindowsVersionen können sich unterschiedliche Reaktionen ergeben.
Dieselben Informationen können also je nach System in
unterschiedlichen Fenstern abgefragt werden. Außerdem können
die Fenster in einer anderen Reihenfolge als angegeben erscheinen.
Die typischen Schritte für die Installation bei PCs unter
Windows 95/98/2000 sind wie folgt:
1. Starten Sie Windows 95/98/2000 neu. Sorgen Sie dafür, dass die
SMC-Installations-CD und die Windows 95/98/2000-CD für die
Treiberinstallation bereitliegt.
2. Das Fenster “New Hardware Found” (Neue Hardwarekomponente
gefunden) wird geladen und der Assistent für neue Hardware
wird ausgeführt. Im Fenster wird das zu installierende neue
Netzwerk-Hardwaregerät (Controller) angezeigt. Klicken Sie auf
“Next” (Weiter).
3. Wählen Sie “Display a list of drivers in a specific location” (Eine
Liste von Treibern in einem bestimmten Verzeichnis zum
Auswählen anzeigen), um den benötigten Treiber auszuwählen.
Klicken Sie auf “Next”.
4. Wählen Sie den Gerätetyp in der Liste. Klicken Sie auf “Network
Adapters” (Netzwerkkarten). Klicken Sie auf “Next”. Klicken Sie
auf “Have Disk” (Diskette).
5. Es erscheint die Aufforderung “Install from Disk” (Von Diskette
installieren). Legen Sie die SMC-CD mit den Treibern ein, geben
Sie den Pfad zum CD-ROM-Verzeichnis (z. B. “d:\Drivers \Win95”
oder “d:\Drivers \Win98”) ein und klicken Sie auf “OK”.
6. Es wird “SMC1233A-TX 10/100 PCI Network card” (SMC1233A-TX
10/100 PCI Netzwerkkarte) angezeigt. Klicken Sie auf “OK”.
Deutsch
Deutsch
SMC-EZ6505TX_UK/GE/FR/SP/IT.qxd 23/9/02 12:48 pm Page 23
Expand
Erweitern
Cascade
Internet-
Geräte
PC
PC
Drucker
Page 13

7. Das Gerät wird als “SMC1233A-TX 10/100 PCI Network card”
(SMC1233A-TX 10/100 PCI Netzwerkkarte) erkannt. Klicken Sie auf
“Next”.
8. Möglicherweise werden Sie aufgefordert, die Windows 95/98-CD
einzulegen. Entnehmen Sie die SMC-Installations-CD, legen Sie die
Windows 95/98/2000-CD ein und klicken Sie auf “OK”.
Möglicherweise werden Sie aufgefordert, Daten von der Windows
95/98-CD zu kopieren. Geben Sie den Pfad zu den WindowsInstallationsdateien auf der Windows-CD (z. B.
D:\Drivers\smc1233tx\win98) ein. Klicken Sie auf “OK”.
9. Ihre SMC-Netzwerkkarte ist nun unter Windows 95/98 erfolgreich
installiert. Klicken Sie auf “Finish” (Beenden).
10. Wählen Sie “Yes” (Ja), wenn Sie gefragt werden, ob der
Computer neu gestartet werden soll.
Windows XP Installation
Der Treiber für Windows XP ist bereits integriert, d.h. die Karte
installiert sich selbst. Sie erscheint z.B. als ADMtek 983 10/100
Adapter im Device Manager (Geräte-Manager).
23 24
Deutsch
Deutsch
Fehlerbehebung für die Treiberinstallation
1. Doppelklicken Sie auf “My Computer” (Arbeitsplatz) auf dem
Windows-Desktop, dann auf “Control Panel” (Systemsteuerung)
und anschließend auf “System”.
2. Klicken Sie auf “Device Manager” (Geräte-Manager).
3. Doppelklicken Sie auf “Network Adapters”.
4. Wenn ein Fehler bei der Installation des Treibers vorliegt,
erscheint ein Ausrufezeichen neben dem Eintrag “SMC1233A-TX
PC 10/100 Network card” (SMC1233A-TX 10/100 PCI
Netzwerkkarte). Doppelklicken Sie auf den Eintrag “SMC1233A-TX
PCI 10/100 Network card” (SMC1233A-TX 10/100 PCI
Netzwerkkarte). Das Fenster “Properties” (Eigenschaften) wird
mit einer Meldung über den Status des Geräts angezeigt. Sie
müssen vermutlich die Einstellungen des Geräts oder des
Computers ändern. Wenn das Problem sich nicht beheben lässt,
deinstallieren Sie die Treiber und installieren Sie sie erneut.
SMC-EZ6505TX_UK/GE/FR/SP/IT.qxd 23/9/02 12:48 pm Page 25
Page 14

Schritt C
Einrichten eines Peer-To-Peer-Netzwerks unter
Windows 95/98/2000
In diesem Abschnitt wird beschrieben, wie 2 oder mehr PCs mit der
Hardware des SMC EZ Connect Network Kit zu einer NetzwerkArbeitsgruppe verbunden werden können. Jeder PC im Netzwerk
sollte bereits über eine SMC-Netzwerkkarte verfügen und unter
Windows 95/98/2000 laufen. Die Netzwerkkarten sollten mit den
im Lieferumfang des Kit enthaltenen Netzwerkkabeln an den SMC
EZ Switch angeschlossen sein.
1. Klicken Sie auf “Start”, “Settings” (Einstellungen) und “Control
Panel”. Doppelklicken Sie anschließend auf
“Network” (Netzwerk).
2. Ändern Sie in der Registerkarte “Configuration” (Konfiguration)
die Einstellung für “Primary Network Logon” (Primäre
Netzwerkanmeldung) in “Client for Microsoft Networks” (Client für
Microsoft-Netzwerke). Klicken Sie auf “File and Print Sharing”
(Datei- und Druckerfreigabe) und wählen Sie “I want to be able to
give others access to my files” (Anderen Benutzern soll Zugriff auf
meine Dateien ermöglicht werden können).
Klicken Sie auf “OK”.
3. Klicken Sie im Feld für installierte Netzwerkkomponenten auf
“TCP/IP” und auf “Remove” (Entfernen). Klicken Sie nun auf “Add”
und wählen Sie “Protocol” (Protokoll) im Fenster “Select Network
Component Type” (Netzwerkkomponententyp wählen). Klicken Sie
schließlich auf “Add”. Wählen Sie “Microsoft” und wählen Sie “NET
BEUI” aus den Netzwerkprotokollen aus. Klicken Sie auf “OK”.
25 26
Deutsch
Deutsch
Dies muss auf allen einzubindenden PCs ausgeführt werden
4. Klicken Sie auf die Registerkarte “Identification” (Identifikation)
und wählen Sie den Namen, mit dem Sie Ihren Computer im
Netzwerk identifizieren wollen (z. B. PC1). Wählen Sie ebenfalls
den Namen einer Arbeitsgruppe (z. B. Firmennetz). Klicken Sie
auf “OK”.
Achtung: Sie müssen auf beiden PCs denselben
Arbeitsgruppennamen wählen. Wenn die Namen unterschiedlich
sind, können die PCs nicht miteinander kommunizieren.
5. Möglicherweise werden Sie aufgefordert, die Windows 95/98-CD
einzulegen. Legen Sie die CD ein und klicken Sie auf “OK”.
6. Klicken Sie auf “Yes”, um den Computer neu zu starten.
7. Wiederholen Sie die Schritte 1-6 für den nächsten PC (z.B. PC2),
der in Ihre Netzwerk-Arbeitsgruppe aufgenommen werden soll.
SMC-EZ6505TX_UK/GE/FR/SP/IT.qxd 23/9/02 12:48 pm Page 27
Page 15

8. Um die Verbindung zwischen PC1 und PC2 zu prüfen,
doppelklicken Sie auf “Network Neighborhood”
(Netzwerkumgebung) auf Ihrem Windows-Desktop. PC1 und PC2
sollten als Mitglieder Ihrer Netzwerk-Arbeitsgruppe angezeigt
werden.
9. Sie können nun von den ins Netzwerk eingebundenen Computern
gemeinsam auf Dateien zugreifen.
Gemeinsamer Zugriff auf Dateien
Im folgenden Beispiel wird gezeigt, wie PC2 auf das Laufwerk C:
von PC1 zugreifen kann.
1. Doppelklicken Sie auf dem Windows-Desktop von PC1 auf “My
Computer”. Klicken Sie mit der rechten Maustaste auf das
Laufwerk oder den Ordner, den oder das Sie freigeben wollen.
2. Wählen Sie “Sharing” (Freigabe) im Kontextmenü:
Es erscheint ein Fenster ähnlich dem folgenden:
27 28
Deutsch
Deutsch
3. Wählen Sie einen “Share Name” (Freigabenamen) für das
Laufwerk oder den Ordner, das oder den Sie freigeben wollen,
und wählen Sie einen Wert für den gewünschten Zugriffstyp.
Klicken Sie auf “OK”.
4. Klicken Sie auf dem Windows-Desktop von PC2 auf “Network
Neighborhood” (Netzwerkumgebung) und wählen Sie dann PC1.
Sie können nun auf die ausgewählten Ressourcen von PC1
zugreifen. Herzlichen Glückwunsch! Sie haben soeben ein Peer-ToPeer-Netzwerk zwischen PC1 und PC2 eingerichtet.
SMC-EZ6505TX_UK/GE/FR/SP/IT.qxd 23/9/02 12:48 pm Page 29
Page 16

29 30
Deutsch
Deutsch
Funktionsweise von Switches
Ein Switch funktioniert ganz anders als ein normaler Hub. Der
Hauptunterschied ist, dass ein Switch das Netzwerkpaket überprüft und
nur an die Person schickt, für die es bestimmt war. Dies vermindert die
Menge an Netzwerkverkehr und steigert daher dessen Leistung. Ein
standardmäßiger Hub kann dies nicht und sendet einfach alle Pakete,
die er empfängt, an jeden angeschlossenen Benutzer.
Dadurch wird eine Menge unnötiger Informationen an jeden Computer
geschickt. Der Hauptfaktor, der die Leistung beeinflusst, ist, dass der
Switch den Vollduplexmodus unterstützt. Hierdurch können
Informationen gleichzeitig gesendet und empfangen werden, wodurch
die Arbeitsgeschwindigkeit und die Datenmenge gegenüber einem
normalen Hub verdoppelt werden kann. Ein Hub arbeitet nur im
Halbduplexmodus. Dies bedeutet, dass er jeweils nur ein einziges
Datenpaket senden oder empfangen kann.
Es kann jeweils nur ein einziger Computer, der an einen Hub
angeschlossen ist, mit diesem kommunizieren; dies vermindert die
Geschwindigkeit der Übertragung von Daten an den Benutzer. Wenn
mehrere Computer gleichzeitig Informationen anfordern, tritt eine
sogenannte Kollision ein. Eine Kollision ist ein “Zusammenstoß” zweier
Informationspakete auf einem Kabel. Dies geschieht, wenn der Hub
ein Informationspaket sendet, während gleichzeitig der empfangende
Computer ein Informationspaket sendet.
Je mehr Benutzer an ein Netzwerk angeschlossen sind, desto mehr
Kollisionen treten auf und desto mehr wird die Netzwerkleistung
vermindert. Bei Verwendung eines Switch treten keine Kollisionen auf,
da nur Datenpakete an den Computer gesendet werden, der die
betreffenden Informationen anforderte, und da der Switch gleichzeitig
senden und empfangen kann.
Switch
Computer
Die Bandbreite ist in einem Ethernet-Netzwerk ein sehr wichtiger
Faktor, das sie dessen Leistung bestimmt; ein Switch bietet eine
wesentlich größere Bandbreite als ein Hub.
•
Ein 10-MBit/s-Hub mit 5 Ports hat eine Bandbreite von 10
MBit/s
•
Ein 10/100-MBit/s-Hub mit 5 Ports hat eine Bandbreite von 110
MBit/s
•
Ein 10/100-MBit/s-Switch mit 5 Ports hat eine Bandbreite von
1000 MBit/s
Folglich ist die Leistung eines Switch 100 mal so groß wie die
eines 10-MBit/s-Hub und fast 10 mal so groß wie die eines
10/100-MBit/s-Hub.
Netzwerkaufbau
Ein Switch kann auf mehrere Arten verwendet werden. Sie können
Computer direkt an ihn anschließen, Gruppen von Hubs mit ihm
verbinden oder beides.
Abb. A.
Direktes Anschließen von Computern an den Switch
Computer
In dieser Abbildung ist jeder Computer direkt an den Switch
angeschlossen. Dies bedeutet, dass jeder Benutzer seine eigene
Bandbreite von 200 MBit/s hat. Diese große Leistung vermindert
sich auch nicht, wenn das Datenaufkommen im Netzwerk sich
erhöht. Wenn einer der Benutzer eine sehr große Datei
herunterlädt, wird die Leistung für die anderen Benutzer nicht
beeinträchtigt.
SMC-EZ6505TX_UK/GE/FR/SP/IT.qxd 23/9/02 12:48 pm Page 31
Page 17

31 32
Deutsch
Français
Hub
Computer
Hub
Computer
Hub
Computer
Switch
Server
Server
Hub
Computer
Hub
Computer
Hub
Computer
Switch
Drucker
Server
Abb. B.
Anschließen von Hub-Gruppen an den Switch
Computer
In dieser Abbildung existiert bereits ein Netzwerk aus 3 HubGruppen und 2 Servern. Der Switch wird in das Zentrum des
Netzwerks gestellt, damit er den Datenverkehr im Netzwerk steuert.
Hierdurch wird der Datenverkehr von Hub-Gruppen getrennt und
die Leistung des Netzwerks drastisch gesteigert. Da der
Datenverkehr getrennt wird, steht jedem Benutzer mehr Bandbreite
und dadurch auch mehr Leistung zur Verfügung.
Abb. C.
Verbinden von Hubs, anderen Switches und Computern mit dem
Switch In der obigen Abbildung wird gezeigt, wie Switches auf
verschiedene Arten verwendet werden können.
Der Switch im Mittelpunkt des Netzwerks leitet den
Netzwerkverkehr an die verschiedenen Gruppen von Hubs, den
Server, den Drucker und einen anderen Switch um. Wenn Sie
Switches miteinander koppeln, benötigen Sie einen Uplink-Port.
Die zwei Geräte können nicht miteinander kommunizieren, wenn
sie über einen Standard-Port miteinander verbunden sind (es sei
denn, Sie verwenden ein Crossover-Kabel).
Bienvenue
Le kit réseau commuté 10/100Mbps de SMC contient tout ce dont
vous avez besoin, chez vous comme au bureau, pour relier en un
tour de main plusieurs ordinateurs en réseau ou étendre et
développer un réseau existant.
Ce kit s’inscrit donc dans la continuité de la ligne SMC des produits
destinés au grand public et aux PME et surpasse même ces
homologues de la ligne en terme de performances.
Vous êtes certainement impatient d’exploiter ce kit mais avant
d’effectuer les premiers branchements, nous vous conseillons de
lire attentivement ce manuel qui vous simplifiera l’installation.
Il vous suffit en effet de suivre les trois étapes A, B et C proposées
pour être prêt.
Nous tenons à vous remercier d’avoir choisi SMC pour vos besoins
réseau. Pour de plus amples informations sur les solutions réseau
SMC destinées au grand public et aux PME, consultez la brochure
sur le CD ci-joint ou rendez-vous sur www.smc-europe.com pour des
informations détaillées.
Systèmes d’exploitation
Ce kit réseau est accompagné de drivers assurant sa compatibilité
avec les systèmes d’exploitation suivants :
•
Microsoft Windows for Workgroup 3.11
•
Microsoft Windows (r) 95/ 98/ NT/ 2000, XP
•
Netware 4.11 ou 5.0, FreeBSD 3.0, Linux
•
SCO Unixware 7
Il n’est pas indispensable que les ordinateurs fonctionnent sous le
même système d’exploitation.
Ordinateur
Un PC ou un Power Macintosh disposant d’un emplacement PCI
libre.
SMC-EZ6505TX_UK/GE/FR/SP/IT.qxd 23/9/02 12:48 pm Page 33
Page 18

33 34
Français
Français
Contenu du kit réseau commuté 10/100Mbps de SMC
•
Un guide d’installation
Ce manuel vous guide tout au long de l’installation à
l’aide d’explications faciles à comprendre.
•
Un commutateur 5 ports 10/100Mbps
Cet appareil est l’élément central sur lequel tous les
périphériques réseau seront branchés.
•
Deux cartes réseau Fast Ethernet 10/100Mbps
SMC1233A-TX
Chaque carte s’insère dans un emplacement PCI libre de
l’ordinateur. Elle lui permet d’échanger des données
avec les autres postes en réseau.
•
Deux câbles réseau de 5 mètres chacun
Ces câbles directs permettent de connecter les
périphériques réseau au commutateur ou de relier deux
postes entre eux. Dans ce dernier cas, il faudrait un
câble croisé (non fourni).
•
Un CD-ROM d’installation
Ce CD-ROM contient les drivers qui vous permettent de
configurer vos cartes réseau.
•
Un bloc d’alimentation externe
(Royaume-Uni/Europe)
Cet élément est nécessaire pour alimenter le
commutateur. Vérifiez que le bloc d’alimentation est
correctement branché et placé dans un endroit sûr, sans
risque de faux-contact.
Étape A
Installation de la carte réseau SMC Fast Ethernet 10/100Mbps
SMC1233A-TX
Vérifiez que tous les ordinateurs sont éteints et débranchés. Avant
d’installer les cartes dans votre ordinateur, vérifiez que vous
disposez des disques d’installation du système d’exploitation en
particulier pour les ordinateurs sous Windows et du CD-ROM
d’installation contenu dans le coffret SMC. Pour installer la carte
réseau sur chaque ordinateur :
•
Arrêtez le système d’exploitation.
•
Éteignez l’ordinateur.
•
Débranchez-le du secteur pour éviter tout risque, notamment de
décharge électrique.
•
Retirez le capot de l’unité centrale.
•
Repérez un emplacement PCI libre sur chaque ordinateur ; ces
slots sont généralement de petite taille.
•
Retirez la plaque de protection correspondante sur le châssis.
•
Insérez la carte réseau et resserrez la vis de fixation pour
bloquer la carte sur l’ordinateur.
Remettez le capot en place et rebranchez l’ordinateur.
•
Répétez ces opérations sur chaque ordinateur.
SMC-EZ6505TX_UK/GE/FR/SP/IT.qxd 23/9/02 12:48 pm Page 35
Page 19

35 36
Français
Français
Installation du commutateur EZ Switch
•
Installez les ordinateurs et le commutateur :
- à proximité d’une prise secteur ;
- suffisamment près les uns des autres pour pouvoir les relier à
l’aide des câbles fournis.
•
Branchez le bloc d’alimentation sur le commutateur puis sur le
secteur.
•
Vérifiez que le témoin d’alimentation est allumé (vert).
Branchement des câbles, du commutateur et des ordinateurs
•
Reliez les câbles réseau à chacune des cartes.
•
Branchez leur seconde extrémité aux ports 1 et 2 du switch.
Auto MDI / MDIX sur chaque port - utilisation de câble droit en
toutes circonstances.
Si vous envisagez d’utiliser des câbles plus longs, assurez-vous
qu’il s’agit bien de câbles UTP (paire torsadée non blindée) de
catégorie 5 (longueur maximale de 100 m). Vous pouvez alors
rallumer les ordinateurs.
Vous pouvez ajouter des équipements au réseau comme l’illustre le
schéma.
Étape B
Installation des drivers réseau Windows 95/98
Cette section vous explique comment installer un driver réseau
Windows. La procédure varie cependant selon le système
d’exploitation. En effet, toutes les versions de Windows ne se
comportent pas de la même façon. Il se peut donc que les écrans
qui s’afficheront sur votre poste soient différents de ceux présentés
ici mais les informations requises seront quant à elles identiques.
En outre, ces écrans peuvent s’afficher dans un ordre différent. La
procédure type d’installation sous Windows 95/98/2000 est la
suivante :
1. Redémarrez Windows 95/98/2000. Vérifiez que vous disposez
bien du CD-ROM d’installation SMC ainsi que du CD de
Windows 95/98/2000.
2. La fenêtre Détection de nouveau matériel s’affiche et l’Assistant
Ajout de nouveau matériel s’ouvre en indiquant le type de
périphérique (contrôleurs) à installer. Cliquez sur « Suivant ».
3. Choisissez « Afficher la liste des pilotes à un emplacement
spécifique » afin de pouvoir sélectionner un driver. Cliquez sur
« Suivant ».
4. Sélectionnez le type de périphérique dans la liste. Cliquez sur
« Cartes réseau », puis sur « Suivant » et enfin sur « Disquette
fournie ».
5. La fenêtre d’installation depuis la disquette s’affiche alors.
Insérez le CD-ROM de SMC contenant les drivers et spécifiez le
chemin d’accès du CD-ROM (par exemple, d:\Drivers\Win95 ou
Win98), puis cliquez sur « OK ».
6. L’écran indique alors « SMC1233A-TX 10/100 PCI Network card ».
Cliquez sur « OK ».
SMC-EZ6505TX_UK/GE/FR/SP/IT.qxd 23/9/02 12:48 pm Page 37
Extension
du réseau
à volonté
Périphérique
Internet
PC
PC
Imprimante
Page 20

37 38
Français
Français
7. Votre périphérique est identifié comme une carte réseau PCI
10/100Mbps SMC1233A-TX. Cliquez sur « Suivant ».
8. Vous devrez peut-être insérer le CD de Windows 95/98. Remplacez
alors le CD-ROM d’installation de SMC par le CD de Windows
95/98, puis cliquez sur « OK ».
Vous devrez peut-être également copier des éléments depuis le CD
de Windows 95/98. Spécifiez le chemin des fichiers d’installation sur
le CD de Windows (par exemple, D:\Drivers\SMC1233A-TX\win98).
Cliquez sur « OK ».
9. La carte réseau est maintenant installée sous Windows 95/98.
Cliquez sur « Terminer ».
10. Lorsque le système vous le demande, redémarrez l’ordinateur.
Installation pour Windows XP
Le driver de la carte SMC1233A-TX est intégré dans Windows XP. La
carte sera automatiquement installée. Elle apparaîtra sous le nom
"carte réseau ADMtek 983 10/100" dans le panneau de
configuration.
Installation des drivers
1. Double-cliquez sur l’icône Poste de travail du Bureau Windows,
puis sur le Panneau de configuration et enfin sur l’icône
Système. 3. Double-cliquez sur « Cartes réseau ».
2. Cliquez sur l’onglet « Gestionnaire de périphériques ».
3. Double-cliquez sur « Cartes réseau ».
4. Si vous rencontrez des difficultés au cours de l’installation du
driver, un point d’exclamation apparaît à côté de « carte réseau
PCI 10/100Mbps SMC1233A-TX ». Double-cliquez sur cette
phrase. La fenêtre des propriétés s’ouvre et un message relatif à
l’état du périphérique s’affiche. Il se peut que vous deviez
vérifier la configuration du périphérique réseau ou de
l’ordinateur. Si le problème persiste, désinstallez et réinstallez
les drivers.
SMC-EZ6505TX_UK/GE/FR/SP/IT.qxd 23/9/02 12:48 pm Page 39
Page 21

39 40
Français
Français
Étape C
Configuration d’un réseau poste-à-poste sous
Windows 95/98/2000
Cette section décrit comment connecter au moins deux PC
ensemble en réseau avec les éléments fournis dans le Kit réseau
SMC. Chaque poste d’un groupe de travail en réseau doit déjà
posséder une carte réseau SMC et fonctionner sous
Windows 95/98/2000. Les cartes réseau doivent être reliées au
commutateur SMC EZ par les câbles réseau fournis avec le kit.
1. Cliquez sur « Démarrer », « Paramètres », « Panneau de
configuration » et double-cliquez sur « Réseau » pour accéder à
la fenêtre de paramétrage du réseau.
2. Dans l’onglet « Configuration », sélectionnez Client pour les
réseaux Microsoft dans la zone « Ouverture de session réseau
principale ». Cliquez sur « Partage de fichiers et d’imprimantes »
et cochez la case « Permettre à d’autres utilisateurs d’accéder à
mes fichiers ». Cliquez ensuite sur « OK ».
3. Dans la zone des composants réseau installés, cliquez sur
« TCP/IP », puis sur le bouton « Supprimer ». Cliquez sur
« Ajouter » et sélectionnez le protocole à ajouter dans la
fenêtre des types de composant réseau, puis cliquez sur
« Ajouter ». Sélectionnez « Microsoft » comme Constructeur et
« NET BEUI » comme Protocole. Cliquez ensuite sur « OK ».
Répétez cette opération sur les deux ordinateurs.
4. Cliquez sur l’onglet « Identification » et choisissez un nom pour
votre ordinateur sur le réseau (par exemple, PC1). Attribuez
également un nom au groupe de travail (par exemple, Mon
réseau). Cliquez sur « OK ».
Avertissement : Vous devez utiliser le même nom de réseau sur
les deux PC. S’ils sont différents, ces postes ne pourront pas
communiquer l’un avec l’autre.
5. Vous devrez peut-être insérer le CD de Windows 95/98. Dans ce
cas, insérez-le et cliquez sur « OK ».
6. Cliquez sur « Oui » pour redémarrer l’ordinateur.
7. Répétez les opérations 1 à 6 pour chaque ordinateur (PC2, par
exemple) à ajouter au groupe de travail.
SMC-EZ6505TX_UK/GE/FR/SP/IT.qxd 23/9/02 12:48 pm Page 41
Page 22

41 42
Français
Français
8. Pour vérifier la connexion réseau entre le PC1 et le PC2, doublecliquez sur l’icône Voisinage réseau du Bureau Windows. PC1 et
PC2 doivent apparaître comme membres de votre groupe de
travail.
9. Vous pouvez alors partager des fichiers entre les ordinateurs
connectés en réseau.
Partage de fichiers
L’exemple suivant montre comment le PC2 peut accéder au lecteur
« C : » du PC1.
1. Sur le PC1, double-cliquez sur l’icône Poste de travail du Bureau
Windows. Cliquez à l’aide du bouton droit de la souris sur le
lecteur de disque ou le répertoire que vous souhaitez partager.
2. Sélectionnez l’option de partage dans le menu contextuel.
Une fenêtre similaire à celle-ci apparaît :
3. Choisissez le nom de partage du lecteur ou du répertoire puis
indiquez le type d’accès que vous souhaitez définir. Cliquez
ensuite sur « OK ».
4. Sur le PC2, cliquez sur Voisinage réseau du Bureau Windows,
puis sélectionnez le poste PC1.
Vous avez alors accès aux ressources sélectionnées sur PC1. Vous
venez ainsi de créer un réseau poste-à-poste entre PC1 et PC2.
Installation de la carte réseau SMC Fast Ethernet 10/100Mbps
et de son logiciel sur un Power Macintosh
Configuration requise
Un Power Macintosh avec bus PCI, lecteur de CD-ROM, système
d’exploitation Mac OS 8.5.1 ou 8.6 et AppleScript.
Procédure d’installation
Commencez par monter la carte SMC Fast Ethernet puis installez le
logiciel et sélectionnez une nouvelle connexion réseau.
Installation de la carte SMC Fast Ethernet
Eteignez votre Macintosh et tous les périphériques connectés puis
débranchez-les. Suivez les instructions du manuel Macintosh pour
l’installation d’une carte PCI.
Reportez-vous à l’installation du switch EZ Switch dans le présent
manuel. La procédure est en effet similaire.
SMC-EZ6505TX_UK/GE/FR/SP/IT.qxd 23/9/02 12:48 pm Page 43
Page 23

43 44
Français
Français
Fonctionnement d’un commutateur
Le fonctionnement d’un commutateur se distingue de celui d’un
concentrateur normal. La principale différence tient à ce que le
commutateur analyse les paquets de données et ne les transmet
qu’aux personnes auxquelles ils sont destinés. Cela réduit le
volume des informations en transit sur le réseau et en améliore les
performances. Un concentrateur standard n’est pas capable de cela
; son fonctionnement se résume à émettre les paquets reçus à
toutes les personnes qui lui sont connectées. Les divers
utilisateurs reçoivent donc un grand nombre de données même s’ils
n’en ont pas besoin.
Au niveau des performances, l’autre atout d’un commutateur est sa
prise en charge du mode de transmission Full duplex. Cela signifie
qu’il est en mesure d’émettre ou de recevoir des informations
simultanément, ce qui double la vitesse à laquelle il fonctionne
ainsi que le volume des données acheminées par rapport à un
concentrateur.
Ce dernier fonctionne uniquement en mode Half duplex. Il doit
donc effectuer émissions et réceptions de données
consécutivement. Un seul ordinateur à la fois peut communiquer
avec le concentrateur, ce qui ralentit la réception des informations.
Lorsque plusieurs postes demandent des données en même temps,
cela provoque une collision. Cela se produit lorsque deux paquets
de données arrivent au même moment sur le même câble,
notamment lorsque le concentrateur adresse un paquet
d’informations à un ordinateur lui-même en train de lui envoyer
des données. Le nombre de connexions au concentrateur accroît le
risque de collisions et de ralentissement des performances du
réseau. Comme un commutateur se contente d’adresser les données
à leurs réels destinataires et qu’il peut émettre et recevoir en
même temps, vous n’êtes pas confronté à ces collisions lorsque
vous y êtes connecté.
Commutateur
Ordinateurs
Ce commutateur offre une meilleure bande passante, élément-clé
d’un réseau Ethernet. En effet, plus celle-ci est large, meilleures
sont les performances du réseau.
•
Un concentrateur 5 ports 10Mbps a une bande passante de
10Mbps
•
Un concentrateur 5 ports 10/100Mbps a une bande passante de
110Mbps
•
Un commutateur 5 ports 10/100Mbps a une bande passante Full
Duplex de 1000Mbps
Les performances du commutateur sont donc 100 fois supérieures à
celles d’un concentrateur à 10Mbps et presque 10 fois plus élevées
que celles d’un concentrateur 10/100Mbps.
Conception du réseau
Un commutateur peut servir de diverses façons. Vous pouvez y
connecter directement les ordinateurs, y brancher des groupes de
concentrateurs ou opter pour une configuration mixte.
Fig. A
Connexion directe d’ordinateurs au commutateur
Ordinateurs
Sur ce schéma, chaque ordinateur est relié directement au
commutateur. Cela signifie que chaque utilisateur dispose d’une
bande passante exclusive de 200Mbps en Full Duplex. Les
transmissions sont donc très rapides et ne ralentissent pas lorsque
le trafic s’intensifie. Ainsi, si l’un des utilisateurs télécharge un
fichier très volumineux, cela n’affecte pas les performances des
autres utilisateurs.
SMC-EZ6505TX_UK/GE/FR/SP/IT.qxd 23/9/02 12:48 pm Page 45
Page 24

45 46
Français
Español
Concentrateur
Ordinateurs
Concentrateur
Ordinateurs
Concentrateur
Ordinateurs
Commutateur
Serveur
Serveur
Concentrateur
Ordinateurs
Concentrateur
Ordinateurs
Concentrateur
Ordinateurs
Commutateur
Imprimante
Serveur
Fig. B
Connexion de groupes de concentrateurs au commutateur
Ordinateurs
Le schéma présente un réseau préexistant, composé de trois
groupes de concentrateurs et de deux serveurs. Le commutateur
est placé au centre du réseau afin d’acheminer tout le trafic de
celui-ci. Le trafic de chaque groupe est donc indépendant de celui
des autres, ce qui permet des gains de performances substantiels
sur le réseau. Chaque groupe d’utilisateurs dispose donc d’une plus
grande bande passante et donc de meilleures performances.
Fig. C
Connexion de concentrateurs, d’ordinateurs et d’autres
commutateurs au commutateur principal
Le schéma ci-dessus illustre les différents emplois des
commutateurs. Le commutateur central redirige le trafic vers les
différents groupes de concentrateurs, le serveur, l’imprimante et
l’autre commutateur. Si vous reliez des commutateurs entre eux,
vous devez utiliser le port de cascade sur l’un des deux
commutateurs. En effet, les deux commutateurs ne sont pas en
mesure de communiquer ensemble s’ils sont connectés par un port
standard, à moins que vous n’utilisiez un câble
¡Hola y bienvenido/a!
El EZ Connect kit de networking de SMC contiene todo lo necesario
para interconectar de forma rápida y fácil los ordenadores de casa
y de la oficina, para que cree su propia red o amplíe y mejore su
red actual.
Este kit se suma a la amplía gama de productos de red que SMC ha
diseñado para el hogar y la pequeña oficina, y saca el mejor
rendimiento de todos sus dispositivos.
Sabemos que desea estrenarlo. No obstante, antes de continuar y
empezar a conectar componentes, le recomendamos que lea este
manual, que le ayudará en el proceso de instalación.
Sólo tiene que seguir los pasos A, B y C y enseguida podrá
empezar a utilizar el sistema.
Gracias por elegir SMC para sus actividades de conexión en red. Si
desea obtener más información sobre los demás productos de la
gama de conexión en red para el hogar y la pequeña oficina,
consulte el folleto almacenado en el CD o vaya a www.smceurope.com, donde encontrará toda la información y la asistencia
que necesite.
Sistemas operativos
Este kit de red es compatible con los siguientes sistemas
operativos, para los que dispone de controladores apropiados.
•
Microsoft Windows for Workgroup 3.11
•
Microsoft Windows (r) 95/ 98/ NT/ 2000 y XP
•
Netware 4.11, 5.0, FreeBSD 2.2.x, 3.0, Linux
•
SCO Unixware 7
No hace falta que los dos ordenadores tengan el mismo sistema
operativo.
SMC-EZ6505TX_UK/GE/FR/SP/IT.qxd 23/9/02 12:48 pm Page 47
Page 25

Paso A
Instalación de la tarjeta Fast Ethernet LAN SMC1233A-TX
10/100 Mbps
Asegúrese de que todos los ordenadores estén apagados y
desconectados de la red de alimentación.
Antes de instalar las tarjetas en los ordenadores, compruebe que
tenga los disquetes o el CD-ROM de instalación del sistema
operativo (especialmente en el caso de ordenadores con sistema
Windows) y el CD de instalación incluido en el paquete de SMC.
Los pasos para instalar cada tarjeta de red son los siguientes:
•
Cierre el sistema operativo.
•
Apague el ordenador.
•
Desconecte el cable de alimentación del ordenador para una
mayor seguridad y para evitar descargas eléctricas.
•
Retire la carcasa del ordenador.
•
Busque una ranura de expansión PCI libre en cada ordenador (las
ranuras PCI suelen ser pequeñas).
•
Retire la placa correspondiente del chasis del ordenador.
•
Inserte la tarjeta de red y apriete el tornillo de sujeción de la
misma para fijarla al ordenador.
Coloque la carcasa al ordenador y restituya el cable de
alimentación.
•
Repita estos pasos para instalar una tarjeta de red en cada
ordenador.
Instalación del EZ Switch de SMC
•
Coloque los ordenadores y el switch:
- cerca de una toma de corriente
- lo suficientemente cerca entre sí para conectar los dos cables
de red
Ordenador
PC o Power Macintosh con una ranura PCI disponible.
Éste es el contenido del EZ Connect Kit de networking de SMC:
•
Una guía de inicio rápido
Esta guía le ayudará en cada uno de los pasos del proceso
de instalación, de forma sencilla y utilizando términos
comprensibles.
•
Un EZ Switch a 10/100 Mbps de 5 puertos
El switch es el elemento principal de la red, el punto central
al que están conectados todos los dispositivos de red.
•
Dos tarjetas de red Fast Ethernet SMC1233A-TX a
10/100 Mbps
Cada tarjeta se introducirá en una ranura de expansión PCI
del ordenador. Las tarjetas de red permiten que un
ordenador intercambie datos con otros equipos de la red.
•
Dos cables de red (longitud = 5 m cada uno)
Los cables de red directos se utilizan para conectar los
dispositivos que operan en red con el hub. No están
pensados para conectar directamente dos ordenadores. Para
este fin, se necesita un cable de cruce.
•
Un CD de instalación
Este CD contiene los controladores (drivers) de software que
le permitirán instalar las tarjetas de red.
•
Fuente de alimentación externa (Reino Unido/Europa)
Esta unidad es necesaria para alimentar el EZ Switch de
SMC. Para evitar que se produzcan fallos en la red,
compruebe siempre que la fuente de alimentación esté
conectada firmemente y que se encuentre en un lugar
seguro.
Español
Español
47 48
SMC-EZ6505TX_UK/GE/FR/SP/IT.qxd 23/9/02 12:48 pm Page 49
Page 26

Paso B
Instalación del controlador de red para Windows 95/98/2000
y ME
En este apartado se explica cómo instalar un controlador de red para
Windows. Puede que el proceso no sea el mismo en todas las
versiones de Windows. Los pasos habituales para la instalación en un
ordenador con Windows 95/98/2000/ME son los siguientes:
1. Reinicie Windows 95/98/2000. Asegúrese de tener a mano el CD de
instalación de SMC y el CD de Windows 95/98/2000 durante el
proceso de instalación del controlador.
2. Aparece la ventana "New Hardware Found" ("Nuevo hardware
encontrado") y se carga el programa "New Hardware Wizard"
("Asistente para Nuevo hardware"). El "New Hardware Wizard"
("Asistente para Nuevo hardware") indica qué dispositivo de
hardware de red (controlador) se instalará. Pulse "Next"
("Siguiente").
3. Seleccione "Display a list of drivers in a specific location"
("Mostrar una lista de controladores en una ubicación específica")
para elegir el controlador que necesite. Pulse "Next" ("Siguiente").
4. El sistema le indicará "Install from Disk" ("Instalar desde disco").
Introduzca el CD de SMC que contiene los controladores e
introduzca la ruta de acceso del CD-ROM (p. ej. d:\Drivers \Win95
o Win98) y pulse "OK" ("Aceptar"). Tarjeta de red. Pulse "Next"
("Siguiente").
5. En la pantalla verá "SMC1233A-TX 10/100 PCI NIC" ("SMC1233A-TX
10/100 PCI NIC"). Pulse "OK" ("Aceptar").
6. Su dispositivo será reconocido como "SMC1233A-TX 10/100Mbps
PCI NIC" ("SMC1233A-TX 10/100Mbps PCI NIC"). Pulse "Next"
("Siguiente").
7. La tarjeta de red SMC ya está instalada correctamente. Pulse
"Finish" ("Finalizar").
8. Elija "Yes" ("Sí") cuando se le pregunte si desea reiniciar el
ordenador.
•
Inserte la fuente de alimentación en el switch y la toma de
corriente.
•
Asegúrese de que la luz "Power" ("Alimentación") esté
encendida (verde).
Conexión de los cables, el switch y los ordenadores
•
Conecte un extremo de los cables de red en cada tarjeta de red.
•
Conecte el otro extremo de los cables de red en el Puerto 1 y el
Puerto 2 del switch.
Conexión en serie de unos switch y otros dispositivos de red
Todos los puertos del switch admiten la configuración MIDI/MDI-X
para las conexiones de cables. Esto le permite utilizar cable directo
para conectarse con otros switch o hub desde cualquier puerto del
switch. No son necesarios cables de cruce ni otra configuración de
dispositivos.
Si pretende utilizar cables más largos, recuerde que sólo puede usar
cable UTP de la categoría 5 con una longitud máxima de 100 m.
Español
Español
49 50
SMC-EZ6505TX_UK/GE/FR/SP/IT.qxd 23/9/02 12:48 pm Page 51
PC
Expansión
de la red
a voluntad
Impresora
Dispositivos
de Internet
PC
Page 27

Resolución de problemas en la instalación del controlador
1. Haga doble clic en el icono "My Computer" ("Mi PC") del
escritorio de Windows; luego en "Control Panel" ("Panel de
control") y finalmente en "System" ("Sistema").
2. Pulse "Device manager" ("Administrador de dispositivos").
3. Haga doble clic en "Network Adapters" ("Adaptadores de red").
Tal vez se le pida que copie del CD de Windows 95/98. Asegúrese de
introducir la ruta de acceso a los archivos de instalación de Windows
del CD de Windows (p. ej. D:\Controladores\smc1233atx\win98).
Pulse "OK" ("Aceptar").
9. La tarjeta de red de SMC se ha instalado correctamente en
Windows 95/98. Pulse "Finish" ("Finalizar").
10.Elija "Yes" ("Sí") cuando se le pregunte si desea reiniciar el
ordenador.
Instalación en Windows XP
Windows XP incorpora un controlador para la tarjeta SMC1233A-TX.
La tarjeta se instalará automaticamente. Aparecerá como p.ej una
tarjeta de red ADMtec 983 10/100 en el administrador de
dispositivos.
Español
Español
51 52
SMC-EZ6505TX_UK/GE/FR/SP/IT.qxd 23/9/02 12:48 pm Page 53
Page 28

Paso C
Configuración de una punto a punto Windows 95/98
En este apartado se explica cómo conectar dos, o más, ordenadores
entre sí y formar un grupo de trabajo en red utilizando el equipo
suministrado en el EZ Connect Kit de Networking. Cada uno de los
ordenadores de la red debe tener instalada una tarjeta de red SMC y
debe ejecutarse en Win 95/98. Las tarjetas deben estar conectadas al
EZ switch de SMC mediante los cables de red incluidos en el kit.
1. Pulse "Start" ("Inicio"), "Settings" ("Configuración"), "Control
Panel" ("Panel de control") y haga doble clic en "Network"
("Red").
2. En la ficha "Configuration" ("Configuración"), apartado "Primary
Network Logon" ("Inicio de sesión principal", seleccione "Client for
Microsoft Networks" ("Cliente para redes Microsoft"). Pulse "File
and Print Sharing" ("Compartir archivos e impresoras...") y
seleccione "I want to be able to give others access to my files"
("Permitir que otros usuarios tengan acceso a mis archivos").
Pulse "OK" ("Aceptar").
3. A continuación, pulse "Add" ("Agregar..."), seleccione "Protocol"
("Protocolo") en la ventana "Select Network Component Type"
("Seleccionar tipo de componente de red") y pulse "Add"
"Agregar..." Seleccione "Microsoft" ("Microsoft") y "NET BEUI"
("NET BEUI") como protocolos de red. Pulse "OK" ("Aceptar").
Esto debe hacerse en ambos ordenadores.
4. Pulse la ficha "Identification" ("Identificación") y asigne un
nombre a su ordenador para identificarlo en la red (p. ej., PC1).
Elija también un nombre para el grupo de trabajo (p. ej., Red de
casa). Pulse "OK" ("Aceptar").
4. Si surge algún problema al instalar el controlador, aparecerá un
signo de exclamación junto a "SMC1233A-TX PC 10/100 Network
card" ("Tarjeta de red SMC1233A-TX PC 10/100"). Haga doble clic
en "SMC1233A-TX PCI 10/100 Network card" ("Tarjeta de red
SMC1233A-TX PCI 10/100"). Se abrirá la ventana "Properties"
("Propiedades") y aparecerá un mensaje sobre el estado del
dispositivo en la ventana. Tal vez tenga que revisar la
configuración del dispositivo de red o del ordenador. Si el
problema persiste, desinstale los controladores y vuélvalos a
instalar.
Español
Español
53 54
SMC-EZ6505TX_UK/GE/FR/SP/IT.qxd 23/9/02 12:48 pm Page 55
Page 29

Empezar a compartir archivos
En este ejemplo veremos cómo acceder a la unidad "C:" de PC1 desde
PC2.
1. En el escritorio de PC1, haga doble clic en el icono "My Computer"
("Mi PC"). Con el botón derecho del ratón, pulse la unidad de
disco o la carpeta que desee compartir.
2. En el menú contextual, seleccione "Sharing" ("Compartir"):
Aparecerá una ventana parecida a ésta:
3. En "Share Name" ("Nombre del recurso compartido"), asigne un
nombre a la unidad o carpeta que desee compartir y seleccione el
tipo de acceso que quiera establecer. Pulse "OK" ("Aceptar").
4. En el escritorio de PC2, pulse "Network Neighborhood" ("Entorno
de red") y seleccione el ordenador PC1.
Ahora ya puede acceder a los recursos seleccionados de PC1.
¡Felicidades! Acaba de establecer una red de punto a punto entre los
equipos PC1 y PC2.
¡Advertencia! El nombre del grupo de trabajo debe ser
idéntico en ambos ordenadores. De lo contrario, éstos no
podrán conectarse entre sí.
5. Tal vez se le pida que inserte el CD de Windows 95/98. Hágalo y
pulse "OK" ("Aceptar").
6. Seleccione "Yes" ("Sí") cuando se le pida si desea reiniciar el
ordenador.
7. Repita los pasos 1 a 6 en el siguiente ordenador (PC2, p. ej.) que
desee añadir al grupo de trabajo en red.
8. Para verificar que los ordenadores PC1 y PC2 están
interconectados, haga doble clic en el icono "Network
Neighborhood" ("Entorno de red") del escritorio de Windows. Verá
que PC1 y PC2 aparecen como componentes del grupo de trabajo
en red.
9. Ahora ya puede compartir archivos entre los ordenadores de la red.
Español
Español
55 56
SMC-EZ6505TX_UK/GE/FR/SP/IT.qxd 23/9/02 12:48 pm Page 57
Page 30

Empezar a compartir archivos
1. En el escritorio de PC1, haga doble clic en el icono "My Computer"
("Mi PC"). Con el botón derecho del ratón, pulse la unidad de
disco o la carpeta que desee compartir.
2. En el menú contextual, seleccione "Sharing and Security"
("Compartir y seguridad"):
Aparecerá una ventana parecida a ésta:
3. Seleccione "Share This Folder" ("Compartir esta carpeta") y en
"Share Name" ("Nombre del recurso compartido") asigne un
nombre a la carpeta o unidad que desee compartir.
4. Seleccione "Permissions" ("Permisos") y establezca los que desee.
Pulse "OK" ("Aceptar").
5. En el escritorio de PC2, pulse "My Network Places" ("Mis sitios de
red"). Seguidamente, explore "Entire Network" ("Toda la red")
hasta localizar el recurso compartido de PC1.
¡Felicidades! Acaba de establecer una red de punto a punto entre los
equipos PC1 y PC2.
Configuración de una red de punto a punto en Windows XP
1. Pulse "Start" ("Inicio"), "Settings" ("Configuración"), "Control
Panel" ("Panel de control") y haga doble clic en "System"
("Sistema").
2. En la ficha "Computer Name" ("Nombre del ordenador"), pulse
"Change" ("Cambiar"). Aparecerá el menú correspondiente, en el
que podrá asignar un nombre a su ordenador y a su grupo de
trabajo.
3. Escoja un nombre que identifique a su ordenador en la red (p. ej.,
"PC1"). Haga lo mismo con el grupo de trabajo (p. ej., Red de
casa) y pulse "OK" ("Aceptar").
Advertencia: El nombre del grupo de trabajo debe ser el mismo
en todos los ordenadores. La ortografía y los espacios entre
palabras deben ser idénticos.
4. Se le pedirá que reinicie el ordenador para que los cambios surjan
efecto.
5. Pulse "OK" ("Aceptar") para reiniciar el ordenador.
6. Repita los pasos 1 a 6 en el siguiente ordenador (p. ej., PC2) que
desee añadir al grupo de trabajo en red.
7. Para verificar que los ordenadores PC1 y PC2 están
interconectados, pulse "Start" ("Inicio"), "My Network Places"
("Mis sitios de red"), "Entire Network" ("Toda la red") y luego
"Microsoft windows network" ("Red de Microsoft Windows"). Verá
que PC1 y PC2 aparecen como componentes del grupo de trabajo
en red.
8. Ahora ya puede compartir archivos entre los ordenadores de la red.
Español
57 58
SMC-EZ6505TX_UK/GE/FR/SP/IT.qxd 23/9/02 12:48 pm Page 59
Page 31

•
Un hub de 10 Mbps y 5 puertos tiene un ancho de banda de 10
Mbps
•
Un hub de 10/100 Mbps y 5 puertos tiene un ancho de banda de
110 Mbps
•
Un switch de 10/100 Mbps y 5 puertos tiene un ancho de banda
de 1.000 Mbps
Por consiguiente, el rendimiento del switch es 100 veces superior al
del hub de 10 Mbps y casi 10 veces superior al del hub de 10/100
Mbps.
Funcionamiento de los switches
Un switch funciona de forma muy distinta a un hub normal. La
principal diferencia es que un switch examina el paquete de red y
sólo lo envía a la persona a la que va destinado. Esto reduce el
tráfico en la red y mejora el rendimiento de los equipos. Un hub
estándar, en cambio, no lo puede hacer y simplemente envía
cualquier paquete que recibe a todos los equipos conectados. Esto
significa que se transmite mucha información innecesaria a todos los
ordenadores.
El factor principal que determina el rendimiento es que el switch
admite el modo bidireccional, es decir, que puede enviar y recibir
información al mismo tiempo, con lo que se dobla la velocidad de
funcionamiento y la cantidad de información que puede enviar un
hub normal.
Un hub sólo funciona en modo unidireccional. Esto significa que sólo
puede enviar o recibir un paquete de información en un momento
dado. Sólo uno de los ordenadores conectados al hub puede
establecer comunicación, lo cual reduce la velocidad a la que se
recibe la información. Cuando más de un ordenador solicita
información al mismo tiempo se produce lo que se denomina una
colisión. La colisión ocurre cuando dos paquetes de información
"chocan" en un mismo cable. Eso sucede cuando el hub envía un
paquete de información a un ordenador que, en ese mismo instante,
también envía otro paquete de información. Cuantos más equipos
estén conectados al hub, mayor es la probabilidad de colisión y de
que empeore el rendimiento de la red.
Con un switch no se producen colisiones, ya que sólo envía los
paquetes de información a los ordenadores que los solicitan y además
es capaz de enviar y recibir información simultáneamente.
El ancho de banda es un elemento muy importante en las redes
Ethernet y, en este aspecto, los switches ofrecen mucho más ancho
de banda que los hubs. Cuanto mayor es el ancho de banda de la red,
mejor rendimiento se obtiene de ella.
Español
Español
59 60
SMC-EZ6505TX_UK/GE/FR/SP/IT.qxd 23/9/02 12:48 pm Page 61
Page 32

Ordenadores
Switch
estándar
Ordenadores Ordenadores
Servidor
Servidor
EZ Switch
Switch
estándar
Switch
estándar
EZ Switch
Ordenadores
OrdenadoresOrdenadores Ordenadores
Impresora
Servidor
Switch
estándar
Switch
estándar
Switch
estándar
EZ Switch
Ordenadores
En este diagrama, ya existe una red formada por 3 grupos de hubs y
2 servidores. El switch se coloca en el centro de la red para dirigir
todo su tráfico. Esto separa el tráfico de los grupos de hubs y mejora
significativamente el rendimiento de la red. Gracias a la separación
del tráfico, cada usuario dispone de un ancho de banda superior, con
las ventajas que ello supone para su rendimiento.
Imagen C
Conexión de hubs, ordenadores y otros switch al switch.
El diagrama superior muestra los diferentes usos de los switches.
El switch del centro de la red está desviando el tráfico hacia los
distintos grupos de hubs, el servidor, la impresora y otro switch.
Para enlazar varios switches, hay que utilizar el puerto uplink. Si
se conectan los dos dispositivos mediante un puerto estándar,
no podrán comunicarse entre sí (a no ser que se utilice un cable
de cruce).
Estructura de la red
Los diseños de red con switches pueden ser variados: se les pueden
conectar ordenadores directamente, grupos de hubs o ambas cosas a
la vez.
Imagen A
Conexión de ordenadores directamente al switch
Ordenadores
En este diagrama, cada ordenador está conectado directamente al
switch. Esto significa que cada usuario dispone de su propio ancho de
banda de 200 Mbps. El rendimiento será muy alto y no disminuirá
cuando aumente el volumen de tráfico en la red. Aunque uno de los
usuarios esté descargando un archivo muy grande, los demás seguirán
gozando con un buen funcionamiento de la red.
Imagen B
Español
Español
61 62
SMC-EZ6505TX_UK/GE/FR/SP/IT.qxd 23/9/02 12:48 pm Page 63
Page 33

Package Checklist
Familiarizzare con il contenuto del kit di rete EZ Connect di SMC:
•
Una Guida rapida all'avvio
Questa guida dettagliata vi guiderà in ogni passaggio
dell'installazione con un linguaggio semplice e
facilmente comprensibile.
•
Un EZ Switch con 5 porte da 10/100 Mbps
Lo switch è l'unità principale di rete a cui vengono
collegate tutte le periferiche di rete
•
Due schede di rete Fast Ethernet SMC1233A-TX a
10/100 Mbps Schede di rete
Ogni scheda viene inserita in uno slot PCI disponibile
nel computer. Una scheda di rete consente a un
computer di scambiare dati con altre macchine in rete.
•
Due cavi di rete (lunghezza = 5m ciascuno)
I cavi di rete diretti vengono utilizzati per collegare le
unità di rete all'hub. Questi cavi non possono essere
utilizzati per collegare direttamente due computer. In
Questo caso, è richiesto un cavo cross-over.
•
Un CD di installazione
Questo CD contiene i driver software che permettono
l'installazione delle schede di rete.
•
Alimentatore esterno (Regno Unito/Europa)
Questa unità è necessaria per alimentare lo EZ Switch di
SMC. Accertarsi sempre che l'alimentatore sia
saldamente collegato e collocato in una posizione
sicura per evitare malfunzionamenti sulla rete.
Benvenuti!
Il Kit di rete SMC EZ Connect di SMC contiene tutto ciò che serve
per connettere rapidamente e con facilità i computer di casa o
dell'ufficio per formare una rete o estendere e migliorare una rete
esistente.
Il Kit di rete EZ Connect di SMC amplia la famiglia di prodotti di
rete Home e Small Office di SMC e offre le migliori prestazioni fra
tutti i prodotti.
Prima di iniziare a collegare i diversi componenti, leggere
attentamente questo manuale poiché in tal modo l'installazione
risulterà più semplice.
Seguire semplicemente i passaggi A, B, C e sarà possibile operare
molto rapidamente.
Grazie per aver scelto SMC per le esigenze di rete. Per ulteriori
informazioni sul resto dell'offerta Home e Small office di SMC
leggere la brochure contenuta nel CD o visitare il sito www.smceurope.com per informazioni esaurienti e un completo supporto.
Sistemi operativi
Questo kit di rete è compatibile e dispone dei driver per i seguenti
sistemi operativi:
•
Microsoft Windows for Workgroup 3.11,
•
Microsoft Windows (r) 95/98/NT/2000, XP
•
Netware 4.11, 5.0, FreeBSD 2.2.x, 3.0, Linux,
•
SCO Unixware 7
Non è necessario che su entrambi i PC sia installato lo stesso
sistema operativo.
Computer
Un PC o Power Macintosh con uno slot PCI disponibile.
Italiano
Italiano
63 64
SMC-EZ6505TX_UK/GE/FR/SP/IT.qxd 23/9/02 12:48 pm Page 65
Page 34

Installazione dello EZ Switch di SMC
•
Posizionare i computer e l'hub:
- accanto a una presa elettrica
- sufficientemente vicini l'uno all'altro per collegare i due
cavi di rete
•
Collegare il cavo di alimentazione allo switch e alla presa
elettrica.
•
Accertarsi che la spia "Power" sia accesa (verde).
Collegare i cavi, lo switch e i computer
•
Inserire un'estremità del cavo di rete in ogni scheda di rete.
•
Inserire l'altra estremità di ogni cavo di rete nella Porta 1 e
nella Porta 2 dello switch.
Switch in cascata e altre periferiche di rete
Tutte le porte dello switch supportano la configurazione
automatica MDI/MDI-X per il collegamento dei cavi. Pertanto, è
possibile utilizzare un cavo diretto per collegare gli altri switch o
hub da qualsiasi porta dello switch. Non sono necessari cavi di
crossover o altre impostazioni dei dispositivi.
Se si prevede di utilizzare cavi più lunghi, accertarsi di utilizzare
soltanto cavi UTP Category 5 con una lunghezza massima di 100 m.
Ora è possibile accendere i computer.
Passaggio A
Installare la scheda LAN SMC1233A-TX Fast Ethernet a
10/100 Mbps
Accertarsi che tutti i computer siano spenti e scollegati dal cavo
di alimentazione.
Prima di installare le schede nei computer, accertarsi di avere a
disposizione i dischi di installazione o il CD-ROM del sistema
operativo (soprattutto per i computer in ambiente Windows) e il
CD di installazione fornito con il prodotto SMC.
I passaggi per installare CIASCUNA scheda di rete sono i seguenti:
•
Uscire dal sistema operativo.
•
Spegnere il computer.
•
Scollegare il cavo principale di alimentazione del computer per
questioni di sicurezza e per evitare scosse elettriche.
•
Rimuovere il coperchio del computer.
•
Individuare uno slot di espansione PCI disponibile in ogni
computer (gli slot PCI sono generalmente quelli più piccoli).
•
Rimuovere la corrispondente piastrina dallo chassis del
computer.
•
Inserire la scheda di rete e serrare la vite della scheda di rete
sullo chassis del computer.
Rimontare il coperchio del computer e collegare di nuovo il cavo di
alimentazione del computer.
•
Ripetere questi passaggi per installare una scheda di rete in
ogni computer.
Italiano
Italiano
65 66
SMC-EZ6505TX_UK/GE/FR/SP/IT.qxd 23/9/02 12:48 pm Page 67
Espansione
in cascata
Periferiche
Internet
PC
Stampante
PC
Page 35

Verrà richiesto di copiare dal CD di Windows 95/98. Accertarsi di
immettere il percorso per i file di installazione di Windows sul CD
di Windows (ad esempio, D:\Drivers\smc1233atx\win98). Scegliere
"OK".
9. La scheda di rete SMC è ora installata correttamente in Windows
95/98. Fare clic su "Finish" (Fine).
10.Selezionare "Yes" (Sì) quando viene chiesto di riavviare il
computer.
Passaggio B
Installazione del driver di rete per Windows 95/98/2000 ME
Questa sezione fornisce le istruzioni per installare un driver di rete
per Windows. È possibile che non tutte le versioni di Windows
rispondano nello stesso modo. I tipici passaggi per l'installazione
su PC in ambiente Windows 95/98/2000/ME sono i seguenti:
1. Riavviare Windows 95/98/2000. Accertarsi di avere a
disposizione il CD di installazione di SMC e il CD di Windows
95/98/2000 CD per le procedure di installazione dei driver.
2. Viene visualizzata la finestra di dialogo "New Hardware
Wizard"(Individuato nuovo componente hardware) e viene
caricato il programma "New Hardware Wizard" (Installazione
guidata nuovo hardware). "Installazione guidata nuovo
hardware" specifica la periferica hardware di rete (il controller)
da installare.
Fare clic su "Next"(Avanti).
3. Selezionare "Display a list of drivers in a specific
location"(Visualizza elenco driver in una posizione specifica) in
modo da poter scegliere i driver desiderati. Fare clic su "Next"
(Avanti).
4. Verrà richiesto "Install from Disk"(Installa dal disco). Inserire il
CD di SMC che contiene i driver e immettere il percorso nel CDROM (ad esempio, d:\Drivers\Win95 o Win98) e scegliere "OK".
Scheda di rete. Fare clic su "Next"(Avanti).
5. Verrà visualizzato "SMC1233A-TX 10/100 PCI NIC". Scegliere
"OK".
6. La periferica verrà riconosciuta come "SMC1233A-TX
10/100Mbps PCI NIC". Fare clic su "Next" (Avanti).
7. La scheda di rete SMC è stata installata correttamente. Fare clic
su "Finish" (Fine).
8. Selezionare "Yes" (Sì) quando viene chiesto di riavviare il
computer.
Italiano
Italiano
67 68
SMC-EZ6505TX_UK/GE/FR/SP/IT.qxd 23/9/02 12:48 pm Page 69
Page 36

4. Se si è verificato un problema durante l'installazione di un
driver, viene visualizzato un punto esclamativo accanto a
"SMC1233A-TX PC 10/100 Network card". Fare doppio clic su
"SMC1233A-TX PCI 10/100 Network card". Verrà visualizzata la
finestra di dialogo "Proprietà" con un messaggio relativo allo
stato della periferica. Sarà probabilmente necessario verificare la
periferica di rete o le impostazioni del computer. Se il problema
persiste, disinstallare e reinstallare i driver.
Installazione di Windows XP
Windows XP presenta un driver incorporato per la scheda
SMC1233A-TX.
Attenersi alle istruzioni sull'installazione a pagina 3 e al momento
del riavvio del PC, la scheda verrà installata automaticamente con
un driver Generic Macronix.
Risoluzione dei problemi di installazione dei driver
1. Fare doppio clic su "My Computer" (Risorse del computer) sul
desktop di Windows, fare doppio clic su "Control Panel"(Pannello
di controllo) e quindi su "System" (Sistema).
2. Scegliere "Device Manager" (Gestione periferiche).
3. Fare doppio clic su "Network Adapters" (Schede di rete).
Italiano
Italiano
69 70
SMC-EZ6505TX_UK/GE/FR/SP/IT.qxd 23/9/02 12:48 pm Page 71
Page 37

Attenzione! Utilizzare esattamente lo stesso nome del gruppo
di lavoro su entrambi i PC. In caso contrario, i PC non saranno
in grado di comunicare tra di loro.
5. Potrebbe essere necessario inserire il CD di Windows 95/98.
Inserire il CD e scegliere "OK".
6. Fare clic su "Sì" per riavviare il computer.
7. Ripetere i passaggi da 1 a 6 per il successivo PC (ad esempio,
PC2) da inserire nel gruppo di lavoro in rete.
8. Per verificare il collegamento di rete tra PC1 e PC2, fare doppio
clic su "Network Neighborhood" (Risorse di rete) sul desktop di
Windows. PC1 e PC2 dovrebbero essere presenti come membri del
gruppo di lavoro di rete.
9. Si è ora pronti per condividere i file tra i computer in rete.
Passaggio C
Come impostare una rete peer-to-peer in Win 95/98
Questa sezione descrive come collegare due (o più) PC tra di loro
in una rete di gruppo di lavoro con le apparecchiature fornite nel
kit di rete EZ Connect di SMC. Ogni PC in rete deve già disporre di
una scheda di rete SMC installata e deve eseguire Win 95/98. Le
schede di rete devono essere collegate allo switch EZ di SMC con i
cavi di rete forniti in questo kit.
1. Fare clic su "Start"(Start/Avvio), "Settings" (Impostazioni),
"Control Panel" (Pannello di controllo) e fare doppio clic su
"Network" (Rete).
2. Nella scheda "Configuration" (Configurazione), modificare le
impostazioni di "Primary Network Logon" (Accesso primario) in
"Client for Microsoft Networks" (Client reti Microsoft). Fare clic
su "File and Print Sharing" (Condivisione di file e stampanti) e
selezionare "I want to be able to give others access to my files"
(Attiva la condivisione dei file).
Scegliere "OK".
3. Ora fare clic su "Add" (Aggiungi) e scegliere "Protocol"
(Protocollo) nella finestra di dialogo "Select Network Component
Type" (Selezione tipo di componete di rete) e quindi scegliere
"Add" (Aggiungi). Scegliere "Microsoft" e selezionare "NET BEUI"
in Protocolli di rete. Scegliere "OK".
Queste operazioni devono essere seguite su entrambi i PC
4. Fare clic sulla scheda "Identification" (Identificazione) e
scegliere un nome del computer per identificarlo sulla rete (ad
esempio, PC1). Scegliere inoltre un nome del gruppo di lavoro
(ad esempio, Rete di casa). Scegliere "OK".
Italiano
Italiano
71 72
SMC-EZ6505TX_UK/GE/FR/SP/IT.qxd 23/9/02 12:48 pm Page 73
Page 38

Come impostare una rete peer-to-peer in Win XP
1. Fare clic su "Start"(Start/Avvio), "Control Panel" (Pannello di
controllo) e fare doppio clic su "System" (Sistema).
2. Nella scheda "Computer Name" (Nome computer), fare clic su
"Change" (Cambia). Verrà visualizzato il menu di modifica del
nome computer che consente di specificare il nome del
computer e del gruppo di lavoro.
3. Scegliere un nome per il computer in modo che possa essere
identificato sulla rete (ad esempio "PC1"). Scegliere anche un
nome del gruppo di lavoro (ad esempio, Rete di casa) e
scegliere "OK".
Attenzione: Utilizzare esattamente lo stesso nome del gruppo
di lavoro su tutti i computer. L'ortografia e gli spazi devono
essere esattamente gli stessi.
4. Verrà richiesto di riavviare il PC per far sì che le modifiche
vengano applicate.
5. Fare clic su "OK" per riavviare il computer.
6. Ripetere i passaggi da 1 a 6 per il successivo PC (ad esempio,
PC2) da inserire nel gruppo di lavoro in rete.
7. Per verificare il collegamento di rete tra PC1 e PC2, fare clic su
"Start", "My Network Places" (Risorse di rete), "Entire
Network"(Tutta la rete) e infine "Microsoft windows network"
(Rete di Microsoft Windows). PC1 e PC2 dovrebbero essere
presenti come membri del gruppo di lavoro di rete.
8. Si è ora pronti per condividere i file tra i computer in rete.
Avvio della condivisione di file
Il seguente esempio illustra come PC2 è in grado di accedere a
"C:Drive" (C:Unità) di PC1.
1. Da PC1, fare doppio clic su "My Computer" (Risorse del
computer) nel desktop di Windows. Fare clic con il pulsante
destro del mouse sull'unità o sulla cartella che si desidera
condividere.
2. Selezionare "Sharing" (Condivisione) dal menu di scelta rapida:
Verrà visualizzata una finestra di dialogo simile a questa:
3. Selezionare "Share Name" (Nome condivisione) per l'unità o la
cartella che si desidera condividere e selezionare il tipo di
accesso che si desidera impostare. Scegliere "OK".
4. Da PC2, fare clic su Risorse di rete sul desktop di Windows,
quindi selezionare il computer PC1.
Ora si ha accesso alle risorse selezionate su PC1.
Congratulazioni! È stata stabilita una rete peer-to-peer tra PC1 e
PC2.
Italiano
Italiano
73 74
SMC-EZ6505TX_UK/GE/FR/SP/IT.qxd 23/9/02 12:48 pm Page 75
Page 39

Funzionamento di uno switch
Uno switch funziona in modo notevolmente diverso rispetto a un
hub. La differenza principale consiste nel fatto che uno switch
esamina i pacchetti di rete e li invia soltanto al destinatario. Ciò
riduce la quantità di traffico sulla rete e migliora le prestazioni. Un
hub standard non è in grado di eseguire queste operazioni, ma
invia semplicemente tutti i pacchetti ricevuti a chiunque sia
collegato. Ciò significa che a ogni computer arriva una notevole
quantità di informazioni non necessarie.
Il fattore principale che influisce sulle prestazioni è che uno
switch supporta la modalità Full Duplex. Ciò significa che può
inviare e ricevere le informazioni contemporaneamente,
raddoppiando, di conseguenza, la velocità di funzionamento e
raddoppiando la quantità di informazioni che è possibile inviare
rispetto a un normale hub.
Un hub funziona soltanto in modalità Half Duplex. Ciò significa
che è in grado di inviare o ricevere solo un pacchetto di
informazioni alla volta. Solo un computer può comunicare in ogni
momento quando è collegato a un hub, riducendo la velocità con
cui è possibile ricevere le informazioni. Quando più di un computer
richiede contemporaneamente informazioni, si verifica ciò che
viene chiamato collisione. Ciò si verifica quando due pacchetti di
informazioni entrano in collisione sullo stesso cavo. Ciò avviene
quando l'hub invia un pacchetto di informazioni e il computer di
destinazione invia a sua volta un altro pacchetto di informazioni.
All'aumentare del numero di utenti collegati a un hub aumentano
le probabilità di collisione e di degrado delle prestazioni della rete.
Non si verifica alcuna collisione quando si è collegati a uno
switch, poiché esso invia i pacchetti di rete soltanto al computer
che ha richiesto le informazioni e, inoltre, è in grado di
trasmettere e ricevere contemporaneamente.
La larghezza di banda è estremamente importante su una rete
Ethernet e uno switch offre una larghezza di banda decisamente
superiore rispetto a un hub. Maggiore è la larghezza di banda
disponibile sulla rete, migliori saranno le prestazioni.
Avvio della condivisione di file
1. Da PC1, fare doppio clic su "My Computer" (Risorse del
computer) sul desktop di Windows. Fare clic con il pulsante
destro del mouse sull'unità o sulla cartella che si desidera
condividere.
2. Selezionare "Sharing" (Condivisione) dal menu di scelta rapida:
Verrà visualizzata una finestra di dialogo simile a questa.
3. Selezionare "Share This Folder" (Condividi cartella), quindi
specificare "Share Name" (Nome condivisione) per la cartella
dell'unità che si desidera condividere.
4. Selezionare "Permissions" (Autorizzazioni) e impostare le
autorizzazioni desiderate. Scegliere "OK".
5. Da PC2, fare clic su "My Network Places" (Risorse di rete) dal
desktop di Windows, sarà quindi possible esplorare "Entire
Network" (Tutta la rete) per verificare le risorse condivise su
PC1.
Congratulazioni! È stata stabilita una rete peer-to-peer tra PC1 e
PC2.
Italiano
Italiano
75 76
SMC-EZ6505TX_UK/GE/FR/SP/IT.qxd 23/9/02 12:48 pm Page 77
Page 40

Hub
Computers
Hub
Computers
Hub
Computers
Switch
Stampante
Server
Hub
Computers
Hub
Computers
Hub
Computers
Switch
Server
Server
Switch
Computers
Computer
In questo schema, è già presente una rete composta da 3 gruppi
di hub e 2 server. Lo switch viene collocato al centro della rete
per dirigere il traffico in tutta la rete. In questo modo viene
separato il traffico dai gruppi di hub e le prestazioni della rete
migliorano sensibilmente. Poiché il traffico è separato, ogni
utente dispone di una maggiore larghezza di banda e quindi le
prestazioni sono migliori.
Figura C.
Collegamenti di hub, altri switch e computer in uno switch
La figura precedente mostra come è possibile utilizzare uno switch
in numerosi modi diversi. Lo switch al centro della rete reindirizza
il traffico ai diversi gruppi di hub, al server, alla stampante e a un
altro switch. Se si collegano più switch insieme, sarà necessario
utilizzare la porta uplink. Le due periferiche non saranno in grado
di comunicare tra di loro, se vengono collegate tramite una porta
standard (a meno che non si utilizzi un cavo cross-over)
•
Un hub a 5 porte da 10Mbps ha una larghezza di banda di 10
Mbps
•
Un hub a 5 porte da 10/100Mbps, ha una larghezza di banda di
110 Mbps
•
Uno switch a 5 porte da 10/100Mbps ha una larghezza di banda
di 1000 Mbps.
Di conseguenza, le prestazioni di uno switch sono cento volte
migliori rispetto a un hub da 10 Mbps e circa dieci volte migliori
rispetto a un hub 10/100Mbps.
Sezione "Progettazione della rete"
Uno switch può essere utilizzato in molti modi diversi. È possibile
collegarvi direttamente alcuni computer, collegare gruppi di hub o
avere entrambe le configurazioni.
Figura A.
Collegamento di computer direttamente a uno switch
Computer
In questo schema ogni computer è collegato direttamente allo
switch. Ciò significa che ogni utente dispone della propria larghezza
di banda dedicata di 200 Mbps. Le prestazioni saranno molto elevate
e non verranno influenzate dall'aumentare del traffico di rete. Se uno
degli utenti effettua il download di un file di ampie dimensioni, le
prestazioni degli altri utenti rimarranno invariate.
Figura B.
Italiano
Italiano
77 78
SMC-EZ6505TX_UK/GE/FR/SP/IT.qxd 23/9/02 12:48 pm Page 79
Page 41

Specification
Notes
Copyright
Information furnished by SMC brand is believed to be
accurate and reliable.However,no responsibility is assumed by
SMC for its use, nor for any infringements of patents or other
rights of third parties which may result from its use.No
license is granted by implication or otherwise under any
patent or patents by SMC.SMC reserves the right to change
specifications at any time without notice.
Trademarks
SMC is a registered trademark. Other product and company
names are trademarks or registered trademarks of their
respective holders.
Warranty
Complete warranty information for all SMC products is
available on the SMC web site at http//www.smc-europe.com.
EC Conformance Declaration
The information technology products comply with ISO/IEC
Guide 22 and EN4501.They conform to the following
specifications:
EMC:EN55022 (1988)/CISPR-22(1985)Class A/Class B
EN50082-1:IEC 1000-4-2/3/4/6
These information technology products comply with the
requirements of the LOW Voltage Directive 73/23/EC and the
EMC directive 89/336/EEC.
Status: 08/2002
Model
Standards
Interface
Power
Dimensions
Weight
Temperature
Humidity
(non condensing)
Safety Compliance
Warranty
Drivers
SMC1233A-TX
(network card),
SMC Fast Ethernet Card
IEEE 802.3, 10BASE-T,
IEEE802.3u,100BASE-TX
Meets PCI Local Bus
Specification, rev 2.0
or later
RJ-45 for 10BASE-T and
100BASE-TX
+5 VDC
@145mA (Standby);
@300mA (Transmit)
120 x 38 mm
0.3 kg
0° to 50°C (normal
operating conditions)
10% to 90%
CE Mark, FCC, Part 15,
Class B
Limited Lifetime,
Windows for Workgroup
3.11, Windows
95/98/NT/2000, v8.51 and
higher, SCO Unixware 7,
Netware 4.11, 5.0
FreeBSD 3.0, Linux, MAC OS
For latest drivers visit
www.smc-europe.com
SMC-EZ6505TX KIT
(switch),
SMC EZ Switch 10/100
IEEE 802.3u,
802.3u,802.3x
RJ-45: 100ohm, UTP
cable, 10BASE-T : Cat. 3,
4 or 5
100BASE-TX : Cat. 5.
All ports support AutoMDI/MDIX
Consumption:7.5 Watts
EZ. Input: 7.5 V DC,1A
120 x 95 x 30 mm
0º to 50ºC (normal
operating conditions)
5% to 95%
CE Mark, Emissions, FCC
Class B (EZ6505TX), FCC
Class A, (EZ6508TX,
EZ6516TX), EN 55022
(CISPR 22)Class A, C-Tick AS/NZS 3548 (1995) Class
A, EN 61000-3-2/3
Limited Lifetime,
Specifications
Copyright
79 80
SMC-EZ6505TX_UK/GE/FR/SP/IT.qxd 23/9/02 12:48 pm Page 81
 Loading...