

Page 1

8-Bay Media Converter Chassis
Media Converter Chassis
Konvertergehäuse mit 8 Slots
Châssis 8 ports pour convertisseurs de média
V2.0
0100-03807-0901
Quick Start Guide
Installationskurzanleitung
Guide d'installation
SMC-8MCC
Page 2
English 2 - 5
8-Bay Media Converter Chassis
Package Contents
The following items should be included in the package:
German 6 - 9
French 10 -13
Copyright & Notes 14
•One media converter chassis
•One power supply
•One power supply cable
• 19” Rack-mount kit
•8 blank panels (fitted)
•8 converter mounting panels
•4 Self-adhesive pads
• Spare screws and fuses
•User’s Manual CD-ROM
•Warranty Card
NOTE: Please visit us at www.smc-europe.com to register your
product and become eligible for various support services and
product information up-date!
English
1 2
Page 3

Features
• Sturdy, 19” Rack-mountable chassis
• Supports up to 8 modular media converters
• Supports two load sharing, hot-swappable power supplies
• LED status panel
• Supports port power isolation
• Supports 10/100/1000Base, copper, fiber (single and multi-mode)
ST, SC, MT-RJ, VF-45, LC connectors
• FCC Class A & CE approved
General Guide
Setting Up
1. Installation
There are two options:
• Wall-mount - Install separately on a shelf that is capable of
supporting 15kg
• Rack-mount - Follow the 3 steps below to install
chassis into 19” EIA designed rack.
English
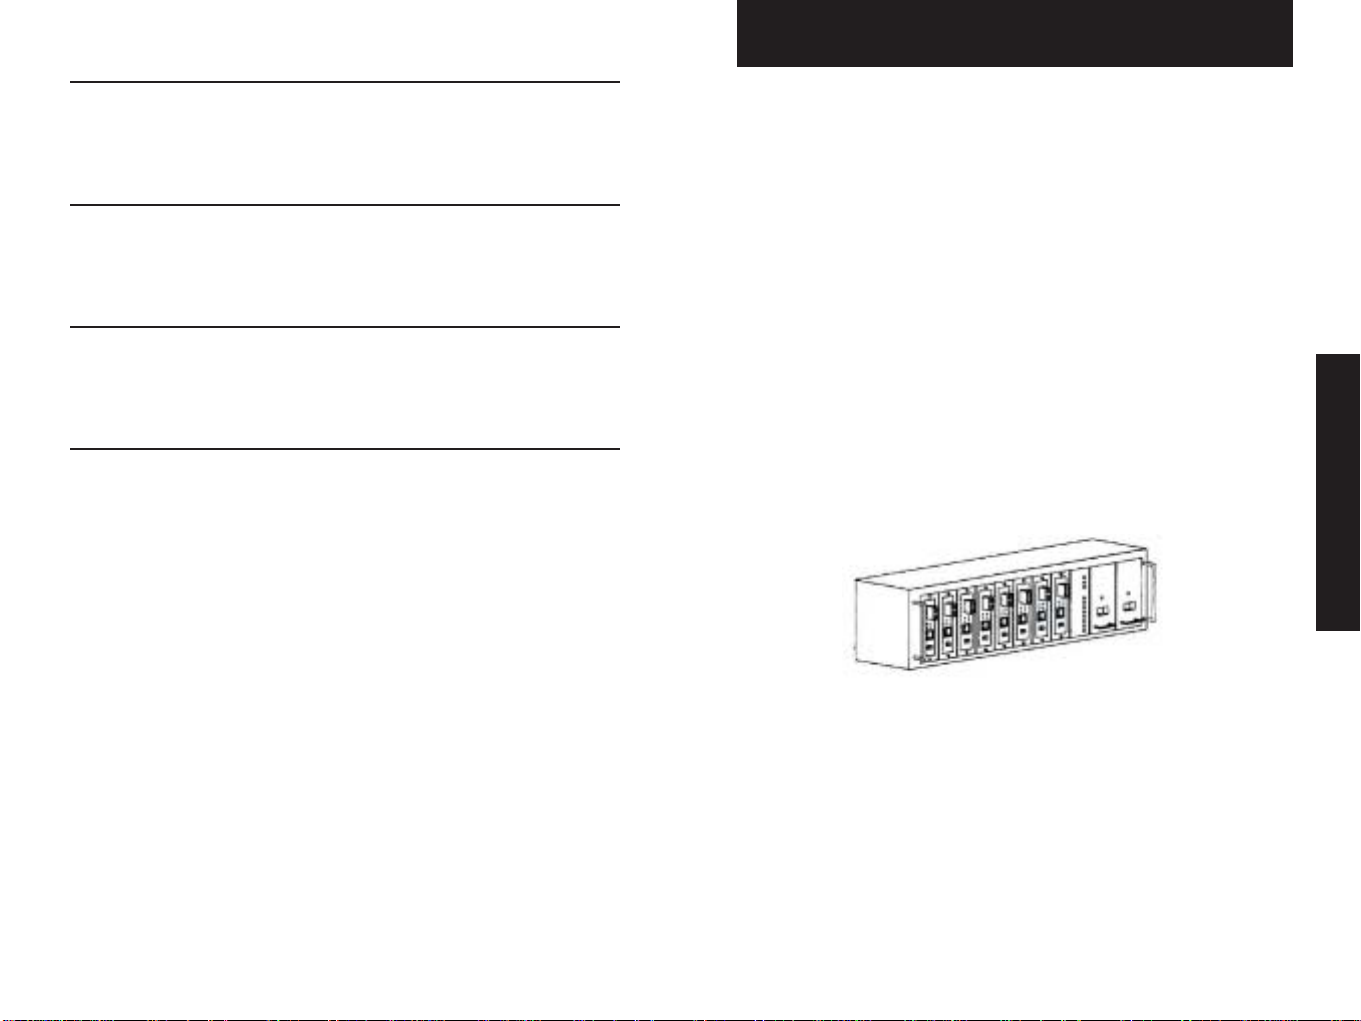
Front Panel View
19” 8-port Converter Chassis with 75W Modular Power Supply Pack
3 4
Rear Panel View
8 Port
Status LED
panel
Power
Supply Bays
1
2.Inserting Modular Media Converters
Please refer to the User’s Manual on CD-ROM for details on
assembling the bracket to the modular media converter.
2
3
English
Page 4

Konvertergehäuse mit 8 Slots
3.Power On
•Insert a power supply pack into either one of the power supply bays.
• Plug the power cable into a power source.
• Flip the switch to the “ON” position and a green PWR LED will
light to indicate normal power status.
4. LED Guide
LED Status Interpretation
FANOnPower to fan is on and is
English
UNIT On Converter module occupies the
operating normally.
port and is operating normally.
Packungsinhalt
Prüfen Sie, ob folgende Artikel enthalten sind:
•1 Medienkonvertergehäuse
•1 Netzteil
•1 Netzkabel
•Montagesatz für 19"-Schrank
•8 Blindplatten (eingesetzt)
•8 Konvertermontageplatten
•4 Selbstklebende Auflagepuffer
• Ersatzschrauben und -sicherungen
• CD-ROM mit Benutzerhandbuch
• Garantiek arte
Deutsch
HINWEIS: Bitte besuchen Sie uns unter www.smc-europe.com bzw.
www.smc.de, um Ihr Produkt zu registrieren. Damit stehen Ihnen
umfassende Supportleistungen, wie u.a. Support, Handbücher und
Updates, zur Verfügung.
5 6
Page 5

Merkmale und Funktionen
Einrichtung
• Robustes Gehäuse zur Montage im 19"-Schrank
• Nimmt bis zu 8 Medienkonvertermodule auf
• Unterstützt zwei im Betrieb austauschbare Netzteile zur
Lastverteilung
• LED-Statusanzeige
•Isolierung der Slotstromversorgung
• Unterstützt 10/100/1000Base-, Kupfer-, Glasfaser- (Monomodeund Multimode-) ST-, SC-, MT-RJ-, VF-45-, LC-Anschlüsse
• FCC Klasse A & CE-zertifiziert
Allgemeiner Überblick
Deutsch
Ansicht von vorn
19"-Konvertergehäuse mit 8 Slots und
75-W-Stromver sor gungsmodul
Ansicht von hinten
1. Montage
Es gibt zwei Möglichkeiten:
• Wandmontage – Separat auf einem Regel mit einer
Tragfähigkeit von 15 kg (siehe Abb. 1)
• Schrankmontage – Einbau des Gehäuses in einen 19"-Schrank
gemäß EIA entsprechend der unten aufgeführten Vorgehensweise
1
2.Medienkonvertermodule einsetzen
2
Deutsch
3
Ausführliche Informationen zur Montage der Halterung für die
Medienkonvertermodule finden Sie im Benutzerhandbuch auf der
CD-ROM.
Stromversor-
Status-LEDs
8 Slots
7 8
gungsslot
Page 6

Châssis 8 ports pour convertisseurs de média
3.Einschalten
• Setzen Sie ein Stromversorgungsmodul in einen der
Stromversorgungsslots ein.
• Schließen Sie das Netzkabel an eine Netzsteckdose an.
• Schalten Sie das Gerät über den Schalter ein. Die grüne
Stromversorgungs-LED (STROM) beginnt zu leuchten, was den
normalen Betriebszustand darstellt.
4.LEDs
LED Zustand Bedeutung
Deutsch
FAN Ein Lüfter wird mit Strom versorgt und
(LÜFTER) arbeitet normal.
UNIT Ein Konvertermodul ist in den Slot
(EINHEIT) eingesetzt und arbeitet normal.
Contenu de l’emballage
L’emballage doit contenir les éléments suivants :
•1 châssis convertisseur de média
•1 bloc d’alimentation
•1 câble d’alimentation
•1 kit de montage en rack 19 pouces
•8 caches (installés)
•8 supports de montage pour convertisseur
•4 patins adhésifs
• Vis et fusibles de rechange
• CD-ROM contenant le Manuel d’installation
• Carte de garantie
Français
L fter 1
L fter 2
L fter 3
Einheit 1
Einheit 2
Einheit 3
Einheit 4
Einheit 5
Einheit 6
Einheit 7
Einheit 8
Status-LEDs
REMARQUE : Rendez-vous sur le site www.smc-europe.com/fr pour
enregistrer votre produit. Vous pourrez ainsi bénéficier d’un ensemble
de services d’assistance et recevoir des informations sur les mises à
jour des produits.
9 10
Page 7

CARACTÉRISTIQUES
MISE EN SERVICE
• Châssis 19 pouces robuste, pouvant être monté en rack
• Supporte jusqu’à 8 convertisseurs de média modulaires
•Accepte deux blocs d’alimentation à répartition de charge,
insérables à chaud
• Témoins lumineux d’indication d’état
•Isolation électrique des baies d’alimentation
• Compatible avec les connecteurs 10/100/1000Base, cuivre, fibre
(monomode et multimode) ST, SC, MT-RJ, VF-45 et LC
• Conforme aux normes FCC Classe A et CE
General Guide
Français
Vue de la façade avant
Châssis convertisseur 8 ports 19 pouces avec pack
d’alimentation 75W
Vue de la façade arrière
8 baies
Panneau avec
témoin d’état
d’alimentation
Baies
1. Installation
Il existe deux types d’installation :
• Fixation murale – Le châssis est installé séparément sur une
étagère pouvant supporter un poids de 15 kg (voir la figure 1).
• Installation en rack – Reportez-vous au schéma ci-dessous pour
installer le châssis dans un rack EIA 19 pouces.
1
2.Mise en place des convertisseurs de média modulaires
Pour savoir précisément comment mettre en place le convertisseur de
média modulaire dans le châssis, consultez le Manuel d’installation,
disponible sur le CD-ROM fourni.
2
Français
3
11 12
Page 8

3.Mise en marche
•Insérez un bloc d’alimentation dans l’une des baies
d’alimentation.
•Branchez le cordon d’alimentation sur une source d’alimentation.
• Basculez le commutateur d’alimentation sur la position ON. Le
témoin PWR vert s’allume pour indiquer que l’appareil est sous
tension.
4. Fonctions des témoins lumineux
Témoin État Signification
FAN Allumé Le ventilateur est sous tension et
Français
UNIT Allumé Le convertisseur est installé dans la baie
fonctionne normalement.
et fonctionne normalement.
Warranty
Complete warranty information for all SMC products is available on
the SMC web site at www.smc-europe.com and in the English
manual on the CD-Rom.
Full Installation Manual
Full installation manual in English is provided on the
Installation CD-Rom.
Copyright
Copyright
Information furnished by SMC Networks, Inc. (SMC) is believed to
be accurate and reliable.
However, no responsibility is assumed by SMC for its use, nor for
any infringements of patents or other rights of third parties
which may result from its use. No license is granted by
implication or otherwise under any patent or patent rights of
SMC. SMC reserves the right to change specifications at any time
without notice.
Trademarks:
SMC is a registered trademark and EZ Connect is a trademark of
SMC Networks, Inc. Other product and company names are
trademarks or registered trademarks of their respective holders.
13 14
 Loading...