

Page 1
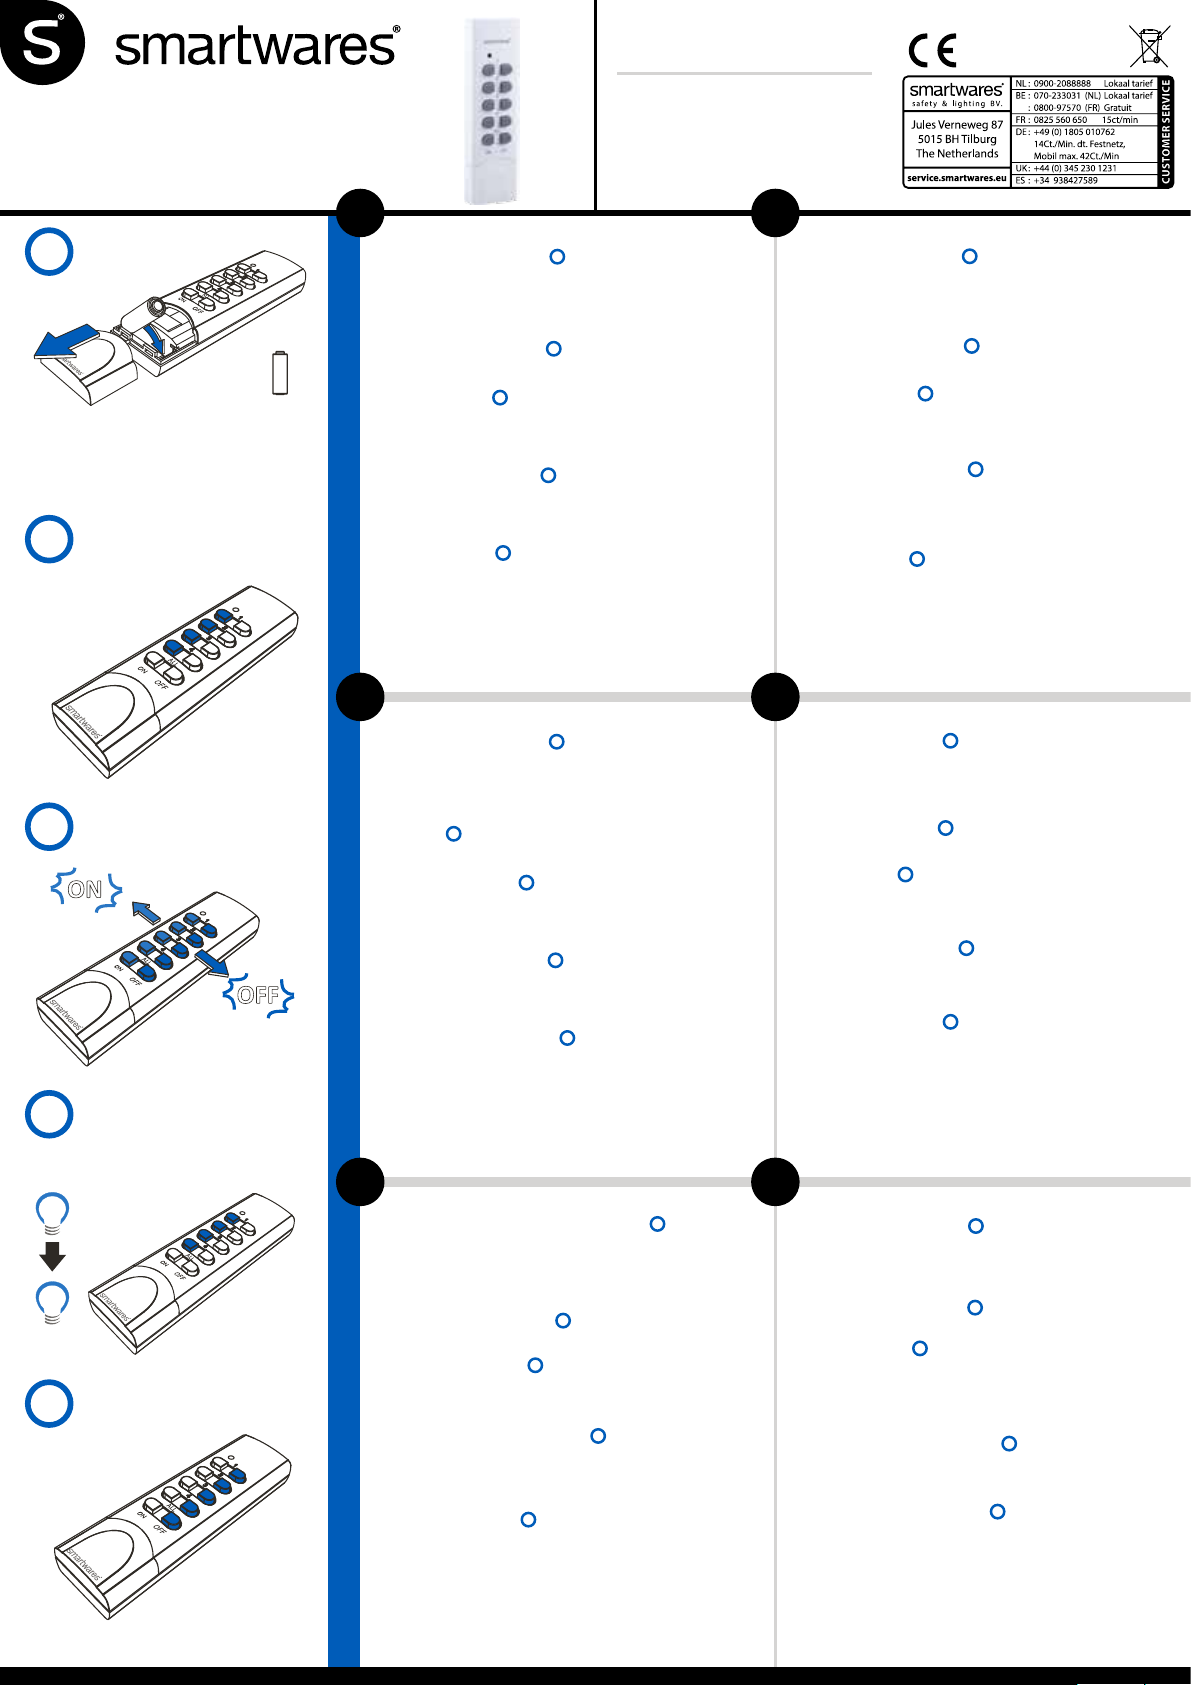
1
2x
2
3
4
Dim
5
10.037.06 | SH5-TDR-F
EN Remote control
NL Afstandsbediening
DE Fernbedienung
FR Télécommande
ES Mando a distancia
IT Telecomando
ON
1 x A23S
OFF
Specifications:
433.92MHz.
Remote control battery: 12V, type 23A (incl.)
Channels: 4 + Master
Range: 30 m.
Warranty: 2 years
EN
Preparation for use
• Remove the plastic and insert the battery
Pairing the transmitter (SH5-TDR-F) with a receiver
a. Press and hold the button on the receiver for 3 seconds and then release it. During this operation the
LED starts to blink. Your receiver is now switched into the pairing mode.
Attention: the LED should blink only after releasing the button. If the LED starts to blink while
holding the button, there will be no pairing.
b. Press the ”ON” button on the transmitter
on the receiver will light up.
c. Repeat these steps for any other receiver.
Operating receivers
a. Press the ”ON” button on the transmitter to turn on the receiver.
b. Press the “OFF” button on the transmitter to turn o the receiver.
c. Press the ”ON” button beneath ALL (on the transmitter) to turn on all receivers at the same time.
d. Press the ”OFF” button beneath ALL (on the transmitter) to turn o all receivers at the same time.
Operating a dimmer receiver
a. Press the ”ON” button on the transmitter to turn on the dimmer on the last set dim level.
b. Press the “OFF” button on the transmitter to turn o the dimmer.
c. When the dimmer is turned on: briey press the “ON” button to dim the light; press the “ON” button
again to stop the dimming.
Disconnecting a link
a. Press and hold the button on the receiver for 3 seconds and then release it. During this operation the
LED starts to blink. Your receiver is now switched into the pairing mode.
Attention: the LED should blink only after releasing the button. If the LED starts to blink while
holding the button, there will be no pairing.
b. Perform one of the following steps:
- Press the ”OFF” button on the transmitter to disconnect it from a receiver. During this operation the
LED on the receiver turns o.
- Press the ”OFF” button beneath ALL (on the transmitter) to disconnect all links. During this
operation the LED on the receiver turns o.
3
5
.
1
2
to pair it with a receiver. During this operation the LED
4
.
NL
Voorbereiding voor gebruik
• Verwijder het plastic en plaats de batterij
De zender (SH5-TDR-F) met een ontvanger koppelen
a. Druk 3 seconden op de knop op de ontvanger en laat deze vervolgens los. Bij deze handeling gaat de
LED knipperen. Uw ontvanger bevindt zich nu in de koppelmodus.
Let op! De LED mag pas knipperen na het loslaten. Als de LED gaat knipperen tijdens indrukken dan
wordt er niet gekoppeld.
b. D ruk op ”ON”
c. Herhaal deze stappen voor eventuele overige ontvangers.
Een ontvanger bedienen
a. Druk op ”ON” op de zender om de ontvanger in te schakelen.
b. D ruk op “OFF” op de zender om de ontvanger uit te schakelen.
c. Druk op “ON” onder ALL (op de zender) om alle ontvangers tegelijk in te schakelen.
d. Druk op “OFF” onder ALL (op de zender) om alle ontvangers tegelijk uit te schakelen.
Dimmer ontvangers bedienen
a. Druk op de zender op ”ON” om de dimmer in te schakelen op de laatst ingestelde dimstand.
b. D ruk op de zender op “OFF” om de dimmer uit te schakelen.
c. Wanneer de dimmer is ingeschakeld: druk op de zender kort op “ON” om het licht te dimmen; druk
Een koppeling ongedaan maken
a. Druk 3 seconden op de knop op de ontvanger en laat deze vervolgens los. Bij deze handeling gaat de
b. Voer een van de volgende handelingen uit:
2
ontvanger branden.
nogmaals op “ON” om het dimmen te stoppen.
LED knipperen. Uw ontvanger bevindt zich nu in de koppelmodus.
Let op! De LED mag pas knipperen na het loslaten. Als de LED gaat knipperen tijdens indrukken dan
wordt er niet gekoppeld.
- Druk op “OFF” op de zender om deze te ontkoppelen. Bij deze handeling dooft de LED op de
ontvanger.
- Druk op “OFF” onder ALL (op de zender) om het gehele geheugen van de ontvanger te wissen. Bij
deze handeling dooft de LED op de ontvanger.
op de zender om deze te koppelen. Bij deze handeling gaat de LED op de
.
1
3
4
5
DE
Benutzung vorbereiten
• Aktivieren Sie die Batterie, indem Sie den Trennstreifen herausziehen
Verbindung des Empfängers (SH5-TDR-F) mit einem Empfänger
a. Drücken und halten Sie die Taste am Empfänger 3 Sekunden lang und lassen Sie sie wieder
los. Während dieses Vorgangs beginnt die LED zu blinken. Ihr Empfänger wurde jetzt in den
Verbindungsmodus geschaltet.
Achtung: Die LED darf erst nach der Freigabe blinken. Wenn die LED beginnt zu blinken, während
die Taste noch gedrückt wird, wird keine Verbindung aufgebaut.
b. D rücken Sie am Transmitter die „EIN“-Taste,
diesem Vorgang leuchtet die LED am Empfänger auf.
c. Wiederholen Sie diese Schritte für alle anderen Empfänger.
Bedienung der Empfänger
a. Drücken Sie die „EIN“-Taste am Transmitter, um den Empfänger einzuschalten.
b. D rücken Sie die „AUS“-Taste am Transmitter, um den Empfänger auszuschalten.
c. Drücken Sie die „EIN“-Taste unter ALLE (am Transmitter), um alle Empfänger gleichzeitig einzuschalten.
d. Drücken Sie die „AUS“-Taste unter ALLE (am Transmitter), um alle Empfänger gleichzeitig auszuschalten.
Bedienung eines Dimmer-Empfängers
a. Drücken Sie die „EIN“-Taste am Transmitter, um den Dimmer auf dem zuletzt eingestellten Dimm-
Niveau einzuschalten.
b. D rücken Sie die „AUS“-Taste am Transmitter, um den Dimmer auszuschalten .
c. Wenn der Dimmer eingeschaltet wurde: Drücken Sie kurz die „EIN“-Taste, um das Licht zu dimmen,
drücken Sie die „EIN“-Taste erneut, um den Dimmvorgang zu stoppen.
Eine Verbindung trennen
a. Drücken und halten Sie die Taste am Empfänger 3 Sekunden lang und lassen Sie sie wieder
los. Während dieses Vorgangs beginnt die LED zu blinken. Ihr Empfänger wurde jetzt in den
Verbindungsmodus geschaltet.
Achtung: Die LED darf erst nach der Freigabe blinken. Wenn die LED beginnt zu blinken, während
die Taste noch gedrückt wird, wird keine Verbindung aufgebaut.
b. Führen Sie einen der folgenden Schritte aus:
- Drücken Sie am Transmitter die „AUS“-Taste, um ihn vom Empfänger zu trennen. Bei diesem
Vorgang erlischt die LED am Empfänger.
- Drücken Sie die „AUS“-Taste unter ALLE (am Transmitter), um alle Verbindungen zu trennen. Bei
diesem Vorgang erlischt die LED am Empfänger.
2
um ihn mit dem Empfänger zu verbinden. Bei
3
4
5
.
1
.
FR
Préparation avant utilisation
• Enlevez le plastique et insérez la batterie
Connecter l’émetteur (SH5-TDR-F) à un récepteur
a. Maintenez le bouton du récepteur enfoncé pendant 3 secondes avant de le relâcher. Pendant cette
opération, la DEL commence à clignoter. Votre récepteur est à présent en mode de connexion.
Attention : la DEL doit clignoter uniquement une fois le bouton relâché. Si la DEL commence à
clignoter lorsque le bouton est enfoncé, aucune connexion ne se produira.
b. Appuyez sur le bouton “ON” de l’émetteur
opération, la DEL du récepteur s’allumera.
c. Recommencez ces étapes pour tout autre récepteur.
Utiliser les récepteurs
a. Appuyez sur le bouton “ON” de l’émetteur pour mettre le récepteur en marche.
b. Appuyez sur le bouton “OFF” de l’émetteur pour éteindre le récepteur.
c. Appuyez sur le bouton “ON” sous ALL (sur l’émetteur) pour allumer tous les récepteurs en même temps.
d. Appuyez sur le bouton “OFF” sous ALL (sur l’émetteur) pour éteindre tous les récepteurs en même temps.
Utiliser un récepteur gradateur
a. Appuyez sur le bouton “ON” de l’émetteur pour mettre le gradateur en marche au dernier niveau
de gradation.
b. Appuyez sur le bouton “OFF” de l’émetteur pour éteindre le gradateur.
c. Lorsque le gradateur est en marche : appuyez brièvement sur le bouton “ON” pour baisser la lumière ;
appuyez à nouveau sur le bouton “ON” pour interrompre la gradation.
Déconnecter un lien
a. Maintenez le bouton du récepteur enfoncé pendant 3 secondes avant de le relâcher. Pendant cette
opération, la DEL commence à clignoter. Votre récepteur est à présent en mode de connexion.
Attention : la DEL doit clignoter uniquement une fois le bouton relâché. Si la DEL commence à
clignoter lorsque le bouton est enfoncé, aucune connexion ne se produira.
b. Suivez l’une des étapes suiantes :
- Appuyez sur le bouton “OFF” de l’émetteur pour le déconnecter d’un récepteur. Pendant cette
opération, la DEL du récepteur s’éteindra.
- Appuyez sur le bouton ”OFF” sous l’indication ALL (de l’émetteur) pour déconnecter tous les liens.
Pendant cette opération, la DEL du récepteur s’éteindra.
5
.
1
2
pour le connecter à un récepteur. Pendant cette
3
4
.
ES
Preparación para el uso
• Quite el plástico e introduzca la pila
Conectar el transmisor (SH5-TDR-F) a un receptor
a. Presione y mantenga el botón del receptor durante 3 segundos y suéltelo. Durante esta operación el
LED comenzará a parpadear. El receptor pasará a modo conexión.
Atención: el LED solamente debe parpadear tras soltar el botón. Si el LED comienza a parpadear
durante la pulsación no se producirá la conexión.
b. Pulse el botón “ON” del transmisor
encenderá el LED del receptor.
c. Repita estos pasos para cualquier otro receptor.
Uso de receptores
a. Pulse el botón “ON” en el transmisor para encender el receptor.
b. Pulse el botón “OFF” en el transmisor para apagar el receptor.
c. Pulse el botón “ON” debajo de ALL (en el transmisor) para encender todos los receptores simultáneamente.
d. Pulse el botón “OFF” debajo de ALL (en el transmisor) para apagar todos los receptores simultáneamente.
Uso de un receptor regulador
a. Pulse el botón “ON” en el transmisor para encender el regulador con el último nivel de regulación establecido.
b. Pulse el botón “OFF” en el transmisor para apagar el regulador.
c. Cuando esté encendido el regulador: pulse brevemente el botón “ON” para suavizar la luz; pulse de
nuevo el botón “ON” para detener el suavizado.
Desconectar una conexión
a. Presione y mantenga el botón del receptor durante 3 segundos y suéltelo. Durante esta operación el
LED comenzará a parpadear. El receptor pasará a modo conexión.
Atención: el LED solamente debe parpadear tras soltar el botón. Si el LED comienza a parpadear
durante la pulsación no se producirá la conexión.
b. Realice uno de los pasos siguientes:
- Pulse el botón “OFF” del transmisor para desconectarlo de un receptor. Durante la operación se
apagará el LED del receptor.
- Pulse el botón “OFF” debajo de ALL (en el transmisor) para desconectar todas las conexiones.
Durante la operación se apagará el LED del receptor.
.
1
2
para conectarlo a un receptor. Durante la operación se
3
4
.
5
IT
Preparazione per l’uso
• Rimuovere la plastica e inserire la batteria
Associazione del trasmettitore (SH5-TDR-F) con un ricevitore
a. Tenere premuto il pulsante sul ricevitore per 3 secondi e rilasciarlo. Durante questa operazione il LED
inizia a lampeggiare. Il ricevitore a questo punto è in modalità di associazione.
Attenzione: il LED deve lampeggiare solo dopo il rilascio del pulsante. Se il LED inizia a
lampeggiare tenendo premuto il pulsante, l’associazione non sarà eettuata.
b. Premere il pulsante “ON” sul trasmettitore
operazione il LED sul ricevitore si accende.
c. Ripetere queste operazioni per tutti gli altri ricevitori.
Utilizzo dei ricevitori
a. Premere il pulsante “ON” sul trasmettitore per attivare il ricevitore.
b. Premere il pulsante “OFF” sul trasmettitore per disattivare il ricevitore.
c. Premere il pulsante “ON” sotto ALL (tutti) (sul trasmettitore) per attivare tutti i ricevitori
contemporaneamente.
d. Premere il pulsante “OFF” sotto ALL (tutti) (sul trasmettitore) per disattivare tutti i ricevitori
contemporaneamente.
Utilizzo di un ricevitore con variatore
a. Premere il pulsante “ON” sul trasmettitore per attivare il variatore sull’ultimo livello di luminosità.
b. Premere il pulsante “OFF” sul trasmettitore per disattivare il variatore.
c. Quando il variatore è attivo: premere brevemente il pulsante “ON” per abbassare la luce, premere di
nuovo il pulsante “ON” per interrompere l’abbassamento.
Scollegamento di un collegamento
a. Tenere premuto il pulsante sul ricevitore per 3 secondi e rilasciarlo. Durante questa operazione il LED
inizia a lampeggiare. Il ricevitore a questo punto è in modalità di associazione.Attenzione: il LED
deve lampeggiare solo dopo il rilascio del pulsante. Se il LED inizia a lampeggiare tenendo premuto
il pulsante, l’associazione non sarà eettuata.
c. Eettuare una delle seguenti operazioni:
- Premere il pulsante “OFF” sul trasmettitore per scollegarlo dal ricevitore. Durante questa
operazione il LED sul ricevitore si spegne.
- Premere il pulsante “OFF” sotto ALL (tutti) (sul trasmettitore) per scollegare tutti i collegamenti.
Durante questa operazione il LED sul ricevitore si spegne.
3
.
1
2
per associarlo al ricevitore. Durante questa
4
5
Page 2

2x
EN Go to www.smartwares.eu to obtain manuals, product information, images and the document of conformity
NL Ga naar www.smartwares.eu voor handleidingen, product informatie, afbeeldingen of het document van conformiteit
DE Gehen Sie auf ww w.smartwares.eu, um Handbücher, Produktinformationen, Bilder und die Konformitätserklärung abzurufen
FR Visitez www.smartwares.eu pour obtenir les modes d’emploi, les informations concernant les produits, les images et la documentation de conformité du produit
10.037.06 | SH5-TDR-F
PT Controlo remoto
TR Uzaktan kumanda
PL Pilot sterowania
SV Fjärrkontroll
CS Dálkové ovládání
SK Diaľkový ovládač
PT
Preparação para utilização
1
1 x A23S
2
• Retire o plástico e insira a pilha
Emparelhar o transmissor (SH5-TDR-F) com um recetor
a. Prima e mantenha o botão premido no recetor durante 3 segundos e depois solte-o. Durante esta
operação, o LED começa a piscar. O seu recetor está agora ligado no modo de emparelhamento.
Atenção: o LED só deverá piscar depois de soltar o botão. Se o LED começar a piscar enquanto
mantiver o botão premido, não se vericará o emparelhamento.
b. Prima o botão “ON” no transmissor
LED no recetor irá acender-se.
c. Repita estes passos para qualquer outro recetor.
Operar os recetores
a. Prima o botão “ON” no transmissor para ligar o recetor.
b. Prima o botão “OFF” no transmissor para desligar o recetor.
c. Prima o botão “ON” por baixo de TODOS (no transmissor) para ligar todos os recetores em
simultâneo.
c. Prima o botão “OFF” por baixo de TODOS (no transmissor) para desligar todos os recetores em
simultâneo.
Operar um recetor de regulador da intensidade da luz
a. Prima o botão “ON” no transmissor para ligar o regulador da intensidade da luz no último nível de
regulação da intensidade da luz denido.
b. Prima o botão “OFF” no transmissor para desligar o regulador da intensidade da luz.
c. Quando o regulador da intensidade da luz está ligado: prima brevemente o botão “ON” para reduzir
a intensidade da luz; prima o botão “ON” novamente para parar a regulação da intensidade da luz.
Desligar uma ligação
a. Prima e mantenha o botão premido no recetor durante 3 segundos e depois solte-o. Durante esta
operação, o LED começa a piscar. O seu recetor está agora ligado no modo de emparelhamento.
Atenção: o LED só deverá piscar depois de soltar o botão. Se o LED começar a piscar enquanto
mantiver o botão premido, não se vericará o emparelhamento.
c. Realize um dos seguintes passos:
- Prima o botão “OFF” no transmissor para o desligar de um recetor. Durante esta operação, o LED no
recetor apaga-se.
- Prima o botão “OFF” por baixo de TODOS (no transmissor) para desligar todas as ligações. Durante
esta operação, o LED no recetor apaga-se.
.
2
para o emparelhar com um recetor. Durante esta operação, o
3
5
TR
Kullanım için hazırlık
• Plastiği çıkarın ve pili takın
Vericiyi (SH5-TDR-F) alıcı ile eşleştirme
a. Alıcıdaki düğmeyi 3 saniye boyunca basılı tutun ve ardından serbest bırakın. Bu işlem esnasında LED
yanıp sönmeye başlar. Alıcınız eşleştirme moduna geçer.
Dikkat: LED düğme serbest bırakıldıktan hemen sonra yanıp sönmelidir. LED düğme basılı
tutulurken yanıp sönmeye başlarsa eşleştirme gerçekleşmeyecektir.
3
ON
OFF
4
b. Vericiyi alıcı ile eşleştirmek için vericideki “ON” düğmesine basın
LED yanacaktır.
c. Bu adımları diğer alıcılar için tekrarlayın.
Alıcıları çalıştırma
a. Alıcıyı açmak için vericideki “ON” düğmesine basın.
b. Alıcıyı kapatmak için vericideki “OFF” düğmesine basın.
c. Tüm alıcıları aynı anda açmak için ALL (vericideki) ibaresinin altındaki “ON” düğmesine basın.
d. Tüm alıcıları aynı anda kapatmak için ALL (vericideki) ibaresinin altındaki “OFF” düğmesine basın.
Dimmer alıcısını çalıştırma
a. Dimmeri son karartma seviyesinde açmak için vericideki “ON” düğmesine basın.
b. Dimmeri kapatmak için vericideki “OFF” düğmesine basın.
c. Dimmer açıldığında: ışığı karartmak için “ON” düğmesine kısa bir süre basın; karartmayı durdurmak
için “ON” düğmesine tekrar basın.
Bir bağlantıyı kesme
a. Alıcıdaki düğmeyi 3 saniye boyunca basılı tutun ve ardından serbest bırakın. Bu işlem esnasında LED
yanıp sönmeye başlar. Alıcınız eşleştirme moduna geçer.
Dikkat: LED düğme serbest bırakıldıktan hemen sonra yanıp sönmelidir. LED düğme basılı
tutulurken yanıp sönmeye başlarsa eşleştirme gerçekleşmeyecektir.
b. Şu adımlardan birini gerçekleştirin:
-Vericinin alıcı ile bağlantısını kesmek için vericideki “OFF” düğmesine basın. Bu işlem esnasında
alıcıdaki LED söner.
-Tüm bağlantıları kesmek için ALL (vericideki) ibaresinin altındaki “OFF” düğmesine basın. Bu işlem
esnasında alıcıdaki LED söner.
.
1
3
4
5
ES Acceda a www.smartwares.eu para obtener manuales, información de productos, imágenes y la documentación de cumplimiento
IT Visitare il sito www.smartwares.eu per scaricare i manuali, ottenere informazioni, immagini e documento di conformità dei prodotti.
PT Aceda a ww w.smartwares.eu para obter manuais, informações dos produtos, imagens e o documento de conformidade.
TR Kılavuzlara, ürün bilgisine, resimlere ve uygunluk belgesine ulaşmak için www.smartwares.eu adresini ziyaret edin.
PL Wejdź na stronę www.smartwares.eu, aby uzyskać instrukcje, informacje o produktach, zdjęcia oraz dokument zgodności.
SV Gå till w ww.smartwares.eu för att hitta handböcker, produktinformation, bilder och deklarationen om överensstämmelse
CS Pro získání návodů, informací o výrobku, obrázků a dokumentů o schodě navštivte stránky www.smartwares.eu
SK Návody, informácie o výrobkoch, obrázky a dokumenty o zhode nájdete na stránkewww.smartwares.eu.
SV
Förberedelse för användning
• Ta bort plasten och sätt i batteriet
Länka sändaren (SH5-TDR-F) till en mottagare
a. Håll in knappen på mottagaren i 3 sekunder och släpp den sedan. LED:n börjar blinka. Din
mottagare är nu i länkningsläge.
Observera: LED:n ska endast blinka sedan du släppt knappen. Om LED:n börjar blinka medan
knappen trycks in utförs ingen länkning.
b. Tryck på knappen ”ON” på sändaren
tänds LED:n på mottagaren.
c. Upprepa dessa steg för andra mottagare.
Använda mottagare
a. Tryck på knappen ”ON” på sändaren för att slå på mottagaren.
b. Tryck på knappen ”OFF” på sändaren för att slå av mottagaren.
c. Tryck på knappen ”ON” under ALL (på sändaren) för att slå på alla mottagare samtidigt.
d. Tryck på knappen ”OFF” under ALL (på sändaren) för att slå av alla mottagare samtidigt.
4
Använda en dimmer-mottagare
a. Tryck på knappen ”ON” på sändaren för att slå på dimmern med den senast inställda dimmer-nivån.
b. Tryck på knappen ”OFF” på sändaren för att slå av dimmern.
c. När dimmern är påslagen: tryck snabbt på knappen ”ON” för att minska ljuset; tryck på knappen
”ON” igen för att återställa ljuset.
Koppla bort en länk
a. Håll in knappen på mottagaren i 3 sekunder och släpp den sedan. LED:n börjar blinka. Din
mottagare är nu i länkningsläge.
Observera: LED:n ska endast blinka sedan du släppt knappen. Om LED:n börjar blinka medan
knappen trycks in utförs ingen länkning.
b. Utför ett av följande steg:
- Tryck på knappen ”OFF” på sändaren för att stänga av länken till mottagaren. Under denna åtgärd
släcks LED:n på mottagaren.
- Tryck på knappen ”OFF” under ALL (på sändaren) för att stänga av alla länkar. Under denna åtgärd
släcks LED:n på mottagaren.
.
2
för att länka den till en mottagare. Under denna åtgärd
3
4
.
5
CS
Příprava k použití
2
. Bu işlem esnasında alıcıdaki
• Sejměte umělou hmotu a vložte baterii.
Spárování/odpojení vysílače (SH5-TDR-F) s přijímačem
a. Na 3 sekundy stiskněte a přidržte tlačítko na přijímači a pak jej uvolněte. Během této činnosti začne
blikat LED. Váš přijímač je nyní přepnut do režimu spárování.
Upozornění: LED by měla blikat pouze po uvolnění. Pokud LED začne blikat během doby kdy
tisknete tlačítko, přijímač se nespáruje.
b. Stiskněte na vysílači tlačítko ”ON” (ZAP)
LED na přijímači.
c. Opakujte tyto kroky pro všechny další přijímače.
Ovládání přijímačů
a. Stiskněte tlačítko ”ZAP” na vysílači a zapnete přijímač.
b. Stiskněte tlačítko ”VYP” na vysílači a vypnete přijímač.
c. Stiskněte tlačítko ”ZAP” pod tlačítkem ALL (všechny) (na vysílači) pro zapnutí všech přijímačů najednou.
d. Stiskněte tlačítko ”VYP” pod tlačítkem ALL (všechny) (na vysílači) pro vypnutí všech přijímačů najednou.
Ovládání přijímačů ztlumení
a. Stiskněte tlačítko ”ZAP” na vysílači a zapnete přijímač ztlumení na poslední nastavenu úroveň ztlumení.
b. Stiskněte tlačítko ”VYP” na vysílači a vypnete ztlumení.
c. Pokud je ztlumení zapnuto: krátce stiskněte tlačítko “ZAP” a ztlumte světlo; opětovným stiskem
tlačítka “ZAP” ztlumení světel ukončíte.
Odpojení linky
a. Na 3 sekundy stiskněte a přidržte tlačítko na přijímači a pak jej uvolněte. Během této činnosti začne
blikat LED. Váš přijímač je nyní přepnut do režimu spárování.
Upozornění: LED by měla blikat pouze po uvolnění. Pokud LED začne blikat během doby kdy
tisknete tlačítko, přijímač se nespáruje.
b. Proveďte některý z následujících kroků:
- Stiskněte na vysílači tlačítko ”VYP” a odpojte jej od přijímače. Během činnosti pohasne LED na
přijímači.
- Stiskněte tlačítko ”VYP” pod tlačítkem ALL (všechny) (na vysílači) pro vypnutí všech přijímačů.
Během činnosti pohasne LED na přijímači.
3
5
1
2
a spárujte jej s přijímačem. Během činnosti se rozsvítí
4
Dim
5
PL
Przygotowanie do użytkowania
• Zdjąć plastikową osłonę i włożyć baterię
Łączenie/rozłączanie nadajnika (SH5-TDR-F) z odbiornikiem
a. Naciśnij i przytrz ymaj przycisk na odbiorniku przez 3 sekundy, a następnie zwolnij go. W trakcie tej
operacji kontrolka LED zaczyna migać. Odbiornik jest teraz przełączony na tryb łączenia.
Uwaga: Kontrolka LED powinna migać tylko po zwolnieniu. Jeśli kontrolka LED zacznie migać już w
trakcie naciskania przycisku, wtedy nie będzie połączenia.
b. Naciśnij pr zycisk „ON” na nadajniku,
czynności zaświeci się kontrolka LED na odbiorniku.
c. Powtórz te kroki dla każdego innego odbiornika.
Użytkowanie odbiorników
a. Naciśnij przycisk „ON” na nadajniku, aby włączyć odbiornik.
b. Naciśnij pr zycisk „OFF” na nadajniku, aby wyłączyć odbiornik.
c. Naciśnij przycisk „ON” pod ALL (na nadajniku), aby włączyć wszystkie odbiorniki jednocześnie.
d. Naciśnij przycisk „OFF” pod ALL (na nadajniku), aby wyłączyć wszystkie odbiorniki jednocześnie.
Użytkowanie odbiornika ściemniacza
a. Naciśnij przycisk „ON” na nadajniku, aby włączyć ściemniacz na ostatnio ustawionym poziomie ściemnienia.
b. Naciśnij pr zycisk „OFF” na nadajniku, aby wyłączyć odbiornik.
c. Gdy ściemniacz jest włączony: na chwilę naciśnij przycisk „ON”, aby przyciemnić światło; naciśnij
przycisk „ON” ponownie, aby zatrzymać ściemnianie.
Rozłączanie połączenia
a. Naciśnij i przytrz ymaj przycisk na odbiorniku przez 3 sekundy, a następnie zwolnij go. W trakcie tej
operacji kontrolka LED zaczyna migać. Odbiornik jest teraz przełączony na tryb łączenia.
Uwaga: Kontrolka LED powinna migać tylko po zwolnieniu. Jeśli kontrolka LED zacznie migać już w
trakcie naciskania przycisku, wtedy nie będzie połączenia.
b. Wykonaj jedną z poniższych czynności:
- Naciśnij przycisk „OFF” na nadajniku, aby przerwać połączenie z odbiornikiem. Podczas
wykonywania tej czynności kontrolka LED na odbiorniku zgaśnie.
- Naciśnij przycisk „OFF” pod ALL (na nadajniku), aby wyłączyć wszystkie połączenia. Podczas
wykonywania tej czynności kontrolka LED na odbiorniku zgaśnie.
.
1
2
aby połączyć go z odbiornikiem. Podczas wykonywania tej
3
4
.
5
SK
Príprava na použitie
• Odstráňte plastový kryt a vložte batériu
Spárovanie vysielača (SH5-TDR-F) s prijímačom
a. Na 3 sekundy stlačte a podržte tlačidlo na prijímači a potom ho uvoľnite. Počas tejto činnosti začne
blikať LED. Váš prijímač je teraz prepnutý do režimu spárovania.
Pozor: LED by mala blikať len po uvoľnení tlačidla. Ak LED začne blikať počas stlačenia tlačidla,
prijímač sa nespáruje.
b. Stlačte na vysielači
LED na prijímači.
c. Opakujte tieto kroky pre všetky ďalšie prijímače.
Ovládanie prijímačov
a. Stlačte na vysielači tlačidlo ON, aby sa prijímač zapol.
b. Stlačte na vysielači tlačidlo OFF, aby sa prijímač vypol.
c. Stlačte tlačidlo ON pod tlačidlom ALL (na vysielači), aby sa súčasne zapli všetky prijímače.
d. Stlačte tlačidlo OFF pod tlačidlom ALL (na vysielači), aby sa súčasne vypli všetky prijímače.
Ovládanie prijímača stlmenia svetla
a. Stlačte na vysielači tlačidlo ON, aby sa tlmič svetla zapol na poslednú nastavenú úroveň stlmenia
svetla.
b. Stlačte na vysielači tlačidlo OFF, aby sa tlmič svetla vypol.
c. Keď je tlmič svetla zapnutý: krátko stlačte tlačidlo ON, aby sa svetlo stlmilo; opätovným stlačením
tlačidla ON ukončite tlmenie svetla.
Odpojenie linky
a. Na 3 sekundy stlačte a podržte tlačidlo na prijímači a potom ho uvoľnite. Počas tejto činnosti začne
blikať LED. Váš prijímač je teraz prepnutý do režimu spárovania.
Pozor: LED by mala blikať len po uvoľnení tlačidla. Ak LED začne blikať počas stlačenia tlačidla,
prijímač sa nespáruje.
c. Vykonajte jeden z týchto krokov:
- Stlačte na vysielači tlačidlo OFF, aby sa odpojil od prijímača. Počas tejto činnosti zhasne LED na
prijímači.
- Stlačte tlačidlo OFF pod tlačidlom ALL (na vysielači), aby sa odpojili všetky linky. Počas tejto
činnosti zhasne LED na prijímači.
2
tlačidlo ON, aby sa spároval s prijímačom. Počas tejto činnosti sa rozsvieti
5
.
1
3
4
 Loading...